

Ozone Neon M50 User Manual [nl]

user manual

Symbol for Separate Collection in European Countries.
This symbol indicates that this product is to be collected separately.
The following apply only to users in European countries:
This product is designated for separate collection at an appropriate
collection point. Do not dispose of as household waste.
For more information, contact the retailer or the local authorities in charge
of waste management.
WEEE NOTICE:

System RequirementS
1. Operation System
Windows XP / Windows 7 / Windows 8 / Windows 8.1 / Windows 10
2. Free USB 1.1/ 2.0 port
3. 50 MB free hard disk space
InstallatiOn InstructiOnS
1. Plug USB connector of NEON M50 to a USB port of your PC
2. Download the driver from www.ozonegaming.com
3. Double click “Setup.exe” to start the installation program.
Click “Next” to continue
4. Select the folder to save the driver and click “Next” to continue
5. Installation run automatically; click “Finish” to complete the installation
1
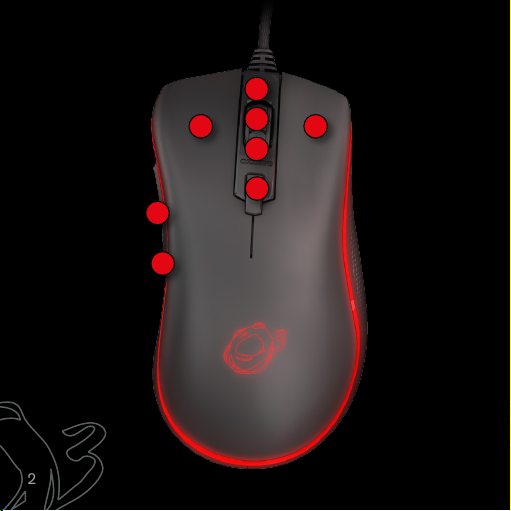
BUTTONS LAYOUT
5
6
2
7
3
1
2
8
4

DEFAULT BUTTON ASSIGNMENT
1 - Click
2 - Menu
3 - Wheel Click
4 - Cpi Cycle
5 - IE Forward
6 - IE Backward
7 - Scroll Up
8 - Scroll Down
easy & custOm User PROFILES
Via Software; search for BUTTON SETTINGS and choose the right
function and assign it to the desired button, you can adjust the buttons
configuration and customize them. You can save different configurations in
each profile to maximize your gaming experience in every game you play.
(Install the driver to assign different functions to each button)
3
 Loading...