

Ozito SDR-003 User Manual
Cordless Trio Driver
3.6V Lithium Ion
SDR-003
CAUTION: Read this operation manual before using this tool.
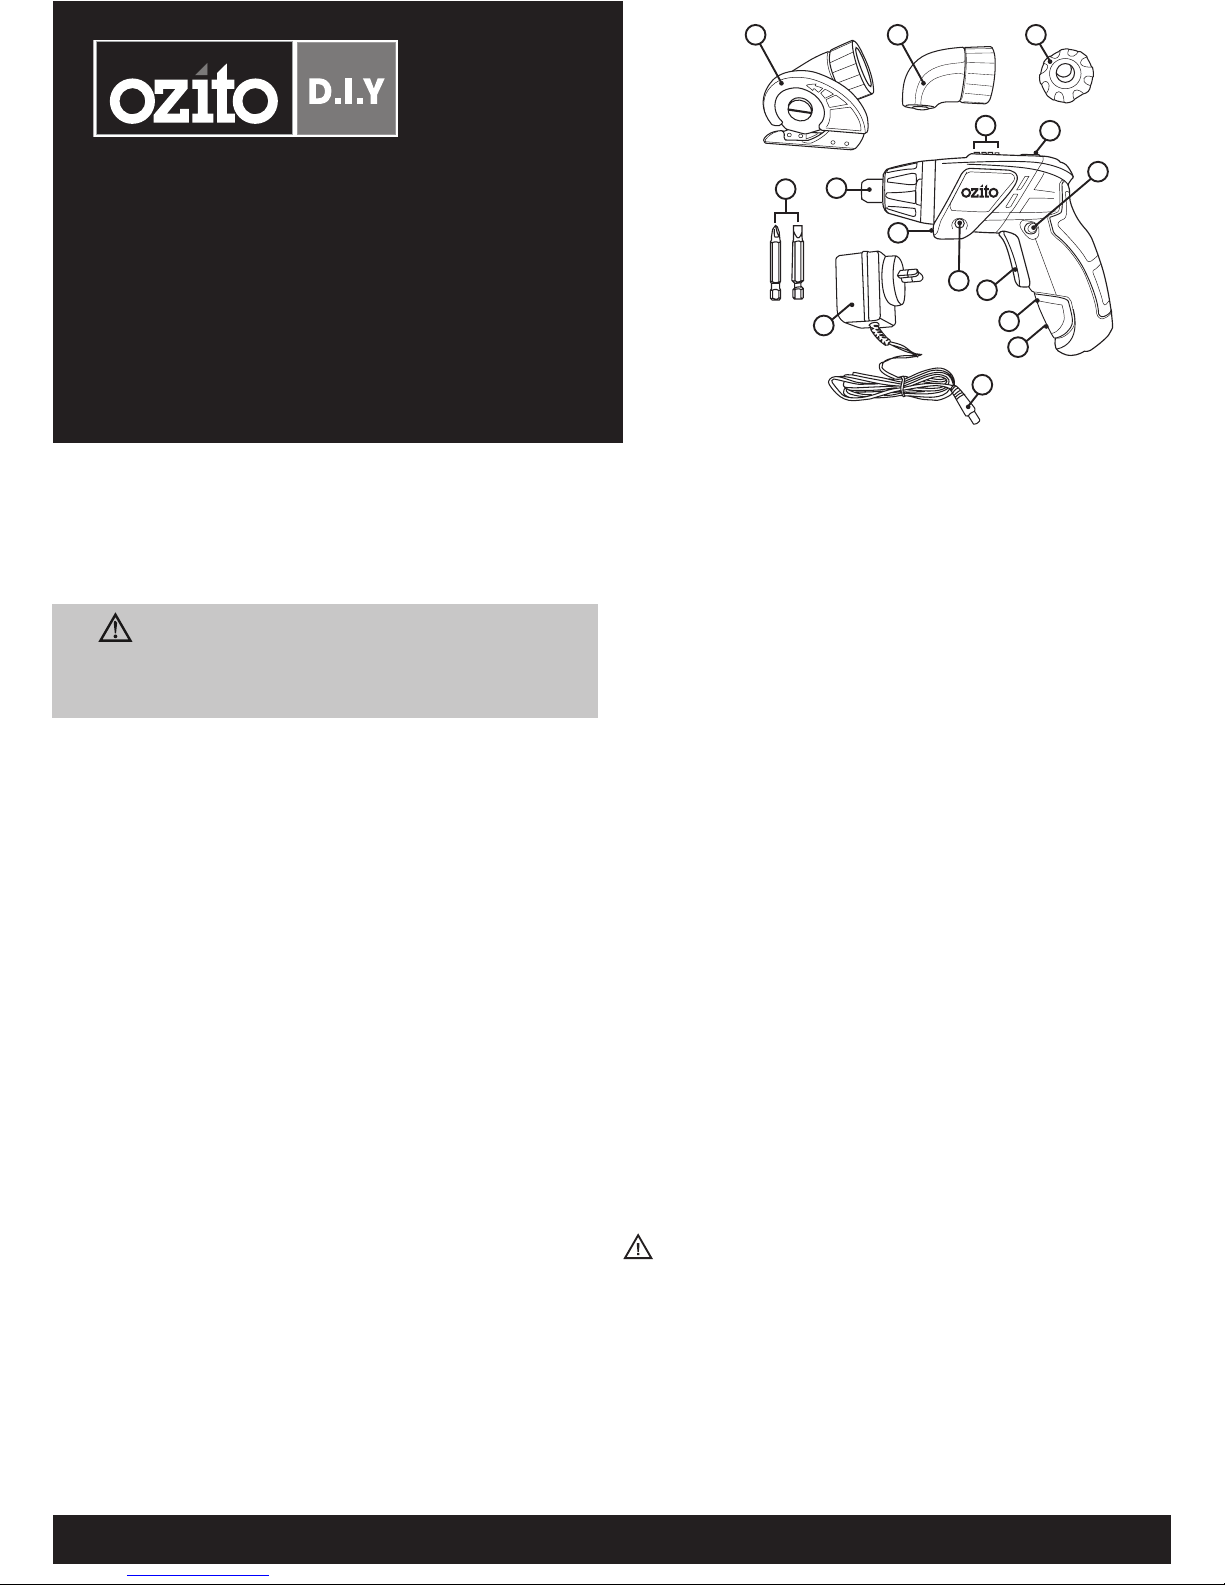
1. Cutting Head Attachment
2. Right Angle Attachment
3. Protective Rubber Nose Piece
4. Driver Bit Accessories
5. ¼” Magnetic Bit Holder
6. Battery Level Indicator
7. Rear Rotating Handle Lock Button
8. Forward/Reverse Switch
9. LED Charge Indicator
10. Charging Socket
11. ON/OFF Trigger Switch
12. LED Light On/Off Button
13. LED Light
14. Charger Plug
15. 240V Charger Adaptor
Specifications
Motor: 3.6 Volt
Charger input: 240V ~ 50Hz
Charger output: 6V DC 300mA
No load speed: 200rpm
To view the full range visit: www.ozito.com.au
0312
Additional Safety Instructions For Chargers And
Batteries
Danger! If the battery pack case is cracked or damaged, do not insert into
charger. There is a danger of electric shock or electrocution.
WARNING! Don’t allow any liquid to get inside charger. Electric shock
may result.
To facilitate cooling of the battery pack after use, avoid placing the charger
or battery pack in a warm environment such as in a metal shed, or an
un-insulated trailer.
• Before using the charger, read all instructions and cautionary markings on
charger, battery pack and product using the battery pack.
• Do not place any object on top of the charger or place the charger on a
soft surface that may result in excessive internal heat. Place the charger in a
position away from any heat source.
• To reduce risk of damage to the electric plug and cord, pull by the plug
rather than the cord when disconnecting the charger.
• Make sure cord is located so that it will not be stepped on, tripped over, or
otherwise subjected to damage or stress.
• An extension cord should not be used unless absolutely necessary. Use of
an improper extension cord could result in the risk of fire, electric shock
or electrocution.
1 2
3
8
12
10
9
15
5
4
7
11
13
14
6
4) Power tool use and care
a) Do not force the power tool. Use the correct power tool for your
application. The correct power tool will do the job better and safer at the
rate for which it was designed.
b) Do not use the power tool if the switch does not turn it on and off. Any
power tool that cannot be controlled with the switch is dangerous and
must be repaired.
c) Disconnect the plug from the power source and/or the battery pack
from the power tool before making any adjustments, changing
accessories, or storing power tools. Such preventive safety measures
reduce the risk of starting the power tool accidentally.
d) Store idle power tools out of the reach of children and do not allow
persons unfamiliar with the power tool or these instructions to operate
the power tool. Power tools are dangerous in the hands of untrained users.
e) Maintain power tools. Check for misalignment or binding of moving
parts, breakage of parts and any other condition that may affect the
power tool’s operation. If damaged, have the power tool repaired
before use. Many accidents are caused by poorly maintained power tools.
f) Keep cutting tools sharp and clean. Properly maintained cutting tools
with sharp cutting edges are less likely to bind and are easier to control.
g) Use the power tool, accessories and tool bits etc. in accordance with
these instructions, taking into account the working conditions and the
work to be performed. Use of the power tool for operations different from
those intended could result in a hazardous situation.
5) Battery tool use and care
a) Recharge only with the charger specified by the manufacturer. A
charger that is suitable for one type of battery pack may create a risk of
fire when used with another battery pack.
b) Use power tools only with specifically designated battery packs. Use of
any other battery packs may create a risk of injury and fire.
c) When battery pack is not in use, keep it away from other metal
objects, like paper clips, coins, keys, nails, screws or other small
metal objects, that can make a connection from one terminal to
another. Shorting the battery terminals together may cause burns or a fire.
d) Under abusive conditions, liquid may be ejected from the battery;
avoid contact. If contact accidentally occurs, flush with water. If
liquid contacts eyes, additionally seek medical help. Liquid ejected
from the battery may cause irritation or burns.
6) Service
a) Have your power tool serviced by a qualified repair person using only
identical replacement parts. This will ensure that the safety of the power
tool is maintained.
b) If the supply cord is damaged, it must be replaced by the manufacturer,
its service agent or similarly qualified persons in order to avoid a hazard.
1) Work area safety
a) Keep work area clean and well lit. Cluttered or dark areas invite accidents.
b) Do not operate power tools in explosive atmospheres, such as in the
presence of flammable liquids, gases or dust. Power tools create sparks
which may ignite the dust or fumes.
c) Keep children and bystanders away while operating a power tool.
Distractions can cause you to lose control.
2) Electrical safety
a) Power tool plugs must match the outlet. Never modify the plug in any
way. Do not use any adapter plugs with earthed (grounded) power tools.
Unmodified plugs and matching outlets will reduce risk of electric shock.
b) Avoid body contact with earthed or grounded surfaces, such as pipes,
radiators, ranges and refrigerators. There is an increased risk of electric
shock if your body is earthed or grounded.
c) Do not expose power tools to rain or wet conditions. Water entering a
power tool will increase the risk of electric shock.
d) Do not abuse the cord. Never use the cord for carrying, pulling or
unplugging the power tool. Keep cord away from heat, oil, sharp
edges or moving parts. Damaged or entangled cords increase the risk of
electric shock.
e) When operating a power tool outdoors, use an extension cord suitable
for outdoor use. Use of a cord suitable for outdoor use reduces the risk of
electric shock.
f) If operating a power tool in a damp location is unavoidable, use a
residual current device (RCD) protected supply. Use of an RCD reduces
the risk of electric shock.
3) Personal safety
a) Stay alert, watch what you are doing and use common sense when
operating a power tool. Do not use a power tool while you are tired or
under the influence of drugs, alcohol or medication. A moment of
inattention while operating power tools may result in serious personal injury.
b) Use personal protective equipment. Always wear eye protection. Protective
equipment such as dust mask, non-skid safety shoes, hard hat, or hearing
protection used for appropriate conditions will reduce personal injuries.
c) Prevent unintentional starting. Ensure the switch is in the off-position
before connecting to power source and/or battery pack, picking up or
carrying the tool. Carrying power tools with your finger on the switch or
energising power tools that have the switch on invites accidents.
d) Remove any adjusting key or wrench before turning the power tool on.
A wrench or a key left attached to a rotating part of the power tool may
result in personal injury.
e) Do not overreach. Keep proper footing and balance at all times. This
enables better control of the power tool in unexpected situations.
f) Dress properly. Do not wear loose clothing or jewellery. Keep your hair,
clothing and gloves away from moving parts. Loose clothes, jewellery or
long hair can be caught in moving parts.
g) If devices are provided for the connection of dust extraction and
collection facilities, ensure these are connected and properly used. Use
of dust collection can reduce dust-related hazards.
Save all warnings and instructions for future reference.
The term “power tool” in all of the warnings refers to your mains-operated
(corded) power tool or battery-operated (cordless) power tool.
WARNING! Read all safety warnings and all instructions. Failure
to follow the warnings and instructions may result in electric
shock, fire and/or serious injury.
General Power Tools Safety Warnings
Battery: 3.6V DC 1300mAh
Rotation: Forward & Reverse
Gearbox: Single Speed
Weight: 0.52kg
• Do not operate charger if it has received a sharp blow, been dropped or
otherwise damaged in any way. Have it checked by an electrician or
power tool repairer.
• Do not disassemble charger. Take it to an electrician or power tool
repairer when service or repair is required. Incorrect reassembling may
result in a risk of electric shock, electrocution or fire.
• To reduce risk of electric shock, unplug charger from the outlet before
attempting any cleaning. Removing the battery pack will not reduce
this risk.
• Never attempt to connect 2 chargers together.
• DO NOT store or use the tool and battery pack in locations where the
temperature may reach or exceed 40ºC (such as outside sheds or metal
buildings in summer).
• The charger is designed to operate on standard household electrical
power (240 Volts). Do not attempt to use it on any other voltage!
The battery pack is not fully charged out of the carton. First read the
safety instructions and then follow the charging notes and procedures.
• The longest life and best performance can be obtained if the battery
pack is charged when the air temperature is between 18 - 24ºC. Do not
charge the battery pack in an air temperature below 10o C or above
40ºC. This is important and will prevent damage to the battery pack.
• Do not incinerate the battery pack even if it is seriously damaged or is
completely worn out. The battery can explode in a fire.
• Never attempt to open the battery pack for any reason. If the plastic
housing of the battery pack breaks or cracks, immediately discontinue
use and do not recharge.
This appliance is not intended for use by persons (including children)
with reduced physical, sensory or mental capabilities, or lack of
experience and knowledge, unless they have been given supervision or
instruction concerning use of the appliance by a person responsible for
their safety.
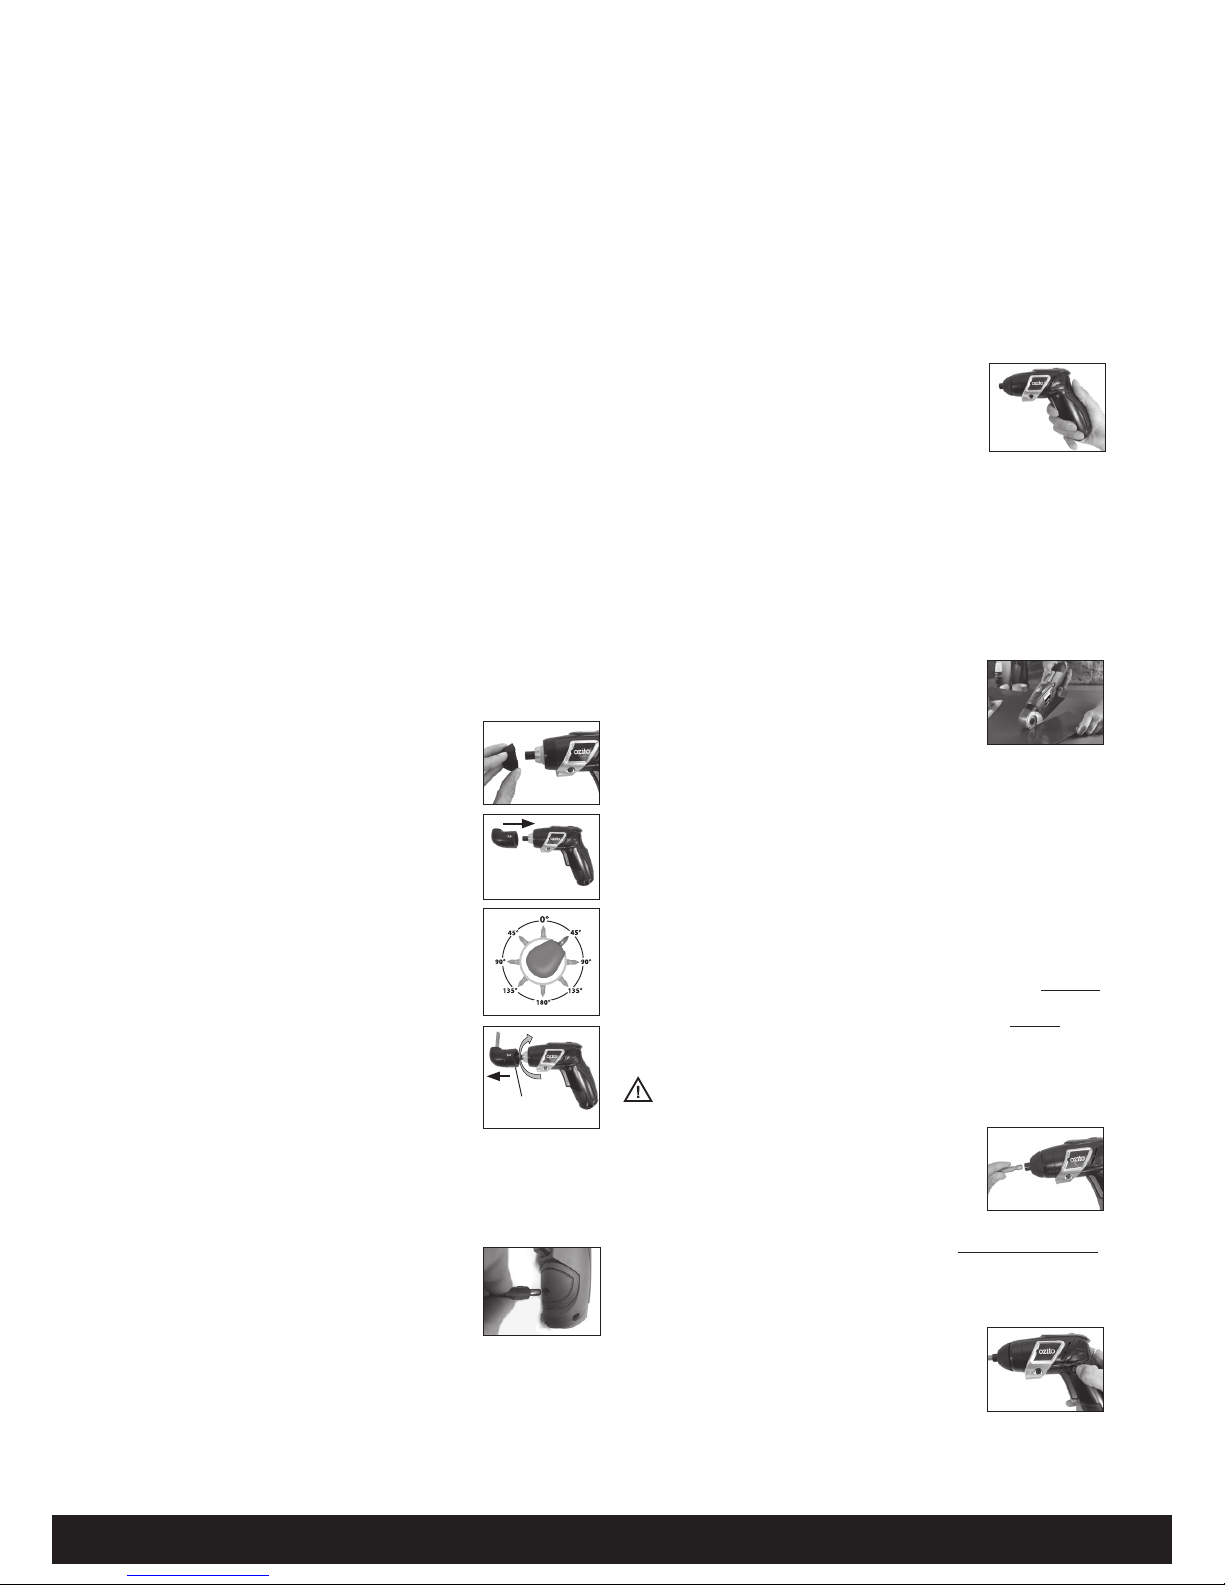
Installing the Cutting Head Attachment /Right Angle Attachment
1. Remove the protective rubber nose piece (3) of the
Trio Driver by pulling gently at the lip (Fig.1).
2. Select the desired attachment and angle position
and click onto the Trio Driver (Fig.2).
3. The cutting head and right angle attachments can
be positioned in 8 different angle positions to suit
any required job (Fig.3).
4. To remove the attachments slightly twist the spring
loaded lock collar in the direction of the arrow
until released.
5. Always ensure the protective rubber nose piece (3) is replaced when
you are not using any of the attachments. The rubber protective rubber
nose piece needs to be used on the Trio Driver in a driving, drilling mode.
Charging the Battery
This tool has been shipped in a low charge condition
and should be fully charged prior to use.
Plug the 240V charger adaptor (15) into an appropriate
AC power outlet and switch on.
Connect the charger plug (14) of the AC adaptor into
the charging socket (10) of the screwdriver.
The red charge indication LED (9) will illuminate.
The batteries will take 3-5 hours to charge. This may vary up to 7 hours due
to the level of charge left in the batteries and also the ambient temperature.
Note: The charge indicator LED (9) will turn off when the Trio Driver is fully
charged, the charger adaptor (15) LED power indicator will always be
illuminated when the charger is plugged in and turned on!
Additional Safety Instructions For Chargers
And Batteries (cont.)
Operation
To view the full range visit: www.ozito.com.au
Initial Charge
Charge your battery for 5-7 hours then use it until it runs down and only
slowly operates. Recharge for 5-7 hours again.
Once again run your tool until only a small amount of charge remains.
Repeat the above cycle about 4 or 5 times, this should set the battery
“memory”, then charge as earlier stated.
Caution: This charger does not automatically turn off when the battery is
fully charged. Please take care not to leave the tool on the charger turned
on for excessive periods of time.
Switch off the charger at mains when charging is complete.
Note: The charge indicator LED (9) will be illuminated when the charger
is plugged and charging the screwdriver. The charge indicator LED (9) will
turn off when the screwdriver is fully charged.
Operation
Starting Operation
Switching On and Off
• To operate on the Trio Driver press the On/Off trigger
switch (11) (Fig.6).
• To turn off the Trio Driver, release the On/Off trigger
switch (11).
Cutting operation
Do not force the Trio Driver. Let the accessory do the cutting, or premature
stalling will occur.
The cutting performance of the Trio Driver depends on the materials that are
being cut and the level of battery charge.
If too much force is applied to the Trio Driver, the battery overload protection
will be activated resulting in the product to stop functioning. The trigger then
must released and reactivated to resume cutting.
Depending on the batteries level of charge, excessive feed considerably
reduces the performance capability.
Always keep the blade free and clean of material debris.
The guide edge of the cutting head attachment (1)
must be aligned parallel to the cutting surface (Fig.7)
thin materials, such as fabrics, can be pulled into the
Trio Driver during cutting and become jammed.
Therefore, do not apply too much pressure with fabric
materials in order to achieve good cutting results.
During cutting, apply sufficient tension while holding fabrics and cut slowly.
Cutting Capacity
The Trio Driver cutting head has the capacity to cut the following:
- 6mm thick cardboard
- 6mm thick carpet
- 1mm plastic
The cutting head is not capable of cutting anything thicker than the above.
The life of the blade will be determined by what type of material is cut
and how often. Cutting thicker materials on a regular basis will reduce the
blades sharpness and affect the cutting performance.
Replacement Blade
If the blade becomes worn and/or damaged contact your local Bunnings
store for a replacement cutting head attachment.
Caution: If fabric become tangled around the cutting wheel DO NOT pull.
Remove the cutting wheel from the machine and gently try and remove.
Inserting Driver Bits
WARNING! Always unplug the charger and make sure the forward/
reverse switch (8) is in the lock position. Refer to the forward/reverse in
the coming instructions.
The Trio Driver has a ¼”magnetic bit holder (5) which
holds all your driver bits securely. To either insert or
extract the driver bits simply insert the shank of the
driver bit into the ¼” magnetic bit holder (5) and ensure
the bit is secure.
When using the right angle attachment (2) simply
insert into the chuck of the right angle attachment (2) (Fig.8).
Replacement Driver Bits can be purchased at any Bunnings Warehouse.
Always ensure you only use single ended 50mm driver bits as shorter driver
bits may become stuck or hard to remove from the screwdriver.
Forward / Reverse Lever
To select forward /reverse switch (8) on the Trio Driver
simply push forward/reverse switch (8) to the right side
for reverse (L) or the left side for forward (R).
To lock the Trio Driver simply ensure that the
forward/reverse switch (8) is placed in between forward
and reverse position (Fig.9).
Pre Drilling your Material
It is recommended to pre drill holes, (pilot hole) in the material you are
about to screw into. Pre drilling holes will assist the screwdriver when driving screws and enable your tool to operate efficiently.
Fig.1
Fig.2
Fig.3
Fig.4
Fig.5
Fig.6
Fig.7
Fig.8
Fig.9
Operation (cont.)
Spring Loaded
Collar
 Loading...