

Ozeri BP5K User Manual
Automatic Wrist Blood Pressure Monitor
With Voice-Guided Operation
Ozeri Customer Service
Customer service: 1-877-299-1296 or
Email: support@ozeri.com
Table of Contents
●
Introduction ................................................................
●
Important Safety Notes .............................................
●
Getting to Know your Unit .........................................
●
Battery Installation/ Replacement ........................
●
Initialization ............................................................
●
Applying the Wrist Cuff .......................................
●
Taking a Measurement ......................................
●
Using Memory Function ....................................
●
About Blood Pressure ........................................
●
Troubleshooting ...............................................
●
Care and Maintenance ......................................
●
Specifications .....................................................
●
Warranty information...............................................28
●
Warranty information...............................................29
6-11
12-14
15-17
18-19
20-21
22-23
24-25
26-27
4-5
Model No.: BP5K
Thank you for choosing an Ozeri Blood Pressure Monitor.
Please read this instruction manual before using your unit.
Please keep this instruction manual safe for future use.
Introduction
1
2
3
Thank you for your purchase of an Ozeri Fully Automatic Wrist Blood Pressure
Monitor with Voice-Guided Operation.
The unit includes an intelligent voice-guided feature to alert you of the proper
positioning of your wrist for accurate blood pressure measurements. It also
automatically provides an audible hypertension assessment via a new talking
function as well as a display in the LCD screen.
The unit uses the oscillometric method of blood pressure measurement. The
oscillometric method detects the movement of your blood through your brachial
artery, and converts your blood pressure into a digital reading. The unit is simple to
use because a stethoscope is not needed while using an oscillometric monitor.
The unit stores automatically 180(2*90) sets of measurement values with the
measuring date and time. You can read the stored data conveniently by pressing the
memory button.
Type BF applied part
Attention sign.
Symbol for the marking of electrical and electronics devices
according to Directive 2002/96/EC.
The device, accessories and the packaging have to be
disposed of waste correctly at the end of the usage.
Please follow Local Ordinances or Regulations for disposal.
Important Safety Notes
+
-
-
To assure the correct use of the product, basic safety measures
should always be followed including the precautions listed below:
Read all information in the instruction manual and any other literature
included in the box before using the unit.
Consult your physician before measuring blood pressure, especially if you
have any of the following conditions: hypertension, diabetes, arteriosclerosis,
kidney or vascular disease, or any other condition affecting circulation.
Operate the unit only as intended. Don't use for any other purpose.
The unit is intended for use in measuring blood pressure and heart rates for
adults only. Do not use on infants or persons who cannot express their
intentions.
Do not use a cellular phone near the unit. Cell phones may cause operation
failure.
Do not disassemble or attempt to repair the unit or components. Doing so
will void the warranty.
Do not use the equipment where flammable gases (such as anesthetic gas,
oxygen or hydrogen) or flammable liquids (such as alcohol) are present.
2
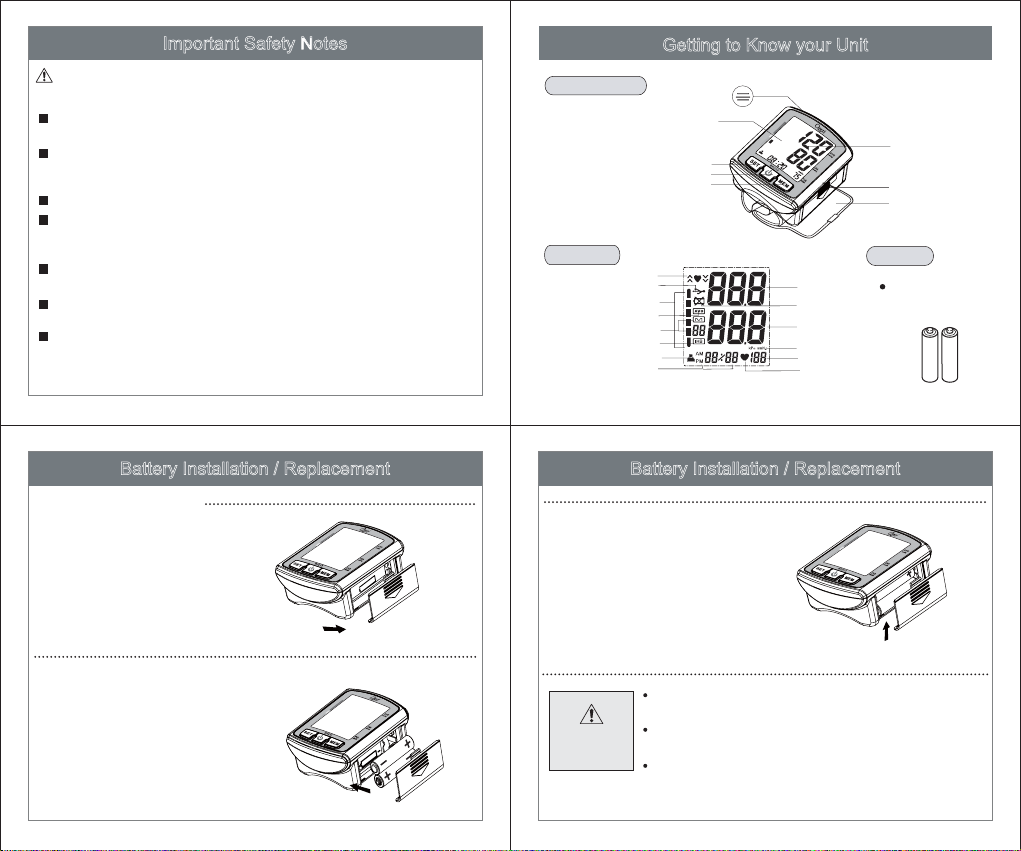
Body & Cuff
Back Light
Setting Button
Start/Stop Button
Memory Button
Display
Position Symbol
*PC Link Symbol
Inflation/Deflation Symbol
or WHO Indication
Average Value Symbol
Memory&Times
Irregular Heartbeat Symbol
User Symbol
Date/Time
* May not be available on this model
Getting to Know your Unit
Voice
Systolic Blood
Pressure
Low Battery
Indication
Diastolic Blood
Pressure
Unit Indication
Pulse
Heartbeat Symbol
3
Display
Battery Compartment
Wrist Cuff
Power
2 AAAAlkaline
Batteries
Battery Installation / Replacement
How to Install Battery
Remove the battery
1
cover from the battery
compartment.
Insert two new AAA
2
batteries into the
compartment and ensure
the “+” (positive) and “-”
(negative) polarities are
correctly aligned.
Battery Installation / Replacement
Replace the battery cover.
3
Use two identical 1.5V alkaline batteries type AAA
LR03.
+
-
-
+
Caution!
4
Replace all of the batteries if the low battery
symbol appears on the display.
Never leave low batteries in the battery
compartment as they may leak causing damage
to the unit.
5
Initialization
Selecting a User
Setting the Date and Time
Selecting the unit of measurement
Setting the year
Initialization
Initialization
Initialization settings include: user setting, year/date/time setting,
unit of measure, positioning sensor, and the voice/audio setting.
This device automatically stores 180 sets of values for 2 users
(2*90) with the date and time. Set all of the parameters before
taking a measurement for the first time, otherwise the unit will
display the default values by the system.
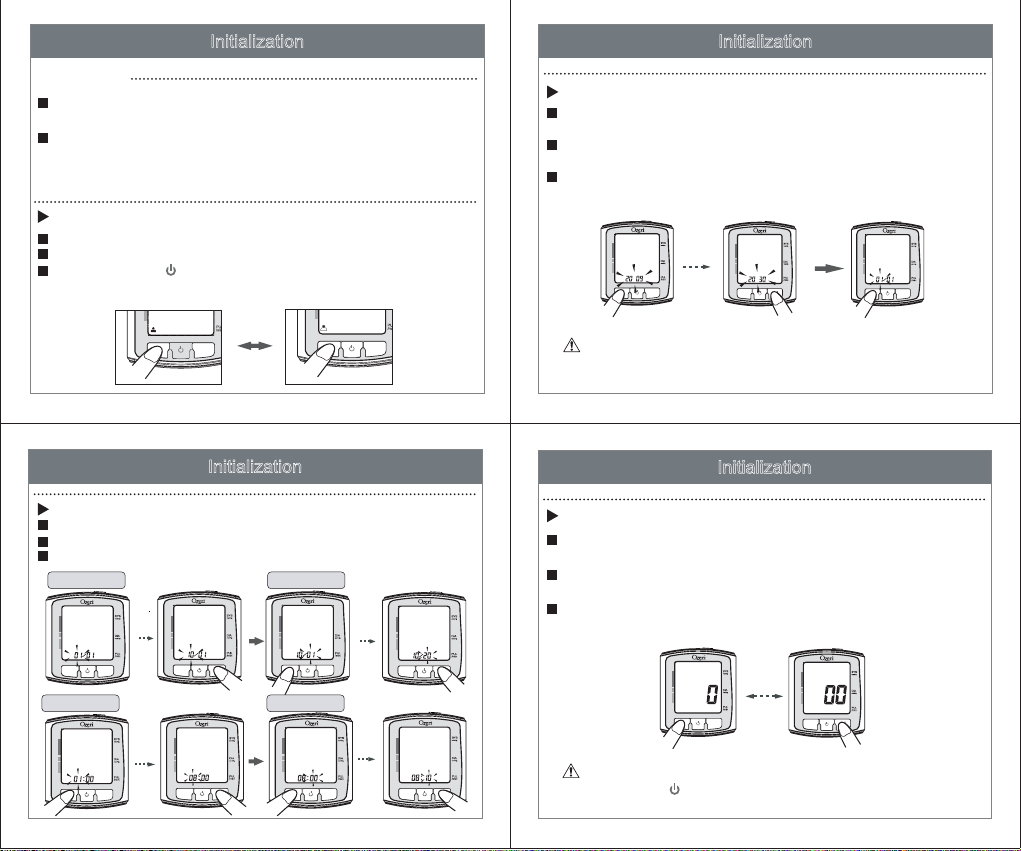
Selecting a User
The icon indicating a user will appear when pressing the“SET” button.
Press the “SET” button again to change the current user.
Press the power “ ” button to confirm the user of choice. The
device will turn off.
BP213
MEM
BP213
MEM
6
Initialization
Setting the Date and Time
Press the “MEM” button to change the month.
Then press the “SET” button to confirm the month selected.
Proceed to set the day, hour and minute by following the same steps.
Day SettingMonth Setting
BP213
MEM
SET
BP213 BP213
SET
MEM
SET
Minute SettingHour Setting
Setting the year
Press and hold the “SET” button for 3-4 seconds. The year will
appear flashing on the screen.
Then press the “MEM” button to advance in increments of one
year.
Press the “SET” button to confirm the year and proceed to the
date setting.
BP213
MEM
BP213
SET
BP213
MEM
The device calendar accepts year values from 2009 to 2030.
When the display reaches 2030 it will return to 2009.
7
Initialization
Selecting the unit of measurement
The unit icon will appear on the screen after confirming the minutes
minutes for the time.
The default unit of measurement is mmHg, which is the most commonly used
in the USA. To change the unit of measurement to kPa, press the "MEM" button.
Press the “SET” button to confirm the unit measure and proceed to the
position sensor.
BP213
mmHg kPa
BP213
MEM
BP213
SET
BP213
MEM
BP213 BP213 BP213
SET
MEM
SET
You can save your settings at any time and turn off the unit by pressing
the Start/ Stop “ ” button.
98
 Loading...