

Page 1
Page 2
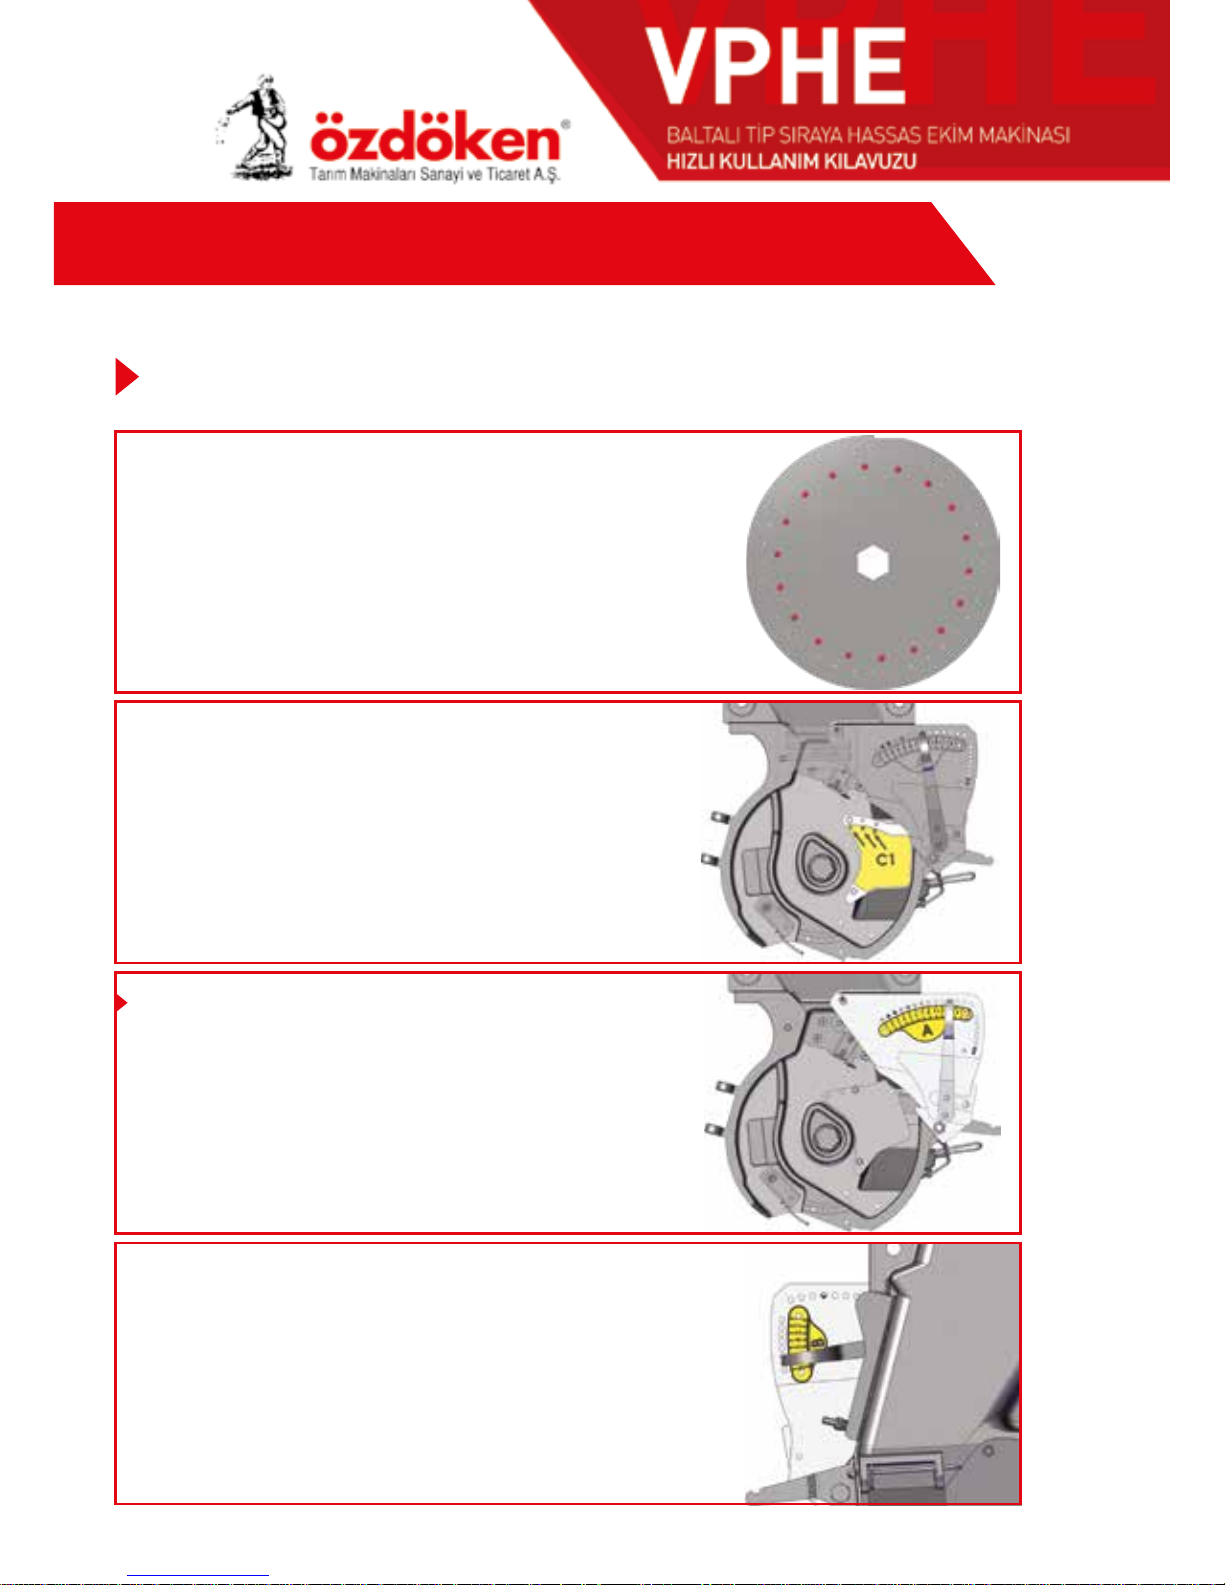
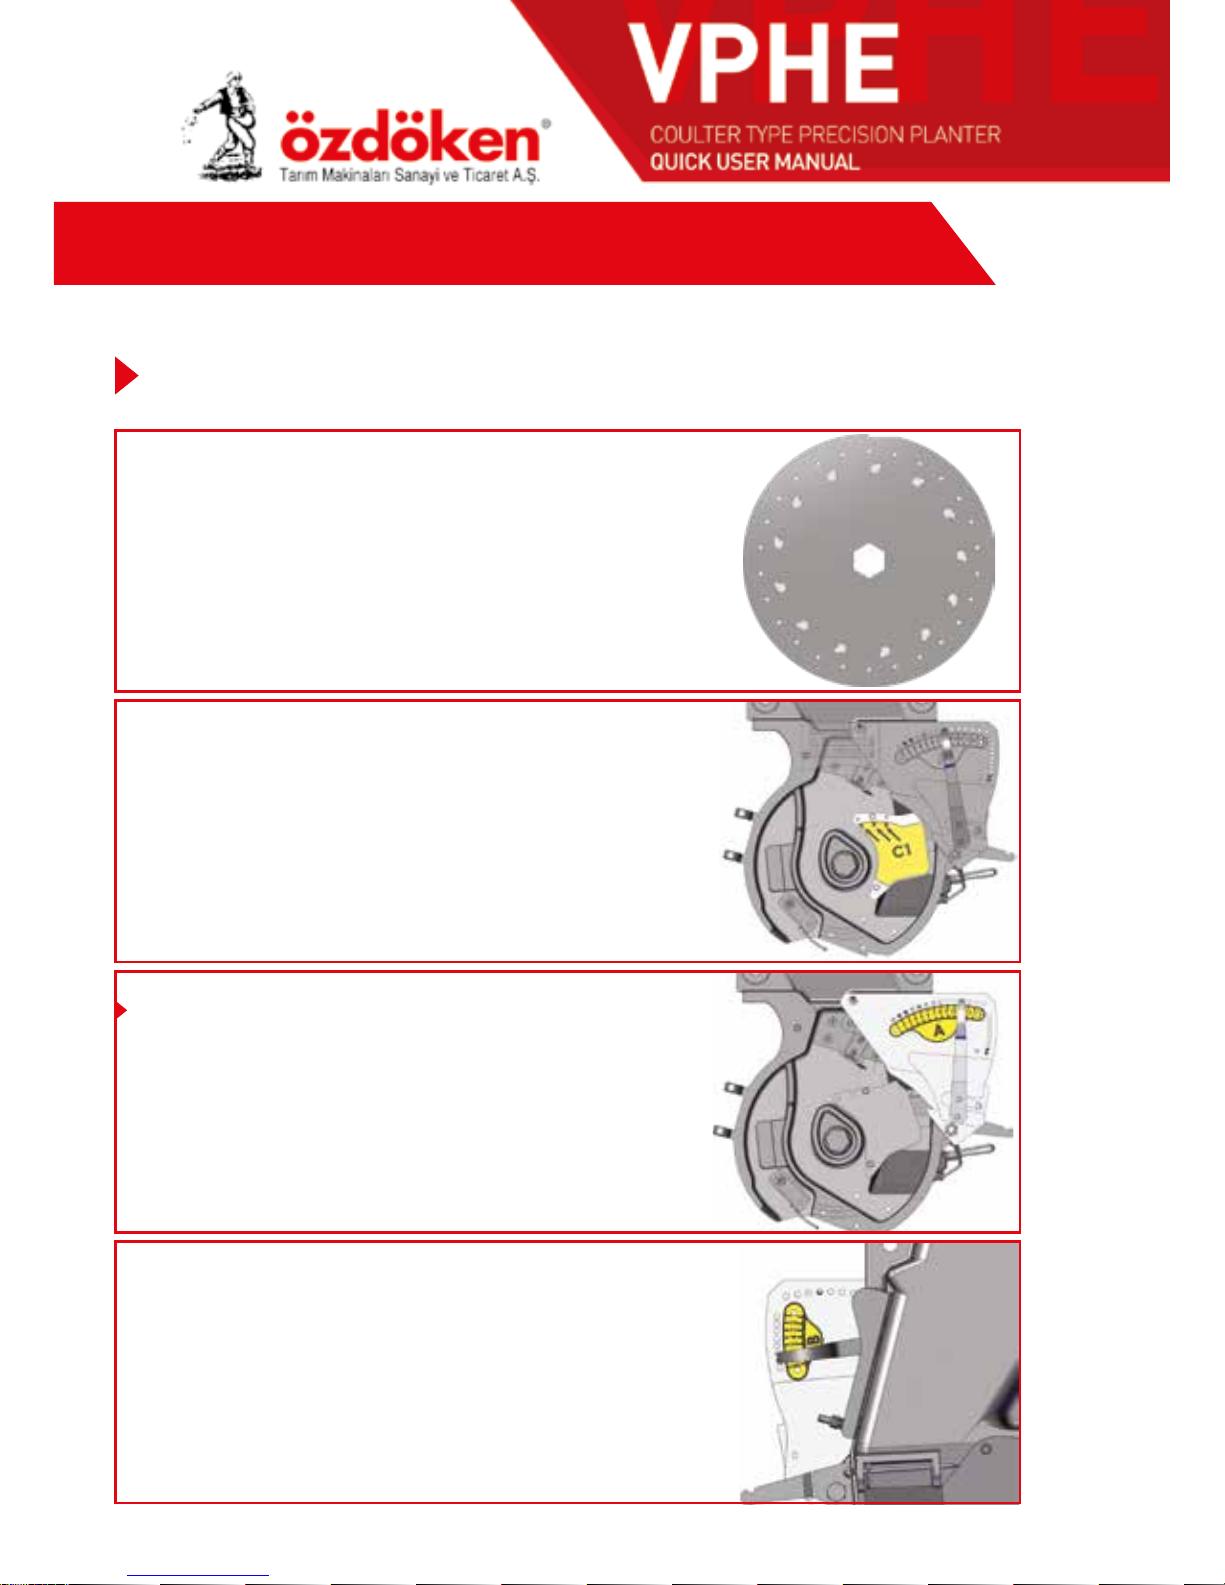
HIZLI AYAR TABLOSU
TOHUM İÇİ AYAR SEVİYE KAPAĞI
C1 kapağı 1 nolu deliğe takılacak.
Kaplamalı Pancar (mavi) tohumu ekeceğinizde makinenizi aşağıdaki değerlere ayarlamanızı tavsiye ederiz.
Baltalı Makina Kaplamalı Pancar Tohumu
A SELEKTÖR
SELEKTÖR (TOHUM TEKLEYİCİ) AYARI
Dış selektör kolu 9 veya 10 nolu deliğe
takılacak.
B SELEKTÖR
İç selektör kolu 4 nolu deliğe
takılacak.
EKİCİ DİSK
• Ø 2.1 mm delikli
• Yuvarlak karıştırıcılı
• Tercihen 36 delikli disk.
02
Page 3
Yukarıda verilen değerler tohum yapısına göre değişkenlik gösterebilir.
Ayarları uyguladıktan sonra kesinlikle test ediniz.
Oluşabilecek hatalı ekimlerden kullanıcı sorumludur.
Kaplamalı Pancar Tohumu
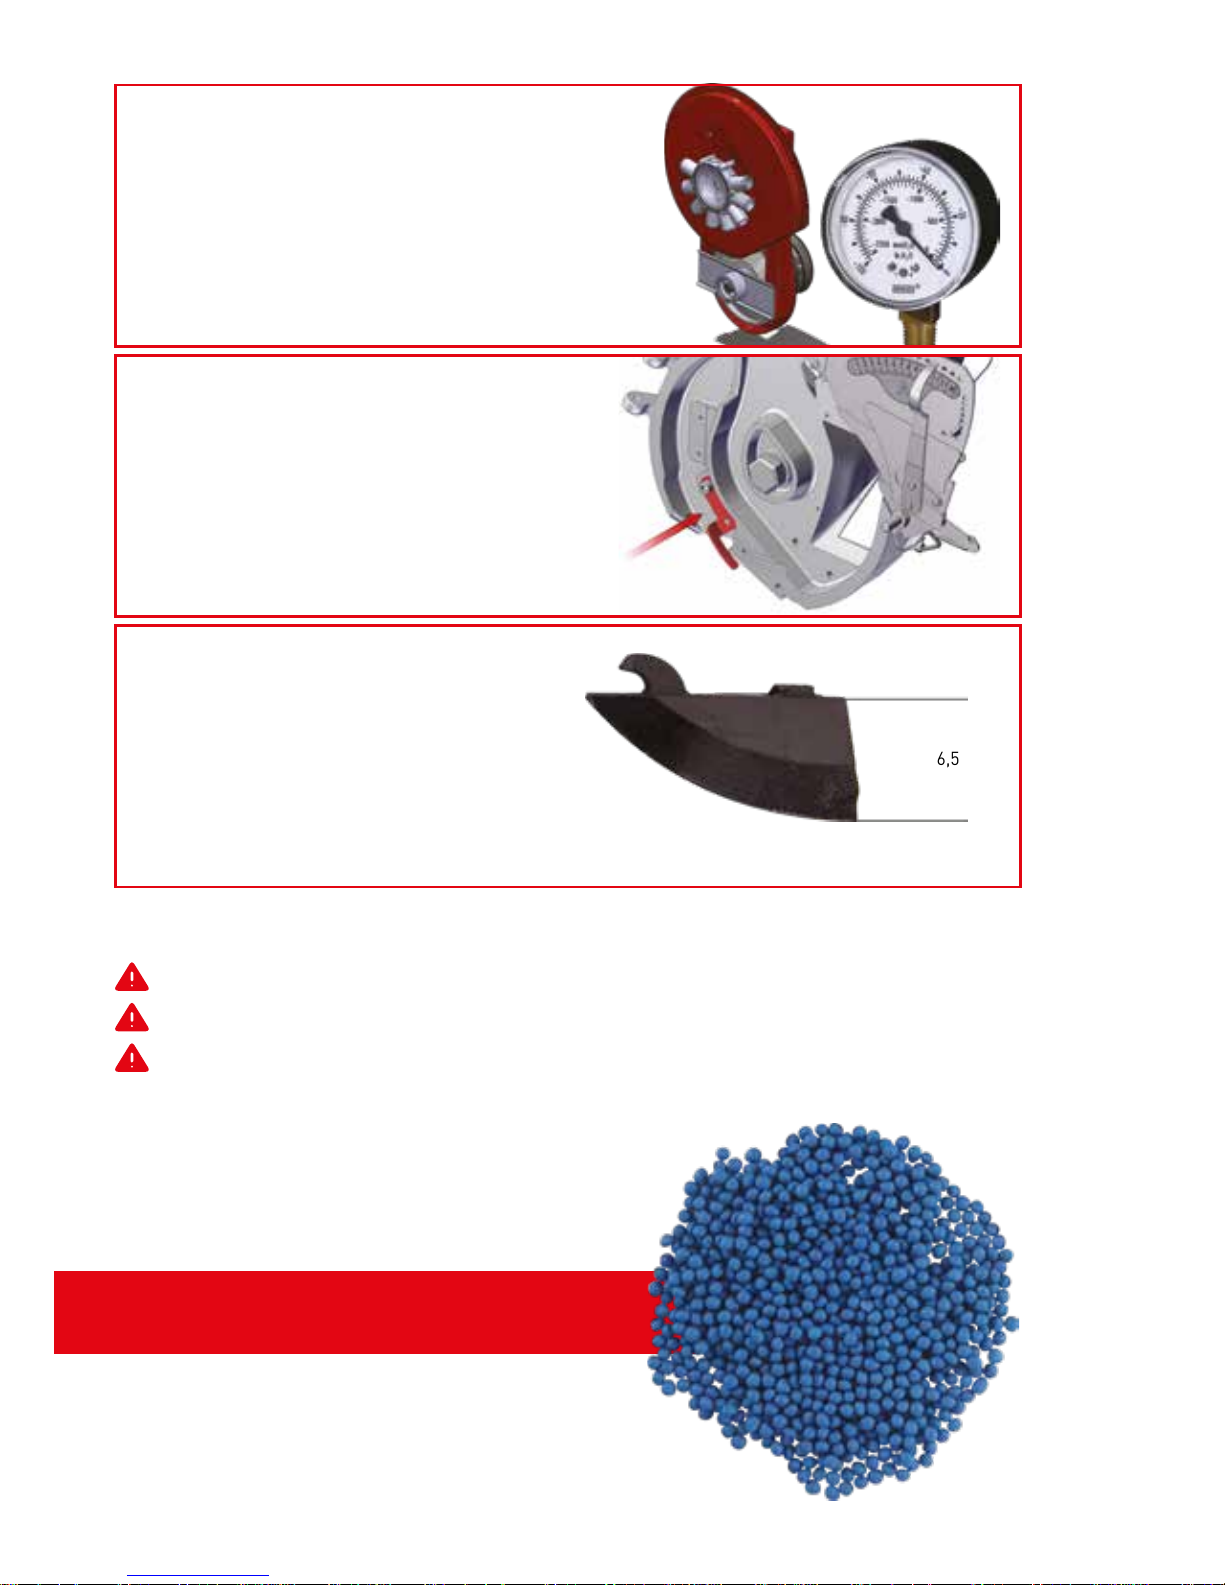
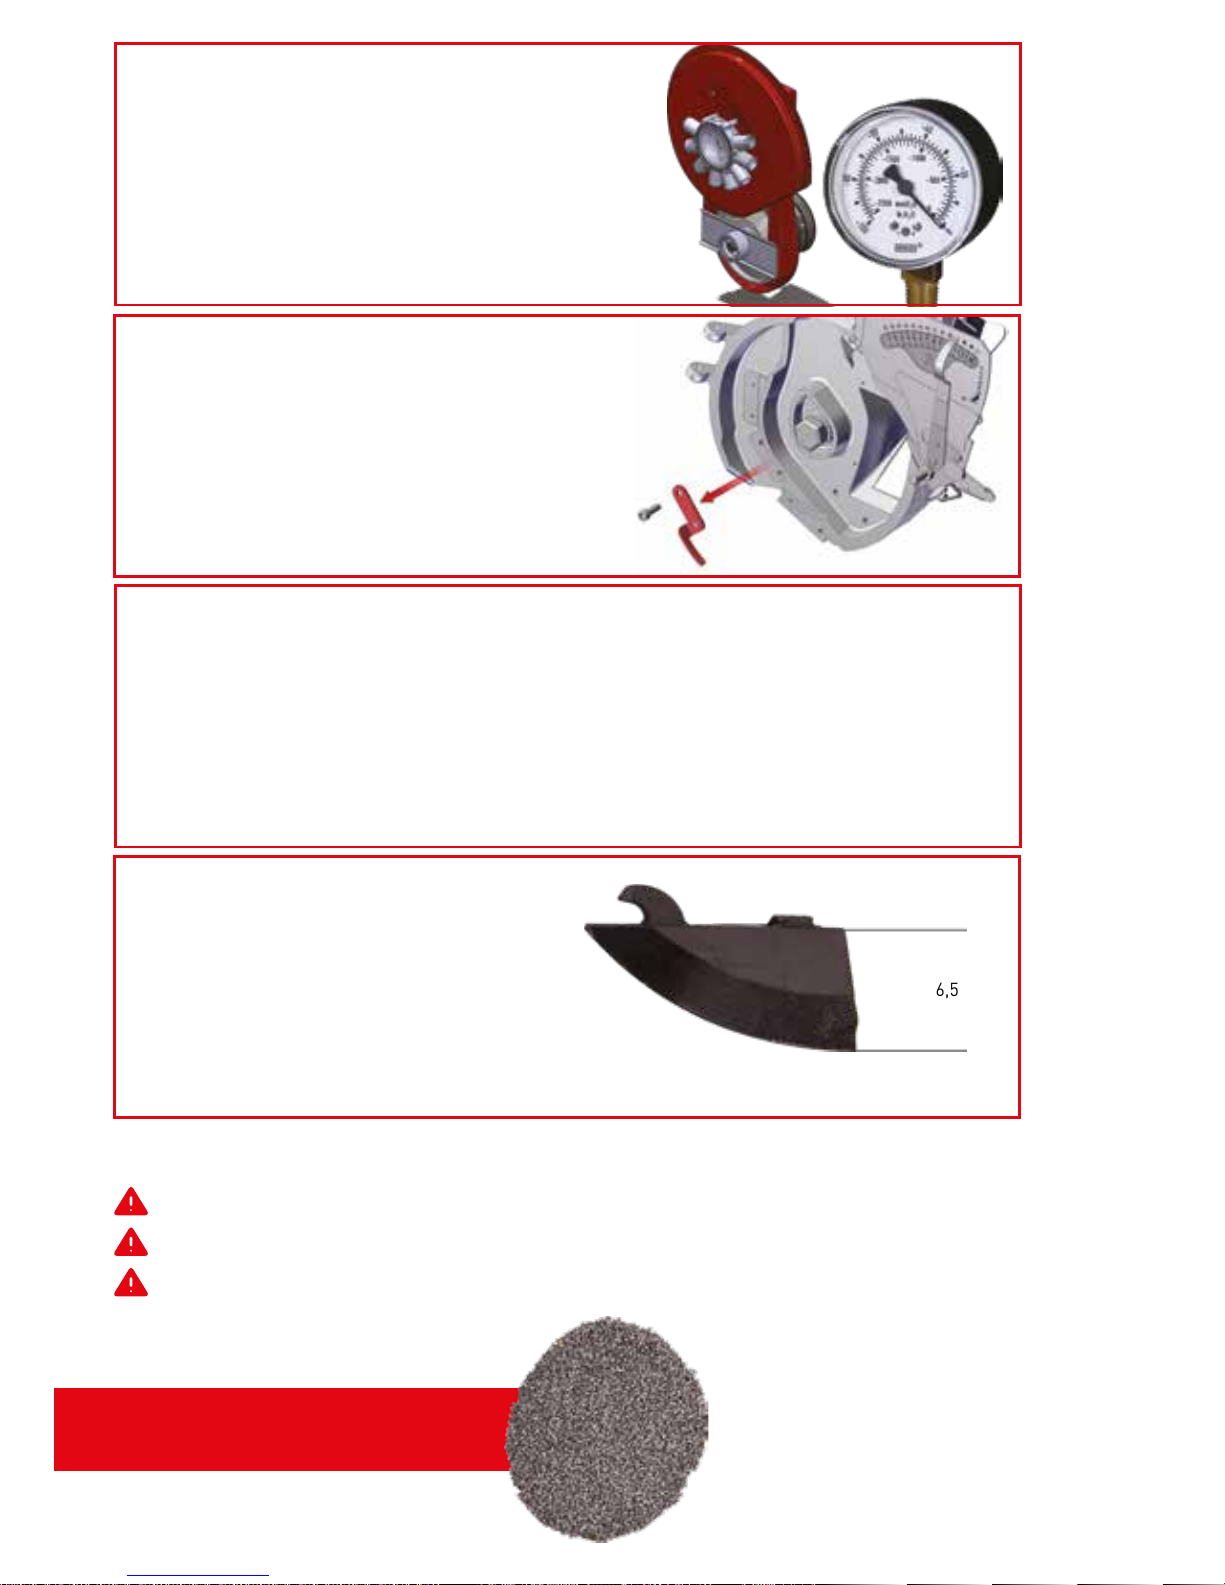
FAN (VAKUMETRE AYARI)
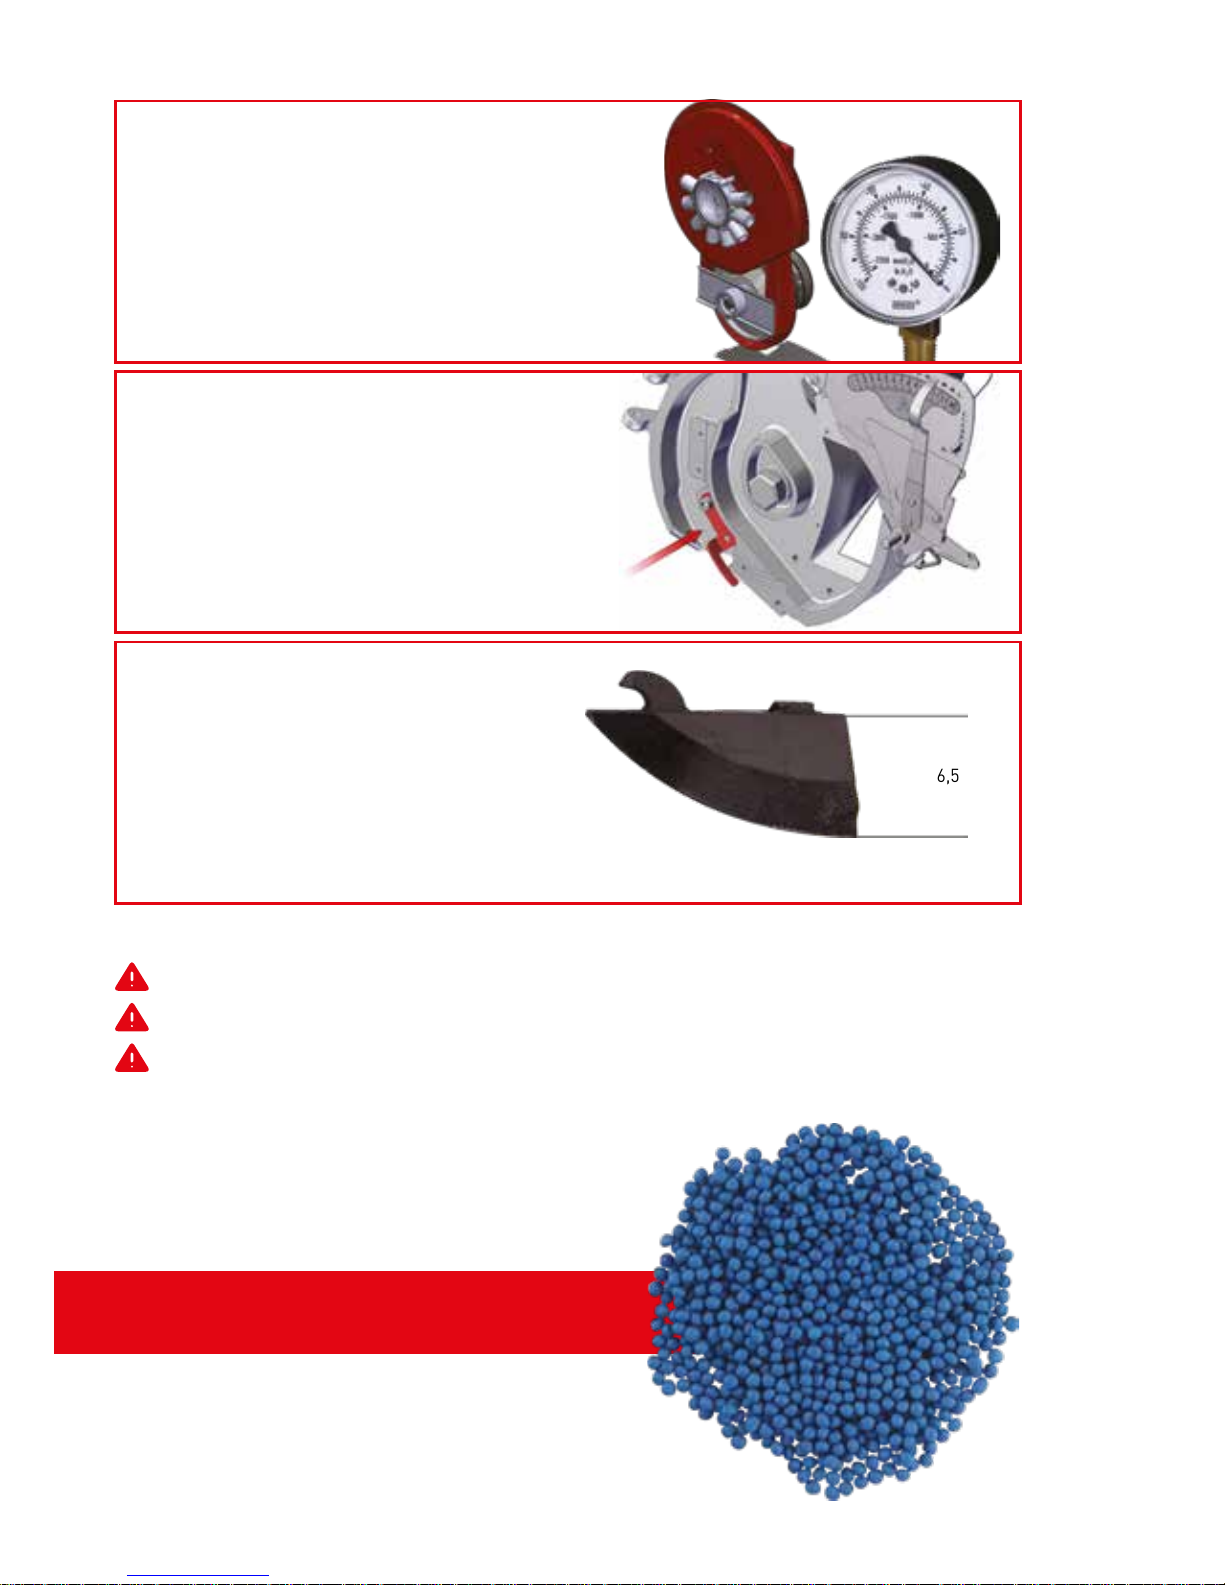
Fan vakumetre saati 30-35
barda olmalıdır.
EKİM BALTASI
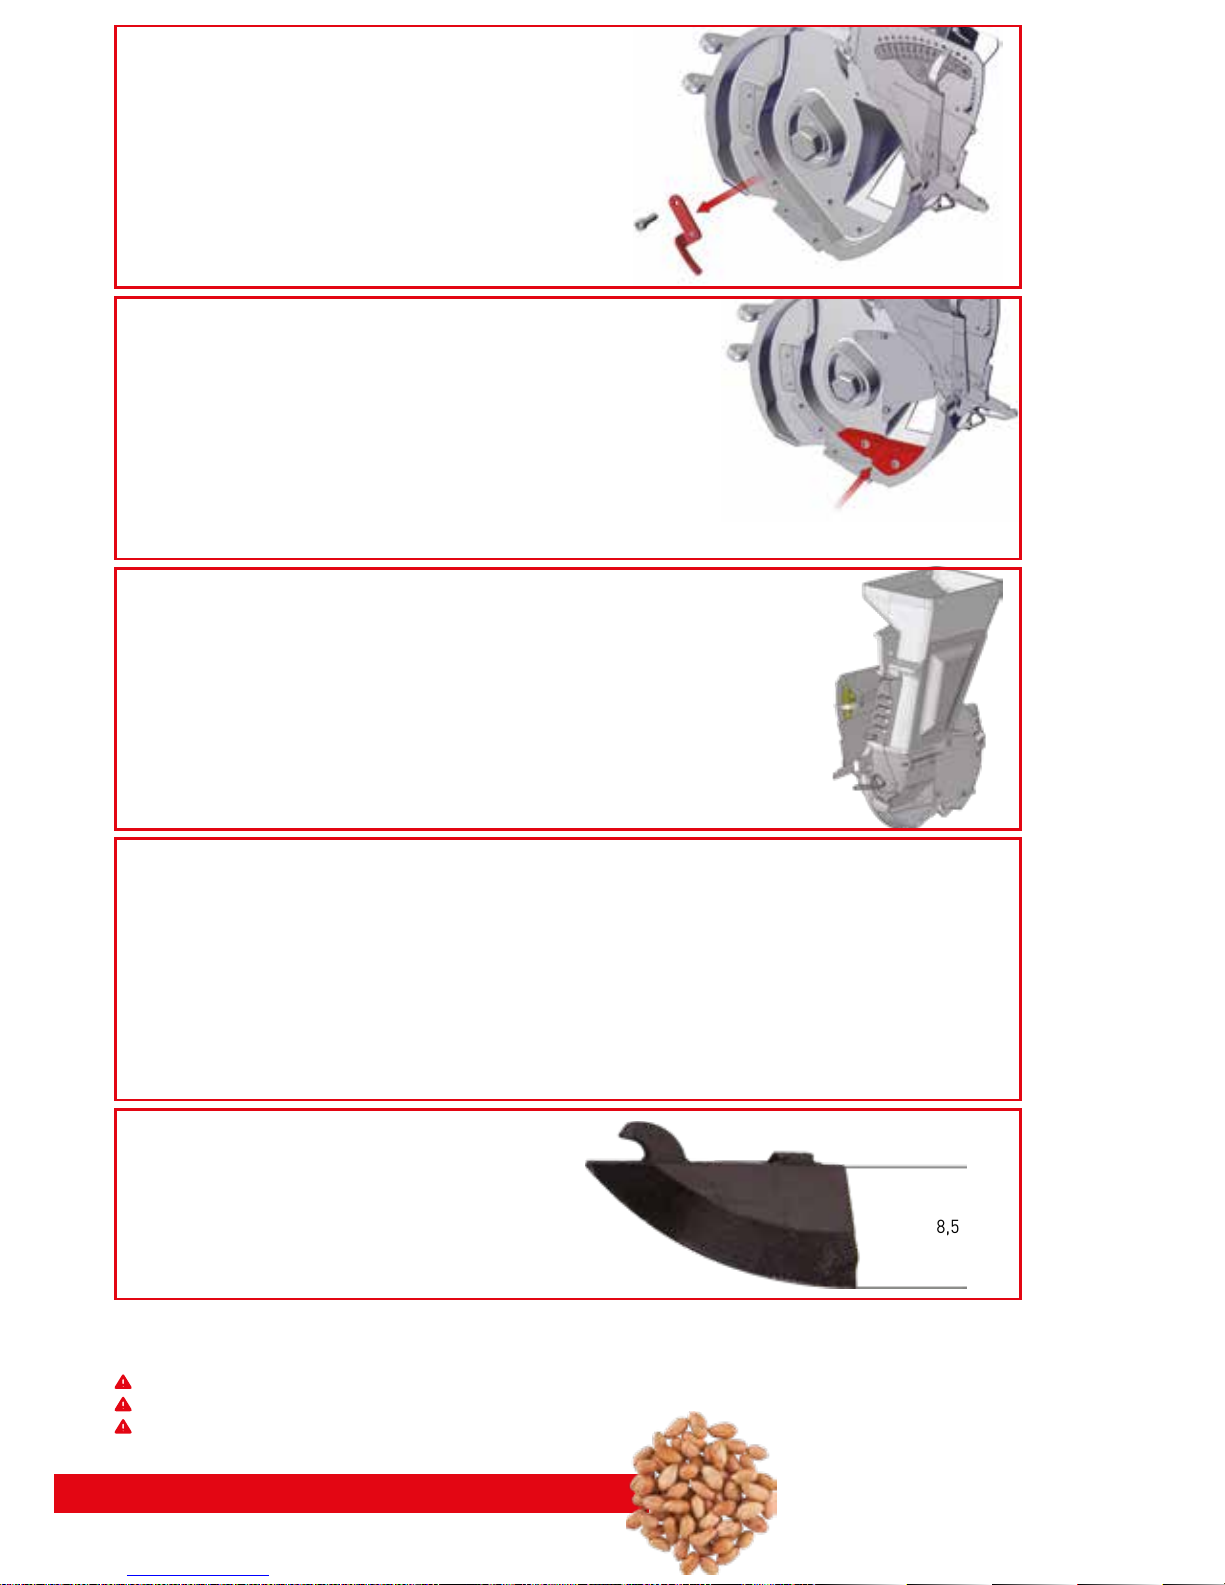
Pancar ekimi için alçak ekim
baltasını (6,5 cm) takınız.
6,5 cm
TOHUM SIYIRICI
Pancar sıyırıcısı takılı olmalıdır.
takılacak
03
Page 4
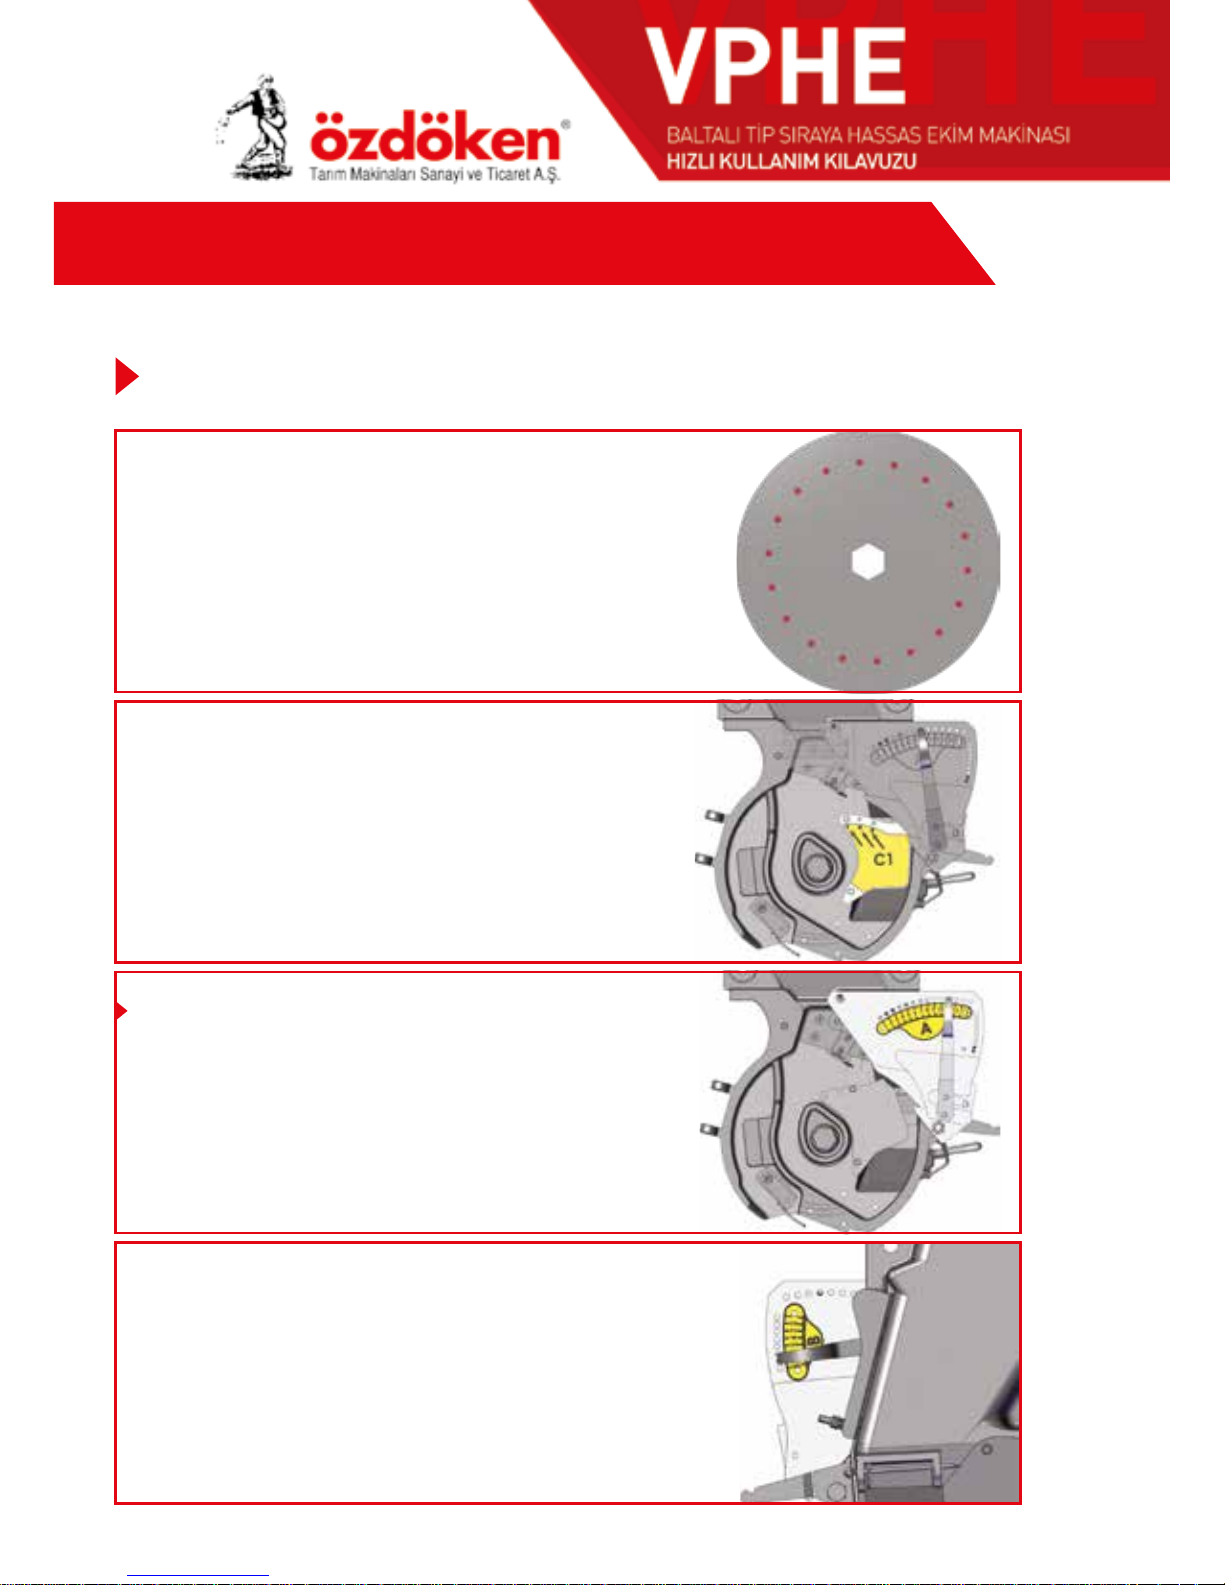
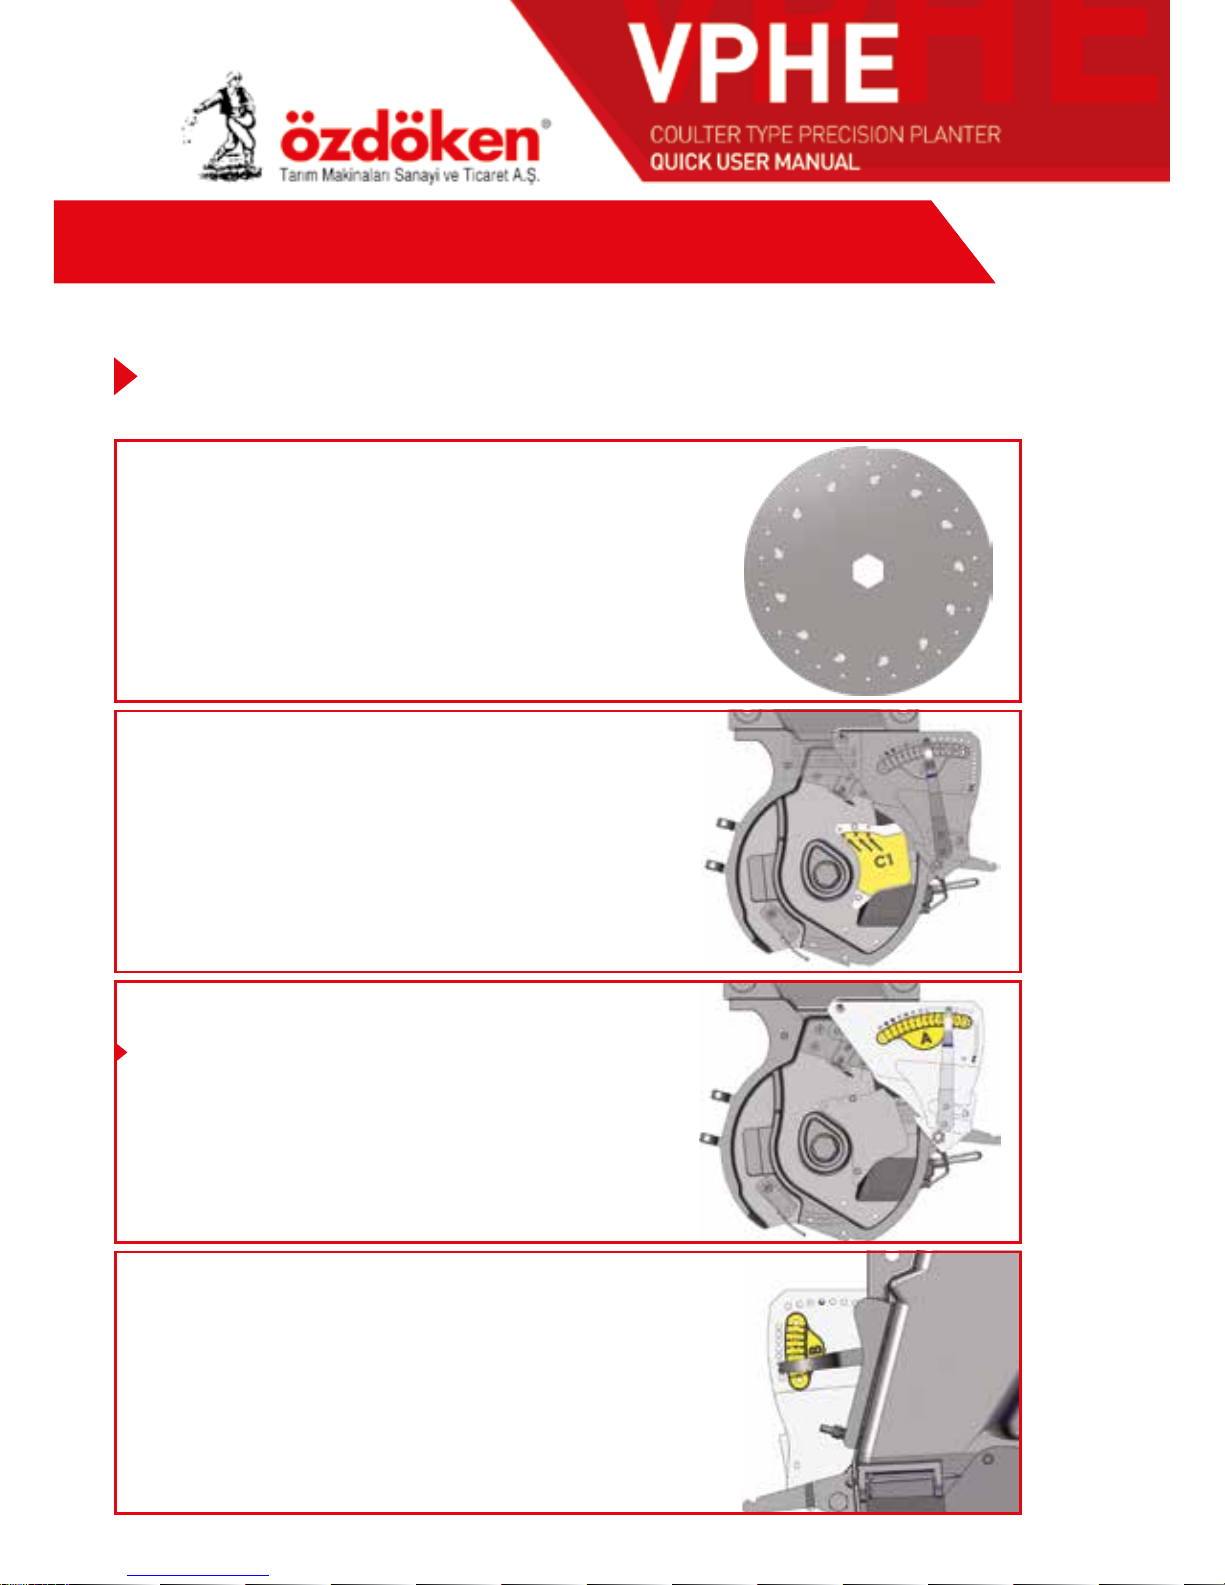
HIZLI AYAR TABLOSU
B SELEKTÖR
İç selektör kolu 3 veya 4 nolu deliğe
takılacak.
A SELEKTÖR
SELEKTÖR (TOHUM TEKLEYİCİ) AYARI
Dış selektör kolu 7 veya 8 nolu deliğe
takılacak.
TOHUM İÇİ AYAR SEVİYE KAPAĞI
C1 kapağı 1 nolu deliğe takılacak.
Kaplamasız Pancar tohumu ekeceğinizde makinenizi aşağıdaki değerlere ayarlamanızı tavsiye ederiz.
Baltalı Makina Kaplamasız Pancar Tohumu
EKİCİ DİSK
• Ø 1.7 mm delikli
• Yuvarlak karıştırıcılı
• Tercihen 36 delikli disk.
04
Page 5
Yukarıda verilen değerler tohum yapısına göre değişkenlik gösterebilir.
Ayarları uyguladıktan sonra kesinlikle test ediniz.
Oluşabilecek hatalı ekimlerden kullanıcı sorumludur.
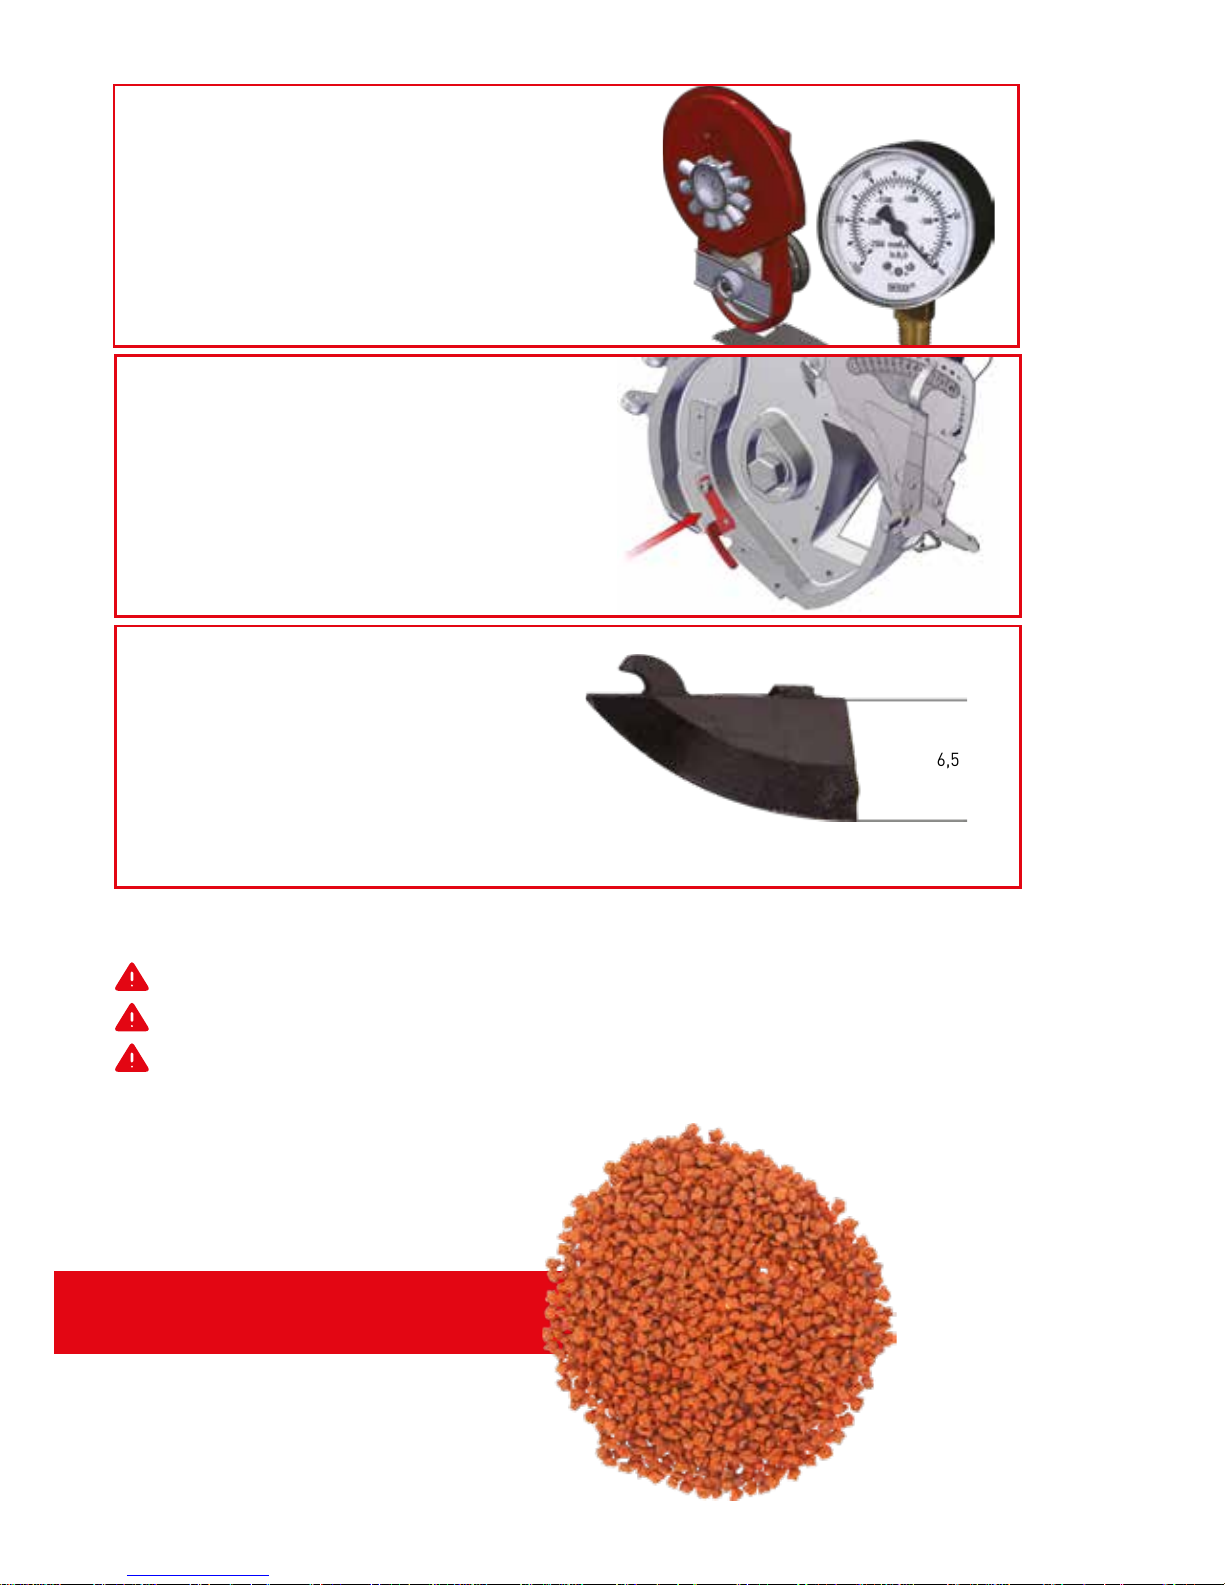
Kaplamasız Pancar Tohumu
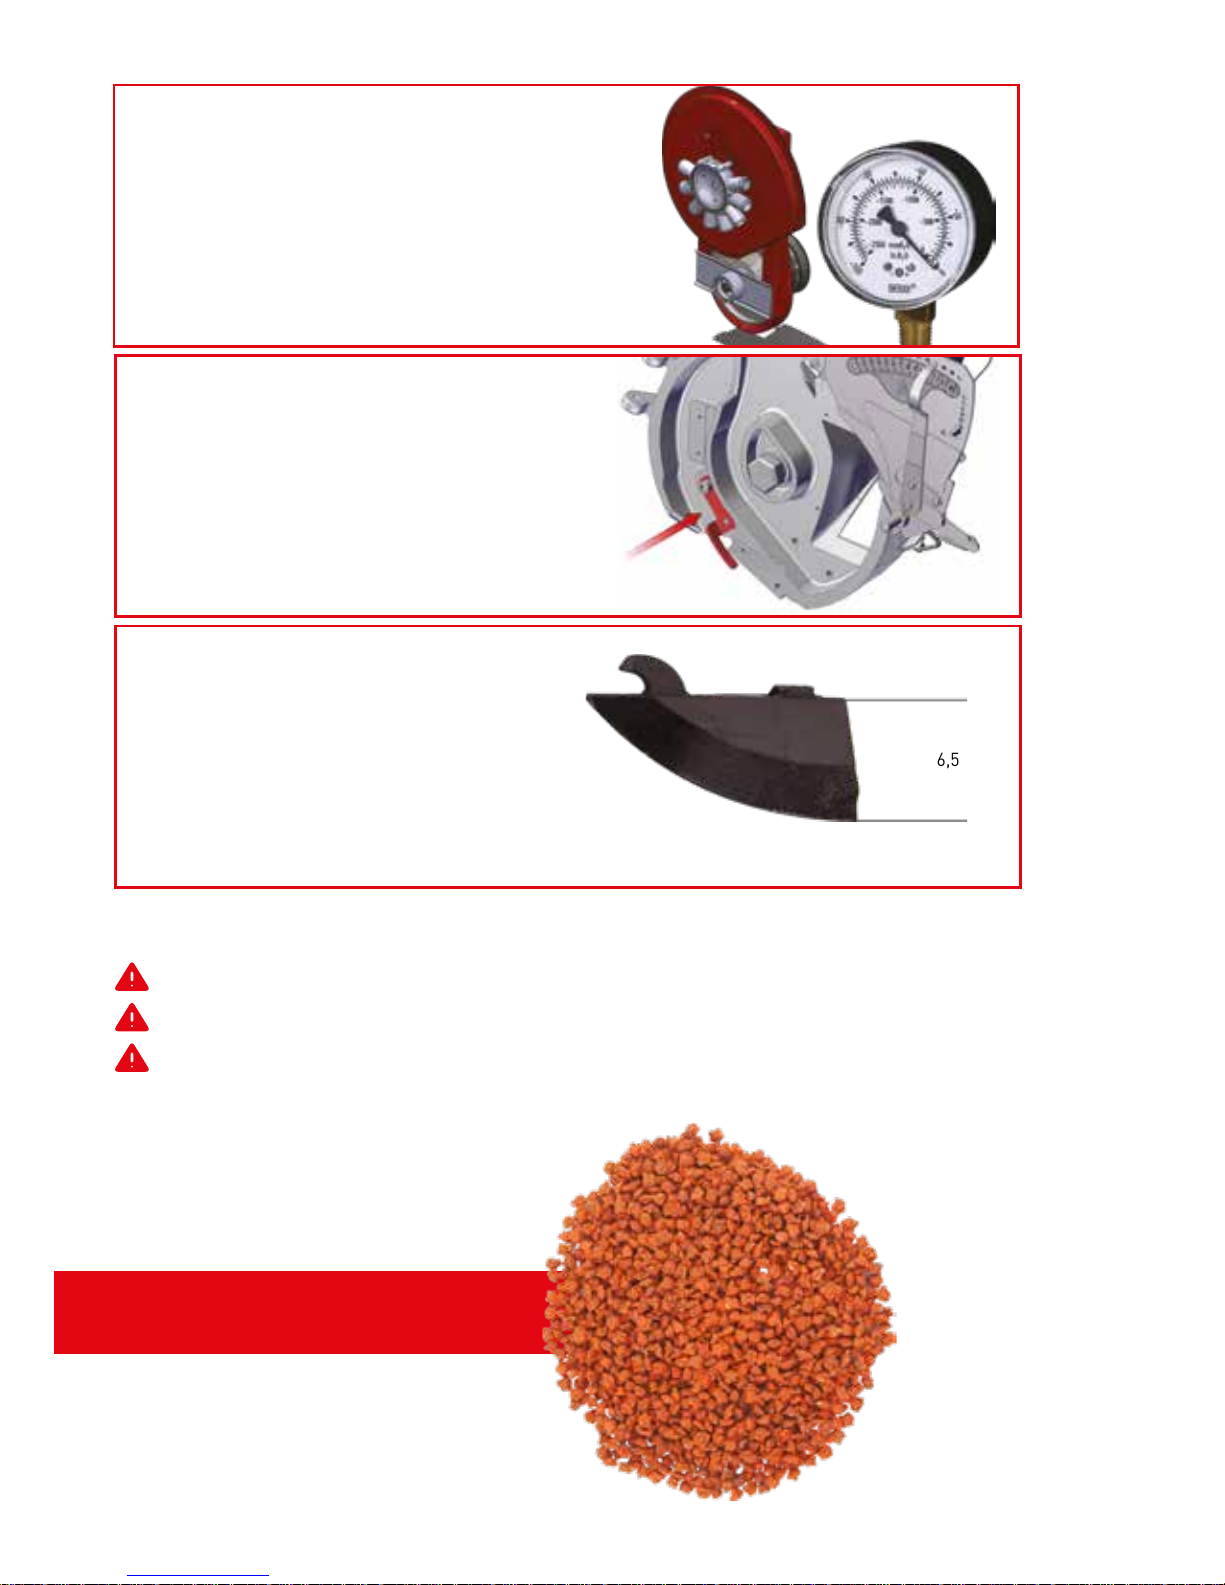
FAN (VAKUMETRE AYARI)
Fan vakumetre saati 25 - 30 barda
olmalıdır.
NOT: Hava basıncı bu değerleri
geçmemelidir.
EKİM BALTASI
Pancar ekimi için alçak ekim
baltasını (6,5 cm) takınız.
6,5 cm
TOHUM SIYIRICI
Pancar sıyırıcısı takılı olacak.
takılacak
05
Page 6
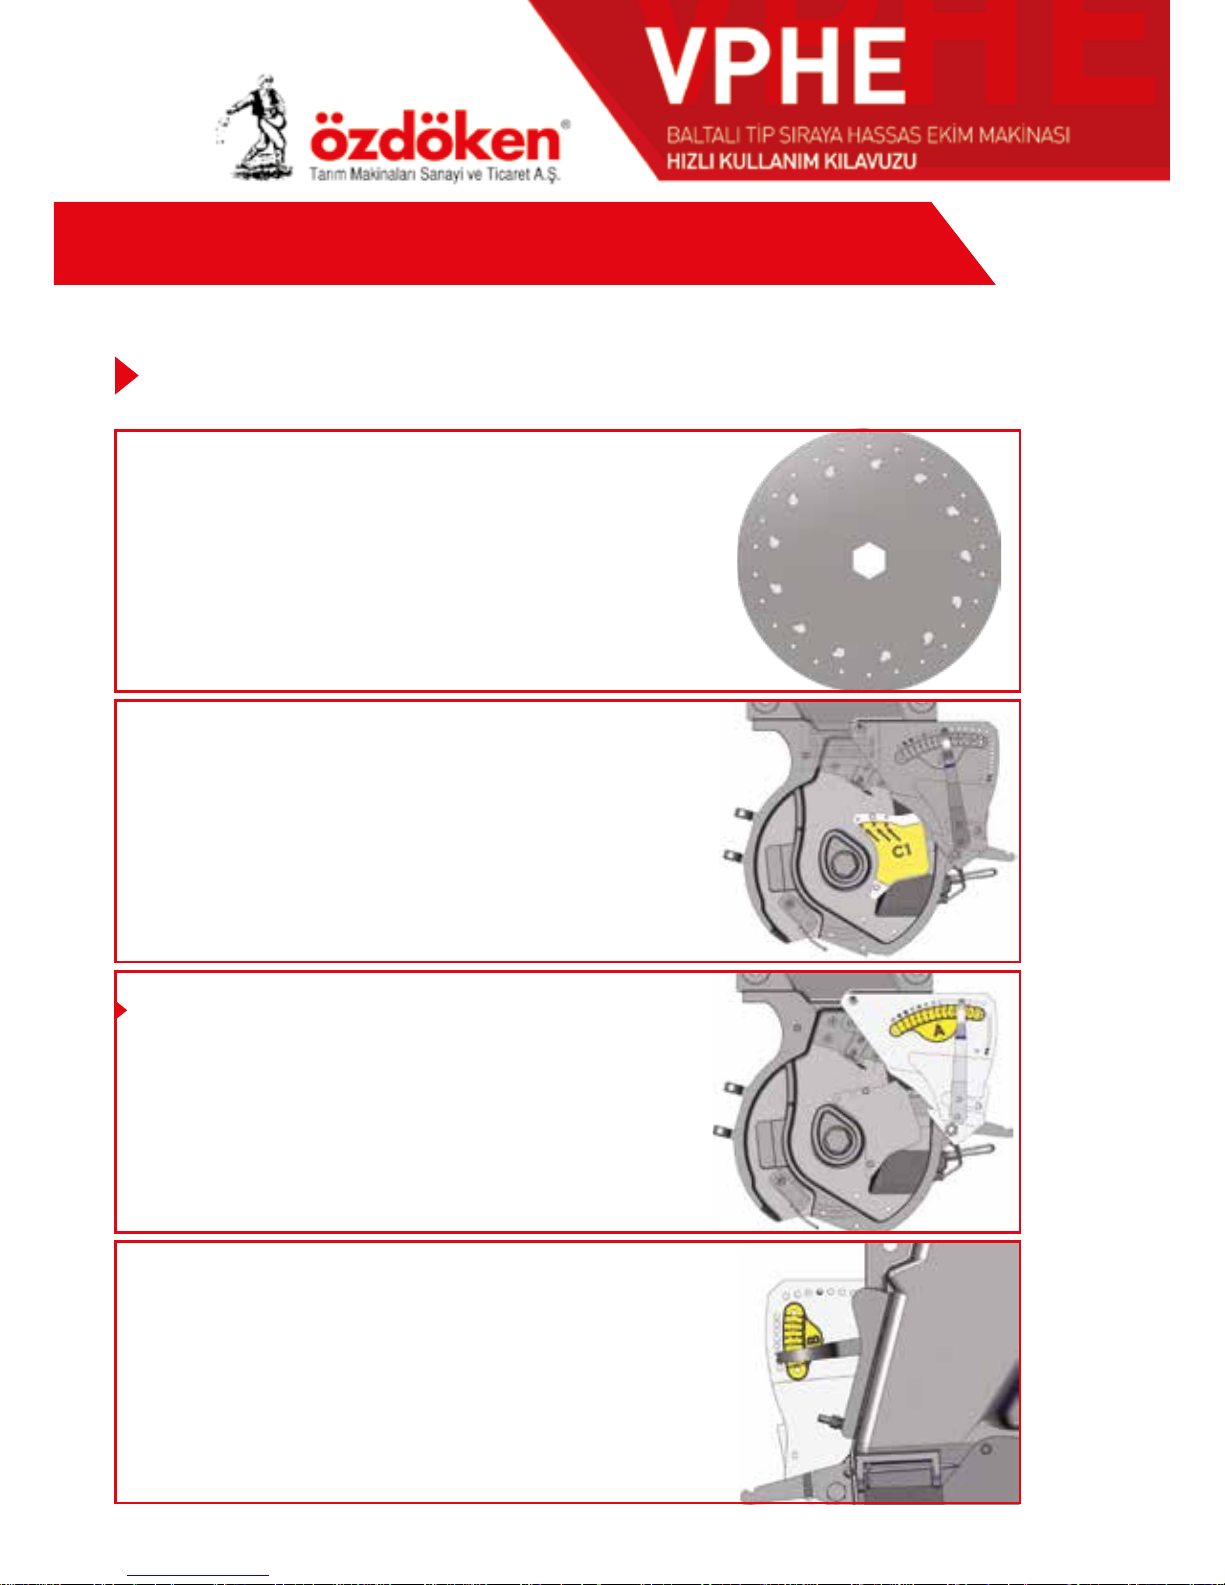
Baltalı Makina Yağlık Ayçekirdeği Tohumu (TOMBUL)
Yağlık ayçekirdeği (tombul) tohumu ekeceğinizde makinenizi aşağıdaki değerlere ayarlamanızı tavsiye ederiz.
EKİCİ DİSK
• Ø 3 mm delikli
• Tırnaklı karıştırıcılı
• Tercihen 20 veya 26 delikli disk.
TOHUM İÇİ AYAR SEVİYE KAPAĞI
C1 kapağı 2 nolu deliğe takılacak.
SELEKTÖR (TOHUM TEKLEYİCİ) AYARI
A SELEKTÖR
Dış selektör kolu 10 nolu deliğe takılacak.
B SELEKTÖR
İç selektör kolu 4 veya 5 nolu
deliğe takılacak.
HIZLI AYAR TABLOSU
06
Page 7
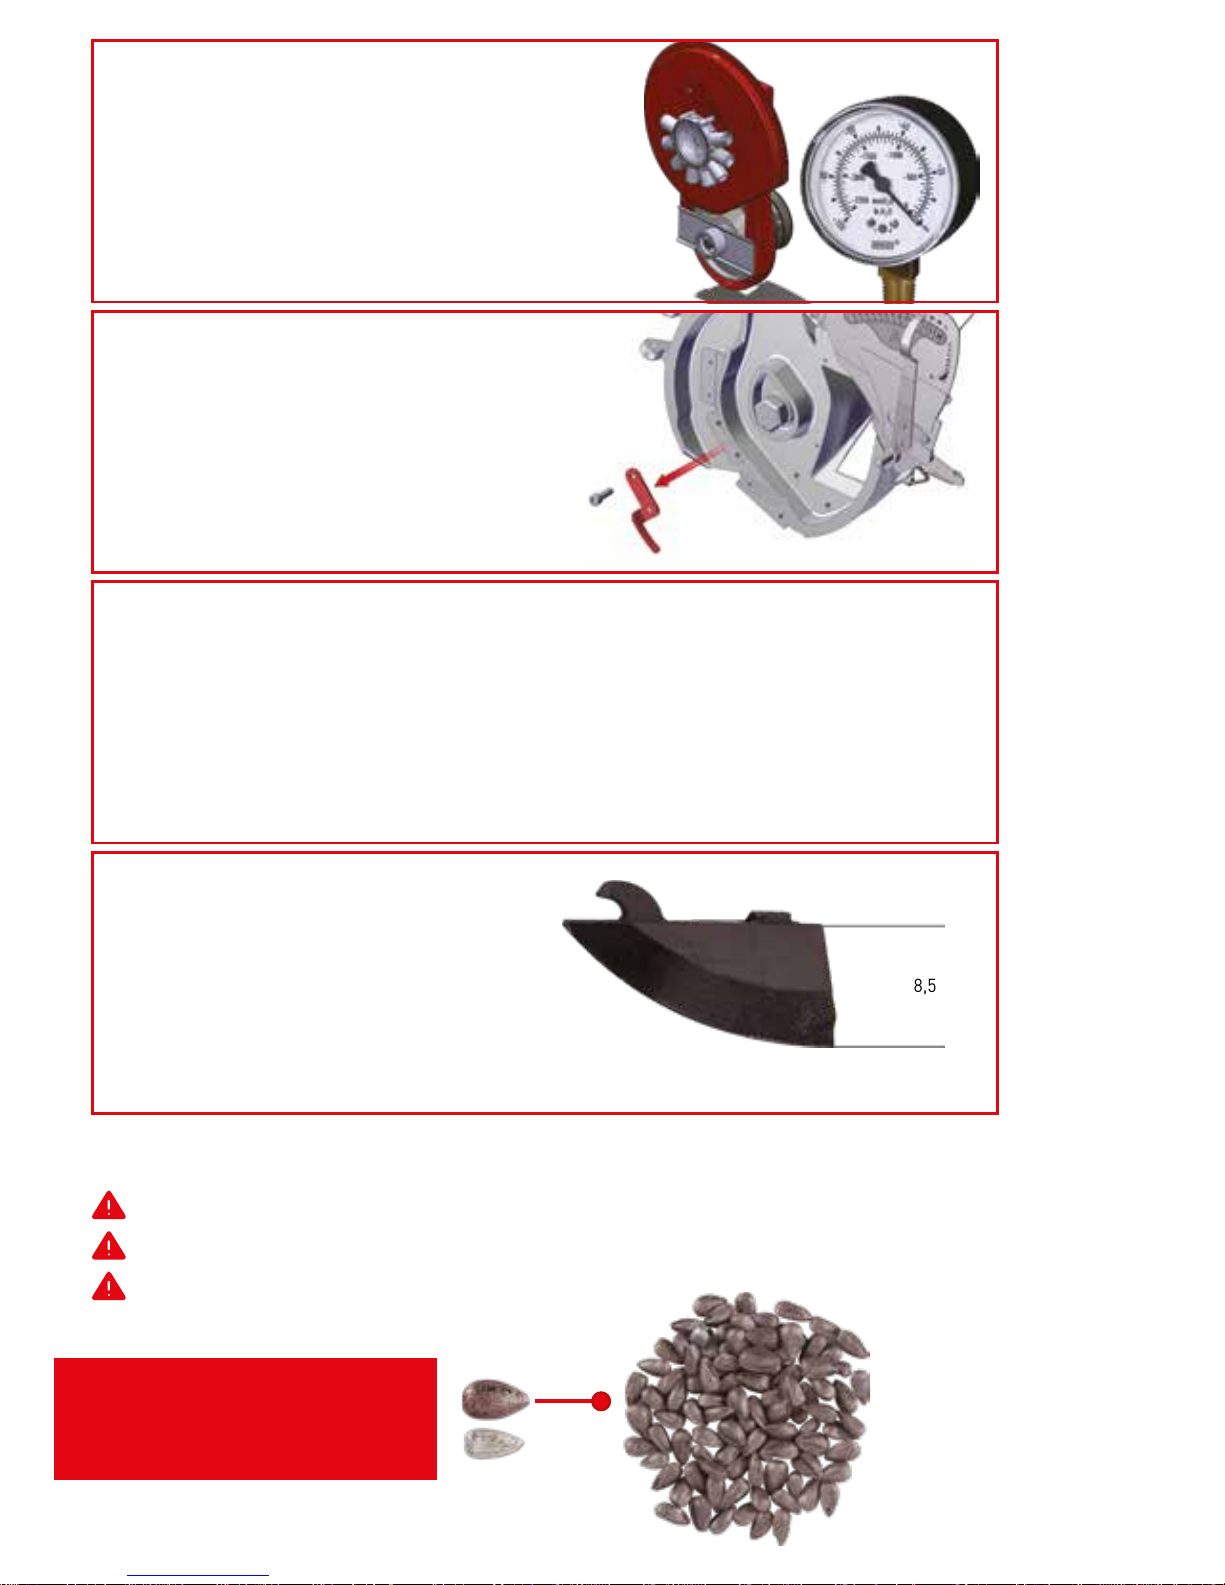
Yağlık Ayçekirdeği
Tohumu
Tombul
Yukarıda verilen değerler tohum yapısına göre değişkenlik gösterebilir.
Ayarları uyguladıktan sonra kesinlikle test ediniz.
Oluşabilecek hatalı ekimlerden kullanıcı sorumludur.
FAN (VAKUMETRE AYARI)
Fan vakumetre saati 40-50 barda
olmalıdır.
EKİM BALTASI
Ayçekirdeği ekimi için yüksek ekim
baltasını (8,5 cm) takınız.
8,5 cm
DİKKAT EDİLECEK HUSUSLAR
1. EKİMİ YAPILACAK TOHUM KESİNLİKLE KURU OLMALIDIR.
2. NEMLİ VEYA ISLATILMIŞ TOHUMLA EKİM YAPILMAMALIDIR.
3. ÜZERİNDE KAPLAMA OLMAYAN TOHUM EKİLECEKSE TOHUM
AKIŞKANLIĞININ DAHA İYİ OLMASI İÇİN, TOHUM ÇOCUK PİŞİK PUDRASI
İLE KARIŞTIRILIP EKİM YAPILMASI TAVSİYE EDİLİR. BU ŞEKİLDE TOHUM
AKIŞKANLIĞI DAHA RAHAT OLUR.
TOHUM SIYIRICI
DİKKAT: SÖKÜNÜZ!!!
Bu ekipman kullanılmayacaktır.
Yandaki resimde gözüken ekipman
sökülü olmalıdır.
sökünüz
07
Page 8
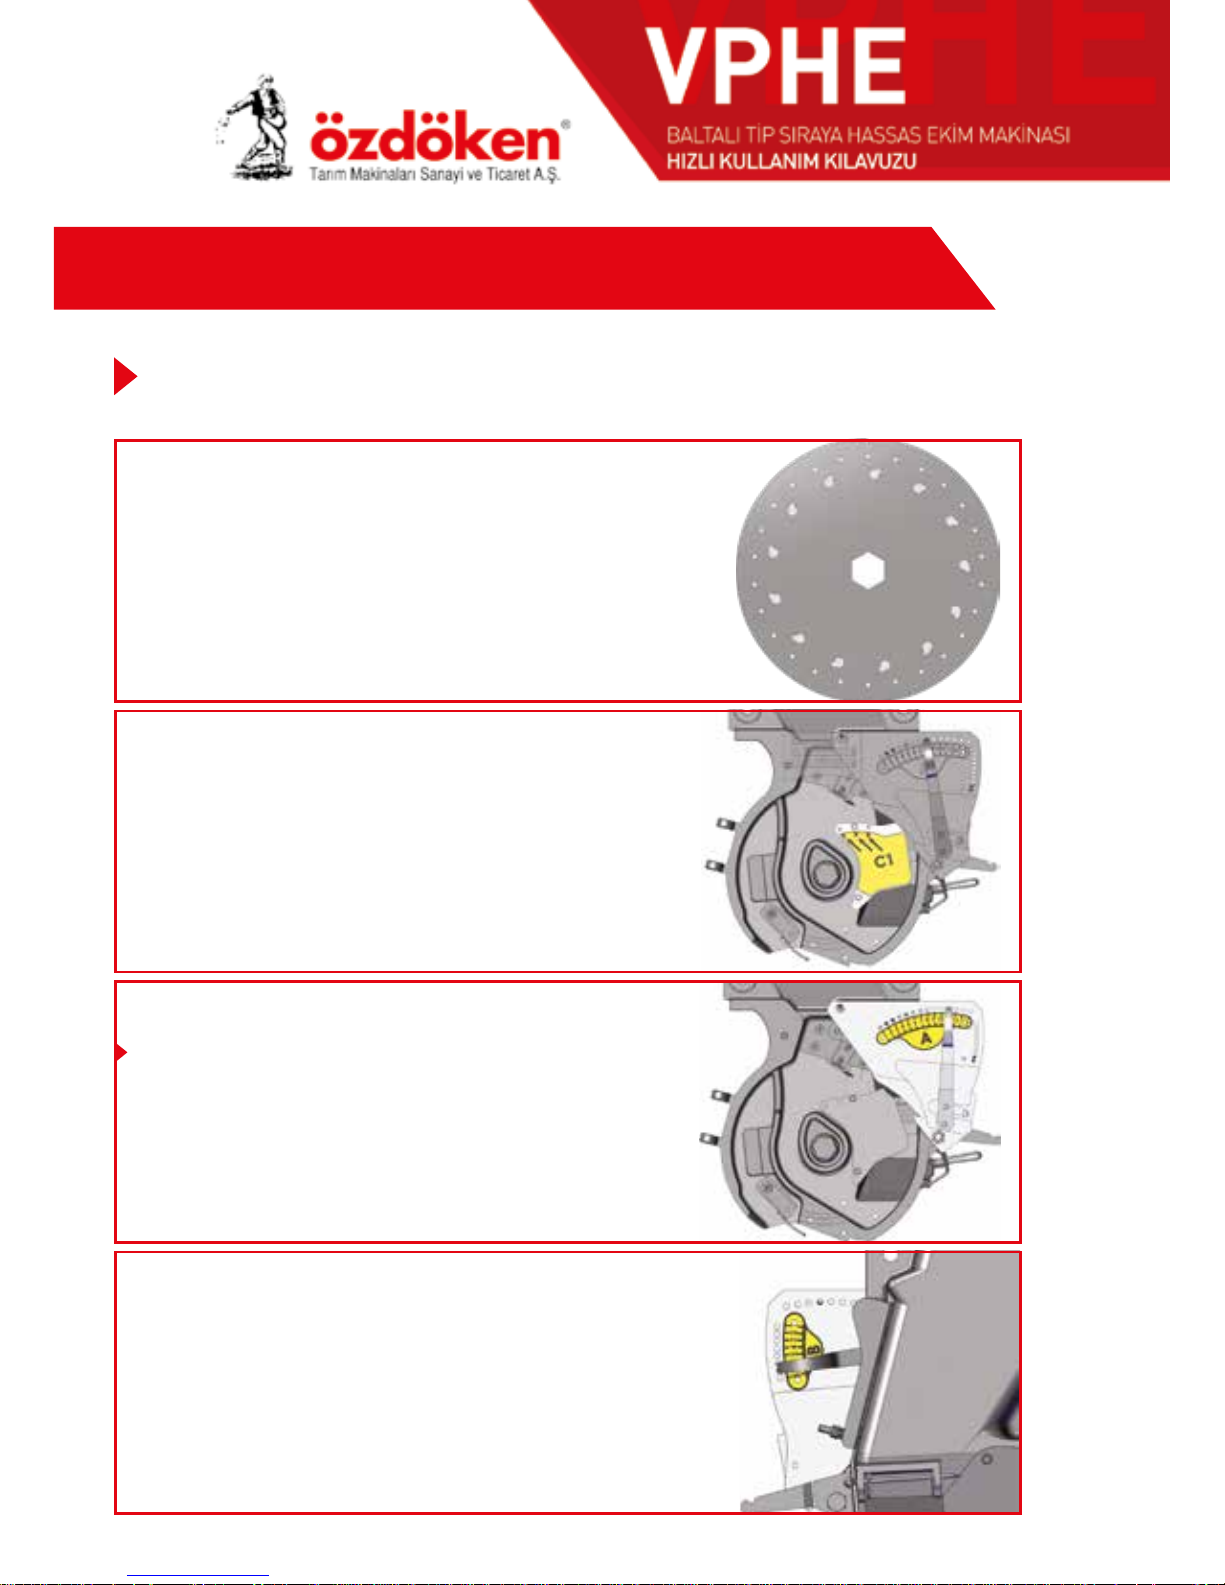
Yağlık Ayçekirdeği (cılız) tohumu ekeceğinizde makinenizi aşağıdaki değerlere ayarlamanızı tavsiye ederiz.
Baltalı Makina Yağlık Ayçekirdeği Tohumu (CILIZ)
EKİCİ DİSK
• Ø 2.5 mm delikli
• Tırnaklı karıştırıcılı
• Tercihen 20 veya 26 delikli disk.
TOHUM İÇİ AYAR SEVİYE KAPAĞI
C1 kapağı 2 nolu deliğe takılacak.
SELEKTÖR (TOHUM TEKLEYİCİ)
AYARI
A SELEKTÖR
Dış selektör kolu 10 nolu deliğe takılacak.
B SELEKTÖR
İç selektör kolu 3-4 nolu deliğe
takılacak.
HIZLI AYAR TABLOSU
08
Page 9
Yukarıda verilen değerler tohum yapısına göre değişkenlik gösterebilir.
Ayarları uyguladıktan sonra kesinlikle test ediniz.
Oluşabilecek hatalı ekimlerden kullanıcı sorumludur.
Ayçekirdeği Tohumu
Cılız
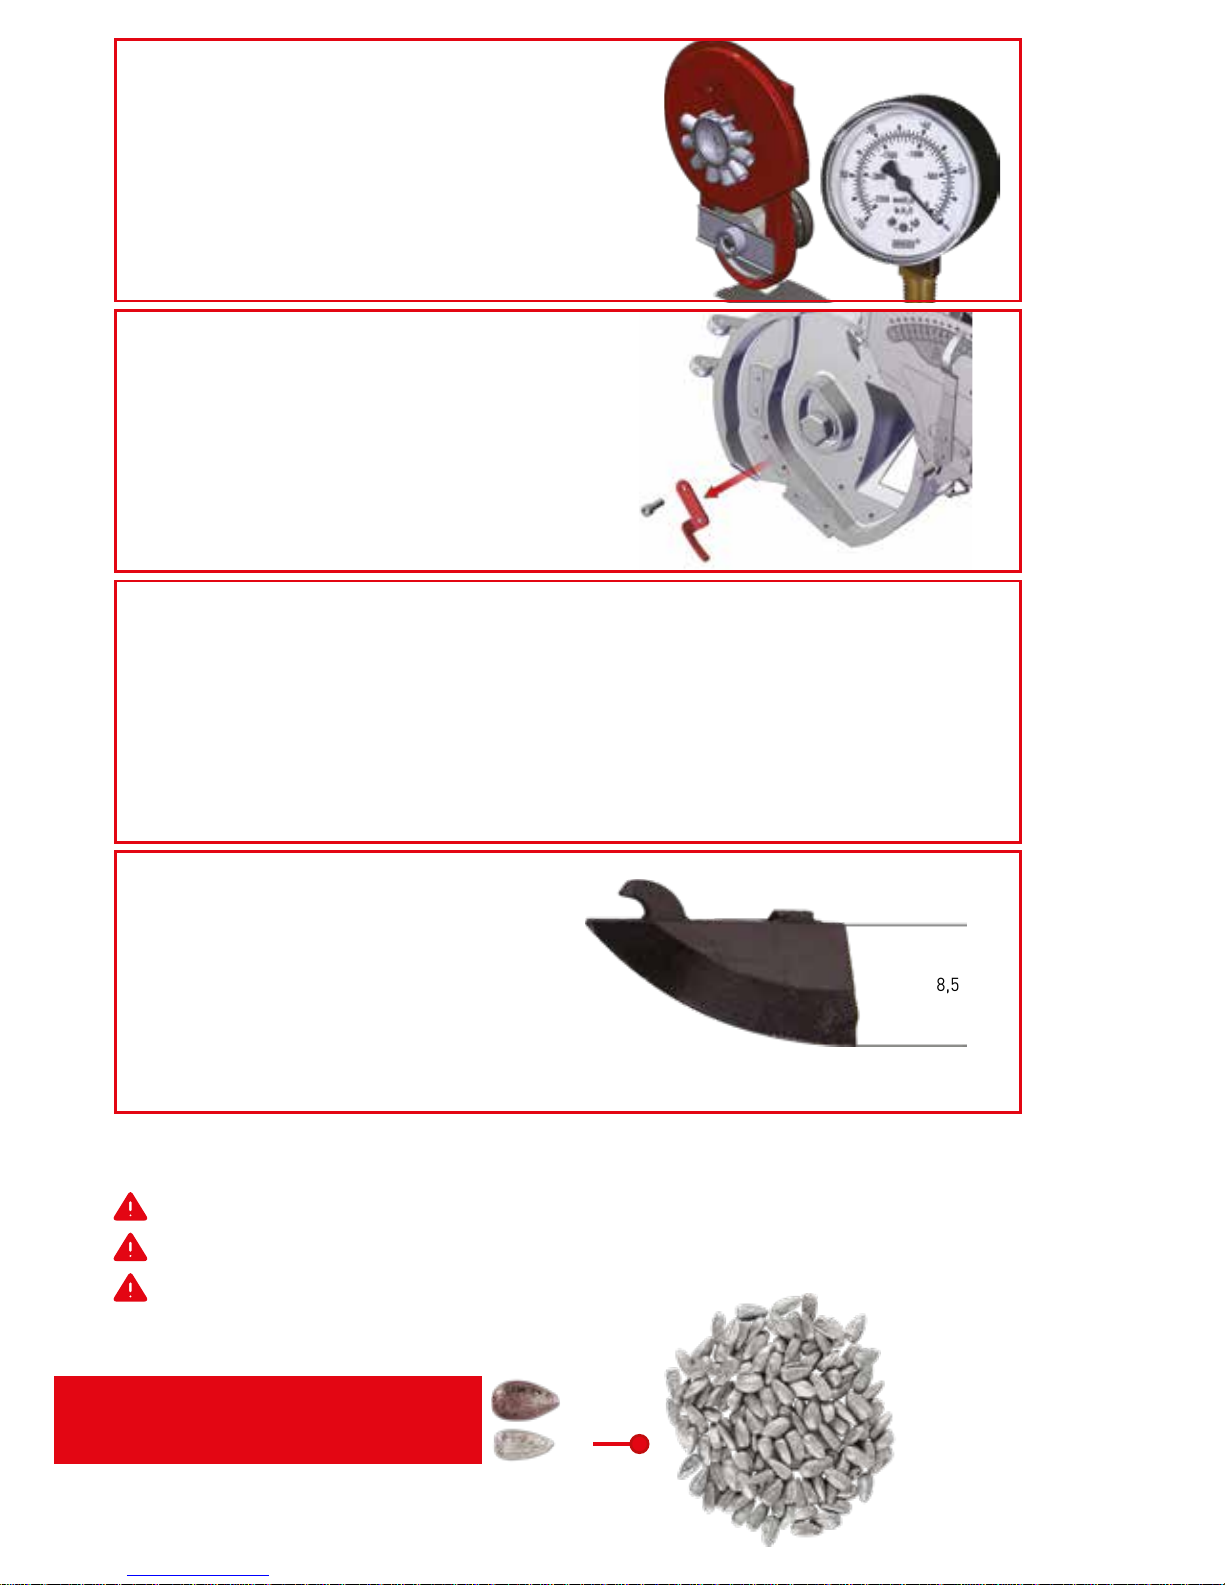
FAN (VAKUMETRE AYARI)
Fan vakumetre saati 35-45 barda
olmalıdır.
EKİM BALTASI
Ayçekirdeği ekimi için yüksek ekim
baltasını (8,5 cm) takınız.
8,5 cm
DİKKAT EDİLECEK HUSUSLAR
1. EKİMİ YAPILACAK TOHUM KESİNLİKLE KURU OLMALIDIR.
2. NEMLİ VEYA ISLATILMIŞ TOHUMLA EKİM YAPILMAMALIDIR.
3. ÜZERİNDE KAPLAMA OLMAYAN TOHUM EKİLECEKSE TOHUM AKIŞKANLIĞININ DAHA İYİ OLMASI İÇİN, TOHUM ÇOCUK PİŞİK PUDRASI İLE KARIŞTIRILIP EKİM YAPILMASI TAVSİYE EDİLİR. BU ŞEKİLDE TOHUM AKIŞKANLIĞI
DAHA RAHAT OLUR.
TOHUM SIYIRICI
DİKKAT: SÖKÜNÜZ!!!
Bu ekipman kullanılmayacaktır.
Yandaki resimde gözüken ekipman
sökülü olmalıdır.
sökünüz
09
Page 10
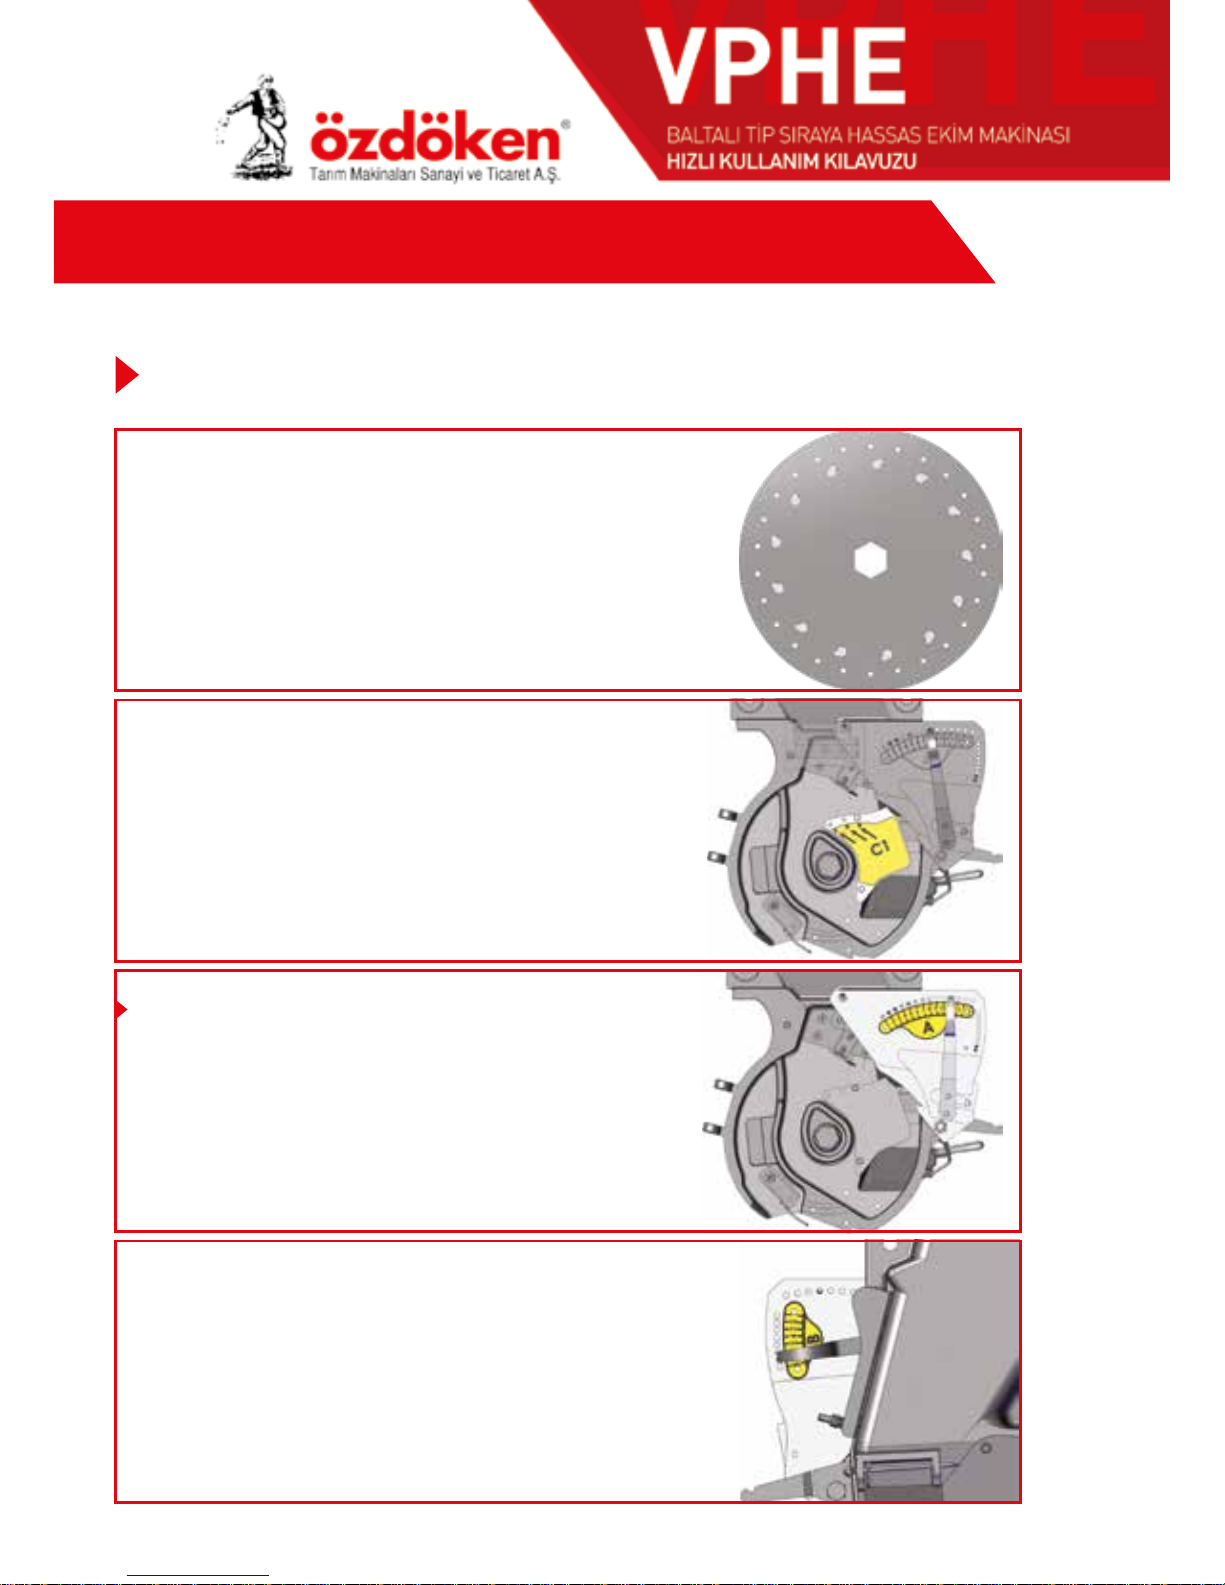
HIZLI AYAR TABLOSU
C1 kapağı 3 nolu deliğe takılacak.
TOHUM İÇİ AYAR SEVİYE KAPAĞI
EKİCİ DİSK
• Ø 4,5 veya Ø 5 mm Delikli Tırnaklı Karıştırıcılı
• Tercihen 20 veya 26 Delikli Disk
NOT: İri tohumda Ø 5 mm delikli disk, orta boy
tohumda Ø 4,5 mm delikli disk kullanılabilir.
Ø 4,5 mm delikli diskte diskin arasıra tohum
almadığını görürseniz Ø 5 mm delikli diski kullanınız.
Mısır büyük boy ve orta boy tohumu ekeceğinizde makinenizi aşağıdaki değerlere ayarlamanızı tavsiye ederiz.
SELEKTÖR (TOHUM TEKLEYİCİ) AYARI
A SELEKTÖR
Dış selektör kolu 11 veya 12 nolu deliğe
takılacak.
B SELEKTÖR
İç selektör kolu 6 nolu deliğe takılacak.
Baltalı Makina Mısır Tohumu (ORTA BOY-BÜYÜK BOY)
10
Page 11
Yukarıda verilen değerler tohum yapısına göre değişkenlik gösterebilir.
Ayarları uyguladıktan sonra kesinlikle test ediniz.
Oluşabilecek hatalı ekimlerden kullanıcı sorumludur.
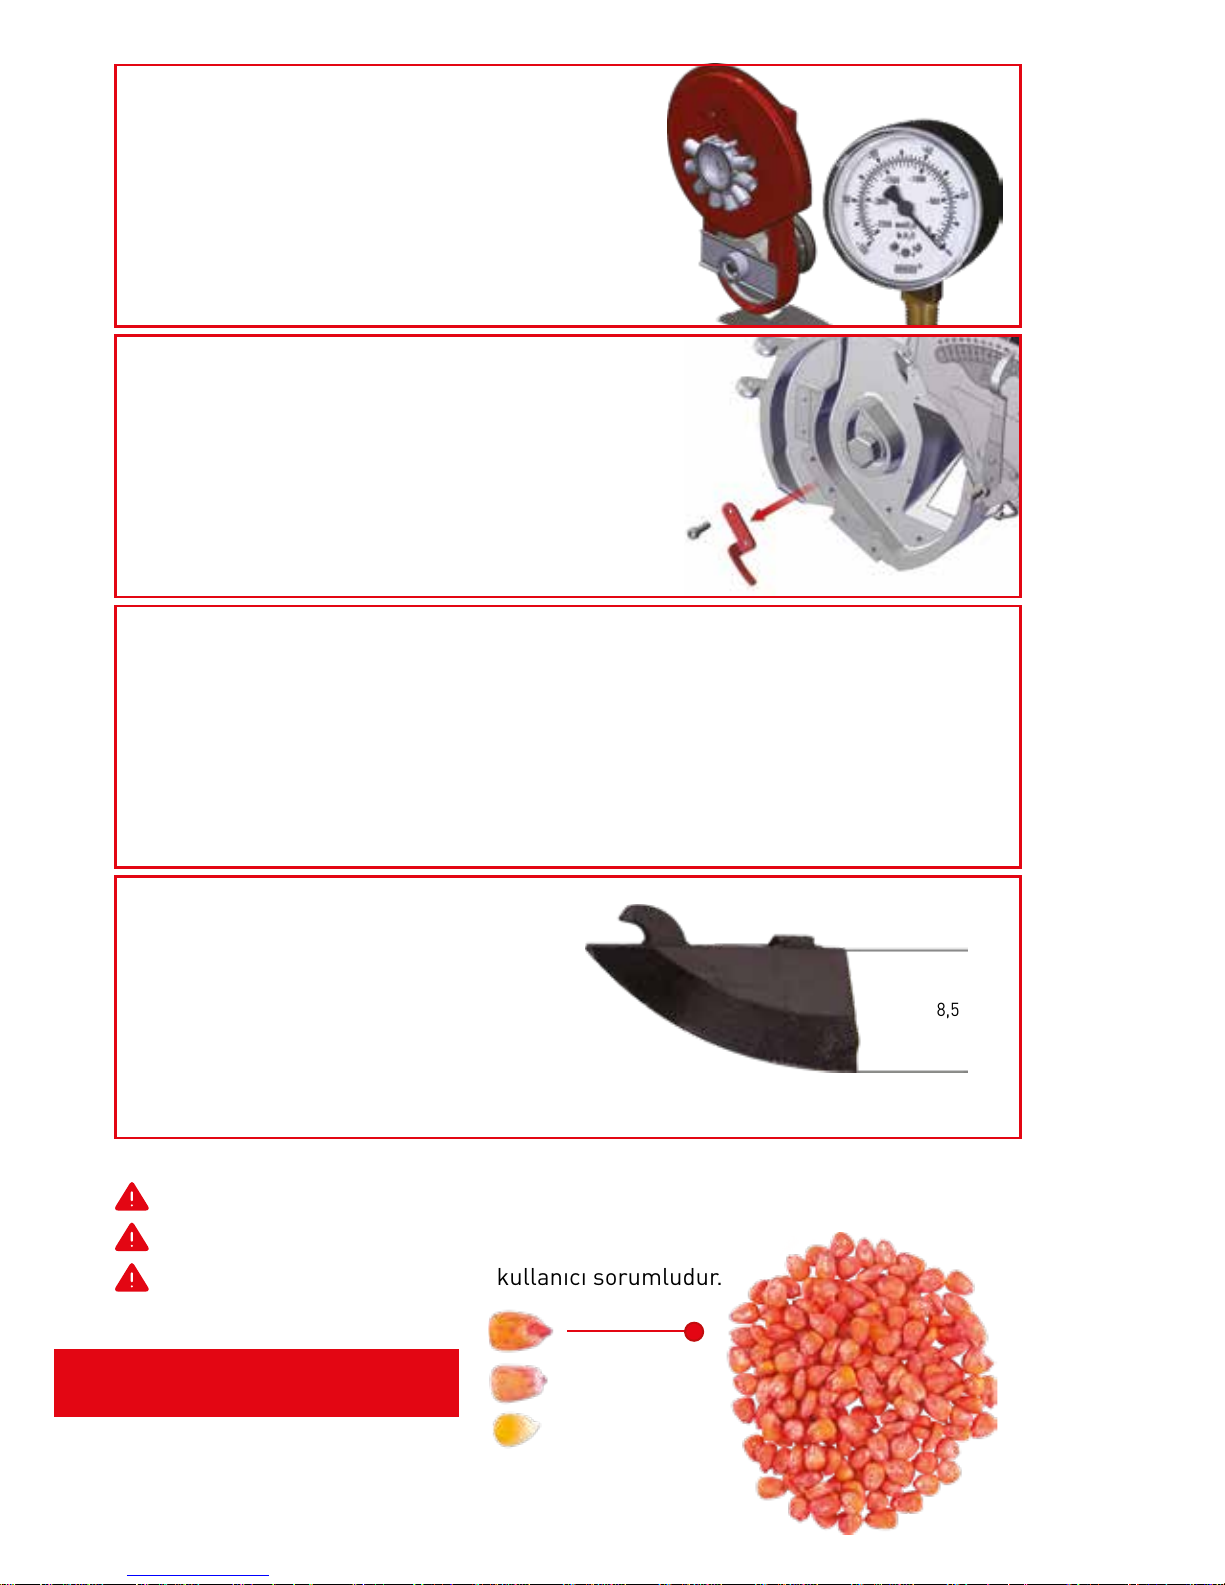
FAN (VAKUMETRE AYARI)
Fan vakumetre saati 50 - 60 barda
olmalıdır.
DİKKAT: Tohum büyüklüğüne göre fan
değeri daha az veya daha fazla olabilir.
Mısır Tohumu
Büyük Boy
EKİM BALTASI
Mısır ekimi için yüksek ekim
baltasını (8,5 cm) takınız.
8,5 cm
sökünüz
TOHUM SIYIRICI
DİKKAT: SÖKÜNÜZ!!!
Bu ekipman kullanılmayacaktır.
Yandaki resimde gözüken ekipman
sökülü olmalıdır.
DİKKAT EDİLECEK HUSUSLAR
1. EKİMİ YAPILACAK TOHUM KESİNLİKLE KURU OLMALIDIR.
2. NEMLİ VEYA ISLATILMIŞ TOHUMLA EKİM YAPILMAMALIDIR.
3. TOHUMUN İLAÇLANMASI AMACIYLA ISLATILMASI ÜZERİNDE NEMLİ
BİR TABAKA OLUŞTURDUĞU İÇİN, İLAÇ EKİCİ DİSKLERE YAPIŞMAKTA VE
DELİKLERIN TIKANMASINA VE DİSKLERİN DÖNÜŞÜNE ENGEL OLMAKTADIR. BU DA EKİMDE TOHUM MESAFESİ VE TOHUM ATIŞINDA DÜZENSİZLİK
YAPMAKTADIR.
11
Page 12
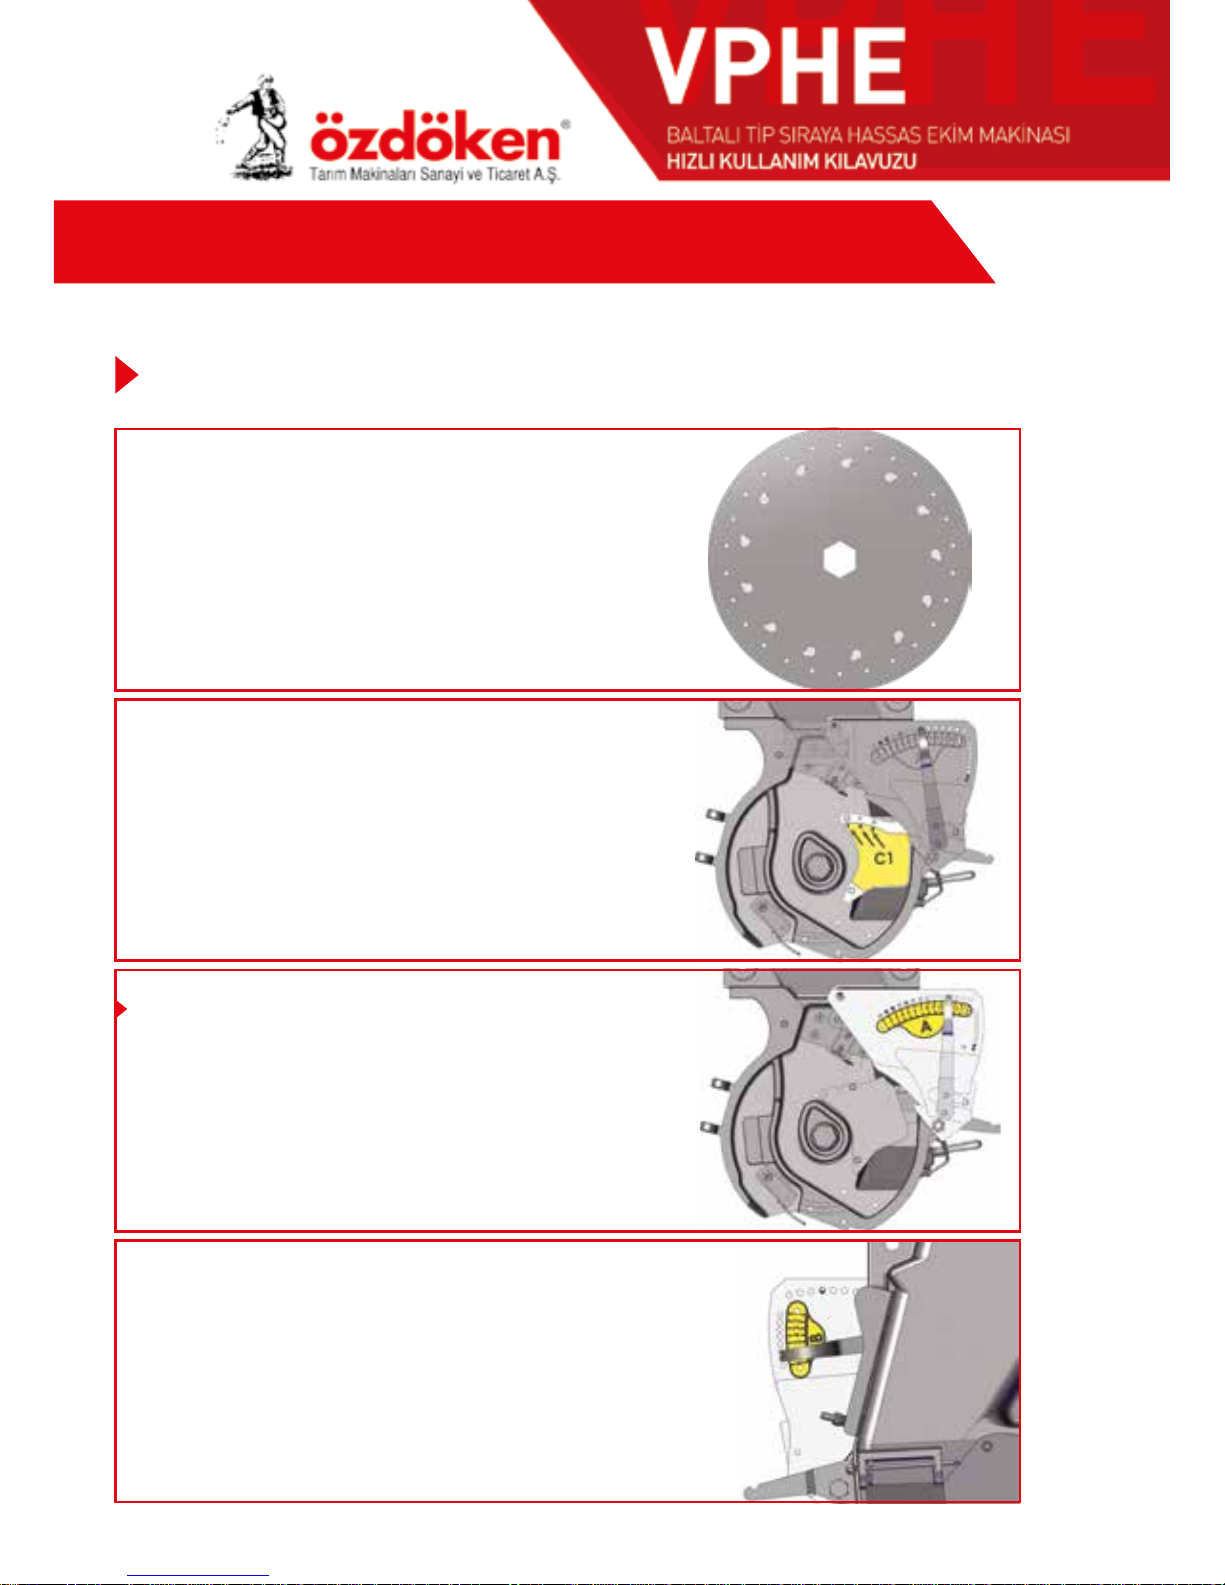
HIZLI AYAR TABLOSU
TOHUM İÇİ AYAR SEVİYE KAPAĞI
C1 kapağı 1 nolu deliğe takılacak.
EKİCİ DİSK
• Ø 3.5 mm veya 4 mm delikli
• Tırnaklı karıştırıcılı
• Tercihen 20 veya 26 delikli disk.
Mısır (ufak boy) tohumu ekeceğinizde makinenizi aşağıdaki değerlere ayarlamanızı tavsiye ederiz.
Baltalı Makina Mısır Tohumu (UFAK BOY PATLATMALIK MISIR)
SELEKTÖR (TOHUM TEKLEYİCİ) AYARI
A SELEKTÖR
Dış selektör kolu 10 veya 11 nolu
deliğe takılacak.
B SELEKTÖR
İç selektör kolu 4 veya 5 nolu
deliğe takılacak.
12
Page 13
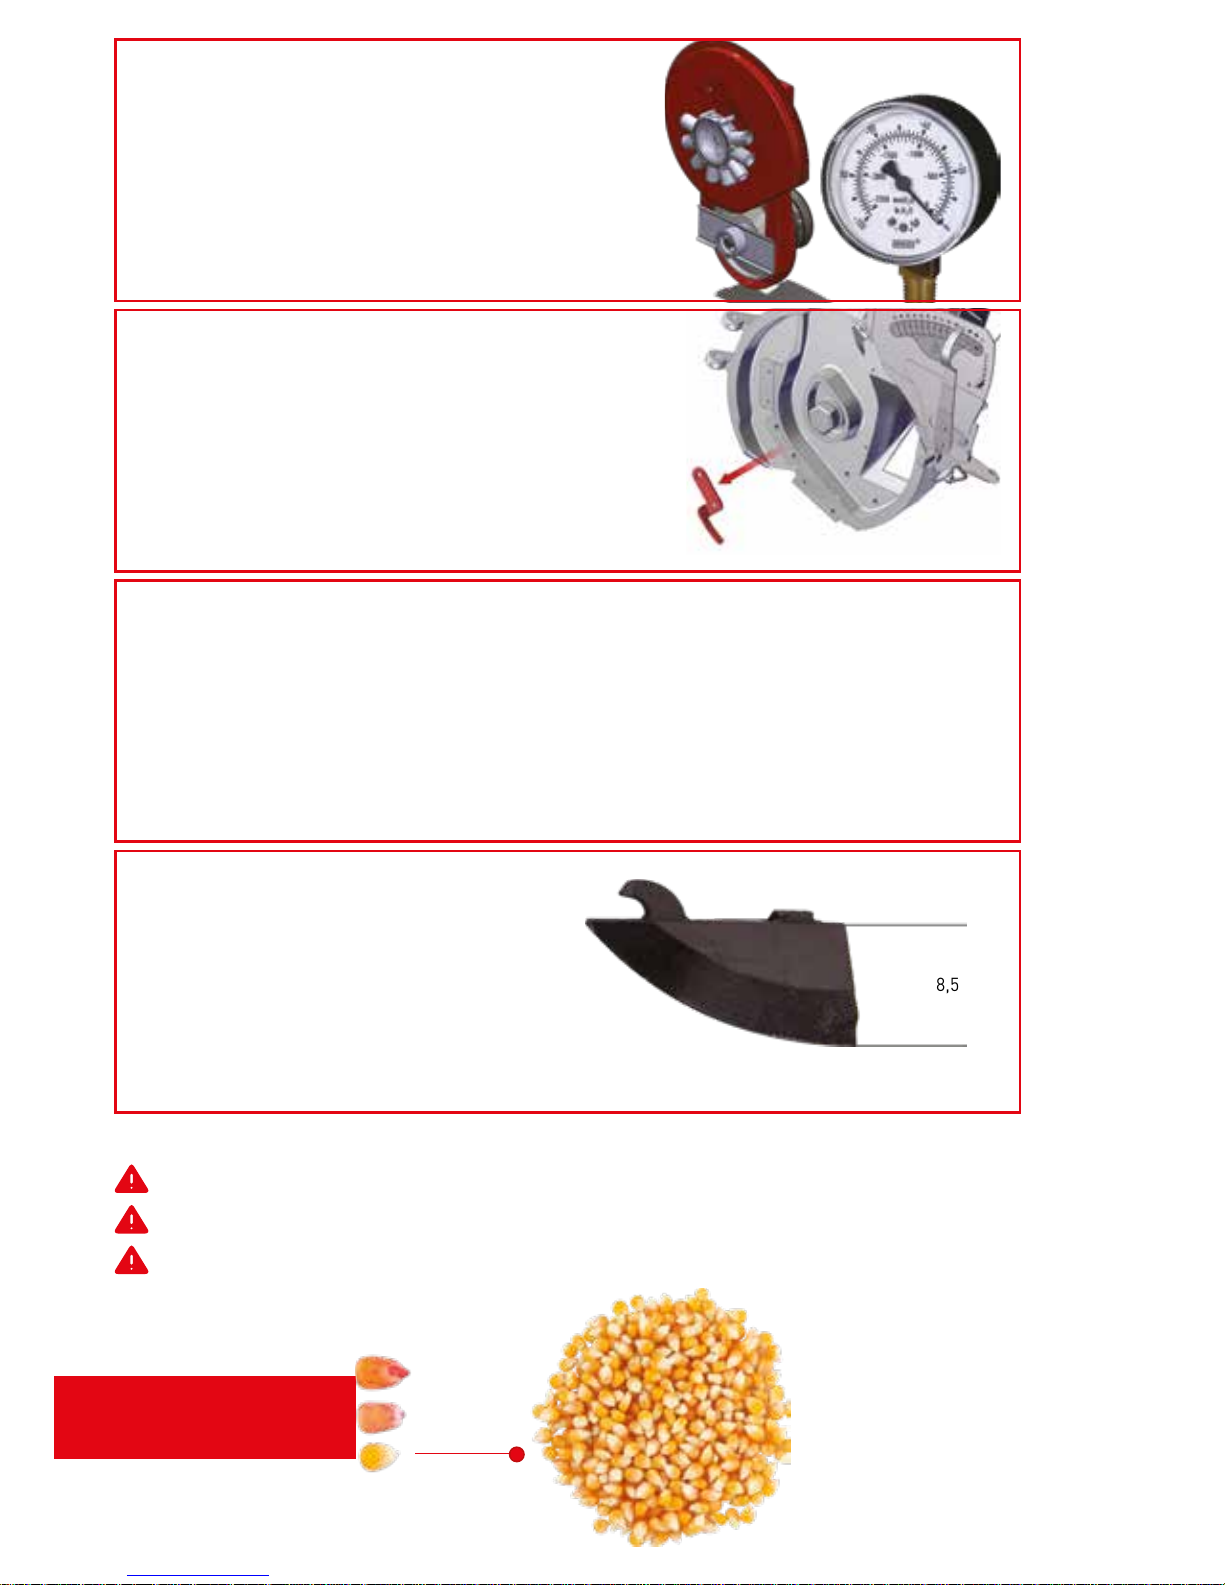
Yukarıda verilen değerler tohum yapısına göre değişkenlik gösterebilir.
Ayarları uyguladıktan sonra kesinlikle test ediniz.
Oluşabilecek hatalı ekimlerden kullanıcı sorumludur.
FAN (VAKUMETRE AYARI)
Fan vakumetre saati 45-50 barda
olmalıdır.
DİKKAT: Tohum büyüklüğüne göre fan
değeri daha az veya daha fazla olabilir.
Mısır Tohumu
Ufak Boy
EKİM BALTASI
Mısır ekimi için yüksek ekim
baltasını (8,5 cm) takınız.
8,5 cm
TOHUM SIYIRICI
DİKKAT: SÖKÜNÜZ!!!
Bu ekipman kullanılmayacaktır.
Yandaki resimde gözüken ekipman
sökülü olmalıdır.
sökünüz
DİKKAT EDİLECEK HUSUSLAR
1. EKİMİ YAPILACAK TOHUM KESİNLİKLE KURU OLMALIDIR.
2. NEMLİ VEYA ISLATILMIŞ TOHUMLA EKİM YAPILMAMALIDIR.
3. TOHUMUN İLAÇLANMASI AMACIYLA ISLATILMASI ÜZERİNDE NEMLİ BİR TABAKA
OLUŞTURDUĞU İÇİN, İLAÇ EKİCİ DİSKLERE YAPIŞMAKTA VE DELİKLERIN
TIKANMASINA VE DİSKLERİN DÖNÜŞÜNE ENGEL OLMAKTADIR. BU DA EKİMDE
TOHUM MESAFESİ VE TOHUM ATIŞINDA DÜZENSİZLİK YAPMAKTADIR.
13
Page 14
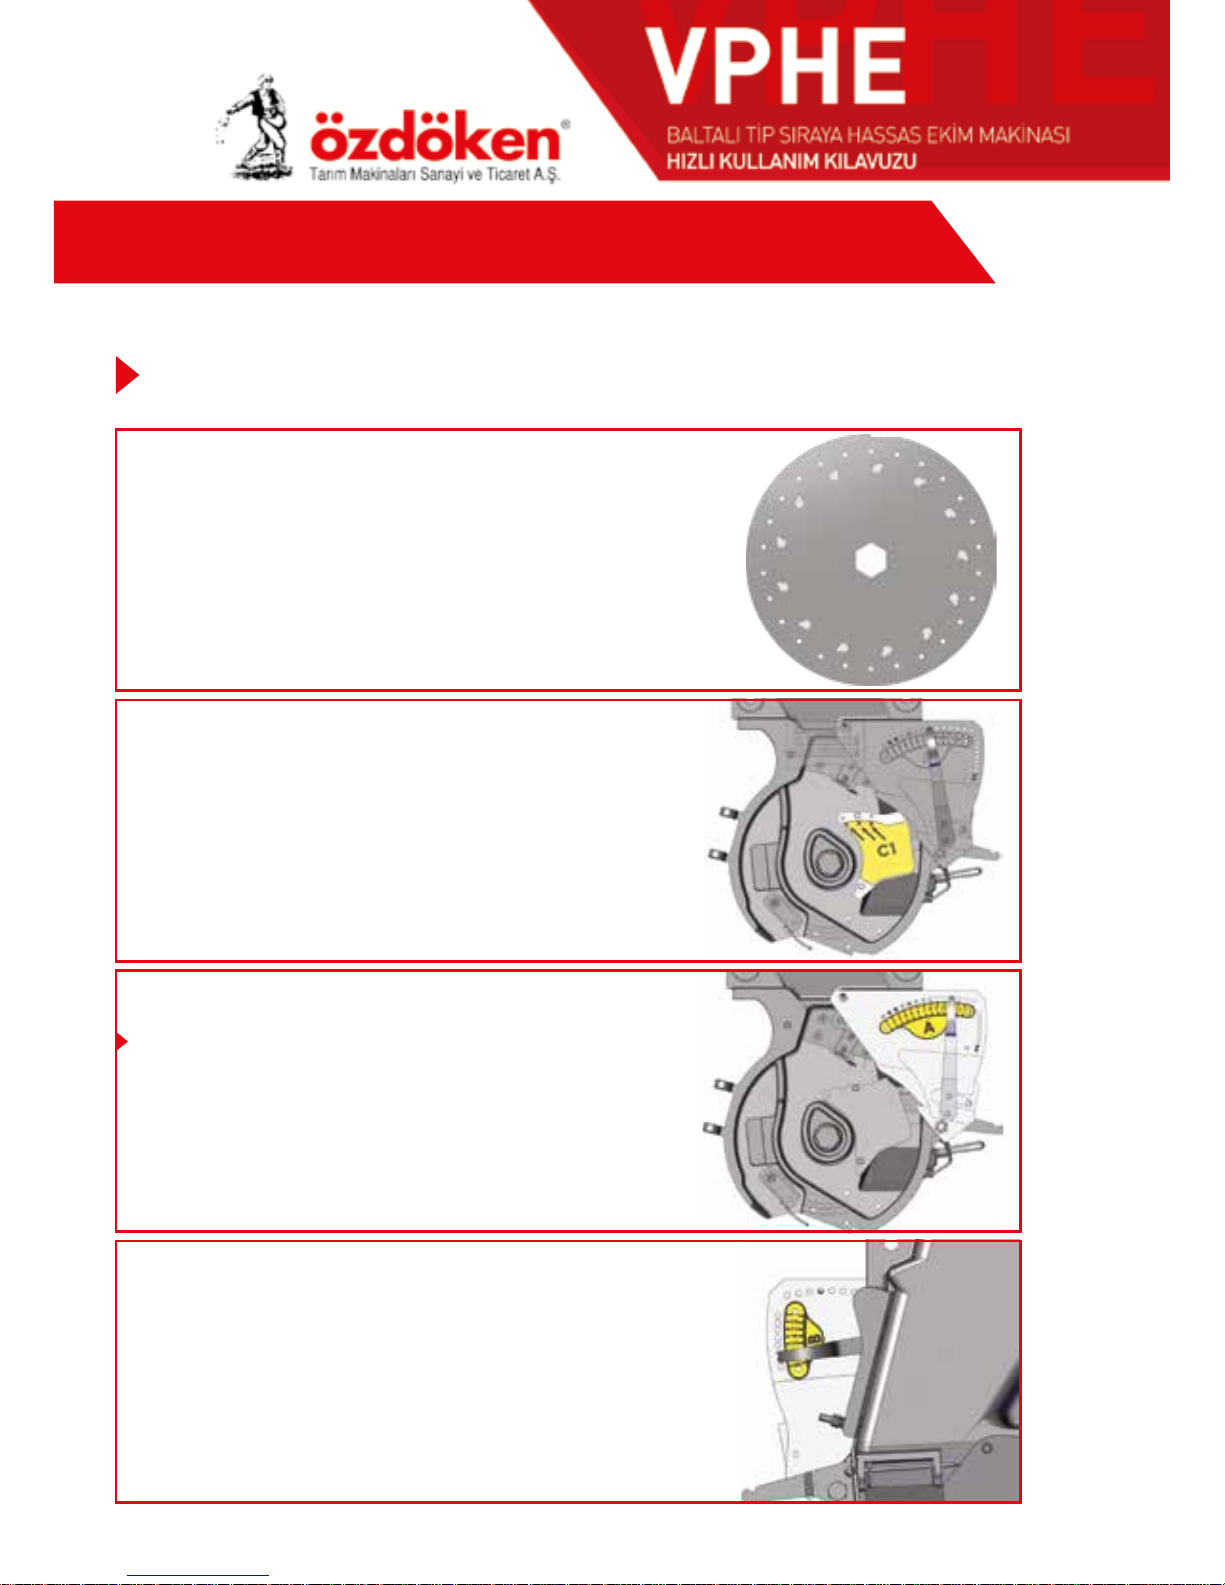
HIZLI AYAR TABLOSU
B SELEKTÖR
İç selektör kolu 7 nolu deliğe
takılacak.
SELEKTÖR (TOHUM TEKLEYİCİ) AYARI
A SELEKTÖR
Dış selektör kolu 12 nolu deliğe takılacak.
C1 kapağı 2 nolu deliğe takılacak.
TOHUM SEVİYE AYAR KAPAĞI
Fasülye tohumu ekeceğinizde makinenizi aşağıdaki değerlere ayarlamanızı tavsiye ederiz.
Baltalı Makina Fasülye Tohumu
Normal Boy (10 mm - 11 mm Boy)
EKİCİ DİSK
• Ø4,5 mm veya Ø5 mm Delikli
• Tırnaklı Karıştırıcılı
• Tercihen 26 Delikli Disk
14
Page 15
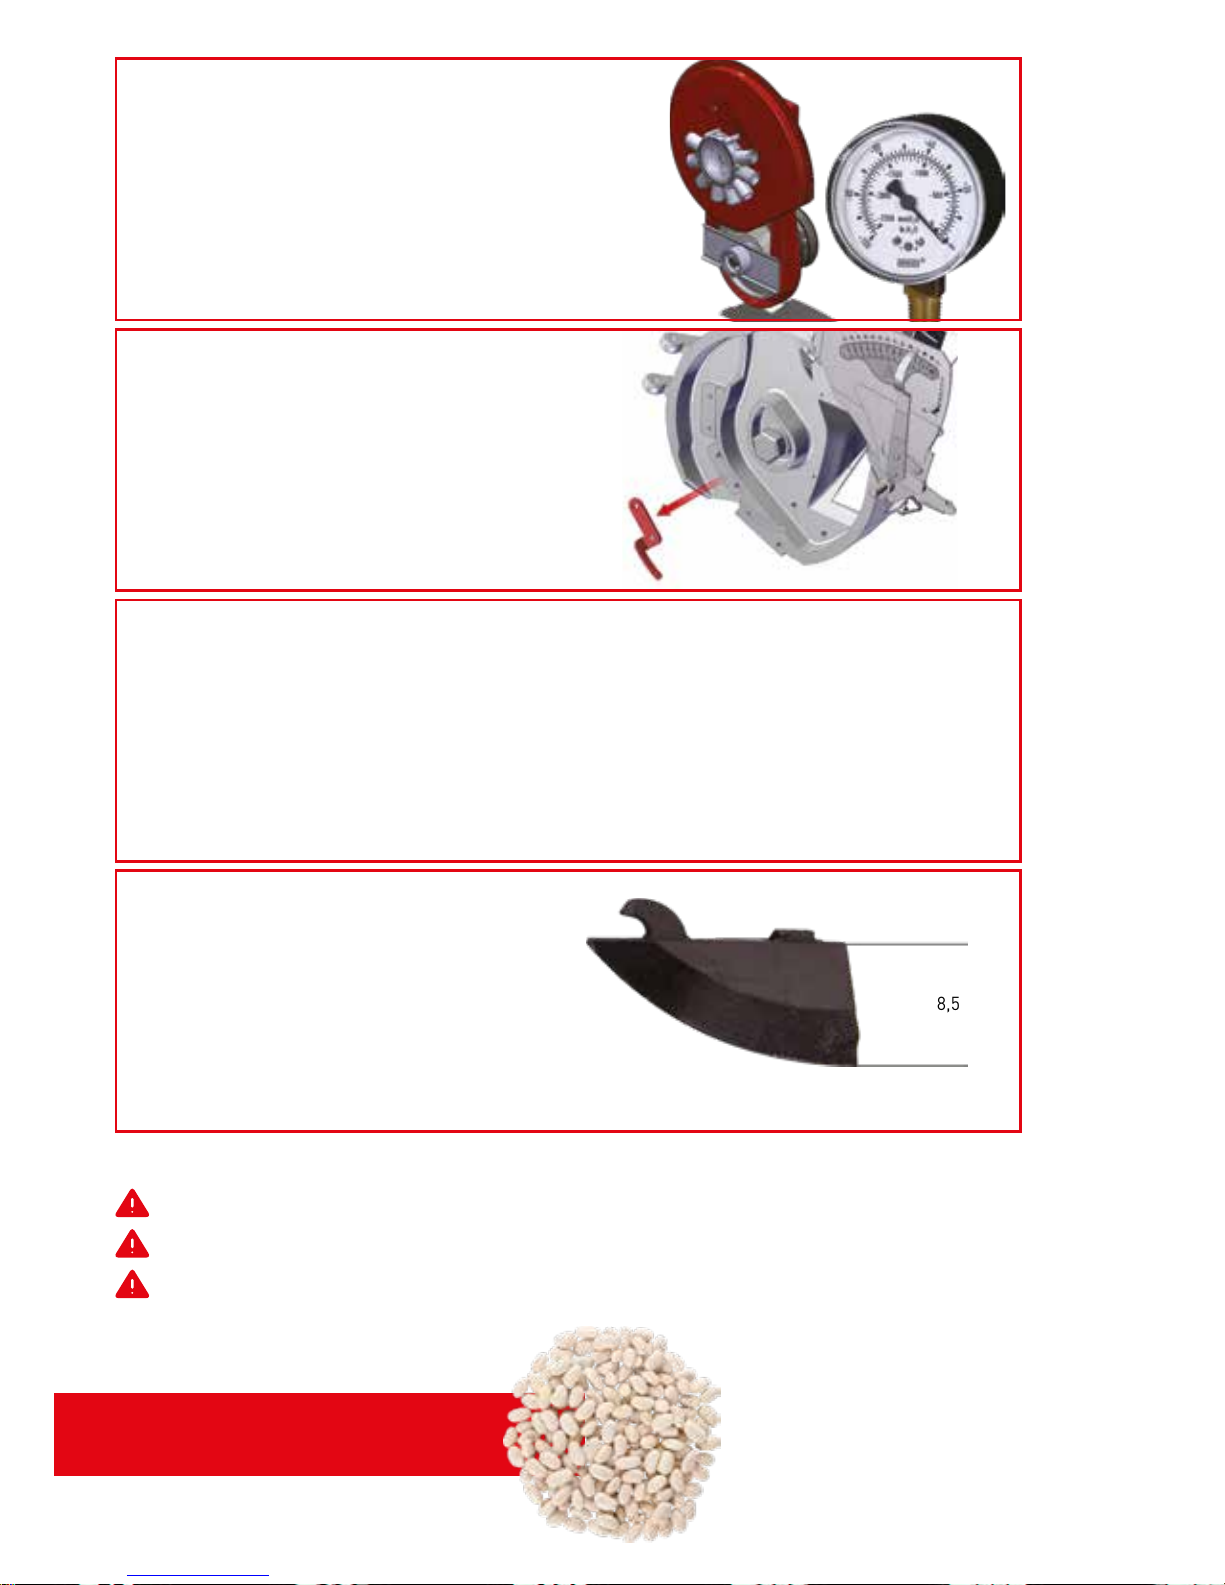
Yukarıda verilen değerler tohum yapısına göre değişkenlik gösterebilir.
Ayarları uyguladıktan sonra kesinlikle test ediniz.
Oluşabilecek hatalı ekimlerden kullanıcı sorumludur.
FAN (VAKUMETRE AYARI)
Fan vakumetre saati 45 - 50 barda
olmalıdır.
NOT: Daha büyük fasülyelerde 50-55 bar
olmalıdır.
TOHUM SIYIRICI
DİKKAT: SÖKÜNÜZ!!!
Bu ekipman kullanılmayacaktır.
Yandaki resimde gözüken ekipman
sökülü olmalıdır.
sökünüz
Fasülye Tohumu
DİKKAT EDİLECEK HUSUSLAR
1. EKİMİ YAPILACAK TOHUM KESİNLİKLE KURU OLMALIDIR.
2. NEMLİ VEYA ISLATILMIŞ TOHUMLA EKİM YAPILMAMALIDIR.
3. TOHUMUN İLAÇLANMASI AMACIYLA ISLATILMASI ÜZERİNDE NEMLİ BİR TABAKA
OLUŞTURDUĞU İÇİN, İLAÇ EKİCİ DİSKLERE YAPIŞMAKTA VE DELİKLERIN TIKANMASINA VE DİSKLERİN DÖNÜŞÜNE ENGEL OLMAKTADIR. BU DA EKİMDE TOHUM
MESAFESİ VE TOHUM ATIŞINDA DÜZENSİZLİK YAPMAKTADIR.
EKİM BALTASI
Fasülye ekimi için yüksek ekim
baltasını (8,5 cm) takınız.
8,5 cm
15
Page 16
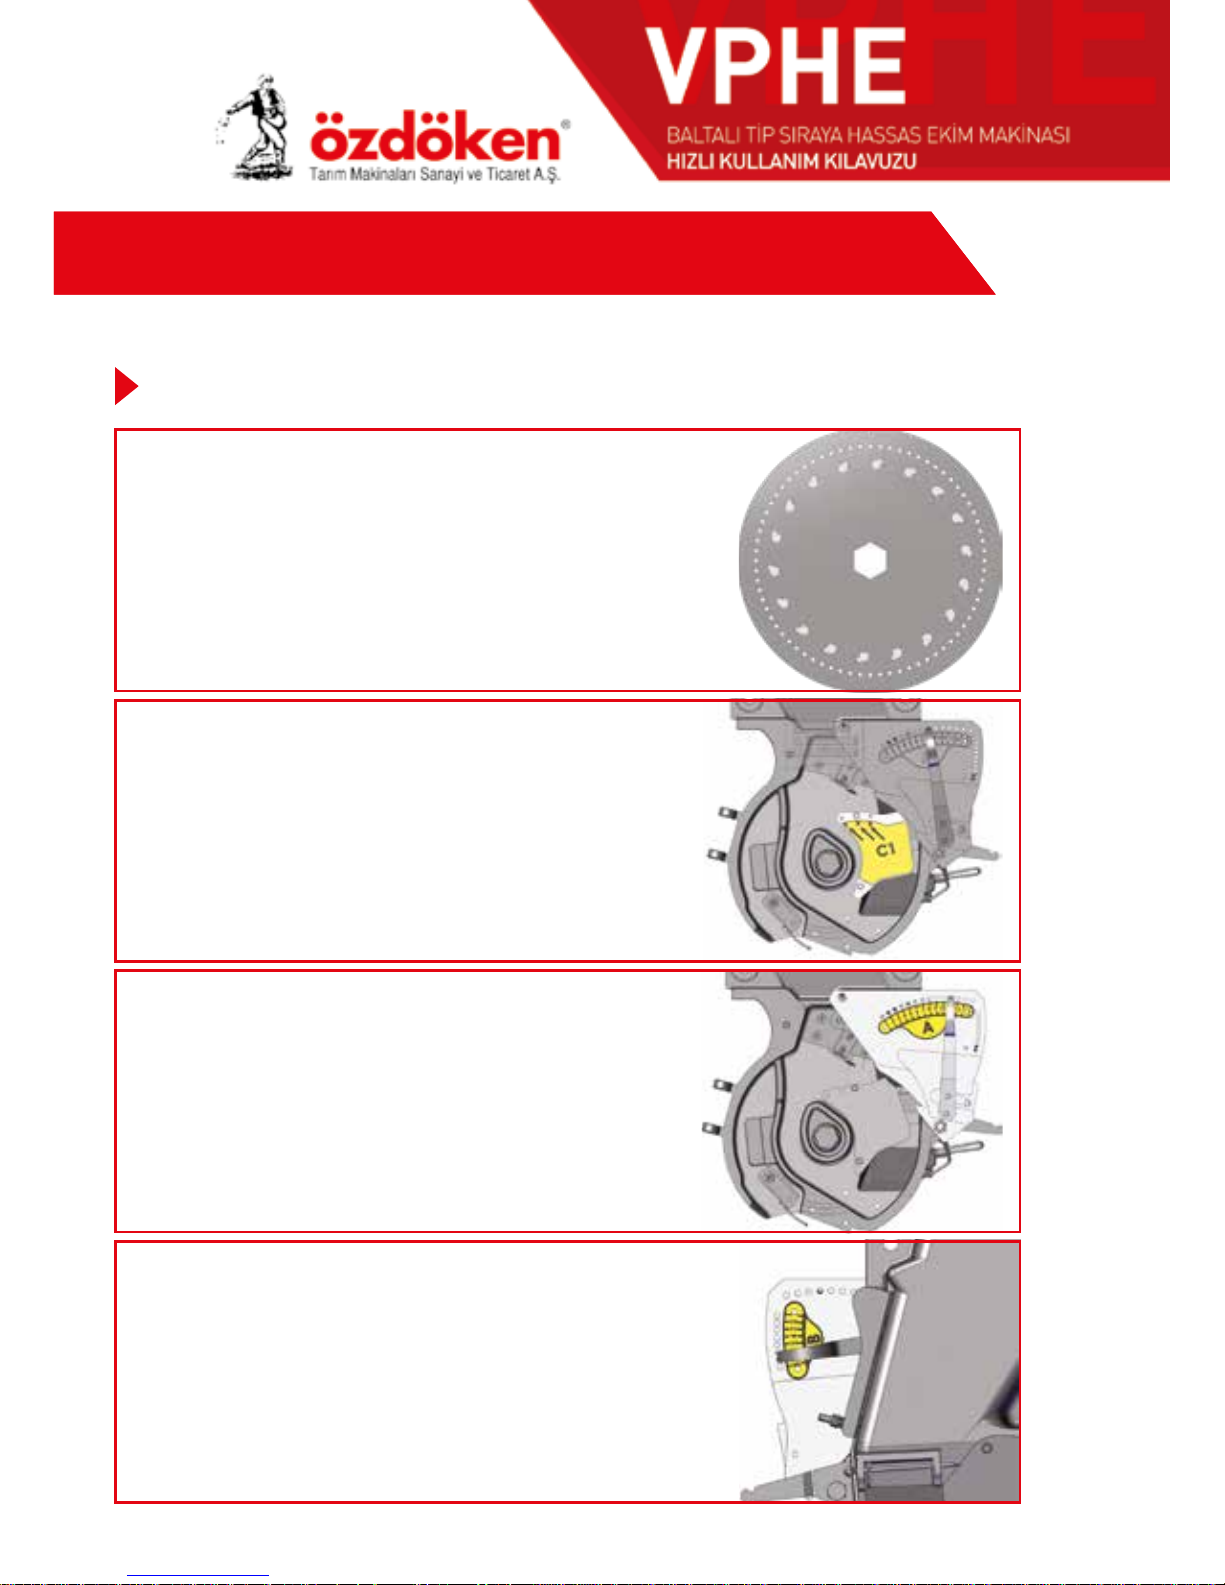
HIZLI AYAR TABLOSU
B SELEKTÖR
İç selektör kolu 4 veya 5 nolu
deliğe takılacak.
SELEKTÖR (TOHUM TEKLEYİCİ ) AYARI
A SELEKTÖR
Dış selektör kolu 10 veya 11 nolu deliğe
takılacak.
TOHUM İÇİ AYAR SEVİYE KAPAĞI
C1 kapağı 2 nolu deliğe takılacak.
EKİCİ DİSK
• Ø 3.5 mm delikli
• Tırnaklı karıştırıcılı
• Tercihen 72 delikli disk.
Pamuk tohumu ekeceğinizde makinenizi aşağıdaki değerlere ayarlamanızı tavsiye ederiz.
Baltalı Makina Pamuk Tohumu
16
Page 17
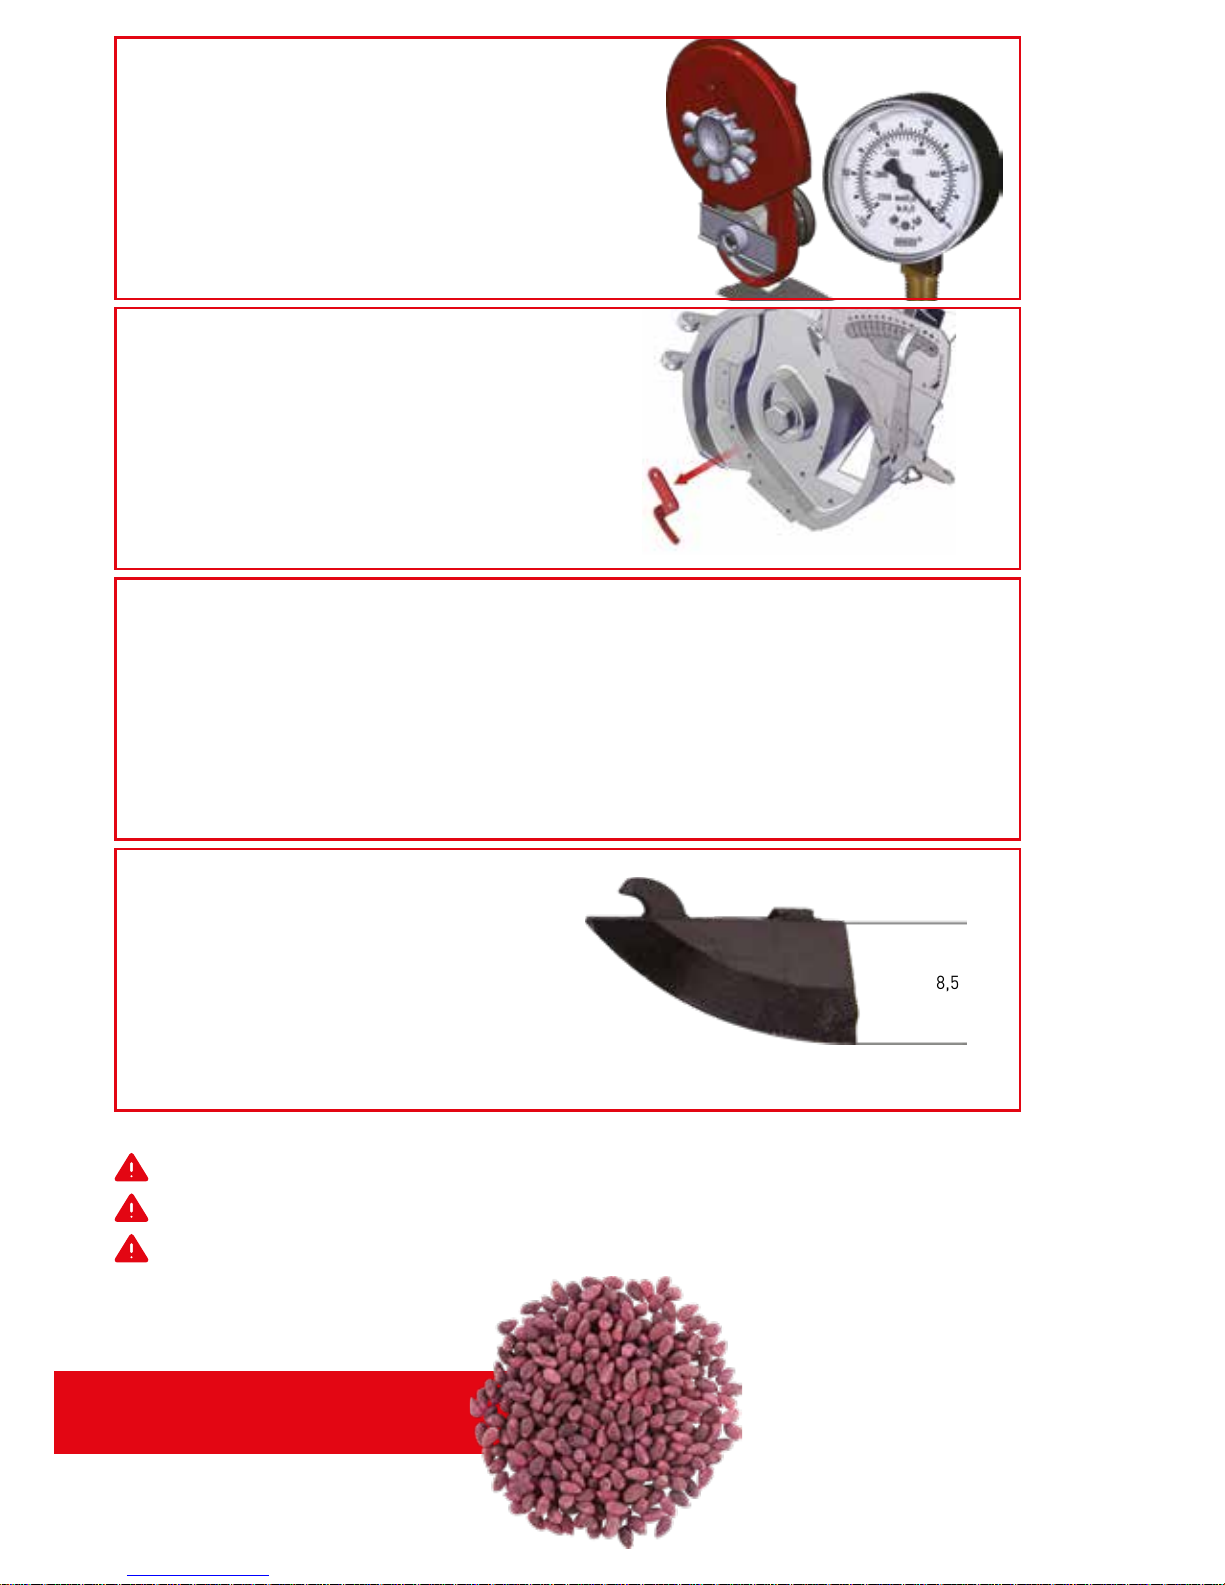
Yukarıda verilen değerler tohum yapısına göre değişkenlik gösterebilir.
Ayarları uyguladıktan sonra kesinlikle test ediniz.
Oluşabilecek hatalı ekimlerden kullanıcı sorumludur.
Pamuk Tohumu
FAN (VAKUMETRE AYARI)
Fan vakumetre saati 40 - 45
barda olmalıdır.
TOHUM SIYIRICI
DİKKAT: SÖKÜNÜZ!!!
Bu ekipman kullanılmayacaktır.
Yandaki resimde gözüken ekipman
sökülü olmalıdır.
sökünüz
EKİM BALTASI
Pamuk ekimi için yüksek ekim
baltasını (8,5 cm) takınız.
8,5 cm
DİKKAT EDİLECEK HUSUSLAR
1. EKİMİ YAPILACAK TOHUM KESİNLİKLE KURU OLMALIDIR.
2. NEMLİ VEYA ISLATILMIŞ TOHUMLA EKİM YAPILMAMALIDIR.
3. TOHUMUN İLAÇLANMASI AMACIYLA ISLATILMASI ÜZERİNDE NEMLİ BİR TABAKA
OLUŞTURDUĞU İÇİN, İLAÇ EKİCİ DİSKLERE YAPIŞMAKTA VE DELİKLERIN TIKANMASINA VE DİSKLERİN DÖNÜŞÜNE ENGEL OLMAKTADIR. BU DA EKİMDE TOHUM
MESAFESİ VE TOHUM ATIŞINDA DÜZENSİZLİK YAPMAKTADIR.
17
Page 18
Baltalı Makina Eğlencelik Ayçekirdeği Tohumu (BÜYÜK BOY)
(Kırıkkale, Erzurum, Çivril, Elbistan)
EKİCİ DİSK
• Ø 4 mm Delikli
• Özel İNCE Yuvarlak Karıştırıcılı
• Tercihen 13 Delikli Disk
SELEKTÖR (TOHUM TEKLEYİCİ) AYARI
A SELEKTÖR
Dış selektör kolu 12 veya 13 nolu deliğe
takılacak.
B SELEKTÖR
İç selektör kolu 8-9 nolu deliğe
takılacak.
B SELEKTÖR - SÖKÜNÜZ !!!
İç selektör üzerinde yer alan standart selektör
sacı sökülecek. Yerine bu tohum için özel
yapılmış selektör sacı takılacaktır. Bu selektör
sacı ile karıştırıcı tırnakları İNCE olan ekim diski
kullanılmalıdır. Diğer ekim disklerinizde kesinlikle
kullanmayınız. Makinenize zarar verir.
TOHUM İÇİ AYAR SEVİYE KAPAĞI
• C1 Kapak sökülecek.
• Sadece C3 Kapağı Takılacak.
HIZLI AYAR TABLOSU
Ayçekirdeği tohumu ekeceğinizde makinenizi aşağıdaki değerlere ayarlamanızı tavsiye ederiz.
18
Page 19
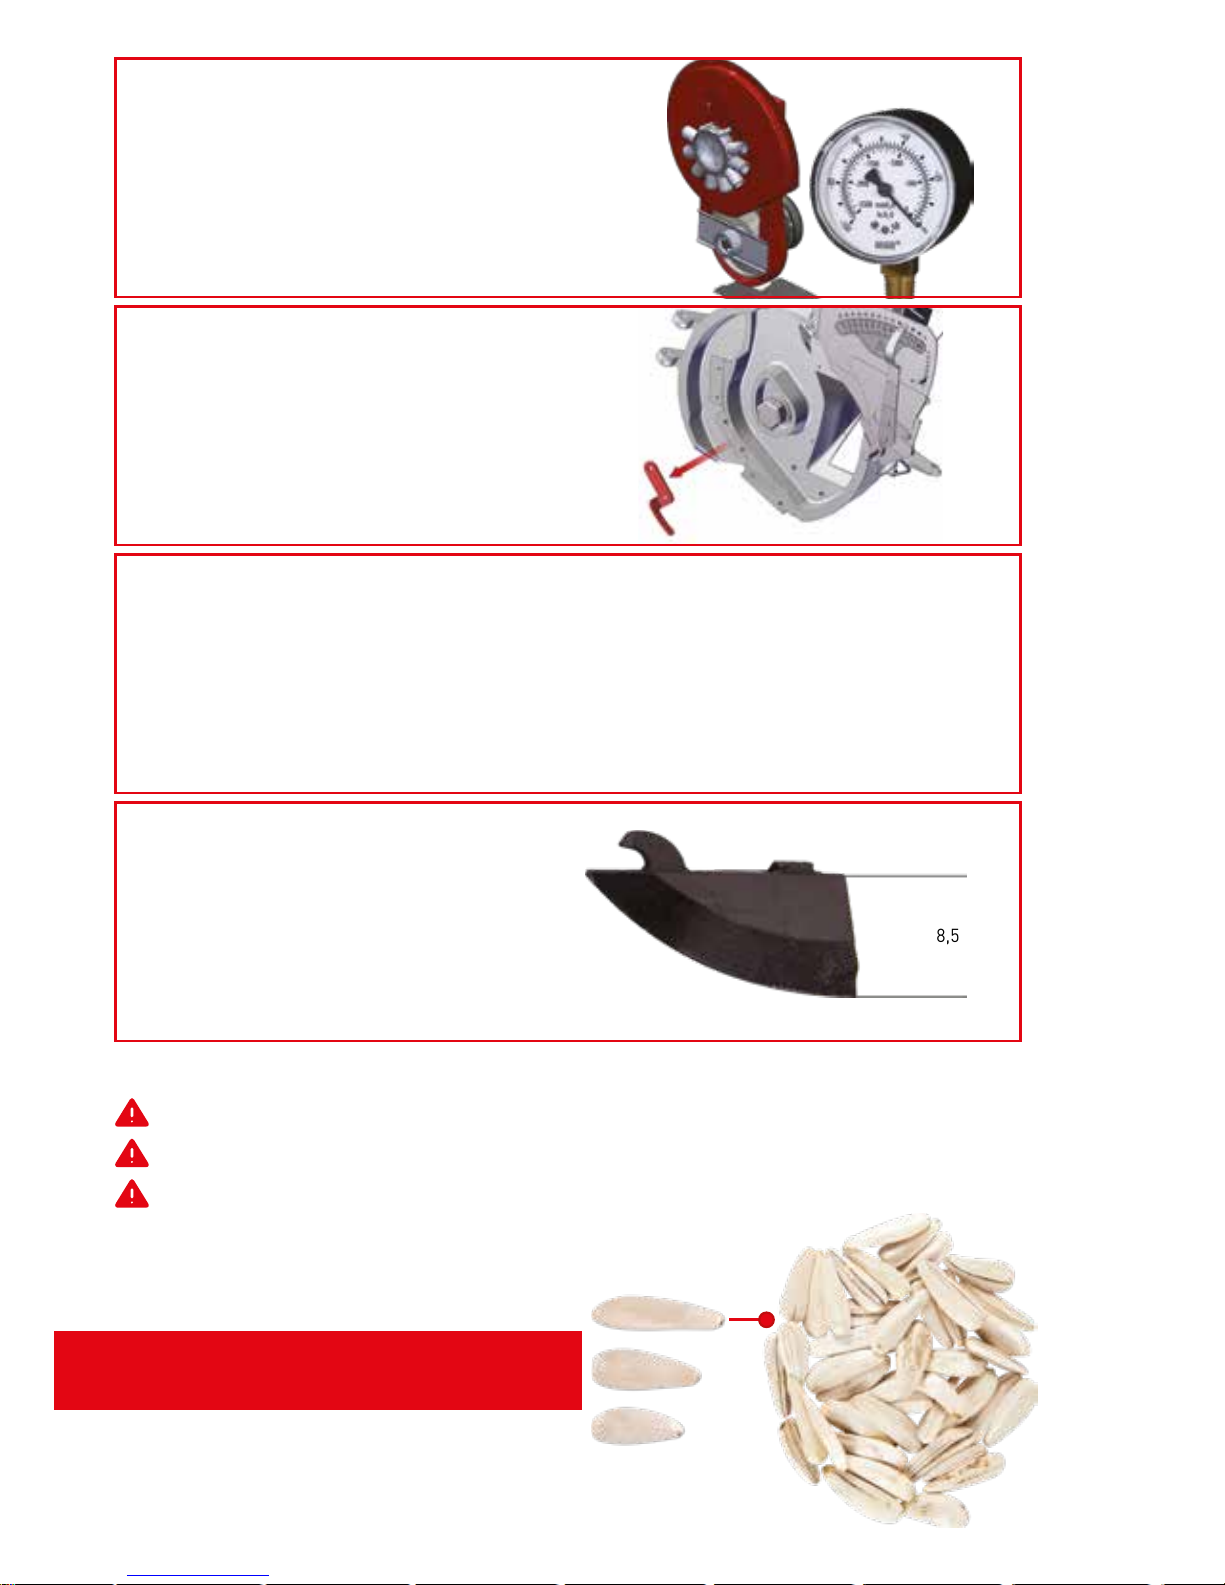
Eğlencelik Ayçekirdeği Tohumu
En Büyük Boy
Yukarıda verilen değerler tohum yapısına göre değişkenlik gösterebilir.
Ayarları uyguladıktan sonra kesinlikle test ediniz.
Oluşabilecek hatalı ekimlerden kullanıcı sorumludur.
EKİM BALTASI
Ayçekirdeği ekimi için yüksek ekim
baltasını (8,5 cm) takınız.
8,5 cm
FAN (VAKUMETRE AYARI)
Fan vakumetre saati 60 - 65 barda
olmalıdır.
TOHUM SIYIRICI
DİKKAT: SÖKÜNÜZ!!!
Bu ekipman kullanılmayacaktır.
Yandaki resimde gözüken ekipman
sökülü olmalıdır.
sökünüz
DİKKAT EDİLECEK HUSUSLAR
1. EKİMİ YAPILACAK TOHUM KESİNLİKLE KURU OLMALIDIR.
2. NEMLİ VEYA ISLATILMIŞ TOHUMLA EKİM YAPILMAMALIDIR.
NOT: BU TOHUMLARI EKERKEN MAKİNEDE TOHUM ATIŞ SENSÖRÜNÜN OLMASI
TAVSİYE EDİLİR. BU SENSÖR HER ÜNİTEYİ KONTROL EDİP TOHUM ATIP ATMADIĞINI
KULLANICIYA GÖSTERİR. BU ALET MAKİNEYE İSTEK ÜZERİNE TAKILAN OPSİYONEL BİR
ALETTİR.
19
Page 20
Baltalı Makina Eğlencelik Ayçekirdeği Tohumu
ORTA BOY
SELEKTÖR (TOHUM TEKLEYİCİ) AYARI
A SELEKTÖR
Dış selektör kolu 12 veya 13 nolu deliğe
takılacak.
B SELEKTÖR
İç selektör kolu 8-9 nolu deliğe
takılacak.
B SELEKTÖR - SÖKÜNÜZ !!!
İç selektör üzerinde yer alan standart selektör
sacı sökülecek. Yerine bu tohum için özel
yapılmış selektör sacı takılacaktır. Bu selektör
sacı ile karıştırıcı tırnakları İNCE olan ekim diski
kullanılmalıdır. Diğer ekim disklerinizde kesinlikle
kullanmayınız. Makinenize zarar verir.
TOHUM İÇİ AYAR SEVİYE KAPAĞI
• C1 Kapak sökülecek.
• Sadece C2 Kapağı Takılacak.
EKİCİ DİSK
• Ø 3,5 mm Delikli
• Özel İNCE Yuvarlak Karıştırıcılı
• Tercihen 13 Delikli Disk
HIZLI AYAR TABLOSU
Ayçekirdeği tohumu ekeceğinizde makinenizi aşağıdaki değerlere ayarlamanızı tavsiye ederiz.
20
Page 21
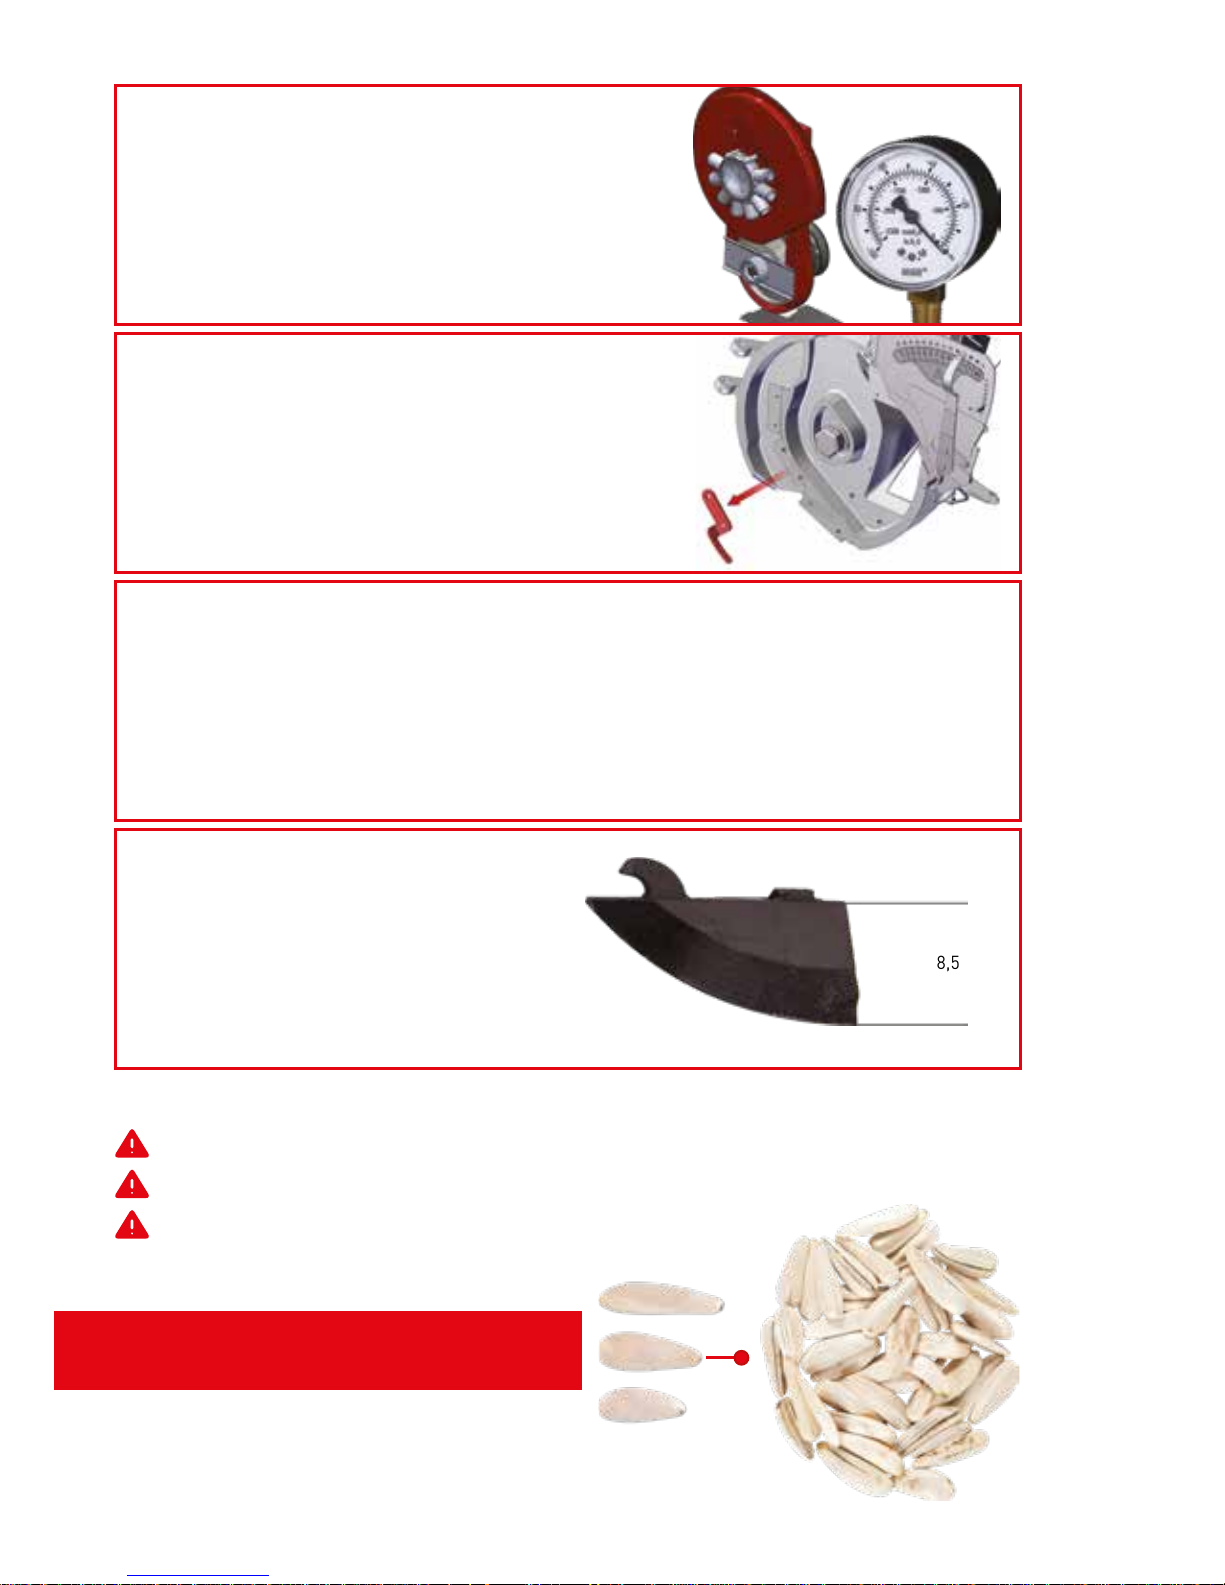
Eğlencelik Ayçekirdeği Tohumu
Orta Boy
EKİM BALTASI
Ayçekirdeği ekimi için yüksek ekim
baltasını (8,5 cm) takınız.
8,5 cm
FAN (VAKUMETRE AYARI)
Fan vakumetre saati 55 - 60 barda
olmalıdır.
TOHUM SIYIRICI
DİKKAT: SÖKÜNÜZ!!!
Bu ekipman kullanılmayacaktır.
Yandaki resimde gözüken ekipman
sökülü olmalıdır.
sökünüz
DİKKAT EDİLECEK HUSUSLAR
1. EKİMİ YAPILACAK TOHUM KESİNLİKLE KURU OLMALIDIR.
2. NEMLİ VEYA ISLATILMIŞ TOHUMLA EKİM YAPILMAMALIDIR.
NOT: BU TOHUMLARI EKERKEN MAKİNEDE TOHUM ATIŞ SENSÖRÜNÜN OLMASI
TAVSİYE EDİLİR. BU SENSÖR HER ÜNİTEYİ KONTROL EDİP TOHUM ATIP ATMADIĞINI
KULLANICIYA GÖSTERİR. BU ALET MAKİNEYE İSTEK ÜZERİNE TAKILAN OPSİYONEL BİR
ALETTİR.
Yukarıda verilen değerler tohum yapısına göre değişkenlik gösterebilir.
Ayarları uyguladıktan sonra kesinlikle test ediniz.
Oluşabilecek hatalı ekimlerden kullanıcı sorumludur.
21
Page 22
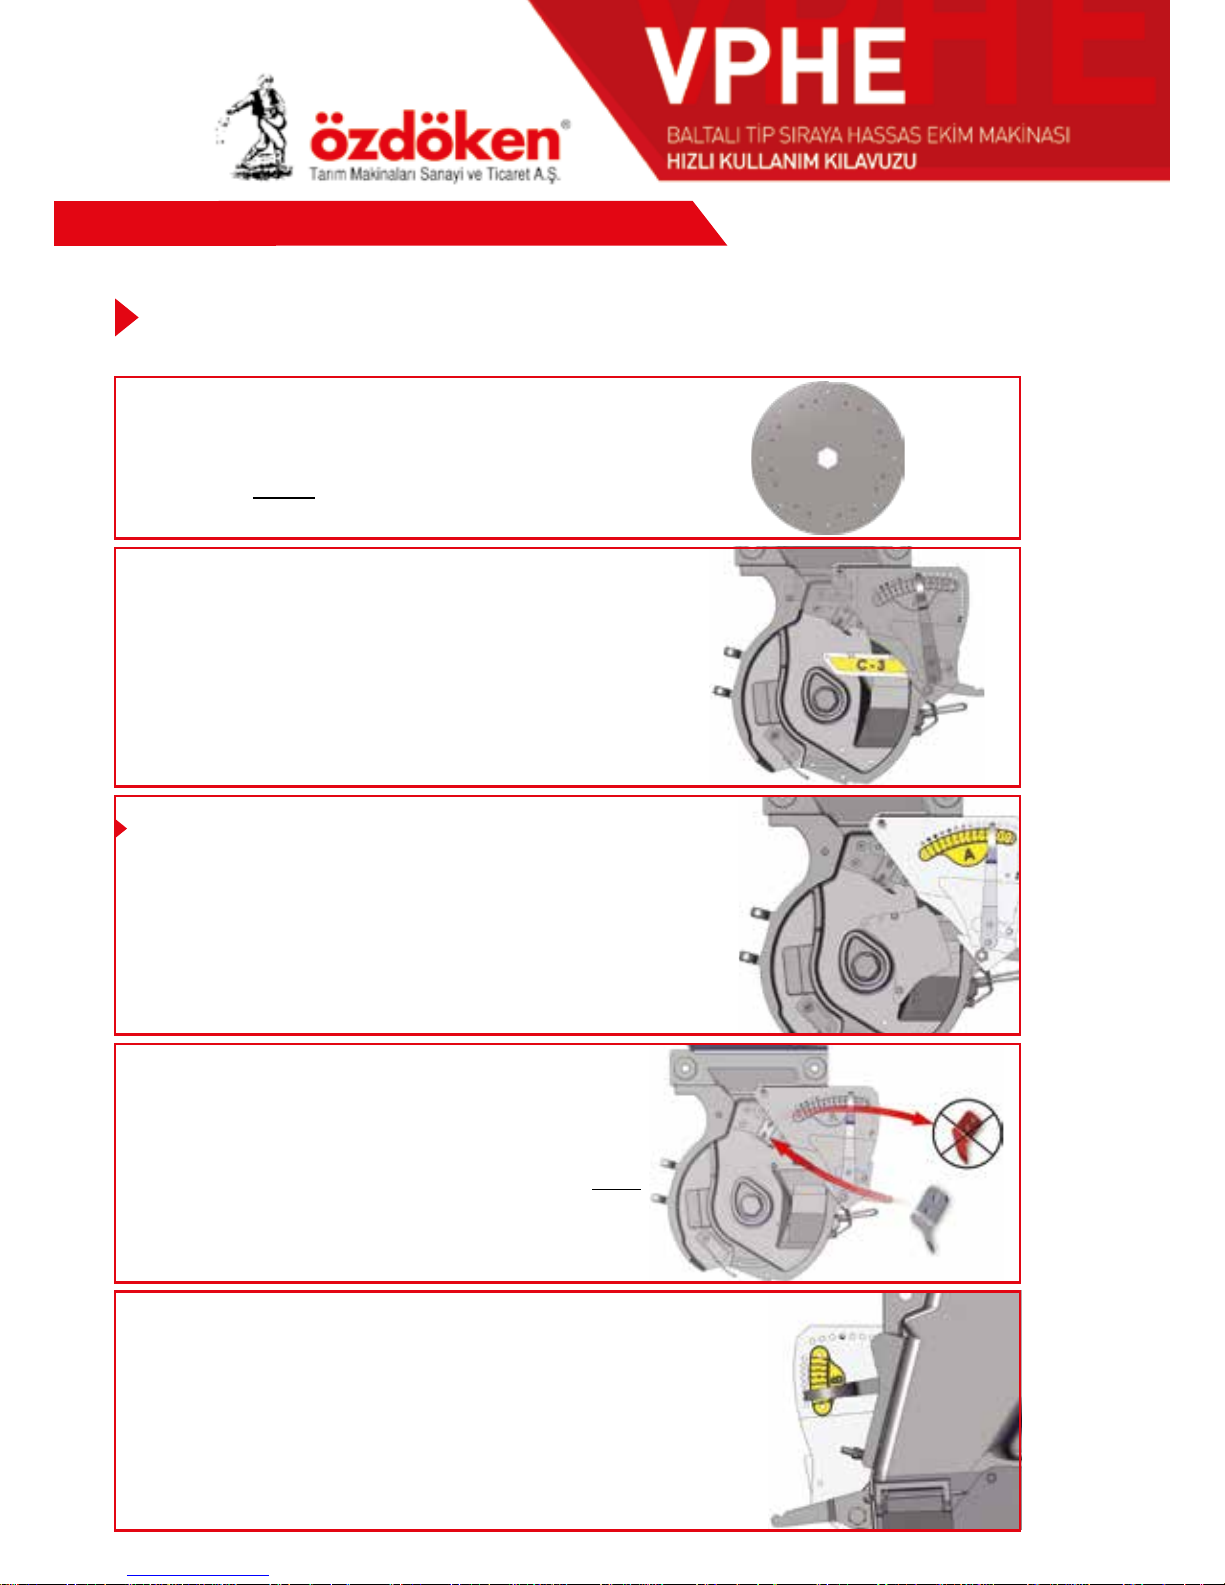
Baltalı Makina Kabak Tohumu
SELEKTÖR (TOHUM TEKLEYİCİ) AYARI
A SELEKTÖR
Dış selektör kolu 12 veya 13 nolu deliğe
takılacak.
B SELEKTÖR
İç selektör kolu 8-9 nolu deliğe
takılacak
B SELEKTÖR - SÖKÜNÜZ !!!
İç selektör üzerinde yer alan standart selektör sacı
sökülecek. Yerine bu tohum için özel yapılmış selektör sacı
takılacaktır. Bu selektör sacı ile karıştırıcı tırnakları İNCE
olan ekim diski kullanılmalıdır. Diğer ekim disklerinizde
kesinlikle kullanmayınız. Makinenize zarar verir.
TOHUM İÇİ AYAR SEVİYE KAPAĞI
• C1 Kapak sökülecek.
• Sadece C3 Kapağı Takılacak.
EKİCİ DİSK
• Ø 3,5 veya Ø 4 mm Delikli
• Özel 16 İNCE Yuvarlak Karıştırıcılı
• Tercihen 8 Delikli Disk
HIZLI AYAR TABLOSU
Kabak tohumu ekeceğinizde makinenizi aşağıdaki değerlere ayarlamanızı tavsiye ederiz.
22
Page 23
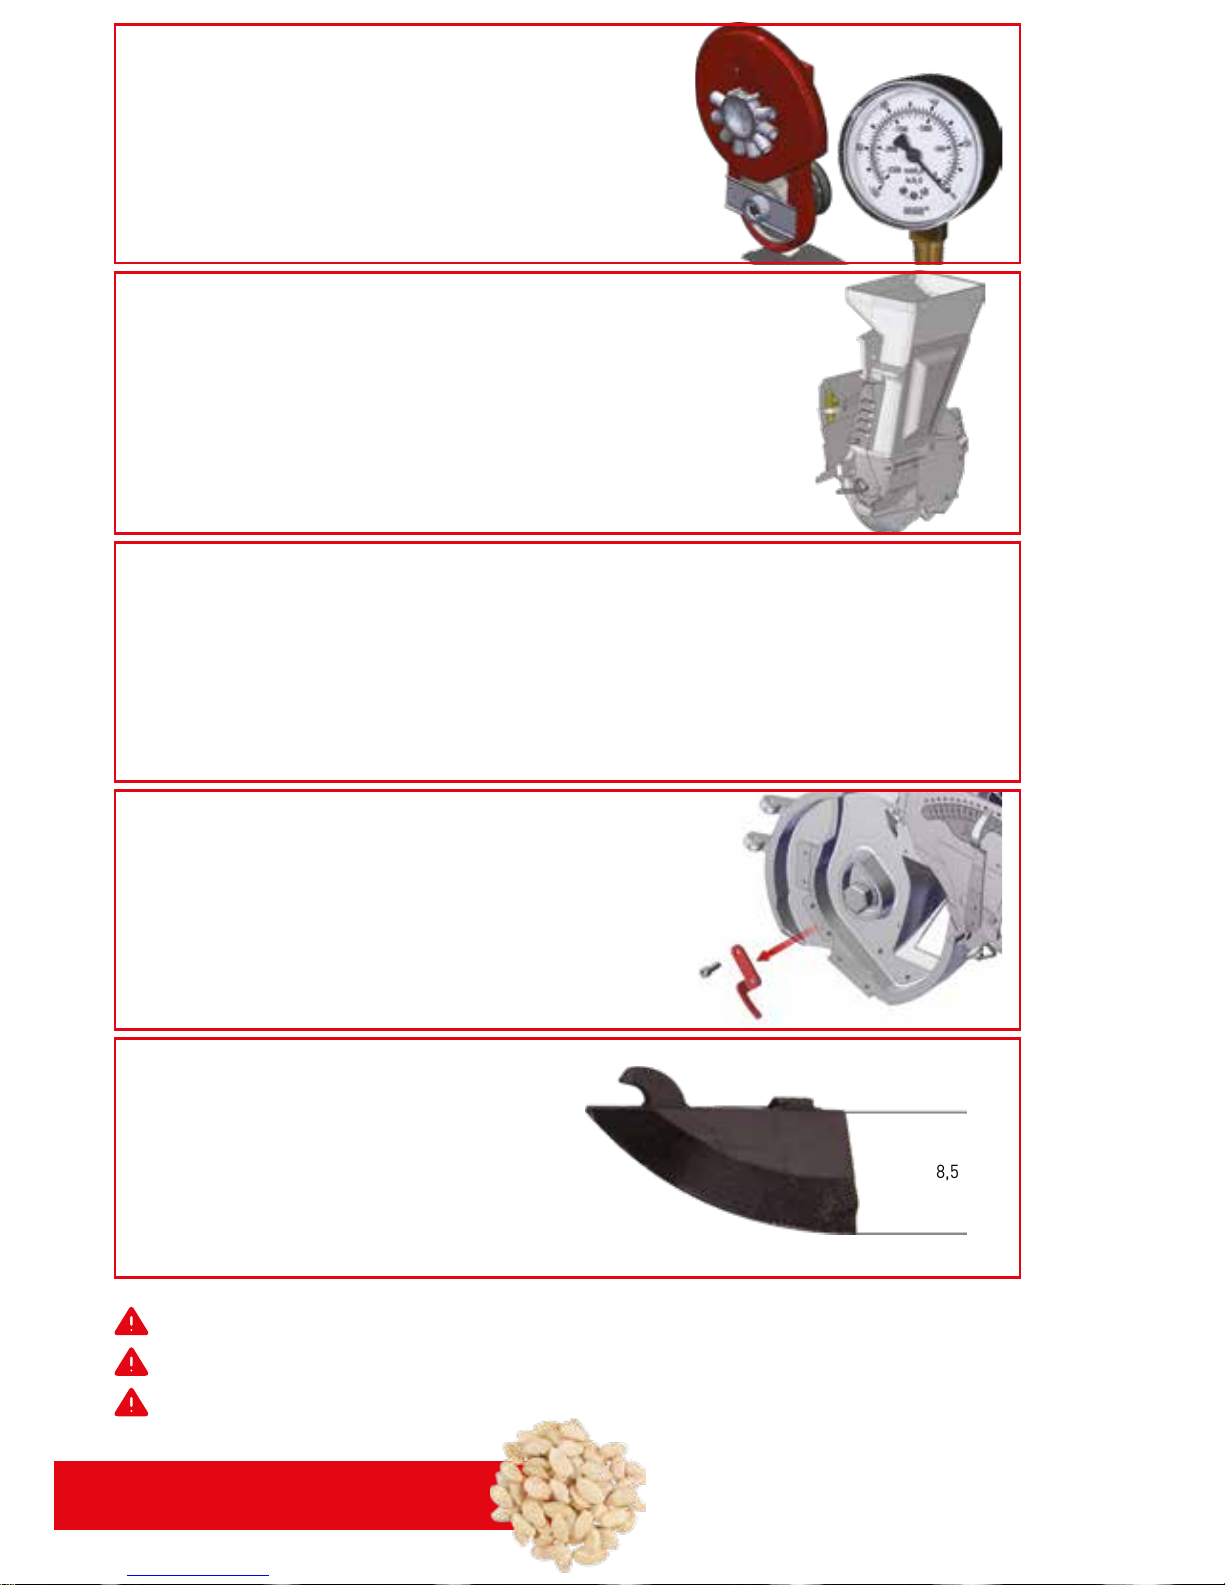
Kabak Tohumu
Yukarıda verilen değerler tohum yapısına göre değişkenlik gösterebilir.
Ayarları uyguladıktan sonra kesinlikle test ediniz.
Oluşabilecek hatalı ekimlerden kullanıcı sorumludur.
FAN (VAKUMETRE AYARI)
Fan vakumetre saati 60 - 65
barda olmalıdır.
ALÜMİNYUM TOHUM EKİCİ GÖVDE
DİKKAT
KABAK EKİMİNDE TOHUM AKIŞININ DAHA RAHAT
OLABİLMESİ İÇİN ALÜMİNYUM GÖVDE YAN DUVARI AÇIK
OLMASI TAVSİYE EDİLMEKTEDİR. MAKİNE SİPARİŞLERİNDE ÜNİTESİ BU ŞEKİLDE İSTENMESİ TAVSİYE EDİLİR.
DİKKAT EDİLECEK HUSUSLAR
1. EKİMİ YAPILACAK KABAK TOHUMU KESİNLİKLE KURU OLMALIDIR.
2. NEMLİ VEYA ISLATILMIŞ TOHUMLA EKİM YAPILMAMALIDIR.
3. KABAK TOHUMU ÇOCUK PİŞİK PUDRASI İLE KARIŞTIRILIP EKİM YAPILMASI TAVSİYE EDİLİR. BU ŞEKİLDE TOHUM
AKIŞKANLIĞI DAHA RAHAT OLUR
4. TOHUM HAZNESİ YAN DUVARI KAPALI ALÜMİNYUM EKİCİ İSE EN FAZLA 1 LT VEYA 2 LT; YAN DUVARI AÇIK
ALÜMİNYUM EKİCİ İSE EN FAZLA 4 LT VEYA 6 LT KABAK TOHUM KONMALIDIR.
NOT: BU TOHUMLARI EKERKEN MAKİNEDE TOHUM ATIŞ SENSÖRÜNÜN OLMASI TAVSİYE EDİLİR. BU SENSÖR HER
ÜNİTEYİ KONTROL EDİP TOHUM ATIP ATMADIĞINI KULLANICIYA GÖSTERİR. BU MAKİNEYE İSTEK ÜZERİNE TAKILAN
OPSİYONEL BİR ALETTİR.
EKİM BALTASI
Kabak ekimi için yüksek ekim
baltasını (8,5 cm) takınız.
8,5 cm
TOHUM SIYIRICI
DİKKAT: SÖKÜNÜZ!!!
Bu ekipman kullanılmayacaktır. Yandaki
resimde gözüken ekipman sökülü olmalıdır.
sökünüz
23
Page 24
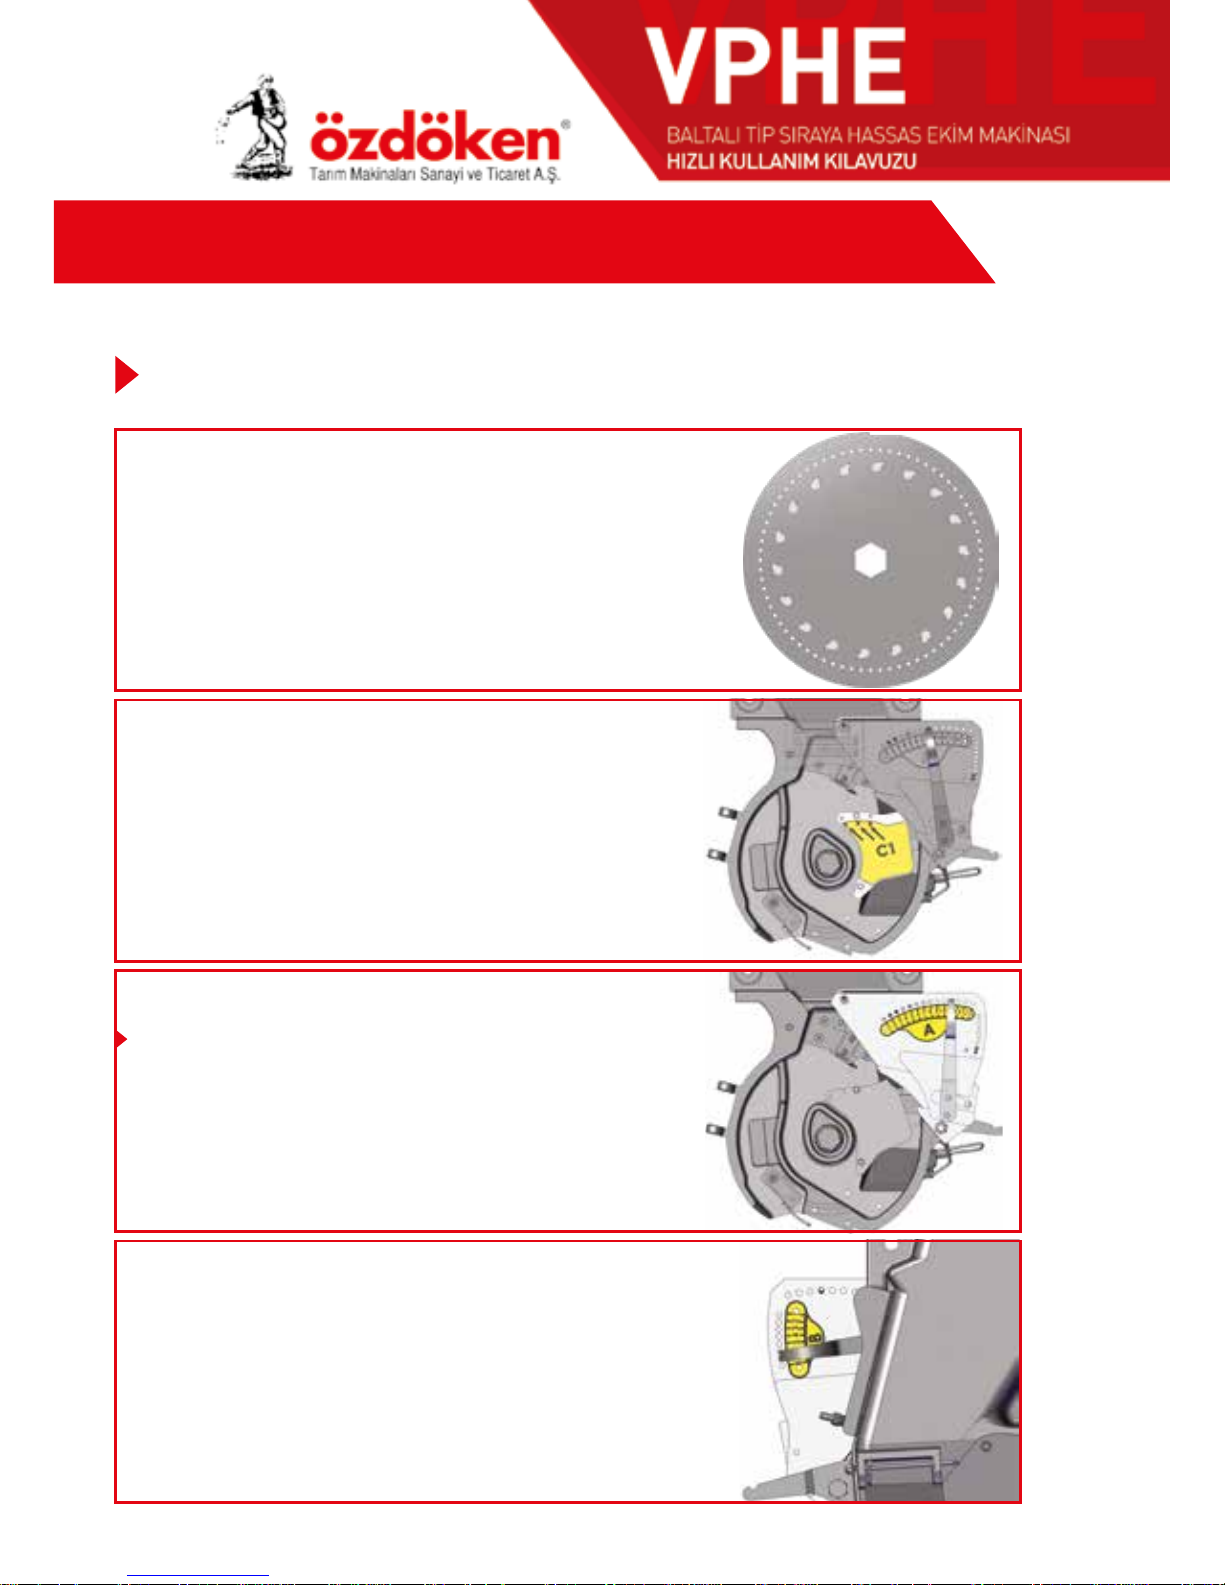
HIZLI AYAR TABLOSU
TOHUM İÇİ AYAR SEVİYE KAPAĞI
C1 kapağı 2 nolu deliğe takılacak.
NOT: Tohum büyüklüğüne göre 3 nolu
deliğe de takılabilir.
EKİCİ DİSK
• Ø 3.5 mm delikli
• Tırnaklı karıştırıcılı
• Tercihen 72 delikli disk.
Baltalı Makina Soya Fasülyesi
SELEKTÖR (TOHUM TEKLEYİCİ) AYARI
A SELEKTÖR
Dış selektör kolu 10 veya 11 nolu
deliğe takılacak.
B SELEKTÖR
İç selektör kolu 4 veya 5 nolu
deliğe takılacak.
Soya fasülyesi tohumu ekeceğinizde makinenizi aşağıdaki değerlere ayarlamanızı tavsiye ederiz.
24
Page 25
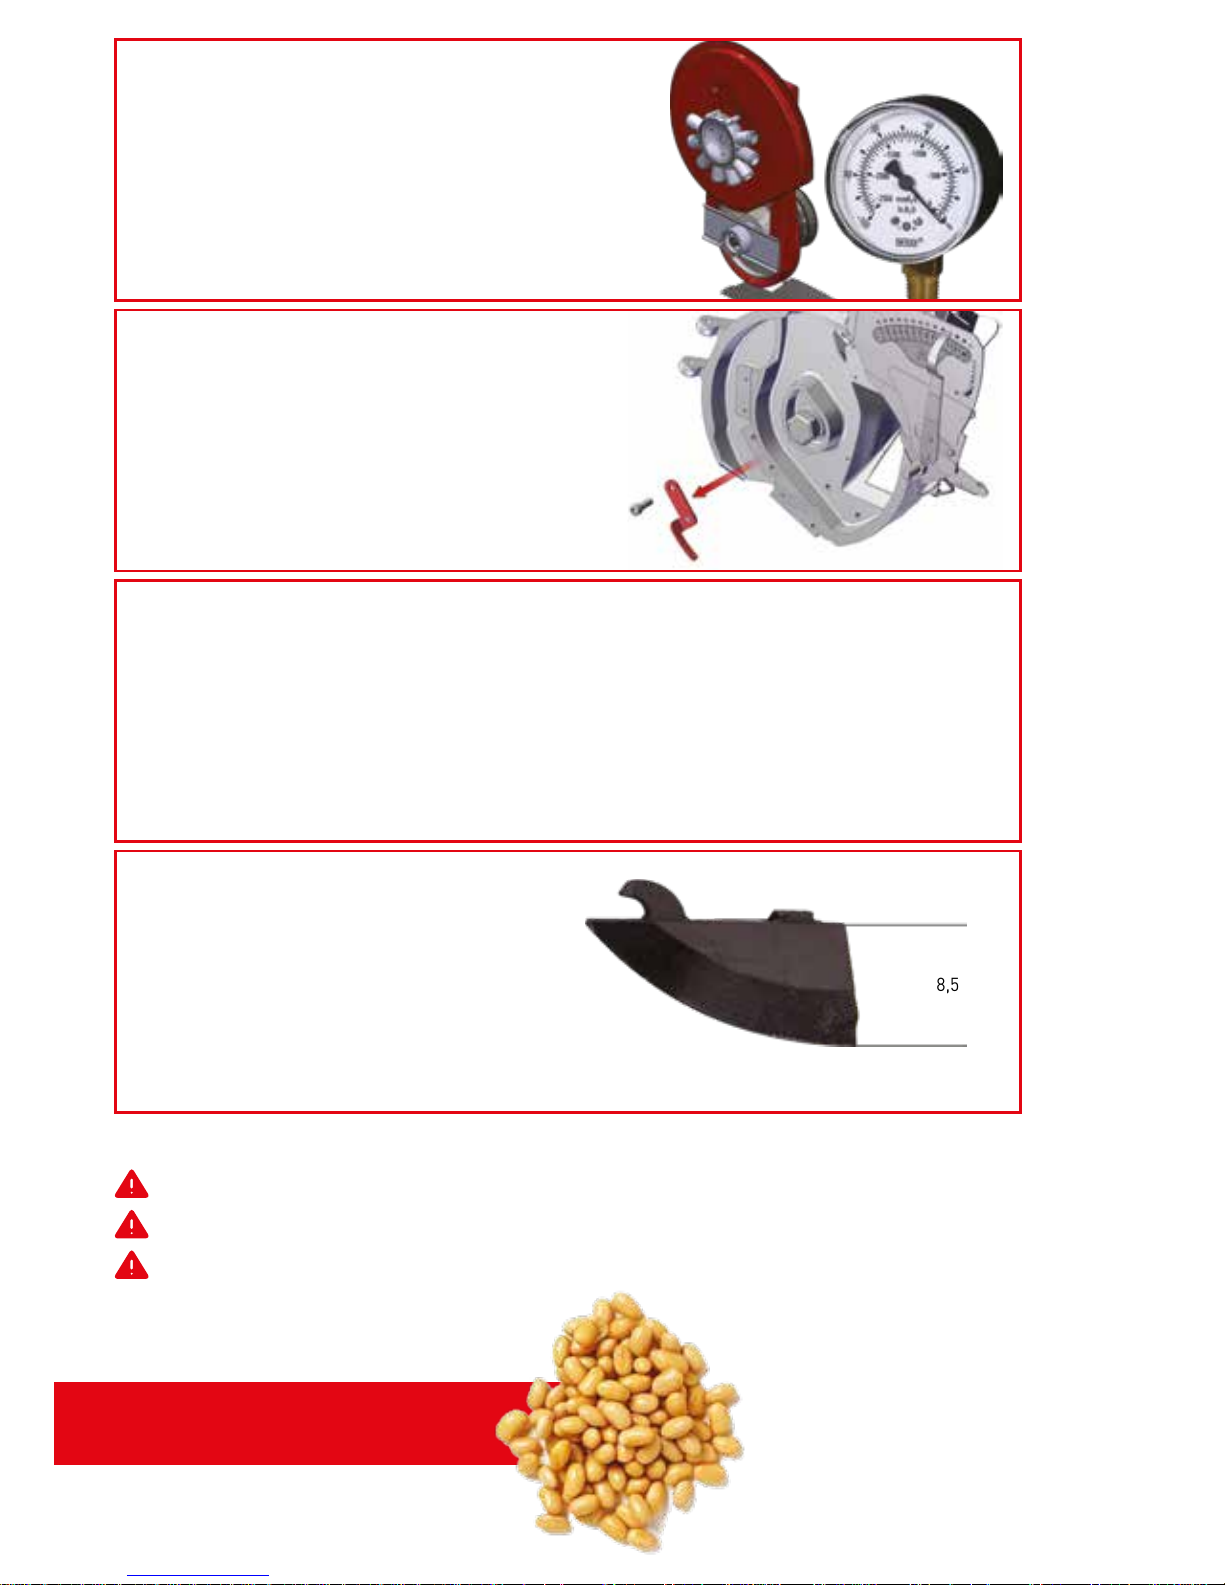
FAN (VAKUMETRE AYARI)
Fan vakumetre saati 45-50 barda
olmalıdır.
EKİM BALTASI
Soya ekimi için yüksek ekim
baltasını (8,5 cm) takınız.
8,5 cm
TOHUM SIYIRICI
DİKKAT: SÖKÜNÜZ!!!
Bu ekipman kullanılmayacaktır.
Yandaki resimde gözüken ekipman
sökülü olmalıdır.
sökünüz
DİKKAT EDİLECEK HUSUSLAR
1. EKİMİ YAPILACAK TOHUM KESİNLİKLE KURU OLMALIDIR.
2. NEMLİ VEYA ISLATILMIŞ TOHUMLA EKİM YAPILMAMALIDIR.
3. TOHUMUN İLAÇLANMASI AMACIYLA ISLATILMASI ÜZERİNDE NEMLİ BİR
TABAKA OLUŞTURDUĞU İÇİN, İLAÇ EKİCİ DİSKLERE YAPIŞMAKTA VE DELİKLERİN
TIKANMASINA VE DİSKLERİN DÖNÜŞÜNE ENGEL OLMAKTADIR. BU DA EKİMDE
TOHUM MESAFESİ VE TOHUM ATIŞINDA DÜZENSİZLİK YAPMAKTADIR.
Soya Tohumu
Yukarıda verilen değerler tohum yapısına göre değişkenlik gösterebilir.
Ayarları uyguladıktan sonra kesinlikle test ediniz.
Oluşabilecek hatalı ekimlerden kullanıcı sorumludur.
25
Page 26
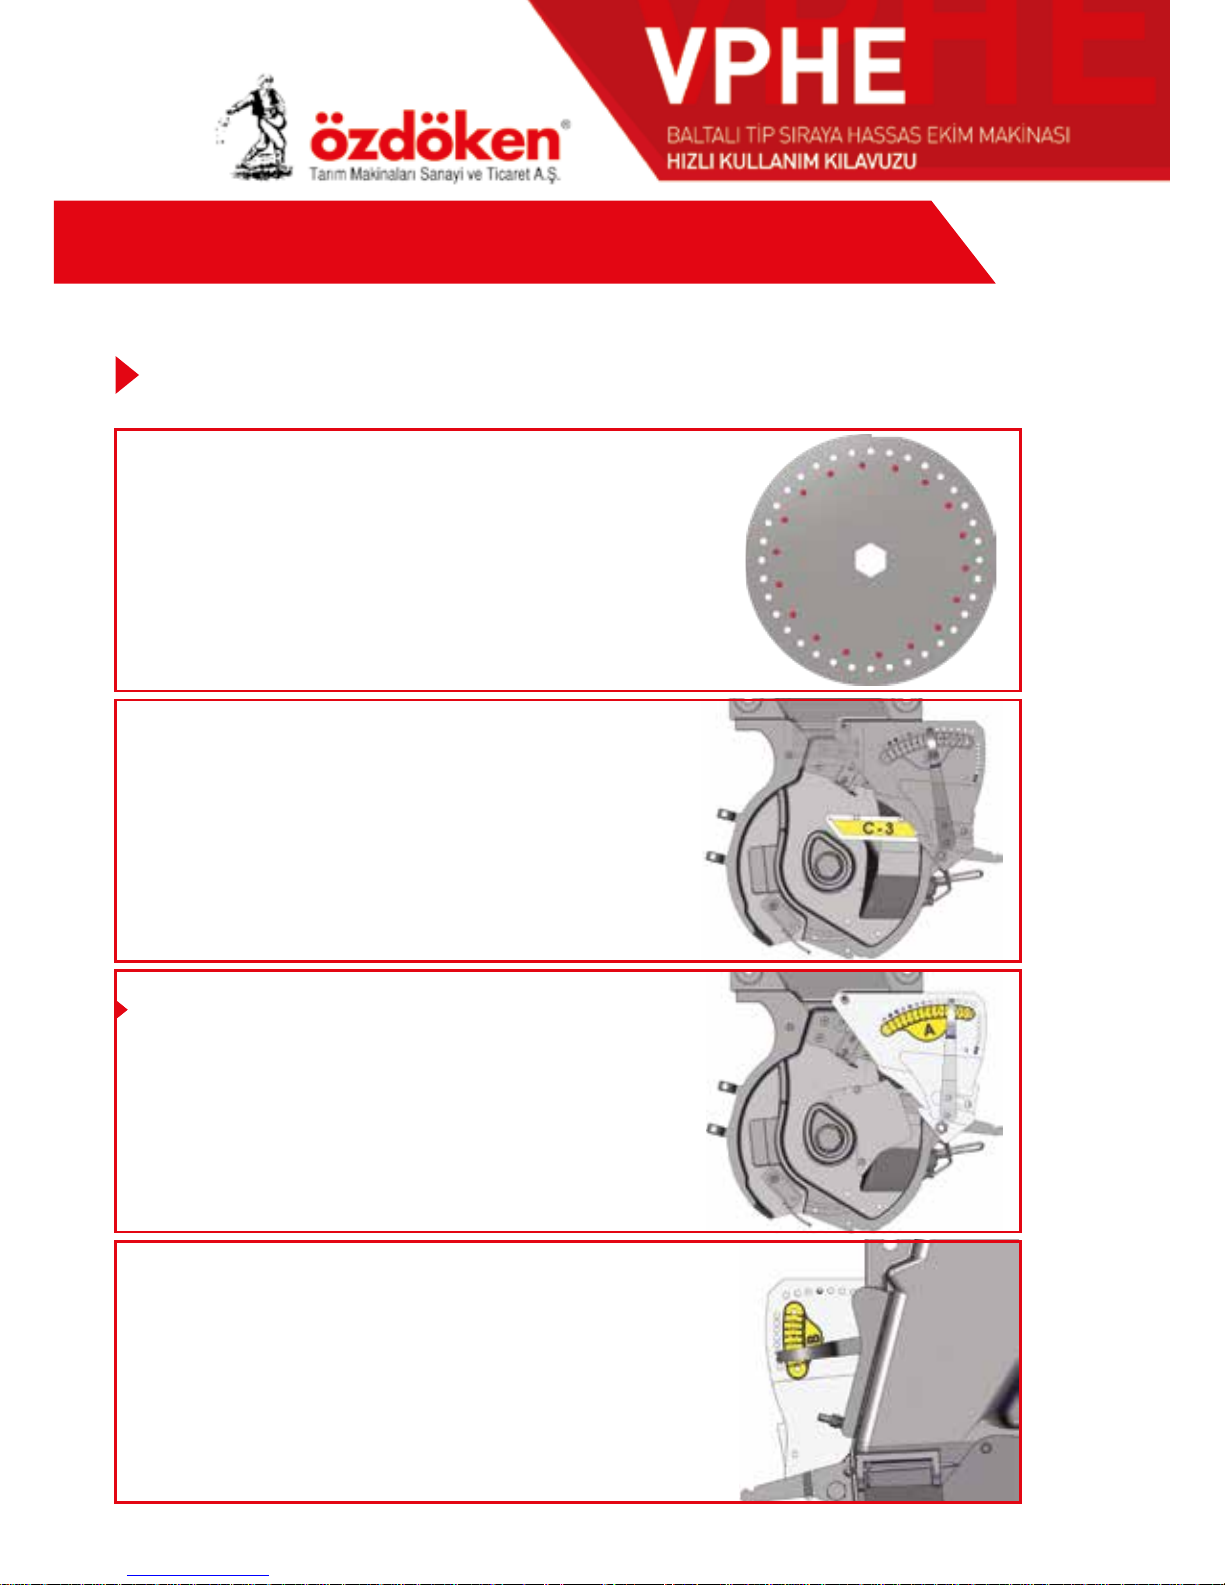
HIZLI AYAR TABLOSU
EKİCİ DİSK
• Ø 6.5 mm delikli
• Yuvarlak karıştırıcılı
• Tercihen 36 delikli disk.
Nohut Tohumu (büyük) ekeceğinizde makinenizi aşağıdaki değerlere ayarlamanızı tavsiye ederiz.
Baltalı Makina Nohut Tohumu
Büyük Taneli (9-10-11 mm Tohum Büyüklüğü)
TOHUM İÇİ AYAR SEVİYE KAPAĞI
C1 Kapak sökülecek. Sadece C-3 Kapağı Takılacak.
Not: 1. Tohum haznesinde taşacak kadar fazla
tohum olmamalıdır.
2. Makine bu kapaklar sökük kesinlikle
kullanılmamalıdır. Aksi takdirde tohum haznede
sıkışır ve tohum diski karıştırıcı tırnaklarını bozar.
SELEKTÖR (TOHUM TEKLEYİCİ) AYARI
A SELEKTÖR
Dış selektör kolu 14 nolu deliğe takılacak.
B SELEKTÖR
İç selektör kolu 9 nolu deliğe
takılacak.
26
Page 27
Yukarıda verilen değerler tohum yapısına göre değişkenlik gösterebilir.
Ayarları uyguladıktan sonra kesinlikle test ediniz.
Oluşabilecek hatalı ekimlerden kullanıcı sorumludur.
Nohut Tohumu Büyük
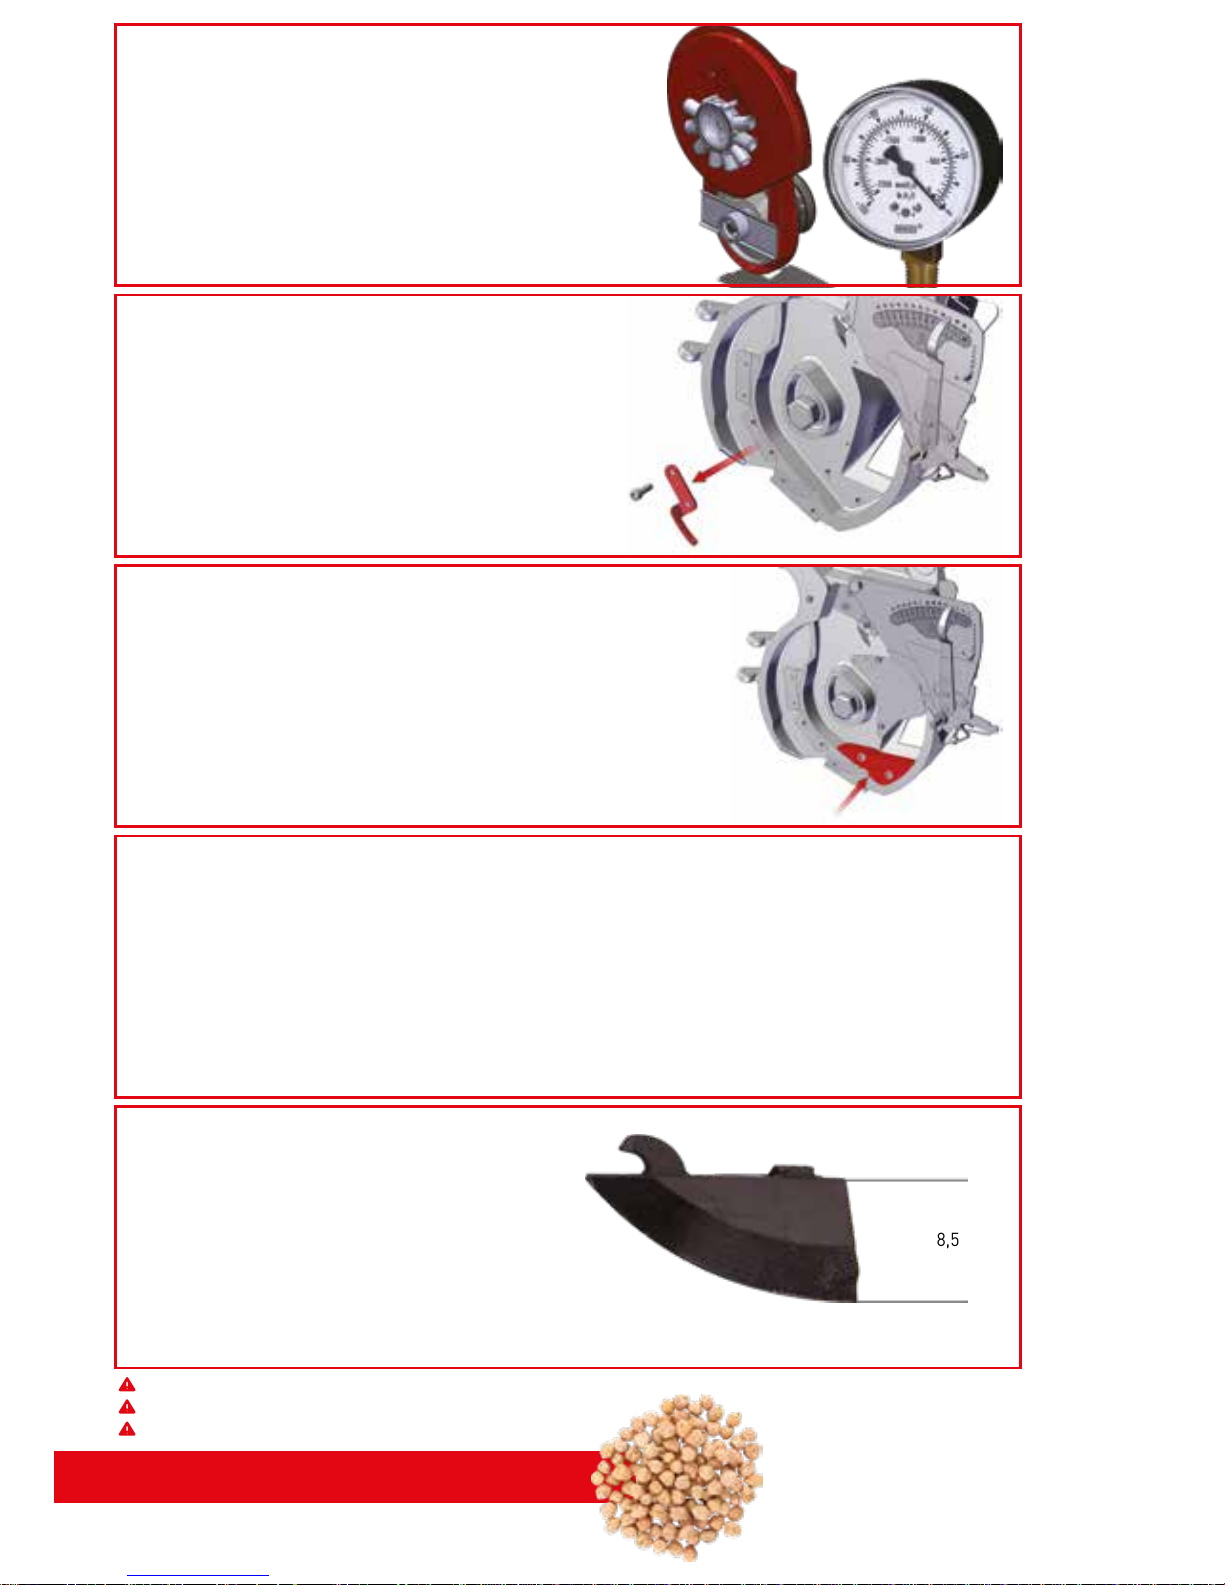
FAN (VAKUMETRE AYARI)
Fan vakumetre saati 60 barda
olmalıdır.
sökünüz
TOHUM SIYIRICI
DİKKAT: SÖKÜNÜZ!!!
Bu ekipman kullanılmayacaktır.
Yandaki resimde gözüken ekipman
sökülü olmalıdır.
EKİM BALTASI
Nohut ekimi için yüksek ekim
baltasını (8,5 cm) takınız.
8,5 cm
DİKKAT EDİLECEK HUSUSLAR
1. EKİMİ YAPILACAK TOHUM KESİNLİKLE KURU OLMALIDIR.
2. NEMLİ VEYA ISLATILMIŞ TOHUMLA EKİM YAPILMAMALIDIR.
3. TOHUMUN İLAÇLANMASI AMACIYLA ISLATILMASI ÜZERİNDE NEMLİ BİR TABAKA
OLUŞTURDUĞU İÇİN, İLAÇ EKİCİ DİSKLERE YAPIŞMAKTA VE DELİKLERİN TIKANMASINA VE DİSKLERİN DÖNÜŞÜNE ENGEL OLMAKTADIR. BU DA EKİMDE TOHUM
MESAFESİ VE TOHUM ATIŞINDA DÜZENSİZLİK YAPMAKTADIR.
NOHUT ve FISTIK KORUYUCU PLASTİK
Alt tohum koruyucu plastik KESİNLİKLE takılı olmalıdır.
Aksi takdirde tohum disklerinin karıştırıcı tırnaklarını
bozar.
Not: Bu plastik takılırken alüminyum gövde üzerinde
bulunan başlıksız 2,5 allen civatalar sökülecek bu plastiğin
civataları ondan sonra sıkılacaktır.
takılacak
27
Page 28
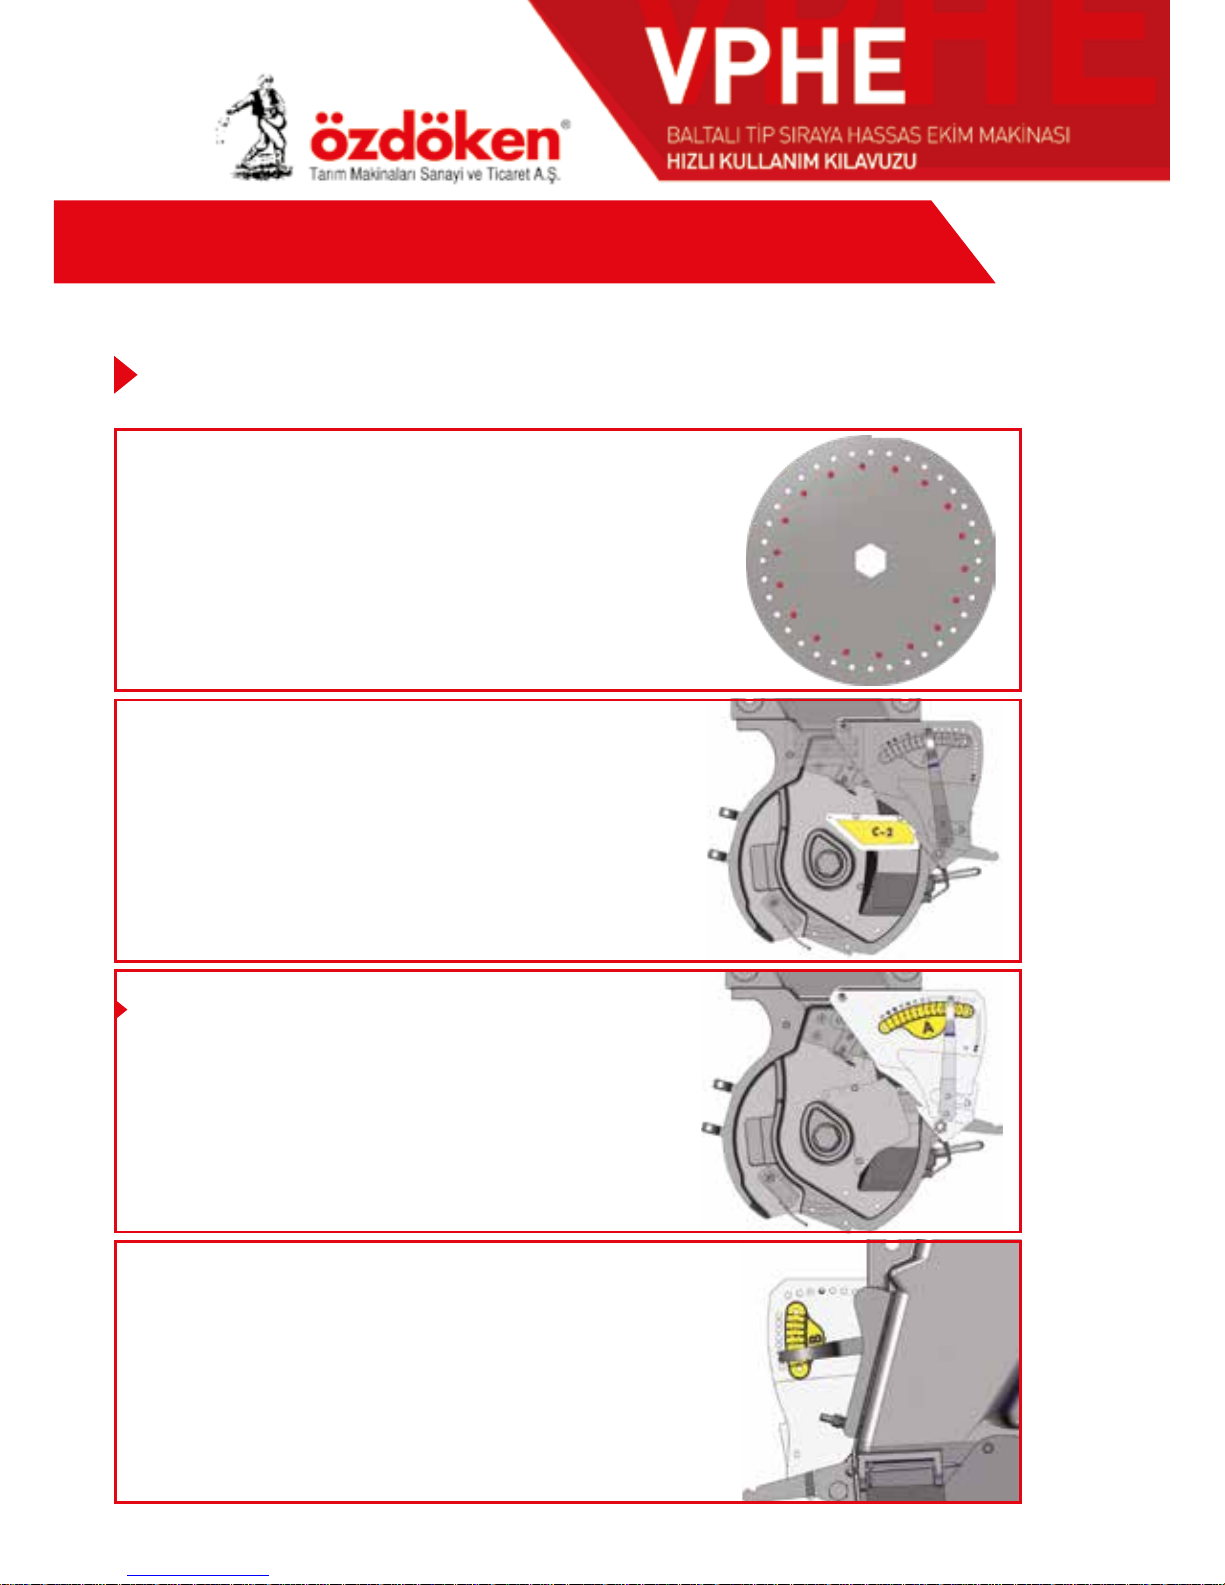
HIZLI AYAR TABLOSU
EKİCİ DİSK
• Ø 5.5 mm delikli
• Yuvarlak karıştırıcılı
• Tercihen 36 delikli disk.
Nohut tohumu (ufak) ekeceğinizde makinenizi aşağıdaki değerlere ayarlamanızı tavsiye ederiz.
Baltalı Makina Nohut Tohumu
Ufak Taneli (6-7-8 mm Tohum Büyüklüğü)
TOHUM İÇİ AYAR SEVİYE KAPAĞI
C1 Kapak sökülecek. Sadece C-2 Kapağı Takılacak.
Not: 1. Eğer tohum akışkanlığında sorun varsa C3
kapağıda takılabilir.
2. Makine bu kapaklar sökük kesinlikle
kullanılmamalıdır. Aksi takdirde tohum haznede sıkışır
ve tohum diski karıştırıcı tırnaklarını bozar.
A SELEKTÖR
SELEKTÖR (TOHUM TEKLEYİCİ) AYARI
Dış selektör kolu 14 nolu deliğe
takılacak.
B SELEKTÖR
İç selektör kolu 9 nolu deliğe takılacak.
28
Page 29
Yukarıda verilen değerler tohum yapısına göre değişkenlik gösterebilir.
Ayarları uyguladıktan sonra kesinlikle test ediniz.
Oluşabilecek hatalı ekimlerden kullanıcı sorumludur.
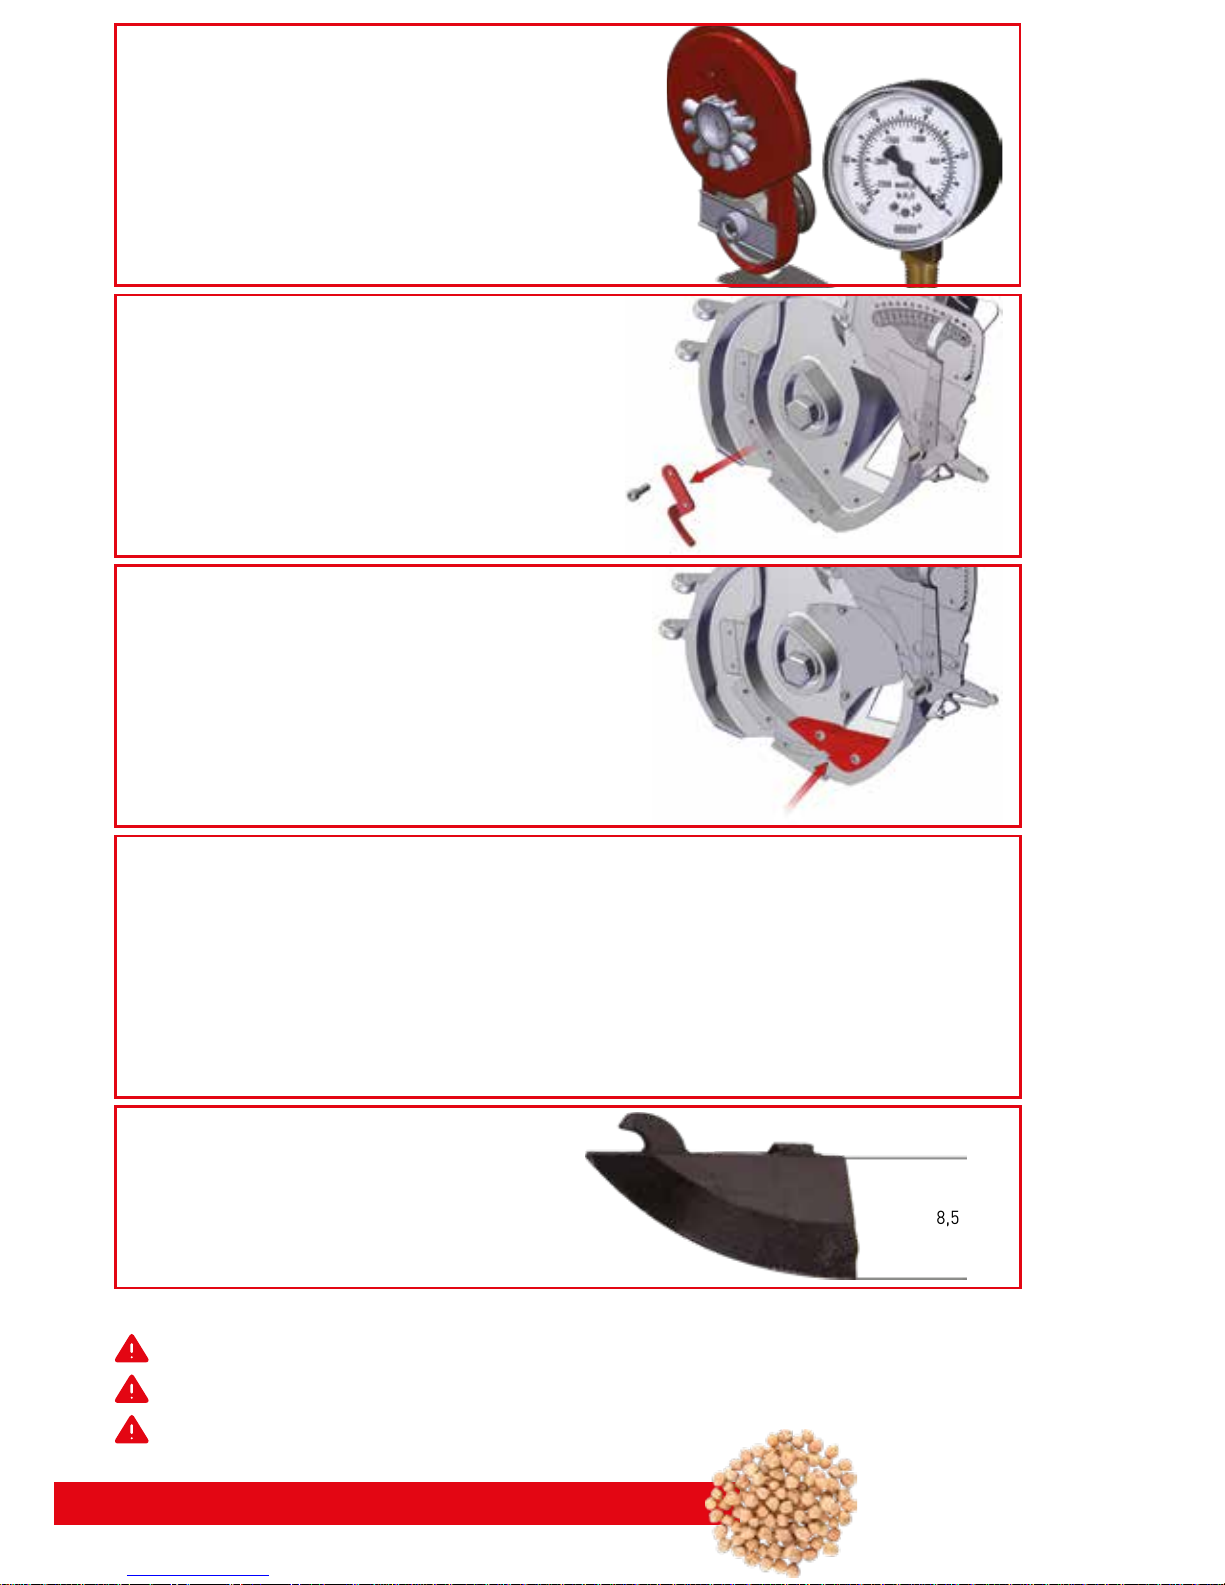
Nohut Tohumu Ufak
FAN (VAKUMETRE AYARI)
Fan vakumetre saati 50-55 barda
olmalıdır.
TOHUM SIYIRICI
DİKKAT: SÖKÜNÜZ!!!
Bu ekipman kullanılmayacaktır.
Yandaki resimde gözüken ekipman
sökülü olmalıdır.
sökünüz
EKİM BALTASI
Nohut ekimi için yüksek ekim
baltasını (8,5 cm) takınız.
8,5 cm
DİKKAT EDİLECEK HUSUSLAR
1. EKİMİ YAPILACAK TOHUM KESİNLİKLE KURU OLMALIDIR.
2. NEMLİ VEYA ISLATILMIŞ TOHUMLA EKİM YAPILMAMALIDIR.
3. TOHUMUN İLAÇLANMASI AMACIYLA ISLATILMASI ÜZERİNDE NEMLİ BİR TABAKA OLUŞTURDUĞU İÇİN, İLAÇ EKİCİ DİSKLERE YAPIŞMAKTA VE DELİKLERİN
TIKANMASINA VE DİSKLERİN DÖNÜŞÜNE ENGEL OLMAKTADIR. BU DA EKİMDE
TOHUM MESAFESİ VE TOHUM ATIŞINDA DÜZENSİZLİK YAPMAKTADIR.
NOHUT ve FISTIK KORUYUCU PLASTİK
Alt tohum koruyucu plastik KESİNLİKLE takılı
olmalıdır. Aksi takdirde tohum disklerinin karıştırıcı
tırnaklarını bozar.
NOT: Bu plastik takılırken alüminyum gövde üzerinde bulunan başlıksız 2,5 allen civatalar sökülecek bu
plastiğin civataları ondan sonra sıkılacaktır.
takılacak
29
Page 30
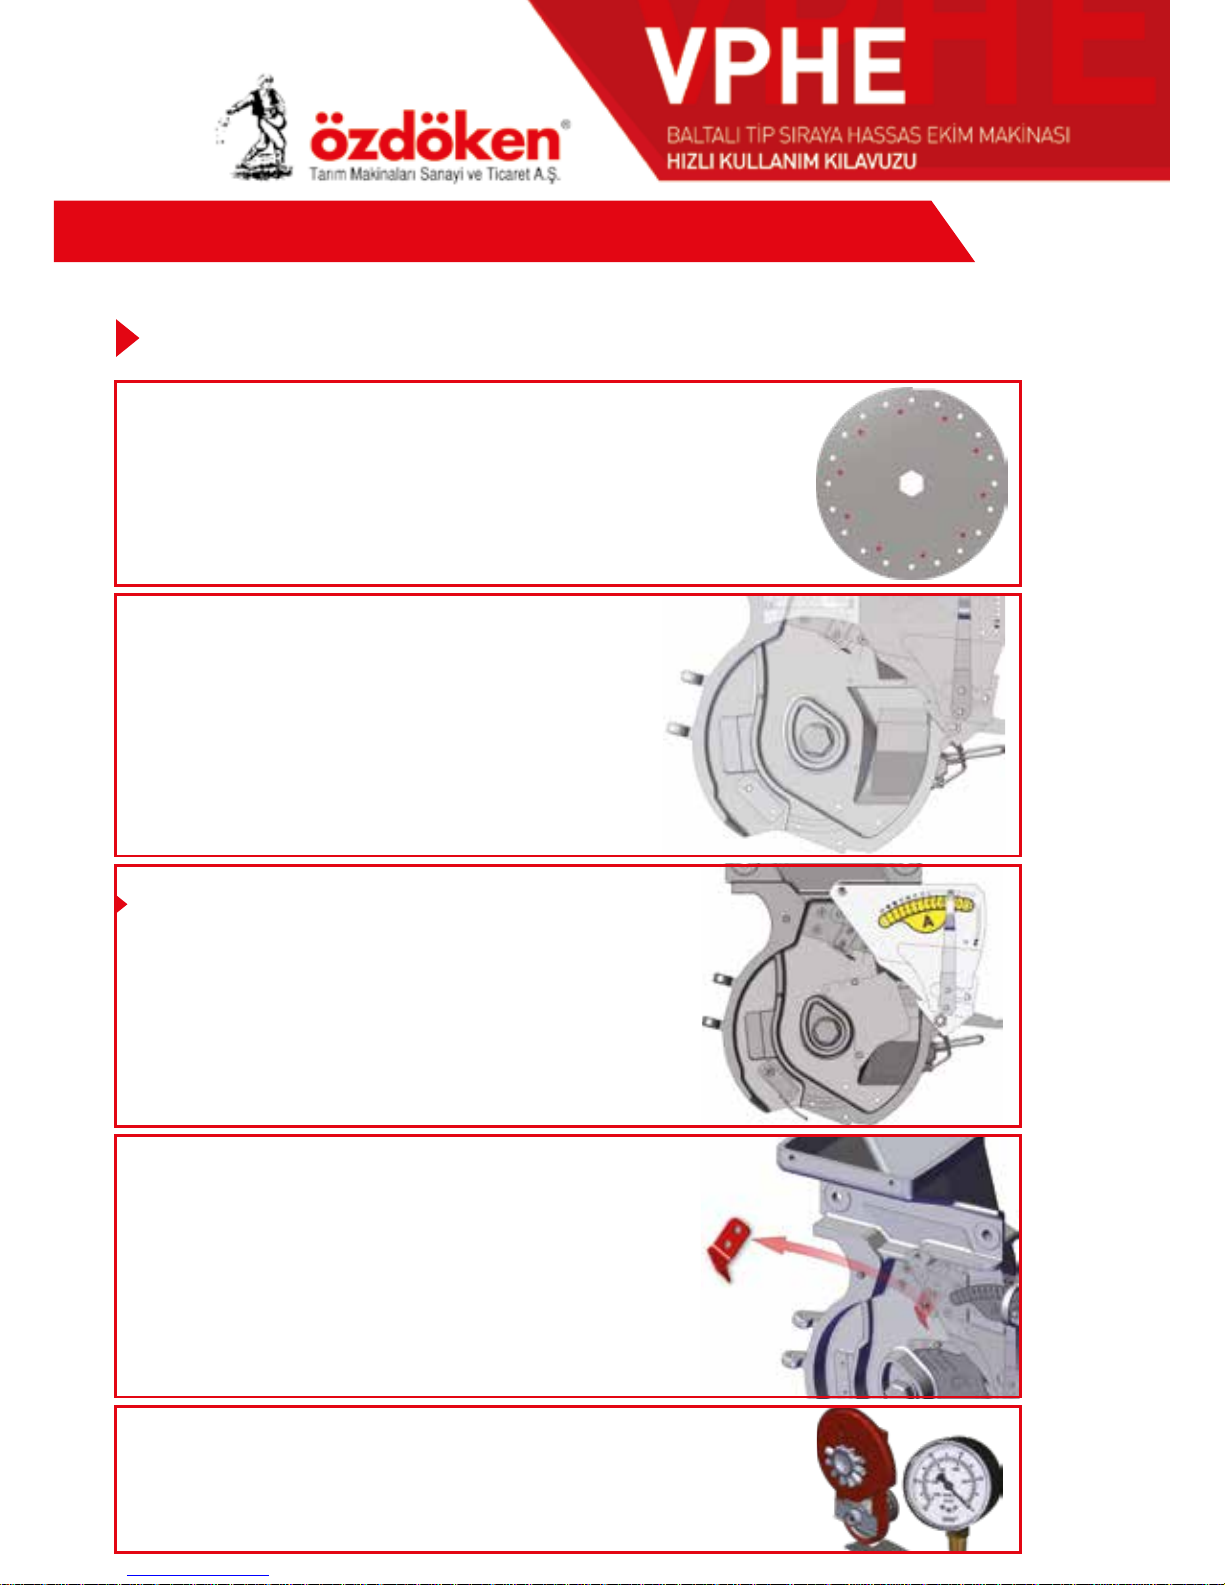
Yer fıstığı tohumu ekeceğinizde makinenizi aşağıdaki değerlere ayarlamanızı tavsiye ederiz.
FAN (VAKUMETRE AYARI)
Fan vakummetre saati 60-70
barda olmalıdır.
SELEKTÖR (TOHUM TEKLEYİCİ) AYARI
A SELEKTÖR
Dış selektör kolu 14 nolu deliğe takılacak.
Bütün kapaklar sökülecek
TOHUM İÇİ AYAR SEVİYE KAPAĞI
EKİCİ DİSK
• Ø6,5 veya Ø7 mm delikli
• Yuvarlak karıştırıcılı
• Tercihen 20 veya 26 delikli disk.
Baltalı Makina Yer Fıstığı Tohumu
B SELEKTÖR
İç selektör üzerinde yer alan
selektör sacı sökülecek.
sökülecek
HIZLI AYAR TABLOSU
30
Page 31
NOT: Fıstık ekiminde yavaş gidilmesini tavsiye ederiz.
Yukarıda verilen değerler tohum yapısına göre değişkenlik gösterebilir.
Ayarları uyguladıktan sonra kesinlikle test ediniz.
Oluşabilecek hatalı ekimlerden kullanıcı sorumludur.
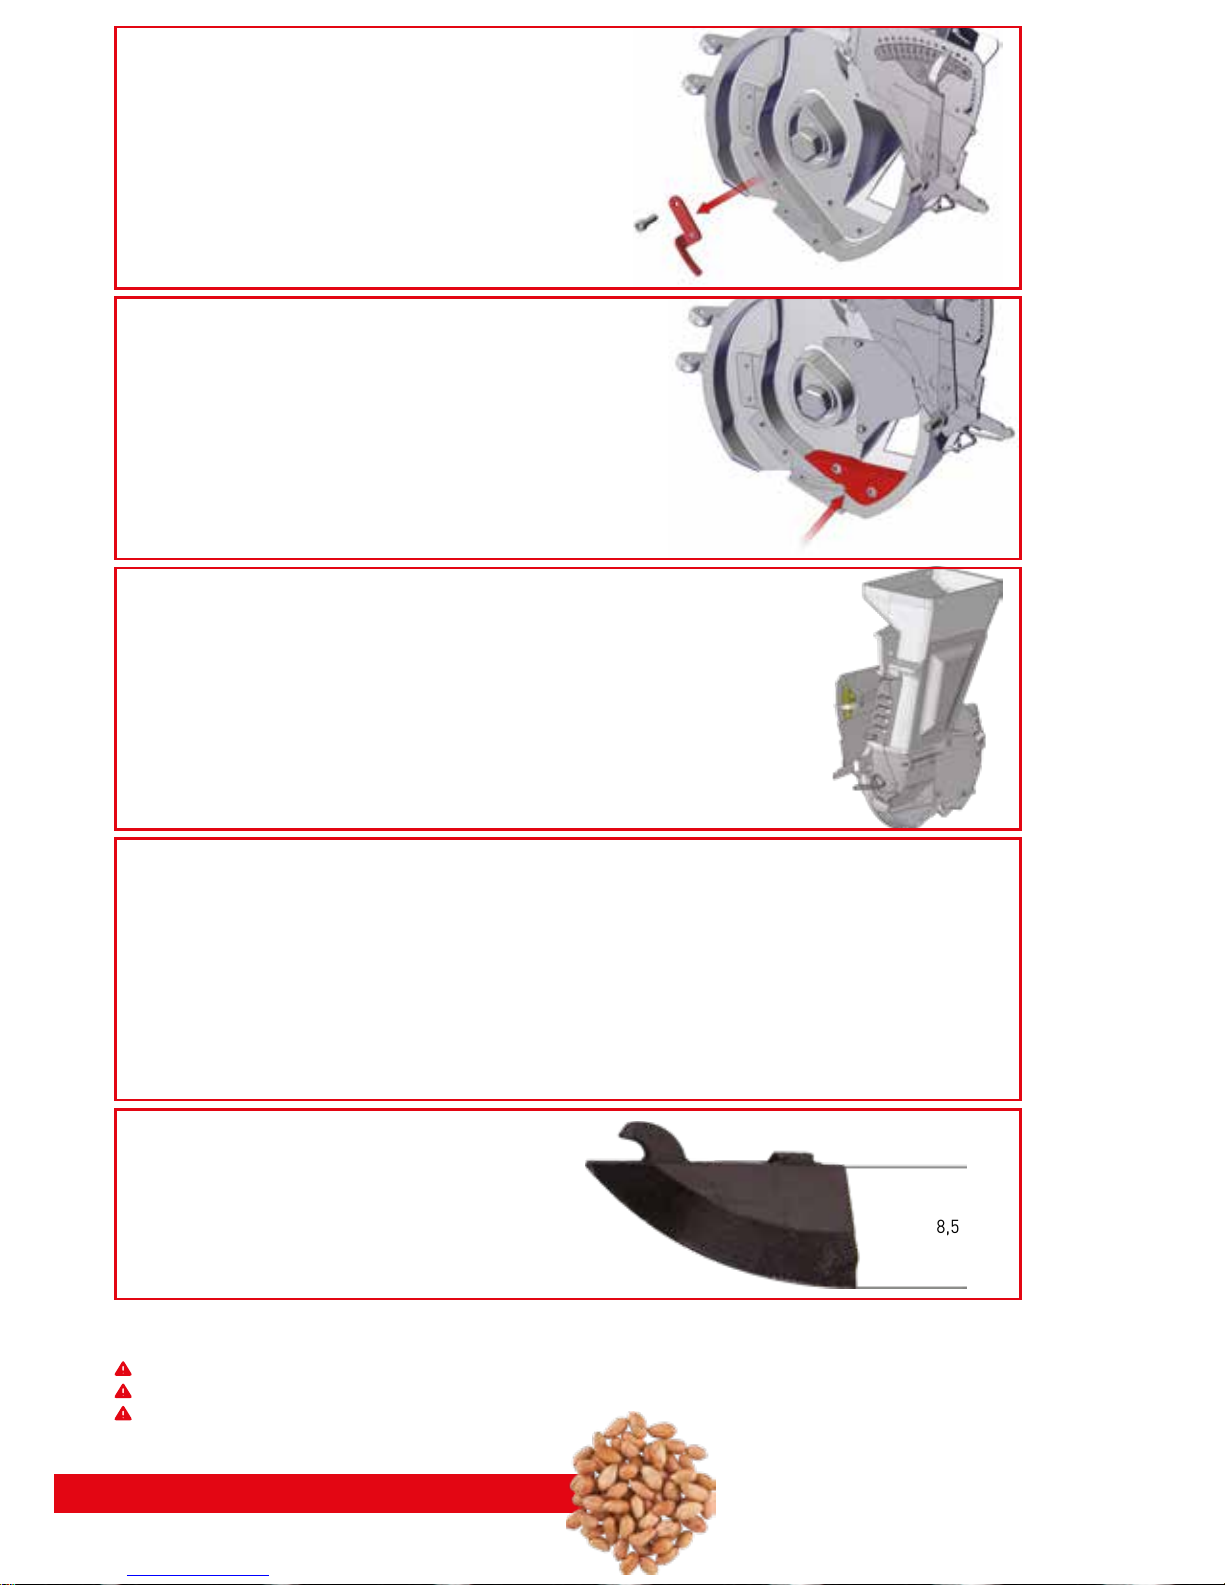
Yer Fıstığı Tohumu
TOHUM SIYIRICI
DİKKAT: SÖKÜNÜZ!!!
Bu ekipman kullanılmayacaktır.
Yandaki resimde gözüken ekipman
sökülü olmalıdır.
sökünüz
ALÜMİNYUM TOHUM EKİCİ GÖVDE
DİKKAT:
FISTIK EKİMİNDE TOHUM AKIŞININ DAHA RAHAT
OLABİLMESİ İÇİN ALÜMİNYUM GÖVDE YAN DUVARI
AÇIK OLMASI TAVSİYE EDİLMEKTEDİR. MAKİNE SİPA
RİŞLERİNDE ÜNİTESİ BU ŞEKİLDE İSTENMESİ TAVSİYE
EDİLİR.
DİKKAT EDİLECEK HUSUSLAR
1. EKİMİ YAPILACAK TOHUM KESİNLİKLE KURU OLMALIDIR.
2. NEMLİ VEYA ISLATILMIŞ TOHUMLA EKİM YAPILMAMALIDIR.
3. TOHUMUN İLAÇLANMASI AMACIYLA ISLATILMASI ÜZERİNDE NEMLİ BİR TABAKA OLUŞTURDUĞU İÇİN, İLAÇ EKİCİ DİSKLERE YAPIŞMAKTA VE DELİKLERİN
TIKANMASINA VE DİSKLERİN DÖNÜŞÜNE ENGEL OLMAKTADIR. BU DA EKİMDE
TOHUM MESAFESİ VE TOHUM ATIŞINDA DÜZENSİZLİK YAPMAKTADIR.
EKİM BALTASI
Fıstık ekimi için yüksek ekim
baltasını (8,5 cm) takınız.
8,5 cm
NOHUT ve FISTIK KORUYUCU PLASTİK
Alt tohum koruyucu plastik KESİNLİKLE takılı olmalıdır. Aksi takdirde tohum diski üzerindeki karıştırıcı tırnaklar tohumu kırar.
NOT: Bu plastik takılırken alüminyum gövde üzerinde bulunan başlıksız 2,5 allen civatalar sökülecek bu
plastiğin civataları ondan sonra sıkılacaktır.
takılacak
31
Page 32
HIZLI AYAR TABLOSU
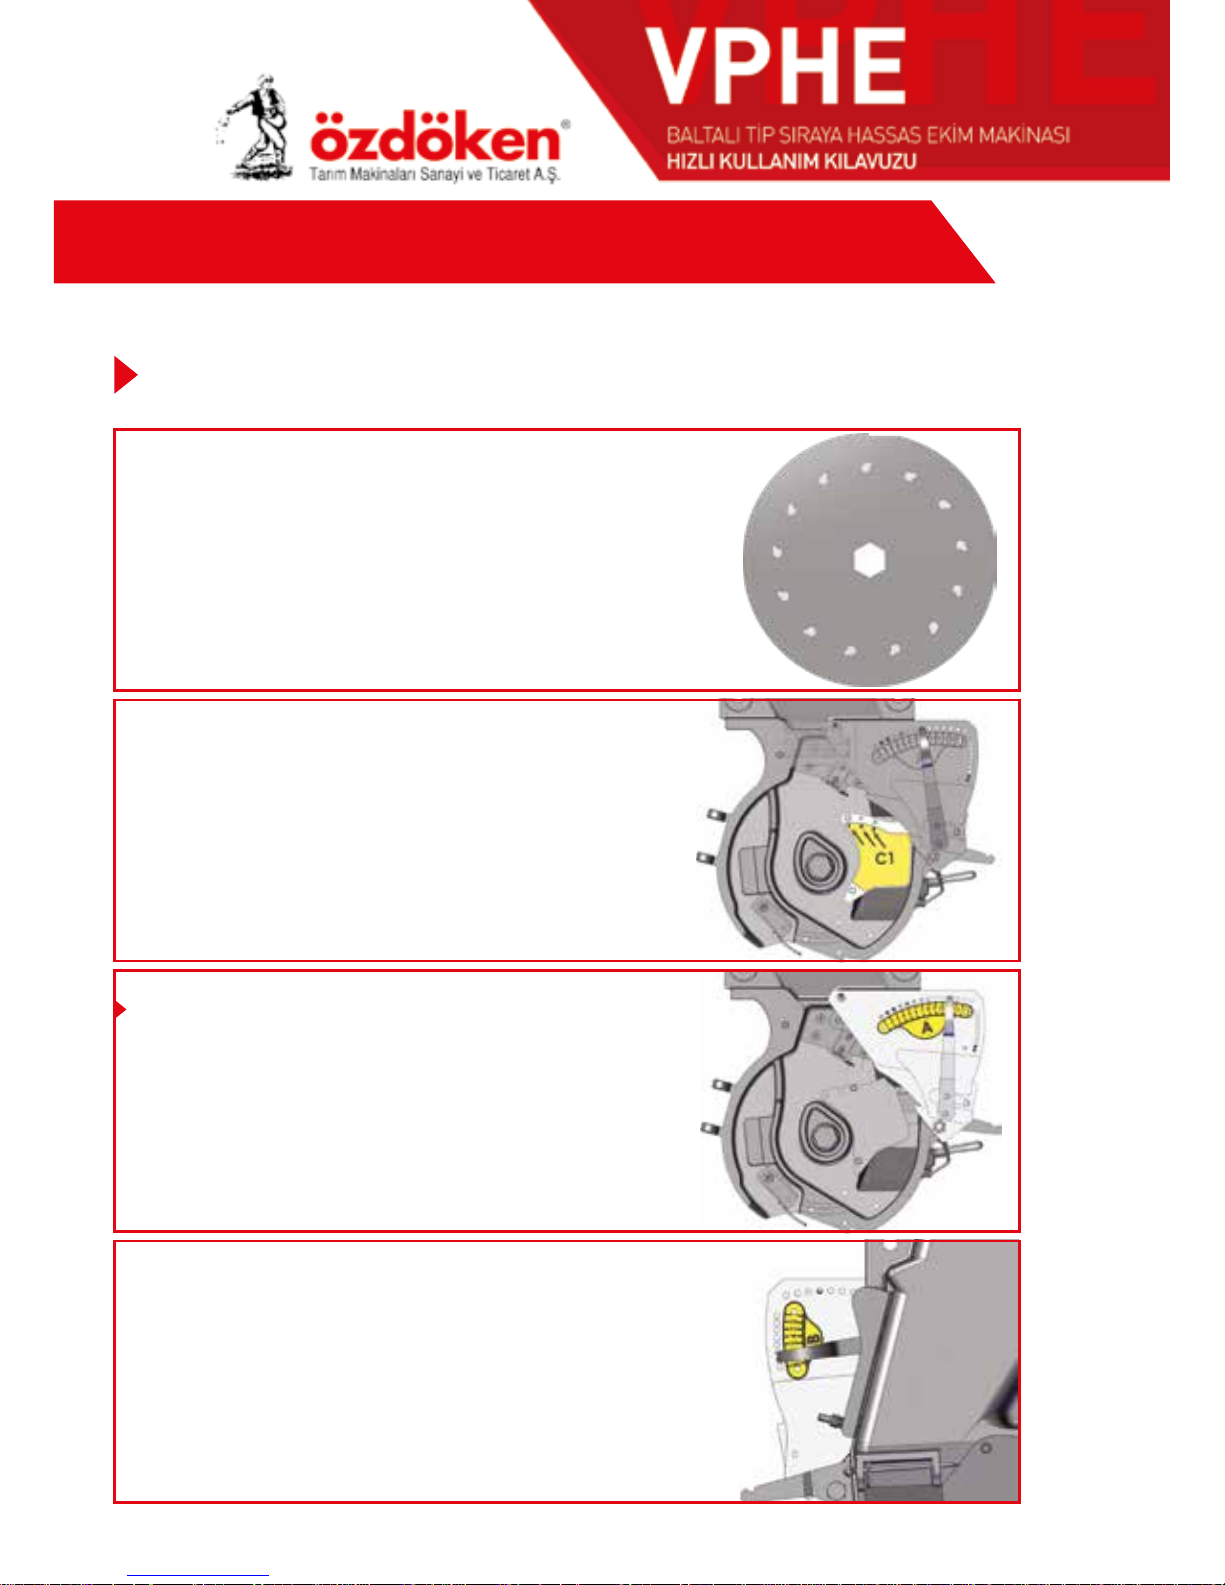
B SELEKTÖR
İç selektör kolu 1 veya 2 nolu
deliğe takılacak.
SELEKTÖR (TOHUM TEKLEYİCİ) AYARI
A SELEKTÖR
Dış selektör kolu 8 nolu deliğe takılacak.
EKİCİ DİSK
• Ø 1.2 mm delikli
• Tırnaklı karıştırıcılı
• Tercihen 104 delikli disk.
Soğan tohumu ekeceğinizde makinenizi aşağıdaki değerlere ayarlamanızı tavsiye ederiz.
Baltalı Makina Soğan Tohumu
C1 kapağı 1 nolu deliğe takılacak
TOHUM İÇİ AYAR SEVİYE KAPAĞI
32
Page 33
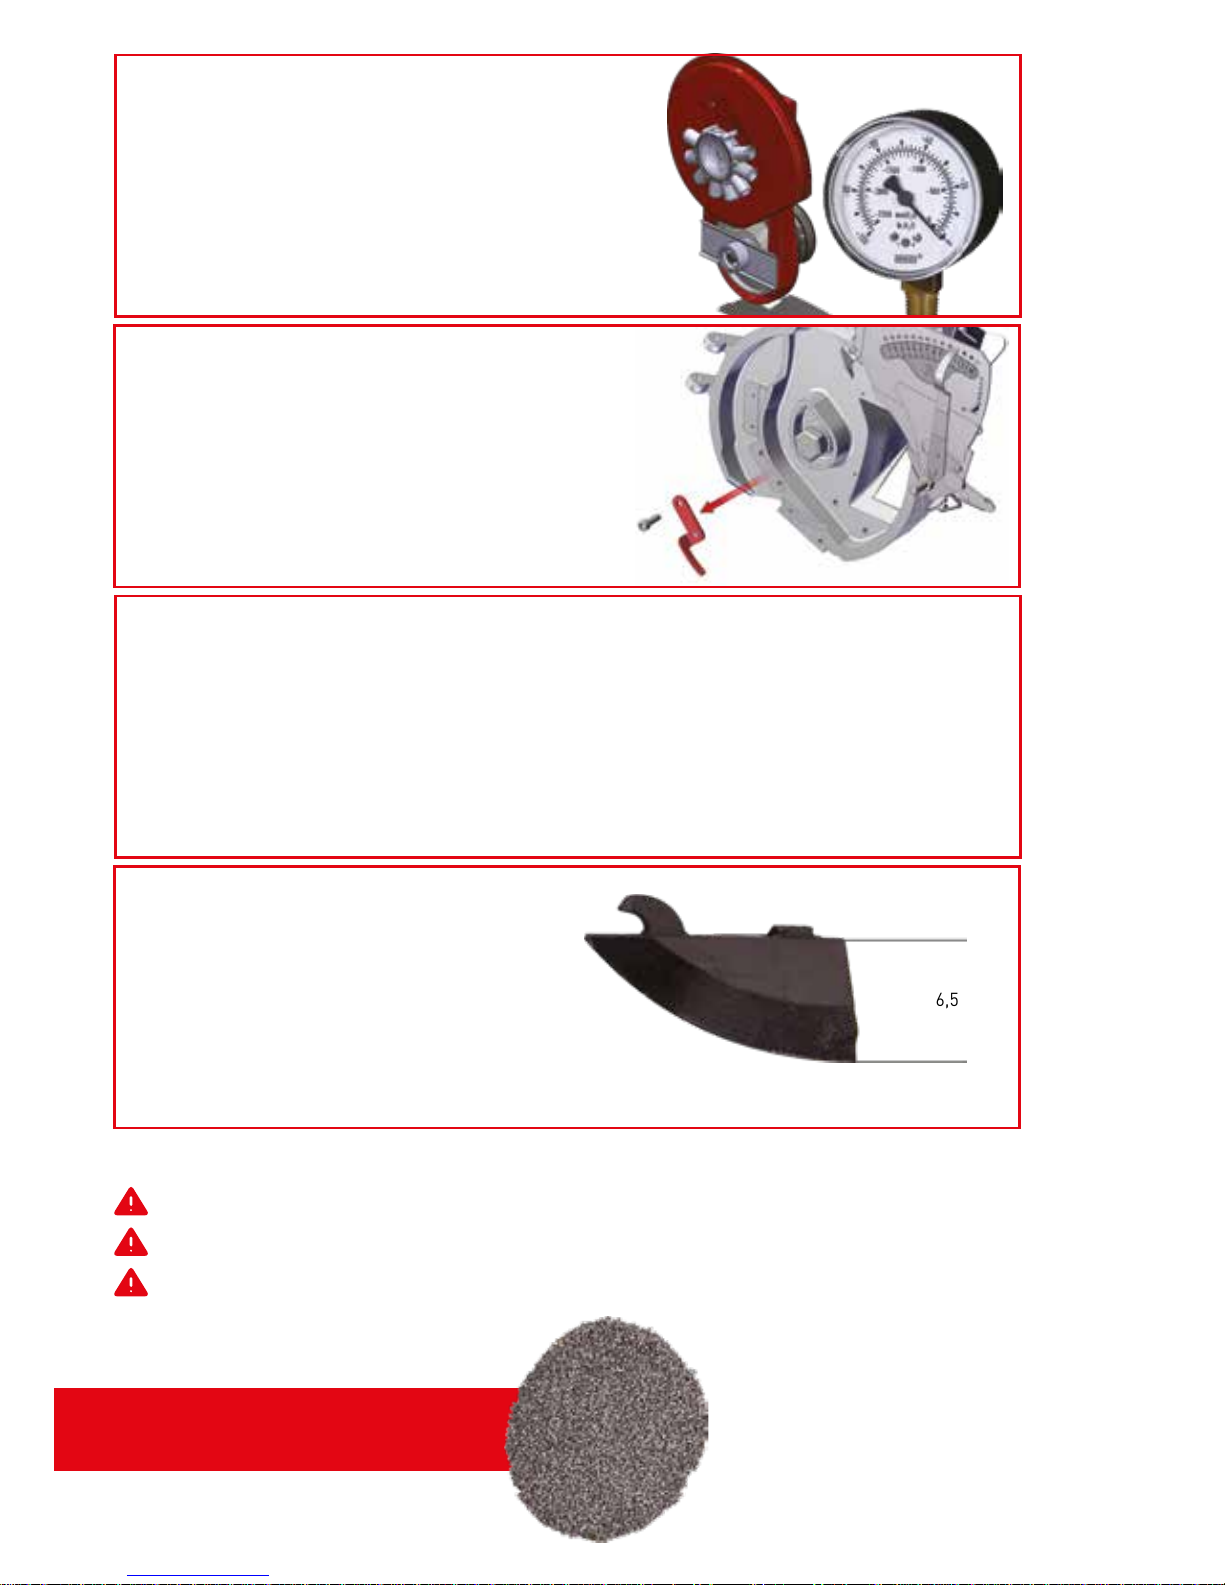
Yukarıda verilen değerler tohum yapısına göre değişkenlik gösterebilir.
Ayarları uyguladıktan sonra kesinlikle test ediniz.
Oluşabilecek hatalı ekimlerden kullanıcı sorumludur.
Soğan Tohumu
FAN (VAKUMETRE AYARI)
Fan vakumetre saati 25-30 barda
olmalıdır.
DİKKAT EDİLECEK HUSUSLAR
1. EKİMİ YAPILACAK TOHUM KESİNLİKLE KURU OLMALIDIR.
2. NEMLİ VEYA ISLATILMIŞ TOHUMLA EKİM YAPILMAMALIDIR.
3. TOHUMUN İLAÇLANMASI AMACIYLA ISLATILMASI ÜZERİNDE NEMLİ BİR TABAKA OLUŞTURDUĞU İÇİN, İLAÇ EKİCİ DİSKLERE YAPIŞMAKTA VE DELİKLERİN
TIKANMASINA VE DİSKLERİN DÖNÜŞÜNE ENGEL OLMAKTADIR. BU DA EKİMDE
TOHUM MESAFESİ VE TOHUM ATIŞINDA DÜZENSİZLİK YAPMAKTADIR.
EKİM BALTASI
Soğan ekimi için alçak ekim
baltasını (6,5 cm) takınız.
6,5 cm
TOHUM SIYIRICI
DİKKAT: SÖKÜNÜZ!!!
Bu ekipman kullanılmayacaktır.
Yandaki resimde gözüken ekipman sökülü olmalıdır.
sökünüz
33
Page 34
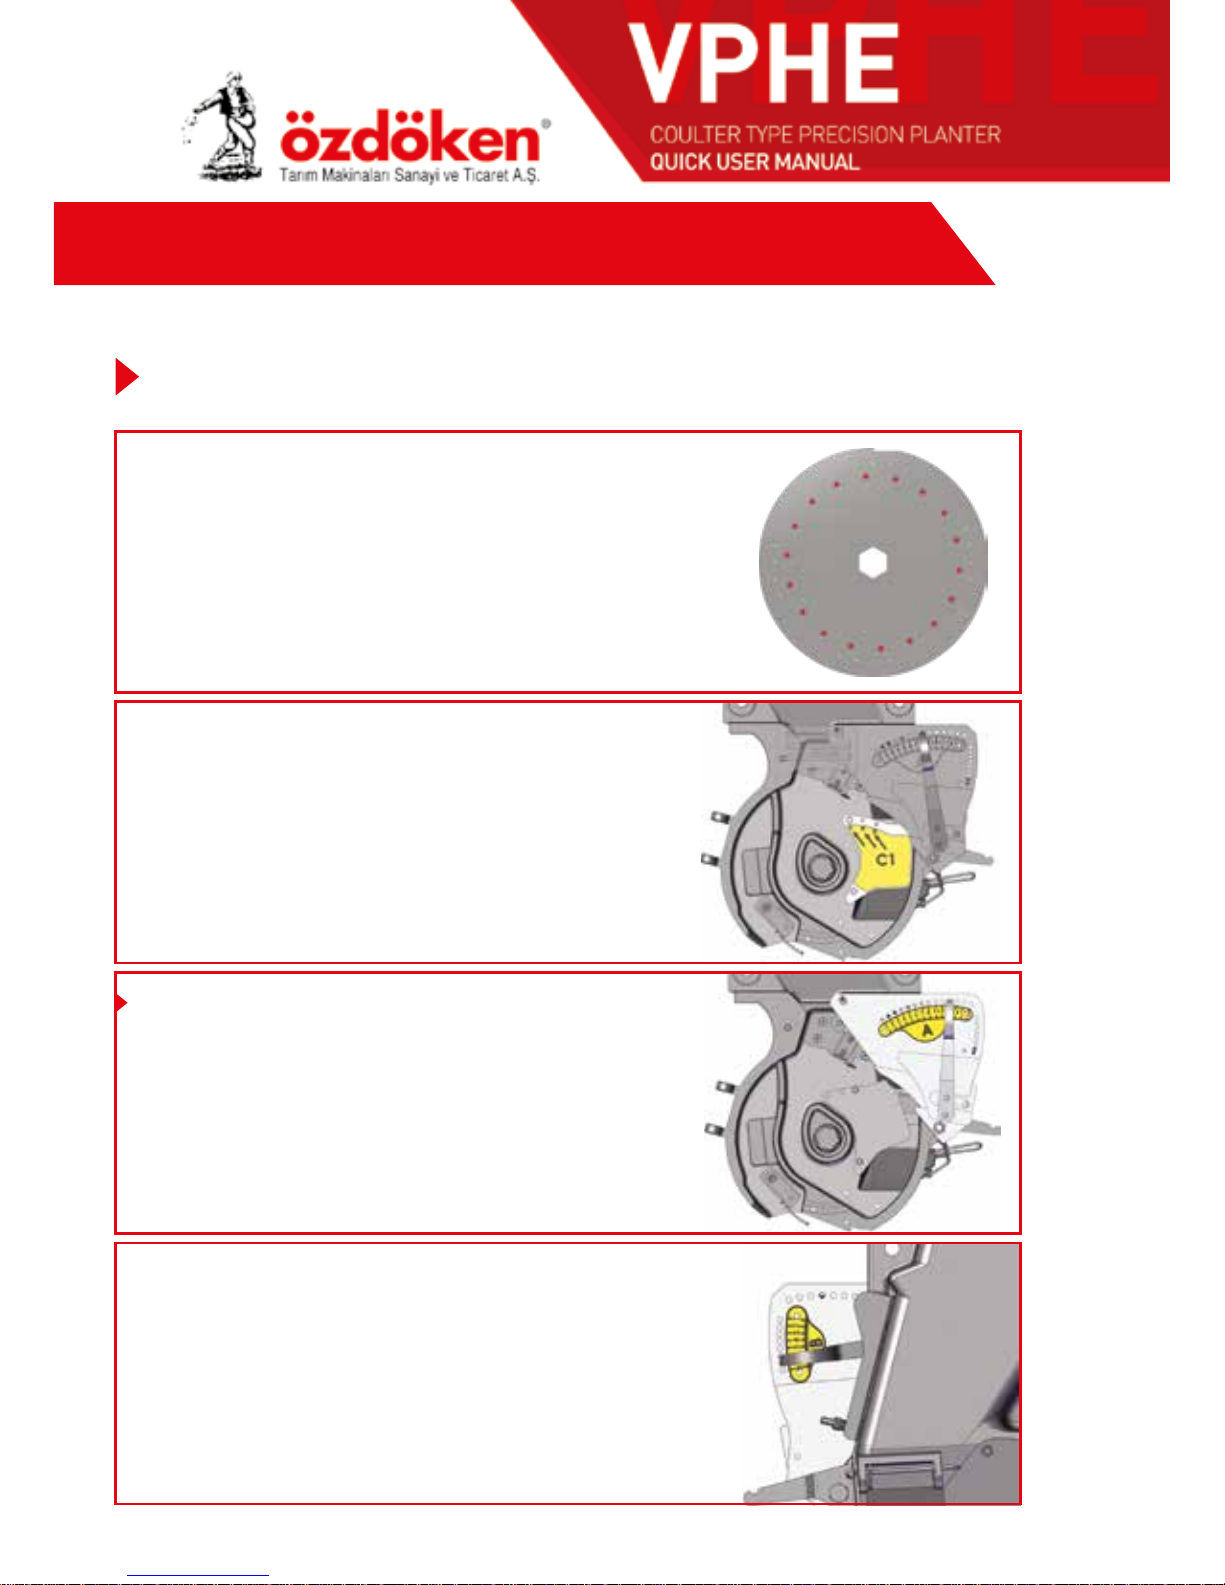
QUICK SETTING TABLE
OVERFLOW PLATES
C1 plate should be fixed to hole no. “1”
We recommend, to set your machine to the following values for Sugar beet seeds.
COATED SUGAR BEET SEED
A SELECTOR SETTING
SELECTORS (SEED SINGULATORS)
Outer selector handle should be fixed to hole
no. “9” or “10”
B SELECTOR SETTING
Inner selector handle should be
fixed to hole no. “4”
SEEDING DISC
• Ø2.1 mm hole diameter
• With round mixers
• Preferably 36 holes
34
Page 35
Page 36
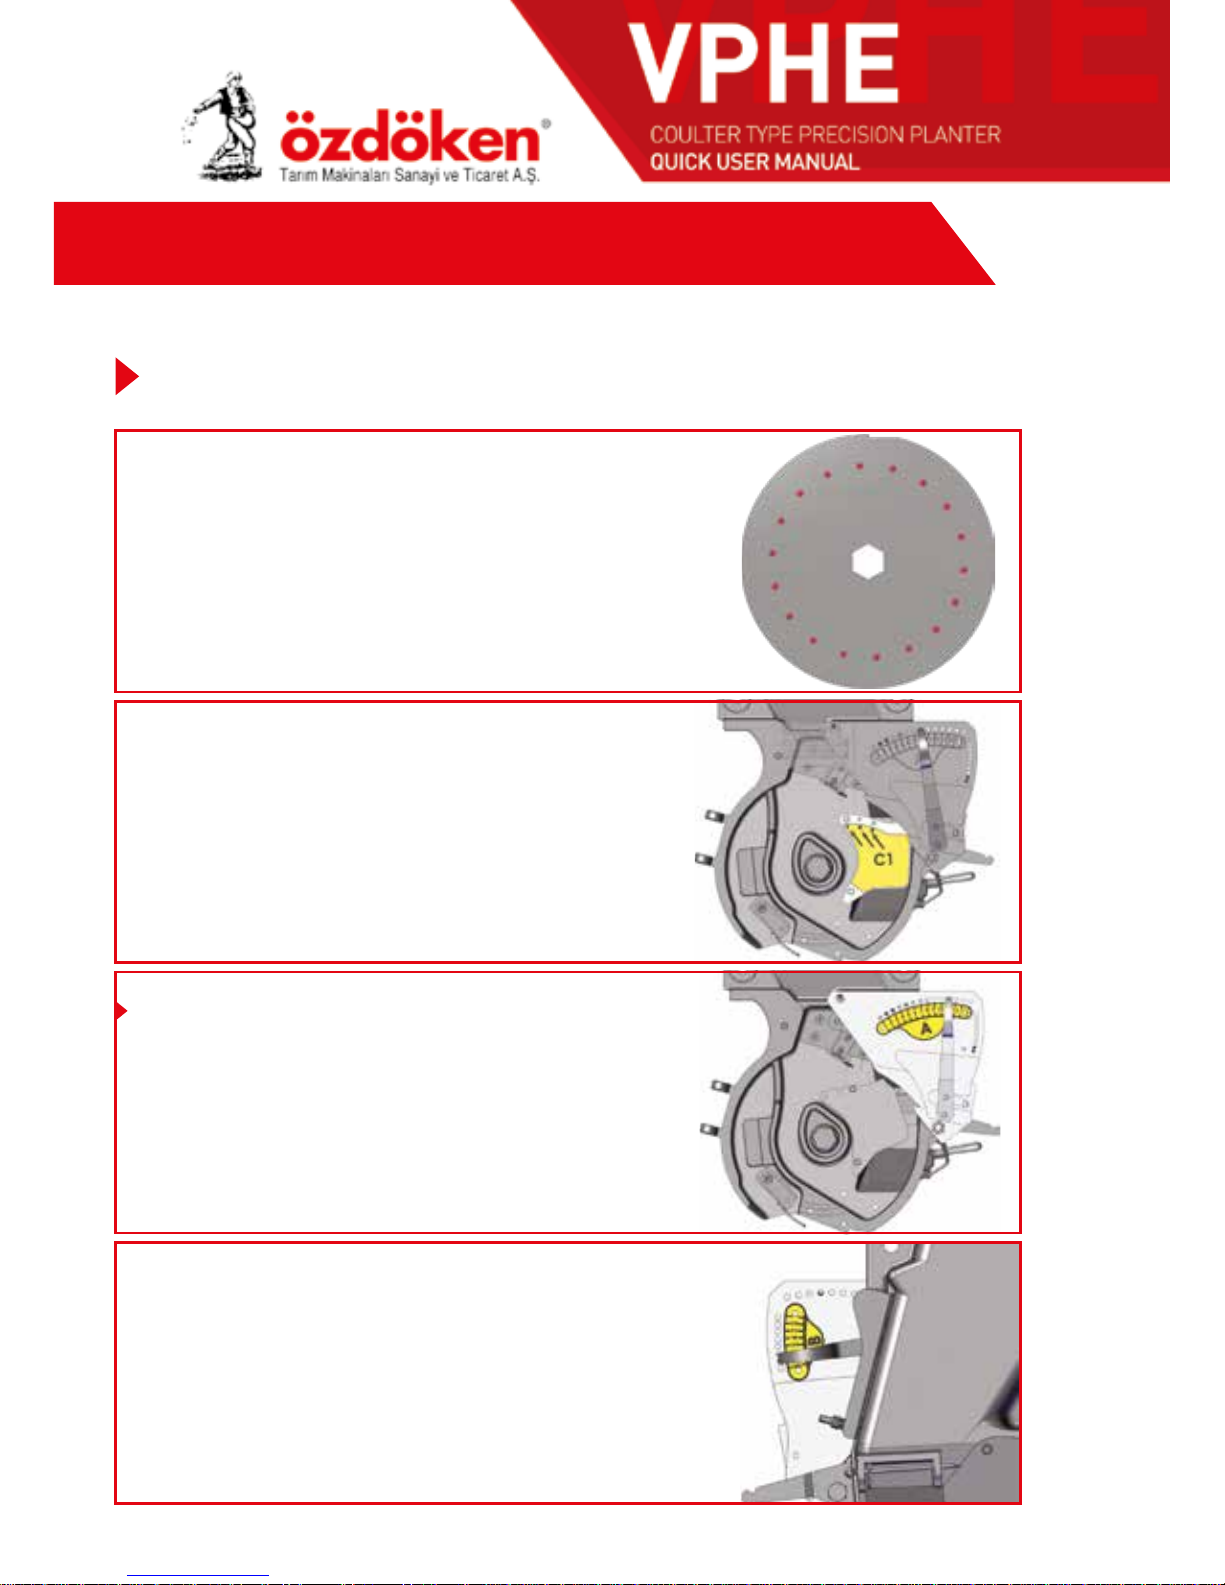
QUICK SETTING TABLE
B SELECTOR SETTING
Inner selector handle should be fixed
to hole no. “3” or “4”
A SELECTOR SETTING
SELECTORS (SEED SINGULATORS)
Outer selector handle should be fixed to hole
no. “7” or “8”
OVERFLOW PLATES
C1 plate should be fixed to hole no. “1”
We recommend, to set your machine to the following values for Sugar beet seeds.
UNCOATED SUGAR BEET SEED
SEEDING DISC
• Ø1.7 mm hole diameter
• With round mixers
• Preferably 36 holes
36
Page 37
Settings shown above can fluctuate.
After applying the settings, test the machine.
The user is responsible for any incorrect planting process.
Coated Sugar Beet Seed
FAN (VACCUMETER SETTING)
Manometer should be arranged
around 30-35 bars.
SEEDING COULTER
For Coated Sugar beet seeds,
coulter depth should be (6.5 cm).
6,5 cm
SEED SCRAPER
Scraper should be attached.
attach
37
Page 38
SUNFLOWER FOR OIL (Big Size)
We recommend, to set your machine to the following values for Sunflower seeds.
SEEDING DISC
• Ø3mm hole diameter
• Nail mixers
• Preferably “20” or “26” holes
OVERFLOW PLATES
C1 plate should be fixed to hole no. “2”
SELECTORS (SINGULATORS)
A SELECTOR SETTING
Outer selector handle should be fixed to
hole no. “10”
B SELECTOR SETTING
Inner selector handle should be
fixed to hole no. “4” or “5”
QUICK SETTING TABLE
38
Page 39
Settings shown above can fluctuate.
After applying the settings, test the machine.
The user is responsible for any incorrect planting process.
Uncoated Sugar Beet Seed
FAN (VACCUMETER SETTING)
Manometer should be arranged around
25-30 bars.
Note: Pressure must not exceed these
values.
SEEDING COULTER
For Uncoated Sugar beet seeds,
coulter depth should be (6.5 cm).
6,5 cm
SEED SCRAPER
Scraper should be attached.
attach
39
Page 40
We recommend, to set your machine to the following values for Sunflower seeds.
SUNFLOWER FOR OIL (Small Size)
SEEDING DISC
• Ø2.5mm hole diameter
• Nail mixers
• Preferably “20” or “26” holes
OVERFLOW PLATES
C1 plate should be fixed to hole no. “2”
SELECTORS (SINGULATORS)
A SELECTOR SETTING
Outer selector handle should be fixed to
hole no. “10”
B SELECTOR SETTING
Inner selector handle should be
fixed to hole no. “3” or “4”
QUICK SETTING TABLE
40
Page 41
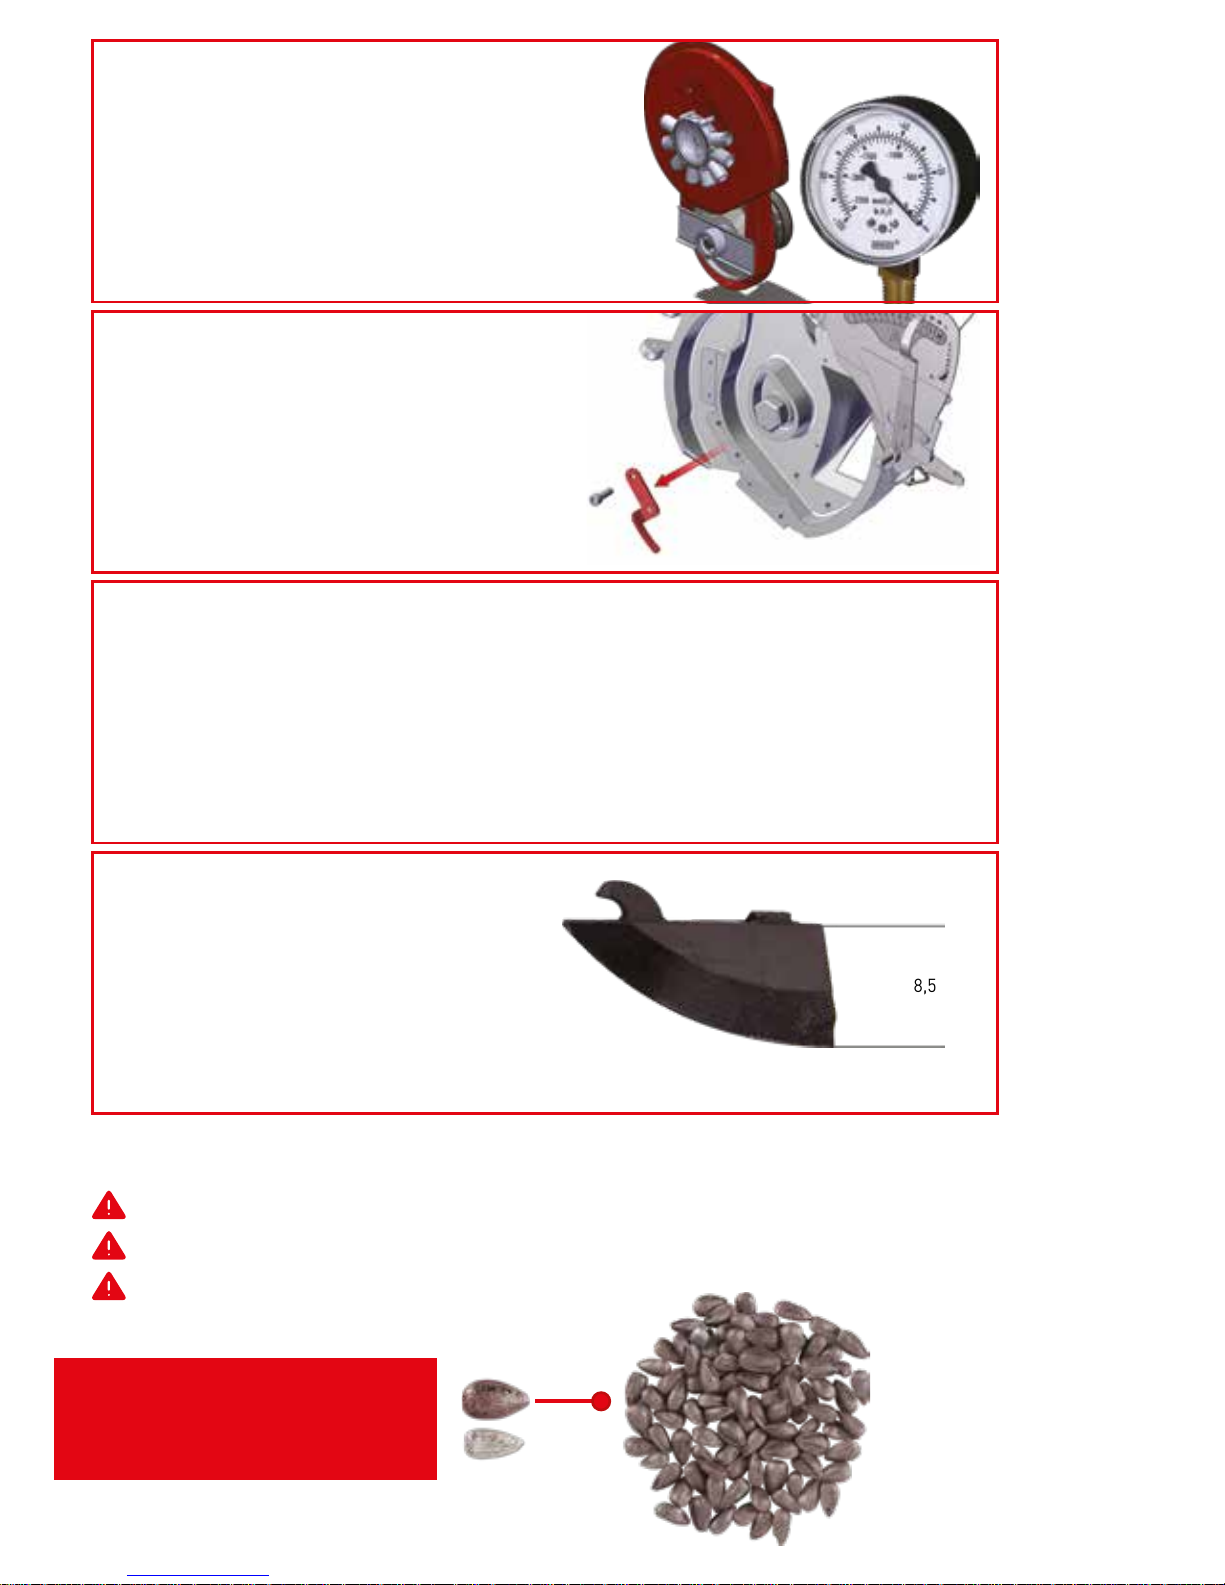
Sunflower For Oil
Big Size
Setting shown above can fluctuate.
After applying the settings, test the machine.
The user is responsible for any incorrect Seeding.
FAN (VACCUMETER SETTING)
Manometer should be arranged
around 40-50 bars.
SEEDING COULTER
For Sunflower seeds, coulter depth
should be (8.5 cm).
8,5 cm
CONSIDERATIONS
1.The seeds to be used for plantation process must be dry.
2. Humid or wet seeds must not be used.
3. If uncoated seeds are to be used for plantation process, seeds must be
sprayed with “CHILD POWDER”. This way, the flow of the seeds would
be much smoother.
SEED SCRAPER
ATTENTION: REMOVE!!!
Scraper must not be attached.
remove
41
Page 42
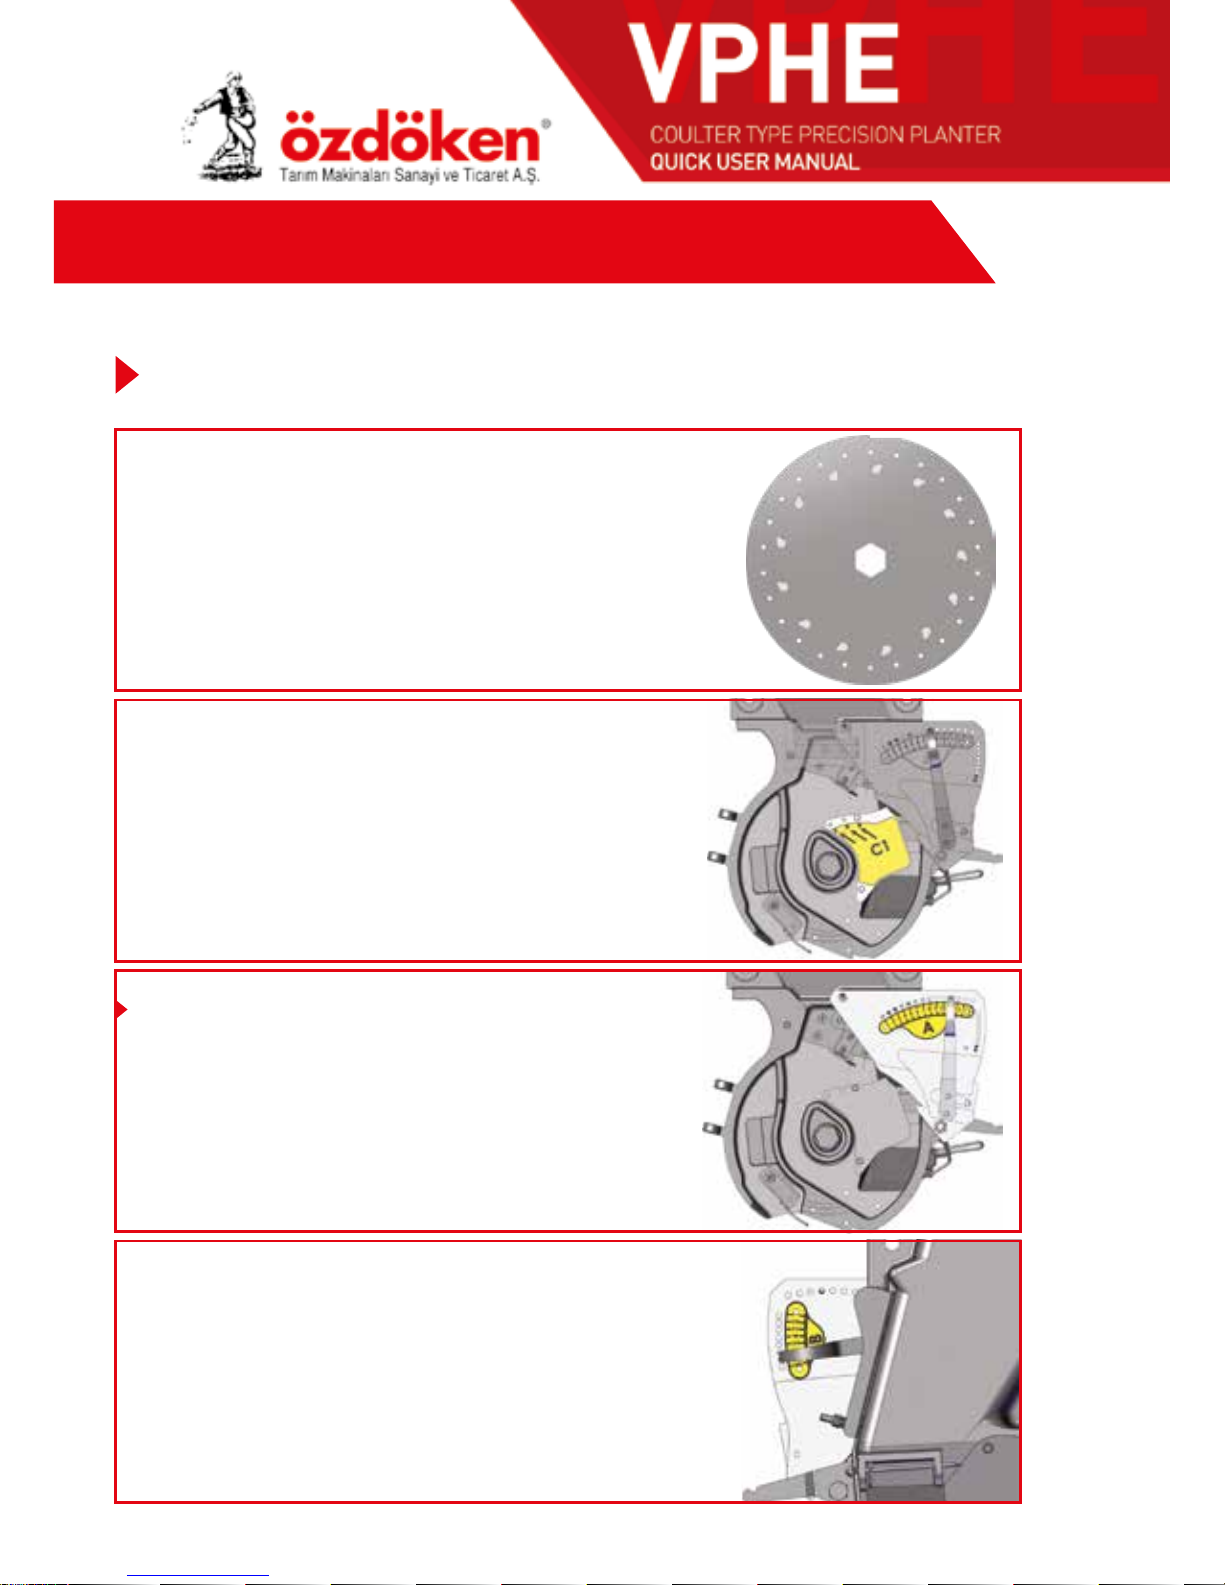
QUICK SETTING TABLE
C1 plate should be fixed to hole no. “3”
OVERFLOW PLATES
SEEDING DISC
• Ø4.5mm or Ø5mm hole diameter
• Preferably “20” or “26” holes
Note: For bigger size seeds, Use Ø5mm holed disc
and for medium size seeds, use Ø4.5mm holed disc.
If it is observed that Ø4.5mm holed disc is not holding
the seeds then Ø5mm holed disc must be used.
We recommend, to set your machine to the following values for Corn seeds.
SELECTORS (SINGULATORS)
A SELECTOR SETTING
Outer selector handle should be fixed to hole
no. “11” or “12”
B SELECTOR SETTING
Inner selector handle should be fixed
to hole no. “6”
CORN SEED (Medium Size / Big Size)
42
Page 43
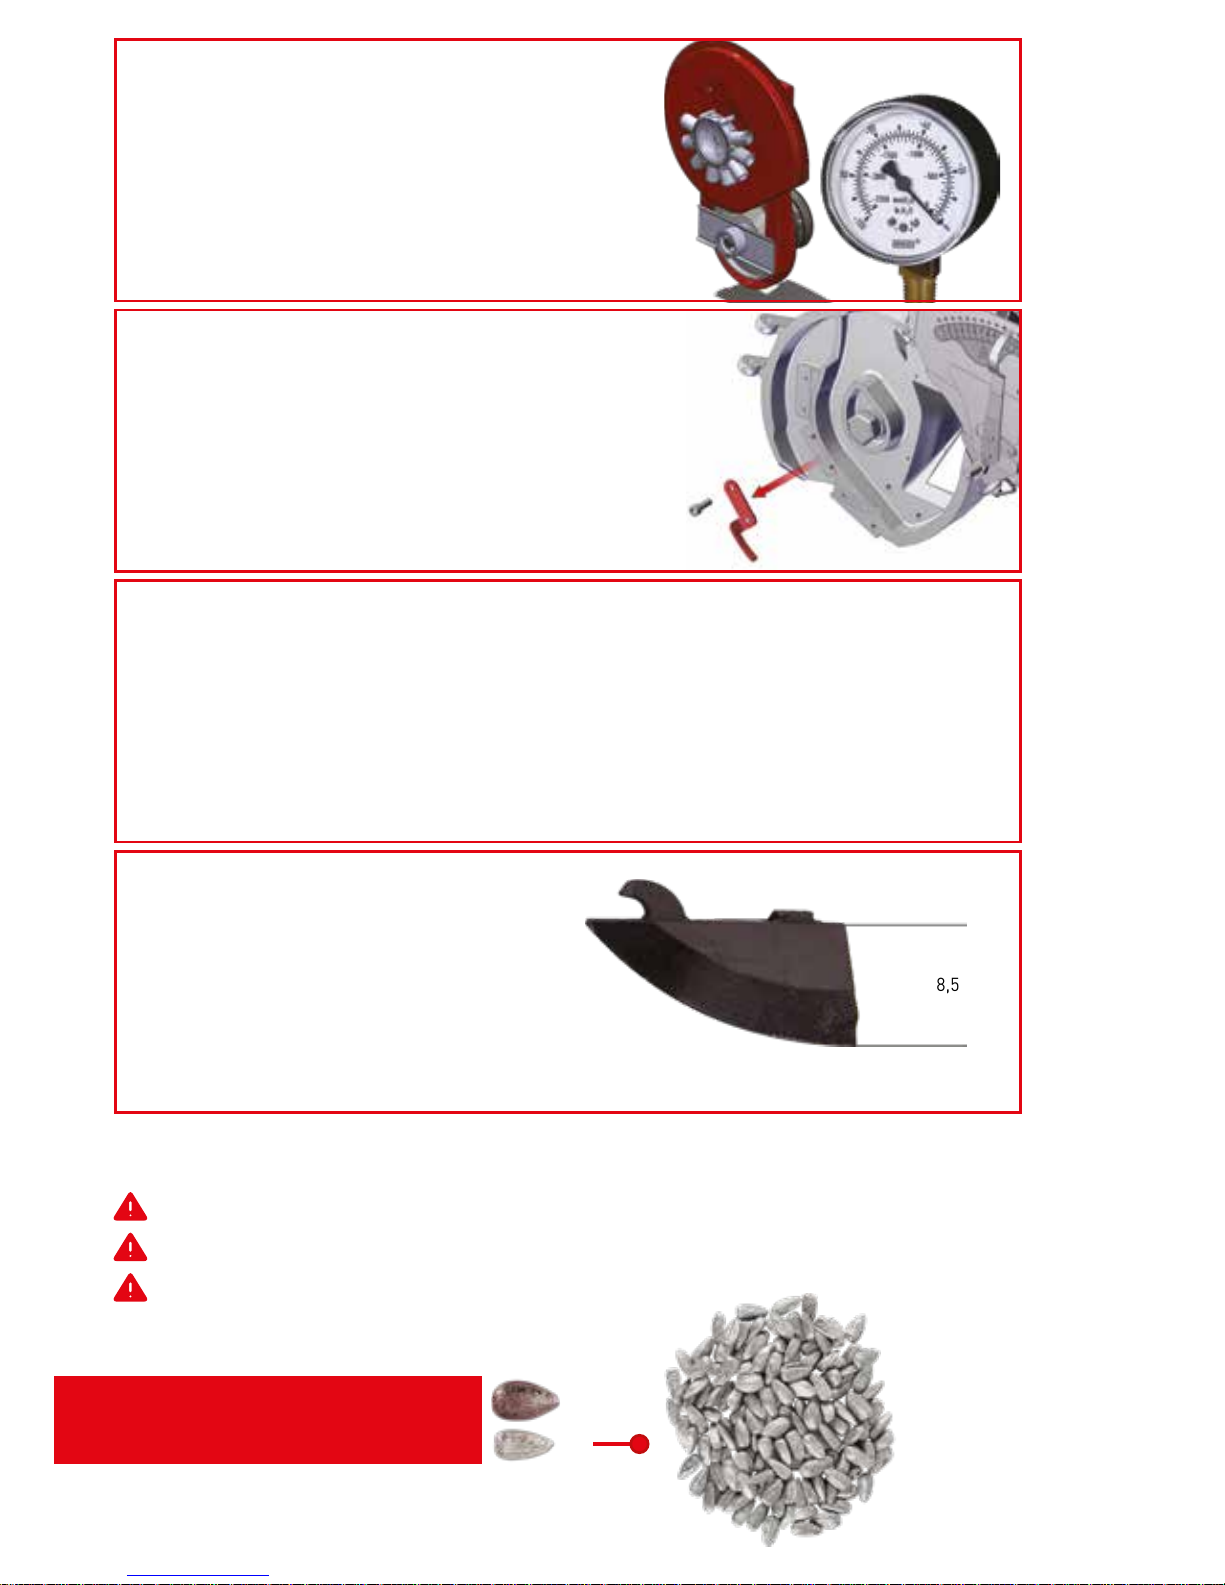
Setting shown above can fluctuate.
After applying the settings, test the machine.
The user is responsible for any incorrect planting process.
Sunflower For Oil
Small Size
FAN (VACCUMETER SETTING)
Manometer should be arranged
around 35-45 bars.
SEEDING COULTER
For Sunflower seeds, coulter depth
should be (8.5 cm).
8,5 cm
CONSIDERATIONS
1.The seeds to be used for plantation process must be dry.
2. Humid or wet seeds must not be used.
3. If uncoated seeds are to be used for plantation process, seeds must be
sprayed with “CHILD POWDER”. This way, the flow of the seeds would be
much smoother.
SEED SCRAPER
ATTENTION: REMOVE!!!
Scraper must not be attached.
remove
43
Page 44
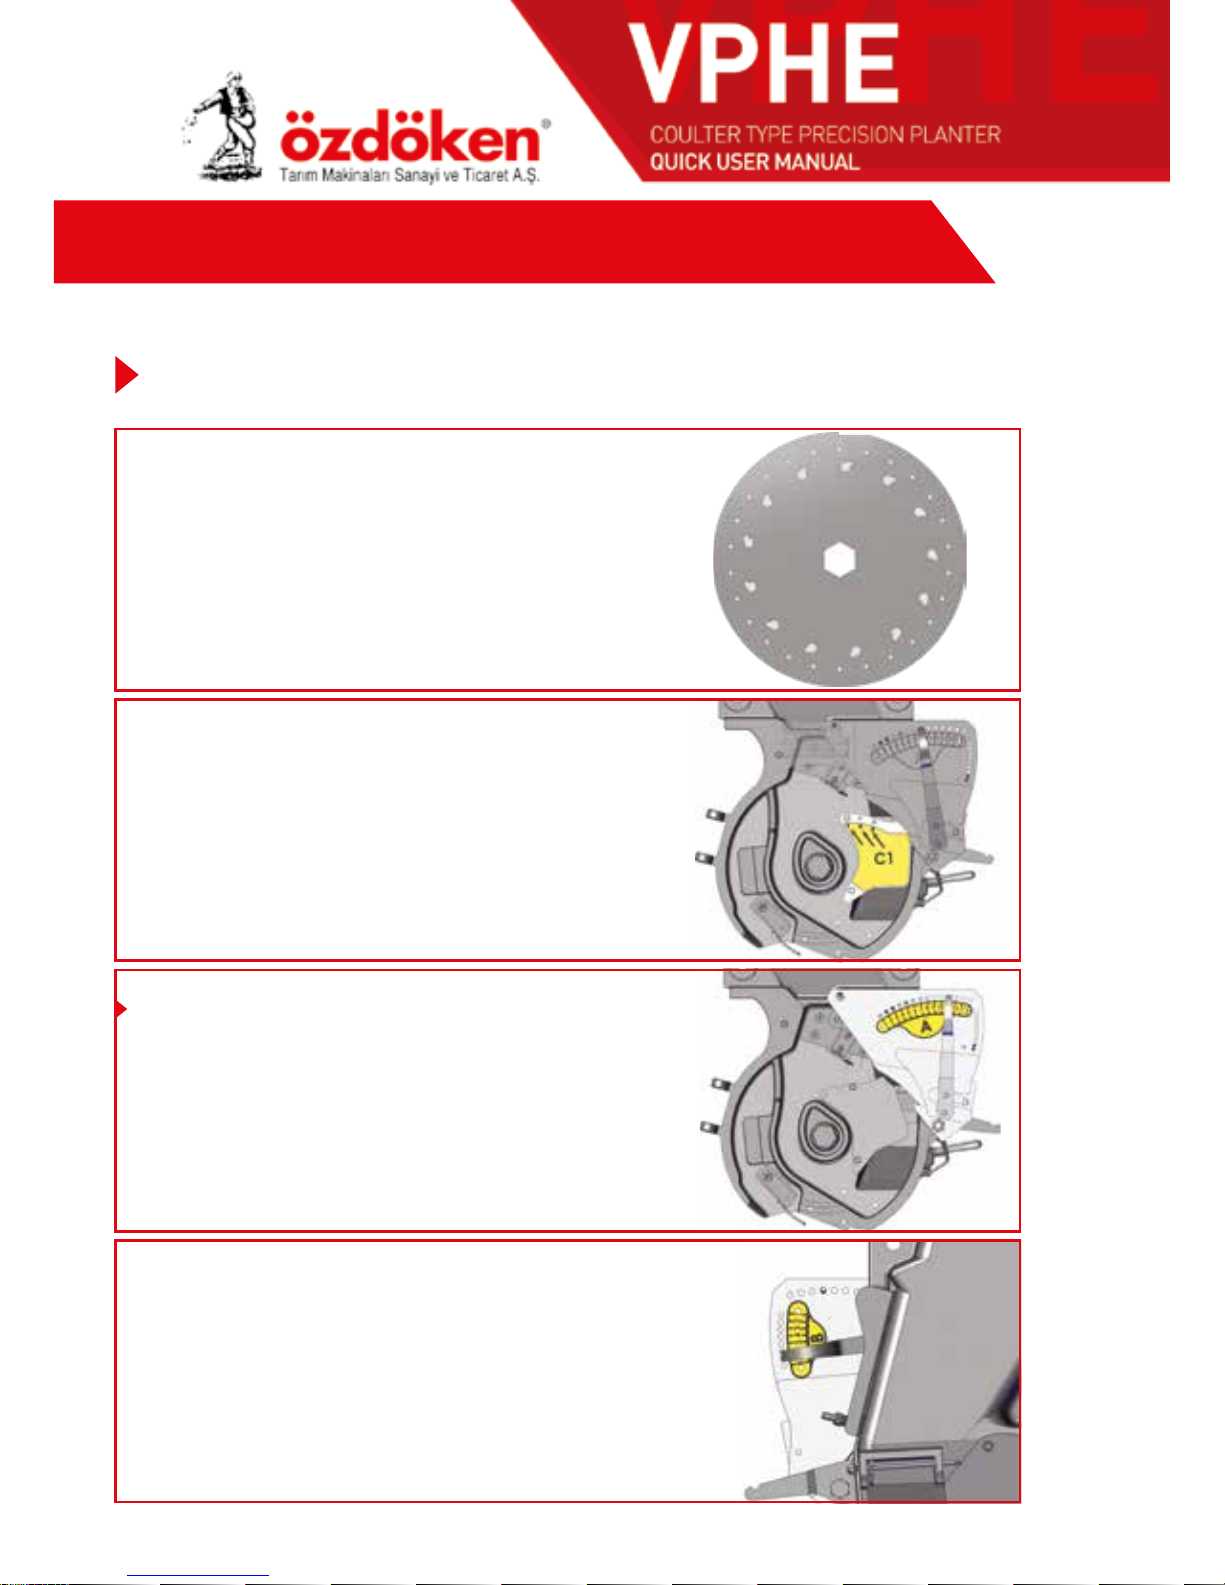
QUICK SETTING TABLE
OVERFLOW PLATES
C1 Plate should be fixed to hole No. “1”
SEEDING DISC
• Ø3.5 mm or Ø4 mm hole diameter
• Nail mixer
• Preferably “20” or “26” holes
We recommend, to set your machine to the following values for Corn seeds.
CORN SEED (Small Size / Popcorn Size)
SELECTORS (SINGULATORS)
A SELECTOR SETTING
Outer selector handle should be fixed to hole
no. “10” or “11”
B SELECTOR SETTING
Inner selector handle should be
fixed to hole no. “4” or “5”
44
Page 45
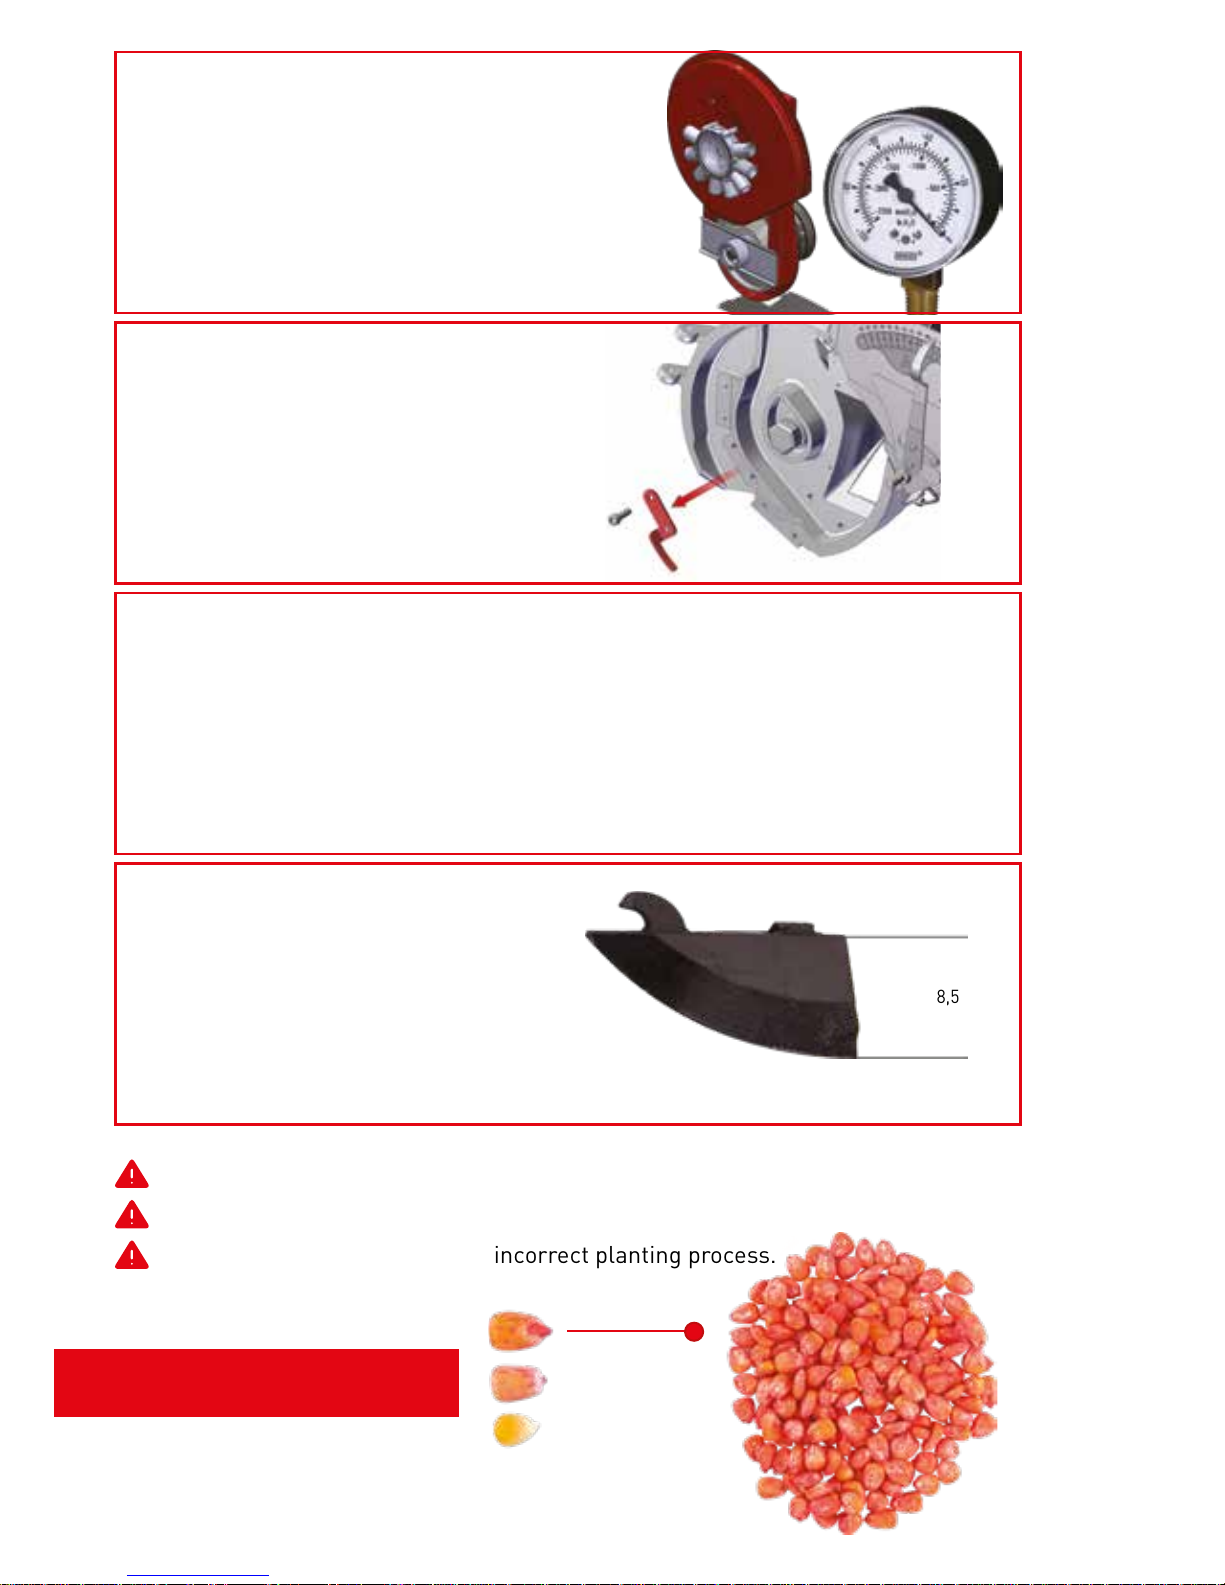
Setting shown above can fluctuate.
After applying the settings, test the machine.
The user is responsible for any incorrect planting process.
FAN (VACCUMETER SETTING)
Manometer should be arranged around
50-60 bars.
ATTENTION: Pressure value can be
decreased or increased for small or big
size seeds relatively.
Corn Seed
Big Size
SEEDING COULTER
For Corn seeds, coulter depth
should be (8.5 cm).
8,5 cm
remove
SEED SCRAPER
ATTENTION: REMOVE!!!
Scraper must not be attached.
CONSIDERATIONS
1.The seeds to be used for plantation process must be dry.
2. Humid or wet seeds must not be used.
3. Sometimes seeds are wetted and are coated with a wet layer of medicine
to protect them. while planting these seeds, medicine on them sticks to the
holes of the disc and act as an obstacle for turning of the discs. So, seeding
distance and seed planting process are affected.
45
Page 46
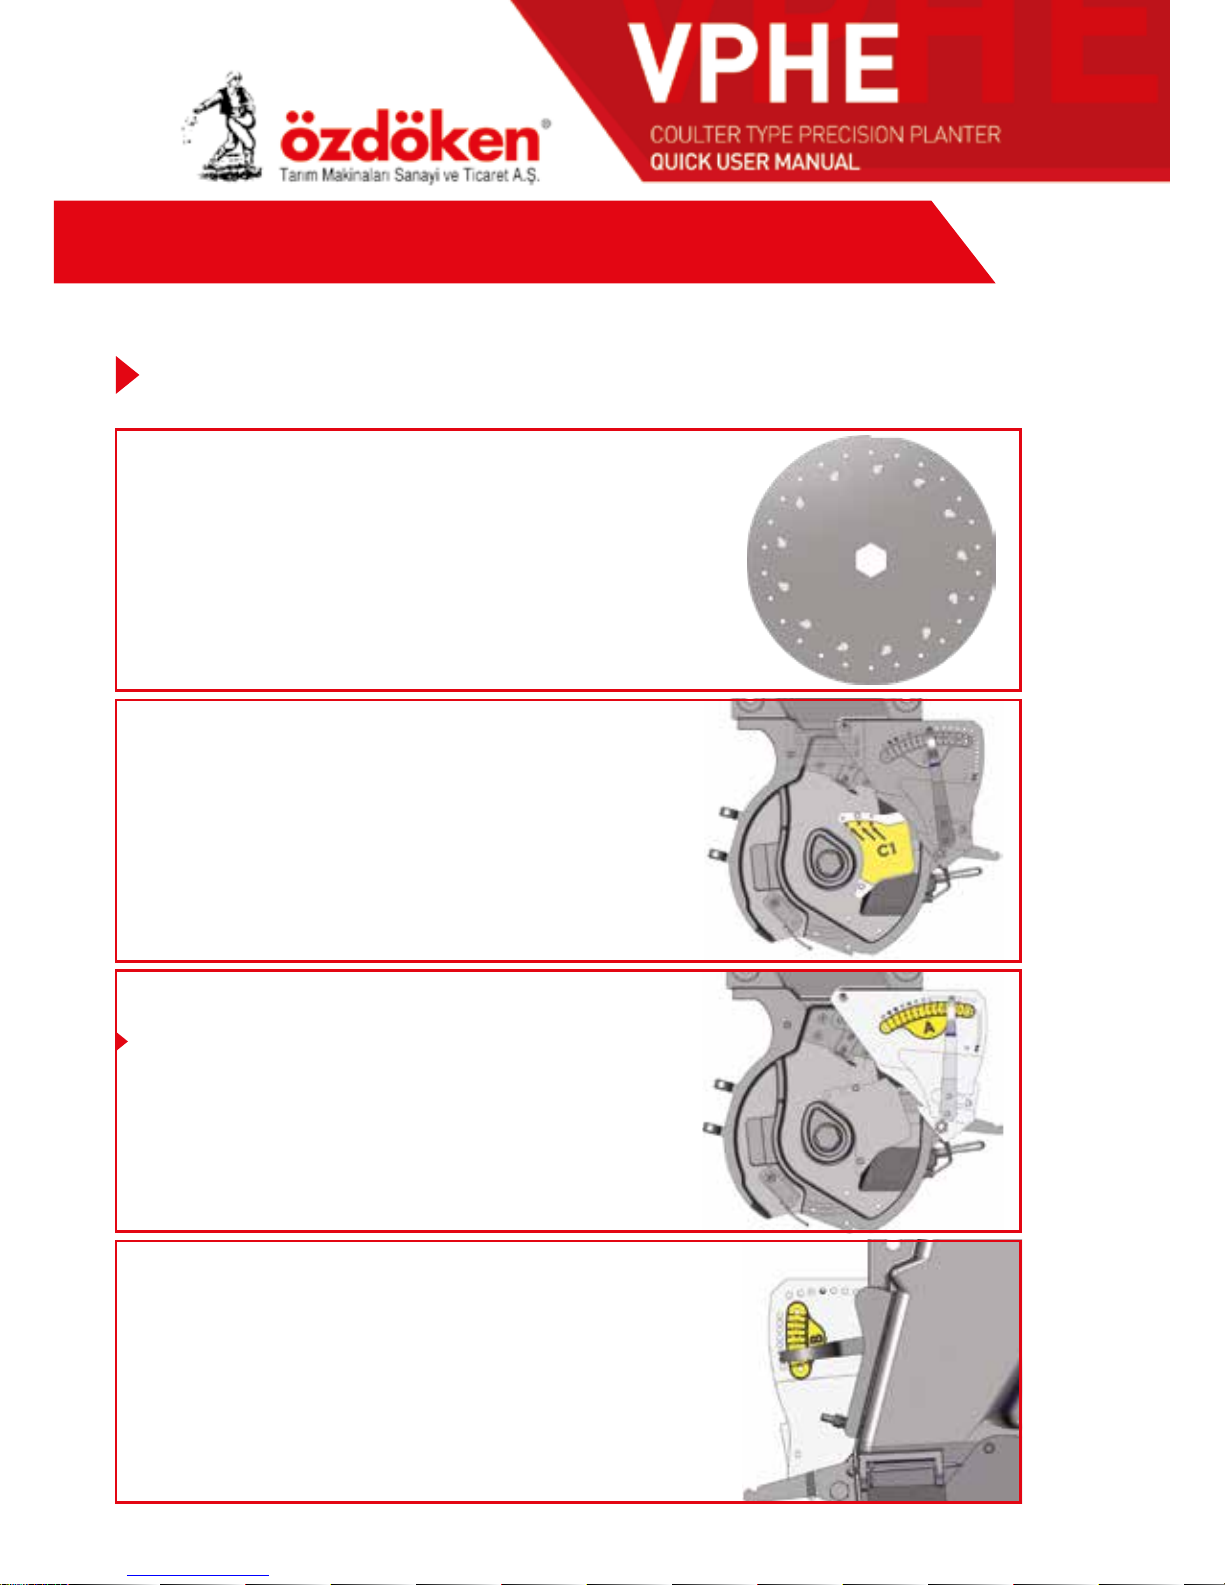
QUICK SETTING TABLE
B SELECTOR SETTING
Inner selector handle should be
fixed to hole no. “7”
SELECTORS (SINGULATORS)
A SELECTOR SETTING
Outer selector handle should be fixed to
hole no. “12”
C1 plate should be fixed to hole no. “2”
OVERFLOW PLATES
We recommend, to set your machine to the following values for Bean seeds.
BEANS SEED
(Normal Size 10 mm – 11 mm)
SEEDING DISC
• Ø4.5mm or Ø5mm hole diameter
• Nail mixers
• Preferably “26” holes
46
Page 47
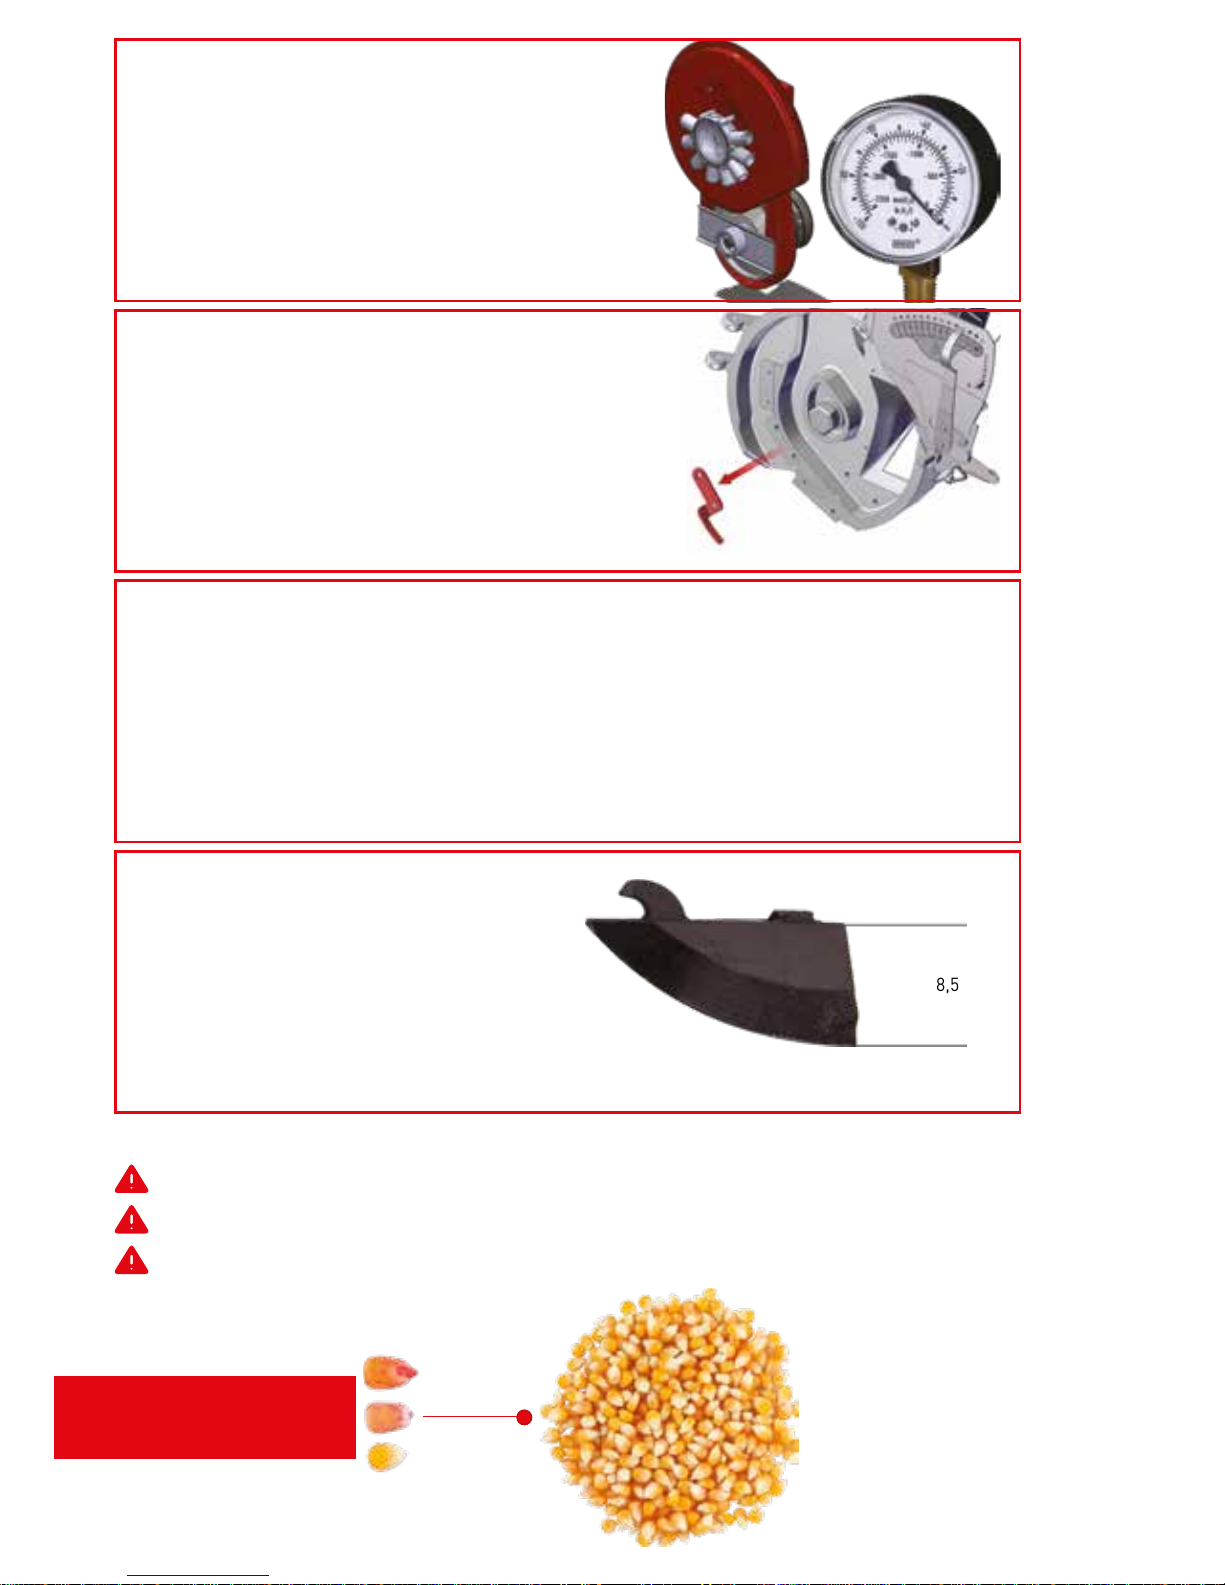
Setting shown above can fluctuate.
After applying the settings, test the machine.
The user is responsible for any incorrect planting process.
FAN (VACCUMETER SETTING)
Manometer should be arranged around
45-50 bars.
ATTENTION: Pressure value can be
decreased or increased for small or big
seeds relatively.
Corn Seed
Small Size
SEEDING COULTER
For Corn seeds, coulter depth
should be (8.5 cm).
8,5 cm
SEED SCRAPER
ATTENTION: REMOVE!!!
Scraper must not be attached.
remove
CONSIDERATIONS
1.The seeds to be used for plantation process must be dry.
2. Humid or wet seeds must not be used.
3. Sometimes seeds are wetted and are coated with a wet layer of medicine to protect
them. while planting these seeds, medicine on them sticks to the holes of the disc
and act as an obstacle for turning of the discs. So, seeding distance and seed planting
process are affected.
47
Page 48
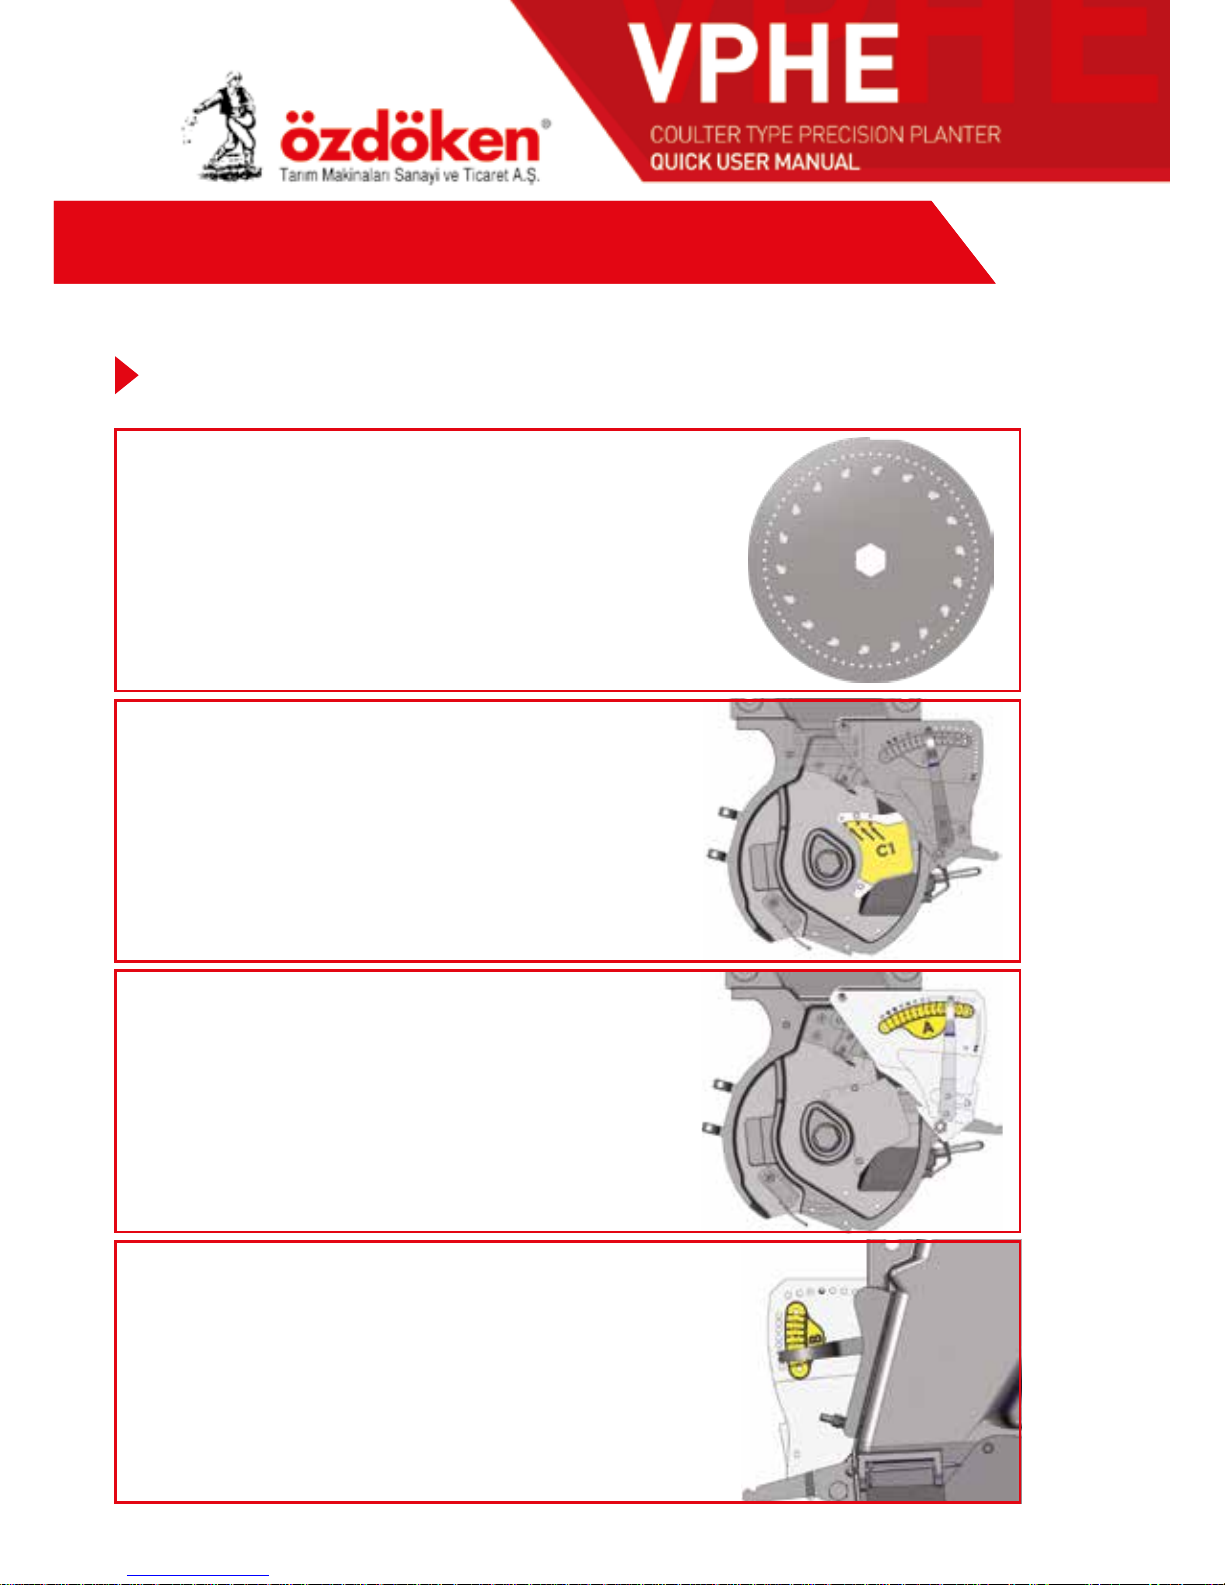
QUICK SETTING TABLE
B SELECTOR SETTING
Inner selector handle should be
fixed to hole no. “4” or “5”
SELECTORS (SINGULATORS)
A SELECTOR SETTING
Outer selector handle should be fixed to hole
no. “10” or “11”
OVERFLOW PLATES
C1 plate should be fixed to hole No. “2”
SEEDING DISC
• Ø3.5mm hole diameter
• Nail mixer
• Preferably “72” holes
We recommend, to set your machine to the following values for Cotton seeds.
COTTON SEED
48
Page 49
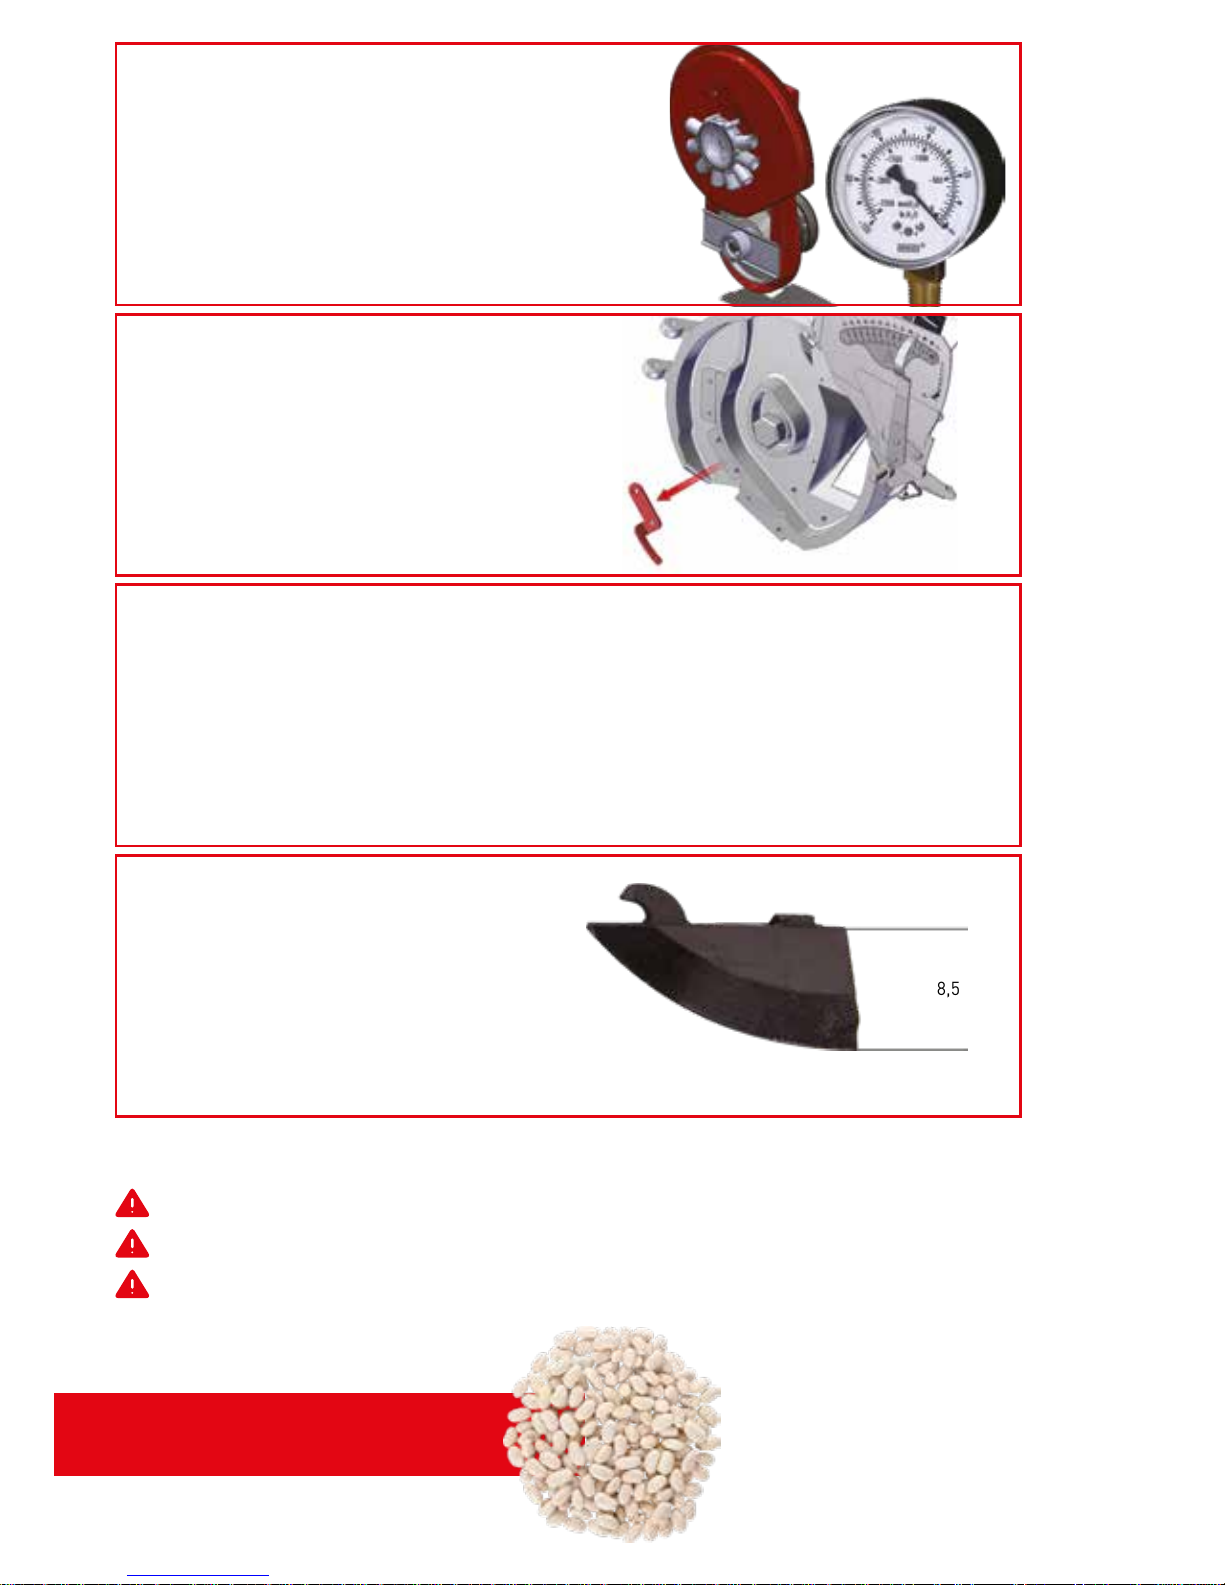
Setting shown above can fluctuate.
After applying the settings, test the machine.
The user is responsible for any incorrect planting process.
FAN (VACCUMETER SETTING)
Manometer should be arranged around
45-50 bars.
ATTENTION: Pressure value should be
50-55 bars for bigger bean seeds.
SEED SCRAPER
ATTENTION: REMOVE!!!
Scraper must not be attached.
remove
Bean Seeds
CONSIDERATIONS
1.The seeds to be used for plantation process must be dry.
2. Humid or wet seeds must not be used.
3. Sometimes seeds are wetted and are coated with a wet layer of medicine to protect
them. while planting these seeds, medicine on them sticks to the holes of the disc
and act as an obstacle for turning of the discs. So, seeding distance and seed planting
process are affected.
SEEDING COULTER
For Bean seeds, coulter depth
should be (8.5 cm).
8,5 cm
49
Page 50
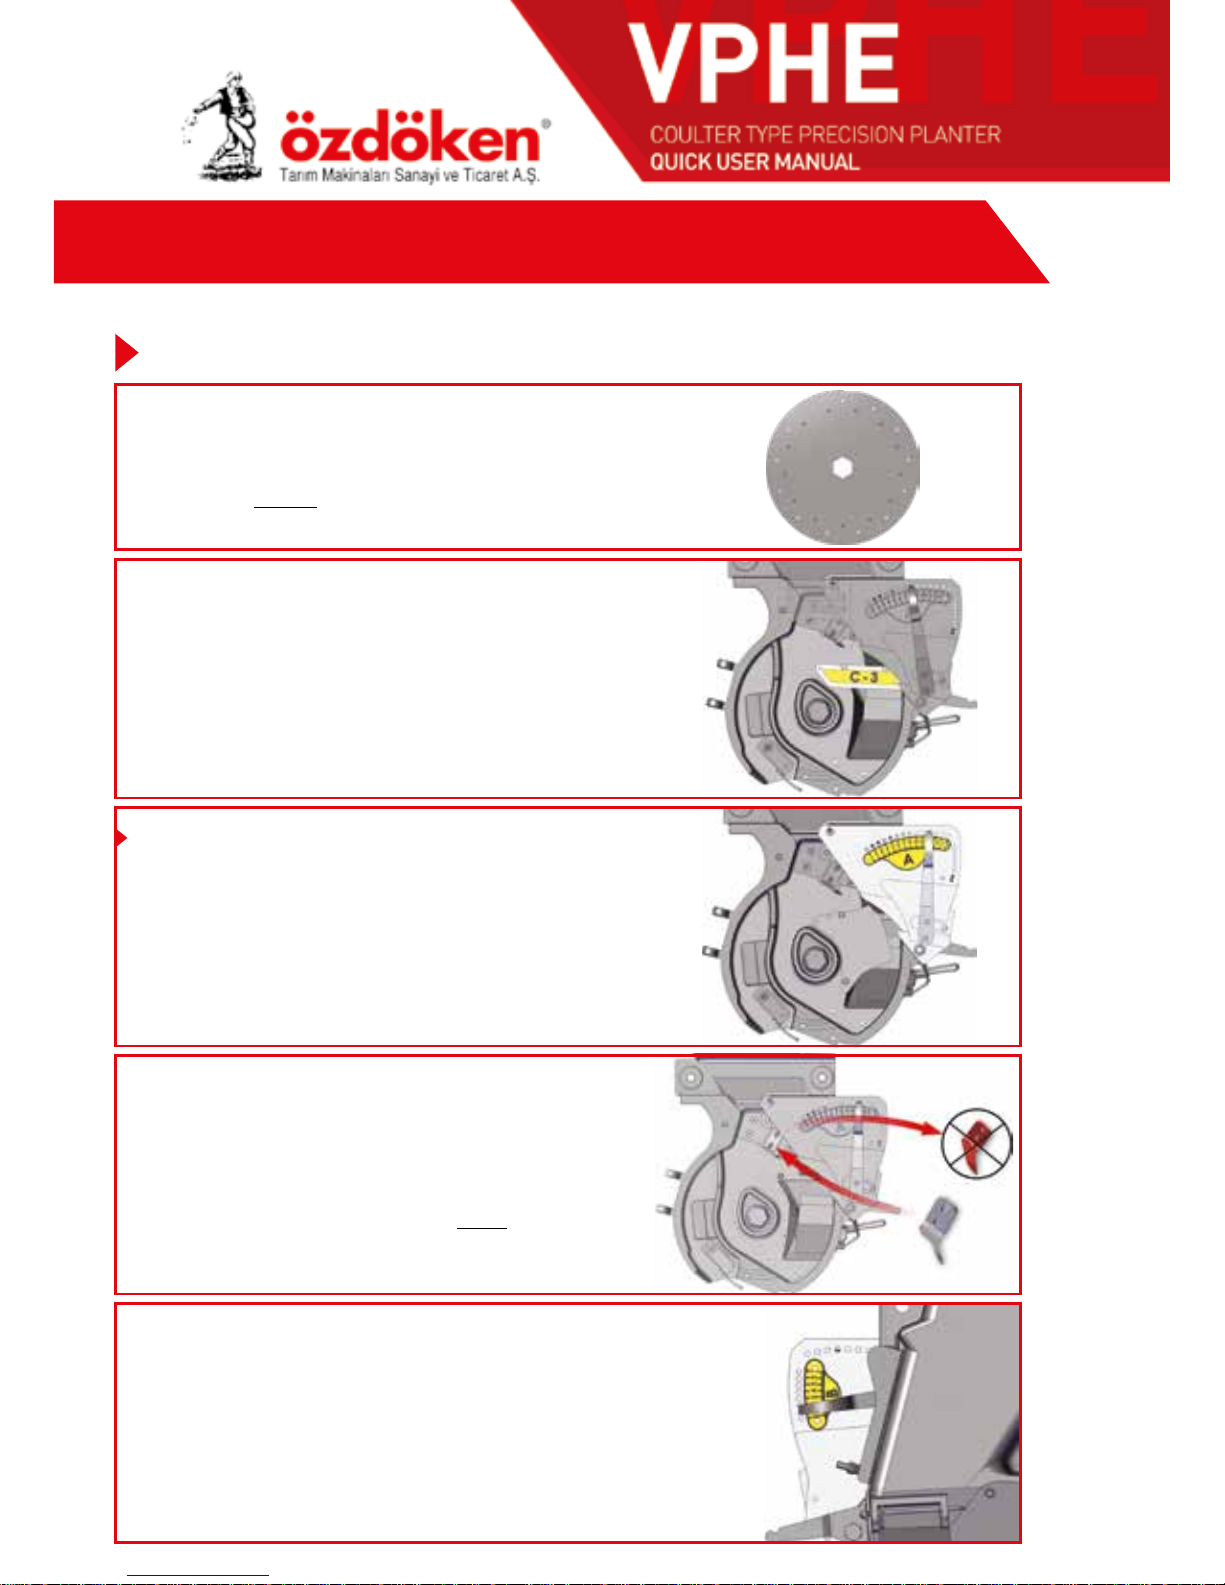
SUNFLOWER SEEDS (Big Size)
SEEDING DISC
• Ø4mm hole diameter
• Special THIN round mixer
• Preferably “13” holes
SELECTORS (SINGULATORS)
A SELECTOR SETTING
Outer selector handle should be fixed to hole
no. “12” or “13”
B SELECTOR SETTING
Inner selector handle should be
fixed to hole no. “8” or “9”
B SELECTOR - ATTENTION: REMOVE
The standard selector plate located on The Internal
selector will be removed. Instead of this special selector
plate for this seed will be attached. With this special
selector plate, a seeding disc with THIN nail mixers
must be used. Never use this plate with other seeding
discs. It damages the machine.
OVERFLOW PLATES
• Only C3 plate should be attached.
• C1 plate will be removed.
QUICK SETTING TABLE
We recommend, to set your machine to the following values for Sunflower seeds.
50
Page 51
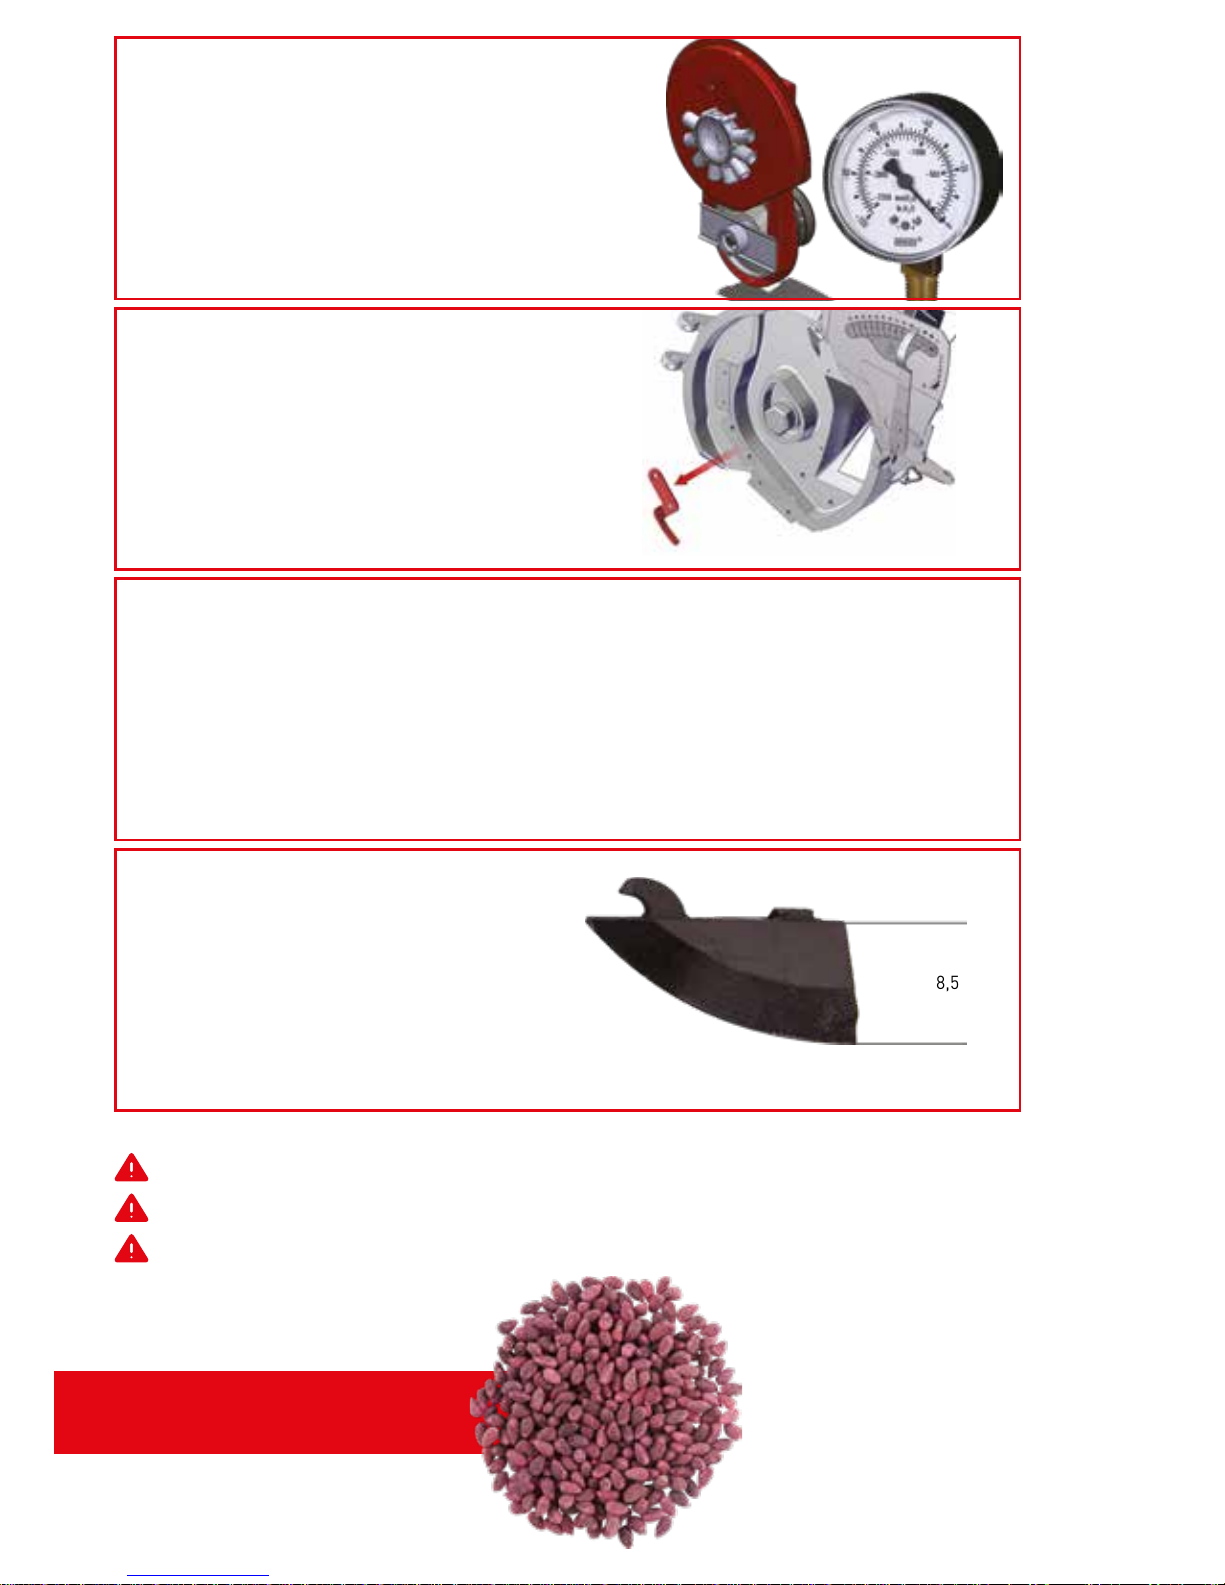
Setting shown above can fluctuate.
After applying the settings, test the machine.
The user is responsible for any incorrect planting process.
Cotton Seed
FAN (VACCUMETER SETTING)
Manometer should be arranged
around 40-45 bars.
SEED SCRAPER
ATTENTION: REMOVE!!!
Bu ekipman kullanılmayacaktır.
Yandaki resimde gözüken ekipman
sökülü olmalıdır.
remove
SEEDING COULTER
For Cotton seeds, coulter depth
should be (8.5 cm).
8,5 cm
CONSIDERATIONS
1.The seeds to be used for plantation process must be dry.
2. Humid or wet seeds must not be used.
3. Sometimes seeds are wetted and are coated with a wet layer of medicine to protect
them. While planting these seeds, medicine on them sticks to the holes of the disc
and act as an obstacle for turning of the discs. So, seeding distance and seed planting
process are affected.
51
Page 52
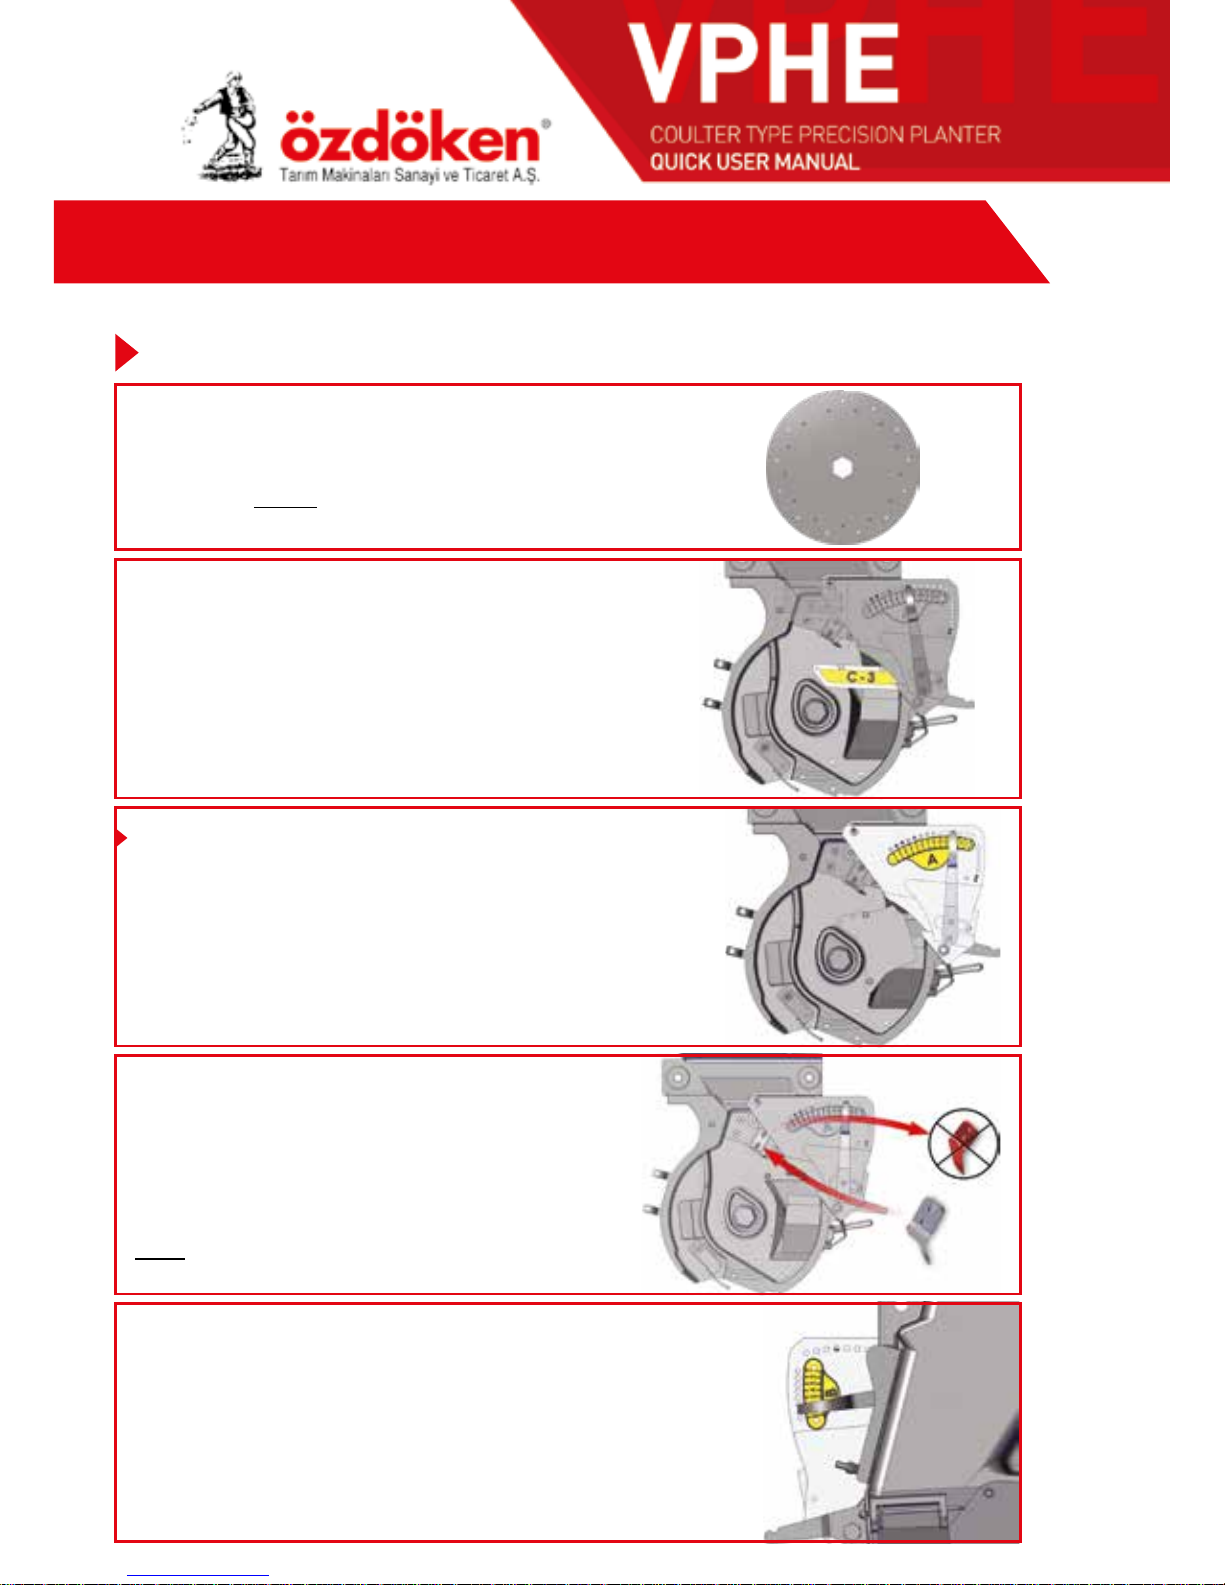
SUNFLOWER SEED (Medium Size)
SELECTORS (SINGULATORS)
A SELECTOR SETTING
Outer selector handle should be fixed to hole
no. “12” or “13”
B SELECTOR SETTING
Inner selector handle should be
fixed to hole no. “8” or “9”
B SELECTOR - ATTENTION: REMOVE
The standard selector plate located on The Internal
selector will be removed. Instead of This special
selector plate for this seed will be attached.
With this special selector plate, a seeding disc with
THIN nail mixers must be used. Never use this plate
with other seeding discs. It damages the machine.
OVERFLOW PLATES
• Only C2 plate should be attached.
• C1 plate will be removed.
SEEDING DISC
• Ø3.5mm hole Diameter
• Special THIN round mixer
• Preferably “13” holes
QUICK SETTING TABLE
We recommend, to set your machine to the following values for Sunflower seeds.
52
Page 53
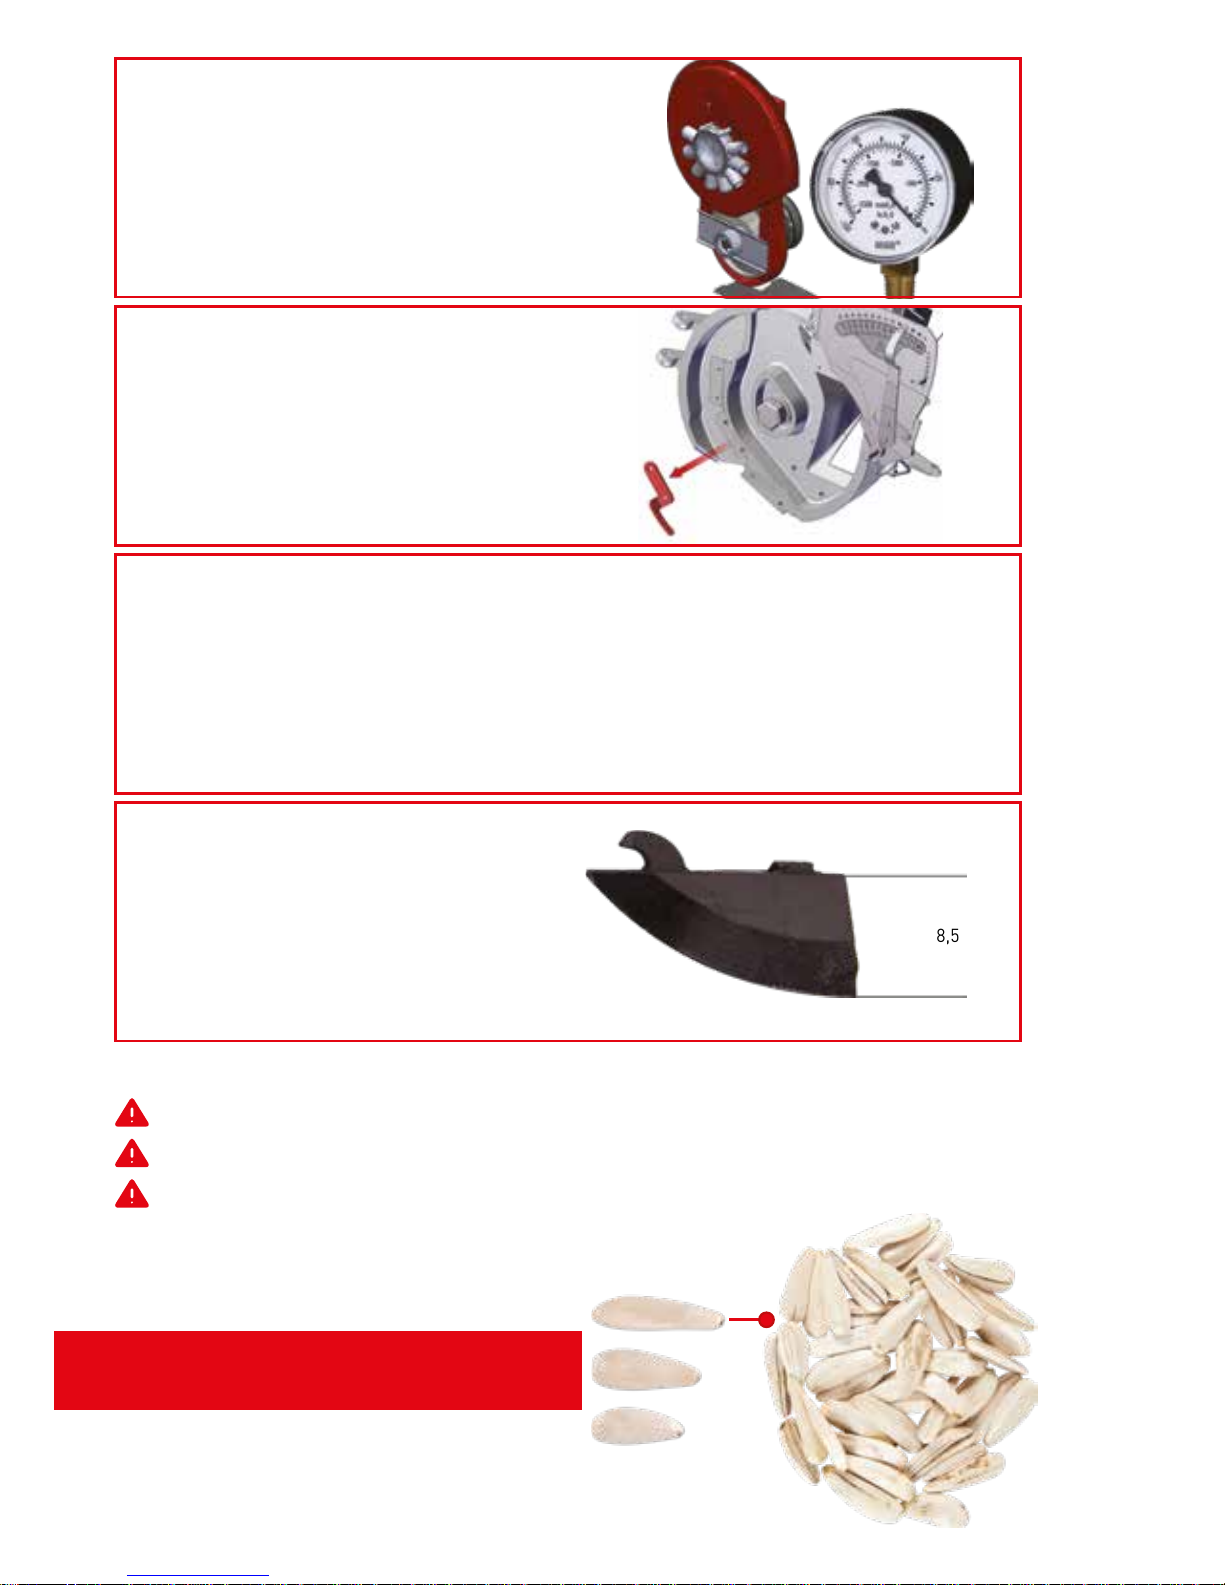
Sunflower Seed
Biggest Size
Setting shown above can fluctuate.
After applying the settings, test the machine.
The user is responsible for any incorrect planting process.
SEEDING COULTER
For Sunflower seeds, coulter depth
should be (8.5 cm).
8,5 cm
FAN (VACCUMETER SETTING)
Manometer should be arranged
around 60-65 bars.
SEED SCRAPER
ATTENTION: REMOVE!!!
Scraper must not be attached.
remove
CONSIDERATIONS
1.The seeds to be used for plantation process must be dry.
2. Humid or wet seeds must not be used.
Note: While planting this seed, the use of seed controller sensor is highly recommended.
This sensor controls every unit, whether it is planting the seed or not. This tool is optional
and is provided on request.
53
Page 54
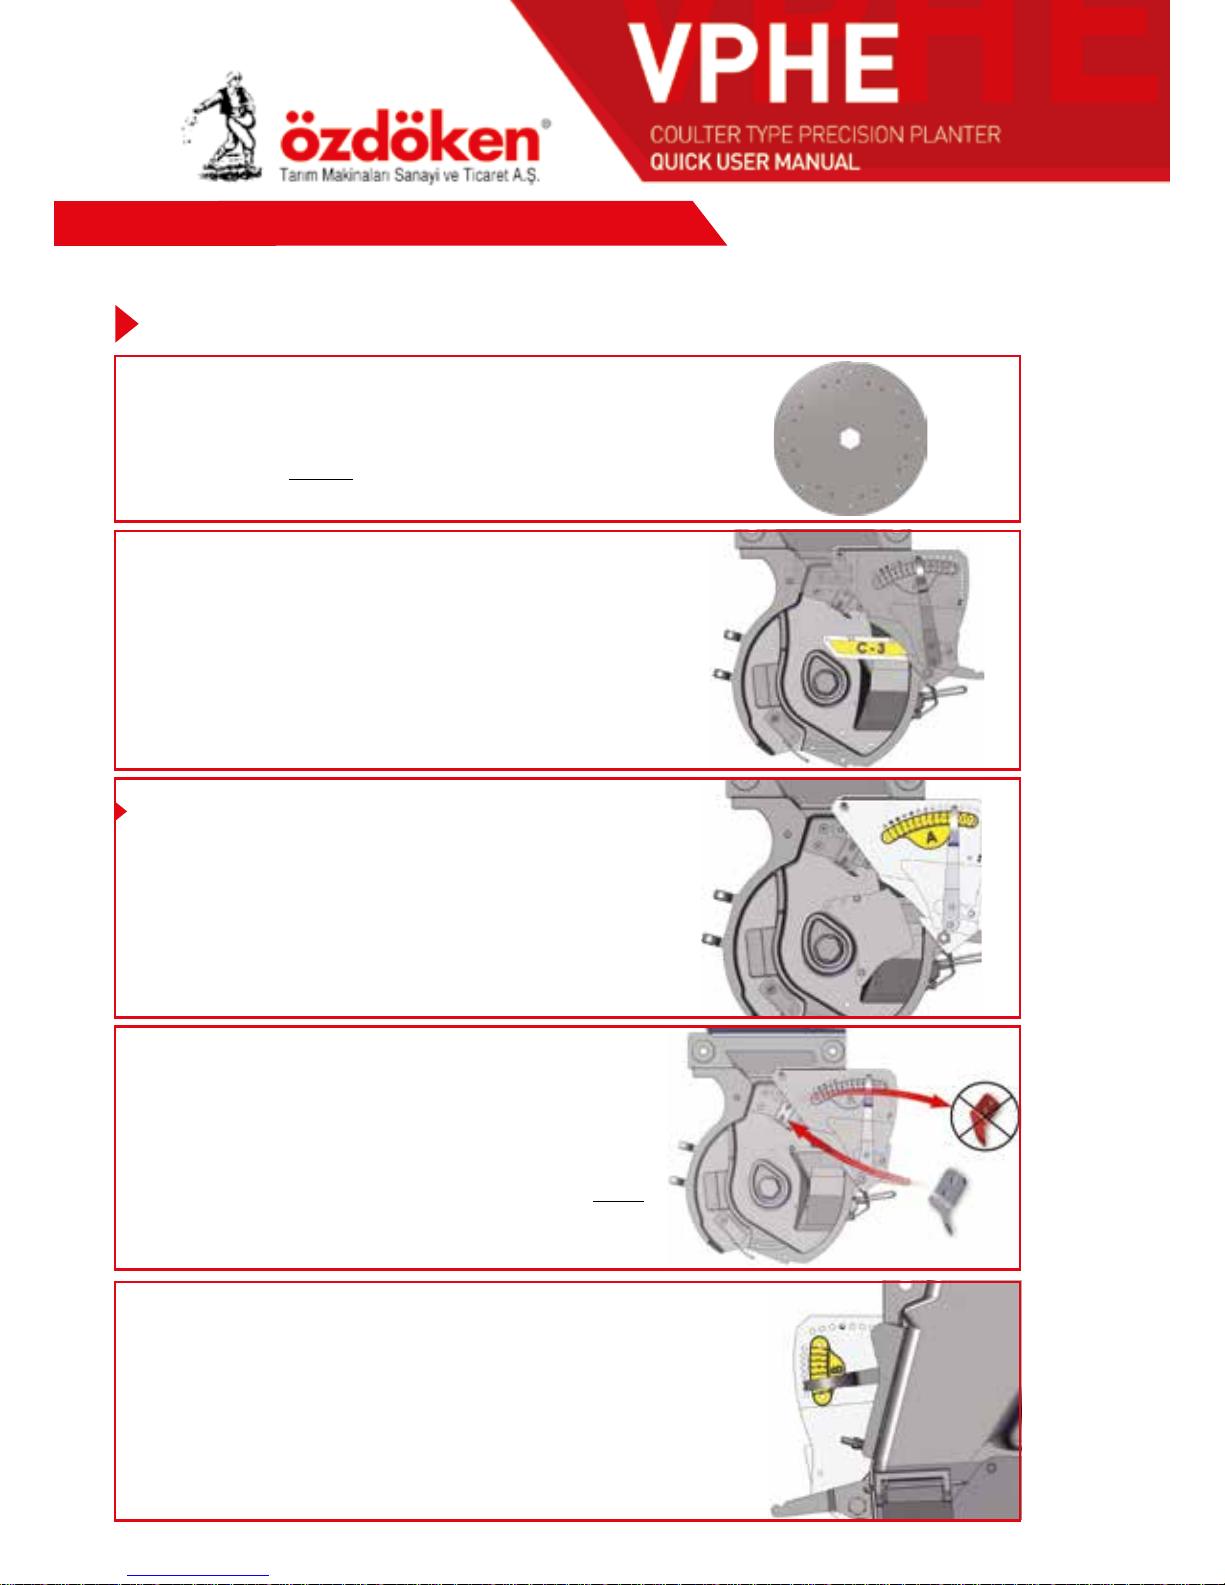
PUMPKIN SEED
SELECTORS (SINGULATORS)
A SELECTOR SETTING
Outer selector handle should be fixed to hole
no. “12” or “13”
B SELECTOR SETTING
Inner selector handle should be
fixed to hole no. “8” or “9”
B SELECTOR - ATTENTION: REMOVE
He the standard selector plate located on the Internal
selector will be removed. Instead of this special selector
plate for this seed will be attached.
With this special selector plate, a seeding disc with THIN
nail mixers must be used. Never use this plate with
other seeding discs. It damages the machine.
OVERFLOW PLATES
• Only C3 plate should be attached.
• C1 plate will be removed.
SEEDING DISC
• Ø3.5mm or Ø4mm hole diameter
• Special 16 THIN round mixer plate
• Preferably “8” holes
QUICK SETTING TABLE
We recommend, to set your machine to the following values for Pumpkin seeds.
54
Page 55
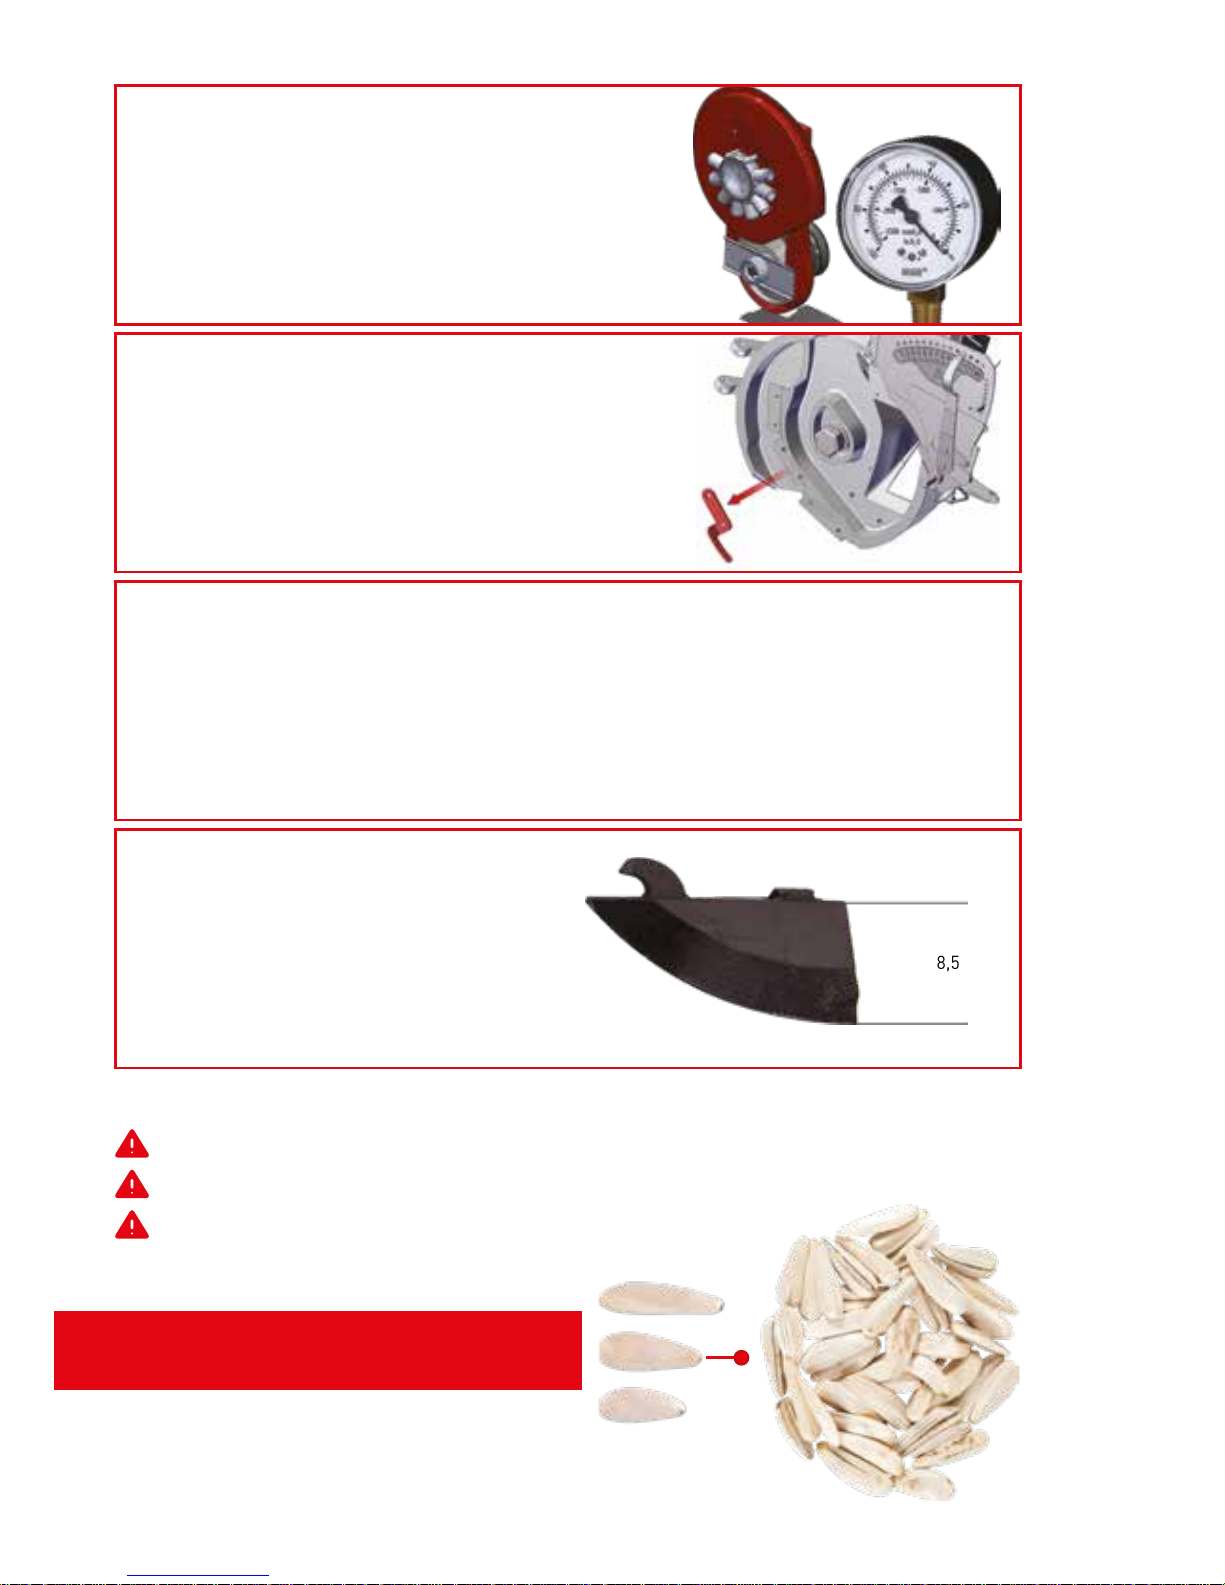
Sunflower Seed
Medium Size
SEEDING COULTER
For Sunflower seeds, coulter depth
should be (8.5 cm).
8,5 cm
FAN (VACCUMETER SETTING)
Manometer should be arranged
around 55-60 bars.
SEED SCRAPER
ATTENTION: REMOVE!!!
Scraper must not be attached.
remove
CONSIDERATIONS
1.The seeds to be used for plantation process must be dry.
2. Humid or wet seeds must not be used.
Note: While planting this seed, the use of seed controller sensor is highly recommended.
This sensor controls every unit, whether it is planting the seed or not. This tool is optional
and is provided on request.
Setting shown above can fluctuate.
After applying the settings, test the machine.
The user is responsible for any incorrect planting process.
55
Page 56
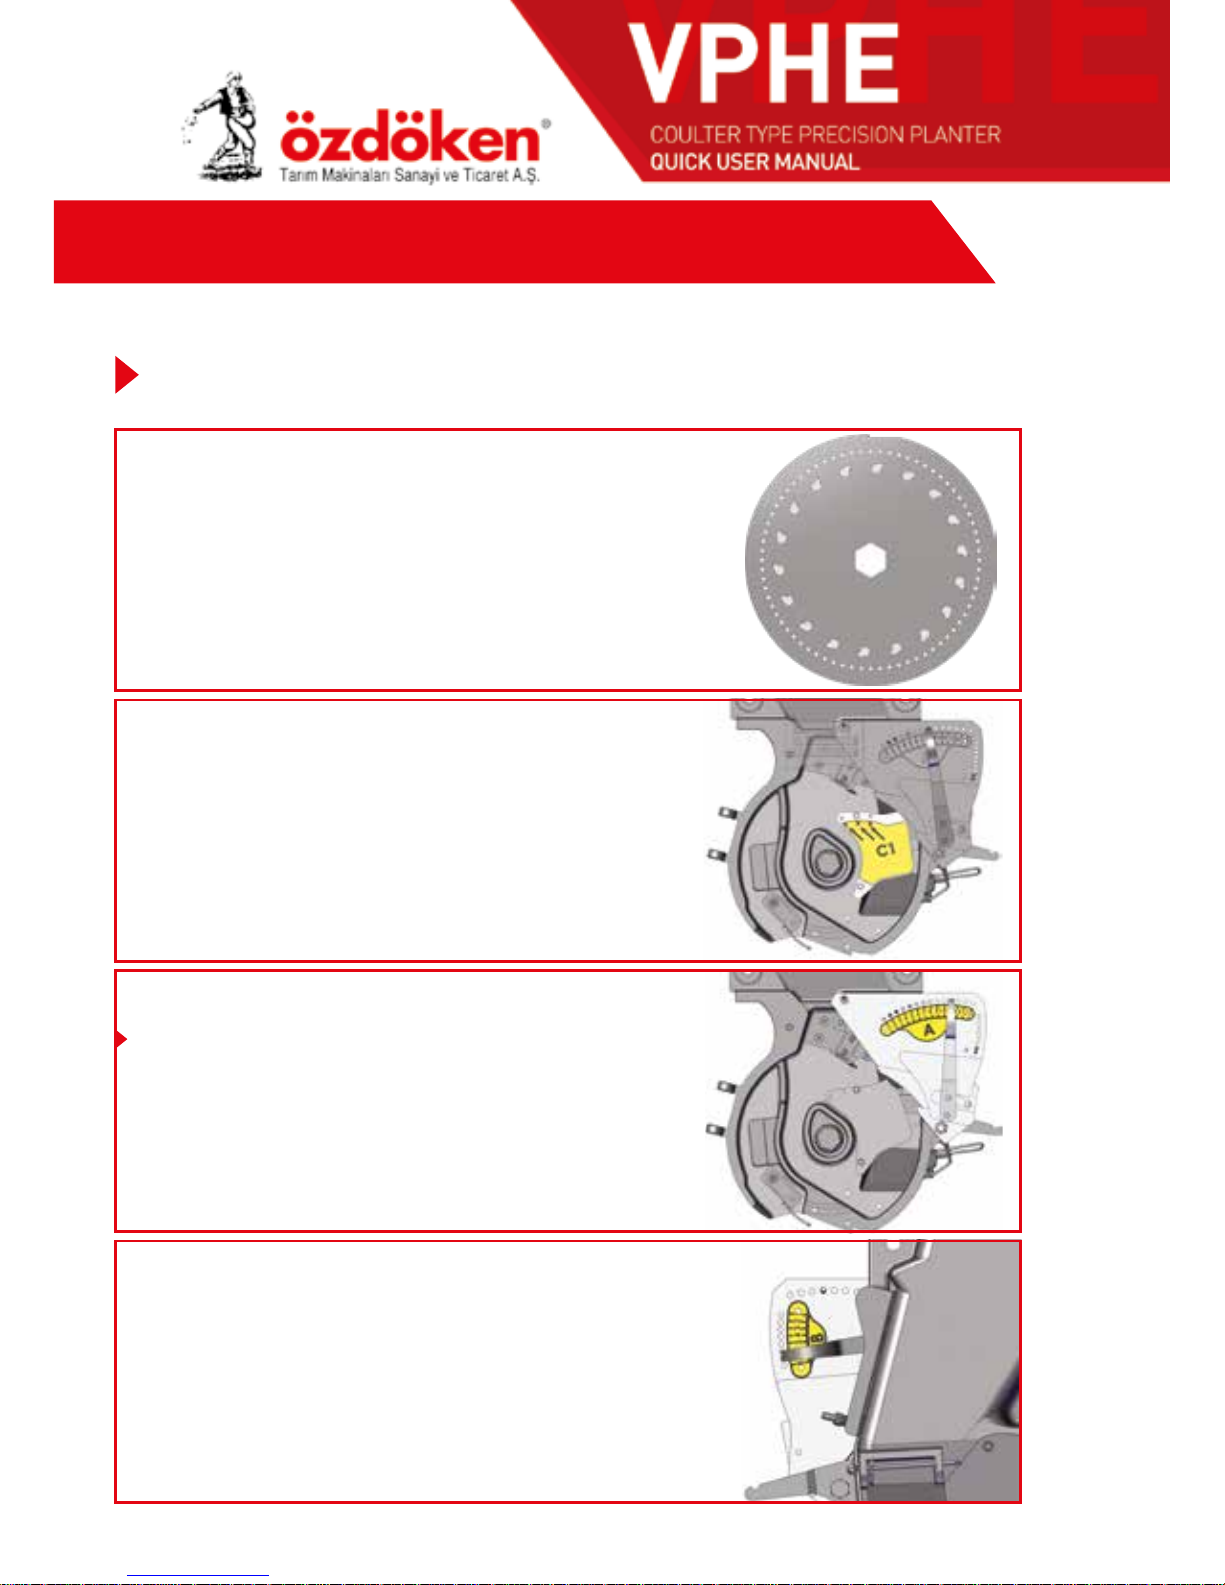
QUICK SETTING TABLE
OVERFLOW PLATES
C1 plate should be fixed to hole no. “2”
Note: Plate can be inserted to hole no. “3”
if the seed size is bigger.
SEEDING DISC
• Ø3.5mm hole diameter
• Nail mixers
• Preferably “72” holes
SOYBEAN SEEDS
SELECTORS (SINGULATORS)
A SELECTOR SETTING
Outer selector handle should be fixed to hole
no. “10” or “11”
B SELECTOR SETTING
Inner selector handle should be
fixed to hole no. “4” or “5”
We recommend, to set your machine to the following values for Soybean seeds.
56
Page 57
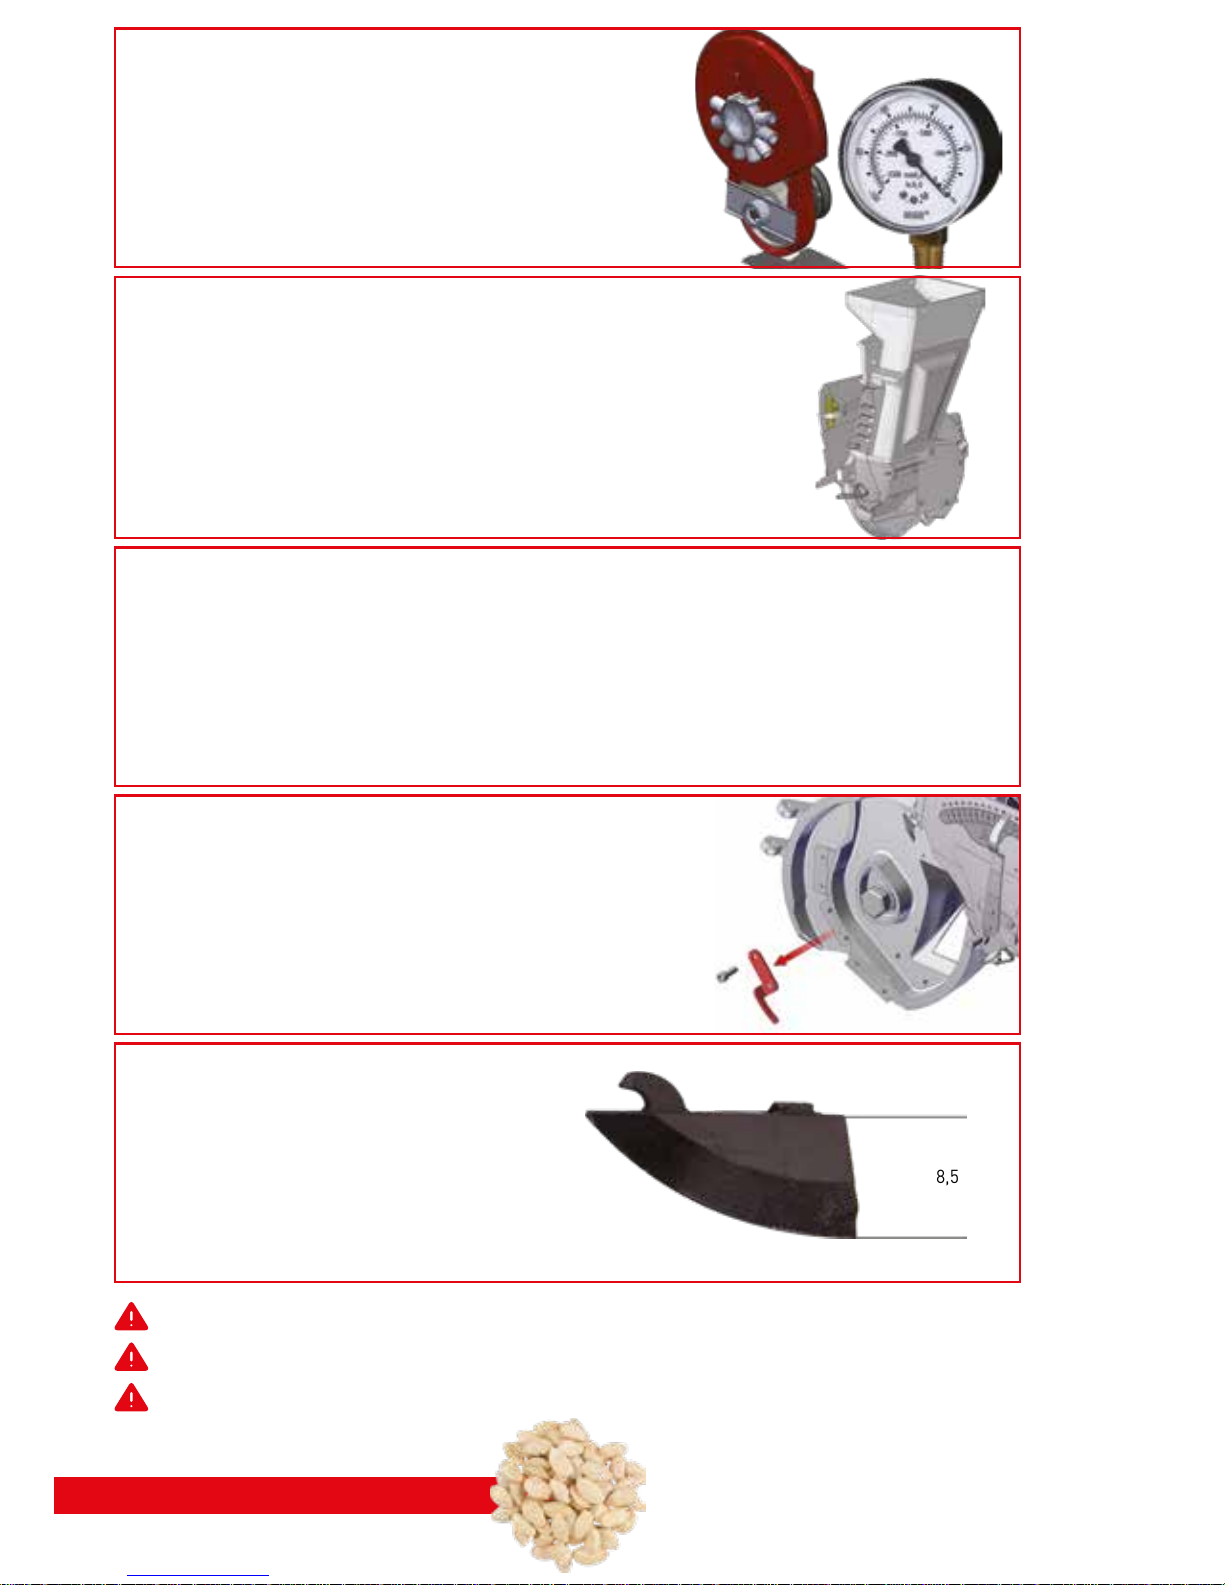
Pumpkin Seed
Setting shown above can fluctuate.
After applying the settings, test the machine.
The user is responsible for any incorrect planting process.
FAN (VACCUMETER SETTING)
Manometer should be arranged
around 60-65 bars.
ALUMINUM SEEDING UNIT
ATTENTION!!!
While planting Pumpkin, we recommend that the side wall
of the seeding unit must be open for the smooth flow of the
seeds.
Please bear this in mind and order the machine accordingly.
CONSIDERATIONS
1.The seeds to be used for plantation process must be dry.
2. Humid or wet seeds must not be used.
3. If uncoated seeds are to be used for plantation process, seeds must be sprayed with “CHILD POWDER”. This way, the flow
of the seeds would be much smoother.
4. Seeding hopper should be filled as follows;
If side wall of seeding unit is closed --- 1LT or 2 LT
If side wall of seeding unit is opened --- 4LT or 6 LT
Note: While planting this seed, the use of seed controller sensor is highly recommended. This sensor controls every unit,
whether it is planting the seed or not. This tool is optional and is provided on request.
SEEDING COULTER
For Pumpkin seeds, coulter depth
should be (8.5 cm).
8,5 cm
SEED SCRAPER
ATTENTION: REMOVE!!!
Scraper must not be attached.
remove
57
Page 58
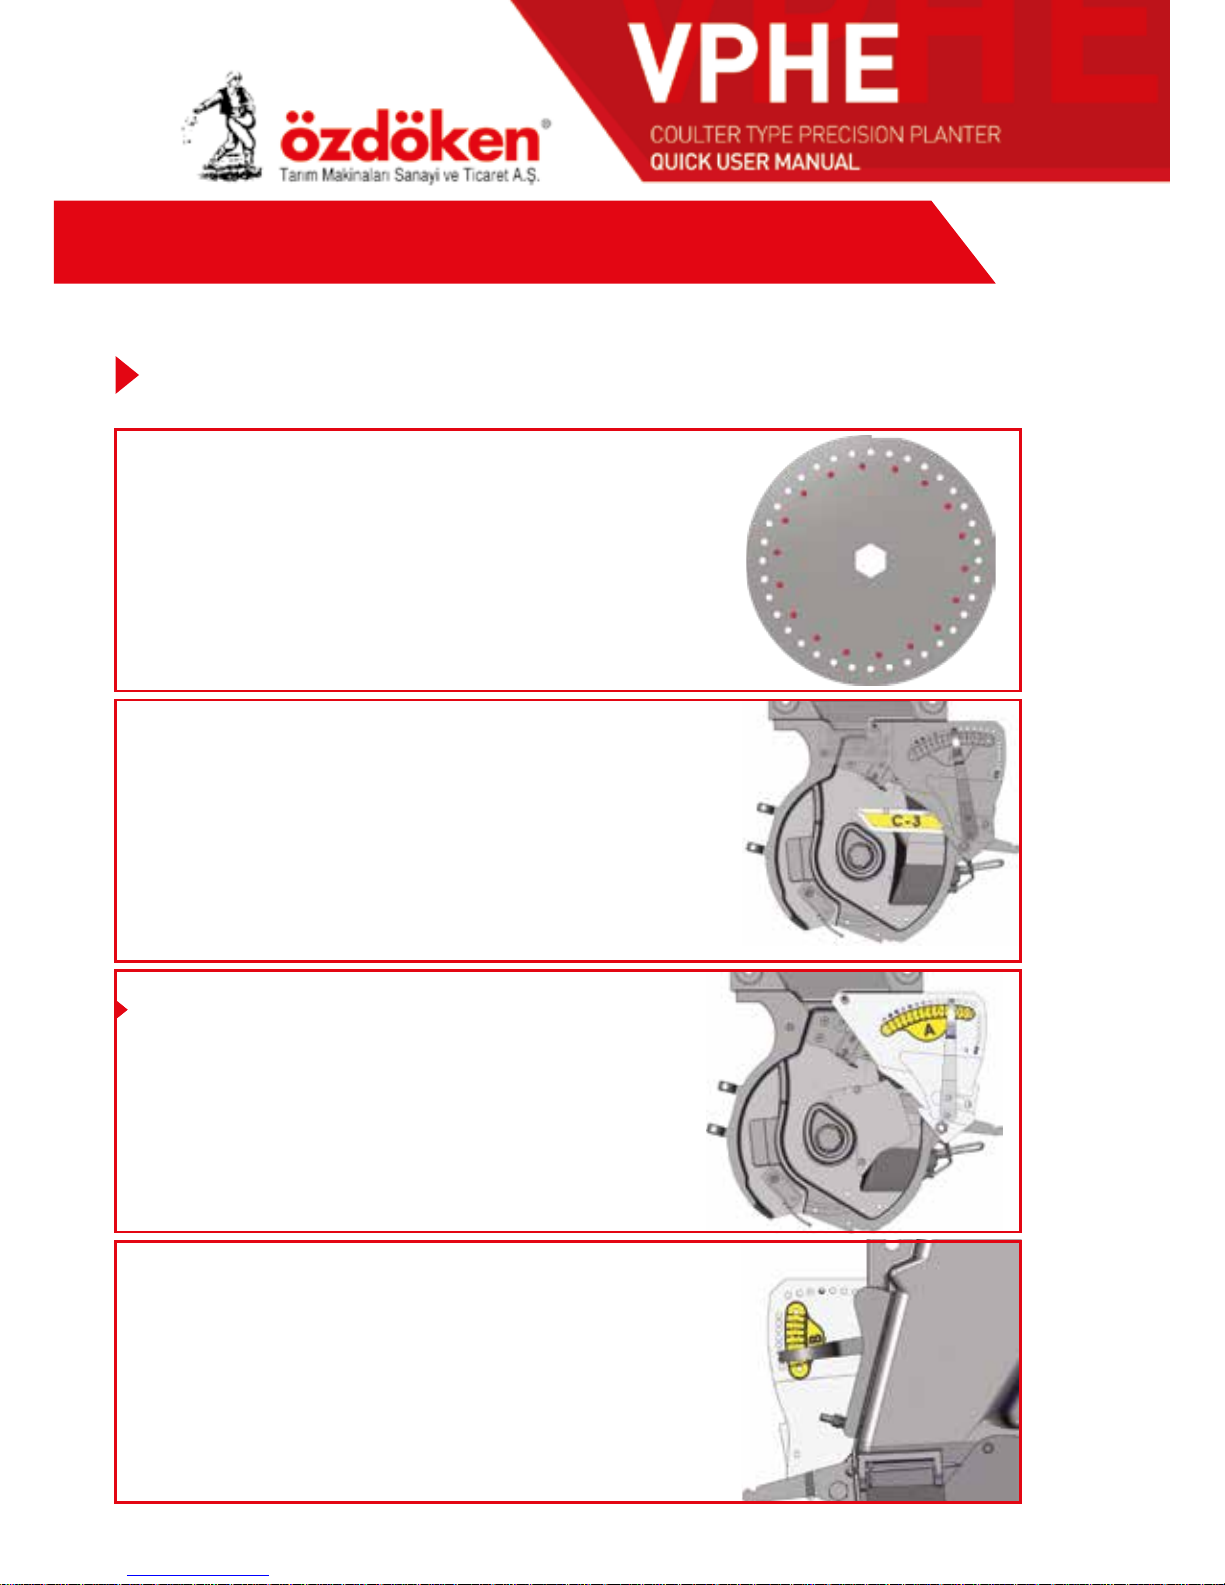
QUICK SETTING TABLE
SEEDING DISC
• Ø6.5 mm holes diameter
• Round mixers
• Preferably 36 holes
We recommend, to set your machine to the following values for Chickpea seeds.
CHICKPEA SEEDS (Big Size 9-10-11 mm)
OVERFLOW PLATES
C1 plate must be removed.
Only C3 plate must be attached.
Note; 1.Seeding hopper must not carry too much seeds.
2. Machine must not be used without these plates.
Otherwise, seeds will stuck in hopper and will damage
the nail mixers on the disc.
SELECTORS (SINGULATORS)
A SELECTOR SETTING
Outer selector handle should be fixed to
hole no. “14”
B SELECTOR SETTING
Inner selector handle should be
fixed to hole no. “9”
58
Page 59
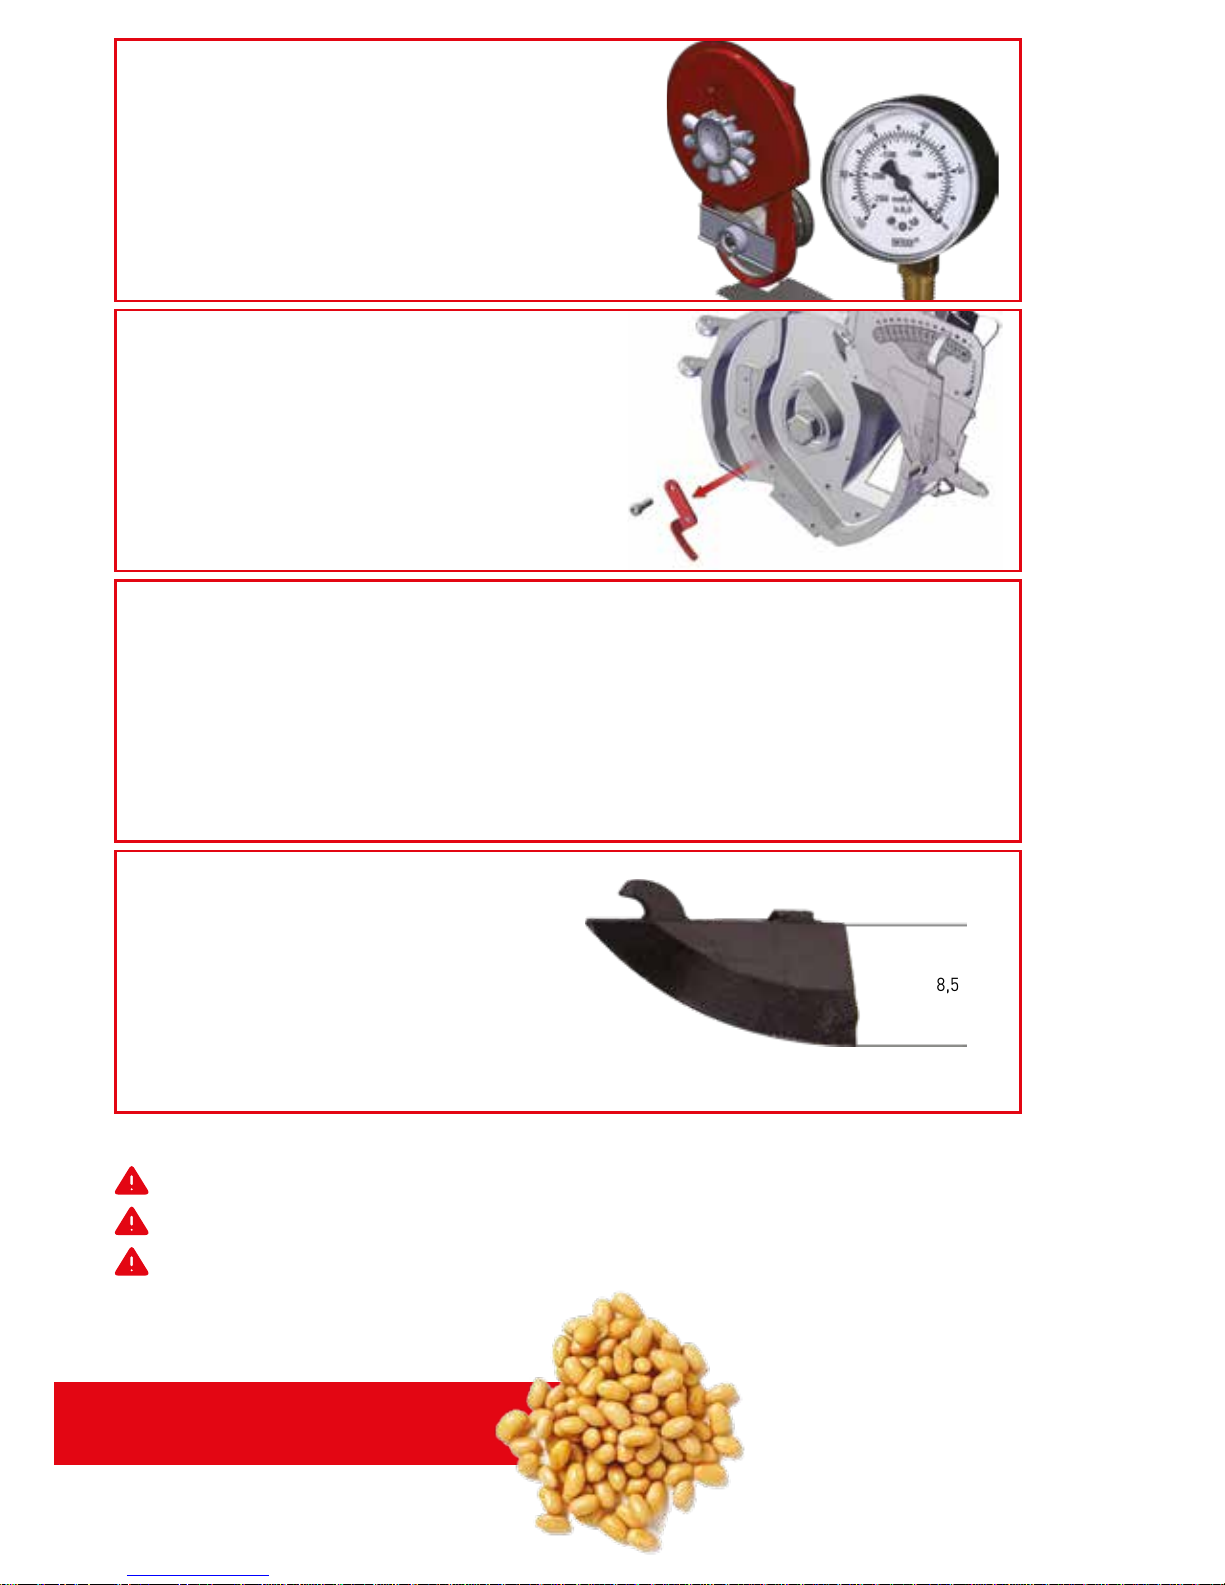
FAN (VACCUMETER SETTING)
Manometer should be arranged
around 45-50 bars.
SEEDING COULTER
For Soybean seeds, coulter depth
should be (8.5 cm).
8,5 cm
SEED SCRAPER
ATTENTION: REMOVE!!!
Scraper must not be attached.
remove
CONSIDERATIONS
1.The seeds to be used for plantation process must be dry.
2. Humid or wet seeds must not be used.
3. Sometimes seeds are wetted and are coated with a wet layer of medicine to protect
them. while planting these seeds, medicine on them sticks to the holes of the disc
and act as an obstacle for turning of the discs. So, seeding distance and seed planting
process are affected.
Soybean Seed
Setting shown above can fluctuate.
After applying the settings, test the machine.
The user is responsible for any incorrect planting process.
59
Page 60
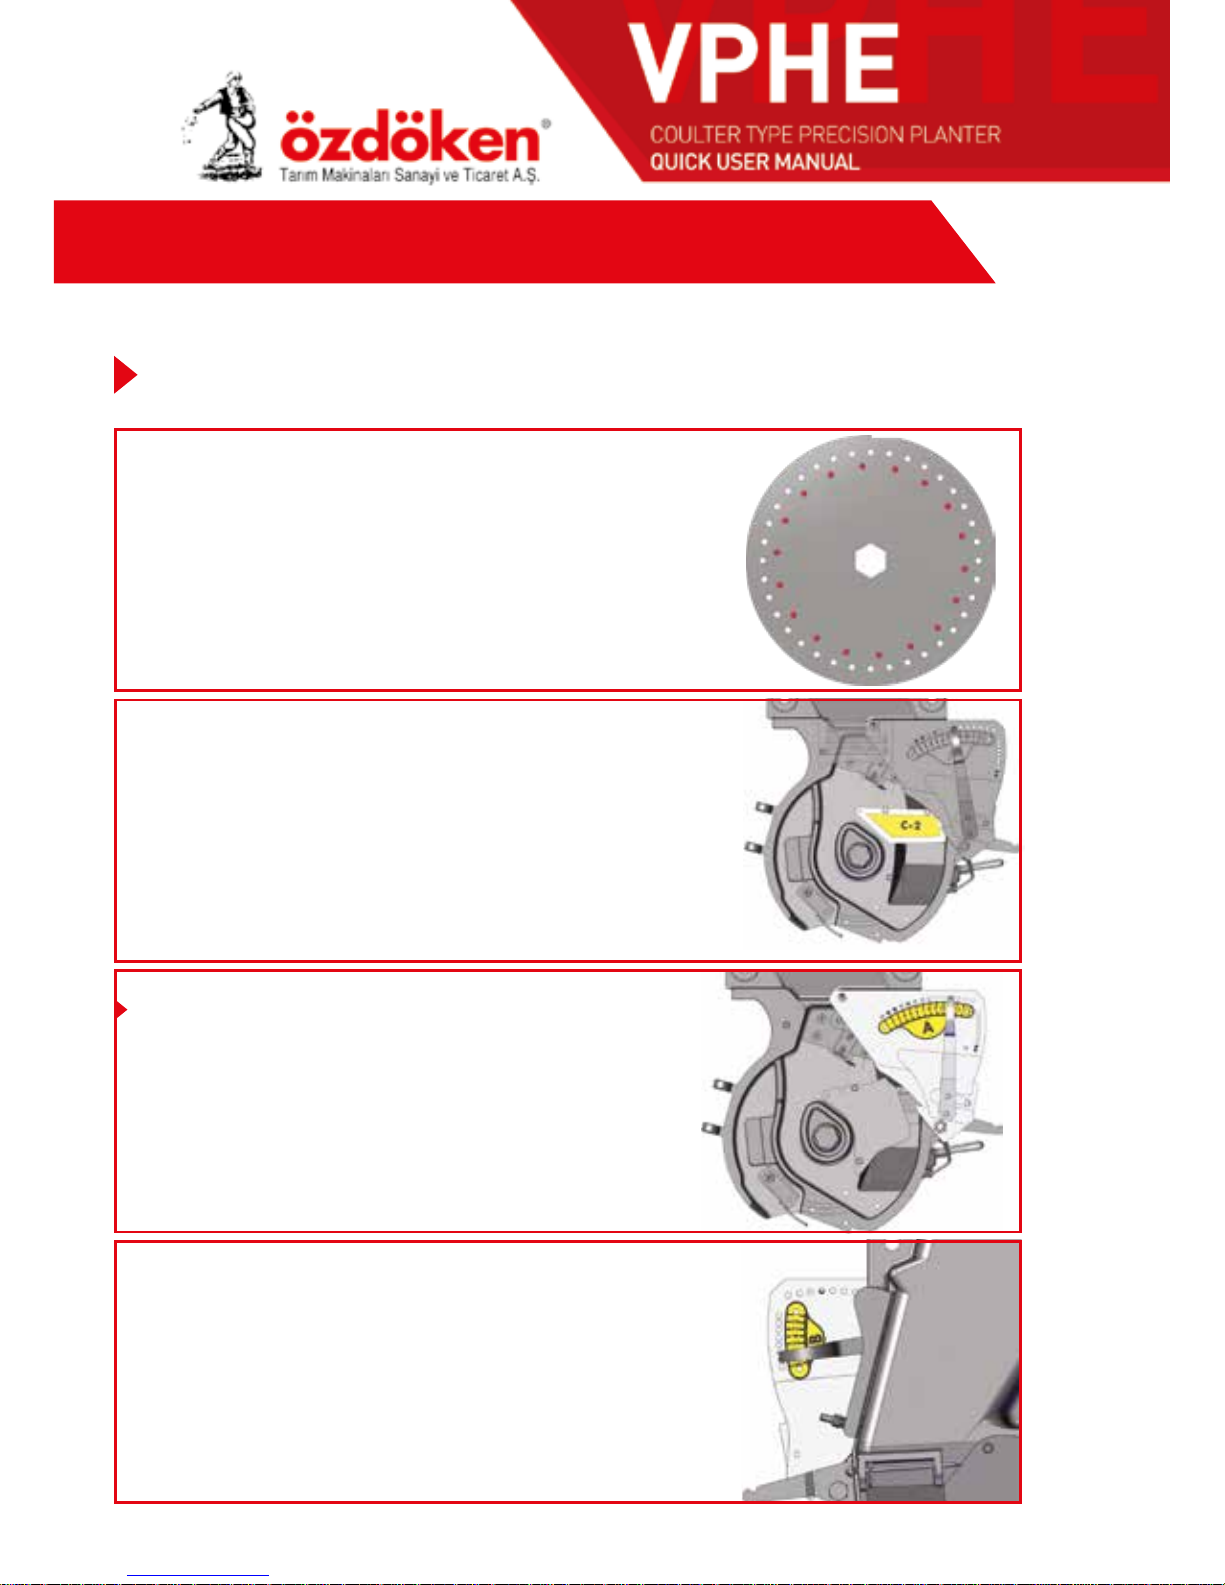
QUICK SETTING TABLE
SEEDING DISC
• Ø5.5 mm hole diameter
• Round mixer
• Preferably 36 holes
We recommend, to set your machine to the following values for Chickpea seed.
CHICKPEA SEEDS (Small Size 6-7-8 mm)
OVERFLOW PLATES
C1 plate must be removed. Only C2 plate must be attached.
Note: 1. If the flow of the seeds is not smooth then
C3 plate can be attached.
2. Machine must not be used without these plates.
Otherwise, seeds will be stuck in hopper and will damage
the nail mixers on the disc.
A SELECTOR SETTING
SELECTORS (SINGULATORS)
Outer selector handle should be
fixed to hole no. “14”
B SELECTOR SETTING
Inner selector handle should be fixed
to hole no. “9”
60
Page 61
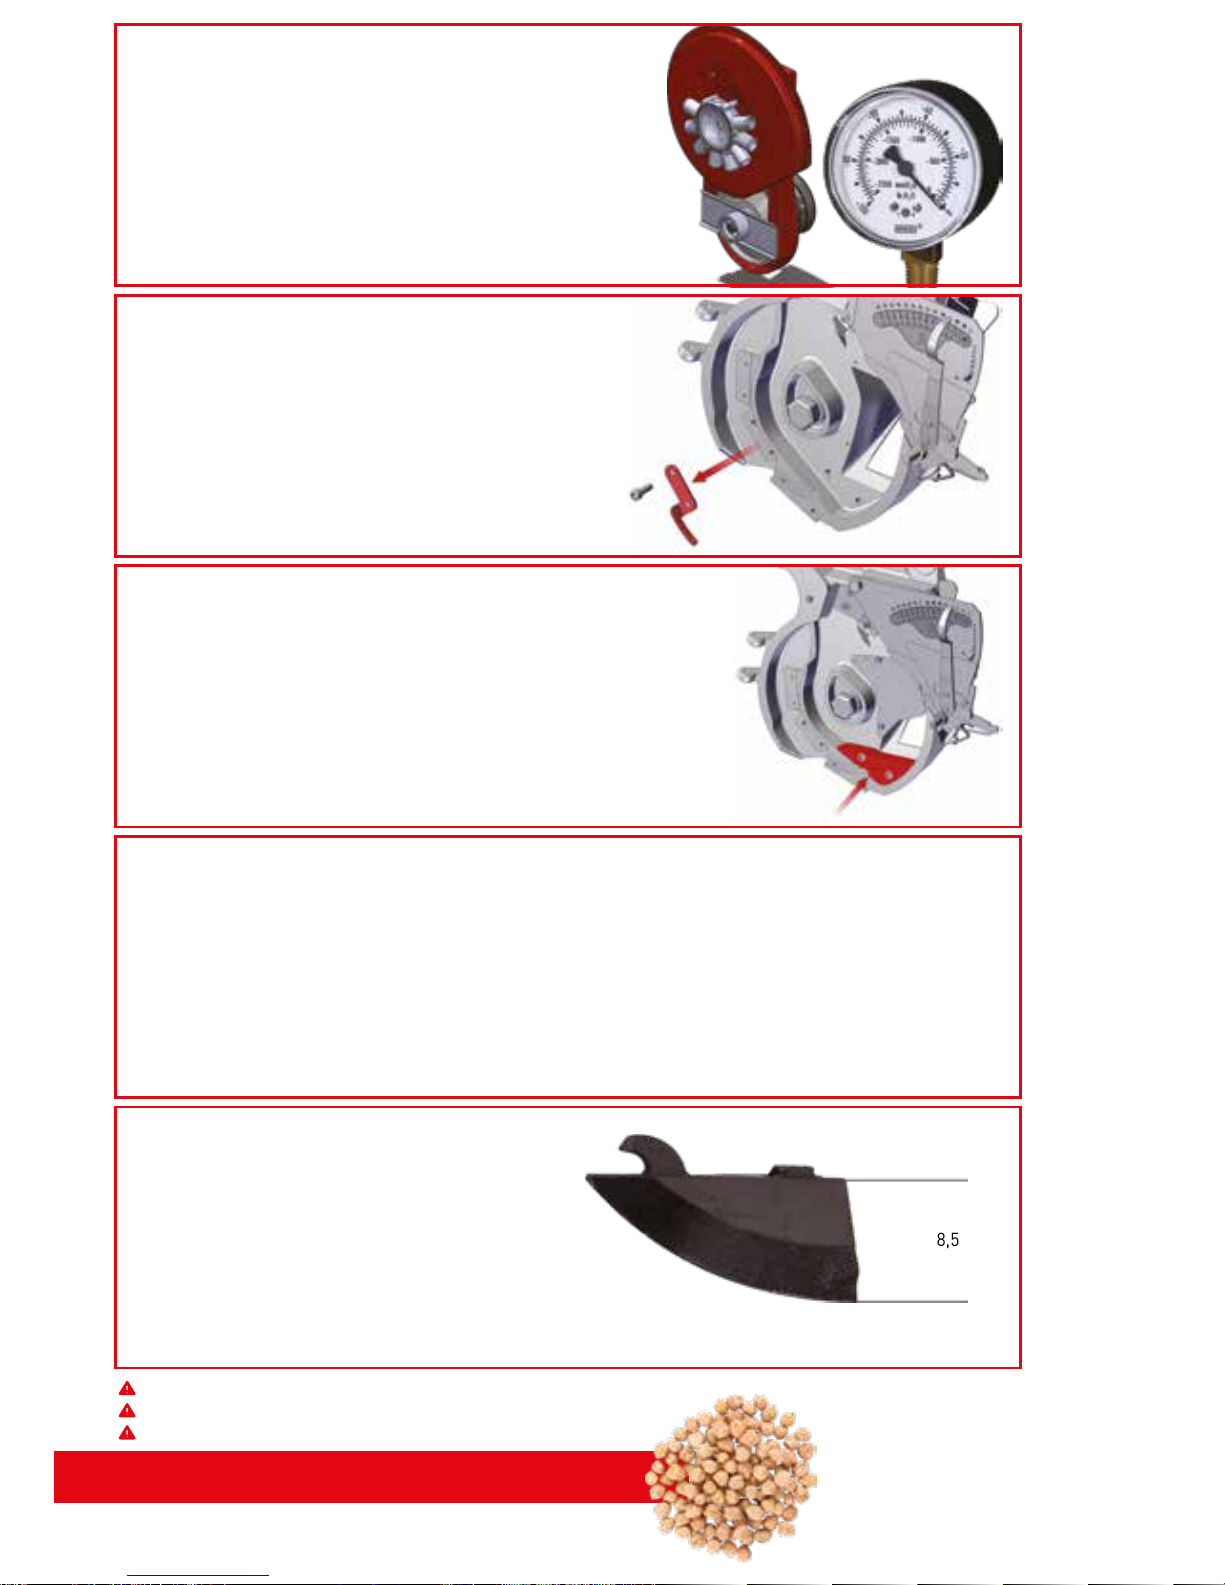
Setting shown above can fluctuate.
After applying the settings, test the machine.
The user is responsible for any incorrect planting process.
Chickpea Seeds (Big Size)
FAN (VACCUMETER SETTING)
Manometer should be arranged
around 60 bars.
remove
SEED SCRAPER
ATTENTION: REMOVE!!!
This tool will not be used.
Remove the tool shown in the
figure.
SEEDING COULTER
For Chickpea seeds, coulter depth
should be (8,5 cm).
8,5 cm
CONSIDERATIONS
1.The seeds to be used for plantation process must be dry.
2. Humid or wet seeds must not be used.
3. Sometimes seeds are wetted and are coated with a wet layer of medicine to protect
them. while planting these seeds, medicine on them sticks to the holes of the disc
and act as an obstacle for turning of the discs. So, seeding distance and seed planting
process are affected.
CHICKPEA and PEANUT PROTECTION PLASTIC
Protection plastic MUST BE ATTACHED.
Otherwise, mixer nails of the disc will be damaged.
Note: While mounting this plastic, first remove the 2.5
Allen head bolts and then put the bolts for this part.
attach
61
Page 62
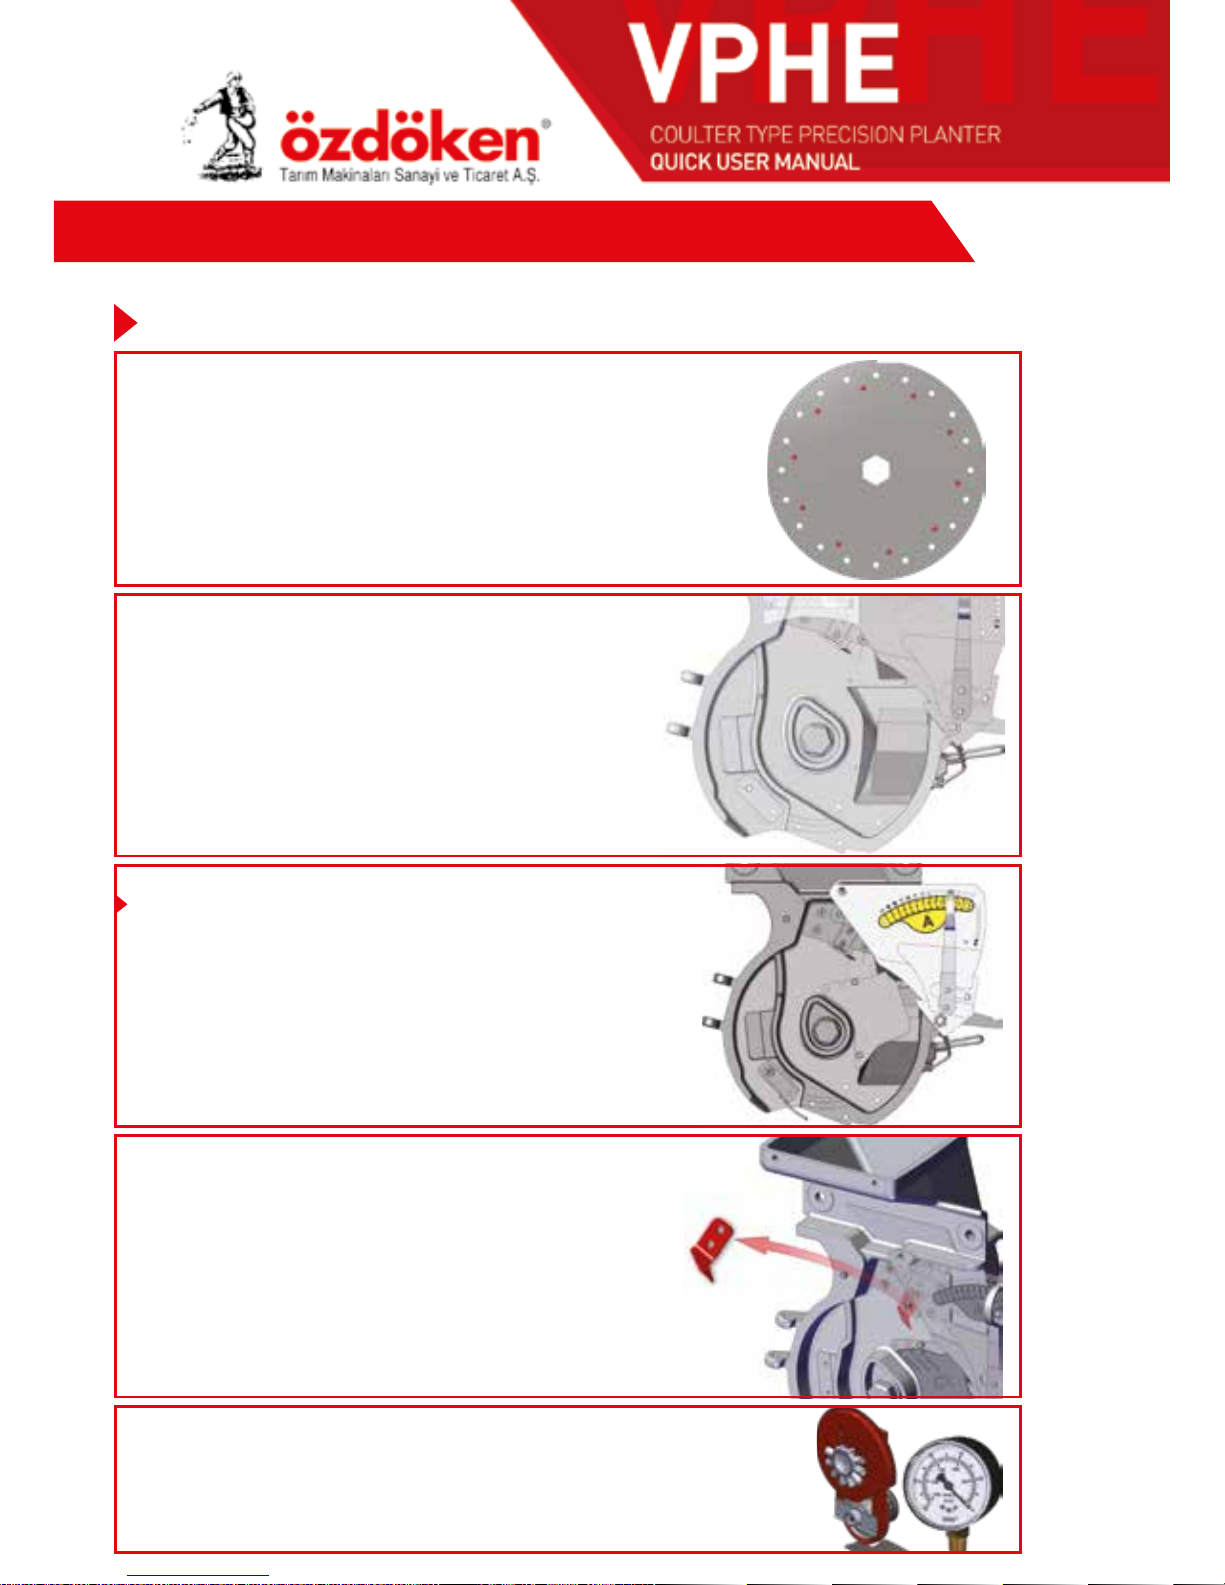
We recommend, to set your machine to the following values for Peanut seeds.
FAN (VACCUMETER SETTING)
Manometer should be arranged
around 60-70 bars.
SELECTORS (SINGULATORS)
A SELECTOR SETTING
Outer selector handle should be fixed to
hole no. “14”
All plates must be removed.
OVERFLOW PLATES
SEEDING DISC
• Ø6.5 and Ø7 mm hole diameter
• Round mixers
• Preferably 20 or 26 holes
PEANUT SEEDS
B SELECTOR SETTING
Selector nail placed on inner
selector will be removed.
remove
QUICK SETTING TABLE
62
Page 63
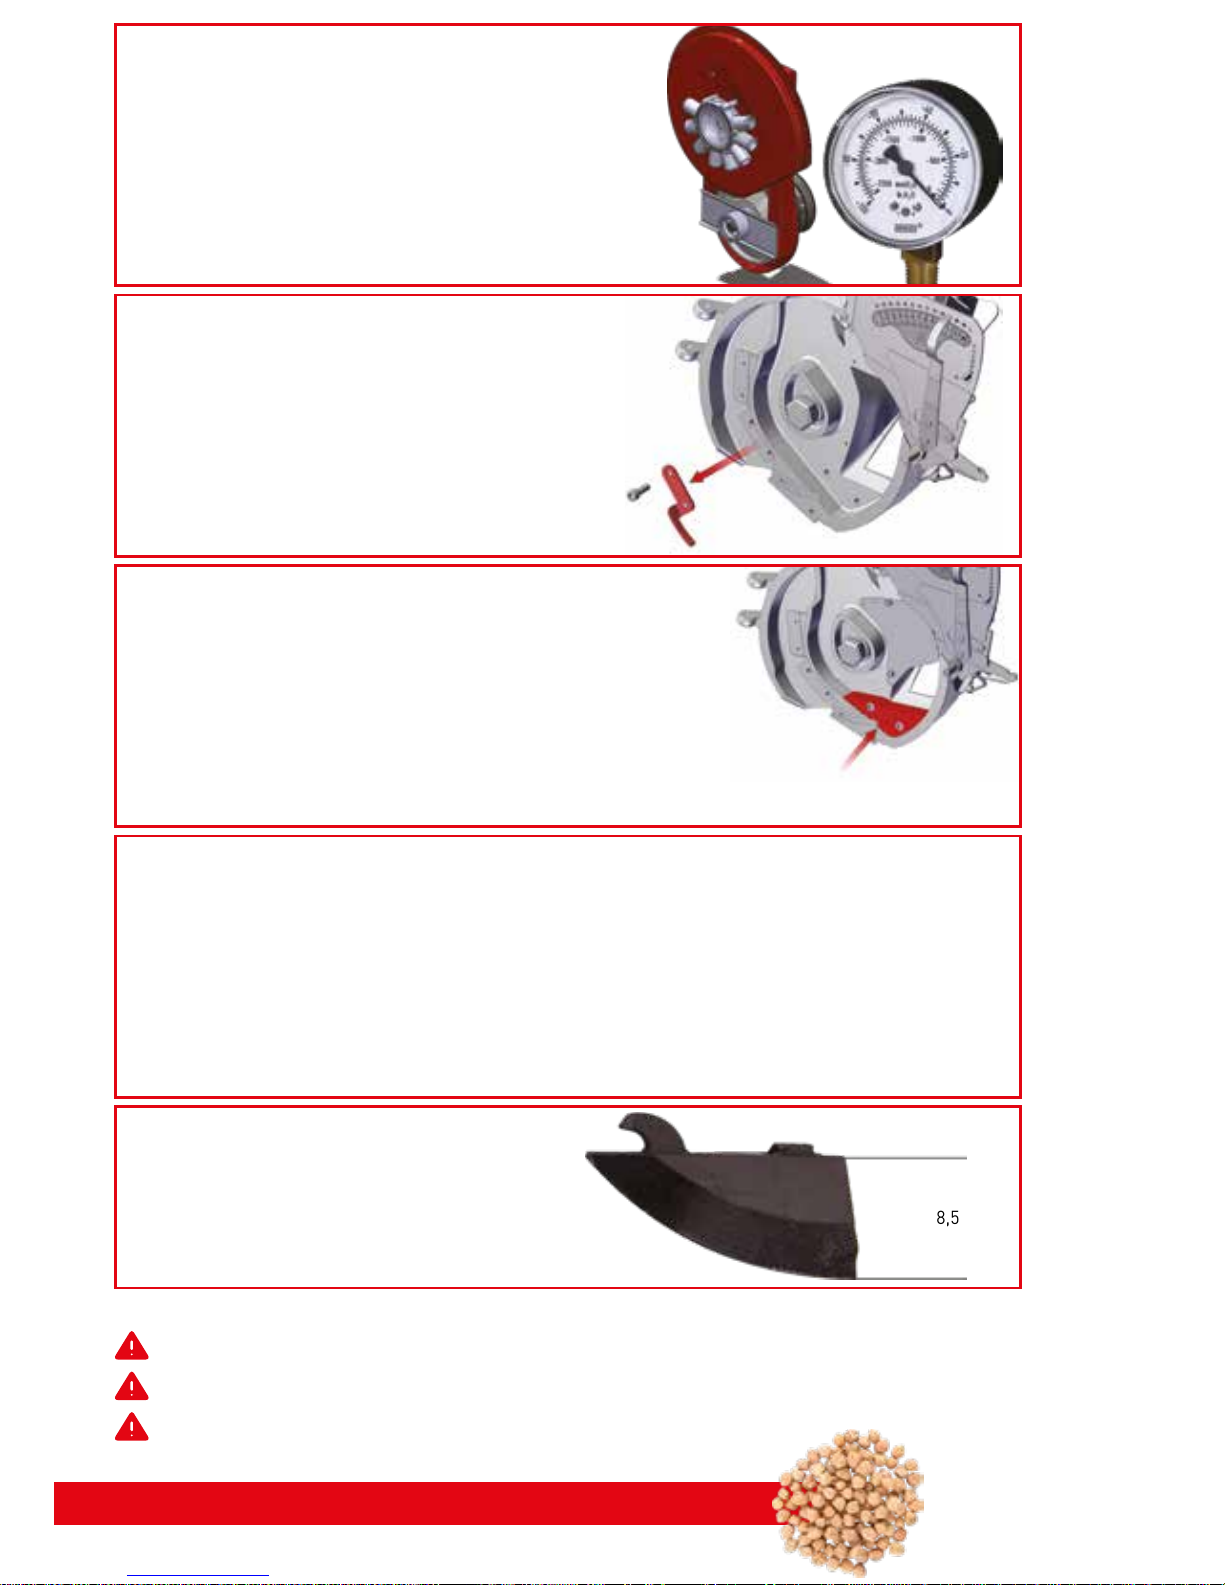
Setting shown above can fluctuate.
After applying the settings, test the machine.
The user is responsible for any incorrect planting process.
Chickpea Seed (Small Size)
FAN (VACCUMETER SETTING)
Manometer should be arranged
around 50-55 bars.
SEED SCRAPER
ATTENTION: REMOVE!!!
This tool will not be used.
Remove the tool shown in the figure.
remove
SEEDING COULTER
For Chickpea seeds, coulter depth
should be (8.5 cm).
8,5 cm
CONSIDERATIONS
1.The seeds to be used for plantation process must be dry.
2. Humid or wet seeds must not be used.
3. Sometimes seeds are wetted and are coated with a wet layer of medicine to protect them. while planting these seeds, medicine on them sticks to the holes of the
disc and act as an obstacle for turning of the discs. So, seeding distance and seed
planting process are affected.
CHICKPEA and PEANUT PROTECTION PLASTIC
Protection plastic MUST BE ATTACHED.
Otherwise, mixer nails of the disc will be damaged.
Note: While mounting this plastic, first remove the
2.5 Allen head bolts and then put the bolts for this
part.
attach
63
Page 64
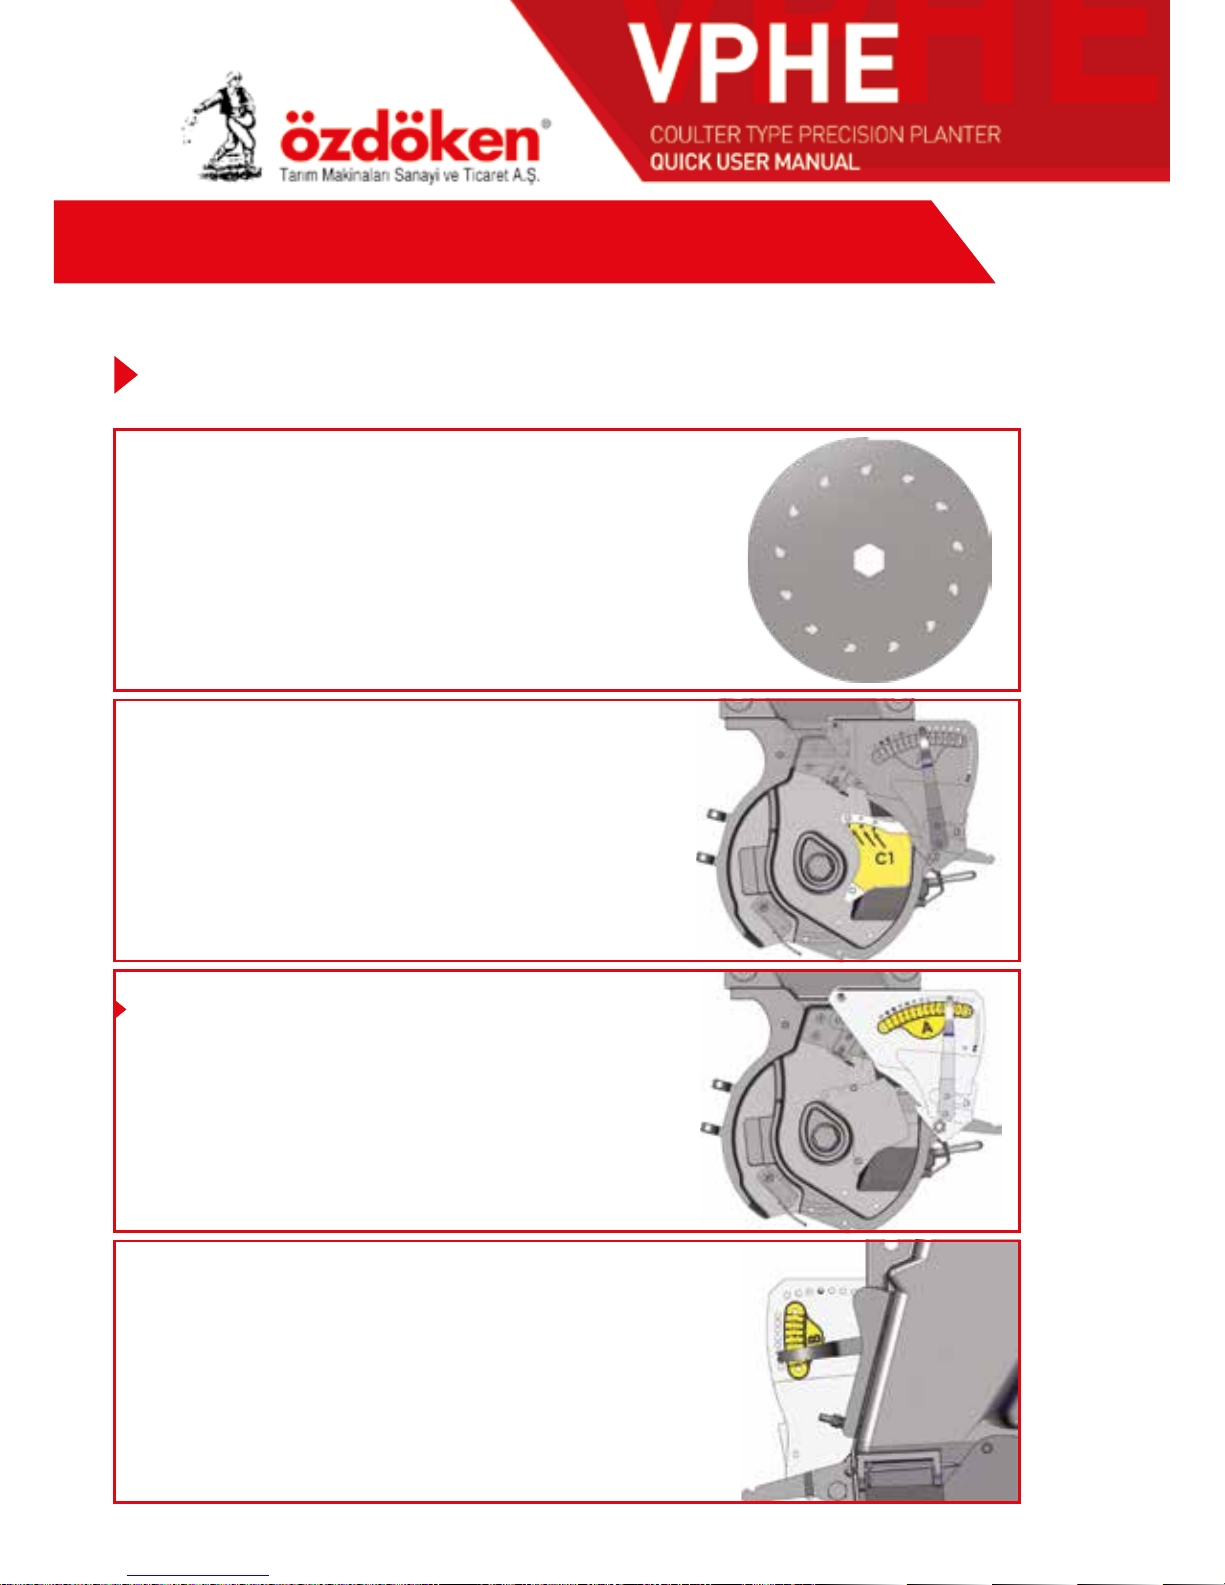
QUICK SETTING TABLE
B SELECTOR SETTING
Inner selector handle should be
fixed to hole no. “1” or “2”
SELECTORS (SINGULATORS)
A SELECTOR SETTING
Outer selector handle should be fixed to
hole no. “8”
SEEDING DISC
• Ø1.2mm hole diameter
• Nail mixers
• Preferably 104 holes
We recommend, to set your machine to the following values for Onion seeds.
ONION SEEDS
C1 plate will be fixed to hole no. “1”
OVERFLOW PLATES
64
Page 65
Setting shown above can fluctuate.
After applying the settings, test the machine.
The user is responsible for any incorrect planting process.
Peanut Seeds
SEED SCRAPER
ATTENTION: REMOVE!!!
Scraper must not be used.
remove
ALUMINUM SEEDING UNIT
ATTENTION!!!
While planting Peanut, we recommend the side wall of the seeding unit must be open for the smooth flow of the seeds.
Please bear this in mind and order the machine accordingly.
CONSIDERATIONS
1.The seeds to be used for plantation process must be dry.
2. Humid or wet seeds must not be used.
3. Sometimes seeds are wetted and are coated with a wet layer of medicine to protect them. while planting these seeds, medicine on them sticks to the holes of the
disc and act as an obstacle for turning of the discs. So, seeding distance and seed
planting process are affected.
SEEDING COULTER
For Peanut seeds, coulter depth
should be (8,5 cm).
8,5 cm
CHICKPEA and PEANUT PROTECTION PLASTIC
Protection plastic MUST BE ATTACHED.
Otherwise, mixer nails of the disc will be damaged.
Note: While mounting this plastic, first remove the
2,5 Allen head bolts and then put the bolts for this
part.
attach
Note: We recommend to lower the speed while planting Peanuts.
65
Page 66

NOTES
66
Page 67
Setting shown above can fluctuate.
After applying the settings, test the machine.
The user is responsible for any incorrect planting process.
Onion Seeds
FAN (VACCUMETER SETTING)
Manometer should be arranged
around 25-30 bars.
CONSIDERATIONS
1.The seeds to be used for plantation process must be dry.
2. Humid or wet seeds must not be used.
3. Sometimes seeds are wetted and are coated with a wet layer of medicine to protect them. while planting these seeds, medicine on them sticks to the holes of the
disc and act as an obstacle for turning of the discs. So, seeding distance and seed
planting process are affected.
SEEDING COULTER
For Onion beet seeds, coulter depth
should be (6,5 cm).
6,5 cm
SEED SCRAPER
ATTENTION: REMOVE!!!
This tool will not be used.
Remove the tool shown in the
figure.
remove
67
Page 68

 Loading...