

Page 1
OC-SR30 Manual - Rev 1.0
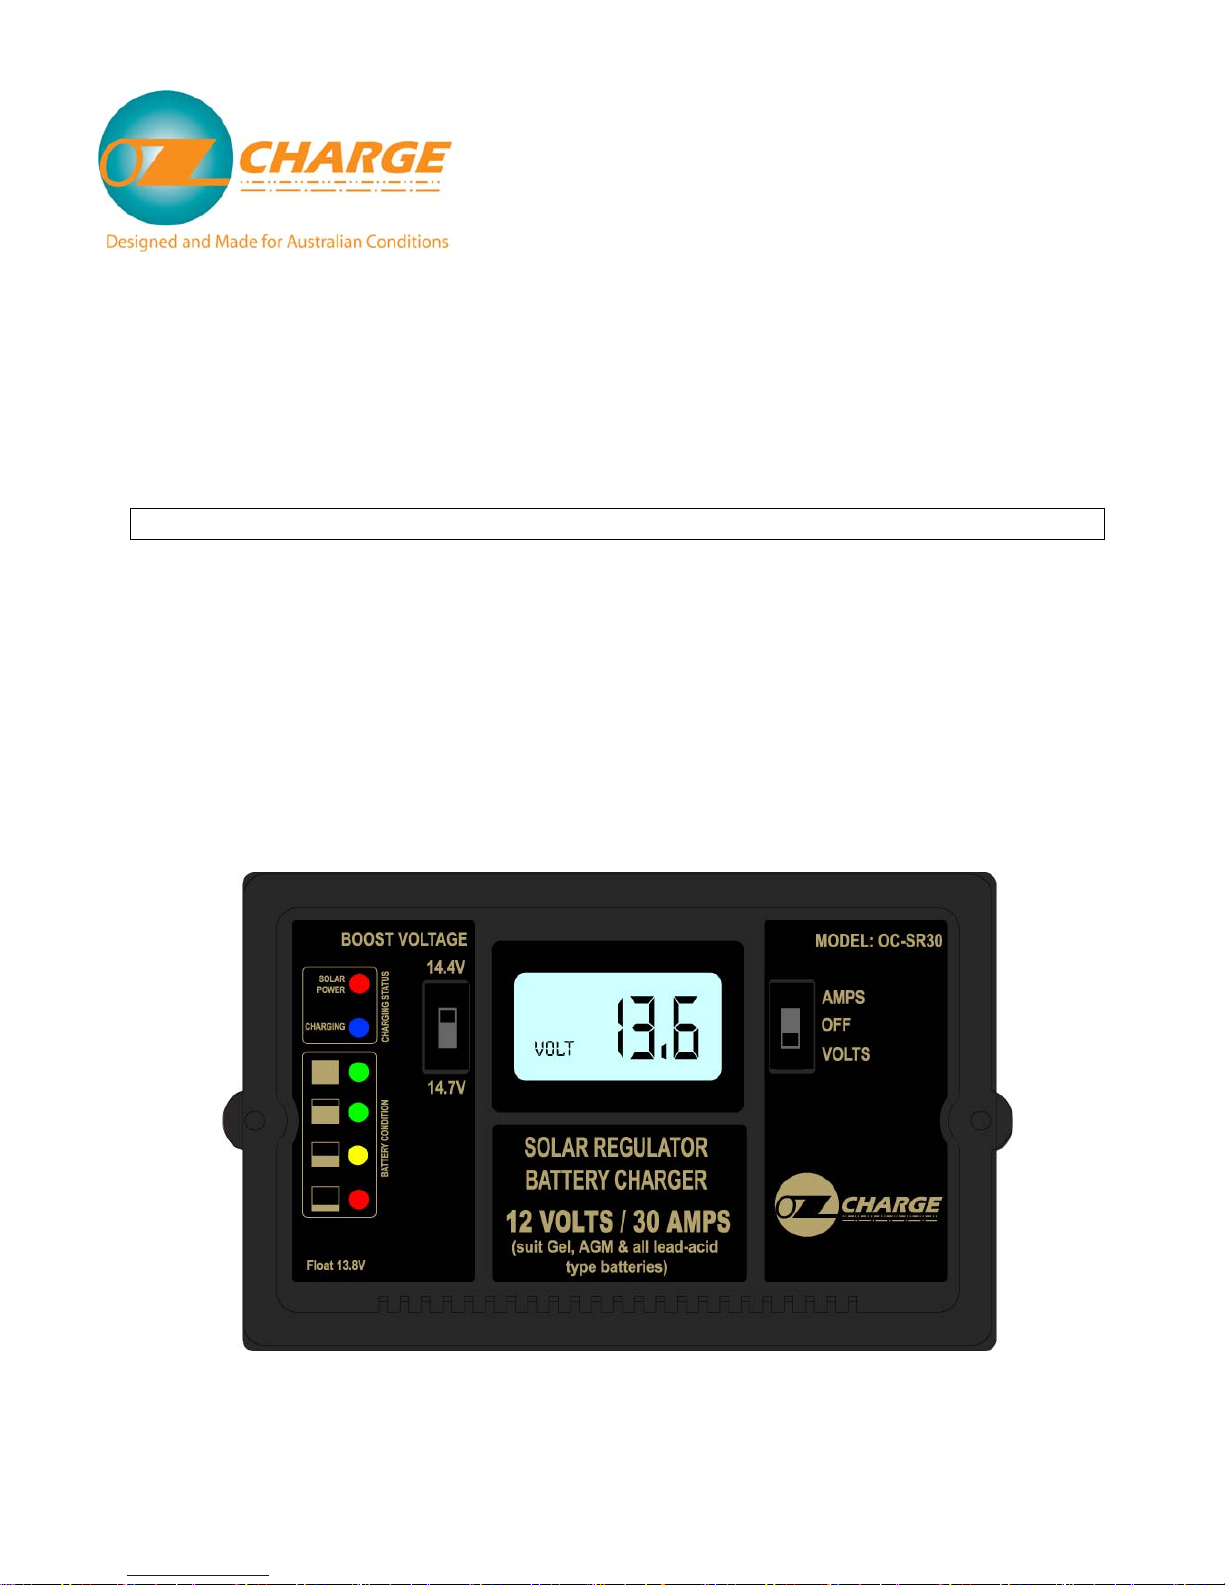
Solar Controller / Battery Charger
Input: DC12V Solar Panel (Max. 25V)
Output: DC12V 30A
Model Number: OC-SR30
User’s Manual and Important Safety Information
Congratulations on purchasing an OzCharge Solar Controller Regulator.
OzCharge Controllers are comprised of the latest technology and suited to Aussie conditions:
Please carefully read these instructions before installing and using this device.
FEATURES
• Suits Gel, AGM, Conventional lead-acid and Calcium Batteries.
• Built in regulator to prevent your battery from being overcharged. Overcharging occurs when the charge voltage is
unregulated. This can result in premature battery failure.
• Can be connected to the battery permanently to keep the battery fully charged by using a process called “floating”.
This means the controller will stop charging when the battery is full and will automatically start charging the battery
as required. This process will also reduce water loss and help prevent the battery from ‘drying out’.
• Protects your battery from discharge at night. Under low light or no light conditions the solar panel voltage could be
less than the battery voltage. The unit contains a special circuit which prevents cu rrent flowing back from the
battery and into the solar panel.
• Coloured LED’s to indicate the operational status when there is power from the solar panel.
• Digital LCD to indicate battery voltage / current.
• Surface Mount or Flush Panel Mount options.
For use with 12 Volt Solar Panels Only.
Suitable for Solar Panels up to 510 Watts.
Page 2
OC-SR30 Manual - Rev 1.0
WARNING – IMPORTANT PLEASE READ…
• This device is to be used with 12V (nominal) Solar Panels only and the Panel(s) should not exceed 510W (30A)
(total) limit.
• This charger is designed for indoor use only and should never be exposed to rain.
• Do not disassemble the charger. Take to a qualified person if the unit requires repairing.
• Lead acid batteries can be dangerous. Ensure no sparks or flames are present when working near batteries.
• Eye protection should always be used. Never short circuit the battery
• Given sufficient light solar panels always generate energy even when they are disconnected. Accidental ‘shorting’
of the terminals or wiring can result in sparks causing personal injury or a fire hazard. We recommend that you
cover up the panel(s) wit h some s ort of soft clot h so you can block all incoming light during the installation. This will
ensure that no damage is caused to the Solar Panel or Battery if the wires are accidentally short circuited.
• Always install a battery fuse on each circuit including the solar controller
• Do not reverse connect the wires to the solar panel or battery.
MOUNTING THE DEVICE
The Solar Controller has two mounting options.
1. Surface mount:
The quickest and easiest way to mount the unit is to use the two plastic spacers and self tapping screws supplied and
mount the unit to a flat surface,
2. Flush (panel) mount:
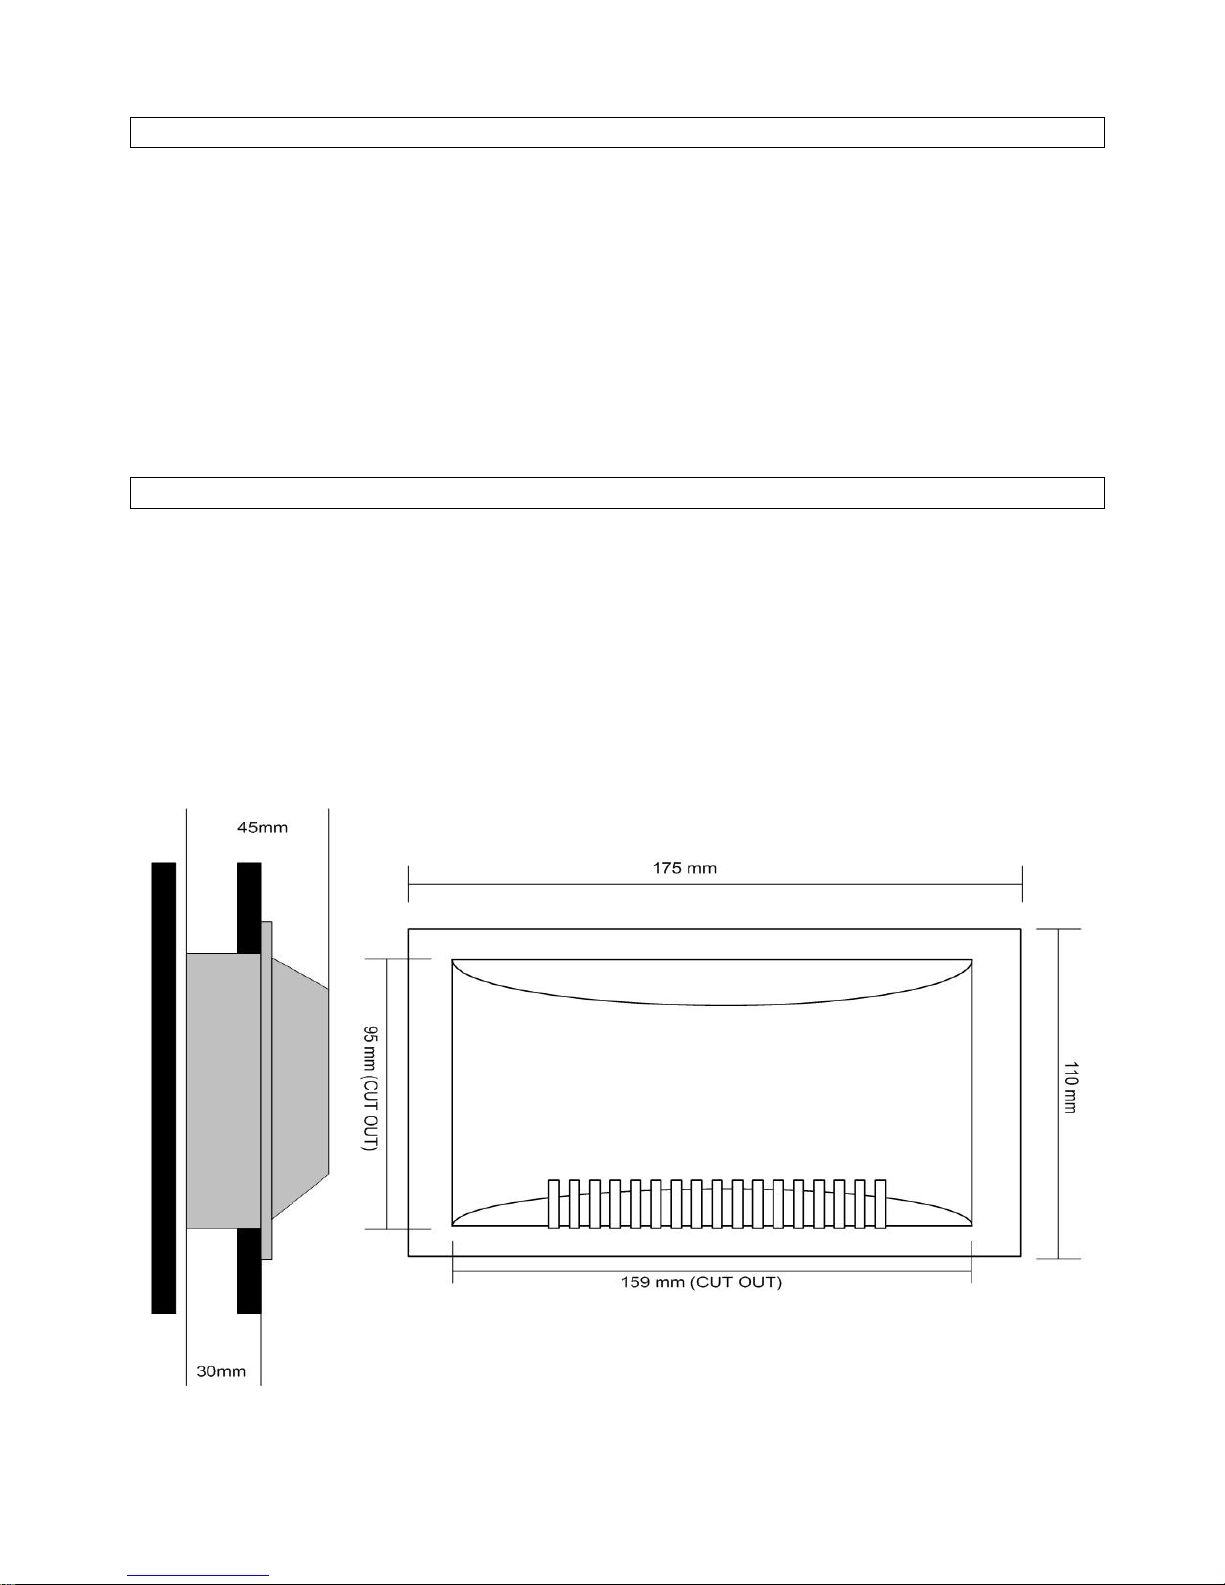
Before deciding to use this mounting method, please ensure there is sufficient depth behind the controller or in the
cavity. (Refer to Diagram below)
Using the dimensions shown in the followi ng diagram, mark a 95mm x 159mm rectangle where you wish to mou nt the
controller and cut-out the panel opening then use the two self- tapping screws supplied to secure the unit.
Note: You can use the card insert from the packaging as a guide for the CUT OUT.
Page 3
OC-SR30 Manual - Rev 1.0
WIRING CONNECTIONS
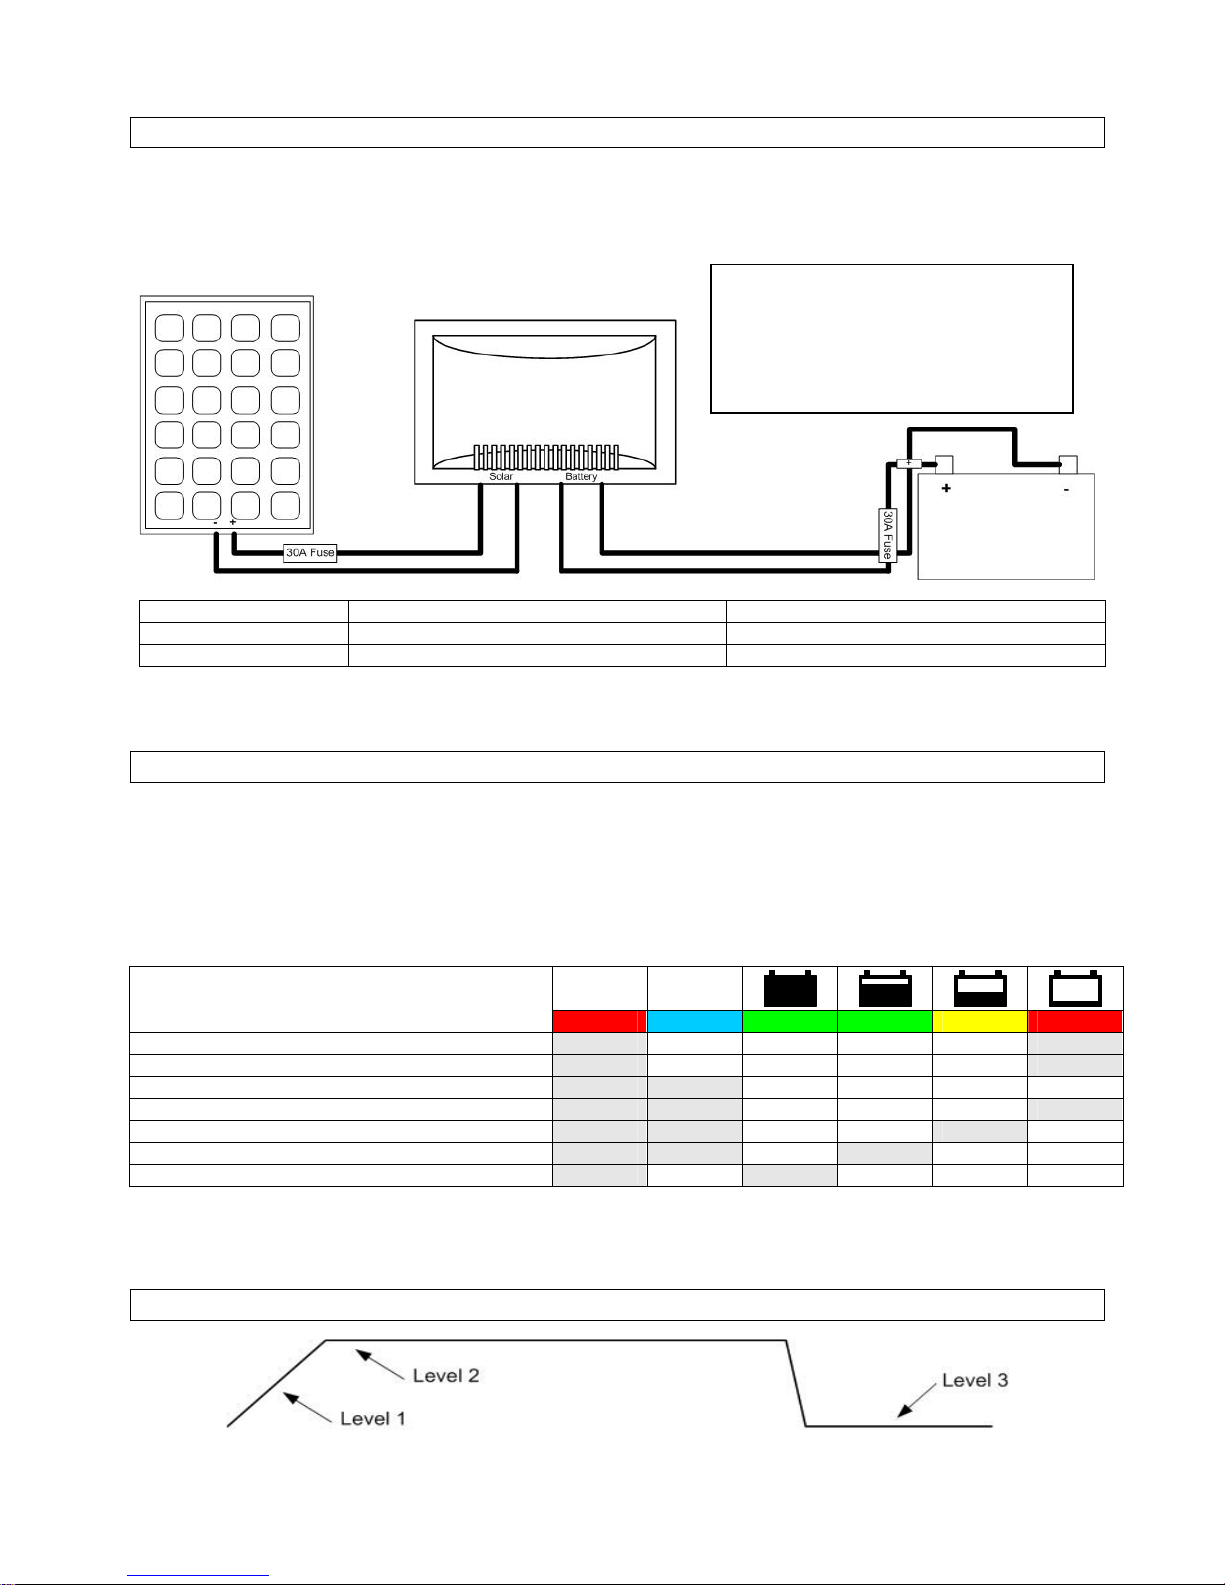
To protect the Battery and the Solar Panel, we strongly recommend that you place a 30A inline fuse on the positive
wire on both the “Solar” and “Battery” Circuits. (As close to the Battery / Panel as possible)
The Solar Controller has 4 terminals which are clearly marked ‘Solar’ and ‘Battery’.
There is a (12V) and earth (GND) terminal for each circuit.
Refer to the wiring diagram below.
Battery Connection Solar Array Connection
Length of Wire >2m 6m 9m 12m
Size (AWG)
8 or 6 10 8 6
1. Using the Terminals supplied, crimp the terminals on your Solar Array wires and connect to the Solar Panel like shown.
2. Using the Terminals supplied, crimp the terminals on your Battery wires and connect to the Battery like shown.
OPERATION – L.E.D INDICATORS
When the connections are completed, the Solar Controller will start charging the battery automatically.
The unit has a 3 stage charging algorithm.
Bulk Charge (Level 1) –Constant Voltage (Level 2) – Float Mode (Level 3)
Please check your battery manufacturer’s specifications to ensure the Boost Voltage switch is on the appropriate
setting. Boost Voltage – Is the maximum Voltage used to charge a battery.
Typically for Gel and AGM batteries you would need to select 14.4V.
For all other Conventional and Calcium batteries, you would need to select 14.7V.
The 6 LED’s indicate the charging status and
the battery condition
Solar
Power
Charge
Status
(These only work when there is power from solar panel input)
Red Blue Green Green Yellow Red
Solar Power Present – No Battery Connected
ON OFF OFF OFF OFF FLASH
Reverse Polarity / Short Circuit
ON OFF OFF OFF OFF FLASH
Solar Power Weak
ON FLASH OFF OFF OFF OFF
Battery Voltage below 11.5V (+/-0.4V)
ON ON OFF OFF OFF ON
Battery Voltage between 11.5V - 12.5V (+/-0.4V)
ON ON OFF OFF ON OFF
Battery Voltage above 12.5V (+/-0.4V)
ON ON OFF ON OFF OFF
Float Mode (Battery Fully Charged)
ON OFF ON OFF OFF OFF
A voltage less than 11.5 Volts indicates that the battery is discharged and needs re-charging.
Digital LCD Meter – This can either display the battery voltage, the charging current or it can be switch off.
This switch maybe changed at any time during the charging process.
CHARGING CURVE (VOLTAGE)
Correct Wire Size:
Please refer to the wire size chart below
to determine the minimum size wire
needed for each connection. This will
also ensure you get the best
performance out of your solar regulator.
Page 4
OC-SR30 Manual - Rev 1.0
SPECIFICATIONS
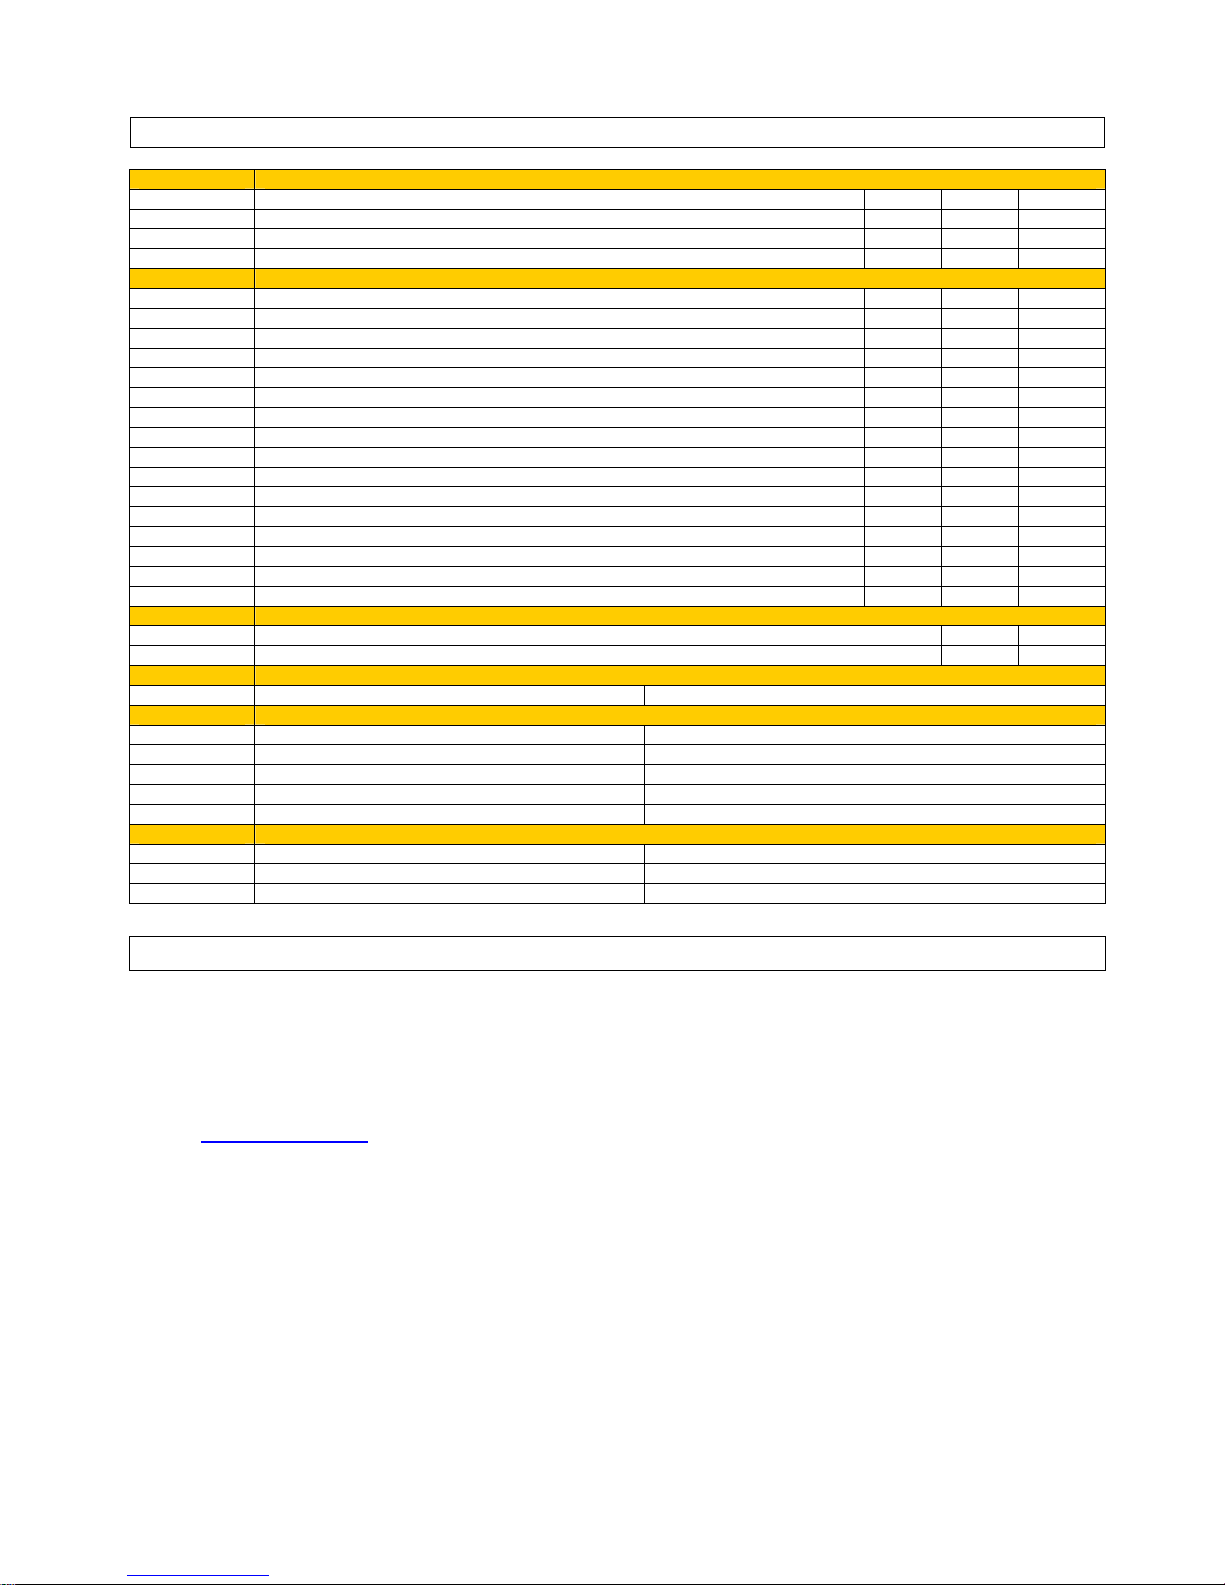
1 Electrical Parameters
1-1 Normal input solar cell array voltage : 17 - 22 Typ. Vdc
1-2 Max. solar cell array voltage (when output has no load) 25 Max. Vdc
1-3 Current consumption when connected 15V Array (battery not present) : 35 Max. mAdc
1-4 Current consumption when connected 12V battery (Array not present) : 25 Max. mAdc
2 Output Control & metering Characteristics
2-1
Charging Method: Level 1 → Level 2 → Level 3
2-2
Minimum charging condition for Start Up
2-2-1 Correct polarity at input and output;
2-2-2 Charging starts when Battery voltage is not less than 5.0 +/-0.3 Vdc
2-2-3 Minimum solar cell array voltage 13.0 +/-0.3 Vdc
2-2-4 Solar cell array voltage is higher than battery voltage 1.0 +/-0.3 Vdc
2-3 Maximum Charging Current at Level 1 period 30.0 +/-1.0 Adc
2-4 Maximum charging voltage at Level 2 Period ( for GEL Battery) 14.4 +/-0.4 Vdc
2-5 Maximum charging voltage at Level 2 Period (for LEAD-ACID Battery) 14.7 +/-0.4 Vdc
2-6 Level 1 to Level 2 Period when charging voltage reach (for GEL Battery) 14.1 +/-0.4 Vdc
2-7 Level 1 to Level 2 Period when charging voltage reach (for Lead-Acid Battery) 14.5 +/-0.4 Vdc
2-8 Level 2 to Level 3 Period when charging current reach (for GEL Battery) 4.0 +/-1.0 Adc
2-9 Level 2 to Level 3 Period when charging current reach ( for Lead-Acid Battery) 4.0 +/-1.0 Adc
2-10 Maximum charging voltage at Level 3 Period 13.8 +/-0.4 Vdc
2-11 LCD Meter Accuracy at DC Voltage 1.25 %
2-12 LCD Meter Accuracy at DC Current at 5 ~30Amp 3 %
3 Protection
3-1-1 Over temperature protection active at above 85
o
C
3-1-2 The charger will resume the charging at about 65
o
C
4 Electrical Parts
4-1 Input / Output Terminals M5 Terminals
5 Physical Parameters
5-1 Panel material : Plastic, Standard ABS
5-2 Panel Dimension : 175 (W) x 110 (H) mm
5-3 Panel Cut Out Size: 159 (W) x 95 (H) mm
5-4 Overall Depth : approx. 45 mm
5-5 Net weight : approx. 360g
6 Environmental Characteristics
6-1 Operating temperature : -5 to 45 oC
6-2 Storage temperature : -10 to 70 oC
6-3 Operating Humidity range : 0 to 80% RH
2 YEAR MANUFACTURER WARRANTY
Zylux Distribution Pty. Ltd. (OzCharge) warrants to the Customer that this product is substantially free from defects in materials and
workmanship under normal use for a period of 2 Years from the Date of Purchase.
Please ensure you keep a copy of your receipt on file as this will be required for proof of purchase and to validate your warranty.
Obtaining Warranty Service
Within the warranty period, the Customer must contact the authorised supplier / retailer where the product was purchased or
alternatively you can contact the OzCharge service centre through one of the following methods:
Hotline: (03) 9482 2203
Website: www.ozcharge.com.au
If the Authorised Supplier and / or OzCharge service centre concludes that while under normal use, a product failure or malfunction
occurred during the warranty period and was caused by a defect in material or workmanship (see Exclusions), the Customer will be
asked to ship to the nearest service point. The product must be packaged appropriately for safe shipment. To prove that the product is
under warranty, the customer should enclose a copy of their receipt for proof of purchase. It is recommended that returned products be
sent by registered mail as Zylux Distribution Pty Ptd. (OzCharge) accepts no responsibility / liability for goods lost or damaged in tran si t.
Return Shipping costs to be incurred by the Customer.
Exclusions
If upon receiving a product for repair and if testing and examining the product has disclosed that the alleged defect or malfu nction in the
product does not exist or was caused by the Customer or any third persons misuse, physical abuse, water damage, unauthorised
attempts to open, repair or modify the product or improper installation, this will not be covered under this warranty.
This Warranty is void if:
1. The product has been tampered or repaired by unauthorised personnel.
2. The warranty seal is broken or altered.
3. The warranty period has expired.
 Loading...