


-1-
Model Number: OC-1210PS
Recreational Vehicle (RV) and Marine
Fanless 12Volt 10Amp peak (8A constant)
Switched-Mode Microprocessor Controlled
Programmable Automatic Battery
Charger and Power Supply
Dust-proof and water splash-proof to IP64
Australian & New Zealand Standard
AS/NZS 60335.2.29 compliant including
clause 21.102 for vibration and legal use
in caravans and similar vehicles.
You are now the owner of one of the most
advanced, reliable and feature packed
chargers available today.
Please take the time to read and
understand this manual, even though it
may have already been installed for you.

-2-
Installation and User’s Manual.
FEATURES
Congratulations on purchasing an Ozcharge fully automatic switched-mode battery charger.
Ozcharge battery chargers comprise of the latest technology and incorporates the following features:
High frequency Switching Mode with pulse charge output.
Microprocessor controlled.
No fan! No noise to keep you awake at night and no moving parts to wear out and fail.
Quick connect output plugs.
Automatic Power-Supply mode.
Suits all Lead Acid battery types (user selectable):
Conventional wet flooded, Calcium, Absorbed Glass Mat (AGM) & Gel
Battery rejuvenation (De-Sulphation) function (user selectable)
Heavy-duty cables & fittings.
Designed for Australian & New Zealand conditions and applications.
- - - - - - - - - - - - - - - - - - - WARNING - - - - - - - - - - - - - - - - - - - - -
While this charger is dust-proof and water splash-proof to IP64, we recommend that it is used and/or
installed indoors only and should never be directly exposed to water, rain, pressure washer, etc.
Make sure you are using proper AC mains power voltage.
Do not attempt to use the charger if it has been dropped or damaged.
Never attempt to charge a damaged battery, frozen battery or non-rechargeable battery.
Do not use the charger in a closed area or poorly-ventilated area.
Never smoke, use an open flame, or create sparks near a battery or charger during charging operation as
this may cause an explosion / explosive gas.
Do not operate the charger if any of the cables or plugs are damaged.
Do not disassemble the charger. Take it to a qualified and authorised person if any repair is required.
Keep the charger away from infants, children and pets.
CAUTIONS
Ensure the correct Battery Type is selected before the first use or any battery replacement.
Do not charge using an incorrect Battery Type setting. (EG: do not charge a Gel battery with Calcium
battery selection setting or vice-versa as this may damage your battery)
If you are in doubt as to what battery type you have, refer to the battery Supplier or Manufacturer. Do not
guess or assume as this may damage your battery.
Incorrect Battery Type selection may result in you battery being under charged or over charged and any
damage will not be covered by warranty.
Check the Battery Manufacture’s specific precautions. EG: such as removing or not removing cell caps
whilst charging.
As a general precaution, someone should be within range of your voice or close enough to come to your
aid while working with any battery.
Wear protective goggles and turn your face away when connecting or disconnecting a battery.
If battery acid contacts your skin or clothing, wash immediately with soap and water. If acid enters your eye,
immediately flush the eye with running cold water for at least 10 minutes and seek medical attention.
To reduce risk of damaging the battery, avoid dropping any metal tools onto the battery. Wrap spanners
with electrical insulation tape to minimise the risk of a short circuit.
Never rest the battery being charged on top of your Ozcharge battery charger or place the charger on top
of the battery.
The battery charger should be installed and kept as far away from the battery as the output cables permit.
-3-
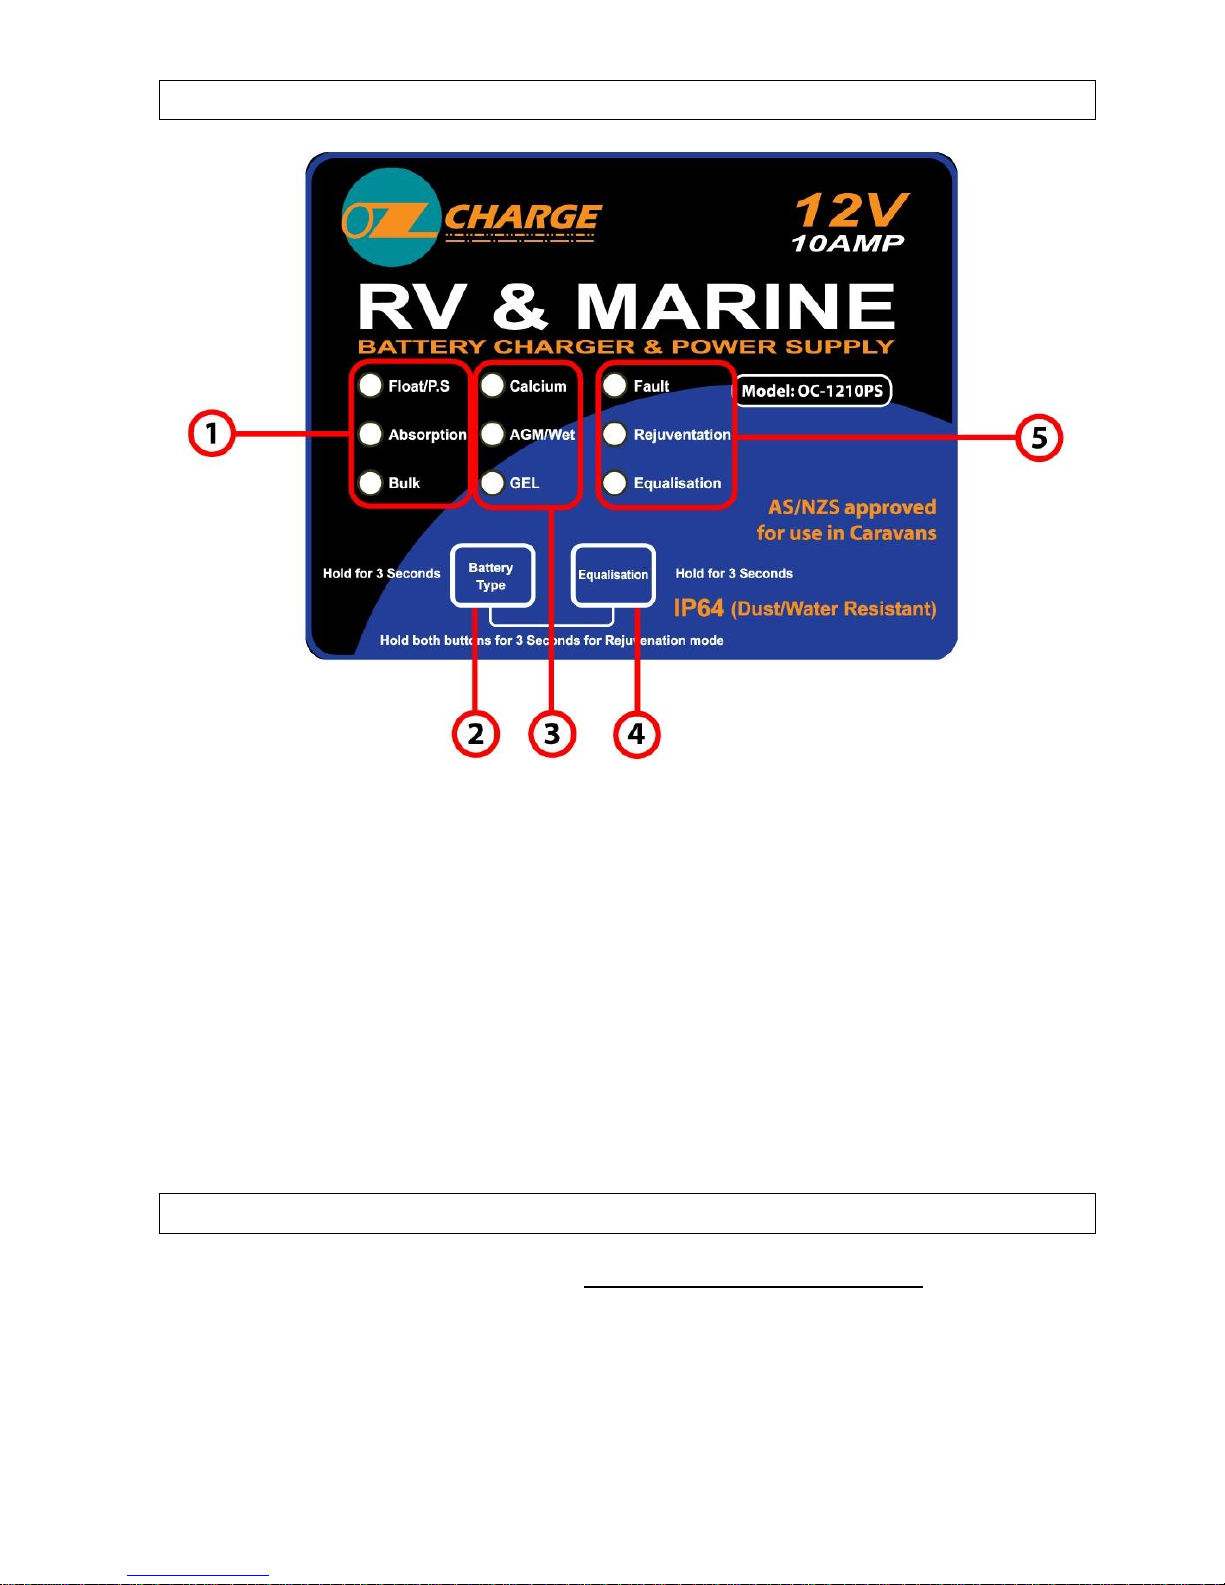
CONTROL AND INDICATORS
1. Charge stage indicator LED’s.
Shows what the stage of charge mode is. See page 7 for details.
The Float/PS LED will automatically come on when used with no battery as a Power Supply (PS).
2. Battery Type button.
Allows the user to program the charger for the battery type connected. Hold for 3 seconds to change.
See page 5 for details on each battery type.
3. Battery Type selection.
Shows what battery type is programmed. Use Battery Type button to change.
4. Equalisation button.
Allows the user to start an Equalisation charge cycle. Hold for 3 seconds to begin.
Refer to page 7 before use!
5. Fault, Rejuvenation and Equalisation mode LED’s
Refer to page 7 & 8 for more information.
INSTALLATION
This product is designed to be installed in a hardwired situation only.
Because this charger has no fan it is important to mount it an area of good ventiallation. Nothing should
located be within 100mm (4 inches) of the charger unit to ensure natural convection cooling takes place.
Choose a suitable location that meets these requirements. In camper-trailers and caravans especially make
sure the location is not used for storage of things that may limit the airflow like tents/swags/canvas awnings
that may wrap around the unit during travel and not be unfolded or used at the next destination.
NOTE if this charger does get too hot, it is no t a danger as the unit will automatically “foldback” and
reduce the output the current and continue to work at a lower power level to prevent overheating. The
battery recharge time however will be longer. Only in extreme ambient heat environments the unit may
shutdown.

-4-
6. Temperature Compensation sensor socket.
Before any use, connect only the provided sensor. Do not modify the cable in any way. Connect the
sensor to one of the battery terminals (preferably the Negative).
7. DC output socket.
Anderson 30Amp Power-Pole (PP30) connector. Use the matching cable provided to connect to the
battery (preferably via the battery master fuse). This cable can be shortened. Extra care should be
taken before making this cable longer to make sure any voltage drop is considered (a larger cable will
probably be required depending on the distance).
8. AC mains input plug.
For use with 230-240Vac only.

-5-
PROGRAMMING
Before any use, make sure the correct battery type is set! This is a list of common batteries from the lead-acid
chemistry family;
Conventional wet flooded cell. Also simply known as “Lead Acid”. This type will have screw-out vents
for maintenance and topping up with distilled water. For this type use the AGM/Wet setting.
Sealed Maintenance Free (SMF). This type still has a liquid acid inside (if you rock it from side to side
you will hear it ‘slosh’ and move) but is not able to be opened for topping up. This type commonly has a
“Magic Eye” for telling the state of charge too. Use the Calcium setting for this battery type.
Absorbed Glass Mat (AGM). A common type of fully sealed and maintenance free battery used in a lot
of camper-vans, caravans, motorhomes & boats as they emit no toxic fumes during normal use. Use
the AGM/Wet setting for this type of battery.
Gel. The original sealed battery type uses silica-dioxide to fix the acid in place. They can be difficult to
identify and can be easily mistaken for an AGM battery. Use the GEL setting for this type.
IMPORTANT! If you are unsure of your battery type, check with your battery supplier or the battery
manufacturer. Using the wrong setting can damage your battery and will not be covered under
warranty.
AUTOMATIC POWER-SUPPLY MODE
This charger will automatically become a power supply in the event there is no battery connected or there has
been a total battery failure. This allows you to use critical loads such as a water-pump in a remote area where
no replacement may be available.
If there has never been a battery installed in your camper-trailer, caravan, etc you must have this unit plugged
into AC mains to be able to operate the lights, TV, etc.
If you decide to install a battery at a later stage, you do not need to purchase another charger. Simply have a
suitable battery installed by a professional automotive-electrician and check the Battery Type is set correctly.
If you have a battery installed and suspect there has been a battery failure of any kind, this feature will allow
you to still be able to operate your DC loads such as lights and TV because the charger will still turn on when
the battery has been disconnected and/or removed.
If this happens, disconnect the AC mains and have an automotive-electrician to disconnect the battery
Negative terminal and then secure and insulate the cable so it cannot short-circuit or make contact with
anything.
When AC mains is re-applied with no battery connected, the charger will automatically restart as a Power
Supply. This is shown by the Float/PS LED coming on.
When the problem is fixed or faulty battery is replaced, it will automatically restart as a Battery Charger.
USE WITH OTHER CHARGING SOURCES
It is quite common in installations where this charger will be used to have other methods of charging the
batteries also connected (and possibly in use) at the same time. Because this charger is has been designed as
a voltage regulated product, there is little chance of this being a problem. Most alternators, solar controllers,
DC-DC chargers, etc will not cause any ill-effect if used at the same time. However, we recommend that you
check with the other equipment suppliers if you are not sure.
STORAGE
This charger has been designed to be left permanently connected.
We therefore recommend that you plug the charger into AC mains when your camper-trailer, caravan, boat, etc
is in storage so that the battery is always maintained at 100% state of charge and always ready for use.
If you don’t have access to permanent AC mains power, consider solar panels and a suitable regulator (such
as the Ozcharge OCSR30) to keep the battery fully charged.
Keep in mind that all batteries have a certain rate of “self discharge” and will eventually go flat by themselves,
so we recommend the charger be left connected to AC mains when not in use.

-6-
RECOMMENDED BATTERY CAPACITY
This product is designed to be installed in a hardwired situation therefore the battery capacity will normally be a
fixed size and determined by the vehicle manufacturer. If the battery was supplied and installed in a
campervan or caravan ask the manufacturer what make and model they have supplied as the battery is
often out of sight and/or in a protective box. For all other installations such as marine and offgrid solar
installation refer to the battery label or system owner’s manual.
Always refer to the battery manufacturer for the minimum and maximum allowable charge current.
We recommend this charger be normally used with 80-100Ah deep-cycle battery. However it can be used with
up to a 200Ah battery maximum but the recharge time will be very long which can be annoying to you and
your neighbours when using a generator.
Remember that standing DC loads such as lights, TV, fridge, etc that are being used at the same time you are
trying to charge your battery will “steal” power away leaving only the difference available for recharge.
EG: if the charger working at its full 10Amp output and running 4Amps of other loads simultaneously, there is
only have 6Amps left available to charge the battery.
USE WITH GENERATORS
This product is designed for safe use with generators. Test your generator with the charger before you
leave home!
We recommend only using “inverter” type generators (ie: Honda EU or Yamaha EF-iS) or generators with an
Automatic Voltage Regulator (AVR) on the alternator.
If you are using a 2-stroke or open frame “tradesman” type generator without an AVR, we highly recommend
using an additional surge protector at the generator outlet (ie: Dick Smith part # M7404 or Jaycar part #
MS4015).
Remember that powered sites in remote areas are often powered from a large generator too.
The charger requires approx 200Watts to run at its full output. Therefore we recommend the smallest
generator used to run this charger is 1kVA (1000VA).
OPERATING INSTRUCTIONS
This Ozcharge battery charger has been designed to be easy to operate and very simple to use.
Please refer to the operating instructions below.
1. Pre-Charge Check
(a) Check the Battery Electrolyte level (non-sealed batteries). If necessary, remove the vent caps and add
distilled water so the levels are halfway between the upper and lower fill lines.
(b) Location – Ensure the Battery is in a well ventilated area. Never charge a conventional wet cell
battery inside a campervan or caravan without adequate ventilation. This includes “Calcium”
maintenance-free types. Refer to Australian / New Zealand Standards 2676 and 3011 for indoor
battery installations.
(c) If your charger came as Original Equipment (OE) with your caravan, ignore this step.
Keep the charger as far away from battery as the cables permit. Never place the charger directly
above the battery being charged as gasses from the battery may corrode and damage the charger.
Always keep the charger away from high corrosion / wet and moist areas.
2. Connecting the charger to your battery
Because this product is designed to be hardwired, this step will normally be done as part of the original
installation.
(a) Connect the Red lead from the charger directly to the positive (+) battery terminal.
(b) Connect the Black lead from the charger directly to the negative (-) battery terminal. Do not connect
to the chassis, fuel rails, brake lines, etc.
(c) When multiple batteries are installed in parallel, always use a fuse or DC circuit breaker as close to
each battery as possible.
(d) If connecting the charger to batteries in parallel, connect the charger output lead to each of the
opposite ends of the battery bank to minimise any voltage drop in each battery interconnect.

-7-
3. Connect the battery charger to the mains power (230-240Vac)
(a) Note this could be from a generator, powered site, marina, or your home.
(b) The charger will automatically start when AC power is connected.
(Note: If the Fault Indicator LED illuminates Red, please check your connections as the most
common problem is that the Positive and Negative Leads are reversed. Refer to Trouble Shooting
Page for further information)
(c) Ensure the Battery Type indicator LED matches your battery installed!
Note: The charger will automatically memorise your charging rate setting and battery type setting. The next
time you use the charger it will default to the last setting.
The Charging process
The charging LED’s indicate all of the Charging Stages. The charging stages are in this order as follows:
Soft Start. Indicated by the green Bulk LED flashing.
A Soft Start will only occur if the initial battery voltage is between 3V and 10.5V due to a deep
discharge. During a Soft Start the unit will charge the battery using 2.5Amps until the battery voltage
is over 10.5V.
If the green Bulk LED is blinking, turn off all the loads possible (lights, TV, etc) until the Bulk LED
turns solid and stops blinking.
Bulk charge. Indicated by the green Bulk LED on solid.
Charges the battery using a constant maximum current (10Amps maximum) until the battery voltage
rises to the Absorption level. This stage is generally the first 60%.
Absorption. Indicated by the green Absorption LED on solid.
This stage charges the battery using a constant voltage (determined by the Battery Type setting). This
stage is generally the second 30%.
Float. Indicated by green Float/PS (Power Supply) LED.
During the first hour of float charge (>90%) the green Float/PS LED will blink.
When the battery is 100% and fully charged the green Float/PS LED will turn solid. It will now be
trickle charged and maintained at a safe constant voltage (determined by the Battery Type selection).
Equalising. Indicated by the green Absorption LED flashing and the Equalisation LED on.
Equalisation mode (not possible in GEL mode).
This mode is a well proven way of extending the life of your battery, especially when used in a deep-cycle
application such as a camper-trailer or with an electric outboard on a boat. Activating this mode will force the
battery voltage higher than normal, at a limited output current to perform a controlled overcharge, reactivating
all of the chemicals maximising all of the available capacity. Every battery manufacturer has different
guidelines for Equalisation so check with them before activating this mode. A s a general rule though, use this
mode once a month if you are use the battery heavily to once every few months if you use it lightly.
Rejuvenation mode (Patented).
Your Ozcharge battery charger provides a unique battery “Rejuvenation” function.
What does this feature do? The Rejuvenation mode uses high frequency and high voltage pulses that has
been proven to break down the crystalline form of lead sulphate (commonly called “Sulphation” pronounced
“Sul-Fay-Shon”) within the battery cells which helps extend your battery life. Sulphation can occur when
batteries are regularly discharged, have insufficient recharge time and/or they are left in a discharged state.
We recommend that you periodically use this rejuvenation (de-Sulphate) feature to ensure you get the
maximum life out of your battery, only when connected to mains power (not on a generator due to the time and
fuel that would be required).
While there are no true rules to follow, we suggest that if you use the battery on a daily basis, Rejuvenation
every few months is adequate. If you only use the battery a few times a year, every 6-12 months or so is
enough.
To activate the Rejuvenation feature, press and hold the Battery Type and the Equalisation buttons for 3
seconds until the yellow Rejuvenation LED begins flashing.
Once the charger has entered the rejuvenation (de-sulphate) charging stage, the process will automatically
stop after 24 hours.

-8-
CHARGER SPECIFICATIONS
1. Input: 230Vac nominal (216-264Vac); 50Hz;
2. Charging starting conditions: Battery must be over 3.0V
3. Rated output: 10Amps DC peak. 8Amps DC constant.
4.
Type of battery: Lead-acid only (not Nickel-Cadmium, Lithium, etc). EG: Conventional/Calcium/AGM/Gel
5. Charging output voltage: 14.1/14.4/14.7V programmable for the “Absorption” stage
6. Float output voltage: 13.7V for the finish trickle charge stage
7. Equalise voltage: 15.5V current limited. Automatic for Calcium battery types
8. Operating Environmental: 0~40 degC, 90% RH maximum; non-Condensing
9. Net Weight (kg): 1.0 (approx.)
10. Dimensions (mm): 140L x 145W x 55D
TROUBLE SHOOTING
Problems
Indication
Possible causes
Suggest solution
Charger does
not work
Indicator lights are not
on
No AC power
Internal fuse is blown due to poor AC
mains.
Check the AC plug connection at the base
of the main unit.
Have the generator checked.
Return the unit for service.
Charger has
no DC output
Battery Type green
LED is on.
No battery connection.
Battery is deeply-discharged.
Check the battery connection is secure.
Check the DC plug is fully connected
(vibration may have caused accidental
disconnection)
Check the battery voltage is over 3V.
No Charging
Current
Fault LED is blinking.
Fault LED is on solid.
Fault and green Bulk
LED are Flashing
Output is shorted or battery is connected in
reverse.
Over temperature shutdown
Soft Start mode has timed out
Check the DC cabling & master fuse.
Check the polarity of the battery
connection.
Check the charger is not covered and has
good ventilation. Allow to cool. Restart
the charger.
Battery is in extremely poor condition.
Turn off all loads. Restart the charger.
Run the Rejuvenate mode.
Replace battery if necessary.
2 YEAR MANUFACTURER WARRANTY
Zylux Distribution Pty. Ltd. (OzCharge) warrants to the Customer that this product is substantially free from defects in materials and
workmanship under normal use for a period of Two Years from the Date of Purchase.
Please ensure you keep a copy of your purchase on file as this will be required to validate your warranty.
Obtaining Warranty Service
Within the warranty period, the Customer must contact the authorised supplier / installer / retailer where the product was purchased or
alternatively you can contact the OzCharge service centre through one of the following methods:
Identify the serial number and proof of purchase first!
Hotline: Australia (03) 9482 2203 New Zealand (09) 527 7260
Website: www.ozcharge.com.au www.ozcharge.co.nz
If the Authorised Supplier and / or OzCharge service centre concludes that while under normal use, a product failure or malfunction occurred
during the warranty period and was caused by a defect in material or workmanship (see Exclusions), the Customer will be asked to ship to
the nearest service point for repair or replacement, at our discretion. The product must be packaged appropriately for safe shipment. To
prove that the product is under warranty, the customer should enclose a copy of their receipt for proof of purchase. It is recommended that
returned products be sent by registered mail as Zylux Distribution Pty Ltd. (Ozcharge) accepts no responsibility / liability for goods lost or
damaged in transit. Return Shipping costs to be incurred by the Customer.
Exclusions
If upon receiving a product for repair and if testing and examining the product has disclosed that the alleged defect or malfunction in the
product does not exist or was caused by the Customer or any third persons misuse, physical abuse, water or lightning damage,
unauthorised attempts to open, repair or modify the product or improper installation, this will not be covered under this warranty.
This Warranty is void if:
1. The product has been tampered with or repaired by an unauthorised person.
2. The warranty seal is broken or altered.
3. The warranty period has expired.
Specifications subject to change without notice.
Distributed by Zylux Distribution Pty. Ltd.
ABN: 66 101 378 009
© 2012 Rev_1.0
 Loading...