

Ozark Trail WMT-530NQ User Manual
THINGS YOU SHOULD KNOW
• Do not leave batteries in the air pump to avoid corrosion.
• Place a sheet or mattress pad over the mattress cover to help avoid dirt and stains.
• Remove dirt or stains from the mattress cover with mild detergent and water solution.
Dampen cloth in solution and gently rub to loosen dirt and stains.
• The 3 nozzles that come with the air pump may also be used to inflate a variety of
inflatable toys.
6 Month Limited Warranty
Campvalley (Xiamen) Co. Ltd. warrants for a period of 6 months from the original date of purchase,
this product against any defects in materials or workmanship. At its discretion, Campvalley
(Xiamen) Co. Ltd. may provide replacement parts to original purchaser. Original receipt or proof of
purchase as well as proof of defect is required. Campvalley (Xiamen) Co. Ltd. will not be responsible
for shipping costs incurred outside the continental USA.
Warranty is valid for the original purchaser six months from the date of purchase and is not transferable. This warranty does not cover any product purchased through non-authorized dealers and/
or online auction websites.
This Warranty Does Not Cover
This 6 Month Limited Warranty does NOT cover normal wear and tear, abuse or misuse of this
product including damage from inclement weather conditions, such as wind, rain or hail. In case
of inclement weather remove all valuables and persons and seek appropriate shelter. Under no
circumstances will Campvalley (Xiamen) Co. Ltd. be liable or responsible for any incidental or
consequential damages. This product is designed and intended for recreational use only. Prolonged
exposure to UV rays will cause any fabric to fade and deteriorate and is NOT covered by this 6
Month Limited Warranty.
All replacement products or parts will assume the remaining warranty of the original product.
This warranty gives you specific legal rights. You may also have other rights which vary from
state to state.
To Obtain Warranty Service
Call Toll Free 1-888-774-5840 for warranty service, repair parts, or product questions. Mon-Fri,
8:00 a.m. – 5:00 p.m. Central Time.
NOTICE: DO NOT RETURN PRODUCT TO RETAIL STORE.
Item No. WMT-530NQ
Model No. 30660
DOUBLE SIZE BED
WITH MATTRESS
(78” L x 59” D x 24” H)
(1.98 m x 1.49 m x 0.61 m)
Campvalley (Xiamen) Co., Ltd.
No.18th, West Road 3, Jinyuan, Jimei District, Xiamen, Fujian 361022 (China)
Made in China • Printed in China
Before you begin
Read all instructions thoroughly before beginning set up.
• Select a level site clear of rocks, branches and other hard or sharp objects before
setting up bed frame.
• Carefully read all warning tags and TO OPEN /CLOSE VALVE tag on air mattress.
• Two people can easily setup this bed with air mattress in minutes.
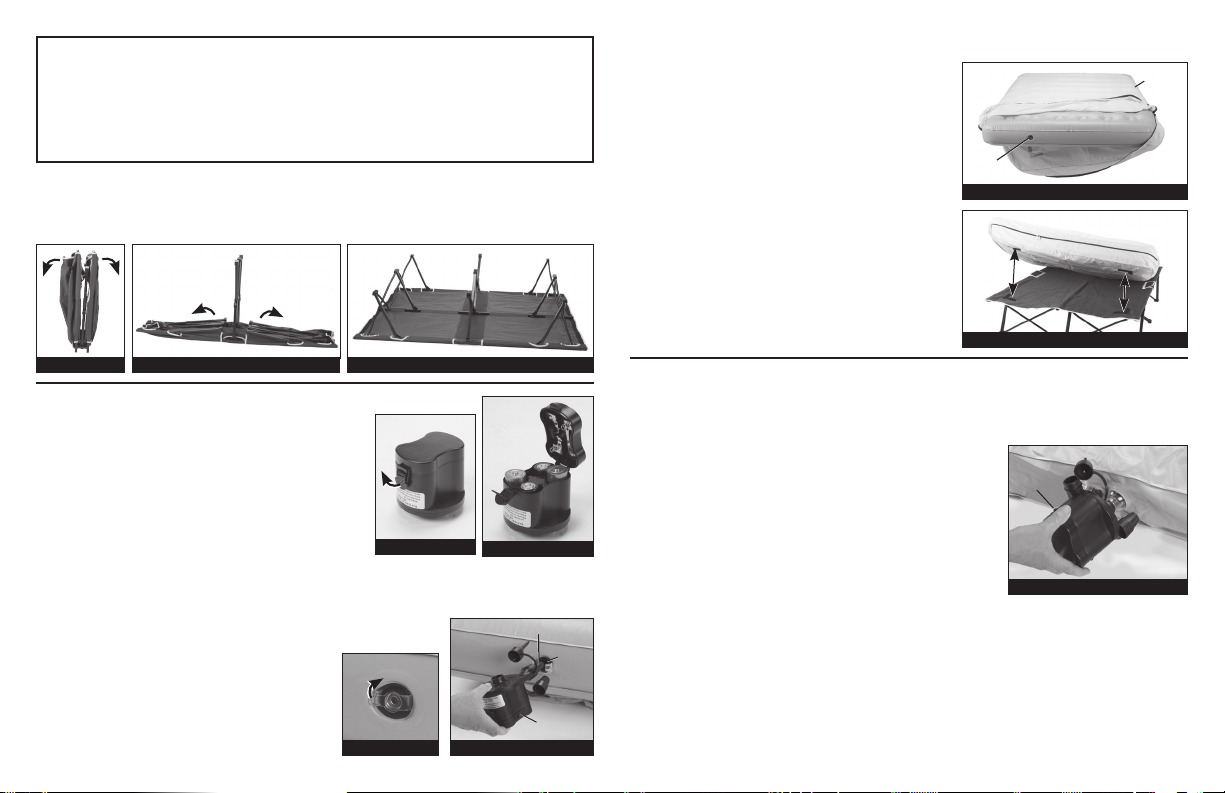
SET UP BED FRAME
FULLY EXTEND FRAME
as shown in Figures 1, 2 and 3; then flip extended frame over to upright position.
Figure 1
Figure 2 Figure 3
AIR MATTRESS PUMP
INSTALL OR CHANGE BATTERIES
• Unhook latch and open lid to battery compart ment. (Fig. 4 and 5)
• Insert four D-cell batteries as shown. (Fig. 5)
• Close lid and hook latch to secure.
INFLATE AIR MATTRESS IN COVER
• Unfold the mattress and flatten all edges.
• Put air mattress inside cover
• Pull valve cap on mattress to open. (Fig. 6)
NOTE: Insert black one-way valve before filling.
• Place medium diameter nozzle onto “INFLATE”
labeled outlet of air pump. (Fig. 7)
• Insert filling nozzle into fully opened valve.
• Switch on air pump and fill mattress to
desired firmness. DO NOT OVERFILL.
• Turn off switch, remove air pump and im mediately insert valve cap.
Figure 4
Figure 6 Figure 7
Figure 5
Medium Filling Nozzle
Switch
Valve
ATTACH AIR MATTRESS
INFLATE AIR MATTRESS IN COVER (continued)
NOTE: Make sure air valve on mattress is posi-
tioned at the open zippered end of mattress cover.
(Fig. 8)
IMPORTANT: Fasteners are located on the bottom
side of the cover.
• Zip up mattress cover completely.
Valve
Figure 8
ATTACH MATTRESS TO TOP OF FRAME
• Align fasteners located on bottom of the mattress
cover and top of the bed frame. (Fig. 9)
• Press down firmly on top of mattress at each
corner to secure.
Figure 9
STORING AIR MATTRESS, FRAME & PUMP
• Remove mattress from frame.
DEFLATE AIR MATTRESS
• Unzip mattress cover to access valve cap.
• Pull valve cap to open and pull out the one-way black
valve. (Fig. 10)
NOTE: This will allow air to escape and start deflating
the mattress.
• Place medium diameter nozzle onto “DEFLATE”
labeled outlet on top of the air pump. (Fig. 10)
• Insert filling attachment into fully opened valve.
• Turn on air pump switch and remove air until mattress
is completely flattened.
• Remove mattress cover then fold to store.
• Fold the mattress to store.
FOLD UP FRAME
• Flip extended frame over to as shown in Figure 3.
• Fold up legs in reverse order (Figures 2 and 1)
• Place the frame, mattress and cover in carry case.
• Remove batteries from air pump and place in carry case.
Switch
Cover
Figure 10
 Loading...