

Ozark Trail W853.3S Assembly Manual
ASSEMBLY INSTRUCTIONS
MODEL W853.3S 10 PERSON TUNNEL TENT 11’x 16’
DANGER
DANGER
WARNING
SAFETY WARNING DOs AND DO NOTs
EVERYONE WHO USES THIS TENT SHOULD READ THIS MANUAL AND BECOME FAMILIAR WITH ALL
SAFETY WARNINGS AND PRECAUTIONS FOR SAFE USE, ASSEMBLY, CARE, MAINTENANCE,
AND STORAGE. KEEP THIS MANUAL SO YOU CAN REFER TO IT LATER.
CARBON MONOXIDE GAS WILL KILL YOU
Stoves, heaters, grills, lantern, candles, and other fuel-burning devices that burn propane, natural gas, charcoal, kerosene, coal, or other fuels
produce a toxic gas called carbon monoxide. Because carbon monoxide gas is invisible, odorless, and colorless, a dangerous level of carbon
monoxide gas can accumulate in a tent which cannot be detected by sight, smell, or taste. For these reasons:
• DO NOT use matches, lighters, stoves, heaters, grills, lanterns, candles, cooking equipment, or other fuel-burning devices inside or near a tent.
• DO NOT build fires inside or near a tent.
• DO NOT leave campfires unattended.
Your failure to follow this warning will cause death, serious injury, or permanent disability to you or others.
• DO NOT leave children unattended inside a tent or in camp.
• DO NOT allow children to assemble a tent.
• DO NOT allow children to enter or exit a tent except through the door.
• DO NOT allow children to remain in a closed-up tent on hot days.
Your failure to follow this warning will cause death, serious injury, or permanent disability to your children.
PROTECT YOUR CHILDREN
This tent is made with flame resistant fabric which meets CPAI-84 specification. IT IS NOT FIREPROOF. The fabric will burn if left in continuous
contact with any flame source. The application of any foreign substance to the tent fabric may render the flame-resistant properties ineffective.
Your failure to follow this warning could cause death, serious injury, or permanent disability to you or others.
FLAMMABILITY WARNING KEEP ALL FLAME AND HEAT SOURCES AWAY FROM THIS TENT FABRIC
1. Do not pitch tent near open fire.
2. Do not leave campfire unattended.
3. Do not leave children unattended inside a tent.
4. Do not use heating, lighting or cooking equipment with open flames in or near tents.
5. Do not use other than recommended water repellent compounds on your tent.
6. Do not spray the tent with insecticide.
7. Do not store tent on concrete floor.
CAMPING DO’S AND DON’TS
DO NOT...
1. Always extinguish campfire before leaving area.
2. Exercise care when using electricity and lighting in and near tents.
3. Make certain your tent is properly ventilated in all weather conditions. In extreme weather conditions, snow could obstruct airflow and
cause asphyxiation unless cleared frequently.
4. Anchor your tent securely to provide additional security from changing climatic conditions. Snow pegs, skis and/or heavy rocks may
be necessary to supplement tent stakes and guy cords.
5. Take your tent down and store properly after camping.
DO...
DO NOT LEAVE YOUR TENT SET UP IN DIRECT SUNLIGHT LONGER THAN NECESSARY. THE SUN’S ULTRAVIOLET
(UV) LIGHT DEGRADES ALMOST EVERY FABRIC AND MATERIAL. IF LEFT IN SUNLIGHT FOR PROLONGED PERIODS
OF TIME, FABRIC WILL FADE AND WEAKEN. DO NOT STORE TENT ON CONCRETE FLOOR. DO NOT SPRAY THE
TENT WITH INSECTICIDE.
Your tent is water repellent, however, it is not waterproof. During heavy rain, some leakage may occur. Keep
objects from touching the inside of the tent. Such objects may cause leakage at point of contact. If seam leakage
occurs, it can be controlled by applying a seam sealer compound.
EXERCISE CARE WHEN USING ELECTRIC DEVICES IN AND NEAR TENTS.
Although our tents and screen houses are constructed to rigid specifications, periods of wind or rain
soaking the ground may loosen the stakes and cause the uprights to sink into the g round. This will
weaken the rigidity of the overall structure. Water pockets may also form in the roof if the unit is not
assembled taut, possibly causing broken frames and torn fabric.
If you have questions or need to order a part, call 1-800-325-4121 or send an e-mail to contactus@wenzelco.com.
Have your model number or part number ready when you call. DO NOT ORDER BY REFERENCE KEY NUMBER.
Send your request for parts to:
Exxel Outdoors, LLC.
6235 Lookout Road
Boulder, CO 80301
CARE
REPLACEMENT PARTS
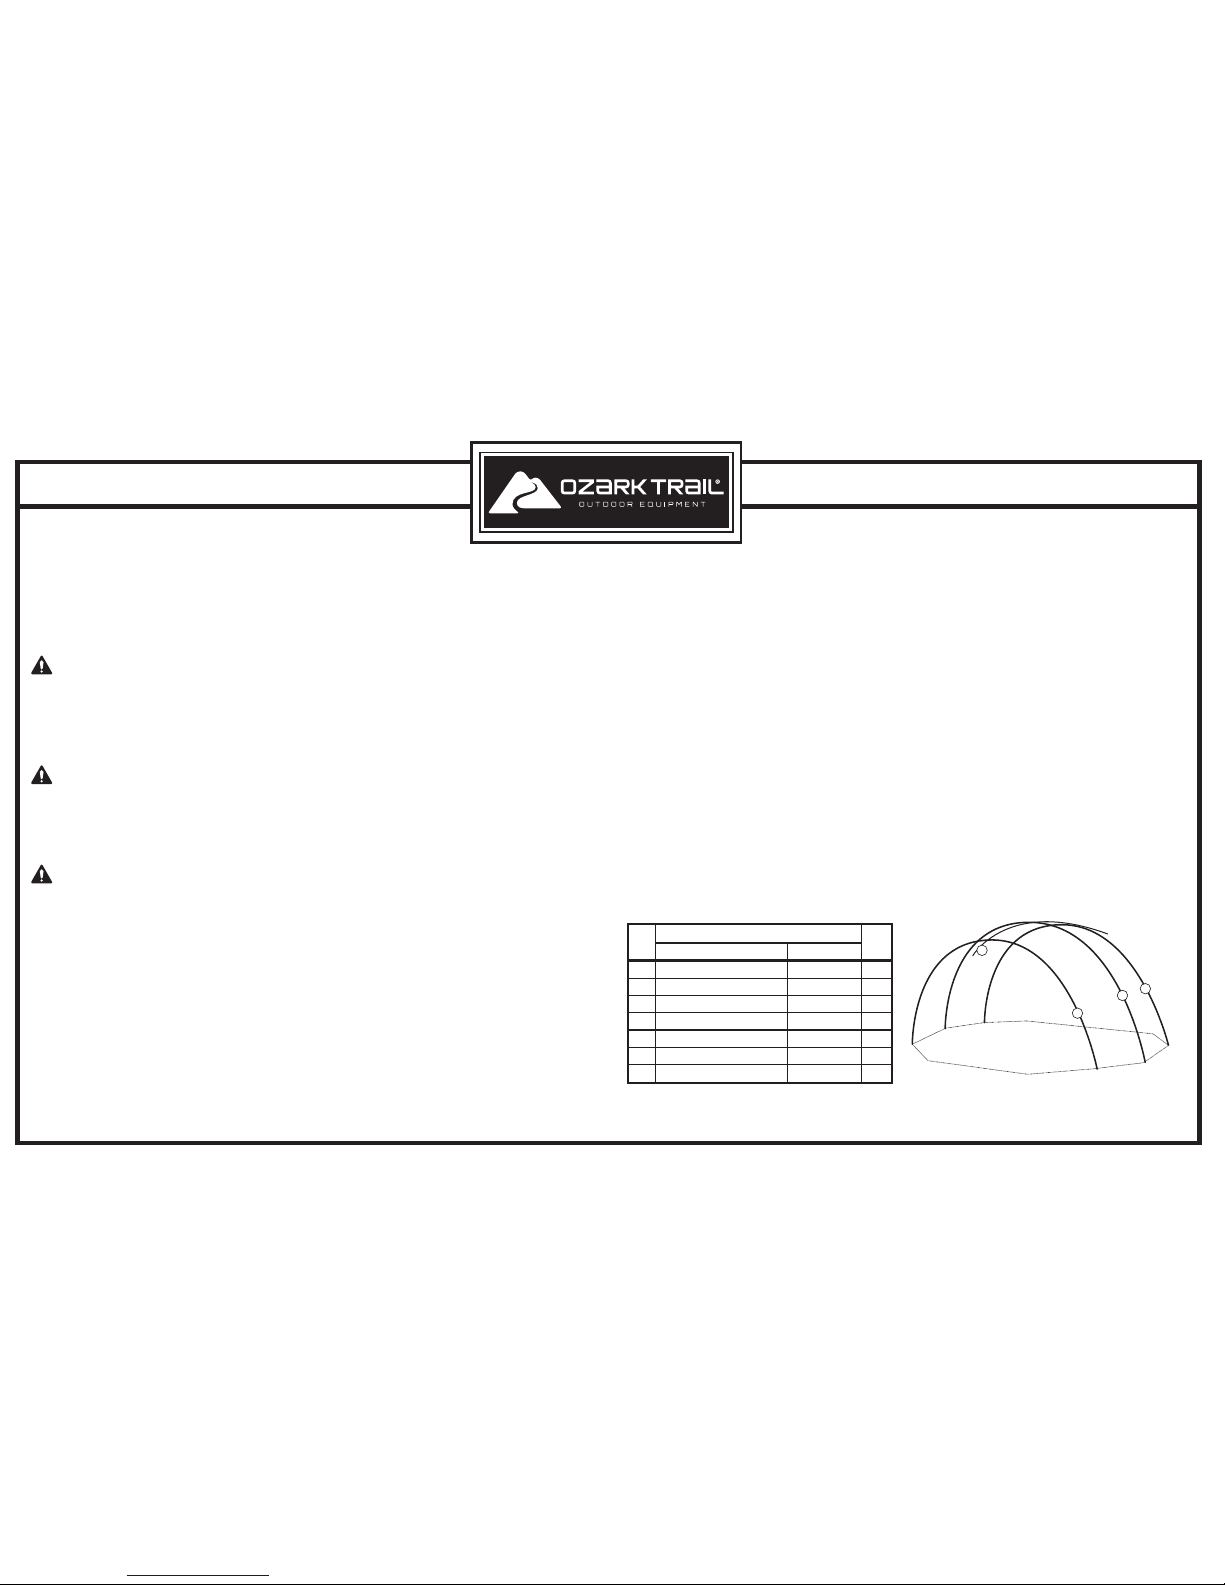
MODEL NO W853.3S, 11’x 16’ 10 Person Tent
A
B
C
W853.3SM
1
2
1
1
1
4
14
W853.3SS
W853.3SR
W853.3ST
A1001
PIN STAKE
DESCRIPTION PART NO.
QTY
REQ
KEY
NO.
W853.3SFL
Main Pole
Side Pole
Ridge Pole
Complete Frame
Replacement Fly
Guy Rope
Steel Stake
A
B
B
C
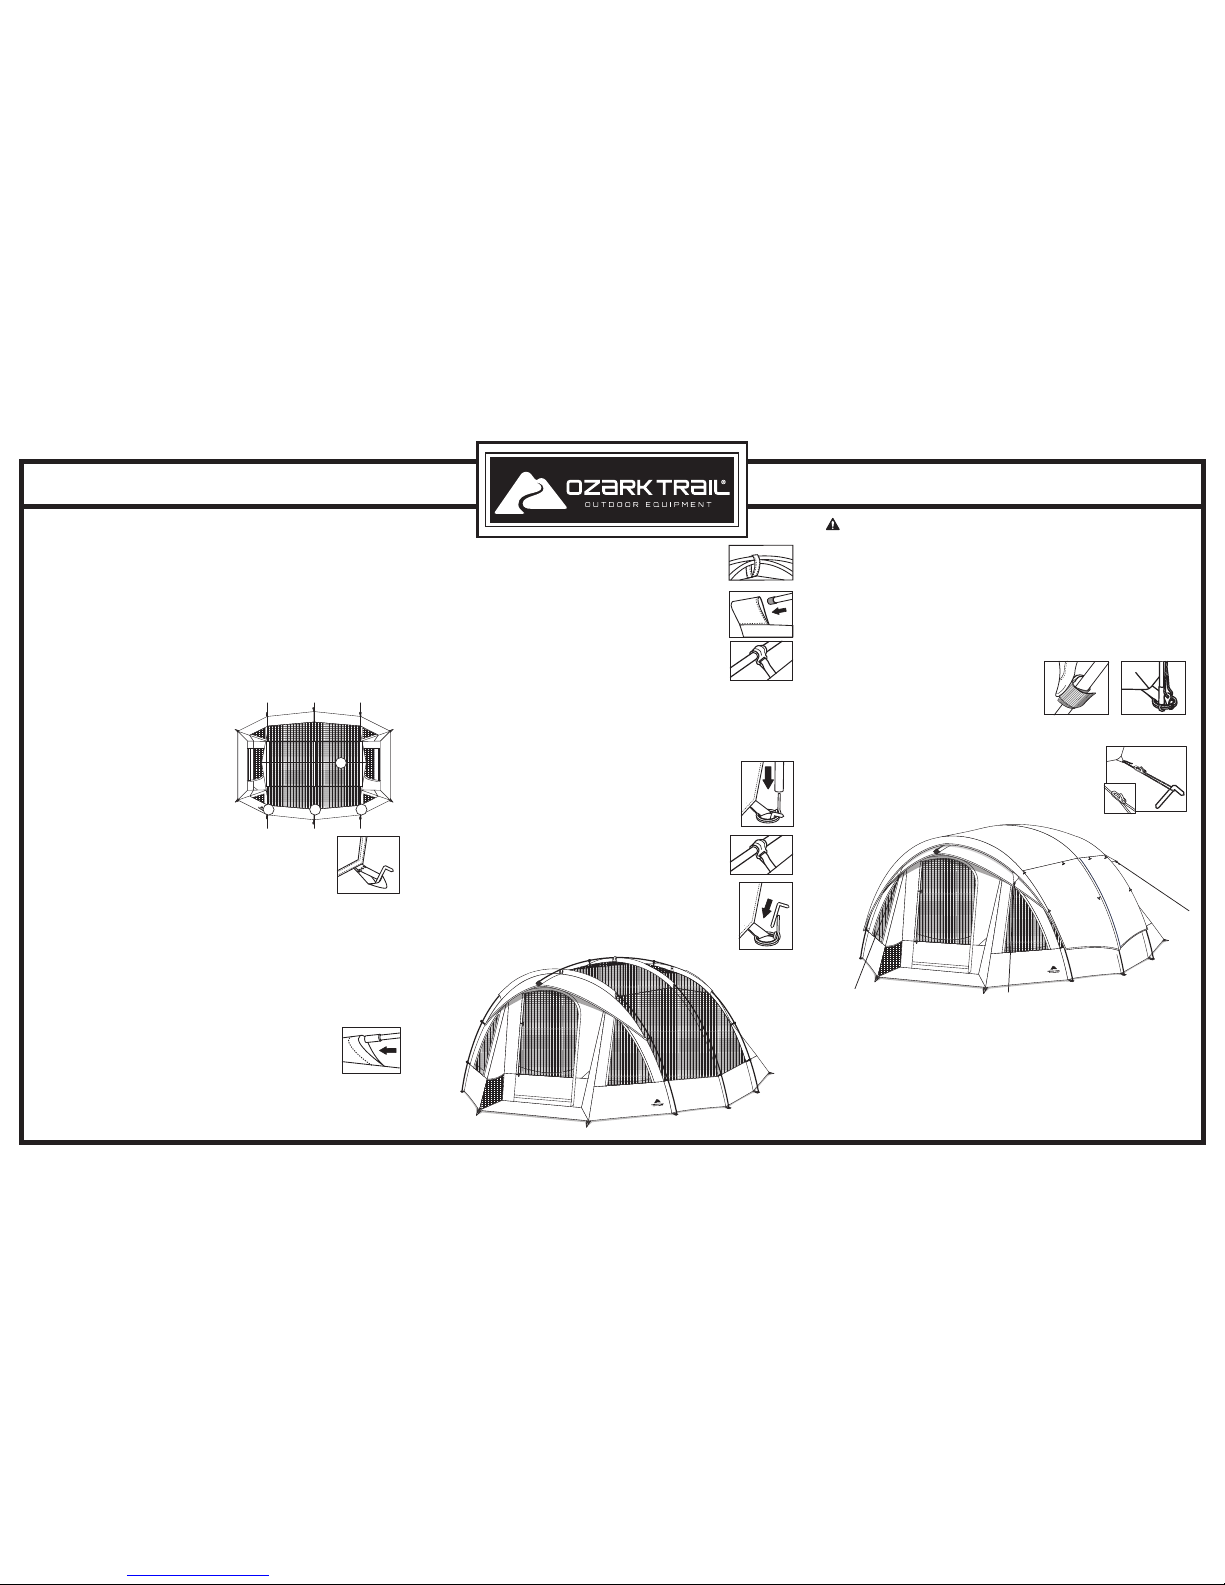
ASSEMBLY INSTRUCTIONS
IMPORTANT: WE ADVISE YOU TO ASSEMBLE THE TENT ONCE BEFORE
GOING CAMPING TO BECOME FAMILIAR WITH THE ASSEMBLY OF THE TENT.
NOTE: PLEASE LOOK AT THE REPLACEMENT PARTS DIAGRAM TO SEE HOW
YOUR FRAME IS ASSEMBLED. IT IS RECOMMENDED TO HAVE TWO ADULTS
BE INVOLVED IN SET UP.
TO PROLONG THE LIFE OF THE TENT FLOOR, SELECT A LEVEL, CLEAN AREA
FOR THE CAMPSITE. TO PREVENT DAMAGE TO THE ZIPPER, UNZIP THE DOOR
TO ALLOW AIR TO ENTER THE TENT. TO IMPROVE THE WEATHER RESISTANCE
OF YOUR TENT, IT IS ADVISABLE TO USE SEAM SEALER TO COAT ALL EXPOSED
SEAMS. YOU SHOULD APPLY ONLY TO THE INSIDE SEAMS OF THE TENT AND
UNDERSIDE OF THE TENT FLY. IF APPLIED TO THE OUTSIDE OF SEAMS,
DISCOLORATION OF YOUR TENT MAY OCCUR. SEAM SEALER IS AVAILABLE
IN THE CAMPING SECTION OF ANY LOCAL SPORTING GOODS STORE.
STEP 1:
Spread tent out flat, floor side down.
STEP 3: Extend each of the fiberglass frame poles by pulling out each section
and placing pole ends into the metal ferrule connectors. You will have 4 fiberglass
poles (Refer to the frame drawing on the opposite side of the assembly instructions).
The longest pole with metal end ferrules (A) is the main or middle pole. (it is marked
with white tape at both ends) The next longest pair of poles, also with metal ends
(B) are the side poles. The single pole © with cap ends is the center ridge pole.
STEP 4:
Insert the longest tent pole (A) through the sleeve in the
middle of your tent. Be sure to put the pole through the fabric loop
at the center of the tent.
STEP 5: Insert the side poles (B) through the remaining sleeves at front and rear
of the tent.
STEP 7:
Go to one side of the tent and place the ferrules at the ends of the poles
onto the pins located on the corresponding rings at the base of the tent. The tent
poles should follow the seam lines of the tent.
STEP 8:
Go to the opposite side of the tent. Working from front to back
raise the tent by flexing the poles into an arch and placing the ends of
the poles onto the pins located on the rings at the base of the tent.
STEP 12: For extra stability, there are guy ropes attached
to the fly. Extend the guy ropes and make a loop at the
opposite end of the guy rope by using the slider (as shown)
and place loop over a tent stake. Adjust the slider to make
the guy rope tight and stake to the ground.
Tent should appear
as shown.
NOTE:
Make sure tent is clean and dry before storing. To take down tent, follow steps above
in reverse order. Be sure to leave doors and windows unzipped. Place stakes into stake bag and
poles into pole bag, which are provided. The tent should be folded into equal parts toward the
center of the tent to distribute the bulk. Fold fly and lay fly and pole bag on top of tent at the end
opposite the door. Start a small tight roll, the width of the carry bag, and roll tent toward door to
allow air to escape. Once rolled, tie a string around tent to hold into place. Place tent, frame and
stakes into carry bag for storage.
STEP 9:
Clip the plastic hooks to the fiberglass frame poles.
STEP 10: Finish staking the tent to the ground by inserting stakes
through the rings at the base of the tent. Hammer stakes into the
ground at a 45° angle, making sure the tent floor is pulled out tight.
MODEL W853.3S 10 PERSON TUNNEL TENT 11’x 16’
WARNING:
Elastic cords can snap back and hit your eye. To reduce the
risk of injury to you and others:
• Keep your body and face clear.
• Do not over stretch elastic cords.
• Maintain firm grip on hook.
• Pull the hook toward you; if it slips it will spring away from you.
• Make sure hook is fully clipped to tent before releasing.
• Wear protective eyewear during tent assembly.
Your failure to follow this warning could cause serious injury or permanent disability.
Tent should appear
as shown.
NOTE:
Toggles and loops are attached to the fly to allow for multiple ventilation options
in good weather. Please refer to the packaging and online videos.
A
B B
C
STEP 6: Locate the center ridge pole (C) and slide it through the
fabric loop at the center of the tent. The ridge pole runs from front
to back across the roof. Please make sure the ridge pole goes over
the other three poles.
Locate the pole pockets that are attached to
the tent above each door. Place one end of the pole into one pocket.
Go to the other end of the tent, flex the fiberglass pole, and
place
the end into the corresponding pole pocket. Clip the plastic hooks
on the roof of the tent to the ridge pole.
STEP 2:
Stake the tent to the ground by inserting tent stakes through
the webbing loops at the front and back corners of the tent. Hammer
stakes into the ground at a 45° angle, making sure the tent floor is
pulled out even and tight.
STEP 11: Unfold fly and place over tent so
the grey zipper covers on each side of the
fly are located over the middle pole.
Attach the fly to the tent by hooking the
S-hooks located on each side of the fly to
the rings at the base of the tent. Fasten the Velcro fasteners sewn to the edge of
the fly around the tent poles at all locations.
 Loading...