

Page 1

User Manual
USER MANUAL Model No: 3080, 3081, 4278
16” Stand Fan
*COLOUR MAY VARY*
Page 2

Safety Instructions
Notice: Ensure you read and fully understand instructions before use
While every attempt is made to ensure the highest degree of protection in all equipment, we cannot
guarantee freedom from injury. The user assumes all risk of injury due to use. All merchandise is sold on
this condition, which no representative of the company can waive or change.
• The fan is only for intended use as described in this manual. All other uses, not
recommended in this manual, may cause fire, electrical shock or injury to persons.
• This fan is intended for household use.
• To protect against electrical shock, do not immerse fan, plug or cord into water or spray
with liquids. KEEP AWAY FROM ALL LIQUIDS.
• Close supervision is necessary when any appliance is used near children.
• Always unplug the fan when it is not in use, when moving fan from one location to
another, and before cleaning.
• Avoid contact with moving parts. Never insert fingers, pencils or other similar objects
through the guard.
• Do not operate in the presence of explosive or flammable fumes.
• Do not place fan or parts near an open flame, cooking or other heating appliances.
• Do not operate fan with a damaged cord, plug or after the fan suffered malfunctions or
has been dropped or damaged in any manner.
• The use of attachments not recommended by manufacturer may be hazardous.
• Do not use outdoors.
• Do not let cord hang over the edge of a table or counter, or let it touch any hot surfaces.
• To disconnect, grip plug and pull from wall outlet, never yank the cord.
• Always use on a dry level surface.
• This appliance is not intended for use by children or other persons without assistance or
supervision if their physical, sensory or mental capabilities prevent them from using it
safely.
• Children should be supervised to ensure that they do not play with the appliance.
• If the supply cord is damaged, it must be replaced by the manufacturer or its service
agent or similarly qualified person in order to avoid a hazard.
• Do not operate without fan lattice/grille is properly in place.
• If the product is damaged or has any defects, please contact cservice@oypla.com
USER MANUAL Model No: 3080, 3081, 4278
Page 3
Operating Instructions
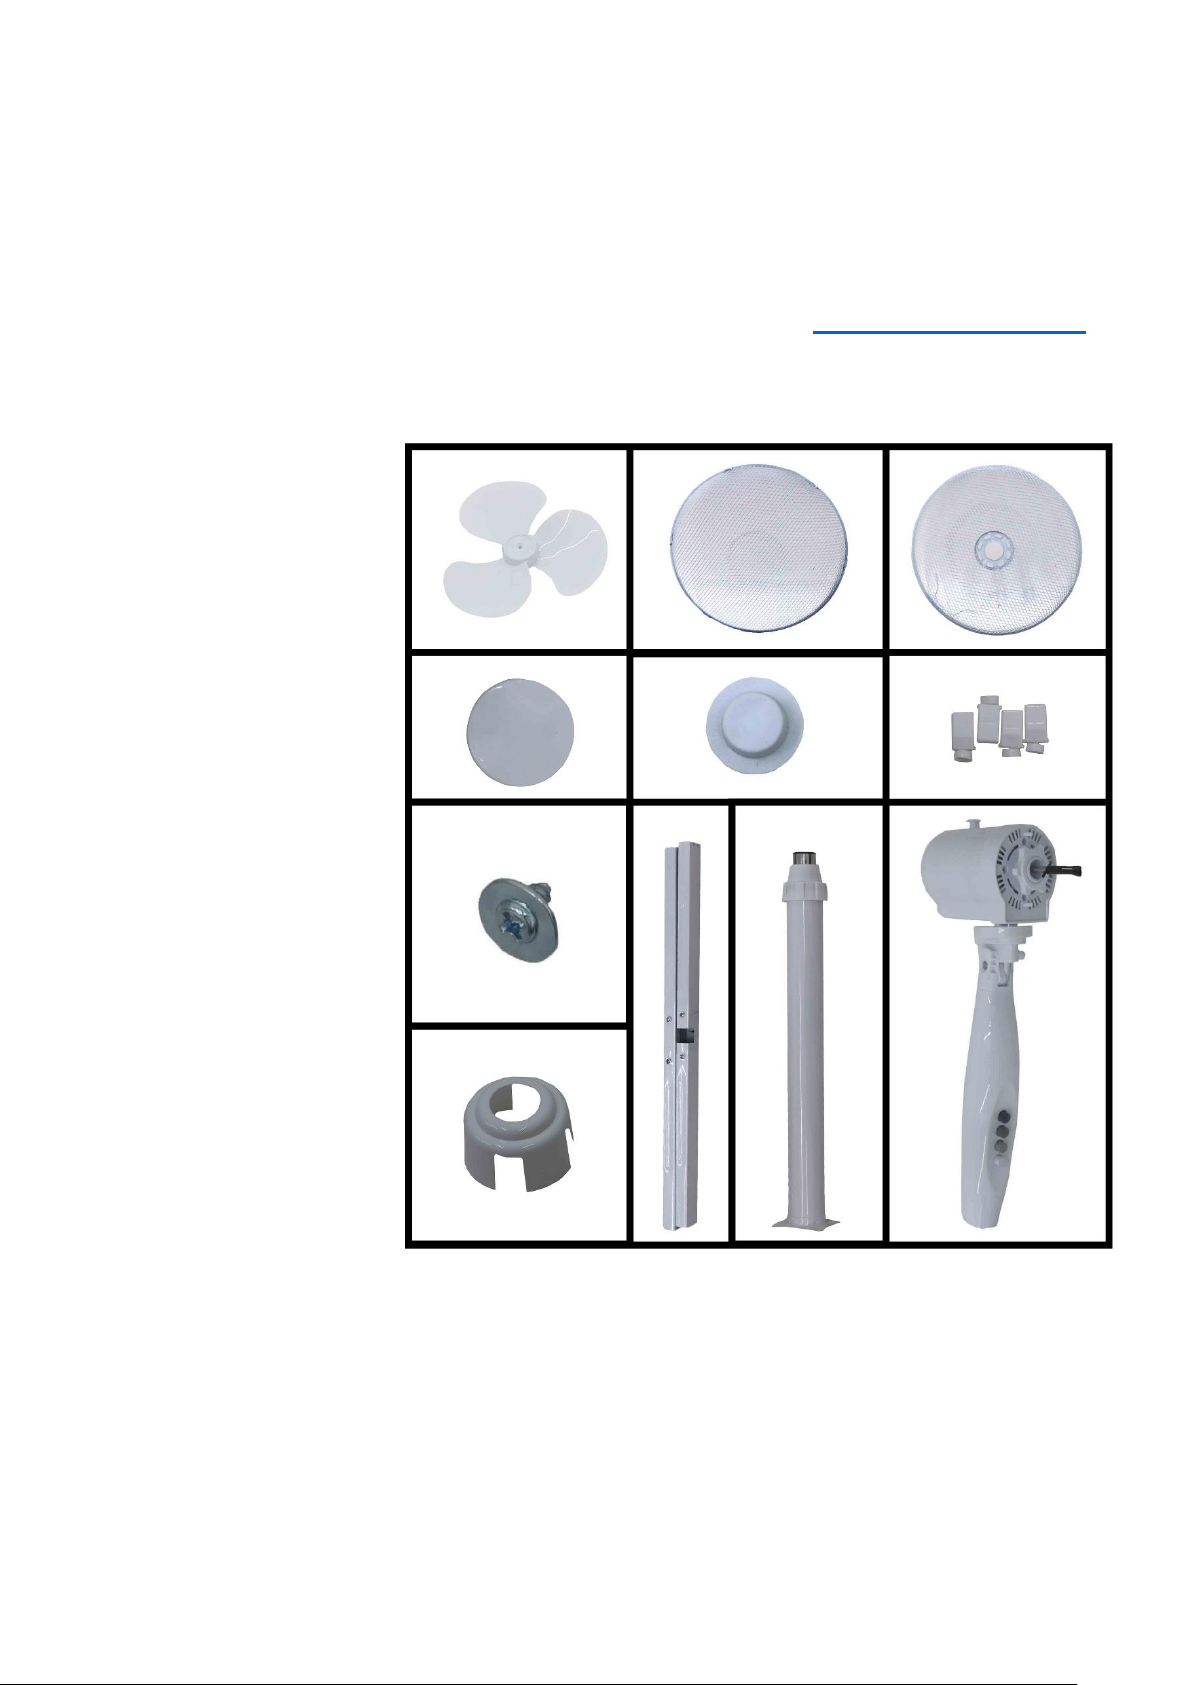
Parts List:
If you are missing any of the below parts please contact cservice@oypla.com
Please be aware that you will be referring to this parts list throughout the assembly process.
Fan Blade
Front Fan Guard
Back Fan Guard
Fan cover Plate
Fan Blade Locking Nut
Feet Stoppers [4pcs]
Small Screw with Washer [3pcs]
Base Stand [2pcs]
Lower Stand Pole
Fan Body
Base cover
This fan should be properly grounded for your safety. The power cord of this fan is equipped with a three-prong plug, which
mates with standard three prong wall outlets to minimize the possibility of electrical shock.
Do not under any circumstances cut or remove the third ground prong from the power cord supplied.
This fan requires a standard 220~240Volts A.C. ~/50Hz electrical outlet with three-prong ground.
The cord should be secured behind the fan and not left exposed or dangling to prevent accidental injury. Never unplug the fan
by pulling the power cord. Always grip the plug firmly and pull straight out from the receptacle.
Do not use an extension cord with this appliance. If the power cord is too short, have a qualified electrician or service
technician install an outlet near the appliance.
USER MANUAL Model No: 3080, 3081, 4278
Page 4

3
2
1
Off
A
1. Ensure voltage used corresponds with the voltage indicated on the rating label. Located on the
product.
2.
Turn the speed control to selected speeds: 0 (Off) and speeds 1, 2 and 3 for Slow, Medium and Fast.
3.
Tilting angles-By pushing the tilt-guard, you can adjust the fan to an elevation of your preference.
4. Never touch the blades with your hand or any object!
5.
Do not pull the power cable too hard. If damaged after use, get any repairs performed by a qualified
electrician.
6. To start Oscillation, push down on the knob marked as A “Oscillating Knob”.
7. To stop Oscillation, pull up on the knob marked as A “Oscillating Knob”.
USER MANUAL Model No: 3080, 3081, 4278
Page 5

Assembly Instructions
Aligning Prongs
1. Begin by taking the fan body (part 10). Unscrew the back fan-locking nut (part 5). Take the back fan guard
(part 3) and slide onto the fan body (part 10). Make sure the two prongs align on the fan body (part 10) with
the holes on the back fan guard (part 3). When aligning the back fan guard (part 3) make sure the handle is
facing upwards like in the image above. Do not over tighten.
2. Take the fan blade (part 1) and slide onto the fan body you have just created. Now secure the fan blade
using the fan blade-locking nut (part 5) turn anti-clockwise to tighten but do not over tighten. Please see the
image above.
USER MANUAL Model No: 3080, 3081, 4278
Page 6

3. Take the front fan guard (part 2). Unfold each tab located either side of the fan guard. Place the fan cover
plate (part 4) and in the middle of the front fan guard. Lock the fan cover plate using the three screws provided
(part 7). Located at the bottom of the fan guard there is a little nut and bolt. Unscrew this part and keep, as
you will need this part in the next step. Do not over tighten. Please see the image above.
4. Place the Front fan guard that you have just created in the last step, place on the fan body making sure the
holes align at the bottom of both fan guards. Please place the nut and bolt through each hole and tighten. Fold
each tab down to secure the front guard into place. Do not over tighten. Please see the image above.
A
5. Take the base stand (part 8) and unscrew the screws marked as A in the image above. Slide both base stands
(part 8) together like the image above.
USER MANUAL Model No: 3080, 3081, 4278
Page 7

6. Take the lower stand pole (part 9) and place over the base stand you have just created in the last step. Use
the four screws from step 5 to secure the lower stand pole into place. Do not over tighten. Please see the image
above.
A
7. Unscrew the height adjuster marked as point A in the image above. Remove part A, and slide the base cover
(part 11) over the top of the base stand. Screw part A back onto the base stand. Do not over tighten. Please
see the image above.
8. Take all four feet stoppers (part 6) and clip into the bottom of the base stand. Force may be needed to
secure into place correctly. Please see the image above.
USER MANUAL Model No: 3080, 3081, 4278
Page 8

A
A
A
9. Unscrew the knob that is marked as A in the image above. Now slide the fan body onto the base stand. Once
you have done this, use the knob marked as A to secure both parts together. Do not over tighten. Please see
the image above. Check over your product thoroughly before use. Now your product is ready to use.
Imported into the EU by Oypla.com LLP, Uxbridge, UB8 2FX
Environmental Protection
Products bearing the symbol shown above means that used electrical and electronic equipment (WEEE) should not be mixed with general
household waste. For proper treatment, recovery and recycling, please take this product(s) to designated collection points where it will be
accepted free of charge. Disposing of this product correctly will help save valuable resources and prevent any potential negative effects on
human health and the environment, which could otherwise arise from inappropriate waste handling. Please contact your local authority for
further details of your nearest designated collection point. Penalties may be applicable for incorrect disposal of this waste, in accordance with
your national legislation.
Please retain a copy of all instructions for future
consultation.
USER MANUAL Model No: 3080, 3081, 4278
 Loading...