

OYEN DIGITAL Mobius Pro User Manual
Mobius Pro 2-Bay RAID System
User Guide
(10) Warranty Information
This product includes a two (2) year repair/replacement
warranty provided by Oyen Digital. This warranty is nontransferable and is limited to the original purchaser. Warranty
service may be requested by completing the form at the
following link: www.oyendigital.com/rma-request-form.html
For our complete warranty policy, visit:
www.oyendigital.com/warranty.html
(9) Troubleshooting and FAQ
(7) Sleep Mode
(8) RAID 1 Rebuild
If one of the drives fail, the drive’s LED will change from BLUE to
RED when connected to a computer. A new HDD can be installed
and will automatically rebuild with data (if congured for RAID 1).
Note: The replacement drive must be a new, unformatted drive
with the same capacity as the original.
1. Power down the Mobius.
2. Remove the failed drive.
3. Install the new drive and power up the Mobius.
4. The LEDs will blink twice per second, which indicates a
rebuild in progress. This can take several hours.
The Mobius Pro does not have an auto-sleep timer. However, it will
follow the sleep settings of the computer. When your computer
enters sleep mode, the drives inside the Mobius will spin down.
Table of Contents
1 Specications
2 Detailed View
3 Inserting or Removing Drives
4 Setup
5 RAID Modes
6 Formatting
7 Sleep Mode
8 RAID 1 Rebuild
9 Troubleshooting and FAQ
10 Warranty Information
11 Safety and Compliance
1) Does a "Clear" procedure delete data from existing RAID 1 or
JBOD drive(s)?
No, if a Clear procedure is performed on RAID 1 or JBOD drives, the
existing data on the drives will not be deleted.
2) Can I remove a drive from the RAID and install it in another
enclosure for access to the les?
Yes, only if using RAID 1(Mirroring) or JBOD.
3) Can I connect the Mobius Pro to a Thunderbolt 3 port?
Yes, the Mobius Pro is fully compatible with Thunderbolt 3 as
well as USB 3.1 and 3.0. However, you must use the USB-C cable
included with the Mobius Pro.
4) Is the Mobius Pro compatible with Thunderbolt 2 using a
Thunderbolt 3 adapter?
No, the Mobius Pro is not compatible with Thunderbolt 2 using an
adapter of any make or model.
For other questions please contact tech support or visit the FAQ
section of our Web site (www.oyendigital.com/support.html).
Technical Support: tech@oyendigital.com
Location and placing precautions
• Avoid positioning it in locations with direct sunlight or other sources
of heat with high temperatures (over 120° F).
• Do not expose the product to water or humid conditions.
• Do not move the device while it is powered on.
• Ensure that the device is on a clean, rm, and stable surface.
• To allow proper ventilation, do not block or disable the fan.
Regulatory Compliance
FCC Class B Information: This device has been tested and found
to comply with the limits of a Class B digital device, pursuant to
Part 15 of the FCC Rules. These limits are designed to provide
reasonable protection against harmful interference in a
residential installation. This unit generates, uses, and can radiate
radio frequency energy and, if not installed and used in
accordance with the instructions, may cause harmful interference to radio or television reception. However, there is no
guarantee that interference will not occur in a particular
installation.
(11) Safety and Compliance
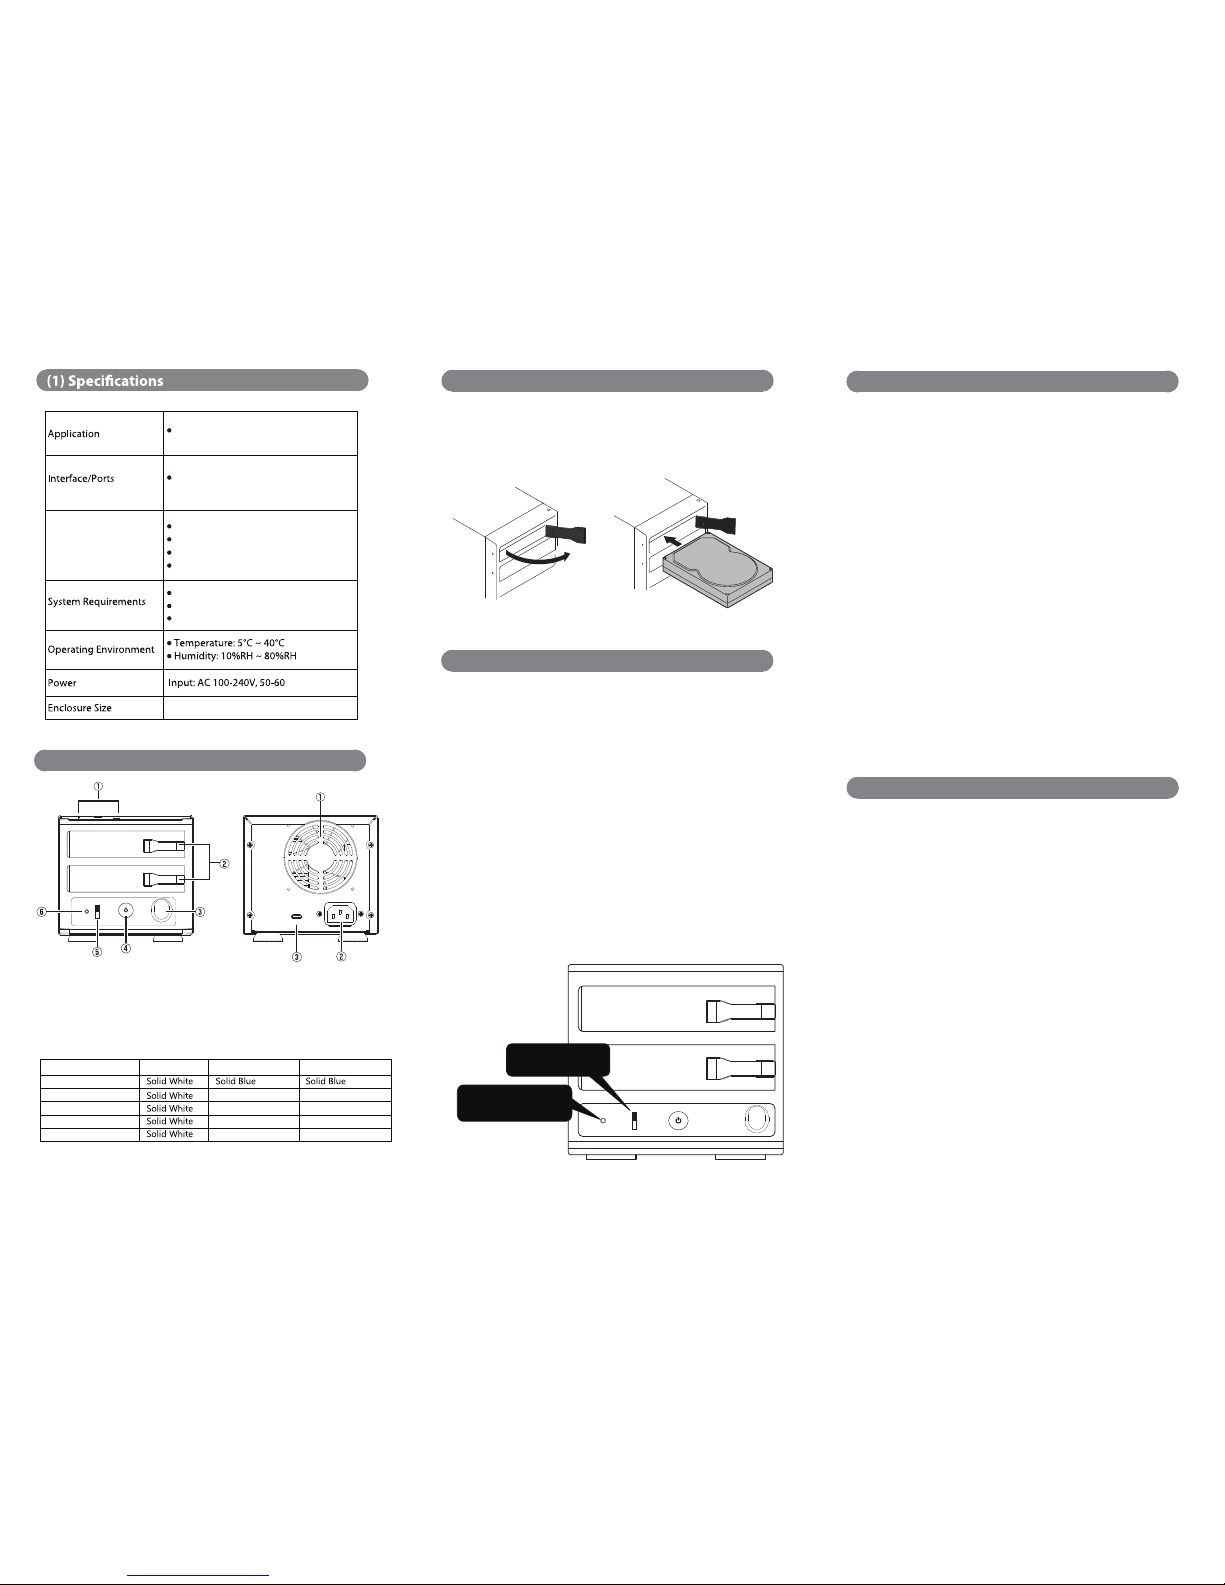
(3) Inserting or Removing Drives
Inserting: Gently pull the lever and insert/remove the drive into
the bay. Push the drive all the way into the bay until you feel it
seated into the connector. Release the lever.
(5) RAID Modes
(4) Setup
(2) Detailed View
1. Power & Drive L EDs
2. Drive Eje ct Lever
3. Lock Inl et
4.
Power Button
5. RAID S witch
6. Set Butt on
1. Cooling Fan
2. 100-24 0VAC Power Input
3. USB- C USB 3.1 Gen 2 Port
The default mode is JBOD. To set a new mode, perform these steps:
Set RAID Procedure:
1. Set the switch on the Mobius to the desired mode.
2. Connect the Mobius to the host computer.
3. Press & hold the MODE button for 5-7 seconds.
4. Release the MODE button. The RAID mode is now congured.
If changing RAID modes, you rst must perform a “Clear” procedure
to remove the previous RAID mode.
Clear Procedure:
1. Set the switch on the Mobius to JBOD.
2. Connect the Mobius to the host computer.
3. Press & hold the MODE button for 5-7 seconds.
4. Release the MODE button. Any previous RAID mode is removed
and the drives are now set for JBOD mode.
RAID 0 (Striping) is a non-redundant data mapping technique. It
combines data evenly across both drives simultaneously; dramatically
increasing performance.
• RAID 0 will be viewed as one single storage unit. If one disk in the RAID
System fails, all data in installed disks will be lost.
• The total capacity = smallest drive x the total number of drives. For
example, if the smallest drive is 500GB and the other is 2TB, the total
capacity will be 1TB (500 x 2).
RAID 1 (Mirroring) consists of two drives storing duplicate copies of the
same data. In this mode, the data is simultaneously written to two disks.
The speed of operation is slow in comparison to RAID 0.
JBOD (Clear) is simply is a collection of drives that are recognized as
separate drives by the OS. JBOD provides no performance increase or
redundancy. This is the default setting.
Combine (Span) combines both hard drives into a single logical unit.
Unlike Striping, it writes data to the rst drive until it reaches full capacity.
When the rst disk reaches full capacity, data is written to the second disk.
Spanning does not increase performance or safety.
(6) Formatting
After setting a new RAID mode, you must format the volume
before it is accessible.
To format using Windows:
http://oyendigital.com/windows-reformat.html
To format using MAC OS:
http://oyendigital.com/mac-reformat.html
Note: The drive can be used on both Windows and Mac
systems by formatting the drive as “MS-DOS (FAT32)” or
“exFAT.” Instructions are provided in the Mac OS link above.
JBOD
RAID 0
RAID 1
COMBINE
LED indicators
* Note: HDD1 & HDD2 LEDs will be OFF when the Mobius is not
connected to a computer.
Red
Fast rapid blinking
Red
Off
Slow steady blink
Off
Slow steady blink
State Power LED Drive 1 (D1) Drive 2 (D2)
Drive Error or missing
HDD Sleep
RAID 1 Rebuilding
Read/Write activity
Powered & ready
Fast rapid blinking
JBOD
RAID 0
RAID 1
COMBINE
MODE
Set the RAID switch to
the desired mode.
Press and hold the MODE
button for 5 seconds.
2 x SATA HDD/SSD
Mac OS 10.6 or higher
Linux 3.13 or later
Windows 7 or higher
RAID Modes
RAID 0 Striping
RAID 1 Mirroring
JBOD Clear (independent drives)
BIG (non-RAID single volume)
USB-C (USB 3.1 Gen 2, 10Gbps)
Compatible with Thunderbolt 3
Hz
8.25 x 4.5 x 5.0 inches
 Loading...