

OXX Digital oxx540008 - Tube 2.1 WiFi Internet Radio, Tube Internet Radio User Manual
User Guide
Tube Internet Radio
6

2

Before Starting
Before you are able to use your internet
radio, you will need the following items:
• A broadband internet
connection
• A wired/wireless access point,
or router connected to your
broadband internet connection.
If your wireless network is
configured to use Wired Equivalent
Privacy (WEP) or WIFI Protected
Access (WPA) data encryption, you
will need to know the WEP or WPA
code so that you can setup your
internet radio to communicate with
your wireless network. Consult
your network administrator for your
WEP or WPA codes.
•
Before continuing, make sure
that your wired/wireless access
point or router is powered on,
and connected to your
broadband internet connection.
Consult the manufacturer’s
guide supplied with your
wired/wireless access point or
router if you are unsure how to
do this.
3

Contents
Before Starting 3
Contents 4
Safety Information 5
Power Source 5
General 5
Cleaning 5
Ventilation 5
Servicing 5
Sound Levels 6
Parts Identification 7
Front view 7
Rear view 7
Getting Started 8
Switching on 8
Connecting to a wireless network 8
Connection to a wireless network
when the SSID is not broadcasted 9
Connecting to a wired network 10
The menu structure 11
Using the WI-FI Radio 12
Connecting to a station 12
Changing the volume 12
Exiting a station 12
Connecting to an on demand
radio station 13
On demand features 13
Saving a station to a preset memory 13
Using the Media Player 14
Supported file types 14
Setting up your PC 14
Connecting the WI-FI radio to your
PCs shared folder 15
Connecting the WI-FI radio to your
PC using UPnP mode 15
Playing your media files 16
Media player controls 16
Removing tracks from the queue 17
Playing tracks in a random order 17
Repeating all tracks 17
Clock Functions 18
Setting the clock 18
Setting the alarm 18
Setting the sleep timer 19
Configuration Settings 20
Network Config 20
Version 20
Upgrade firmware 20
Language 20
Factory Reset 20
Register 20
Clock 20
Sleep timer 20
Equalisation 20
Help and Advice 21
Error Messages 22
Windows 2000 Users 23
Technical Specification 24
Guarantee and support 25
Disposal
25
4

Safety Information
Power Source
This product requires a 230-240 v AC, 50Hz
mains supply. Do not use any other supply.
General
Position the mains cable so that it cannot
be walked on or pinched by other items
placed on or against them.
Do not use this product in humid or damp
conditions.
Do not allow this product to get wet.
Do not expose this product to dripping or
splashing.
Do not place water filled objects such as
vases on top of this product.
Do not place naked flame sources, such
as candles on top of this product.
Cleaning
Always unplug this product from the
mains supply before you clean it.
Do not use liquid or aerosol cleaners.
This product should be cleaned with a
soft, barely damp cloth.
Ventilation
The slots and openings on this product
are for ventilation purposes. Do no cover
or block them as this could cause
overheating.
Never let children push anything into the
slots or openings in the case.
Servicing
There are no user-serviceable parts in
this product.
If servicing is required, always refer to
qualified service personnel.
Always consult the helpline (stated on the
warranty card) if you are ever in doubt
about the installation, operation or safety
of this product.
5

Safety Information
Sound Levels
Your hearing is very important to you and to us, so please take care when using this product. It is
strongly recommended that you follow the listed guidelines in order to prevent possible damage or
loss of hearing.
Establish a safe sound level
1. Over time your hearing will adapt to continuous loud sounds and will give the impression that
the volume has in fact been reduced. What seems normal to you may in fact be harmful. To
guard against this before your hearing adapts, set the volume to a low level.
2. Slowly increase the level until you can hear comfortably and clearly and without distortion.
3. Damage to your hearing is accumulative and is irreversible. Any ringing or discomfort in the
ears indicates that the volume it too loud.
4. Once you have established a comfortable listening level, do not increase the sound level.
The examples below may help you in recognising just how loud you have set the volume.
30dB Quiet library, soft whisper.
40dB Living room, fridge freezer, bedroom away from traffic.
50dB Normal conversation, quiet office, light traffic.
60dB Electric sewing machine.
70dB Vacuum cleaner, hair dryer, noisy restaurant.
THE FOLLOWING NOICE CAN BE HARMFUL UNDER CONSTANT EXPOSURE
80dB Average city traffic, alarm clock buzzer at 2 feet, food mixer.
90dB Motorcycly, heavy goods vehicle, petrol lawn mower.
100dB Pneumatic drill, chain saw, refuse vehicle, disco/night club.
120dB Rock bank concert, thunderclap.
PERMANENT LOSS OF HEARING – THRESHOLD OF PAIN
140dB Gunshot at 2 feet away.
180dB Rocket launching pad.
6
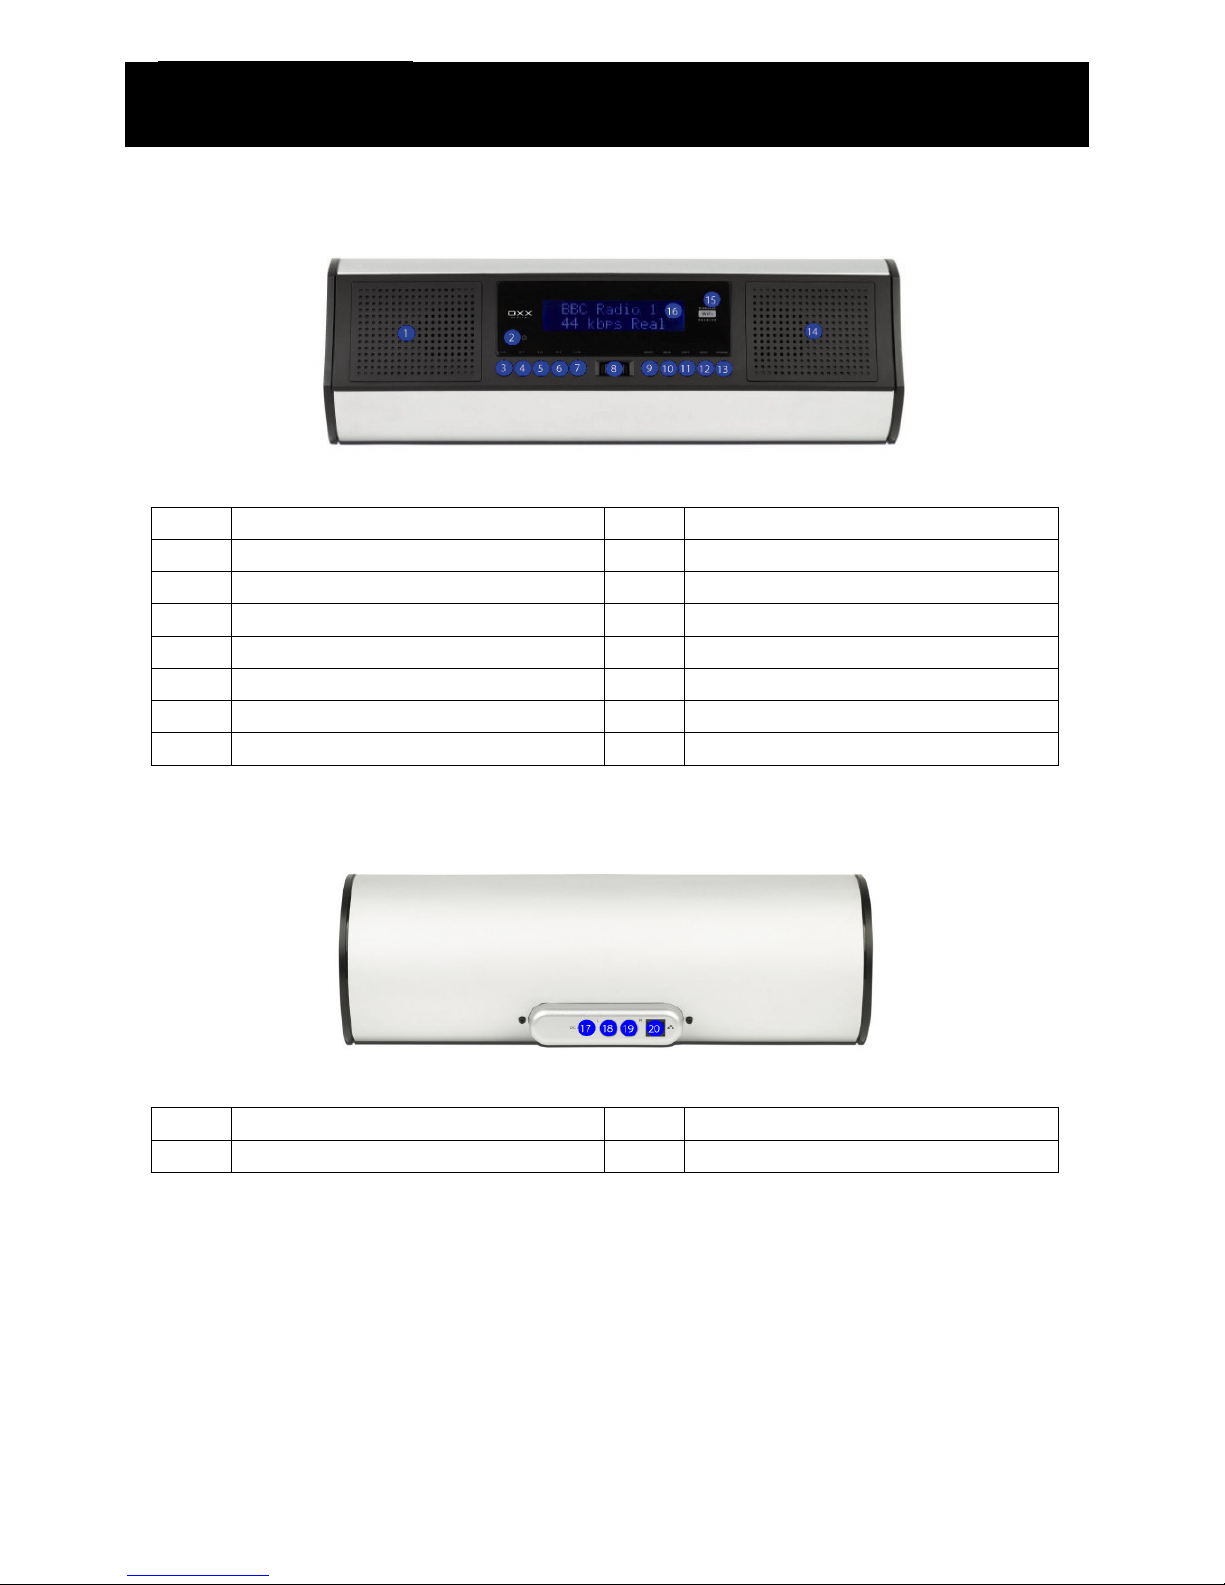
Parts Identification
Front view
1 Left speaker. 9 Select button.
2 3.5mm Headphone socket. 10 Back button.
3 Preset 1/6. stop button. 11 Shift button.
4 Preset 2/7. play/Pause button. 12 Reply button.
5 Preset 3/8. skip back button. 13 Standby button.
6 Preset 4/9. skip forwards button. 14 Right speaker.
Preset 5/10. browse button.
7
8 Multifunction and volume control. 16 Information display.
Remote control sensor.
15
Rear view
17 DC In. 19 Right audio out (red).
18 Left audio out (white) 20 Ethernet (wired network) connection.
7
Getting Started
Switching on
1. Using the power adapter supplied,
connect to the socket on the rear of the
product labelled ‘7.5V DC’, and switch
on at the mains supply.
2. After a brief pause the information
display will light up as displayed below.
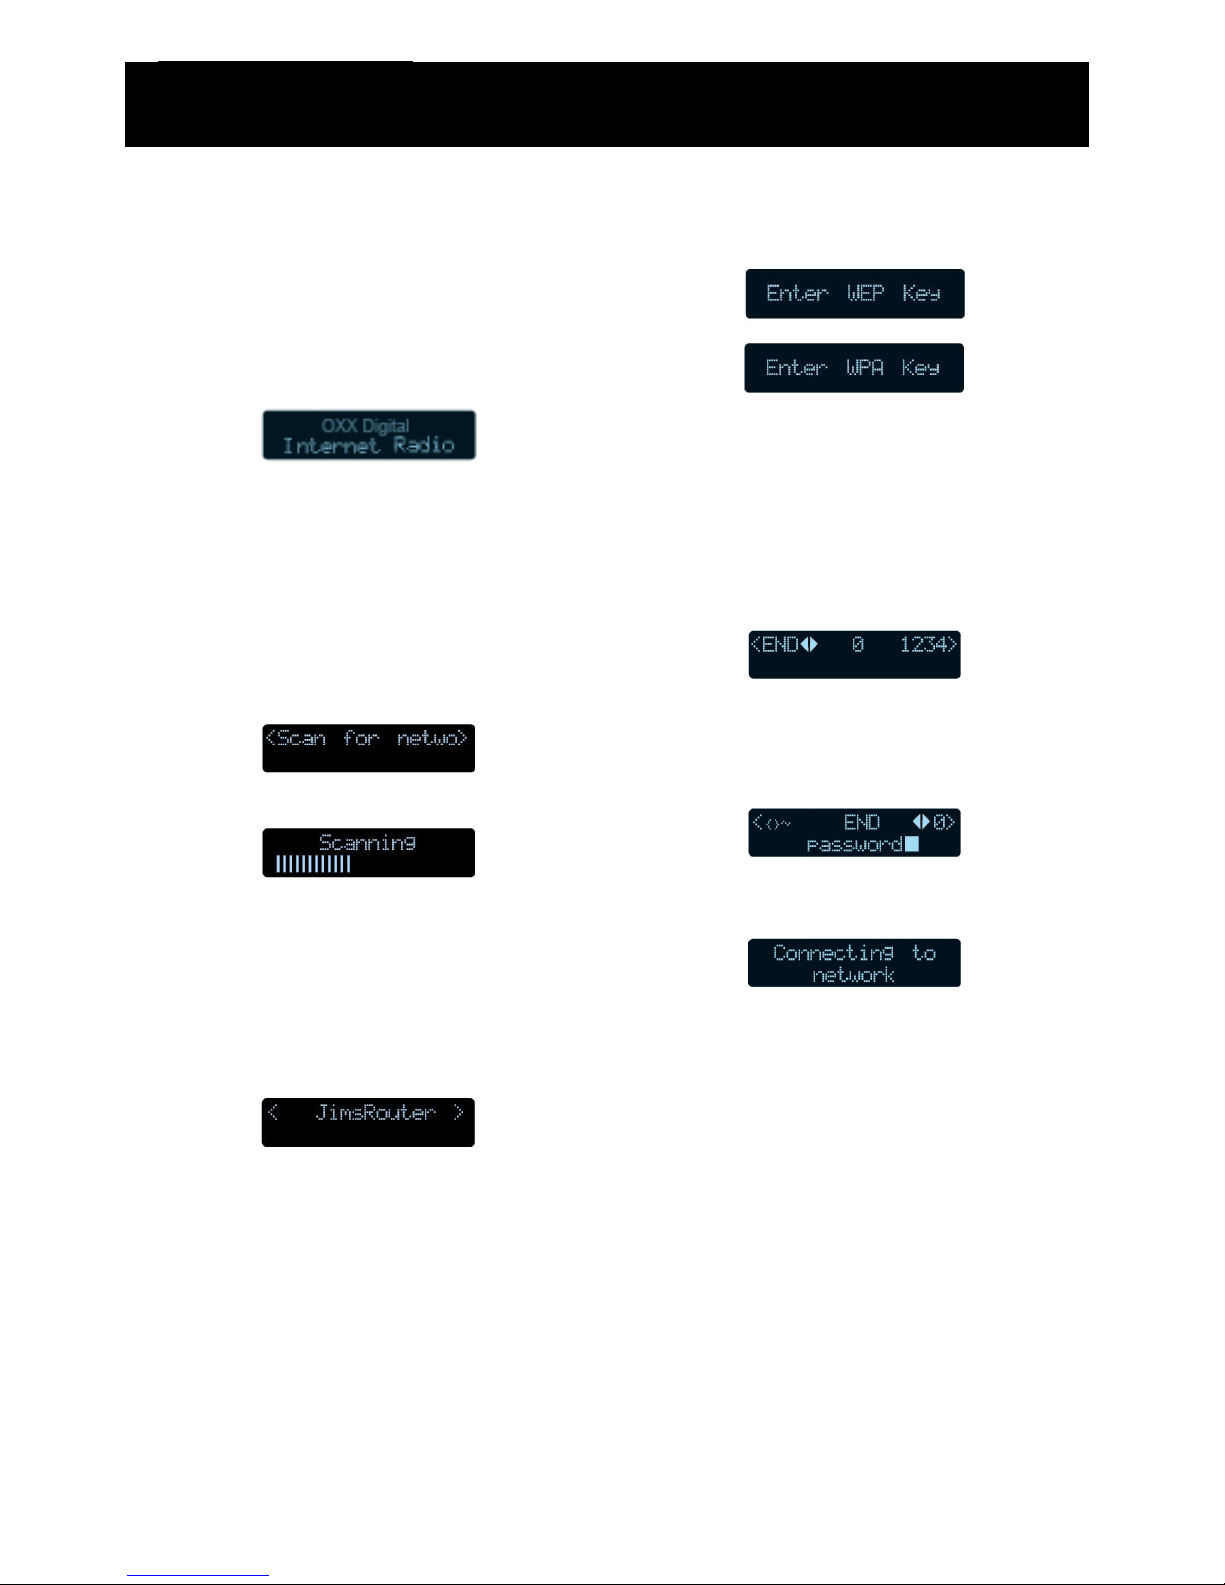
Connecting to a wireless network
When switched on for the fist time, you will
need to enter your wireless network details.
To setup your wireless network complete the
following procedure:
1. Press the ‘STANDBY’ button and wait
until the following is displayed.
2. Press the ‘SELECT’ button.
If your wireless network uses WEP
or WPA encryption, one of the
following screens will display.
If your wireless network does not
use WEP or WPA go to step
number 7 below.
5. When the following screen is displayed,
turn the multifunction control to enter
your WEP/WPA key. Use the ‘SELECT’
button to confirm the digit chosen.
6. When the WEP/WPA key has been
entered, turn the multifunction control
so that
is selected. Press the
‘END’
‘SELECT’ button to confirm.
3. When scanning is complete, the name
of a wireless network will be shown.
If your wireless network is not
found, check that your wireless
access point or router is switched
on and connected to your
broadband internet connection.
If the SSID (name of your wireless access
point) is not displayed, turn the
multifunction control to the right until the
correct one is shown.
4. When the correct wireless network is
shown, press the
‘SELECT’
button.
7. The WI-FI radio will now connect to your
wireless network.
8. To listen to a station see “Connecting to
a station” on page 12.
8
 Loading...