

OXTS Inertial+ Quick Start Manual
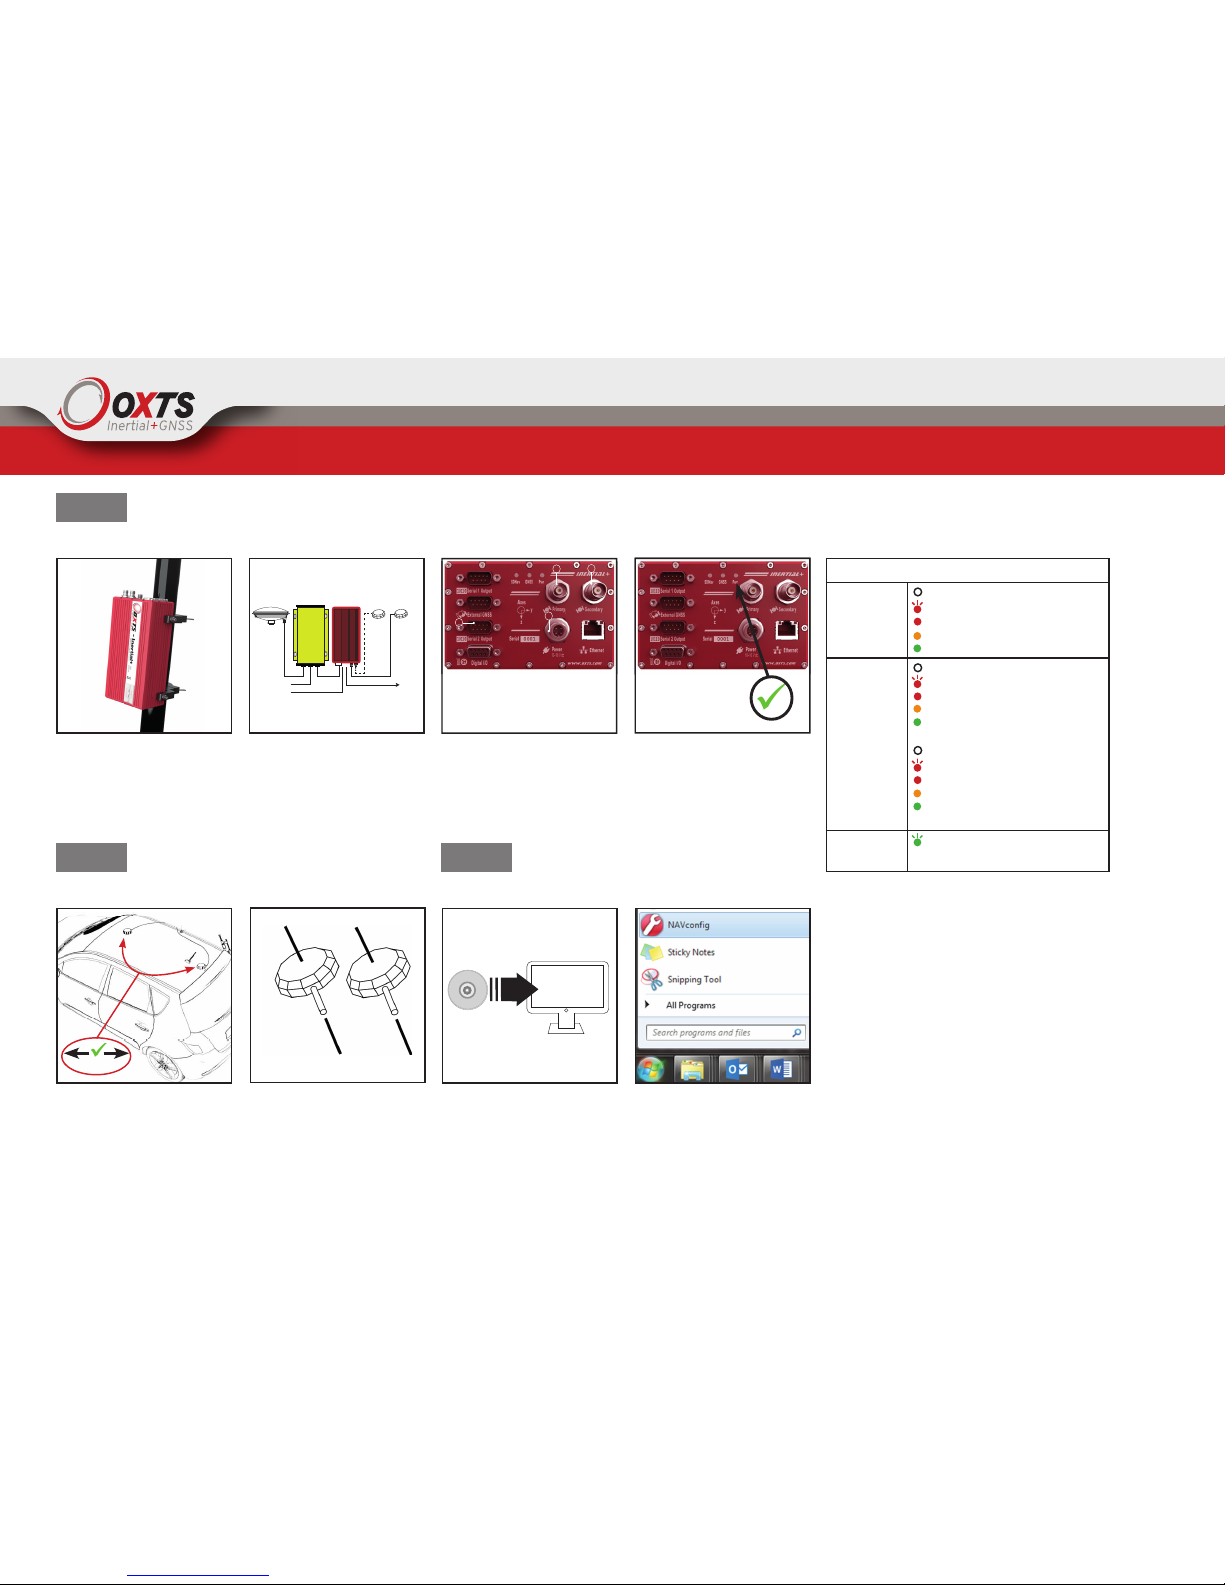
Install an Inertial+
Use secure mounting solution e.g.
RT-Strut, to secure Inertial+ rigidly
to vehicle.
Connect internal GNSS antennas
(for time/heading) then connect
the power connector.
Connect external GNSS to the
Inertial+ using a serial connection
on the ‘External GNSS’ port.
Apply power (10-28 V d.c). Green
power LED light will appear.
Positioning the antennas
STEP 2
Antenna separation should be
between 1 m and 5 m apart. Place
the GNSS antennas on a metal
parallel surface. Make sure the
antennas have a ground plane to
prevent GPS signal refl ection.
Follow steps in NAVconfi g:
1. Product Selection: Select relevant Inertial+ model.
2. Read Confi gurations: Use default settings.
3. GNSS Selection: Choose your external GNSS receiver from the list.
4. Orientation: Set the Y and Z axis points to match your installation.
5. Primary Antenna: Measure from the Inertial+ measurement points
to the primary antenna along the three vehicle axes and enter the
measurements accurately.
6. Secondary Antenna: Select ‘Enable Secondary Antenna’ and
enter the accurate measurements between the antennas. Measure
as accurately as possible but below 5 cm. Static Initialisation can be
enabled at this stage.
7. Wheel Confi guration: Confi gure for land vehicles only.
8. Options: Use default settings.
9. Commit: Make sure Inertial+ is connected and turned on. Select the
appropriate IP address and click commit.
10. Save/Finish: The data will be stored internally on the Inertial+ once
committed but use the option to store locally if necessary.
STEP 3
Once installed go to;
Start > All Programs > OxTS >
NAVconfi g
Allow permission for NAVconfi g to
use network. This can be changed
in windows Firewall.
Install software from the CD
provided. If you have trouble
downloading, please contact our
support team for more information.
Confi guring a Inertial+
STEP 1
Ensure the orientation of the two
antennas is the same.
1 m - 5 m
ON
Secondary
Antenna
Primary
Antenna
Serial 1
Serial 2
Ethernet
External GPS
Serial
Power
Power
External
Antenna
1 Antenna
2 Antenna
3 Power
4 External GNSS
2
1
3
4
LED States
SDNav Off- fi rmware has not updated.
Firmware has been booted.
Ready to initialise.
Initialised but no real-time.
Real-time output.
POS/
Heading
Single
Antenna
Dual
Antennas
No position lock.
GNSS receiver is booting.
SPS position.
Differential position.
RTK position.
GNSS fault.
Unable to determine heading.
Low quality heading lock.
Medium quality heading lock.
RTK calibrated heading
lock.
GNSS
GNSS receiver active.
For other GNSS receiver fault contact OxTS
Web: www.oxts.com
Email: info@oxts.com
Phone: +44 (0)1869 238 015
Inertial+ Quick Start Guide
Initialisation and warming up
In a vehicle where single antenna
initialisation is used, drive forward
until system initialises.
AUTO
RD
STEP 5
Open windows explorer.
RD fi les can be accessed via
FTP either using an FTP client
or the windows explorer fi le
management tool.
While the Inertial+ is operating, it
saves all data internally to a fi le
with suffi x .RD.
Static initialisation will take
approximately 30 sec-10 mins
depending on dual antenna
separation and measurement
accuracy.
Downloading and viewing data
30 sec-10 min
Land vehicles should drive in fi gures of eight with some acceleration
and braking and with the addition. After 15-20 mins system will be ready
for use. Monitor accuracy values in NAVdisplay’s ‘‘warm-up’’ template.
Once warmed up, system should
be left on. Data can be viewed
and recorded in NAVdisplay.
The fi les on the xNAV will then
be listed and the RD fi les can be
copied to your PC for processing.
In the address bar, type
“ftp://195.0.0.nn” where nn are
the last two digits of the serial
number.
STEP 4
LEAVE ON
Complete.
Support:
For further information,
please check the Inertial+
manual.
If you encounter any
issues during installation,
please contact our OxTS
support team via the
website.
Note:
The Kalman Filter
must warm up every
time the system is
turned on, so a short
warm-up is essential.
1
2
3
4
5
6
7
8
Web: www.oxts.com
Email: info@oxts.com
Phone: +44 (0)1869 238 015
Inertial+ Quick Start Guide
 Loading...