

OXO Tot Sprout chair, Silla Sprout, Chaise Sprout, Sprout Instruction Manual

SproutTM Chair
Sprout High Chair & Youth Chair grows with your child
from 6 months to 5 years of age
Instruction Manual
IMPORTANT! KEEP FOR FUTURE REFERENCE

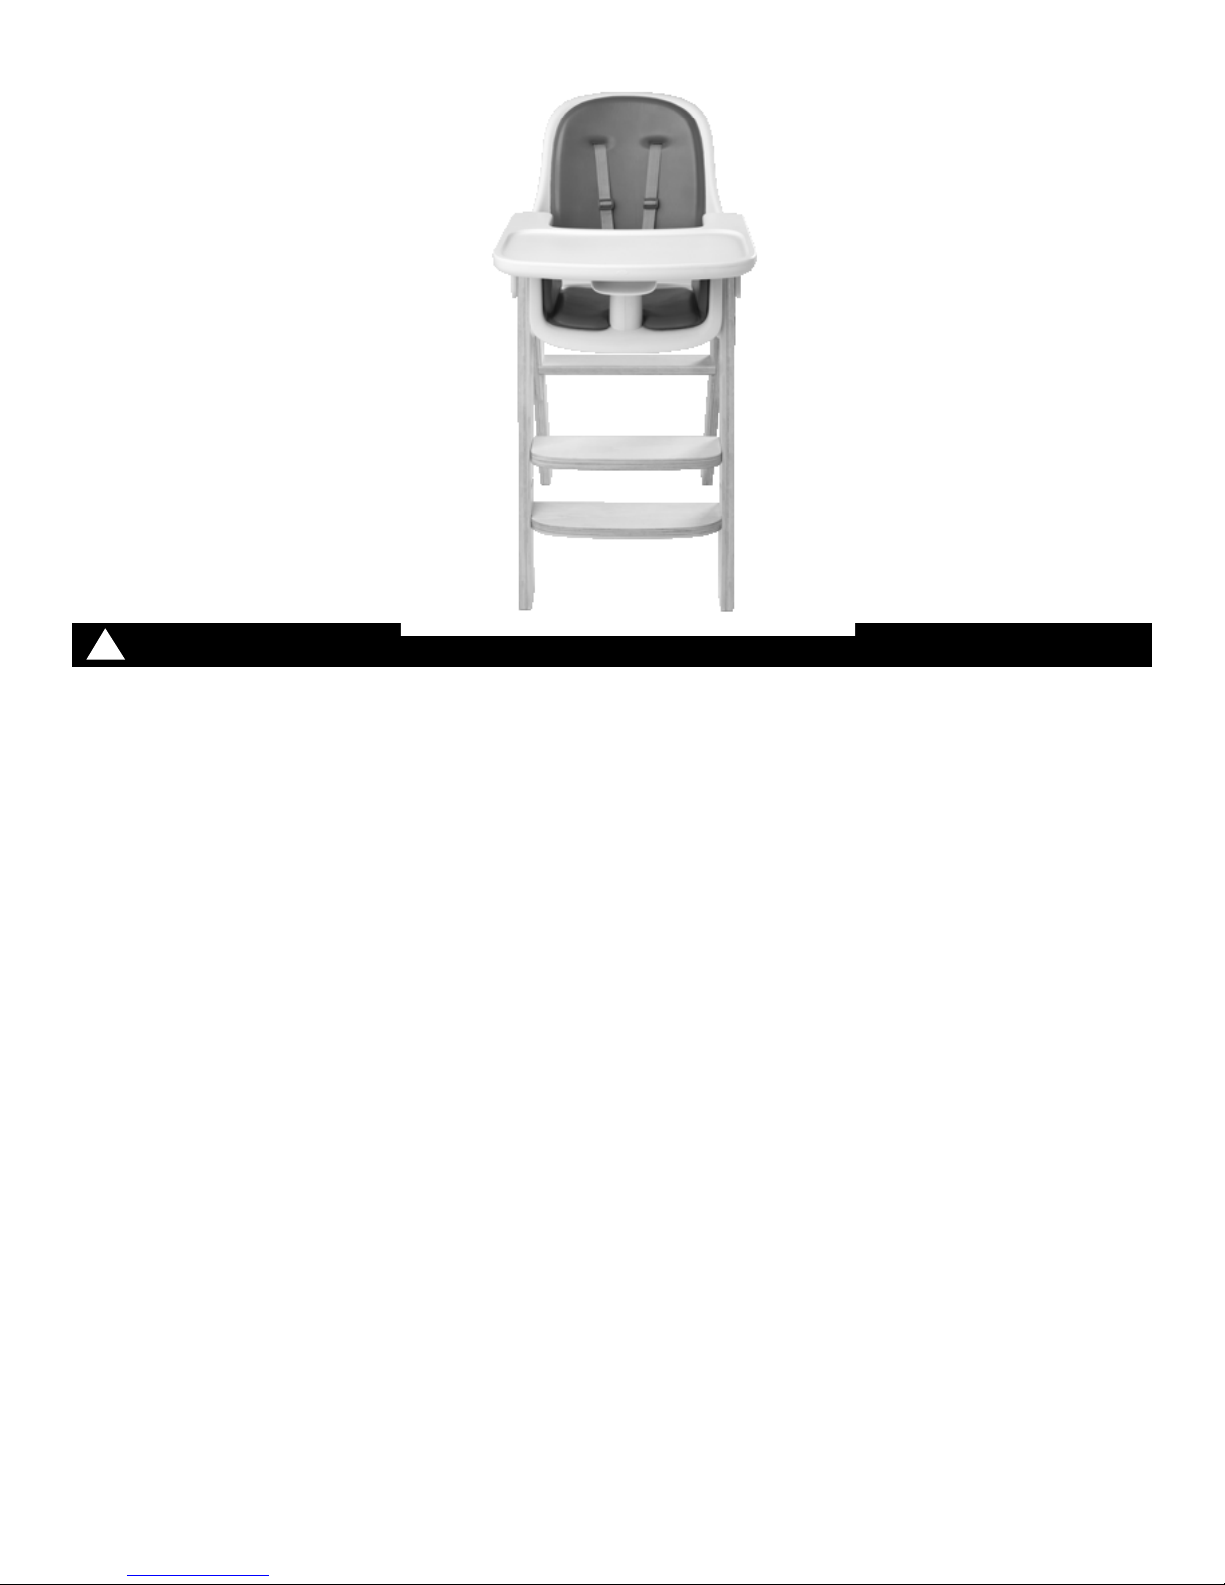
Congratulations on your purchase of the OXO Tot Sprout Chair, a chair that grows with your child
from six months to five years!
Sprout Chair is an extended use Chair that grows with your child through their developmental stages.
The seat adjusts in height, width and depth and the footrest is height-adjustable for a perfect fit
during all stages.
A depth-adjustable tray accommodates your growing baby and can be removed so the Chair can
be pulled up to the table. The seat, back and cushions are contoured for comfort and promote
“sitting up straight.”
We know how eating time can be messy, so the Chair and cushions are easily wipeable for quick
cleanup of crumbs and other sticky messes.
For children age three and older, the crotch post, tray and harness are removable to convert the
Sprout High Chair to a Youth Chair so children can sit comfortably at the table. For grown-ups’
added convenience, Sprout requires no tools to adjust the seat, tray or footrest. Sleek wood
construction and space-saving design complement any home décor.
Please read instructions carefully before assembling your Sprout Chair.
Complies with ASTM F404-08

Parts Included......................................................2
Assembling High Chair..........................................3
Base Assembly.........................................4
Seat Back Assembly.................................5
Seat Bottom Assembly.............................6 – 7
Seat Removal..........................................7
Installing Footrest....................................8
Adjusting Footrest...................................8
TABLE OF CONTENTS
Tray Attachment......................................9
Tray Adjustment......................................9
Securing Child.........................................10
Youth Chair Assembly...........................................11
Tray Removal..........................................12
Seat Adjustment......................................12 – 13
Seat Cushion Replacement.......................13
Footrest Adjustment................................14
Harness Removal....................................14
Care, Cleaning & Storage.....................................15
Replacement Parts...............................................15
Warranty.............................................................16
Registration.........................................................16
Contact Us...........................................................16
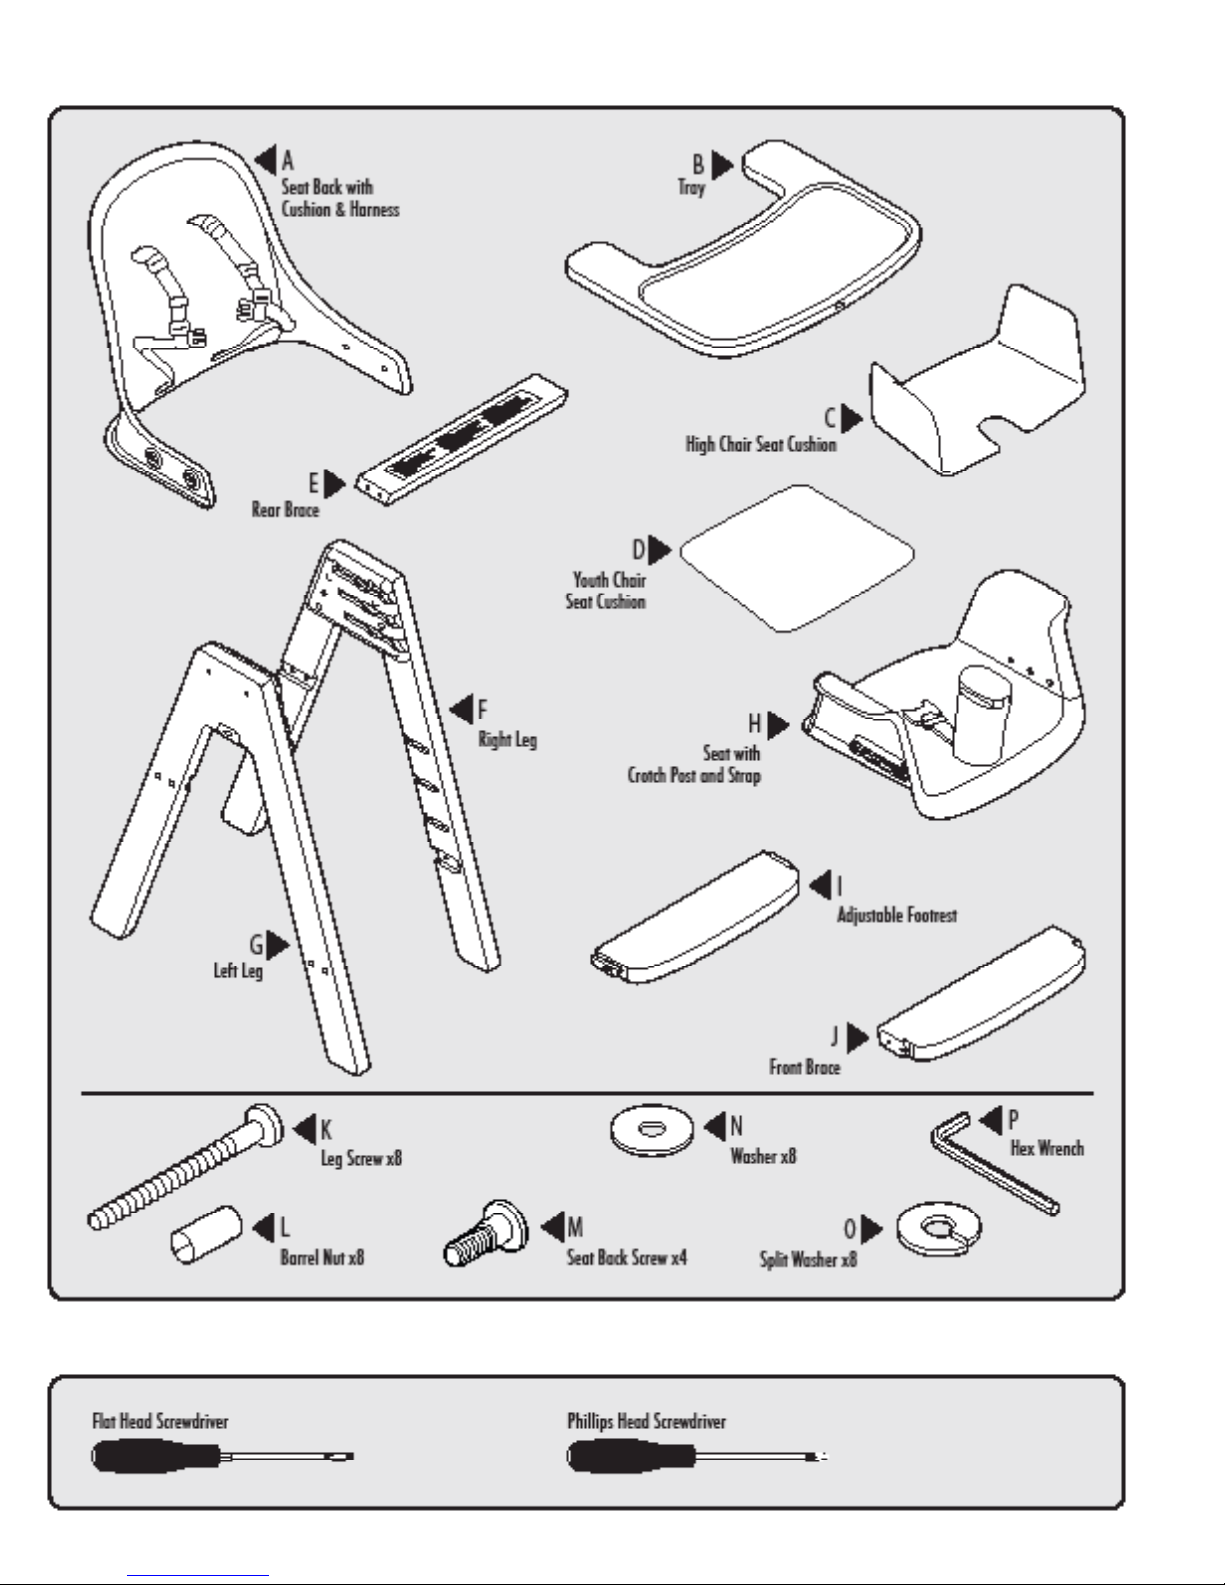
INCLUDED
NOT INCLUDED
2
ASSEMBLING THE HIGH CHAIR
!
WARNING
Failure to follow these warnings and the assembly instructions could result in serious injury or death.
• Prevent serious injury or death from falls or sliding out.
- Always secure child in the restraint. Snugly adjust the restraint belts to fit your child.
- Warning: Do not leave the child unattended.
- Use High Chair only with children capable of sitting upright unassisted.
- Never adjust seat height when child is sitting in seat.
- Do not allow children to climb into the High Chair unassisted.
- The tray is not designed to hold the child in the Chair.
• Maximum weight 60lbs (27kg)
• Avoid injuries to adults and older children from falls.
- Do not use High Chair as a step stool or ladder to climb up or reach elevated surfaces.
- Do not allow adults or older children to sit in High Chair.
• Never use High Chair without seat back attached.
• Keep High Chair away from open re and other sources of strong heat (electric and gas res).
• Do not over tighten screws.
• Tighten screws frequently.
• Check this product for damaged hardware, loose joints, missing parts or sharp edges before and after assembly and frequently during
use. Do not use High Chair unless all components are correctly fitted and adjusted. DO NOT use High Chair if any parts are missing,
damaged or broken. Contact OXO for replacement parts and instructional literature if needed at 1-800-545-4411(U.S.).
Outside U.S. contact your local distributor or info
• Adult assembly is required. Take care when unpacking and assembling; contains small parts and sharp edges.
@oxo.com. DO NOT substitute parts.
3
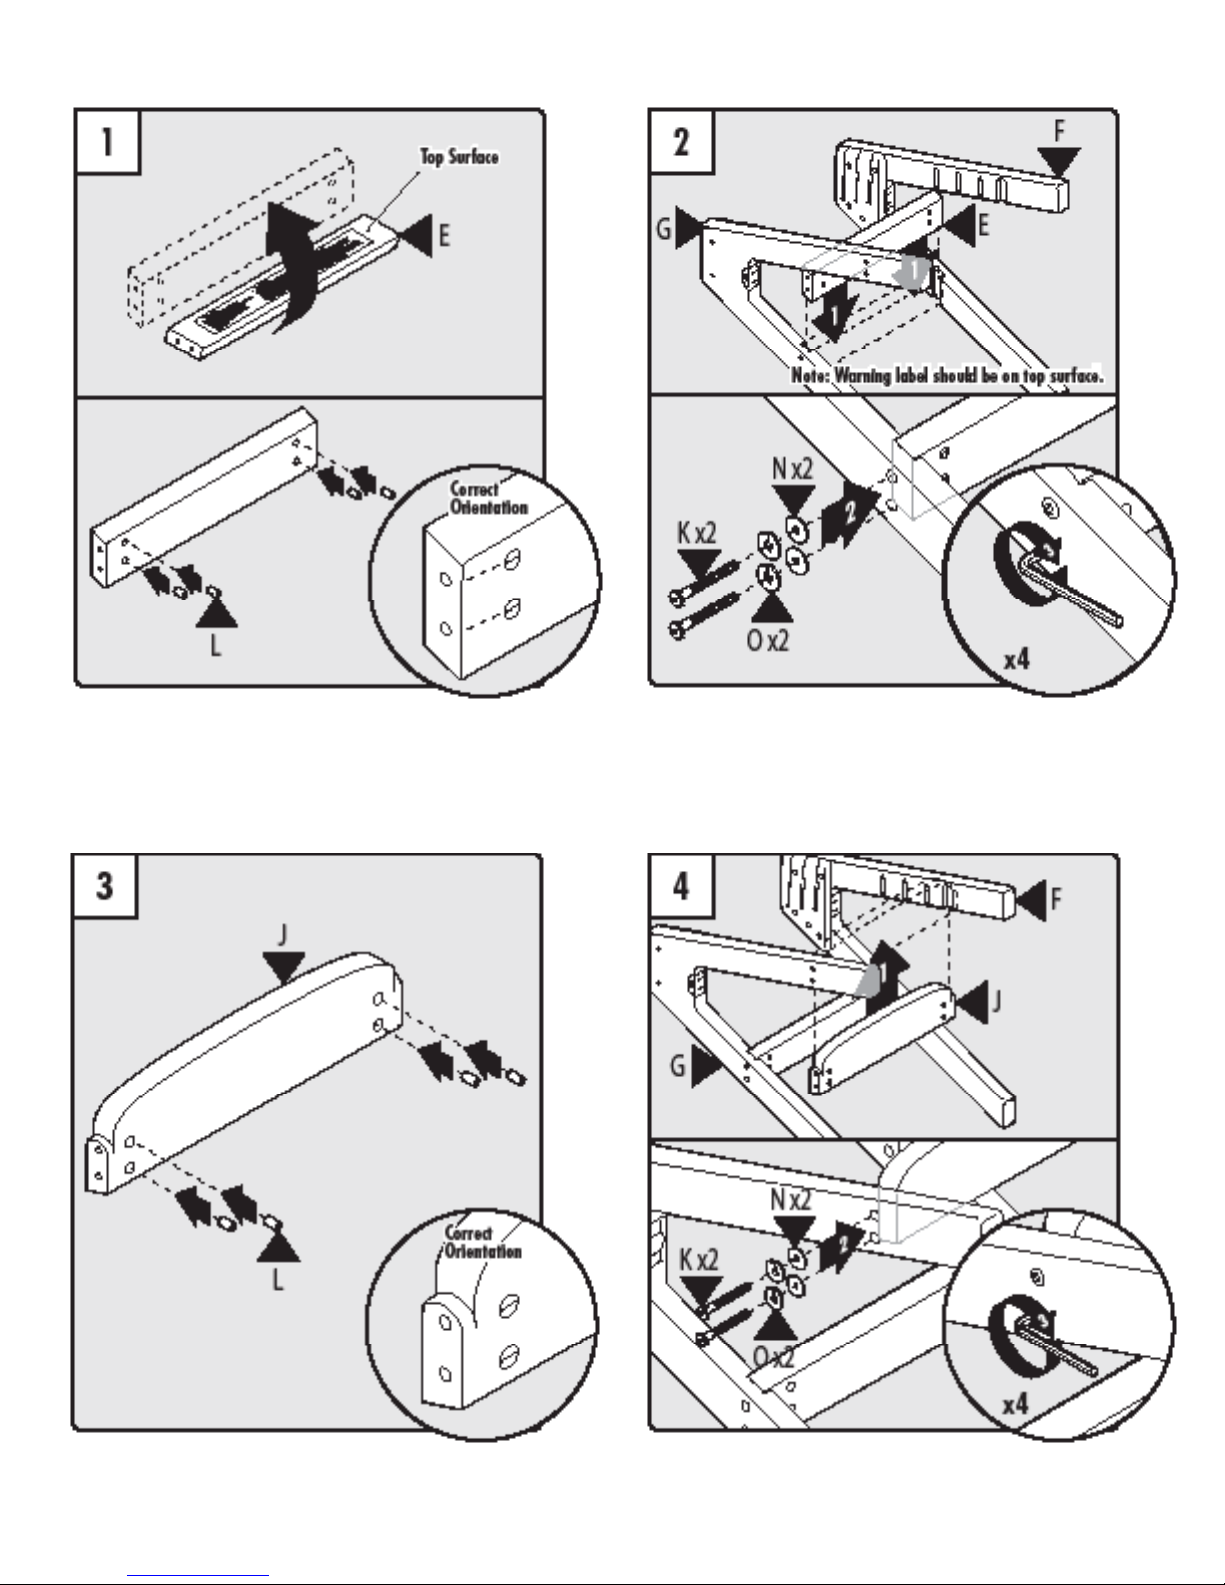
HIGH CHAIR – Base Assembly
Insert barrel nuts (L) all the way into each hole on the bottom of the rear
brace (E). Using a at head screwdriver (not included), orient the barrel
nuts so that the grooves are horizontal and pointing towards end of rear
brace.
Lower rear brace (E) into place between the left leg (G) and right leg (F).
Note: Warning label should be facing upwards. Insert two leg screws (K)
with four washers (O) and (N) and repeat on opposite side to attach rear
brace to legs. Tighten all four screws with hex wrench. Note: Split washer
must go on leg screw first.
Insert barrel nuts (L) all the way into each hole on the bottom of the front
brace (J). Using at head screwdriver, orient the barrel nuts so that the lines
are horizontal and pointing towards end of front brace.
4
Raise front brace (J) into place between the left leg (G) and right leg (F).
Insert two leg screws (K) with four washers (O) and (N) and repeat on
opposite side to attach front brace to legs. Note: Split washer must go on
leg screw first. Tighten all four screws with hex wrench.
 Loading...