

Oxileaf ultra User Manual

ULTRA
AIR PURIFICATION SYSTEM
USER’S GUIDE
32
Please read all of the information provided in this user’s guide before
operating your new air purier.
WARNING
This air unit is not a medical device. Do not stop or
alter any medical therapy programs or medications
without the advice of your physician. Excessive ozone
concentrations may cause mucous membrane or
respiratory irritation.
Read the enclosed literature carefully to prevent
operating and maintenance problems.
Insulation material within your unit may cause electrical shock. For the
safety of everyone, do not remove product covering.
Caution: This unit is not intended for use by people (including children)
with reduced physical, sensory, or mental capacity, unless they are
supervised or have been given clear instructions, which they are
competent to understand and follow, concerning the use of the unit
by people directly responsible for their safety. Children should be
supervised to ensure they do not play with the unit.
LEADING SOURCE OF UNIQUE INDOOR AIR
PURIFICATION TECHNOLOGY!
Congratulations on your purchase. You have obtained a state-of-the-art
air purication system with wood cabinetry and a high quality laminated
surface. Only the nest materials surround this amazing air purication
technology. We hope you will enjoy your purchase for years to come.
Read all instructions carefully before using this product.
UNDERSTANDING OXILEAF™ ULTRA
Control for the negative ion generator is separate from the O3 control.
Negative ions will be created around the clock to keep down dust and
other particulates. O3, also known as activated oxygen, is normally kept
at modest levels in occupied spaces. To remove heavy odors, the O3
may be adjusted to a higher level for a period of time. Some use a timer
to deodorize the home or oce while away. Unused O3 reverts back to
O2 (oxygen) in about an hour.
OPERATION/SETTINGS AND CONTROLS
NOTE: Some features may not be included on all models.
Turn on the power switch (back of the unit), then turn the unit on (front
panel).
Press “Fan ∆” or “Fan ∇” to adjust airow speed. There are four levels
from which to choose. These buttons are also used to set/adjust the
time (hour).
Press “Ozone ∆” or “Ozone ∇” to adjust the level of activated oxygen
(O3). There are four levels. Use the following chart to determine the
proper setting for the area to be puried.
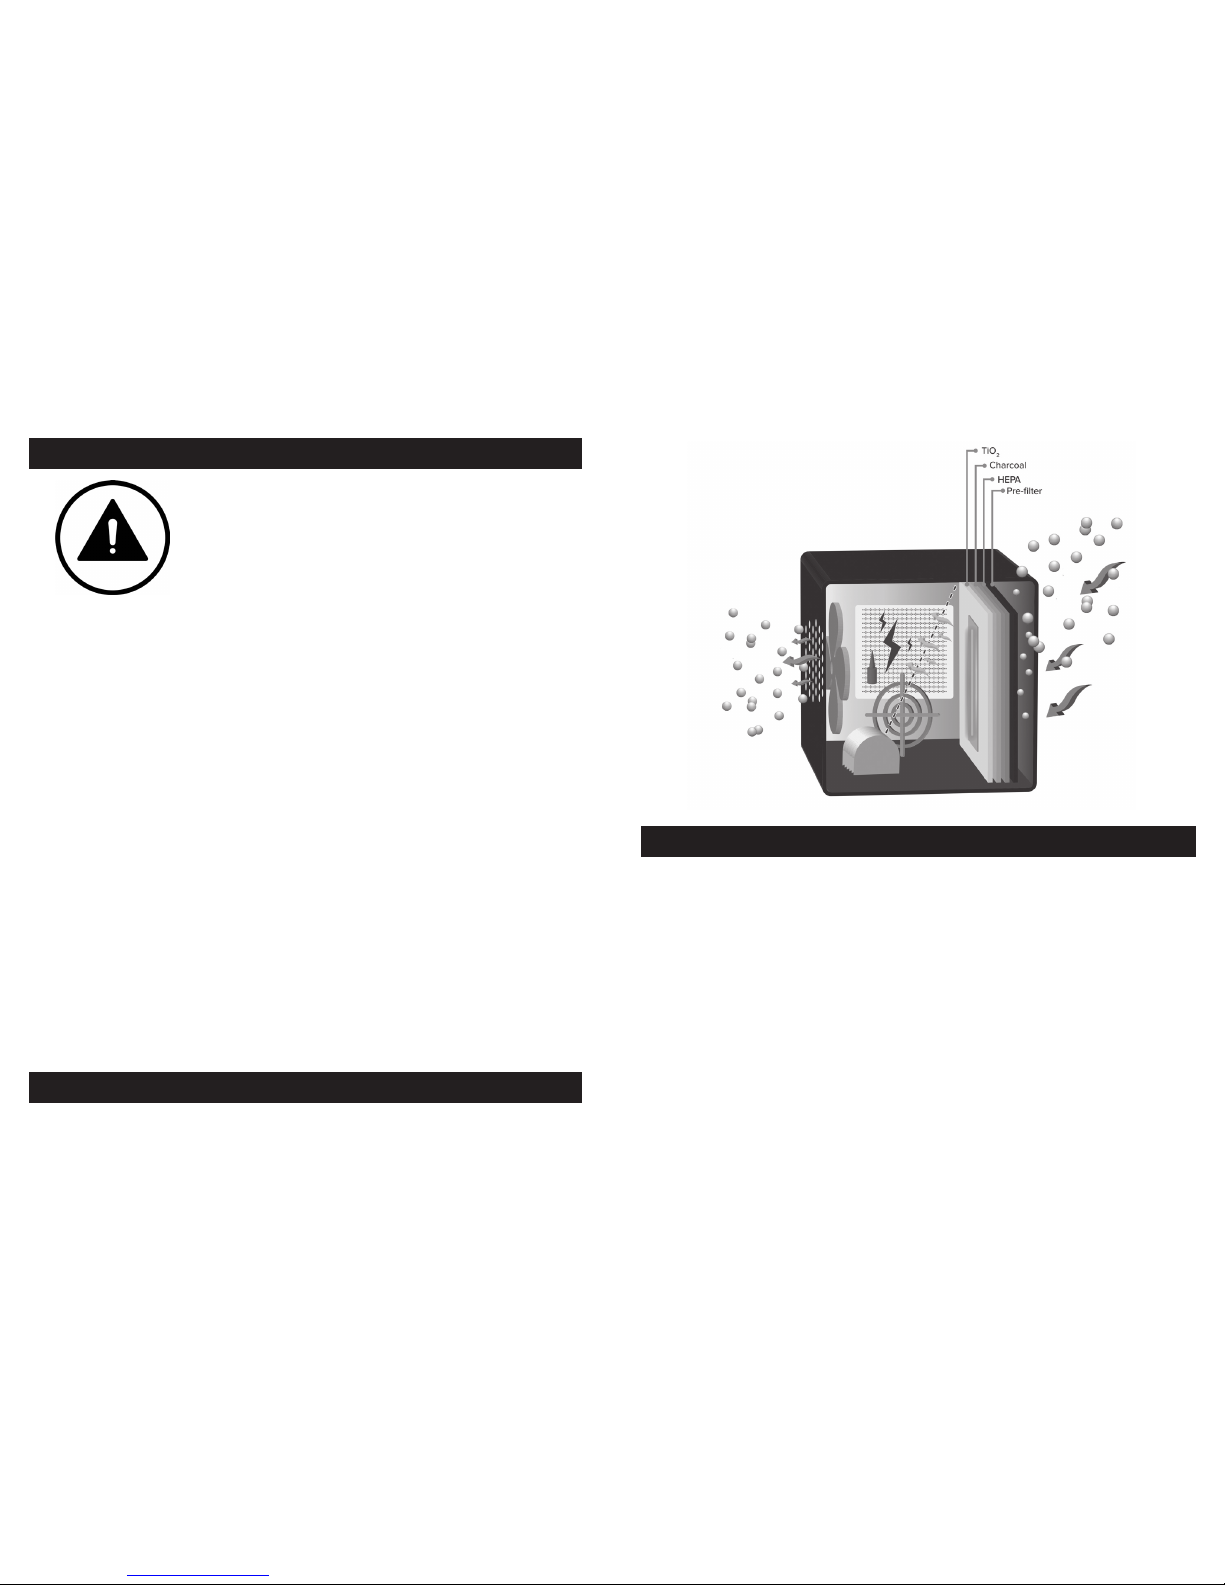
Press the “UV” button to activate this function and always keep this
turned on. The UV lamp works in conjunction with TiO2 photo-catalytic
lter. You will know that this feature is activated from the blue UV
indicator light on the front of the unit above the “UV” button.
“Anion” or ionization controls the production and dispersal of negative
ions. You will know that this feature is activated from the red “Power/
Anion” indicator light on the front of the unit above the “Power/Anion”

54
button. Anion activates by default automatically when the unit is turned
on, and stays on while unit is in operation.
“Time/Set” is used to set/adjust the unit’s displaying time and optional
ozone timer and unit timer, both of which are described in detail in
the next section with instructions to set. Whether or not you use the
optional ozone timer via the unit timer, you should set the proper time
on unit.
SETTING TIME AND USING OPTIONAL TIMER
To set the clock to the current time, press “Time/Set” once. The hour
and minutes will ash. While ashing, press “Fan ∆” or “Fan ∇” to set
the hour and press “Ozone ∆” or “Ozone ∇” to set the minutes. After
you input the correct time, press the “Time/Set” button one nal time to
set it and conclude the process.
NOTE: The air purier uses the standard U.S. 12-hour clock.
Your air purier features two digital built-in timers which work together
as one to control the sanitizing function (ozone) on a timer if you wish,
as directed below:
Unit timer: use this feature to control the ozone (O3) output to your liking
and sensitivity.
If for any reason you cannot run ozone 24/7, or you simply desire
controlled, intermittent O3 output, then the unit timer should be used.
The unit timer will simply turn o the ozone production after a certain
period of time by shutting down the entire unit, while preserving its
settings. Properly set, the same timer will then turn the unit back on
at the specied time with same settings as before. Thus, set once
the machine will turn itself on and o automatically at your preferred
time. This optional feature is for a small percentage of people who are
sensitive to ozone smell.
To set “Unit Timer”, rst turn o the unit by pressing the On/O button:
Make sure the air purier is plugged in and set to the correct time. Push
the On/O button on the instrument panel to turn o the unit. If the fan
has stopped spinning, the unit is ready to be programmed.
NOTE: Leave the power switch (back of unit) in the ON position. Use
only the On/O button on the front panel.
Use the “Fan ∆” and “Fan ∇” to set the desired fan speed. The setting
will be illuminated on the instrument panel’s LCD screen.
Use the “Ozone ∆” and “Ozone ∇” buttons to set the desired output
level. The output level will light up on the instrument panel. There are
four levels of ozone output: I, II, III, IV.
To turn on the UV light, press the UV button. Once pressed a blue light
on the instrument panel will light up under UV indicator conrming the
UV light has been turned on.
To select the time for the air purier to turn on, press Time/Set button
twice. On the LCD screen, Unit Timer will begin to blink. When blinking
use the “Fan ∆” and “Fan ∇” to set the hour you want the purier to
turn on. Pressing “Fan ∇” adds an hour to the time on the LCD screen,
pressing “Fan ∆” subtracts an hour from the time on the LCD screen.
To change the minutes of the time, use the “Ozone ∆” and “Ozone ∇”
buttons. The “Ozone ∆” button adds a minute to the time while the
“Ozone ∇” button subtracts a minute from the time. Once the desired
time is selected, press Time/Set again, Unit Timer/O on the LCD
screen will start to blink.
When Unit Timer/O is blinking, set the time that you wish to have the
air purier shut o. Us the “Fan ∆” and “Fan ∇” button to select the hour
you want the air purier to shut o. Use the “Ozone ∆” and “Ozone ∇”
buttons to select the minute you want the air purier to turn o.
To conrm the timer has been set successfully, press the Uniter Timer
button and right above it to the left on the instrument panel you should
now see a blinking red light under the Unit Time, which indicates the
Unit Timer function is on and the air purier will turn on and o at the
preselected time with all the functions at the levels you have chosen.
OZONE TIMER: DO NOT USE THE OZONE TIMER BY ITSELF! IT
WILL BE ACTIVATED FOR USE TOGETHER WITH THE UNIT TIMER,
FOLLOWING ABOVE INSTRUCTIONS.
USING A TIMER
Some users who are sensitive to ozone set their units up on a timer so
that the purier does its work only when they are away from home. This
allows for a higher setting and higher concentrations, which can be
more eective for purging purposes. The ozone will normally dissipate
in less than an hour after the purier is turned o. Simple timers plug
into an outlet and are available at hardware and variety stores. This unit
also features a built-in timer.
 Loading...