

Page 1
Operational
manual
www.oxgard.com
info@oxgard.com
Тel. +7(812) 366-15-94
Cube С-01 turnstile
Page 2

Page 3

CONTENTS
List of Abbreviations used ........................................................................... 4
1. Product Designation ................................................................................. 5
2. Standard Equipment (Supplied Package of a Product) ............................ 5
3. Main Technical Specifications ................................................................. 6
4. Product Design ......................................................................................... 7
5. Transportation and Storage .................................................................... 11
6. Safety Requirements .............................................................................. 12
7. Turnstile Operation ................................................................................ 13
7.1. Turnstile Switch On .......................................................................... 13
7.2. Turnstile Operating Modes ............................................................... 14
7.3. Adjustment of remote control panel ................................................. 20
8. Troubleshooting ..................................................................................... 22
Operating Instructions 3
Page 4

List of Abbreviations used
PS – Power Supply
SFAS – Security and Fire Alarm System
ACS – Access Control System
Cube С-01 turnstile 4
Page 5

Denomination
Quantity
Cube С-01 turnstile
1 pc
Remote control panel with a cable
1 pc
Base Cover
1 pc
Product Passport
1 pc
Installation Instructions
1 pc
Technical Maintenance
1 pc
Operating Instructions
1 pc
Anchor with a screw of FH 12/10 SK * type
3 pcs
Connecting cable PVA 2x1.5
1 pc
1. Product purpose
Cube С-01 turnstile is designed for access control and crowd
management. The turnstile can be used at the guard desks of enterprises
and organizations, in the institutions, banks, educational institutions, sport
and recreational facilities, shops, stations etc.
To ensure a convenient and quick passage of persons it is
recommended to install one turnstile for each 500 persons operating at one
shift.
2. Delivery set
Тable 1. Scope of supply
*- optional
Operational manual 5
Page 6

Specification
Turnstile
Panel
Overall dimensions (H х W х D), mm:
-in operating condition
-with fold down arms
1024х800х900
1024х200х361
107х107х25
Weight, kg
25
0.5
Temperature range, °С:
- in operation
- transportation and storage
+1...+40
+1...+40
+1...+40
+1...+40
Relative humidity, %, no more
80
80
Width of the passage formed, mm
500
Capacity, person/min
30
Lifetime, years
8
8
Specification
Turnstile
Panel
Power supply voltage, V:
-rated
-working
12
10.8...13.2
12
7.5...15.0
Standby average current *, А
0.4
Average current in a pass mode **, А
0.4
Maximum absorbed current
1.5
3. Basic specifications
Тable 2. Basic Specifications
Table 3. Electrical characteristics
*- values indicated at rated voltage
**The manufacturer reserves the right for changing configuration, technical specifications and
appearance of the product
Cube С-01 turnstile 6
Page 7

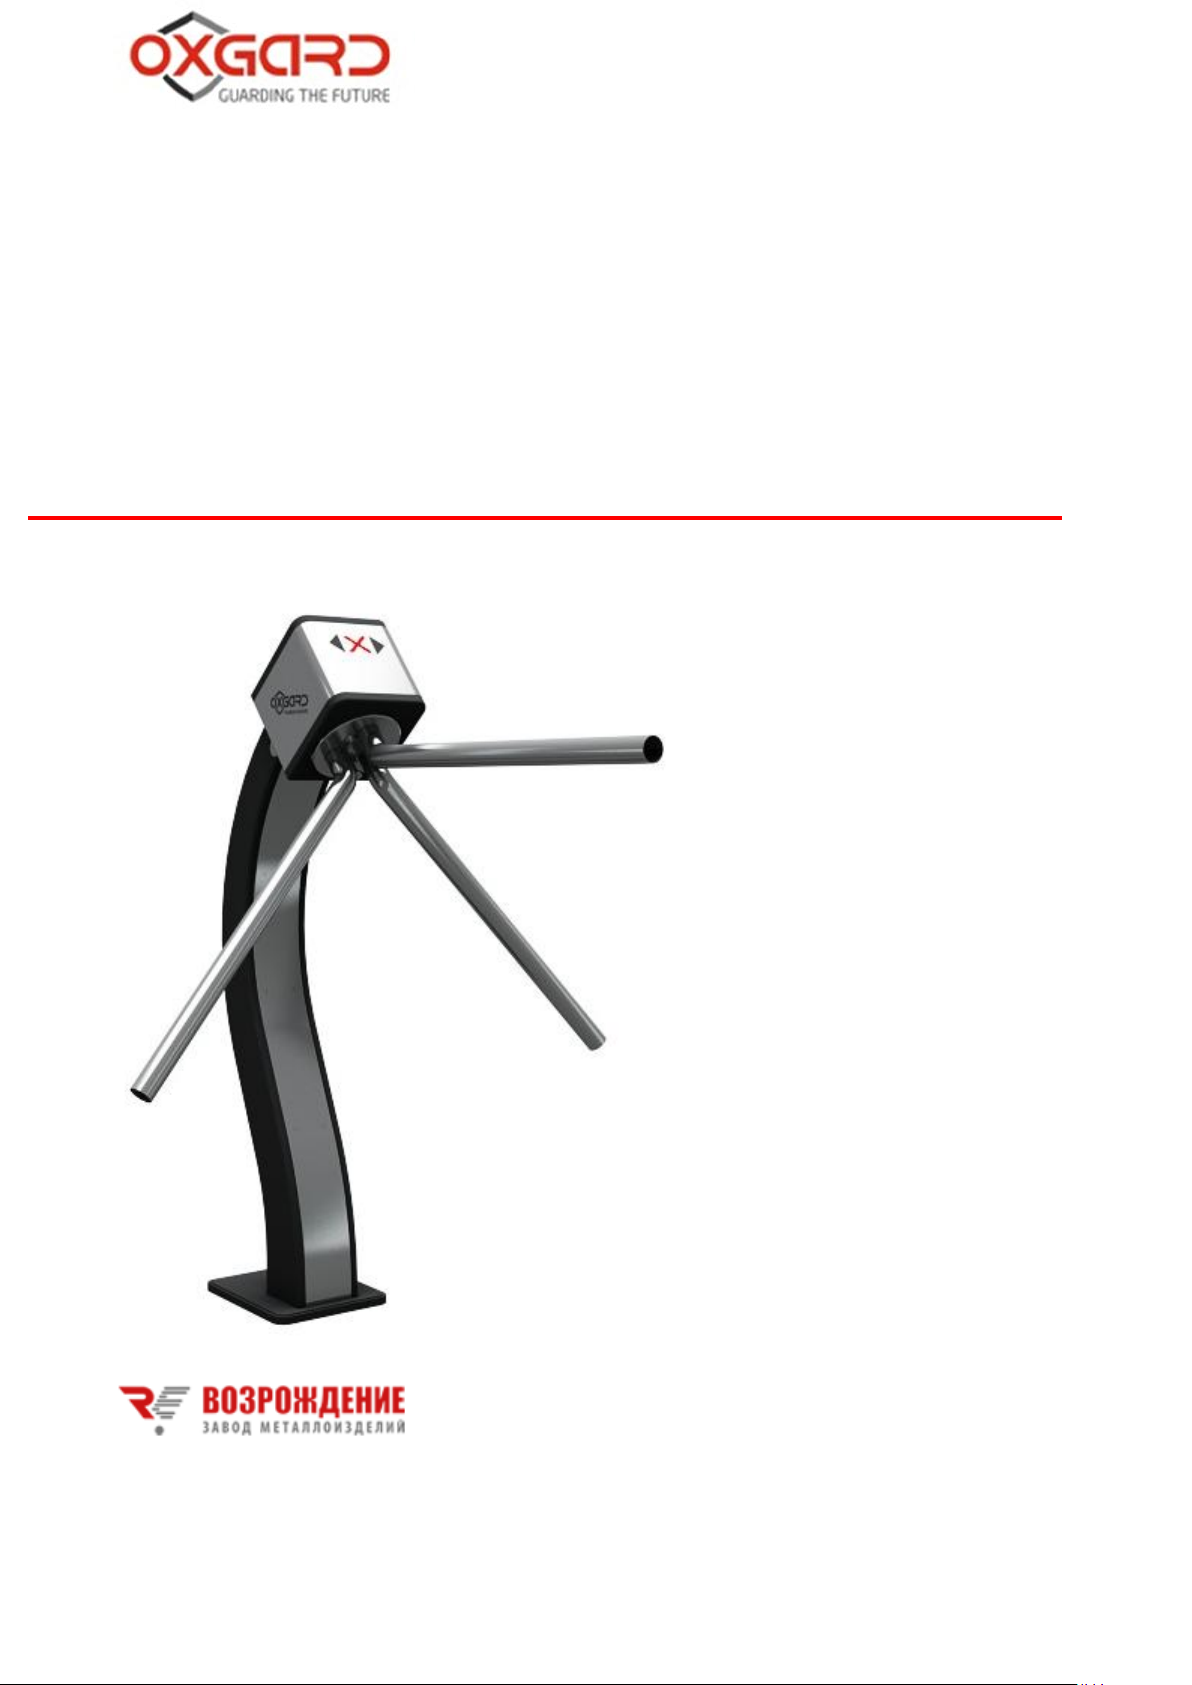
4. Product design
Turnstile housing
Turnstile housing and arms are made of brushed stainless steel. In the
middle part of the body frame there is a dismountable bent plate made of
stainless steel for quick access to the cross-board for connection of cables
PS, remote control panel and ACS. At the lower part of the turnstile rack
there is a hole for entry of these cables
Basement cover shall be fixed with double-sided adhesive tape or
sealing compound. The cover hides turnstile fixation to the floor (Fig.1).
Fig. 1. General view and overall dimensions of turnstile
Operational manual 7
Page 8

Ограждение
200 мм min
Не более
50 мм
П ла н к а
о гр а ж де н и я
Fence
no more than
50 mm
200 mm
Blocking
arm
ATTENTION! To log passages during turnstile operation under ACS
control and to avoid unauthorized passages, it is required to arrange
passage zones as per Fig.2
Recommended installation diagram Not recommended installation
diagram
Fig.2. Arrangement of turnstile passage zone
When installing the turnstile it is necessary to take into account possible
free movement of the arm, in the STOP mode it constitutes 6 grades in
each side, Fig 3
Cube С-01 turnstile 8
Page 9

Ограждение
Турникет
9,5
град.
6 град
6 degrees
Fig. 3. Possible free movement of the arm, in “STOP” mode
Indication panel
Indication panel of the turnstile is located at the upper part of the
turnstile behind the insert made of acryl glass. Operation modes of the
turnstile are displayed on the panel in form of pneumonic signs allowing
and prohibiting a passage (Fig. 4).
Operational manual 9
Page 10

Sign permitting
pathway
Sign prohibiting
pathway
Fig. 4. Appearance of indication panel
Remote Control Panel
Housing of turnstile and arms are made of brushed stainless steel. In
the front there are located control buttons 1 - 4 and LEDs indicating
operation modes on the panel (Fig.5). Standard cable length, included in
the delivery set, is 5 meters.
Cube С-01 turnstile 10
Page 11

Fig. 5. External view of control panel
5. Transportation and Storage
Turnstile in its original packaging shall be transported by air, by road
and by railroad with protection from direct exposure to rain and dust
without range limitation. For transportation the turnstile is required to be
folded in following i.7.2 of the Instruction7.2. Turnstile Operating Modes
It is allowed to stack boxes in 2 rows during transportation and storage if
Euro-pallets are used. Keep the turnstile in dry (no moisture condensation)
heated places within +1 to + 40 °C temperature range. Avoid vapors of
acids, alkalis, and corrosive gases at the storage place. Storage of turnstile
in the original package in a dry unheated premises or closed transport
containers is permitted for short periods, no more than 3 days. Before
startup, the turnstile must be kept in a room with normal climate
conditions for 12 hours after storage in unheated rooms.
Operational manual 11
Page 12

Packaging dimensions 270х430х970 mm (H х W х L).
6. Safety Requirements
ATTENTION! A failure to observe safety requirements, indicated in this
Section, may cause damage to life and health of people, complete or partial
loss of operating capability of the product and (or) auxiliary equipment.
ATTENTION! Installation of turnstile shall be carried out by skilled
professionals according to Installation Instruction.
ATTENTION! The manufacturer shall disclaim the liability for causing
injury to human life and health complete or partial loss of operating
capability of the product and (or) auxiliary equipment in case of a failure
to observe safety requirements, indicated in this Section, and will
terminate the validity of the product warranty.
Cube С-01 turnstile 12
Page 13

IT IS FORBIDDEN:
to install power supply module inside the body of the turnstile as it
may result in an injury of the human beings due to an electric shock;
to install the turnstile outside dry and heated premises;
to use pastes and liquids chemically aggressive to the materials of the
housing for cleaning purposes of the product.
7. Turnstile Operation
7.1. Turnstile Switch On
The turnstile is supplied in a folded state (transportation mode). Before
starting the operation it shall be transferred to the working position:
- unscrew a fixing screw 4 (Fig.9) and elevate the turnstile head up to the
stop.
- screw in a fixing screw 4 (Fig.9) for fasten purpose of a turnstile head
- screw in a screw 3 (Fig.9) for secure fastening of the turnstile head.
- retract a fixation lock 2 of the arms (Fig.6), holding one arm by the hand
in a fixed position, unfold other arms into operating position.
Operational manual 13
Page 14

Connect PS to the mains ~220V and switch it on. On the indication
panel of the turnstile the red cross will light up, prohibiting the passage,
LED indicator of the button 2 located on REMOTE CONTROL PANEL
(Fig 5) will light red. One of the arms is in state of blocking that prohibits
the passage. The turnstile is ready for operation.
7.2. Turnstile Operating Modes
The turnstile has several modes of operation. The desired mode is set by
using RC panel or ACS. Operational modes displayed on the panel in the
form of mnemonic signs depicting authorization and non-authorization of
passage. Operation by ACS is described in the installation guidelines. This
section describes operation by RC panel. General view of RC panel is
shown in Fig. 3.
The "Stop" mode
"Stop" mode is set when the turnstile is turned on. Switch from another
mode to "Stop" is performed by pressing button 2, in this case LED
indicator above button 2 turns red. In this mode the passage is nonauthorized in both directions. Central arm can be deflected from its initial
position on a small angle. The stopper will be turned on automatically and
will not let the arm to rotate for passage, and then the arm will return to its
original state.
Single passage mode
Cube С-01 turnstile 14
Page 15

Button 1 (3) turns on single passage mode to the left (right). This mode
allowes one pass to the left (right) with a subsequent changing to "Stop"
mode. Green arrow indicator turns on on the display showing a free
passage to the left (right). Green LED indicator on the RC panel turns on
above the button corresponding to the authorized passage and a red
indicator - above button 2. If the passage is not performed within 5
seconds, the turnstile switches to "Stop" automatically.
Multiple passage in one direction mode
In order to switch to this mode press and hold button 2 and then press
button 1 (3). After that release both buttons. Multiple pass mode is
displayed on the RC panel by green light above the button 1 (3). Red LED
indicator above button 2 is off. Arrow indicator on the LED panel shows
the direction of the authorized passage. In this mode the passage is allowed
in the authorized direction for an unlimited number of times. It is also
possible to authorize a single pass into the non-authorized direction by
pressing button 1 (3). After this passage or within 5 seconds turnstile will
return to the original mode.
Free passage mode
In order to switch to this mode it is required to press and hold button 1,
then press 3 and release both buttons. In this mode passage is allowed in
both directions for an unlimited number of times. Arrow indicators on the
LED panel blink in both directions. Green LED indicators on the RC panel
turn on above the buttons 1 and 3.
Operational manual 15
Page 16

“Аntipanic”mode
Switching to this mode is carried out by mechanical way. Switch the
turnstile to “Antipanic” mode, to do this press button 4 on the control
panel. Pull off fixation limit stop 2 of the arms (Fig.6), holding one arm by
hand in a fixed position, rotate the other arm clockwise in such a way that
all the arms are aligned (Fig.7). Then tighten further down all the arms
folded together (Fig.8)
While doing so there green arrows will flash indicating both directions on
the indication panel.
Fig.6.
Cube С-01 turnstile 16
Page 17

Fig 7.
Operational manual 17
Page 18

Fig. 8.
“Transportation” mode
This mode is used for transportation. To enter this mode, arms shall be
folded as described in “Antipanic” mode. Raise all folded arms to
horizontal position, then fully unscrew the screw 4 (Fig.9) located on
turnstile housing, loose the screw 3 (Fig.9) and move the turnstile head
down so that all folded arms would fit the bent of the turnstile leg
(Fig.10).
Cube С-01 turnstile 18
Page 19

Fig.9.
Operational manual 19
Page 20

Fig. 10.
7.3. Adjustment of remote control panel
Turnstile can be set in various directions in relation to the user. In
some cases it is needed to reverse left / right passage buttons. This can be
done by the following operations:
Switch off the power of the turnstile;
Cube С-01 turnstile 20
Page 21

Press and hold down the buttons of passage to the left (1) and to the
right (3);
Switch on the turnstile power;
Holding down buttons 1 and 3, press button 2;
Release buttons 1 and 3;
Release button 2.
Now when you click left button passage will be allowed to the right
and vice versa. The current functions of the buttons are saved and do not
reset when power is turned off. In order to return to the initial modification
re-do the above sequence.
Operational manual 21
Page 22

Failure
Remedy
PS unit is connected, but the
turnstile does not function
1. Please check for a proper connection of
the power wires
2. Check the fuse on the cross-board
Remote control panel does
not function
1. Make sure that the control panel is
connected properly.
2. If +12V and GND are properly
connected, try reversing CL and CH
The turnstile does not work
correctly
Calibrate the turnstile.
Remote control panel
displays operating state of
the turnstile but the turnstile
does not respond to
pressing buttons
Check J2 jumper on the cross-board (the
jumper shall be removed, please, see Article
5.4 of Installation guidelines)
8. Troubleshooting
Table 4. Troubleshooting
Calibration sequence:
The turnstile can be calibrated by two ways:
1. Using BUT1 button, located on the cross-board .
- switch off the PS
-press the single button on the cross-board (BUT1).
-switch on the PS, holding the button (BUT1)
- wait for the turnstile LED flashing and release the button
BUT1.
Cube С-01 turnstile 22
Page 23

- while indicators are flashing, press the button (BUT1) once.
After that the automatic calibration sequence will start even if
the control panel is not connected.
2. Using the control panel.
- power off the turnstile.
- switch on the power , the LED’s located on REMOTE CONTROL
PANEL first will light up and turn off, except for the button (2), press
shortly the button (2), the button(4) will light up, press shortly the button
(4), these manipulations should be done in time before lighting up of the
red cross sign on the indication panel.
- after that the red cross sign will light up on the indication panel
The turnstile is calibrated.
After calibration connect the turnstile to your system and check the proper
functioning of the turnstile.
Operational manual 23
Page 24

Cube С-01 turnstile 24
Page 25

OOO “Vozrozhdenie”
66, Sofiyskaya str.
192289, Saint-Petersburg
tel./fax +7 (812) 336 15 94
www.oxgard.com
info@oxgard.com
 Loading...