

User Instruction Manual
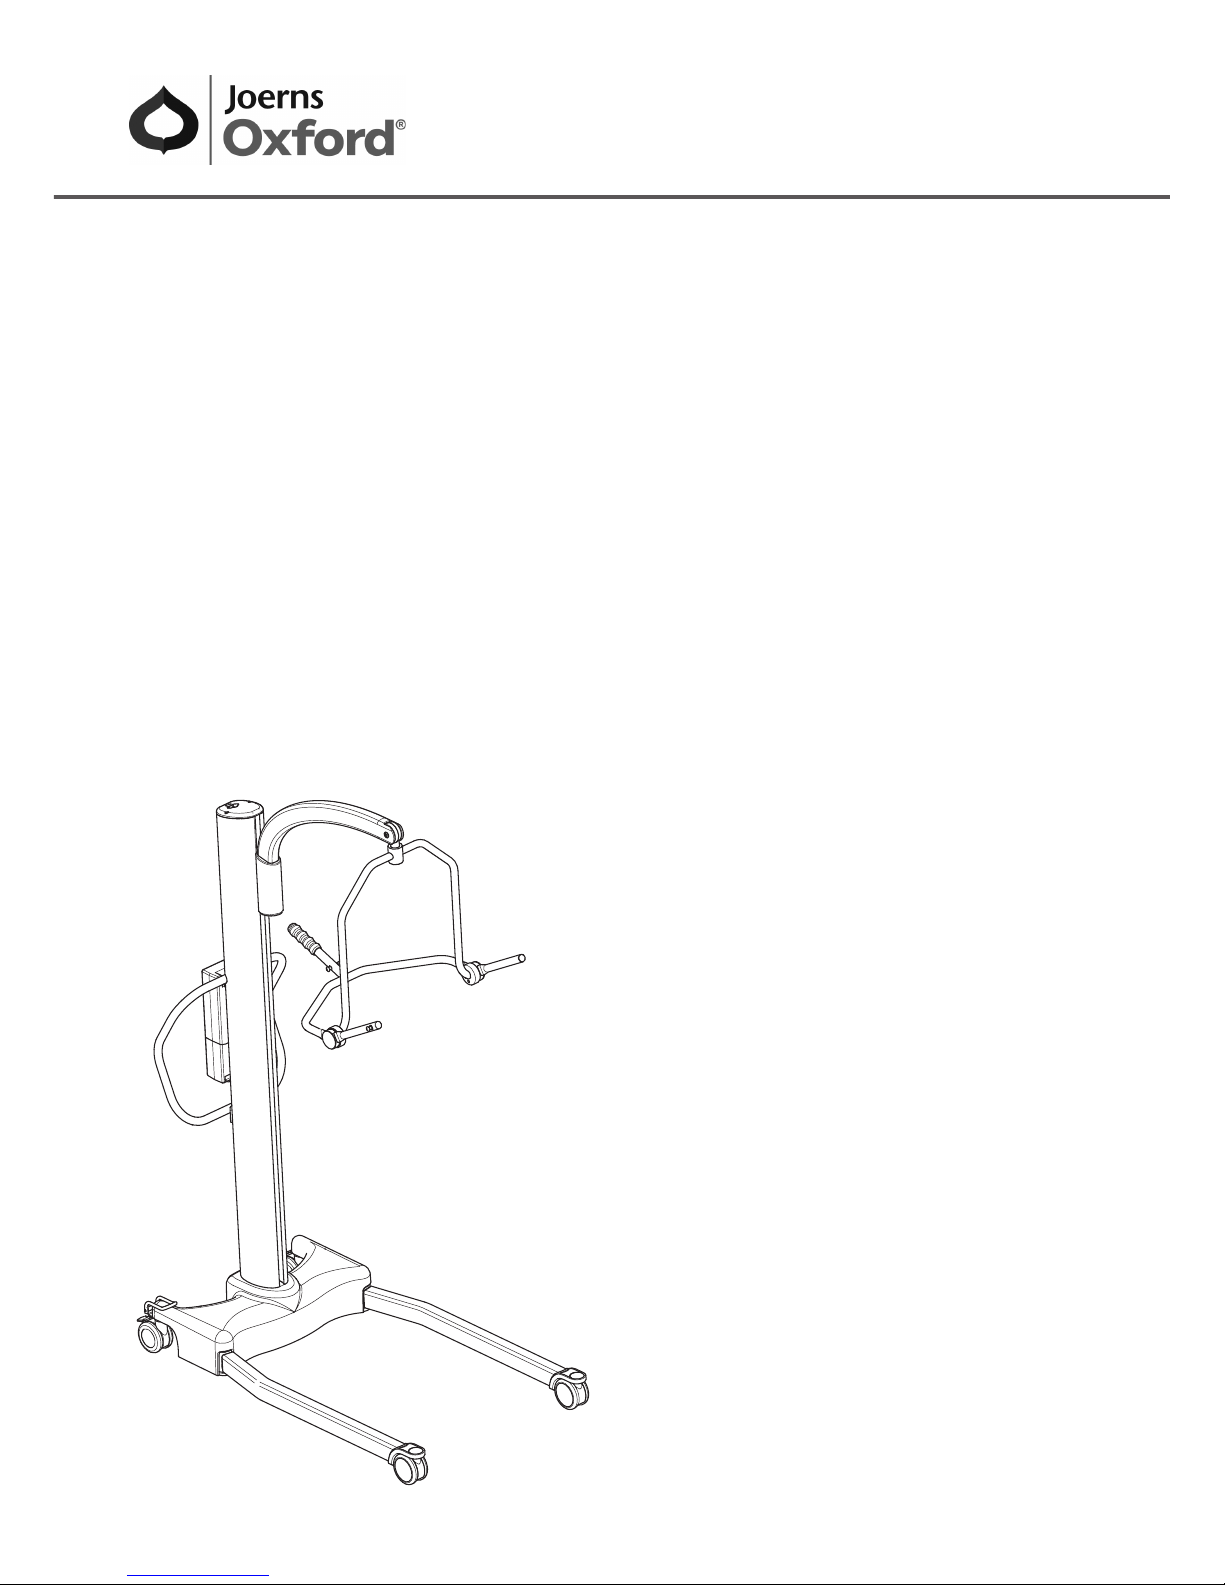
Oxford® Stature
To avoid injury, read user manual prior to use.
Manuel de l’utilisateur
Oxford® Stature
Afin d’éviter tout accident, veuillez lire
attentivement la notice avant utilisation.
Manual de Instrucciones
Oxford® Stature
Para evitar posibles daños, lea
previamente el manual de usuario.
Benutzerhandbuch
Oxford® Stature
Um Verletzungen zu vermeiden, lesen Sie bitte die
Gebrauchsanweisung vor der ersten Benutzung.

Oxford
®
Stature
2
English
Contents
1. Oxford Stature Patient Lift ..................................................................................... 3
2. Introduction: About Your Lift .................................................................................. 4
3. Assembly and Commissioning Instructions ........................................................... 5
4. Safety Precautions ................................................................................................ 9
5. Smart Monitor & Handset ...................................................................................... 11
6. Operating Instructions ........................................................................................... 15
7. Removal of Spreader Bar/Cradle Systems ........................................................... 19
8. Charging Instructions............................................................................................. 21
9. Maintenance Schedule & Daily Check List ........................................................... 23
10. Technical Specifications ........................................................................................ 26
11. Warranty ................................................................................................................ 29
Oxford
®
Stature
3
English
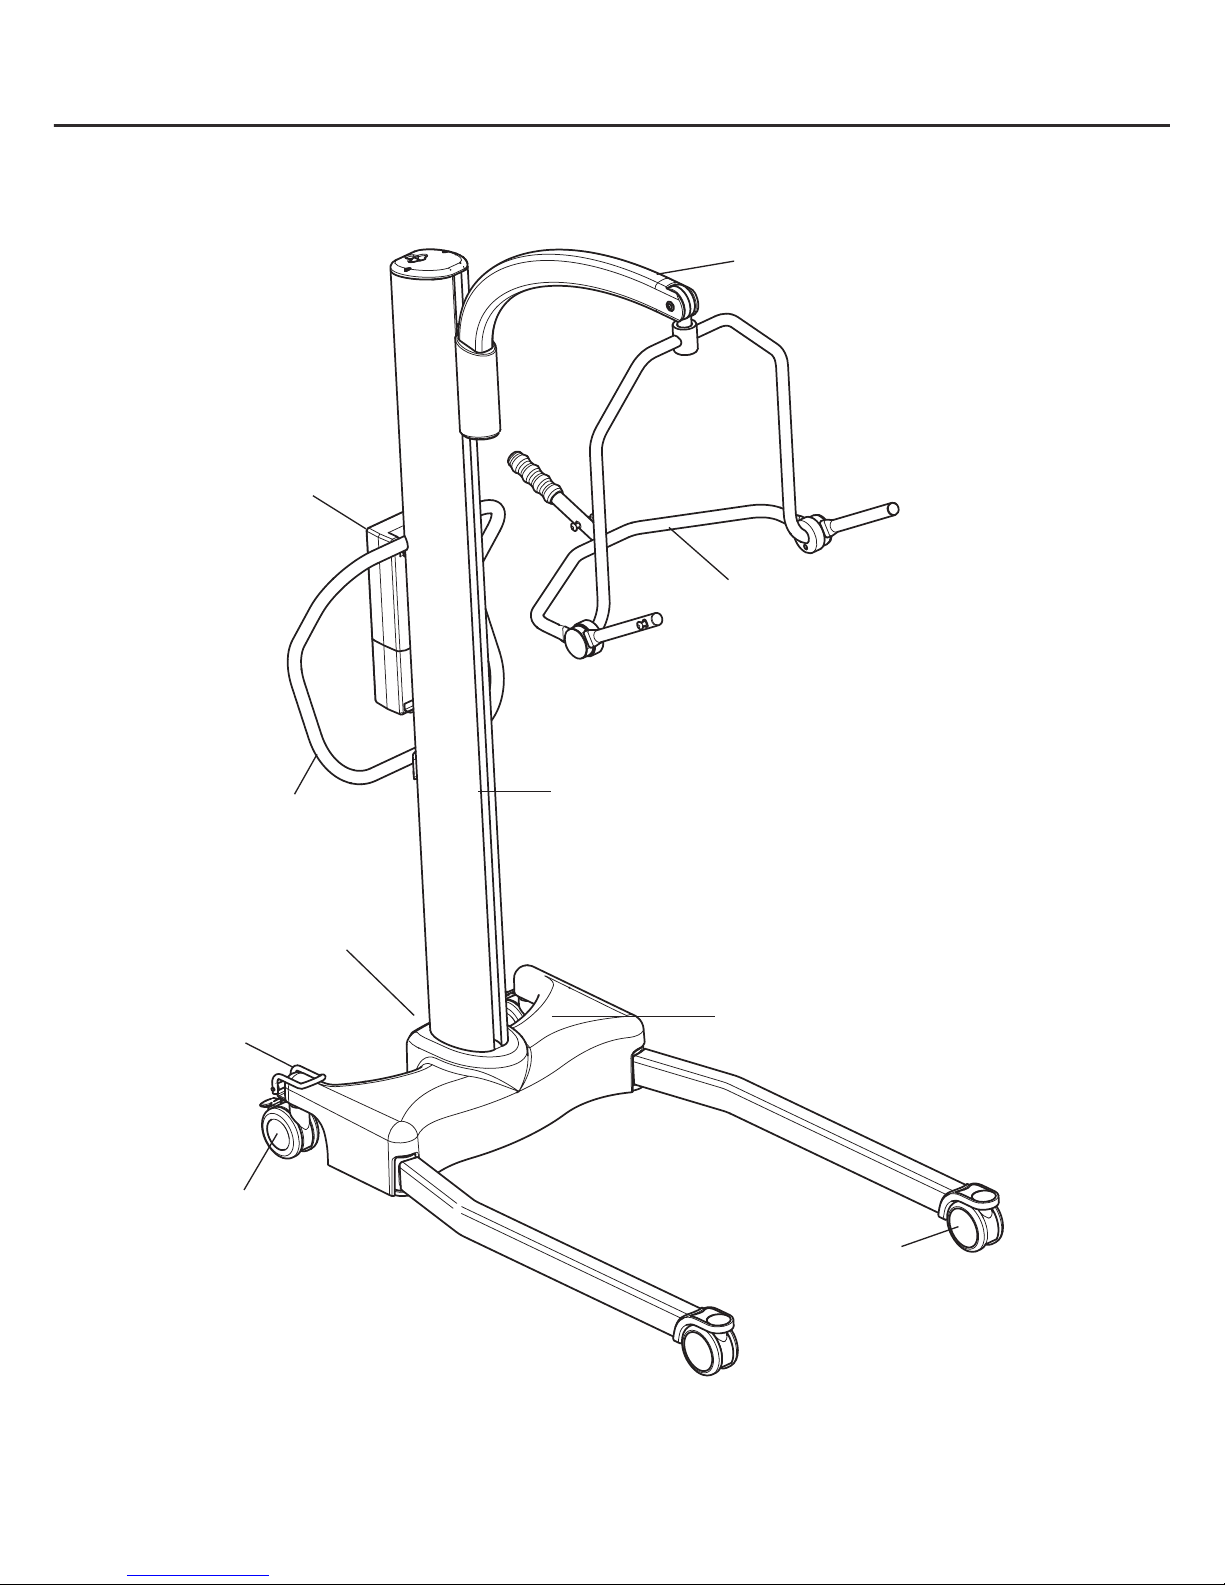
1. Oxford Stature Patient Lift
READ AND UNDERSTAND THE INSTRUCTIONS IN THIS MANUAL
BEFORE USING YOUR STATURE
Boom
Spreader Bar
Motor Gearbox
Mast Extrusion
Rear Castor
(braked)
Push Handle
Foot Push Pad
Straight Line
Steering Device
Battery/
Control Pack
Front Castor
(non-braked)
Oxford
®
Stature
4
English
2. Introduction: About Your Lift
Each Stature lift is fully assembled load tested and certified before being packed/shipped.
The packing consists of a strong, purpose built carton that is used for both export and
domestic markets to ensure the safe arrival of the lift. A number of documents are supplied in
a wallet which is packed with each lift and should be kept safely for future reference.
• USER MANUAL • CUSTOMER SATISFACTION CARD (Europe only)
• TEST CERTIFICATE • DEALER GUARANTEE CARD (Europe only)
• PACKING CHECK LIST
The TEST CERTIFICATE is an important document and may be required for your insurance
records. It is valid for six months and after it has expired the lift should be inspected and serviced
per the maintenance schedule by a competent authorised engineer.
The CE mark:
Statement of Intended Use
The intended use of this lifting device is for the safe lifting and transfer of an individual from one
resting surface to another (such as a bed to a wheelchair). Joerns Healthcare recommends that the
transfer of a patient is fully risk assessed and conducted safely over a short distance only.
The Oxford Stature is suitable for patients in the SITTING, SITTING/RECUMBENT and
RECUMBENT positions.
The Oxford Stature is an electrically operated patient lift, designed to support and promote safe
patient handling and transfer for both the patient and carer.
The examples of slings suitable for use with this device are listed as follows:
• Oxford Quickfit • Oxford Access
• Oxford Full Back • Oxford Comfort
• Oxford Quickfit Deluxe • Oxford Silkfit
• Oxford Long Seat
Expected Service Life
Oxford Professional lifts are designed and tested for a minimum service life of ten (10) years,
subject to the use and maintenance procedures stated in this manual. Use, other than in accordance
with these instructions, may compromise service life.
The Oxford Stature carries the CE mark and complies
with the following EC directives:
• Medical Device Directive (93/42/EEC)
• EMC Directive (89/336/EEC)
• Low Voltage Directive (73/23/EEC)
Oxford
®
Stature
5
English
3. Assembly and Commissioning Instructions
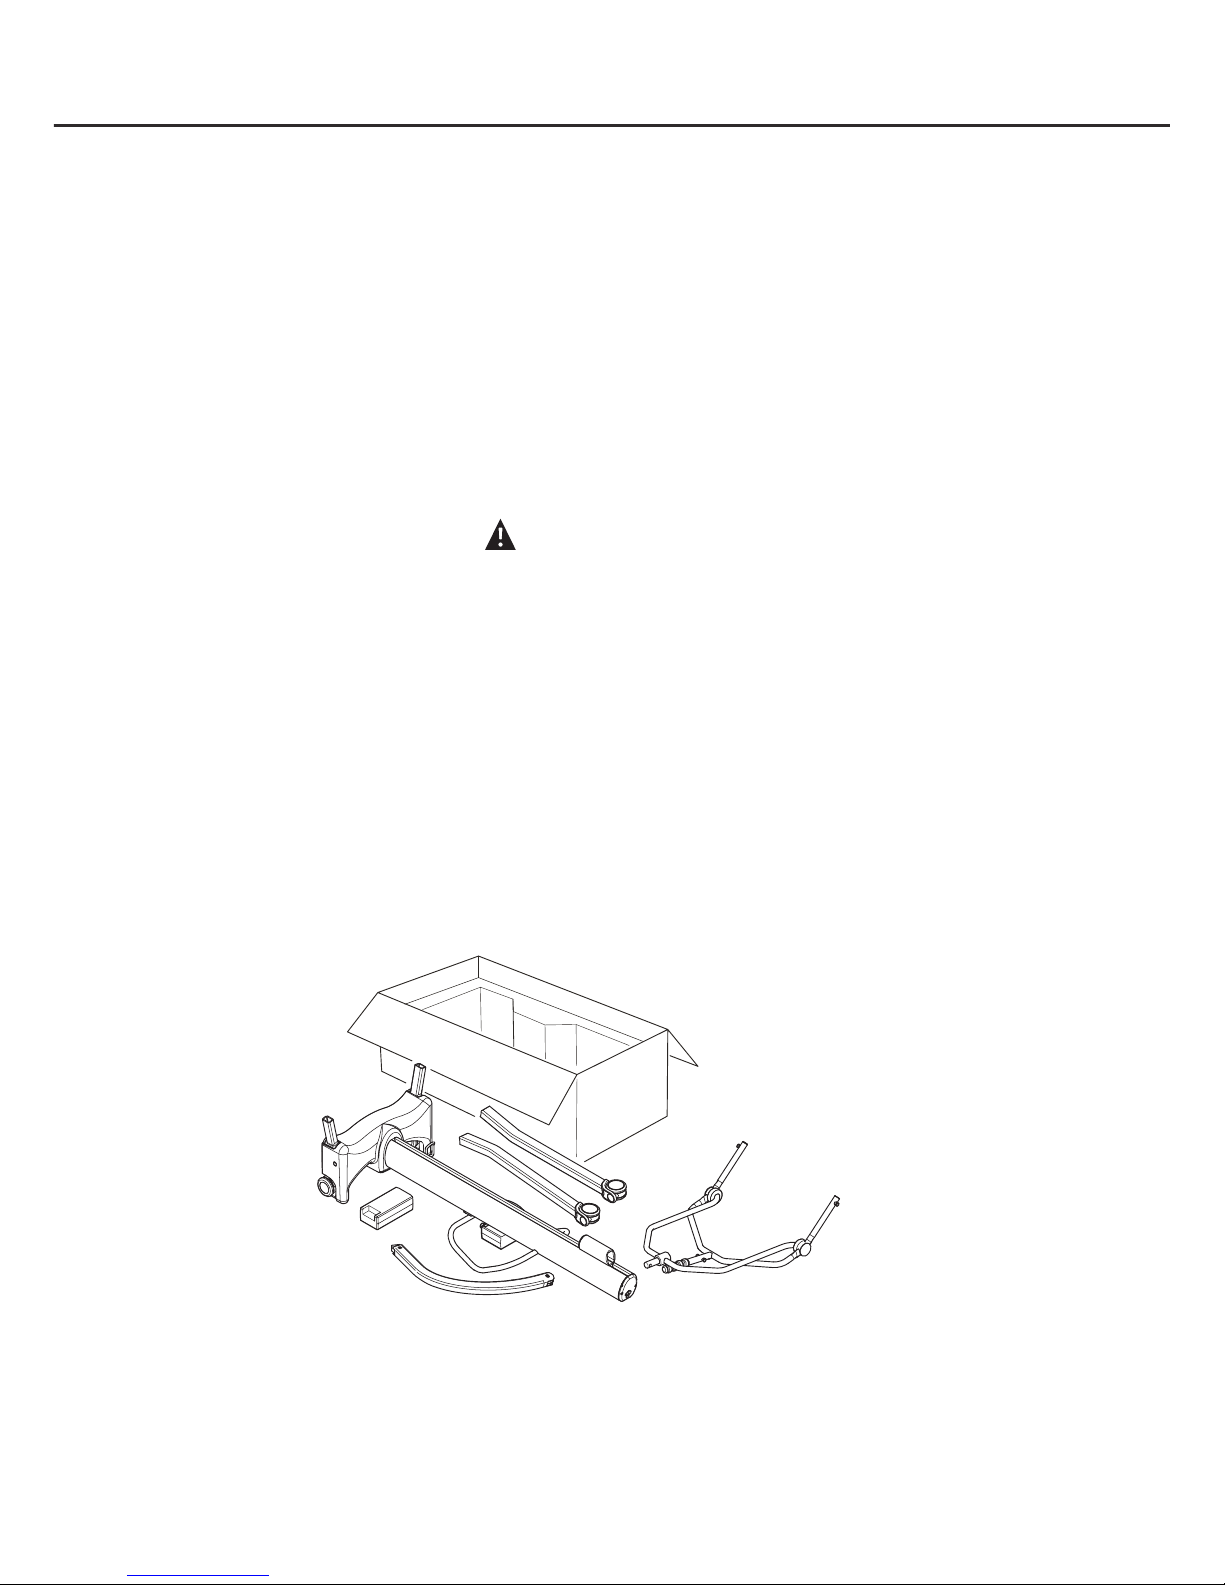
Carton Contents
Place the carton in a clear working area and open carefully. The carton contains:
•
OXFORD STATURE LIFT
•
WALLET CONTAINING DOCUMENTS
•
HAND CONTROL
•
BATTERY PACK
•
DESK TOP CHARGER/STAND/LEAD
• FASTENER KIT (INCLUDES SCREWS, ALLEN KEY, HEX SOCKET, CAPPING PLATE)
WARNING
The Oxford Stature is heavy and will need to be lifted with care. You may need assistance
to lift the Oxford Stature from the carton.
Assembly Instructions
Remove all the parts from the carton and place on the floor, taking care to protect the finish from
damage.
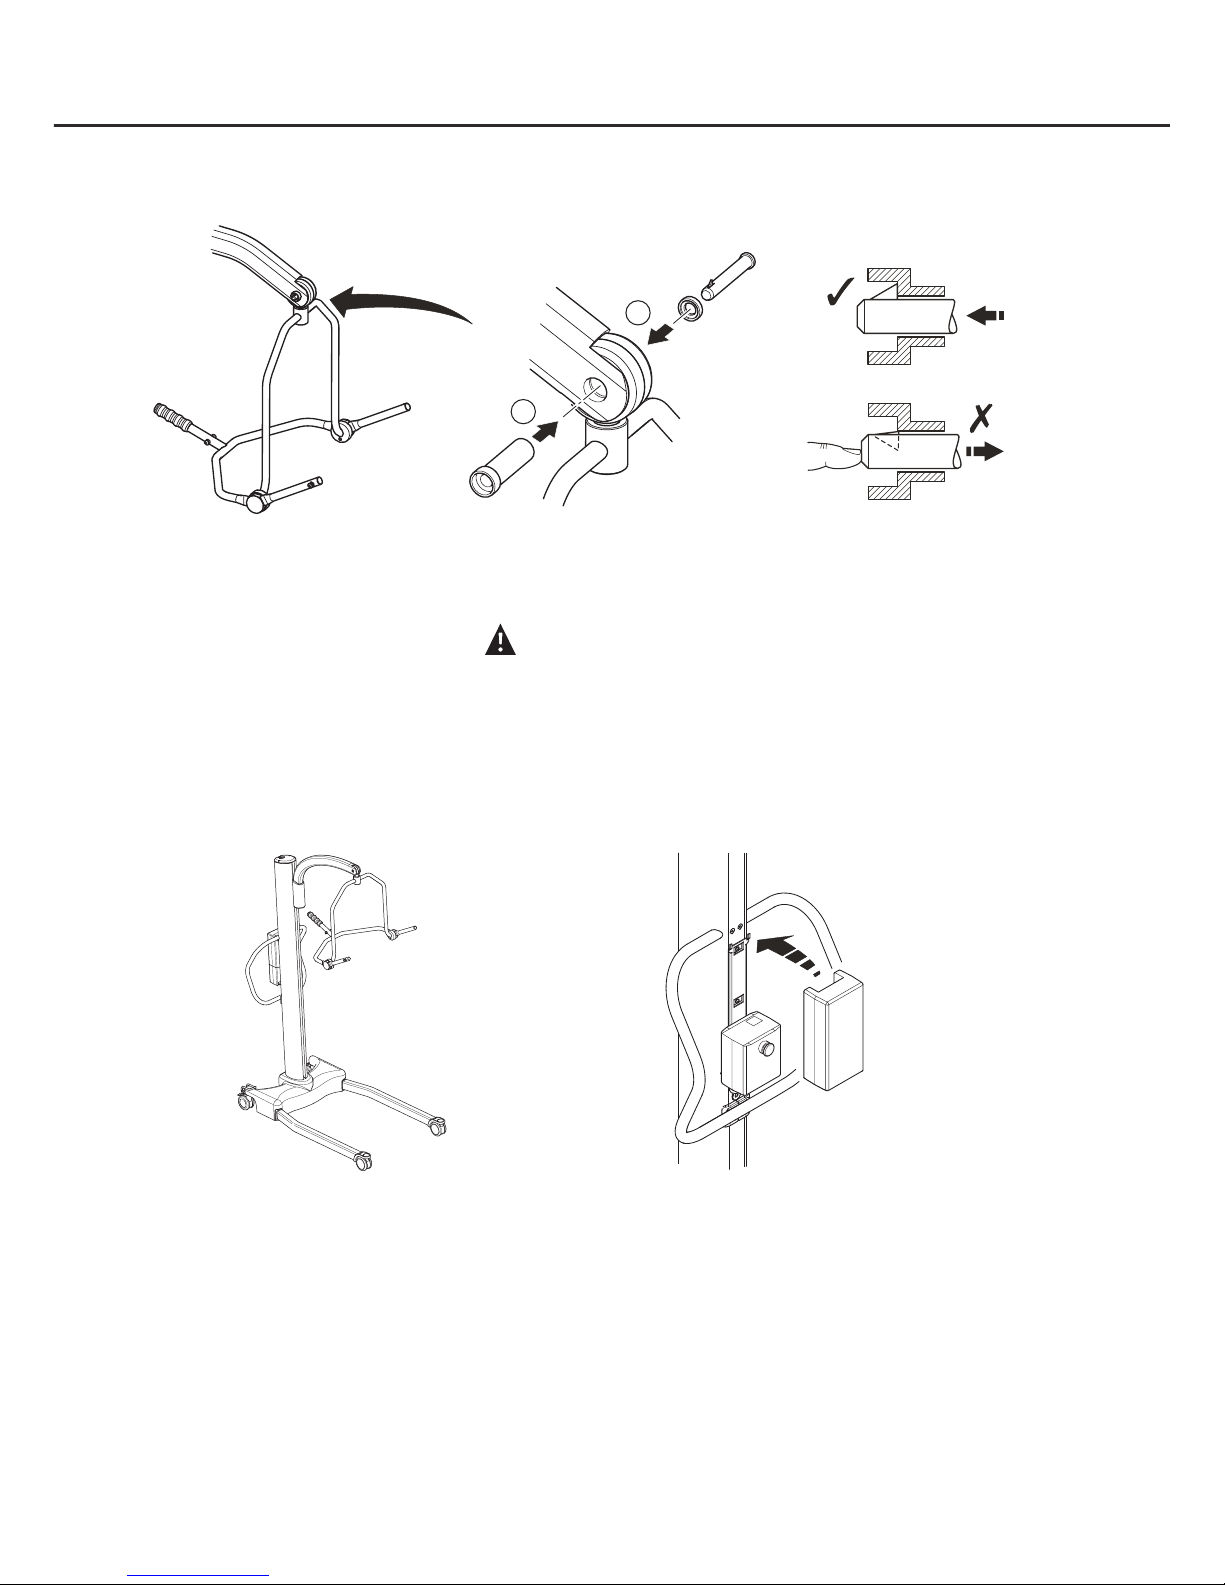
1. Place the chassis and mast (which are connected) in a clear space. The mast and chassis
should be rested on the push handle, which will ensure the product remains stable while
connecting the legs and boom to the product.

Oxford
®
Stature
6
English
2. Fit the legs to the chassis using two 6mm countersunk screws per leg as provided.
NOTE: There is a left and a right leg and they are configured as shown below
3. Using Allen Key provided, tighten the 6mm screws located on each side of the chassis.
WARNING
The screws should be secured firmly.
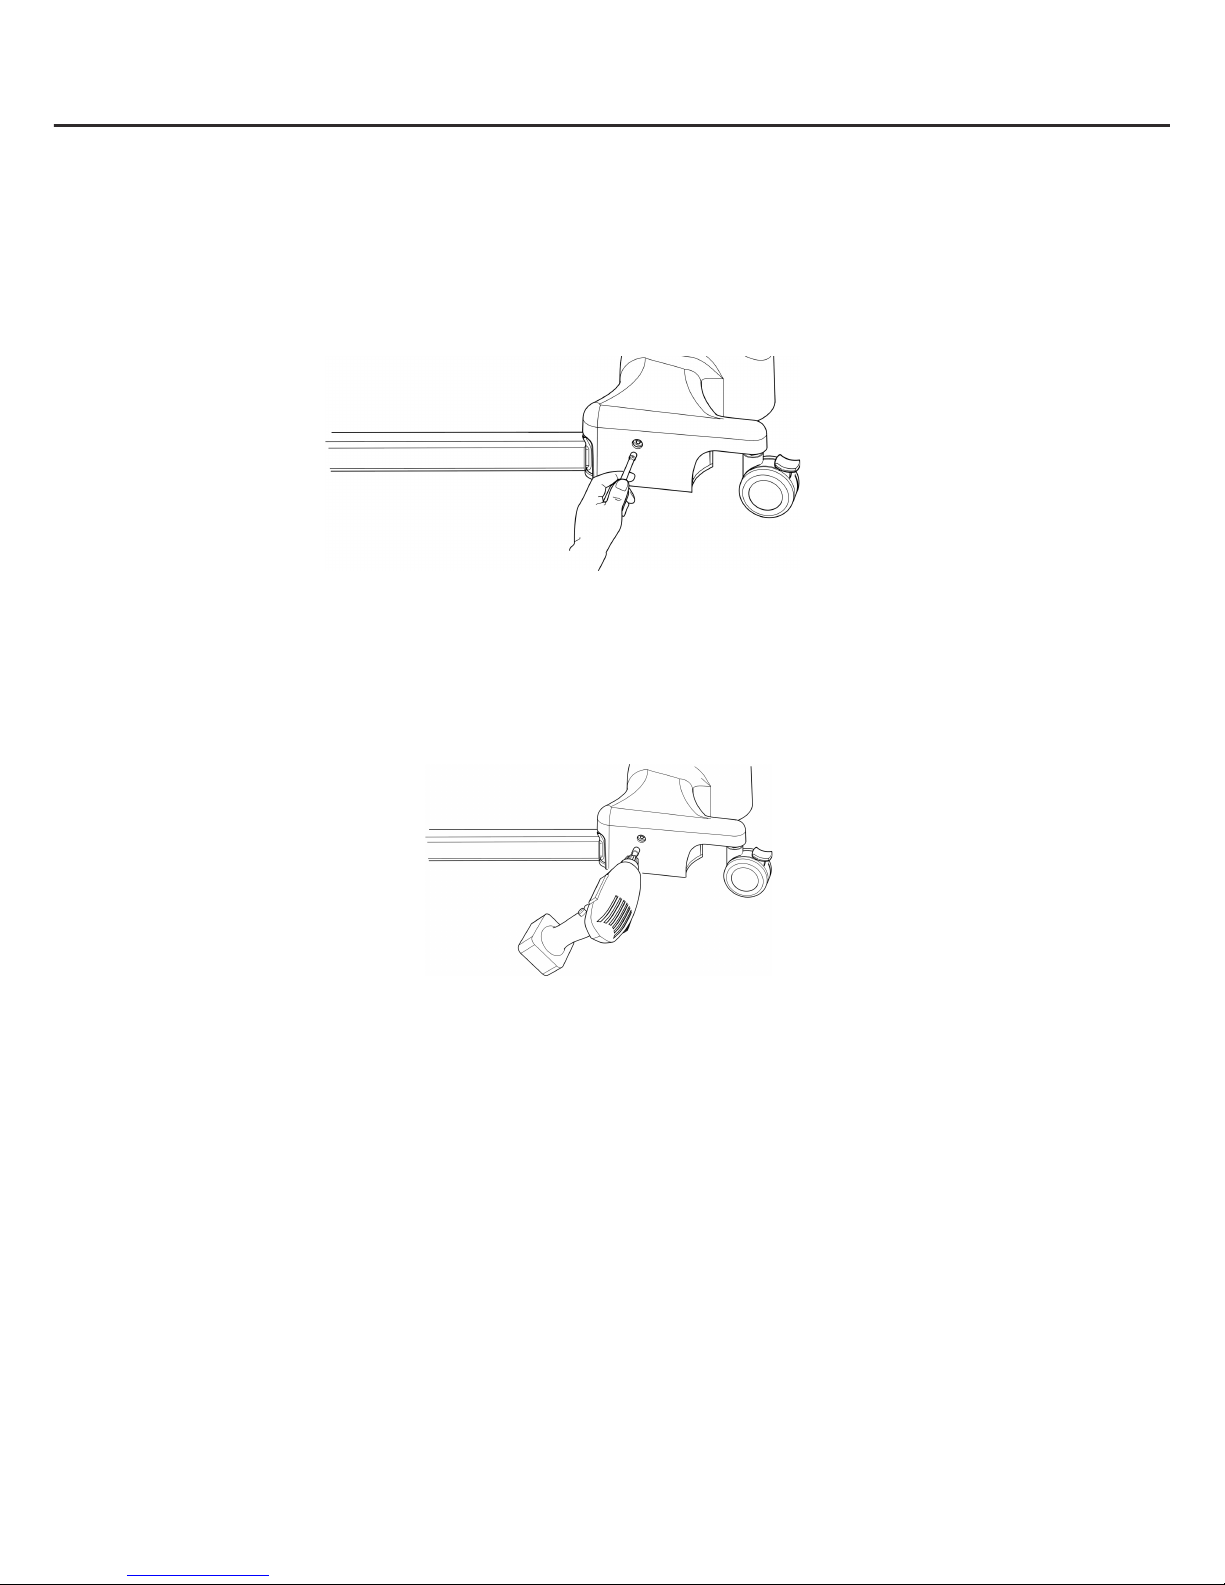
4. Insert the curved boom section into the boom carriage. Secure the assembly by inserting
the two 6mm countersunk screws into the blue capping plate provided in the fastener kit, as
shown below and tighten firmly.
Oxford
®
Stature
7
English
5. Attach four point positioning cradle to the lift boom by inserting the split pin. Ensure pin is
secure.
2
1
6. Stand the Stature upright and apply the brakes.
WARNING
Be careful when lifting the Stature to the upright position, as it is heavy.
Fit hand control plug into the bottom of the control box located on the mast, ensure correct
alignment to the plug socket. Fit power pack to the lift and make sure the latch holding the pack in
place is fully engaged “Click” into place.
Disassembly
The lift should not be disassembled unless for service, repair or transport if necessary. If
disassembly is necessary, follow the assembly instructions in reverse sequence.
Oxford
®
Stature
8
English
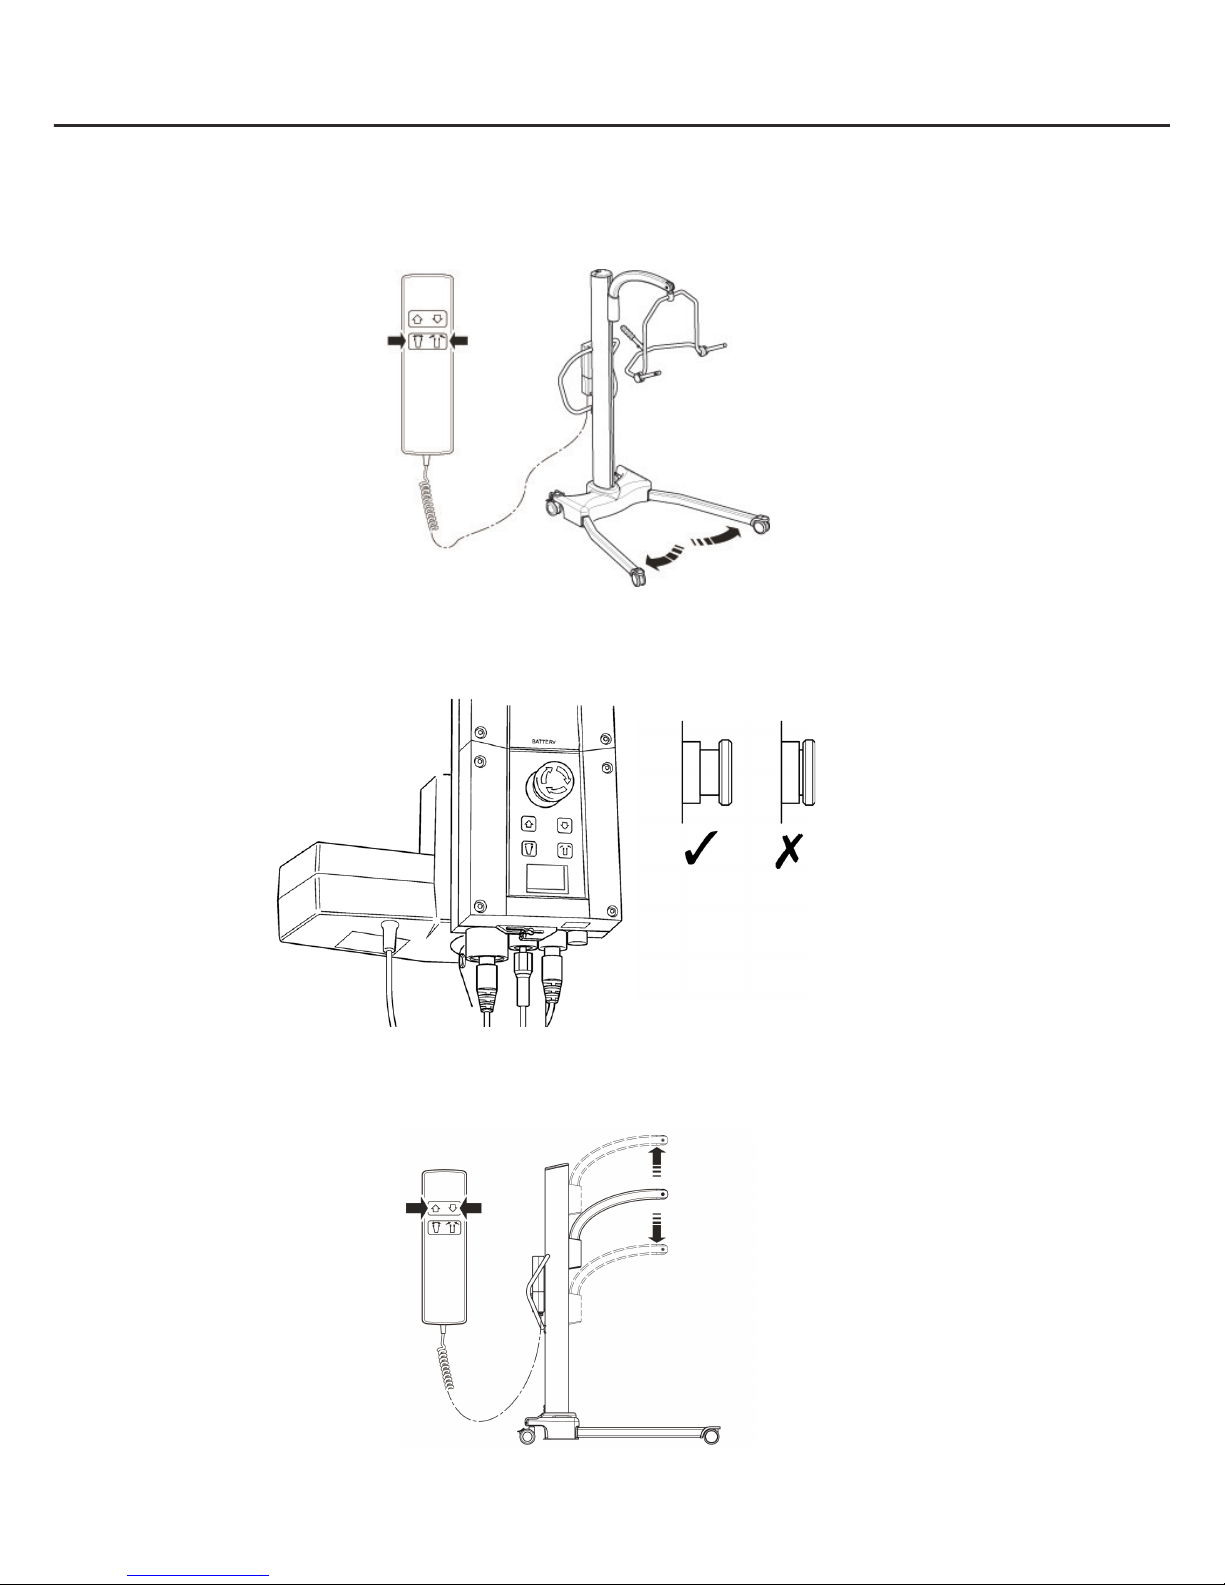
ALWAYS CHECK THE FOLLOWING BEFORE OPERATION
• Push the open and close buttons on the hand control to confirm that the legs of the lift open
and close satisfactorily.
• The red emergency stop button, located on the rear of the control box, is in the OFF (out)
position.
• Push the up and down buttons on the hand control to confirm that the boom rises and lowers
satisfactorily.

Oxford
®
Stature
9
English
4. Safety Precautions
Please read and follow the safety precautions listed below. Following these few basic safety
precautions will make lifting operations easy and trouble free.
WARNING
• ALWAYS check the safe working load of the lift is suitable for the weight of the patient.
• DO NOT exceed the safe working load of the hoist, as an electrical current limiting
device will activate, preventing use of the hoist.
• ALWAYS plan your lifting operations before commencing.
• ALWAYS carry out the DAILY CHECK LIST before using the lift.
• ALWAYS familiarise yourself with the operating control and safety features of a lift
before lifting a patient.
• DO NOT use a sling unless it is recommended for use with the lift.
• ALWAYS check the sling is suitable for the particular patient and is of the correct size
and capacity.
• NEVER use a sling which is frayed or damaged.
• ALWAYS fit the sling according to the instructions provided (user instructions).
• ALWAYS ensure sling straps DO NOT get caught around the legs of the hoist.
• ALWAYS carry out lifting operations according to the instructions in the user manual.
• NEVER disconnect or bypass a control or safety feature because it seems easier to operate
the lift.
• DO NOT lift a patient with the castor brakes on. Always let the lift find the correct centre of
gravity.
• DO NOT attempt to manoeuvre the lift by pushing on the mast, boom or patient.
• ALWAYS manoeuvre the lift with the push handle, located on the mast. A foot push pad
is also provided on the base of the hoist.
• ALWAYS lower the patient to the lowest comfortable position before transfers.
• DO NOT push a loaded lift at speeds which exceed a slow walking pace (3 Km/hour 0.8
metres/second).

Oxford
®
Stature
10
English
• DO NOT push the lift over uneven or rough ground. Particularly if loaded.
• DO NOT attempt to push/pull a loaded lift over a floor obstruction.
• NEVER force an operating/safety control. All controls are easy to use and do not
require excessive force.
• DO NOT park a loaded lift on ANY sloping surface.
• DO NOT use electric lifts in a shower.
• DO NOT charge an electric lift in a bathroom or shower room.
• DO NOT lift a patient unless you are trained and competent to do so.
• YOUR lift is for patient lifting. DO NOT use it, or allow it to be used, for any other purpose.
• DO NOT bump the lift down steps, loaded or unloaded.
• DO NOT attempt to negotiate a loaded lift on a slope which exceeds 1:12 (approximately
5 degrees).
• DO NOT attempt to negotiate a slope without a second helper being present.
• DO NOT use in a wet or corrosive environment such as poolside locations.
• DO NOT use on extra thick pile carpet when the lift is fully loaded.
• NEVER operate lift with loose/worn or missing parts/fasteners.
Oxford
®
Stature
11
English
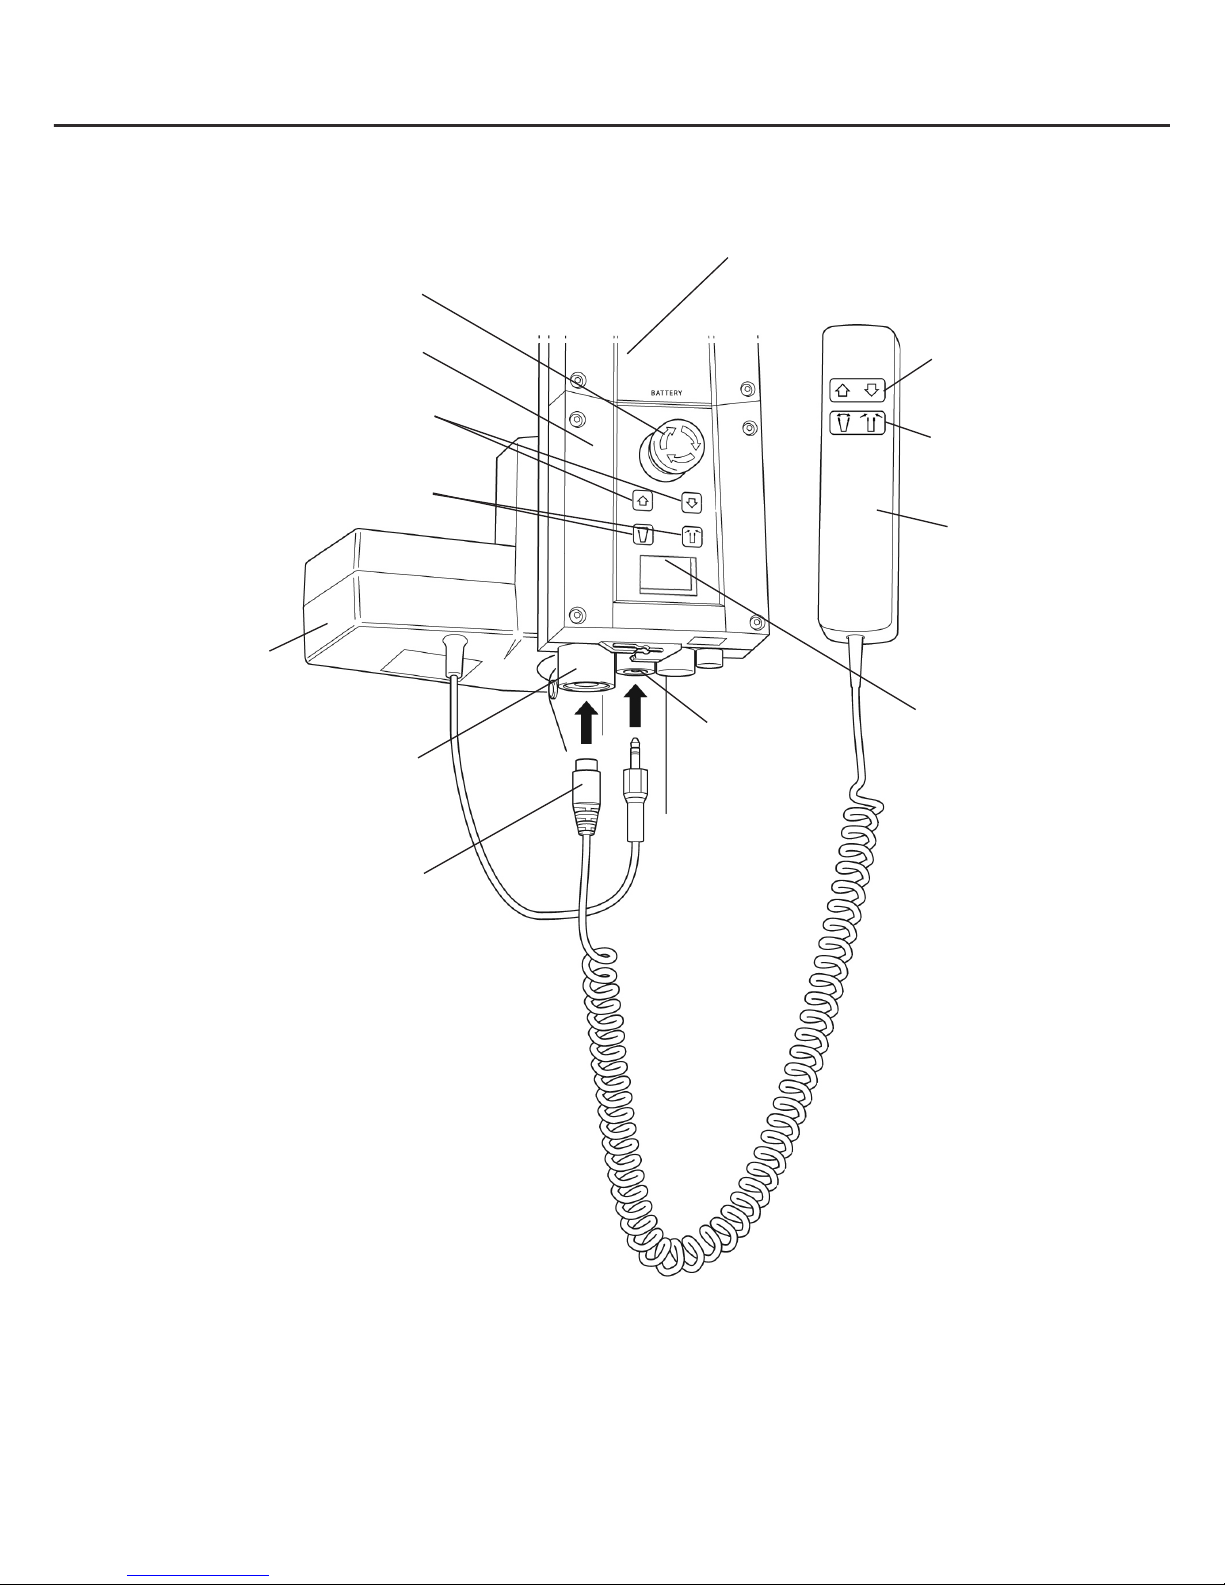
5. Smart Monitor & Handset
Emergency Stop Button
Emergency Raise & Lower
Redundant Controls
LCD
Information
Screen
Handset
Connection
Socket
Actuator
Connection
Socket
Handset
Connection
Plug
Raise & Lower
Buttons
Handset
Actuator
Detachable Battery
Pack
Smart Monitor
Legs Open /
Close Buttons
Legs Open / Close
Redundant Controls

Oxford
®
Stature
12
English
Intended Use
The Oxford Smart Monitor is a control system for Oxford Hoists. The Smart Monitor stores
useful servicing information about the hoist that can be recalled when required. This servicing
information includes:
• Number of patient lift cycles
• Total work done by actuator
• Number of lift overloads (attempted lifts above the safe working load)
• Number of days since last service interval
The Oxford Smart Monitor contains a microprocessor inside making it possible to read out service
data via the on-board LCD screen.
Features
• Data collection in the control box with data display via LCD screen
• Work counter
• Intelligent cycle counter
• Service indicator
• Service interval indicator
• Overload information
• 3 step battery indicator
Benefits
• Improved safety for both patient and carer
• Accurate service data available at the touch of a button
• Optimised product life time
• Ease of maintenance for engineers and service technicians
Oxford
®
Stature
13
English
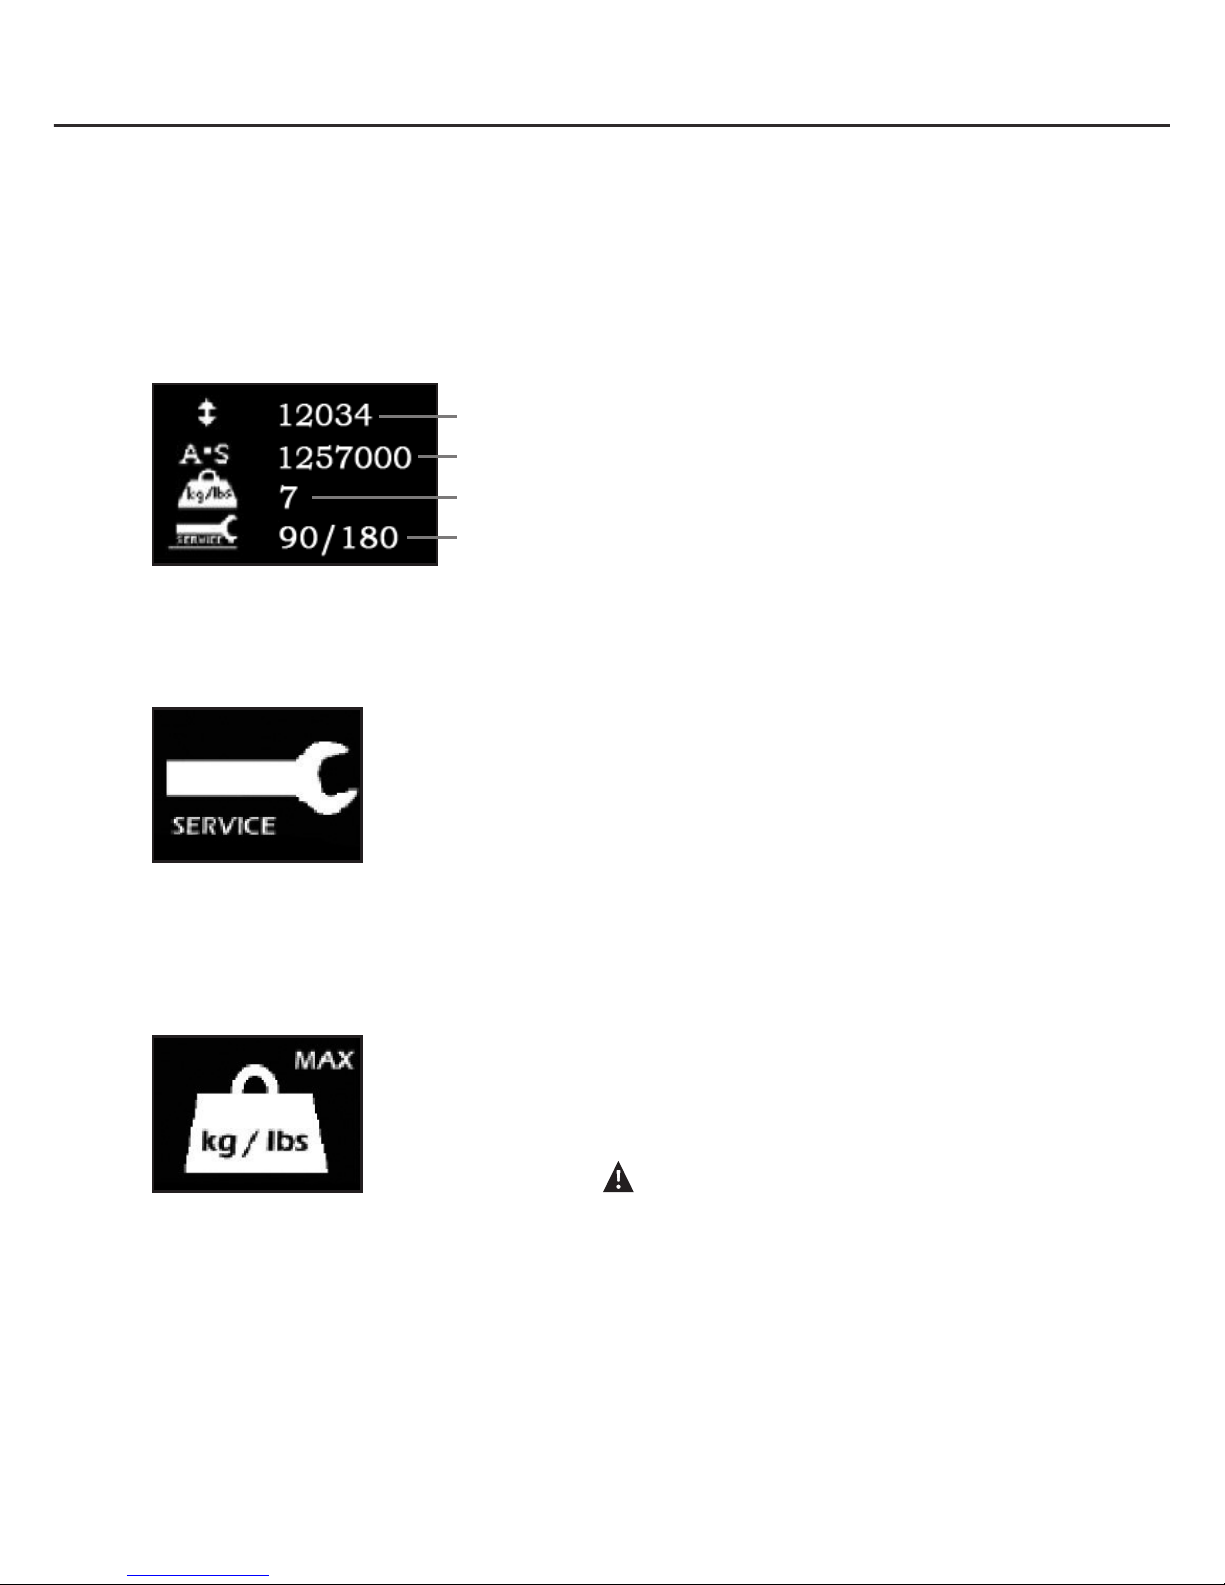
LCD Display Screen
The Oxford Smart Monitor has the option to read out information via the LCD display screen. It is
possible to read out total lifting cycles, total work done, overloads and number of days since last
service, which can be used to quickly and easily evaluate the condition of the lift actuator.
This information is accessed by a ½ second press on the ‘UP’ button on the User handset or
redundant ‘UP’ button on the Smart Monitor.
Service & Usage Information
When it is time for a service, the service symbol will appear on the
display. In addition, when the user handset is activated, the Smart
Monitor will give an audible signal giving notice to users that a service
is required.
The service symbol will be displayed each time the raise or lower keys
are depressed on the User handset. When the service symbol is displayed,
contact your authorised service provider immediately to arrange a service.
You may continue to use your lift for a short period of time until a service
has been carried out.
If the lift stops because of an overload (an attempt to lift more than the
safe working load) the overload symbol will appear on the LCD display
and the lift will cease to operate until the additional load (above the
SWL) has been removed.
WARNING
If the LCD display screen on your Smart Monitor has recorded
an overload, Joerns Healthcare recommend that ALL routine
daily checks are carried out on the lift prior to further use (for a
list of daily checks, please refer to your lift user manual). Joerns
Healthcare also recommend that you contact your authorised
Oxford service provider for additional guidance.
Total Lifting Cycles
Total Work Done (Amps * Seconds)
Number of Overloads
Number of Days (since last service) /
Number of Days (between services)

Oxford
®
Stature
14
English
On-Board Redundant Controls
On-board redundant controls enable the lift to be raised or lowered in
the event of an emergency.
If your lift incorporates powered leg positioning, there are redundant
controls to both open and close the legs.
Battery Information
The display showing full battery means that the battery is fully charged
and the lift is ready for use.
The display showing a half empty battery indicates that it is time to
charge the battery.
The empty battery symbol showing on the display indicates that
the battery has no capacity left and should be placed on charge
immediately.
WARNING
To avoid possible permanent damage to the battery, the battery should be placed on
charge as soon as the display indicates the half empty battery symbol.

Oxford
®
Stature
15
English
6. Operating Instructions
1. Leg adjustment
The legs on the Oxford Stature are electrically adjustable for width. The legs can be opened
to enable access around armchairs or wheelchairs. For transferring and negotiating narrow
doorways and passages the lift legs should be in the closed position.
Electric leg adjustment is achieved by pressing the appropriate buttons on the hand control. The
legs will be locked whenever the hand control switch is released.
2. Castors and Braking
The lift has two braked castors which can be applied for parking. When lifting, the castors
should be left free and un-braked. The lift will then be able to move to the centre of gravity. If
the brakes are applied it is the patient that will swing to the centre of gravity and this may prove
disconcerting and uncomfortable. Attached to the rear castor is a straight line steering device,
which when applied to the castor will facilitate straight line movement.
3. Raising and lowering the boom
The movement of the boom carriage is achieved by a powerful motor gearbox, which is
controlled by a simple hand control unit. The hand control has two buttons with directional
arrows UP and DOWN áâ. The motor gearbox stops automatically at the limit of travel in both
directions. The hand control plugs into a socket at the base of the control box.
SAFETY NOTE: The downward movement of the boom will stop if the lift senses that the patient
has encountered an obstruction.
4. Emergency Stop
The red Emergency Stop Button is located on the front of the control box and is activated by
pressing in. This will cut all power to the lift and only be reset by twisting the button anticlockwise
and releasing.
5. Redundant controls
All Oxford lifts are fitted with raise and lower buttons on the control box. These are located
underneath the emergency stop button and can be used to lower/raise the patient should the
hand control fail.
Oxford
®
Stature
16
English
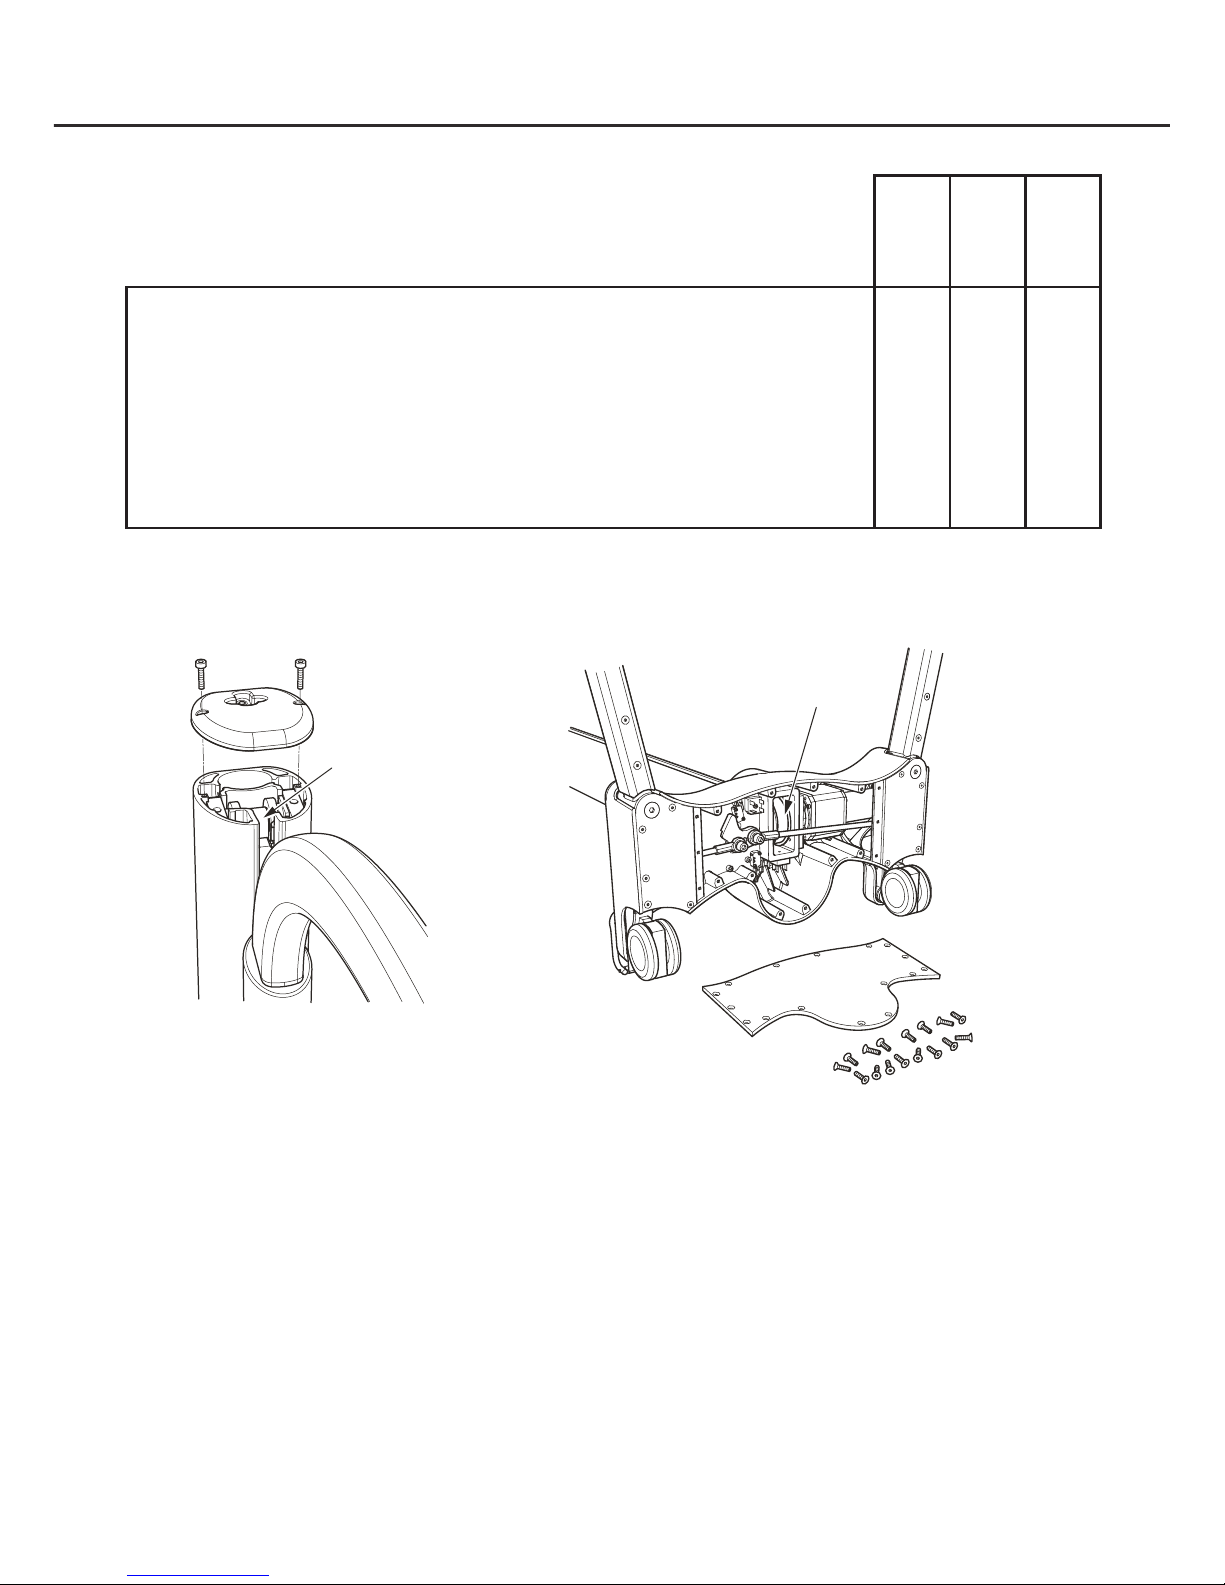
6. Mechanical Emergency Down
In the case of a complete electrical failure the Stature lift is fitted with mechanical lowering device.
This device is located on the left hand side of the lift’s chassis.
The lowering mechanism is operated by inserting a 6mm Hex socket into the aperture and onto
the mechanism turning clockwise to raise the lift and anticlockwise to lower the lift. This can be
done manually with a socket wrench.
RECOMMENDATION:
In order to raise or lower the boom more quickly it is recommended that a 6mm Hex socket be
used in conjunction with a 1/4 inch drive adaptor and an electric reversible drill (NOTE: do not
use hammer setting). This will increase the speed in which the patient can be safely raised and
lowered. A 6mm Hex socket is contained in the top cap located on the top of the mast.
NOTE: Before raising or lowering the patient, ensure you have you have planned your
destination carefully. For instance back onto a chair or bed.
7. Batteries
The batteries are protected from deep discharge by a LOW VOLTAGE ALARM. This will sound
when the batteries need recharging and the hand control is being operated. It will not sound
independently of the hand control being operated. DO NOT IGNORE THIS WARNING ALARM.
Complete the lifting operation and place the battery on charge (see charging instructions).

Oxford
®
Stature
17
English
8. Slings
The Oxford Stature has the option of both a 6 point spreader bar and a 4 point positioning cradle.
Both systems use different attachment methods and slings.
The 6 point system uses slings with webbing loops, which allow positioning adjustment by selecting different coloured loops. The 4 point cradle uses the Secruri3 safety clip system and adjustment is made by rotating the 4 point cradle either upward or down.
Loop strap slings: Oxford Quickfit, Full Back, Quickfit Deluxe, Long Seat, Access and Silkfit.
Safety clip slings: Oxford Comfort
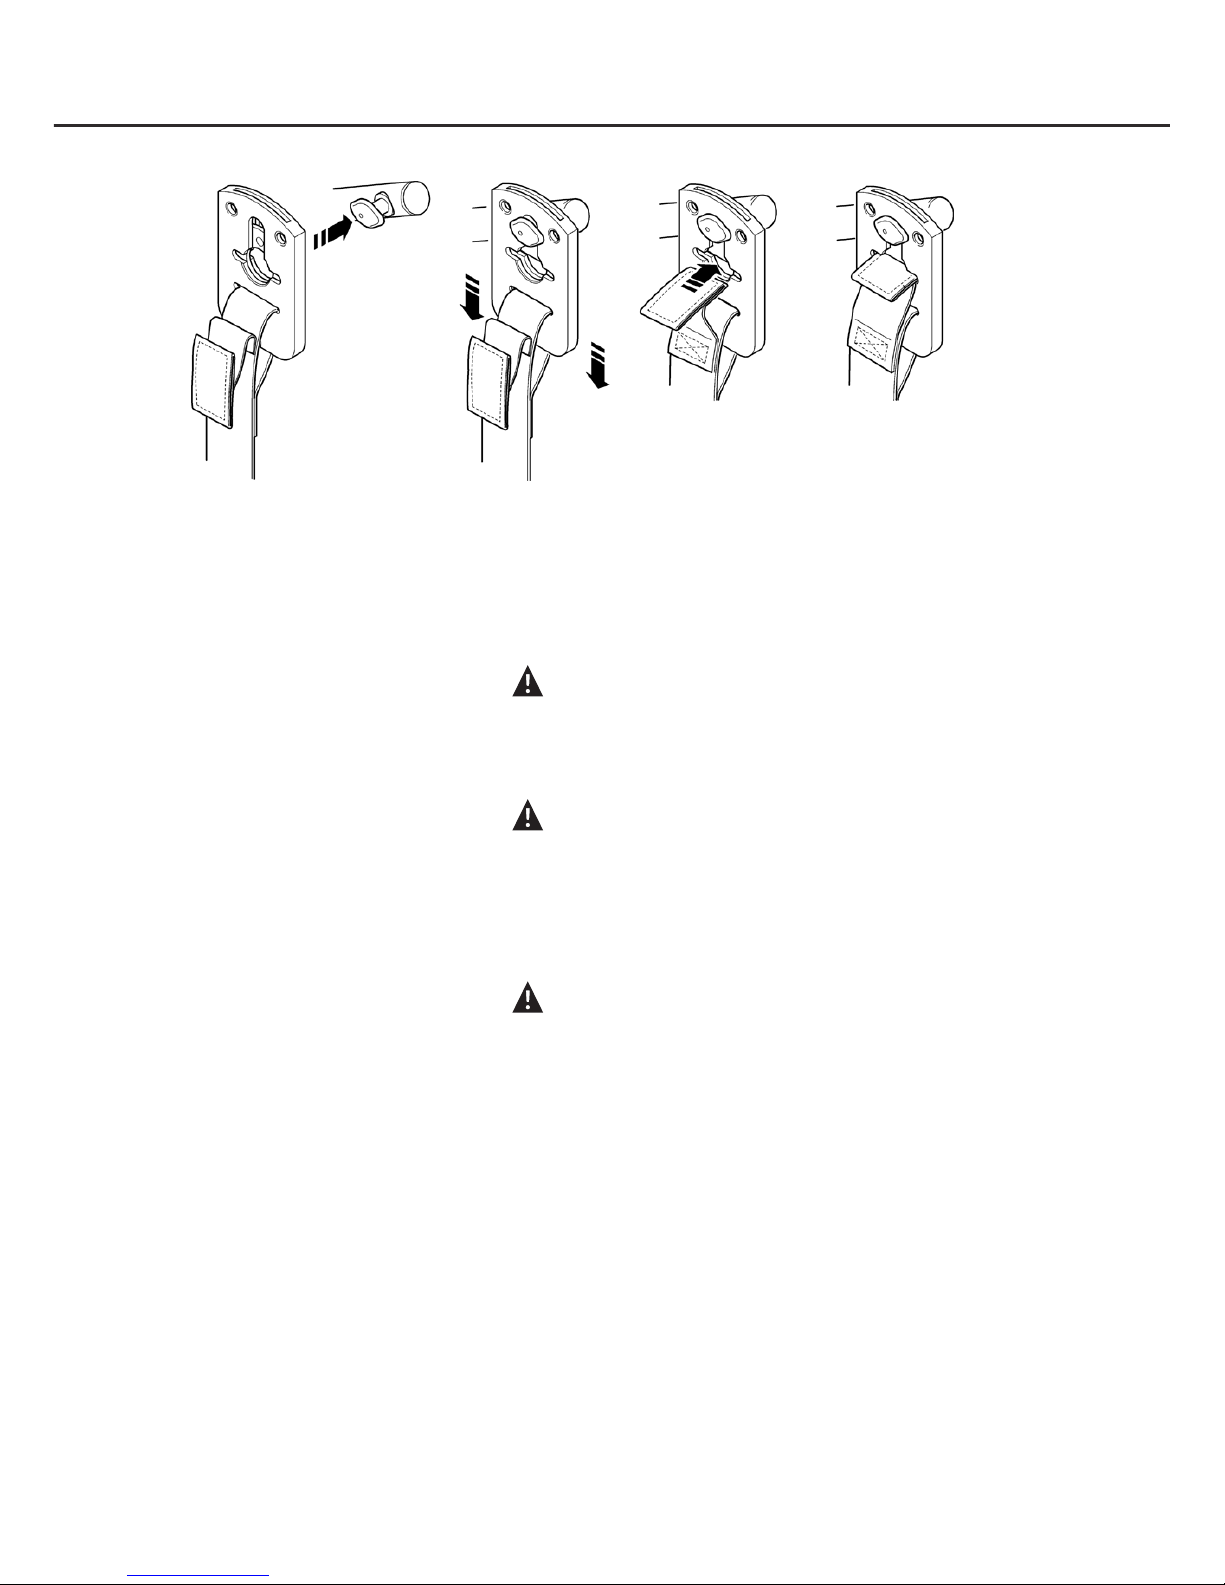
The 6 point system attaches to the spreader bar hooks via loop straps (shown below), each sling
is supplied with instructions. Please study the instruction guide before use.
6 Point spreader bar
Example of 6 point spreader bar sling with loop attachments.
The four point cradle sling attaches to the cradle studs via a safety clip system (shown below),
each sling is supplied with instructions. Please study the instruction guide before use.
4 point positioning cradle
Example of 4 point cradle sling with safety clip system.
Shoulder Straps
Shoulder Strap
Attachment Point
Shoulder Strap
Attachment
Point
Leg
Straps
Leg Strap
Attachment Points
Shoulder Straps
Shoulder Strap
Attachment Point
Leg
Straps
Leg Strap
Attachment Points
Oxford
®
Stature
18
English
Securi3 sling attachment system
Example of installation.
NOTE: For detailed fitting instructions, please refer to the user guide supplied with each sling.
WARNING
Joerns Healthcare recommends that slings be checked regularly and particularly before
use for signs of fraying or damage. DO NOT use slings that are worn or damaged.
WARNING
OXFORD RECOMMENDS THE USE OF GENUINE OXFORD PARTS. Oxford sling and lift
products are designed to be compatible with one another. For country specic guidance
on sling use and compatibility, please refer to the sling label or contact your local market
distributor or Joerns Healthcare.
WARNING
Refer to maximum weight capacity of lift. Sling capacity is limited by the maximum
capacity of the lift.
Oxford
®
Stature
19
English
7. Removal of Spreader Bar/Cradle Systems
FOLLOW THESE INSTRUCTIONS EXACTLY
Your Stature lift has the option of using both a 6 point spreader bar and 4 point positioning
cradle. The removal of either of these systems is completed easily by the use of a quick-release
pin. This is done quickly and easily, but you must read the following safety instructions to ensure
the spreader bar/cradle is safely locked into position before use.
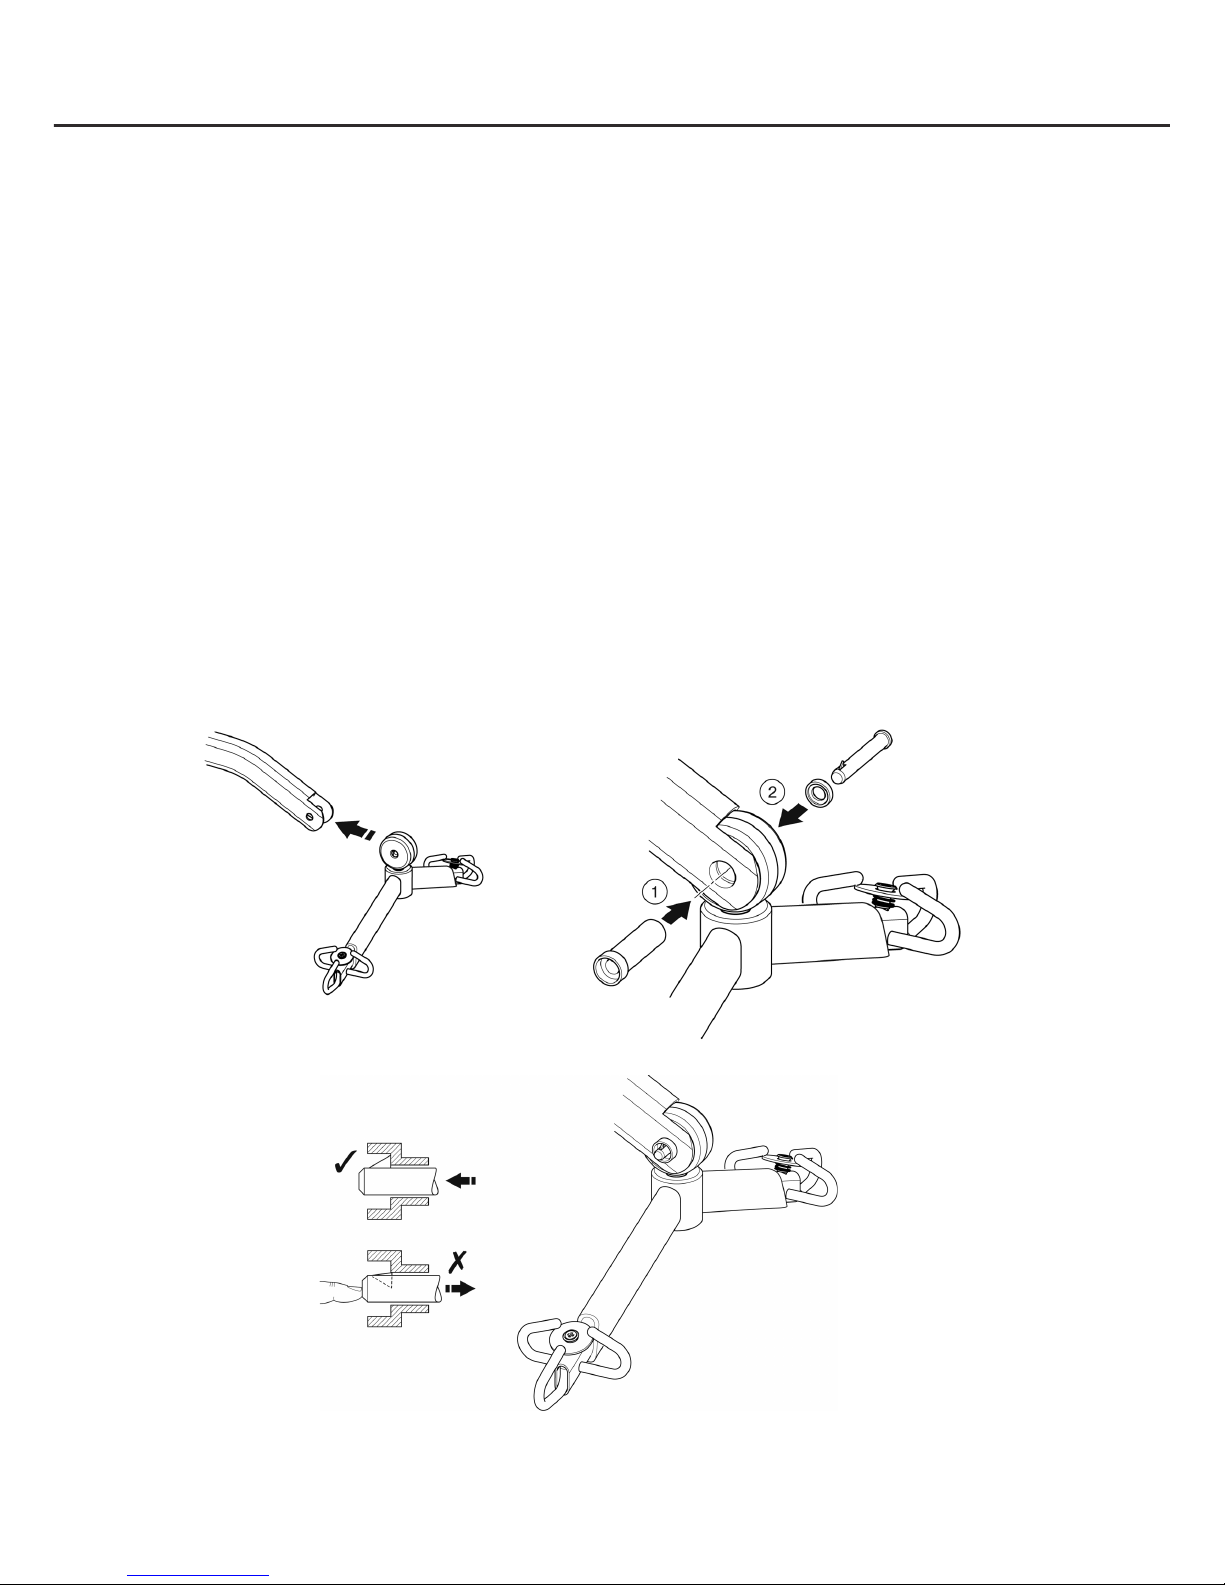
Connection
To connect, raise the spreader bar/cradle up toward the boom slot.
Insert the pin sleeve through the plastic end cap and to support the spreader bar/cradle.
Once aligned in the boom slot reinsert the quick release pin fully into the sleeve until it locks into
position. YOU MUST CHECK THAT THE PIN IS SECURELY FITTED.
To do this, press your finger into the barbed end. If the pin remains stationary the lift is safe to use.
Oxford
®
Stature
20
English
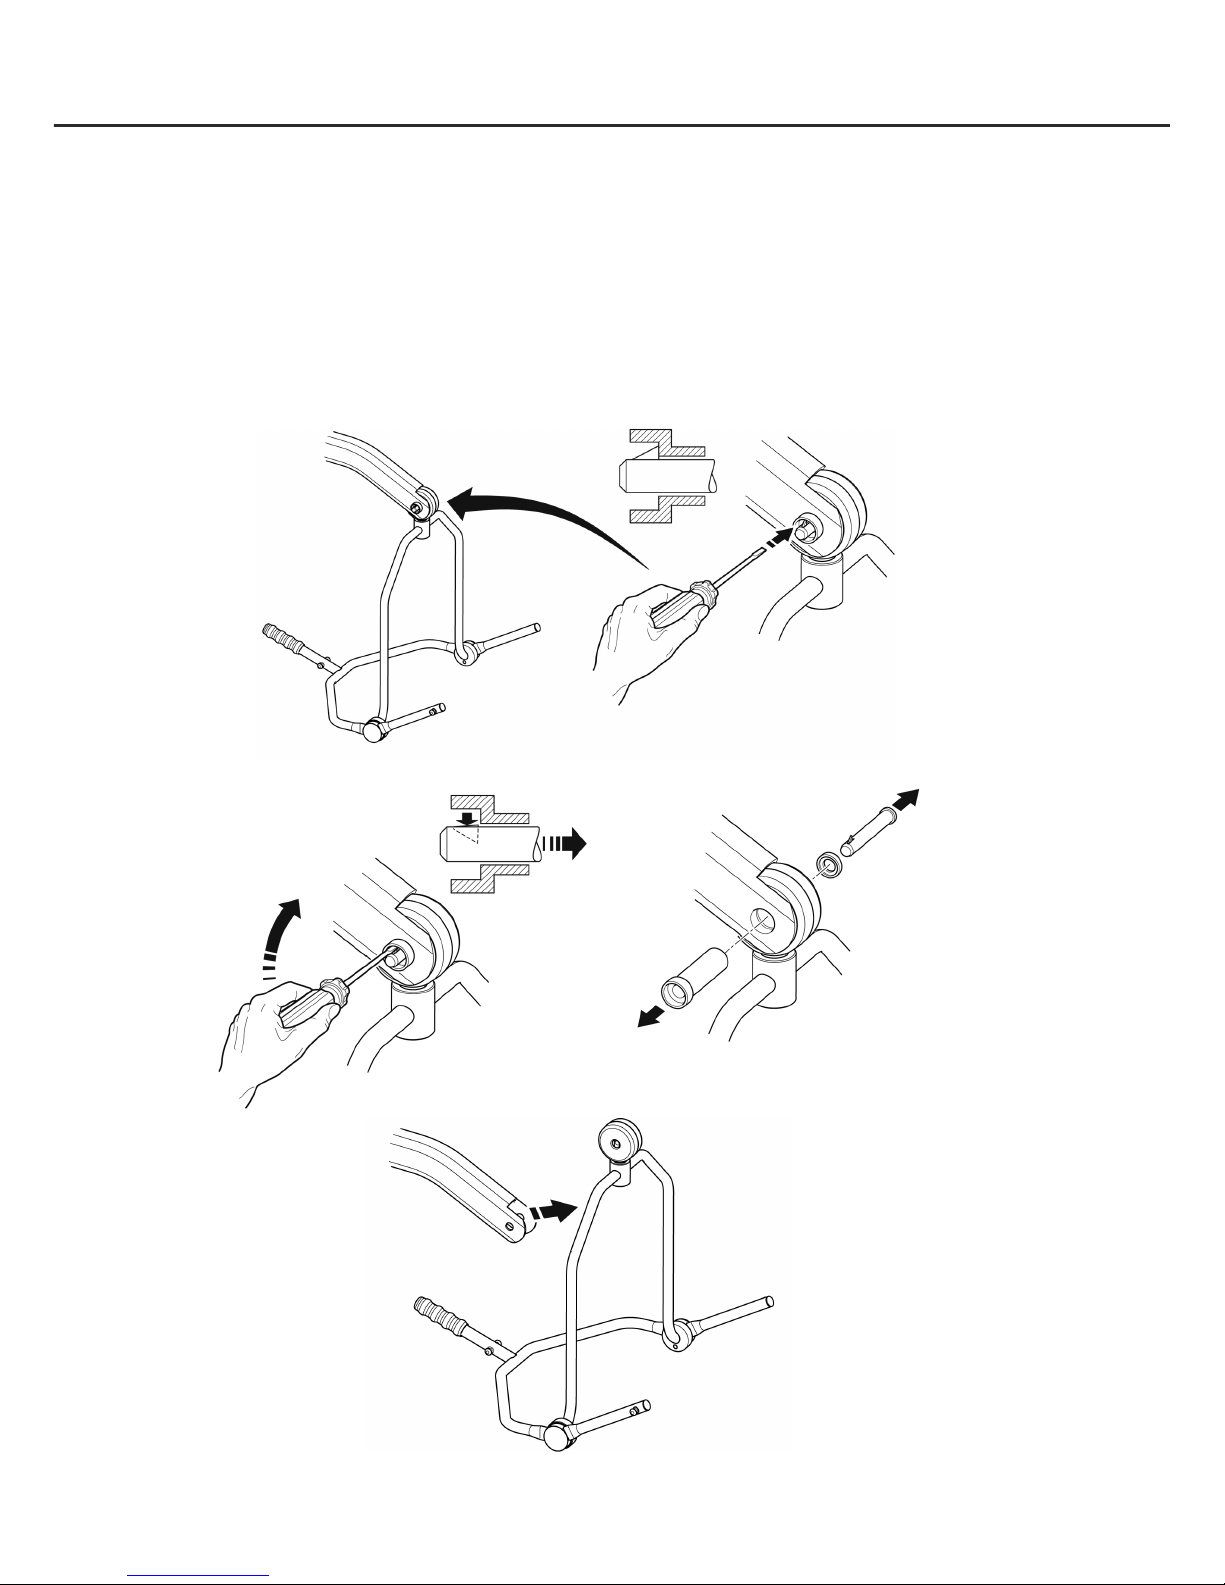
Removal
CAUTION: Be sure to support the weight of the spreader bar/cradle before removing pin.
To detach pin, depress the spring barb (using a flat blade electrical screw driver or similar) and
pull the pin out.
Support the spreader bar/cradle, and then pull the pin sleeve in the opposite direction, removing it
completely from the boom. This will release the spreader bar completely.

Oxford
®
Stature
21
English
8. Charging Instructions
When the power pack needs charging it is removed from the lift and fitted to an off board charging unit.
Joerns Healthcare recommend an additional battery pack is purchased, so that one pack can be
on charge at all times.
1. Remove the power pack from the lift. The pack is retained by a simple latch at the top of the
power pack. Lift the latch and the power pack will be released.
2. Fit the power pack to the charging unit. The location and latching of the power pack to the
charger is the same system as used on the lift.
3. Plug the charger mains plug into a suitable mains outlet and switch the mains supply ON.
4. Charging is automatic and will fully charge the batteries over a period of four (4) hours.
Note: Even if the charger is left plugged in for extended periods it will not allow the batteries
to overcharge.
a) Green Light - Indicates main power is on.
b) Yellow Light - Indicates battery is charging.
c) Battery will be fully charged when yellow light goes off.
Note: It is recommended that the battery be charged immediately upon receipt.
5. To return the lift to service, switch OFF the mains supply and remove the power pack from
the charger. Fit the power pack to the lift and make sure the latch holding the pack in place is
fully engaged. “Click” in place. The charging of Oxford electric lifts is simple and straightforward,
but it is important to follow the charging instructions closely. Please pay particular attention to
the following points, they will help you avoid problems with discharged batteries.
WARNING
• The battery, charger, hand control and control box are NOT to be opened by unauthorised
personnel. (Contact your distributor for warranty and repairs).
• DO NOT touch battery/charger terminals.
• KEEP the batteries fully charged. Place the battery on charge whenever it is not in use.
If it is more convenient to do so, place on charge every night. The charger will not allow
the batteries to overcharge.
• NEVER run the batteries completely flat. As soon as the audible warning sounds,
complete the lifting operation in hand and place on charge.
• To avoid possible permanent damage to the battery, the battery should be placed on
charge as soon as the display indicates the half empty battery symbol.
• NEVER store the battery for long periods without regular charging throughout the storage
period.
• ALWAYS make sure the mains power to the charger is switched off before connecting or
disconnecting the battery pack.
• NEVER leave the battery pack connected with the charger mains power switched off.
• DO NOT leave the charger switched on with the battery disconnected.

Oxford
®
Stature
22
English
• DO NOT use the lift while charging is taking place.
• CHECK the lift is not charging before moving as the electrical connection may be
damaged.
• NEVER disconnect the charger plug by pulling on the cable.
• BE CAREFUL not to trip over the charge lead.
• DO NOT charge an electric lift in a bathroom or shower room.

Oxford
®
Stature
23
English
9. Maintenance Schedule & Daily Check List
All Oxford products are designed for minimum maintenance, however some safety checks and
procedures are required. A schedule of DAILY tasks is detailed below. Daily checks and a six
monthly service, inspection and test will ensure a lift is kept in optimum safe working condition.
A list of spare parts is available upon request.
The LOAD TEST and certification should only be carried out by qualified personnel or an
authorised service agent / dealer.
DAILY CHECK LIST: Joerns Healthcare strongly recommends the following checks be carried
out on a daily basis and before using lift.
• MAKE sure the lift moves freely on its castors.
• MAKE sure the spreader bar is free to rotate and swing
• EXAMINE the spreader bar/cradle is firmly attached to the boom.
• EXAMINE the sling hooks/clips on the spreader bar/cradle and side suspenders for
excessive wear.
• MAKE sure the legs open and close correctly.
• OPERATE the hand control to confirm the boom raises and lowers satisfactorily.
• ON electric powered lifts check the operation of the emergency stop button.
• EXAMINE slings for fraying or other damage. DO NOT use any sling if damaged or if the
sling shows signs of wear.
• CONFIRM the lift is not giving a low battery alarm when the hand control is operated. If the
alarm sounds, DO NOT use, and place on charge immediately.
• CHECK fasteners for tightness and wear.
Maintenance, Inspection and Test
Joerns Healthcare recommend a thorough inspection and test of the Oxford Stature lift and
lifting accessories, slings, scales etc is carried out on a regular basis. Inspection frequency
varies depending on locality, so you must check with your dealer or local government agency
as appropriate regarding how often an inspection is required. The examination and test should
be conducted according to the recommendations and procedures provided in this manual.
Joerns Healthcare recommends maintenance, inspection and certified testing is carried out by
authorised service agent / dealers only.
NOTE: These recommendations are in compliance with the requirements of 1998 No2307 Health
and Safety: The Lifting Operations and Lifting Equipment Regulations 1998. This is a UK
regulation. Outside the UK please check your local country requirement.

Oxford
®
Stature
24
English
*THESE CHECKS SHOULD INCLUDE:
Initially
Before
Use
Service
Intervals
1. SPREADER BAR: Check the spreader bar for freedom of rotation and
swing. Check for wear on the central pivot. Check for firm attachment to
the boom.
ü ü ü
2. BOOM: Check the attachment of the boom to the mast carriage. Make
sure there is only minimal movement.
ü ü ü
3. MAST: Check it is firmly connected to the chassis.
ü ü ü
4. MOTOR GEARBOX: This should require no maintenance other than
checking for correct operation and listening for unusual noise.
ü
5. SMART MONITOR: Check the function of the emergency stop button.
Inspect the hand control socket for correct fitting. Check functioning of
the hand control. Check the redundant controls and confirm they operate as
intended.
ü ü ü
6. BATTERIES: The batteries are housed in the power pack and should not
require maintenance other than the regular charging as detailed in the
charging instructions. Check that the connections remain clean. Confirm
the battery bracket is secure and undamaged.
ü
7. LEG ADJUSTMENT: Check that the legs operate in both full extensions
(inward/outward).
ü ü ü
8. CASTORS: Check all castors for firm attachment to the legs. Check for
free rotation of the castor and the wheels.
ü ü ü
9. CLEANING: Wipe down with a clean cloth, using soap and water and/
or any hard surface disinfectant. Harsh chemical cleaners or abrasives
should be avoided as these may damage the surface finish of the lift.
Avoid excessive wetting, especially electrical areas and the opening
to the base of the hoist. We recommend that the cloth is soaked in the
solution, squeeze out excess fluid and wipe hoist surface.
ü ü
10. LOAD TEST: The load test should be carried out in accordance with the
manufacturer’s test procedures (see Service Manual). It is strongly
recommended the testing is carried out by an authorised service dealer.
ü
11. BASE AND WHEELS: Ensure base is even and level (all four wheels are
on the floor).
ü ü ü
12. SLINGS: Check for wear and fraying.
ü ü ü
13. LUBRICATION: Oil pivot joints, including mast and boom connections,
pedal assembly, spreader bar joint (only if required).
ü
14. HAND SET: Ensure plugged fully into controller.
ü ü
15.
FIXINGS: Check all nuts, bolts, screws and fasteners for excessive wear
and for tightness. Replace as required.
ü
16. QUICK RELEASE PIN: Ensure the pin is securely fitted before lifting, by
pressing the barbed end.
ü ü
Oxford
®
Stature
25
English
*THESE CHECKS SHOULD INCLUDE:
Check
Lift Strap
Check
Lift Strap
Initially
Before
Use
Service
Intervals
17. LIFTING STRAP: Your lift strap should be checked at service intervals
for any sign of wear (ideally every six months). In order to view the
strap it is recommended to remove the cap at the top of the mast, cycle
the lift in both directions whilst observing the condition of the strap. If
you see any wear (fraying, creasing or similar) it is recommended an
authorised, Joerns Healthcare Dealer or qualified, competent service
engineer replaces the strap IMMEDIATELY. For details regarding strap
maintenance and replacement please request our detailed service guide.
(See below for details)
ü ü

Oxford
®
Stature
26
English
10. Technical Specifications
Safe Working Load ...............................................................................500 lbs ..................227 kgs
Maximum Overall Length ...............................................................54.7 inches ............... 1390 mm
Minimum Overall Length ................................................................50.8 inches ............... 1290 mm
Maximum Overall Height ................................................................ 83.8 inches ............... 2130 mm
Minimum Overall Height ................................................................. 76.6 inches ............... 1945 mm
Height at Maximum Reach ............................................................. 77.8 inches ............... 1975 mm
Reach at Maximum Height ............................................................. 24.6 inches ................. 625 mm
Reach at Minimum Height .............................................................. 24.6 inches ................. 625 mm
Maximum Reach* ........................................................................... 24.6 inches ................. 625 mm
Turning Radius ...............................................................................61.0 inches ............... 1550 mm
Legs Open - External Width .......................................................... 53.5 inches ............... 1360 mm
Legs Open - Internal Width ............................................................48.4 inches ............... 1230 mm
Legs Closed - External Width .......................................................29.9 inches ................. 760 mm
Legs Closed - Internal Width ......................................................... 25.1 inches ................. 640 mm
Overall Height of Legs ...................................................................... 4.3 inches ..................110 mm
Ground Clearance ............................................................................ 1.2 inches ................... 30 mm
Front Twin Castors ..............................................................................4 inches ................. 100 mm
Rear Braked Castors ........................................................................... 4 inches ................. 100 mm
* Reach = centre of spreader bar to the front of the mast
4 Point Position Cradle (measurement to top of location pins)
NOTE: 4 point positioning cradle is standard fitment with the Stature lift.
Cradle Max. Height............................................................................61 inches ............... 1550 mm
Cradle Min. Height (usable) ...........................................................15.4 inches ................. 390 mm
6 Point Spreader Bar (measurement to top of location pins)
NOTE: 6 point positioning cradle is optional for the Stature lift.
Spreader Bar Max. Height .............................................................. 77.7 inches ............... 1975 mm
Spreader Bar Min. Height (usable).................................................26.6 inches ................. 675 mm
Weights
Mast, Base & Boom Assembly ..............................................................142 lbs ................. 64.5 kgs
4 point positioning cradle .....................................................................13.2 lbs ...................... 6 kgs
Power Pack ............................................................................................6.6 lbs ......................3 kgs
Total ......................................................................................................162 lbs ................. 73.5 kgs
NOTE: Manufacturing tolerances apply to all dimensions.

Oxford
®
Stature
27
English
ELECTRICAL SPECIFICATIONS:
BATTERIES.....................................................24 volt Rechargeable sealed lead acid type
BATTERY CAPACITY ..................................... 3.2 Ampere hours
CHARGER RATED INPUT .............................100 - 240 V AC/ 50/60 Hz
CHARGER RATED OUTPUT .........................29.5 VDC, Max. 19 W
ELECTRIC SHOCK PROTECTION
CHARGER .......................................................CLASS II (EN 60601-1)
LIFT .................................................................INTERNAL POWER SOURCE
DEGREE OF SHOCK PROTECTION
CHARGER .......................................................TYPE B (EN 60601-1)
LIFT .................................................................TYPE B (EN 60601-1)
ENVIRONMENTAL CONDITIONS:
Outside this environment functionality and safety may be compromised.
OPERATING:
TEMPERATURE ............................................5°C to 40°C
RELATIVE HUMIDITY ..................................... 20% to 90% @ 30°C - not condensing
ATMOSPHERIC PRESSURE .........................700 to 1060 hPa
STORAGE:
TEMPERATURE ........................................... .-10°C to +50°C
RELATIVE HUMIDITY ..................................... 20% to 90% @ 30°C - not condensing
ATMOSPHERIC PRESSURE .........................700 to 1060 hPa
IP RATINGS
CONTROL BOX .............................................IPX4
ACTUATOR ....................................................IPX4
OFF BOARD CHARGER ...............................IPX5
BATTERY ....................................................... IPX5
HANDSET ......................................................IPX5
DUTY CYCLES
ACTUATOR ..................................................... 10% (2 min./18 min.)
CHARGER .....................................................Approx. 4 hrs.
ACOUSTICS
A-Weighted sound power level ......................60 dB (A)
Oxford
®
Stature
28
English
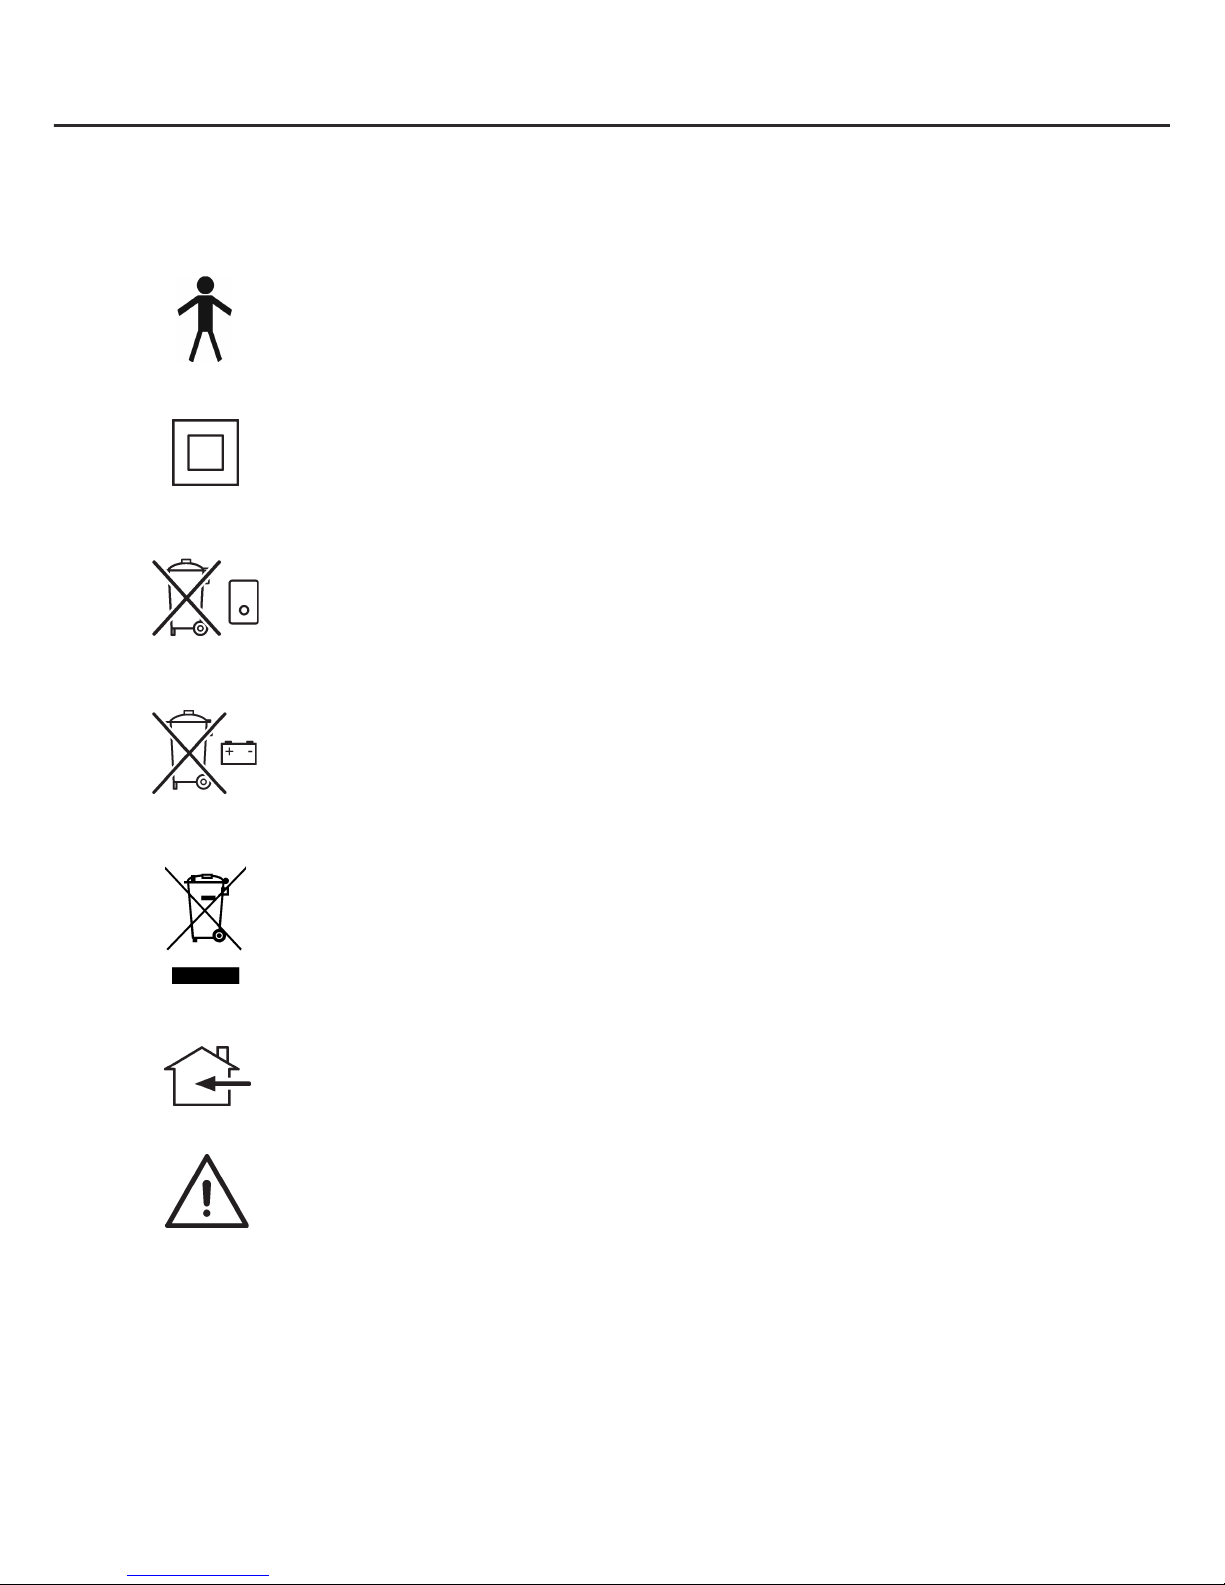
KEY SYMBOLS:
The following symbols are used on the charger, control unit and battery:
Type B equipment, as per EN 60601-1
Class 2 equipment
The disposal of the charging and control unit should not be mixed with general
household waste
The disposal of batteries should not be mixed with general household waste.
The disposal of electronics should not be mixed with general household waste
For indoor use
ATTENTION, consult accompanying documents.
WEEE Producers registration number WEE/GG0464RZ

Oxford
®
Stature
29
English
11. Warranty
Joerns Healthcare has an established network of authorised distributors and service agents who
will be pleased to handle all of your purchasing, warranty, repair and maintenance enquiries. It
is recommended that our products are commissioned by your authorised distributor or service
agent.
The distributor or service agent operates the warranty programme, so it is important to keep
a record of their name, address and telephone number so they can be contacted should any
problem arise. If you are in any doubt as to where your lift was purchased, Joerns Healthcare
can trace the supplier if you quote the serial number of the lift.
All warranty claims are subject to the correct use and maintenance in accordance with the user
instruction manual provided with each lift. Damage caused by use in unsuitable environmental
conditions or failure to maintain the product in accordance with user and service instructions is
not covered. Your statutory rights remain unaffected.
REMEMBER: Contact your authorised distributor or service agent for purchases, repairs,
servicing and certified maintenance.
Your distributor:

Francais
Oxford
®
Stature
30
Table des matières
1. Lève-personne Oxford Stature .............................................................................. 31
2. Introduction: À propos de votre lève-personne ..................................................... 32
3. Instructions de montage et de mise en service..................................................... 33
4. Consignes de sécurité ........................................................................................... 37
5. Moniteur Smart de commande manuelle .............................................................. 39
6. Instructions de fonctionnement ............................................................................. 43
7. Dépose des systèmes de barres d’écartement à 6 points
et de berceaux à 4 points ...................................................................................... 47
8. Instructions de charge ........................................................................................... 49
9. Périodicité d’entretien et liste des vérifications quotidiennes ................................ 51
10. Spécifications techniques ...................................................................................... 54
11. Garantie ................................................................................................................. 57

Francais
Oxford
®
Stature
31
1. Lève-Personne Oxford Stature
LISEZ ET COMPRENEZ LES INSTRUCTIONS FIGURANT DANS CE MANUEL
AVANT D’UTILISER LE STATURE
Flèche
Barre d’écartement
Boîtier de renvoi
du moteur
Partie extrudée du mât
Roulette arrière
(avec frein enclenché)
Poignée de
manœuvre
Pédale
Dispositif de
direction en ligne
droite
Bloc de commande
de la batterie
Rouletter avant
(sans frein enclenché)

Francais
Oxford
®
Stature
32
2. Introduction: À propos de votre lève-personne
Chaque lève-personne Stature est entièrement monté, soumis à un essai de charge et certifié
avant d’être emballé / expédié.
L’emballage se compose d’une boîte en carton robuste construite spécialement pour les
expéditions domestiques et les exportations et garantissant l’arrivée de l’appareil intact à
destination.
L’emballage de chaque lève-personne comprend une pochette contenant un certain nombre
de documents qui doivent être conservés en lieu sûr au cas où ils devraient être consultés
ultérieurement.
• MANUEL D’UTILISATION • CARTE DE GARANTIE DU REVENDEUR (Europe uniquement)
• CERTIFICAT D’ESSAI • CARTE DE SATISFACTION (Europe uniquement)
• LISTE DE VÉRIFICATIONS D’EMBALLAGE
Le CERTIFICAT D’ESSAI est un document important qui doit être conservé dans votre dossier
assurance. Il est valide pendant six mois et, après son expiration, le lève-personne doit être
inspecté et entretenu par un ingénieur autorisé compétent selon le calendrier d’entretien
Marque CE :
Declaración de uso al que está destinado
El uso previsto para este dispositivo es la elevación y transferencia seguras de un individuo
de una superficie de descanso a otra (como de una cama a una silla de ruedas, por ejemplo).
Joerns Healthcare recomienda que la transferencia de pacientes se lleve a cabo posteriormente
a una evaluación de riesgos, y de manera segura, en una breve distancia solamente.
L’Oxford Stature est un lève-personne électrique, conçu pour soutenir et promouvoir la sécurité de
la manipulation et du transport du patient pour le personnel soignant et le patient lui-même.
L’appareil Oxford Stature convient aux patients ASSIS, ASSIS / ALLONGÉS ET ALLONGÉS.
Les sangles convenant pour l'utilisation de ce dispositif sont énumérés ci-dessous:
• Oxford Quickfit • Oxford Access
• Oxford Full Back • Oxford Comfort
• Oxford Quickfit Deluxe • Oxford Silkfit
• Oxford Long Seat
Durée de vie prévue
Les lève-personnes Oxford Professional sont conçus et testés pour une durée de vie minimum de dix
(10) ans, si les consignes d’utilisation et d’entretien énoncées dans le présent manuel sont respectées.
Toute utilisation non conforme aux consignes peut compromettre la durée de vie du matériel.
L’appareil Oxford Stature porte la marque CE et il est conforme
aux directives CE suivantes:
• Medical Device Directive (appareils médicaux) (93/42/EEC)
• Directive EMC (89/336/EEC)
• Directice relative aux basses tensions (73/23/EEC)

Francais
Oxford
®
Stature
33
3. Instructions de montage et de mise en service
Contenu de la boîte
Placez la boîte sur une surface bien dégagée et ouvrez-la avec précaution. Elle contient:
• LÈVE-PERSONNE OXFORD STATURE
• UNE POCHETTE CONTENANT DES DOCUMENTS
• UNE COMMANDE MANUELLE
• BLOC BATTERIE
• CHARGEUR / SUPPORT / FIL POUR BUREAU
• KIT DE FIXATION (COMPREND LES VIS, UNE CLÉ HEXAGONALE, UNE DOUILLE
HEAGONALE, UNE PLAQUE DE COUVERTURE)
AVERTISSEMENT
L’appareil Oxford Stature est lourd et doit être soulevé avec précaution. Vous aurez
éventuellement besoin d’aide pour soulever l’appareil Oxford Stature et le sortir de sa boîte.
Montage
Retirez toutes les pièces de la boîte et placez-les par terre, en prenant soin de protéger le fini.
1. Placez le châssis et le mât (qui sont connectés) dans un espace dégagé. Le mât et le châssis
doivent reposer sur la poignée de manœuvre, ce qui garantit que l’appareil restera stable
pendant le raccordement des pieds et de la flèche à l’appareil.

Francais
Oxford
®
Stature
34
2. Adaptez les pieds au châssis à l’aide de deux vis à têtes fraisées plates de 6 mm par pied,
comme fourni.
REMARQUE: les pieds gauche et droit sont différents et sont configurés comme indiqué ci-dessous.
3. Serrez les vis de 6 mm se trouvant de chaque côté du châssis à l’aide de la clé hexagonale
fournie.
AVERTISSEMENT
Les vis doivent être fermement serrées.
4. Introduisez la partie courbée de la flèche dans le support de celle-ci. Fixez l’ensemble en
insérant les deux vis à têtes fraisées plates de 6 mm dans la plaque de couverture bleue fournie
avec le kit de fixation, comme indiqué ci-dessous, et serrez fermement.

Francais
Oxford
®
Stature
35
5. Fixez le berceau de positionnement à quatre points sur la flèche de relevage en insérant la
goupille fendue. Assurez-vous que la goupille est bien en place.
2
1
6. Relevez le Stature en position verticale et serrez les freins.
AVERTISSEMENT
Faites attention lors du relevage du Stature en position verticale, car il est lourd.
Adaptez la prise de la poignée de commande dans la partie inférieure du boîtier de commande
qui se trouve sur le mât, assurez-vous de l’alignement correct avec la douille de la prise. Adaptez
le bloc d’alimentation sur le lève-personne ; assurez-vous que le verrou maintenant le bloc en
place est complètement enclenché, et qu’il a émis un « Clic ».
Démontage
Le lève-personne ne doit pas être démonte sauf pour entretien, réparation ou transport si nécessaire. Si un démontage s’impose, suivez les instructions de montage dans l’ordre inverse.

Francais
Oxford
®
Stature
36
EFFECTUEZ TOUJOURS LES VÉRIFICATIONS SUIVANTES AVANT D’UTILISER
L’APPAREIL:
• Appuyez sur les boutons d’ouverture et de fermeture sur la commande manuelle afin de
confirmer l’ouverture et la fermeture satisfaisantes des pieds du lève-personne.
• Le bouton rouge d’arrêt d’urgence situé à l’arrière du boîtier de commande, est en position OFF
(arrêt).
• Appuyez sur les boutons « up » (vers le haut) et « down » (vers le bas) de la commande manu-
elle pour confirmer que la flèche se lève et s’abaisse correctement.

Francais
Oxford
®
Stature
37
4. Consignes de sécurité
Veuillez lire et suivre les consignes de sécurité ci-dessous. Si vous suivez ces quelques consignes
de sécurité fondamentales, vous serez en mesure d’utiliser ce lève-personne facilement et sans
problème.
AVERTISSEMENT
• Vérifiez TOUJOURS que la charge maximale d’utilisation du lève-personne est
compatible avec le poids du patient.
• NE DÉPASSEZ PAS la charge maximale du lève-personne, car un dispositif de limitation
de courant électrique s’activerait et empêcherait l’utilisation du lève-personne.
• Planifiez TOUJOURS vos opérations de levage avant de commencer.
• Effectuez TOUJOURS les étapes de la LISTE DES VÉRIFICATIONS QUOTIDIENNES avant
d’utiliser le lève-personne.
• Familiarisez-vous TOUJOURS avec les commandes de fonctionnement et les dispositifs
de sécurité d’un lève-personne avant de soulever un patient.
• N’UTILISEZ PAS de courroie, à moins que cela ne soit recommandé.
• Vérifiez TOUJOURS que la courroie convient au patient et qu’elle est de taille et de
capacité appropriées.
• N’utilisez JAMAIS une courroie effilochée ou montrant des signes de détérioration.
• Ajustez TOUJOURS la courroie suivant les instructions fournies (consignes d’utilisation).
• Assurez-vous TOUJOURS que les sangles NE s’enroulent PAS autour des pieds du lève-
personne.
• Effectuez TOUJOURS le levage en fonction des instructions du manuel d’utilisation.
• Ne débranchez ni n’ignorez JAMAIS une commande ou un dispositif de sécurité sous
prétexte que cela facilite l’utilisation du lève-personne.
• NE soulevez PAS un patient si les freins des roulettes sont enclenchés. Laissez toujours
le lève-personne trouver le centre de gravité correct.
• N’essayez PAS de manœuvrer le lève-personne en poussant le mât, la flèche
ou le patient.
• Manœuvrez TOUJOURS le lève-personne avec la poignée qui se trouve sur le mât. Une
pédale est également prévue sur la base du lève-personne.

Francais
Oxford
®
Stature
38
• Amenez TOUJOURS le patient à la position la plus basse et la plus confortable avant un
transfert.
• NE poussez PAS un lève-personne chargé à des vitesses dépassant une allure de
marche lente (3 kilomètres / heure, soit 0.8 mètres / seconde).
• NE poussez PAS le lève-personne sur un terrain accidenté particulièrement s’il est chargé.
• N’essayez PAS de pousser / tirer un lève-personne chargé pour surmonter un
obstacle au sol.
• NE forcez JAMAIS une commande de fonctionnement / de sécurité. Toutes les
commandes sont faciles à utiliser et ne nécessitent pas une force excessive.
• NE rangez JAMAIS un lève-personne chargé sur UNE surface inclinée.
• N’utilisez PAS les lève-personnes électriques dans la douche.
• NE chargez PAS un lève-personne électrique dans une salle de bains ou une salle de
douche.
• NE soulevez PAS un patient si vous n’en avez ni l’expérience ni la compétence.
• VOTRE lève-personne est prévu pour soulever des patients. NE l’utilisez PAS,
et n’autorisez personne à s’en servir à d’autres fins.
• NE forcez PAS le lève-personne à descendre des marches, qu’il soit chargé ou non.
• N’essayez PAS de déplacer un lève-personne chargé sur une pente de plus de 1:12 (envi-
ron 5 degrés).
• N’essayez PAS de monter ou de descendre une côte sans une autre personne à vos côtés.
• N’utilisez PAS le lève-personne dans un endroit mouillé ou corrosif, tel que les abords
d’une piscine.
• N’UTILISEZ PAS l’appareil sur une moquette épaisse lorsque le lève-personne est
complètement chargé.
• N’UTILISEZ JAMAIS le lève-personne si des pièces/fixations sont desserrées ou man-
quantes.

Francais
Oxford
®
Stature
39
5. Moniteur Smart et commande manuelle
Bouton d’arrêt d’urgence
Boutons de secours d’élévation
et d’abaissement d’urgence
Écran d'information
LCD
Prise de raccordement de
la commande manuelle
Prise de
raccordement
du vérin
Fiche de raccordement de
la commande manuelle
Boutons d’ouverture/
fermeture des jambes
Commande
manuelle
Vérin
Batterie détachable
Moniteur Smart
Boutons
d’élévation et
d’abaissement
Ouverture/fermeture des jambes
Commandes de secours

Francais
Oxford
®
Stature
40
Utilisation prévue
Le moniteur Oxford Smart est un système de commande prévu pour les lève-personnes Oxford
Mobile. Le moniteur Smart enregistre de précieuses données de service relatives à l’utilisation du
lève-personne, lesquelles peuvent être consultées à tout moment, notamment:
• Nombre de cycles de levage des patients
• Charge de travail totale réalisée par le vérin
• Nombre de levages effectués en surcharge (tentatives de levage avec une charge supérieure
à la charge maximale autorisée)
• Nombre de jours écoulés depuis le dernier entretien
Le moniteur Oxford Smart contient un microprocesseur qui permet de lire les données de service
sur l’écran d’affichage LCD embarqué.
Caractéristiques
• Collecte des données dans la boîte de commande et affichage des données sur l’écran LCD
• Compteur d’opérations
• Compteur de cycles intelligent
• Indicateur d’entretien
• Indicateur d’intervalle entre 2 entretiens
• Informations sur l’utilisation en surcharge
• Indicateur de batterie à 3 témoins
Avantages
• Sécurité renforcée pour le patient et l’assistant
• Données de service précises sur simple activation d’un bouton
• Durée de vie prolongée du produit
• Simplicité d’entretien pour les ingénieurs et les techniciens

Francais
Oxford
®
Stature
41
Écran d’affichage LCD
Le moniteur Oxford Smart permet l’affichage d’informations sur l’écran LCD. Il peut, par exemple,
afficher le nombre total de cycles de levage, la charge de travail totale effectuée, les surcharges
et le nombre de jours écoulés depuis le dernier entretien. Ces informations permettent de rapidement
évaluer l’état du vérin du lève-personne.
Pour afficher ces informations, appuyez une demi-seconde sur le bouton ‘HAUT’ de la commande
manuelle ou sur le bouton de secours ‘HAUT’ du moniteur Smart.
Information sur l'entretien et l'utilisation
Quand arrive le moment de faire faire l’entretien, le symbole Service
s’affiche à l’écran. De plus, lorsque la commande manuelle est activée,
le moniteur Smart émet un signal sonore pour attirer l’attention de
l’utilisateur sur le fait que l’entretien arrive à échéance.
Le symbole Service s’affichera à l’écran à chaque fois que les touches
d’élévation ou d’abaissement sont actionnées sur la commande manuelle.
Lorsque le symbole Service s’affiche, contactez immédiatement votre
service d’entretien agréé pour prendre rendez-vous.
Vous pouvez continuer à utiliser le lève-personne pendant une brève
période en attendant la visite d’entretien.
Si le lève-personne s’arrête en raison d’une surcharge (la charge à lever
est supérieure à la charge maximale autorisée), le symbole de surcharge
s’affiche sur l’écran LCD et le fonctionnement du lève-personne est
interrompu jusqu’à ce que l’excès de charge ait été supprimé.
AVERTISSEMENT
Après la détection de surcharge par le lève-personne, Joerns
Healthcare recommande d’effectuer TOUTES les vérifications de
routine avant de réutiliser l’appareil (vous trouverez la liste des
vérifications quotidiennes dans le manuel d’utilisation fourni avec
le lève-personne). Joerns Healthcare vous recommande également
de contacter votre service d’entretien agréé.
Total des cycles de levage
Total de la charge de travail effectuée (Ampères * Secondes)
Nombre de surcharges
Nombre de jours (depuis le dernier entretien) /
Nombre de jours (entre deux entretiens)

Francais
Oxford
®
Stature
42
Commandes de secours embarquées
Les commandes de secours embarquées permettent de lever ou
d’abaisser le lève-personne en situation d’urgence.
Si votre lève-personne comprend une fonction de positionnement des
jambes intégrée, les commandes de fermeture et ouverture des jambes
seront inutiles.
Niveau de batterie
Le symbole de la batterie pleine indique que la batterie est à pleine
capacité et le lève-personne est prêt à l’emploi.
Le symbole de la batterie à moitié pleine indique qu’il est nécessaire de
recharger la batterie.
Le symbole de la batterie vide indique que la batterie est complètement
déchargée et doit être mise en charge immédiatement.
AVERTISSEMENT
Pour éviter tout endommagement irréversible de la batterie, il convient de mettre celle-ci
en charge dès que l’écran affiche le symbole de la batterie à moitié pleine.

Francais
Oxford
®
Stature
43
6. Instructions de fonctionnement
1. Réglage des pieds
La largeur des pieds de l’appareil Oxford Stature est réglable. Les pieds peuvent être ouverts
pour faciliter l’accès autour des fauteuils ou des chaises roulantes. Pour permettre les transferts
et le passage par des portes et des endroits exigus, les pieds du lève-personne doivent être en
position fermée.
Le réglage des pieds électriques - est accompli en appuyant sur certains boutons de la commande manuelle. Les pieds se bloquent lorsque l’interrupteur de la commande manuelle est
relâché.
2. Roulettes et freinage
Le lève-personne comporte deux roulettes à frein, qui permettent d’immobiliser l’appareil. Durant
le levage, les roulettes doivent rester libres et ne pas être bloquées. Le lève-personne peut ainsi
se diriger vers son centre de gravité. Si les freins sont enclenchés, le patient peut basculer vers
le centre de gravité, ce qui peut s’avérer déconcertant et inconfortable. Fixé sur la roulette arrière
se trouve un dispositif de direction, qui facilite le déplacement en ligne droite quand il est appliqué sur la roulette.
3. Levage et abaissement de la flèche
Le mouvement du support de la flèche est transmis par un puissant boîtier de renvoi du moteur,
qui est lui-même contrôlé par une simple unité de commande manuelle. La commande manuelle est munie de deux boutons sur lesquels se trouvent les flèches UP (vers le haut) et DOWN
(vers le bas). Le boîtier de renvoi s’arrête automatiquement en fin de course dans les deux sens.
La commande manuelle se branche sur une prise située à la base du boîtier de commande.
Consigne de sécurité - Le mouvement vers le bas de la flèche s’arrête si le lève-personne
détecte que le patient a rencontré un obstacle.
4. Arrêt d’urgence
Le bouton rouge d’arrêt d’urgence, situé à l’arrière du boîtier de commande, est activé lorsqu’on
appuie dessus. Cela coupe l’alimentation du lève-personne, laquelle n’est rétablie que lorsque le
bouton est tourné dans le sens antihoraire, puis relâché.
5. Commandes de secours
Tous les lève-personnes Oxford sont équipés de boutons d’élévation et d’abaissement sur le
boîtier de commande. Ils sont situés sous le bouton d’arrêt d’urgence et peuvent servir à élever /
abaisser le patient en cas de panne de la commande manuelle.

Francais
Oxford
®
Stature
44
6. Descente mécanique d’urgence
En cas de panne électrique totale, le lève-personne Stature est doté d’un dispositif de descente
mécanique. Ce dispositif se trouve sur le côté gauche du châssis du lève-personne.
Le mécanisme de descente s’actionne en introduisant une douille hexagonale de 6 mm dans
l’ouverture et sur le mécanisme en la tournant dans le sens des aiguilles d’une montre pour relever le
lève-personne et dans le sens inverse pour l’abaisser. Ceci peut être effectué manuellement avec
une clé à douille.
RECOMMANDATION
Afin de relever ou d’abaisser la flèche plus rapidement, il est conseillé d’utiliser une douille
hexagonale de 6 mm en conjonction avec un adaptateur de 1/4 pouce et une visseuse électrique
réversible. (Remarque - n’utilisez pas le réglage marteau.) Ceci accéléra la montée et la descente
en sécurité du patient. Une douille hexagonale de 6 mm se trouve dans le capuchon supérieur situé
en haut du mât.
REMARQUE: avant de lever ou d’abaisser le patient, veillez à prévoir votre destination avec
prudence. Par exemple, recul sur une chaise ou un lit.
7. Batteries
Les batteries sont protégées contre les décharges poussées par une ALARME DE BASSE
TENSION. Celle-ci retentit lorsque les batteries doivent être rechargées et que la commande
manuelle est en usage. Elle ne retentit pas si la commande manuelle n’est pas en usage. NE
NÉGLIGEZ PAS CETTE ALARME. Achevez le levage et mettez l’appareil sous charge (voir
instructions de charge).

Francais
Oxford
®
Stature
45
8. Courroies
L’appareil Oxford Stature peut être équipé d’une barre d’écartement à six points ou d’une chassis à
quatre points de fixation. Les deux systèmes utilisent des méthodes de fixation et des courroies
différentes.
Le système à six points utilise des courroies dotées de boucles sanglées de couleurs différentes,
permettant de régler le positionnement. Le système à quatre points utilise le système d’attaches
sécuritaires Secri3 et se règle en faisant pivoter la chassis à quatre points montes ou descendre.
Courroies à sangles à boucles: Oxford Quickfit, Full Back, Quickfit Deluxe, Long Seat, Access et Silkfit
Courroies dotées d’attaches sécuritaires: Oxford Comfort
Le système à deux points s’attache aux crochets de la barre d’écartement à l’aide de sangles à
boucles (illustrées ci-dessous). Chaque courroie est fournie avec des instructions. Veuillez lire le
guide d’instructions avant toute utilisation.
Barre d’écartement à 6 points. Exemple d’une courroie pour barre d’écartement à six points
munie d’attaches en boucle.
La courroie pour le système à quatre points s’attache aux crochets de la chassis à l’aide de
sangles à boucles (illustrées ci-dessous). Chaque courroie est fournie avec des instructions.
Veuillez lire le guide d’instructions avant toute utilisation.
Chassis à 4 points de fixation. Exemple d’une courroie pour chassis à 4 points dotée d’attaches
sécuritaires.
Sangles
d’épaule
Points d’attache de
la sangle d’épaule
Sangles de retenue de jambe
Points d’attache de la sangle
de retenue de la jambe
Sangles d’épaule
Point d’attache de la
sangle d’épaule
Point d’attache
de la sangle
d’épaule
Sangles de
retenue de jambe
Points d’attache de la
sangle de retenue de
la jambe

Francais
Oxford
®
Stature
46
Système de fixation à sangle Securi3. Exemple d’installation.
REMARQUE: Pour toute instruction détaillée sur la mise en place, reportez-vous au guide
d’utilisation fourni avec chaque courroie.
AVERTISSEMENT
Joerns Healthcare vous conseille de vérifier, régulièrement et avant toute utilisation, que
vos courroies ne sont ni effilochées, ni endommagées. N’utilisez JAMAIS une courroie
usagée ou endommagée.
AVERTISSEMENT
OXFORD RECOMMANDE L’UTILISATION DE PIECES OXFORD AUTHENTIQUES. Les produits
de sangle et de levage Oxford sont conçus pour être compatibles ensemble. Pour les di-
rectives spéciques à votre pays au sujet de l’utilisation d’élingues et de leur compatibilité,
veuillez lire l’étiquette de l’élingue ou contacter votre revendeur local ou Joerns Healthcare.
AVERTISSEMENT
Respectez la charge maximale du lève-personne. La charge de la courroie est limitée par
la charge maximale du lève-personne.

Francais
Oxford
®
Stature
47
7. Dépose des systèmes de barres d’écartement/
chassis
SUIVEZ CES INSTRUCTIONS À LA LETTRE
Votre lève-personne Stature a l’option d’un système d’écartement à 6 points ou chassis à 4 points.
Le retrait d’une de ces systèmes s’effectue facilement à l’aide d’une broche à déblocage rapide.
Cette opération est rapide et facile, mais il est nécessaire de lire les consignes de sécurité suivantes
afin de vous assurer que la barre d’écartement/chassis est verrouillée en place et en sécurité avant
utilisation.
Connexion
Pour effectuer la connexion, relevez la barre d’écarter/chassis vers l’encoche de la flèche.
Introduisez le manchon de la broche dans le capuchon en plastique pour soutenir la barre
d’écartement/chassis.
Une fois l’alignement sur l’encoche de la flèche obtenu, réintroduisez la broche à déblocage
rapide dans le manchon jusqu’à ce qu’elle se verrouille en place. VÉRIFIEZ QUE LA BROCHE
EST CORRECTEMENT ENCLENCHÉE
Pour cela, appuyez sur l’extrémité cannelée avec le doigt. Si la broche reste immobile, le lève
personne peut être utilisé en sécurité.

Francais
Oxford
®
Stature
48
Dépose
ATTENTION: Vérifiez que le poids de la barre est correctement/chassis supporté avant de retirer
la goupille.
Pour détacher la broche, appuyez sur la languette de ressort (à l’aide d’un tournevis plat ou un
outil similaire) et extrayez la broche.
Soutenez la barre d’écartement/chassis et tirez le manchon de la broche dans le sens opposé, en
le retirant complètement de la flèche. Ceci libère complètement la barre d’écartement/chassis.

Francais
Oxford
®
Stature
49
8. Instructions de charge
Lorsque le bloc d'alimentation nécessite d'être chargé, retirez-le du lève-personne et insérez-le
dans le chargeur non transporté.
Joerns Healthcare recommande d'acheter un pack de batteries supplémentaire afin d'avoir
toujours à disposition un pack chargé.
1. Retirez le bloc d'alimentation du lève-personne. Le bloc est maintenu en place par un simple
loquet fixé en haut. Il suffit de soulever le loquet pour libérer le bloc d'alimentation.
2. Insérez le bloc d'alimentation dans le chargeur. L'orientation et l'enclenchement du bloc
d'alimentation dans le chargeur sont les mêmes que lorsqu'il est branché dans le lèvepersonne.
3. Branchez la fiche du chargeur sur une prise de courant, puis mettez le chargeur SOUS
TENSION.
4. La charge est automatique et se poursuivra sur une période de quatre (4) heures jusqu'à
recharge complète des batteries.
Remarque: même si le chargeur reste branché pendant une période plus longue que
nécessaire, la charge des batteries s’interrompt dès que celles-ci sont pleines. Il n’y a pas de
risque de surcharge.
a) Témoin vert - Chargeur sous tension.
b) Témoin jaune - Charge en cours.
c) L'extinction du témoin jaune indique que la batterie est entièrement chargée.
Remarque: Il est conseillé de charger la batterie dès réception de celle-ci.
5. Pour réutiliser le lève-personne, débranchez la fiche du chargeur et retirez le bloc d'alimentation
du chargeur. Insérez le bloc d'alimentation dans le lève-personne. Vérifiez que le loquet qui
maintient le bloc en place est bien enclenché. S'il est bien enclenché, il doit émettre un clic. Le
processus de charge des lève-personnes électriques Oxford est simple, mais il est important
de suivre attentivement les consignes énoncées. Prêtez une attention particulière aux points
ci-dessous pour éviter tout problème de batteries déchargées.
AVERTISSEMENT
• La batterie, le chargeur, la commande manuelle et la boîte de commande NE doivent
PAS être ouverts par du personnel non autorisé. (Contactez votre distributeur pour
toute information sur la garantie et les réparations).
• NE touchez PAS les bornes de la batterie/du chargeur.
• VEILLEZ à ce que les batteries restent en permanence complètement chargées. Pendant
les périodes de non-utilisation du lève-personne, mettez la batterie en charge. Vous
pouvez également mettre la batterie en charge la nuit. Le chargeur interrompt
automatiquement la recharge dès que les batteries sont pleines. Il n’y a pas de risque
de surcharge
• NE laissez JAMAIS les batteries se décharger complètement. Dès que l’avertisseur
sonore retentit, terminez le levage en cours, puis mettez-les batteries en charge.
• Pour éviter tout endommagement irréversible de la batterie, il convient de mettre celle-
ci en charge dès que l’écran affiche le symbole de la batterie à moitié pleine.

Francais
Oxford
®
Stature
50
• N’entreposez JAMAIS la batterie pendant une longue période sans le recharger
régulièrement.
• Veillez à TOUJOURS mettre le chargeur hors tension avant de brancher ou de
débrancher le bloc d’alimentation.
• Ne laissez JAMAIS le bloc d’alimentation branché au chargeur si ce dernier est hors
tension.
• NE LAISSEZ PAS le chargeur sous tension si la batterie est débranchée.
• N’UTILISEZ PAS le lève-personne pendant qu’il est en charge.
• VÉRIFIEZ que le lève-personne n’est pas en charge avant de le déplacer afin d’éviter
tout endommagement électrique.
• NE DÉBRANCHEZ JAMAIS le chargeur en tirant sur le câble.
• VEILLEZ à ne pas trébucher sur le câble du chargeur.
• NE RECHARGEZ PAS un lève-personne électrique dans une salle de bains ou une salle
d’eau.

Francais
Oxford
®
Stature
51
9. Périodicité d’entretien
Tous les produits Oxford sont conçus de manière à ne nécessiter qu’un entretien minimal; toutefois, certaines vérifications et procédures de sécurité sont nécessaires. Un tableau des tâches
QUOTIDIENNES est présenté ci-après. Des vérifications quotidiennes et un entretien, une
inspection et un essai semestriel garantissent que le lève-personne fonctionne parfaitement. Une
liste de pièces détachées est disponible sur demande.
L’ESSAI DE CHARGE et la certification doivent être effectués par du personnel qualifié ou un
agent / concessionnaire d’entretien autorisé.
LISTE DES VÉRIFICATIONS QUOTIDIENNES: Joerns Healthcare vous conseille vivement
d’effectuer les vérifications suivantes chaque jour et avant d’utiliser le lève-personne.
• ASSUREZ-VOUS que le lève-personne se déplace facilement sur ses roulettes.
• ASSUREZ-VOUS que la barre d’écartement tourne et pivote facilement.
• VÉRIFIEZ qu’elle barre d’écartement/chassis est bien fixée sur la flèche.
• RECHERCHEZ les signes d’usure sur les crochets des courroies de la barre d’écartement/
chassis et sur les dispositifs de suspension latéraux.
• ASSUREZ-VOUS que les pieds s’ouvrent et se referment correctement.
• ACTIONNEZ la commande manuelle ou l’unité hydraulique pour confirmer que la flèche se
soulève et s’abaisse normalement.
• Les appareils électriques ACTIVÉS permettent de vérifier le fonctionnement du bouton
d’arrêt d’urgence.
• INSPECTEZ les courroies afin de déceler tout éventuel signe d’effilochage ou d’usure.
N’UTILISEZ PAS de courroie endommagée.
• ASSUREZ-VOUS que l’alarme de batterie faible ne se déclenche pas lorsque la commande
manuelle est actionnée. Si l’alarme retentit, N’UTILISEZ PAS l’appareil et mettez-le sous
charge immédiatement.
• VÉRIFIEZ l’usure et le serrage de toutes les fixations.
Entretien, Inspection Et Essais
Joerns healthcare recommande d’effectuer régulièrement une inspection et des essais poussés
du lève-personne Oxford Stature et des accessoires, courroies, etc. La fréquence des inspections
varie selon l'endroit. Veuillez vous renseigner auprès de votre revendeur et / ou d’un organisme
gouvernemental local sur la périodicité requise des inspections. Les examens et les essais doivent
être effectués suivant les recommandations et les procédures énoncées dans le présent manuem.
Dans la mesure du possible, Joerns Healthcare recommande que l’entretien, les inspections et les
essais certifiés soient effectués uniquement par un agent d’entretien ou un revendeur agréé.
REMARQUE: Ces recommandations sont conformes aux normes d’Hygiène et de Sécurité N°
2307 de 1998. Réglementations sur les opérations et l’équipement de levage 1998. Il s’agit d’une
réglementation du Royaume-Uni. En dehors du Royaume-Uni, veuillez vous renseigner sur les
règlements de votre pays.

Francais
Oxford
®
Stature
52
*CES VÉRIFICATIONS DOIVENT PORTER SUR:
Initialement
Avant
utilisation
Intervalles
d’entretien
1. BARRE D’ÉCARTEMENT/CHASSIS: Vérifiez que la barre d’écartement/
chassis tourne et pivote librement. Vérifiez l’absence d’usure sur le pivot
central. Assurez-vous qu’elle est solidement fixée sur la flèche.
ü ü ü
2. FLÈCHE: Vérifiez que la flèche est fixée sur le mât. Assurez-vous que
le mouvement de la flèche est minimal.
ü ü ü
3. MÂT: vérifiez s’il est fermement connecté au châssis.
ü ü ü
4. BOÎTIER DE RENVOI DU MOTEUR: Hormis la vérification du bon
fonctionnement et la recherche de bruits inhabituels, le boîtier de renvoi
du moteur ne nécessite en principe aucun entretien.
ü
5. MONITEUR SMART: Vérifiez le bon fonctionnement du bouton d’arrêt
d’urgence. Vérifiez le branchement de la prise de la commande manuelle.
Vérifiez le fonctionnement de la commande manuelle. Vérifiez que les
commandes de secours fonctionnement correctement.
ü ü ü
6. BATTERIES: Les batteries sont logées dans le bloc d’alimentation et, à
l’exception de recharges régulières effectuées conformément aux
instructions decharge, elles ne nécessitent en principe aucun entretien.
Vérifiez la propreté des connexions. Confirmez que le support de
batterie est fixé et intact.
ü
7. RÉGLAGE DES PIEDS: Vérifiez que les pieds s’étendent complètement
(vers l’intérieur / l’extérieur).
ü ü ü
8. ROULETTES: Vérifiez que toutes les roulettes sont solidement fixées
sur les pieds. Vérifiez que les roulettes et les roues tournent librement.
ü ü ü
9. NETTOYAGE: Essuyez avec un chiffon propre, en utilisant de l’eau
savonneuse et/ou un désinfectant pour surfaces dures. Les produits de
nettoyage chimiques corrosifs oules abrasifs doivent être évités, car
il peuvent endommager le fini du lève-personne. Évitez de mouiller
excessivement, surtout les zones électriques et l’ouverture à la base du
lève-personne. Nous recommandons d’imprégner le chiffon de solution,
de presser l’excès de liquide et d’essuyer la surface du lève-personne.
ü ü
10. ESSAI DE CHARGE: L’essai de charge doit être effectué conformément
aux procédures d’essai préconisées par le fabricant. (reportez-vous
au manuel d’entretien). Nous vous conseillons vivement de faire tester
l’appareil par un spécialiste agréé.
ü
11. BASE ET ROUES: Assurez-vous que la base est régulière et nivelée
(les quatre roues reposent sur le sol).
ü ü ü
12. COURROIES: Vérifiez qu’elles ne sont pas usées, ni effilochées.
ü ü ü

Francais
Oxford
®
Stature
53
Check
Lift Strap
Check
Lift Strap
Vérifiez la sangle
de levage
Vérifiez la sangle
de levage
*CES VÉRIFICATIONS DOIVENT PORTER SUR:
Initialement
Avant
utilisation
Intervalles
d’entretien
13. LUBRIFICATION: Huilez les joints pivotants, y compris les pièces reliant
le mât et la flèche, l’ensemble de la pédale, la barre d’écartement et le
joint (seulement si nécessaire).
ü
14. COMBINÉ: Vérifiez qu’il est totalement branché dans le contrôleur.
ü ü
15. GOUPILLE À DÉVERROUILLAGE RAPIDE: Vérifiez que la goupille est
bien insérée avant de soulever en appuyant sur l’extrémité crantée.
ü
16. FIXATIONS: Vériez que les écrous, boulons, vis et xations ne
présentent pas de signe d'usure et sont correctement serrés. Remplacezles si nécessaire.
ü ü
17. SANGLE DE LEVAGE: L’usure de votre sangle de levage doit être
vérifiée lors de l’entretien de routine (tous les six mois, de préférence).
Pour voir la sangle, il est recommandé de déposer le capuchon en haut du
mât et d’effectuer un cycle de levage dans les deux sens tout en observant
l’état de la sangle. Si vous voyez une usure (un effilochement ou un
craquèlement ou un phénomène similaire), il est conseillé qu’un revendeur
Joerns Healthcare ou un ingénieur d’entretien qualifié, compétent et agréé,
remplace IMMÉDIATEMENT la sangle. Pour plus de détails sur l’entretien
et le remplacement des sangles, veuillez demander notre guide d’entretien
détaillé. (Voir les détails ci-dessous.)
ü ü

Francais
Oxford
®
Stature
54
10. Spécifications techniques
Charge maximale d’utilisation ...............................................................500 lbs .................. 227 kgs
Longueur maximale hors tout ........................................................54,7 pouces .............. 1390 mm
Longueur minimale hors tout .........................................................50,8 pouces .............. 1290 mm
Hauteur maximale hors tout ..........................................................83,8 pouces .............. 2130 mm
Hauteur minimale hors tout ...........................................................76,6 pouces .............. 1945 mm
Hauteur à portée maximale ...........................................................77,8 pouces .............. 1975 mm
Portée à hauteur maximale ...........................................................24,6 pouces ................ 625 mm
Portée à hauteur minimale ............................................................24,6 pouces ................ 625 mm
Portée maximale ...........................................................................24,6 pouces ................ 625 mm
Rayon de braquage .......................................................................61,0 pouces .............. 1550 mm
Pieds ouverts - Largeur externe ....................................................53,5 pouces .............. 1360 mm
Pieds ouverts - Largeur interne .....................................................48,4 pouces .............. 1230 mm
Pieds fermés - Largeur externe.....................................................29,9 pouces ................ 760 mm
Pieds fermés - Largeur interne......................................................25,1 pouces ................ 640 mm
Hauteur des pieds, hors tout ...........................................................4,3 pouces .................110 mm
Garde au sol ....................................................................................1,2 pouces .................. 30 mm
Roulettes jumelées avant ...................................................................4 pouces ................ 100 mm
Roulettes arrière à freins ....................................................................4 pouces ................ 100 mm
*Portée = distance entre le centre de la barre d’écartement et l’avant du mât
Berceau à positionnement en 4 points (mesure en haut des goujons
de placement)
REMARQUE: le berceau de positionnement à 4 points est monté en série sur le lève-personne Stature.
Hauteur maximum du berceau ......................................................63,3 pouces ............... 1610 mm
Hauteur minimum du berceau (utile) .............................................12,2 pouces ................. 310 mm
Barre d’écartement à 6 points (mesure en haut des goujons de
placement)
REMARQUE: le berceau de positionnement à 6 points est monté en option sur le lève-per-
sonne Stature.
Hauteur maximale de la barre d’écartement .................................77,7 pouces .............. 1975 mm
Hauteur minimale de la barre d’écartement ..................................26,6 pouces ................ 675 mm
Poids
Ensemble mât, base et flèche ...............................................................142 lbs ................. 64,5 kgs
Berceau à positionnement en 4 points .................................................13,2 lbs ........................6 kg
Bloc d’alimentation .................................................................................6,6 lbs ...................... 3 kgs
Total ......................................................................................................162 lbs ................. 73,5 kgs
Toutes les dimensions sont indiquées avec une tolérance de fabrication.

Francais
Oxford
®
Stature
55
SPÉCIFICATIONS ÉLECTRIQUES
BATTERIES .............................................12 volts, type plomb-acide, scellées rechargeables
CAPACITÉ DES BATTERIES ................ 3,2 A / h
VALEURS NOMINALES D’ENTRÉE DU CHARGEUR 230 Vca, 50 / 60 Hz
VALEURS NOMINALES DE SORTIE DU CHARGEUR 27,4 / 29,0 Vcc à 0,8 A
Protection Contre les Décharges Électriques
CHARGEUR ........................................... CLASSE II
LÈVE-PERSONNE ................................. SOURCE D’ALIMENTATION INTERNE
Degré de Protection Contre les Décharges
CHARGEUR ........................................... TYPE B
LÈVE-PERSONNE ................................. TYPE B
ENVIRONNEMENT DE
FONCTIONNEMENT PRÉVU ................ >+5˚ <+40˚.
En dehors de ce type d’environnement, le fonctionnement et la sécurité de l’appareil peuvent
être compromis.
CONDITIONS ENVIRONNEMENTALES
En dehors de ce type d’environnement le fonctionnement et la sécurité de l’appareil peuvent être
compromis.
FONCTIONNEMENT
TEMPÉRATURE ..........................................................5°C à 40°C
HUMIDITÉ RELATIVE ................................................... 20% à 90% @ 30°C - sans condensation
PRESSION ATMOSPHÉRIQUE ...................................700 à 1060 hPa
ENTREPOSAGE
TEMPÉRATURE ........................................... ...............-10°C à +50°C
HUMIDITÉ RELATIVE ................................................... 20% à 90% @ 30°C - sans condensation
PRESSION ATMOSPHÉRIQUE ...................................700 à 1060 hPa
PROTECTION D’ENTRÉE
BOÎTIER DE COMMANDE ............................................IPX4
ACTIONNEUR ............................................................... IPX4
CHARGEUR NON TRANSPORTÉ ..............................IPX5
BATTERIE .................................................................... IPX5
COMBINÉ .....................................................................IPX5
CYCLES DE SERVICE
ACTIONNEUR ............................................................... 10% (2 min./18 min.)
CHARGEUR ................................................................. Environ 4 heures
ACOUSTIQUE
Niveau sonore pondéré A ............................................60 dB (A)

Francais
Oxford
®
Stature
56
PRINCIPAUX SYMBOLES:
Vous trouverez les symboles suivants sur le chargeur, l’unité de commande et la batterie :
Equipement de type B, conformément à EN 60601-1
Equipement de Classe 2
Ne pas jeter le chargeur et l’unité de commande avec les déchets ménagers.
Ne pas jeter la batterie avec les déchets ménagers.
Ne pas jeter les composants électroniques avec les déchets ménagers.
Utilisation à l’intérieur
ATTENTION, consultez les documents fournis.
Numéro DEEE: WEE/GG0464RZ

Francais
Oxford
®
Stature
57
11. Garantie
Joerns Healthcare possède un réseau d’agents de service et de distributeurs agréés qui se
feront un plaisir de répondre à vos questions relatives à l’achat, la garantie, la réparation et
l’entretien de votre matériel. Nous vous recommandons de confier la mise en service de nos
produits à votre agent de service ou distributeur agréé.
Le programme de garantie est assuré par votre distributeur ou l’agent de service, il est donc
important de conserver soigneusement ses coordonnées (nom, adresse et numéro de téléphone)
afin de pouvoir le contacter en cas de problème. An cas de doute sur le lieu d’achat de votre
lève-personne, Joerns Healthcare est en mesure d’identifier votre fournisseur à partir du numéro
de série du lève-personne.
Toutes les réclamations au titre de la garantie sont conditionnées à l’usage et à l’entretien
corrects et conformes au manuel d’utilisation livré avec chaque appareil. Tout endommagement
résultant d’une utilisation dans des conditions inadaptées ou du non-respect des consignes
d’entretien et d’utilisation n’est pas couvert pas la garantie. La garantie ne porte pas atteinte à
vos droits légaux.
N’OUBLIEZ PAS: Contactez votre agent de service ou distributeur agréé pour vos achats,
réparations, entretiens et maintenances certifiées.
Votre distributeur:

Deutsch
Oxford
®
Stature
58
Inhalt
1. Oxford Stature Patientenlifter ................................................................................ 59
2. Einführung: Über Den Lifter................................................................................... 60
3. Montage und Inbetriebnahme ............................................................................... 61
4. Sicherheitshinweise ............................................................................................... 65
5. Smart Monitor und Handbedienung ...................................................................... 67
6. Betriebshinweise ................................................................................................... 71
7. Entfernen des Sechspunkt-Spreizbügels und des Vierpunktgestells .................... 75
8. Aufladen der Akkueinheit ...................................................................................... 77
9. Wartungsplan und tägliche Prüfliste ...................................................................... 79
10. Technische Daten.................................................................................................. 82
11. Garantie ................................................................................................................. 85

Deutsch
Oxford
®
Stature
59
1. Oxford Stature Patientenlifter
VOR DEM EINSATZ IHRES STATURE LIFTERS MÜSSEN SIE DIESES
BENUTZERHANDBUCH GELESEN UND VERSTANDEN HABEN
Fußschiebepedal
Linearlenkvorrichtung
Ausleger
Spreizbügel
Motorgetriebe
Mastspitze
Hintere Laufrolle
(feststellbar)
Schiebejandgriff
Steuerungseinheit des
Akkusatzes
Vordere Laufrolle
(nicht feststellbar)

Deutsch
Oxford
®
Stature
60
2. Einführung: Über den Lifter
Der Stature-Lifter wird vor der Auslieferung vollständig montiert, unter Last getestet und zertifiziert.
Die Verpackung besteht aus einem festen, zweckmäßig geformten Versandkarton für den sicheren
Transport des Lifters und wird sowohl für den heimischen Markt als auch für den Export verwendet.
Mit jedem Lifter werden die zugehörigen Dokumente in einer beiliegenden Tasche geliefert, die
für die spätere Verwendung sicher aufbewahrt werden müssen.
• BENUTZERHANDBUCH • HÄNDLER-GARANTIEKARTE (Nur in Europa)
• PRÜFZERTIFIKAT • KUNDENDIENST-KARTE (Nur in Europa)
• PACKPRÜFLISTE
Das PRÜFZERTIFIKAT ist ein wichtiges Dokument und ist für Ihre Versicherungsdokumentation
erforderlich. Es ist sechs Monate lang gültig, und nach Ablauf dieser Zeit muss der Lifter gemäß
Wartungsplan von einem fachkundigen, befugten Techniker inspiziert und gewartet werden.
Das CE-Zeichen:
Sachgemäße Anwendung des Lifters
Die bestimmungsgemäße Verwendung dieser Hebevorrichtung ist das sichere Heben und
Umlagern einer Person von einer Ruhefläche zu einer anderen (wie etwa von einem Bett in
einen Rollstuhl). Joerns Healthcare empfiehlt, für die Umlagerung von Patienten eine vollständige
Risikoanalyse durchzuführen und nur über kurze Entfernung umzulagern.
Der Oxford Stature ist für Patienten in SITZENDER, SITZENDER/LIEGENDER und LIEGENDER
Position geeignet.
Der Oxford Stature ist ein elektrischer Patientenlifter und ist dafür ausgelegt, die sichere
Handhabung und das sichere Umlagern von Patienten sowohl für den Patienten als auch für die
Pflegeperson zu unterstützen und zu fördern.
Beispiele für Gurte, die für dieses Gerät geeignet sind, werden wie folgt angegeben:
• Oxford Quickfit • Oxford Access
• Oxford Full Back • Oxford Comfort
• Oxford Quickfit Deluxe • Oxford Silkfit
• Oxford Long Seat
Erwartete Lebensdauer
Oxford Professional Patientenlifter sind für eine Lebensdauer von mindestens zehn (10) Jahren
ausgelegt und geprüft, vorausgesetzt, die in diesem Handbuch beschriebenen Verfahren für
Gebrauch und Wartung werden eingehalten. Bei einer Verwendung, die nicht den Angaben in
dieser Anleitung entspricht, kann die Lebensdauer beeinträchtigt werden.
Der Oxford Stature trägt das CE-Zeichen und erfült die folgenden
EU-Richtlinien:
• Richtlinie über Medizinprodukte (93/42/EWG)
• EMC-Verordnung (89/336/EWG)
• Niederspannungsrichtlinie (73/23/EWG)

Deutsch
Oxford
®
Stature
61
3. Montage und Inbetriebnahme
Kartoninhalt
Stellen Sie den Versandkarton in einem freien Arbeitsbereich auf und öffnen Sie ihn vorsichtig.
Der Karton enthält folgende Teile:
• OXFORD STATURE LIFTER
• TASCHE MIT DOKUMENTEN
• HANDBEDIENUNG
• AKKUEINHEIT
• TISCHLADEGERÄT/STÄNDER/LADEKABEL
• BEFESTIGUNGS-KIT (INKL. SCHRAUBEN, INBUSSCHLÜSSEL, INNENSECHSKANT,
ABDECKBLECH)
WARNUNG
Der Oxford Stature ist schwer und muss vorsichtig gehoben werden. Holen Sie sich Hilfe,
um den Oxford Stature aus dem Karton zu heben.
Montage
Nehmen Sie alle Teile aus dem Karton heraus, legen Sie sie auf den Boden und achten Sie
darauf, dass die Oberfläche des Geräts nicht beschädigt wird.
1. Stellen Sie den Rahmen und den Mast (die miteinander verbunden sind) an einer freien Stelle
auf. Der Mast und der Rahmen sollten auf dem Schiebehandgriff ruhen, wodurch sichergestellt
wird, dass das Produkt beim Anschluss der Träger und des Auslegers stabil bleibt.

Deutsch
Oxford
®
Stature
62
2. Befestigen Sie die Träger mit Hilfe der mitgelieferten 6-mm-Senkschrauben (zwei pro Träger)
am Rahmen.
HINWEIS: Es gibt einen rechten und einen linken Träger, die wie unten gezeigt konfiguriert sind.
3. Ziehen Sie die auf beiden Seiten des Rahmens befindlichen 6-mm-Schrauben mit Hilfe des
mitgelieferten Inbusschlüssels fest.
WARNUNG
Die Schrauben müssen fest angezogen werden.
4. Setzen Sie den gekrümmten Auslegerabschnitt in den Auslegerschlitten ein. Befestigen Sie
die Baugruppe, indem die beiden 6-mm-Senkschrauben wie unten gezeigt in das mit dem
Befestigungs-Kit gelieferte blaue Abdeckblech eingesetzt und festgezogen werden.

Deutsch
Oxford
®
Stature
63
5. Befestigen Sie das Vierpunktgestell durch Einsetzen des Spannstifts am Ausleger des Lifters.
Vergewissern Sie sich, dass der Stift sicher montiert ist.
2
1
6. Stellen Sie den Stature aufrecht und ziehen Sie die Bremsen an.
WARNUNG
Beim Anheben des Stature mit Vorsicht vorgehen, da das Gerät schwer ist.
Stecken Sie den Stecker der Handbedienung in den Boden des am Mast angebrachten
Steuerkastens ein; achten Sie auf die korrekte Ausrichtung zur Steckerbuchse. Setzen Sie die
Akkueinheit in den Lifter ein und vergewissern Sie sich, dass der Verschluss, der die Einheit an
ihrem Platz hält, vollständig und mit einem hörbaren Klickgeräusch einrastet.
Demontage
Der Lifter sollte nur bei Bedarf für Wartung, Reparatur oder Transport demontiert werden. Dabei
sind die Montageanweisungen in umgekehrter Reihenfolge zu befolgen.

Deutsch
Oxford
®
Stature
64
PRÜFEN SIE VOR DEM BETRIEB STETS DIE FOLGENDEN PUNKTE
• Drücken Sie die Tasten ÖFFNEN und SCHLIESSEN auf der Handbedienung um zu bestätigen,
dass sich die Träger des Lifters wie gewünscht öffnen und schließen lassen.
• Der rote Not-Aus-Knopf auf der Rückseite der Steuereinheit befindet sich in der Position OFF
(Aus).
• Drücken Sie die Aufwärts- und Abwärts-Tasten auf der Handbedienung und vergewissern Sie
sich, dass sich der Ausleger wie gewünscht hebt und senkt.

Deutsch
Oxford
®
Stature
65
4. Sicherheitshinweise
Lesen und befolgen Sie die nachfolgend aufgeführten Sicherheitshinweise. Wenn Sie diese grundlegenden Sicherheitsvorkehrungen beachten, ist der Hebebetrieb leicht und problemlos.
WARNUNG
• Vergewissern Sie sich STETS, dass die zulässige Arbeitsbelastung des Lifters für das
Gewicht des Patienten ausreicht.
• Überschreiten Sie NICHT die zulässige Betriebslast des Lifters, da andernfalls ein
Strombegrenzungsregler aktiviert wird, der die weitere Verwendung des Lifters verhindert.
• Planen Sie die mit dem Lifter auszuführenden Aufgaben STETS, bevor Sie beginnen.
• Gehen Sie vor JEDEM Einsatz des Lifters die TÄGLICHE PRÜFLISTE durch.
• Machen Sie sich vor JEDEM Heben von Patienten mit den Bedienungselementen und
Sicherheitseinrichtungen des verwendeten Lifters vertraut.
• Verwenden Sie KEINE Gurte, die nicht ausdrücklich zur Verwendung mit diesem Lifter
empfohlen werden.
• Prüfen Sie STETS, ob der Gurt für den speziellen Patienten geeignet ist und die korrekte
Größe und Tragfähigkeit besitzt.
• Verwenden Sie NIEMALS Gurte, die ausgefranst oder beschädigt sind.
• Passen Sie die Gurte STETS gemäß den Anweisungen (Benutzerhandbuch) an.
• Achten Sie STETS darauf, dass sich die Riemengurte NICHT um die Träger des Lifters
herum verfangen.
• Bedienen Sie den Lifter STETS gemäß den Anweisungen im Benutzerhandbuch.
• Bedienungs- oder Sicherheitselemente dürfen AUF KEINEN FALL entfernt oder außer
Kraft gesetzt werden, um den Lifter-Betrieb zu vereinfachen.
• Heben Sie Patienten NIEMALS mit festgestellten Laufrollen an. Der Lifter muss sich stets
auf den richtigen Schwerpunkt positionieren können.
• Manövrieren Sie den Lifter NIEMALS durch Schieben am Mast, Ausleger oder am
Patienten.
• Manövrieren Sie den Lifter STETS mit Hilfe des am Mast angebrachten Handschiebegriffs.
Ein Fußschiebepedal ist ebenfalls am Unterteil des Lifters angebracht.
• Senken Sie den Patienten vor Beginn des Transfers STETS auf die niedrigste bequeme
Position.

Deutsch
Oxford
®
Stature
66
• Schieben Sie den beladenen Lifter NICHT bei Geschwindigkeiten, die über einer
langsamen Schrittgeschwindigkeit liegen (3 km/h, 0,8 m/s).
• Schieben Sie den Lifter NICHT über unebene oder raue Flächen, insbesondere wenn er
beladen ist.
• Schieben/ziehen Sie den beladenen Lifter NICHT über Hindernisse am Boden.
• Betätigen Sie die Bedienungs-/Sicherheitselemente NIEMALS mit Gewalt. Alle Elemente
sind leichtgängig und ohne größere Kraftanstrengung zu betätigen.
• Parken Sie den beladenen Lifter NICHT auf schiefen Ebenen.
• Verwenden Sie elektrische Lifter NICHT in Duschbädern.
• Laden Sie elektrische Lifter NICHT in Bädern oder Duschräumen auf.
• Heben Sie KEINE Patienten, wenn Sie nicht dafür ausgebildet und kompetent sind.
• IHR Lifter ist zum Heben von Patienten konzipiert worden. Er darf von Ihnen oder
anderen für KEINE anderen Zwecke verwendet werden.
• Der Lifter darf in beladenem oder in unbeladenem Zustand KEINE Stufen herunter
geschoben werden.
• Führen Sie den beladenen Lifter NICHT über schiefe Ebenen mit mehr als 1:12 (ca. 5
Grad) Gefälle.
• Führen Sie den Lifter NICHT ohne zweiten Helfer über schiefe Ebenen.
• Verwenden Sie ihn NICHT in einer feuchten oder korrosiven Umgebung wie z. B. an
einem Schwimmbecken.
• Den Lifter bei Vollbeladung NICHT auf besonders dicken, weichen Teppichen verwenden.
• Lifter NIEMALS mit lockeren, verschlissenen oder fehlenden Teilen bzw.
Befestigungselementen verwenden.

Deutsch
Oxford
®
Stature
67
5. Smart Monitor und Handbedienung
Not-Aus-Taste
Redundante Bedienelemente
zum Anheben und Absenken
LCD-Info-Anzeige
Anschlussbuchse
für Handbedienung
Anschlussstecker
für Verstellmotor
Anschlussstecker für
Handbedienung
Tasten zum
Anheben und
Absenken
Handbedienung
Verstellmotor
Abnehmbare
Akkueinheit
Smart Monitor
Tasten zum Öffnen
/ Schließen des
Fahrgestells
Redundante Bedienelemente zum
zum Öffnen / Schließen des
Fahrgestells

Deutsch
Oxford
®
Stature
68
Bestimmungsgemässe Verwendung
Der Oxford Smart Monitor ist ein Steuersystem für mobile Oxford Patientenlifter. Der Smart
Monitor speichert nützliche Servicedaten zum Patientenlifter, die bei Bedarf aufgerufen werden
können. Zu den Servicedaten gehören:
• Anzahl der mit Patienten durchgeführten Hübe
• Gesamtleistung des Verstellmotors
• Anzahl der Überlasten am Patientenlifter (Hubversuche über der maximalen Tragfähigkeit)
• Anzahl der Tage seit dem letzten Serviceintervall
In den Oxford Smart Monitor ist ein Mikroprozessor eingebaut, mit dem Servicedaten über die
eingebaute LCD-Anzeige ausgelesen werden kann.
Funktionen
• Datensammlung im Steuerkasten mit Anzeige der Daten über eine LCD-Anzeige
• Leistungszähler
• Intelligenter Hubzähler
• Serviceanzeige
• Serviceintervallanzeige
• Überlastinformationen
• 3-stufige Akkuanzeige
Vorteile
• Mehr Sicherheit für Patienten und Pflegepersonal
• Korrekte Servicedaten auf Knopfdruck verfügbar
• Optimierte Lebensdauer des Produkts
• Einfache Wartung für Mechaniker und Servicemechaniker

Deutsch
Oxford
®
Stature
69
LCD Anzeige
Mit dem Oxford Smart Monitor können Daten über die LCD-Anzeige ausgelesen werden. Es
können die Gesamtzahl der Hubvorgänge, Gesamtleistung, Überlasten und Anzahl der Tage
seit dem letzten Service ausgelesen werden, die zur schnellen und einfachen Beurteilung des
Zustands des Hubverstellmotors verwendet werden können.
Der Zugriff auf die Daten erfolgt durch Drücken der Taste ‘UP’ an der Handbedienung für ½
Sekunde oder der redundanten Taste ‘UP’ am Smart Monitor.
Informationen zu Service und Verwendung
Wenn ein Service fällig ist, erscheint das Service-Symbol auf dem
Display. Wenn die Handbedienung aktiviert ist, gibt der Smart Monitor
auch ein akustisches Signal ab, das den Benutzer darauf hinweist, dass
ein Service erforderlich ist.
Das Service-Symbol wird jedes Mal angezeigt, wenn die Taste zum
Anheben oder Absenken an der Handbedienung gedrückt wird. Wenn
das Service-Symbol angezeigt wird, wenden Sie sich sofort an Ihren
autorisierten Fachhändler, um einen Termin für einen Service zu
vereinbaren.
Sie können den Patientenlifter für kurze Zeit weiter benutzen, bis ein
Service durchgeführt wurde.
Wenn der Patientenlifter wegen einer Überlast (ein Versuch, mehr
als die maximal zulässige Tragkraft anzuheben) stoppt, erscheint das
Überlast-Symbol auf der LCD-Anzeige und der Patientenlifter funktioniert
erst wieder, wenn die zusätzliche Last (über der maximalen zulässigen
Tragkraft) abgenommen wurde.
WARNUNG
Wenn die LCD-Anzeige auf Ihrem Smart Monitor eine Überlast
erfasst hat, empfiehlt Joerns Healthcare, vor der weiteren
Benutzung ALLE täglichen Routineprüfungen am Patientenlifter
durchzuführen (eine Liste der täglichen Überprüfungen finden Sie
im Benutzerhandbuch des Patientenlifters). Joerns Healthcare
empfiehlt auch, dass Sie sich für weitere Informationen an Ihren
autorisierten Oxford Fachhändler wenden.
Gesamtzahl der Hübe
Gesamtleistung (Ampere * Sekunden)
Anzahl der Überlasten
Anzahl der Tage (seit dem letzten Service) /
Anzahl der Tage (zwischen einem Service und dem nächsten)

Deutsch
Oxford
®
Stature
70
Eingebaute redundante Steuerung
Mit der eingebauten redundanten Steuerung kann der Patientenlifter im
Notfall angehoben oder abgesenkt werden.
Wenn Ihr Patientenlifter mit einer elektrischen Fahrgestellpositionierung
ausgestattet ist, sind redundante Bedienelemente zum Öffnen und
Schließen des Fahrgestells vorhanden.
Angaben zum Akku
Wenn auf dem Display ein voller Akku angezeigt wird, heißt das, dass
der Akku ganz aufgeladen und der Patientenlifter betriebsbereit ist.
Wenn auf dem Display eine halb leerer Akku angezeigt wird, heißt das,
dass der Akku aufgeladen werden muss.
Das Symbol mit dem leeren Akku auf dem Display zeigt an, dass der
Akku ganz leer ist und sofort aufgeladen werden sollte.
WARNUNG
Um eine mögliche Dauerschädigung des Akkus zu vermeiden, sollte der Akku aufgeladen
werden, wenn das halb leere Akkusymbol auf dem Display angezeigt wird.

Deutsch
Oxford
®
Stature
71
6. Betriebshinweise
1. Einstellen der Fahrgestellbreite
Die Breite des Fahrgestells am Oxford Stature ist elektrisch einstellbar. Das Fahrgestell kann
gespreizt werden, um Sessel oder Rollstühle zu umschließen. Für den Transfer durch enge
Türen und Durchgänge sollte das Fahrgestell zusammengeführt werden.
Elektrisches Einstellen der Fahrgestellbreite - Drücken Sie auf der Handbedienung die entsprechenden Tasten. Das Fahrgestell wird festgestellt, wenn der Handbedienungsschalter losgelassen wird.
2. Laufrollen und Feststellbremsen
Der Lifter besitzt zwei feststellbare Laufrollen, die beim Abstellen benutzt werden. Beim Heben
müssen die Laufrollen frei und nicht festgestellt sein. Der Lifter kann sich dann zum Schwerpunkt
des Lifters hin bewegen. Wenn Sie die Bremse betätigen, kann der Patient beim Heben mit
festgestellten Laufrollen möglicherweise zum Schwerpunkt schwenken, was beunruhigend oder
unangenehm sein kann. An der hinteren Laufrolle ist eine Linearlenkvorrichtung angebracht, die,
falls eingesetzt, die geradlinige Bewegung der Laufrolle erleichtert.
3. Heben und Senken des Auslegers
Die Bewegung des Auslegerschlittens erfolgt mit Hilfe eines leistungsstarken Motorgetriebes, das
mit einer einfachen Handbedienung gesteuert wird. Auf der Handbedienung befinden sich zwei
Taster mit den Richtungspfeilen AUFWÄRTS und ABWÄRTS. Das Motorgetriebe stoppt automatisch in der oberen bzw. unteren Endlage. Die Handbedienung ist an einer Buchse unten an der
Steuereinheit angeschlossen. Sicherheitshinweis- Die Abwärtsbewegung des Auslegers stoppt,
wenn der Lifter erkennt, dass der Patient auf ein Hindernis gestoßen ist.
4. Not-Aus-Taste
Die rote Not-Aus-Taste befindet sich auf der Vorderseite der Steuereinheit und wird durch
Drücken ausgelöst. In diesem Fall wird die gesamte Stromzufuhr zum Lifter unterbrochen. Um
den Not-Aus-Zustand aufzuheben, wird die Taste gegen den Uhrzeigersinn gedreht und losgelassen.
5. Redundante Steuerung
Alle Oxford Patientenlifter sind mit Tasten zum Anheben und Absenken am Steuerkasten
ausgestattet. Sie befinden sich unter der Not-Aus-Taste und können beim Ausfall der
Handbedienung zum Absenken/Anheben des Patienten verwendet werden.

Deutsch
Oxford
®
Stature
72
6. Mechanische Notabsenkung
Für den Fall eines kompletten Stromausfalls ist der Stature-Lifter mit einem mechanischen
Senkmechanismus ausgestattet. Diese Vorrichtung befindet sich auf der linken Seite des
Lifterrahmens.
Der Senkmechanismus wird betätigt, indem ein 6-mm-Sechskant in die Öffnung und auf die Vorrichtung
gesteckt wird; der Lifter wird dann durch Drehen im Uhrzeigersinn gehoben und durch Drehen im
Gegenuhrzeigersinn abgesenkt. Das kann manuell mit einem Inbusschlüssel durchgeführt werden.
EMPFEHLUNG
Um den Ausleger schneller anzuheben oder abzusenken, wird empfohlen, einen 6-mm-Sechskant
in Verbindung mit einem Adapter für Zoll-Antrieb und einen reversiblen elektrischen Bohrer
zu verwenden. (Hinweis: nicht die Schlagbohreinstellung verwenden). Dadurch lässt sich die
Geschwindigkeit erhöhen, mit der der Patient gefahrlos angehoben oder abgesenkt werden kann.
Ein 6-mm-Sechskant befindet sich in der oberen Abdeckung auf der Mastspitze.
HINWEIS: Vor dem Anheben oder Absenken des Patienten müssen Sie sich vergewissern, dass
Sie Ihren Bestimmungsort sorgfältig gewählt haben. Zum Beispiel zurück auf einen
Stuhl oder ein Bett.
7. Akkus
Die Akkus werden durch einen LADEZUSTANDSALARM vor zu starker Entladung geschützt.
Dieser Alarm ertönt bei Betätigung der Handbedienung, wenn die Akkus aufgeladen werden
müssen. Der Alarmton wird nur dann ausgelöst, wenn die Handbedienung betätigt wird. DIESER
ALARM IST UNBEDINGT ZU BEACHTEN. Führen Sie den Hebevorgang zu Ende und laden Sie
die Akkus auf (siehe „Aufladen der Akkueinheit“).

Deutsch
Oxford
®
Stature
73
8. Gurte
Der Oxford Stature bietet die Wahl zwischen einem Sechspunkt- Spreizbügel und einem Vierpunkt-
Rahmen. Diese beiden Systeme verwenden verschiedene Befestigungsmethoden und Gurte.
Das Sechspunktsystem verwendet Gurte mit Gurtschlingen, die ein Einstellen der Position durch
die Auswahl verschiedenfarbiger Schlingen ermöglichen. Das Vierpunktsystem verwendet das
System der Secruri3-Sicherheitsclips. Es wird durch Drehen des Vierpunkt-Rahmen eingestellt.
Schleifenriemengurte: Oxford Quickfit, Full Back, Quickfit Deluxe, Long Seat, Access und Silkfit.
Sicherheitsclipgurte: Oxford Comfort
Das Sechspunktsystem wird an den Haken des Hebebügels mit Schleifenriemen befestigt (siehe
unten). Für jeden Gurt werden spezielle Anweisungen mitgeliefert. Lesen Sie bitte vor Gebrauch
die Anweisungen.
Sechspunkt-Spreizbügel
Beispiel für Sechspunkt-Spreizbügelgurt mit Befestigung durch Schleifen
Das Vierpunkt-Rahmengurt wird an den Ständer des Hebebügels mit einem
Sicherheitsclipsystem befestigt (siehe unten). Für jeden Gurt werden spezielle Anweisungen mitgeliefert. Lesen Sie bitte vor Gebrauch die Anweisungen.
Vierpunkt-Rahmensystem
Beispiel für Vierpunkt-Rahmengurt mit Sicherheitsclipsystem.
Schulterriemen
Befestigungspunkte
für Schulterriemen
Beinriemen
Befestigungspunkte
für Beinriemen
Schulterriemen
Befestigungspunkt für
Schulterriemen
Befestigungspunkt für
Schulterriemen
Beinriemen
Befestigungspunkte
für Beinriemen

Deutsch
Oxford
®
Stature
74
Securi3 Schlingenbefestigungssystem. Installationsbeispiel.
HINWEIS: Für detaillierte Anleitungen zur Befestigung siehe die Bedienungsanleitung für die Gurte.
WARNUNG
Joerns Healthcare empfiehlt, die Gurte regelmäßig und vor dem Gebrauch auf Ausfransen
oder andere Schäden zu prüfen. Verwenden Sie KEINE Gurte, die abgenutzt oder beschädigt
sind.
WARNUNG
OXFORD EMPFIEHLT DIE VERWENDUNG VON ORIGINAL OXFORD-TEILEN. Bespannun-
gen und Lifts von Oxford sind frei miteinander kombinierbar. Länderspezische Angaben
zur Bespannung und Kompatibilität nden Sie im Etikett der Bespannung oder wenden Sie
sich an Ihren örtlichen Händler oder an Joerns Healthcare.
WARNUNG
Bitte beachten Sie die maximale Tragfähigkeit des Lifters. Die Kapazität der Gurte ist
durch die maximale Tragfähigkeit des Lifters begrenzt.

Deutsch
Oxford
®
Stature
75
7. Entfernen der Sechspunkt-Spreizbügel und
Vierpunkt-Rahmen
DIESE ANWEISUNGEN BITTE GENAU BEFOLGEN
Ihr Stature-Patientenlifter kann sowohl mit einem Sechspunkt- wie auch einem Vierpunktsystem verwendet weerden. Diese Systeme lassen sich mit Hilfe eines Schnellauslösestifts
leicht entfernen. Dies lässt sich zwar schnell und einfach durchführen, Sie müssen jedoch
die folgenden Sicherheitsanweisungen durchlesen, um sicherzustellen, dass der Spreizbügel/
Rahmen vor Gebrauch sicher eingerastet ist.
Befestigung
Zur Befestigung den Spreizbügel/Rahmen zum Auslegerschlitz hin anheben.
Stiftbuchse zur Unterstützung den Spreizbügel/Rahmen durch die Plastikendkappe einsetzen.
Nach korrekter Ausrichtung im Auslegerschlitz den Schnellauslösestift bis zum Einrasten wieder
vollständig in die Buchse einsetzen. SIE MÜSSEN ÜBERPRÜFEN, DASS DER STIFT SICHER
BEFESTIGT IST.
Dazu den Finger in das gezahnte Ende drücken. Bleibt der Stift in seiner Position, kann der Lifter
sicher genutzt werden.

Deutsch
Oxford
®
Stature
76
Entfernen
VORSICHT: Stellen Sie sicher, dass Sie das Gewicht der Querstange stützen/Rahmen, bevor
Sie den Stift entfernen.
Um den Stift zu entfernen, die Steckfeder (mit Hilfe eines Flachschraubenziehers oder eines
ähnlichen Werkzeugs) eindrücken und den Stift herausziehen.
Spreizbügel/Rahmen unterstützen und die Stiftbuchse in die entgegengesetzte Richtung ziehen,
wobei sie vollständig vom Ausleger entfernt wird. Dadurch wird der Spreizbügel/Rahmen vollständig freigegeben.

Deutsch
Oxford
®
Stature
77
8. Aufladen der Akkueinheit
Die Akkus befinden sich in der Akkueinheit und werden über eine externe Tischladeeinheit
aufgeladen.
Wenn die Akkueinheit aufgeladen werden muss, wird sie vom Lifter entfernt und an eine externe
Ladeeinheit angeschlossen.
Joerns Healthcare Ltd empfiehlt, eine Ersatz-Akkueinheit zu kaufen, sodass eine Einheit ständig
geladen sein kann.
1. Entfernen Sie die Akkueinheit aus dem Lifter. Die Einheit ist mit einem einfachen Verschluss
befestigt, der sich oben auf der Akkueinheit befindet. Wenn Sie den Verschluss anheben, wird
die Akkueinheit freigegeben.
2. Schließen Sie die Akkueinheit an die Ladeeinheit an. Die Position und Befestigung der
Akkueinheit an der Ladeeinheit ist dieselbe wie am Lifter.
3. Stecken Sie den Netzstromstecker des Ladegeräts in eine geeignete Netzsteckdose, und
schalten Sie die Stromversorgung EIN.
4. Der Ladevorgang erfolgt automatisch, und die Akkus werden innerhalb acht bis zwölf Stunden
vollständig aufgeladen. Hinweis: Auch wenn das Ladegerät längere Zeit angeschlossen bleibt,
sind die Akkus vor Überladung geschützt.
a) Grünes Licht - Zeigt an, dass es eingeschaltet ist.
b) Gelbes Licht - Zeigt an, dass die Batterie geladen wird.
c) Batterie ist ganz aufgeladen, wenn das gelbe Licht ausgeht.
Hinweis: Der Ladevorgang dauert bis zu 4 Stunden.
Es wird empfohlen, die Batterie sofort nach dem Empfang aufzuladen.
5. Um den Lifter wieder in Betrieb zu nehmen, schalten Sie die Stromversorgung AUS und ent-
fernen Sie die Akkueinheit vom Ladegerät. Setzen Sie die Akkueinheit in den Lifter ein und
vergewissern Sie sich, dass der Verschluss, der die Einheit an ihrem Platz hält, vollständig
eingerastet ist. Die Einheit muss mit einem klickenden Geräusch einrasten. Das Aufladen ele-
ktrischer Oxford Lifter ist einfach und direkt, aber es ist wichtig, die Ladeanweisungen genau
zu befolgen. Beachten Sie bitte die folgenden Punkte, die Ihnen dabei helfen, Probleme mit
entladenen Akkus zu vermeiden.
WARNUNG
• Akku, Ladegerät, Handsteuerung und Steuereinheit dürfen NUR von autorisiertem
Personal geöffnet werden. (Wenden Sie sich wegen Garantie und Reparaturen an Ihren
Fachhändler).
• Die Akkupole/Pole des Ladegeräts NICHT berühren.
• Die Akkus IMMER ganz aufladen. Lassen Sie die Akkueinheit immer aufladen, wenn
sie nicht benutzt wird. Wenn es für Sie einfacher ist, laden Sie sie jede Nacht auf. Das
Ladegerät schützt die Akkueinheit vor dem Überladen.
• Die Akkus NIE ganz entladen lassen. Sobald das Alarmsignal ertönt, den Hebevorgang
zu Ende führen und die Akkus aufladen.

Deutsch
Oxford
®
Stature
78
• Um eine mögliche Dauerschädigung des Akkus zu vermeiden, sollte der Akku aufgeladen
werden, wenn das halb leere Akkusymbol auf dem Display angezeigt wird.
• Den Akku IMMER in regelmäßigen Abständen nachladen, wenn er für längere Zeit nicht
verwendet wird.
• STETS darauf achten, dass die Netzspannung zum Ladegerät ausgeschaltet ist, bevor
das Akkupaket angeschlossen oder abgenommen wird.
• Das Akkupaket NIE am Ladegerät angeschlossen lassen, wenn die Netzspannung zum
Ladegerät ausgeschaltet ist.
• DAS LADEGERÄT NICHT eingeschaltet lassen, wenn der Akku nicht angeschlossen ist.
• DEN PATIENTENLIFTER WÄHREND DES LADEVORGANGS NICHT benutzen.
• ÜBERPRÜFEN Sie vor dem Verfahren, dass der Patientenlifter nicht aufgeladen wird, da
der elektrische Anschluss sonst dadurch beschädigt werden kann.
• DAS LADEGERÄT KEINESFALLS durch Ziehen am Kabel ausstecken.
• ACHTEN SIE DARAUF, dass Sie nicht über das Ladekabel stolpern.
• LADEN SIE ELEKTRISCHE PATIENTENLIFTER NICHT in Bädern oder Duschräumen auf.

Deutsch
Oxford
®
Stature
79
9. Wartungsplan und Tägliche Prüfliste
Alle Oxford Produkte sind so konzipiert, dass sie nur ein Minimum an Wartung benötigen. Einige
Sicherheitsprüfungen und -prozeduren sind jedoch unerlässlich. Im Folgenden sind die TÄGLICH
auszuführenden Aufgaben aufgeführt. Tägliche Überprüfungen und alle sechs Monate Wartung,
Inspektion und Prüfung gewährleisten, dass ein Lifter in optimalem, sicherem Funktionszustand
bleibt. Eine Liste der Ersatzteile erhalten Sie auf Anfrage.
Die BELASTUNGSPRÜFUNG und -zertifizierung sollte nur von qualifiziertem Personal oder von
autorisierten Servicevertretern / Händlern durchgeführt werden.
TÄGLICHE PRÜFLISTE: Joerns Healthcare empfiehlt dringend, dass der Lifter täglich vor der
Benutzung auf folgende Punkte überprüft wird:
• VERGEWISSERN SIE SICH, dass sich der Lifter frei auf den Laufrollen bewegen kann.
• VERGEWISSERN SIE SICH, dass der Spreizbügel frei drehbar und schwenkbar ist.
• ÜBERPRÜFEN SIE, ob der Spreizbügel/Rahmen fest am Ausleger angebracht ist.
• ÜBERPRÜFEN SIE Gurthaken/Clips am Spreizbügel/Rahmen und Seitenaufhängungen auf
übermäßigen Verschleiß.
• VERGEWISSERN SIE SICH, dass das Fahrgestell sich einwandfrei öffnet und schließt.
• BETÄTIGEN SIE die Handbedienung, um sicherzustellen, dass sich der Ausleger einwand
frei hebt und senkt.
• PRÜFEN SIE die Funktionsfähigkeit der Not-Aus-Taste (nur bei Elektro-Ausführung).
• PRÜFEN SIE Gurte auf Ausfransen und andere Schäden. Beschädigte Gurte dürfen NICHT
verwendet werden.
• PRÜFEN SIE, ob am Lifter ein Ladezustandsalarm vorliegt, wenn die Handbedienung
betätigt wird, Wenn der Alarm ertönt, darf der Lifter NICHT verwendet werden und muss
sofort aufgeladen werden.
• PRÜFEN Sie die Befestigungselemente auf festen Sitz und auf Abnutzung.
Wartung, Inspektion und Prüfung
Joerns Healthcare empfiehlt eine regelmäßige gründliche Inspektion und Prüfung des Oxford
Stature Lifters und der Zubehörteile (Gurte, Waagen usw.). Die Häufigkeit der Inspektionen ist
je nach Einsatzort unterschiedlich, d.h., Sie müssen sich bei Ihrem Händler oder bei der zuständigen Behörde vor Ort erkundigen, wie oft eine Inspektion durchgeführt werden muss. Die
Untersuchung und der Test müssen nach den in diesem Handbuch angegebenen Empfehlungen
und Verfahrensweisen durchgeführt werden. Joerns Healthcare empfiehlt, dass Wartung,
Inspektion und zertifizierte Prüfungen nur von autorisierten Servicevertretern / Händlern durchgeführt
werden.
HINWEIS: Diese Empfehlungen entsprechen den Vorschriften für Großbritannien und Nordirland
gemäß No2307 Health and Safety: The Lifting Operations and Lifting Equipment
Regulations 1998 (Vorschriften zur Arbeitssicherheit für Hebevorgänge und Lifter).
Außerhalb von Großbritannien und Nordirland gelten die Vorschriften des jeweiligen
Landes.

Deutsch
Oxford
®
Stature
80
*DIESE PRÜFUNGEN SOLLTEN UMFASSEN:
Anfangs
Vor dem
Gebrauch
Wartungs-
intervalle
1. SPREIZBÜGEL/RAHMEN: Vergewissern Sie sich, dass der Spreizbügel/
Rahmen frei dreh-und schwenkbar ist. Prüfen Sie den zentralen Stift auf
Verschleiß. Prüfen Sie, dass der Stift fest mit dem Ausleger verbunden ist.
ü ü ü
2. AUSLEGER: Prüfen Sie die Verbindung von Ausleger und Mast. Stellen Sie
sicher, dass der Ausleger sich nur geringfügig bewegen.
ü ü ü
3. MAST: Prüfen Sie, dass der Mast fest mit dem Rahmen verbunden ist.
ü ü ü
4. MOTORGETRIEBE: Das Motorgetriebe muss, abgesehen vom Prüfen auf
korrekten Betrieb und außergewöhnliche Geräusche, nicht gewartet werden.
ü
5. SMART MONITOR: Überprüfen Sie die Funktion der Not-Aus-Taste. Überprüfen
Sie, dass der richtige Anschluss in die Buchse an der Handbedienung
eingesteckt ist. Überprüfen Sie die Funktion der Handbedienung. Überprüfen Sie
die redundanten Bedienelemente und dass sie ordnungsgemäß funktionieren.
ü ü ü
6. AKKUS: Die Akkus befinden sich in der Akkueinheit und müssen,
abgesehen vom regelmäßigen Aufladen (siehe „Aufladen der
Akkueinheit“), nicht gewartet werden. Achten Sie darauf, dass
die Anschlüsse sauber bleiben. Vergewissern Sie sich, dass die
Batteriehalterung sicher befestigt und nicht beschädigt ist.
ü
7. EINSTELLEN DER FAHRGESTELLBREITE: Prüfen Sie, dass das Fahrg-
estell nach innen und nach außen in vollem Umfang verstellt werden kann.
ü ü ü
8. LAUFROLLEN: Prüfen Sie, dass die Laufrollen fest mit dem Fahrgestell
verbunden sind. Vergewissern Sie sich, dass die Laufrollen frei beweglich sind.
ü ü ü
9. REINIGUNG: Verwenden Sie zum Reinigen ein sauberes Tuch, Seife und
Wasser und/oder Desinfektionsmittel für harte Oberflächen. Starke
hemische Reinigungsmittel oder Scheuermittel sollten nicht verwendet
werden, da diese die Oberfläche des Lifters angreifen. Vermeiden
Sie übermäßige Benetzung, besonders in der Nähe der Elektronik
und der Öffnung zum Unterteil des Lifters. Wir empfehlen, das Tuch
in die Reinigungslösung einzutauchen, überschüssige Flüssigkeit
auszudrücken und die Oberflächen des Lifters mit dem ausgedrückten
Tuch abzuwischen.
ü ü
10. BELASTUNGSPRÜFUNG: Die Belastungsprüfung sollte gemäß den
Prüfverfahren des Herstellers durchgeführt werden (siehe Wartungshandbuch). Es wird eindringlich empfohlen, dass die Prüfungen nur von
autorisierten Servicevertretern durchgeführt werden.
ü
11. FAHRGESTELL UND ROLLEN: Vergewissern Sie sich, dass das Fahrgestell
auf glattem, ebenem Boden steht. (alle vier Rollen haben Bodenkontakt)
ü ü ü
12. GURTE: Prüfen Sie auf Verschleiß und Ausfransen.
ü ü ü

Deutsch
Oxford
®
Stature
81
*DIESE PRÜFUNGEN SOLLTEN UMFASSEN:
Check
Lift Strap
Check
Lift Strap
Hebegurt
überprüfen
Hebegurt
überprüfen
Anfangs
Vor dem
Gebrauch
Wartungs-
intervalle
13. SCHMIERUNG: Schmieren Sie alle Drehgelenke, einschließlich Mast-
und Auslegeranschlüsse, Pedal, Spreizbügelgelenk (nur nach Bedarf).
ü
14. HANDBEDIENUNG: Vergewissern Sie sich, dass sie vollständig in die
Steuerung gesteckt ist.
ü ü
15. SCHNELLVERSCHLUSSSTIFT: Stellen Sie vor dem Heben sicher, dass
der Stift fest sitzt, indem Sie auf das spitze Ende drücken.
ü
16. BEFESTIGUNGSTEILE: Überprüfen Sie alle Muttern, Schrauben, Bolzen
und Verbindungselemente auf übermäßige Abnutzung und festen Sitz.
Bei Bedarf auswechseln.
ü ü
17. HEBEGURT: Ihr Hebegurt muss zu den Wartungsintervallen auf
Anzeichen von Verschleiß überprüft werden (idealerweise alle sechs
Monate). Um den Gurt zu inspizieren, wird empfohlen, die Kappe oben
am Mast abzunehmen und den Lifter in beide Richtungen zu bewegen,
während der Zustand des Gurtes überprüft wird. Falls Sie Verschleiß
(Ausfransen, Faltenbildung oder ähnliches) feststellen, wird empfohlen,
den Gurt von einem autorisierten Joerns Healthcare Händler oder einem
qualifizierten Wartungstechniker UNVERZÜGLICH austauschen zu lassen.
Einzelheiten bezüglich der Wartung und des Austausches des Gurtes sind
in der ausführlichen Wartungsanleitung enthalten, die auf Anfrage erhältlich
ist. (Siehe weiter unten bezüglich Einzelheiten.)
ü ü

Deutsch
Oxford
®
Stature
82
10. Technische Daten
Zulässige Belastung ..............................................................................500 lbs .................. 227 kgs
Maximale Gesamtlänge ...................................................................... 54,7 Zoll ............... 1390 mm
Minimale Gesamtlänge ....................................................................... 50,8 Zoll ............... 1290 mm
Maximale Gesamthöhe ...................................................................... 83,8 Zoll ............... 2130 mm
Minimale Gesamthöhe ....................................................................... 76,6 Zoll ............... 1945 mm
Höhe bei maximaler Reichweite ......................................................... 77,8 Zoll ............... 1975 mm
Reichweite bei maximaler Höhe ......................................................... 24,6 Zoll ................. 625 mm
Reichweite bei minimaler Höhe .......................................................... 24,6 Zoll ................. 625 mm
Maximale Reichweite ......................................................................... 24,6 Zoll ................. 625 mm
Wenderadius ...................................................................................... 61,0 Zoll ............... 1550 mm
Fahrgestell, gespreizt - Äußere Breite ............................................... 53,5 Zoll ............... 1360 mm
Fahrgestell, gespreizt - Innere Breite ................................................. 48,4 Zoll ............... 1230 mm
Fahrgestell, geschlossen - Äußere Breite .......................................... 29,9 Zoll ................. 760 mm
Fahrgestell, geschlossen - Innere Breite............................................ 25,1 Zoll ................. 640 mm
Gesamthöhe des Fahrgestells ............................................................. 4,3 Zoll ..................110 mm
Bodenabstand ...................................................................................... 1,2 Zoll ................... 30 mm
Doppellaufrollen vorne ............................................................................ 4 Zoll ................ 100 mm
Laufrollen mit Feststellbremse hinten ..................................................... 4 Zoll ................ 100 mm
*Reichweite = Mitte Spreizbügel bis Vorderseite Mast
Vierpunktgestell (Messung bis zum oberen Ende der Passstifte)
HINWEIS: Das Vierpunktgestell gehört zur standardmäßigen Ausstattung des Stature-Lifters.
Max. Höhe des Gestells ..................................................................... 63,3 Zoll ............... 1610 mm
Min. Höhe des Gestells (nutzbar)....................................................... 12,2 Zoll ................. 310 mm
Sechspunktspreizbügel (Messung bis zum oberen Ende der
Passstifte)
HINWEIS: Das Sechspunktgestell ist wahlweise für den Stature-Lifter erhältlich.
Spreizbügel, maximale Höhe ............................................................. 77,7 Zoll ............... 1975 mm
Spreizbügel, minimale Höhe .............................................................. 26,6 Zoll ................. 675 mm
Gewicht
Mast, Fahrgestell, Ausleger ................................................................... 142 lbs ................. 64,5 kgs
Vierpunktgestell ....................................................................................13,2 lbs ......................6 kgs
Akkueinheit .............................................................................................6,6 lbs ......................3 kgs
Gesamt ..................................................................................................162 lbs .................73,5 kgs
Fertigungstoleranzen gelten für alle Maße.

Deutsch
Oxford
®
Stature
83
ANGABEN ZUR ELEKTRIK
AKKUS ................................................................. 24 V, aufladbar, geschlossene Blei/Säure-Akkus
AKKUKAPAZITÄT ................................................ 3,2 Ah
EINGANGSSPANNUNG DES LADEGERÄTS (NENNWERT) ........... 230VAC 50/60Hz
AUSGANGSSPANNUNG DES LADEGERÄTS (NENNWERT) .......... 27,4/29,0 VDC@0,8A
SCHUTZ GEGEN STROMSCHLAG
LADEGERÄT ........................................................ KLASSE II
PATIENTENLIFTER ............................................. INTERNE STROMQUELLE
STOSSFESTIGKEIT
LADEGERÄT ........................................................ TYP B
PATIENTENLIFTER ............................................. TYP B
UMGEBUNGSBEDINGUNGEN
Außerhalb dieser Umgebungsbedingungen können Funktionsfähigkeit und Sicherheit unter
Umständen beeinträchtigt werden.
BETRIEB
TEMPERATUR ..................................................... >+5˚C <+40˚C
LUFTFEUCHTIGKEIT .......................................... 20% - 90% @ 30ºC (nicht kondensierend)
LUFTDRUCK ........................................................ 700 - 1060 hpa
LAGERUNG
TEMPERATUR ..................................................... >-10˚C <+50˚C
LUFTFEUCHTIGKEIT .......................................... 20% - 90% @ 30ºC (nicht kondensierend)
LUFTDRUCK ........................................................ 700 - 1060 hpa
IP SCHUTZKLASSEN
STEUERKASTEN................................................. IPX4
VERSTELLMOTOR .............................................. IPX4
EXTERNES LADEGERÄT ................................... IPX5
BATTERIE ............................................................ IPX5
HANDBEDIENUNG .............................................. IPX5
EINSCHALTDAUER
VERSTELLMOTOR .............................................. 10% (2 Min. / 18 Min.)
LADEGERÄT ........................................................ 4 Stunden (ca.)
AKUSTIK
A-BEWERTETER SCHALLDRUCKPEGEL ......... 64dB

Deutsch
Oxford
®
Stature
84
WICHTIGE SYMBOLE:
Die folgenden Symbole werden am Ladegerät, am Steuerkasten und am Akku verwendet:
Medizinisches elektrisches Gerät, Typ B, gemäß EN 60601-1
Geräte der Klasse 2
Das Ladegerät und der Steuerkasten dürfen nicht als Hausmüll entsorgt werden
Die Akkus dürfen nicht als Hausmüll entsorgt werden.
Die elektronischen Bauteile dürfen nicht als Hausmüll entsorgt werden.
Für den Gebrauch im Haus
ACHTUNG, siehe die beigefügten Unterlagen
WEEE-Registriernummer der Herstellers: WEE/GG0464RZ

Deutsch
Oxford
®
Stature
85
11. Garantie
Joerns Healthcare verfügt über ein Netz von autorisierten Fachhändlern und
Kundendienstvertretungen, die Ihre Anfragen in Bezug auf Kauf, Garantie, Reparaturen und
Wartung gerne beantworten. Wir empfehlen, die Inbetriebnahme unserer Produkte von Ihrem
autorisierten Fachhändler oder Ihrer Kundendienstvertretung durchführen zu lassen.
Der Fachhändler oder die Kundendienstvertretung sind für das Garantieprogramm zuständig,
deshalb ist es wichtig, dass Sie Namen, Adresse und Telefonnummer notieren, damit Sie sich
an diesen bzw. diese wenden können, falls ein Problem auftritt. Wenn Sie sich nicht sicher
sind, wo Ihr Patientenlifter gekauft wurde, teilen Sie Joerns Healthcare die Seriennummer des
Patientenlifters mit und wir finden den Lieferanten für Sie.
Alle Garantieansprüche sind von der ordnungsgemäßen Benutzung und Wartung gemäß dem
Benutzerhandbuch abhängig, das mit allen Patientenliftern mitgeliefert wird. Die Garantie
gilt nicht für Schäden, die durch die Benutzung in ungeeigneten Umgebungsbedingungen
oder dadurch verursacht wurden, dass die Wartung nicht gemäß dem Benutzer- und
Wartungshandbuch durchgeführt wurde. Die Ihnen zustehenden gesetzlichen Rechte bleiben
davon unberührt.
DENKEN SIE DARAN: Wenden Sie sich für Käufe, Reparaturen, Wartung und zertifizierte
Wartung immer an Ihren autorisierten Fachhändler oder an Ihre Kundendienstvertretung.
Ihr Vertriebspartner:

Español
Oxford
®
Stature
86
Índice
1. El elevador de pacientes Oxford Stature .............................................................. 87
2. Introducción: Generalidades sobre el elevador ..................................................... 88
3. Instrucciones de montaje y encargo ..................................................................... 89
4. Precauciones de seguridad ................................................................................... 93
5. Monitor Smart y control de mano .......................................................................... 95
6. Instrucciones de funcionamiento ........................................................................... 99
7. Remoción de los sistemas de espaciador de 6 puntos y bastidor de 4 puntos ...... 103
8. Instrucciones para la carga ................................................................................... 105
9. Plan de mantenimiento y lista de comprobación diaria......................................... 107
10. Especificaciones Técnicas .................................................................................... 110
11. Garantía ................................................................................................................. 113

Español
Oxford
®
Stature
87
1. El elevador de pacientes Oxford Stature
ANTES DE USAR EL ELEVADOR STATURE ASEGÚRESE DE LEER Y COMPRENDER LAS
INSTRUCCIONES CONTENIDAS EN ESTE MANUAL
Larguero
Barra de extensión
Engranaje del motor
Extrusión de mástil
Ruedas traseras
(con freno)
Asa de empuje
Almohadilla
para el pie
Dispositivo de avance
en línea recta
Unidad de control
de batería
Ruedas delanteras
(sin frenos)

Español
Oxford
®
Stature
88
2. Introducción
: Generalidades sobre el elevador
Cada elevador Stature está completamente montado, y ha sido verificado y certificado antes de
ser embalado y enviado.
El embalaje consiste en una caja de cartón resistente, hecha a medida, que se utiliza tanto para
los envíos nacionales como para las exportaciones para asegurar que el equipo llegue intacto
a su destino. Con cada elevador se envía una bolsa con varios documentos; esta bolsa debe
conservarse para consultas futuras.
• MANUAL DEL USUARIO • TARJETA DE GARANTÍA DEL PROVEEDOR
• CERTIFICADO DE VERIFICACIÓN • TARJETA DE SATISFACCIÓN DEL CLIENTE
• LISTA DE COMPROBACIÓN DE EMBALAJE
El CERTIFICADO DE PRUEBA es un documento importante y será necesario para sus registros
de seguro. Tiene una validez de seis meses. Después de haber vencido este plazo deberá verificarse el elevador y realizarle el mantenimiento por un ingeniero cualificado autorizado según el
programa de mantenimiento.
La marca CE:
Declaración de uso al que está destinado
El uso previsto para este dispositivo es la elevación y transferencia seguras de un individuo
de una superficie de descanso a otra (como de una cama a una silla de ruedas, por ejemplo).
Joerns Healthcare recomienda que la transferencia de pacientes se lleve a cabo posteriormente
a una evaluación de riesgos, y de manera segura, en una breve distancia solamente.
El sistema Oxford Presence es un dispositivo de elevación de pacientes accionado de manera
eléctrica, diseñado para apoyar y promover el manejo y transferencia seguros del paciente, tanto
para el individuo que está siendo transportado como para la persona a cargo.
El Oxford Presence es adecuado para pacientes en las siguientes posiciones: SENTADO,
SENTADO/RECOSTADO y RECOSTADO. A continuación, presentamos una lista de eslingas
compatibles con este dispositivo:
• Oxford Quickfit • Oxford Access
• Oxford Full Back • Oxford Comfort
• Oxford Quickfit Deluxe • Oxford Silkfit
• Oxford Long Seat
Vida útil estipulada previa al mantenimiento:
Los elevadores profesionales Oxford están diseñados y evaluados para durar un período mínimo
de diez (10) años previamente a efectuarse algún tipo de mantenimiento, dependiendo del uso y
cumplimiento con las tareas de mantenimiento establecidas en este manual. El uso diferente al
establecido en estas instrucciones, podría comprometer la vida útil del producto.
El Oxford Stature lleva la marca CE y cumple con las siguientes
directivas de la CE:
• Directiva de Dispositivos Médicos (93/42/EEC)
• Directiva EMC (89/336/EEC)
• Directiva de bajo voltaje (73/23/EEC)

Español
Oxford
®
Stature
89
3. Instrucciones de montaje y encargo
Contenido de la caja
Coloque la caja en una zona de trabajo despejada y ábrala con cuidado. La caja contiene:
• ELEVADOR OXFORD STATURE
• BOLSA CONTENIENDO DOCUMENTOS
• CONTROL DE MANO
• UNIDAD DE BATERÍA
• CARGADOR/SOPORTE/DIODO DE SOBREMESA
• KIT DE SUJETADORES (INCLUYE TORNILLOS, LLAVE ALLEN, LLAVE TUBULAR
HEXAGONAL, PLACA PROTECTORA)
ADVERTENCIA
El Oxford Stature es pesado y habrá que tener cuidado al levantarlo. Puede que necesite
ayuda para sacar el Oxford Stature de la caja.
Montaje
Retire todas las piezas de la caja y colóquelas en el suelo, con cuidado de evitar que el equipo
sufra daños en su superficie.
1. Coloque el armazón y el mástil (los cuales están conectados) en un espacio vacío. El mástil y
el armazón deben colocarse sobre el asidero de empuje, lo cual garantizará que el producto
permanezca estable mientras se conectan las patas y el larguero en el producto.

Español
Oxford
®
Stature
90
2. Ajuste las patas al armazón usando dos tornillos de cabeza fresada de 6 mm por cada pata.
NOTA: Este aparato tiene una pata izquierda y una derecha, configuradas como se muestra
abajo.
3. Con la llave Allen incluida, apriete los tornillos de 6 mm ubicados a cada lado del armazón.
ADVERTENCIA
Los tornillos deben apretarse firmemente.
4. Inserte la sección curva del larguero en el chasis. Asegure el ensamblado al insertar los dos
tornillos de cabeza fresada de 6 mm en la placa protectora azul incluida en el kit de sujetadores,
como se muestra abajo, y apriete firmemente.

Español
Oxford
®
Stature
91
5. Instale el bastidor de posición de cuatro puntos en el larguero de elevación insertando la cha-
veta hendida. Asegúrese que la chaveta está bien fija.
2
1
6. Coloque el elevador Stature en posición vertical y active los frenos.
ADVERTENCIA
Tenga extremo cuidado cuando levante el elevador Stature a su posición vertical, es muy
pesado.
Ajuste el enchufe del control manual en la parte inferior de la caja de control, ubicada en el
mástil y asegúrese que esté bien alineado con el receptáculo del enchufe. Ajuste la fuente de
energía del elevador y asegúrese que el seguro que sostiene la fuente de energía esté totalmente
adentro hasta que caiga en su sitio.
Desmontaje
El elevador no debe ser desmontado a menos que sea necesario darle servicio, repararlo o
transportarlo. Si es necesario desmontarlo, siga las instrucciones de ensamblado, pero en
secuencia inversa.

Español
Oxford
®
Stature
92
ANTES DE HACERLO FUNCIONAR, VERIFIQUE LO SIGUIENTE
• Oprima los botones para abrir y cerrar del control manual para confirmar que las patas del
elevador se abren y cierran de manera satisfactoria.
• El botón rojo de paro de emergencia, ubicado en la parte posterior de la caja de control, está
en la posición de apagado (OFF).
• Oprima los botones de flechas hacia arriba y hacia abajo del control manual para confirmar
que el larguero se eleva y baja de manera satisfactoria.

Español
Oxford
®
Stature
93
4. Precauciones de seguridad
Por favor, lea y siga las precauciones de seguridad que figuran más abajo. Siguiendo estas
precauciones básicas de seguridad, las operaciones de elevación serán fáciles y no causarán
problemas.
ADVERTENCIA
• Compruebe SIEMPRE que la carga de trabajo de seguridad del elevador es adecuada
para el peso del paciente.
• NO exceda la carga de funcionamiento segura de la grúa, ya que se activará un dispositivo limitador de la corriente eléctrica para evitar el uso de la grúa.
• Planifique SIEMPRE sus operaciones de elevación antes de comenzar.
• Lleve SIEMPRE a cabo la LISTA DE COMPROBACIÓN DIARIA antes de utilizar el elevador.
• Familiarícese SIEMPRE con el control de funcionamiento y características de seguridad
de un elevador antes de levantar a un paciente.
• NO utilice una eslinga a no ser que esté recomendada para su uso con el elevador.
• Verifique SIEMPRE que la eslinga es adecuada para el paciente en particular y que su
tamaño y capacidad son correctos.
• NUNCA utilice una eslinga que esté deshilachada o dañada.
• Encaje SIEMPRE la eslinga de acuerdo con las instrucciones que se indican (instrucciones del usuario)
• Asegúrese SIEMPRE que las correas de eslinga no queden atrapadas alrededor de las
patas de la grúa.
• Lleve SIEMPRE a cabo las operaciones de elevación de acuerdo con las instrucciones
en el manual del usuario.
• NUNCA desconecte o deje de realizar un control de seguridad o característica de seguridad porque parezca más fácil para el funcionamiento del elevador.
• NO levante a un paciente con los frenos de las ruedas activados. Deje siempre que el
elevador encuentre el centro correcto de gravedad.
• NO intente maniobrar el elevador empujando el mástil, el larguero o al paciente.
• Maniobre SIEMPRE el elevador con el asidero de empuje, ubicado en el mástil. También
se incluye una almohadilla para el pie en la base de la grúa.

Español
Oxford
®
Stature
94
• Haga SIEMPRE descender al paciente a la posición cómoda más baja posible antes
de transferirlo.
• NO empuje un elevador cargado a velocidades que superen un ritmo de caminar lento
(3 kilómetros/hora, 0,8 metros/segundo).
• NO empuje el elevador sobre terreno desnivelado o con baches. Especialmente, si está
cargado.
• NO intente empujar o tirar de un elevador cargado sobre una obstrucción en el suelo
• NUNCA fuerce los controles de funcionamiento/seguridad. Todos los controles son
fáciles de utilizar y no requieren el uso de fuerza excesiva.
• NO aparque un elevador cargado sobre NINGUNA superficie en cuesta.
• NO utilice elevadores eléctricos en una ducha.
• NO cargue un elevador eléctrico en un baño o en una ducha.
• NO levante a un paciente a no ser que esté entrenado y sea competente para hacerlo.
• SU elevador está destinado a levantar pacientes. NO lo utilice, ni permita que se utilice,
para cualquier otro fin.
• NO lleve el elevador dando tumbos hacia abajo en escaleras, tanto si está cargado como
si está descargado.
• NO intente pasar con un elevador cargado por una pendiente que supere 1:12
(aproximadamente 5 grados).
• NO intente pasar con el elevador por una pendiente sin que haya alguien para ayudarle.
• NO lo utilice en un ambiente húmedo o corrosivo, como por ejemplo al lado de una
piscina
• NO utilice una alfombra extremadamente gruesa cuando el elevador está totalmente cargado.
• NUNCA haga funcionar el elevador con piezas o sujetadores faltantes, sueltos o desgastados.

Español
Oxford
®
Stature
95
5. Monitor Smart y control de mano
Botón de parada
de emergencia
Controles redundantes de
elevación y descenso de
emergencia
Pantalla LCD de
información
Toma de conexión
del control de mano
Toma de
conexión del
actuador
Enchufe de conexión
del control de mano
Botones para
subir y bajar
Control de
mano
Actuador
Caja de baterías
desmontable
Monitor Smart
Piernas abiertas / cerradas
Controles redundantes
Botón piernas abiertas
/ cerradas

Español
Oxford
®
Stature
96
Uso destinado
El monitor inteligente, Oxford Smart Monitor, es un sistema de control para los elevadores Oxford
Mobile. El monitor inteligente almacena información útil sobre el mantenimiento del elevador disponible
para consultar cuando sea necesario. Esta información sobre el mantenimiento incluye:
• Cantidad de ciclos de elevaciones de pacientes
• Total de trabajo ejecutado por el actuador
• Cantidad de sobrecargas de elevación (intentos de elevación por encima de la carga de tra
bajo máxima permitida)
• Cantidad de días desde el último intervalo de mantenimiento
El monitor Smart Oxford incorpora un microprocesador que permite leer los datos de mantenimiento
a través de la pantalla LCD integrada.
Características
• Recopilación de datos en el panel de control con datos visualizados en la pantalla LCD
• Contador de trabajo
• Contador de ciclos inteligente
• Indicador de tareas de mantenimiento
• Indicador de frecuencia de mantenimiento
• Información de sobrecarga
• Indicador de nivel de carga de las baterías de tres pasos
Beneficios
• Mayor seguridad tanto para el paciente como para el proveedor de cuidados
• Datos de mantenimiento precisos con solo tocar un botón
• Vida útil del producto optimizada
• Facilidad para realizar tareas de mantenimiento tanto para ingenieros como para los técnicos

Español
Oxford
®
Stature
97
Pantalla LCD
El monitor Smart Oxford incorpora un microprocesador que permite emitir la lectura de los datos
de mantenimiento a través de la pantalla LCD integrada. Es posible emitir la lectura de los totales
de los ciclos de elevación, los totales de trabajos realizados, de sobrecargas y la cantidad de
días desde el último mantenimiento, datos que pueden utilizarse para evaluar el estado de el
actuador de elevación de manera fácil y rápida.
Puede acceder a esta información pulsando durante medio segundo el botón “UP” (ARRIBA) del
control de mano del usuario o el botón redundante “UP” (ARRIBA) del Monitor inteligente.
Información sobre mantenimiento y uso
Cuando es momento de realizar el mantenimiento, aparecerá en la
pantalla el símbolo correspondiente al mantenimiento. Además, cuando
está activado el control de mano del usuario, el monitor inteligente
emitirá una señal sonora para avisar al usuario que se necesita una
operación de mantenimiento.
El símbolo de mantenimiento aparecerá cada vez que pulse las teclas
hacia arriba o abajo en el control de mano del usuario. Cuando aparezca
el símbolo de mantenimiento, póngase en contacto de inmediato con su
agente de servicio autorizado para organizar el mantenimiento.
Puede seguir utilizando el elevador durante un breve periodo de tiempo
hasta que llevado a cabo el mantenimiento necesario.
Si el elevador se detiene debido a una sobrecarga (si intenta levantar
más peso de la carga máxima segura) aparecerá el símbolo de sobrecarga
en la pantalla LCD y el elevador dejará de funcionar hasta que haya
eliminado la carga adicional (por encima de la carga máxima segura).
ADVERTENCIA
Si la pantalla LCD del monitor inteligente hubiese registrado una
sobrecarga, Joerns Healthcare recomienda que TODAS las tareas
diarias de control se lleven a cabo en el elevador antes de su
utilización (para obtener una lista de controles diarios, consulte
el manual de usuario del elevador). Joerns Healthcare también
recomienda que se ponga en contacto con su agente autorizado de
servicios Oxford para obtener más orientación.
Total de ciclos de elevación
Total de trabajo ejecutado (Amps * Segundos)
Cantidad de sobrecargas
Cantidad de días (desde el último mantenimiento) /
Cantidad de días (entre mantenimientos)

Español
Oxford
®
Stature
98
Controles redundantes integrados
Los controles redundantes integrados permiten que el elevador suba o
baje en caso de emergencia.
Si su sistema de elevación incorpora tecnología de posicionamiento de
piernas eléctrico, hay controles redundantes tanto para abrir como para
cerrar las piernas.
Información sobre la batería
Si aparece el icono de la batería completa, significa que la batería está
completamente cargada y lista para usar.
Si aparece el icono de la batería a la mitad, significa que necesita cargar
la batería.
Si aparece el icono de la batería vacía, significa que la batería carece
de capacidad y debe cargarla de inmediato.
ADVERTENCIA
A fin de evitar posibles daños permanentes en la batería, debe colocar la batería a cargar
en cuanto la pantalla indique el símbolo de la batería a la mitad.

Español
Oxford
®
Stature
99
6. Instrucciones de funcionamiento
1. Ajuste de las patas
Las patas del Oxford Stature son ajustables eléctricamente en cuanto a su anchura. Las patas
pueden abrirse para permitir el acceso alrededor de sillas o de sillas de ruedas. Para transferir y
para pasar por pasillos estrechos, las patas del elevador deben estar en posición cerrada.
Ajuste eléctrico de las patas - se consigue pulsando los botones apropiados en el control de mano.
Las patas se bloquearán cuando se suelte el conmutador del control de mano.
2. Ruedas y frenos
El elevador tiene dos ruedas con frenos, que se pueden aplicar para dejarlo aparcado. Cuando
se realice la elevación, las ruedas deben dejarse libres y los frenos sin aplicar. De esta forma,
el elevador podrá mover el centro de gravedad conforme se realiza la elevación. Si se aplican los
frenos, será el paciente el que se mueva hacia el centro de gravedad y esto puede ser desconcertante e incómodo. En la rueda posterior se encuentra un dispositivo de avance en línea recta;
cuando se aplica este dispositivo a la rueda facilita el avance en línea recta.
3. Elevación y descenso del larguero
El movimiento del chasis del larguero se logra mediante un poderoso motor, el cual se controla
mediante una sencilla unidad de control manual. El control manual tiene dos botones con flechas
HACIA ARRIBA y HACIA ABAJO <symbols>. El motor se detiene automáticamente en el límite
del trayecto en ambas direcciones. El control manual se enchufa en un receptáculo en la base
de la caja de control. Nota de seguridad - El movimiento hacia abajo del larguero se detiene si el
elevador percibe que el paciente ha encontrado un obstáculo.
4. Parara de emergencia
El botón de parada de emergencia rojo está situado en la parte delantera del cuadro de control
y se activa pulsándolo. Al pulsarlo se interrumpe la alimentación eléctrica al elevador y sólo se
puede desarmar girando el botón en sentido contrario a las agujas del reloj y soltándolo.
5. Controles redundantes
Todos los elevadores Oxford están equipados con botones de elevación y descenso en el panel
de control. Estos están ubicados debajo del botón de parada de emergencia y se pueden utilizar
para bajar o subir al paciente si se produjese un fallo en el control de mano.

Español
Oxford
®
Stature
100
6. Descenso mecánico de emergencia
En caso de una falla eléctrica total, el elevador Stature cuenta con un dispositivo mecánico para
bajarlo. Este dispositivo está ubicado en el costado izquierdo del armazón del elevador.
El mecanismo para bajarlo se opera al insertar una llave tubular hexagonal de 6 mm en la apertura y en el mecanismo que gira en sentido horario para subir el elevador, y en sentido antihorario
para bajar el elevador. Esto puede hacerse a mano con una llave tubular.
RECOMENDACIÓN
Para elevar o bajar más rápido el larguero, se recomienda usar una llave tubular hexagonal de 6
mm junto con un adaptador impulsor de pulg. y un taladro eléctrico reversible. (Nota - no utilice
el parámetro de martillo). Esto incrementará la velocidad a la cual puede elevarse y bajarse el
paciente con seguridad. En la tapa superior ubicada en la parte superior del mástil se encuentra
una llave tubular hexagonal de 6 mm.
NOTA: Antes de elevar o bajar al paciente, asegúrese de haber planificado cuidadosamente el
sitio hacia donde desea llevarlo. Por ejemplo, de regreso hacia una silla o cama.
7. Baterías
Las baterías están protegidas ante descargas fuertes por una ALARMA DE VOLTAJE BAJO.
Esta alarma emitirá un sonido cuando las baterías necesiten recargarse y se esté manejando
el control de mano. No sonará si el control de mano no se está manejando. NO IGNORE ESTA
ALARMA DE ADVERTENCIA. Complete la operación de elevación y ponga la batería a cargar
(vea las instrucciones de carga).
 Loading...