

Oxford QR Manuallines

QR LUGGAGE GUIDELINES

F1 Luggage Guidelines
General Advice for users of soft luggage 3
Fitting Guidelines 4 - 5
French 6 - 7
German 8 - 9
Spanish 10 - 11
Italian
Greek
Polish
Japanese
First Time Luggage Colour Insert Fitting
Product Care 21
Returns Procedure
The information included in this booklet was correct at time of going to print, subject to errors and omissions.
Product specification subject to change.
If you require any further help or advice, do not hesitate to contact either your local authorised Oxford dealer or
Oxford direct on +44(0)1993 862300
12 - 13
14 - 15
16 - 17
18 - 19
20
21
Oxford Products Ltd.
De Havilland Way
Range Road
Witney OX29 0YA
www.oxforproducts.com
info@oxprod.com
2

F1 Luggage Guidelines
Motor Cycle Industry Association Ltd.
A motorcycle is a relatively ‘hostile environment’ for luggage and the following general guidelines are provided to
ensure that the luggage performs as the manufacturer intended. As with all types of luggage, users should always
pay particular attention to the manufacturer’s own safety, fitment and usage instructions included with this product.
LOADING
FITMENT
RAINCOVERS
USAGE
PRODUCT
IMPORTANT
Always ensure that luggage is loaded as evenly as possible and within the stated
maximum capacity and weight limits. Heavy objects should be loaded at the bottom
and particular care should be taken with sharp objects to avoid damaging the luggage.
Dependent on the type and specification of the luggage, the contents may have to be
protected against the elements (e.g. water, dirt, etc.) by wrapping in plastic bags for example.
All adjacent surfaces of the motorcycle should be clean and smooth to avoid possible
abrasion. Where the possibility of abrasion exists, the necessary precautions should be
taken. The luggage should be securely attached to the motorcycle and should be mounted
clear of moving parts and sources of heat such as engine and exhaust system(s).It is
recommended that riders check the security/mounting of luggage at regular intervals
throughout their journey.
It is the responsibility of the user to ensure rain covers are fitted safely and correctly (see
fitment advice above) i.e insure that they are fitted snugly to the luggage and are not left
baggy and able to fill with air when on the move.
As the fitment of luggage may affect the stability or operating characteristics of the
motorcycle, riders should always heed the stated recommended maximum speeds for
both solo and ‘two-up’ use. Care should also be taken with luggage that uses magnetic
mountings as these may affect items containing magnetic data such as credit cards, film,
etc. This luggage has been designed for universal fitment on motorcycles, for road use only.
To ensure longevity of the luggage, the manufacturer’s own cleaning and storage instructions
should always be observed.
The manufacturer cannot accept any liability for damage caused to the vehicle, the luggage
or its contents arising out of its misuse or any failure to fit and use it in accordance with the
above guidelines and the manufacturer’s special instructions.
3
GB
F1 Luggage Guidelines
Quick Release:
Included (where
applicable):
• 1 x Tankbag • 1 x Shoulder strap • 1 x Waterproof liner • 1 x Base
• 1 x Quick Release mechanism • 3 x Cap head screws • 3 x Washers
• 3 x Lock nuts
Required:
• 3 Hex key • 8mm Spanner
• Quick Release bike adaptor (to be purchased separately from an Oxford dealer)
QR ADAPTOR
TYPE 1
5 HOLE
(OL280)
QR ADAPTOR
TYPE 2
6 HOLE
(OL281)
QR ADAPTOR
TYPE 3
7 HOLE
(OL282)
QR ADAPTOR
TYPE 4
5 HOLE
(OL283)
QR ADAPTOR
TYPE 5
5 HOLE
(OL284)
QR ADAPTOR
TYPE 6
4 HOLE
(OL279)
QR ADAPTOR
TYPE 7
3 HOLE
(OL278)
Fitting instructions:
• Before fitting your tank bag, always ensure that the tank is completely free from any dirt. This is because even the
finest of residue can lead to the marking of the tank. It is also advisable to clean the bottom of the bag every time
before use.
• Pass the headstock strap around the headstock and clip together. This acts as a secondary securing device.
• Some bags can be expanded vertically to create more capacity. Ensure that it does not hinder your line of sight,
handlebar movement or use of the controls
• Ensure that the bag is securely fastened before setting off.
To fit:
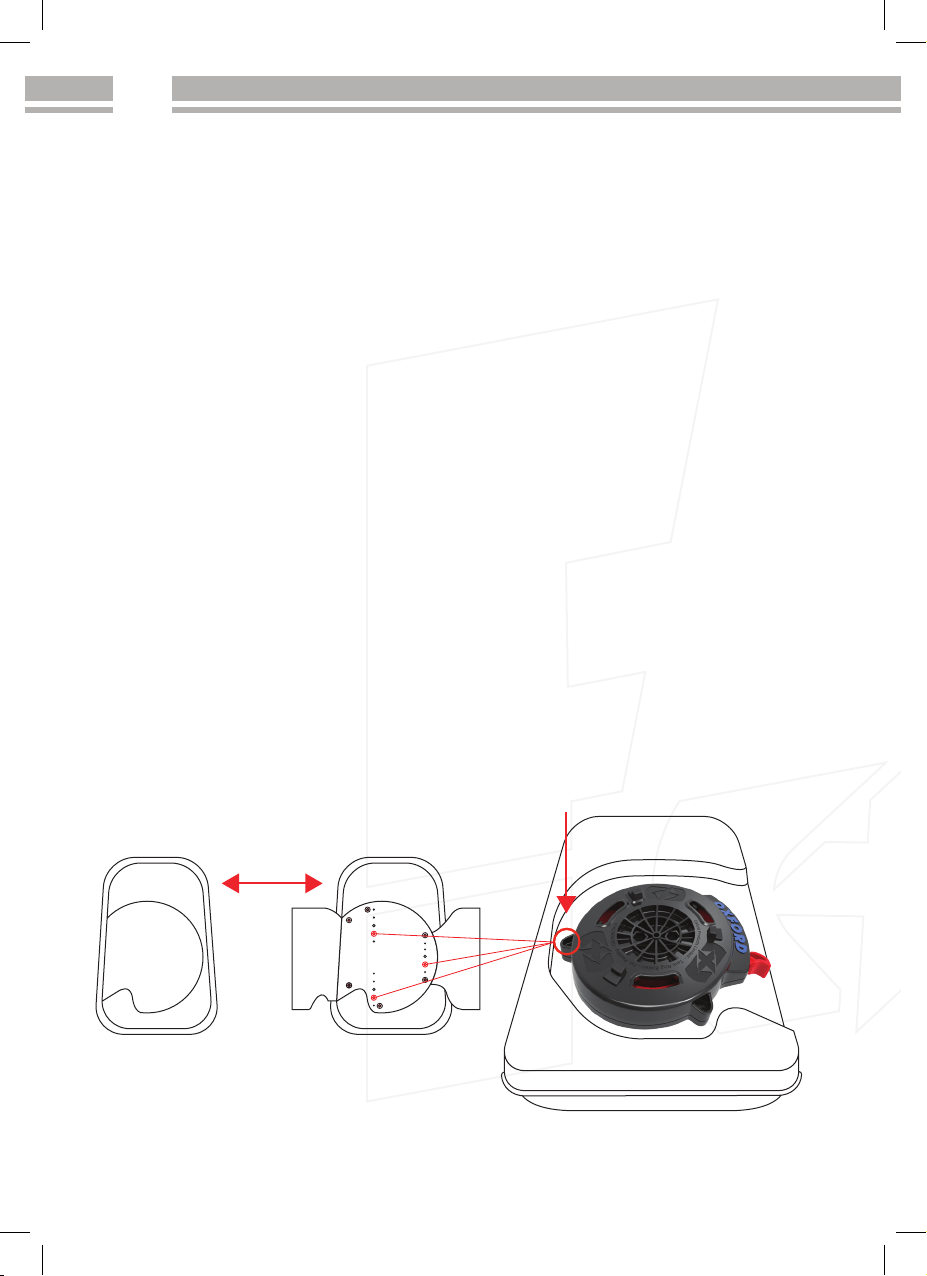
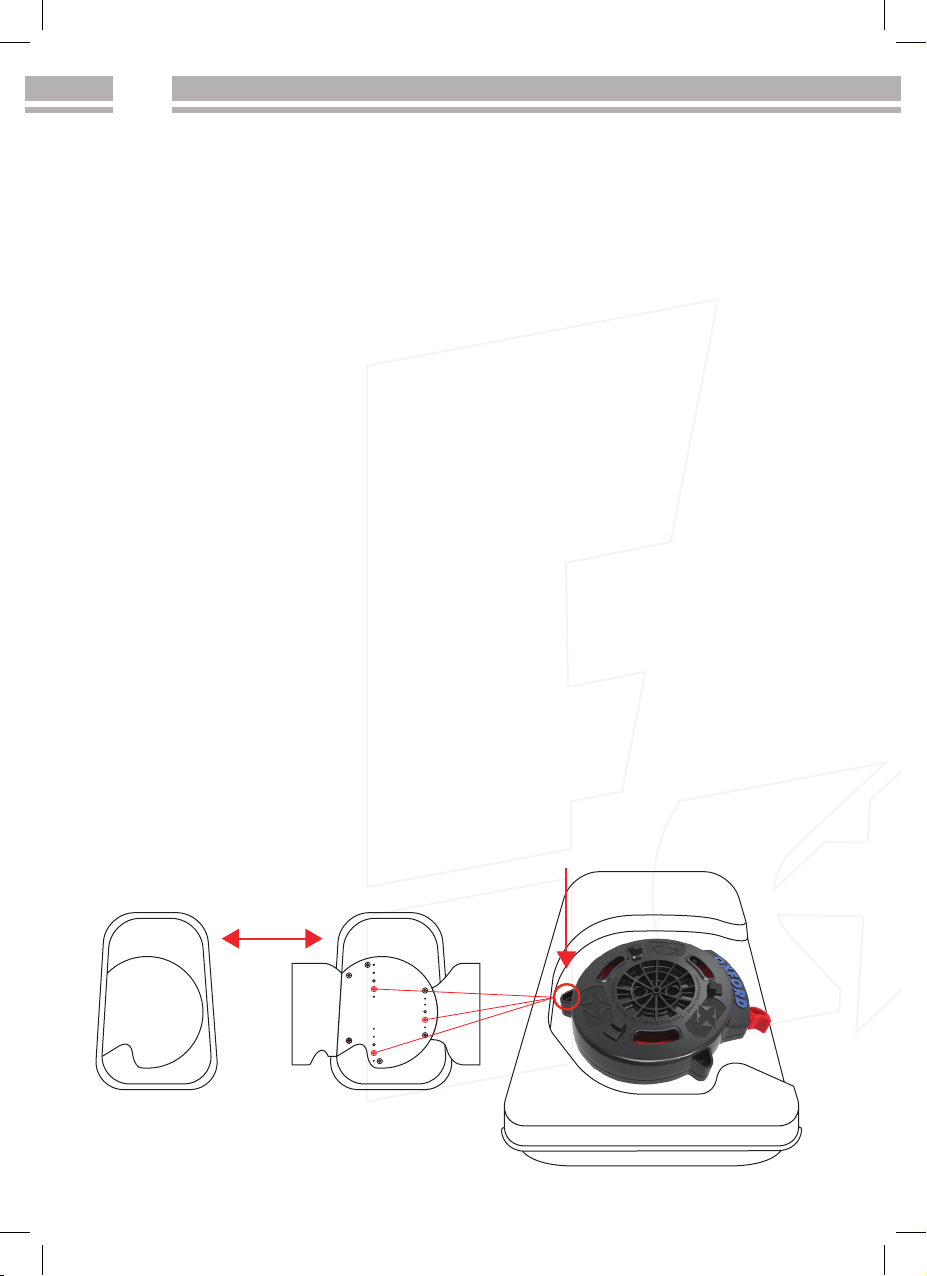
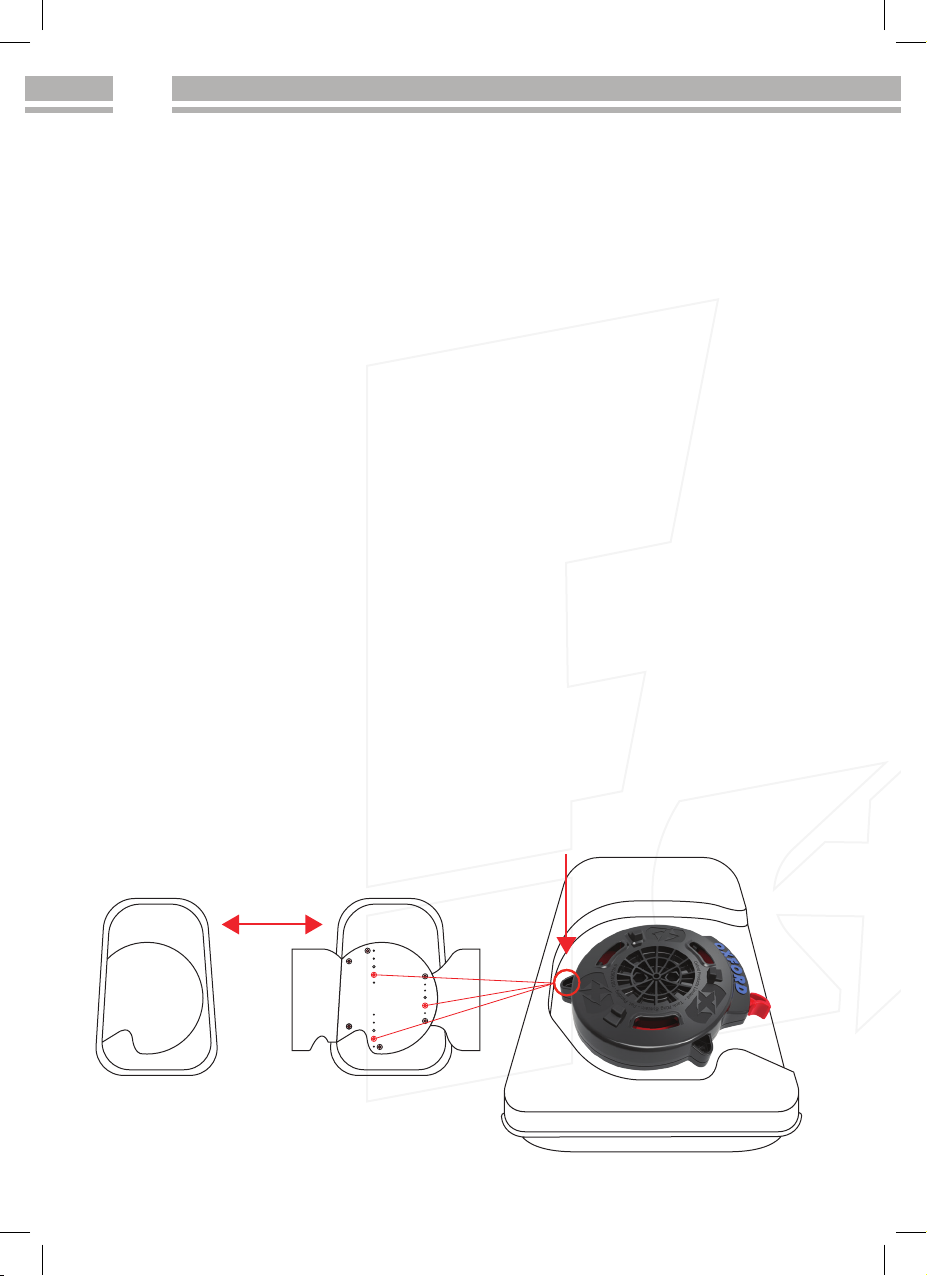
1i. Unzip the base from your bag and open the hook
and loop cover to expose the attachment holes of
the base.
2. Using a 3mm Hex Key and 8mm Spanner attach
Quick Release mechanism to base using screws,
nuts & washers provided.
ii. On reverse/underside of the base select from the
available positions where you would like to position
the Quick Release mechanism to best suit your bike
or personal preference.
4

GB
F1 Luggage Guidelines
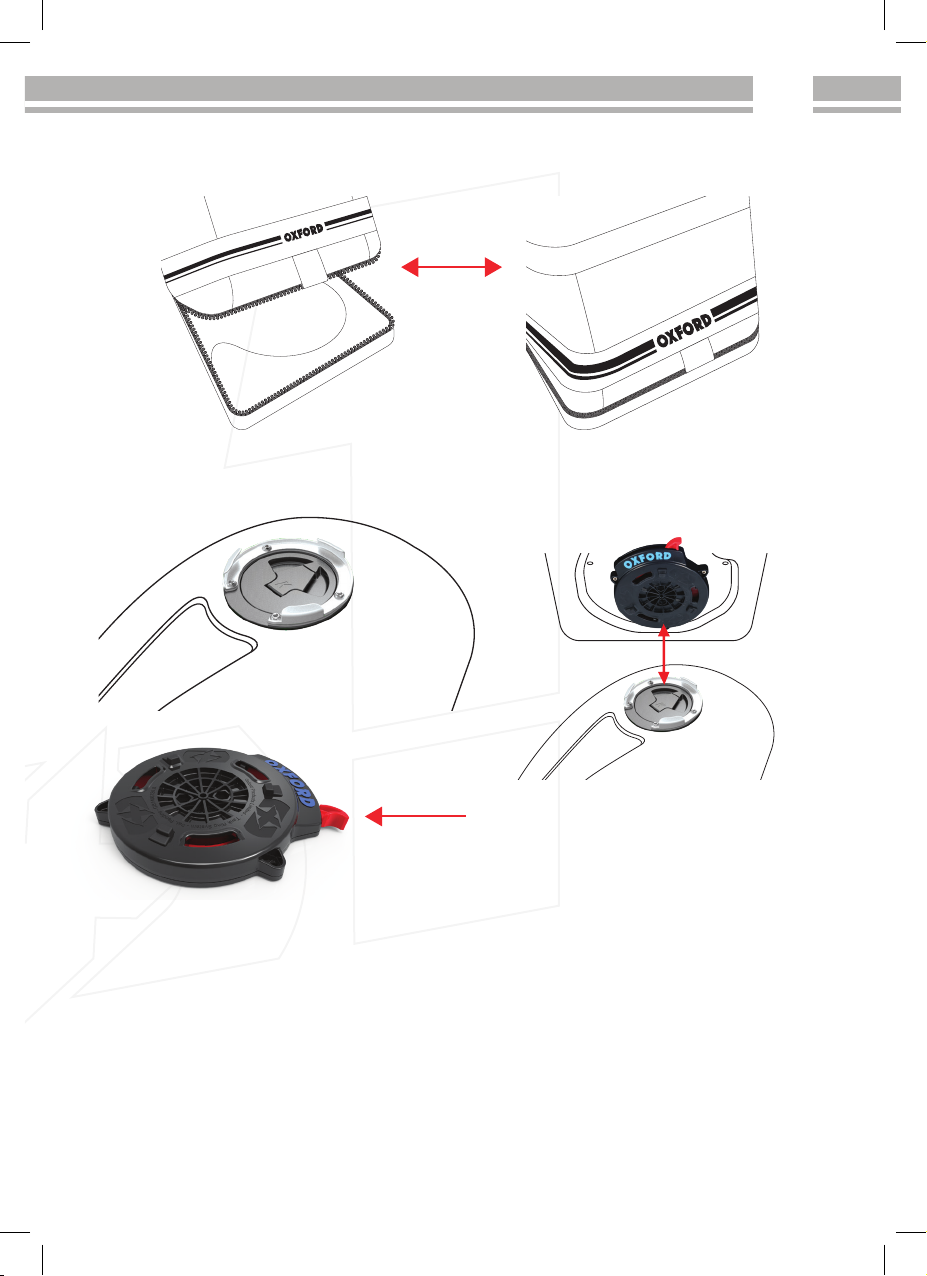
3. Securely zip base (with Quick Release mechanism attached) back onto bag.
4. You should have purchased separately and attached
the correct Quick Release bike adaptor for your fuel
cap.
WARNING
• Do not overload - maximum recommended loading capacity 5kg.
• It is the owner’s responsibility to ensure that the luggage is attached in such a way that it does not damage or put
at risk the owner or any property of the owner.
• Do not exceed the UK legal speed limit. This product has only been tested for use at UK road legal speeds.
• Regularly check cords/ straps for wear and replace if they show any signs of weakening or friction damage. These
can be purchased from your local dealer.
PLEASE NOTE
• If the luggage is not attached securely, it may become detached and cause an obstruction that could lead to
serious injury and even death.
• Do not allow any straps to hang loose near wheels or chains
5. Line up the QR mechanism to the QR bike adaptor
and with one touch lock into place, the mechanism
will slide on to the adaptor and click as it locks
securely into position, the release mechanism will
raise to lock position.
6. To release pull one touch release lever
backwards with light force
5
Instructions d’installation
FR
Mécanisme QR:
Contenu (le cas
échéant):
• 1 sacoche de réservoir • Système de plaques semi-rigide • 1 bandoulière
• 1 housse de pluie / intérieur imperméable • Base • Mécanisme QR
• 3 vis à tête cylindrique à six pans creux • 3 rondelles • 3 écrous d’arrêt
Matériel requis:
• 3mm Clé hexagonale • Clé de 8 mm
• Adaptateur QR pour moto (disponible auprès de votre distributeur Oxford)
ADAPTATEUR
QR DE TYPE 1
5 TROUS
(OL280)
ADAPTATEUR
QR DE TYPE 2
6 TROUS
(OL281)
ADAPTATEUR
QR DE TYPE 3
7 TROUS
(OL282)
ADAPTATEUR
QR DE TYPE 4
5 TROUS
(OL283)
ADAPTATEUR
QR DE TYPE 5
5 TROUS
(OL284)
ADAPTATEUR
QR DE TYPE 6
4 TROUS
(OL279)
ADAPTATEUR
QR DE TYPE 7
3 TROUS
(OL278)
Conseils à l’attention de l’utilisateur :
• Avant d’installer votre sacoche de réservoir, toujours vérifier que le réservoir est exempt de toute saleté. En effet,
le moindre résidu peut causer des marques sur le réservoir. Il est également conseillé de nettoyer le fond de la
sacoche avant chaque utilisation.
• Passer la sangle de la poupée fixe autour de cette dernière et l’attacher à l’aide du clip. Cela sert de dispositif de
fixation secondaire.
• La sacoche s’agrandit verticalement pour offrir une plus grande capacité.
Vérifier que cela ne gêne pas le champ visuel, le mouvement du guidon ou l’utilisation des commandes.
• Vérifier que la sacoche est solidement fixée en place avant de partir.
Installation:
1i. Ouvrir la fermeture éclair à la base de la sacoche
et détacher la partie Velcro pour révéler les trous
de fixation de la base.
2. À l’aide d’une clé hexagonale et d’une clé de
8 mm, fixer le mécanisme QR à la base avec
les vis, les écrous et les rondelles fournies.
ii. De l’autre côté de la base, sélectionner l’une des
positions (à l’exception des modèles OL290/1/2)
disponibles pour le mécanisme QR en fonction de
votre moto ou de votre préférence personnelle.
6
Instructions d’installation
FR
3. Refermer la fermeture éclair (une fois le mécanisme QR installé) de la base de la sacoche.
4. Vous devez avoir acheté séparément et installé
l’adaptateur QR adapté au bouchon de
réservoir de votre moto.
AVERTISSEMENT
• Ne pas trop charger les sacoches. Capacité de charge maximale recommandée : 5 kg par sacoche (2 kg
pour les modèles Q4R).
• La fonction sac à dos doit uniquement être utilisée lorsque vous ne conduisez PAS la moto. Si elle est
utilisée pendant la conduite, elle peut entraîner de graves blessures, voire même la mort, en cas d’accident.
• Il incombe au propriétaire de s’assurer que les bagages soient fixés de manière à ne pas endommager, ni
mettre en danger le propriétaire ou tout bien de ce dernier.
• Veuillez respecter les réglementations de vitesse en vigueur au Royaume-Uni. Ce produit n’a été testé que
pour une utilisation aux limites de vitesse en vigueur au Royaume-Uni.
REMARQUE
• Si les bagages ne sont pas fixés correctement, ils risquent de se détacher et de causer une obstruction susceptible
d’entraîner de graves blessures, voire la mort.
• En cas de doute quant à la sécurité des bagages sur la moto, demandez conseil à votre revendeur Oxford avant
toute utilisation.
5. Aligner le mécanisme QR avec l’adaptateur et, avec
la fixation One Touch en place, le mécanisme doit se
glisser sur l’adaptateur et s’encliqueter en position.
Le mécanisme de décrochage se relève en position
de verrouillage.
6. Pour le décrocher, appuyer légèrement sur le
mécanisme de décrochage.
7
Anweisung zum anbringen am fahrzeug
DE
SV-Mechanismus:
Enthalten sind (wo
zutreffend):
• 1 Tankrucksack • Halbstarre Platten • 1 Schultergurt
• 1 regendichte Abdeckung/wasserdichtes Futter • Unterlage
• 3 Feststellmuttern • 3 Unterlegscheiben • 3 Feststellmuttern
Erforderlich:
• 3mm Innensechskantschlüssel • 8 mm Schraubenschlüssel
• SV Rad-Adapter (erhältlich bei Oxford Händler)
SV ADAPTER
TYP 1
5 ÖFFNUNGEN
(OL280)
SV ADAPTER
TYP 2
6 ÖFFNUNGEN
(OL281)
SV ADAPTER
TYP 3
7 ÖFFNUNGEN
(OL282)
SV ADAPTER
TYP 4
5 ÖFFNUNGEN
(OL283)
SV ADAPTER
TYP 5
5 ÖFFNUNGEN
(OL284)
SV ADAPTER
TYP 6
4 ÖFFNUNGEN
(OL279)
SV ADAPTER
TYP 7
3 ÖFFNUNGEN
(OL278)
Benutzerhinweis:
• Stellen Sie vor dem Anbringen des Tankrucksacks sicher, dass der Tank vollständig frei von Verschmutzungen
ist. Selbst kleinste Schmutzreste können bleibende Spuren auf dem Tank hinterlassen. Es ist darüber hinaus
empfehlenswert, die Unterseite des Rucksacks vor der Verwendung immer zu reinigen.
• Legen Sie den Gabelgurt um die Lenkgabel und stecken Sie ihn zusammen. Dies dient als zusätzliche Sicherung.
• Der Rucksack kann zur Erhöhung der Kapazität vertikal erweitert werden. Stellen Sie sicher, dass der Rucksack
Ihr Sichtfeld, die Beweglichkeit des Lenkers oder die Bedienung des Motorrads nicht behindert.
• Vergewissern Sie sich vor dem Losfahren, dass der Rucksack ordentlich befestigt ist.
Montage:
1i. Öffnen Sie den Reißverschluss vom
Boden Ihres Rucksacks und öffnen Sie die
Klettverschlussabdeckung, um an die Befes
tigungsöffnungen des Bodens zu gelangen.
2. Befestigen Sie den SV-Mechanismus mit
einem Innensechskantschlüssel und 8 mm
Schraubenschlüssel sowie mit Hilfe der mitgelieferten
Schrauben, Muttern und Unterlegscheiben am
Boden.
ii. Wählen Sie auf der Rückseite/Unterseite des Bodens
aus den verfügbaren Positionen (außer bei
OL290/1/2) eine aus, in der Sie den SV-Mech
anismus passend für Ihr Motorrad oder nach Ihren
persönli chen Vorlieben positionieren möchten.
8
 Loading...