

Page 1
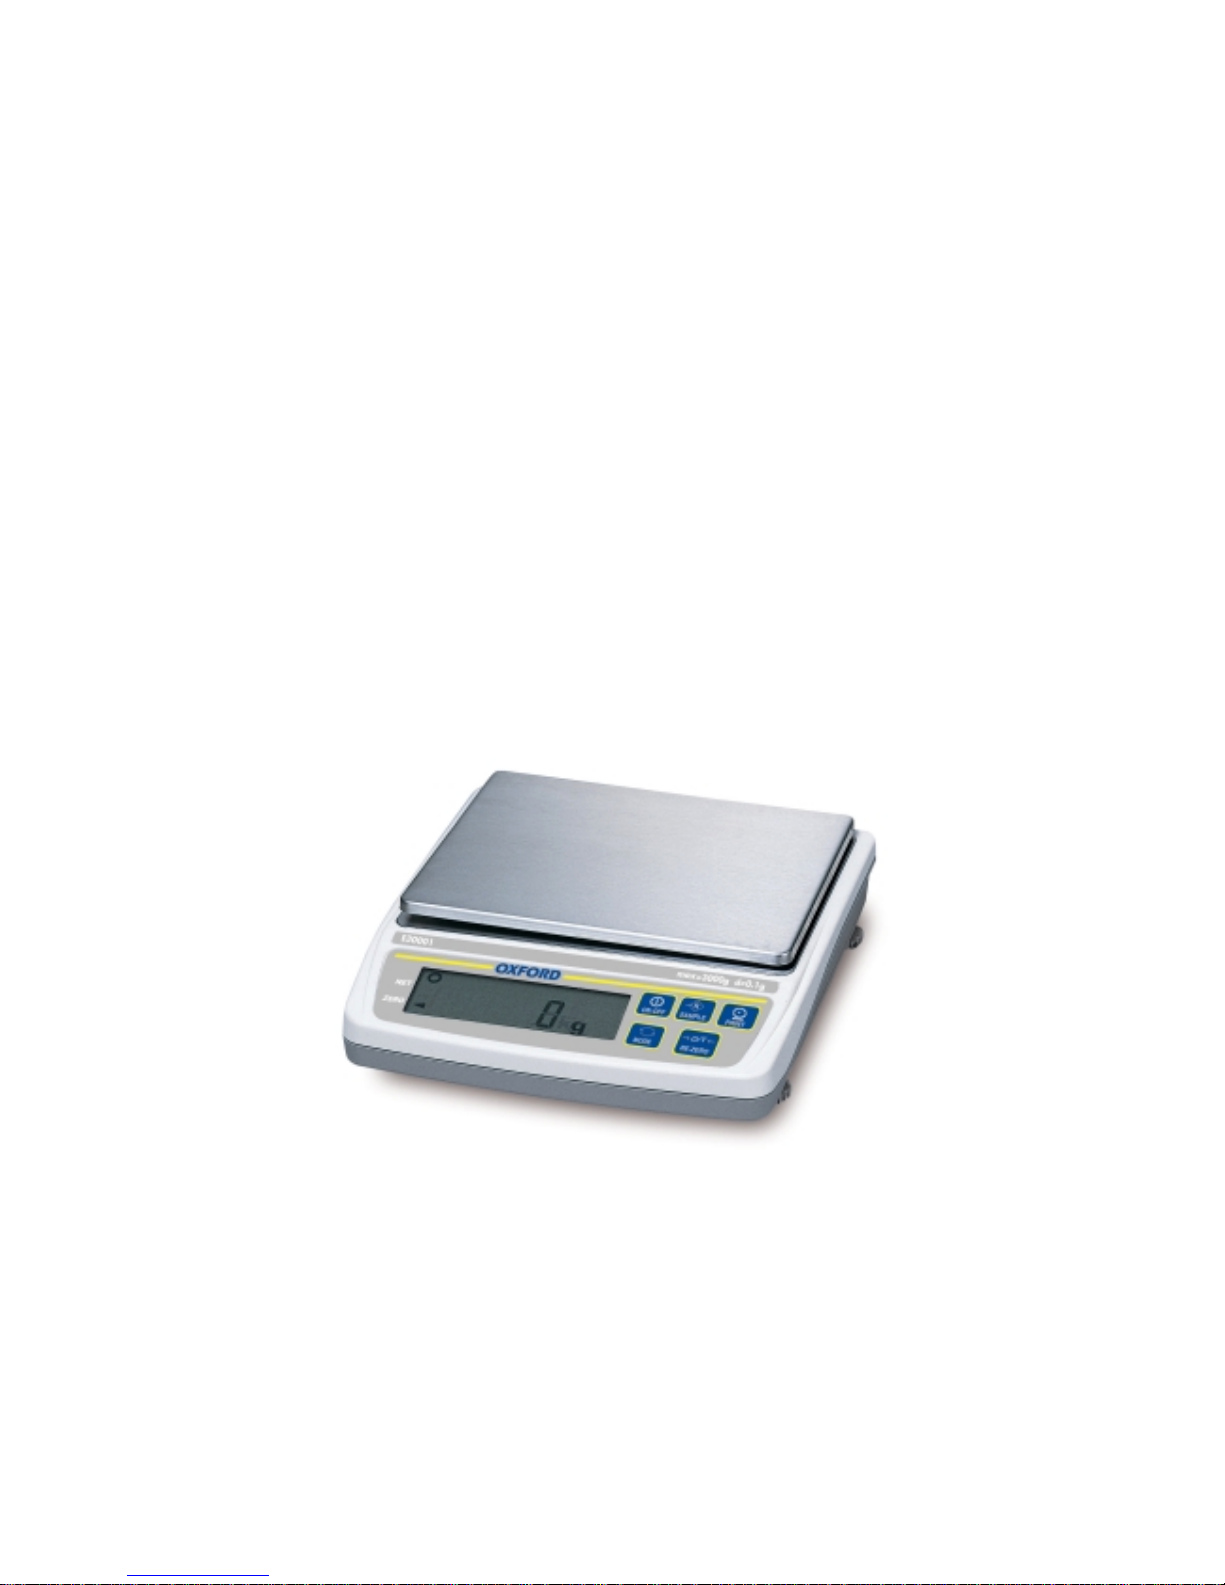
Oxford
E Series
Instruction Manual
Page 2

E Series User Manual
1. Introduction . . . . . . . . . . . . . . . . . . . . . . . . . . . . . . . . . . . . . . . . . . . . . . . . . . . . . . . . . . . . . . . . . .1
2. Unpacking . . . . . . . . . . . . . . . . . . . . . . . . . . . . . . . . . . . . . . . . . . . . . . . . . . . . . . . . . . . . . . . . . . .1
3. Parts name and function . . . . . . . . . . . . . . . . . . . . . . . . . . . . . . . . . . . . . . . . . . . . . . . . . . . . . . .1
4. Setting up . . . . . . . . . . . . . . . . . . . . . . . . . . . . . . . . . . . . . . . . . . . . . . . . . . . . . . . . . . . . . . . . . . .3
4-1. Setting up your balance . . . . . . . . . . . . . . . . . . . . . . . . . . . . . . . . . . . . . . . . . . . . . . . . . . . . . . . .3
4-2. Power source . . . . . . . . . . . . . . . . . . . . . . . . . . . . . . . . . . . . . . . . . . . . . . . . . . . . . . . . . . . . . . . .3
5. Operation . . . . . . . . . . . . . . . . . . . . . . . . . . . . . . . . . . . . . . . . . . . . . . . . . . . . . . . . . . . . . . . . . . . .4
5-1. Turning the power ON and OFF . . . . . . . . . . . . . . . . . . . . . . . . . . . . . . . . . . . . . . . . . . . . . . . . . .4
5-2. LCD backlight . . . . . . . . . . . . . . . . . . . . . . . . . . . . . . . . . . . . . . . . . . . . . . . . . . . . . . . . . . . . . . . .4
5-3. Units . . . . . . . . . . . . . . . . . . . . . . . . . . . . . . . . . . . . . . . . . . . . . . . . . . . . . . . . . . . . . . . . . . . . . . .5
5-4. Selecting a weighing unit . . . . . . . . . . . . . . . . . . . . . . . . . . . . . . . . . . . . . . . . . . . . . . . . . . . . . . .6
5-5. Basic operation . . . . . . . . . . . . . . . . . . . . . . . . . . . . . . . . . . . . . . . . . . . . . . . . . . . . . . . . . . . . . . .6
5-6. Weighing range for the EW-i series . . . . . . . . . . . . . . . . . . . . . . . . . . . . . . . . . . . . . . . . . . . . . . . .7
5-7. Counting mode (pcs) . . . . . . . . . . . . . . . . . . . . . . . . . . . . . . . . . . . . . . . . . . . . . . . . . . . . . . . . . 8
5-8. Percent mode (%) . . . . . . . . . . . . . . . . . . . . . . . . . . . . . . . . . . . . . . . . . . . . . . . . . . . . . . . . . . . . 9
6. Calibration . . . . . . . . . . . . . . . . . . . . . . . . . . . . . . . . . . . . . . . . . . . . . . . . . . . . . . . . . . . . . . . . . .10
6-1. Calibration using a weight . . . . . . . . . . . . . . . . . . . . . . . . . . . . . . . . . . . . . . . . . . . . . . . . . . . . . .11
7. Functions . . . . . . . . . . . . . . . . . . . . . . . . . . . . . . . . . . . . . . . . . . . . . . . . . . . . . . . . . . . . . . . . . . .12
7-1. Key operation . . . . . . . . . . . . . . . . . . . . . . . . . . . . . . . . . . . . . . . . . . . . . . . . . . . . . . . . . . . 12
7-2. Entering the function setting mode . . . . . . . . . . . . . . . . . . . . . . . . . . . . . . . . . . . . . . . . . . . . 13/14
7-3. Function List . . . . . . . . . . . . . . . . . . . . . . . . . . . . . . . . . . . . . . . . . . . . . . . . . . . . . . . . . .15/16
8. Specifications . . . . . . . . . . . . . . . . . . . . . . . . . . . . . . . . . . . . . . . . . . . . . . . . . . . . . . . . . . .17
8-1. E series . . . . . . . . . . . . . . . . . . . . . . . . . . . . . . . . . . . . . . . . . . . . . . . . . . . . . . . .17
8-2. Dimensions . . . . . . . . . . . . . . . . . . . . . . . . . . . . . . . . . . . . . . . . . . . . . . . . . . . . . . . . . . . . . . . .18
Contents
Page 3
E Series User Manual
GB 4
This manual describes how this balance works and how to get the most out of it in terms of
performance.
All E series balances have the following features:
• The E series are high resolution type electronic balances having a resolution of 1/6,000 ~ 1/30,000.
• Both series have almost same functions like counting function, % function and comparator function.
• The backlight LCD will help in low light conditions
• The standard serial interface of RS-232C can be connected with a printer or personal computer.
• Using the serial interface, Good Laboratory Practice (GLP) data can be obtained.
• With the optional rechargeable battery pack (OP-09), the balance can be used for cordless operation.
Introduction
1
Unpacking
2
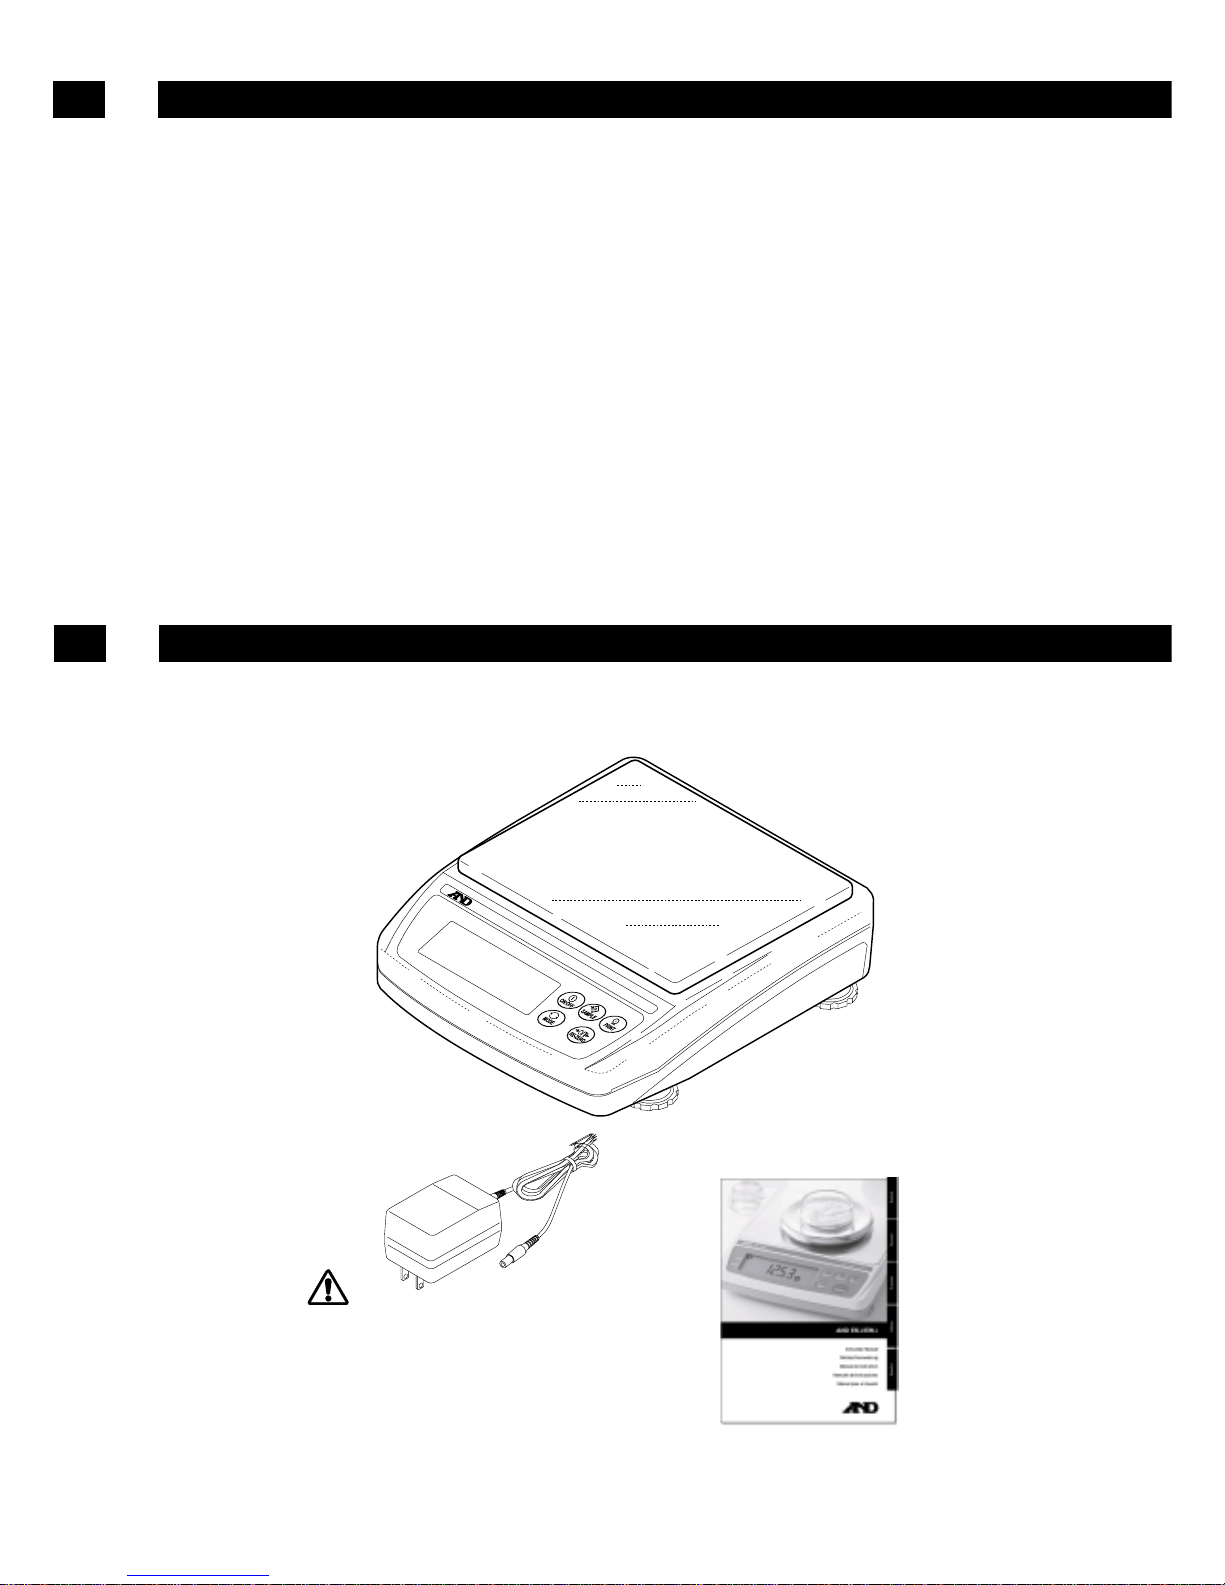
Instruction manual
AC adapter
Please confirm that the AC adapter type is
correct for your local voltage and receptacle
type.
Main unit
NET
ZERO
Max 1200g d=0.1g
Page 4
English
2
Parts name and function
3
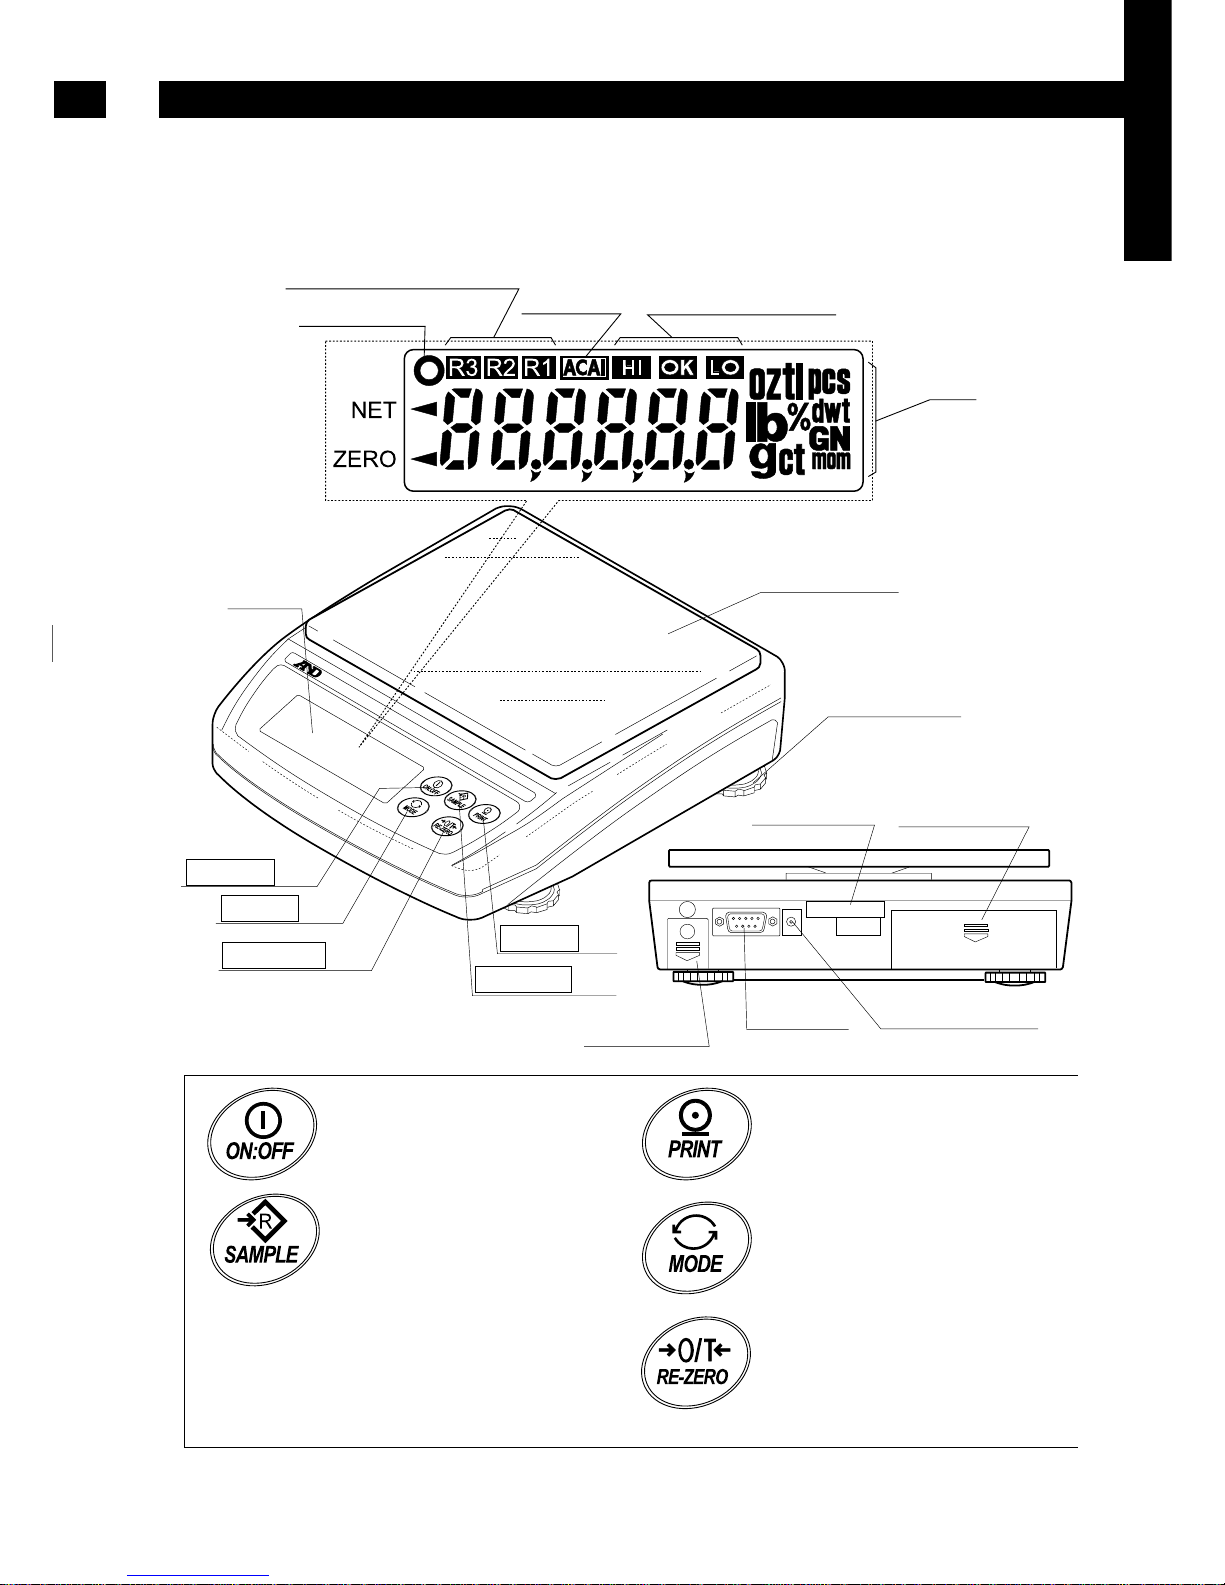
Used to turn the power on or off.
Hold down to enter the function
setting mode.
Weighing mode (EW-i only):
Changes the weighing range
(when rng 0 is selected).
pcs mode:
Enters the sample unit weight
storing mode.
% mode:
Enters the 100% weight
storing mode.
Outputs the weight value to a
printer.
Switches the weighing unit
(the weighing mode).
Clears the display to zero.
NET
ZERO
Max 1200g d=0.1g
Weighing range indicator
ACAI mark
Comparator results
Units
Stability mark
LCD display
ON/OFF key
MODE key
RE-ZERO key
PRINT key
SAMPLE key
Weighing pan
Leveling foot
Spirit level
OP-04/09 slot
AC adapter jack
RS-232C
Calibration
switch cover
Page 5

E Series User Manual
3
Setting up
4
4-1. Setting up your balance
1. Place the weighing pan on the main unit as shown on the previous page.
2. Adjust the level of the balance using the leveling feet. Use the spirit level to confirm. The bubble should
be in the center of the circle.
3. Calibrate your balance before use. (See “6. Calibration”)
Balance location
To measure correctly, to keep the balance in good conditions, and to prevent hazards, observe the
following
• Do not install the balance in locations that are subject to dust, breeze, vibration, large temperature
fluctuations, condensation or that may have a magnetic field.
• Do not install the balance on a surface that is soft or that may cause the balance level to shift.
• Do not install the balance in direct sunshine.
• Do not install the balance near heaters or air conditioners.
• Do not use an unstable AC power source.
• Do not install the balance in a place where combustible or corrosive gases may exist.
• Allow the balance to reach equilibrium with the ambient temperature before use.
• Switch the power ON at least half an hour before use so that the balance can warm up.
• When the balance is installed for the first time, or the balance has been moved, carry out calibration
as described in “7. Calibration.”
4-2. Power source
For the power source, the AC adapter or the rechargeable battery pack (OP09-i Optional item)
is available.
When using the AC adapter
Use a stable power source. To use the AC adapter, insert the AC adapter plug into the AC adapter jack
When using the rechargeable battery pack (OP-09)
Insert the rechargeable battery pack into the main unit.
The balance can be used continuously for about 9 hours using the battery pack.
• If “Lb0” is displayed when using the battery pack, immediately stop using it, and recharge
the battery pack or use the AC adapter.
• Be sure to charge the battery pack before using it for the first time.
Page 6
4
Operation
5
5-1. Turning the power ON and OFF
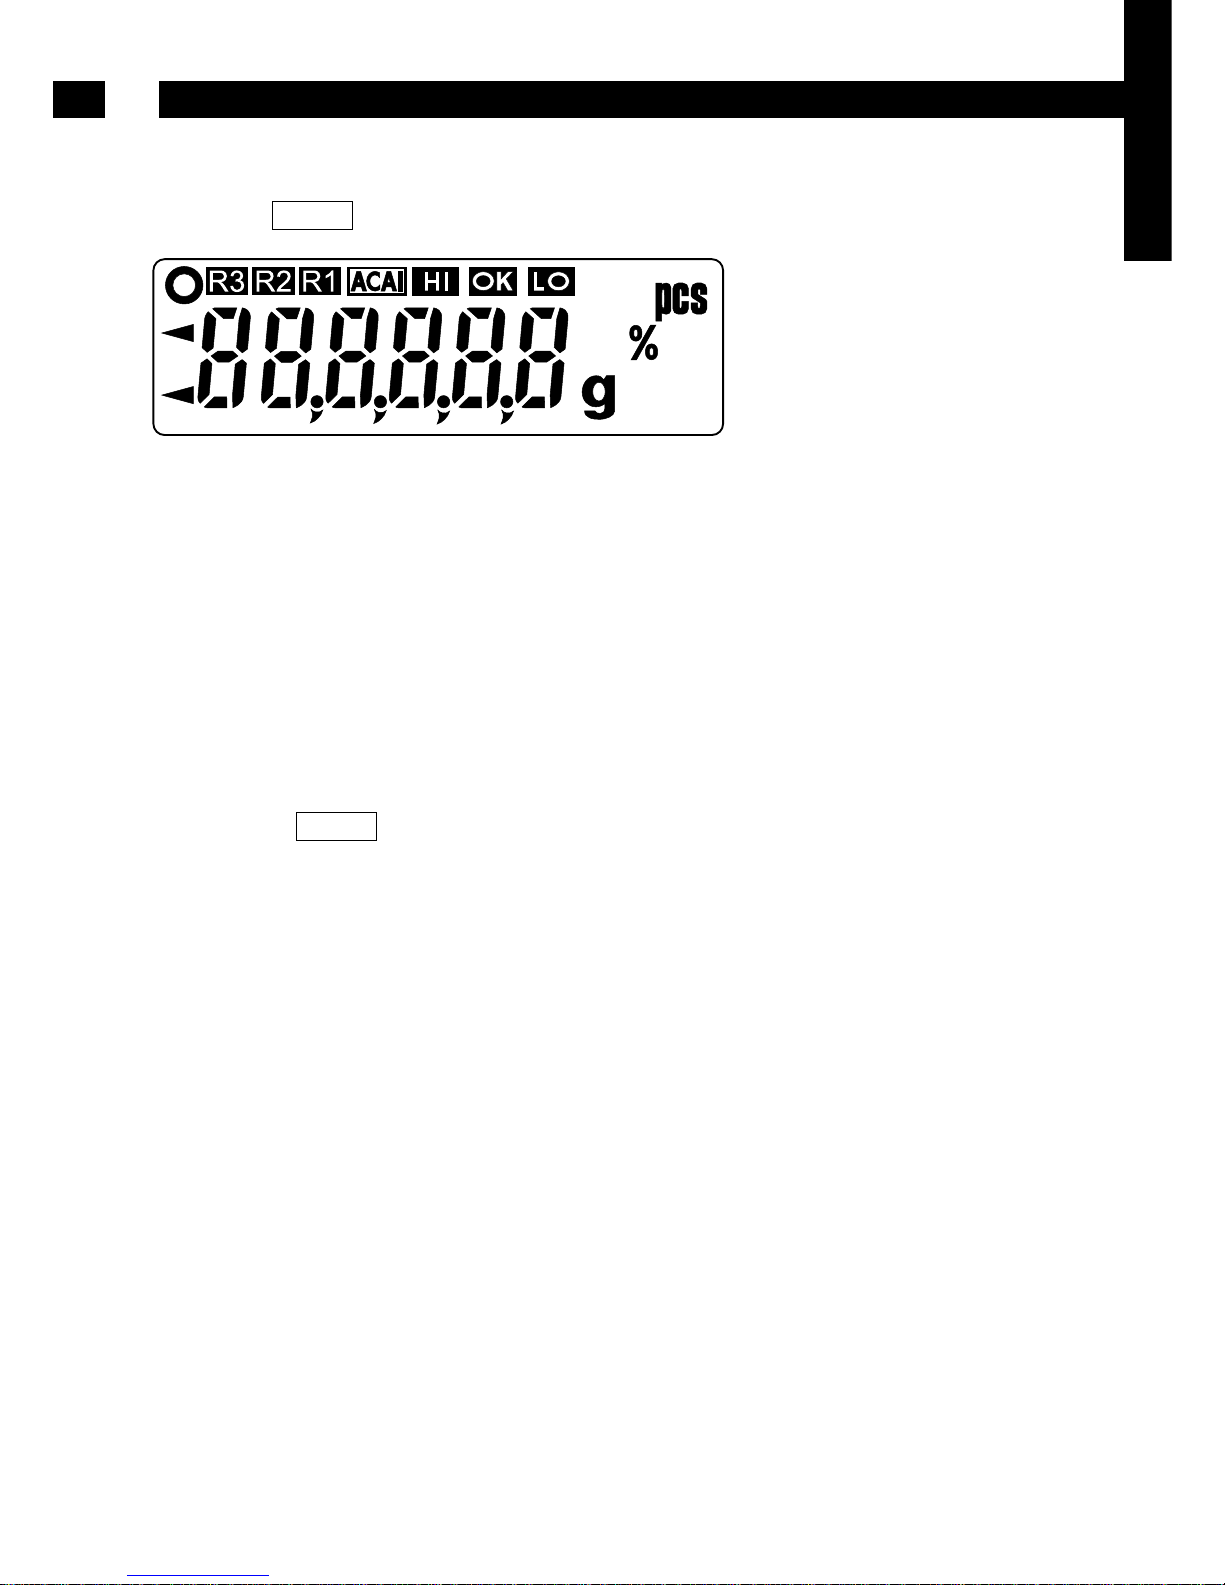
1. Press the ON/OFF key to turn the power ON.
All the display symbols are displayed as shown above.
(About units: Only the units available illuminate.)
When the weighing value internally becomes stable, the display turns off except for a weighing unit and a
decimal point.
The balance waits for the weighing data to become stable, and zero will be shown with the ZERO mark
(power-on zero).
The range for power-on zero is within ±10% of the weighing capacity around the calibrated zero point.
If the power is switched ON while there is a load beyond this range, the balance is tared to zero and the
NET mark and the ZERO mark turn on.
2. Pressing the ON/OFF key again, and the power will be switched OFF.
• Auto-power off function
It is possible to have the power automatically switched OFF, if zero is displayed for
approximately 5 minutes. See “8-5. Function list” and set the function “poff”.
5-2. LCD backlight
The LCD backlight will turn on when the weight value changes more than 4 display digits or any key
operation is done. When the weight data becomes and stays stable for some time, it will automatically
turn off. There is also a setting that will make the backlight always stay on or off. For details, see the
function setting “Ltup” of “Function list”.
Page 7
E Series User Manual
5
5-3. Units
The most common unit of weight used around the world is gram, but there is often a need to shift to
alternative units specific to the country where the balance is used or to select modes such as counting or
percent.
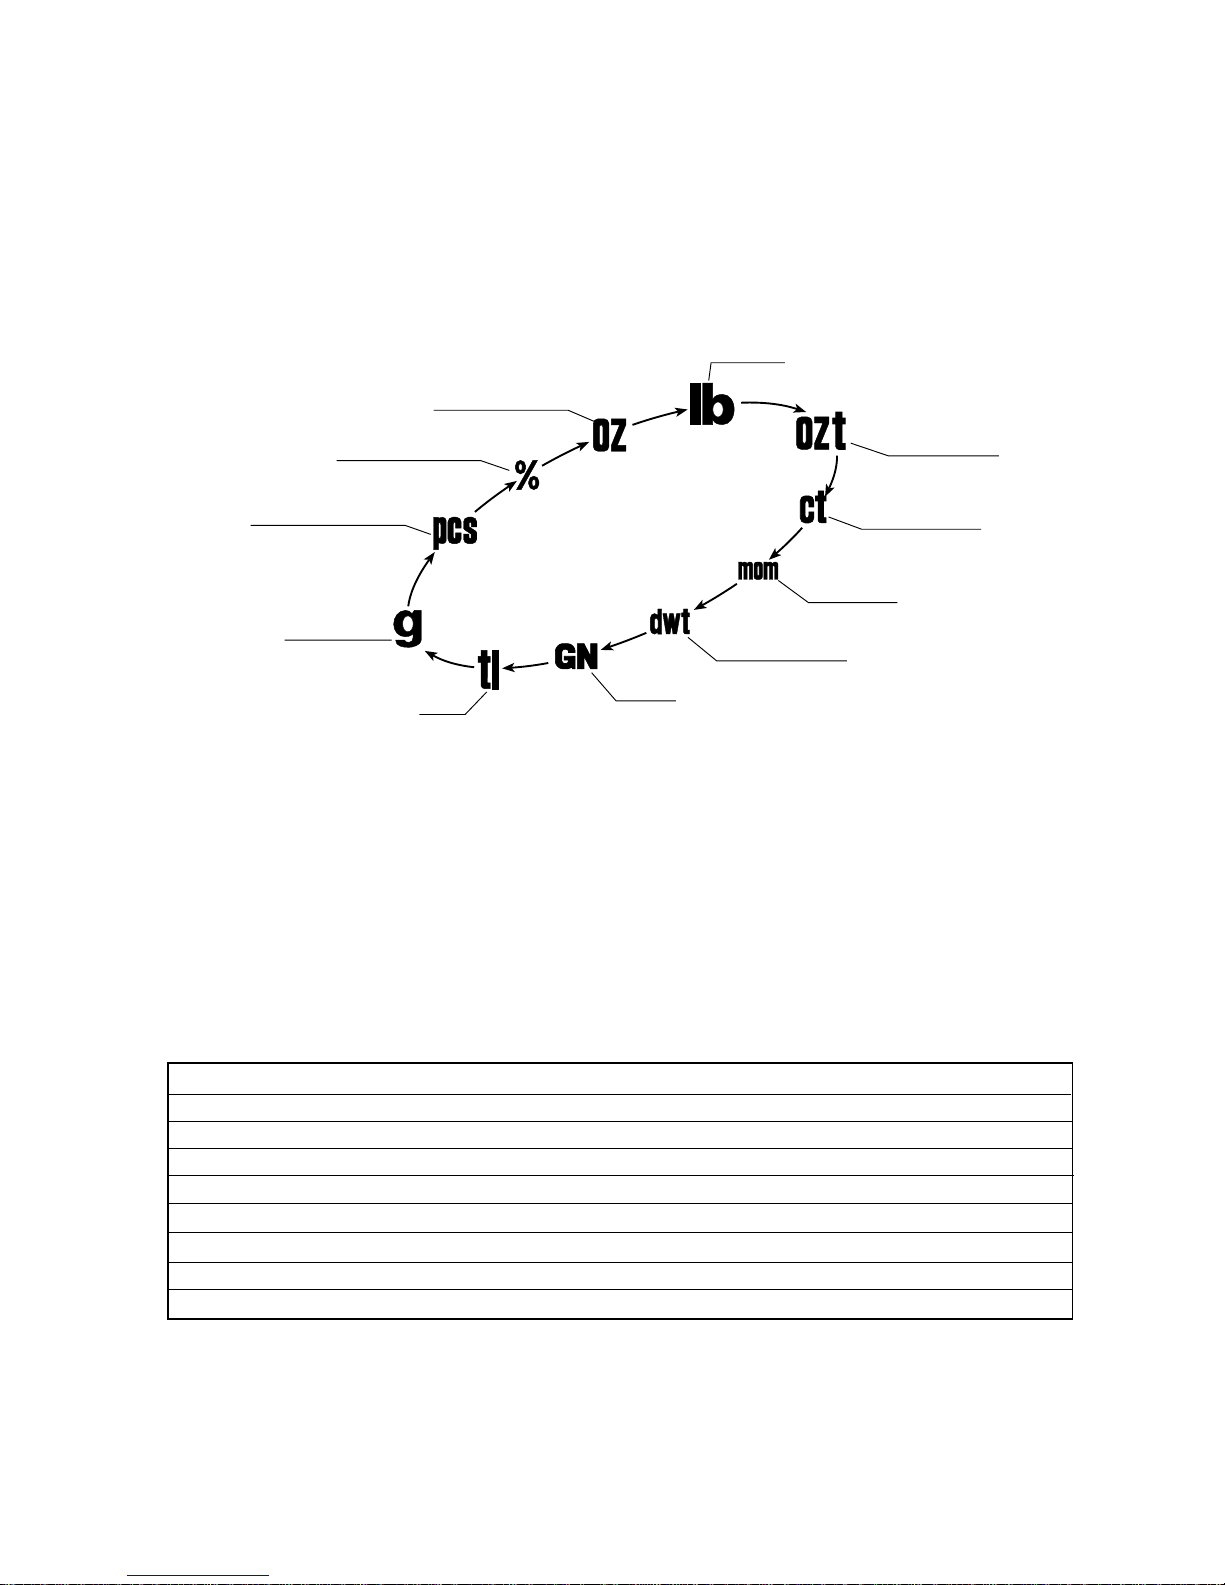
The units and the order they appear in the display are as follows:
Among the units, those available for the user have been set at the factory before shipping.
The unit can be selected in the function setting mode. The order of the units available is the same as
above, while skipping the units that are not available.
Some units are not available on different models. For details, see “13. Specifications”
Conversion table
Units Name Conversion to gram
oz Ounce (avoir) 28.349523125 g
lb Pound (UK) 453.59237 g
ozt Troy ounce 31.1034768 g
ct Metric carat 0.2 g
mom momme 3.75 g
dwt Pennyweight 1.55517384 g
GN Grain (UK) 0.06479891 g
tl tael (Hong Kong general, Singapore) 37.7994 g
• Note
The unit “tl (tael)” is for special version only.
Gram
Counting mode
Percent mode
Ounce (avoir)
Pound
Troy ounce
Metric carat
Momme
Pennyweight
Grain
Tael
Page 8
6
5-4. Selecting a weighing unit
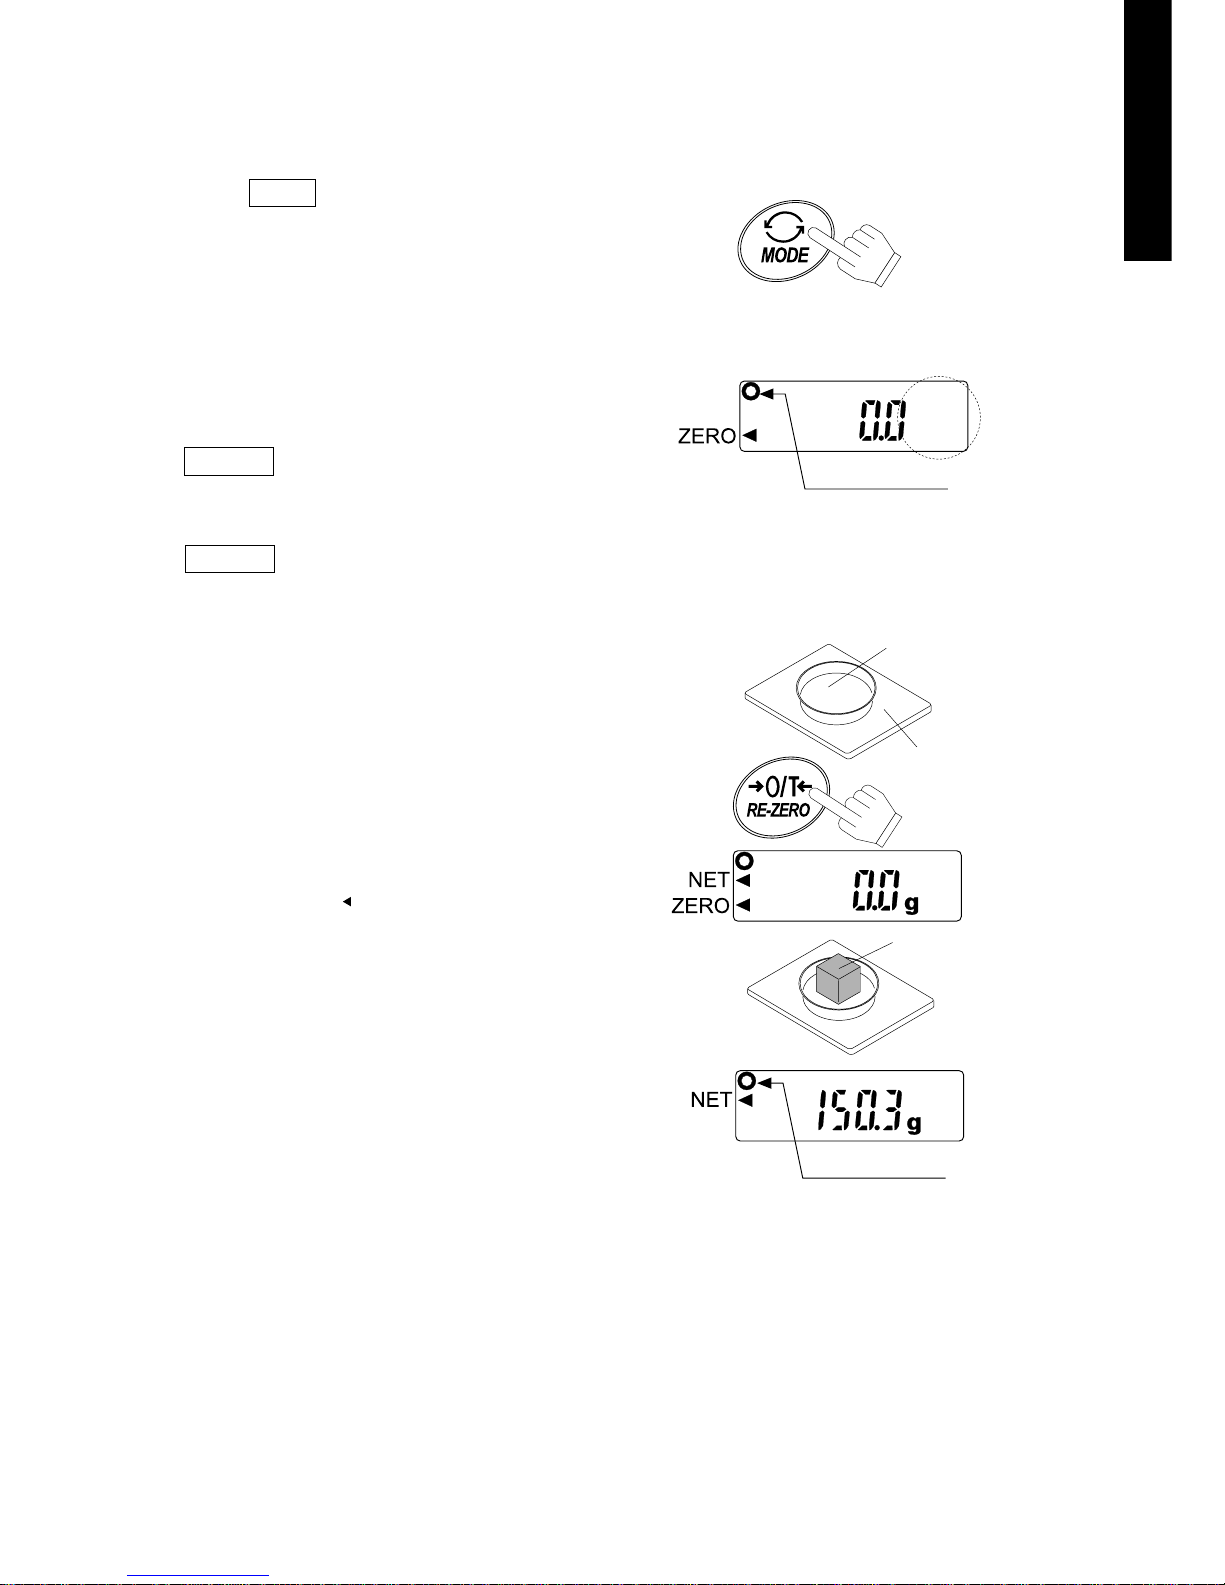
Press the MODE key to select a unit.
The following sections describe about three
common units: g (gram mode), pcs (counting
mode), and % (percent mode).
5-5. Basic operation
1. Select a weighing unit.
2. When the display doesn’t show zero, press the
RE-ZERO key to set the display to zero.
3. When using a tare (container), place the
container on the weighing pan, and press the
RE-ZERO key to set the display to zero.
4. Place the object to be weighed on the pan or in
the container.
Wait for the stability mark ( o ) to be displayed
and read the value.
5. Remove the object from the pan.
• Note
The RE-ZERO key will zero the balance if
the weight is within ±2% of the weighing
capacity around the power-on zero point.
The ZERO mark turns on. When the
weight exceeds +2% of the weighing
capacity, it will be subtracted to zero as a
tare weight. In this case the ZERO and
NET marks turn on.
Each press of the key
switches the units available in
the order described on the
previous page.
Stability mark
Container
Weighing pan
Object to be
weighed
Stability mark
Precautions during operation
• Make sure that the stability mark is on whenever reading or storing a value.
• Do not press keys with a sharp implement such as a pencil.
• Do not apply a shock load to the balance.
• Do not place a load onto the pan that exceeds the rated capacity.
• Keep the balance free from foreign objects such as dust or liquid.
• Calibrate the balance periodically to maintain weighing accuracy. (See “6. Calibration”.)
Page 9

E Series User Manual
7
5-6. Weighing range for the E series
• The EW-i series have three weighing ranges, and the display shows which range the weight value
belongs to with the mark R1, R2 or R3.
• There is a function setting to select how the weighing range changes.
• Select from automatic range (rng 1), manual range (rng 0) or fixed range (rng 2 to 4).
Operation
Automatic range
When the weight value exceeds the maximum value of a range, the weig
hing range changes automatically from a fine to a coarser weighing range.
• When there is nothing on the weighing pan and the display shows zero
with the ZERO mark, the weighing range changes from the coarse to the
fine range.
• When the balance is in range 2 or 3 and there is nothing on the weighing
pan, press the RE ZERO key to re zero the display. The balance will return
to the fine range and gross weight zero will be displayed with the zero mark
• When the balance is in the coarse range with an object (container) on the
weighing pan press the RE ZERO key to tare the course display.
The balance will return to the fine range and net weight zero will be
displayed with the zero mark
Manual range
• Press the SAMPLE key when the display shows a weight value (neither
counting nor % display). The weighing range changes to a coarser range at
any load.
• Press the SAMPLE key to change from a coarser to the fine range, when
there is nothing on the weighing pan and the display shows zero with the
ZERO mark.
• When the RE ZERO key is pressed in a coarse range the object (container)
is tared and the display will return to the fine range in a net weighing mode
• When in range 2 or 3 and a weight less than 2% of capacity is on the
weighing pan the display will be re zero when the RE ZERO key is pressed,
remaining in the same range and in gross weighing mode. Press the
SAMPLE key to change to the fine range if required.
Fixed range
• The weighing range is fixed. Set the function to the weighing range
according to the purpose.
Function setting
rng 1
rng 0
rng 2 to 4
Page 10
8
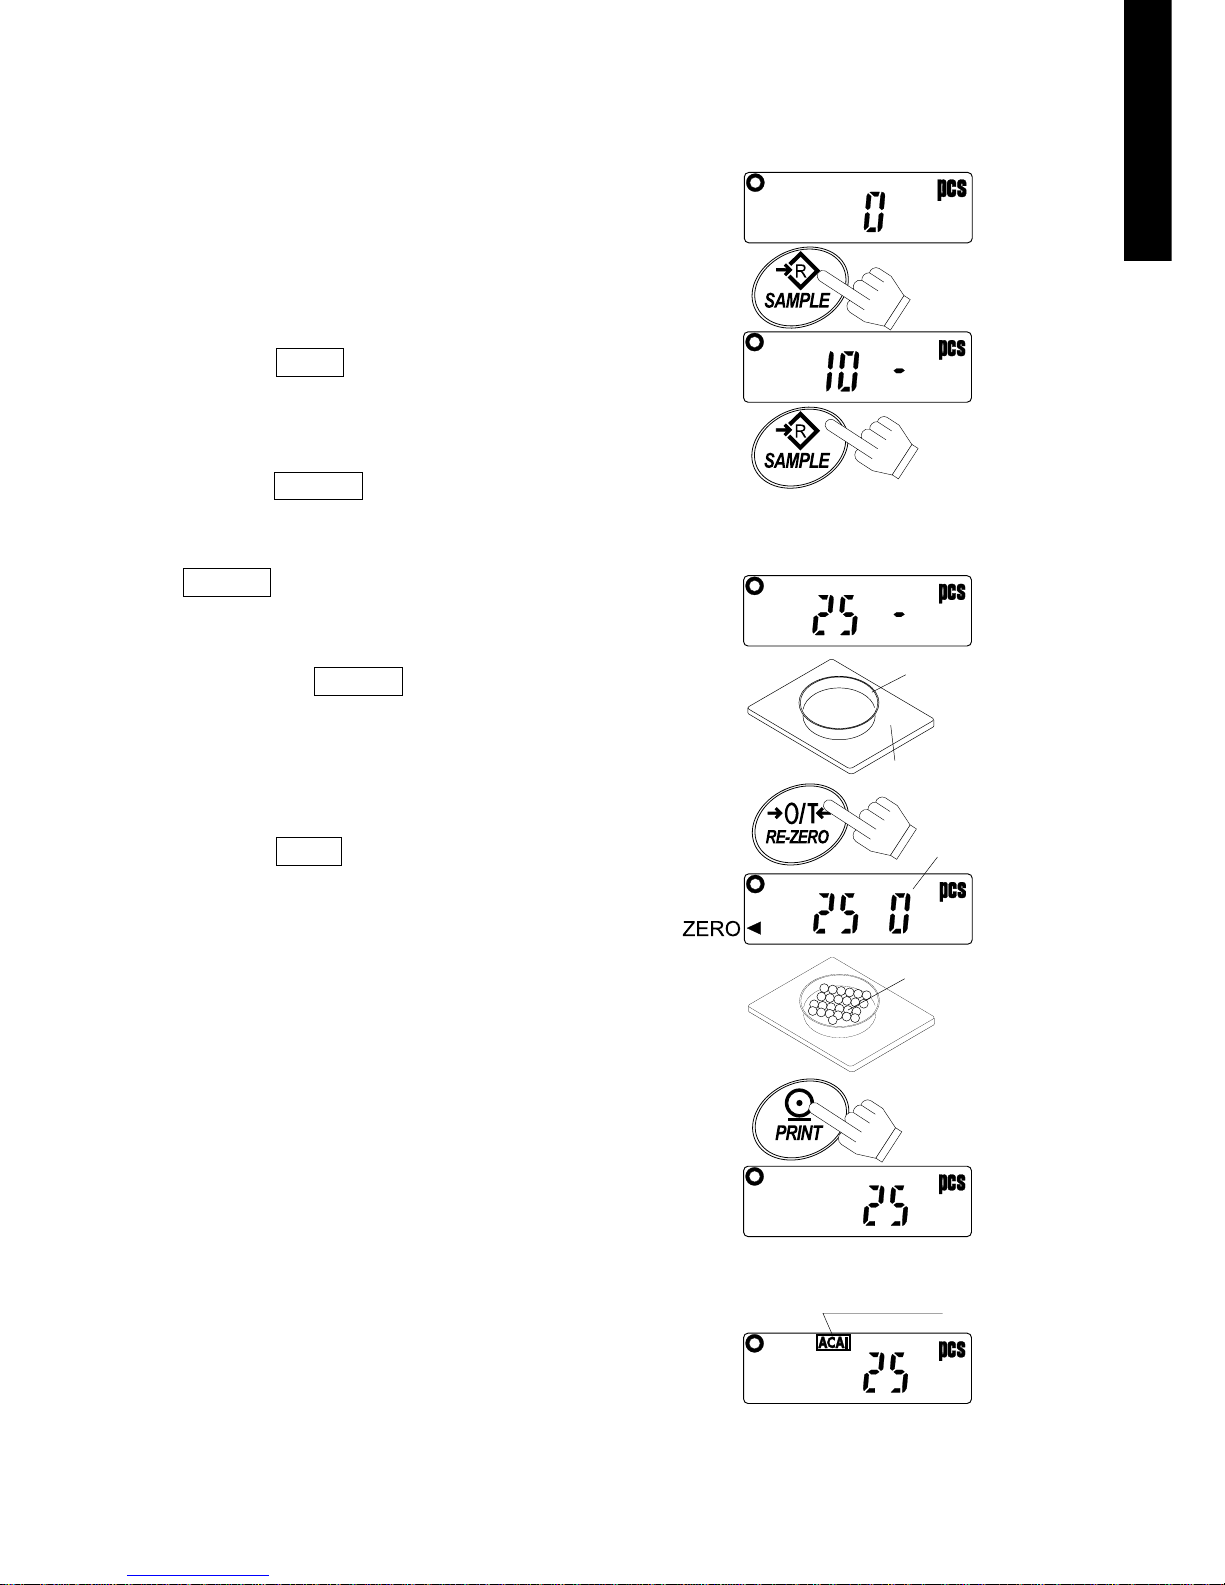
5-7. Counting mode (pcs)
Determines the number of objects in a sample.
Calculates the reading, using the basic sample unit
weight, and determines how many pieces are
contained.
Selecting the counting mode
1 Press the MODE key to select pcs.
(pcs:pieces)
Storing the sample unit
2 Press the SAMPLE key to enter the sample
unit weight storing mode.
3 To select the number of samples, press the
SAMPLE key. It may be set to 5, 10, 25, 50, or
100.
4 Place a tare container on the weighing pan,
and press the RE-ZERO key. Confirm that the
right side of the number of samples shows
zero.
5 Place the number of samples specified on the
pan. In this example, 25 pieces.
6 Press the PRINT key to calculate and store
the unit weight. Remove the sample. The
balance is set to count objects with this unit
weight.
Counting the objects
7 Place the objects to be counted on the pan.
Counting mode using the ACAI function
ACAI™ (Automatic Counting Accuracy
Improvement) is a function that improves the
accuracy of the unit weight by increasing the
number of samples as the counting process
proceeds.
8 If a few more samples are added, the ACAI
mark illuminates. (To prevent an error, add three
or more. The ACAI mark will not illuminate if
overloaded.)
Each pressing
switches the
number of
samples
Tar e
Weighing pan
Sample
(25 pcs)
Has stored
To store
ACAI mark
Confirm
the display
Page 11
E Series User Manual
9
9 The balance re-calculates the unit weight while the ACAI mark is blinking. Do not touch the balance or
samples on the pan until the ACAI mark turns off.
10 Counting accuracy is improved when the ACAI mark turns off. Each time the above operation is
performed, a more accurate unit weight will be obtained. There is no definite upper limit of ACAI range
for the number of samples exceeding 100. Try to add the same number of samples as displayed.
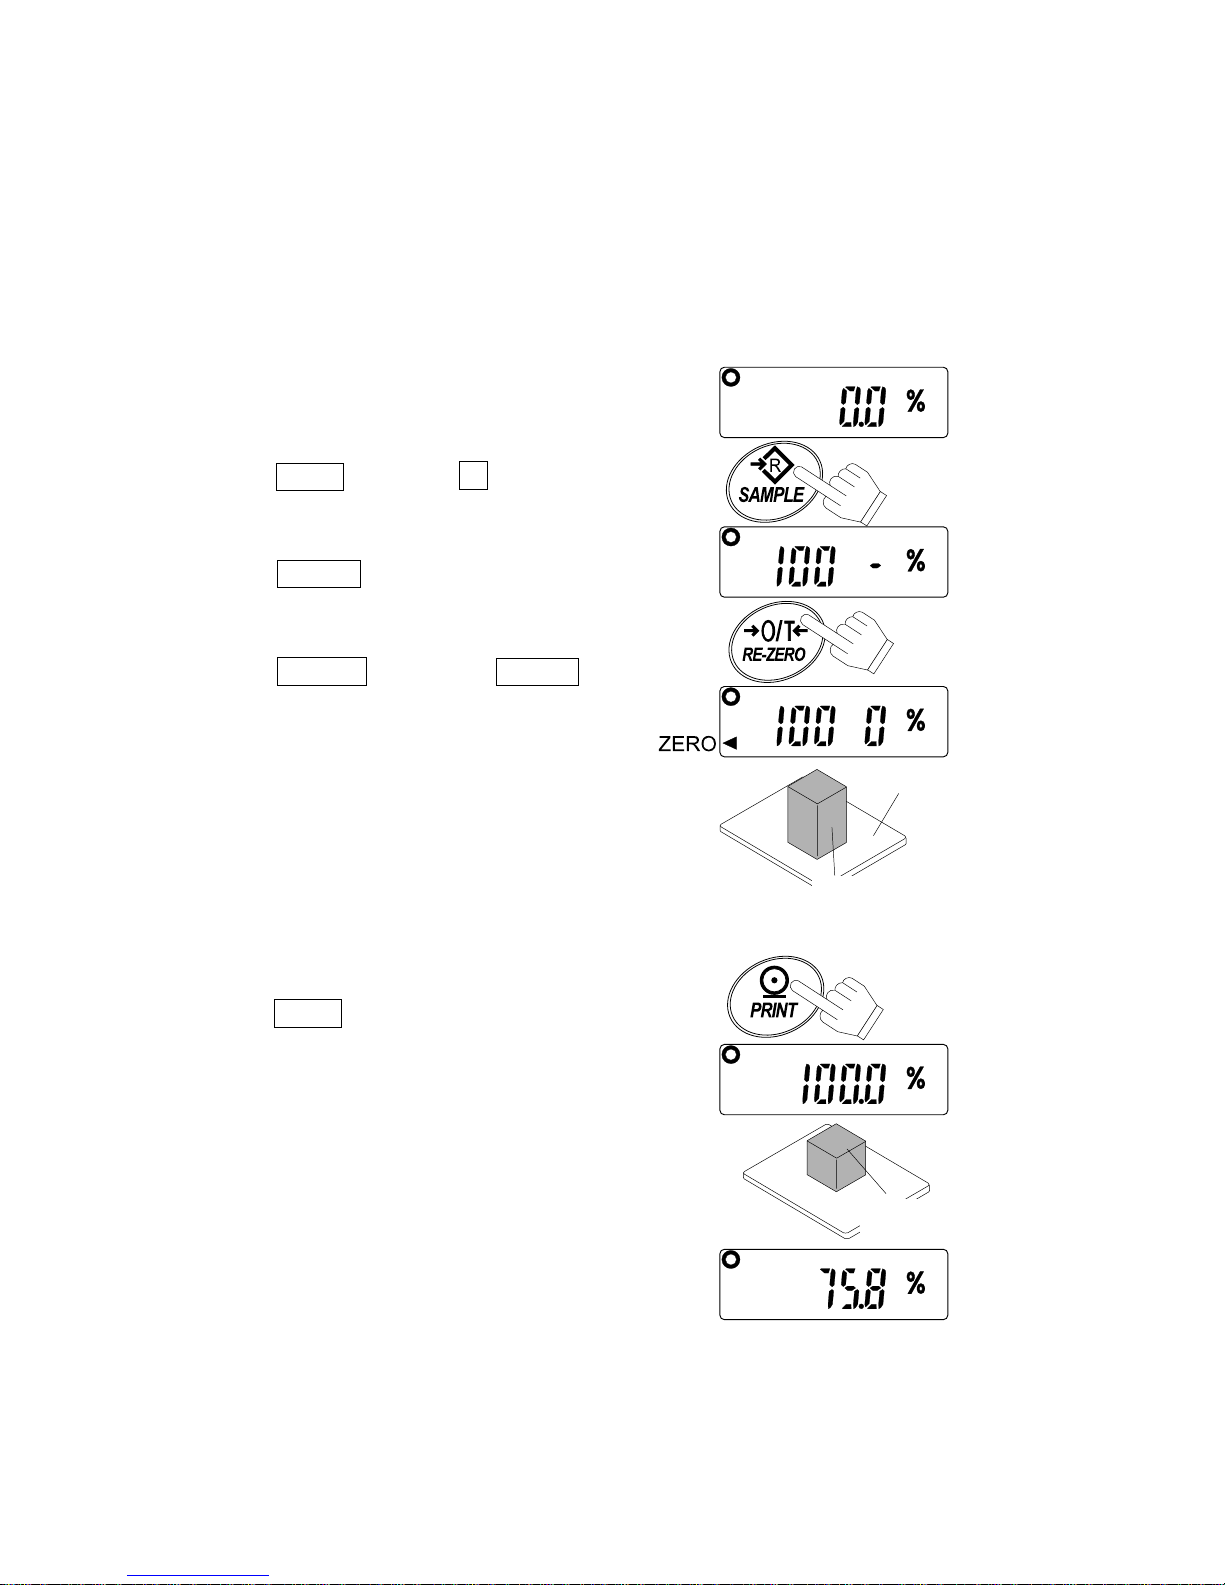
5-8. Percent mode (%)
Displays the weighing value in percentage
compared to the reference (100%) weight.
Selecting the percent mode
1 Press the MODE key to select % .
(%:percent)
Storing the reference (100%) weight
2 Press the SAMPLE key to enter the reference
weight storing mode.
3 Press the RE-ZERO key to display 100 0% .
4 Place the sample to be set as the reference
weight on the pan.
5 Press the PRINT key to store the reference
weight. Remove the sample.
Reading the percentage
6 Place the object to be compared to the
reference weight on the pan. The displayed
percentage is based on 100% of the reference
weight.
Weighing pan
To store
Sample
corresponding
to the 100%
weight
Object to be
compared
Page 12
10
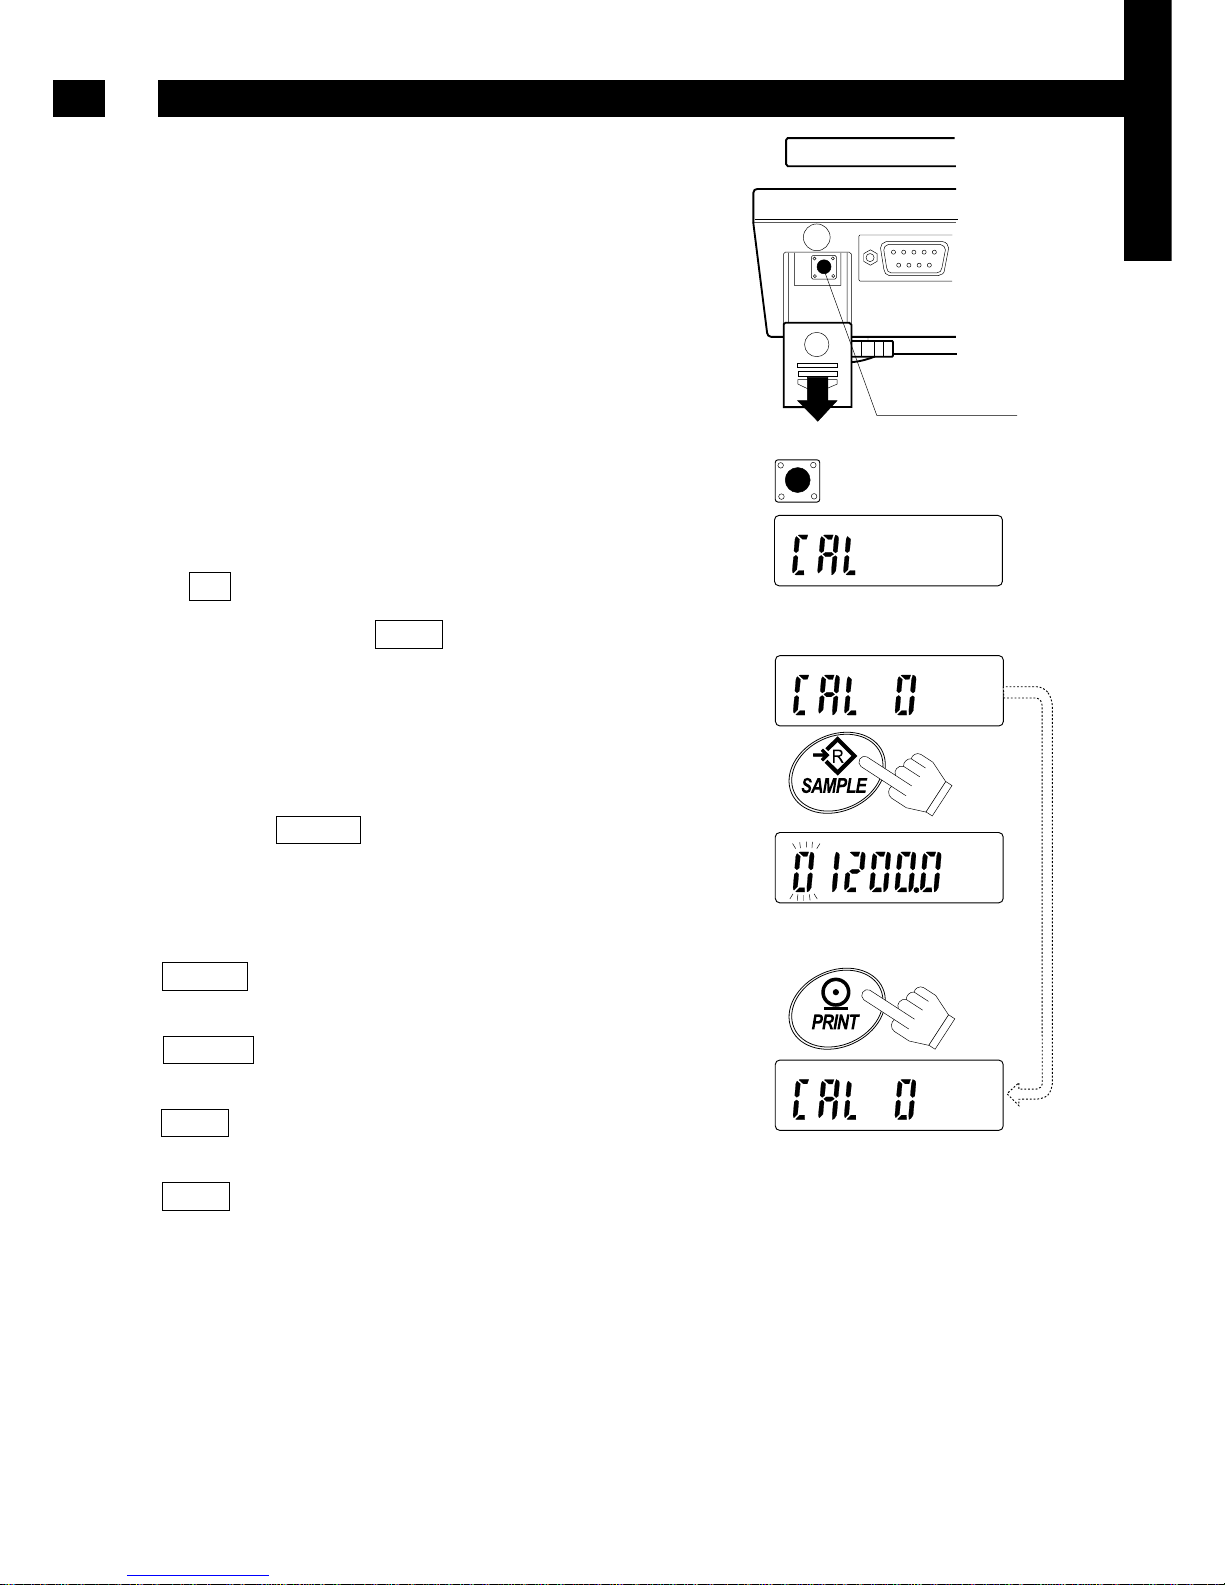
This function adjusts the balance for accurate
weighing. Perform a calibration in the following
cases.
• When the balance is first used.
• When the balance has been moved.
• When the ambient environment has changed.
• For regular calibration.
6-1. Calibration using a weight
1 Warm up the balance for at least half an hour
with nothing on the pan.
2 Press and hold the calibration (CAL) switch until
Cal appears, and release the switch.
3 The balance displays Cal 0 .
To change the calibration weight value, proceed to
step 4.
To use the calibration weight value in the balance
memory, proceed to step 5.
4 Press the SAMPLE key. The display shows
the calibration weight value in "gram” that is
stored in the balance. Use the following keys to
change the value.
SAMPLE key To select the digit blinking to
change.
RE-ZERO key To set the value of the digit
selected.
PRINT key To store the value and return
to step 3.
MODE key To cancel the value and return
to step 3.
Calibration
6
Press and hold
the CAL switch
Release the
CAL switch
Set the weight using
relevant keys
Calibration
(CAL) switch
Press and lower down the
calibration switch cover
Page 13
E Series User Manual
11
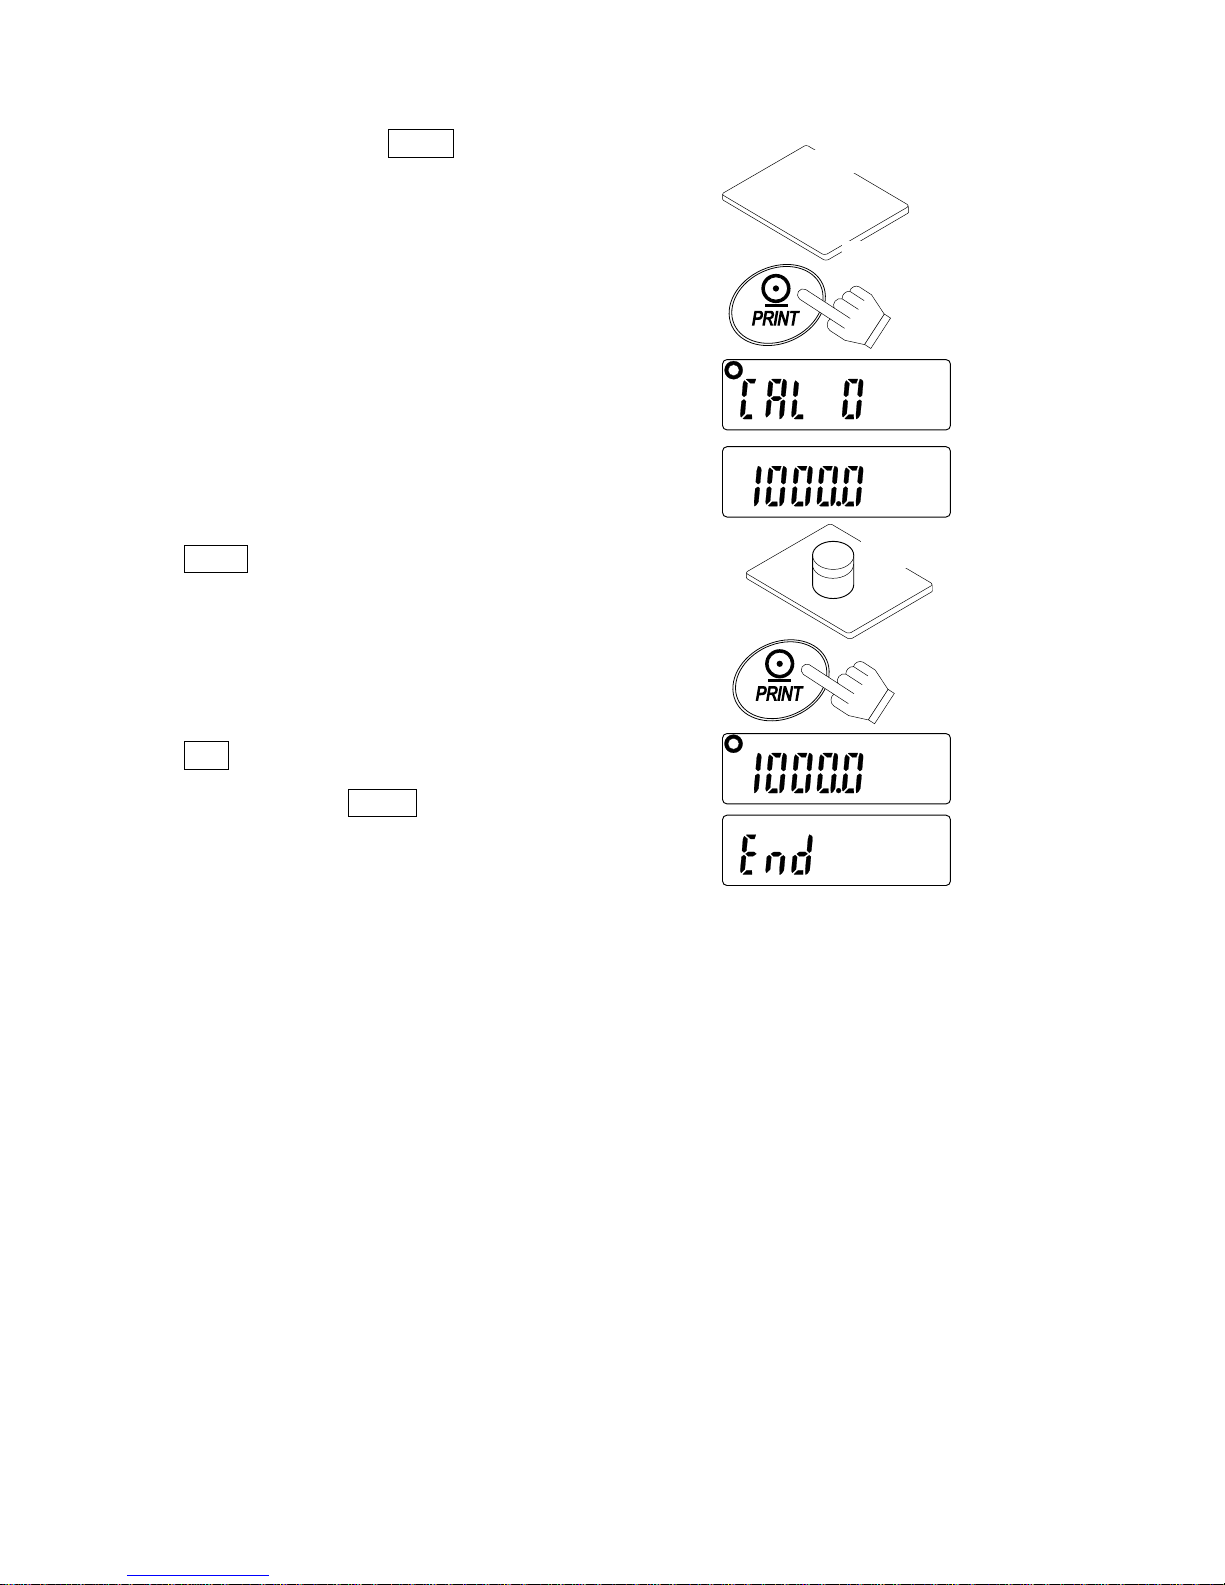
5 At step 3, pressing the PRINT key weighs the
zero-point value. Do not touch the pan during
weighing.
6 Place the calibration weight with the same
value as displayed on the pan. Press the
PRINT key to weigh it. Do not touch the pan
during weighing.
7 end appears.
Remove the weight from the pan, and press
the CAL switch or MODE key to return to the
weighing mode.
• Note
The value set in step 4 is stored in memory
even after the power is switched off.
If the balance is to be moved to another
location, set the gravity acceleration value
for the current location and calibrate the
balance according to the procedure
above. See the next section to set the
value.
Weighing pan
With nothing
on the pan
To store
Calibration
weight
To store
Page 14
E Series User Manual
12
Functions
7
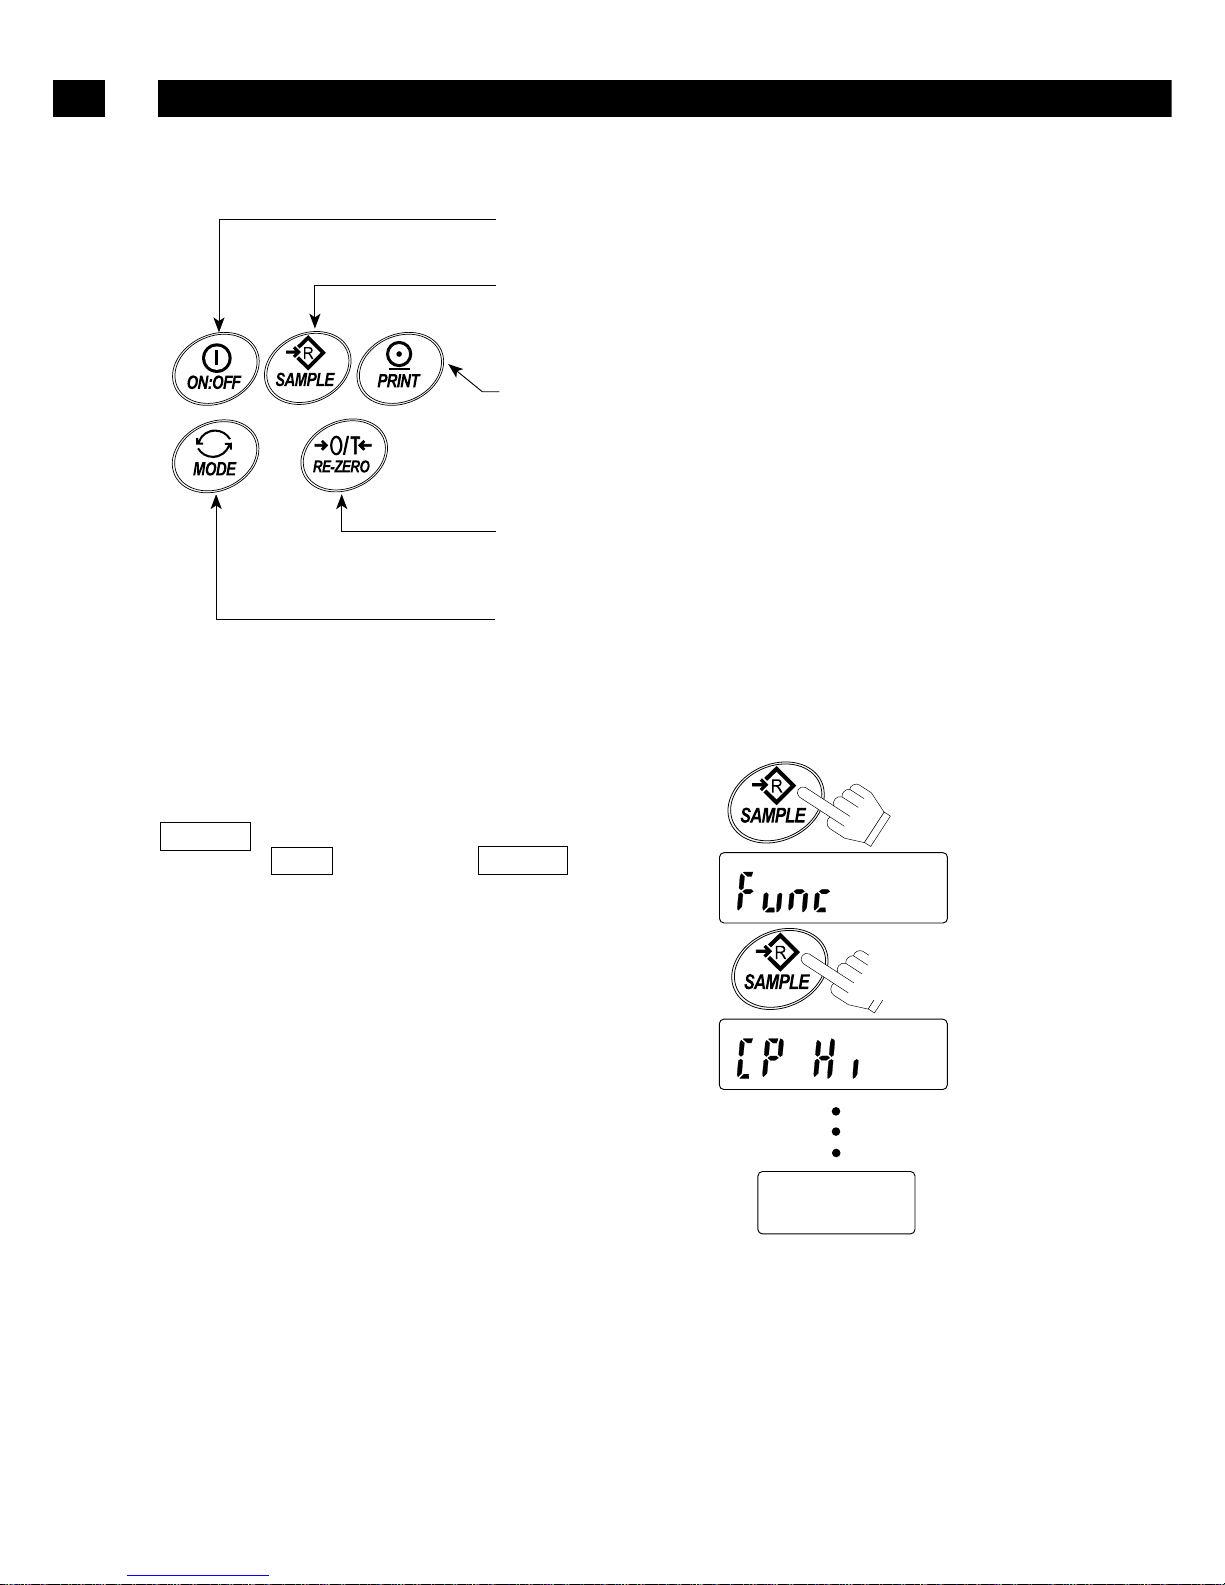
Cancels an operation and turns off the balance.
Item key
Selects a class and an item.
In the weighing mode, press and hold
the key to enter the function setting mode.
Enter key
Proceeds to the selected class.
Stores the settings per class and goes to the next class.
Parameter key
Selects a parameter.
Cancel key
Cancels the operation, and goes to the next class or
returns to the weighing mode.
Press and hold
Each pressing
switches the
class
Set using the
relevant keys
7-2. Entering the function setting mode
In the weighing mode, press and hold the
SAMPLE key to enter the function setting mode
and display func . Each time the SAMPLE
key is pressed, the class appears one after
another.
Once the class is selected, the set items are
available for selection. (See “Function list”.)
7-1. Key operation
Page 15
GB 13
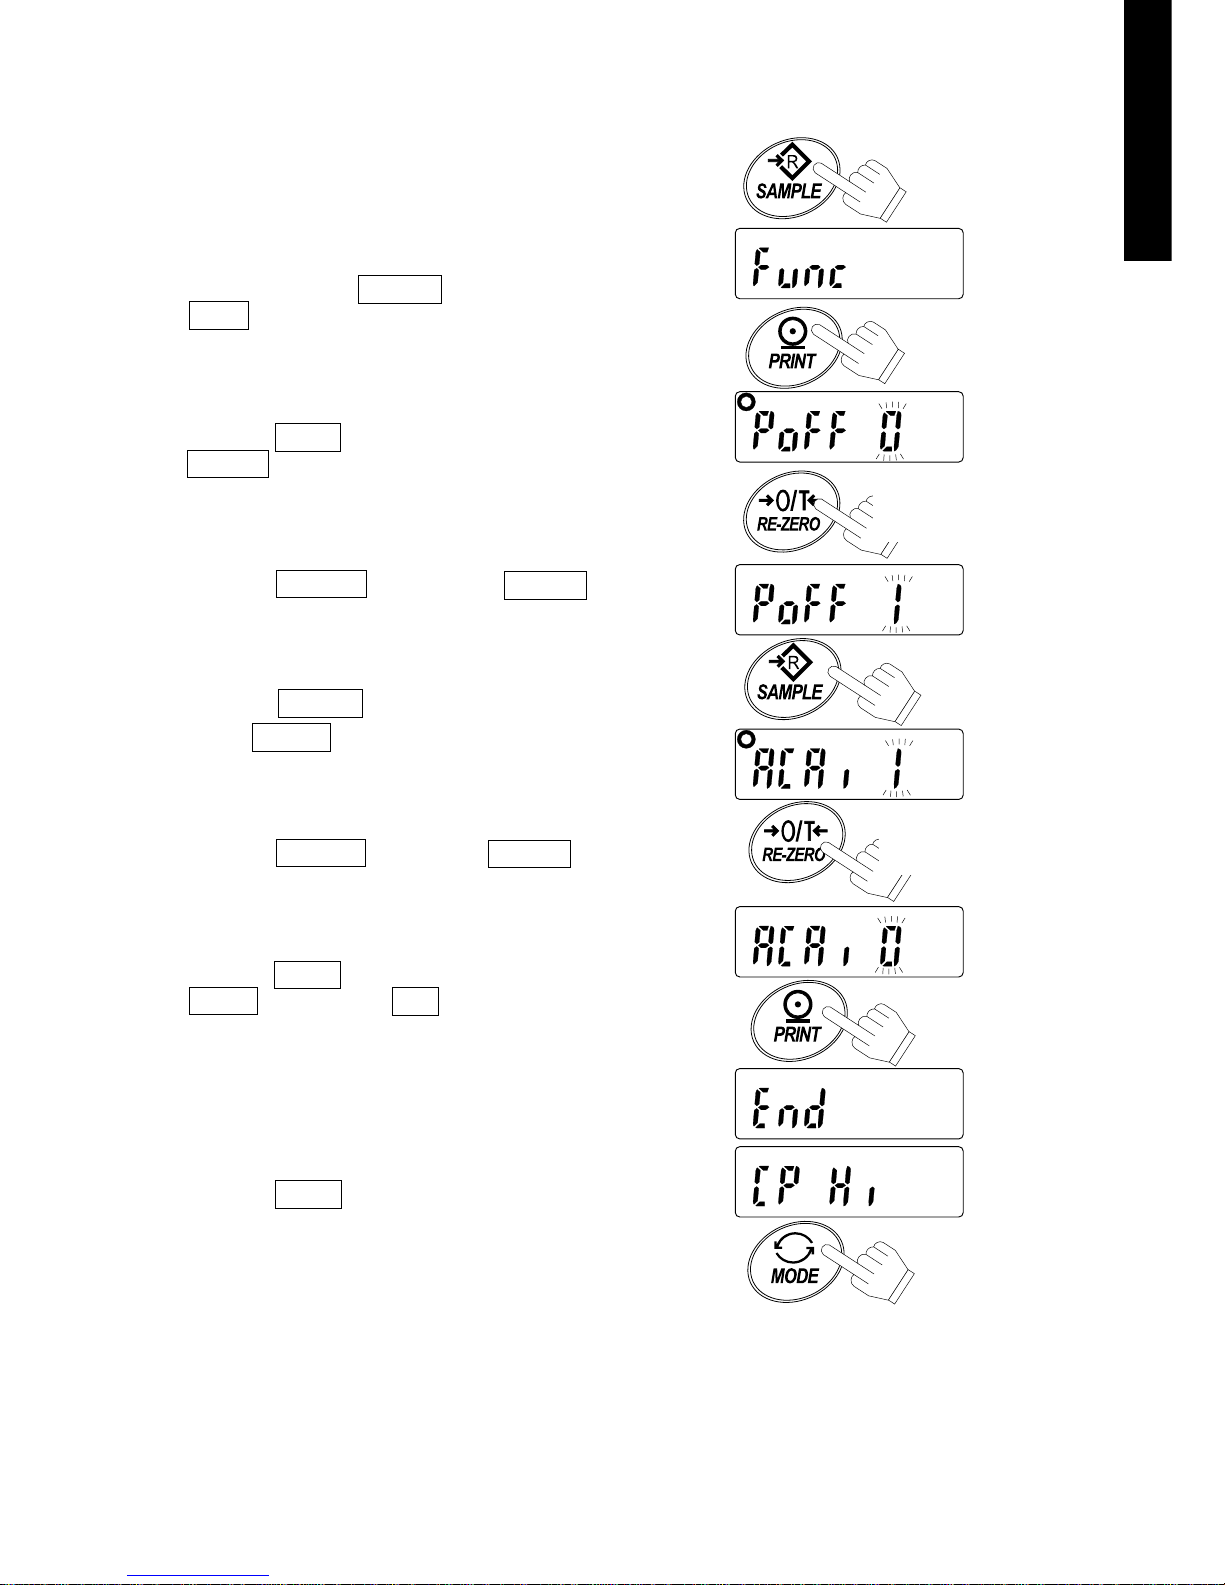
Setting example
To set auto power-off function to "Enabled”, and
the ACAI function to "Disabled”.
1 Press and hold the SAMPLE key to display
func .
2 Press the PRINT key. The balance displays
poff 0 .
3 Press the RE-ZERO key to display poff 1 .
4 Press the SAMPLE key several times to
display ACAi 1 .
5 Press the RE-ZERO key to select ACAi 0 .
6 Press the PRINT key to store the parameters.
Cp Hi appears after end .
7 Press the MODE key to return to the
weighing mode.
Press and hold
Each pressing
switches the
parameter
To confirm
Each pressing
switches the
parameter
To store
Returns to the
weighing mode
Page 16
E Series User Manual
14
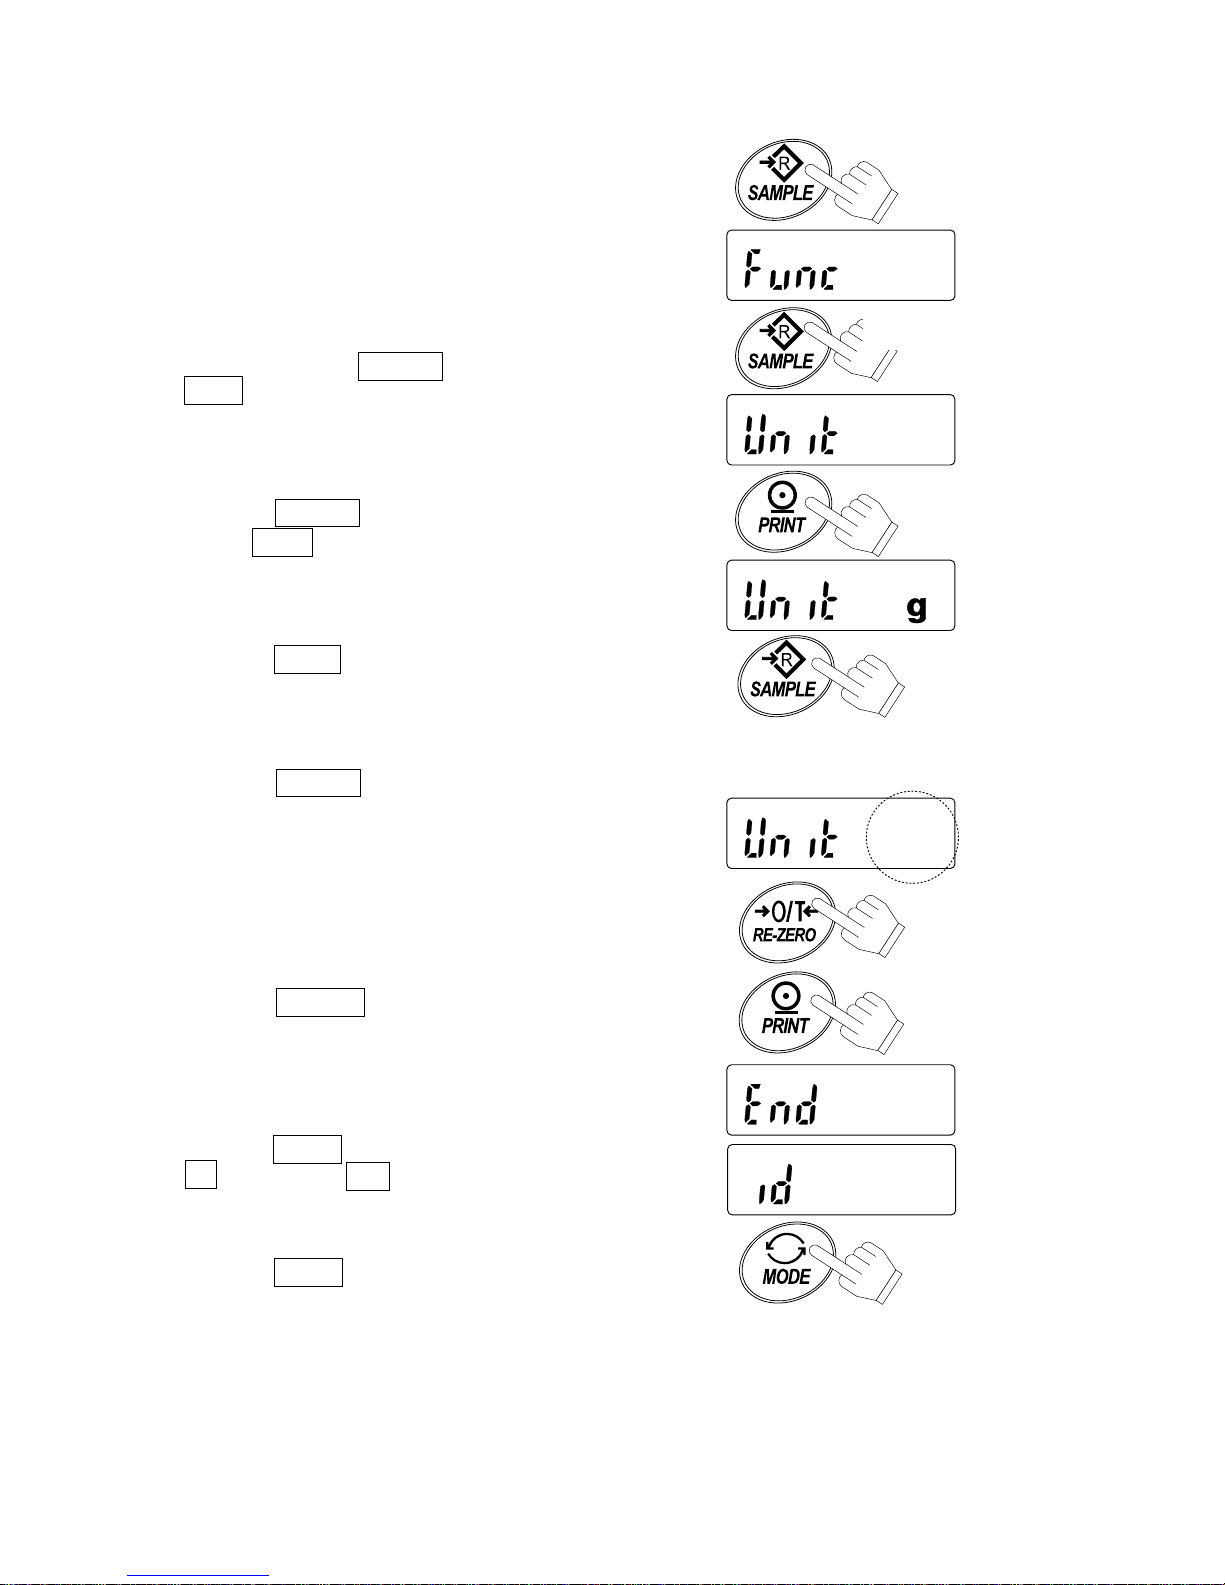
Storing weighing units
It is possible to store the weighing units that will
be actually used from the units available. For the
units available, see “5-3. Units”
Select and store the weighing units as described
below:
1 Press and hold the SAMPLE key to display
func .
2 Press the SAMPLE key several times to
display Unit .
3 Press the PRINT key.
4 Press the SAMPLE key to select a weighing
unit.
5 Press the RE-ZERO key to store the weighing
unit.
6 Repeat steps 4. and 5. to store all weighing
units to be used.
7 Press the PRINT key.
id appears after end .
8 Press the MODE key to return to the weighing
mode.
• Note
When the balance is switched on, it starts
with the unit that was stored first at
step 5.
Press and hold
Each pressing switches
the units available in the
order described on 5-3
To store
To confirm
Returns to the
weighing mode
Press
several times
Page 17
15
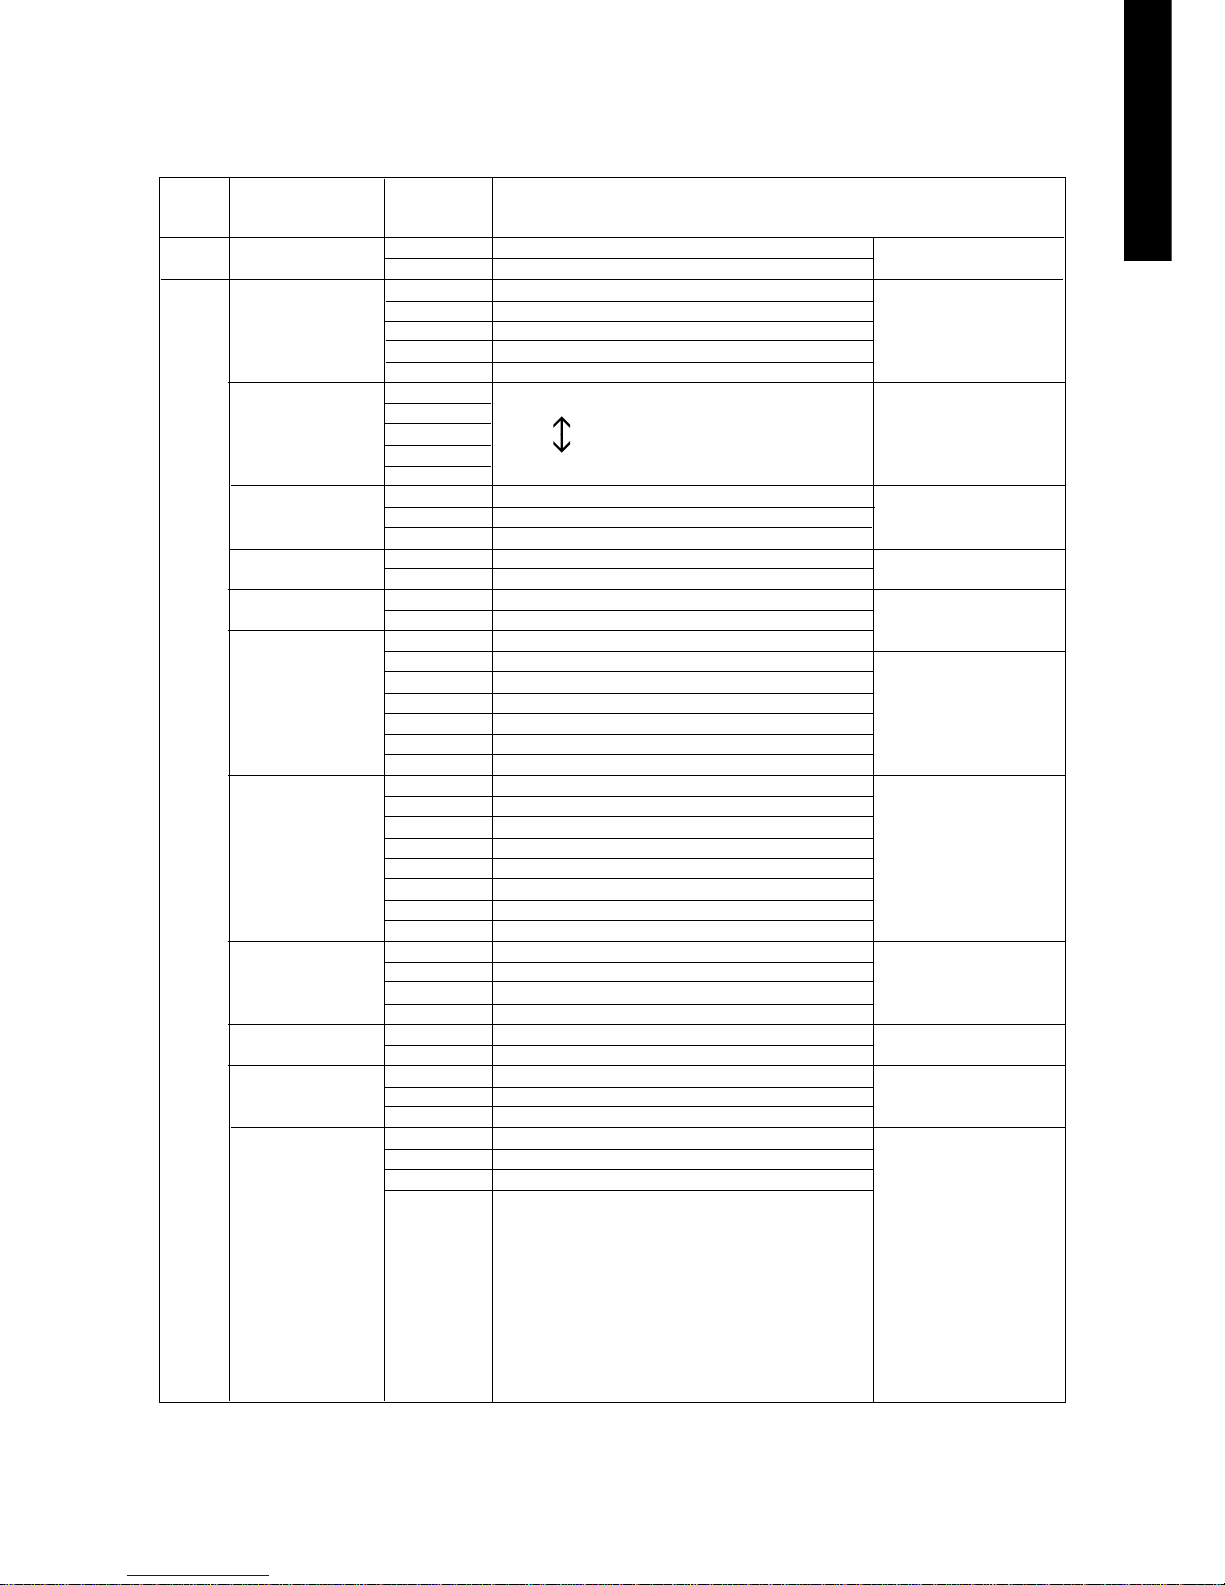
Parameter
• 0
1
0
• 1
2
3
4
0
1
• 2
3
4
0
• 1
2
0
• 1
• 0
1
• 0
1
2
3
4
5
6
• 0
1
2
3
4
5
6
7
0
• 1
2
3
• 0
1
• 0
1
2
• 0
1
2
Auto power-off disabled
Auto power-off enabled
Manual range change
Automatic range change
Fixed to the lowest range
Fixed to the middle range
Fixed to the highest range
Fast / sensitive
Slow / stable
Stable when within ± 0.5d/0.5s
Stable when within ± 1d/0.5s
Stable when within ± 2d/0.5s
Disabled
Enabled
Point (.)
Comma (,)
Comparator disabled
Compares all data
Compares all stable data
Compares plus data > +4d
Compare stable plus data > +4d
Compares data > +4d or < -4d
Compares stable data > +4d or < -4d
Buzzer does not sound.
Buzzer sounds at LO.
Buzzer sounds at OK.
Buzzer sounds at OK and LO.
Buzzer sounds at HI.
Buzzer sounds at HI and LO.
Buzzer sounds at HI and OK.
Buzzer sounds at HI, OK and LO.
Command and stream modes
Command and PRINT key
Command, PRINT key and auto-print A
Command, PRINT key and auto-print B
No pause (general equipment)
1.6 seconds (for AD-8121)
No output
AD-8121 format
General format
2400 bps
4800 bps
9600 bps
Automatically
power off
Range change
setting for EW-i
series
Software filtering
Conditions to
turn on the
stability mark
Tracking zero
shift
Decimal separator
Conditions to
compare.
d = the minimum
display division
Buzzer sounds
according to
the comparator
results
Auto-print A:
+ data
Auto-print B:
+/- data
Interval between
continuous data
GLP
output format
Item
poff
Auto power-off
rng
Range
Cond
Response
st-b
Stability band
width
trc
Zero tracking
pnt
Decimal point
Cp
Comparator
mode
bep
Buzzer output
prt
Data output
mode
pUse Data
output pause
info
GLP output
bps
Baud rate
Description
7-3 Function list
Class
func
• Factory Setting
Page 18
E Series User Manual
16
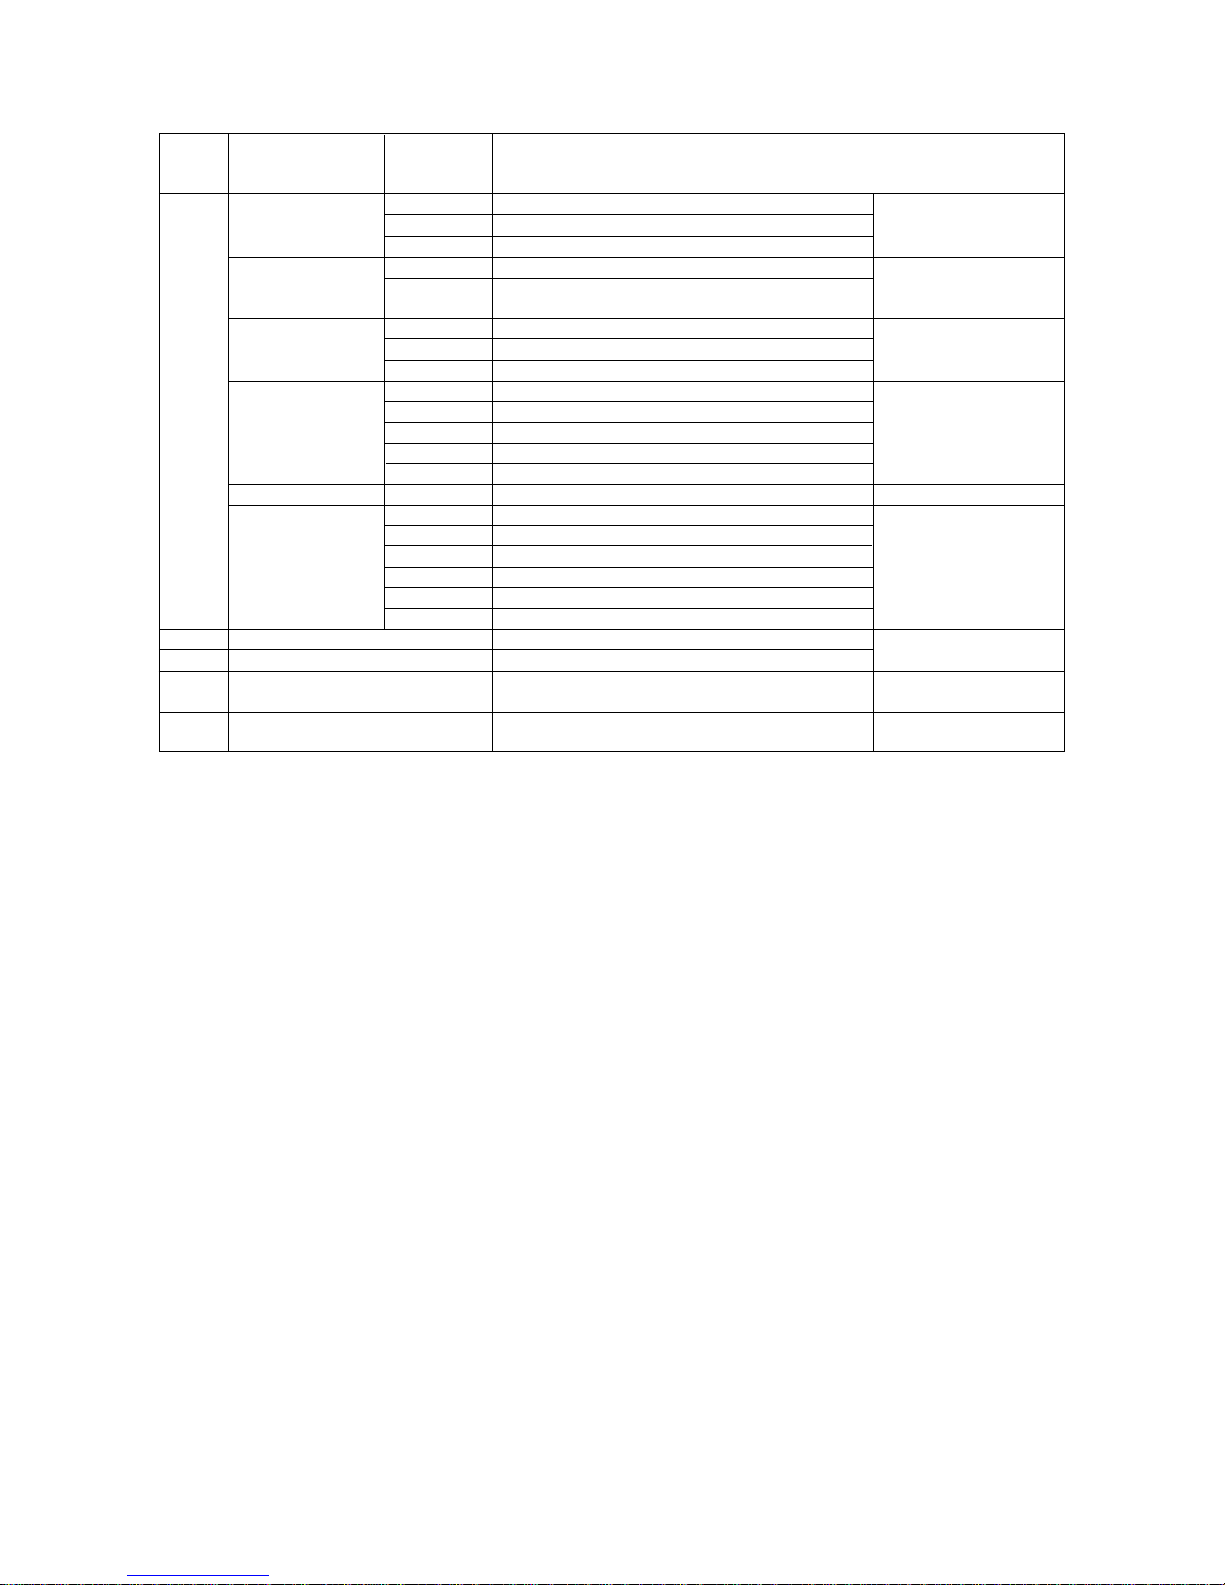
Parameter
• 0
1
2
0
• 1
• 0
1
2
• 0
1
2
3
4
0
1
2
• 3
4
5
7 bits, even parity
7 bits, odd parity
8 bits, non parity
ACAI disabled
ACAI enabled
1 d
1/8 d
More than 4d sample weight
10 pcs
25 pcs
50 pcs
100 pcs
5 pcs
not used
Always off
Turns off after 3 seconds
Turns off after 10 seconds
Turns off after 30 seconds
Turns off after 60 seconds
Always on
If “0” is set, no
additional samples
required
d= the minimum
display division
The number of
samples shown first
when entered into
the unit weight
storing mode
To control how the
LCD backlight turns
off. Weight change
or key operation will
turn the backlight
on.
Weighing units”
NUMBER AND GLP
Item
btpr
Data and parity
ACAi
ACAI function
Umin
Minimum unit
weight
smpl
Sample number
ldin
ltUp
LCD Backlight
control
Description
Class
func
CpHi
Cplo
Unit
id
• Factory Setting
Comparator upper limit
Comparator lower limit
Weighing units to be
displayed
ID number for GLP output
Setting the upper limit value
Setting the lower limit value
Sets to display units
Sets the ID number
Page 19
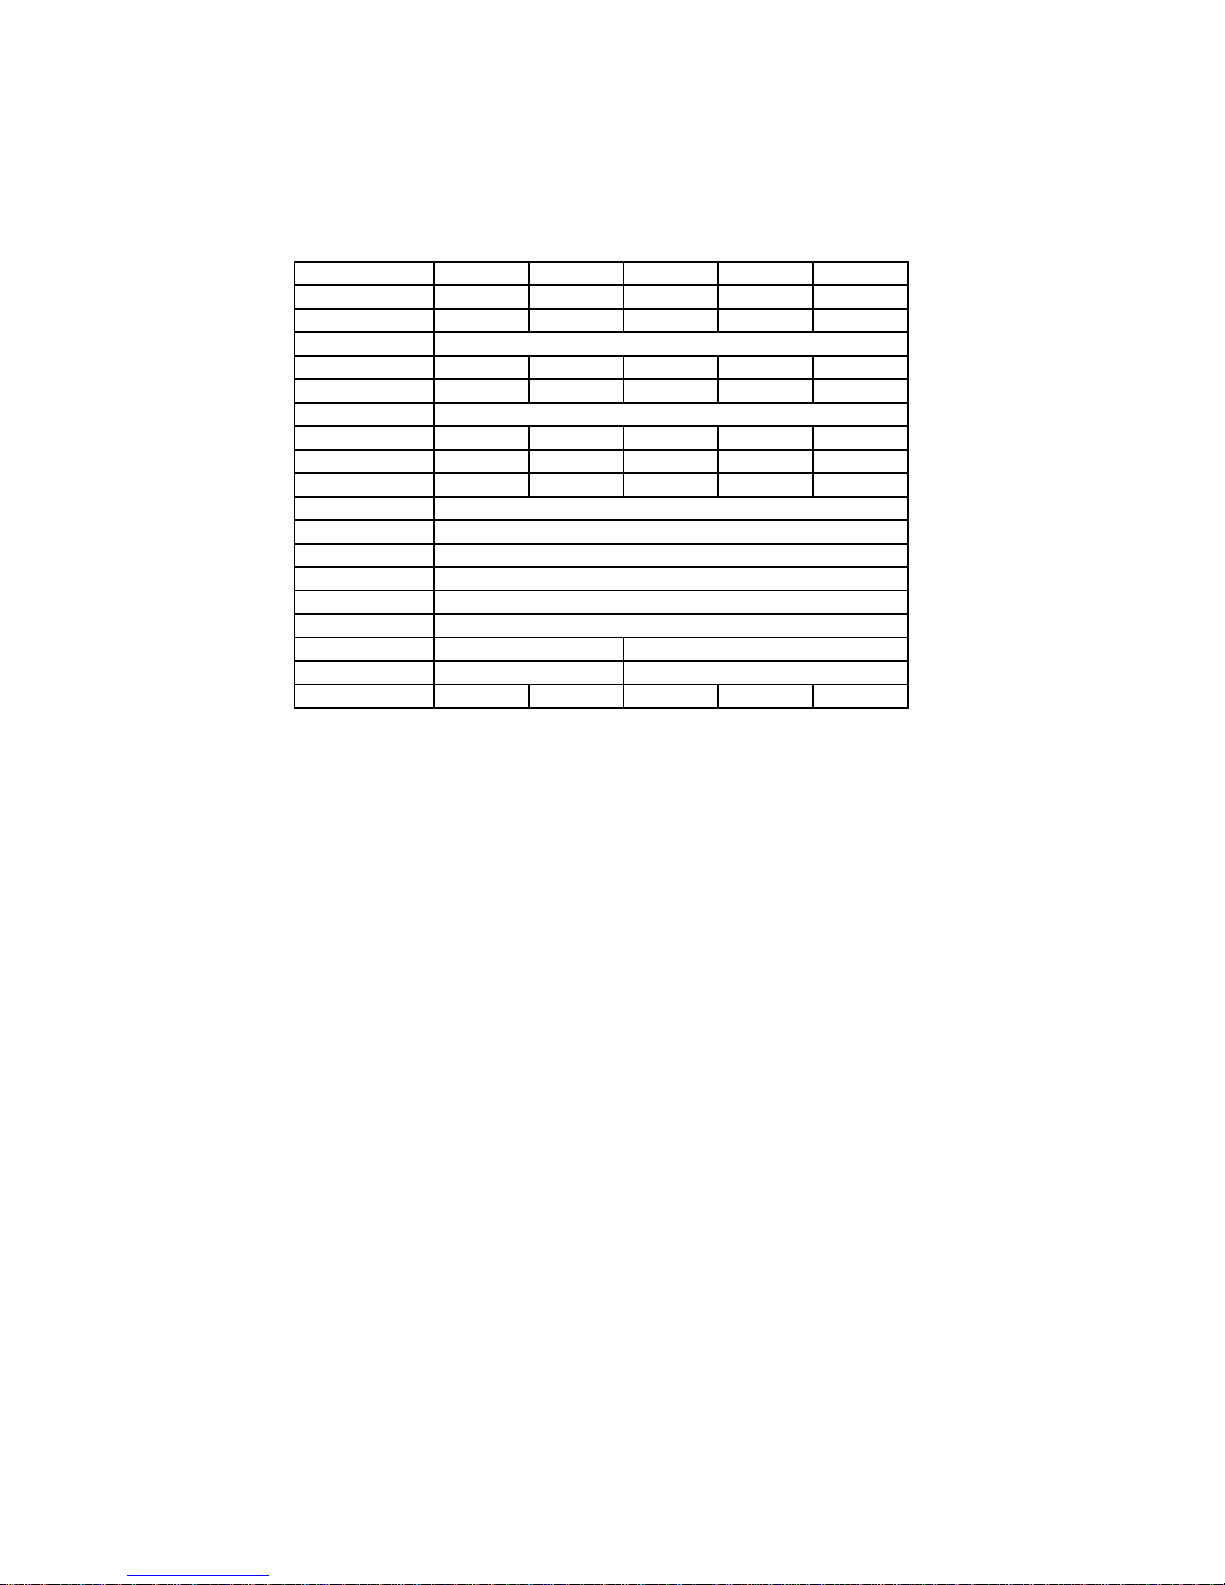
8.1 Specifications
MODEL
E2002 E3002 E12001 E30001 E6000
Capacity
200g 300g 1200g 3000g 6000g
Min display 'd'
0.01g 0.01g 0.1g 0.1g 0.1g
No. of samples
Max. count *)
20,000 30,000 12,000 30,000 6,000
Min unit wt *)
0.01g 0.01g 0.1g 0.1g 1g
Min. % display
Min. 100% weight
1g 1g 10g 10g 10g
Repeatability (SD)
0.01g 0.01g 0.1g 0.1g 1g
Linearity
+/-0.01g +/-0.02g +/-0.1g +/-0.2g +/-1g
Sensitivity drift
Display
Display update
Operating temp.
Power supply
Battery operation
Pan size
Weight (approx)
Cal wt (fact set)
200g 300g 1200g 3000g 6000g
Accessories
OP09-I Rechargeable battery unit (internal)
AD-8920 External Display
DP-1012 Basic Printer
OXFORD ELECTRONIC BALANCES
ANALYTICAL PRODUCTS LTD
OXFORD. OX3 8ST. ENGLAND
17
0.1%
110mm 133mmX170mm
1.1kg 1.5kg
5 , 10 , 25 , 50 or 100 pieces
7 seg LCD display with backlight (character ht 16mm)
10 times per second
AC adapter or optional NiMH battery pack
Approximately 9 hours (backlight off)
Page 20
18
Model EK-150i EK 1500i EW 12Ki
Capacity 1.0580 2.116 5.292 10.580 21.16 52.92 105.8 211.6 423.2
Min. display 0.0005 0.001 0.002 0.005 0.01 0.02 0.05 0.1 0.2
Capacity ----- ----- ----- 0.6615 1.323 3.306 6.615 13.23 26.46
Min. display ----- ----- ----- 0.0005 0.001 0.002 0.005 0.01 0.02
Capacity 0.9645 1.929 4.822 9.645 19.29 48.22 96.45 192.9 385.8
Min. display 0.0005 0.001 0.002 0.005 0.01 0.02 0.05 0.1 0.2
Capacity 150.00 300.0 750.0 1500.0 3000 7500 ----- ----- -----
Min. display 0.05 0.1 0.2 0.5 1 2 ----- ----- -----
Capacity 8.000 16.00 40.00 80.00 160.0 400.0 800.0 1600 3200
Min. display 0.005 0.01 0.02 0.05 0.1 0.2 0.5 1 2
Capacity 19.29 38.58 96.45 192.9 385.8 964.5 1929 3858 7715
Min. display 0.01 0.02 0.05 0.1 0.2 0.5 1 2 5
Capacity 463.0 926.0 2315 4630 9260 23150 ----- ----- -----
Min. display 0.2 0.5 1 2 5 10 ----- ----- -----
Capacity 0.7935 1.587 3.968 7.935 15.87 39.68 79.35 158.7 317.4
Min. display 0.0005 0.001 0.002 0.005 0.01 0.02 0.05 01 0.2
oz.
lb
ozt
ct
mom
dwt
GN
tl
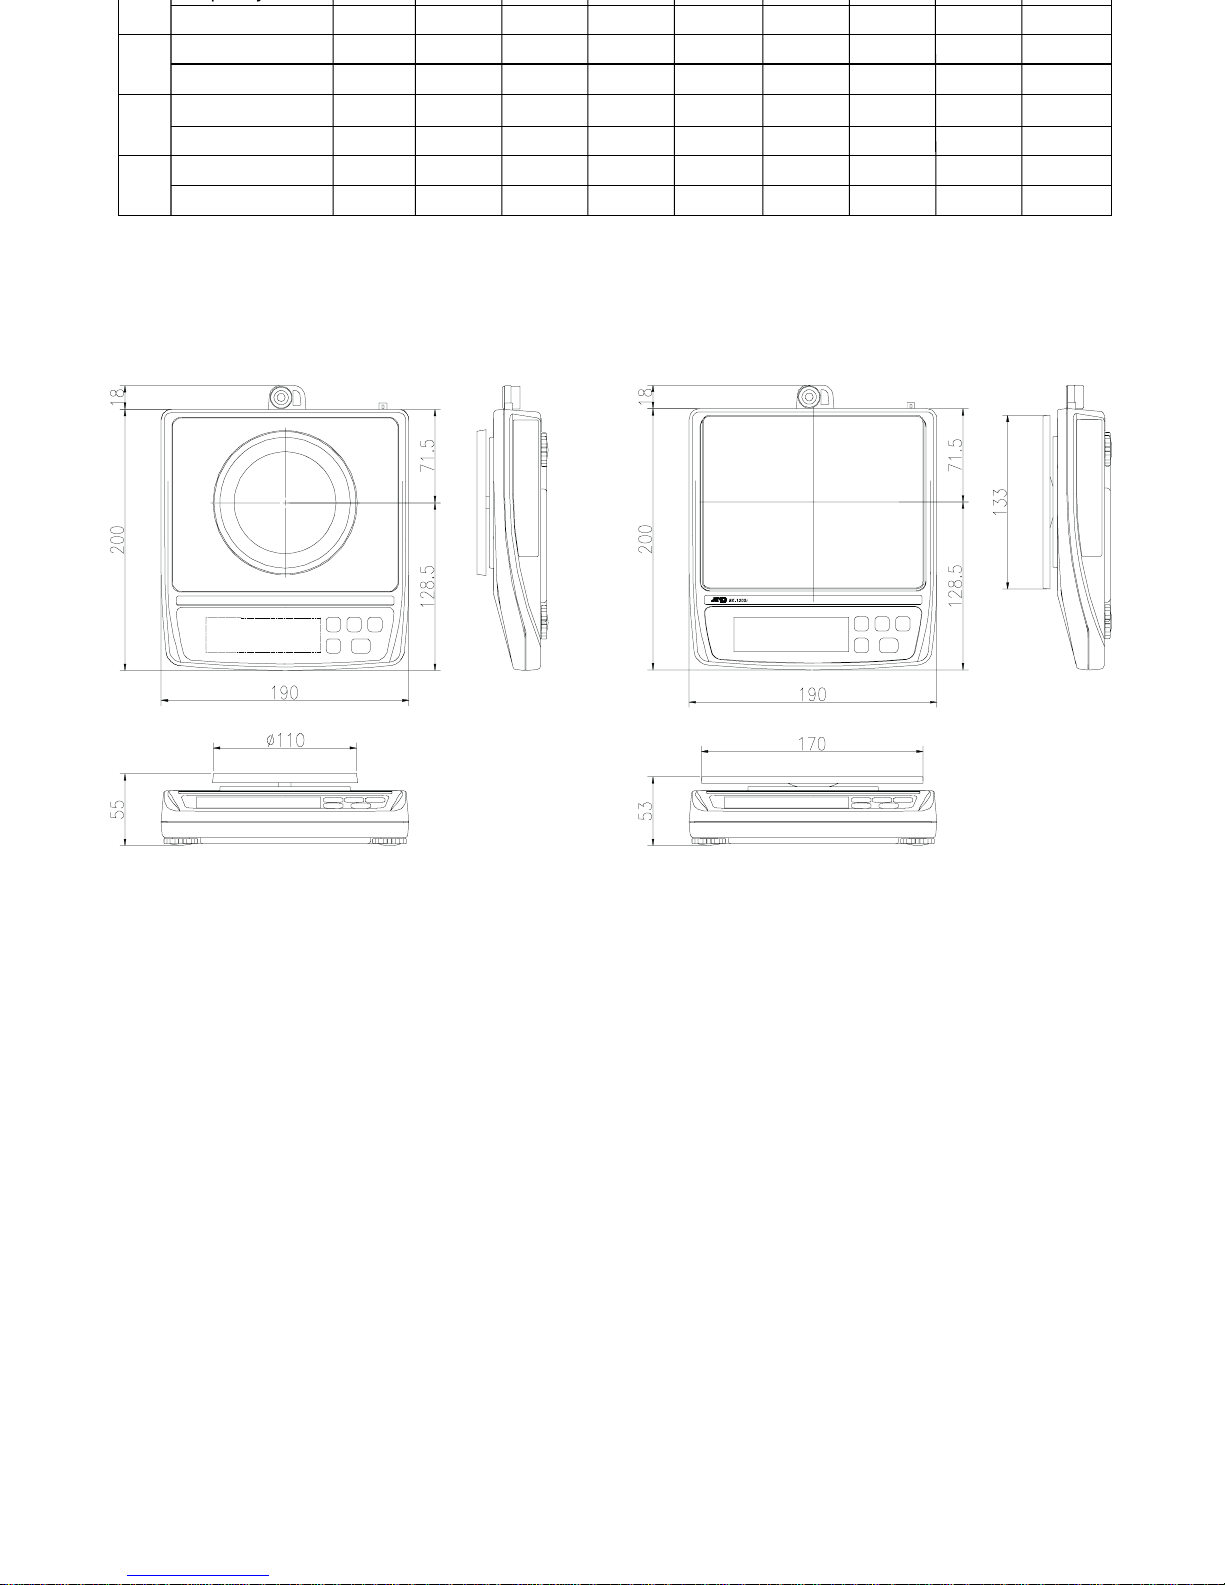
8-2 Dimensions
Note :
“tl” (Hong Kong General / Singapore) is a special version.
NET
ZERO
d= 0.1gMax 1200g
NET
ZERO
E2002 / E3002 E12001 / E30001 / E6000
 Loading...