

Page 1

Single Channel
Arbitrary Waveform Generator
Quick Guide
WWW.OWON.COM
Page 2

Mar. 2015 edition V1.6.3
Copyright © Lilliput Company. All rights reserved.
The Lilliput's products are under the protection of the patent rights, including ones which have already
obtained the patent rights and those which are applying for. The information in this manual will
replace all that in the materials published originally.
The information in this manual was correct at the time of printing. However,
will continue
to improve products and reserves the rights to change specification at any time without notice.
is the registered trademark of the Lilliput Company.
Fujian Lilliput Optoelectronics Technology Co., Ltd.: The Mansion of Optoelectronics, No.19, Heming
Road, Lantian Industrial Zone, Zhangzhou, Fujian, China
Tel:+86-596-2130430 Fax:+86-596-2109272
Web:
Page 3

General Warranty
Lilliput warrants that the product will be free from defects in materials and workmanship
for a period of 3 years (1 year for accessories) from the date of purchase of the product
by the original purchaser from the Lilliput Company. This warranty only applies to the
original purchaser and is not transferable to the third party. If the product proves
defective during the warranty period, Lilliput either will repair the defective product
without charge for parts and labor, or will provide a replacement in exchange for the
defective product. Parts, modules and replacement products used by Lilliput for warranty
work may be new or reconditioned to like new performance. All replaced parts, modules
and products become the property of Lilliput.
In order to obtain service under this warranty, Customer must notify Lilliput of the defect
before the expiration of the warranty period. Customer shall be responsible for
packaging and shipping the defective product to the service center designated by Lilliput,
and with a copy of customer proof of purchase.
This warranty shall not apply to any defect, failure or damage caused by improper use or
improper or inadequate maintenance and care. Lilliput shall not be obligated to furnish
service under this warranty a) to repair damage resulting from attempts by personnel
other than Lilliput representatives to install, repair or service the product; b) to repair
damage resulting from improper use or connection to incompatible equipment; c) to
repair any damage or malfunction caused by the use of non-Lilliput supplies; or d) to
service a product that has been modified or integrated with other products when the
effect of such modification or integration increases the time or difficulty of servicing the
product.
Please contact the nearest Lilliput's Sales and Service Offices for services or a complete
copy of the warranty statement.
For better after-sales service, please visit www.owon.com and register the purchased
product online.
Excepting the after-sales services provided in this summary or the applicable warranty statements,
Lilliput will not offer any guarantee for maintenance definitely declared or hinted, including but not
limited to the implied guarantee for marketability and special-purpose acceptability. Lilliput should
not take any responsibilities for any indirect, special or consequent damages.
Page 4

i
Table of Contents
1.General Safety Requirements ..................................................................................... 1
2.Safety Terms and Symbols ......................................................................................... 2
3.General Characteristics ............................................................................................. 3
4.Front/Rear Panel and User Interface ......................................................................... 4
Front Panel ......................................................................................................................... 4
Rear Panel .......................................................................................................................... 5
User Interface ..................................................................................................................... 6
5.General Inspection .................................................................................................... 7
Foot Stool Adjustment ........................................................................................................ 7
6.Power-On Check ....................................................................................................... 8
AC Power Input Setting ....................................................................................................... 8
Power On ........................................................................................................................... 8
7.Quick Start ................................................................................................................ 9
To Set Basic/Arbitrary Signals .............................................................................................. 9
The User-Definable Waveform ............................................................................................................................... 9
To Generate the Modulated Waveform .............................................................................. 11
To Generate Sweep ............................................................................................................ 11
To Generate Burst .............................................................................................................. 11
To Save and Recall ............................................................................................................. 12
To Use USB Storage ................................................................................................................................ 12
To Edit the File Name ............................................................................................................................. 12
To Set the Utility Function .................................................................................................. 12
To Use Built-in Help ........................................................................................................... 13
8.Communication with PC ......................................................................................... 14
Using USB Port ................................................................................................................... 14
Using LAN Port ................................................................................................................... 14
Connect directly ..................................................................................................................................... 14
Connect through a router....................................................................................................................... 15
Using COM Port ................................................................................................................. 15
9.Appendix ................................................................................................................. 16
Appendix A: Enclosure ....................................................................................................... 16
Appendix B: General Care and Cleaning .............................................................................. 16
Page 5

1.General Safety Requirements
1
1. General Safety Requirements
Before any operations, please read the following safety precautions to avoid any
possible bodily injury and prevent this product or any other products connected from
damage. In order to avoid any contingent danger, this product is only used within the
range specified.
Check AC power input setting according to the standards in your own country (see Page 8,
"AC Power Input Setting").
Only the qualified technicians can implement the maintenance.
To avoid Fire or Personal Injury:
Use Proper Power Cord. Use only the power cord supplied with the product and
certified to use in your country.
Product Grounded. This instrument is grounded through the power cord grounding
conductor. To avoid electric shock, the grounding conductor must be grounded. The
product must be grounded properly before any connection with its input or output
terminal.
Check all Terminal Ratings. To avoid fire or shock hazard, check all ratings and
markers of this product. Refer to the user's manual for more information about
ratings before connecting to the instrument.
Do not operate without covers. Do not operate the instrument with covers or panels
removed.
Use Proper Fuse. Use only the specified type and rating fuse for this instrument.
Avoid exposed circuit. Do not touch exposed junctions and components when the
instrument is powered.
Do not operate if in any doubt. If you suspect damage occurs to the instrument,
have it inspected by qualified service personnel before further operations.
Use your instrument in a well-ventilated area. Make sure the instrument installed
with proper ventilation, refer to the user manual for more details.
Do not operate in wet conditions.
Do not operate in an explosive atmosphere.
Keep product surfaces clean and dry.
Page 6
2.Safety Terms and Symbols
2
2. Safety Terms and Symbols
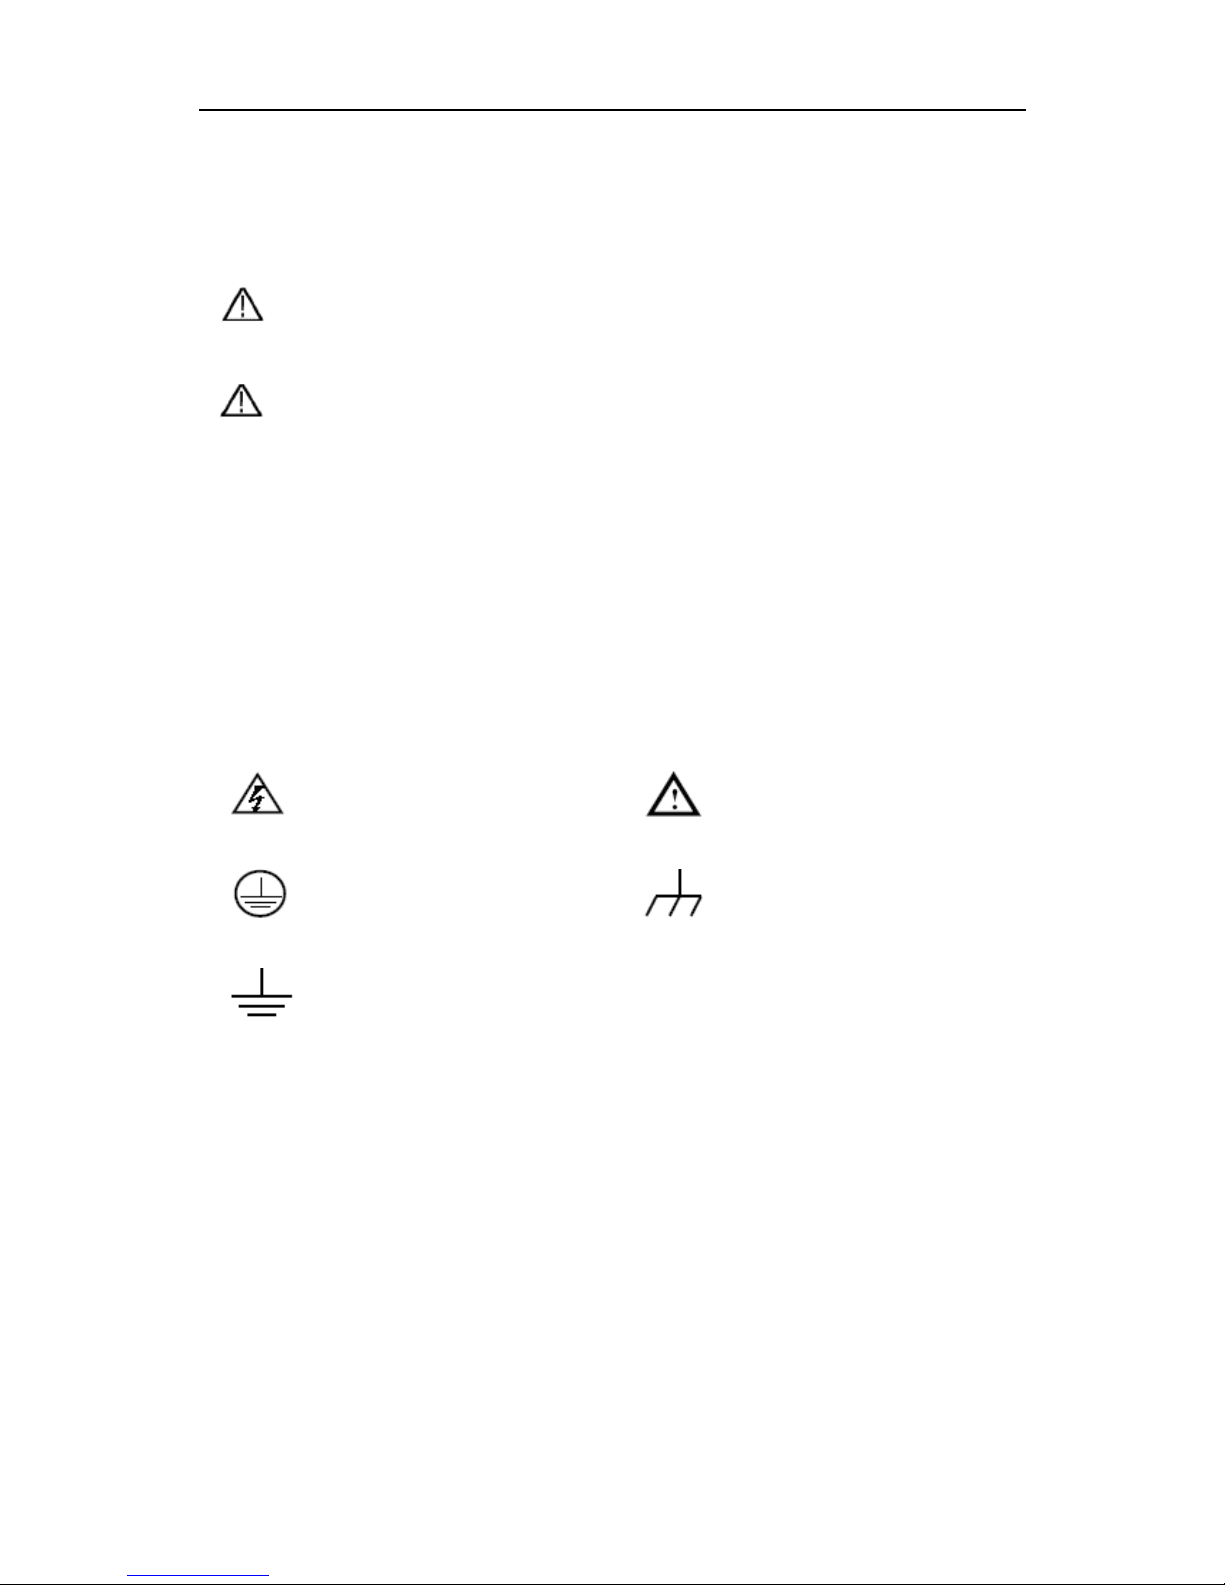
Safety Terms
Terms in this Manual. The following terms may appear in this manual:
Warning: Warning indicates the conditions or practices that could result in
injury or loss of life.
Caution: Caution indicates the conditions or practices that could result in
damage to this product or other property.
Terms on the Product. The following terms may appear on this product:
Danger: It indicates an injury or hazard may immediately happen.
Warning: It indicates an injury or hazard may be accessible potentially.
Caution: It indicates a potential damage to the instrument or other property might occur.
Safety Symbols
Symbols on the Product. The following symbol may appear on the product:
Hazardous Voltage
Refer to Manual
Protective Earth Terminal
Chassis Ground
Test Ground
Page 7

3.General Characteristics
3
3. General Charact eristics
The series are multi-function generators which combine Arbitrary Waveform Generation
and Function Generation. The product introduces Direct Digital Synthesizer (DDS)
technology to provide stable, precise, pure and low distortion signal. The user-friendly
interface design and panel layout bring exceptional user experience. Embedded USB
Device, USB Host, LAN, support USB storage device. Provide more alternative solutions
for users.
Features and benefits:
3.9 inch high resolution (480×320 pixels) TFT LCD display;
Advanced DDS technology, Max.150MHz frequency output;
Max. Sample rate: 400MSa/s, Frequency resolution: 1uHz;
Vertical resolution: 14 bits, up to 1M waveform record length;
Abundant waveform output: 5 basic waveforms and 26 built-in arbitrary waveforms
output;
32 channels digital waveform (optional);
Exponential rise, Exponential fall, Sin(x)/x, Staircase, etc. 26 built-in waveforms and
user defined arbitrary waveform;
Abundant modulation functions: AM, FM, PM, FSK, PWM along with output
liner/logarithm sweep and pulse string waveform;
Standard interface: USB Device, USB Host, LAN, COM etc.
Page 8
4.Front/Rear Panel and User Interface
4
4. Front/Rear Panel and User Interface
Front Panel
①
②
③
④
⑥
⑰
⑬
⑮
⑭
⑯
⑱
⑩
⑪
⑦
⑧
⑨
⑫
⑤
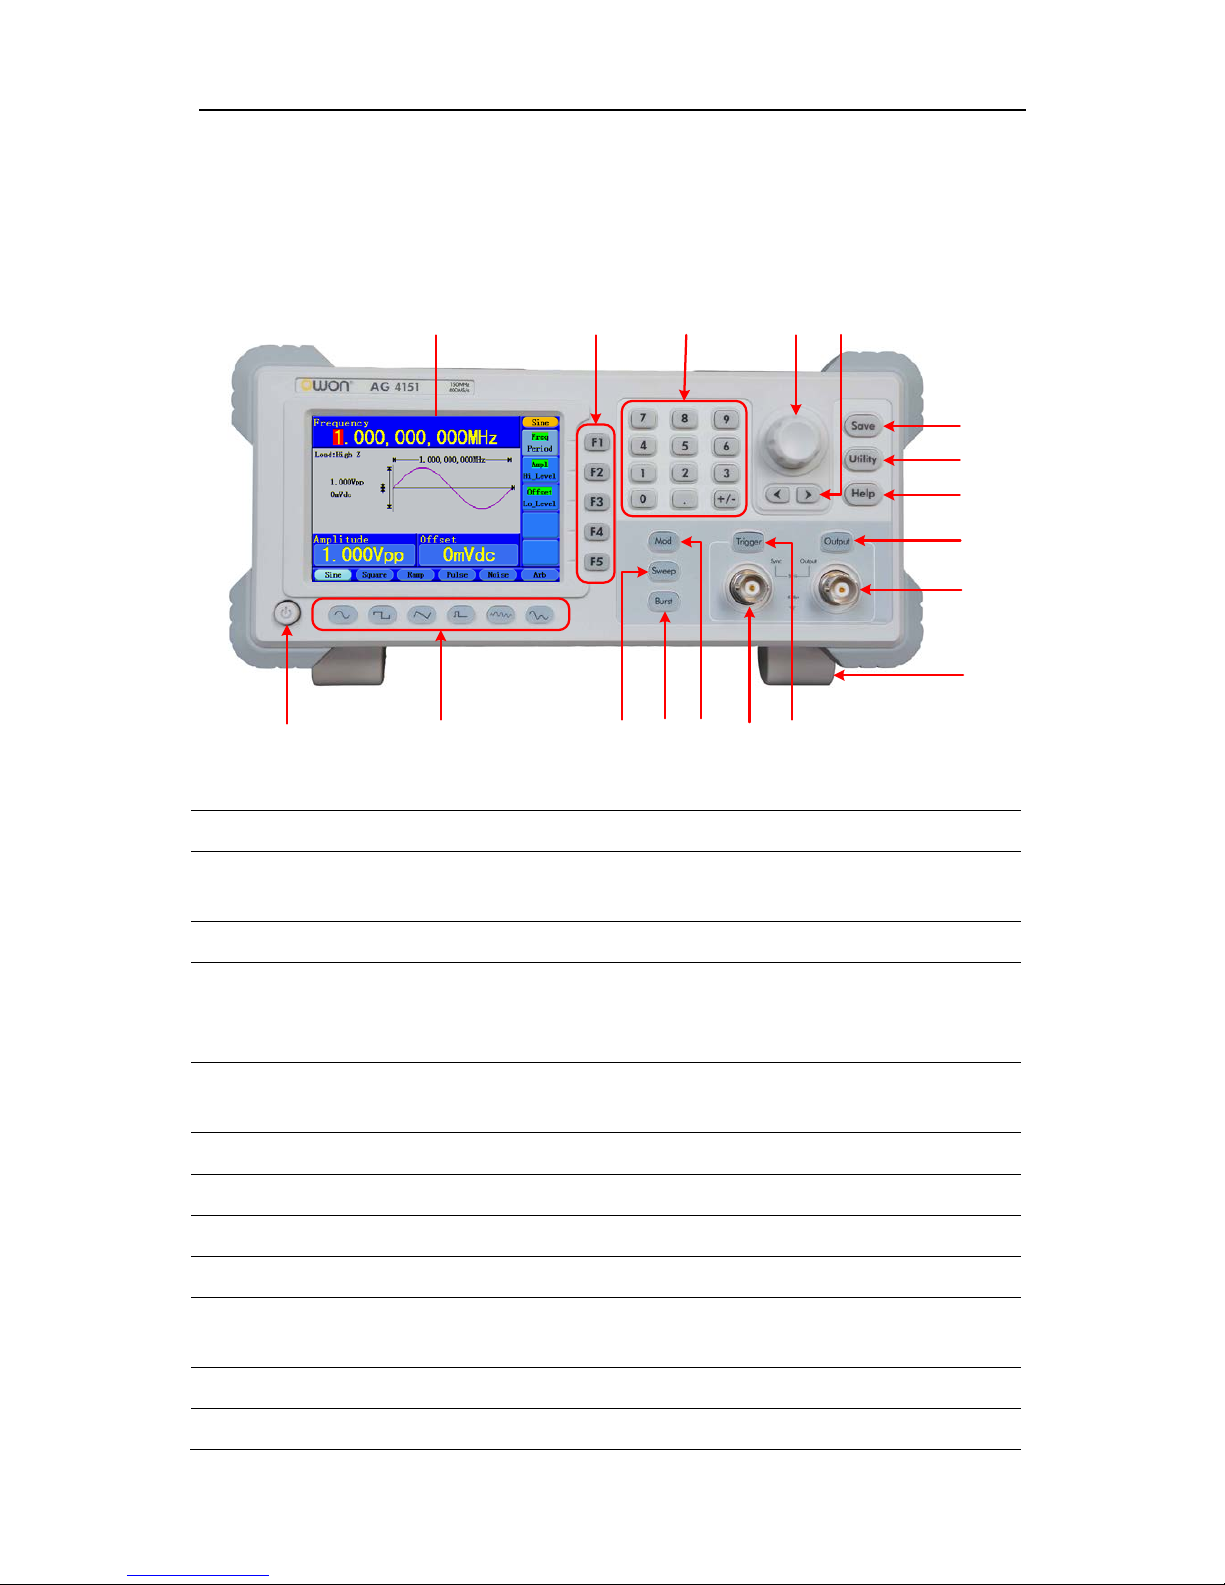
Figure 4-1 Front panel overview
①
LCD
Display the user interface
②
Menu selection
buttons
Include 5 buttons: F1~F5, activate the corresponding menu
③
Number keys
Input parameters, include: number, point and plus/minus sign
④
Knob
Change the current highlighted number, also can be used to
select file location or switch the character of the soft keyboard
when entering file name.
⑤
Direction key Move the cursor of the focused parameter or select the file
locations
⑥
Save
Store/recall the user-defined arbitrary waveform data
⑦
Utility
Set the auxiliary system function
⑧
Help
View the build-in help information
⑨
Output key
Activate or deactivate the output signal
⑩
Main output
terminal
Output main signal
⑪
Foot stool
Make the instrument to be tilted for ease of operation
⑫
Trigger key
In Sweep and N-Cycle Burst, if you choose Source as
Page 9
4.Front/Rear Panel and User Interface
5
"Manual", every time you press this key, the generator will be
triggered once.
⑬
Sync output
terminal
Output sync signal
⑭
Modulation
Generate the Modulated waveforms
⑮
Burst
Generate burst for Sine, Square, Ramp, Pulse and Arbitrary
waveform
⑯
Sweep
Sweep Sine, Square or Ramp waveform
⑰
Waveform
selection buttons
Include: Sine, Square, Ramp, Pulse, Noise and Arbitrary
waveform. When a waveform is selected, the backlight of the
button turns on.
⑱
Power button
Turn on/off the generator
Rear Panel
①
②
③
④
⑤
⑥
⑫
⑪
⑩
⑨
⑧
⑦
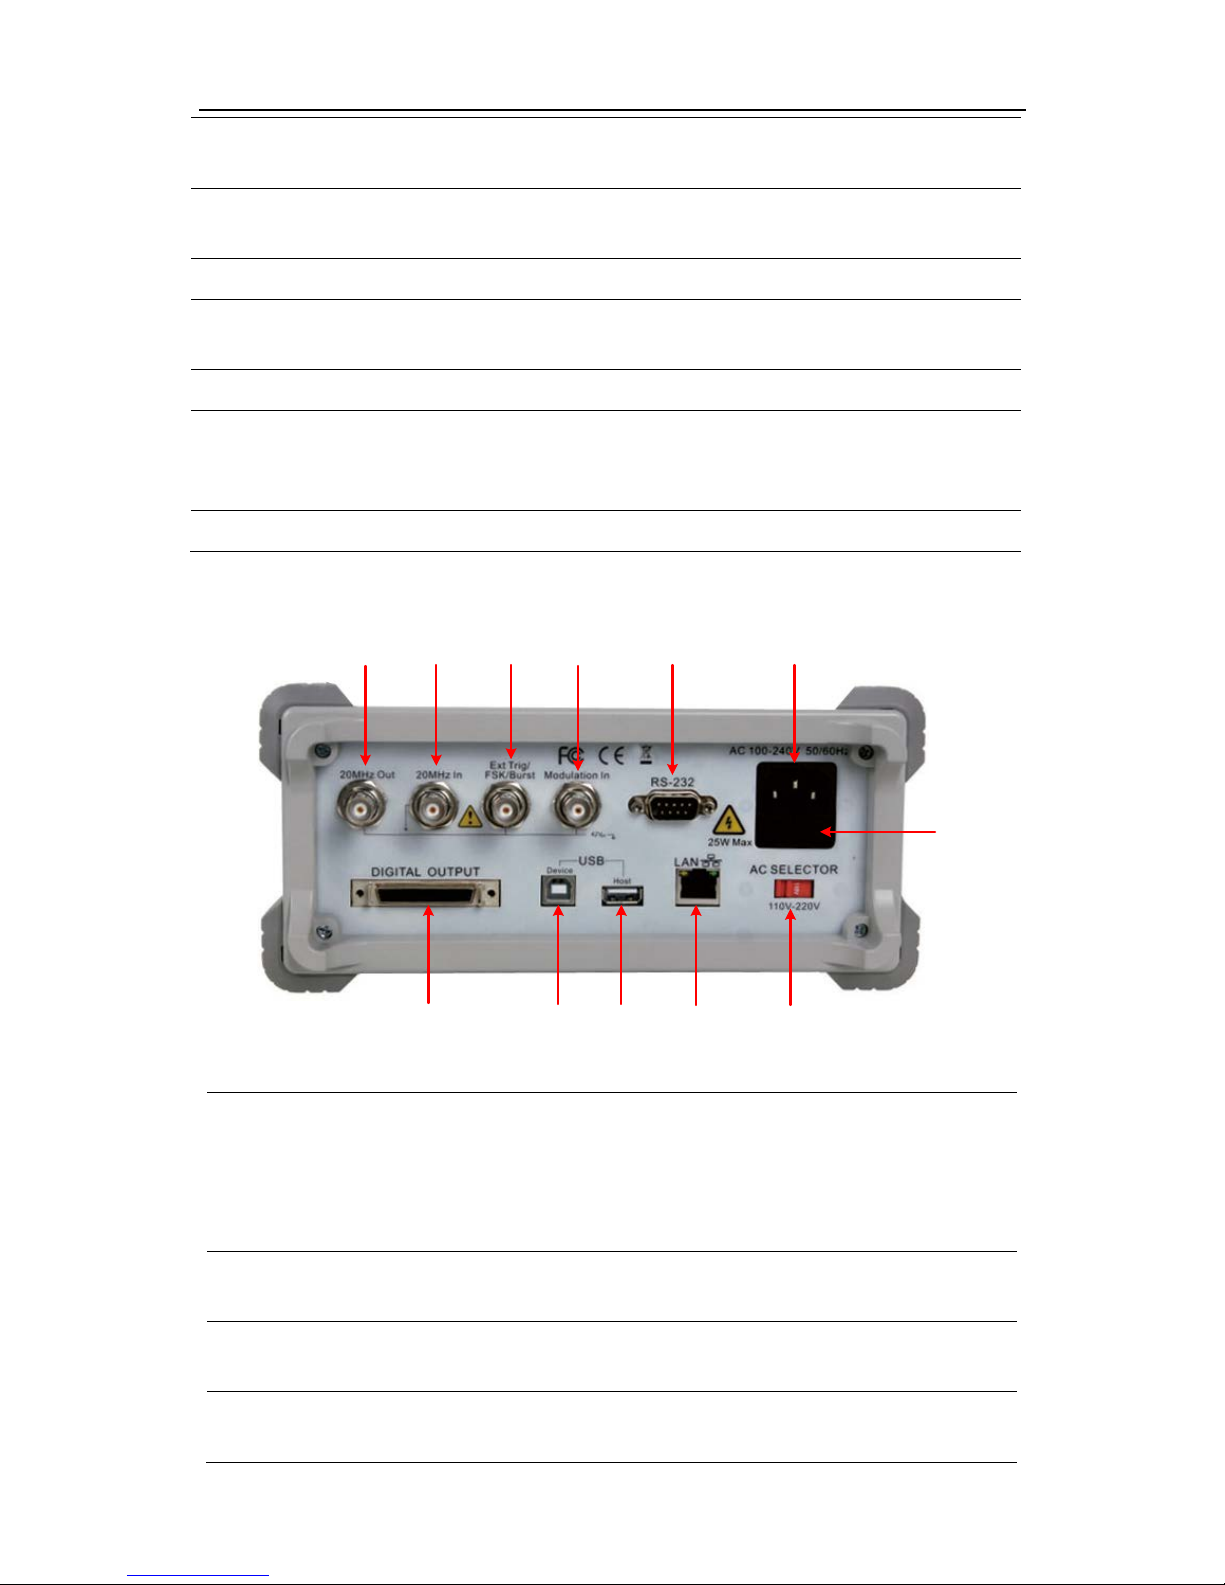
Figure 4-2 Rear panel overview
①
②
20MHz reference
output
20MHz reference
input
These two connectors are used to synchronize generators.
The connector [20MHz In] accepts an external 2
0 MHz
clock signal, and the connector [2
0MHz Out] can output a
2
0 MHz clock signal generated by the crystal inside the
generator.
③
External Trigger
/FSK/Burst
This signal can be used as external signal source in Sweep,
FSK and Burst mode.
④
Modulation In
Modulation waveform input, use it as external signal
source
⑤
RS232 port
Through this interface, the generator can be connected to
a PC and controlled via PC software.
Page 10
4.Front/Rear Panel and User Interface
6
⑥
Power socket
AC input connector
⑦
Fuse
Use the specified fuse according to the voltage scale.
⑧
Power switch
Switch between 110V and 220V.
⑨
LAN port
Through this interface, the generator can be connected to
your local network and controlled via PC software.
⑩
USB Host port
Connect as a "host device" with an external USB device,
such as connect a USB disk to the instrument.
⑪
USB Device port Connect as a "slave device" with an external device, such
as connected to a PC and controlled via PC software.
⑫
Digital output
Connect the generator with the logic signal output module
(optional). Then, configure specific sequence digital signal
in the generator and output the signal through the digital
module.
User Interface
①
⑨
⑩
④
②
⑤
⑦
⑧
⑥
③
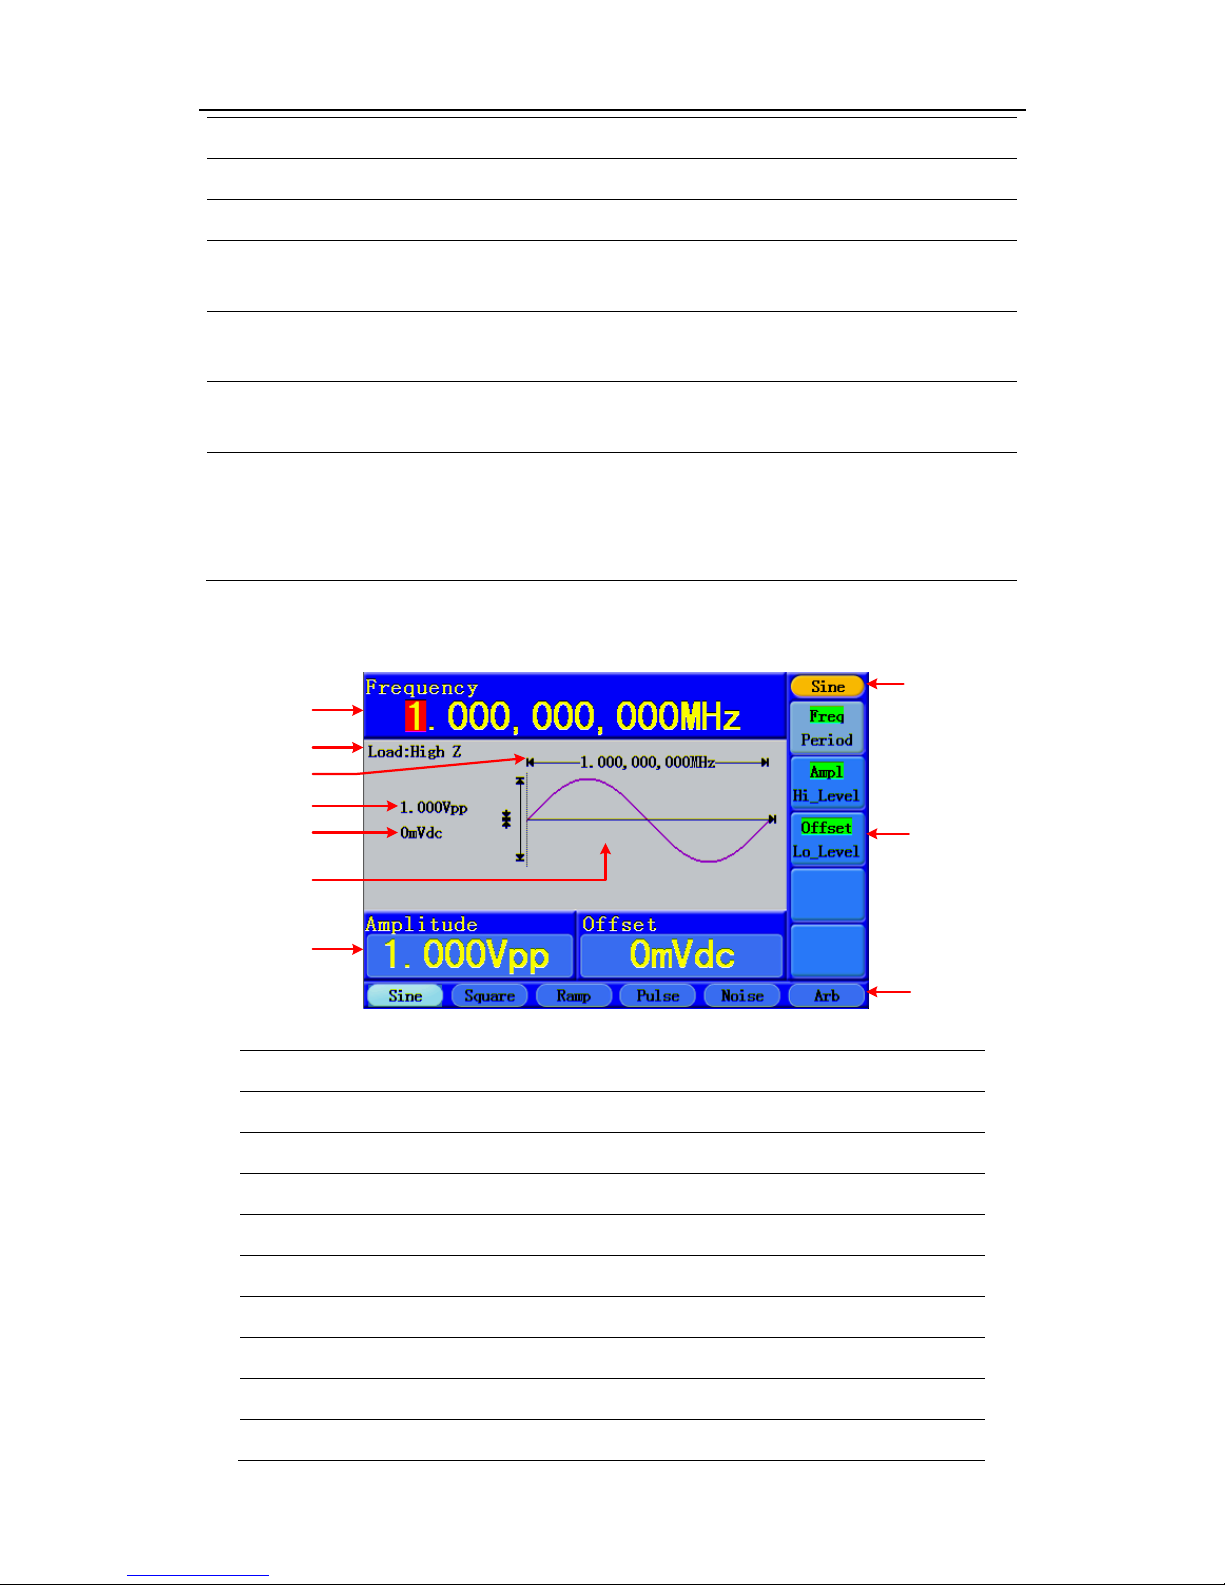
Figure 4-3 User interface (take Sine for instance)
①
Parameter bar 1, display parameters and edit the focused parameter
②
Load, High Z represents high resistance
③
Frequency/period, depends on the highlighted menu item on the right
④
Amplitude/high level, depends on the highlighted menu item on the right
⑤
Offset/low level, depends on the highlighted menu item on the right
⑥
Display current waveform
⑦
Parameter bar 2, display parameters and edit the focused parameter
⑧
Current signal type or mode
⑨
The setting menu of current signal or mode
⑩
Signal type
Page 11

5.General Inspection
7
5. General Inspection
After you get a new Waveform Generator, it is recommended that you should make a
check on the instrument according to the following steps:
1. Check whether there is any damage caused by transportation.
If it is found that the packaging carton or the foamed plastic protection cushion has
suffered serious damage, do not throw it away first till the complete device and its
accessories succeed in the electrical and mechanical property tests.
2. Check the Accessories
The supplied accessories have been already described in the "Appendix A: Enclosure"
of this Manual. You can check whether there is any loss of accessories with reference
to this description. If it is found that there is any accessory lost or damaged, please
get in touch with the distributor of Lilliput responsible for this service or the Lilliput's
local offices.
3. Check the Complete Instrument
If it is found that there is damage to the appearance of the instrument, or the
instrument can not work normally, or fails in the performance test, please get in
touch with the Lilliput's distributor responsible for this business or the Lilliput's local
offices. If there is damage to the instrument caused by the transportation, please
keep the package. With the transportation department or the Lilliput's distributor
responsible for this business informed about it, a repairing or replacement of the
instrument will be arranged by the Lilliput.
Foot Stool Adjustment
Unfold the foot stools on the bottom of the generator, as ⑦ in Figure 4-1.
Page 12
6.Power-On Check
8
6. Power-On Check
AC Power Input Setting
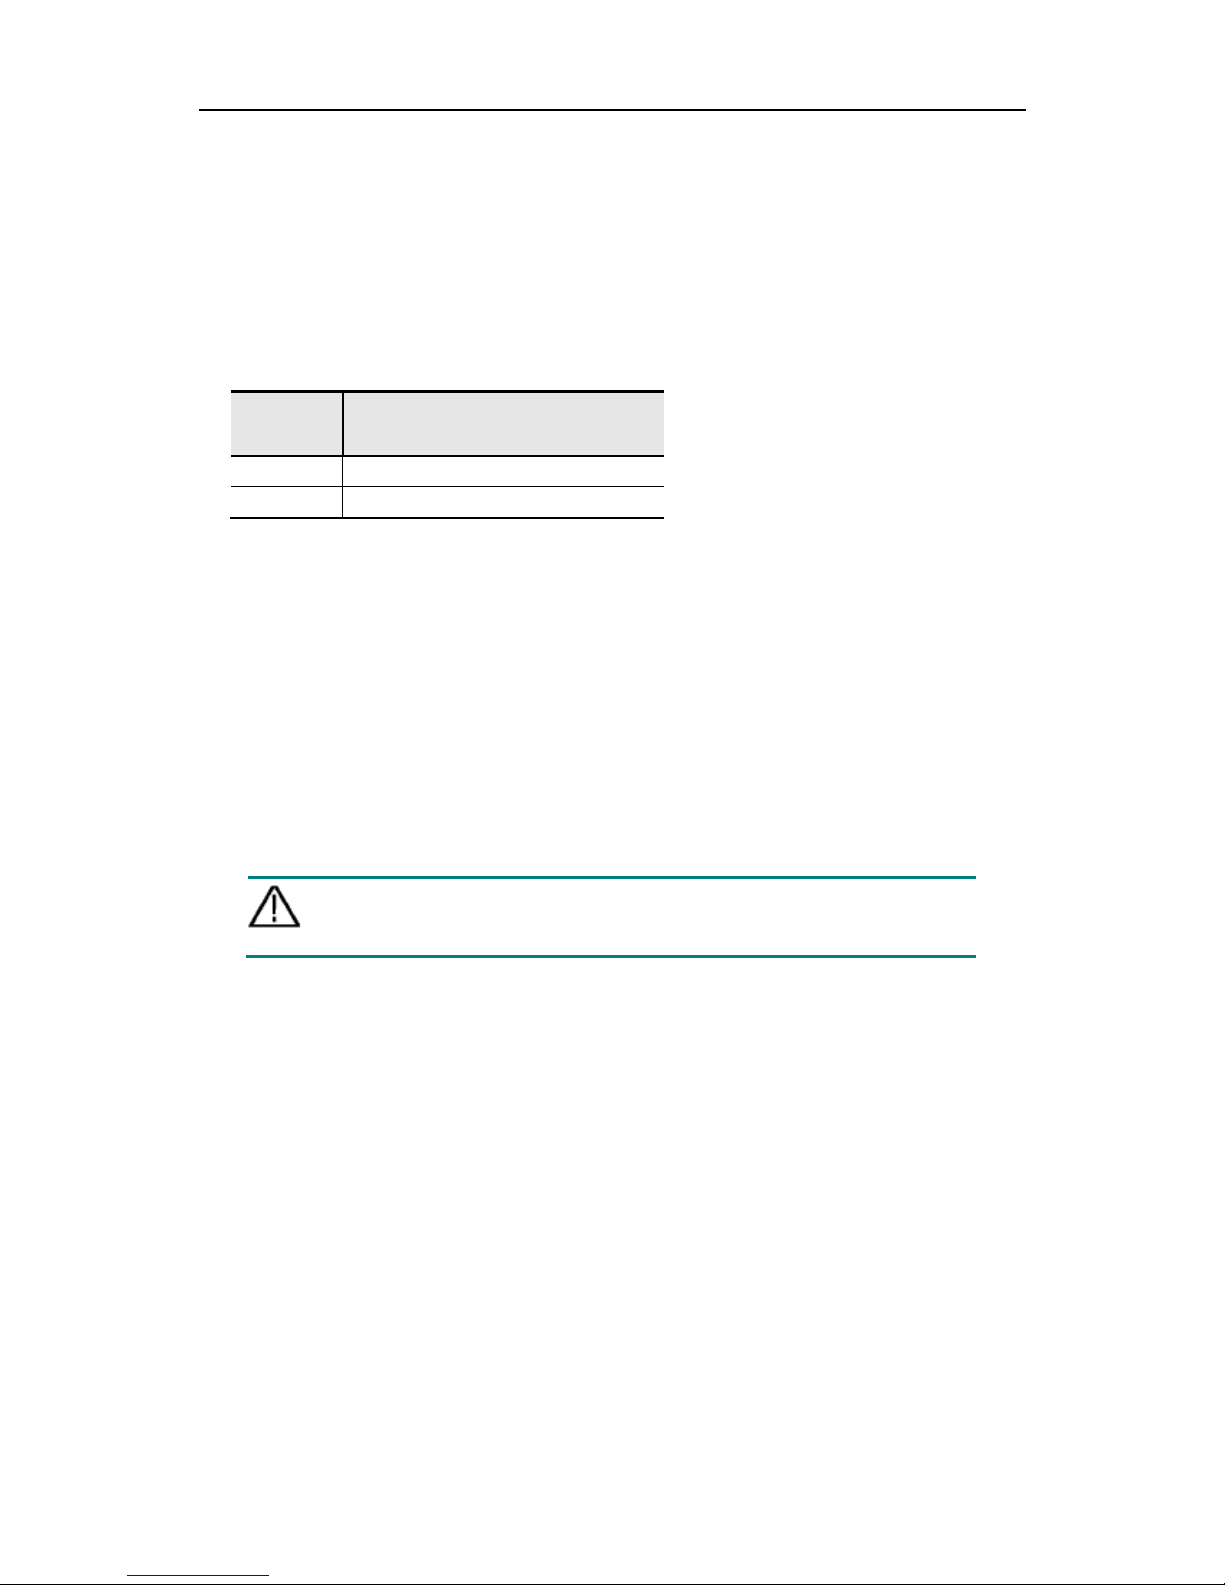
This series adopt 110V/220V AC power source. Users should regulate the voltage scale of
the Power Switch according to the standards in their own country (see Figure 4-2) at the
rear panel and use an appropriate fuse.
Voltage Fuse
110V
125 V, F4AL
220V
250 V, F2AL
To change the voltage scale of the instrument, do the following steps:
(1) Turn off the power button at the front panel and remove the power cord.
(2) Check if the fuse installed before leaving factory (250 V, F2AL) can match with the
selected voltage scale; if not, pry the cover open using a straight screwdriver (see ⑦
in Figure 4-2), change the fuse.
(3) Regulate the Power Switch to the desired voltage scale.
Power On
(1) Connect the instrument to the AC supply using the supplied power cord.
Warning:
To avoid electric shock, the instrument must be grounded properly.
(2) Press down the power button at the front panel, the screen shows the boot screen.
Page 13
7.Quick Start
9
7. Quick Start
To Set Basic/Arbitrary Signals
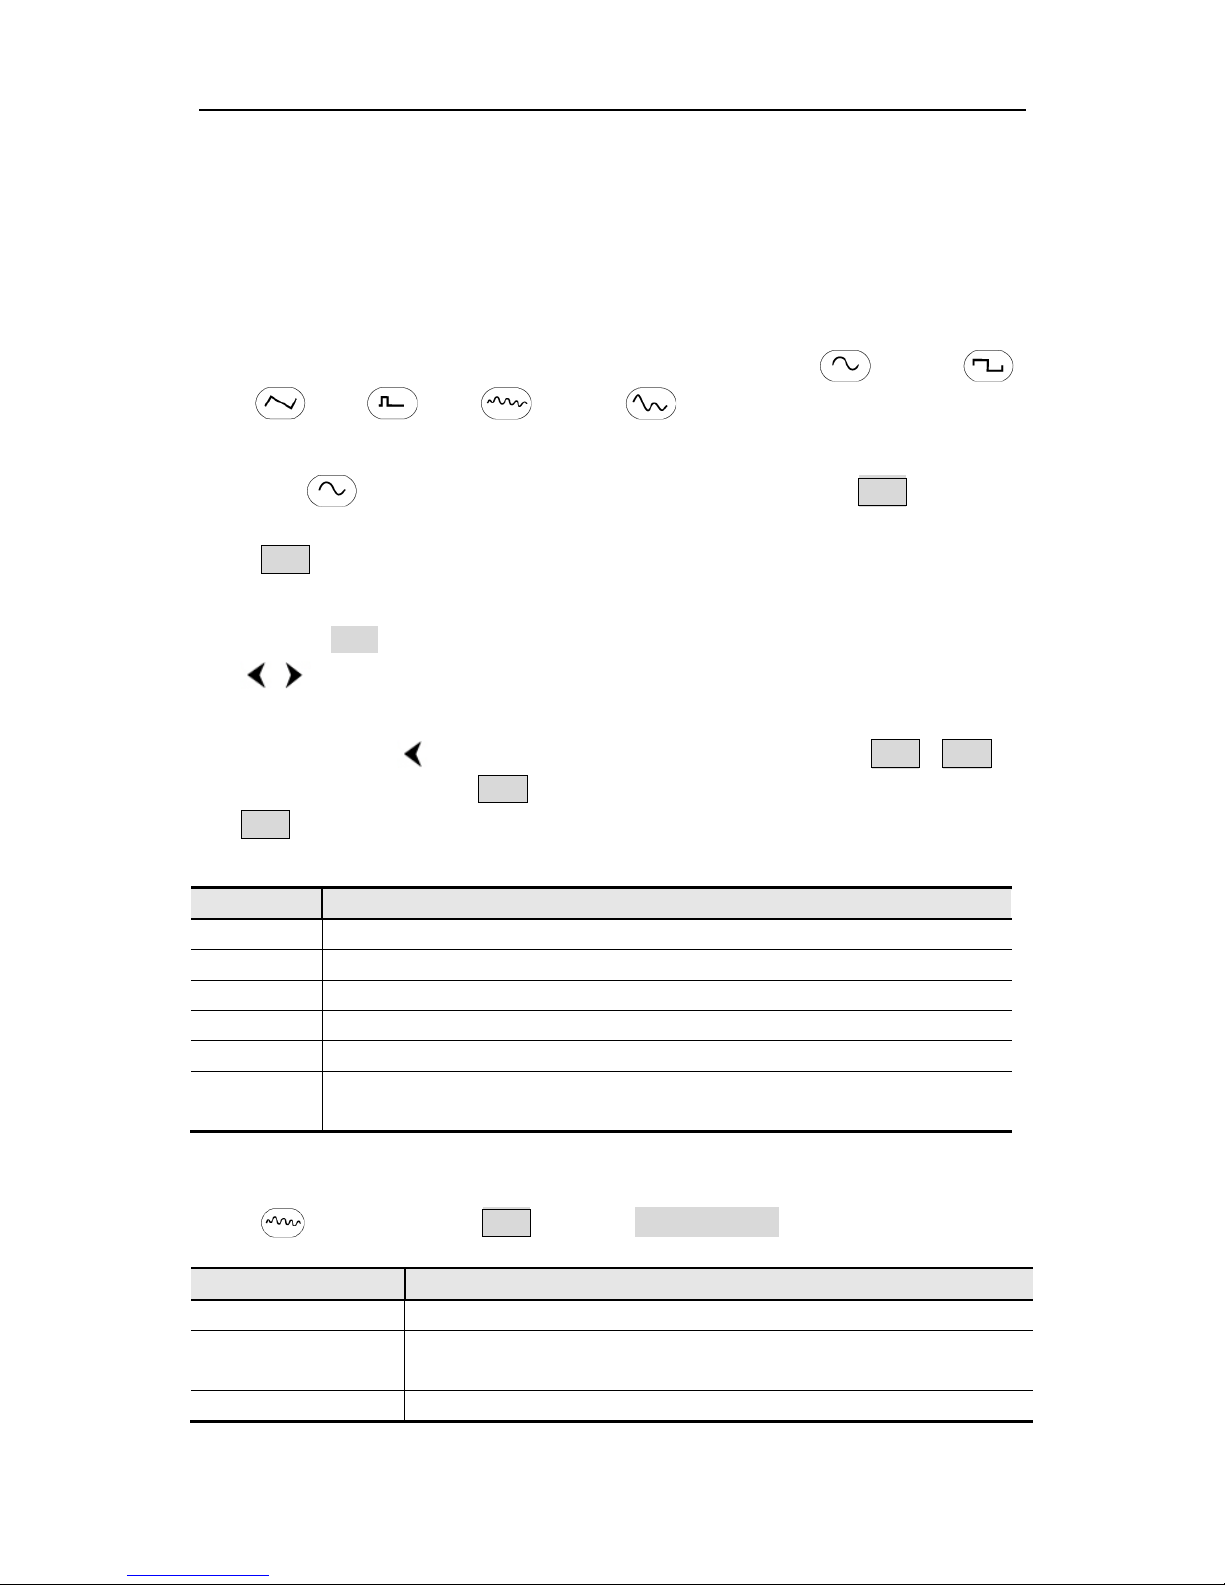
The following describes how to set and output Sine, Square, Ramp, Pulse, Noise and
Arbitrary signals.
Press Waveform selection buttons on the front panel: Sine , Square ,
Ramp , Pulse , Noise , Arbitrary , to enter waveform setting interface.
Different waveform has different parameters.
E.g.: Press button to call the user interface of Sine signal. Press F1 button, the
chosen menu item is highlighted, the focused parameter is displayed in Parameter bar 1.
Press F1 button to switch between Frequency/Period.
Two methods to change the chosen parameter:
Turn the knob to change the value of cursor position in the Parameter bar. Press
/ direction key to move the cursor.
Press a number key in the front panel, an input box will pop up; keep going to input
the value. Press direction key to delete the last number. Press F1 ~ F3 to
choose the unit, or press F4 to go to next page and choose other units. Press
F5 to cancel the input.
Parameters of waveforms
Waveforms
Menu Items
Sine
Frequency/Period, Amplitude/High Level, Offset/Low Level
Square
Frequency/Period, Amplitude/High Level, Offset/Low Level, Duty
Ramp
Frequency/Period, Amplitude/High Level, Offset/Low Level, Symmetry
Pulse
Frequency/Period, Amplitude/High Level, Pulse Width/Duty, Edge Time
Noise
Amplitude/High Level, Offset/Low Level
Arbitrary
Frequency/Period, Amplitude/High Level, Offset/Low Level, Built-in
Waveform, Editable Waveform
The User-Definable Waveform
Press button and press F5 to select "Editable Wform".
Menu item
Instruction
Create Wform
Create a new waveform.
Select Wform
Select the waveform stored in internal storage (FLASH) or U disk
(USBDEVICE).
Edit Wform
Edit the stored waveform.
Page 14
7.Quick Start
10
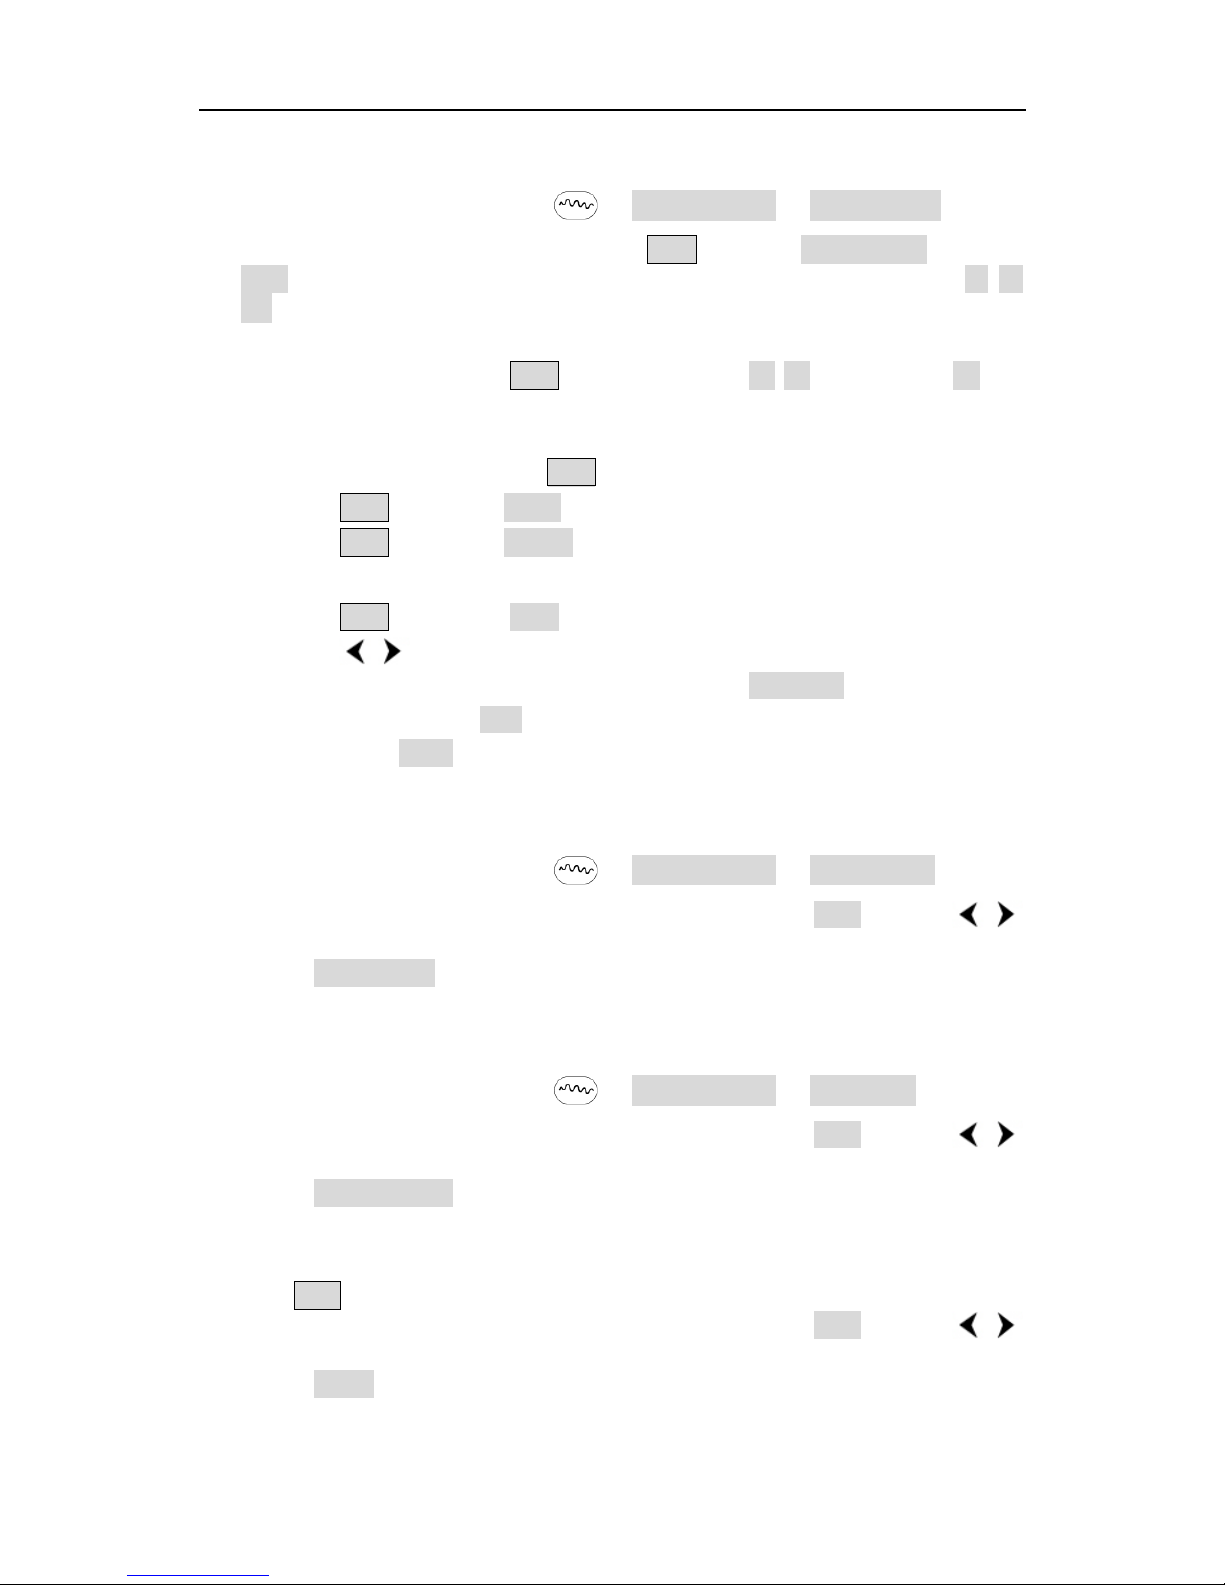
How to Create a New Waveform
(1) Enter the operation menu: Press →Editable Wform →Create Wform.
(2) Set the number of waveform points: Press F1 to select "Wform Points", turn the
knob or press the number keys to input the desired value and choose the unit. X1, XK,
XM respectively represent 1, 1000, 1000,000. The waveform points range is 2~
1000,000.
(3) Set the interpolation: Press F2 to switch between On/Off. If you choose On, the
points will be connected with beelines; otherwise, the voltages between two
consecutive points will not change, and the waveform looks like a step-up one.
(4) Edit the waveform points: Press F3 to enter the operation menu.
Press F1 to choose "Points", input the number of the point to be edited.
Press F2 to choose "Voltage", input the voltage for the current point.
Repeat the step above, set all the points to your needs.
Press F4 to choose "Store", enter the file system. If a U disk is connected,
press / direction key to select the storage. "USBDEVICE" is the U Disk
storage, "FLASH" is the internal storage. Choose Next level, enter the desired
storage path, choose Save, an input keyboard pops up, input the file name, and
then choose DONE.
How to Select a Stored Waveform
(1) Enter the operation menu: Press →Editable Wform →Select Wform.
(2) Enter the storage path of the desired waveform file. Turn the knob or press /
direction key to select the desired waveform file.
(3) Choose Recall output.
How to Edit a Stored Waveform
(1) Enter the operation menu: Press →Editable Wform →Edit Wform.
(2) Enter the storage path of the desired waveform file. Turn the knob or press /
direction key to select the desired waveform file.
(3) Choose Recall suppress.
How to Delete a Stored Waveform
(1) Press Save function button to enter the file system.
(2) Enter the storage path of the desired waveform file. Turn the knob or press /
direction key to select the desired waveform file.
(3) Choose Delete.
Page 15
7.Quick Start
11
To Generate the Modulated Waveform
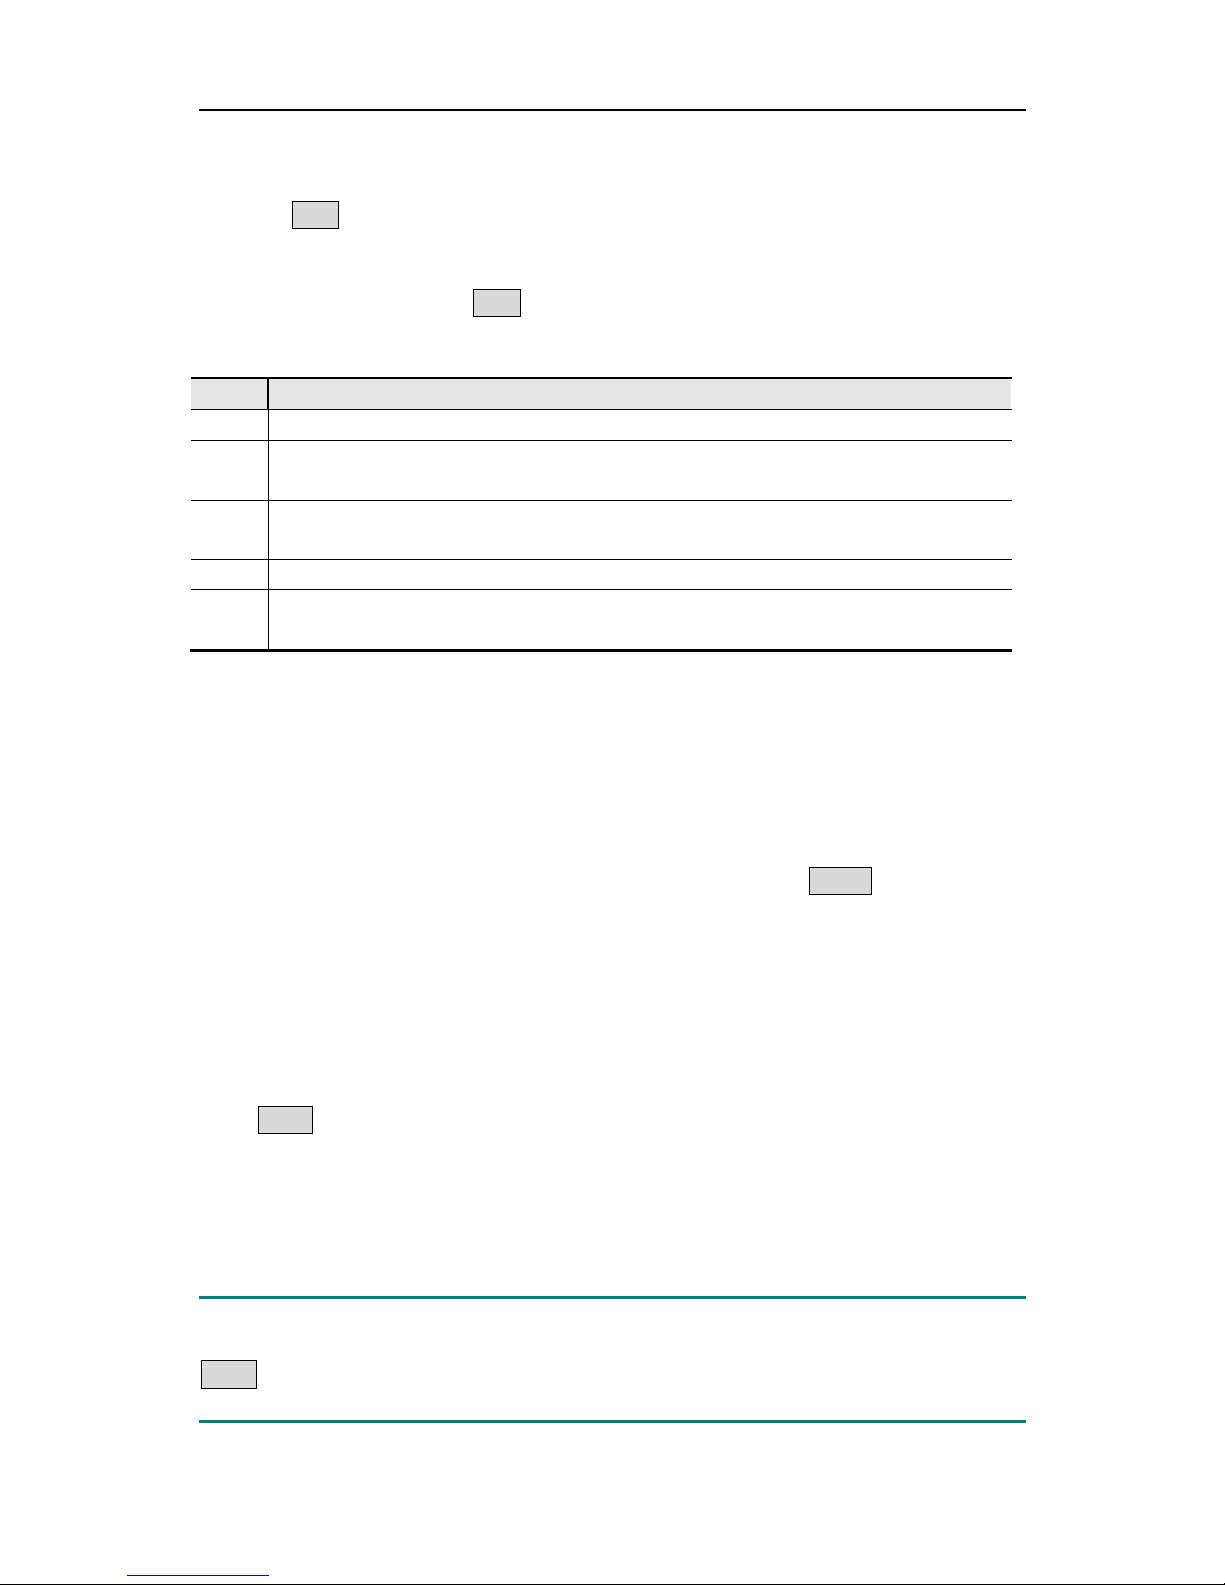
Use the Mod button to generate modulated waveform. This series can modulate
waveform using AM (Amplitude Modulation), FM (Frequency Modulation), PM (Phase
Modulation), FSK (Frequency Shift Keying) and PWM (Pulse Width Modulation). To turn
off the modulation, press the Mod button.
Parameters of modulated waveforms:
Types
Parameters
AM
Source Internal (Mod Shape, AM Frequency, Mod Depth) / Source External
FM
Source Internal (Mod Shape, Mod Frequency, FM Deviation) / Source External
(FM Deviation)
PM
Source Internal (Mod Shape, PM Frequency, Phase Deviation) / Source External
(Phase Deviation)
FSK
Source Internal (FSK Rate, Hop Frequency) / Source External (Hop Frequency)
PWM Source Internal (Mod Shape, Mod Frequency, Duty Deviation
) / Source
External (Duty Deviation)
To Generate Sweep
In the frequency sweep mode, the generator "steps" from the start frequency to the stop
frequency at the sweep rate you specify. Sweep can be generated by Sine, Square or
Ramp Waveforms.
When the output signal is Sine, Square or Ramp waveform, press Sweep function button
to enter the Sweep mode. The parameters as Sweep Time, Linear/Log, Start
Frequency/Center Frequency, Stop Frequency/Frequency Span and Source are allowed to
be set.
To Generate Burst
Using Burst function button can generate versatile waveforms in burst. Burst can last for
certain times of waveform cycle (N-Cycle Burst), or to be controlled by external gated
signals (Gated Burst). Bust can apply to Sine, Square, Ramp, Pulse and Arbitrary
waveforms (Noise can not be used).
Parameters as Burst Period, Delay, Start Phase, Cycles/Infinite and Source are allowed to
be set in N-Cycle mode; while Start Phase and Polarity are available in Gated mode.
Note:
For a burst, the maximum frequency of the used waveform is 25MHz. After pressing the
Burst function button, if the frequency is greater than 25MHz, the generator will adjust it
to 25MHz automatically.
Page 16
7.Quick Start
12
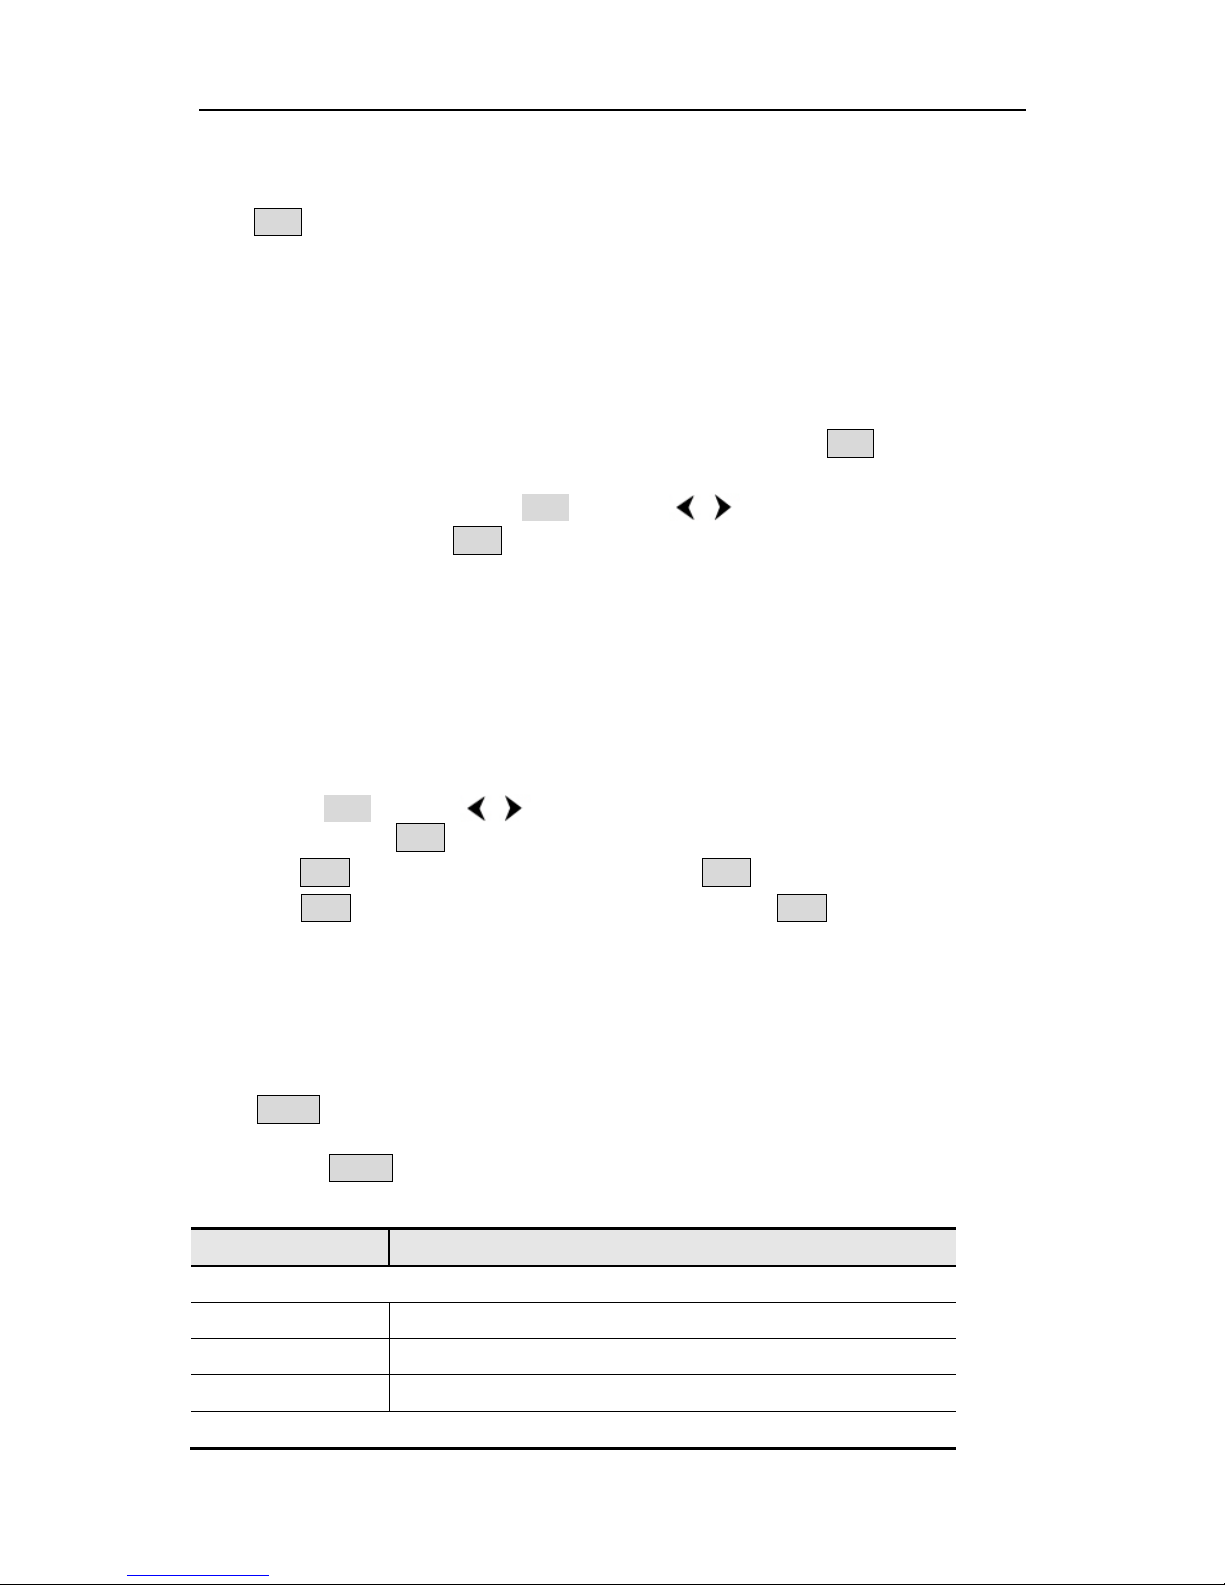
To Save and Recall
Press Save function button to enter the file system.
To Use USB Storage
The storage location is divided into the internal storage (FLASH) and the U disk storage
(USBDEVICE). When a U disk is connected, the storage menu will show "USBDEVICE" and
"FLASH". Otherwise, the storage menu will show "FLASH" only.
(1) Install the U disk: insert a USB disk into the "⑩USB Host port" on the rear panel in
Figure 4-2, and the screen will show "Detect USB device". Press Save function button
to enter the file system, the storage menu will show "USBDEVICE" and "FLASH".
(2) Enter the storage: Turn the knob or press / direction key to choose the
desired storage. Press F1 to enter the chosen storage.
(3) Remove the U disk: Remove the U disk from the USB Host port on the rear panel.
The system will inform you "The USB device is removed", and the "USBDEVICE" in the
storage menu will disappear.
To Edit the File Name
In file system, the user can edit the name of a file or a f old e r. When the system needs the
user to input a name, an input keyboard will appear.
(1) Turn the knob or press / direction key to move the cursor left and right in the
keyboard. Press F3 to switch between capital and small of the characters.
(2) Press F1 to enter the current character. Press F2 to delete the last character .
(3) Press F4 to finish editing and save the file. Press F5 to cancel the save
operation.
Note: The length of file name is up to 15 characters.
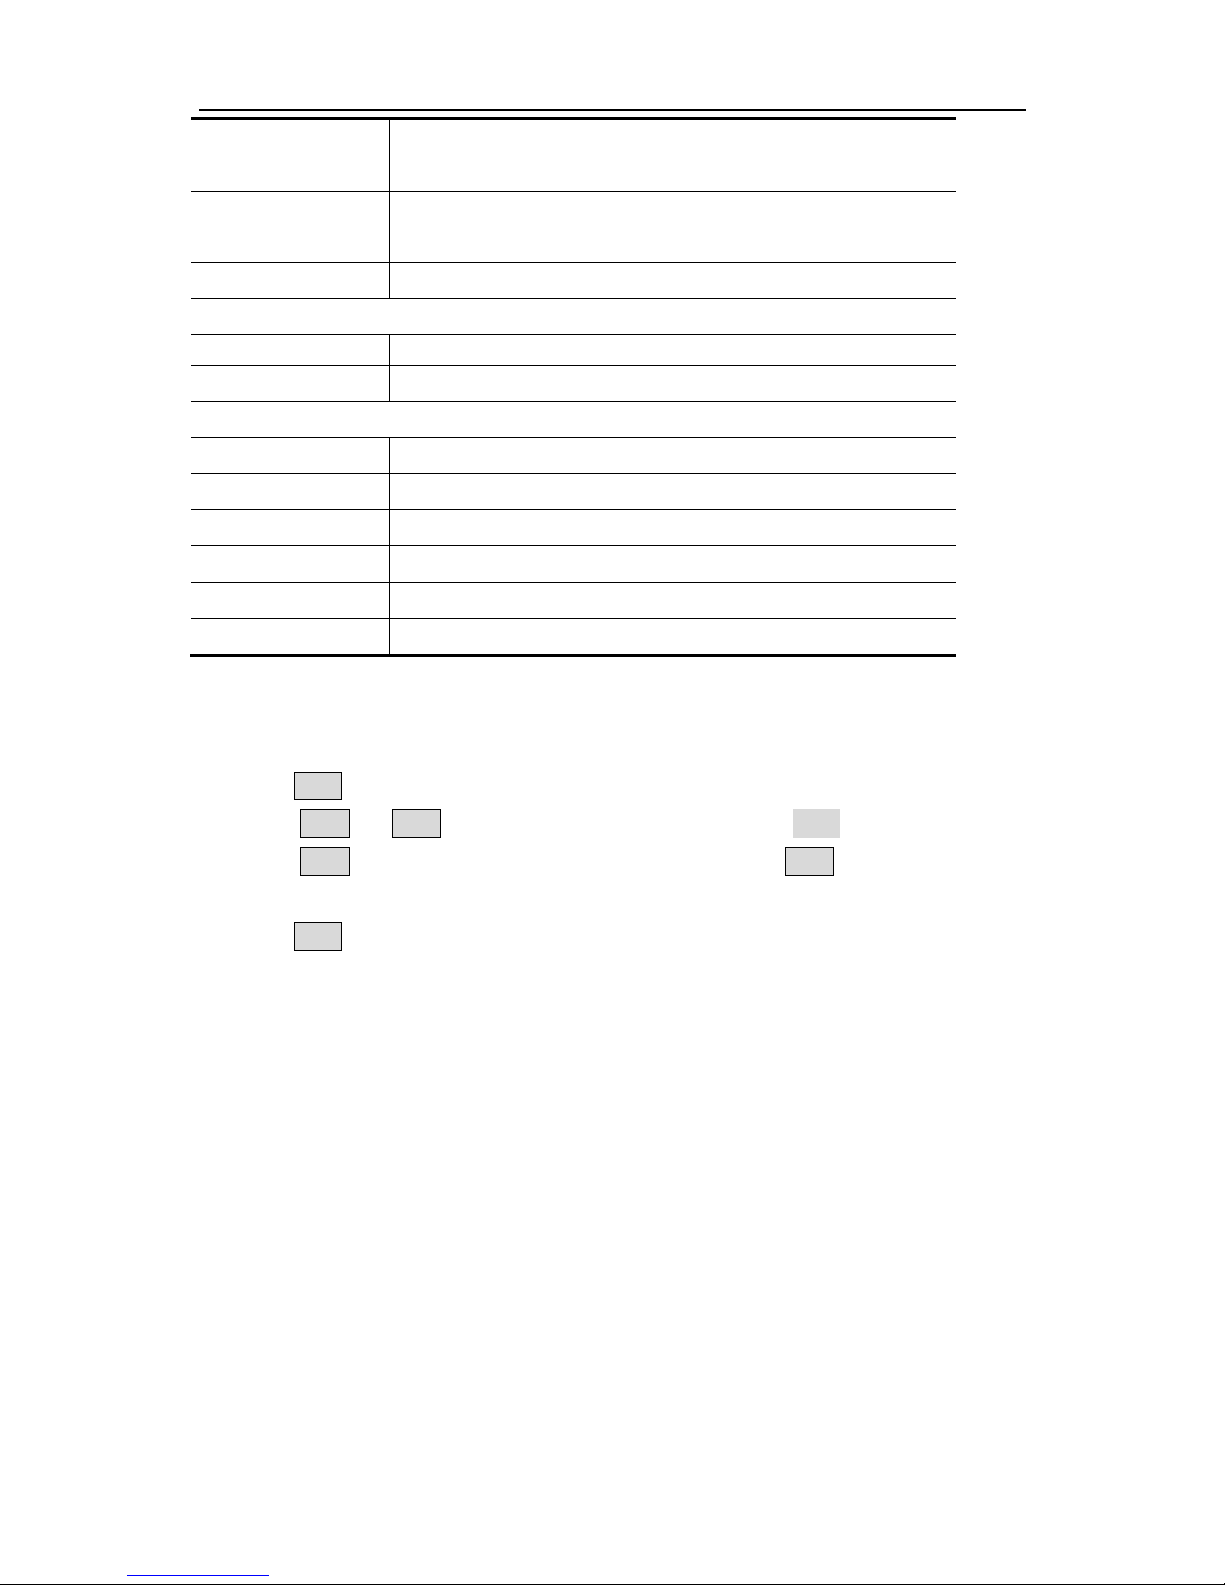
To Set the Utility Function
Press Utility function key to enter the Utility Menu. You can set the parameters of the
Generator such as: Display Parameter, Output Parameter, Interface Parameter and System
Setting. Press Utility again to exit the Utility Menu.
Utility Menu items
Menu Item Explanations
Display Setup
Bright Set the parameter of LCD brightness.
Separator Set the separator of the displayed parameter.
Screen Saver
Time range is 1~999 minutes.
Output Setup
Page 17
7.Quick Start
13
Load
Used to match the displayed voltage with the expected one.
The load range is 1Ω~10KΩ.
Sync On/Off
Enable/disable the Sync Signal on the Sync output terminal
on the front panel.
DC Turn on/off the DC output, you can set the DC voltage.
I/O Setup
Band Rate
Switch the RS232 baud rate.
LAN Set the network parameters when using LAN port
System
Language Switch display languages.
Power On Switch between Default/Last
Set to Default Set all the settings to default.
Beep On is to activate the sound when the system informs you.
System Info View the Version and Serial number.
Clock Source Switch between Internal/External.
To Use Built-in Help
(1) Press Help function button, the catalog will display in the screen.
(2) Press F1 or F2 to choose help topic, or just turn the knob to choose.
(3) Press F3 to view the details about the topic; press F5 to go back to the
catalog.
(4) Press Help again to exit the help, or just do other operations.
Page 18
8.Communication with PC
14
8. Communication with PC
This series support communications with a PC through USB, LAN or COM port. You can
use the ultrawave communication software to set the parameters, control the output of
the Waveform Generator, and synchronously display the screen of the Waveform
Generator.
Here is how to connect with PC. First, install the ultrawave communication software on
the supplied CD. Then there are several ways of connection to choose from.
Using USB Port
(1) Connection: Use a USB data cable to connect the USB Device port in the rear panel
of the Waveform Generator to the USB port of a PC.
(2) Install the driver: When the Waveform Generator is turned on, a dialog will appear
on the PC screen and guide you to install the USB driver. The driver is in the
"USBDRV" folder under the directory where the ultrawave communication software
is installed, such as "C:\Program Files\OWON\ultrawave\USBDRV".
(3) Port setting of the software: Run the ultrawave software; click "Communications" in
the menu bar, choose "Ports-Settings", in the setting dialog, choose "Connect using"
as "USB". After connect successfully, the connection information in the bottom right
corner of the software will turn green.
Using LAN Port
Connect directly
(1) Connection. Plug in the LAN cable to the LAN port in the rear panel of the Waveform
Generator; plug the other end into the interface of the computer.
(2) Set the network parameters of the computer. Since the Waveform Generator can
not support obtaining an IP address automatically, you should assign a static IP
address. Here we set the IP address to 192.168.1.71.
(3) Set the network parameters of the ultrawave software. Run the software on the
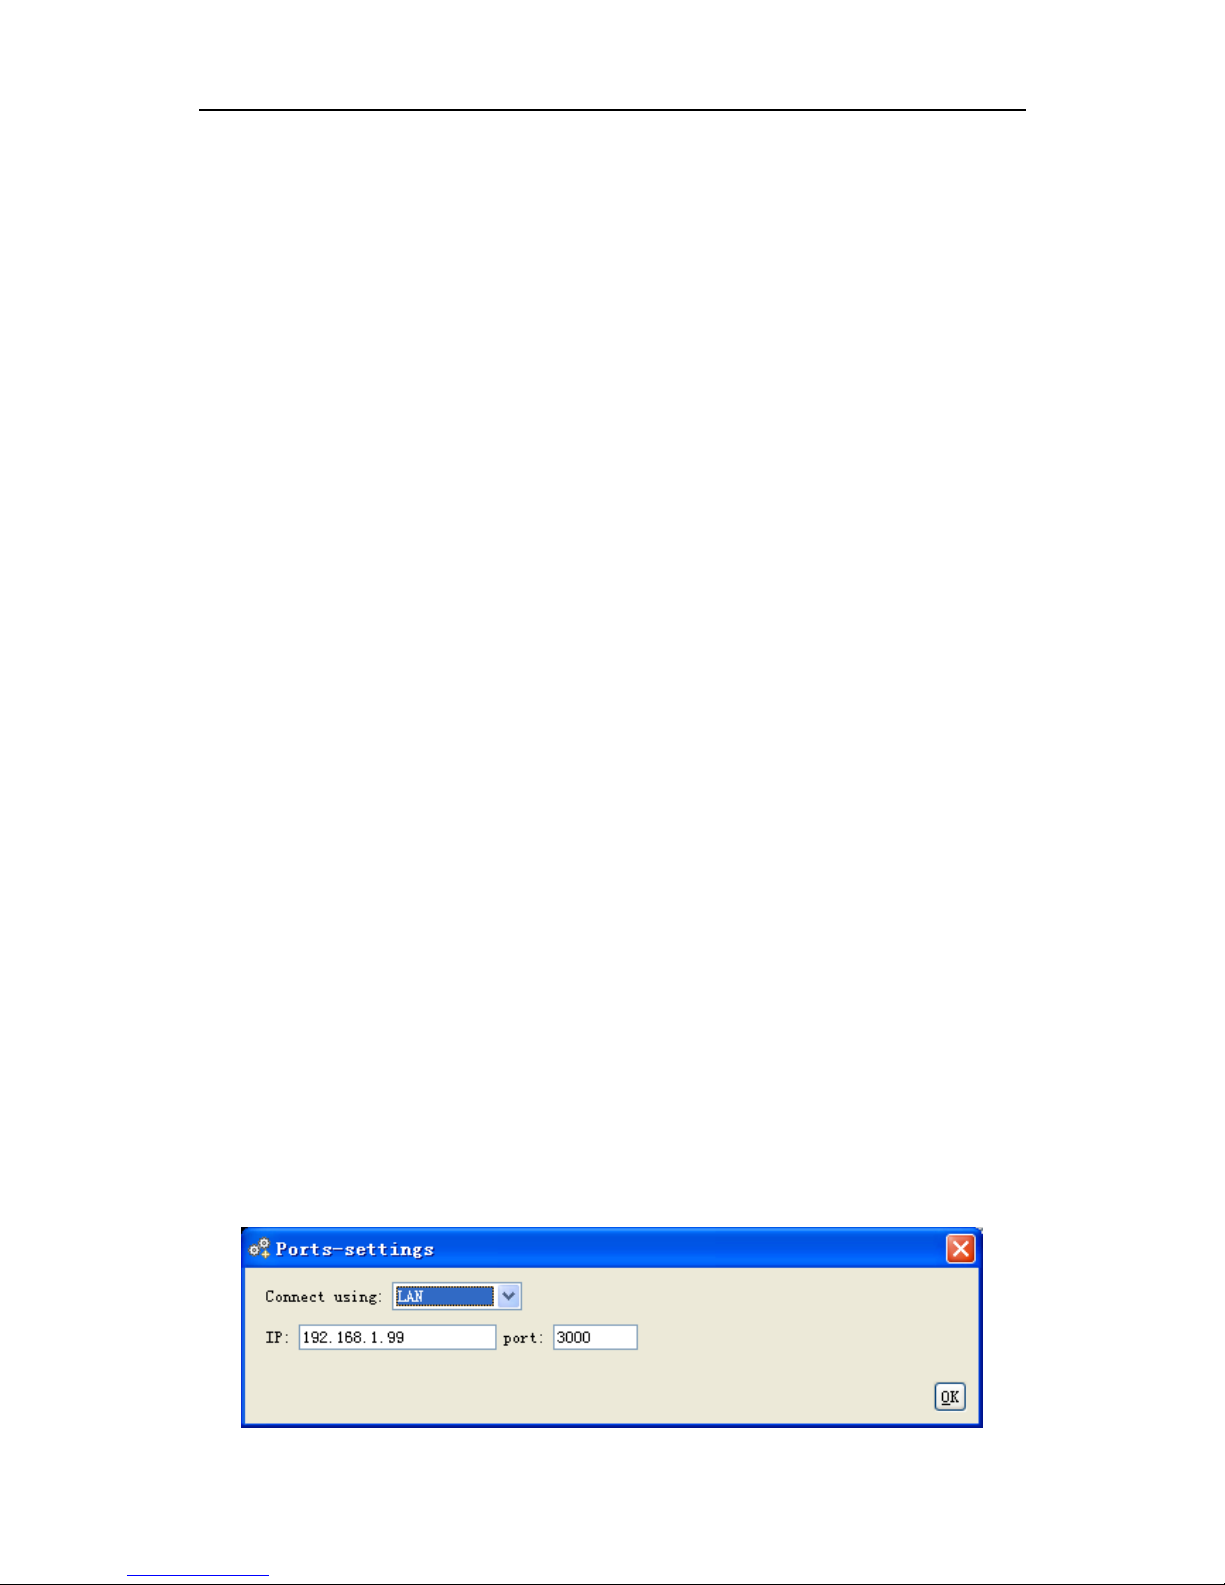
computer, choose the "Ports-settings" of the "Communications" menu item. Set
"Connect using" to LAN. About the IP, the first three bytes is same as the IP in the
step (2), the last byte should be different. Here, we set it to 192.168.1.99. The range
of the port value is 0~4000, but the port which under 2000 is always be used, so it is
suggested to set it to the value above 2000. Here, we set it to 3000.
Figure 8-1: Set the network par ameters of the ultrawave software
Page 19
8.Communication with PC
15
(4) Set the network parameters of the Waveform Generator. In the Waveform
Generator, press Utility and choose I/O Setup, press F2 to choose LAN, enter
the submenu. Set the IP Addr and the Port to the same value as the "Ports-settings"
in the software in step (3). After restarting the Waveform Generator, if you can get
data normally in the ultrawave software, the connection is successful.
Connect through a router
(1) Connection. Use a LAN cable to connect the Waveform Generator with a router, the
LAN port of the Waveform Generator is in the rear panel; the computer should be
connected to the router too.
(2) Set the network parameters of the computer. Since the Waveform Generator can
not support obtaining an IP address automatically, you should assign a static IP
address. The Default gateway and Subnet mask should be set according to the router.
Here we set the IP address to 192.168.1.71, Subnet mask is 255.255.255.0, Default
gateway is 192.168.1.1.
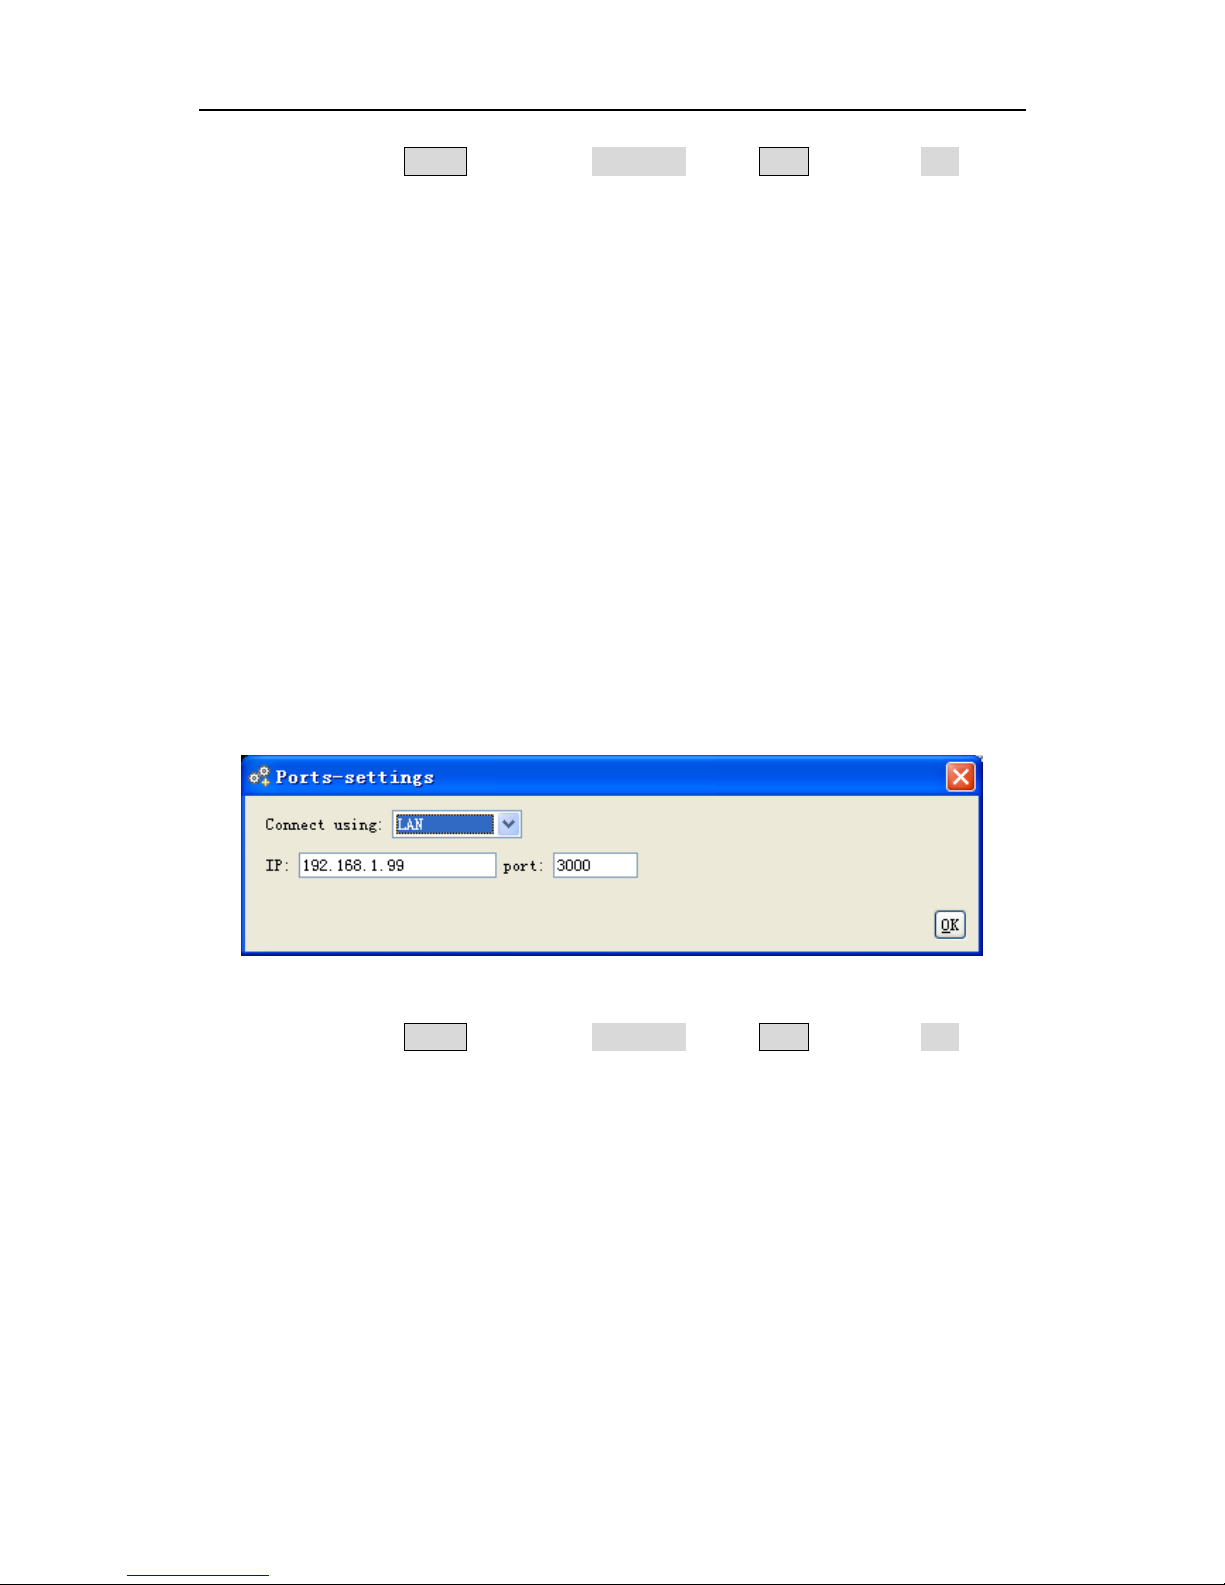
(3) Set the network parameters of the ultrawave software. Run the software on the
computer; choose the "Ports-settings" of the "Communications" menu item. Set
"Connect using" to LAN. About the IP, the first three bytes is same as the IP in the
step (2), the last byte should be different. Here, we set it to 192.168.1.99. The range
of the port value is 0~4000, but the port which under 2000 is always be used, so it is
suggested to set it to the value above 2000. Here, we set it to 3000.
Figure 8-2: Set the network para meters of the ultrawave software
(4) Set the network parameters of the Waveform Generator. In the Waveform
Generator, press Utility and choose I/O Setup, press F2 to choose LAN, enter
the submenu. Set the IP Addr and the Port to the same value as the "Ports-settings"
in the software in step (3). The GateWay should be set according to the router. After
restarting the Waveform Generator, if you can get data normally in the ultrawave
software, the connection is successful.
Using COM Port
(1) Connection. Use a data cable to connect the COM port in the rear panel of the
Waveform Generator, to the COM port of a PC.
(2) Port setting of the software: Run the ultrawave software; click "Communications" in
the menu bar, choose "Ports-Settings", in the setting dialog, choose "Connect using"
as COM.
To learn about how to operate the software, you can press F1 in the software to open the
help document.
Page 20
9.Appendix
16
9. Appendix
Appendix A: Enclosure
Standard Accessories:
A power cord that fits the standard of the destination country
A USB cable
A CD (PC link application software)
A Quick Guide
A BNC/Q9 cable
Appendix B: General Care and Cleaning
General Care
Do not store or leave the instrument where the liquid crystal display will be exposed
to direct sunlight for long periods of time.
Caution: To avoid any damage to the instrument, do not exposed it to any sprays,
liquids, or solvents.
Cleaning
Inspect the instrument as often as operating conditions require.
To clean the instrument exterior, perform the following steps:
1. Wipe the dust from the instrument surface with a soft cloth. Do not make any
scuffing on the transparent LCD protection screen when clean the LCD screen.
2. Disconnect power before cleaning your instrument. Clean the instrument with a
wet soft cloth not dripping water. It is recommended to scrub with soft
detergent or fresh water. To avoid damage to the instrument, do not use any
corrosive chemical cleaning agent.
Warn
ing:
Before power on again for operation, it is required to confirm that
the instrument has already been dried comple
tely, avoiding any
electrical short circuit or bodily injury resulting form the moisture.
 Loading...