


Ownice K1 - User Manual
※Please read though user manual carefully before you install.
※ Advise you test the device by 12V power before install it to your car.
Contents
1. Product Specification ........................................
2. Product Diagram................................................
3. Operation of UI ...................................................
4. Setting of System Function..................................
5. Update MCU and System .....................................
6. Frequently Asked Questions .................................
Product Specification
OS + RAM + ROM
E version: Android 6.0 | 4core | 2G RAM | 16G ROM
C version: Android 8.1 | 4core | 1G RAM | 16G ROM
CPU
Quad Core
Display
1024*600/ Multi-touch
Network
WiFi (Built-in)
External 4G Dongle (Optional)
Radio IC
TDA7786
AMP IC
TDA7388
Standard Functions
FM/AM Radio + RDS + GPS + Bluetooth + Multimedia(USB)+ AUX in + Screen
Mirroring
Optional Accessories
Support 4G Dongle, Carplay Dongle, Starlight Camera, DVR, DAB+, TPMS,
DTV, OBDII, Mic,External DVD Box , Don't Support Bluetooth SWC
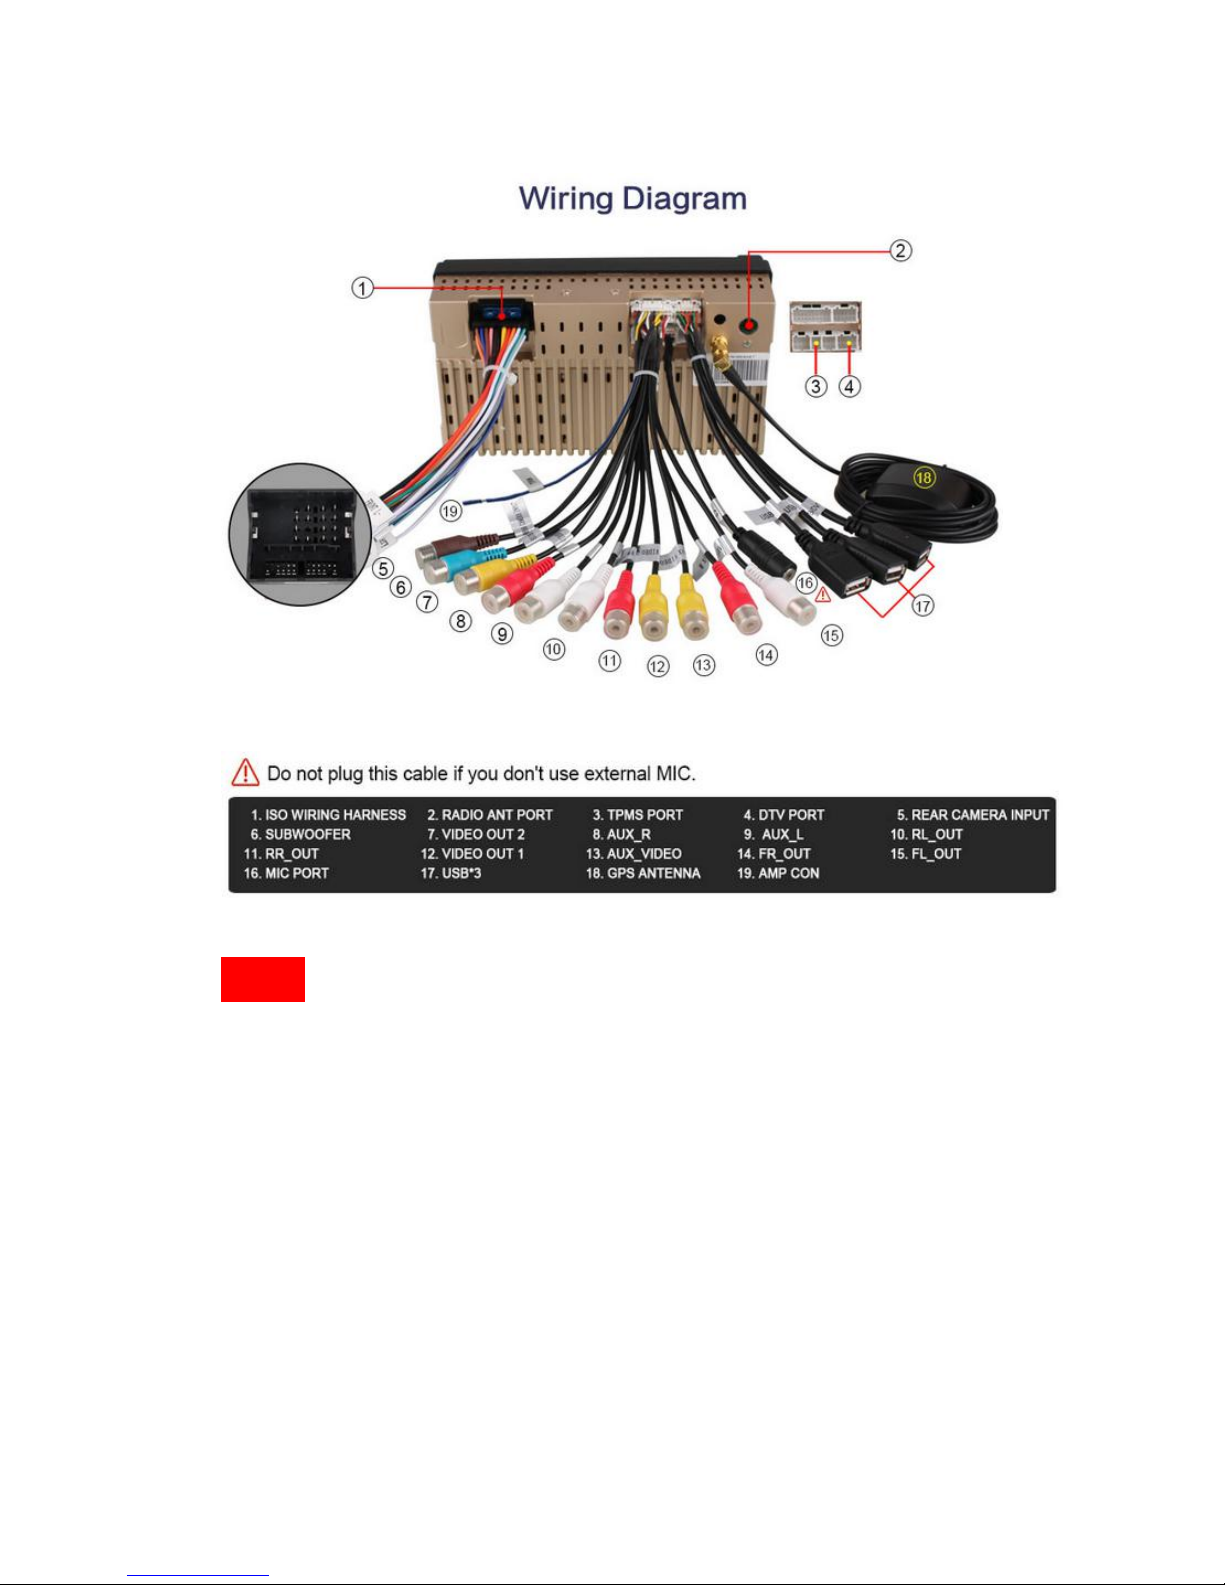
Noted:
If you want to use built-in mic, then must dis-connected the cable "16" , then the built-in
mic will be work.
If you want to use external mic, then must connected the cable "16" , then the built-in
mic will be useless.
Q: Before install it, how to test the device?
A: How to check with a 12V power source directly before installation. Find a 12V power
source, just hook the “13-Ill wire, 14-ACC yellow wire, 15-B+ red wire” together and
connect them with the positive pole, and the “16-Ground black wire” with the negative pole,
then press the “power on” button.
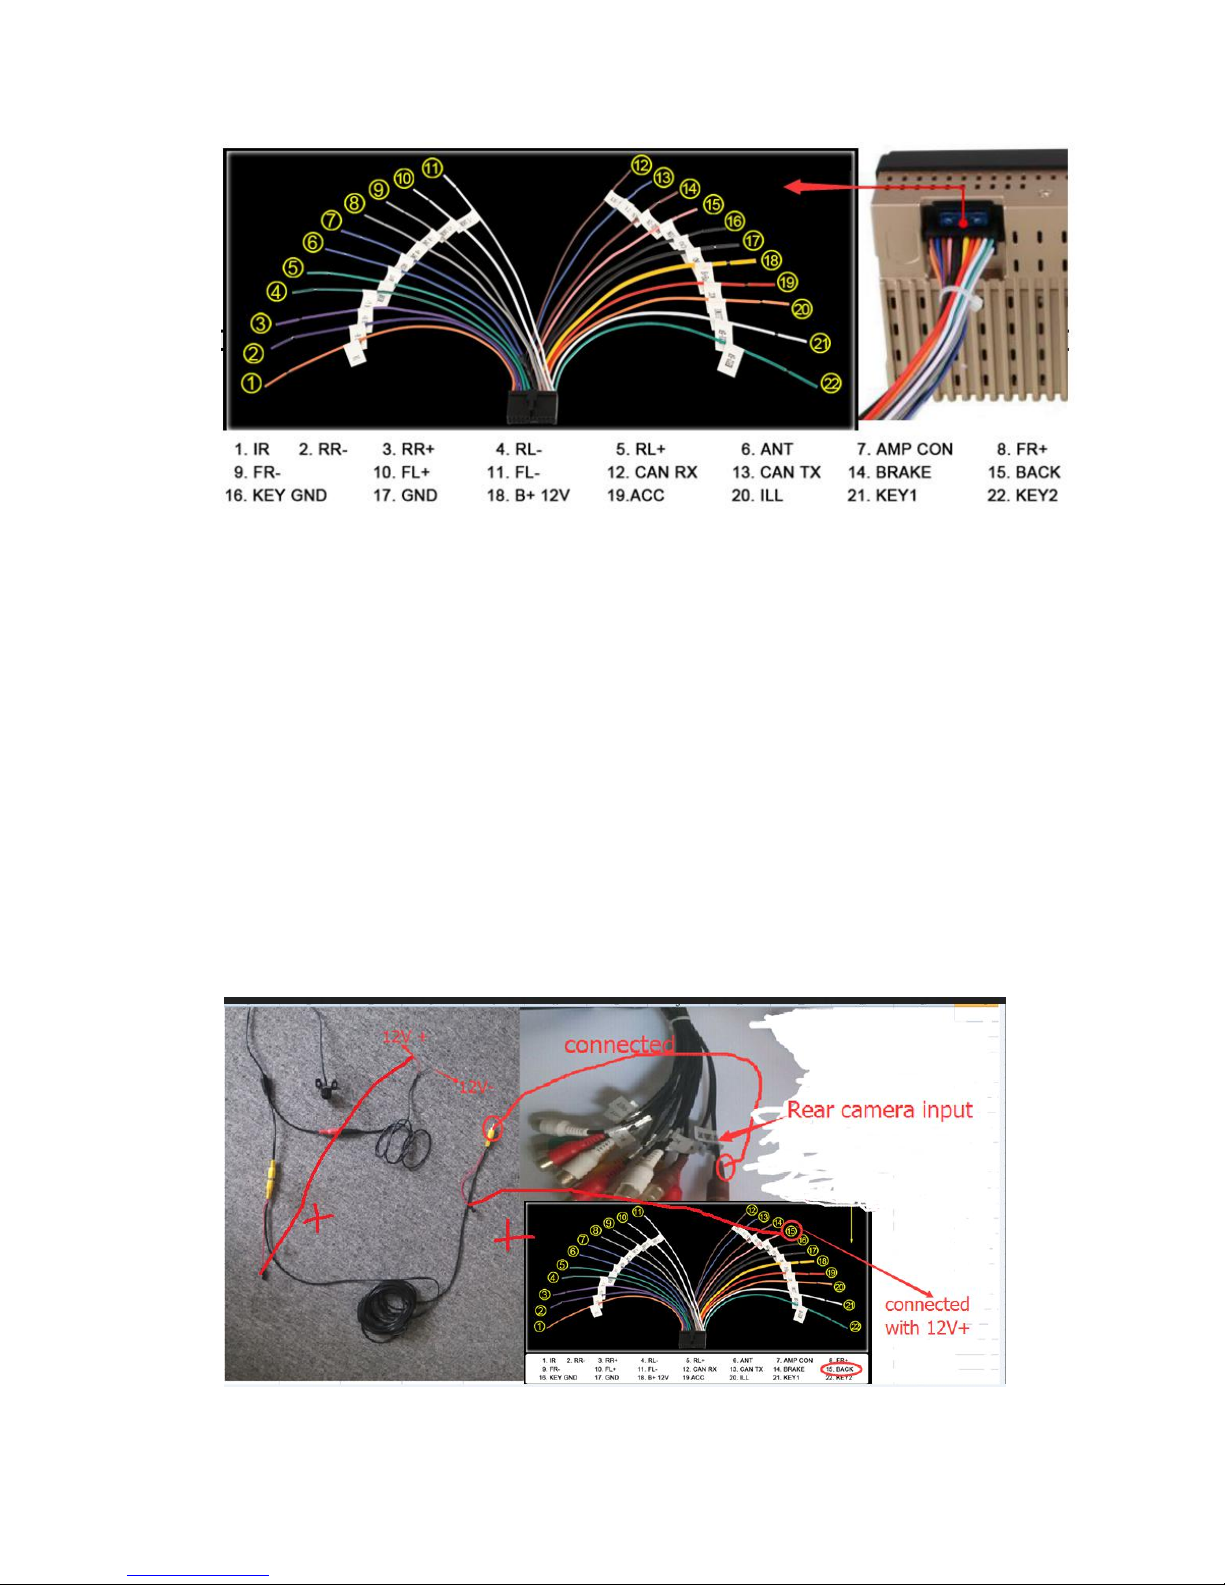
Q: How to connect the rear view camera (Only For Refer)
Please connect as attached photo
Camera: yellow video port <--> Ownice Head Unit: rear camera video input plug
Camera: red power port <--> Original Car: power cable of the reverse light (black wire <-->
ground; red wire <--> power 12v+), to make sure the Ownice Head Unit get instruction to
display the rear view image when you put the gear to reverse and the reverse light turn on.

3.1 UI Operation
This section contains instructions for locating the basic controls and operations
found in the main section.
①
Home Page
②
Back
③
Navigation
④
Radio
⑤
Video
⑥
Bluetooth
⑦
Music
⑧
App page
⑨
Browsing history
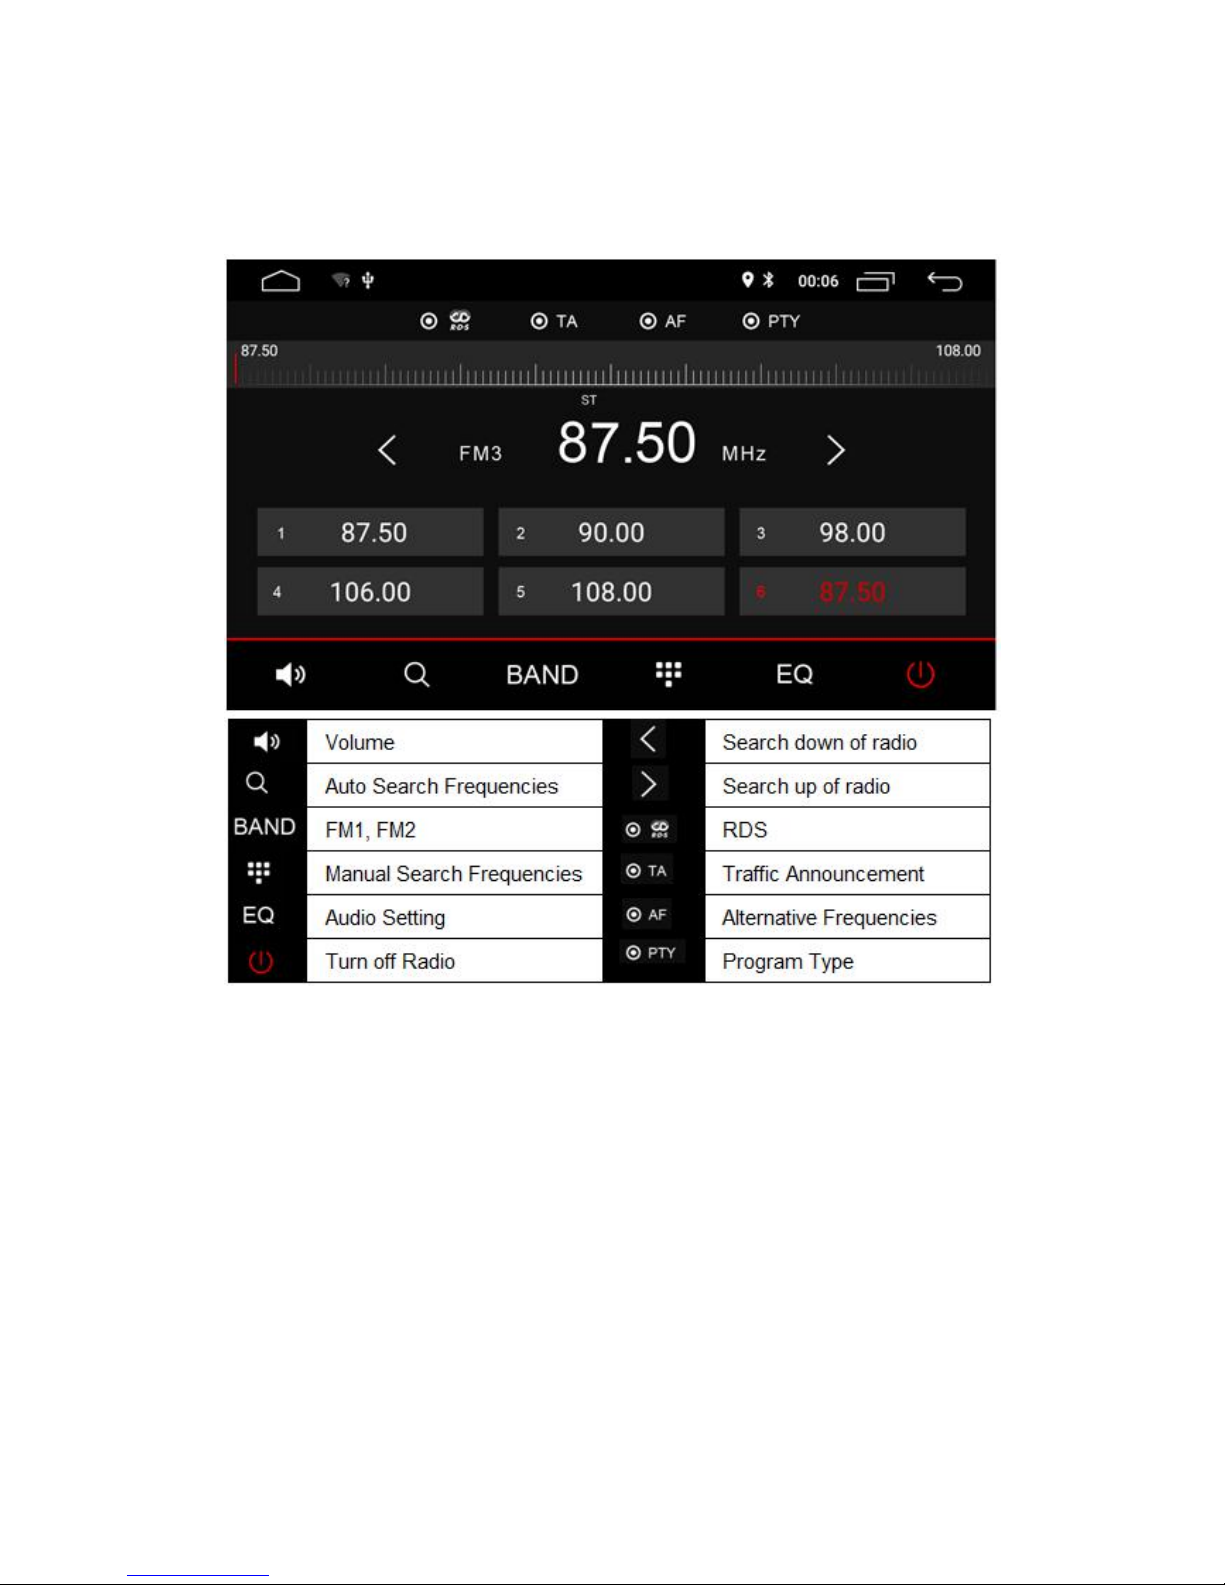
3.2 Radio
This section contains instructions for locating the controls and basic operations
for navigation in the "radio" mode.

3.3 Bluetooth
①
Bluetooth connection icon
⑪
Refresh
②
Diad Pad
⑫
End Calling
③
Phone book
⑬
Phonebook download
④
Recent call
⑭
Delete
⑤
Bluetooth music
⑮
Seach
⑥
Connect bluetooth
⑯
Bluetooth music volume adjust
⑦
Dis-connect bluetooth
⑰
Backward
⑧
Calling
⑱
Pause/Play
⑨
Bluetooth calling volume adjust
⑲
Next
⑩
Recording
⑳
Backward
Q: How to connect the phone by bluetooth ?
For the first connection, use the phone to scan the Bluetooth device, enter the pairing
code (0000) to connect. When have connection records, open the Bluetooth in the
available distance, it will connect automatically. After connect successfully, will show the
Bluetooth sign in the top right of the status bar.

3.4 Music Play
Click into music player
3.5 Video Play
Click into video player
①
Aspect Radio Switch
②
Play mode
③
Previous
④
Pause/Play
⑤
Next
⑥
Collection
⑦
Video list
⑧
Close Video

3.6 EQ Setting
3.7 Volume setting

4. Setting of System Function
Q: How to set the boot logo to others
A: Please set as the following step:
Setting -->car infotainment -->Common-->Boot Logo (Password 9999) --> Choose the
boot logo you want to display --> Confirm.
Q: How to set the button color
A: Please set as the following step:
Setting -->car infotainment -->Common--> Display-->Key light color --> choose the color
you prefer

Q: How to set the standby time
A: Please set as the following step:
Setting -->car infotainment -->Common--> Standby time (0, 10munites, 20munites,
30munites,1hour) --> choose the standby time
Q: How to enter the factory setting.
A: Please set as the following step:
Setting -->car infotainment -->About Device --> click the marked icon as blow (Password
1260) --> Ok

Q: How to let the the message "Do not operate while Driving" disappear?
A: Setting -->car infotainment -->Video ---->Disable Video In Motion ( mark off).
Q: How to automatically connect Bluetooth
A: Please set as the following step:
Setting -->Car infotainment -->Bluetooth --> Open Auto Connect
4.Setting of System Function
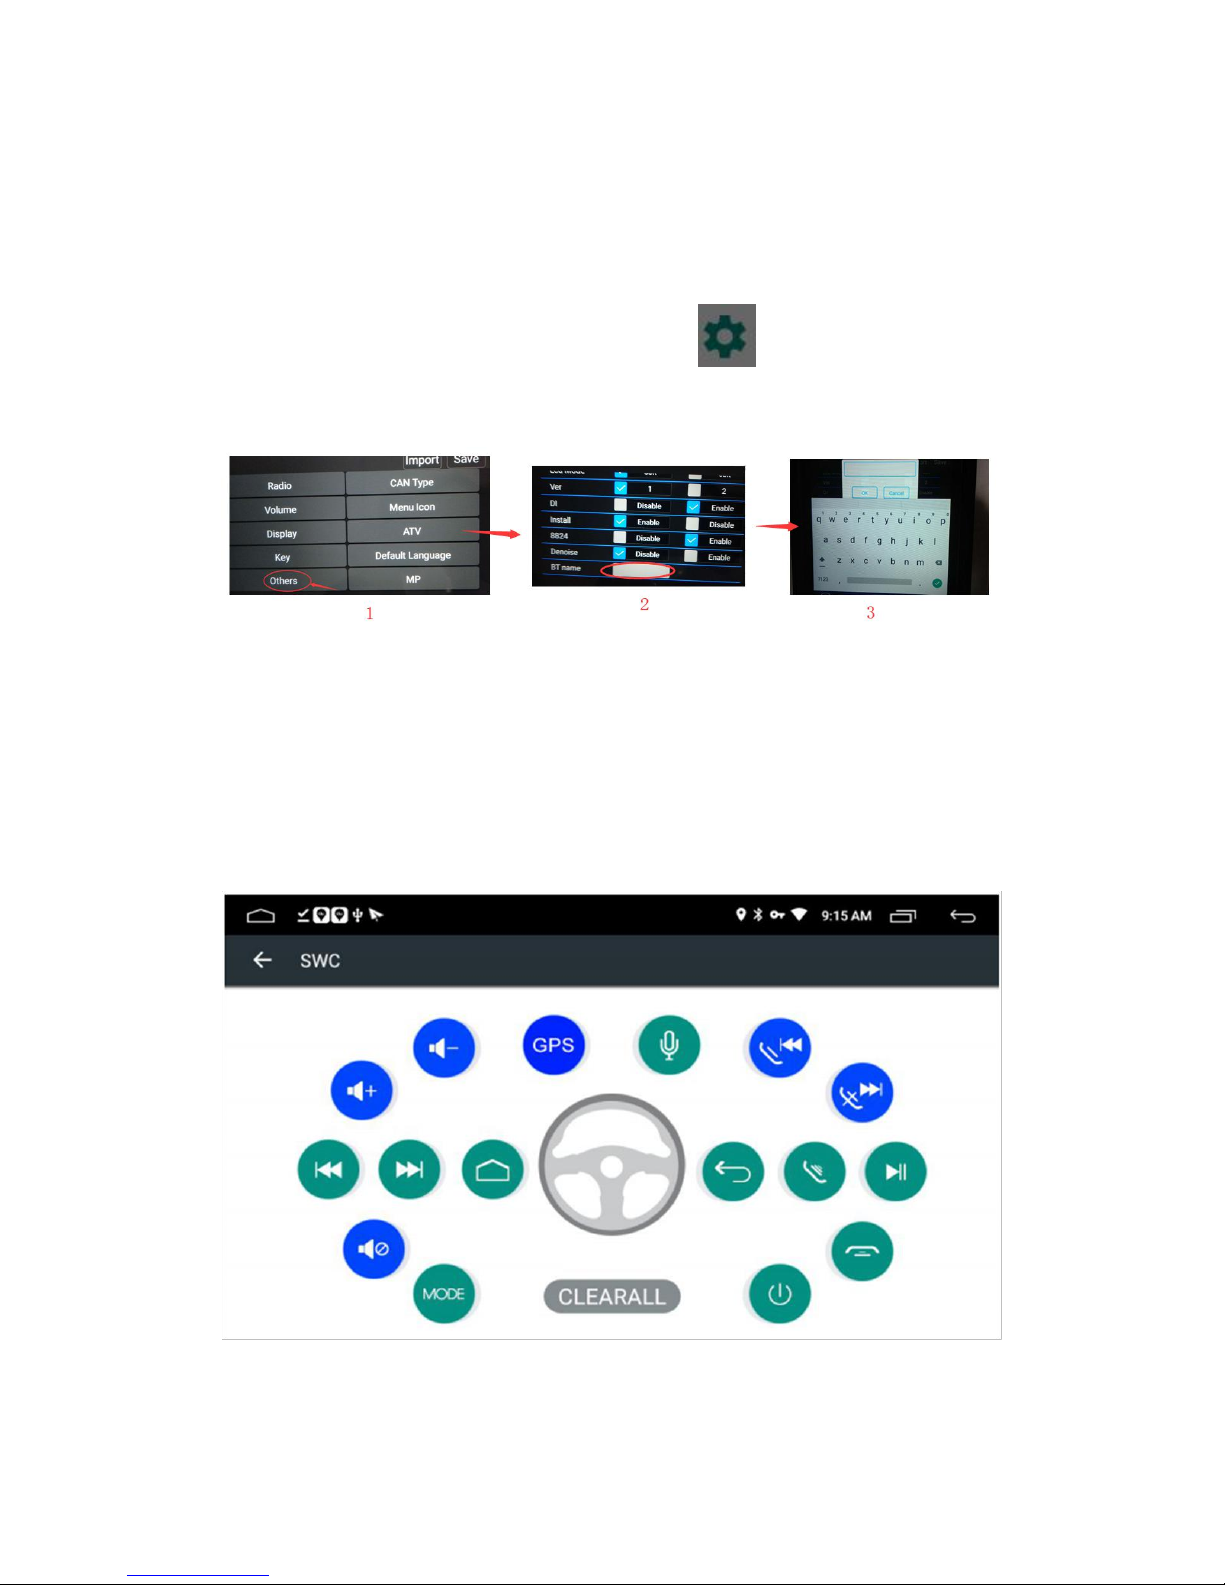
Q: How to change bluetooth name?
Step 1: Follow below to enter to factory setting:
Setting -->car infotainment -->About Device --> click t --> Password 1260 --> Ok
Step 2: Other -->BT name
Q: How to Study Steer Wheel Button.
Way 1: Firstly, click one of the original car steer wheel button, then click the related button
on steer wheel control interface.
Way 2: Firstly, click one of the buttons on device' steer wheel control interface, then click
the related button on original car steer wheel.

Q: How to check whether Ownice device can get the GPS signal?
You can test by the APK to check how many stars your device get? three stars
can locate, four stars can navigate)
Q: How to install the DVR camera APP?
The DVR camera APP is not preload before shipping, we default to install this app only if
you buy the DVR camera together with the Ownice radio. Otherwise you need install it by
yourself.
Q: How to operate the DVR ?
A: After connected the DVR and install the DVR app, you need insert the TF card into the
DVR (Memory card: 8GB -64GB, Class 10). Turning on the DVR will automatically opens
the record.
Q: How to playback recorded video from DVR?
A: Click on the left side of the screen, then the menu bar will pop out, then slide down,
then you will see the Playback button, click it to watch the recorded video.

5.Update MCU and System
How to update:
1) Please contact seller to get the update software download link.(Don’t download from website
randomly, maybe didn’t fit).
2) Then must un-zip the download file.
3) Then copy the two file to onenew USB disc root (can not change the files name), then
connected with our device USB port.
4) How to update: Keep touching the screen, then turn on the device power ACC, then release
your finger when the screen turn on. (Theupgrade process takes about 10 minutes)
Noted:
---Must use the good quality USB disc, can not use " SD memory card + card reader" instead of.
---Must format the USB disc to FAT32, then copy the update software files, and the USB disc can
not have other unrelated files.
---Our device back have 3 USB ports, and you can connected any one with your USB disc, and
another two USB ports must be dis-connected with any device.
---During update progress, can not power off device, also can not plug out your USB disc.
---Before you update, please backup the file, such as map file, the update will erase

6.Frequently Asked Questions
FAQ
Answer
The boot time
For cool boot, the time need about 25s.
For hot boot, the time need about 5s.
What means cool boot: our item can set for delay turn off for (0, 10munites,
20munites, 30munites, 60munites), if you set for 10munites, then after you turn off
your car, and within 10munites, you turn on your car, only need wait for 5s to turn on
our item, but if you after 10munites to turn on your car, then you need wait for about
25s to turn on our device.
The button backlight
don’t work?
Please make sure that you already connected the cable ‘ILL” to positive 12V power,
must connected.
Why the device only
part of the memory
can be used?
About the memory: memory and cache can not be used 100%, which is normal.
Device firmware and map software will take up memory and cache, please
understand!
(If the device built in 16GB: GPS can only display about 12G B of memory or less)
(If the device built in 32GB: GPS can only display about 29GB of memory or less)
Why the device
shows enough
memory , but the
apps can not be
installed?
Because the device is also Android device, as like android smartphone/tablet pc, it's
firmware only set up RAM available for application installation, and you can not
change the RAM. And the other memory is available for GPS data and files
storage, it just not for application install.
Why the GPS does
not have the
satellite?
Weather, High building, car protect film will influence the GPS satellites searching,
Please go outdoor and open space to search satellites.
Car steering wheel
button don’t work?
1, If your model without canbus, usually need connected your steering wheel control
cable with our device " key1, key2" , then study steering wheel control.
2, If your device with canbus, then you should check whether your model canbus
type setting is right.(How to set, please get help from seller)
Without sound?
1, Please check whether all functions without sound?
2, Pls check whether device sound setting is mute?
My phone can not
connected by
bluetooth?
Step 1, Pls help " erase all content" of the device : setting---> general setting--->
erase all content
Step 2, After that, pls re-start your phone or use another phone to try it again.
If still don't solved, then pls contact with us to get more help.
 Loading...