

Page 1

Smart 9 Pro
User Guide
Page 2

Contents
1. For your safety ............................................................................................................... 1
2. Learn about the phone .................................................................................................. 2
Overview ......................................................................................................................... 2
Function Keys ................................................................................................................ 2
3. Before using ................................................................................................................... 3
Insert SIM card and TF card .......................................................................................... 3
Charge the Battery ......................................................................................................... 5
4. Getting started ................................................................................................................ 5
Basic Function ............................................................................................................... 6
Home screen ................................................................................................................... 6
Touch screen .................................................................................................................. 8
5. Communication .............................................................................................................. 9
Make a call ...................................................................................................................... 9
Ongoing call.................................................................................................................... 9
Incoming call ................................................................................................................ 10
Send a Message ........................................................................................................... 10
6. Multimedia ..................................................................................................................... 11
Camera .......................................................................................................................... 11
Gallery ........................................................................................................................... 12
Music ............................................................................................................................. 12
7. Connection .................................................................................................................... 13
Airplane mode .............................................................................................................. 13
WLAN ............................................................................................................................. 13
Bluetooth ....................................................................................................................... 14
USB ................................................................................................................................ 14
8. Features ........................................................................................................................ 15
Face ID ........................................................................................................................... 15
Group Selfie .................................................................................................................. 15
Main Camera Bokeh ..................................................................................................... 15
Front Camera Bokeh .................................................................................................... 15
Notch Screen Gesture ................................................................................................. 16
New Navigation Mode .................................................................................................. 16
Wireless charging ........................................................................................................ 16
Selfies Album ................................................................................................................ 17
9. Operation ...................................................................................................................... 17
Smart Gestures ............................................................................................................ 17
Suspend option ............................................................................................................ 20
10.Warnings and notes ................................................................................................... 20
Page 3
For your safety
1.
Please read this manual before using the cell phone to ensure your safety and proper use.
SWITCH OFF IN HOSPITALS
Please abide by relevant provisions or regulations. Please turn off your mobile phone near medical
equipment.
SWITCH OFF WHEN REFUELING
Don’t use the phone at a refueling point. Don’t use near fuel or chemicals.
MICRO SIM CARD AND SD CARD ARE PORTABLE
Keep your phone, phone parts and accessories out of children’s reach.
BATTERY
Please do not destroy or damage the battery, it can be dangerous and cause fire. Please do not throw
battery in fire to avoid hazard. When battery cannot be used, please dispose in safe environment. Do not
try to dismantle the battery. If the battery or authorized charger is broken or old, please stop using them,
and replace with certified genuine battery.
For first time using, please discharge completely and charge the battery in 100% full and continue
charging one more hour with authorized charger.
USE QUALITY EQUIPMENT
Use authorized equipment to avoid danger.
ROAD SAFETY COMES FIRST
Give full attention while driving, Park before using your phone. Please follow traffic rules of local city
town.
INTERFERENCE
All wireless devices may be susceptible to cause interference, which could affect performance.
SWITCH OFF IN AIRCRAFT
Wireless devices can cause interference in aircraft. It’s not only dangerous but also illegal to use mobile
phone in an aircraft.
1
Page 4
on
Learn about the phone
2.
Overview
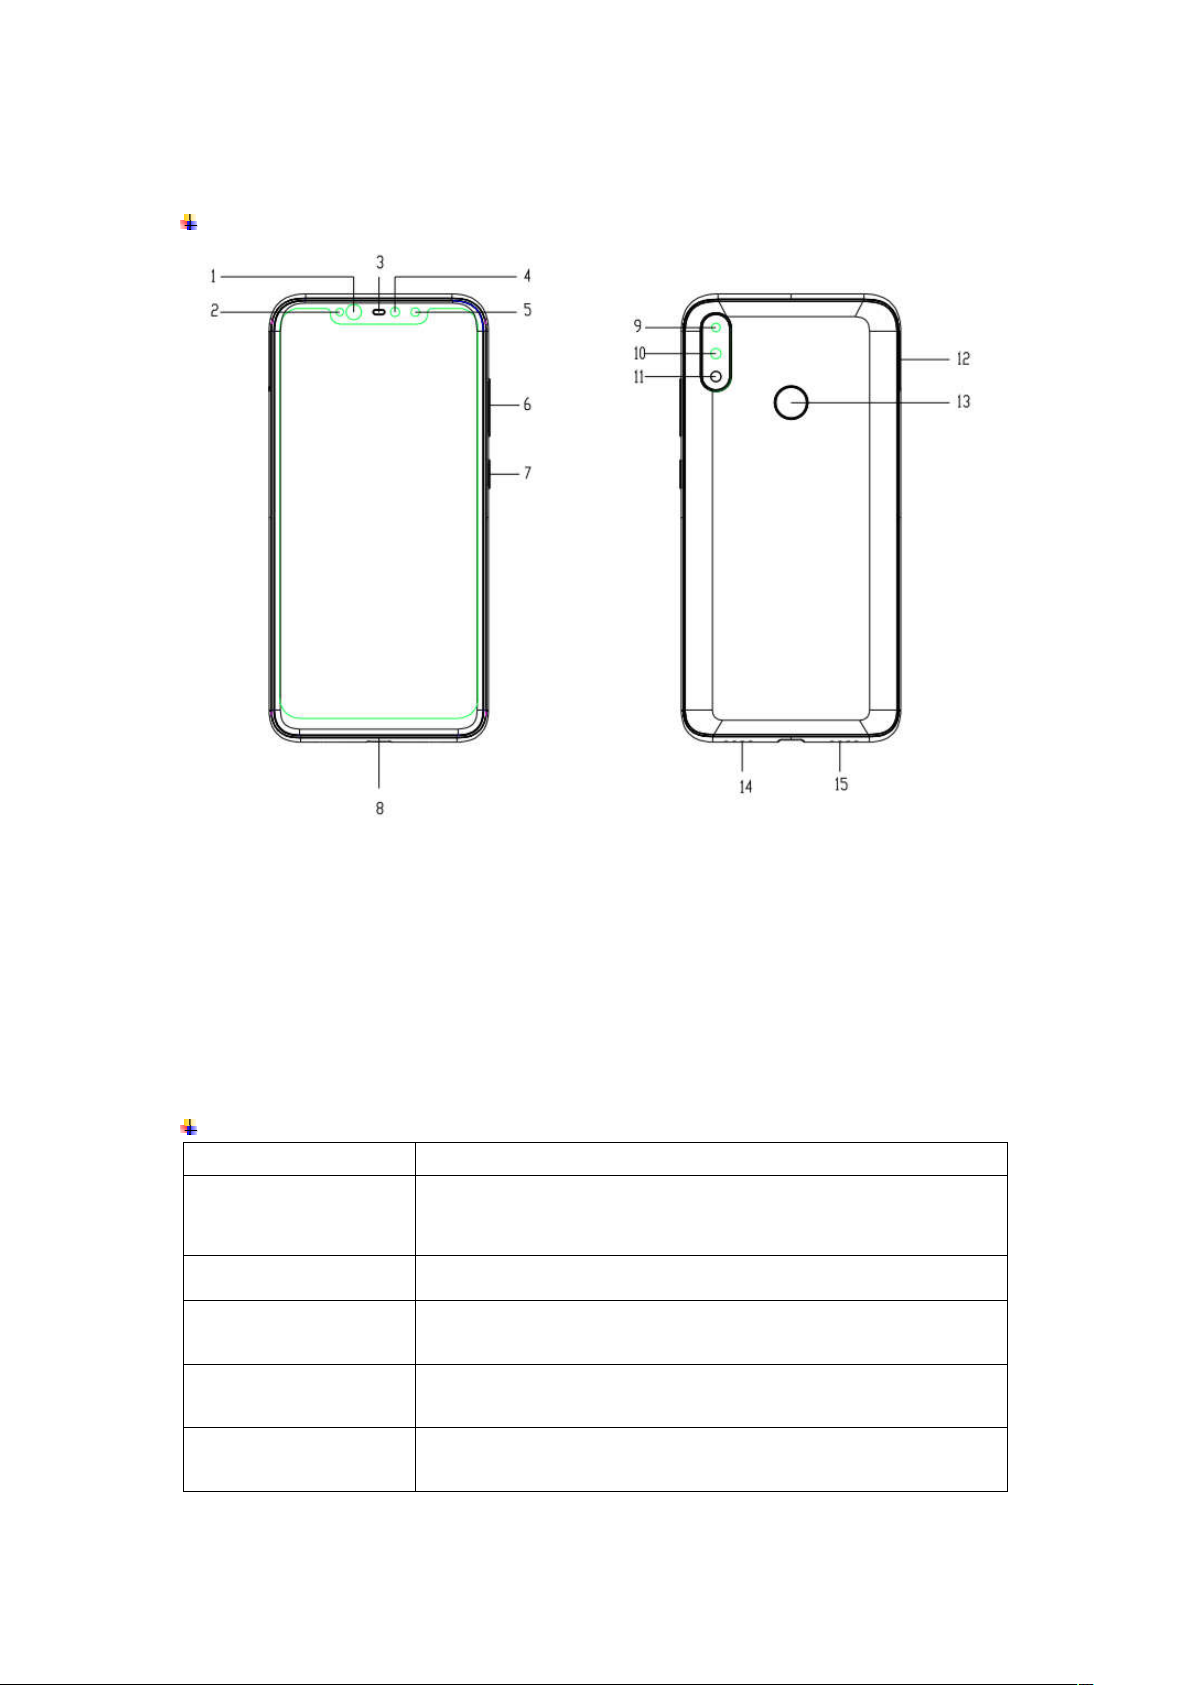
1 Infrared Lamp 9 Rear Camera 1
2 Light Sensor 10 Rear Camera 2
3 Receiver 11 Flash lamp
4 Front Camera 12 Card tray
5 Infrared Camera 13 Fingerprint Sensor
6 Volume key 14 Speaker
7 Screen Lock / Power Key 15 Microphone
8 Type-C port
Function Keys
Keys Functions
Screen Lock /
Power Key
Volume Key
Multi Task Key
(on the screen)
Home Key
(on the screen)
Back Key
(on the screen)
Press to turn on/off the screen.
Press and hold to reboot, power off the phone, and turn
airplane mode or silent.
Press to adjust the volume of device.
Tap to open the list of recently used apps.
Click the circle button to clean all of recently used apps.
Tap to return to Home screen.
Long press to access Google™ search.
Tap to return to the previous screen.
2
Page 5
Note
Multi Task Key and Back Key can be exchanged the layout and color in Settings -->
Navigation bar.
3. Before using
Insert SIM card and TF card
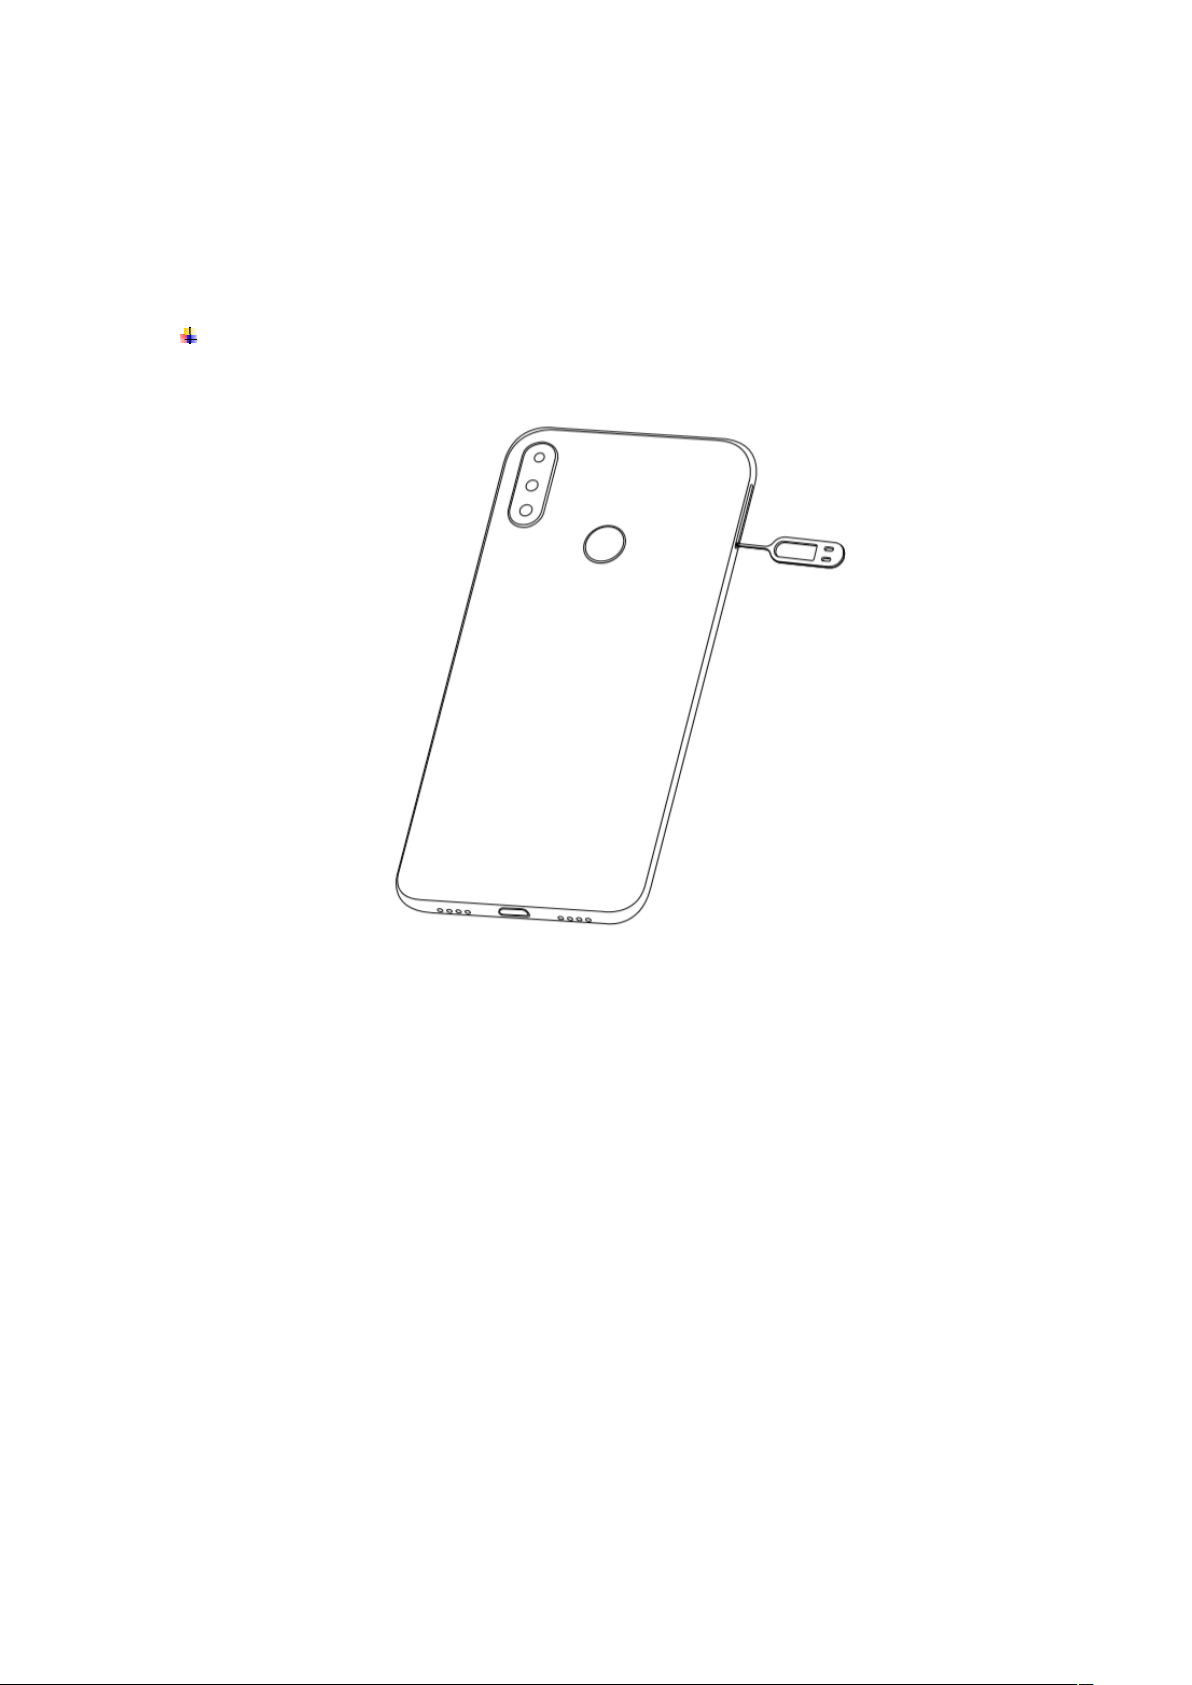
1) Stick into the pin hole with eject tool, and then card tray will be out of phone.
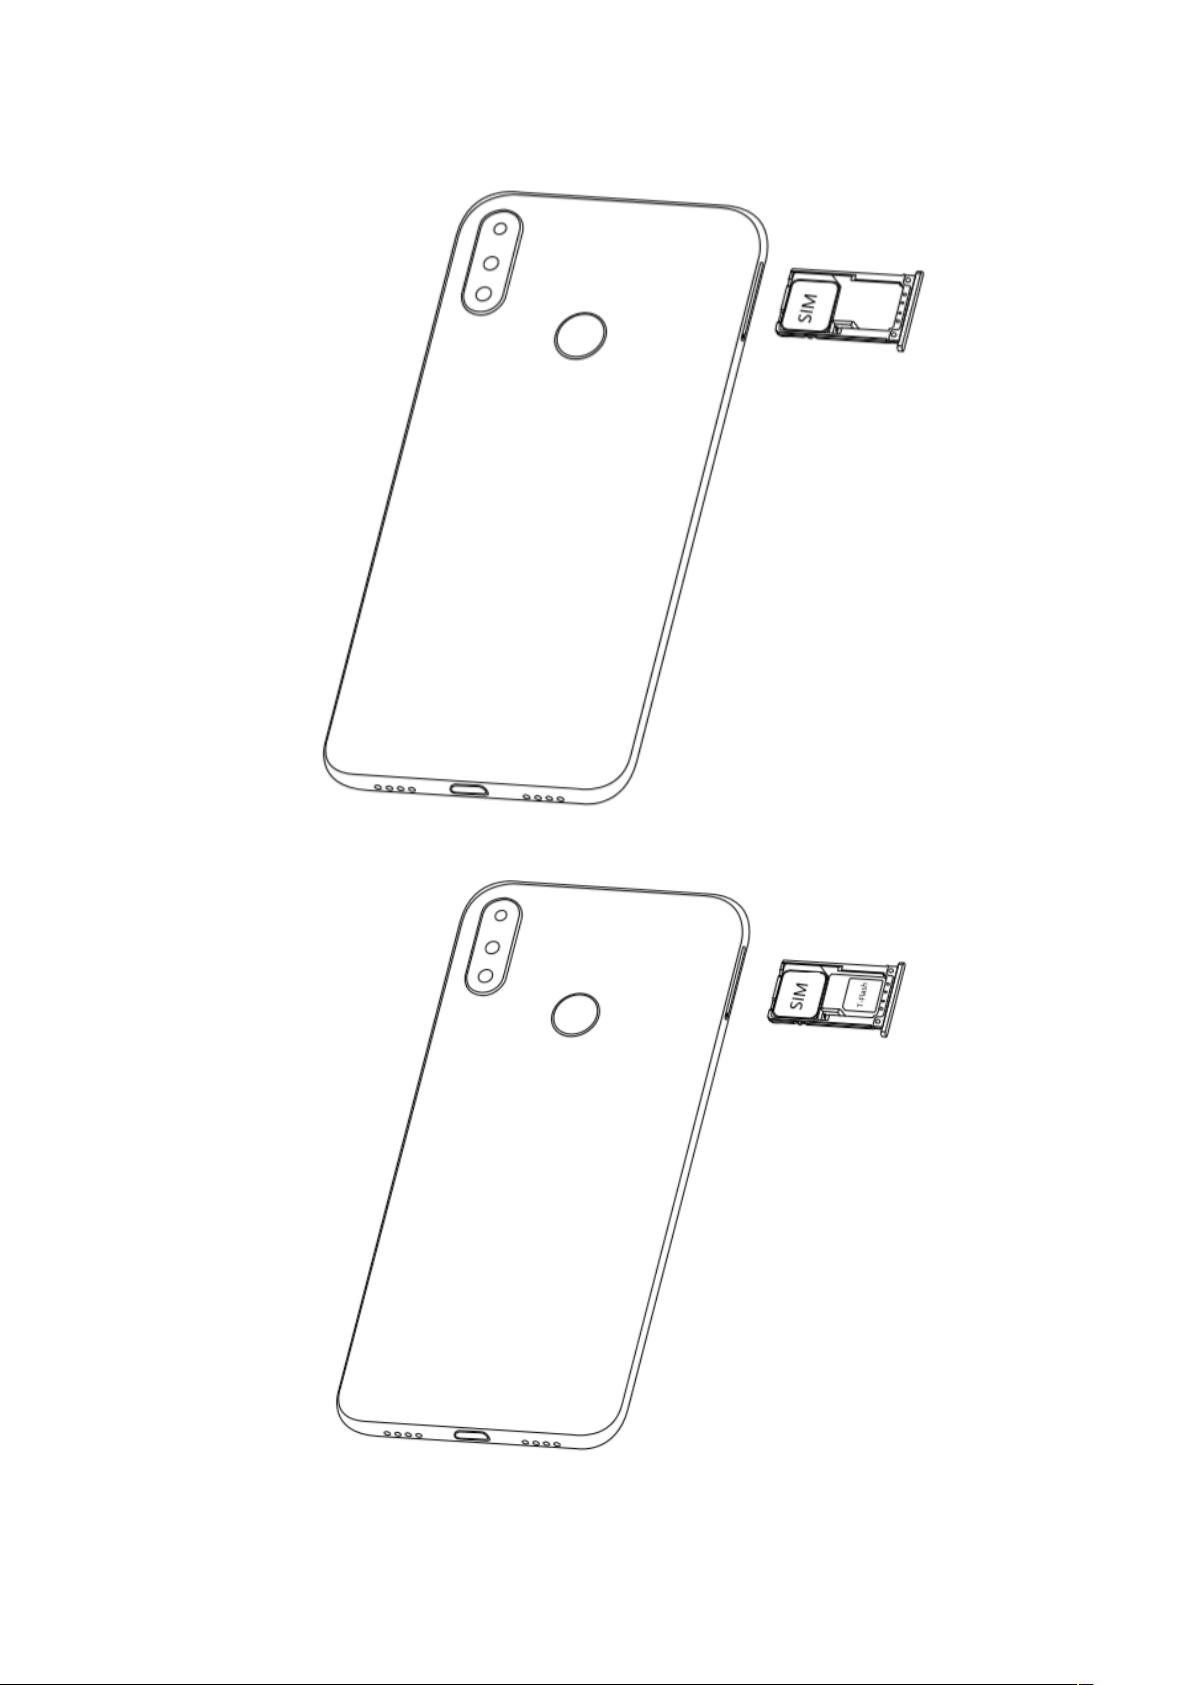
2) Put SIM card and TF card to card tray correctly.
Card 1 supports Micro SIM card.
Card 2 supports TF card.
3
Page 6
4
Page 7

Note: TF card can be used as internal storage.
Option 1: Notification Center --> Tap the notice to set up --> Use as internal storage
--> Next --> Erase & Format
Option 2: Settings --> More settings-->Storage & USB --> Format as internal
storage--> Erase & Format
3) Push the card tray into the phone.
Note:
SIM card and TF card support hot plugging.
Do not remove the cards while the device is transferring data. Doing so may cause
data to be lost or damage to the cards and device.
The SIM card and TF card are small parts. Please keep away from Children to avoid
swallowing the card by accident.
Please do not touch the metal surface of SIM and TF cards and keep them away from
electromagnetic field to avoid damaged data.
Charge the Battery
Charge the battery before using it.
1) Connect the USB cable to the USB power adaptor, and then plug the end of the USB
cable into the USB Port.
2) The phone has a built-in wireless charging coil. Batteries can be recharged using
wireless chargers. Place the center of the back of the phone in the center of the
wireless charger. Connect the USB cable to the USB power adaptor, and then plug
the end of the USB cable into the USB Port of the wireless chargers.
Note:
The phone must be placed accurately on the wireless charger.
Do not put the metal interferences on the wireless charger.
OTG and wireless charging function can not be used at the same time.
Wireless charging maybe affect the FM function, FM and wireless charging function
can not be used at the same time.
If there is a foreign object between the phone and the wireless charger, the charger
may not be able to charge normally.
Please do not use wireless chargers in areas where network signals are weak, may
not be able to receive the network.
Do not place too close to a card with a magnetic bar or chip (ID card and bank card
etc.) to avoid the card lose magnetism.
Please keep the distance more than 20cm between the charger implanted medical
device (pacemakers, implants, etc.) to avoid potential interference to the medical
device.
Please keep it away from fire, water and other liquid.
Not toys for fun, please keep it away from children.
The charging equipment must meet the Qi standard to be use.
Note:
5
Page 8

The battery of mobile phone is fixed. It cannot remove.
4.
Getting started
Basic Function
Turn on the phone
Press and hold the power key for a while to turn on the phone.
Turn off the phone
Long press the power key until a menu shows. Choose “Power off’’ to turn off the
phone.
Restart the phone
Option 1: Long press the power key until a menu shows. Choose “Reboot’’ to restart
the phone.
Option 2: Long press the power key till 11s above to auto restart the phone.
Lock the screen
Option 1: Press the power key to turn off the screen and lock it
Option 2: In the Home screen, double tap the screen to lock it(Long press on an
empty spot to open the Desktop Settings, Choose “Quick lock screen” to turn on the
function).
Option 3: The screen will auto lock if you don't use the phone for a while.
Unlock the screen
Press the power key, and then slide to top for unlocking.
Home screen
The Home screen is your starting point to access all the features on your phone. It
displays application icons, widgets, and other features. You can customize the Home
screen with different wallpaper and display the items you want.
6
Page 9
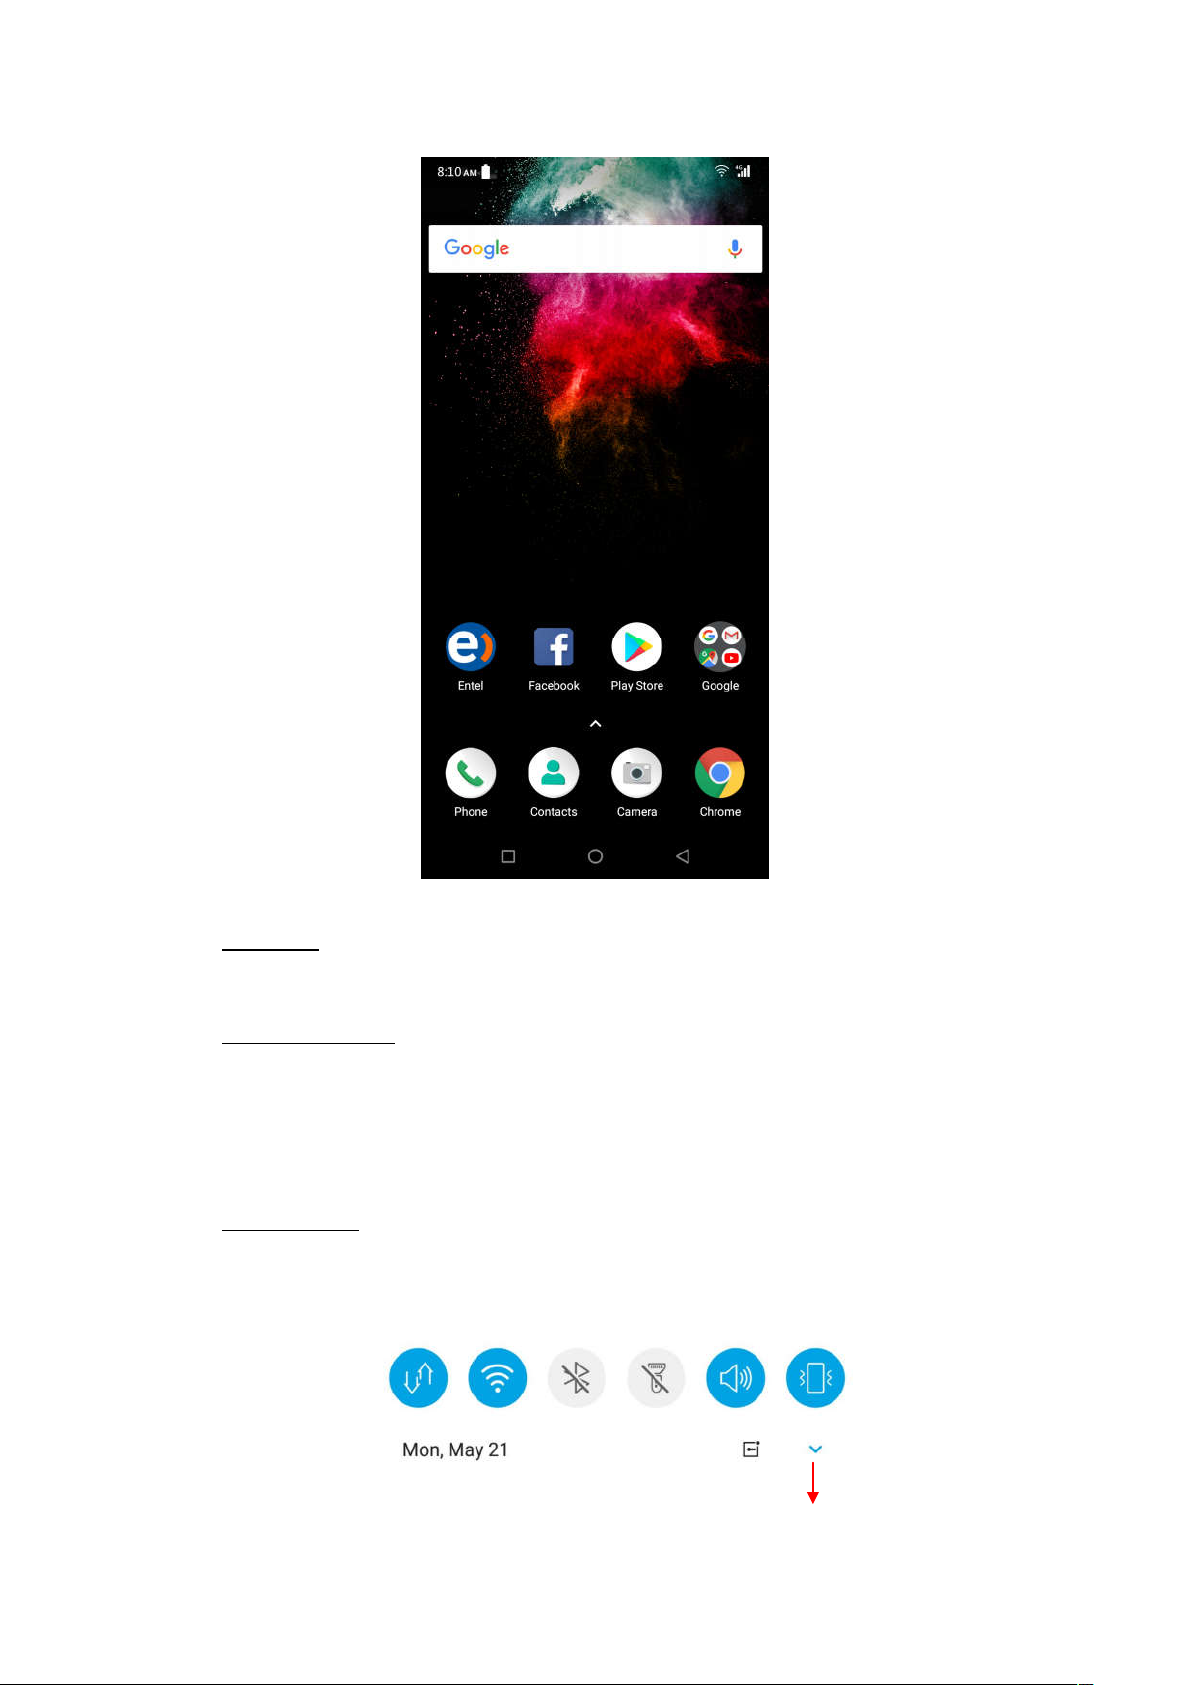
Status Bar
At the top of the screen, it displays the time, signal, battery information.
Notification Center
Swipe down from the top edge to see more details of the new notification, such as
messaging, missed call, Wi-Fi network available etc. Tap the notification and drag to
left or right to delete it.
Settings-->Notification-->Notification Center to manage it.
Control Center
Slide down from the top edge to open the control center.
In the control center, it’s a quick access to Mobile data, Wi-Fi, Bluetooth, Flashlight,
Sound and Vibrate.
7
Tap to see more functions
Page 10
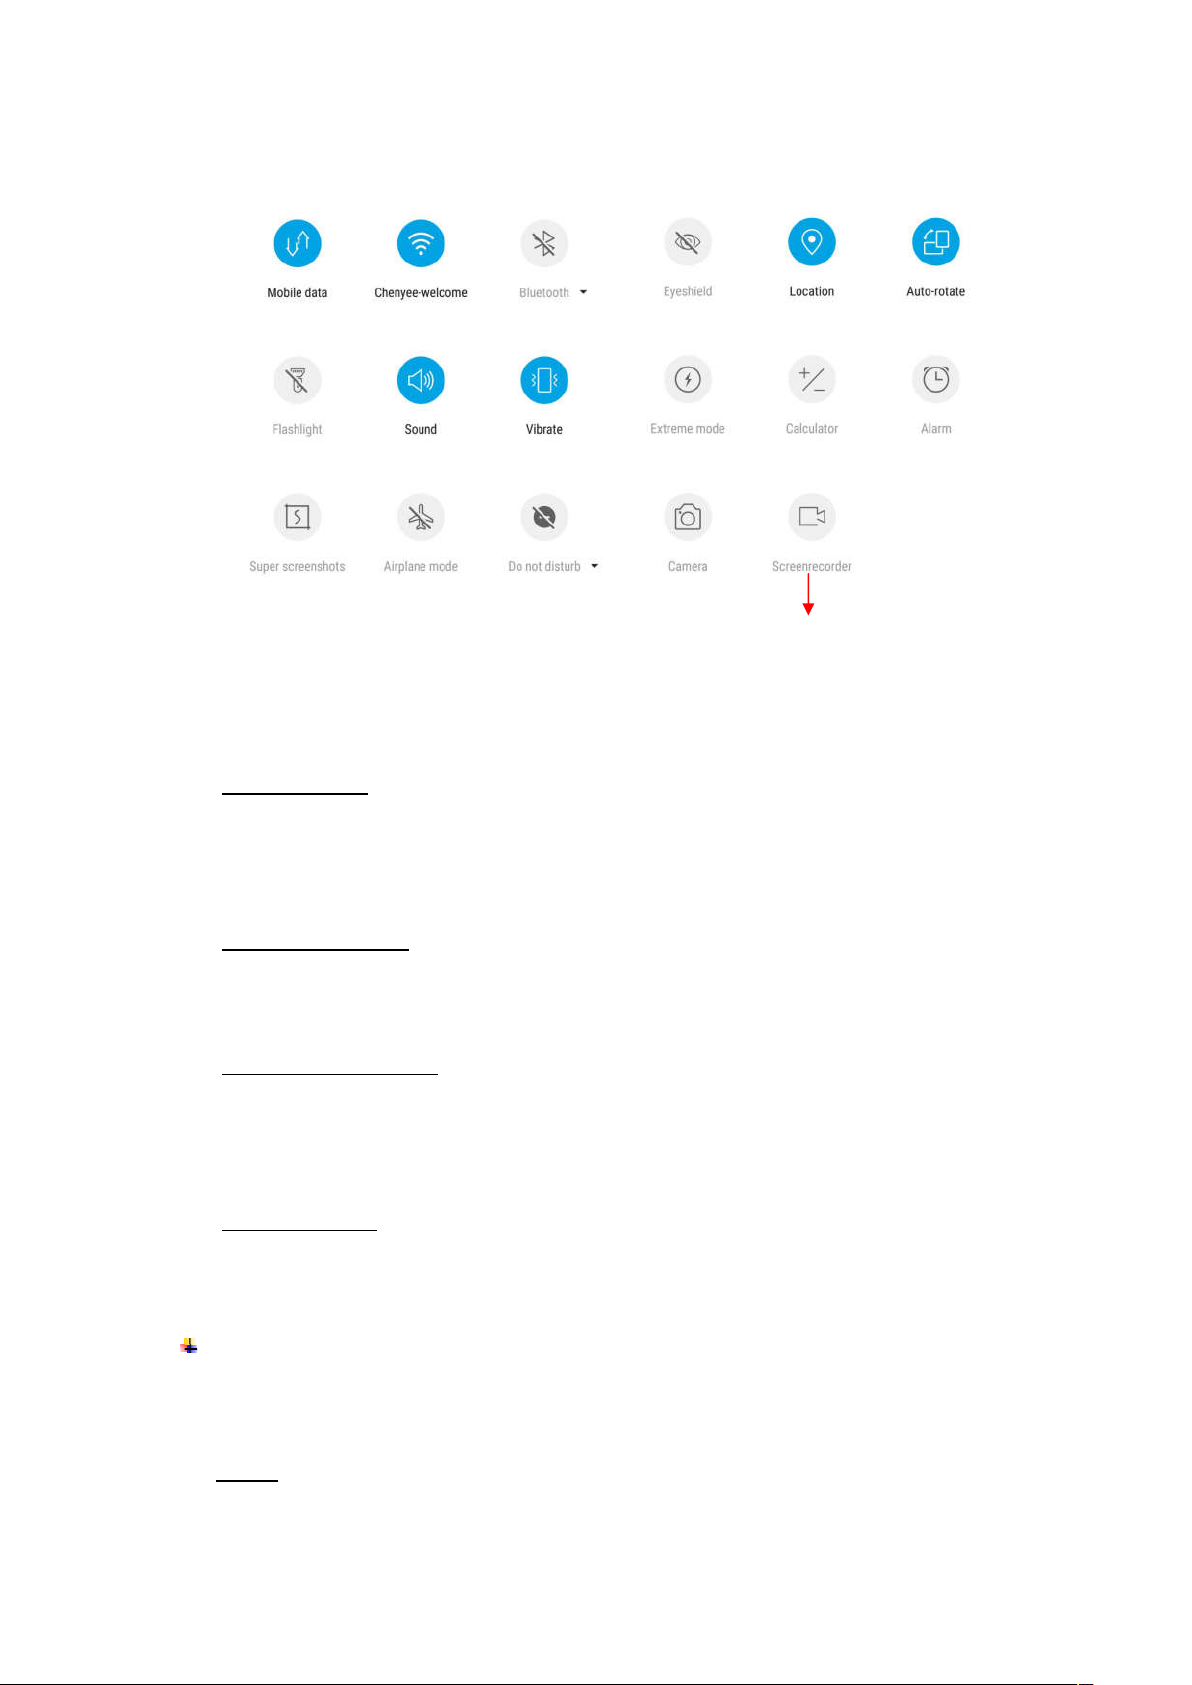
Screen Recorder:
Tap to record your operating
process, and the videos can
be save and share to others.
Launcher Menu
Long press on an empty spot to open the launcher menu. You can change Wallpaper,
Arrange, Search and Desktop Settings. It’s a quick access to Desktop Settings,
Arrange and Search.
Move an application
Touch & hold the icon you want to move. Drag the icon to move or cross at the edge
of the screen to move into another screen.
Uninstall an application
Touch & Drag the icon you want to uninstall to the top. Long press the icon to appear
the hover box, display the application information, click the application information to
enter, Tap “Uninstall” to uninstall.
Creating a folder
Drag an icon on the top of another one to create a folder. Open the folder and then
tap the “Folder” to rename it.
Touch screen
The way to control mobile phone is using your finger on touch icons, buttons, menu items,
the onscreen keyboard, and other items on the touch screen.
Touch: To act on items on the screen, such as application and settings icons, to type
letters and symbols using the onscreen keyboard, or to press onscreen buttons, you
8
Page 11
simply touch them with your finger.
Touch & hold: Touch & hold an item on the screen by touching it and not lifting your
finger until an action occurs.
Drag: Touch & hold an item for a moment and then, without lifting your finger, move
your finger on the screen until you reach the target position. You can drag items on the
Home screen to reposition them and you can drag to open the Notification Center.
Swipe or slide: To swipe or slide, quickly move your finger across the surface of the
screen, without pausing when you first touch (so you don’t drag an item instead). For
example, you slide the screen up or down to scroll a list, and in the same way
Calendar views you can swipe quickly across the screen to change the range of time
visible.
Pinch: In some applications (Such as Maps) you can zoom in and out by placing finger
and thumb on the screen at same time and pinching them out together (to zoom out)
or spreading them apart (to zoom in).
Rotate the screen: On most screens, the orientation of the screen rotates with the
phone as you turn it from upright to its side and back again. You can turn this feature
on and off.
Communication
5.
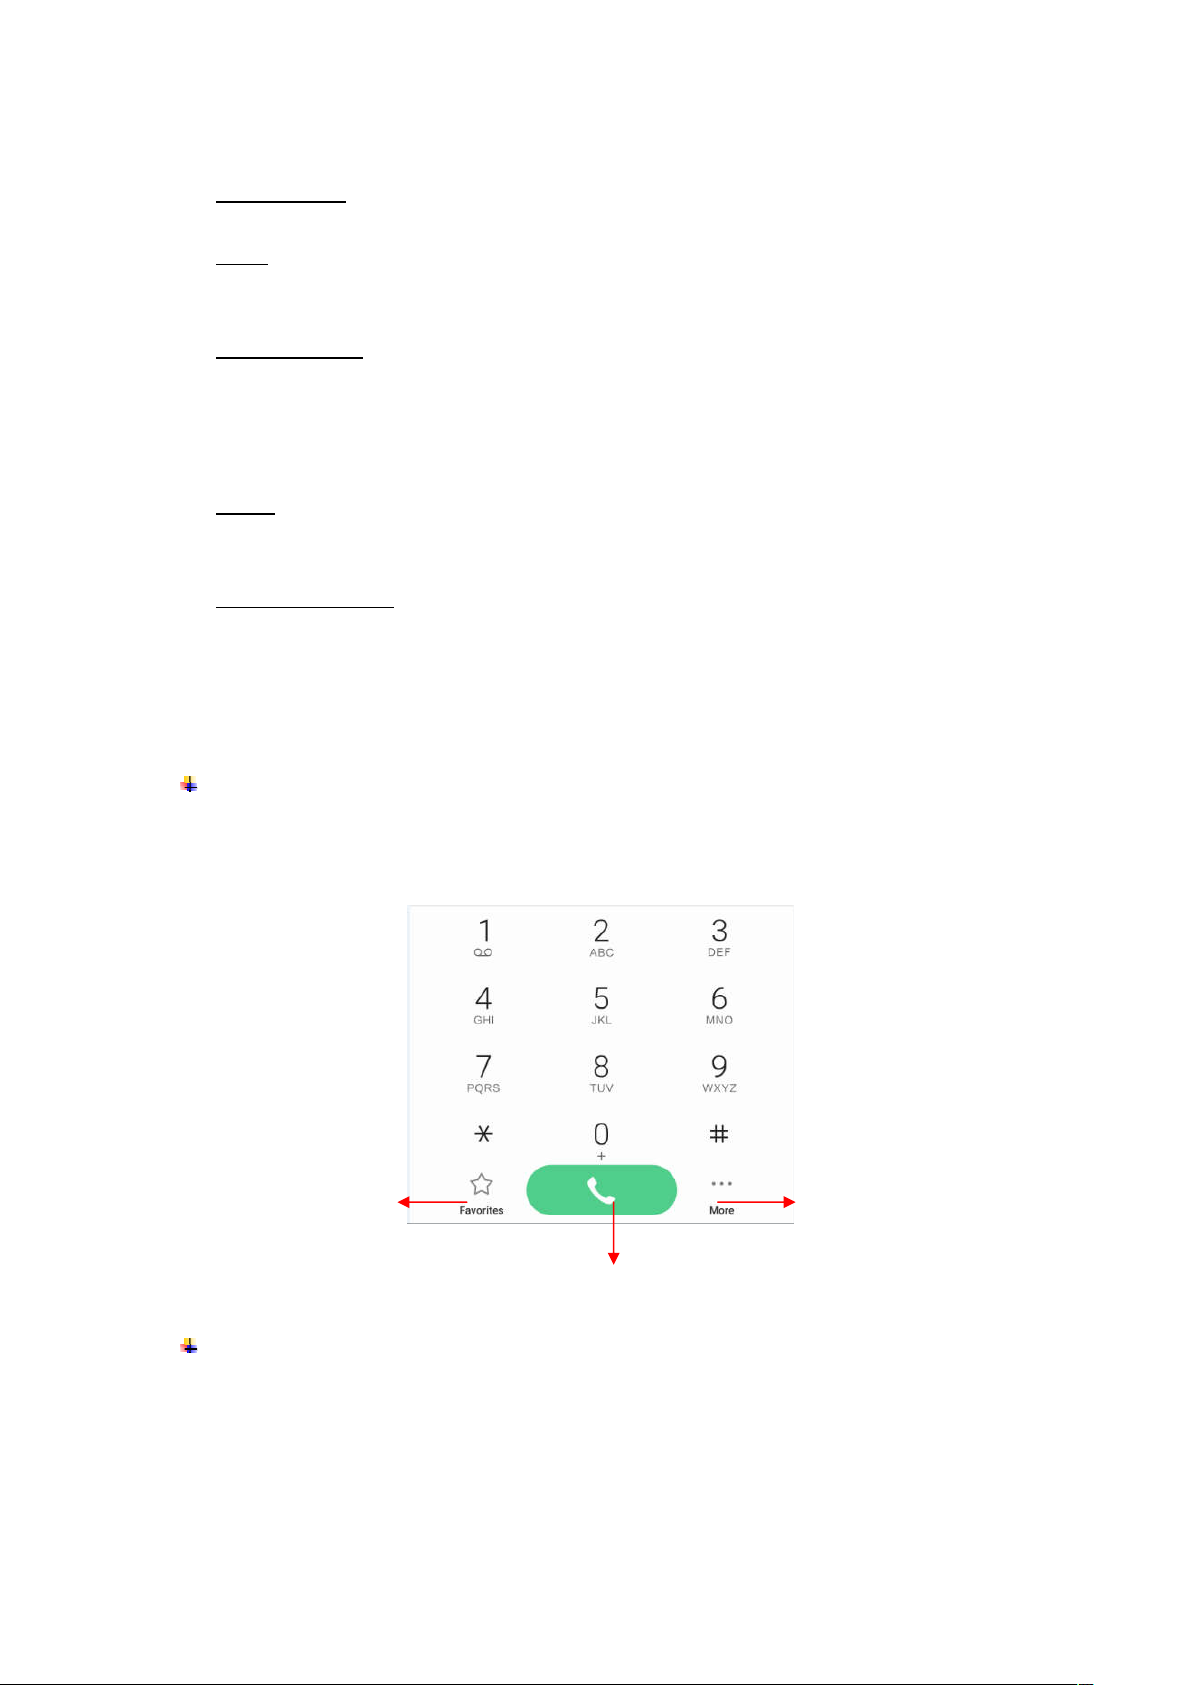
Make a call
Touch the phone icon on the Home screen.
Enter the phone number you want to dial.
Touch the phone icon to dial the number that you entered.
Touch to open favorites
Ongoing call
Touch to make an audio call.
Touch to open advanced option.
9
Page 12
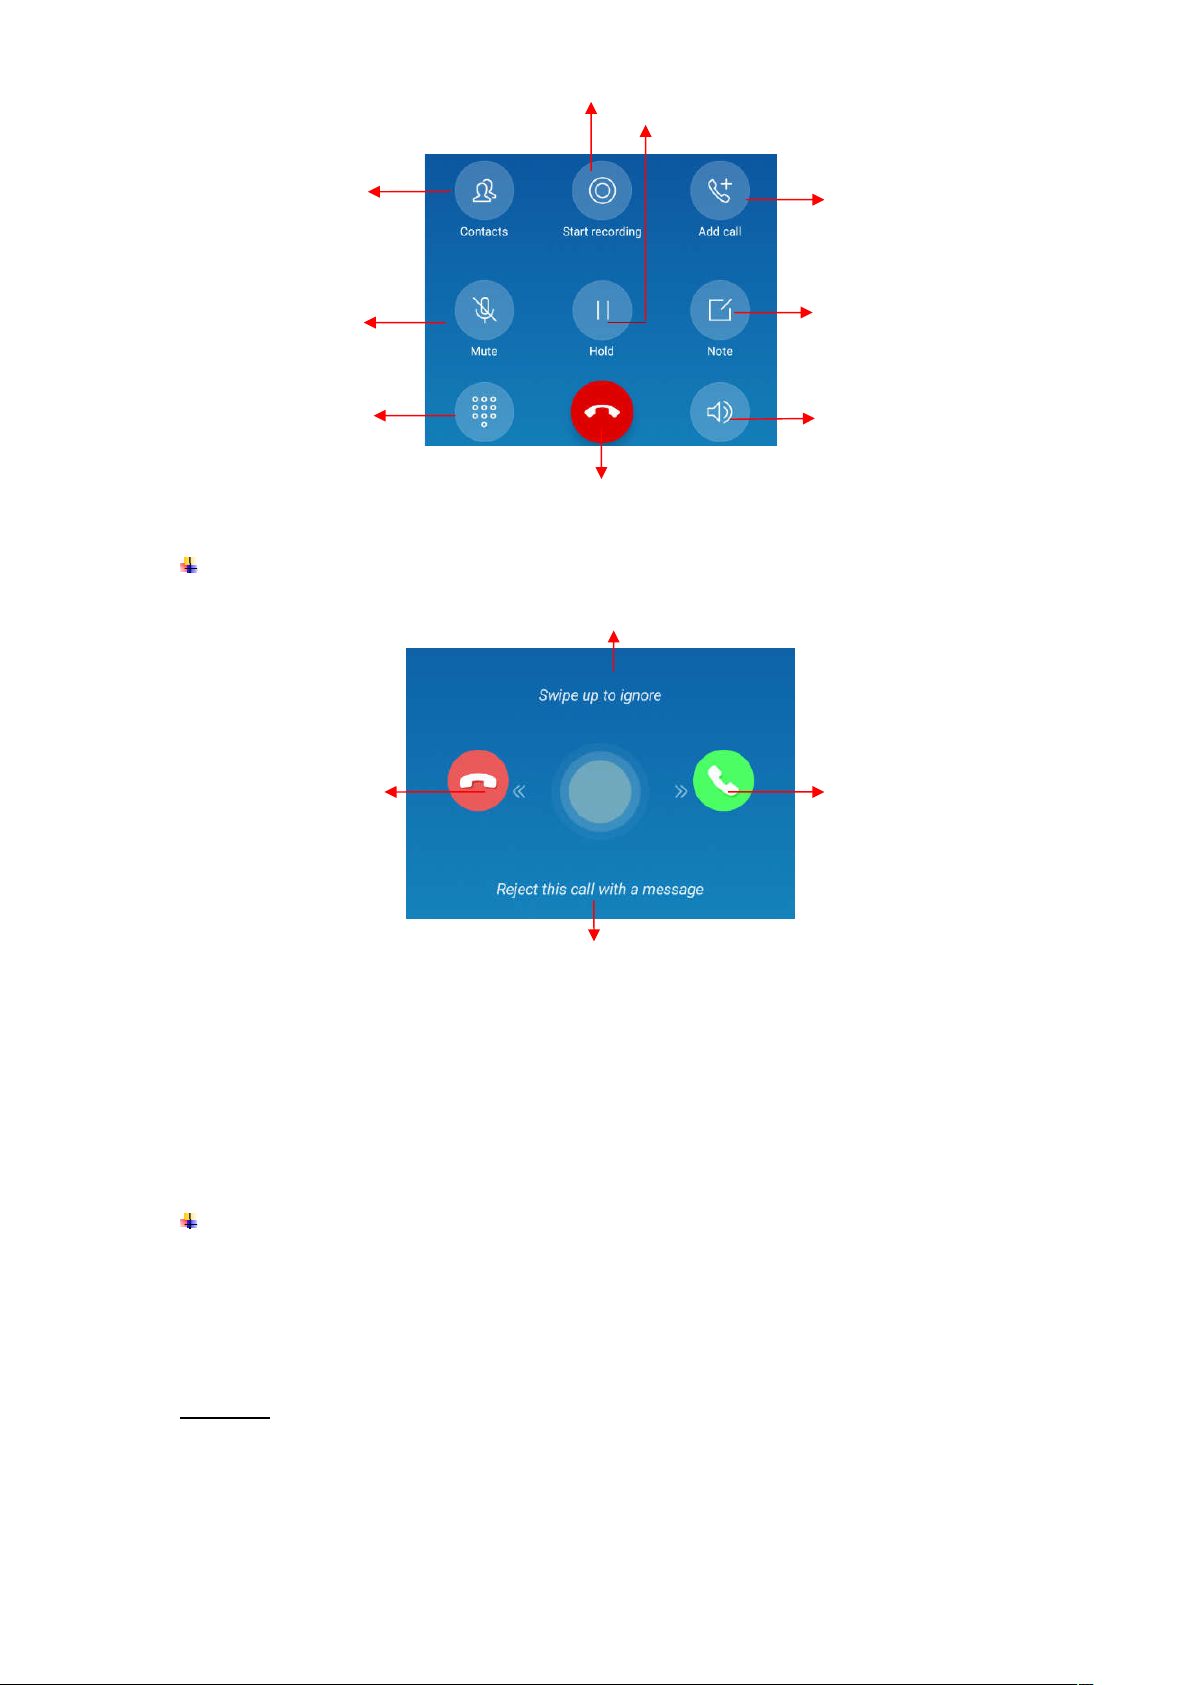
Start recording
Hold on the line
Get contacts information
Mute the line
Number keypad
Incoming call
Drag the phone icon on left
to reject the call.
Make another call
Take a note
Speaker
End the current call
Swipe up to ignore the call.
Drag the phone icon on
right to answer the call.
Drag the phone icon down to reject the call and
send a message to caller.
Note:
You can make an emergency call without SIM card if the locations are available for
the network service. But you should not rely on it for emergencies. It’s also depends
on the local mobile network operator. For more information, please contact with
operator.
Send a Message
You can use this phone to exchange text messages and multimedia messages with your
friends on their mobile phones. The messages come to and from the same contact or
phone number will be visible into a single conversation, so you can see your entire
message history with a person conveniently.
Enter text
Tap the text field to see onscreen keyboard.
Tap the keys on the keyboard to type, the characters you’ve entered appear in a strip
above the keyboard with suggestions for the word you are typing to the write.
10
Page 13
Use the Delete key to erase characters to the left of the cursor.
When you’re finished typing, press back to close the keyboard.
Multimedia
6.
Camera
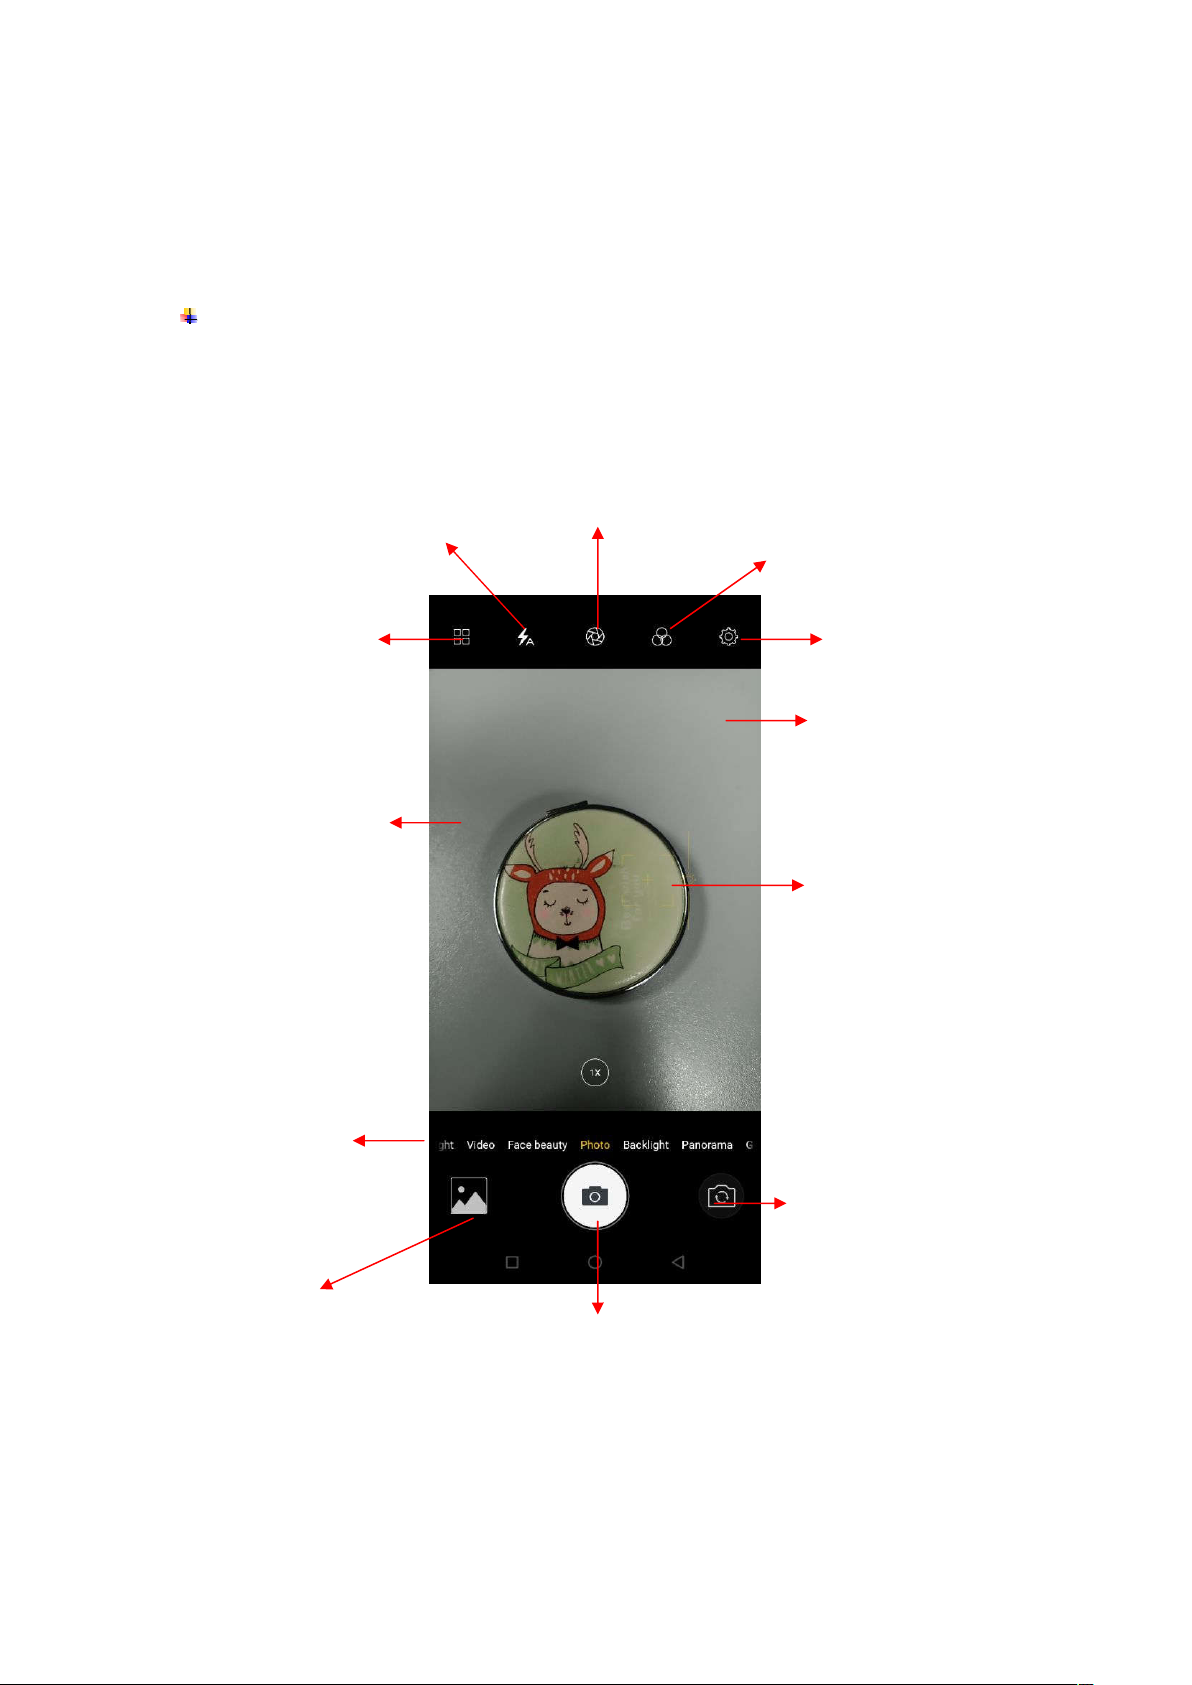
Camera is a combination of camera and camcorder that you use to shoot and share
pictures and videos. Tap the image on the camera screen where should focus on. You can
also change camera setting like transfer front and rear camera, adjust the exposure on
this screen.
Take a photo
Touch to set flash to On, Off or Auto.
Touch to enter the Mode
Settings.
Touch to open Bokeh mode.
Touch to open Filter mode.
Touch to enter the Camera Settings.
Slide down the screen to
enter Mode Settings
Slide right or left to transfer Night
Video, Face beauty, Photo,
Backlight, Panorama and last time
selected feature.
Touch to enter Gallery
Touch to take a picture or shoot a video.
Pinch or spread the screen to
zoom in or zoom out.
Touch the screen to focus on it.
Touch to transfer between rear
camera and front camera
Time-lapse Mode
Time lapse photography is the rapid play of the video, from a
–
long period of time condensed to a very short period of time.
Professional Mode – It includes Focus, Shutter Speed, WB, ISO, AE.
Slow motion Mode - Using slow motion function make a short video, playing with a
11
Page 14
slow speed.
Group selfie Mode – Take group selfie. Press the shutter to take first picture. Then,
rotate the picture slowly to left side to take second picture. Finally, rotate the phone
slowly to right side to take the third picture.
Panorama Mode - Press camera button and slowly move the phone in one direction.
Backlight Mode – Improve the photo quality in dynamic environment.
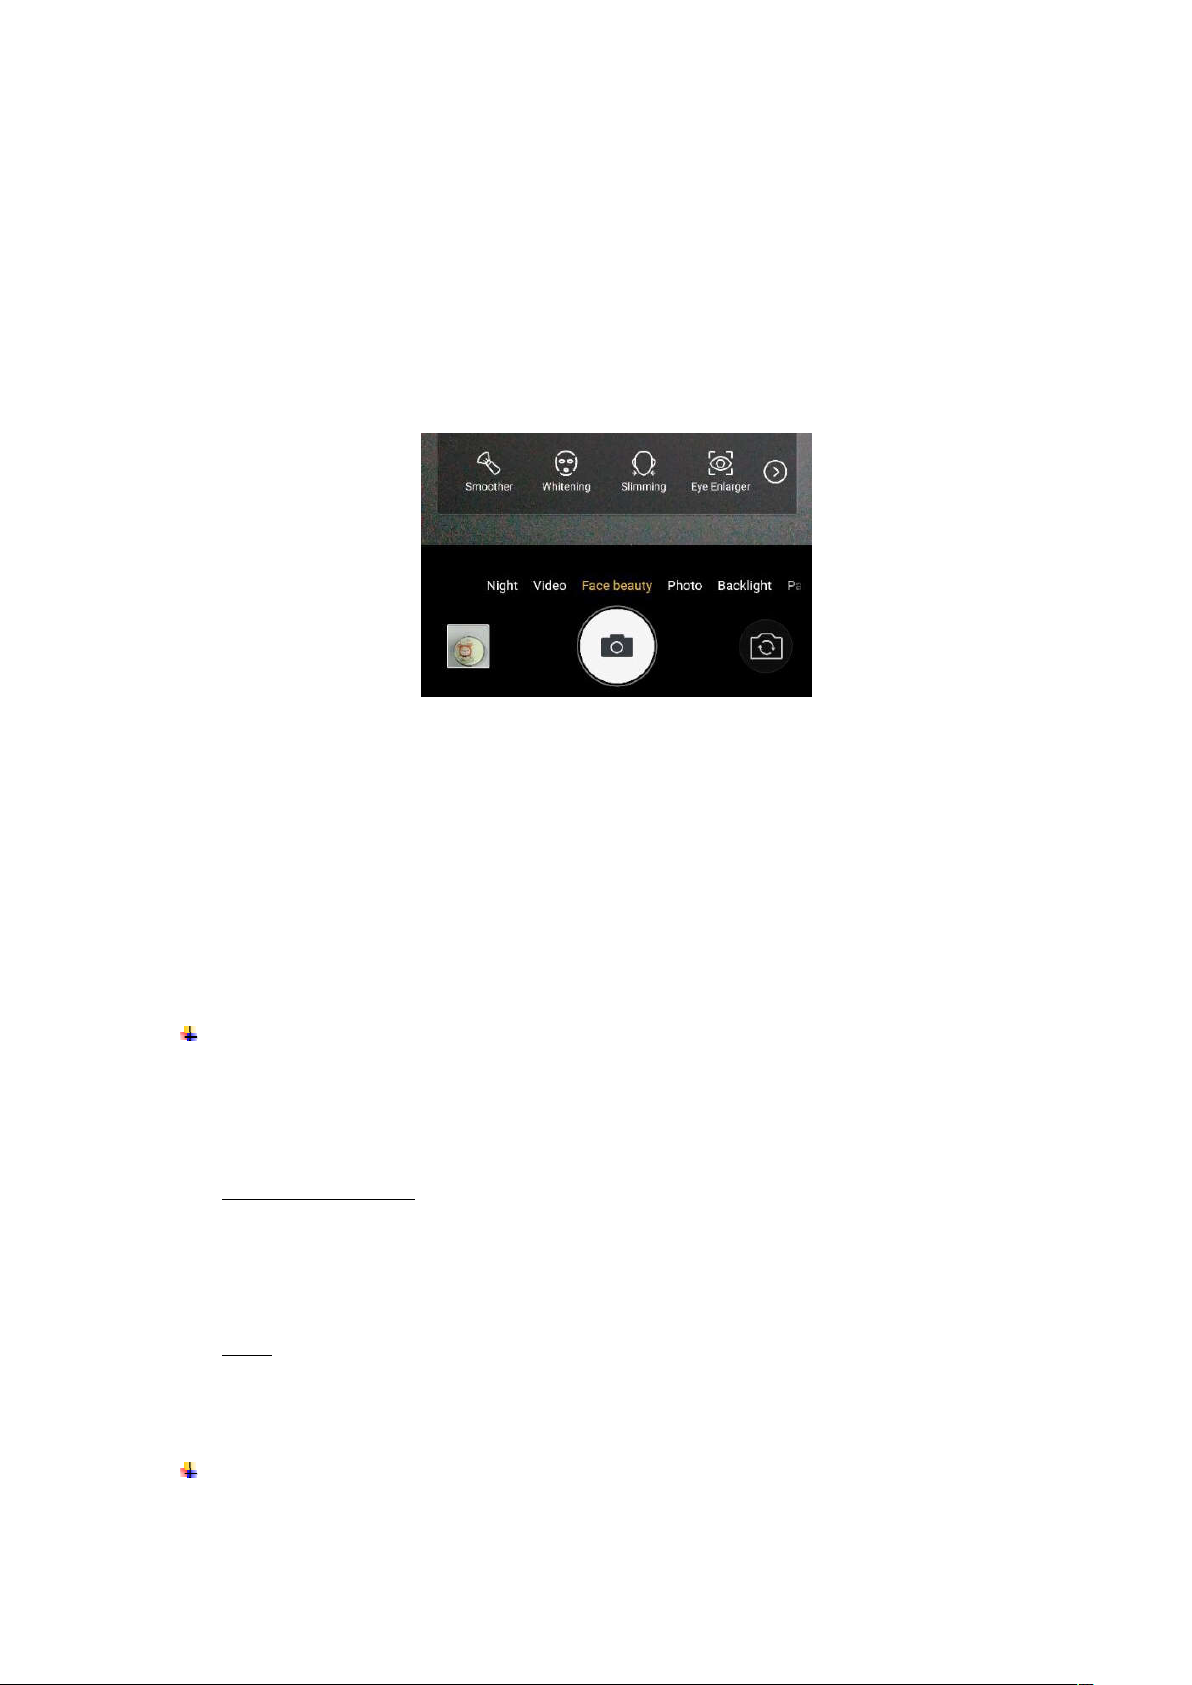
Face beauty Mode – Beautify your photo and realize full skin beauty not just
beautifying the face, so that presents more natural selfie. You can select Smoother,
Whitening, Slimming, and Eye Enlarger. Drag the slider to adjust it.
Night Mode - Through nightscape noise reduction, we see the thing as it actually is.
Shoot a Video
In camera mode, slide the screen to right for video capturing.
Adjust the quality and other settings if you wish or leave them on automatic mode.
Point the lens to frame the scene where you want to start.
Touch the Video icon. Camera starts shooting the video.
Touch Stop video icon to stop shooting. An image from your most recent video is
displayed as a thumbnail at the bottom left.
Gallery
Touch the Gallery icon in the Launcher to view albums of your pictures and videos which
you’ve taken from camera. You may share the pictures and videos with your friends by
Email, Bluetooth and so on.
Hidden management: You can hide any folder in Hidden Management except Selfies
Folder. You can select multiple folders by long pressing on each folder icon, and
clicking on “Hide”. After hiding, the picture will not be displayed in the Time and All.
You can go to Gallery settings --> hidden management to view or manage the hidden
folder.
Trash: Deleted pictures will be moved to trash, which will be deleted permanently on
the seventh day. You can delete or recover these pictures manually in trash.
Music
You can use Music player to organize, listen to music and other audio files that you
12
Page 15
transfer to your phone from your computer.
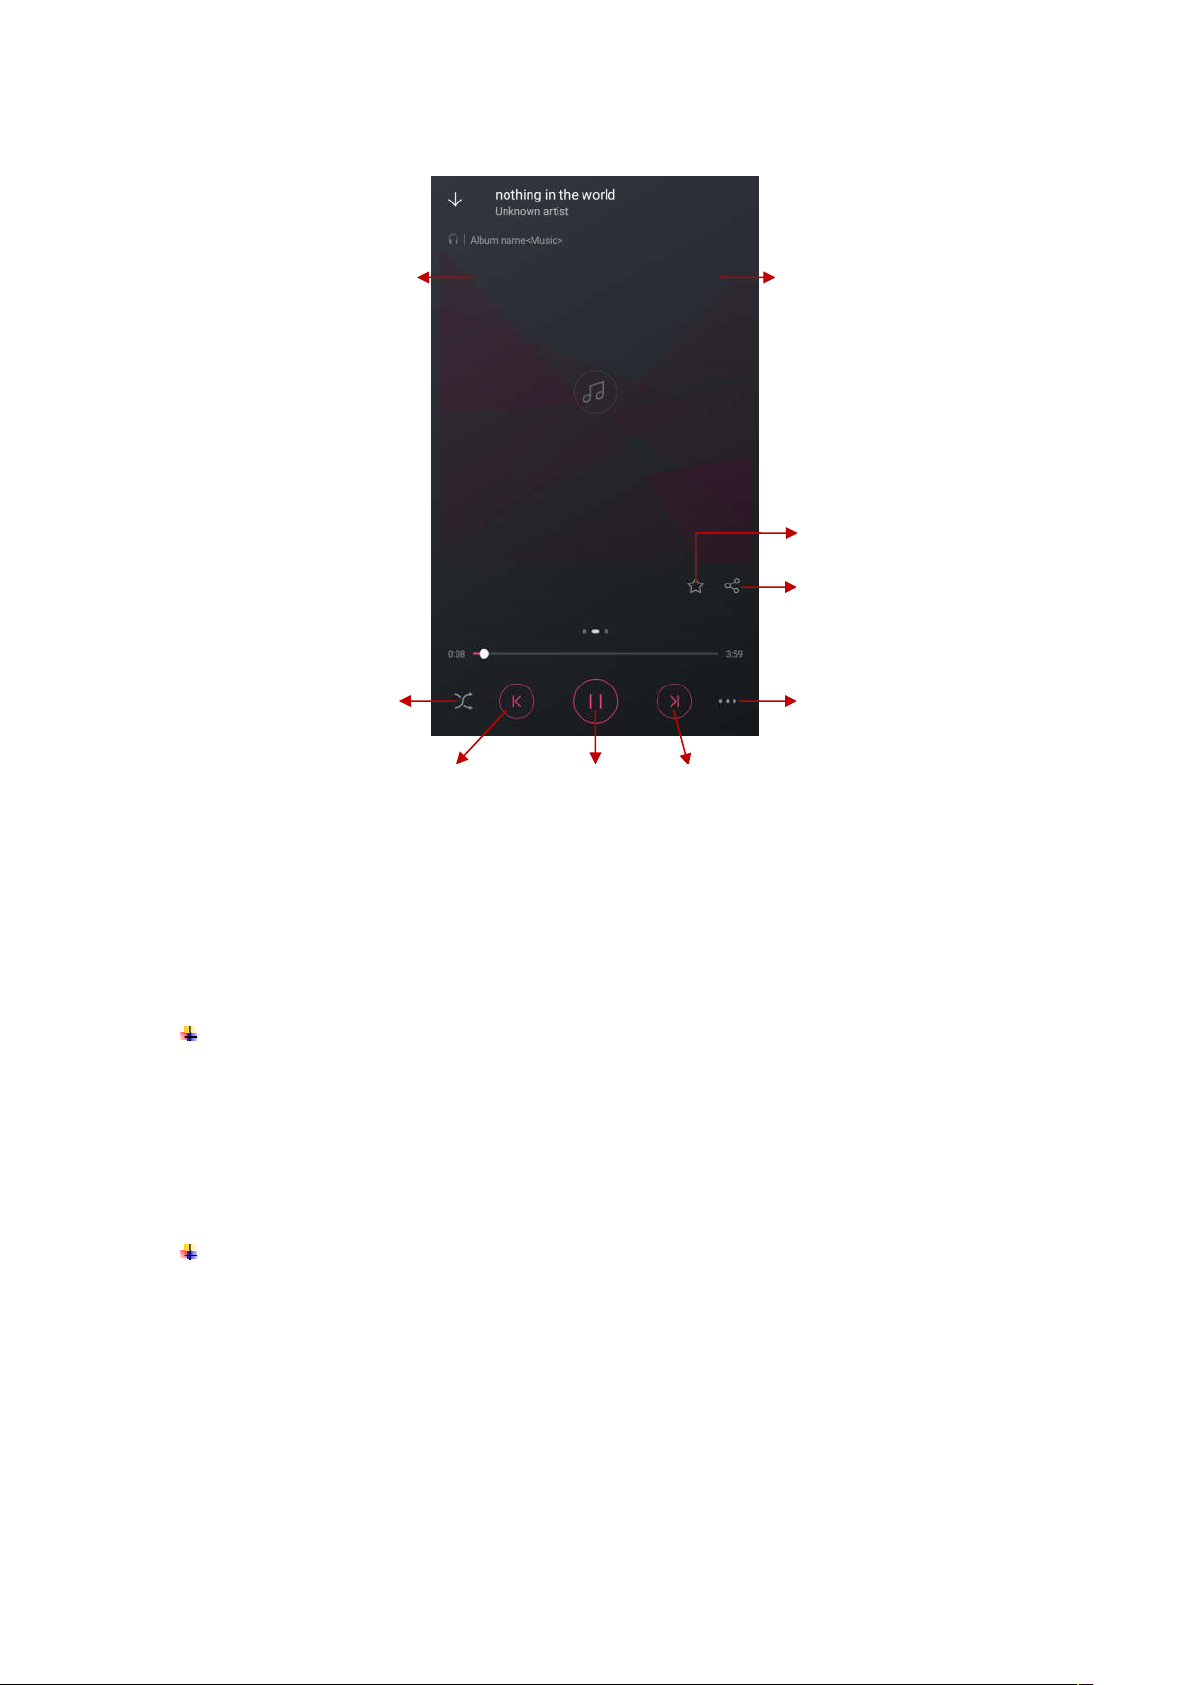
Slide to left for lyrics file.
Touch to Change play mode of Single
cycle, Shuffle, or Circulating list.
7. Connection
Your phone can connect to a variety of networks and devices, including mobile networks
for voice and data transmission, WLAN data networks, and Bluetooth devices, such as
headsets. You can also connect your phone to a computer, to transfer files from your
phone storage, and share your phone’s mobile data connection via USB or as a portable
WLAN hotspot.
Airplane mode
Option1: Settings-->More-->Airplane mode to turn it on
Option2: Swipe down from the top edge to open control center--> tap Airplane mode
Some locations like Airplane may require you to turn off your phone’s Cellular network,
WLAN, and Bluetooth wireless connections. You can turn off all these wireless
connections at once by placing your phone on Airplane mode.
WLAN
WLAN is a wireless networking technology that can provide internet access at distance of
up to 100 meters, depending on the WLAN router and your surroundings. You can
configure the WLAN as follow:
Settings-->WLAN, check WLAN to turn it on.
Enter WLAN. The phone scans for available WLAN networks and displays the names
of those it finds. Secured networks are indicated with a Lock icon. The phone will auto
login to the network if you have previously connected.
Touch a network to connect to it.
Previous song
Play/ Pause
Next song
Slide to right for Playlist
Add to my favorites
or New song list.
Share music by Bluetooth,
Email and so on.
Settings Menu
13
Page 16

If the network is open, you are prompted to confirm that you want to connect to that
network by touching connect. If the network is secured, you’re prompted to enter a
password or other credentials.
Bluetooth
Bluetooth is a short-range wireless communications technology that devices can use to
exchange information over a distance of about 10 meters. The most common Bluetooth
devices are headphones for making calls or listening to music, hands-free kits for cars,
and other portable device, including laptops and cell phones.
To send a file
Settings--> Bluetooth, check Bluetooth to turn it on.
Enter File Explorer to select a file, Select More--> Share--> Bluetooth.
Touch Scan for devices, the phone will scan for and display the names of all
available Bluetooth devices in range.
Touch the names of the other device in the list to pair them. After pairing the file will
be sent.
To receive a file
Settings--> Bluetooth, check Bluetooth to turn it on. Ensure your Bluetooth has been
connected within visibility time.
You can receive files from the devices which are paired with yours. The file you received
will be saved to the “Bluetooth” folder in the File Explorer.
To connect to a Handsfree device
Turn on the Handsfree device, make it in a searchable state;
Settings-->Bluetooth, Select “Search for devices”;
After searching for the Handsfree device,Select it in the list to pair.
After pairing, you can use the Handsfree device to listen to music, video and receive
call.
USB
You can connect the phone to your computer with a USB cable to transfer music, pictures,
and other files.
Turn on USB connection
1. Connect the phone to your computer with a USB cable.
2. In notification center, tap USB charging this device to open USB connection.
3. Choose the USB options.
Charge only, connected as a USB for charging.
Copy files, Transfer music, videos, documents and other documents (MTP).
View photos, Browse photos in DCIM and Pictures file folder (PTP).
USB debugging, Debug mode when USB is connected.
14
Page 17
Note:
Do not disconnect the USB cable from the phone when you are transferring files.
Doing so may cause data loss or phone damage.
8.
Features
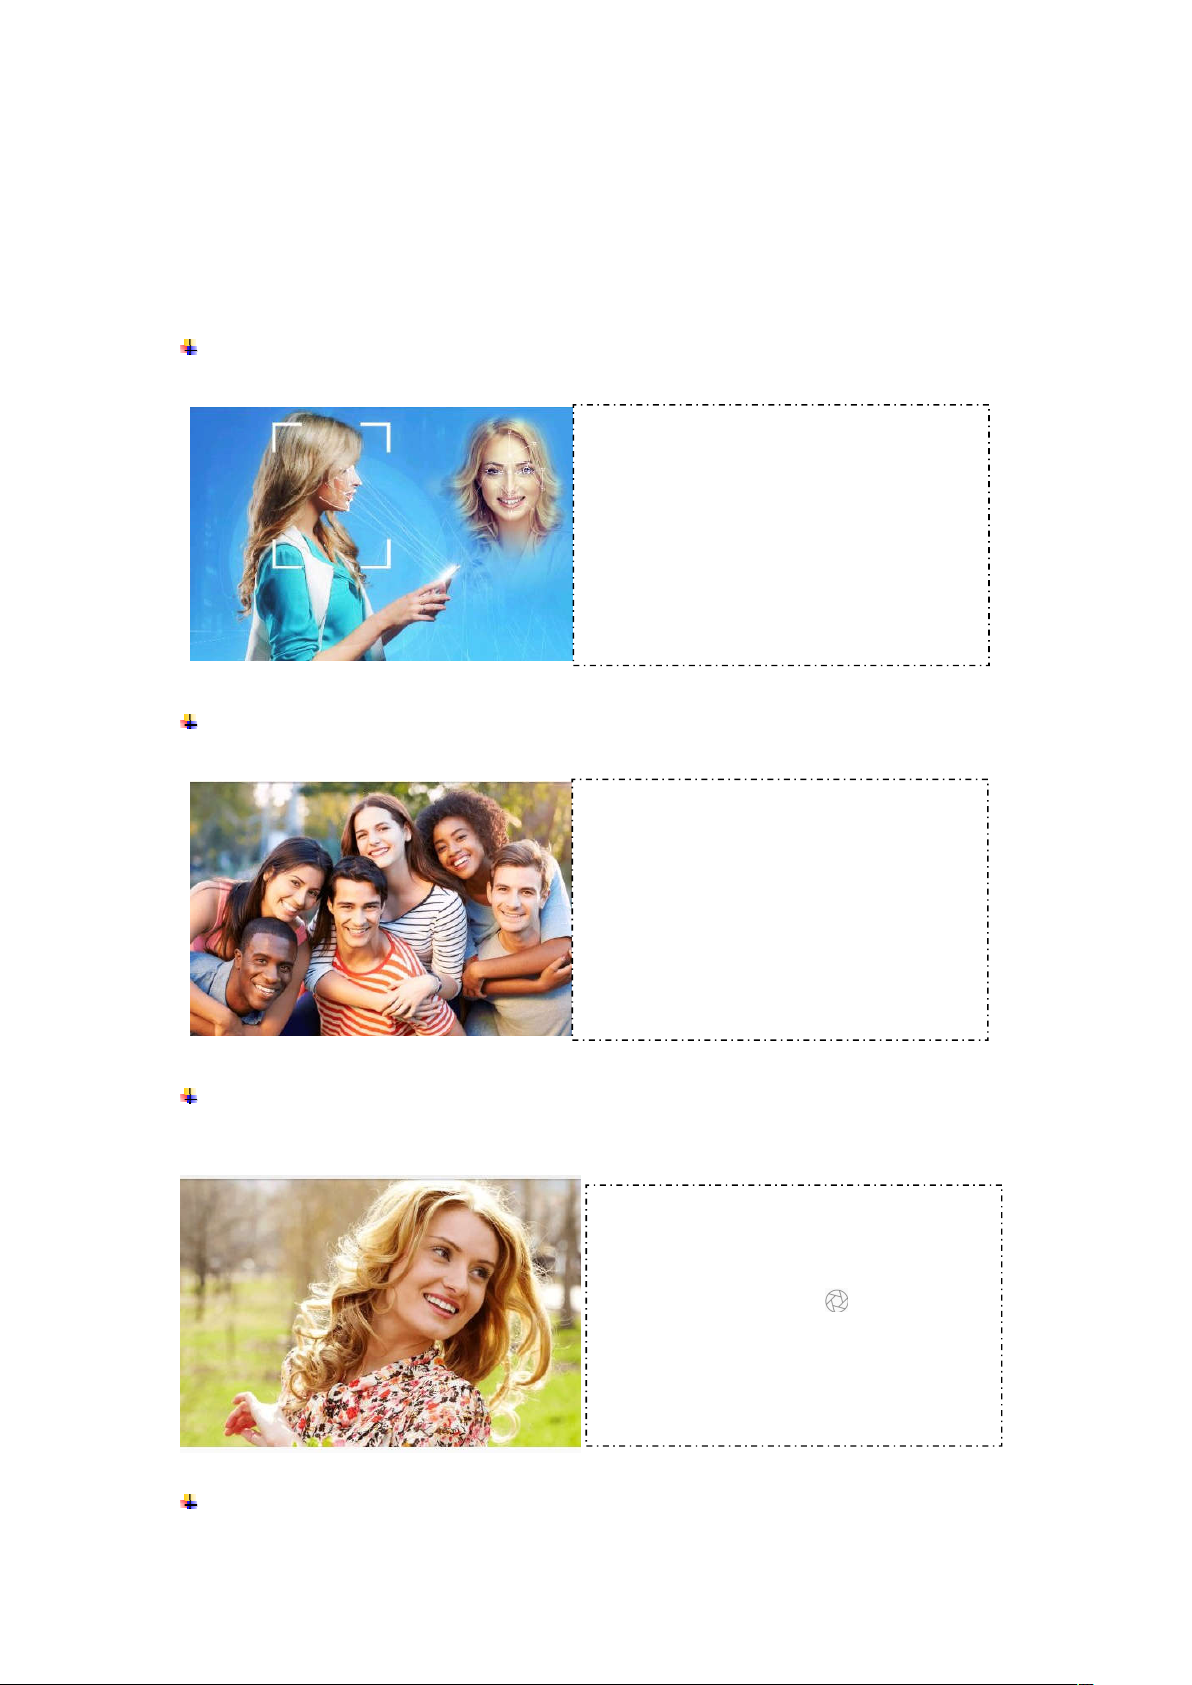
Face ID
Register face to unlock the phone. It can be unlocked even in a full black environment.
How to use
1) Setting-->Security-->Face ID
2) Add a face
3) Unlock your phone under the lock
screen
Group Selfie
Put more details in a single photo. Even many people take selfie together.
How to use
1) Turn the camera on
2) Select the front camera mode
3) Select the group selfie feature
4) Take pictures
Main Camera Bokeh
Excellent Bokeh effect makes your photographs visually appealing. You can change the
highlights to present the different photo effects.
How to use
1) Open the camera
2) Select the main camera mode
3) Click the bokeh icon
4) Take pictures
Front Camera Bokeh
15
Page 18
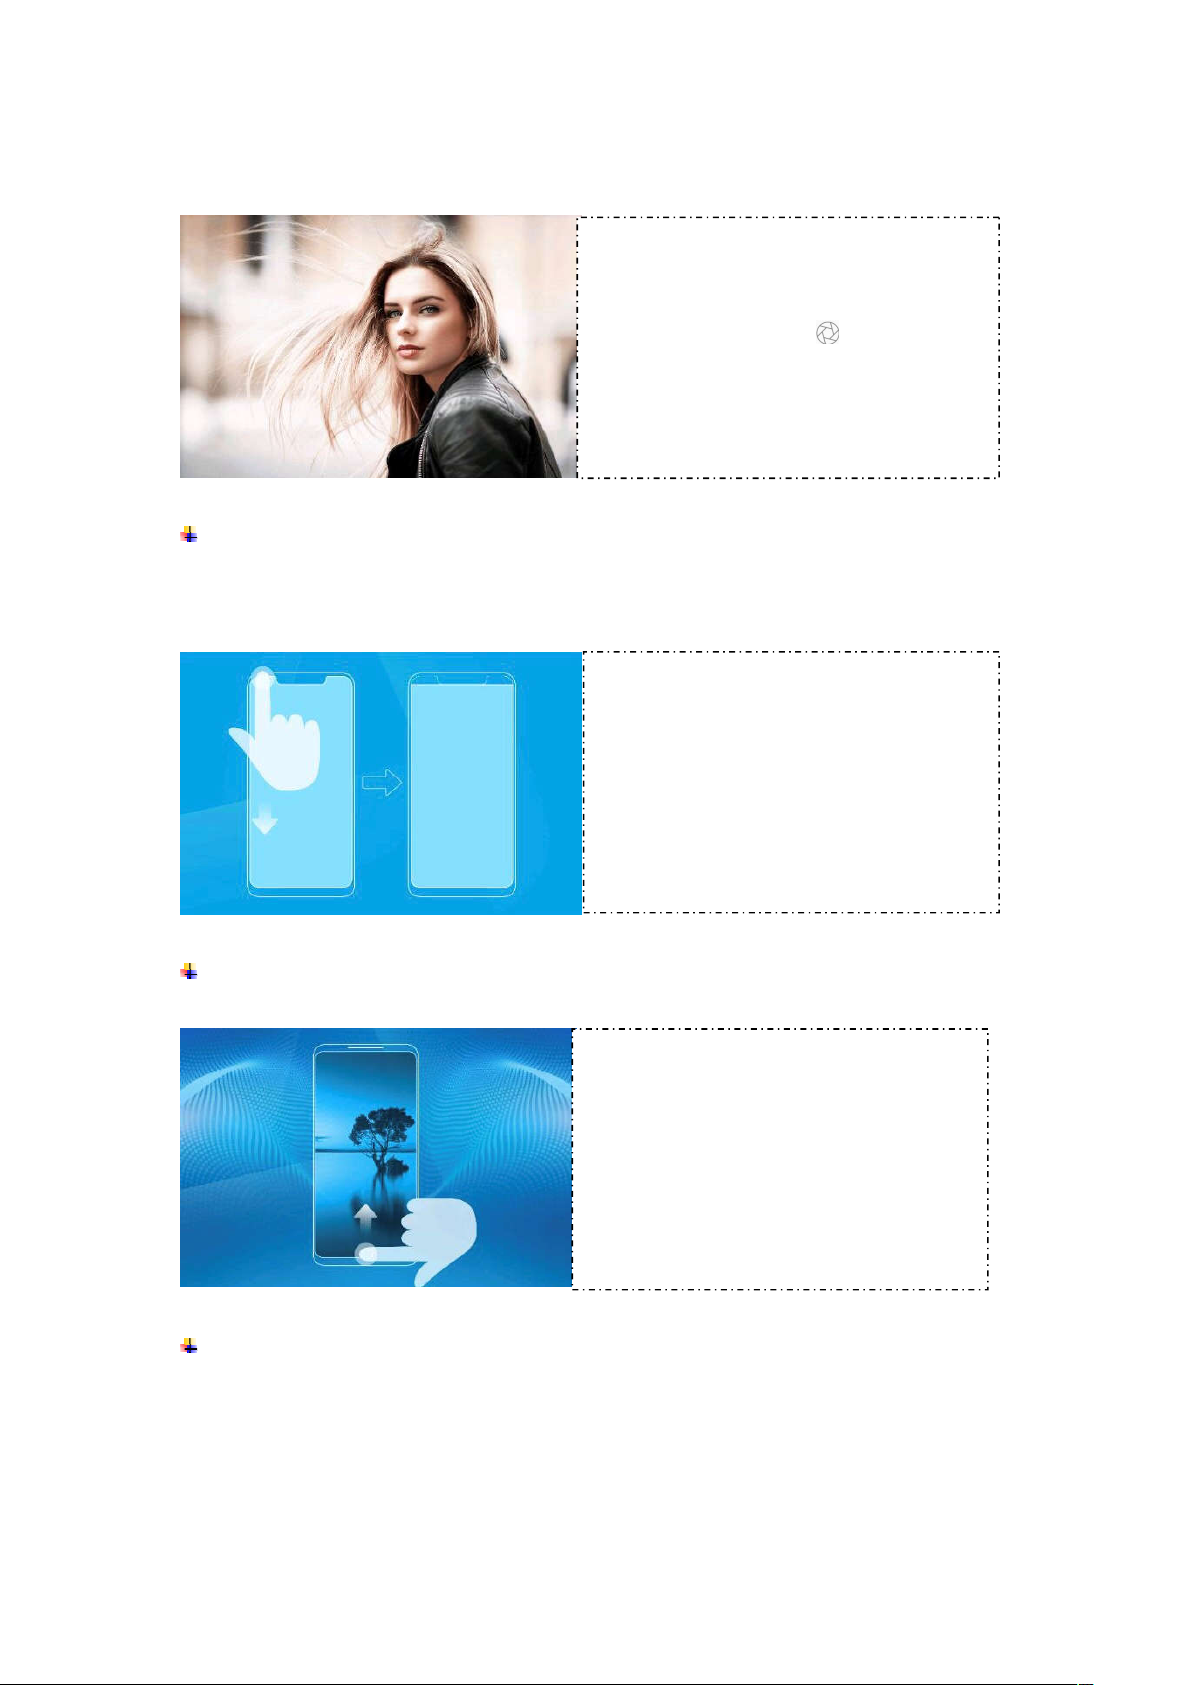
Front Camera Bokeh can achieve the background blur effect with real-time and adjustable
preview, which helps you be the center of attention.
How to use
1) Open the camera
2) Select the front camera mode
3) Click the bokeh icon
4) Take pictures
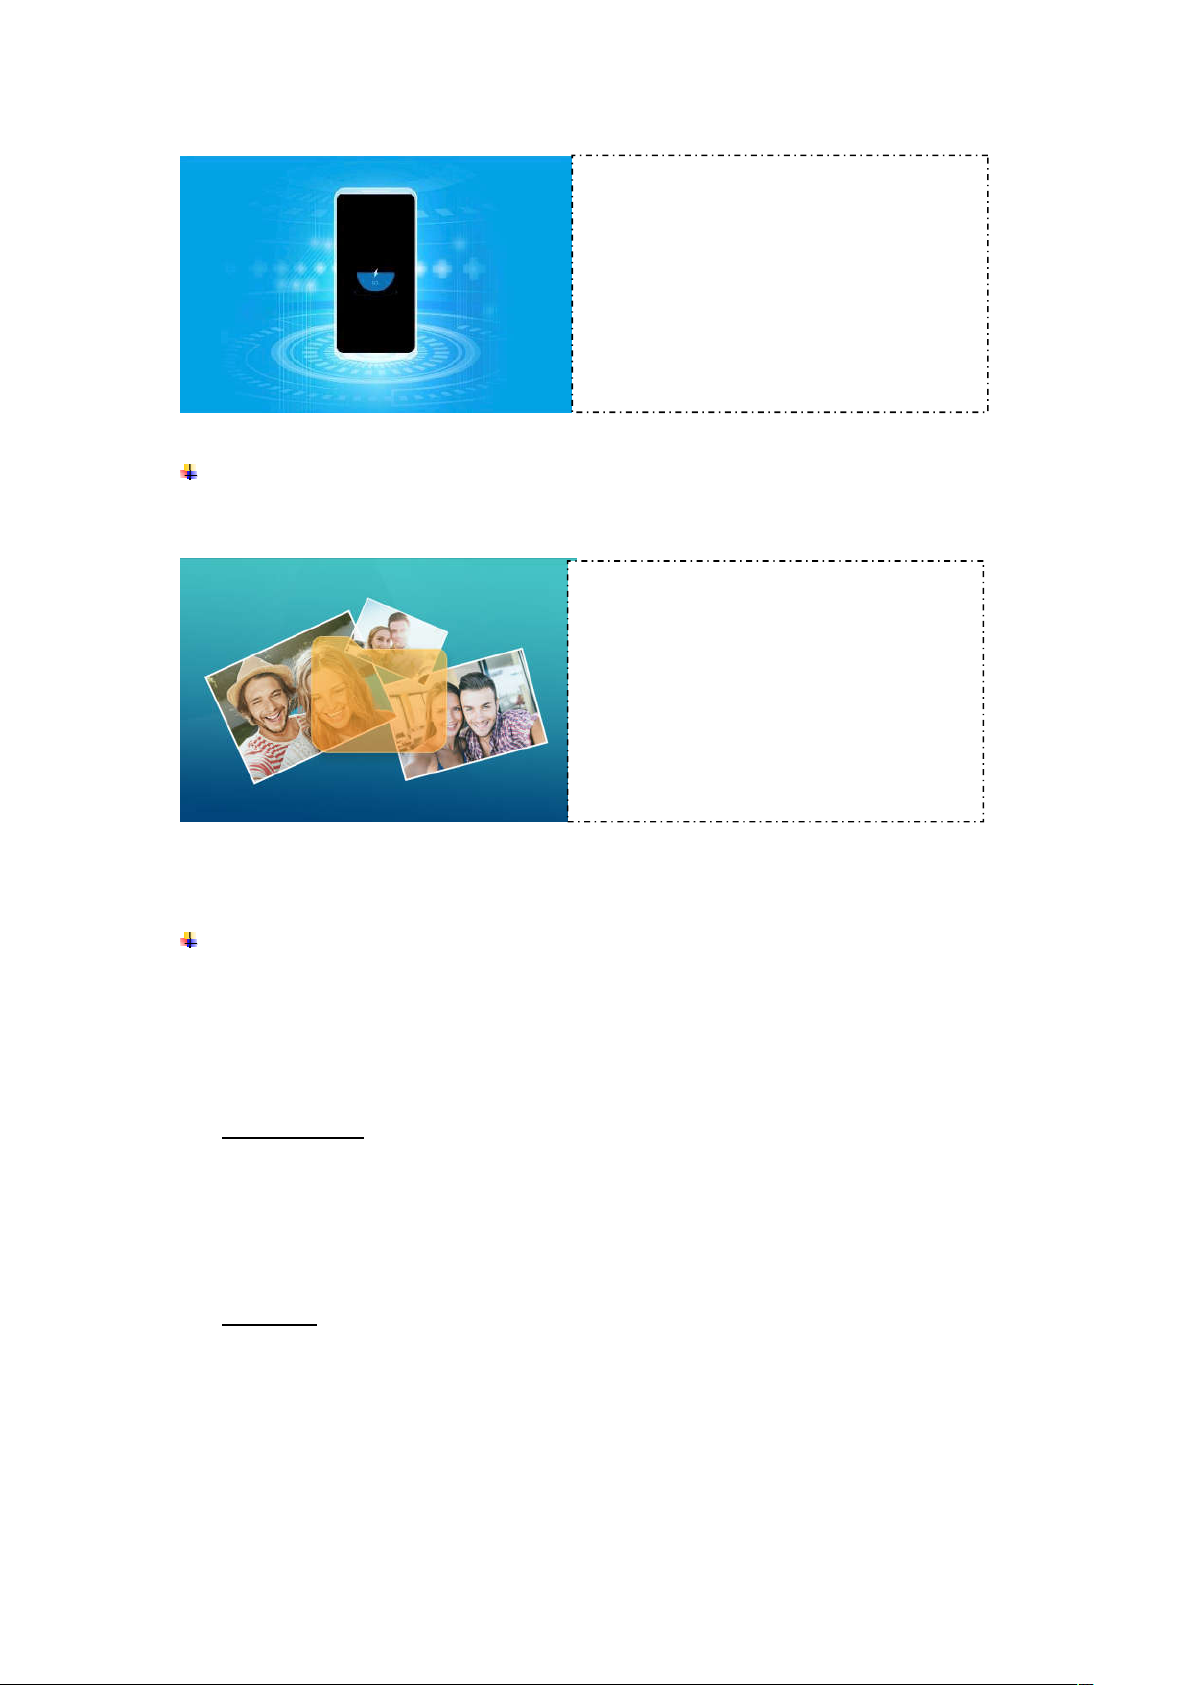
Notch Screen Gesture
With the phone unlocked, slide down from the upper left corner of the screen to switch the
screen display ratio between 18:9 and 19:9; namely, switch the screen display area
between the rectangular and U shapes.
How to use
1) Settings-->Display-->Switch screen
display area
2) Turn the switch on
3) Slide down from the upper left corner
of the screen
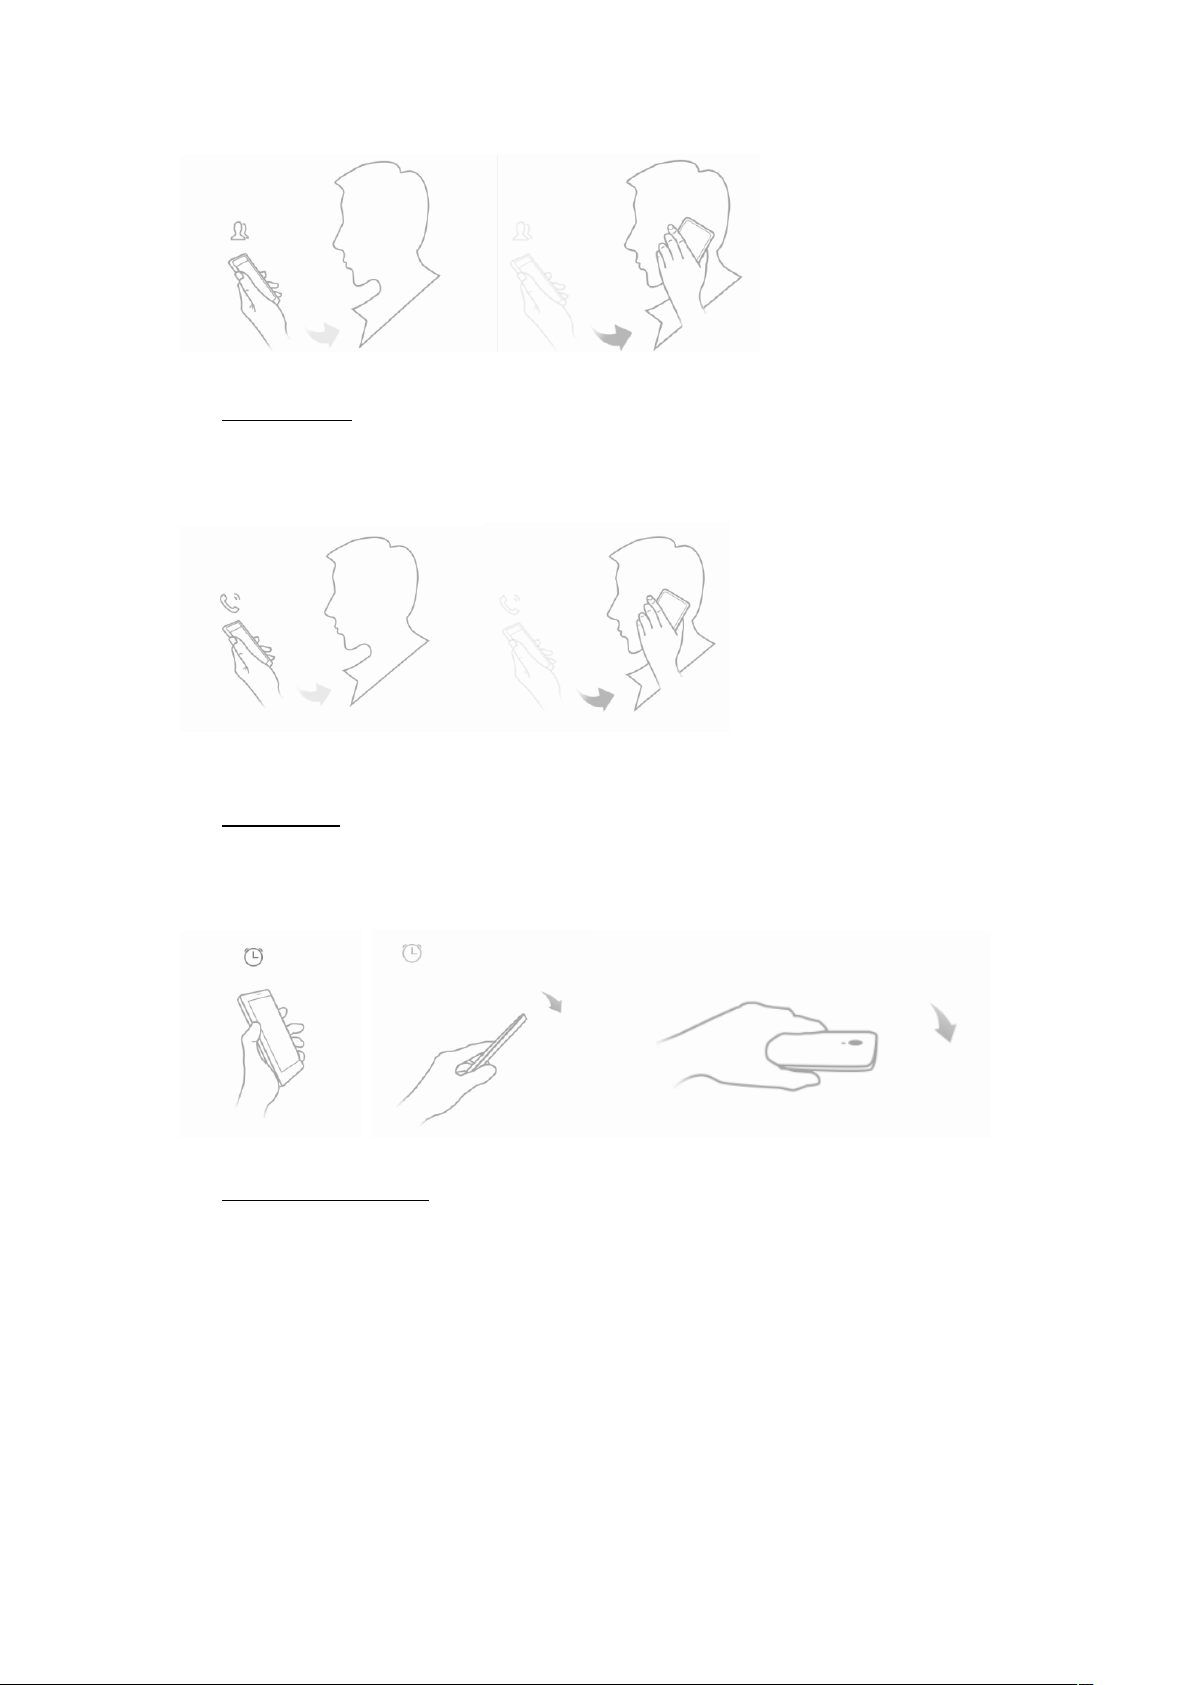
New Navigation Mode
Use sliding gestures to perform the same function.
How to use
1) Settings-->Navigation bar
2) Change navigation mode
3) Slide upward on the bottom of the
screen
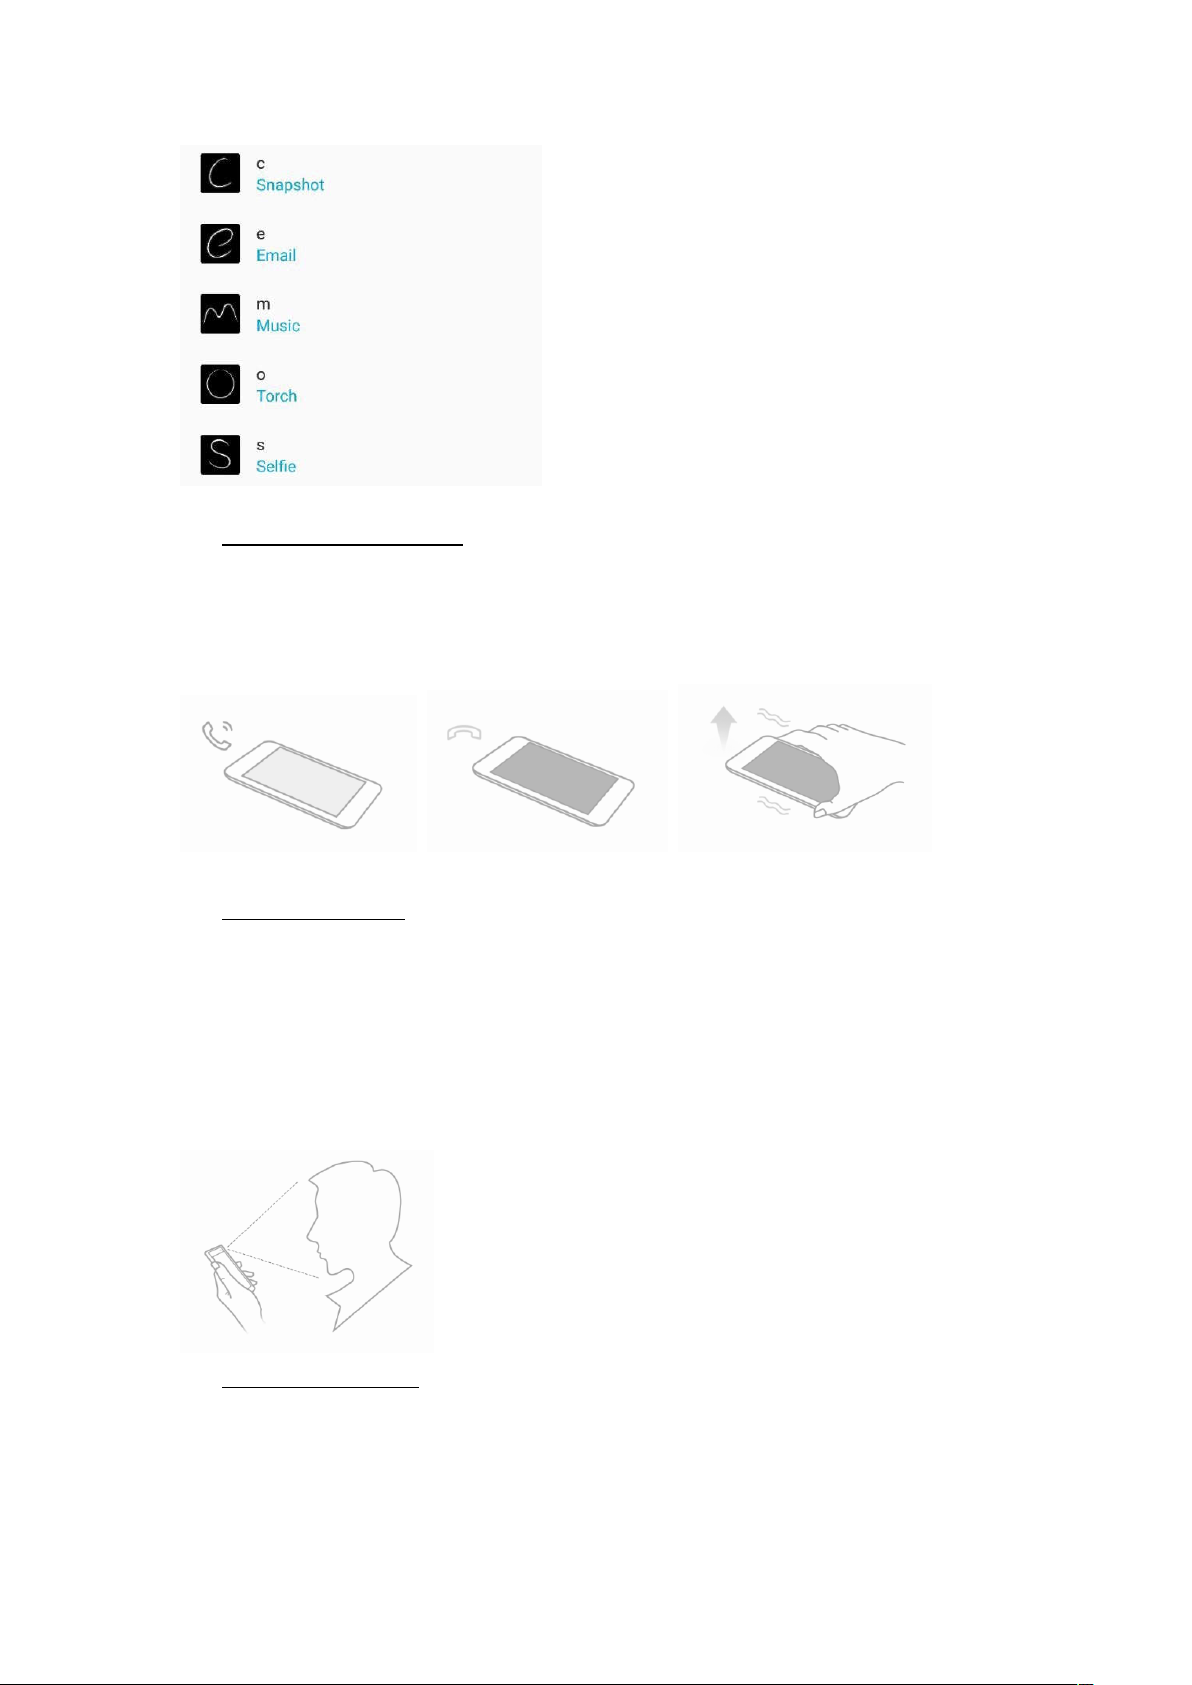
Wireless charging
Charge through a wireless charging Ndock.
16
Page 19
How to use
1) Get a matching wireless charging
dock
2) Put your phone screen upwards in
the center of the dock
3) Wireless charging animation appears
when you turn off or lock the phone
Selfies Album
A new album ‘Selfies’ is added in the Gallery. Photos shot by front camera stocks in the
‘Selfies’ folder automatically.
How to use
1) Take a selfie
2) You can always locate your selfies in
a special folder ‘Selfies’ in the gallery
9. Operation
Smart Gestures
Settings-->More settings--> Smart Gestures to turn it on.
The smart gestures system supports a variety of experience and control, through gesture
can be more convenient operation, some of the smart gesture functions will not work while
flip cover is closed.
Raise to wake
Settings--> More settings --> Smart Gestures --> Turn on Raise to wake
Lift your hand with the phone held to light on the screen so that you can easily view
notifications or start face-based unlocking.
Note: Disabling this feature affects face based unlocking.
Smart dial
Settings--> More settings --> Smart Gestures --> Select Smart dial
In message content page, contacts detail page or call history details page, dial the number
automatically by taking the phone to your ear.
In contact detail page, directly dial the first number if you have many numbers.
① ②
17
Page 20
Smart answer
Settings--> More settings --> Smart Gestures -->Select Smart answer
Take the phone to your ear so it will answer the incoming call automatically.
① ②
Pause alarm
Settings--> More settings --> Smart Gestures -->Select Pause alarm
Flip back the phone to pause an on-going alarm.
① ②
Black screen gestures
Settings--> More settings --> Smart Gestures --> Select Black screen gestures
Draw pattern to access menu quickly while phone is on sleep mode.
18
Page 21
Smart Vibration Reminder
Settings--> More settings --> Smart Gestures -->Select Smart Vibration Reminder
When the phone has missed call or unread SMS, pick up it in sleep screen will vibrate to
remind again.
① ②
Smart bright screen
Settings--> More settings --> Smart Gestures-->Select Smart bright screen
When front camera detects you are viewing screen, the screen will be maintained
normally.
The following scenarios, the function may fail:
-User doesn’t face on the screen
-The light is too strong or too dark
-Front camera is used by other applications
Double click wake up
Settings--> More settings --> Smart Gestures -->Select Double click wake up
When the screen is in sleep mode, quickly double tap to wake up the phone.
① ②
19
Page 22
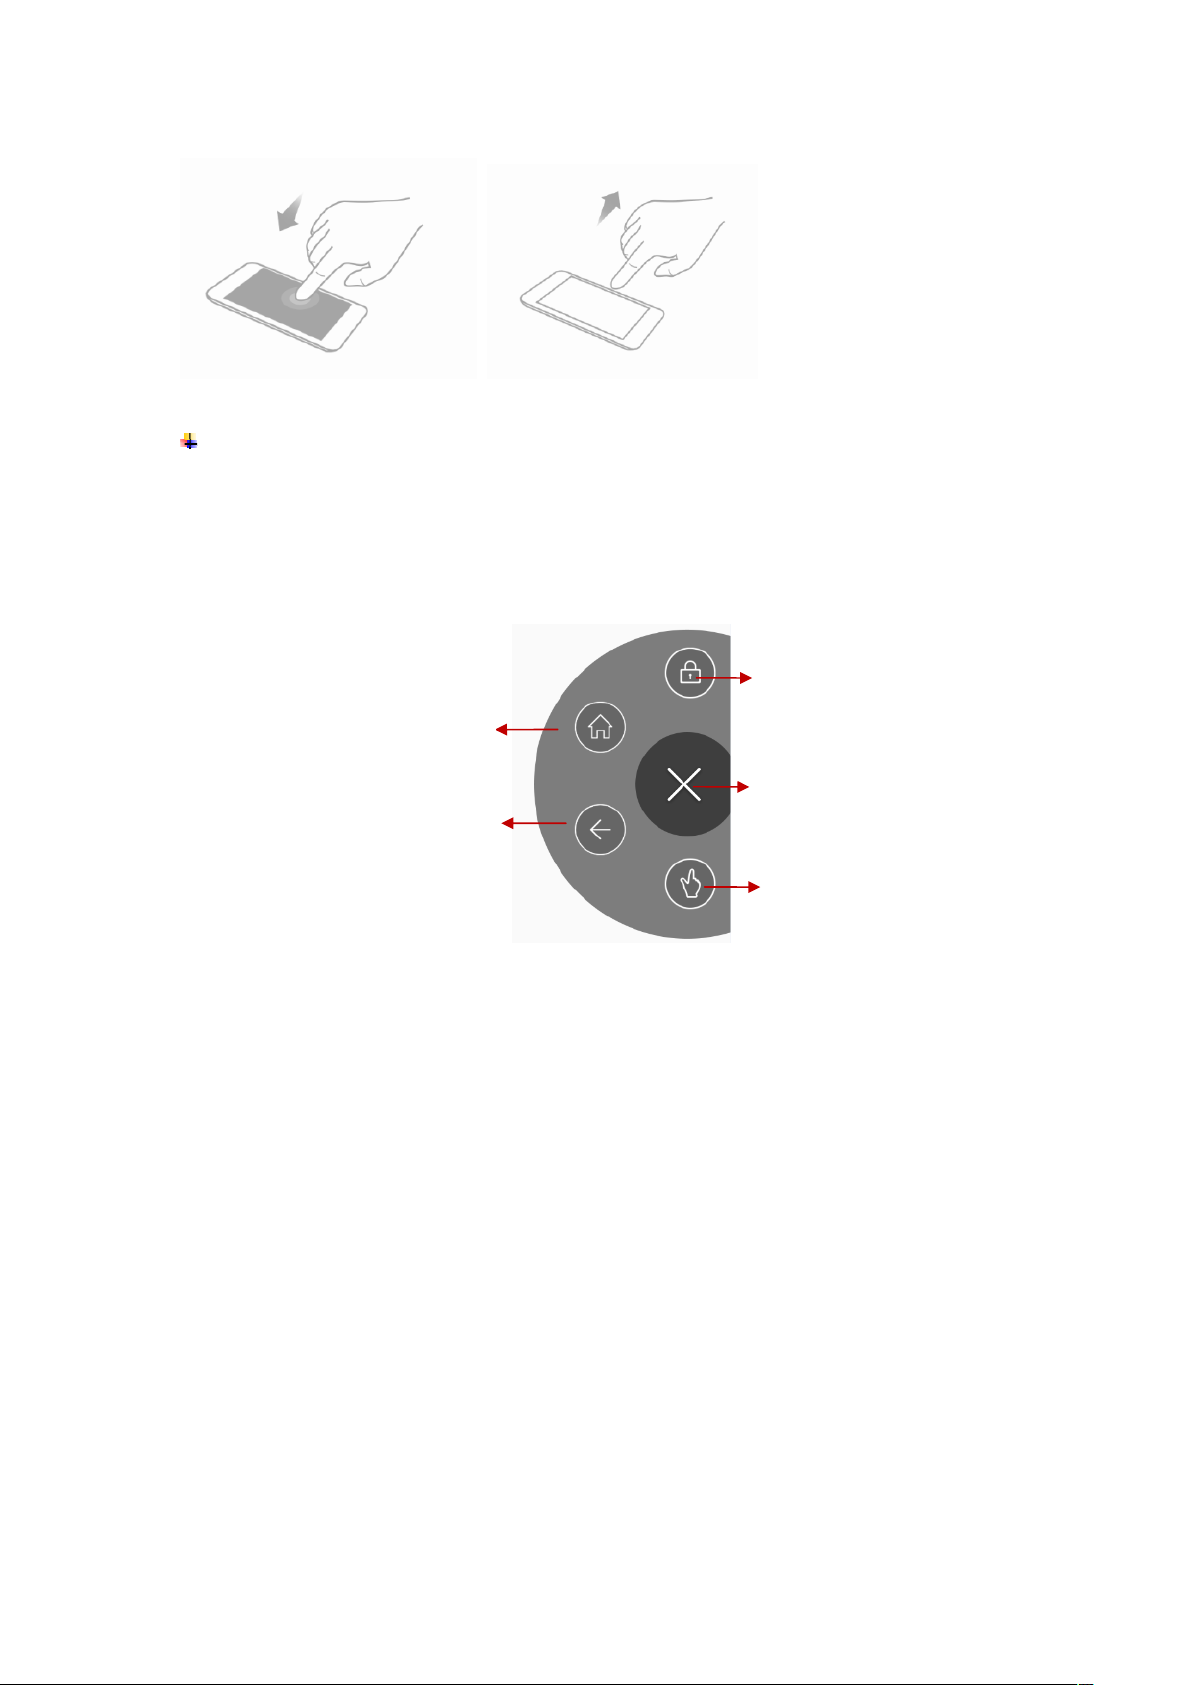
Suspend option
Long press can be hidden in the notification bar. Operation the suspend button,
achieved to return, sleep and so on. You can also change the transparency, button
size, and customization of suspend button here.
Settings--> More settings -->Suspend option
Tap to lock the screen.
Tap to return to the Home screen.
Close
Tap to return to the previous
screen.
Tap to open one hand
operation
10.
Warnings and notes
Operational Warnings
Important information on safe and efficient operation. Read this information before using
your phone. For the safe and efficient operation of your phone, observe these guidelines:
Potentially explosive at atmospheres: Turn off your phone when you are in any areas
with a potentially explosive atmosphere, such as fueling areas (gas or petrol stations,
below deck on boats), storage facilities for fuel or chemicals, blasting areas and areas
near electrical blasting caps, and areas where there are chemicals or particles (Such as
metal powders, grains, and dust) in the air.
Interference to medical and personal Electronic Devices: Most but not all electronic
equipment is shielded from RF signals and certain electronic equipment may not be
shielded against the RF signals from your phone.
Audio Safety: This phone is capable of producing loud noises which may damage your
hearing. When using the speaker phone feature, it is recommended that you place your
phone at a safe distance from your ear.
Other Medical Devices, hospitals: If you use any other personal medical device, consult
20
Page 23

the manufacturer of your device to determine if it is adequately shielded from external RF
energy. Your physician may be able to assist you in obtaining this information. Turn your
phone OFF in health care facilities when any regulations posted in these areas instruct
you to do so. Hospitals or health care facilities may be using equipment that could be
sensitive to external RF energy.
Product statement on handling and use: You alone are responsible for how you use
your phone and any consequences of its use.
You must always switch off your phone wherever the use of a phone is prohibited. Use of
your phone is subject to safety measures designed to protect users and their environment.
Always treat your phone and its accessories with care and keep it in a clean and dust-free
place.
Do not expose your phone or its accessories to open flames or lit tobacco products.
Do not expose your phone or its accessories to liquid, moisture, or high humidity.
Do not drop, throw, or try to bend your phone or its accessories.
Do not use harsh chemicals, cleaning solvents, or aerosols to clean the device or its
accessories.
Do not attempt to disassemble your phone or its accessories; only authorized personnel
can do so.
Do not expose your phone or its accessories to extreme temperatures, minimum 32℉and
maximum 104℉(0℃ to 40℃).
Battery: Your phone includes an internal lithium-ion or lithium-ion polymer battery. Please
note that use of certain data applications can result in heavy battery use and may require
frequent battery charging. Any disposal of the phone or battery must comply with laws and
regulations pertaining to lithium-ion or lithium-ion polymer batteries.
Faulty and damaged products: Do not attempt to disassemble the phone or its
accessory. Only qualified personnel can service or repair the phone or its accessory. If
your phone or its accessory has been submerged in water, Punctured, or subjected to a
severe fall, do not use it until you have taken it to be checked at an authorized service
center.
FCC Regulations:
This mobile phone complies with part 15 of the FCC Rules. Operation is subject to the
following two conditions: (1) This device may not cause harmful interference, and (2) this
device must accept any interference received, including interference that may cause
undesired operation.
This mobile phone has been tested and found to comply with the limits for a Class B digital
device, pursuant to Part 15 of the FCC Rules. These limits are designed to provide
reasonable protection against harmful interference in a residential installation. This
equipment generates, uses and can radiated radio frequency energy and, if not installed
and used in accordance with the instructions, may cause harmful interference to radio
communications. However, there is no guarantee that interference will not occur in a
particular installation If this equipment does cause harmful interference to radio or
television reception, which can be determined by turning the equipment off and on, the
user is encouraged to try to correct the interference by one or more of the following
measures:
21
Page 24

-Reorient or relocate the receiving antenna.
-Increase the separation between the equipment and receiver.
-Connect the equipment into an outlet on a circuit different from that to which the receiver
is connected.
-Consult the dealer or an experienced radio/TV technician for help.
FCC Note:
Caution: Changes or modifications not expressly approved by the party responsible for
compliance could void the user‘s authority to operate the equipment.
RF Exposure Information (SAR)
This phone is designed and manufactured not to exceed the emission limits for exposure
to radio frequency (RF) energy set by the Federal Communications Commission of the
United States.
During SAR testing, this device was set to transmit at its highest certified power level in all
tested frequency bands, and placed in positions that simulate RF exposure in usage
against the head with no separation, and near the body with the separation of 10 mm.
Although the SAR is determined at the highest certified power level, the actual SAR level
of the device while operating can be well below the maximum value. This is because the
phone is designed to operate at multiple power levels so as to use only the power required
to reach the network. In general, the closer you are to a wireless base station antenna, the
lower the power output.
The exposure standard for wireless devices employing a unit of measurement is known as
the Specific Absorption Rate, or SAR.
The SAR limit set by the FCC is 1.6W/kg.
This device is complied with SAR for general population /uncontrolled exposure limits in
ANSI/IEEE C95.1-1992 and had been tested in accordance with the measurement
methods and procedures specified in IEEE1528.
The FCC has granted an Equipment Authorization for this model phone with all reported
SAR levels evaluated as in compliance with the FCC RF exposure guidelines. SAR
information on this model phone is on file with the FCC and can be found under the
Display Grant section of www.fcc.gov/oet/ea/fccid after searching on
FCC ID: 2AO8VSMART9PRO.
For this device, the highest reported SAR value for usage against the head is 0.55
W/kg, for usage near the body is 0.55 W/kg.
While there may be differences between the SAR levels of various phones and at various
positions, they all meet the government requirements.
SAR compliance for body-worn operation is based on a separation distance of 10 mm
22
Page 25

between the unit and the human body. Carry this device at least 10 mm away from your
body to ensure RF exposure level compliant or lower to the reported level. To support
body-worn operation, choose the belt clips or holsters, which do not contain metallic
components, to maintain a separation of 10 mm between this device and your body.
RF exposure compliance with any body-worn accessory, which contains metal, was not
tested and certified, and use such body-worn accessory should be avoided.
Google is a trademark of Google LLC.
23
 Loading...