

OWIM LUVARNOLUX Assembly Manual
LED SOLAR SPOTLIGHT
LED SOLAR SPOTLIGHT
Assembly, operating and safety instructions
REFLECTOR SOLAR CU LED
Indicaţii de montaj-, utilizare- şi siguranţă
ΗΛΙΑΚΟΣ ΠΡΟΒΟΛΕΑΣ LED
Οδηγίες συναρμολόγησης, χειρισμού και ασφάλειας
IAN 282514
LED SOLARNA SVJETILJKA
Upute za montažu, uporabu i sigurnost
СОЛАРЕН LED ПРОЖЕКТОР
Инструкции за монтаж, обслужване и
безопасност
LED-SOLAR-STRAHLER
Montage-, Bedienungs- und Sicherheitshinweise
GB / CY Assembly, operating and safety instructions Page 5
HR Upute za montažu, uporabu i sigurnost Stranica 19
RO Indicaţii de montaj-, utilizare- şi siguranţă Pagina 33
BG Инструкции за монтаж, обслужване
и безопасност Cтраница 47
GR / CY Οδηγίες συναρμολόγησης, χειρισμού
και ασφάλειας Σελίδα 62
DE / AT / CH Montage-, Bedienungs- und Sicherheitshinweise Seite 77
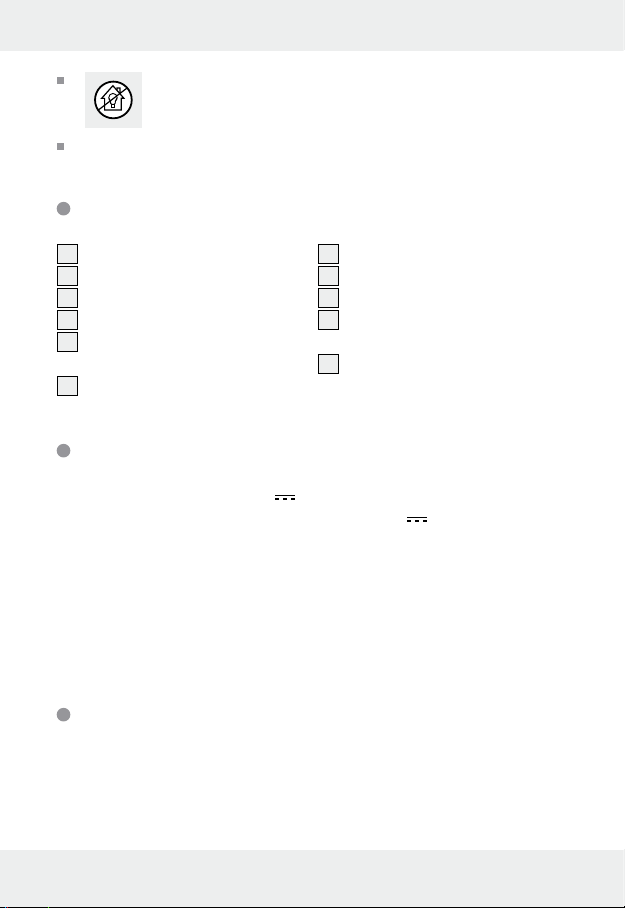
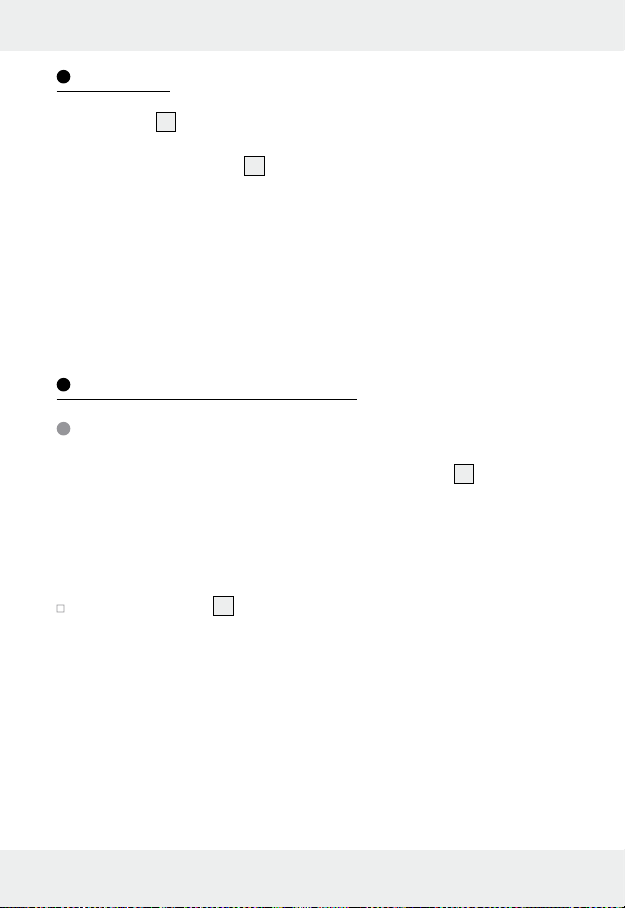
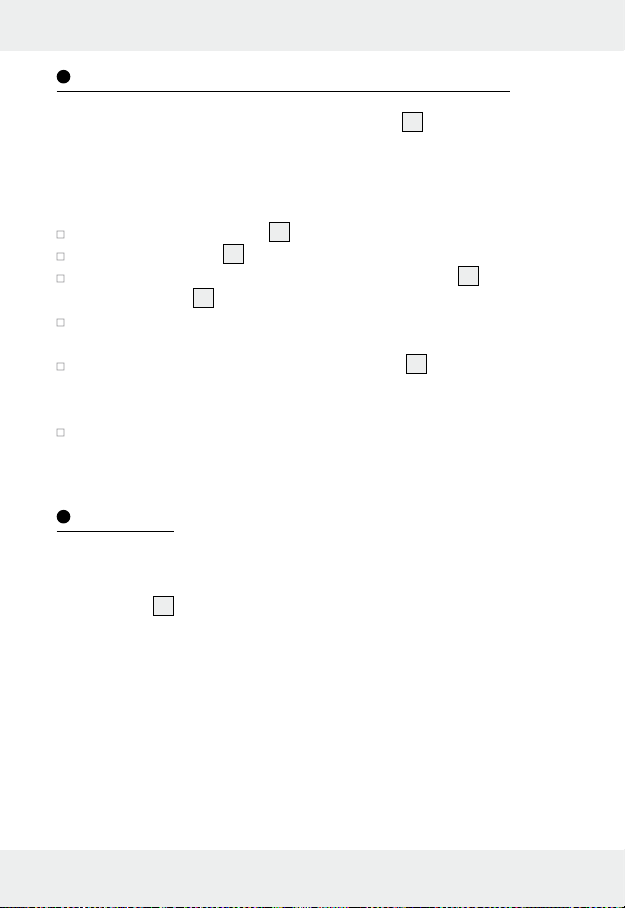
A
1 4 52 3
6
B C
7
D
4
7 88
9
E
F
10
11

List of pictograms used ................................................... Page 6
Introduction ..............................................................................Page 6
Intended use ................................................................................... Page 6
Parts description ............................................................................. Page 7
Technical Data ............................................................................... Page 7
Scope of delivery ........................................................................... Page 7
General safety instructions ......................................... Page 8
Safety instructions for batteries / rechargeable batteries ............Page 9
Function........................................................................................Page 10
Before use ..................................................................................Page 10
Charging the rechargeable batteries............................................Page 10
Assembly .................................................................................... Page 11
Mounting the main unit .................................................................. Page 11
Mounting the solar cell .................................................................. Page 12
Connecting the solar cell to the main unit .................................... Page 12
Start-up ........................................................................................ Page 12
Maintenance /
changing rechargeable batteries
.......................... Page 14
Winter-time use ..................................................................... Page 14
Cleaning and Care .............................................................. Page 15
Troubleshooting ................................................................... Page 15
Disposal ....................................................................................... Page 16
Warranty .................................................................................... Page 17
5 GB/CY

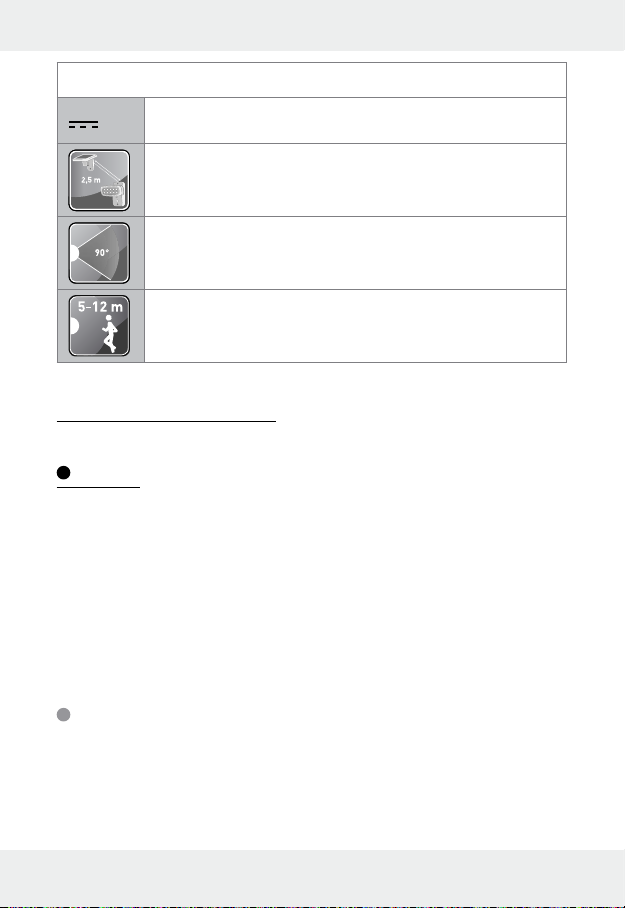
List of pictograms used
Direct current (Type of current and voltage)
2.5 m connection cable between solar cell and
LED spotlight
Detection angle of motion detector: 90°
Motion detector detection range: 5–12 m
LED solar spotlight
Introduction
We congratulate you on the purchase of your new product. You have chosen a high quality product. The instructions for use are part of the product.
They contain important information concerning safety, use and disposal.
Before using the product, please familiarise yourself with all of the safety
information and instructions for use. Only use the product as described
and for the specified applications. If you pass the product on to anyone
else, please ensure that you also pass on all the documentation with it.
Intended use
The product is intended to illuminate outdoor areas without electrical connection, e.g. garden sheds, garages, etc. The product is intended for private use only and is not suitable for commercial use or for use in other
applications.
6 GB/CY
Not suitable for ordinary lighting in household room illumi-
nation.
This product is suitable for extreme temperature up to -21°C.
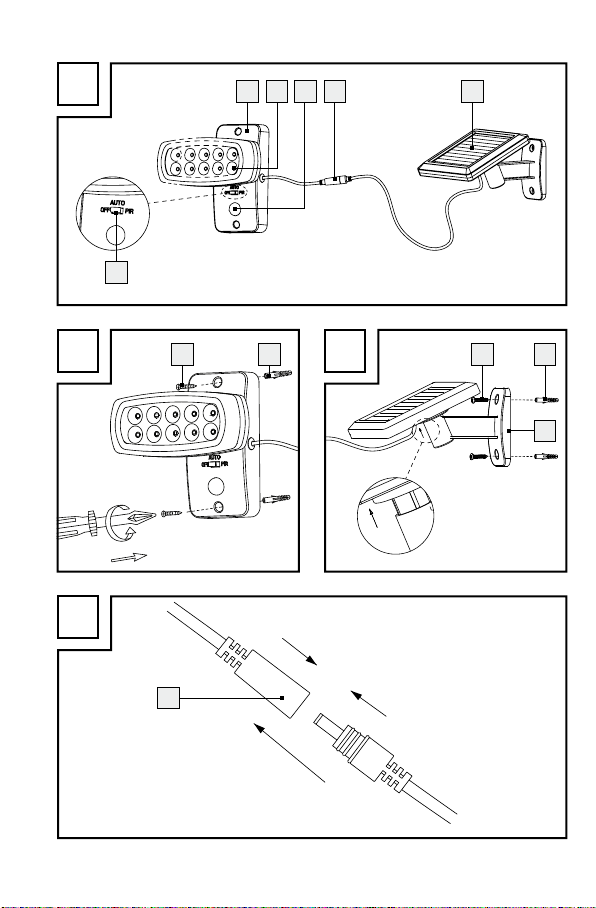
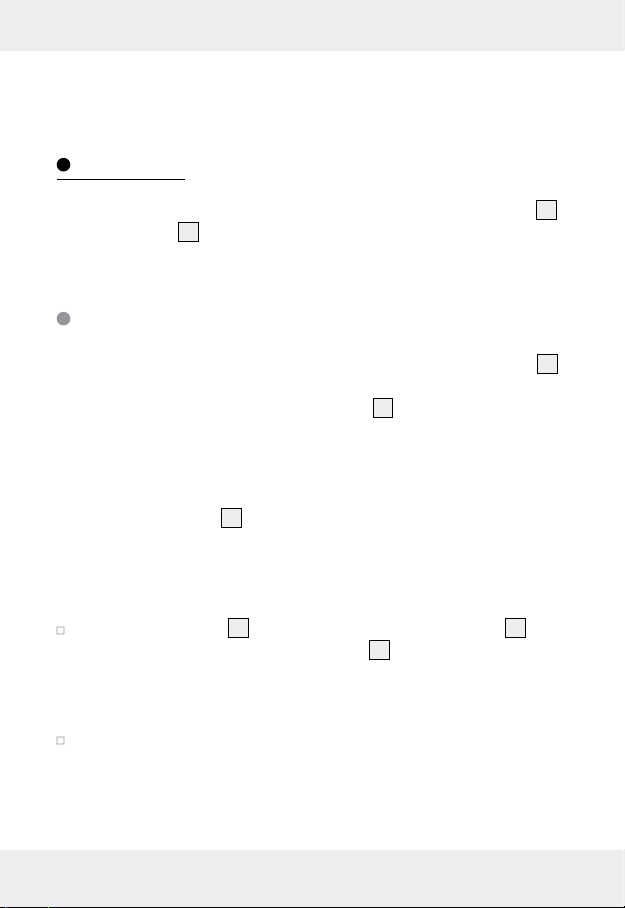
Parts description
1
Main unit
2
LED spotlight
3
Motion detector
4
Electrical connector
5
Solar cell with built-in twilight
sensor
6
Switch (OFF / AUTO / PIR)
7
Screw (4 x 30 mm)
8
Wall plug (ø 6 mm)
9
Bracket (solar cell)
10
Rechargeable battery
compartment
11
Locking screws
Technical Data
Operating voltage: 3.6 V
Rechargeable battery: 3 x Ni-MH battery 1.2 V
, 600 mAh, AA
Light bulb: 10 LEDs, 0.06 W each (LEDs not replaceable)
Solar cell: amorphous, 8 x 8 cm, max. 5.4 V, max. 70 mA
Motion detector: range: approx. 5–12 m,
detection angle: approx. 90° horizontal, 90°
vertical
Protection type: IP44 (splash-proof)
Scope of delivery
Check immediately after unpacking that the parts are complete and that
the product is in proper condition.
7 GB/CY
1 Main unit (consisting of LED spotlight with 10 LEDs, motion detector, re-
chargeable battery compartment with built-in batteries and built-in control)
1 Solar cell (8 cm x 8 cm) (incl. approx. 2.5 m connection cable)
4 Screws (4 x 30 mm)
4 Wall plugs (ø 6 mm)
1 Instructions for assembly and use
General safety instructions
Before using the product, please familiarise yourself with all of the safety
information and instructions for use! When passing this product on to
others, please also include all the documents!
This product can be used by children aged from 8 years and above
and persons with reduced physical, sensory or mental capabilities or
lack of experience and knowledge if they have been given supervision
or instruction concerning use of the product in a safe way and understand the hazards involved. Children shall not play with the product.
Cleaning and user maintenance shall not be made by children without
supervision.
Never leave children unsupervised with the packaging material. The
packaging material represents a danger of suffocation. Children frequently underestimate the dangers.
Keep children out of the area you are working in. A large number of
screws and other small parts are included with delivery. These may
prove life-threatening if swallowed or inhaled.
Do not use this product if you notice any damage!
8 GB/CY
Safety instructions for batteries /
rechargeable batteries
DANGER TO LIFE! Keep batteries/rechargeable batteries out of
reach of children. If accidentally swallowed seek immediate medical
attention.
DANGER OF EXPLOSION! Never recharge non-re-
chargeable batteries. Do not short-circuit batteries/rechargeable batteries and/or open them. Overheating, fire
or bursting can be the result.
Never throw batteries/rechargeable batteries into fire or water.
Do not exert mechanical loads to batteries/rechargeable batteries.
Risk of batteries/rechargeable batteries leakage
Avoid extreme environmental conditions and temperatures, which
could affect batteries/rechargeable batteries, e.g. radiators/direct
sunlight.
Avoid contact with the skin, eyes and mucous membranes. In the event
of contact with battery acid, thoroughly flush the affected area with
plenty of clean water and seek immediate medical attention.
WEAR PROTECTIVE GLOVES! Leaked or damaged bat-
teries/rechargeable batteries can cause burns on contact
with the skin. Wear suitable protective gloves at all times if
such an event occurs.
In the event of a battery leak, immediately remove it from the product
to prevent damage.
Only use the same type of batteries/rechargeable batteries. Do not
mix used and new batteries/rechargeable batteries.
Remove the batteries/rechargeable batteries if the product will not be
used for a longer period.
Risk of damage of the product
Only use the specified type of battery/rechargeable battery!
When inserting ensure the correct polarity! This is shown inside the
battery compartment!
9 GB/CY
Clean the contacts on the battery and in the battery compartment
before inserting!
Remove exhausted batteries/rechargeable batteries from the product
immediately.
Function
The solar cell 5 converts energy from sunlight into electricity. This recharges
the rechargeable batteries inside the rechargeable battery compartment
10
via the connection cable.
These rechargeable batteries store the electricity fed by the solar cell. Fully
charged rechargeable batteries will provide about 2 hours of light on the
„PIR“ setting, and about 8 hours on „AUTO“.
In summer completely drained rechargeable batteries take about 2 to 4
days to fully recharge in constant sunlight. The rechargeable batteries must
be charged prior to initial use (see „Charging rechargeable
batteries“).
Before use
Charging the rechargeable batteries
Note: The rechargeable batteries inside the main unit 1 are fully charged
at delivery. However, they may already have lost charge during transport
from the manufacturer to the retail location. Therefore charge the rechargeable batteries prior to use. During summer, initial charging will take at least
one day in constant sunlight.
Set the switch 6 to the „OFF“ position.
Note: In constant sunlight (depending on the season) drained rechargeable batteries should take two to ten days to charge.
Note: the built-in charging controller of the product prevents the rechargeable batteries from overcharging.
10 GB/CY
Replace the rechargeable batteries if the light output does not improve
after charging (Fig. E).
Assembly
Note: Before mounting, decide where you want to mount the solar cell 5
and the main unit
1
. Please remember the connection cable between the
solar cell and the main unit is approx. 2.5 m long.
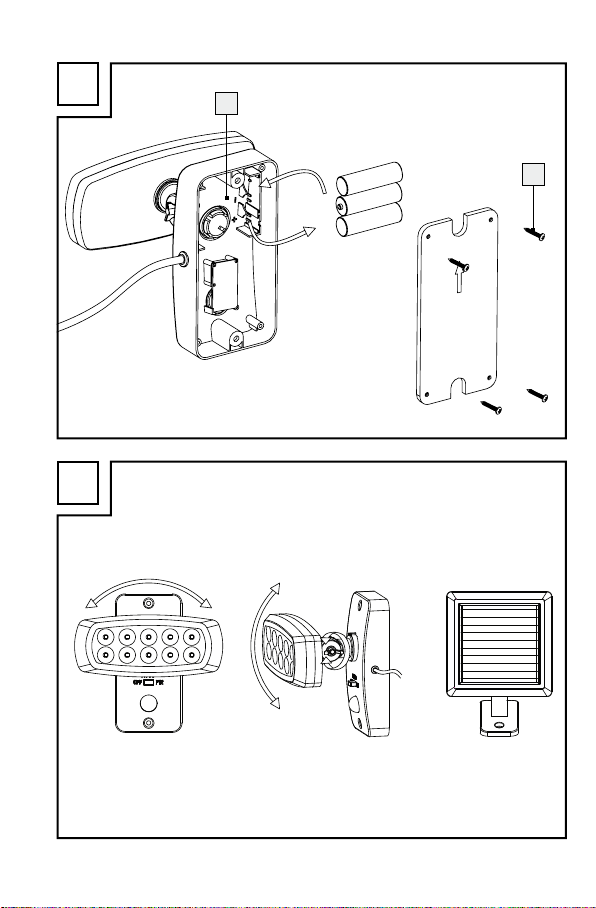
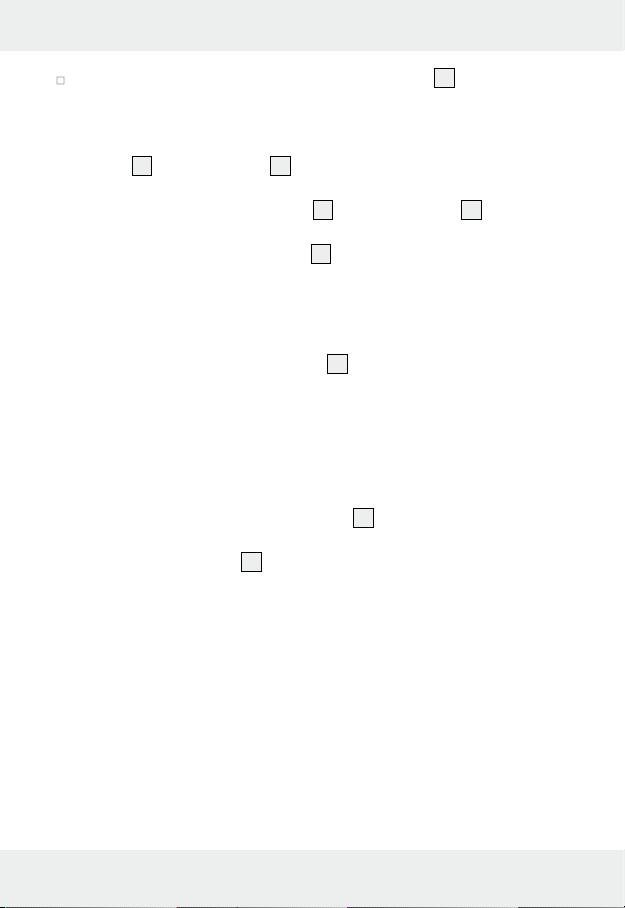
Mounting the main unit
Please remember when selecting the location for mounting the main unit 1:
1. The connection between the LED spotlight
2
and the main unit is flexible and should be able to illuminate the selected area. Please remember to slightly loosen the swivel screw before moving the LED spotlight.
Tighten the swivel screw afterwards (see Fig. F).
2. Depending on the mounting height (ideally between 1.80 m – 2.00 m)
the motion detector
3
has a detection range of max. 12 m with a de-
tection angle of 90° horizontally and 90° vertically.
3. Be sure the motion detector is not illuminated by street lighting at night.
This can influence its functioning.
Secure the main unit 1 using two of the enclosed wall plugs 8
(ø 6 mm) and two of the enclosed screws
7
(4 x 30 mm) (see Fig. B).
Note: The enclosed mounting material is suitable for ordinary masonry
construction. Other wall substrates may require other fastening materials. Seek specialist advice when in doubt.
After mounting, check that the main unit is fitted securely.
11 GB/CY

Mounting the solar cell
The solar cell 5 requires direct sunlight when possible. Ideally, the solar
cell surface will be directed to the south. The enclosed bracket
9
will en-
sure the solar cell is mounted horizontally.
Mount the bracket 9 of the solar cell 5 to a vertical wall using the
enclosed screws
7
(4 x 30 mm) and the enclosed wall plugs 8
(ø 6 mm) (see Fig. C).
Note: The enclosed mounting material is suitable for ordinary masonry
construction. Other wall substrates may require other fastening materials. Seek specialist advice when in doubt.
After mounting, verify the solar cell 5 is fitted securely by the bracket 9.
Then attach the solar cell as shown in Fig. C.
Next adjust the solar cell to face south.
Connecting the solar cell to the main unit
After mounting the two operating units (main unit 1 and solar cell 5) run
the connection cable so it is not subjected to mechanical stress. Use typical
installation material such as cable clamps or conduit to fasten the connection cable, to prevent damage to the insulation.
Connect the plug connector 4 from the main unit connection cable
and the solar cell (see Fig. D).
Start-up
Note:
Connect the main station 1 to the solar cell 5 before using for the
first time. The solar cell
motion detector
12 GB/CY
5
also works as a twilight sensor, while the
3
only responds to movement.
When selecting the setup location for the solar cell 5 be sure the
solar cell, just as the twilight sensor, are not affected by other light
sources, e.g. street lighting.
The switch
Position „OFF“: Motion detector
6
on the main unit 1 (Fig. A) features the following functions:
3
and LED spotlight 2 are off. In
direct sunlight the rechargeable batteries are charged
by the solar cell
5
. Use this setting to charge
drained rechargeable batteries (see „Charging the rechargeable
batteries“).
Position „AUTO“: The solar cell charges the rechargeable batteries in
sunlight. The product automatically switches on or off
once the solar cell
5
detects dusk or dawn. To ensure a long life the LEDs will not be fully powered in
this setting, but only provide approx. 20 % of their full
light power (eco mode). When fully charged, the rechargeable batteries will provide approx. 8 hours of
light in this setting.
Position „PIR“: The solar cell charges the rechargeable batteries in
sunlight. The solar cell
5
automatically switches the
product on in twilight or the dark when the motion de-
3
tector
detects movement. The light ON time is preset to approx. 1.5 minutes. If additional movement is
detected during these 1.5 minutes, the light ON time
will reset. In this setting the LEDs will be fully powered.
With the rechargeable batteries fully charged the
charge on this setting will provide light for a total of
approx. 2 hours.
13 GB/CY
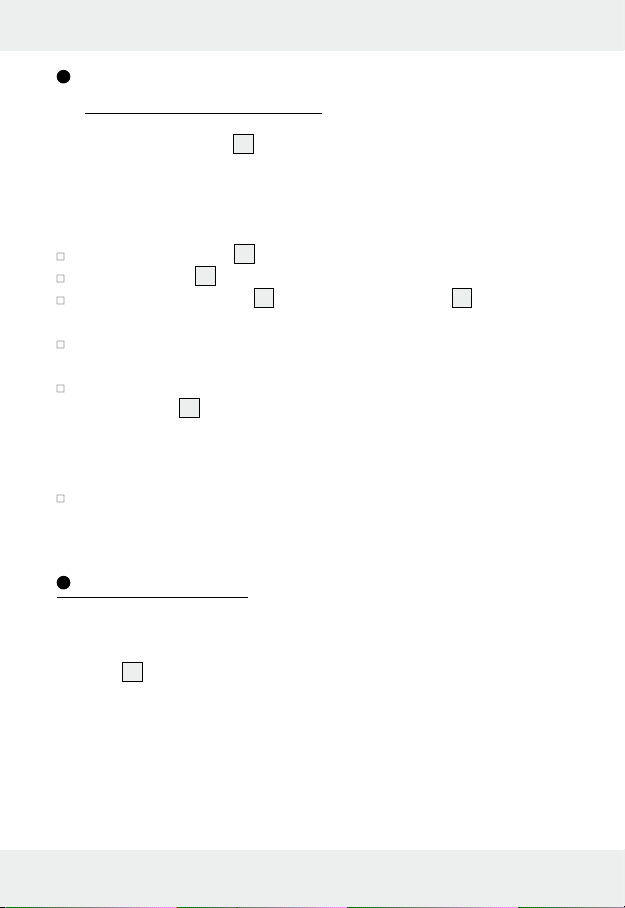
Maintenance / changing
rechargeable batteries
To ensure good solar cell 5 performance the solar cell must be cleaned
regularly (see „Cleaning and care“).
Change the rechargeable batteries as follows:
Remove the main unit 1 from the wall.
Slide the switch 6 to the „OFF“ position.
Loosen the cover screws 11 the back of the main unit 1 using a
cross-tip screwdriver (see Fig. E).
Remove the back of the main unit. Use a flat-head screwdriver to help
if necessary.
Remove the rechargeable batteries from the rechargeable battery
compartment
the same technical data. Be sure to insert the rechargeable batteries in
the correct direction. The correct polarity is shown inside the rechargeable battery compartment.
Close the back of the main unit with the arrow facing upward and
secure the cover screws (see Fig. E).
10
and replace with new rechargeable batteries with
Winter-time use
The low amount of sunlight may reduce the light ON time at night depending on the on-time. Due to the low position of the sun please also verify the
solar cell
and snow as necessary.
If the light ON time is inadequate due to the weather, recharge or replace
the rechargeable batteries (see„Charging the rechargeable
„changing rechargeable batteries“).
5
is out of shade throughout the day in winter and remove ice
batteries“ or
14 GB/CY

Cleaning and Care
Switch off the product before cleaning.
Use a slightly dampened, lint-free cloth and mild cleaning agent to clean.
Regular check the motion detector 3 and solar cell 5 particularly
for dirt.
Regularly clean the motion detector and solar cell to ensure proper func-
tionality.
Especially keep the solar cell free of snow and ice in winter.
Troubleshooting
= Problem
= Cause
= Solution
Product doesn‘t come on.
Switch 6 set to „OFF“ position.
Set switch to “AUTO” / “PIR” position.
Dirty motion detector 3.
Clean motion detector.
Rechargeable batteries are drained.
Charge rechargeable batteries (see „Charging the rechargeable
batteries“).
Product is flickering.
Rechargeable batteries are almost drained.
Charge rechargeable batteries (see „Charging the rechargeable
batteries“).
Rechargeable batteries quickly lose their charge.
The solar cell is dirty.
Clean the solar cell.
Solar cell is positioned incorrectly.
15 GB/CY
Reposition solar cell (see „Mounting the solar cell“).
Poor weather conditions.
See „Winter-time use“.
Defective rechargeable batteries.
Replace rechargeable batteries (see „Maintenance/changing
rechargeable batteries“).
The product contains delicate electronic components. This means that if it is
placed near an object that transmits radio signals, it could cause interference. If malfunction happens to the motion detector, move such objects
away from it.
Electrostatic discharges can lead to malfunctions. In cases of the product
failing to work, remove the rechargeable batteries for a short while and then
replace them.
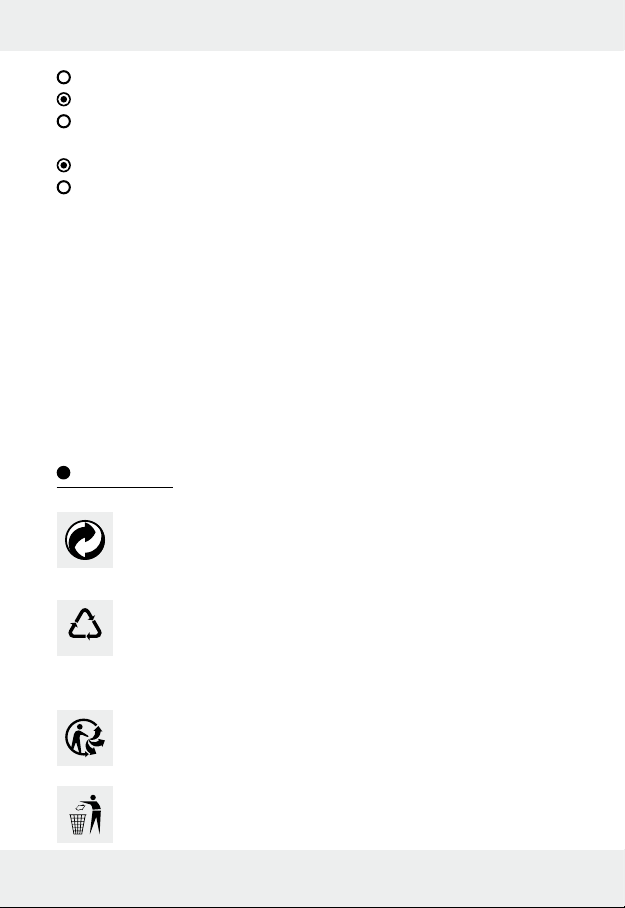
Disposal
The packaging is made entirely of recyclable materials, which
you may dispose of at local recycling facilities. The Green Dot
is not valid for Germany.
Observe the marking of the packaging materials for waste se-
b
paration, which are marked with abbreviations (a) and numbers
a
(b) with following meaning: 1–7: plastics / 20–22: paper and
fibreboard / 80–98: composite materials.
16 GB/CY
The product and packaging materials are recyclable, dispose of
it separately for better waste treatment. The Triman logo is valid
in France only.
Contact your local refuse disposal authority for more details of
how to dispose of your worn-out product.
To help protect the environment, please dispose of the product
properly when it has reached the end of its useful life and not in
the household waste. Information on collection points and their
opening hours can be obtained from your local authority.
Defective or exhausted rechargeable batteries must be recycled in accordance with Directive 2006/66/EC and its amendments. Return rechargeable batteries and / or the product using the recycling facilities provided.
Environmental damage through incorrect disposal
of the rechargeable batteries!
Rechargeable batteries may not be disposed of with the usual domestic
waste. Therefore dispose of used rechargeable batteries through your municipal collection site.
Warranty
The product has been manufactured to strict quality guidelines and meticulously examined before delivery. In the event of product defects you have
legal rights against the retailer of this product. Your legal rights are not
limited in any way by our warranty detailed below.
The warranty for this product is 3 years from the date of purchase. Should
this product show any fault in materials or manufacture within 3 years from
the date of purchase, we will repair or replace it – at our choice – free of
charge to you.
The warranty period begins on the date of purchase. Please keep the original sales receipt in a safe location. This document is required as your proof
of purchase. This warranty becomes void if the product has been damaged, or used or maintained improperly.
17 GB/CY

The warranty applies to defects in material or manufacture. This warranty
does not cover product parts subject to normal wear, thus possibly considered consumables (e.g. batteries) or for damage to fragile parts, e.g.
switches, rechargeable batteries or glass parts.
18 GB/CY

Značenje korištenih simbola ................................Stranica 20
Uvod ..........................................................................................Stranica 20
Namjenska uporaba .................................................................Stranica 20
Opis dijelova .............................................................................Stranica 21
Tehnički podatci ........................................................................Stranica 21
Opseg isporuke .........................................................................Stranica 21
Opće sigurnosne upute .............................................Stranica 22
Sigurnosne upute za baterije / punjive baterije ......................Stranica 22
Funkcija ...................................................................................Stranica 24
Prije prvog puštanja u rad .....................................Stranica 24
Punjenje baterija........................................................................Stranica 24
Postavljanje ........................................................................Stranica 25
Montiranje glavne jedinice .......................................................Stranica 25
Montiranje solarne ćelije ..........................................................Stranica 25
Spajanje solarne ćelije sa glavnom jedinicom ........................Stranica 26
Puštanje u rad ...................................................................Stranica 26
Održavanje / mijenjanje
punjivih baterija
..............................................................Stranica 28
Rad zimi ..................................................................................Stranica 28
Čišćenje i održavanje ..................................................Stranica 29
Uklanjanje smetnji.........................................................Stranica 29
Uklanjanje otpada ........................................................Stranica 30
Jamstvo ..................................................................................Stranica 31
19 HR
Značenje korištenih simbola
Istosmjerna struja (vrsta struje i napona)
2,5 m spojni kabel između glavne jedinice i solarne ćelije
Zahvatni kut detektora kretanja: 90°kretanja
Zahvatno područje detektora kretanja: 5–12 m
LED solarna svjetiljka
Uvod
Čestitamo vam na kupnji novog proizvoda. Ovom kupnjom odlučili ste se
za visokokvalitetan proizvod. Uputa za uporabu je sastavni dio ovog proizvoda. Ona sadrži važne upute o sigurnosti, uporabi i uklanjanju otpada.
Prije upotrebe proizvoda upoznajte se sa svim njegovim uputama za korištenje i sigurnosnim uputama. Koristite ovaj proizvod u skladu s navedenim
uputama te u navedene svrhe. Ukoliko proizvod dajete nekoj drugoj osobi,
predajte toj osobi također i sve upute.
Namjenska uporaba
Proizvod je namjenjen za vanjsku rasvjetu gdje nema strujnog priključka
npr. vrtne kućice, garaže itd. Proizvod je namjenjen isključivo za korištenje
u privatnim kućanstvima i ne za komercijalnu profesionalnu uporabu ili za
druga područja uporabe.
20 HR
Ovaj proizvod nije namijenjen za svrhu kućne rasvjete.
Ovaj proizvod je prikladan za ekstremne temperature do -21 °C.
Opis dijelova
1
glavna jedinica
2
LED-spot
3
detektor kretanja
4
utični spojnik
5
solarna ćelija sa integriranim
senzorom za smrkavanje
6
prekidač (OFF / AUTO / PIR)
7
vjak (4 x 30 mm)
8
tipla (ø 6 mm)
9
držač (solarna ćelija)
10
pretinac za punjive baterije
11
zaporni vijci
Tehnički podatci
Radni napon: 3,6 V
Punjiva baterija: 3 x Ni-MH- Akku 1,2 V , 600 mAh, AA
Rasvjetno tijelo: 10 LED-a sa po 0,06 W (LED-i se ne mogu zamijeniti)
Solarna ćelija: amorph, 8 x 8 cm, maks. 5,4 V, maks. 70 mA
Detektor kretanja: domet: cca. 5–12 m,
zahvatni kut: ca. 90° vodoravno, 90° okomito
Vrsta zaštite: IP44 (zaštićeno od prskanja vode)
Opseg isporuke
Neposredno nakon otvaranja uvijek provjerite opseg isporuke, te da li je
proizvod u besprijekornom stanju.
1 glavna jedinica (sastoji se od reflektora sa 10 LED-a, detektora kretanja,
pretinca za punjive baterije sa ugrađenim punjivim baterijama i ugrađenim upravljačem)
21 HR

1 solarna ćelija (8 cm x 8 cm) (uklj. cca. 2,5 m produžni kabel)
4 vijka(4 x 30 mm)
4 tiple (ø 6 mm)
1 upute za montažu i korištenje
Opće sigurnosne upute
Prije prve uporabe proizvoda upoznajte se sa svim sigurnosnim uputama i
uputama za uporabu! Ako proizvod dajete nekoj drugoj osobi, predajte
joj i pripadajuću dokumentaciju!
Ovaj proizvod mogu koristiti djeca od 8godina i starija djeca, kao i
osobe s umanjenom psihičkom, senzoričkom i mentalnom sposobnošću ili s umanjenim iskustvom, ako su pod nadzorom ili ako su upoznati sa sigurnom uporabom proizvoda i razumiju opasnosti koje iz
nje proizlaze. Djeca se ne smiju igrati s proizvodom. Čišćenje i
održavanje ne smiju obavljati djeca bez nadzora.
Djecu ne ostavljajte nikada bez nadzora s ambalažnim materijalom.
Postoji opasnost od gušenja ambalažom. Djeca često podcjenjuju
opasnost.
Za vrijeme montiranja udaljite djecu sa mjesta na kojem radite. U
opseg isporuke spada mnoštvo vijaka i sitnih dijelova. Ovi mogu u
slučaju gutanja ili udisanja biti opasni po život.
Ne koristite proizvod nikada, ako ustanovite bilo kakva oštećenja!
Sigurnosne upute za baterije /
punjive baterije
OPASNOST PO ŽIVOT! Baterije / punjive baterije držite podalje
od djece. U slučaju gutanja odmah potražite liječničku pomoć!
22 HR
OPASNOST OD EKSPLOZIJE! Nikada ne punite bate-
rije koje nisu namijenjene za punjenje. Ne pravite kratki
spoj na baterijama / punjivim baterijama i ne otvarajte ih.
Posljedice mogu biti pregrijavanje baterije, požar ili eksplozija.
Ne bacajte baterije nikada u vatru ili vodu.
Ne izlažite baterije / punjive baterije nikakvom mehaničkom opterećenju!
Opasnost od curenja baterija / punjivih baterija
Izbjegavajte ekstremne uvjete i temperature koje mogu djelovati na
baterije, npr. radijatore / izravno izlaganje suncu.
Izbjegavajte dodir s kožom, očima i sluznicama! U slučaju kontakta s
baterijskom kiselinom, odmah isperite dotična mjesta čistom vodom i
odmah potražite liječničku pomoć!
NOSITE ZAŠTITNE RUKAVICE! Iscurjele ili oštećene
baterije mogu uzrokovati ozljede kiselinom, ako dođu u
kontakt s kožom. Stoga u takvom slučaju obavezno nosite
odgovarajuće zaštitne rukavice.
U slučaju curenja baterija odmah ih odstranite iz proizvoda kako biste
izbjegli oštećenja.
Uvijek koristite baterije / punjive baterije istog tipa. Ne miješajte stare
baterije / punjive baterije s novima!
Odstranite baterije / punjive baterije, ako proizvod duže vremena nije
u uporabi.
Opasnost od oštećenja proizvoda
Upotrebljavajte isključivo baterije / punjive baterije navedenog tipa!
Pri umetanju vodite računa o ispravnim polovima! Ovi su naznačeni u
pretincu za baterije!
Ako je potrebno, očistite kontakte na baterijama i u pretincu za
baterije prije umetanja!
Odmah odstranite slabe baterije / punjive baterije iz proizvoda.
23 HR
Funkcija
Solarna ćelija 5 pretvara svjetlosnu energiju sunca u električnu energiju.
Putem priključenog spojnog kabla puni ugrađene punjive baterije u pretincu
za punjive baterije baterije
Ove punjive baterije pohranjuju električnu energiju dobivenu od solarne
ćelije. Potpuno napunjene punjive baterije daju, kada je prekidač na
poziciji „PIR“, energiju za oko 2 sata, a u poziciji prekidača „AUTO“, za
oko 8 sati.
Punjenje u cjelosti ispražnjenih punjivih baterija traje ljeti pri normalnom
sunčevom isijavanju nekih 2 do 4 dana. Prije prvog puštanja proizvoda u
rad, punjive baterije moraju biti napunjene (vidi „Punjenje baterija“).
10
.
Prije prvog puštanja u rad
Punjenje baterija
Napomena: punjive baterije ugrađene u glavoj jedinici 1 su isporu-
čene u napunjenom stanju. Međutim, one za vrijeme transporta od proizvođača do prodajnog mjesta mogu izgubiti na punjenju. Stoga prije
prvog korištenja napunite punjive baterije. Pri normalnom sunčevom
isijavanju prvo punjenje ljeti traje najmanje jedan dan.
Postavite prekidač 6 na poziciju „OFF“.
Napomena: Pri normalnom sunčevom isijavanju (ovisno o godišnjem
dobu) prazne punjive baterije trebale bi biti pune nakon dva do deset dana.
Napomena: ugrađeni regulator punjenja sprječava prekomjerno
punjenje baterija.
Promijenite punjive baterije ako se snaga svjetljenja nakon punjenja nije
poboljšala (sl. E).
24 HR
Postavljanje
Napomena: odlučite prije montiranja, gdje ćete namontirati solarnu
5
ćeliju
solarne ćelije i glavne jedinice ima dužinu od cca. 2,5 m.
i glavnu jedinicu 1. Uzmite u obzir da spojni kabel između
Montiranje glavne jedinice
Pri odabiru mjesta za montiranje glavne jedinice 1 pripazite na sljedeće:
1. LED-spot
moći osvjetliti željeno područje. Obratite pažnju da malo otpustite
vijak na zglobu, prije nego što okrećete LED-spot. Ponovno pritegnite
vijak zgloba straga (vidi sl. F).
2. Senzor
1,80 m – 2,00 m) zahvatno područje od maks. 12 m, pri zahvatnom
kutu od 90° vodoravno i 90° okomito.
3. Pazite da detektor kretanja noću nije osvijetljen od ulične rasvjete. To
može utjecati na način rada.
Pričvrstite glavnu jedinicu 1 pomoću dvije priložene tiple 8
(ø 6 mm) i dva priložena vijka
Napomena: priloženi materijal za montiranje je prikladan za pričvršćivanje u normalnom zidu. Za druge ćete podloge možda trebati
druge materijale za pričvršćivanje. U slučaju nedoumice obratite se
stručnjacima za savjet.
Poslije moniranja provjerite da li je glavna jedinica čvrsto postavljena.
2
je pokretno spojen sa glavnom jedinicom und i trebao bi
3
ima (ovisno o visini montaže, idealna je visina od
7
(4 x 30 mm) (vidi sl. B).
Montiranje solarne ćelije
Solarna ćelija 5 treba što je više moguće izravnije sunčevo isijavanje.
Optimalno je usmjeravanje površine solarne ćelije prema jugu. Vodoravno
25 HR
usmjeravanje solarne ćelije 5 je unaprijed zadano pomoću priloženog
držača
9
.
Montirajte držač 9 solarne ćelije 5 na okomitom zidu pomoću dva
priložena vijka
7
(4 x 30 mm) i dvije priložene tiple 8 (ø 6mm)
(vidi sl. C).
Napomena: priloženi materijal za montiranje je prikladan za pričvršćivanje u normalnom zidu. Za druge ćete podloge možda trebati
druge materijale za pričvršćivanje. U slučaju nedoumice obratite se
stručnjacima za savjet.
Poslije moniranja provjerite da li je držač 9 solarne ćelije 5 čvrsto
postavljen.
Nataknite zatim solarnu ćeliju kao što je prikazano na sl. C.
Na kraju usmjerite solarnu ćeliju prema jugu.
Spajanje solarne ćelije sa glavnom jedinicom
Poslije montiranja obje radne jedinice (glavne jedinice 1 i solarne ćelije 5)
postavite spojni kabel tak, da nije izložen nikakvim mehaničkim opterećenjima. Koristite za pričvršćivanje spojnog kabla standardne materijale za
instalaciju kao npr. stezaljke za kablove ili kanal za kablove, da bsite
sprječili oštećivanja izolacije na kablu.
Spojite utične spojnike 4 spojnog kabla glavne jedinice i solarne
ćelije (vidi sl. D).
Puštanje u rad
Napomena:
Prije prvog puštanja u rad spojite glavnu jedinicu 1 sa solarnom
5
ćelijom
dok detektor kretanja
26 HR
. Solarna ćelija 5 funkcionira i kao senzor za smrkavanje,
3
reagira samo na kretanje.
Uvjerite se pri odabiranju mjesta za ugradnju solarne ćelije 5 da so-
larna ćelija isto kao i senzor za smrkavanje, nije pod utjecajem nekog
drugog izvora svjetla, kao što je npr. ulična rasvjeta.
Prekidač
6
glavne jedinice 1 (sl. A) raspolaže sljedećim
funkcijama:
Pozicija „OFF“: detektor kretanja
3
i LED-spot 2 ne rade. Punjive
baterije se pri sunčevom isijavanju kroz solarnu ćeliju
5
pune. Koristite ovu poziciju prekidača za punjenje
ispražnjenih punjivih baterija (vidi „Punjenje baterija“).
Pozicija „AUTO“: Pri upadu svjetla se punjive baterije pune preko so-
larne ćelije. Proizvod se automatski isključuje ili uključuje, čim solarna ćelija
5
registrira smrkavanje ili
svitanje. Da bi se postiglo dugo vrijeme svjetljenja,
LED-i u ovoj poziciji prekidača neće raditi u punoj
snazi, već će oslobađati oko 20 % svoje pune snage
svjetla (Eco-Modus). Kada su punjive baterije napunjene, punjenje je kod ove pozicije prekidača dovoljno za oko 8 sati svjetla.
Položaj „PIR“: Kod upada svjetla baterije se pune preko solarne
ćelije. Solarna ćelija
sumraka tj. tmine, čim detektor kretanja
5
uključuje proizvod za vrijeme
3
registrira
kretanje. Trajanje svjetla je prethodno podešeno i
iznosi oko 1,5 minuta. Ukoliko se za vrijeme trajanja
ovih 1,5 minuta ukaže novi pokret, ponovno započinje vrijeme trajanja svjetla. U ovoj poziciji prekidača,
LED-i rade punom snagom. Kada su punjive baterije
potpuno napunjene, punjenje je kod ove pozicije
prekidača dovoljno za ukupno oko 2 sata svjetla.
27 HR
Održavanje / mijenjanje punjivih baterija
Da biste osigurali dobru učinkovitost solarne ćelije 5, solarna ćelija se
mora čistiti u redovitim razmacima (vidi „Čišćenje i njega“).
Kod promjene punjivih baterija postupajte na sljedeći način:
Odstranite glavnu jedinicu 1 sa zida.
Pomaknite prekidač 6 u poziciju „OFF“.
Otpustite zaporne vijke pomoću zvjezdastog odvijača 11 na poleđini
glavne jedinice
Izvadite otpuštenu poleđinu glavne jedinice. Ako je potrebno,
pomozite si sa ravnim odvijačem.
Izvadite punjive baterije iz pretinca za baterije 10 i zamijenite ih sa
novim punjivim baterijama istih tehničkih podataka. Pri umetanju vodite
računa o ispravnim polovima. Ovi su prikazani u pretincu za baterije.
Ponovno zatvorite poleđinu glavne jedinice sa strelicom prema gore i
pričvrstite zaporne vijke (vidi sl. E).
1
(vidi sl. E).
Rad zimi
Zbog slabog sunčevog isijavanja može se, ovisno o trajanju noćnog
uključivanja, trajanje svjetla po noći skratiti. Stoga i zimi provjerite da li je
solarna ćelija
je potrebno, uklonite led ili snijeg.
Ukoliko trajanje svjetla na temelju vremenske prognoze neće biti dovoljno,
napunite baterije ili ih zamijenite (vidi „Punjenje baterija“ tj. „Mijenjanje
baterija“).
5
unatoč niskom položaju sunca cijeli dan bez sjene i, ako
28 HR
 Loading...