

Owens Corning VentSure Installation Instructions Manual
®
VentSure
with Weather PROtector
^
INSTALLATION INSTRUCTIONS
4-Foot Strip Heat & Moisture Ridge Vent
®
Moisture Barrier
Owens Corning® VentSure® 4'
Strip Heat & Moisture Ridge Vent
Installation Instructions
VentSure® 4 Foot Strip Ridge Vents are designed
for roofs with slopes of / to / pitches.
Intake at the eave vents should be equal or
exceed that of the ridge vent being installed.
VentSure® Ridge Vent is designed for residential
applications.
IMPORTANT NOTES
1. Before applying vent to architectural shingles,
leave felt long at ridge and fold back under vent or
caulk between low areas of shingle and fl ange of
vent, making sure you don’t plug drain holes. This
will help prevent wind driven rain and snow from
entering the attic.
2. See instructions for cutting slot.
3. For structures with different ridge heights, be
sure to vent the higher ridge; it is also acceptable
to vent lower ridges with dormers.
4. For truss rafters, cut a 1¼ inch slot on each
side of the ridge starting a minimum of 6 inches
from the rake edge of the roof. For roofs with a
center pole, cut a 1/ inch slot on each side of
the ridge starting a minimum of 6 inches from the
rake edge of the roof.
5. For best appearance, run VentSure® Ridge Vent
from end to end to give the roof a more attractive
appearance.
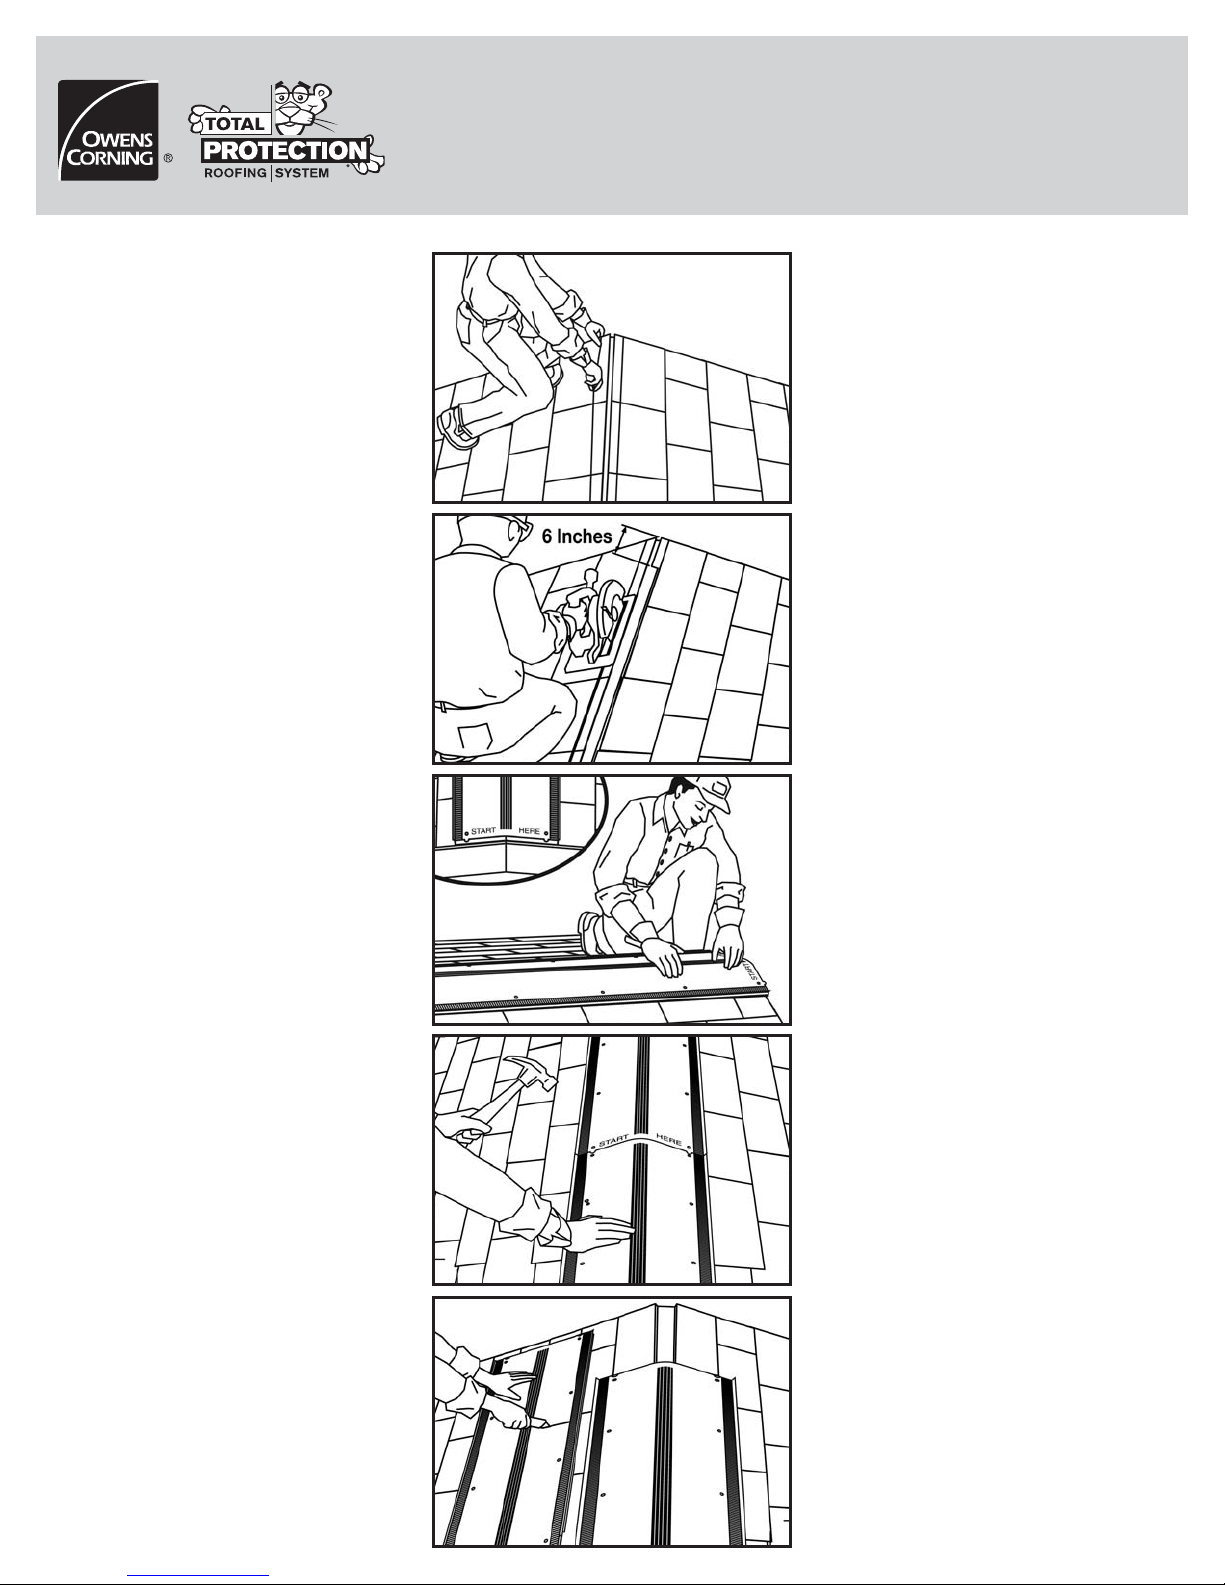
Installation Instructions
1. Using a chalk line, mark out 1¼ inch on both
sides of the ridge as a guide for cutting a slot in
the top of the ridge.
2. Starting 6 inches away from the rake edge
of the roof, cut a slot using a circular saw with
the blade set at a depth to cut through the wood
sheathing only. Remove the sheathing debris from
slot.
3. Center the vent over the opening that has been
cut in the ridge, ensuring the vent sits fl at on the
roof. Also ensure that the alignment tabs are
facing the opposite direction you will be installing
the next piece of ridge vent. For cold weather
installation leave a gap no bigger than ⅛ inch
to allow for expansion. Gaps larger than ⅛ inch
could lead to rain and snow entering the attic.
4. As you install the vents ensure each vent is
aligned, then nail in place using the nail holes
marked on each vent.
5. Using a utility knife cut the fi nal piece to a
length long enough so that it is fl ush with the
edge of the roof. Connect making sure that the
built-in end caps are exposed and nail in place.
Fig. 1
Fig. 2
Fig. 3
Fig. 4
Fig. 5
Instrucciones de instalación para
la ventilación de cumbrera para la
eliminación de calor y humedad en
tiras de 4 pies de Owens Corning
VentSure
Las ventilaciones de cumbrera VentSure® de 4 pies
están diseñadas para pendientes con inclinaciones
de / a /.
La entrada de aire de las ventilaciones de los
aleros debería ser igual o mayor a la de las
ventilaciones de cumbrera que se están instalando.
Las ventilaciones de cumbrera VentSure
diseñado para aplicaciones residenciales.
NOTAS IMPORTANTES
1. Antes de colocar la ventilación sobre tejas
arquitectónicas, deje un excedente de fi eltro sobre
la cumbrera y dóblelo introduciéndolo debajo
de la ventilación, o selle los espacios entre las
áreas bajas de la teja y el ala de la ventilación
asegurándose de no obstruir orifi cios de drenaje.
Esto ayudará a impedir que la lluvia y la nieve se
fi ltren al ático por la acción del viento.
2. Consulte las instrucciones para saber cómo
realizar el corte de la ranura.
3. Para estructuras con cumbreras de diferentes
alturas, asegúrese de ventilar la cumbrera más
alta; también es aceptable ventilar las cumbreras
inferiores con buhardillas.
4. En el caso de los cabrios del armazón, corte una
ranura de 1¼ pulgadas a cada lado de la cumbrera
a partir de 6 pulgadas, como mínimo, de la cornisa
del tímpano del techo. En el caso de techos con un
poste central, corte una ranura de 1/ pulgadas
a cada lado de la cumbrera a partir de 6 pulgadas,
como mínimo, de la cornisa del tímpano del techo.
5. Para una mayor estética, coloque la ventilación
de cumbrera VentSure
techo para darle un aspecto más atractivo.
®
®
de una punta a otra del
®
®
se han
Instrucciones de instalación
1. Trace una línea con tiza de modo de dejar 1¼
pulgadas de cada lado de la cumbrera y utilizarla
como guía para cortar una ranura en la parte
superior de la cumbrera.
2. A 6 pulgadas de la cornisa del tímpano del
techo, corte una ranura usando una sierra circular
con la cuchilla ajustada a una profundidad tal que
el corte atraviese solamente el revestimiento de
madera. Limpie los vestigios del revestimiento de
la ranura.
3. Centre la ventilación sobre la abertura realizada
en la cumbrera, asegurándose de que se apoye
totalmente sobre el techo. También, asegúrese de
que las lengüetas de alineación miren en dirección
opuesta a la cual usted instale el siguiente
segmento de ventilación de cumbrera. Para
instalaciones en climas fríos, deje un espacio no

6. Nail hip and ridge shingle over the vent
using nails long enough to meet the penetration
requirements of the shingle manufacturer or use
nails provided with the VentSure® ridge vent. For
a clean look, extend the hip and ridge shingle to
cover the alignment tabs or trim tabs off using a
utility knife.
INSTRUCTIONS FOR CUTTING SLOTS
Hip and Gable Roofs
Cut slot 1 inch on both sides of ridge to within 6
inches of end wall or hip intersection.
Chimneys
Cut slots 12 inches from chimney. Run ridge vent
from end of roof to butt against chimney.
NOTE: Owens Corning’s written warranty for this
product shall not apply in any instance in which
the product was not installed in accordance with
the instructions contained herein. See actual
warranty for additional warranty details.
“T” & “L” Roof
Saw slots to within 12 inches of ridge intersection
points as shown. Install ridge vent completely
across ridge on long side and butt ridge vent on
the short run against the side of the long run.
NOTE: To prevent leakage and preserve aesthetic
roof line, always leave at least 6 inches between
ridge slot and end of ridge.
NOTE: The net free area of soffi t ventilation
should always be at least equal to or more than
the net free area of the ridge ventilation.
LIMITED WARRANTY This product is covered
by a Limited Warranty which is available by calling
1-800-GET-PINK® or visiting our website at
www.owenscorning.com.
THAT WARRANTY CONSTITUTES OUR
EXCLUSIVE WARRANTY, AND WE HEREBY
DISCLAIM ALL OTHER WARRANTIES,
WHETHER EXPRESSED OR IMPLIED,
INCLUDING THE IMPLIED WARRANTIES
OF MERCHANTABILITY AND FITNESS FOR
A PARTICULAR PURPOSE. IN NO EVENT
SHALL OWENS CORNING BE LIABLE TO
CUSTOMER FOR INCIDENTAL, INDIRECT OR
CONSEQUENTIAL DAMAGES.
OWENS CORN ING ROOFING AND ASP HALT, LLC
ONE OWENS CORNING PARKWAY
TOLEDO, OHIO 43659
1-800-GET-PINK
www.owenscorning.com
Pub. No . 10011388-B. P rinted in U.S .A. S eptember 2 016.
THE PINK PANTHER
All Righ ts Reser ved. The col or PINK is a regi stered tra demark of Owens C orning.
© 2016 Owens Corni ng. All Right s Reserv ed.
Núm. de Pub. 10011388-B. Impreso en EE. UU. septiembre 2016.
THE PINK PANTHER
Todos los derechos reservados. El color PINK es una marca comercial
registrada de Owens Corning. © 2016 Owens Corning. Todos los derechos
reservados.
™
& © 1964–2016 Metro-Go ldwyn-M ayer Studios Inc .
™
y © 1964-2016 Metro-Goldwyn-Mayer Studios Inc.
®
6 inches
6 pulg.
12 inches
12 pulg.
6 inches
6 pulg.
6 inches from end wall to slot
6 pulgadas de distancia antre
la pared y la ranura
12 inches
12 pulg.
12 inches
12 pulg.
12 inches
12 pulg.
slot width
ancho de la ranura
End Wall
Pared
12 inches
12 pulg.
Fig. 6
Fig. 7
Fig. 8
Fig. 9
6 inches
6 pulg.
mayor a ⅛ pulgadas para dar lugar a la expansión.
Si hubiera huecos mayores a ⅛ pulgadas, podría
haber fi ltraciones de lluvia y nieve en el ático.
4. Al instalar las ventilaciones, asegúrese de que
cada una esté alineada, luego clávela utilizando los
orifi cios para clavos que hay en cada una de ellas.
5. Con un cúter, corte el tramo fi nal a un largo
sufi ciente para que quede alineado con el borde
del techo. Asegúrese de que las cofi as integradas
queden expuestas y fi je con clavos.
6. Fije las tejas para limatesa y cumbrera sobre
la ventilación con clavos con una longitud que
coincida con los requisitos de penetración del
fabricante de las tejas o con los clavos provistos
junto con la ventilación de cumbrera VentSure
®
.
Para una apariencia prolija, extienda la teja para
limatesa y cumbrera de manera que cubra las
lengüetas de alineación o recorte las lengüetas
con un cúter.
INSTRUCCIONES PARA EL CORTE DE
RANURAS
Techos con hastiales y limatesas
Corte ranuras de 1 pulgada a ambos lados de la
cumbrera a una distancia de hasta 6 pulg. de la
pared o intersección con la limatesa.
Chimeneas
Cortar las ranuras a 12 pulgadas de la chimenea.
Coloque la ventilación de cumbrera desde el
extremo del techo hasta tocar la chimenea.
NOTA: La garantía escrita de Owens Corning para
este producto no se aplicará en casos en que el
producto no se haya instalado de acuerdo con las
instrucciones aquí mencionadas
echo en “T” y en “L”
Realice ranuras a 12 pulgadas de los puntos de
intersección de la cumbrera como se indica. Instale
la ventilación a lo largo de toda la cumbrera a cada
lado de modo que la ventilación de la cumbrera
con el tramo corto toque contra el lado del tramo
largo. Consulte la garantía para conocer los
detalles adicionales.
NOTA: Para evitar goteras y conservar la línea
estética del techo, siempre deje al menos 6
pulgadas entre la ranura de la cumbrera y el borde
de la cumbrera.
NOTA: El área neta libre de la ventilación de los
sofi tos siempre debe ser al menos igual o mayor al
área libre neta de la ventilación de la cumbrera.
GARANTÍA LIMITADA Este producto está cubierto
por una Garantía Limitada, la cual está disponible
llamando al 1-800-GET-PINK
®
o visitando nuestro
sitio web en www.owenscorning.com.
ESA GARANTÍA CONSTITUYE NUESTRA
GARANTÍA EXCLUSIVA, Y POR LA PRESENTE
SE RECHAZAN TODAS LAS DEMÁS
GARANTÍAS, EXPRESAS O IMPLÍCITAS,
INCLUYENDO LAS GARANTÍAS IMPLÍCITAS
DE COMERCIABILIDAD E IDONEIDAD
PARA UN PROPÓSITO PARTICULAR. EN
NINGÚN CASO OWENS CORNING SERÁ
RESPONSABLE ANTE EL CLIENTE POR
DAÑOS INCIDENTALES, INDIRECTOS O
CONSECUENTES.
 Loading...