

Owens Corning EnergyComplete Instructions-parts List Manual
r_256998_313294_10b
Instructions & Parts
US Patent Number 7,036,171
Korean Patent 338185
Australian Patent Number 152610
2004230905
EP 1610904
EnergyComplete™ Spray Gun
Manual No:
For use with EnergyComplete Spray Foam with Flexible Seal Technology.
Not for use in explosive atmospheres or with flammable materials.
Important Safety Instructions
Read all warnings and instructions in this manual.
Save these instructions.
313294D
r_256998_313294_1b
256998 EnergyComplete Spray Gun with Static Mixer Assembly
3500 psi (24.2 MPa, 242 bar) Maximum Fluid Working Pressure
80-130 psi (0.55-0.9 MPa, 5.5-9.1 bar) Air Inlet Pressure Range
200°F (94°C) Maximum Fluid Temperature

Contents
Warnings . . . . . . . . . . . . . . . . . . . . . . . . . . . . . . . . . 3
Overall View . . . . . . . . . . . . . . . . . . . . . . . . . . . . . . . 5
Keep A and B Components Separate . . . . . . . . . . 6
Grounding . . . . . . . . . . . . . . . . . . . . . . . . . . . . . . . . 6
Piston Safety Lock
(Trigger Lock) . . . . . . . . . . . . . . . . . . . . . . . . . . 7
Loss of Air Pressure . . . . . . . . . . . . . . . . . . . . . . . . 7
Setup . . . . . . . . . . . . . . . . . . . . . . . . . . . . . . . . . . . . . 8
Shutdown . . . . . . . . . . . . . . . . . . . . . . . . . . . . . . . . . 9
Pressure Relief Procedure . . . . . . . . . . . . . . . . . . 10
Optional Configurations . . . . . . . . . . . . . . . . . . . . 11
Optional Fluid Manifold Position . . . . . . . . . . . . 11
Optional Hose Position . . . . . . . . . . . . . . . . . . . 12
Maintenance . . . . . . . . . . . . . . . . . . . . . . . . . . . . . . 13
Supplied Tool Kit . . . . . . . . . . . . . . . . . . . . . . . . 13
Compatible Solvents . . . . . . . . . . . . . . . . . . . . . 13
Keep Gun Clean . . . . . . . . . . . . . . . . . . . . . . . . 13
As Needed . . . . . . . . . . . . . . . . . . . . . . . . . . . . 13
Daily . . . . . . . . . . . . . . . . . . . . . . . . . . . . . . . . . 13
Weekly to Monthly . . . . . . . . . . . . . . . . . . . . . . . 13
Flush Gun . . . . . . . . . . . . . . . . . . . . . . . . . . . . . 14
Clean Outside of Gun . . . . . . . . . . . . . . . . . . . . 14
Clean Air Cap . . . . . . . . . . . . . . . . . . . . . . . . . . 14
Clean Spray Tip . . . . . . . . . . . . . . . . . . . . . . . . 14
Clean Muffler . . . . . . . . . . . . . . . . . . . . . . . . . . . 14
Clean Fluid Manifold . . . . . . . . . . . . . . . . . . . . . 14
Clean Mixer . . . . . . . . . . . . . . . . . . . . . . . . . . . . 14
Clean Slip-Fit Polycarballoy Mix Module . . . . . . 15
Troubleshooting . . . . . . . . . . . . . . . . . . . . . . . . . . . 16
Repair . . . . . . . . . . . . . . . . . . . . . . . . . . . . . . . . . . . 18
Tools Required . . . . . . . . . . . . . . . . . . . . . . . . . . 18
Lubrication . . . . . . . . . . . . . . . . . . . . . . . . . . . . . 18
Disassemble Front End . . . . . . . . . . . . . . . . . . . 18
Reassemble Front End . . . . . . . . . . . . . . . . . . . 19
Slip-Fit Polycarballoy Mix Module . . . . . . . . . . . 20
Rear Rod Seal . . . . . . . . . . . . . . . . . . . . . . . . . . 21
Adjust Rear Rod Seal . . . . . . . . . . . . . . . . . . . . 21
Check Valves . . . . . . . . . . . . . . . . . . . . . . . . . . . 22
Piston and Purge Rod . . . . . . . . . . . . . . . . . . . . 23
Piston Safety Lock . . . . . . . . . . . . . . . . . . . . . . . 24
Air Valve . . . . . . . . . . . . . . . . . . . . . . . . . . . . . . 24
Static Mixer Assembly . . . . . . . . . . . . . . . . . . . . 25
Parts . . . . . . . . . . . . . . . . . . . . . . . . . . . . . . . . . . . . 26
Accessories . . . . . . . . . . . . . . . . . . . . . . . . . . . . . . 28
Gun Repair Kits . . . . . . . . . . . . . . . . . . . . . . . . . . . 28
Check Valve Filter Screen Kits (10 per kit) . . . . . 28
Technical Data . . . . . . . . . . . . . . . . . . . . . . . . . . . . 29
Graco Standard Warranty . . . . . . . . . . . . . . . . . . . 30
Graco Information . . . . . . . . . . . . . . . . . . . . . . . . . 30
2 313294D
Warnings
Warnings
The following warnings are for the setup, use, grounding, maintenance, and repair of this equipment. The exclamation point symbol alerts you to a general warning and the hazard symbol refers to procedure-specific risk. Refer back
to these warnings. Additional, product-specific warnings may be found throughout the body of this manual where
applicable.
WARNING
WARNINGWARNINGWARNING
SKIN INJECTION HAZARD
High-pressure fluid from gun, hose leaks, or ruptured components will pierce skin. This may look like just
a cut, but it is a serious injury that can result in amputation. Get immediate surgical treatment.
• Do not point gun at anyone or at any part of the body.
• Do not put your hand over the spray tip.
• Do not stop or deflect leaks with your hand, body, glove, or rag.
• Do not spray without tip guard.
• Engage trigger lock when not spraying.
• Follow Pressure Relief Procedure in this manual, when you stop spraying and before cleaning,
checking, or servicing equipment.
TOXIC FLUID OR FUMES HAZARD
Toxic fluids or fumes can cause serious injury or death if splashed in the eyes or on skin, inhaled, or
swallowed.
• Read MSDS’s to know the specific hazards of the fluids you are using.
• Store hazardous fluid in approved containers, and dispose of it according to applicable guidelines.
• Always wear impervious gloves when spraying or cleaning equipment.
PERSONAL PROTECTIVE EQUIPMENT
You must wear appropriate protective equipment when operating, servicing, or when in the operating
area of the equipment to help protect you from serious injury, including eye injury, inhalation of toxic
fumes, burns, and hearing loss. This equipment includes but is not limited to:
• Protective eyewear
• Clothing and respirator as recommended by the fluid and solvent manufacturer
•Gloves
• Hearing protection
BURN HAZARD
Equipment surfaces and fluid that’s heated can become very hot during operation. To avoid severe
burns, do not touch hot fluid or equipment. Wait until equipment/fluid has cooled completely.
313294D 3

Warnings
WARNING
WARNINGWARNINGWARNING
FIRE AND EXPLOSION HAZARD
Flammable fumes, such as solvent and paint fumes, in work area can ignite or explode. To help prevent
fire and explosion:
• Use equipment only in well ventilated area.
• Eliminate all ignition sources; such as pilot lights, cigarettes, portable electric lamps, and plastic drop
cloths (potential static arc).
• Keep work area free of debris, including solvent, rags and gasoline.
• Do not plug or unplug power cords, or turn power or light switches on or off when flammable fumes
are present.
• Ground all equipment in the work area. See Grounding instructions.
• Use only grounded hoses.
• Hold gun firmly to side of grounded pail when triggering into pail.
• If there is static sparking or you feel a shock, stop operation immediately. Do not use equipment
until you identify and correct the problem.
• Keep a working fire extinguisher in the work area.
EQUIPMENT MISUSE HAZARD
Misuse can cause death or serious injury.
• Do not operate the unit when fatigued or under the influence of drugs or alcohol.
• Do not exceed the maximum working pressure or temperature rating of the lowest rated system
component. See Technical Data in all equipment manuals.
• Use fluids and solvents that are compatible with equipment wetted parts. See Technical Data in all
equipment manuals. Read fluid and solvent manufacturer’s warnings. For complete information
about your material, request MSDS forms from distributor or retailer.
• Check equipment daily. Repair or replace worn or damaged parts immediately with genuine manufacturer’s replacement parts only.
• Do not alter or modify equipment.
• Use equipment only for its intended purpose. Call your distributor for information.
• Route hoses and cables away from traffic areas, sharp edges, moving parts, and hot surfaces.
• Do not kink or over bend hoses or use hoses to pull equipment.
• Keep children and animals away from work area.
• Comply with all applicable safety regulations.
PRESSURIZED EQUIPMENT HAZARD
Fluid from the gun/dispense valve, leaks, or ruptured components can splash in the eyes or on skin and
cause serious injury.
• Follow Pressure Relief Procedure in this manual, when you stop spraying and before cleaning,
checking, or servicing equipment.
• Tighten all fluid connections before operating the equipment.
• Check hoses, tubes, and couplings daily. Replace worn or damaged parts immediately.
PRESSURIZED ALUMINUM PARTS HAZARD
Do not use 1,1,1-trichloroethane, methylene chloride, other halogenated hydrocarbon solvents or fluids
containing such solvents in pressurized aluminum equipment. Such use can cause serious chemical
reaction and equipment rupture, and result in death, serious injury, and property damage.
4 313294D

Overall View
Overall View
L
W
K
P
T
F
C
M
D
V
R
N
U
G
B
H
A
S
r_256998_313294_7b
Key:
A A Side Fluid Valve (white)
B B Side Fluid Valve (red)
CAir Cap
D Air Line Quick Coupler
EMuffler
F Fluid Housing
G Gun Fluid Manifold
H Handle
J Optional Air Inlet
K Cleanoff Air Valve
L Piston Safety Lock
M Static Mixer Adapter
N Optional Fluid Inlets (A Side Shown)
P Lock Ring
R Fluid Inlet Swivels (A Side Shown)
S Trigger
T Gun Air Whip Hose
U Air Valve
V Static Mixer
WRAC tip
J
E
313294D 5

Keep A and B Components Separate
Keep A and B
Components Separate
NOTICE
• To prevent cross-contamination of the gun’s wetted parts, do not interchange A component
(white fluid) and B component (red fluid) parts.
The gun is shipped with the A side on the left.
The fluid manifold, fluid housing, side seal cartridge, check valve cartridge, and mix chamber
are marked on the A side.
Grounding
Check your local electrical code and proportioner manual 313221 for detailed grounding instructions.
6 313294D
Piston Safety Lock (Trigger Lock)
Piston Safety Lock
(Trigger Lock)
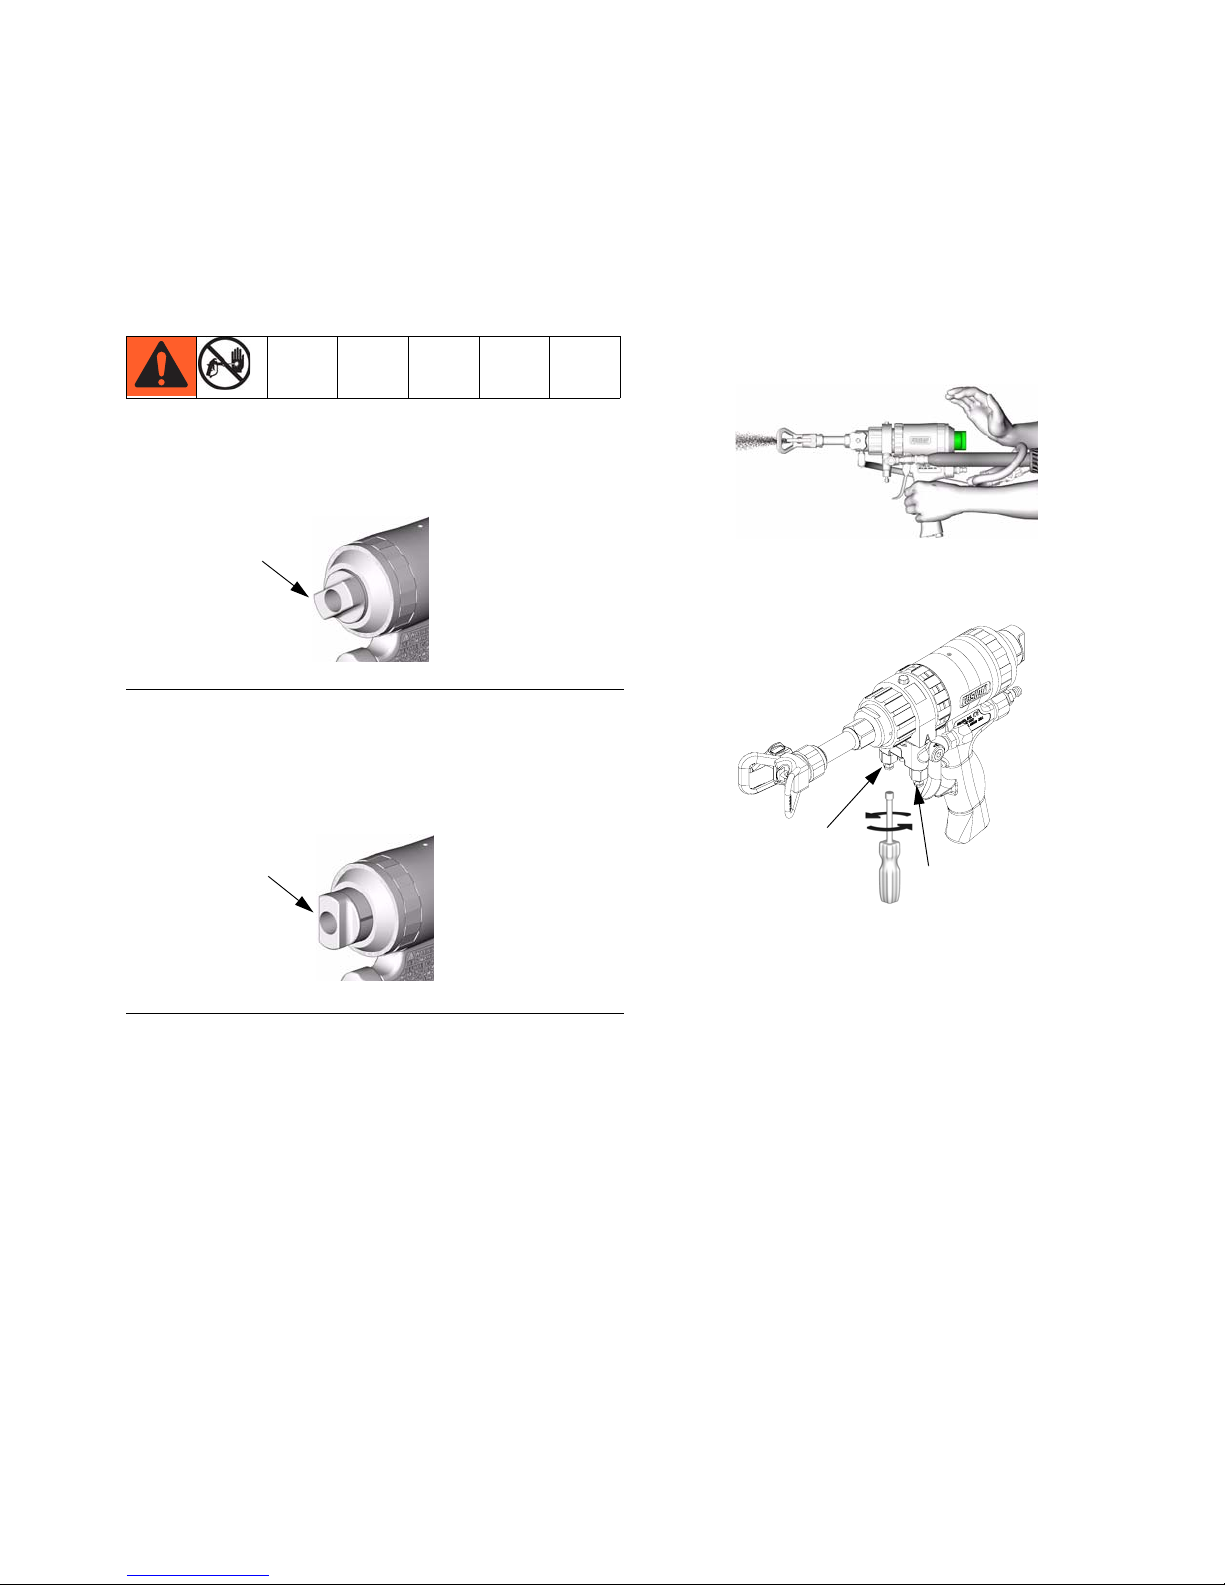
Engage piston safety lock whenever you stop spraying, to avoid accidental triggering.
To engage piston safety lock: push knob in and turn
clockwise. If engaged, gun will not actuate.
Engaged
TI3850A
FIG. 1
To disengage piston safety lock: push knob in and
turn counterclockwise until it pops out. There will be a
gap between knob and gun body.
Loss of Air Pressure
In event of loss of air pressure while gun is triggered,
gun will continue to spray. To shut off gun, do one of the
following:
• Push hard or hit end of safety lock, to engage piston
safety lock.
TI5003A
• Close fluid valves A and B.
Disengaged
IG. 2
F
TI3849A
B
A
r_256998_313294_1b
313294D 7
Setup
Setup
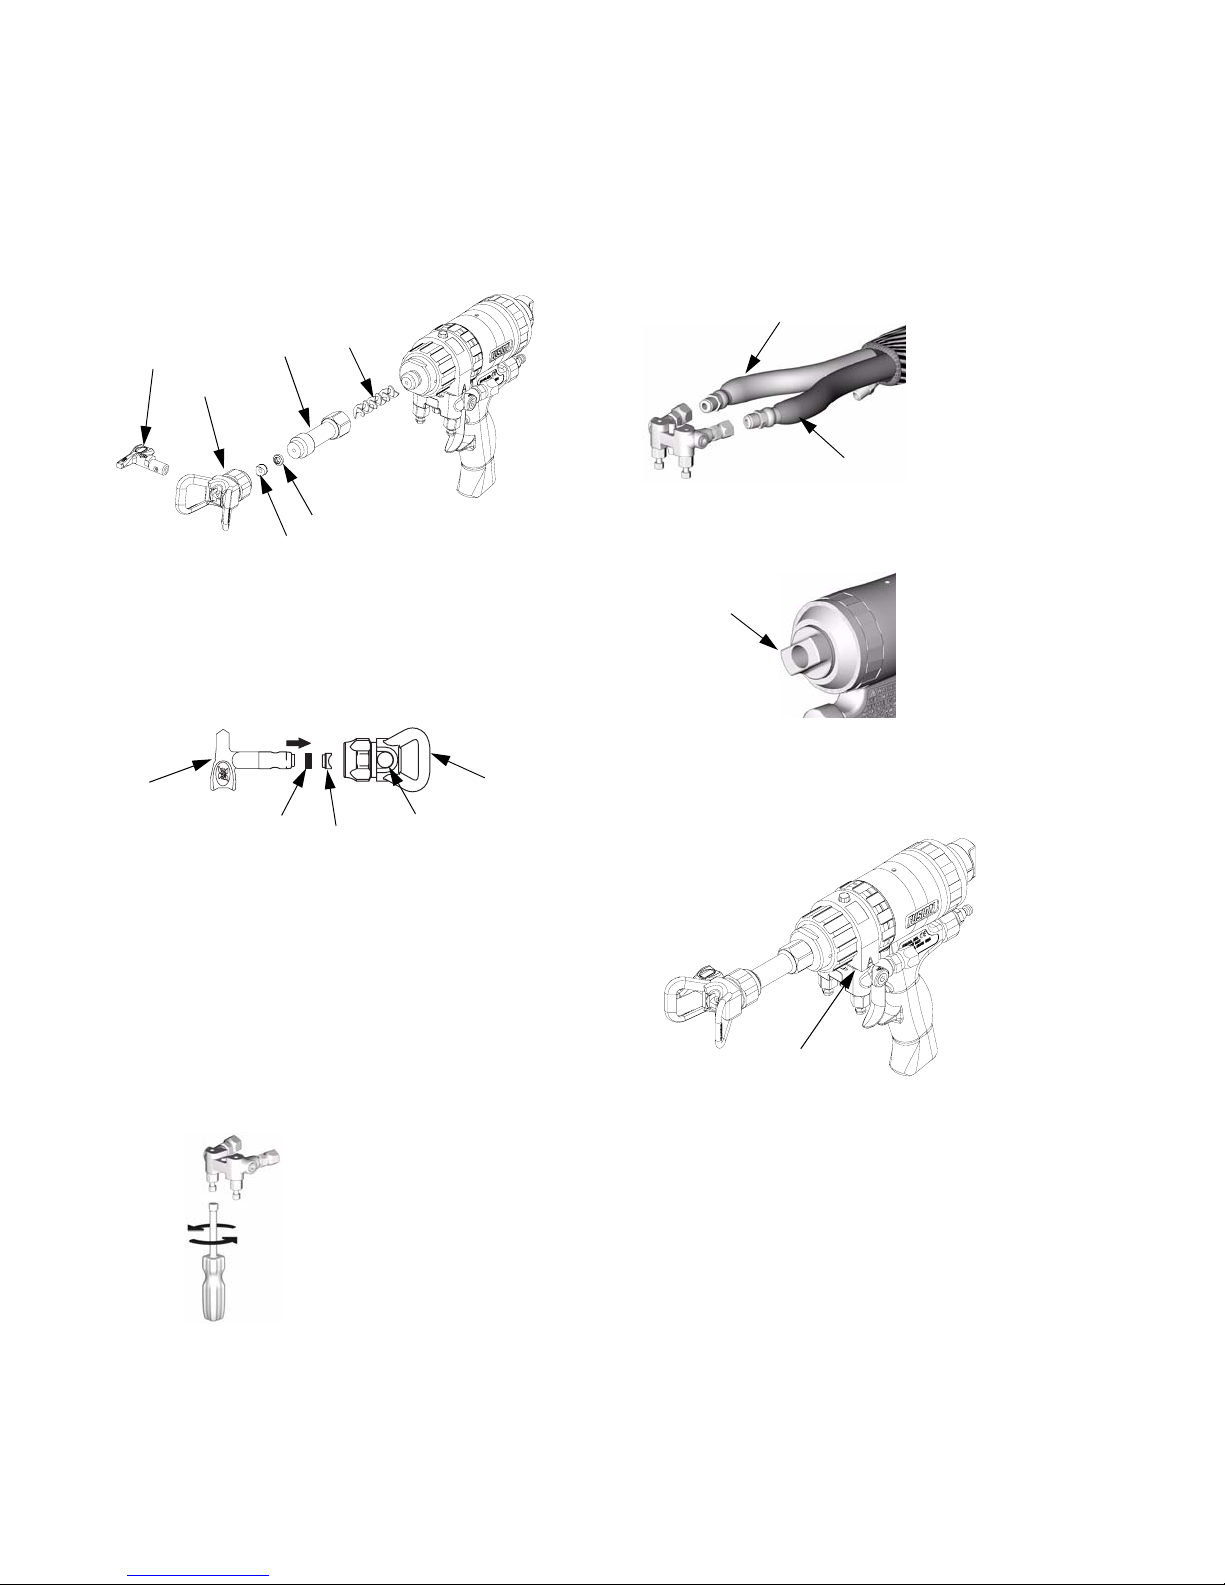
1. Assemble static mixer housing (60) and mix element
(62) on front end of gun.
62
65
60
64
gasket
r_256998_313294_2b
seat
2. Assemble RAC tip and guard (64, 65) assembly.
a. Use end of tip (65) to press gasket and seat into
guard (64), with curve matching tip bore (T).
65
seat
gasket
T
64
4. Connect A (white) and B (red) fluid hoses to fluid
manifold.
B (Red)
A (White)
TI2417A
5. Engage piston safety lock, page 7.
Engaged
TI3850A
6. Connect gun air whip hose and air valve to main air
hose. Attach fluid manifold (M) to gun.
b. Insert RAC tip (65) into tip bore (T).
c. Screw guard (64) onto static mixer housing (60)
with wrench to properly seat gasket.
d. Loosen guard (64) with wrench and tighten
hand tight.
3. Close fluid valves A and B.
TI2411A
M
r_256998_313294_1b
8 313294D
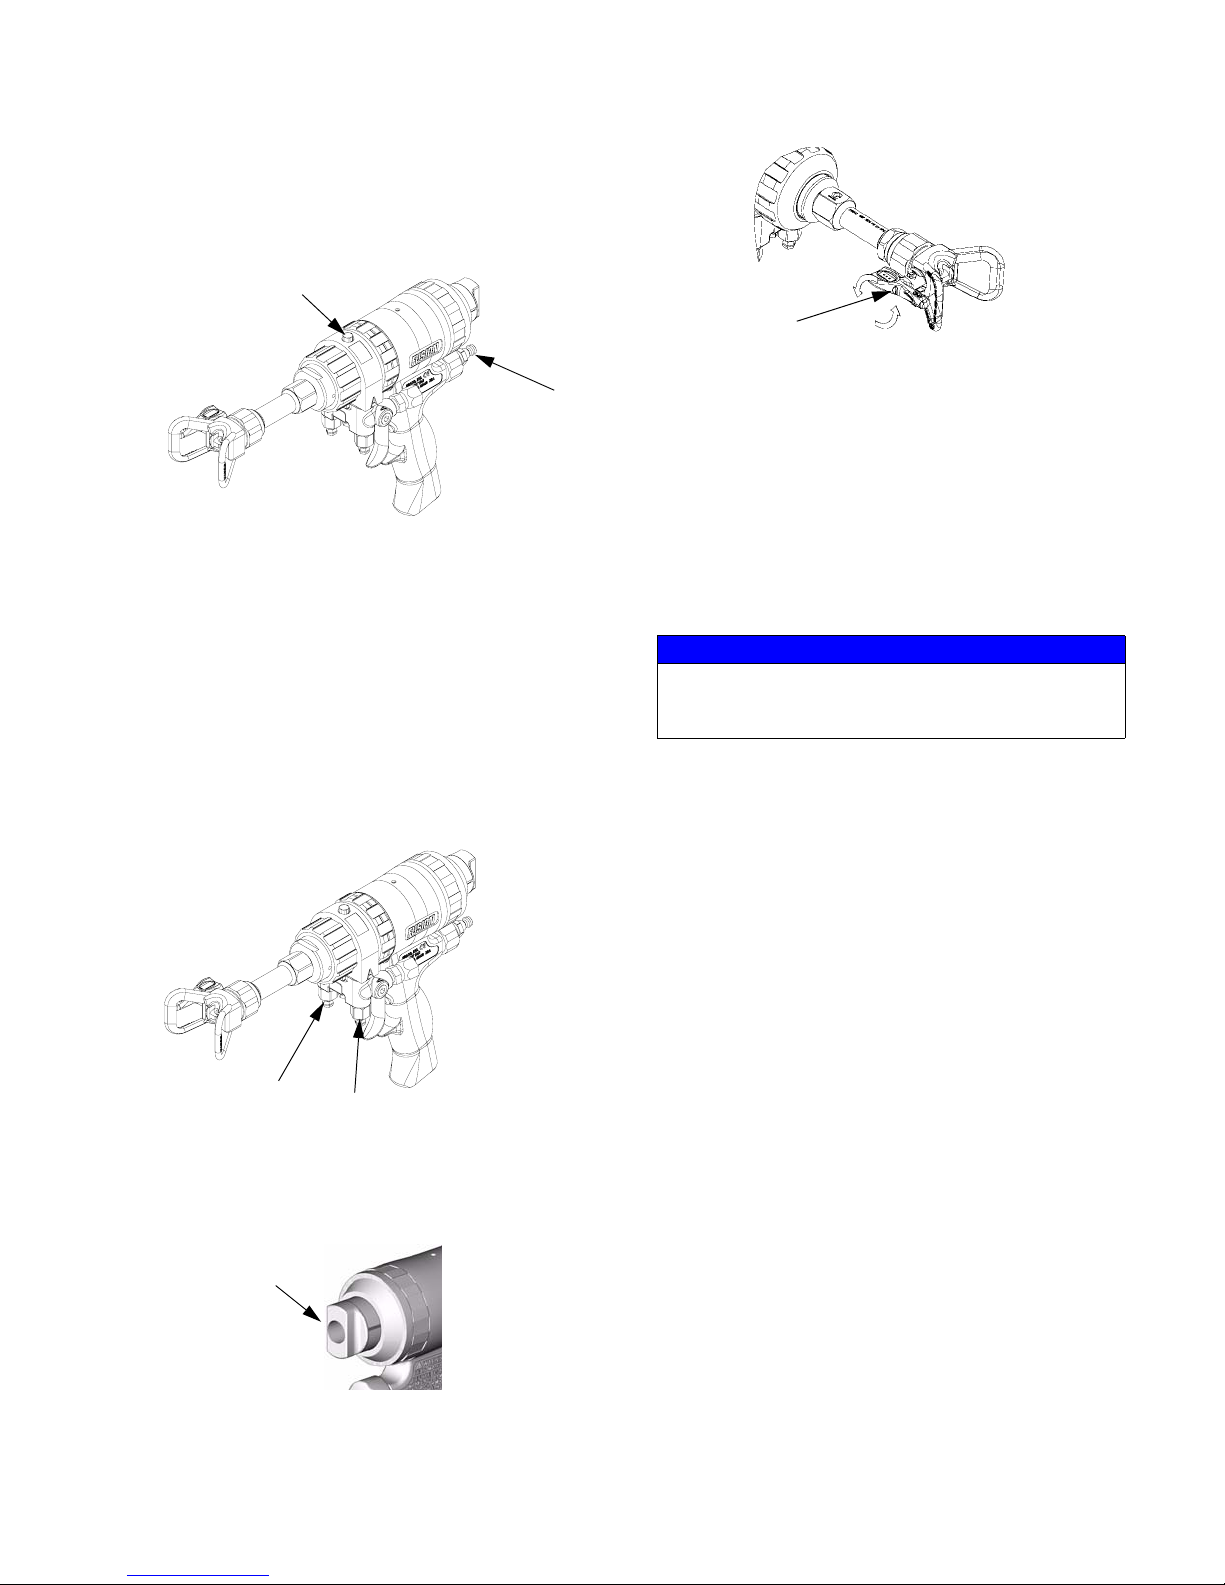
7. Connect quick coupler (D). Turn on air. Open air
valve connected to whip hose. Air valve (K) should
be screwed tight. There is no clean off air to adjust
on the mechanical purge gun.
K
65
Shutdown
exp1008A
D
r_256998_313294_1b
NOTE:
To use optional air inlet, see Optional Hose Position
on page 12.
8. Adjust Purge Rod Position, see page 23.
9. Turn on proportioner.
10. Open B (red fluid) fluid valve (about three half
turns). Then open A (white fluid) fluid valve.
13. Test spray onto cardboard. Adjust pressure and
temperature to get desired results.
14. Apply layer of lubricant over front of gun and lock
ring, or use gun cover to prevent overspray buildup
and ease disassembly. See Accessories on page
28 to order lubricant and gun cover.
15. Gun is ready to spray.
NOTICE
Air supply is required for gun actuation. Do not disconnect gun air supply until fluid pressure is relieved,
page 10.
Shutdown
1. Follow Pressure Relief Procedure, page 10.
2. Flush Gun, page 14.
B fluid valve
A fluid valve
11. Disengage piston safety lock, page 7.
Disengaged
12. Turn RAC tip (65) to spray position.
313294D 9
r_256998_313294_1b
TI3849A
 Loading...