

OWC Mercury Elite RAID
4 Bay Rack Enclosure
Owner’s Manual

Page 1
Table of Contents
Chapter 1
• Quickstart Guide 2
Chapter 2
• Package Contents and Accessories 3
Chapter 3
• Hardware Overview 3
• Important note before proceeding! 4
Chapter 4
• Cable Connections 5
• FireWire 800 (1394B) connection options 6
• USB 2.0 connection options 7
• How to daisy chain multiple enclosures 8
• How to NOT hook up your enclosure (what NOT to do) 9
Chapter 5
• Using with a Macintosh 10
• Setting up as JBOD (4 individual hard drives) 11
• Setting up as RAID-0 (2 hard drives striped for performance) 14
Chapter 6
• Using with a PC 17
• Setting up as JBOD (4 individual hard drives) 18
• Setting up as RAID-0 (2 hard drives striped for performance) 24
Chapter 7
• Customize - Swap drive trays, change system drive icons 30
Chapter 8
• Troubleshooting 31
Chapter 9
• Tips 32
Chapter 10
• Contacting Customer Service 33

Page 2
You can start using your OWC Mercury Elite RAID Rack storage solution
immediately with a few easy steps if you don’t want to read the entire
manual. The drive solution is formatted for a Macintosh and ready to use
right out of the box. If you’re using a Mac, Simply follow the instructions
on this page and dive in!
1. Open the boxes and remove the above items
3. Plug the power cable in and turn the power switch on. Your
drives will mount on the desktop and you can start using them.
2. Look at the back of the storage enclosure. You need to choose which
interface you want to use - FireWire 800 or USB 2.0.
FireWire 800
USB 2.0
Quickstart Guide
Chapter 1
Page 3
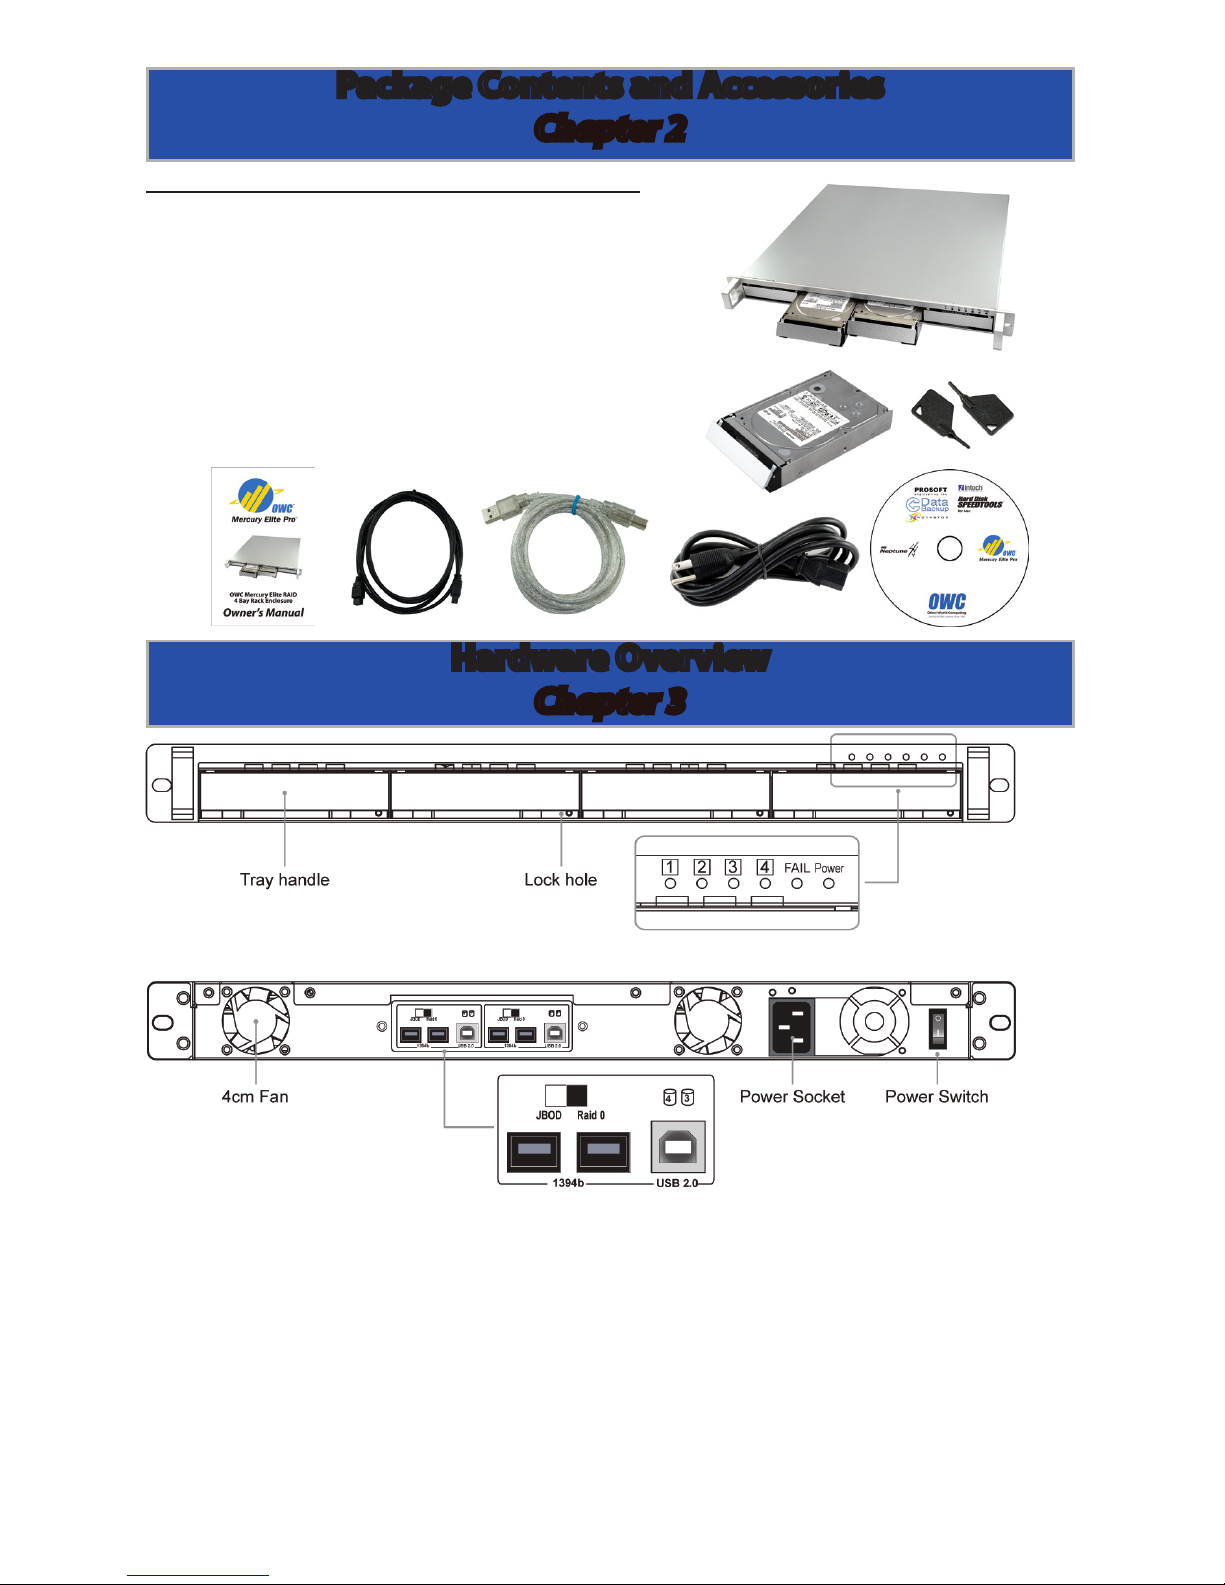
Item Quantity
OWC Mercury Elite RAID Rack Enclosure 1
SATA Hard Drive in carrier (installed) 4
1394b (FireWire 800) cable 2
USB 2.0 (A-B) cable 2
Power cable 1
Drive Carrier Keys 2
Software Bundle CD 1
Installation & Setup Guide 1
Front panel LED status indicators:
• Access LEDs will light up blue if the hard drive is installed.
• Access LED will always light up red if the hard drive is removed.
• HDD Access LED will ash blue when data is being accessed.
• Power LED will light up blue when the power is turned on.
• Fail LED will light up red when the internal temperature exceeds 60˚C
or if the internal fan has failed.
Hardware Overview
Chapter 3
Package Contents and Accessories
Chapter 2

Page 4
1. Before installing, make sure that you have reviewed the previous
page and that all necessary cables and parts are present.
2. Please be sure to use the heavy duty power cord that is provided. The
unit is able to be used with 100-240V, 60Hz power and is autoswitching.
3. Any disassembly of the enclosure or modication will void your
warranty. If you are experiencing problems, please contact our technical
support department before opening the enclosure.
4. Hardware Requirements:
• For the best performance, connect the enclosure using the included
1394b cables (FireWire 800). See note below about gaining even more
performance than a single FireWire 800 connection can provide.
• You can also use a USB 2.0 connection (but not at the same time) if you
do not have a FireWire port on your computer.
If you are looking to maximize the performance of this enclosure, it
has the ability to utilize 2 discrete FireWire 800 connections. You can
connect 2 drives to one FireWire 800 interface, for example, the built-in
FireWire 800 connection on your computer, and the other 2 drives to a
PCI/PCI Express FireWire 800 card, doubling the bandwidth available.
5. OS Requirements:
• Mac:
Compatible with all Apple OS Versions 8.5 through 9.2.x; Apple OS X
10.0.3 and higher (including OS X ‘Leopard’ 10.5.x).
• Windows:
Compatible with Microsoft Windows 98SE, ME, 2000, XP; Any OS or
device with standard FireWire or USB support.
IMPORTANT!!
Please read before proceeding with installation

Page 5
Please review the following pictures to determine the best way to hook
your new drive solution to your computer.
Power Plug On/O Switch
Insert the power plug and connect to your standard wall outlet. The
internal power supply is autoswitching and you can use it with voltages
ranging from 110V to 220V, 60Hz.
Drives 3 & 4
Drives 1 & 2
1394B
(FW800)
USB 2.0
1394B
(FW800)
USB 2.0
These are the connections you will use to attach the storage solution
to your computer. You will need to decide if you are going to hook the
solution up via FireWire 800 (1394b) - which is the fastest interface this
drive solution uses, or via USB 2.0, or both.
The OWC Mercury Elite RAID Rack has two separate back panel connections - called bridges - each controlling 2 hard drives. On the following
pages you will see the dierent methods used to connect the drive solution to your computer.
Cable Connections
Chapter 4
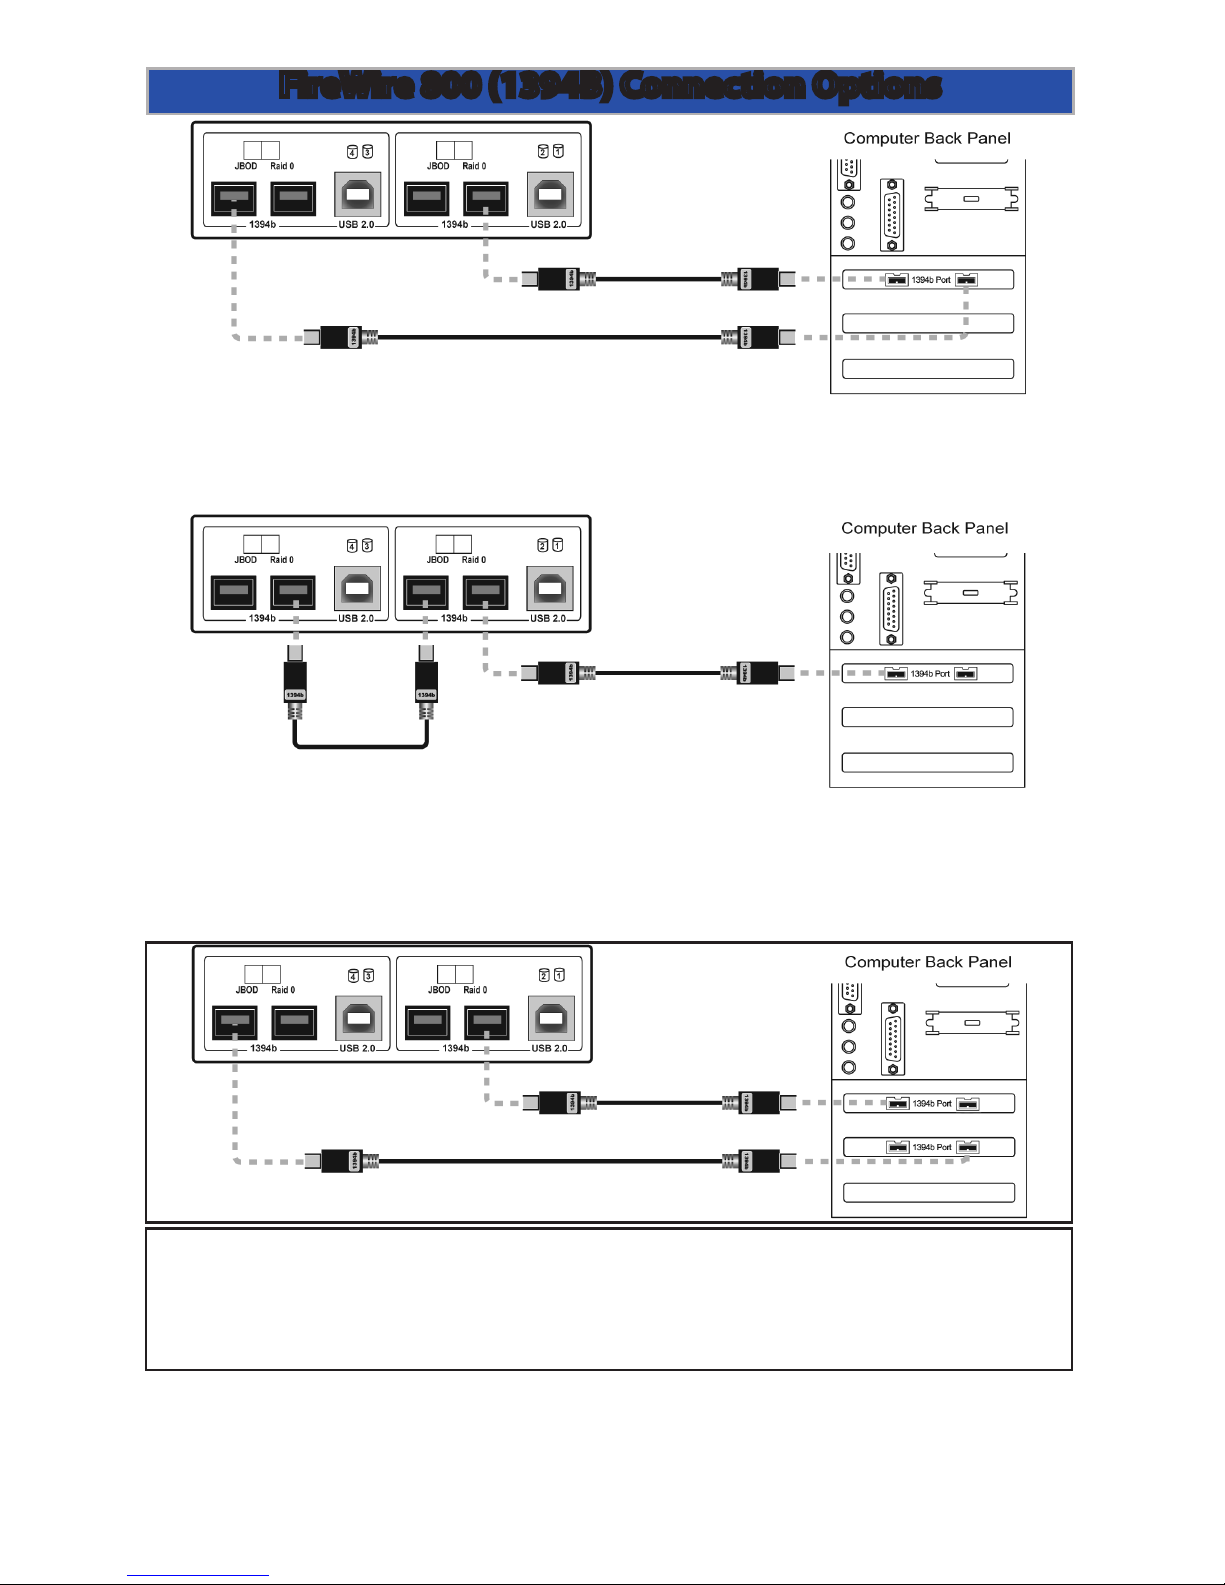
Page 6
Connection option #1 - Connect to the same FireWire 800 source (built
in FireWire 800 ports, or a PCI/PCIe FireWire 800 card) using two cables direct connection for each bridge card.
Connection option #2 - Connect to the same FireWire 800 source (built
in FireWire 800 ports, or a PCI/PCIe FireWire 800 card) via daisy-chaining
the two bridges together, then connect one bridge to the computer.
Connection option #3 - Connect to separate FireWire 800 interfaces
(such as a built in FireWire 800 port, AND a PCI/PCIe FireWire 800 card).
Use the 2 included cables to connect one cable to each of these interfaces, doubling the bandwidth.
Of the 3 types of FireWire 800 connection listed above, Connection
option #3 is the fastest.
FireWire 800 (1394B) Connection Options

Page 7
Connection option #4 - Connect to the same USB 2.0 source (built in
USB 2.0 ports, or a PCI/PCIe USB 2.0 card) using two cables - direct connection for each bridge card.
Connection option #5 - This option allows you to use both a FireWire
800 and a USB 2.0 connection. Connect one cable from the FireWire 800
ports on either bridge card to the computer, and then connect the USB
2.0 connection on the opposite bridge card to the computer.
This allows you to maximize the performance, of the storage solution,
even though you do not have two identical interfaces.
USB 2.0 & Other Connection Options
Page 8
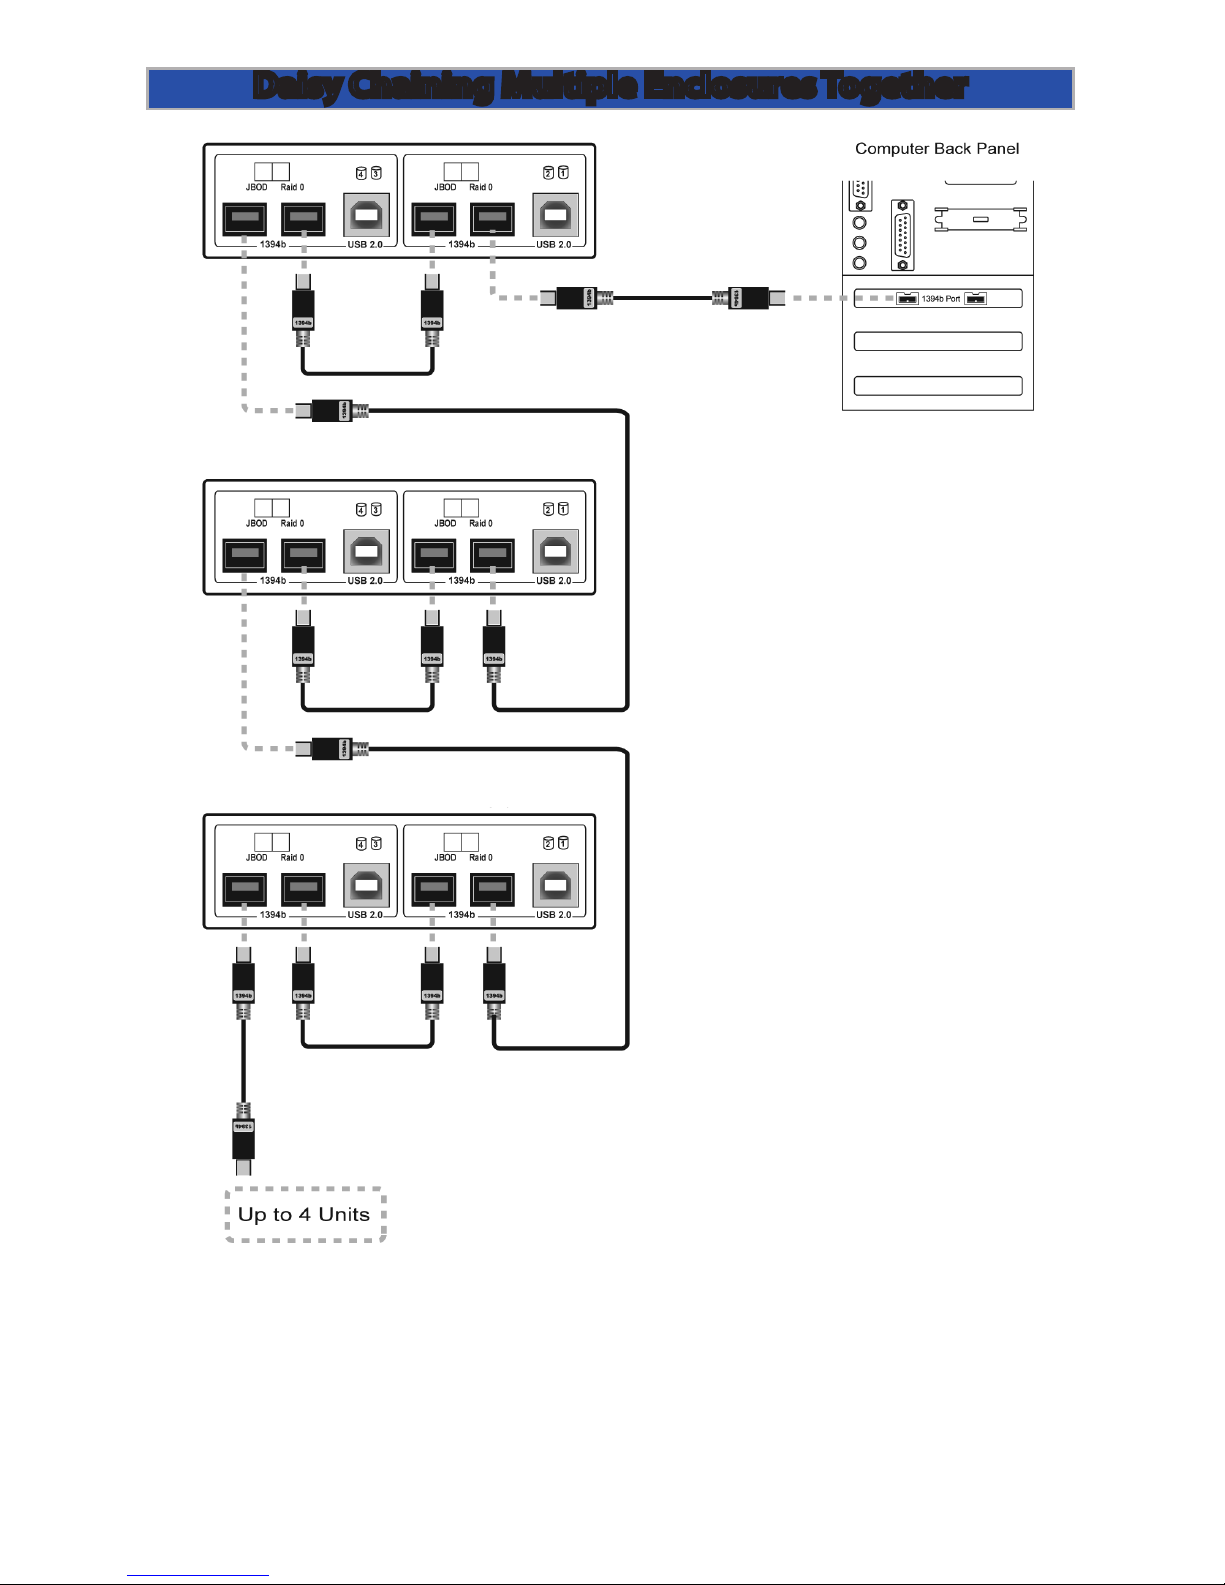
Mercury Elite RAID #1
Mercury Elite RAID #2
Mercury Elite RAID #3
If you wish to connect multiple storage enclosures together, use the
above diagram to properly connect the enclosures to each other. You
can of course split the enclosures onto multiple FireWire 800 sources to
improve data transfer speeds, but it is possible to connect multiple units
together in the described method.
Daisy Chaining Multiple Enclosures Together
Page 9
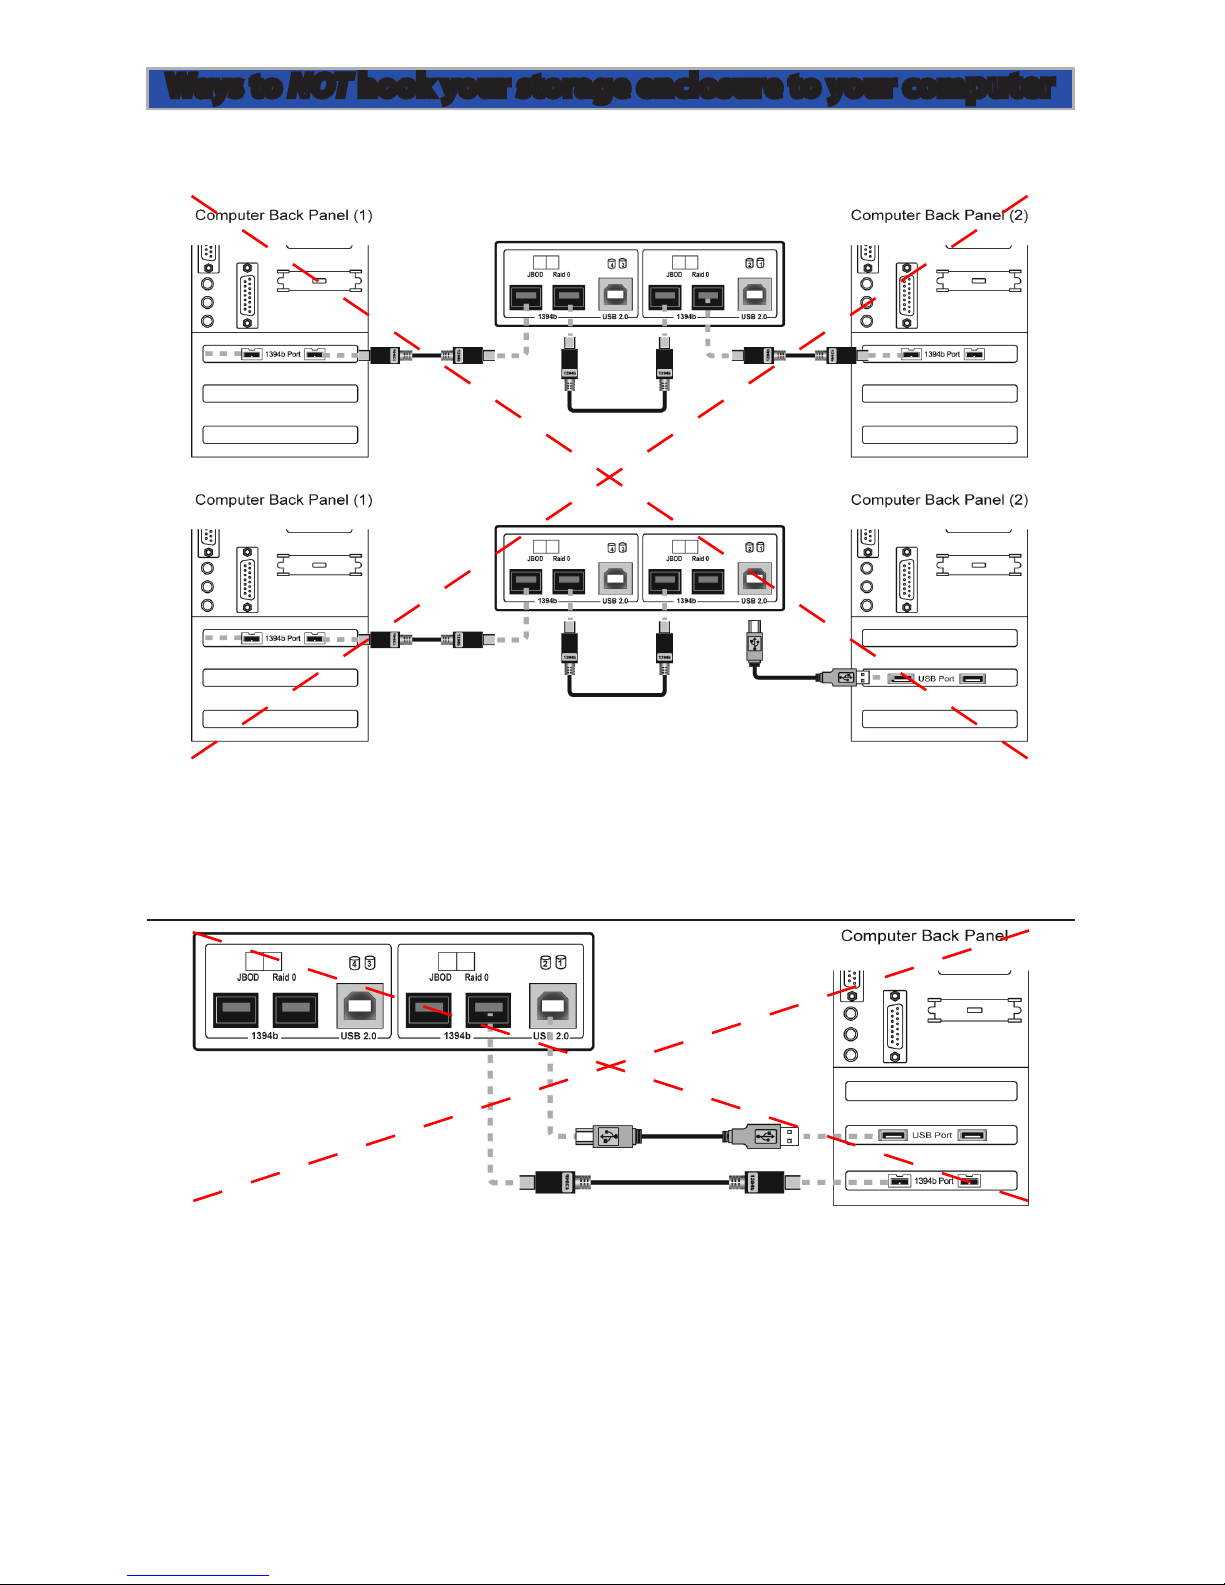
The below described methods show what NOT to do to hook your
storage enclosure to your computer.
You cannot share the storage enclosure between two computers.
Do not attempt to hook cables between the storage enclosure and 2
computers as shown, data loss and damage to the unit can occur.
You also cannot hook both the FireWire 800 and USB 2.0 connection
to the computer on the same bridge card. Once again, data loss and
damage to the computer can occur.
Ways to NOT hook your storage enclosure to your computer

Page 10
Once you have decided on the proper way to connect the OWC Mercury
Elite 4 Bay RAID Rack to your Macintosh, you’re now ready to power the
unit on and begin using it. Do so now.
The OWC Mercury Elite 4 Bay RAID Rack comes from the factory pre
congured one of 3 ways. Please refer to your invoice to verify which
method of conguration you ordered if you do not know already.
The methods are:
JBOD - All 4 hard drives formatted independently, as four individual
hard drive volumes. If you had 4 1TB drives in your OWC Mercury Elite 4
Bay RAID Rack, you would have 4 1TB volumes mount on your desktop.
Stripe (RAID 0) - Two volumes will mount on your desktop, each made
up of a high-speed RAID-0 Stripe - combining two volumes each. Using
a RAID-0 Stripe format, if you had 4 1TB drives in your OWC Mercury
Elite 4 Bay RAID Rack, you would have 2 2TB volumes mount on your
desktop.
RAID 0+1 - This method is a bit dierent than the above two methods as
it uses a piece of software that is included with this bundle - SoftRAID.
SoftRAID combines two Stripe (RAID-0) volumes into a RAID-1 Mirror
- allowing both speed, and full redundancy. If you had 4 1TB drives in
your OWC Mercury Elite 4 Bay RAID Rack using this method, you would
have 1 2TB volume mount on your desktop.
Your solution should be congured properly to work the way that
you ordered it right out of the box. However, if you decide you want
to recongure or change the method you ordered, please see the
following pages to reformat or recongure your RAID.
Using your OWC Mercury Elite 4 bay RAID Rack with a
Macintosh Computer
(If you are using a PC; please turn to page # 17
Chapter 5

Page 11
(IMPORTANT) Realize that reconguring your RAID will destroy
all data on this storage enclosure. Be sure you have a backup
before proceeding. Make sure that the power is turned o.
Look at the back of the OWC Mercury Elite 4 Bay RAID Rack and
locate the switches to the right of the USB port. Make sure they
are both on the “JBOD” position (LEFT).
Choose the connection method you desire (USB, FireWire 800),
and power on the OWC Mercury Elite 4 Bay RAID Rack enclo-
sure. You will see these dialog boxes pop up. Click on “Initialize”.
JBOD - All 4 hard drives formatted independently, as four individual
hard drive volumes. If you had 4 1TB drives in your OWC Mercury Elite 4
Bay RAID Rack, you would have 4 1TB volumes mount on your desktop.
Step
1
Step
2
Step
3
Setup your OWC Mercury Elite 4 Bay RAID Rack as JBOD
(4 individual hard drives) on a Macintosh

Page 12
Once Disk Utility opens, you will see a screen that looks similar
to this - note the 4 individual hard drives shown on the left side,
all unformatted with no volumes listed.
Click on the rst hard drive in the list that has no volume, as
shown above.
Step
4
Step
5

Page 13
Enter a name for your new hard drive, select a volume format,
and click Erase.
Are you sure? Click Erase.
1 drive down, 3 more to go. Continue naming and formatting
each of your drives. You’re all set!
Step
6
Step
7
Step
8

Page 14
Stripe (RAID 0) - Two volumes will mount on your desktop, each made
up of a high-speed RAID-0 Stripe - combining two volumes each. Using
a RAID-0 Stripe format, if you had 4 1TB drives in your OWC Mercury
Elite 4 Bay RAID Rack, you would have 2 2TB volumes mount on your
desktop.
(IMPORTANT) Realize that reconguring your RAID will destroy
all data on this storage enclosure. Be sure you have a backup
before proceeding. Make sure that the power is turned o.
Look at the back of the OWC Mercury Elite 4 Bay RAID Rack and
locate the switches to the right of the USB port. Make sure they
are both on the “RAID 0” position (RIGHT).
Choose the connection method you desire (USB, FireWire 800),
and power on the OWC Mercury Elite 4 Bay RAID Rack enclo-
sure. You will see these dialog boxes pop up. Click on “Initialize”.
Step
1
Step
2
Step
3
Setup your OWC Mercury Elite 4 Bay RAID Rack as a
RAID-0 (2 striped hard drives) on a Macintosh

Page 15
Once Disk Utility opens, you will see a screen that looks similar
to this - note the 4 individual hard drives shown on the left side,
all unformatted with no volumes listed.
Click on the rst hard drive in the list that has no volume, as
shown above.
Step
4
Step
5

Page 16
Are you sure? Click Erase.
1 pair of drives down, 1 more pair to go. Repeat on the 2nd set
and you’re all done!
Step
7
Step
6

Page 17
Once you have decided on the proper way to connect the OWC Mercury
Elite 4 Bay RAID Rack to your Macintosh, you’re now ready to power the
unit on and begin using it. Do so now.
The OWC Mercury Elite 4 Bay RAID Rack comes from the factory
precongured one of 3 ways. Please refer to your invoice to verify which
method of conguration you ordered if you do not know already.
The methods are:
JBOD - All 4 hard drives formatted independently, as four individual
hard drive volumes. If you had 4 1TB drives in your OWC Mercury Elite 4
Bay RAID Rack, you would have 4 1TB volumes mount on your desktop.
Stripe (RAID 0) - Two volumes will mount on your desktop, each made
up of a high-speed RAID-0 Stripe - combining two volumes each. Using
a RAID-0 Stripe format, if you had 4 1TB drives in your OWC Mercury
Elite 4 Bay RAID Rack, you would have 2 2TB volumes mount on your
desktop.
RAID 0+1 - This method is a bit dierent than the above two methods
as it uses a piece of software that is included with this bundle - SoftRAID.
SoftRAID combines two Stripe (RAID-0) volumes into a RAID-1 Mirror
- allowing both speed, and full redundancy. If you had 4 1TB drives in
your OWC Mercury Elite 4 Bay RAID Rack using this method, you would
have 1 2TB volume mount on your desktop.
Your solution should be congured properly to work the way that
you ordered it right out of the box. However, if you decide you want
to recongure or change the method you ordered, please see the
following pages to reformat or recongure your RAID.
Using your OWC Mercury Elite 4 Bay RAID Rack with a PC
(If you are using a Mac, please turn back to page # 10
Chapter 6

Page 18
Click on the start button and then Control Panel.
Step
3
JBOD - All 4 hard drives formatted independently, as four individual
hard drive volumes. If you had 4 1TB drives in your OWC Mercury Elite 4
Bay RAID Rack, you would have 4 1TB volumes mount on your desktop.
Look at the back of the OWC Mercury Elite 4 Bay RAID Rack and
locate the switches to the right of the USB port. Make sure they
are both on the “JBOD” position (LEFT).
Step
2
(IMPORTANT) Realize that reconguring your RAID will destroy
all data on this storage enclosure. Be sure you have a backup
before proceeding. Make sure that the power is turned o.
Step
1
Setup your OWC Mercury Elite 4 Bay RAID Rack as JBOD
(4 individual hard drives) on a PC (Windows XP / Vista)

Page 19
Double click on Computer Management.
Click on Disk Management under the Storage subcategory.
Step
5
Step
6
Open Administrative Tools.
Step
4

Page 20
You will see the above box appear in the middle of the screen.
Right click on the rst unallocated volume that you wish to
format. Select “New Simple Volume”.
The New Simple Volume Wizard will launch. Click Next.
Step
7
Step
8

Page 21
The maximum volume size will automatically be prompted in
the box at the bottom. If you wish to adjust the size smaller, you
can do so. In this demonstration we will use a maximum size volume.
Click Next when you are ready.
Choose a new drive letter for the volume. It will
automatically prompt an unused volume letter. Click Next
when you are ready.
Step
9
Step
10

Page 22
Check “Perform a quick format” and choose which le system
you want to use. NTFS is default and recommended. Click
Next when you are ready.
This screen is an overview of the settings you have chosen to
format the disk with. Click Finish when you are ready.
Step
11
Step
12

Page 23
You will see the drive begin to format. This will take up to 5
minutes to complete.
The format has completed. You will see it report back as a
healthy partition.
Complete the formatting process for the remaining drives using these
steps. You’re all set!
Step
13
Step
14

Page 24
Click on the start button and then Control Panel.
Step
3
Stripe (RAID 0) - Two volumes will mount on your desktop, each made
up of a high-speed RAID-0 Stripe - combining two volumes each. Using
a RAID-0 Stripe format, if you had 4 1TB drives in your OWC Mercury
Elite 4 Bay RAID Rack, you would have 2 2TB volumes mount on your
desktop.
(IMPORTANT) Realize that reconguring your RAID will destroy
all data on this storage enclosure. Be sure you have a backup
before proceeding. Make sure that the power is turned o.
Step
1
Step
2
Look at the back of the OWC Mercury Elite 4 Bay RAID Rack and
locate the switches to the right of the USB port. Make sure they
are both on the “RAID 0” position (RIGHT).
Setup your OWC Mercury Elite 4 Bay RAID Rack as RAID 0
(2 striped hard drives) on a PC (Windows XP / Vista)

Page 25
Double click on Computer Management.
Click on Disk Management under the Storage subcategory.
Step
5
Step
6
Open Administrative Tools.
Step
4

Page 26
You will see the above box appear in the middle of the screen.
Right click on the rst unallocated volume that you wish to
format. Select “New Simple Volume”.
The New Simple Volume Wizard will launch. Click Next.
Step
7
Step
8

Page 27
The maximum volume size will automatically be prompted in
the box at the bottom. If you wish to adjust the size smaller, you
can do so. In this demonstration we will use a maximum size volume.
Click Next when you are ready.
Choose a new drive letter for the volume. It will
automatically prompt an unused volume letter. Click Next
when you are ready.
Step
9
Step
10

Page 28
Check “Perform a quick format” and choose which le system
you want to use. NTFS is default and recommended. Click
Next when you are ready.
This screen is an overview of the settings you have chosen to
format the disk with. Click Finish when you are ready.
Step
11
Step
12

Page 29
Step
13
You will see the drive begin to format. This will take up to 5
minutes to complete.
Step
14
The format has completed. You will see it report back as a
healthy partition.
Complete the formatting process for the remaining drives using these
steps. You’re all set!

Page 30
Drive Icons:
Now that you have your new OWC Mercury Elite-AL Dual congured to
your needs, dress it up! Change the icon of the hard drive! We have created disk icons for every model of drive we make:
http://eshop.macsales.com/Reviews/Framework.cfm?page=/icons/
icons.html
Customizing your new OWC Mercury Elite RAID
Chapter 7
Removable Trays:
You can purchase extra drive carriers and swap out drive mechanisms,
perfect for o-site backup or archiving.
To remove the drive tray - rst,
make sure the power is turned OFF
on the Mercury Elite RAID Rack this is not a “hot swap” procedure.
Start by inserting the included drive
key into the small hole on the right
side of the tray, in the area below
the door.
Push the key in - and it will pop the
door up, allowing you to pull the
tray out of the enclosure.
You can purchase multiple drive
trays and perform a rotation, if you
want to archive data and store it at
another location for safety.

Page 31
Troubleshooting
Chapter 8
If your OWC Mercury Elite-AL is not functioning properly, begin by
checking some basic possibilities, such as:
• Are all cables tightly attached to the computer and drive?
• Is the power supply plugged in rmly, and is the LED lit on the
power supply brick?
If the above solutions are not working, a full reset of your system may be
in order.
• Performing a set of open rmware reset routines can result in the
memory being properly recognized again. To do this, you will need to
boot your machine into Open rmware.
To boot into Open Firmware, shut down your Mac, then start it up while
holding down the Command, Option, O and F keys. At the Open Firmware screen prompt, enter the following commands (you may want to
write them down on a piece of paper before beginning this process),
pressing the return key after each:
reset-nvram (press return)
set-defaults (press return)
reset-all (press return, your machine will reboot)
For further troubleshooting tips, visit our FAQ section online at:
http://eshop.macsales.com/tech_center/FAQ/index.cfm
If you are still experiencing problems with your drive, please continue
on to Chapter 10: Contacting Customer Service, on page 33.

Page 32
To disconnect or unhook your OWC Mercury hard drive, follow
these important steps to properly dismount your drive.
If you wish to disconnect your OWC Mercury drive without shutting
down your computer, simply drag the OWC Mercury drive icon to the
trash can on the desktop (or, in the dock using Mac OS X). Your drive is
now safe to power o and unhook.
Realize that you have up to 4 drives to dismount with this 4 bay unit make sure all drives are disconnected before powering down.
Share your Mac formatted drive with your PC using MacDrive
(optional purchase)
After installing MacDrive, your HFS+ Macintosh volume will mount as if
the drive were formatted in a native Windows format. MacDrive allows
you to use your OWC Mercury hard drive on either platform without
having to reformat or re-initialize the volume. We highly recommend
this software for anyone that is sharing data in a cross platform
environment.
Cloning drives (exact copies)
If you want to make an exact duplicate of a hard drive, we highly
recommend Mike Bombich’s donationware “Carbon Copy Cloner”. It’s a
great tool! You can nd it on his website at:
http://www.bombich.com/ccc.html
Tips
Chapter 9

Page 33
Contacting Customer Service
Chapter 10
Before contacting Customer Service:
• Read the manuals and review Chapter 5: Troubleshooting
• Try and conrm the problem is with the hard drive. If you have a second Macintosh computer, move the drive to that system and verify that
the drive does not function with that machine.
• Visit our tech center for more support suggestions.
http://eshop.macsales.com/tech_center/index.cfm
• Also visit our FAQ section, to see what other customers have asked
about and how they solved their problem.
http://eshop.macsales.com/tech_center/FAQ/index.cfm
If you still need support:
•Have the serial number of the hard drive handy
•Your invoice number (if possible)
•What operating system you are using
•Which kind of Macintosh you are using
Available to you to speed your support contact.
Tech Support Hours (Central Standard Time)
8AM-9PM Monday - Friday
9AM - 4PM Saturday & Sunday
Phone (815) 338-8685
Live Chat is available during normal business hours as well. Visit
http://eshop.macsales.com for more information.
Or, you can email: Submit your email at:
http://eshop.macsales.com/Service/Tech.cfm

Page 34

Copyright ®2007 Other World Computing All Rights Reserved. Other World Computing’s 2 year Limited Warranty is not transferable and subject to limitations.
Copyrights
Copyright © 2007 Other World Computing, Inc. All rights reserved. No part of this publication may be reproduced, stored in a
retrieval system, or transmitted in any form or by any means, electronic, mechanical, photocopying, recording or otherwise,
without the prior written consent of Other World Computing.
Changes
The material in this document is for information only and subject to change without notice. While reasonable eorts have
been made in the preparation of this document to assure its accuracy, Other World Computing assumes no liability resulting
from errors or omissions in this document, or from the use of the information contained herein. Other World Computing
reserves the right to make changes or revisions in the product design or the product manual without reservation and without
obligation to notify any person of such revisions and changes.
FCC Statement:
Warning! Modications not authorized by the manufacturer may void the user’s authority to operate this device.
NOTE: This equipment has been tested and found to comply with the limits for a Class A digital device, pursuant to Part 15 of
the FCC Rules. These limits are designed to provide reasonable protection against harmful interference when the equipment
is operated in a commercial environment. This equipment generates, uses, and can radiate radio frequency energy and, if
not installed and used in accordance with the instruction manual, may cause harmful interference to radio communications.
Operation of this equipment in a residential area is likely to cause harmful interference in which case the user will be required
to correct the interference at his own expense.
NOTE: This equipment has been tested and found to comply with the limits for a Class B digital device, pursuant to Part 15 of
the FCC Rules. These limits are designed to provide reasonable protection against harmful interference in a residential installation. This equipment generates, uses and can radiate radio frequency energy and, if not installed and used in accordance with
the instructions, may cause harmful interference to radio communications. However, there is no guarantee that interference
will not occur in a particular installation. If this equipment does cause harmful interference to radio or television reception,
which can be determined by turning the equipment o and on, the user is encouraged to try and correct the interference by
one or more of the following measures:
• Reorient or relocate the receiving antenna.
• Increase the separation between the equipment and receiver.
• Connect the equipment into an outlet on a circuit dierent from that to which the receiver is connected.
Health And Safety Precautions
• Use proper anti-static precautions while performing the installation of your hard drives into this drive enclosure. Failure to
do so can cause damage to your drive mechanisms, and / or the hard drive enclosure.
• Read this User’s Guide carefully, and follow the correct procedure when setting up the device.
• Do not open your hard drive or attempt to disassemble or modify it. Never insert any metallic object into the drive to avoid
any risk of electrical shock, re, short-circuiting or dangerous emissions. Your hard drive contains no user-serviceable parts. If
it appears to be malfunctioning, have it inspected by a qualied Other World Computing Technical Support representative.
• Never expose your device to rain, or use it near water, or in damp or wet conditions. Never place objects containing liquids
on the drive, as they may spill into its openings. Doing so increases the risk of electrical shock, short-circuiting, re or personal
injury.
General Use Precautions:
• Do not expose the hard drive to temperatures outside the range of 5° C to 40° C (41° F to 104° F). Doing so may damage the
drive or disgure its casing. Avoid placing your drive near a source of heat or exposing it to sunlight (even through a window).
Inversely, placing your drive in an environment that is too cold or humid may damage the unit.
• Always unplug the hard drive from the electrical outlet if there is a risk of lightning or if it will be unused for an extended
period of time. Otherwise, there is an increased risk of electrical shock, short-circuiting or re.
• Use only the power supply shipped with the device.
• Do not use the hard drive near other electrical appliances such as televisions, radios or speakers. Doing so may cause interference which will adversely aect the operation of the other products.
• Do not place the drive near sources of magnetic interference, such as computer displays, televisions or speakers. Magnetic
interference can aect the operation and stability of your hard drive.
• Do not place heavy objects on top of the drive or use excessive force on it.
• Never use excessive force on your drive. If you detect a problem, consult the Troubleshooting section in this manual.
• Protect your hard drive from excessive exposure to dust during use or storage. Dust can build up inside the device, increasing the risk of damage or malfunction.
• Other World Computing recommends the use of normal glass cleaning products to keep the high lustre nish at it’s nest
with this product. Be sure to not get any moisture inside the holes and if you do, allow time to air dry before use.
• Do not block the ventilation outlets on the rear of the drive. These help to keep your drive cool during operation. Blocking
the ventilation outlets may cause damage to your drive and cause an increased risk of short-circuiting or re.
OWCMANFWRACK
 Loading...