

OWC Mercury Elite Pro, Mercury Elite-AL 800 Pro Owner's Manual
OWC Mercury Elite-AL 800 Pro MIRROR RAID 1
Dual Drive FireWire 800/400 USB 2.0 Solution
Owner’s Manual

OWC Mercury Elite-AL Pro Table of Contents
1.1 SYSTEM REQUIREMENTS
1.1.1 Mac Requirements
1.1.2 PC Requirements
1.2 PACKAGE CONTENTS
1.3 ABOUT THIS MANUAL
1.4 PORT VIEW & CABLE CONNECTIONS
1.5 DETAILED VIEW
1.5.1 LED Indicator
2 SYSTEM SETUP
5 APPENDIX
6 CUSTOMER SERVICE
6.1 BEFORE CONTACTING CUSTOMER SERVICE
6.2 CONTACT INFORMATION
2.1 SOFTWARE INSTALLATION
2.2 CONNECTIONS TO COMPUTER
4.1 IMPORTANT INFORMATION ABOUT BOOTING ON AN OLDER MACINTOSH
4.2 IMPORTANT INFORMATION IF YOU PLAN ON USING YOUR DRIVE WITH A PC
SYSTEM
4.3 MACINTOSH FORMATTING
4.4 REMOVING AN EXISTING GUID PARTITION
4.5 WINDOWS FORMATTING
4 TROUBLESHOOTING & TIPS
4.1 TROUBLESHOOTING
4.2 USAGE TIPS
5.1 FAQ
5.2 ABOUT DATA PROTECTION
1 INTRODUCTION
3 FORMATTING
1 INTRODUCTION
1.1 System Requirements
1.1.1 Mac Requirements
•Minimum PowerPC G4 CPU, 128MB RAM
•FireWire interface, Mac OS X 10.2 or later
•USB 2.0 interface, Mac OS X 10.2 or later
1.1.2 PC Requirements
•Minimum 500MHz Intel Pentium III CPU, 128MB RAM
•FireWire interface, Windows 2000 / XP / Vista / Windows 7
•USB 2.0 interface, Windows 2000 / XP / Vista / Windows 7
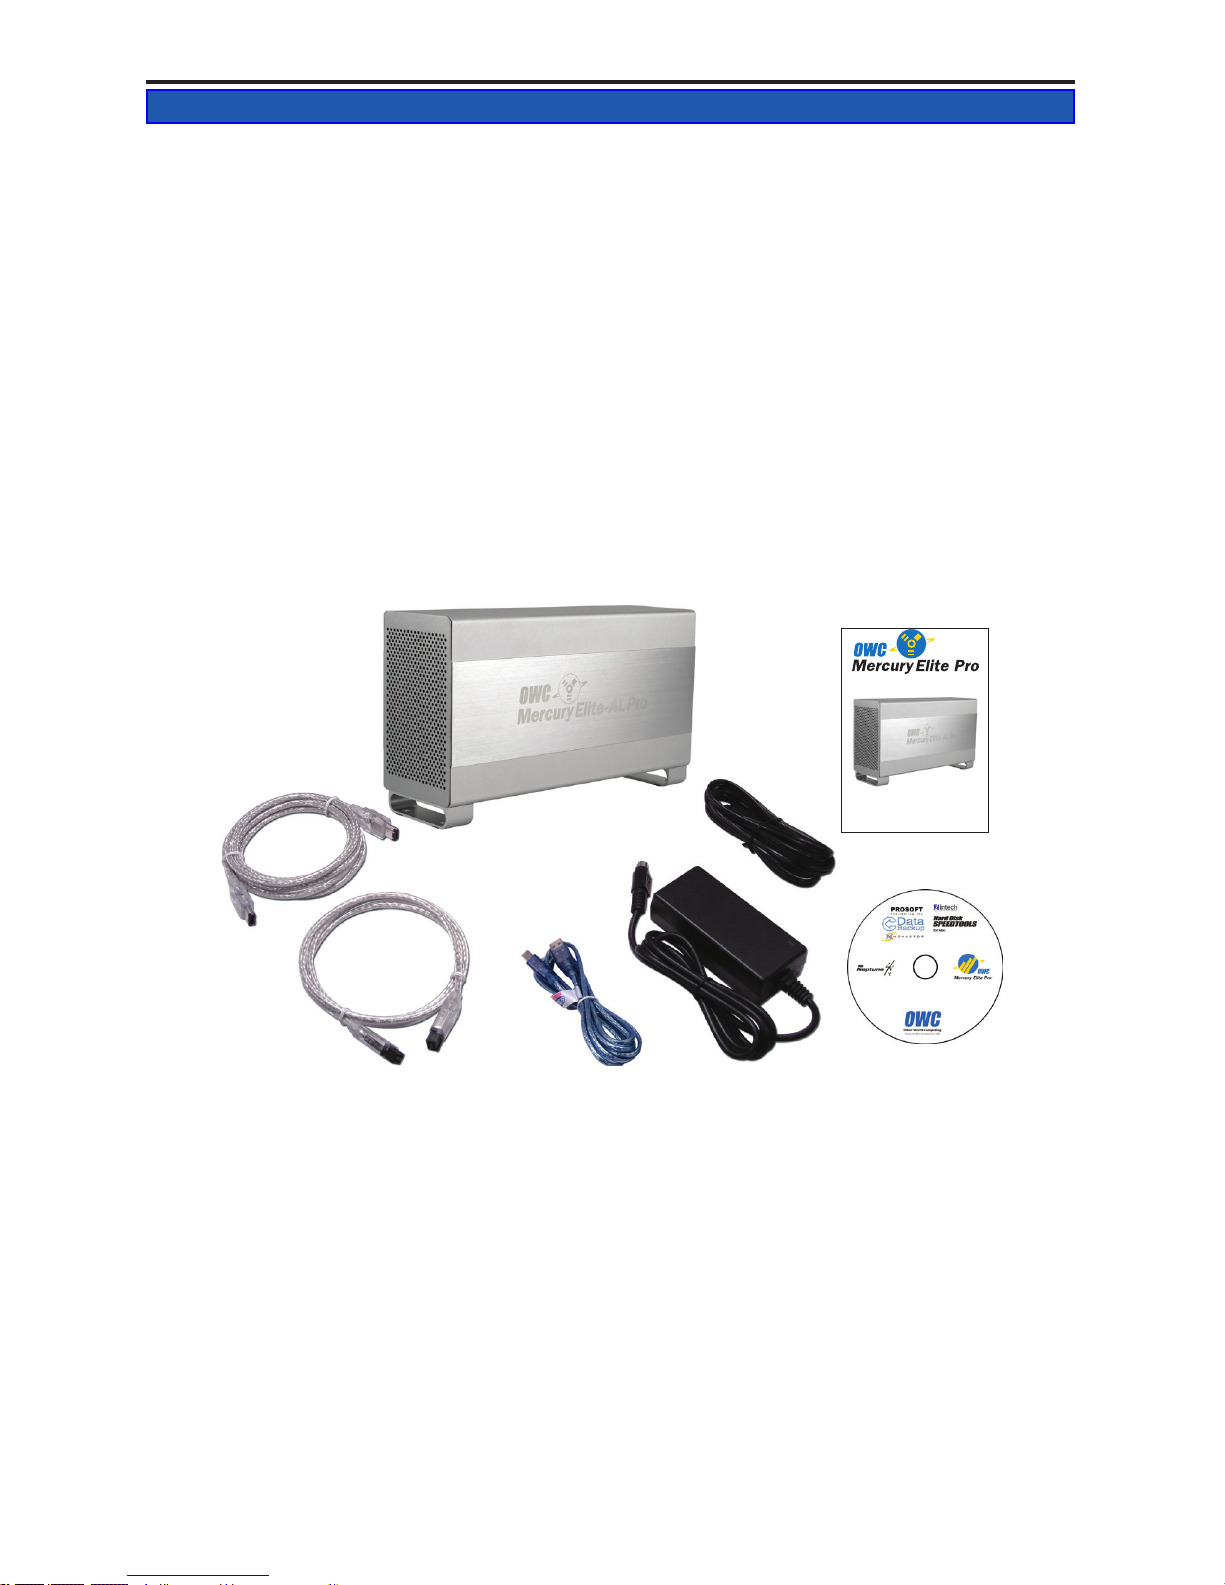
1.2 Package Contents
➀ OWC Mercury Elite-AL Pro
➁ FireWire 400 (1394A) cable
➂ FireWire 800 (1394B) cable
➃ USB 2.0 (A-B) cable
➄ Power Supply
➅ Power Cord
➆ User Guide & Owner’s Manual
➇ Software Bundle
1.3 About This Manual
Firmware, images, and descriptions may vary slightly between this manual and the
unit shipped. Functions and features may change depending on the rmware version.
Please visit the product webpage for the most recent specications.
OWC Mercury Elite-AL Pro Chapter 1 - Introduction
OWC Mercury Elite-AL 800 Pro MIRROR RAID 1
Dual Drive FireWire 800/400 USB 2.0 Solution
Owner’s Manual
➀
➁
➂
➃
➄
➅
➆
➇
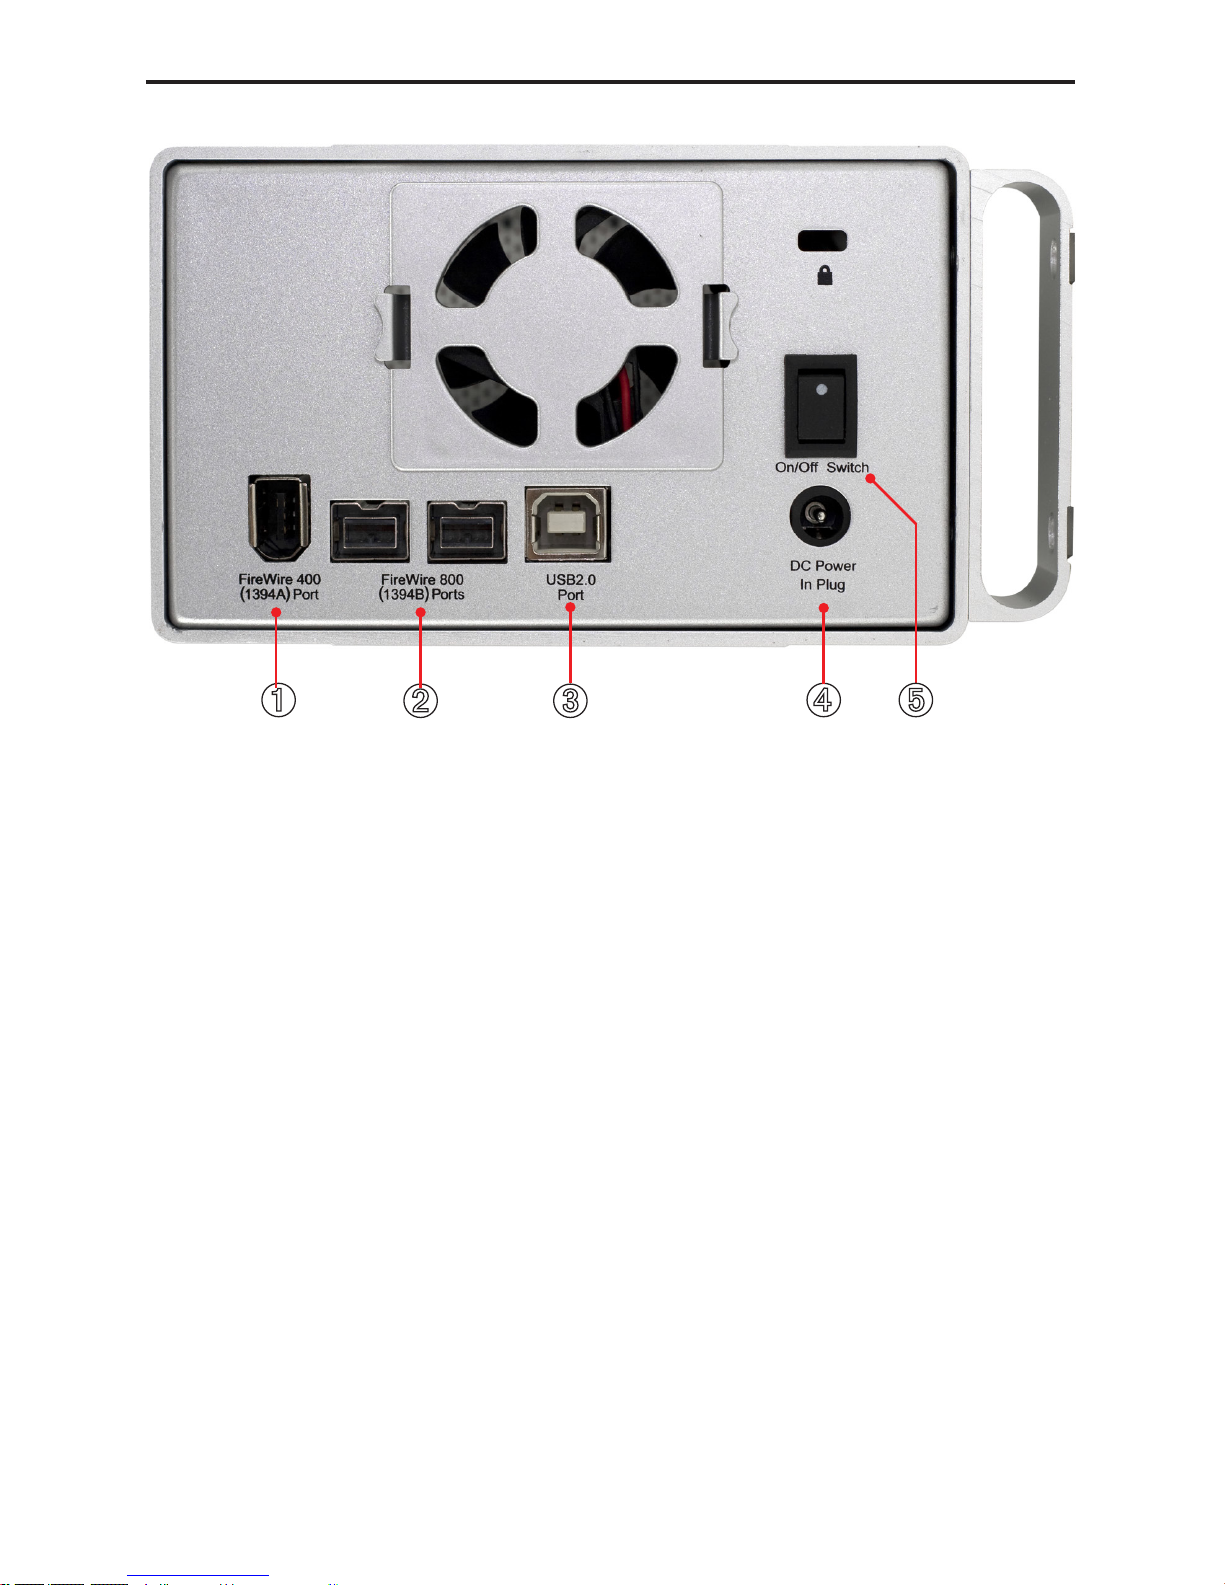
Cable Connections:
➀ FireWire 400 Ports - Connect to a computer that has a FireWire 400 port using this
connection, or daisy-chain additional enclosures with these ports.
➁ FireWire 800 (1394B) Ports - Connect one FireWire 800 port to your computer us-
ing the included cable and have an extra FireWire 800 port to add peripherals with!
➂ USB 2.0 Port - Connect to a computer or interface card that has a USB 2.0 port
using this connection. It is also backwards compatible with USB 1.1 for use with older
systems.
➃ DC IN port - Plug the external power supply in here.
➄ On/O Switch - Turn the OWC Mercury Elite-AL Pro on and o here.
1.4 Port View & Cable Connections
1.5 Detailed View
The OWC Mercury Elite-AL Pro has a cool blue LED at the front of the hard drive enclosure. It will illuminate blue when powered on, and ash on drive activity (both reading
and writing).
OWC Mercury Elite-AL Pro Chapter 1 - Introduction
➌
➍➊
➋
➎

OWC Mercury Elite-AL Pro Chapter 2 - System Setup
2 SYSTEM SETUP
2.1 Software Installation
The OWC Mercury Elite-AL Pro is plug & play, no drivers required with any modern OS.
2.2 Computer Connections
To use the OWC Mercury Elite-AL Pro, connect any interface cable to the drive and the
computer. Then, turn the power switch to the ON position, and verify the blue LED on
the front of the drive is illuminated.
Your drive should mount on your computer’s desktop.
Your new OWC Mercury Elite-AL Pro is shipped preformatted, ready to use on
any Macintosh system. If you are using a Windows PC, you will need to reformat
the drive to use with your system. Please proceed to section 3.3 and follow the
instructions provided.
ATTENTION: The OWC Mercury Elite-AL Pro utilizes an integrated aluminum heatsink design
enclosure. The enclosure will become warm to the touch during heavy usage.

OWC Mercury Elite-AL Pro Chapter 3 - Formatting
3 FORMATTING
3.1 IMPORTANT INFORMATION IF YOU PLAN ON USING YOUR DRIVE
TO BOOT ON A G3, G4, OR G5 SYSTEM
Your new external hard drive has been formatted for the Macintosh as a Mac OS X
Extended (Journaled) volume, using the GUID* Partition Table scheme. This means
that your new drive is ready to use immediately out of the box if you have an Intel
based Macintosh computer.
For your new OWC external hard drive to provide boot compatibility (meaning you
wish to run the operating system from the external drive) with Power-PC based
computers (G3, G4, G5) using Mac OS X, you will need to repartition/format the drive
and change the partition mapping from GUID to APM (Apple Partition Map**). If
you do not plan to use your new external drive as the start up drive, you do not need
to perform this procedure, your new drive will work as formatted for normal external
storage use and step by step instructions to do so are covered on the next pages of
this manual.
Notes:
*GPT (GUID Partition Table) - To use the disk as a boot volume on an Intel-based
Mac, or to use the disk as a non-boot disk with any Mac with Mac OS X version 10.4 or
later.
**APM (Apple Partition Map) - to use the disk as a boot volume on a Power-PC based
Mac, or to use the disk as a non-boot disk with any Mac. If you are using Mac OS X
10.3.9 or earlier, you must repartion and format the hard drive using this method.
Apple also has an article about repartitioning, available at:
http://support.apple.com/kb/TS1600
3.2 IMPORTANT INFORMATION IF YOU PLAN ON USING YOUR DRIVE
WITH A PC SYSTEM
Please turn to section 3.4 and proceed from there to reformat your drive to use with a
PC.
 Loading...