

OWC Mercury Elite-AL Pro Dual-Drive Owner's Manual

Owner’s Manual
Copyright ®2008 Other World Computing All Rights Reserved. Other World Computing’s 3 year Limited Warranty is not transferable and subject to limitations.
OWCMANMEU2HAL2
To disconnect or unhook your OWC Mercury hard drive, follow these important steps
Windows Systems (all versions): If you wish to disconnect your OWC Mercury drive
without shutting down your computer, you need to stop the device with the “Unplug
or Eject Hardware” icon, located on the right side of the system tray. Your drive is now
Macintosh Systems (all versions): If you wish to disconnect your OWC Mercury drive
without shutting down your computer, simply drag the OWC Mercury drive icon to
the trash can on the desktop (or, in the dock using Mac OS X). Your drive is now safe to
Share your Mac formatted drive with your PC using MacDrive (optional purchase)
After installing MacDrive, your HFS+ Macintosh volume will mount as if the drive were
formatted in a native Windows format. MacDrive allows you to use your OWC Mercury
hard drive on either platform without having to reformat or re-initialize the volume.
We highly recommend this software for anyone that is sharing data in a cross platform
environment.
Reformatting your OWC Mercury Hard Drive
To reformat or re-initialize your OWC Mercury hard drive, visit our tech center for
directions using the OS you wish to format the drive with.
http://eshop.macsales.com/tech_center/index.cfm?page=data_fwhdd.html
Notes for use with older Macintosh systems
If you are using an older Macintosh system, or using a PCI card to interface with the
OWC Mercury Elite-AL Pro drive, we recommend using the included Intech Hard Disk
SpeedTools to tune the drive for optimum performance. Transfer errors or corruption
can be avoided by using this software. This is especially recommended if you are NOT
using Mac OS X.
Backup Software
To install and use the included backup software for Mac or
PC, please insert the software CD and follow the included
installation and operation instructions on the CD. Also, all
OWC Mercury Storage Solutions work perfectly with Time
Machine, a feature of Mac OS 10.5 “Leopard”.
Warranty Service
All OWC Mercury Elite-AL solutions include a 2-Year OWC Storage Solution Warranty,
behalf that at the expiration of the OWC 2-Year Storage Solution Warranty, the drive
mechanism within the enclosure will be covered for an additional 1 to 3 years by the
mechanism manufacturer. Please note, opening the enclosure prior to the expiration
of the 2-Year OWC Storage Solution Warranty will void the warranty. Thank you for
selecting Other World Computing as your technology solutions source, we hope you
enjoy your product.
OWC Mercury Elite-AL Pro Dual-Drive
USB 2.0 + USB 2.0 Powered Hub Storage Solution
We thank you for your purchase of your new OWC Mercury Elite-AL
Pro Dual-Drive Solution and are happy to provide you with one of
the newest, fastest, and easiest ways to add mass storage to your
computer!
For more information about USB 2.0, please visit our tech center at:
http://eshop.macsales.com/tech_center/index.cfm
Familiarize yourself with the connections on the back of the OWC
Mercury Elite-AL Pro Dual-Drive Solution - you will need to use these to
connect your new drive to your computer.
Hardware Installation:
Installation of the hardware is simple on any platform.
1. Plug the AC power cord into the wall and to the DC transformer.
2. Plug the DC power cord into the OWC Mercury Elite-AL
3. Connect the USB 2.0 cable into the drive and computer.
4. Power on the OWC Mercury Elite-AL. The power button is on the front of the drive
enclosure, you need to hold it for 3 seconds to turn the drive on or o.
You’re all set Enjoy your new storage device!
The OWC Mercury Elite-AL Pro Dual Drive USB 2.0 Solution has 1 additional feature.
• Front Push Button Backup (for Mac & PC) - software not included, and not supported by
OWC, but some 3rd party backup software can be congured to use this button.
Unpack your new OWC Mercury Elite-AL Pro Dual-Drive Solution and
examine it’s contents.
Before starting, if your new OWC Mercury Elite-AL Pro Dual-Drive Solution is delivered under extreme hot or cold conditions, you should allow
the contents of the package to reach room temperature prior to use.
Treat your new OWC Mercury Elite-AL Pro just like you do your
computer - keep it dry, out of direct sunlight, clean, and avoid static
electricity.
Installation / Setup Instructions
Macintosh Software Installation:
Mac OS X 10.2.8 and later: - Drivers not required. Proceed to hardware
installation.
Windows Software Installation:
Windows - ME & Higher: Drivers not required. For use with Windows
98SE or ME, it may be necessary to select the drive in the device
manager and specify it as a removable drive. Windows 2000/XP
users will have to create a signature for the drive in the Computer
Management control panel.
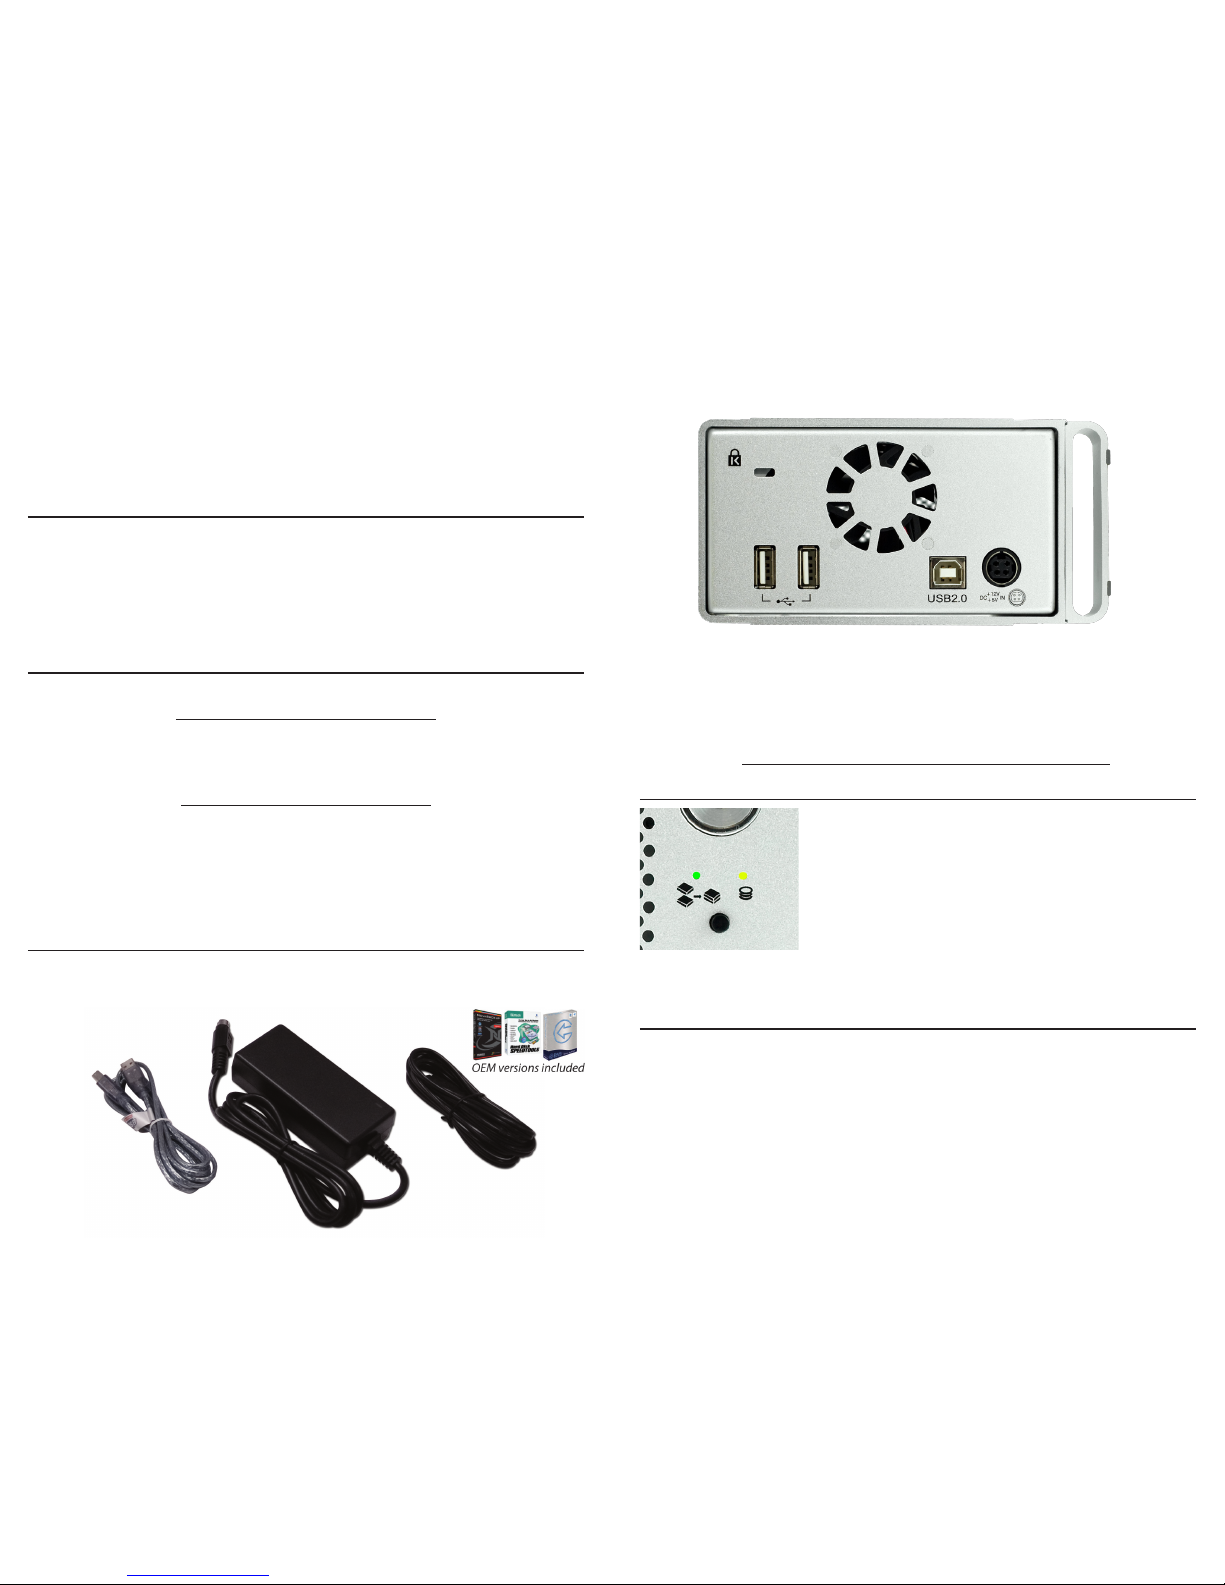
The rear of the OWC Mercury Elite-AL Pro Dual-Drive has a number of
ports that you will need to use to hook to your computer.
• A power receptacle, hook this to the included power transformer.
• A USB 2.0 uplink port; commonly known as a USB “A” type port.
• 2 USB “B” type ports for peripheral hookup - such as printer, or memory
card readers. The hard drive must be powered to use these ports.
• A Kensington Security Slot to secure your drive to a desk if necessary.
The front of the OWC Mercury Elite-AL Pro DualDrive solution has 2 LEDs on it that you should
recognize. The right yellow LED shows drive
activity - and will ash or remain steady while you
are reading or writing to the OWC Mercury Elite-AL
Pro Dual-Drive solution.
If the left green LED ashes, there may be a
problem with one of the internal hard drives, please contact support
for assistance. Also, the power button will glow blue when the drive is
powered on (not shown in this picture).
 Loading...