

Page 1
Advanced Wireless Devices
Page 2

CE
Owasys Advanced Wireless Devices SL (hereafter called as Owasys), the manufacturer of the product described in this manual, certifies that said product complies with all Radio and Telecommunications end
equipment regulations described in the directive 1999/5/EC, the requirements included in the EMC directive
89/336/EEC and the Low Voltage directive 73/23/EEC.
The reproduction of this document, in whole or in part, by any means electronic, mechanical, photocopying,
or recording, without the express written permission of
Owasys is forbidden.
January 2005 Edition
Owasys Advanced Wireless Devices SL (hereafter called as Owasys), publishes this manual without
warranty of its content.
Owasys reserves the right to make changes at any time and without prior notice to
improve and change this manual as necessitated by typographical errors, inaccurate information as printed,
or improvements to the product. These changes will be incorporated into new editions of this manual.
All rights reserved
© Owasys, 2005
Document Number: BOK-200 0005-P1C
Page 3

owasys22C
User’s guide
Advanced Wireless Devices
Page 4

1 General Information . . . . . . . . . . . . . . . .6
1.1 User Warnings . . . . . . . . . . . . . . . . . .6
1.2 Exposure to Electromagnetic
Radio Waves and SAR . . . . . . . . . . .12
1.3 Applicable Standards and
Regulations . . . . . . . . . . . . . . . . . . . .15
1.4 Technical Data . . . . . . . . . . . . . . . . .15
1.5 Practical Advice for the Care and
Maintenance of the Product . . . . . .16
1.6 Effective Use of the Product . . . . . .17
2 Getting Started . . . . . . . . . . . . . . . . . . . .18
2.1 Insertion and Removal
of the SIM Card . . . . . . . . . . . . . . . . .18
2.2 Installing the Battery . . . . . . . . . . . .20
2.3 Charging the Battery . . . . . . . . . . . .22
3 Turning the Phone On and Off . . . . . . .23
3.1 Turning the Phone On . . . . . . . . . . .23
3.2 Entering in the PIN . . . . . . . . . . . . .23
3.3 Turning the Phone Off . . . . . . . . . . .24
4 The Telephone . . . . . . . . . . . . . . . . . . . .25
4.1 Physical Description of
the Telephone . . . . . . . . . . . . . . . . . .25
4.2 Menu Structure . . . . . . . . . . . . . . . .32
5 Making and Receiving Calls . . . . . . . . .35
5.1 How to Make a Call . . . . . . . . . . . . .35
5.2 How to End a Call . . . . . . . . . . . . . . .35
5.3 How to Answer an Incoming Call . .36
5.4 Rejecting a Call . . . . . . . . . . . . . . . .36
5.5 Recalling the Most Recent
Numbers . . . . . . . . . . . . . . . . . . . . . .36
6 Phone Book . . . . . . . . . . . . . . . . . . . . . . .37
6.1 Find and Call . . . . . . . . . . . . . . . . . .37
6.1.1 Alphabetic Search . . . . . . . . . .38
6.2 New Contact . . . . . . . . . . . . . . . . . . .38
6.3 Edit Contact . . . . . . . . . . . . . . . . . . .39
6.4 Delete Contact . . . . . . . . . . . . . . . . .40
6.5 Phone Book Status . . . . . . . . . . . . . .41
6.6 Special Numbers . . . . . . . . . . . . . . .41
TABLE OF CONTENTS
3
Page 5

6.6.1 My Numbers . . . . . . . . . . . . . .41
6.6.2 Emergency Number . . . . . . . .42
6.6.3 Service Number . . . . . . . . . . .42
6.7 Copy Phone Book . . . . . . . . . . . . . . .42
7 Messages . . . . . . . . . . . . . . . . . . . . . . . .43
7.1 Send New Message . . . . . . . . . . . . .43
7.2 Unread Messages . . . . . . . . . . . . . . .44
7.3 Read Messages . . . . . . . . . . . . . . . .45
7.4 Sent Messages . . . . . . . . . . . . . . . . .45
7.5 Unsent Messages . . . . . . . . . . . . . . .46
7.6 Voice Mailbox . . . . . . . . . . . . . . . . . .46
7.7 Message Options . . . . . . . . . . . . . . .47
8 Configuration . . . . . . . . . . . . . . . . . . . . .48
8.1 Sounds and Alarms . . . . . . . . . . . . .48
8.1.1 Ring Volume . . . . . . . . . . . . . . .48
8.1.2 Vibrating Alert . . . . . . . . . . . . .48
8.1.3 Ringing Tones . . . . . . . . . . . . .49
8.1.4 Initial Tone . . . . . . . . . . . . . . . .49
8.1.5 Coverage Alert . . . . . . . . . . . . .49
8.2 Adjust Date and Time . . . . . . . . . . . .49
8.2.1 Set Time . . . . . . . . . . . . . . . . . .49
8.2.2 Changing the Hour Format . .50
8.2.3 Changing the Date . . . . . . . . .50
8.3 Locks . . . . . . . . . . . . . . . . . . . . . . . . .50
8.3.1 Lock the Card . . . . . . . . . . . . .50
8.3.2 Lock the Telephone . . . . . . . . .51
8.4 Voice Synthesis Configuration . . . . .51
8.4.1 Selecting the Speed
of the Spoken Voice . . . . . . . . .52
8.4.2 Selecting the Pitch
of the Spoken Voice . . . . . . . . .52
8.5 Versions . . . . . . . . . . . . . . . . . . . . . . .52
8.6 Factory Settings . . . . . . . . . . . . . . . .52
9 Call Information . . . . . . . . . . . . . . . . . . .53
9.1 Call Information . . . . . . . . . . . . . . . .53
9.2 Call Log Memory . . . . . . . . . . . . . . .53
9.3 Clear Call List . . . . . . . . . . . . . . . . . .53
10 Manage Calls . . . . . . . . . . . . . . . . . . . . .54
10.1 My Number . . . . . . . . . . . . . . . . . . .54
10.2 Call Divert . . . . . . . . . . . . . . . . . . . .54
10.3 Call Barring . . . . . . . . . . . . . . . . . . .55
10.4 Call Waiting . . . . . . . . . . . . . . . . . . .57
4
Page 6

11 Extras . . . . . . . . . . . . . . . . . . . . . . . . . . .58
11.1 Turning off the telephone . . . . . . . .58
12 Accesories . . . . . . . . . . . . . . . . . . . . . . . .59
13 FDA Statement . . . . . . . . . . . . . . . . . . . .60
14 Manufacturer´s Limited Warranty . . . .68
INDEX OF FIGURES
Insertion of the SIM Card . . . . . . . . . . . . . .19
Placement of the battery . . . . . . . . . . . . . . .20
Removing the battery . . . . . . . . . . . . . . . . .21
Front view of the owasys22C . . . . . . . . . . . .26
Side connectors on the owasys22C . . . . . .31
INDEX OF TABLES
Alphanumeric keypad on
the owasys22C . . . . . . . . . . . . . . . . . . . . . . .30
5
Page 7
1 GENERAL INFORMATION
The information contained in this user’s guide is written for the Owasys mobile phone model
owasys22C in 2 different versions: GSM 900/1800 and GSM 850/1900.
Export controls
This product is subject to export laws and regulations from the U.S. and other countries. Diversion
contrary to law is prohibited.
1.1 User Warnings
Before using your owasys22C mobile phone, carefully read the following instructions:
Using your mobile phone while driving:
Consult your local laws and regulations to see if they restrict the use of mobile phones while driving.
The regulations require you keep your hands free. Always keep your attention on your driving. Leave
the road and park before answering your phone or making a call if the driving conditions require it.
The radio waves emitted by your phone can interfere with certain electronic systems in your car,
such as audio equipment, security devices, etc. Some automobile manufacturers do not allow
6
Owasys will not be held responsible for the consequences resulting from improper
use of the telephone or the non-compliance with the guidelines and instructions
contained in this manual.
Page 8

the use of a phone unless the automobile is equipped with a hands-free device and an external
antenna. Consult with the dealer you purchased your car from to see if your mobile phone will
interfere with the electronic systems on your car.
Do not place any objects or devices over the air bag or in the deployment area. If the air bag
were to inflate, it could cause serious injury.
Electronic Devices
The majority of modern electronic equipment, such as the equipment in hospitals and cars, is
protected against radio waves. However, some equipment is not. For this reason, we recommend that you turn your phone off in hospitals and health centers as it may affect the functioning of some medical equipment (deaf-aids, pacemakers...) Avoid placing the phone near any
medical equipment in question. A distance of 15 cm between the phone and the device reduces
the risk of interference. For example, when answering the phone, use it on the side of the body
oppo-site from the device.
If you use some other type of medical device, consult with the device’s maker to see if it is protected from external radio wave emissions.
Turn the mobile phone off when you are in areas that have signs requiring you to do so.
Pacemakers
The Health Industry Manufacturers' Association recommends that a minimum separation of 6
inches (15 cm.) be maintained between a handheld wireless phone and a pacemaker to avoid
potential interference with the pacemaker.
These recommendations are consistent with the independent research by and recommendations of Wireless Technology Research.
7
Page 9

To minimize the potential for interference persons with pacemakers
• Should always keep the phone more than 6 inches (15 cm.) from their pacemaker when the
phone is switched on
• Should not carry the phone in a breast pocket
• Should use the ear opposite the pacemaker to minimize the potential for interference
• Should turn the phone OFF immediately if there is any reason to suspect that interference is
taking place.
Airplanes
Do not use the mobile phone inside aeroplanes as it can create interference with the flight
equipment that uses radio waves. Turn the phone off before boarding the plane. To prevent
interference with the in-flight communications systems, refrain from using the mobile phone
while the aeroplane is in the air.
Also, do not use the phone on the ground until the flight crew has given you permission.
Detonation Areas
Do not use the phone in detonation areas or areas with signs warning to turn off mobile phones. This is to prevent interference with the detonation operations.
Explosive Atmospheres
Turn off the phone in areas that may be explosive. It’s uncommon, but the phone or accessories
could generate sparks that may set off explosions or fires that will cause personal harm. Areas
that may be this way should be well marked with signs.
Do not transport or store flammable or explosive liquids or gasses in the same vehicle compartment with the mobile phone or its accessories.
8
Page 10

Vehicles with an Air Bag
Do not place a portable phone in the area over an air bag or in the air bag deployment area. Air
bags inflate with great force. If a portable phone is placed in the air bag deployment area and
the air bag inflates, the phone may be propelled with great force and cause serious injury.
Electric Supplies
Plug the alternating current (AC) electric adapter only into outlets as shown on the product.
To reduce the risk of damage to the cable, remove it from the outlet only by supporting it by the
alternating current adapter.
To reduce the risk of electric shock, disconnect the unit from the outlet before cleaning it.
Be sure the cable is not walked on, is not tense, and is not exposed to damage.
The alternating current adapter should not be used in the open air or in damp conditions.
Do not change the cable or the alternating current plug. An improper connection can produce
electric discharges.
Children
Keep children away from the phone and its accessories. They can injure themselves or accidentally cause damage to the phone or its accessories.
Keep the removable SIM card out of the reach of children as there is a risk they could swallow it.
Disposal of the Mobile Phone
Do not throw the phone in the trash. Consult your local regulations regarding the disposal of
electronic products.
9
Page 11

Emergency Calls
Remember that for the phone to be able to make and receive calls, it needs to be turned on and
have coverage. Consult with the network operator about the possibility of making emergency calls.
In any case, do not rely solely on the mobile phone to make emergency calls.
When making an emergency call, remember to give all of the necessary information as accu-
rately as possible. Remember that your wireless phone might be the only means of communication at the scene of an accident, therefore you should not terminate the call until given permission to do so.
The world-wide GSM emergency number is 112. In many areas of the United States and Canada,
the number is 911. In other countries other emergency numbers may exist.
Information Regarding the Battery
The battery that comes with your phone is not completely charged. We recommend you charge
it at least three hours before first using it.
The time it takes to talk and standby depends on the transmission conditions while using the
phone. If you use the mobile phone close to a base station, less power is required and the wait
time becomes longer.
Only use batteries, chargers, and accessories that are compatible with the model of your phone
and are recommended by Owasys. Using inappropriate equipment can generate health risks or
can damage the equipment because of incompatible devices.
Do not expose your battery to extreme temperatures above 60 ºC. To maximise the battery capacity, use it at room temperature. At lower temperatures, the battery life is reduced.
Turn the phone off before removing the battery.
10
Page 12

Do not expose your phone to direct sunlight for prolonged periods of time.
Do not let the metallic contacts on the battery come in contact with other metallic objects.
Doing so would produce a short circuit that will damage the battery.
Do not try to disassemble the battery.
Do not expose the battery to flame or liquids.
Do not place the battery in your mouth.
Dispose of batteries and telephones respecting the environmental regulations in place.
Hands-Free Mode
Your phone includes a powerful speaker that can function in hands-free mode. To avoid damaging
your hearing, avoid placing the speaker to your ear when this mode is engaged.
FCC Statements
Modification statement:
Any changes or modifications made to this device that are not expressly approved by Owasys SL
may void the user´s authority to operate the equipment.
Interfence statement:
This device complies with Part 15 of the FCC Rules. Operation is subject to the following two
conditions: (1) this device may not cause harmful interference, and (2) this device must accept
any interference received, including interference that may cause undesired operation.
NOTE: This equipment has been tested and found to comply with the limits for a Class B digi-
tal device, pursuant to Part 15 of the FCC Rules. These limits are designed to provide
reasonable protection against harmful interference in a residential installation. This
equipment generates, uses and can radiate radio frequency energy and, if not installed and
11
Page 13

used in accordance with the instructions, may cause harmful interference to radio communications. However, there is no guarantee that interference will not occur in a particular installation. If this equipment does cause harmful interference to radio or television reception, which
can be determined by turning the equipment off and on, the user is encourage to try to correct
the interference by one or more of the following measures:
- Reorient or relocate the receiving antenna.
- Increase the separation between the equipment and receiver.
- Connect the equipment into an outlet on a circuit from that to which the receiver is connected.
- Consult the dealer or an experienced radio/TV technician for help.
1.2 Exposure to Electromagnetic Radio Waves and SAR
European Union Requirements
THE owasys22C GSM 900/1800 VERSION MOBILE TELEPHONE OPERATES WITHIN THE ELECTROMAGNETIC RADIATION LIMITS ESTABLISHED BY THE EUROPEAN UNION (EU) FOR THE PROTECTION OF THE HEALTH OF THE USER. These limits form part of a set of demands developed by independent investigation organisations and establish the limits of electromagnetic radiation exposure to
the general public, regardless of age or state of health, including a considerable margin of error.
The limit recommended by the European Council is measured with the Specific Absorption Rate, or
SAR, and it is 2 watts/kilogram. This value is the unit of measure of radiation that the body absorbs
while using a mobile phone. The tests were performed with using the maximum power level in all
frequency bands and in standard working conditions. While the SAR is evaluated at its maximum
power level, the actual SAR level while using the phone is generally lower than the values obtained
in the tests. Thus your phone is designed to assure your connection to the network. The closer you
are to a phone tower antenna, the lower the power levels that your phone uses will be.
12
Page 14

The SAR variations under those indicated by the directives regarding electromagnetic energy
exposure do not translate into variations in safety, and although differences can exist in the SAR
levels between different mobile phone models, all must be designed to operate within the directives of electromagnetic energy exposure.
All Owasys mobile phone models are designed to function inside these levels and include an
ample margin of safety in order to guarantee safety to all persons, regardless of their age or
health, and to avoid any measurement variations.
Your owasys22C mobile phone is equipped with an integrated antenna. To achieve the best connection, avoid covering the antenna area on the upper part of the back.
FFCCCC RReeqquuiirreemmeenntts
s
THE owasys22C GSM 850/1900 version MOBILE TELEPHONE MEETS THE U.S. GOVERNMENTS’S REQUIREMENTS FOR EXPOSURE TO RADIO WAVES.
Your wireless phone is a radio transmitter and receiver. It is designed and manufactured not to
exceed the emission limits for exposure to radio frequency (RF) energy set by the Federal
Communications Commission of the U.S. Government. These limits are part of comprehensive
guidelines and establish permitted levels of RF energy for the general population. The guidelines are based on standards that were developed by independent scientific organizations
through periodic and thorough evaluation of scientific studies. The standards include a substantial safety margin designed to assure the safety of all persons, regardless of age and health.
The exposure standard for wireless mobile phones employs a unit of measurement known as
the Specific Absorption Rate, or SAR. The SAR limit set by the FCC is 1.6W/kg. Tests for SAR are
conducted using standard operating positions accepted by the FCC with the phone transmitting
at its highest certified power level in all tested frequency bands. Although the SAR is determined at the highest certified power level, the actual SAR level of the phone while operating can
13
Page 15

be well below the maximum value. This is because the phone is designed to operate at multiple power levels so as to use only the power required to reach the network. In general, the closer you are to a wireless base station antenna, the lower the power output.
Before a phone model is available for sale to the public in the US, it must be tested and certified to the FCC that it does not exceed the limit established by the government for safe exposure. The tests are performed in positions and locations (for example, at the ear and worn on the
body) as required by the FCC for each model.
Body-worn measurements differ among phone models, depending upon available accessories
and FCC requirements.
While there may be differences between the SAR levels of various phones and at various positions, they all meet the government requirement.
The FCC has granted an Equipment Authorization for this model phone with all reported SAR
levels evaluated as in compliance with the FCC RF exposure guidelines. SAR information on this
model phone is on file with the FCC and can be found under the Display Grant section of
http://www.fcc.gov/oet/fccid after searching on FCC ID: SJE13EASJE.
For body worn operation, this phone has been tested and meets the FCC RF exposure guidelines for use with an accessory that contains no metal and that positions the handset a minimum
of 5/8 inch (1.5 cm) from the body. Use of other accessories may not ensure compliance with
FCC RF exposure guidelines.
In the United States, the SAR limit for mobile phones used by the public is 1.6 watts/kilogram
(W/kg) averaged over one gram of tissue. The standard incorporates a substantial margin of
safety to give additional protection for the public and to account for any variations in measurements.
14
Page 16

1.3 Applicable Standards and Regulations
Declaration of Conformity (European Union)
Owasys, the manufacturer of the product owasys22C GSM 900/1800 version described in this
manual, certifies that said product complies with all Radio and Telecommunications terminal
equipment regulations described in the directive 1999/5/EC (R&TTE), the requirements included in the EMC directive 89/336/EEC and the Low Voltage directive 73/23/EEC.
Regulations and Standards applicable in the United States
Owasys declares that the owasys22C GSM 850/1900 version meets all basic requirements and
applicable FCC regulations for radio transmitting and receiving equipment.
The owasys22C GSM 850/1900 version mobile telephone meets all applicable requirements as
defined in the following regulations and standards:
- Applicable FCC 47 CFR rules
- PTCRB (PCS Test Certification Review Board) NAPRD.03_TC v 2.11.2
- MET marking Electrical Safety requirements
1.4 Technical Data
The owasys22C is available in 2 different versions. There is a GSM 900/1800 version for Europe
and other countries and a GSM 850/1900 version mainly for America.
• Weight: 125 g
• Dimensions: 118x49x27 millimetres
15
Page 17

• Dual Band version (GSM 900/1800)
— EGSM 900 MHz Class 4 (2 watts)
— GSM 1800 MHz Class 1 (1 watts)
• Dual Band version (GSM 850/1900)
— GSM 850 megahertz Class 4 (2 watts)
— GSM 1900 megahertz Class 1 (1 watts)
• GPRS Class 8 Class B
• Li-Ion Battery: 1500 mAh
• Working temperatures: -10ºC to +55ºC
• SIM Card: 3 V (This phone is compatible only with 3V SIM cards)
1.5 Practical Advice for the Care and Maintenance of the Product
• Do not expose the phone to dampness or liquids.
• Do not expose the phone to extreme temperatures.
• Keep the phone away from lighted candles, cigarettes, cigars, flames, etc.
• Protect your phone from dropping. Do not throw it or try to fold it. You can damage it.
• Do not paint the phone as paint will obstruct the receiver, the microphone, or the moving pieces and impede their proper functioning.
• Do not try to disassemble the product. The phone does not contain components that the consumer can replace. Only personnel authorised by Owasys may make repairs.
• If the phone is not going to be used for a prolonged period of time, it is good to remove the
battery as leaving it in will cause the battery to drain, even if the phone is turned off.
16
Page 18
• Your phone is equipped with an internal antenna. Do not try to manipulate or extract the
antenna. The phone’s performance may be affected and the SAR levels may go beyond recommended limits.
1.6 Effective Use of the Product
Maintain the mobile phone in the same way you would maintain any other phone, but being
careful not to obstruct the antenna area (in the upper part of the back). Covering the area will
reduce the quality and the phone may need more energy to function. Also, the talk-and-wait
times may be reduced.
17
Use only original accessories recommended by Owasys. Using other accessories could adversely affect your telephone, damaging it, causing fires, electrical discharges, or personal bodily
harm. The warranty does not cover problems to your telephone caused by using accessories
not recommended or provided by Owasys.
Page 19
1
When it is necessary to deactivate the SIM card lock,consult you service provider
18
2 GETTING STARTED
Before using your phone, it is necessary to insert the SIM card and charge the battery.
2.1 Insertion and Removal of the SIM Card
The SIM card contains all the main data necessary to connect (your phone number and phone
book), and uses an associated security code and PIN
1
.
To insert the card:
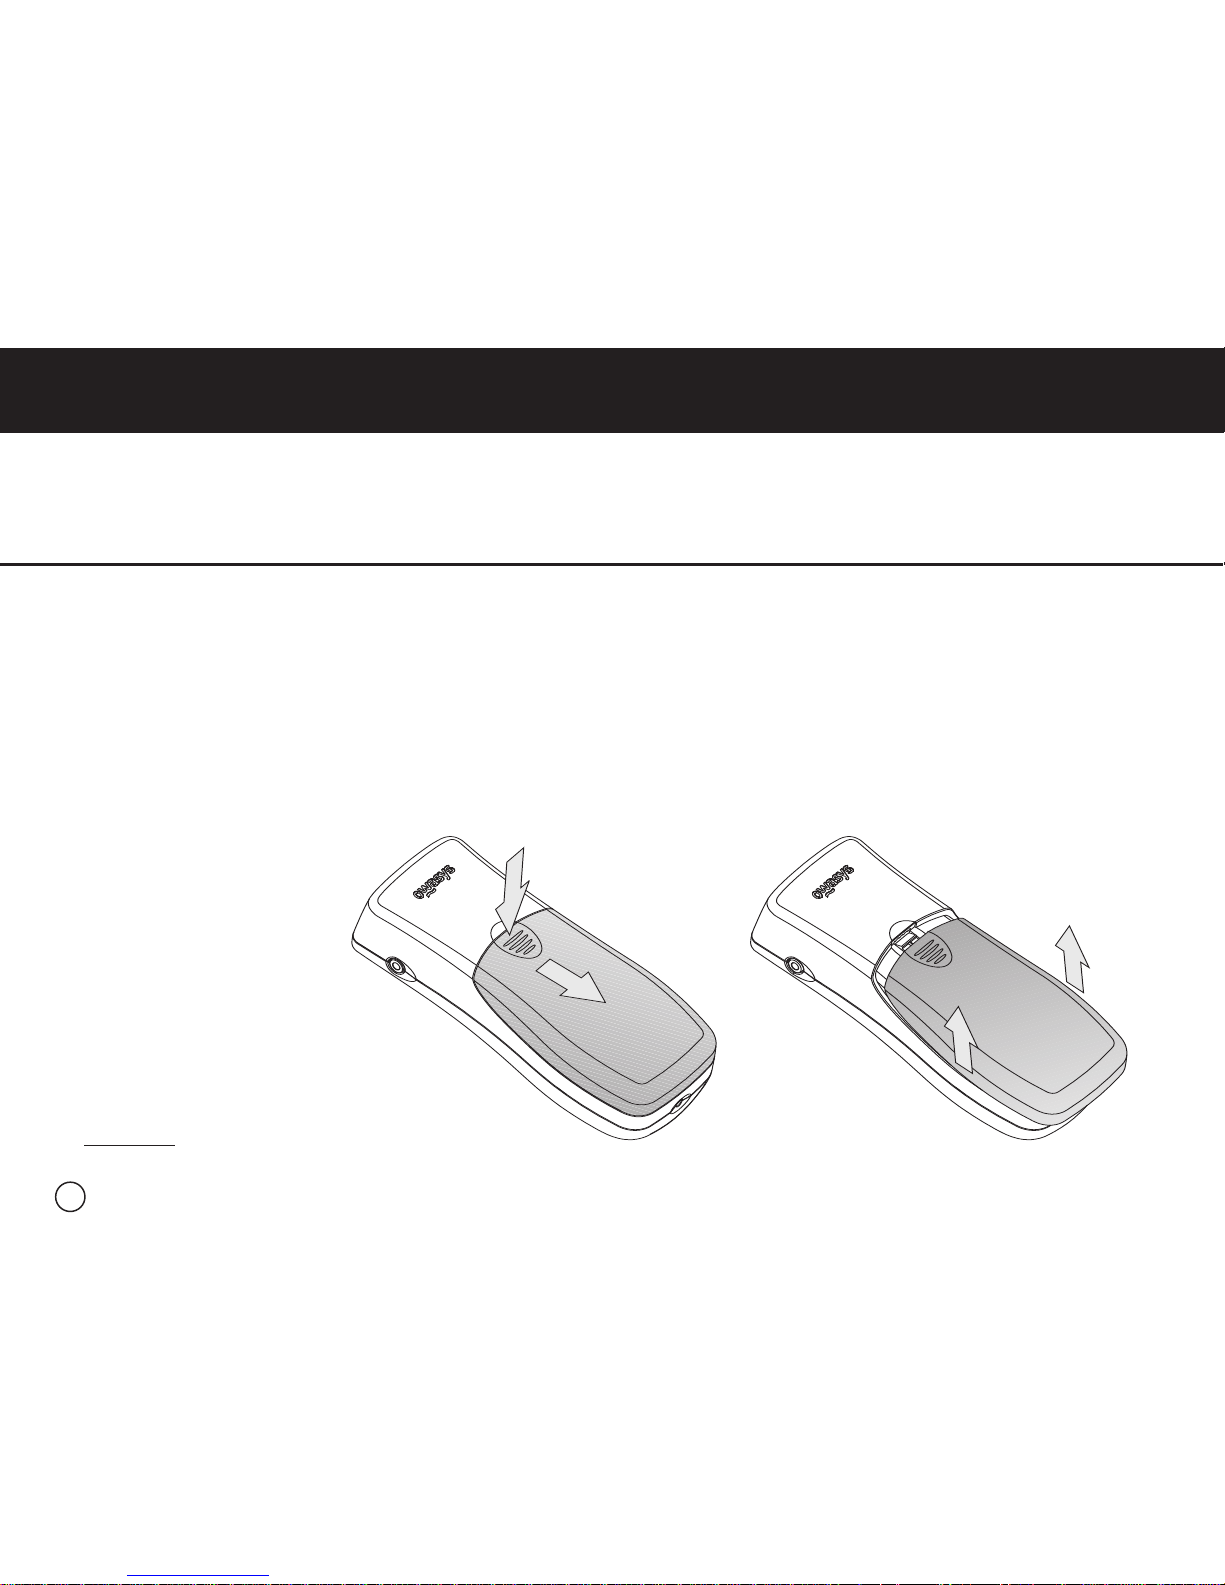
1. Remove the covering on the back part of the phone by pressing down on the ribbed indenta-
tion while simultaneously pushing the covering towards the bottom of the phone. Once the
catch is free, simply lift the covering off.
2. Place the SIM card with the contact surface downwards, such that the clipped corner remains
in the top right.
Page 20
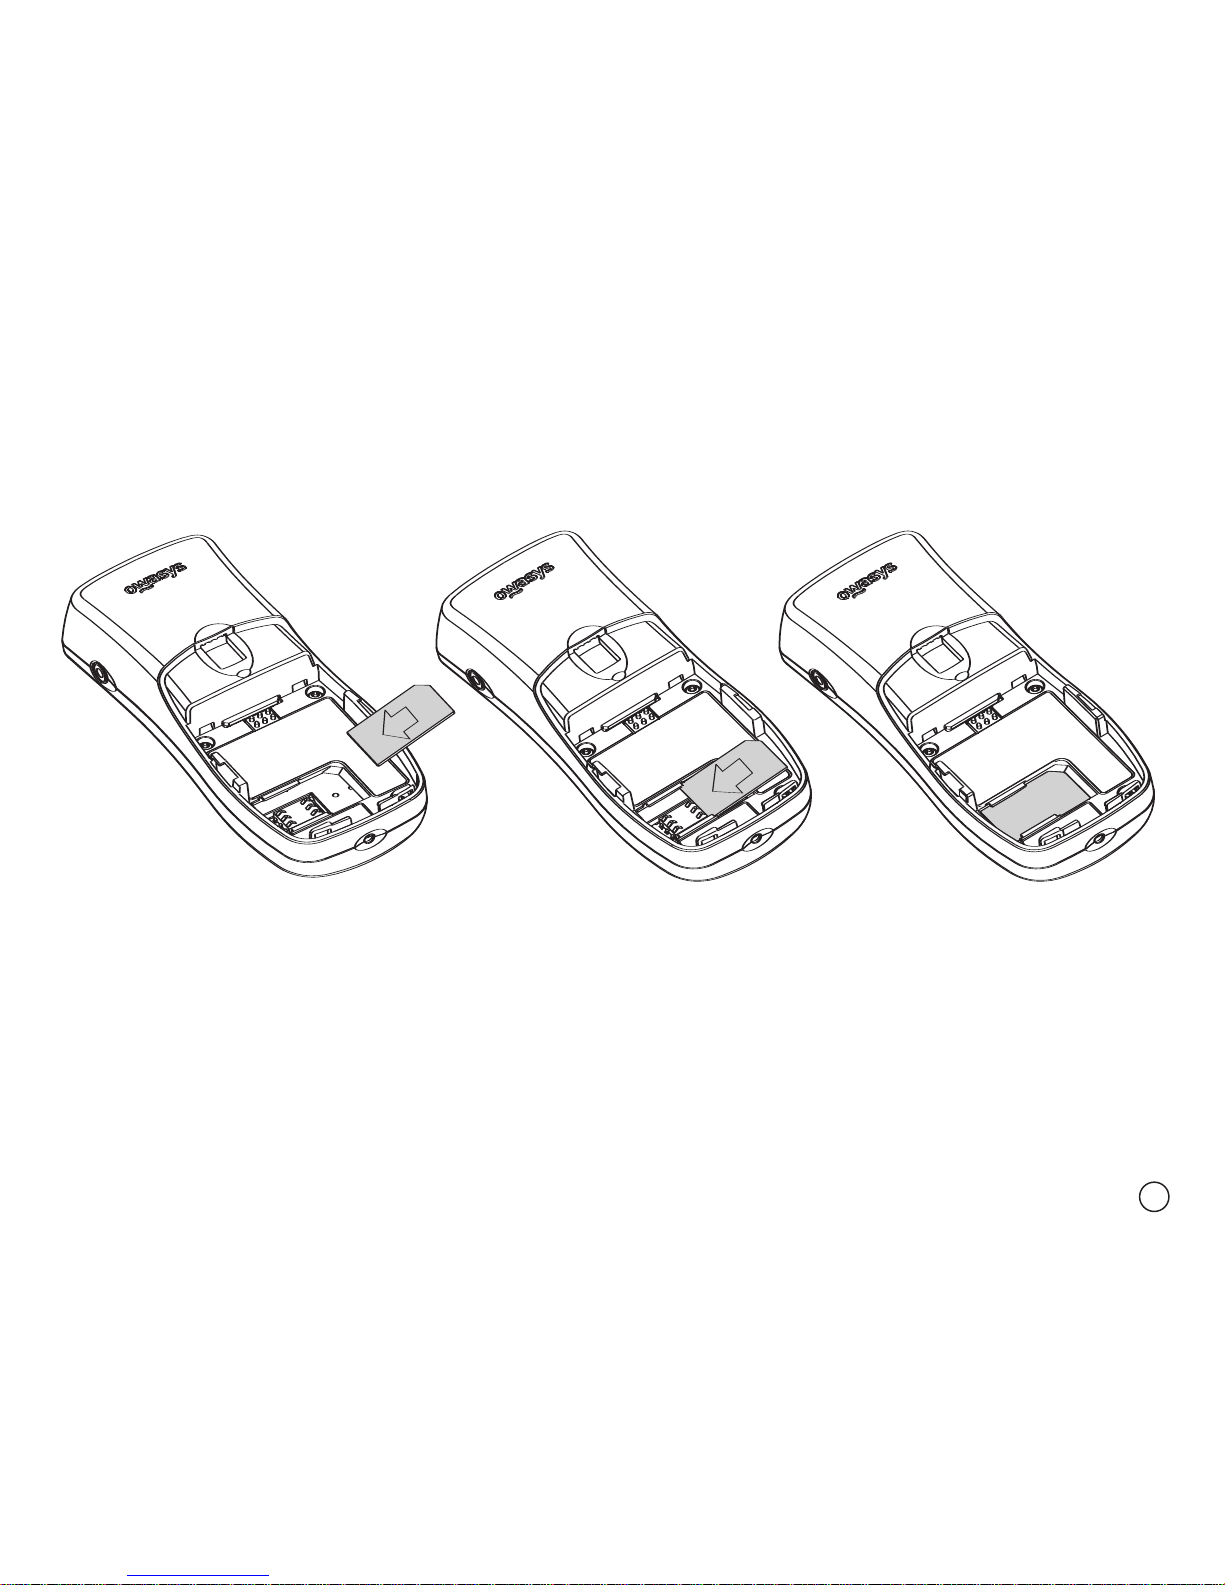
3. Slip the card into place. Be sure that it is placed below the lateral supports situated on either
side of the compartment.
To remove the card:
1. Turn the phone off.
2. Remove the back covering by simultaneously pressing down on the ribbed indentation and
pushing the covering towards the bottom of the phone. Lift the cover up to remove it.
3. Slide the card to remove it from its place.
19
Insertion of the SIM Card
Page 21
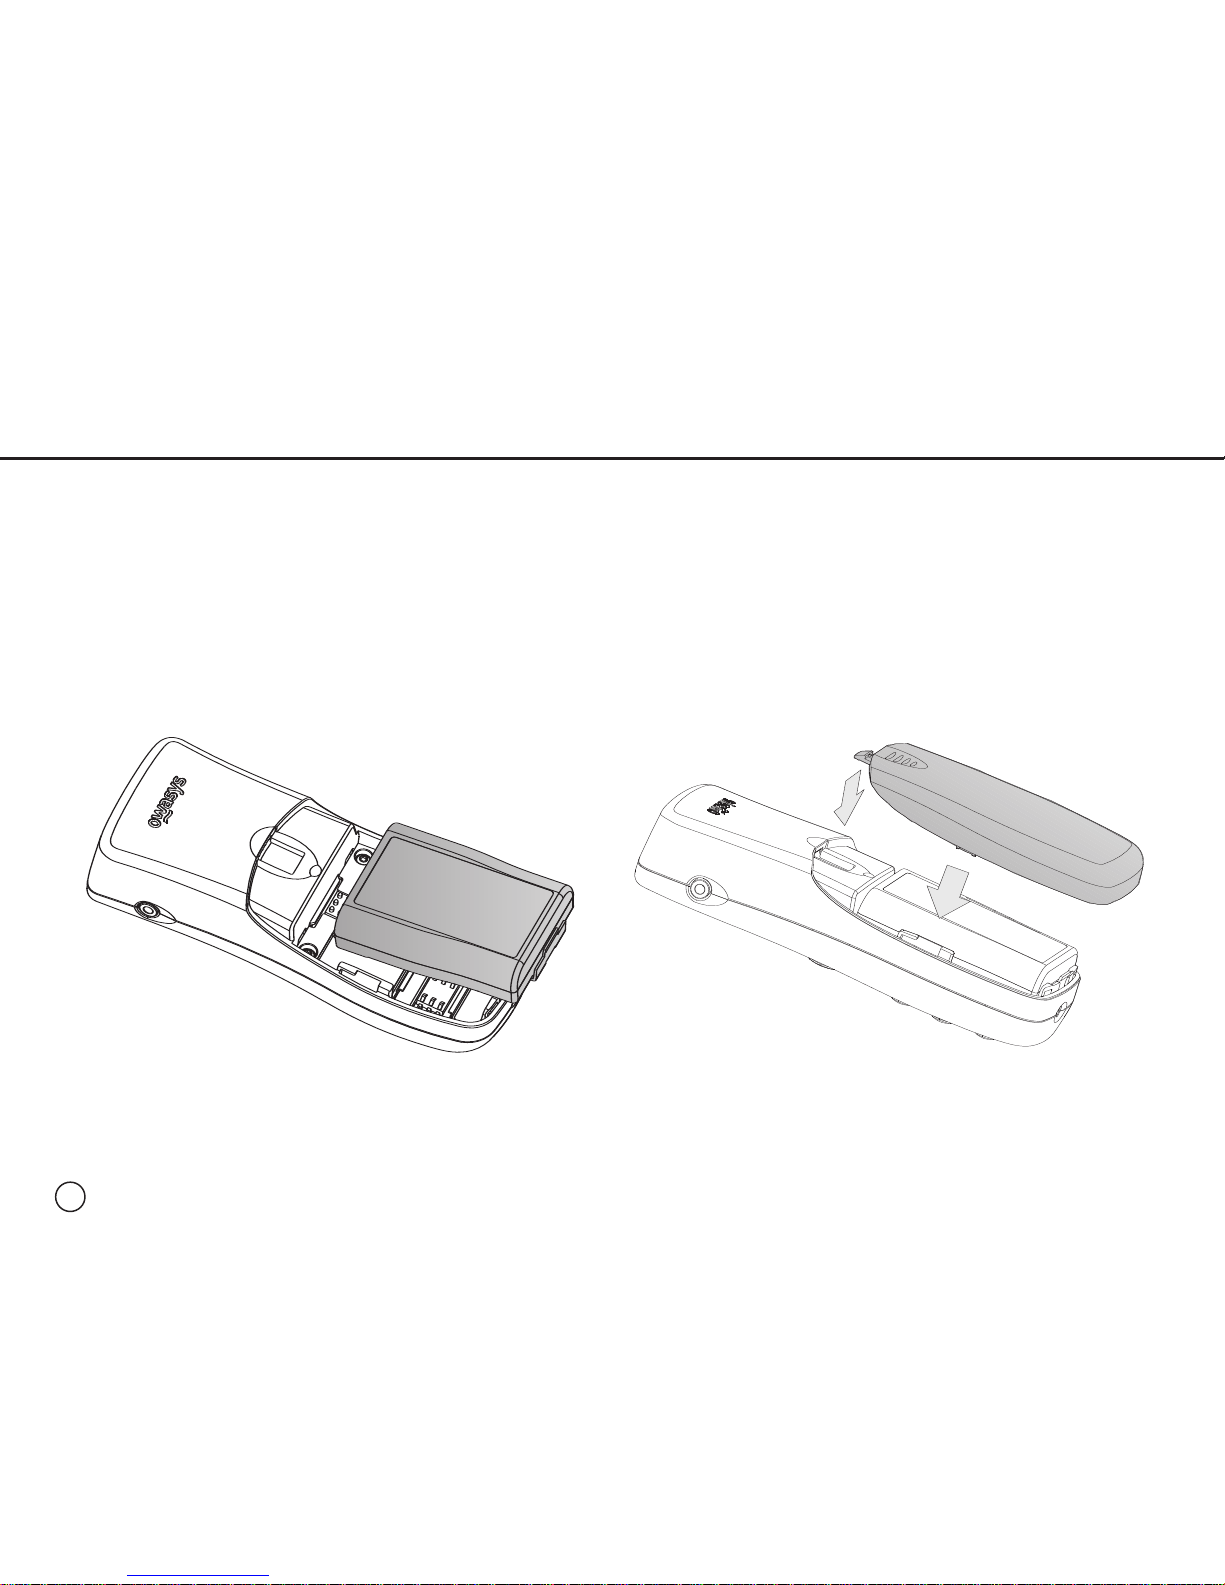
2.2 Installing the Battery
To install the battery, once the cover is removed:
1. First place the upper part in, making sure that the catches situated on the upper part of the
battery fit into the corresponding slots in the telephone.
2. Press down on the battery until you hear the catch on the bottom of the battery click into its
compartment.
3. Replace the back covering.
20
Placement of the battery
Page 22
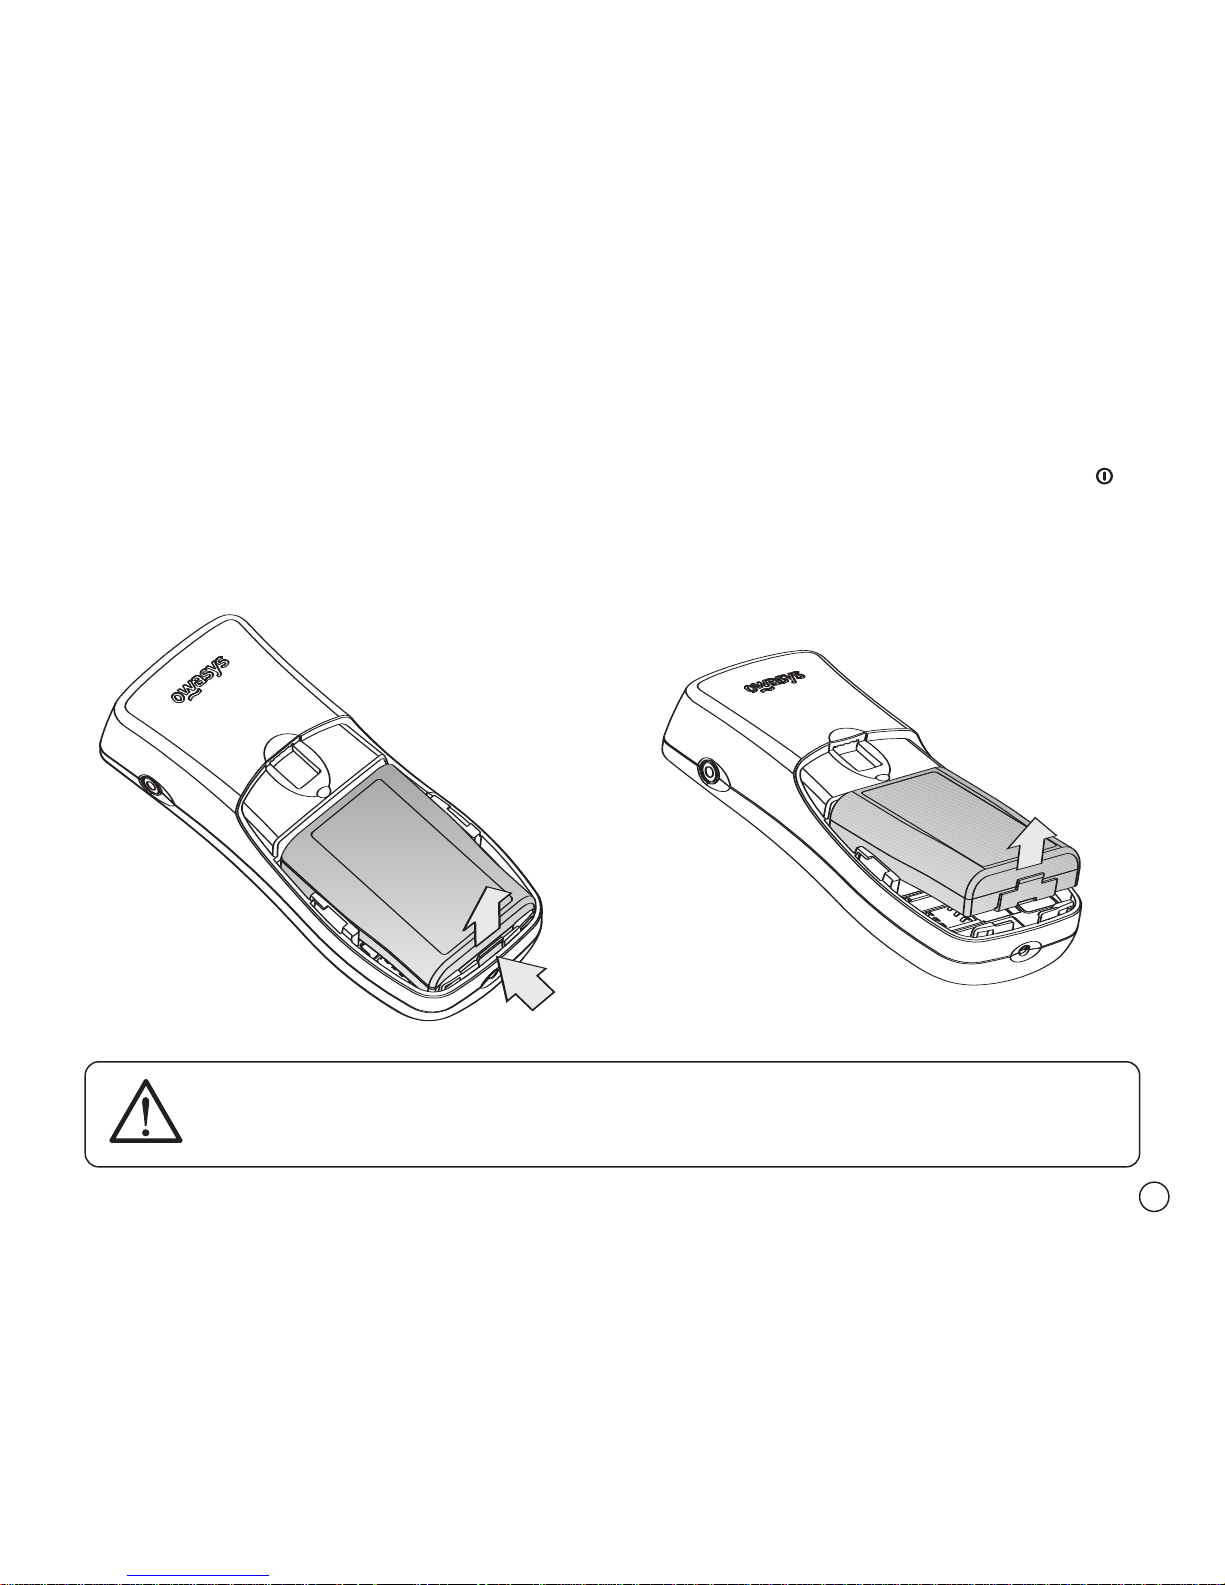
Removing the battery
Turn off the phone before removing the battery.
21
To remove the battery:
4. The phone should be turned off. This is done by pressing and holding the On/Off button .
5. Once off, press on the clip at the base of the battery to free it and then lift up on it to remove.
6. Support the lower lid over the telephone in such a way that the closing catch stays in its cavity.
Push upwards until you hear a click.
Page 23
2.3 Charging the Battery
Connect the phone charger to the appropriate connector situated on the base of the phone. The phone
has a small indentation which will help you to easily locate this connector.
A short acoustic signal will indicate that charging has begun. If during charging the phone is disconnected it will indicate “Only charging” and the lighted indicator will remain on. If the telephone is connected, the status key will indicate "Battery charging". Also it will inform about the complete charging.
Disconnect the battery charger and if you wish, consult the battery power level with the
Status
key
.
When the battery power level is low, you will hear a beep repetitive and receive a low battery
level warning by pressing the
Status key . If you do not recharge the phone, the beeping will
repeat several times until the phone no longer has enough battery to power itself and it turns
itself off.
Before using the phone for the first time, you should charge the battery for at least 3 hours.
3
22
Use only compatible chargers and accesories (those recommended by Owasys) for
your phone model. Owasys disclaims any responsibility for damage caused by the
use of accesories not compatible with your phone.
Page 24
23
3 TURNING THE PHONE ON AND OFF
3.1 Turning the Phone On
To turn your mobile phone on, press and hold the Power key on the right bottom of the keypad .
The phone will vibrate and emit a start up melody to let you know it has been turned on
correctly. Please wait for a few seconds to let your phone carry out this operation. Once it is
finished, you will hear the message “Welcome to the Owasys22C”.
3.2 Entering In the PIN
Once the phone is turned on, you will hear the message “Insert PIN code”. Enter in the 4 digits
PIN code associated with your SIM card using the alphanumeric keypad. Once entered, press
Accept .
If the PIN has not been entered in correctly, you will be asked to re-enter the PIN.
If you incorrectly enter in the PIN three times in a row, the SIM card will lock. To unlock the SIM
card, you will be asked to enter in the 8 digits PUK code (Personal Unlocking Key) code, that has
been provided to you by your telephone operator.
Your owasys22C telephone includes latest-generation software and complex text tospeech mechanisms. This is the reason why switching the phone on takes more time
than for other mobile phones.
Page 25
The registration of the phone in the network will take a few seconds and during this time the
start-up melody will sound. Once a network has been located, your phone will be in STANDBY
mode, ready to send and receive calls.
During this time the telephone will work in private mode (speaker low, hands-free deactivated).
After the telephone has been logged on to the network, it is possible to change to the handsfree mode by pressing the
Hands-Free key .
3.3 Turning the Phone Off
From the standby mode, press and hold the Off key (extreme bottom right of the keypad). The
telephone will ask for confirmation. While turning off, the phone will emit a beep with a vibration and the message “Thank you for using Owasys22C” to let you know that it has turned off
correctly.
You can also turn de telephone off using the menu
Extras (6)/Switch off phone (1)
. For further
information go to Chapter 11 in this manual.
24
If you have forgotten or you do not know your PIN code, check the phone information
or contact your operator. Do not leave the PIN code near the telephone and keep
your SIM card and phone in safe place when you are not using them.
If you want to switch the phone off using the switch off key, you must stay in
stand-by mode.
Page 26

4 THE TELEPHONE
4.1 Physical Description of the Telephone
The front part of your owasys22C telephone includes:
1. Two grooves situated on the upper part of the phone, which covers the speaker. Try not to
obstruct these grooves when the telephone is being used in hands-free mode, as it can affect
the quality of the sound.
2. The
microphone is a small hole located in the lower right of the telephone. Avoid covering this
hole during a call as it will affect the sound quality and make communicating with the other
end more difficult.
3. The
keypad, with which it is possible to access all the available functions on the telephone. It
is made up of a total of 18 keys, formed in three columns of six rows each:
• The three keys located in the first row are, from left to right, the shortcut to the
Phone Book,
the
Hands-Free Mode configuration, and the Phone Status key.
• The second row includes, again from left to right, the
Call/Accept key, the Navigate by Menu
key, and the Hang Up/Cancel/Erase key. The navigation key can be pressed either on the top
or the bottom. In order to differentiate the two, the navigation key has two indentations.
Also, the central part of the navigation key contains an indicator light showing the phone’s
status (on, off, charging battery, etc.)
• The alphanumeric keys are self-explanatory. In addition to letters and numbers, the keys
situated on either side of the last row also act as shortcuts to the
keypad Lock/Unlock fea-
ture and the
Power button.
25
Page 27
26
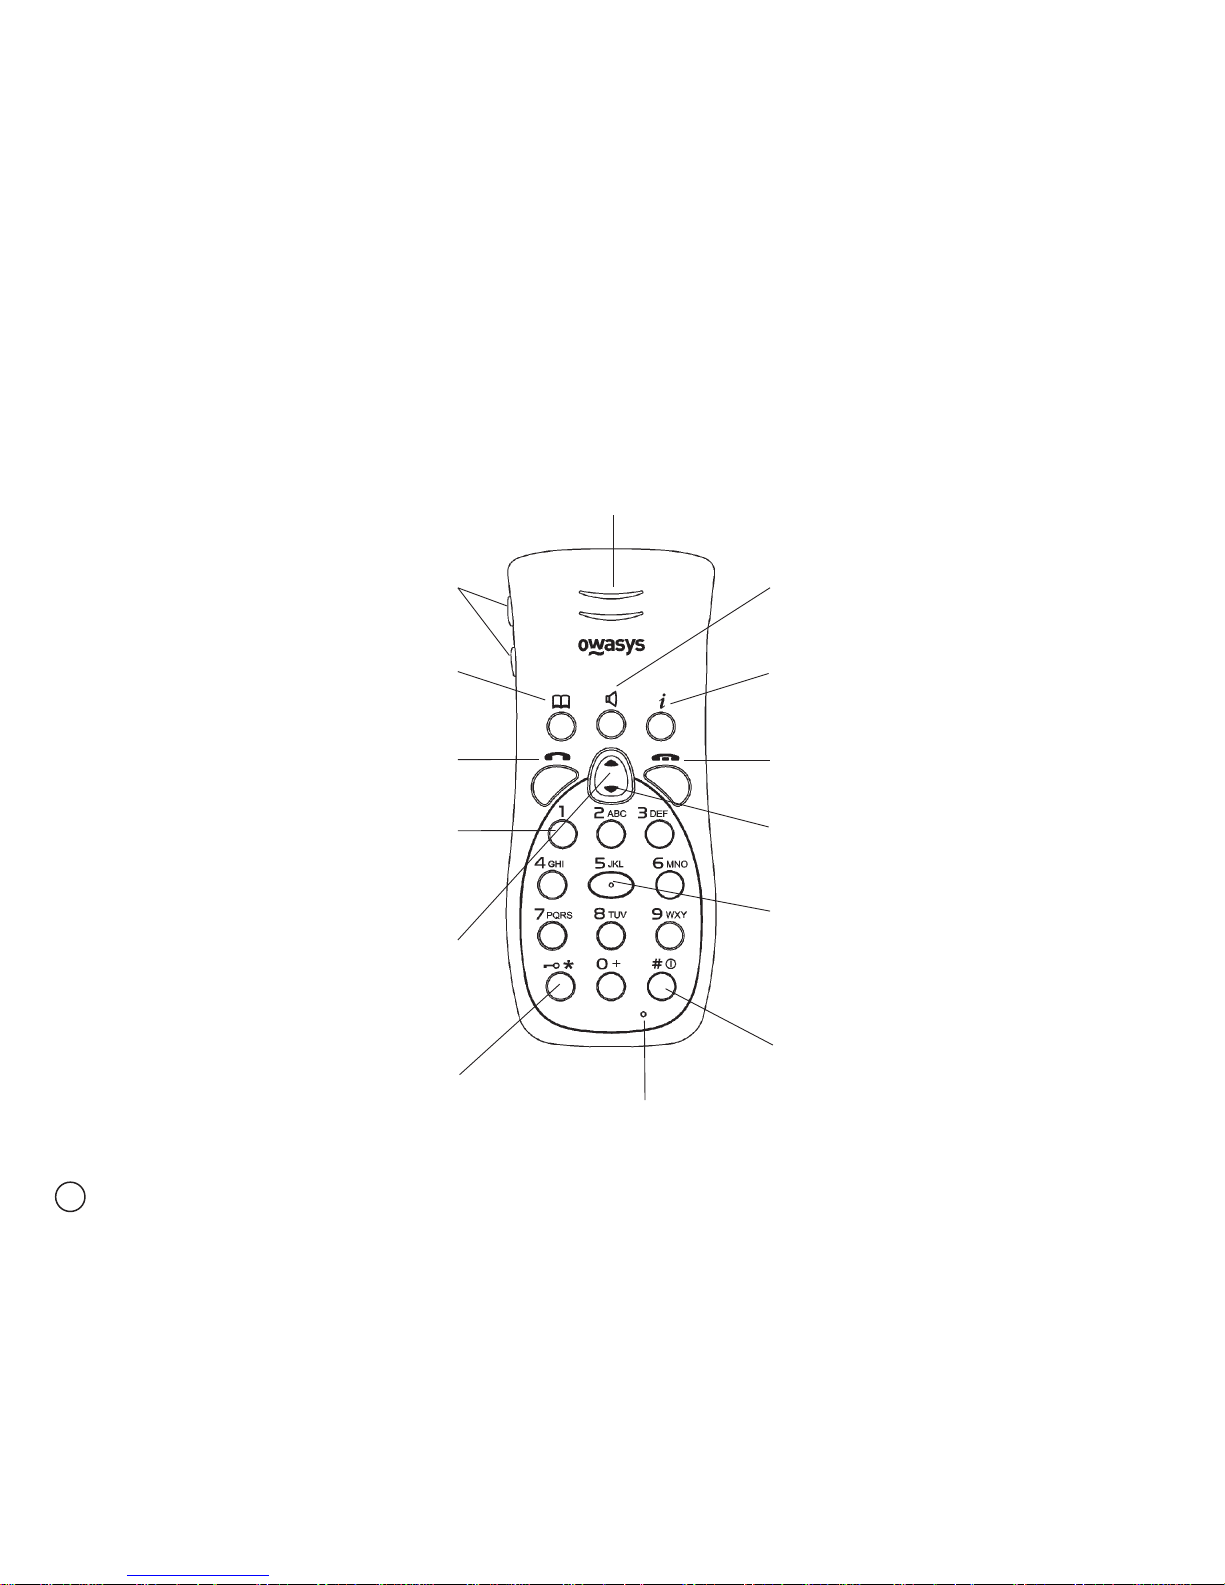
Below is a general diagram of the front of the telephone, detailing the functions of each key as
was explained earlier.
Front view of the owasys22C
Speaker
Handsfree
Hang up/Cancel/Delete
Navegation keys
Silent mode
Turn ON/OFF
Microphone
Keypad
Lock/Unlock
Lighting Indicator
Voicemail
Call/Accept
Phone book
Volume
Status key
Page 28

Phone book
Allows direct access to the list of stored names in the phone list, listed in alphabetical order.
Hands-Free
This is used to go from
handset mode
(with the speaker turned down, or before connecting the
portable hands-free device) to
hands-free mode
in which the speaker has the volume turned up,
and vice-versa.
When going from the private mode to the
hands-free
mode, you will hear the message “
Hands-
free mode
”. When activating private mode, you will hear the message “
Handset mode
”.
Status key
This key provides information about the status of the telephone, (missed calls, and unread messages).
Pressing and holding the key for a while from
standby mode
and pending events provides access
to the following information once the key is released:
•
Number of unread messages. This tells the number of messages that have not been read.
Press the Accept button to access the list of messages that have not been read. You will hear
the date, time, and telephone number or name of the person that sent you the message. Use
the navigation keys to choose the message that you want to read and press
Accept .
•
The number of missed calls. This tells the number of calls you have missed. Press the Accept
key
to access to the list of the missed numbers. The list will indicate the telephone num-
ber (or name contact), date, and time of the calls.
•
Indication of "SMS mailbox full". When this happens the telephone will not be able to receive
more SMSs until you delete any SMS of the list of received messages.
•
Indication of "Silent mode". It tells you that the silent mode is enabled, so all the ringing tones
will be substituted by the vibrator.
27
Page 29

• Operator which provides the service. In the case that there is no coverage, this will be indica-
ted with “No Network”. If it is only possible to make emergency calls, the phone will indicate
this with “Only emergency calls”.
•
Coverage level (Excellent, good, fair, poor, bad). If there is no coverage, it will tell "No coverage" and the Operator will be "No Network".
•
Battery capacity. This indicates the battery charge level (Complete, low, medium, high, full).
When the phone is conected to the battery charger, you will hear the indication “Charging”.
•
Date and time.
This information is replayed verbally in sequential order by pressing the navigation keys. If you
wish to exit this menu press the
Cancel key .
When the
Status key is pressed from the standby mode, you will hear the name of the tele-
phone service provider.
If the
Status key is pressed during the editing of a particular field (for example, while you are
entering a telephone number, contact information, a short message, etc.), you will hear all data
entered up to that point. Pressing and holding the
Status key will also repeat the prompt of
that field verbally (For example: Write name: John).
During menu navigation, the
Status key will inform you of which menu option you are in.
During an incoming call, pressing the
Status key will state the number that is calling or the
name of the caller if the person who is calling has been entered in the phone book.
Call / Accept Call key
This key is used to make or receive calls, validate options, and enter into the following menu level.
Pressing this from the standby mode allows access to the call list. For more information regar-
ding the working of the phone’s call list, consult the CALL INFORMATION Chapter.
28
Page 30
29
Hang Up / Cancel / Delete key
Press this for a normal length of time to hang up or reject a call and to return to a previous menu level.
While navigating the menu, pressing & holding this key for a prolonged period of time will take
you back to the standby mode.
When editing you can delete the last entered character (with a short press) or all the edited infor-
mation (with a long press). When you delete a character in the telephone, you will hear the character that appears prior to the deleted one, as a way to inform you about where you are editing.
Navigate by Menu keys
This key navigates through the various menu options contained within your phone. The options
are articulated verbally. From the standby mode, pressing this key goes to the first available
menu option: (Phone book).
Pressing the up key gives you access to a previous menu option within the same level.
Pressing the down key gives you access to a following menu option within the same level.
This key contains in its central part a lighted indicator that flashes if the telephone is turned on. During the
edition of characters included in the same key, pressing the navigation key down acts as a virtual cursor.
Example: To edit MO, press
M, Navegation key down , O.
Alphanumeric keypad (0-9, , )
Keys for entering letters and numbers in editing mode.
From the main navigation menu, the keys
1 through 9 serve as numerical shortcuts for
entering the submenu corresponding to the key in question.
For example:
If you press 1 from the
Phone book
menu, you will be taken to the submenu
Find and call
.
0-9
Page 31
Alphanumeric keypad
owasys22C
For more detailed information regarding the numerical shortcuts associated with each submenu, consult the MENU STRUCTURE section of this chapter.
Call your voicemail (press and hold for 2 seconds).
Activating and de-activating the silent mode (press and hold for 2 seconds). Activating the
silent mode will silence the tones for all incoming calls, and the phone will automatically
revert to a vibrating mode. The status key informs you if the silent mode is enabled.
Lock/Unlock Keypad (press and hold for 2 seconds).
Turn the mobile phone on/off (press and hold for 3 seconds).
, Your operator can offer services that make use of these keys. Please follow the instruc-
tions that your operator gives you.
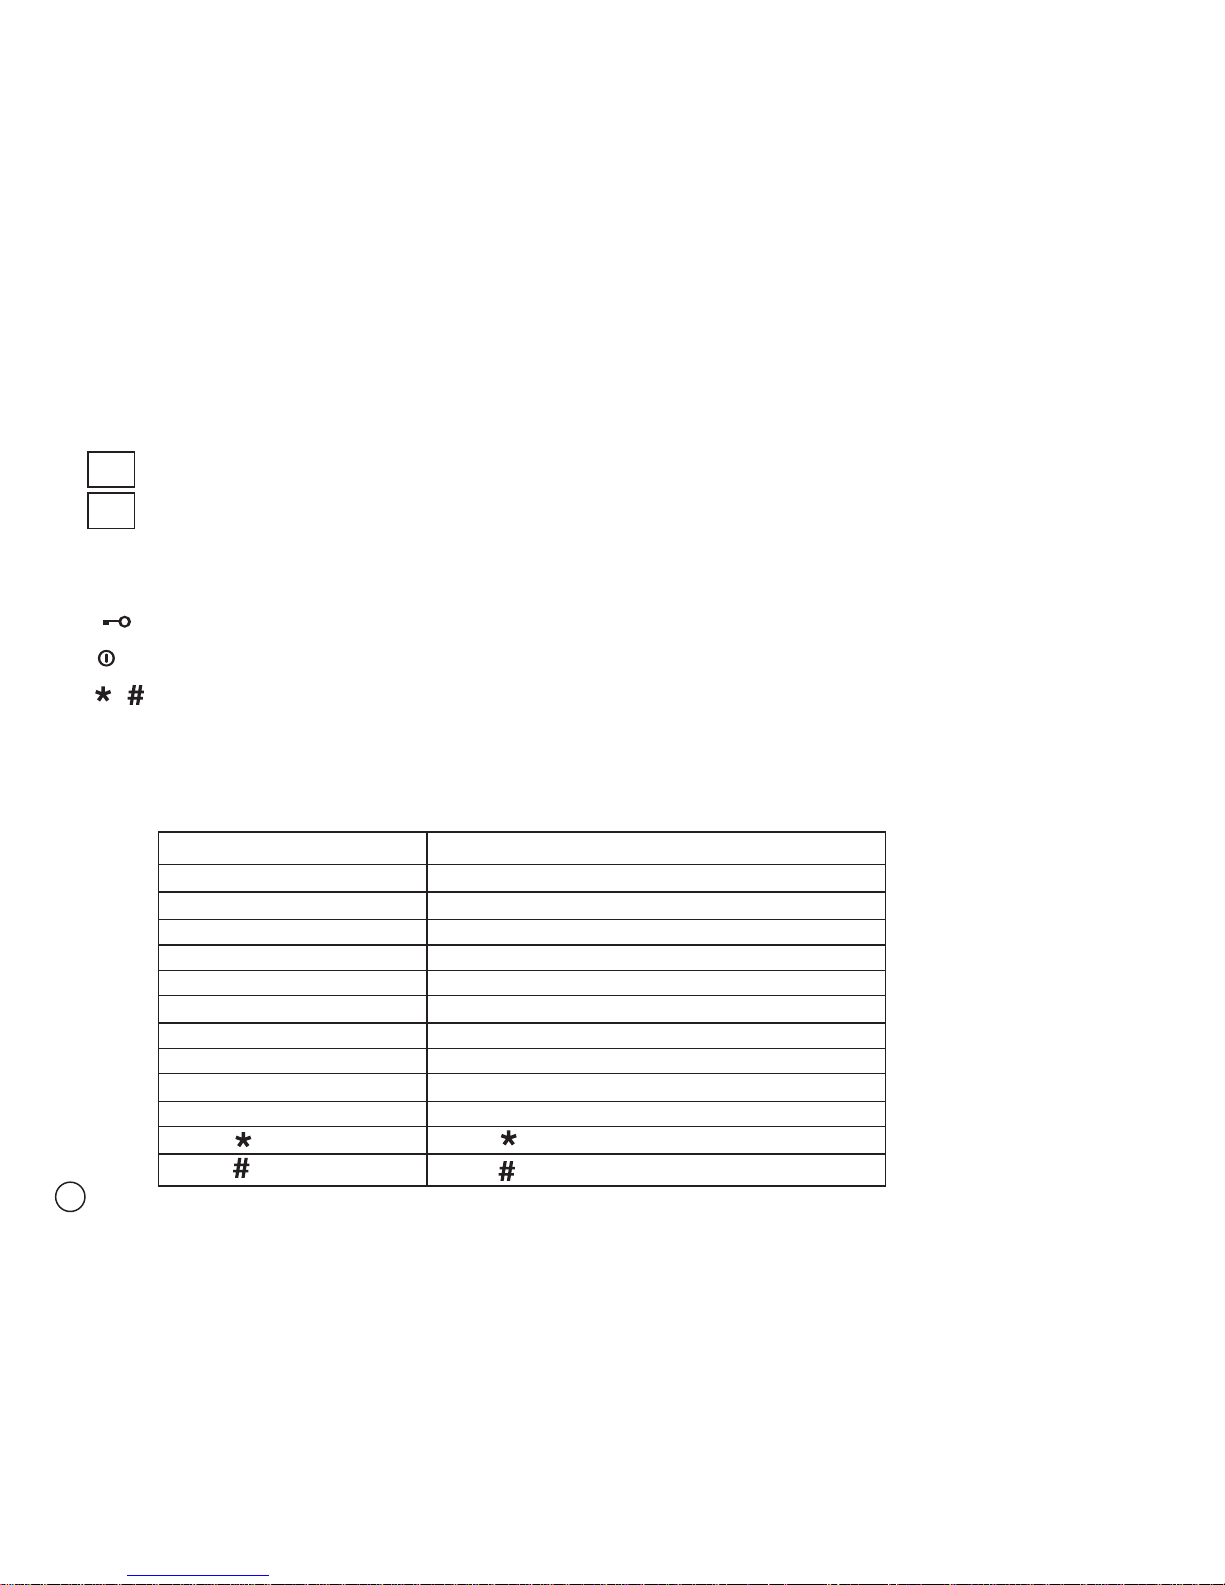
In the following table, you will find what each key’s corresponding to which characters for editing alphanumeric information in the phone book and the content of text messages:
5
1
30
Press...
0
1
2
3
4
5
6
7
8
9
For...
+ - @ $ % & / > < = £ 0
Space , . : ; _ ? ! \“ \’ ( ) 1
a b c 2
d e f 3
g h i 4
j k l 5
m n o 6
p q r s 7
t u v 8
w x y z 9
Note:
You can also edit
numbers with a press
and hold (2 seconds)
the different keys.
Page 32
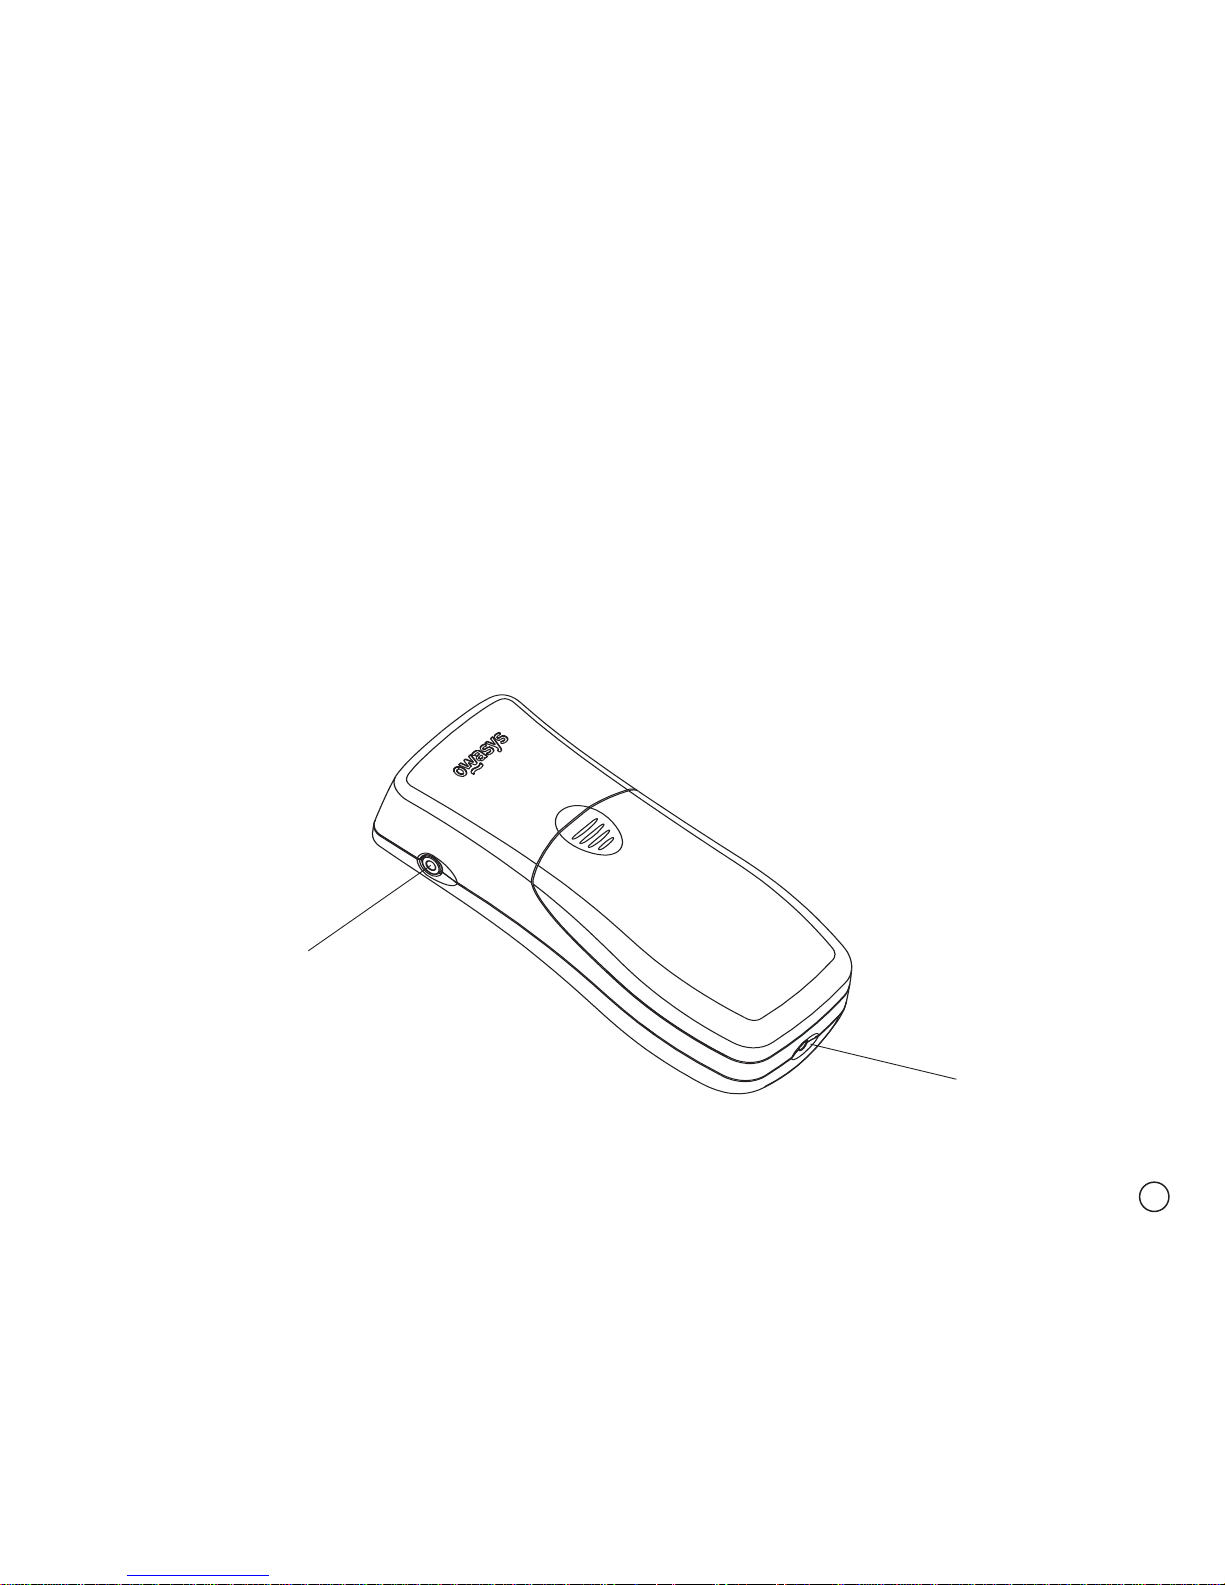
Side connectors on the owasys22C
Battery
charger
connector
Portable Hands-free and
data connector
On the left side of the phone (oriented with the front faced up) there are two volume keys to
adjust the volume of the speaker to its maximum and minimum established levels. When pressing any of these keys you will hear the menu option you are currently in with the volume set at
that moment. Press these keys to adjust the volume to the desired level. This function is available both during conversations and during menu navigation.
On the upper right side of the telephone (oriented with the front face up), you will find the connector for the hands free portable device and for connection to the PC.
At the bottom center of the phone is the connector for the battery charger.
31
Page 33
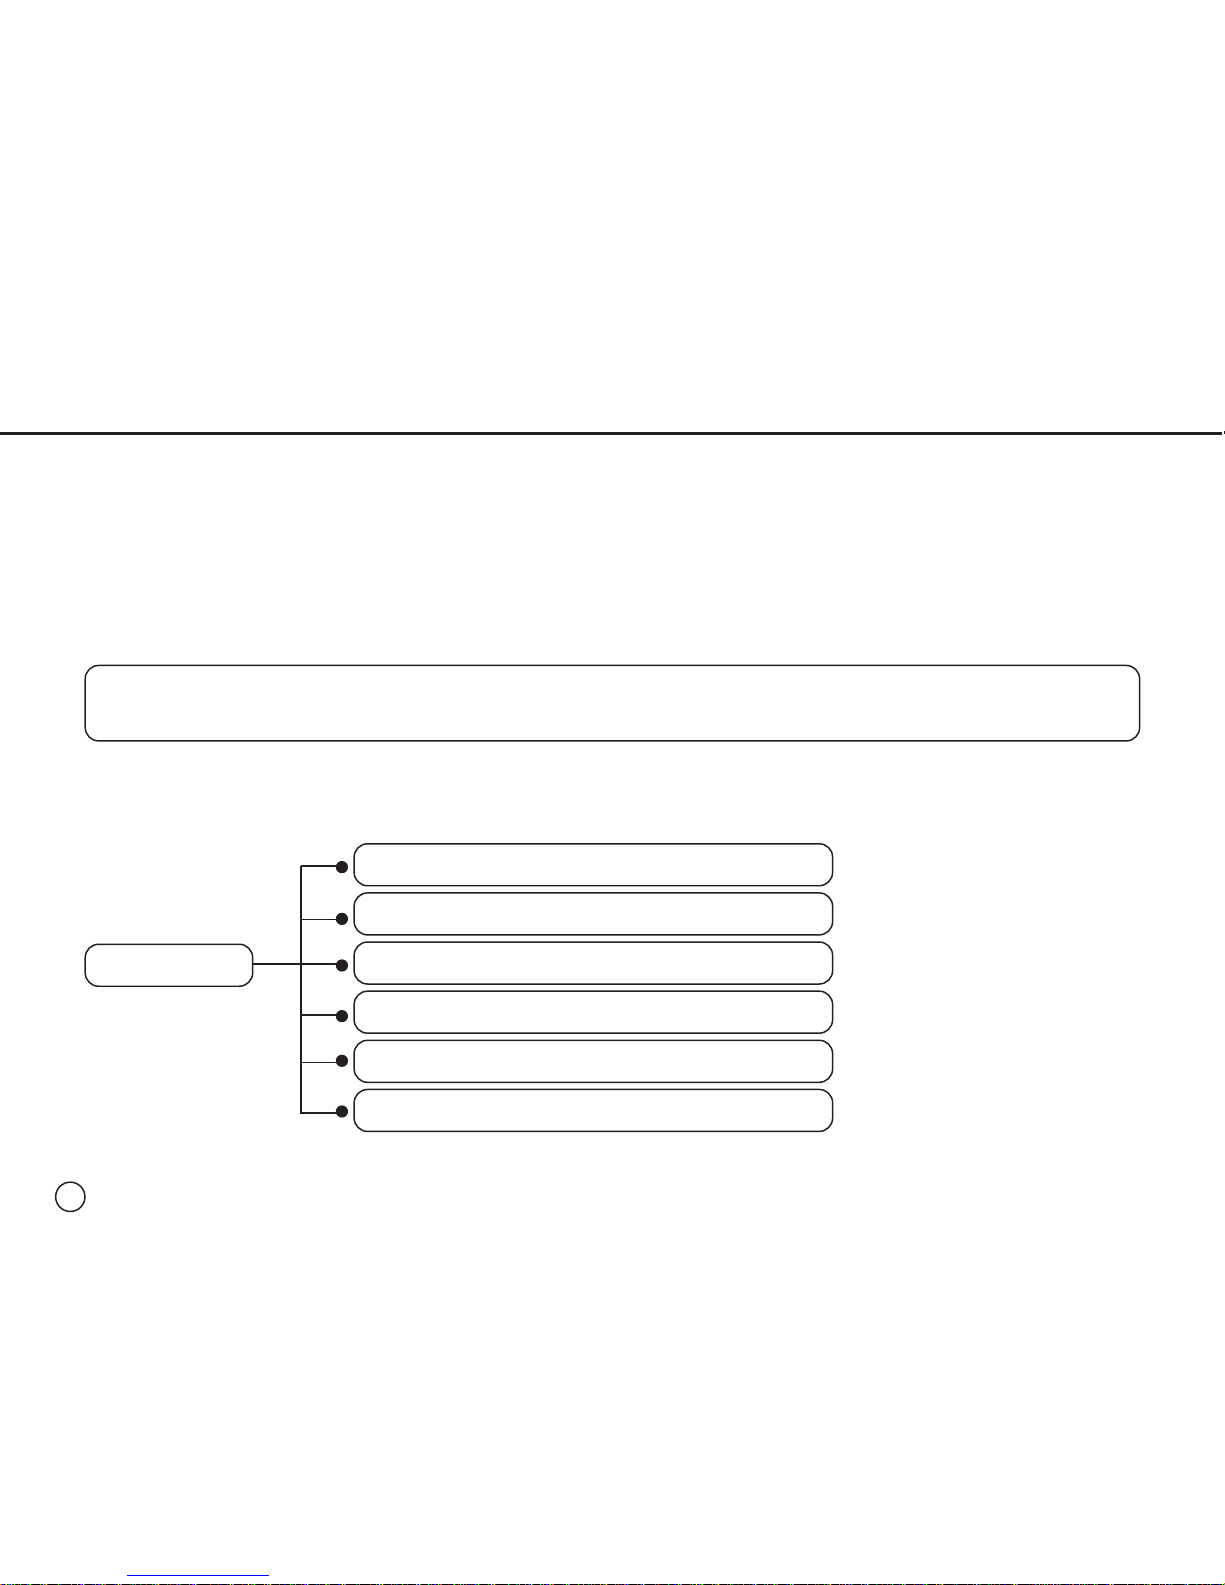
4.2 Menu Structure
What follows is a general description of the menu structure of your owasys22C mobile phone.
Pressing the navigation keys will take you directly to the Phone book, which is the first menu
option available. From here you can use the menu keys or the shortcut keys which are detailed
in the following table.
The menu structure is displayed in tree form, facilitating access to all the functions of your
phone.
The first level of the menu structure is shown in the following figure:
In order to save time, you can use the numeric keypad as shortcuts to access the available
menu options.
MENU
Phone book (1)
Messages (2)
Configuration (3)
Call Information (4)
Manage call (5)
Extras (6)
32
Page 34
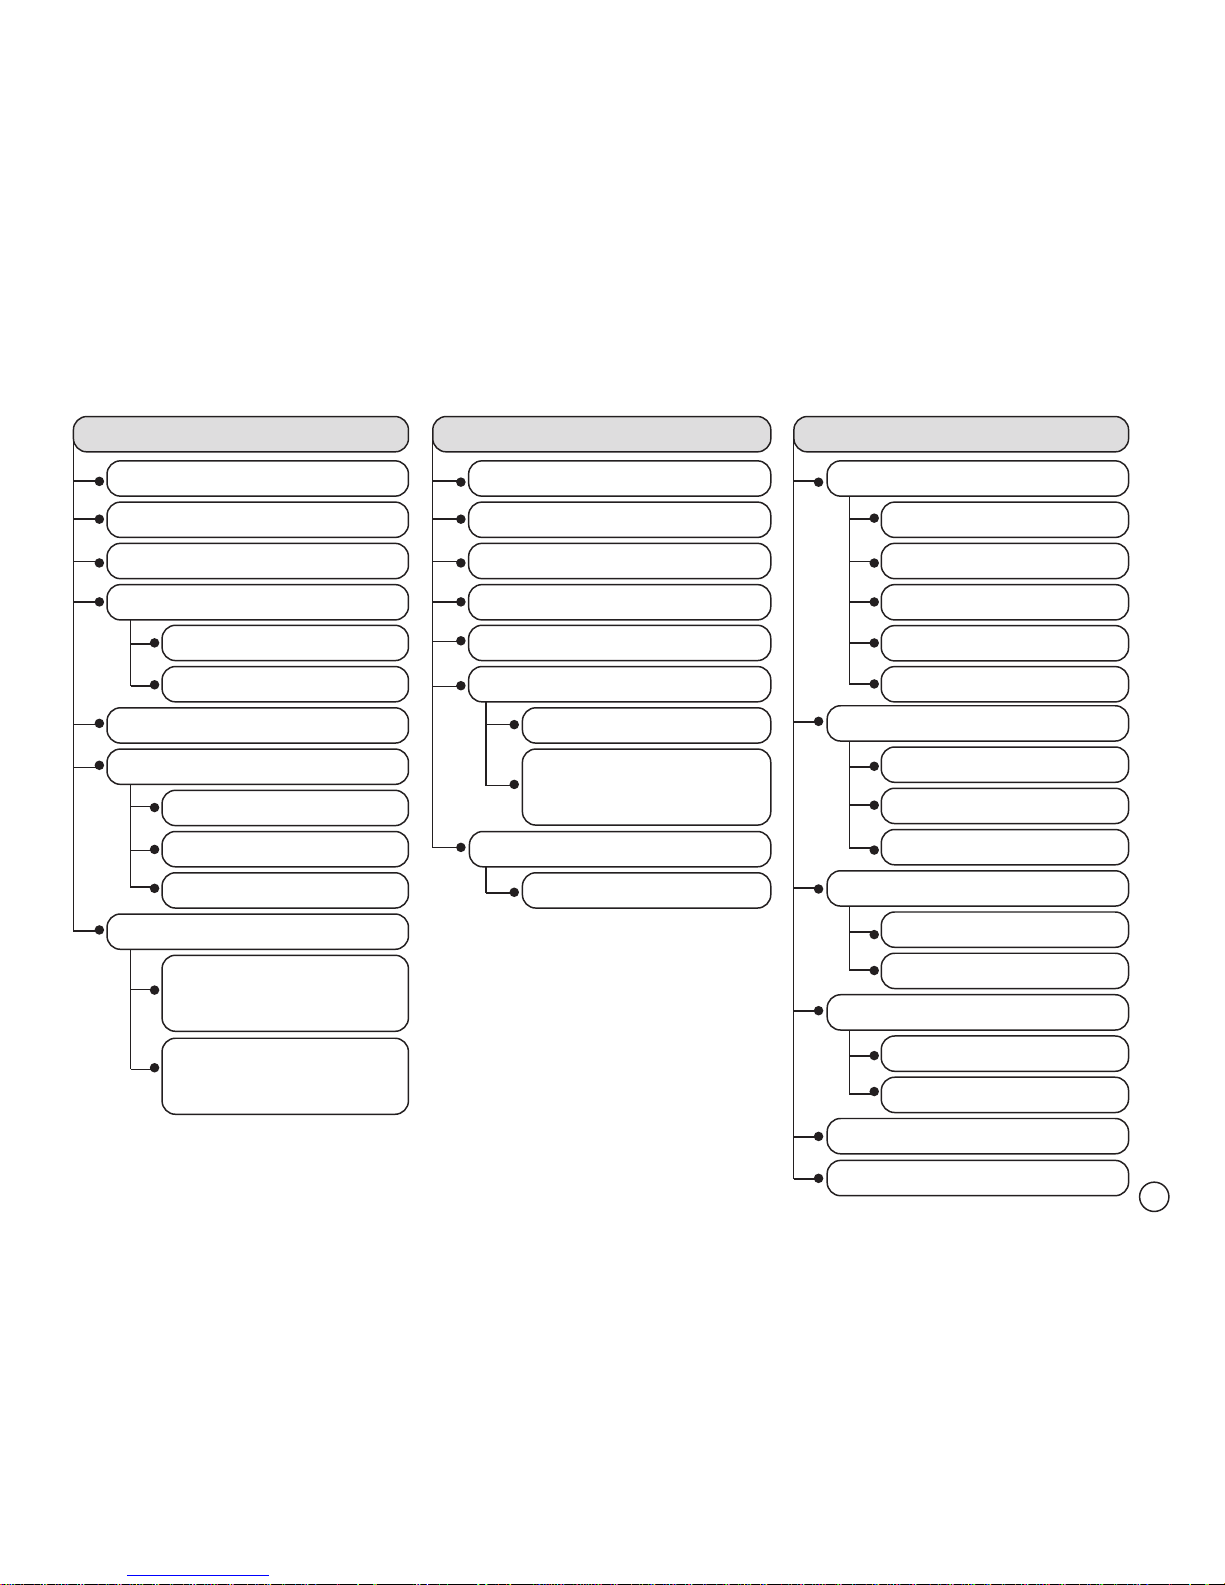
(1) SIM lock
(2) Phone lock
(1) Find and Call
(2) New contact
(3) Edit contact
(4) Delete contact
(1) Choose contact
(2) Delete all contacts
(5) Phone book status
(6) Special numbers
(1) My phone number
(2) Emergency number
(3) Service numbers
(7) Copy phone book
(1) Copy SIM to phone
book
(2) Copy phone book
to SIM
MESSAGES (2)
(1) Send new message
(2) Unread messages
(3) Read messages
(4) Sent messages
(5) Unsent messages
(6) Voice mailbox
(1) Read mailbox
(2) Set mailbox
phone number
(7) Options
(1) SMS centre
CONFIGURATION (3)
(1) Sounds and alarms
(1) Ring volume
(2) Vibrating alert
(3) Ringing tones
(2) Time and date
(1) Set time
(2) Time format
(3) Set date
(3) Locks
(4) Speech configuration
(1) Speed
(2) Pitch
(5) Versions
(4) Initial tone
(5) Coverage alert
(6) Master Reset
PHONE BOOK (1)
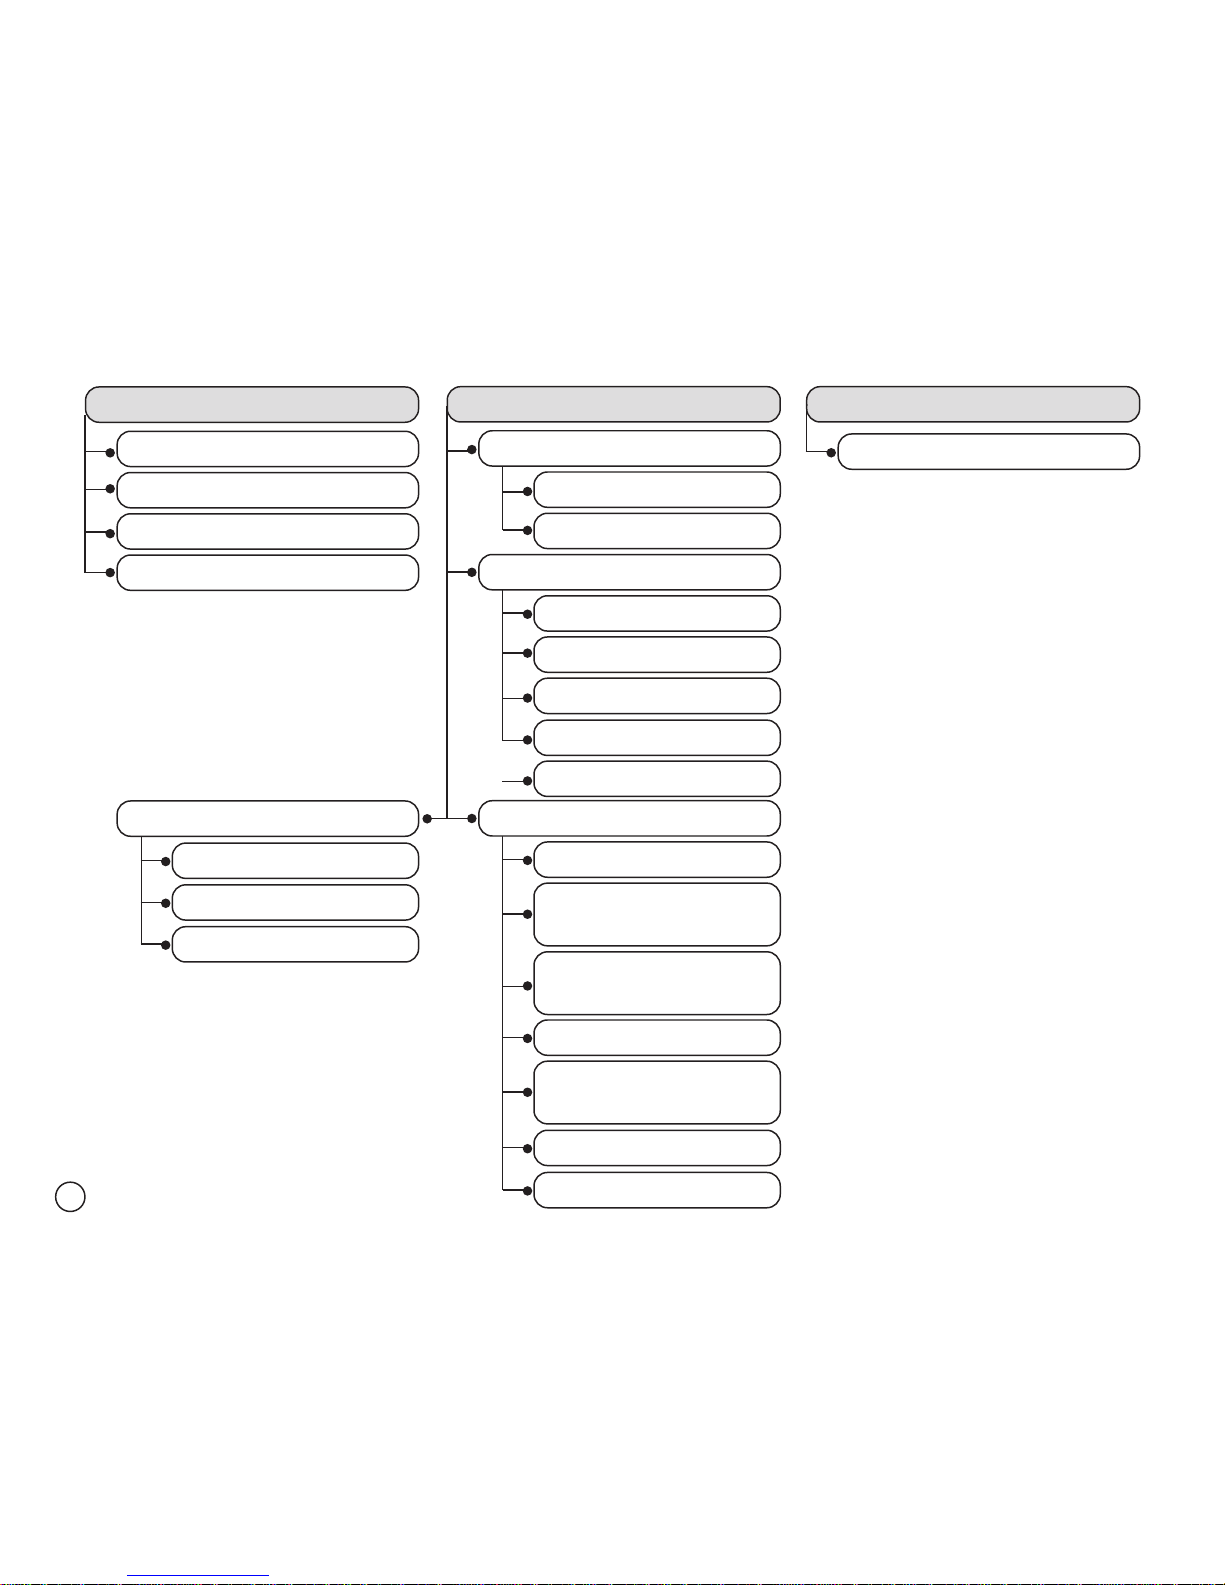
The complete information about available menu options is in the following table:
33
Page 35
34
CALL INFORMATION (4)
(1) Missed calls
(2) Accepted calls
(3) Dialled calls
(4) Clear call list
(1) My number
(1) Show number
(2) Hide number
(2) Call divert
(1) Divert always
(2) On busy
(3) No answer
EXTRAS (6)
(1) Switch off
MANAGE CALLS (5)
(3) Call barring
(1) All outgoing calls
(2) All international
outgoing calls
(3) Roaming
outgoing calls
(4) All incoming calls
(5) Roaming
incoming calls
(6) Cancel all restrictions
(7) Change password
(4) No reachable
(5) Cancel all diverts
(4) Call waiting
(1) Activate
(2) Deactivate
(3) Get status
Page 36
35
5 MAKING AND RECEIVING CALLS
5.1 How to Make a Call
Once the phone is turned on and in standby mode, dial the number you wish to call. Every time
you enter a digit, the telephone will say the number entered. If you misdial, press the
Cancel
button
to erase the last digit. The telephone will state the digit that appeared in front of the
erased one. By pressing and holding the
Cancel button , all entered numbers will be era-
sed and the phone will return to standby mode.
Press the
Accept key . The connection will be indicated and you will hear the message
“Calling...”
When the number you are dialling is engaged or rejects your call, you will hear the message
“User busy” after hearing the engaged tone. If the number you are calling is not available, the
phone will say “No answer”. If there is not enough coverage to make the call, the phone will say
“Call number unreachable”.
It is also possible to make a call using the
Find and call
function in the Phone book (Consult the
FIND AND CALL section of the Phone book chapter) or by selecting a number from the call list.
To gain access to the call list, press the
Accept key from the standby mode. To select a
number from the call list, use the navigation keys. (Consult the CALL LOG MEMORY section in
the CALL INFORMATION chapter).
5.2 How to End a Call
To end a conversation, hang up by pressing the Cancel key . You will immediately hear a
message saying “Call finished”.
Page 37
5.3 How to Answer an Incoming Call
When you receive a call while your phone is in wait mode, press the Accept key to answer it.
If you want to know who is calling you, press the Status key while the ringing tone is playing.You
will be informed of the number or contact name, if stored in the phone book.
When the call is over, hang up by pressing the
Cancel key .
5.4 Rejecting a Call
To reject an incoming call, press the Cancel key . An engaged tone will be sent to the caller.
5.5 Recalling the Most Recent Numbers
To recover the most recent dialled numbers from the call list, press the Accept key from
the standby mode. The telephone will say the total number of dialed calls. Press
Accept to
access the entire list. Use the navigation keys to go through the list of calls and press
Accept to call the selected number. Press Cancel to exit from the menu.
36
Page 38
37
6 PHONE BOOK
Use this option to create a personal phone book by recording phone numbers and the names
associated with them.
Your contacts information can be stored in the phone’s internal memory and/or on the SIM card.
By default, your phone stores your contact information within the internal memory.
The phone book in your owasys22C mobile phone allows you to store for a single contact several phone numbers, as well as their postal and e-mail addresses.
Press the
Phone book key and navigate through the various options available by pressing
the navigation keys by menu.
We will now explain all the functions contained in the different options of the Phone book menu.
6.1 Find and Call
The
Find and call (1)
option allows you to search for a contact by alphabetic order within the
phone book and then make a call.
The first time you use your telephone, the contact information stored on your SIM card will be
automatically transferred to your phone. To transfer the information from your phone book, consult
the 6.7 COPY PHONE BOOK section in this chapter.
Page 39
6.1.1 Alphabetic Search
If you access the phone book through the navigation menu, the search will be performed alphabetically, starting with the first contact that matches with the characters entered. Your phone
will ask you to “Write name”. Use the alphanumeric keypad to enter in a search string and press
Accept to begin the search.
Various entries can come up for any particular search string. Use the navigation keys to hear
the various contacts. Press
Accept to access the numbers associated with the contact you
are searching for.
Pressing the keys ( + number between
2 and 9) from the standby mode will give you quick
access to the
Find and call
function in alphabetical order.
Examples
:+ 2 > gives you access to the first contact whose entry begins with the letter
A. Press
2 again to get B and so on.
+
3 > gives you access to the first contact whose entry begins with the letter
D. Press
3 again to advance to E and so on.
6.2 New Contact
To add a contact to your phone book, select the
New contact (2)
option from the
Phone book (1)
menu. For each new contact created, you will be able to add
Name, Home number, Work num-
ber, Mobile Number, E-mail Address
and
Address
as well as
Store
the contact information. Use
the menu keys and press
Accept in order to select one of the previous options that will be
reproduced by orally.
38
Page 40
39
The phone will ask you to introduce the information you wish to edit in every case. For example,
if you wish to edit the
contact name
, select
Name
and press Accept . You will hear a message asking you to “Write name”. Use the alphanumeric keypad to edit the name and press
Accept .
Repeat this operation until you have completed all the contact information. Finally, select the
Store
option to store the contact data into memory. If you want to quit the edition press
Cancel . The telephone will exit without saving the changes. Press Accept to exit or
Cancel to go on with edition.
The message “Contact stored” will indicate that the record is correctly saved.
6.3 Edit Contact
To change an existing contact’s information, select the
Edit contact (3)
option from the
Phone
book (1)
Menu:
• The telephone will ask you to “Write name” in order to introduce the contact name that you
wish to modify into the contact list. After entering the contacts name, press the
Accept
key
. The contact name that you entered will be searched for.
• When the contact is found, use the menu keys to access the different information fields.
Name, Home number, Work number, Mobile number, E-mail address, Postal address
. At this
Remember that while editing the names and numbers in your contact list it is possible to
check the text (numbers and characters) that have been entered by pressing the Status key .
In case there is an error, the Cancel key will erase the last character introduced and it
will tell the previous character to the deleted one.
Page 41

40
level you can also
Store
the changes. Press the Accept key to select which field you
would like to edit. The phone will ask you to key in the information for the field in question.
Use the alphanumeric keypad to edit the new information for the existing contact and press
Accept .
• Select
Store
to store the new information.
The message “Contact saved” will indicate that the contact was correctly saved.
6.4 Delete Contact
Select the option
Delete (4)
from the
Phone book (1)
menu. This function allows you to access
two sub options from the menu:
•
Choose Contact (1): Allows you to erase one determined contact from the phone book.
•
Delete all Contacts (2): Eliminates the records from your contact list. It is also possible to
erase the entire contact list.
If you wish to erase only one contact, select the
Choose Contact (1)
option. You will be asked to “Write
name” of the contact, and it will begin to search through the list of existing contacts. Press
Accept to choose that contact. The phone will ask you “Are you sure to delete contact?”.
Press
Accept erases the contact. Once the process is finalised, you will hear a message
saying “Contact deleted”.
To cancel the action, press
Cancel .
To erase the entire list, go to the
Delete all contacts
option. The phone will ask you if you wish
to “Delete all?”. Press the
Accept key to agree to the option and erase the entire contact
list. Once the process is finished, you will hear the message “All contacts deleted”.
To cancel the action, press
Cancel .
Page 42
41
6.5 Phone Book Status
Select
Phone book status (5)
in the
Phone book (1)
menu to check the status of the phone’s
internal memory.
A message will tell you the number of positions used and the number still available (250).
6.6 Special Numbers
Through the
Special Numbers (6)
option in the
Phone book (1)
, you will be able to store and
check certain numbers with a special character. Use the menu keys to access the following
options:
•
My phone numbers (1)
• Emergency numbers (2)
• Service numbers (3)
6.6.1 My Numbers
Through this option, you can store different telephone numbers for your
Voice number (1), Fax
number (2),
and
Data number (3).
Use the menu keys and press Accept to access one of
these options. To exit to a previous menu level, press
Cancel .
The phone will ask to "write number" and it will read it if exists. Enter the number to be stored
or modify the existing one after deleting with the
Cancel key .
Enter in your phone number, fax number, and data in that order and confirm by pressing
Accept . Write a number and press Accept again. A message will confirm that the
number has been succesfully saved.
Page 43

6.6.2 Emergency Number
Your number allows you to make emergency calls even if your SIM card is unavailable, as long
as you have GSM coverage. This option let you save an emergency number.
Enter in the appropriate emergency number and press
Accept . To modify the existing one
press firstly the
Cancel key to delete before inserting the new one.
6.6.3 Service Number
This option allows you to hear the numbers associated with your GSM/GPRS service provider.
These numbers are protected and cannot be erased.
With the menu keys you will have access to the list of these numbers stored in your SIM card.
6.7 Copy Phone Book
Use this option to copy records from your SIM card to your phone and viceversa.
Select the
Copy from SIM Card to Phone book (1)
option to copy the contacts stored on your SIM
card into the phone’s memory. This action will overwrite all existing entries in the phone’s
memory, so the phone will ask for confirmation that you really do want to perform this action.
Press
Accept to go through with the copy or Cancel to abort the action.
Select the
Copy Phone book to SIM Card (2)
to copy the contacts stored in the phone’s memory
to the free spaces in your SIM card.
In both cases, the progress will take some seconds. After these, a message will indicate that
the copy has been succesfully done.
42
Page 44
43
7 MESSAGES
The SMS service allows you to send and receive text messages up to 160 characters in length.
7.1 Send New Message
To write a new message, select
Messages (2)/Send New Message (1)
and press Accept .Use
the
Navigation keys to get into the following options:
•
Text: to edit text.
•
Destination: to introduce the destination phone number.
•
Send now: to send the message.
Choose
Text
and press Accept . The phone will ask to “Write text”. Type the text and press Accept .
Go to destination and press
Accept . The phone will ask you to “Write number” . Enter the
telephone number you wish to send the message to. You can choose a number from the phone
book by pressing the phone book key, or type the number directly.
To finish, select the
Send now
option and press Accept if you want to send the message.
This number can be keyed in directly, selected from the phone book, or picked out of the call list.
If the message is successfully sent, you will hear a sound and the message “Message sent”.
While entering in the message, the characters keyed in will be read as they are entered. You can
also review the text already entered in by using the status key.
To erase the last character entered, press
Cancel . The telephone will repeat the character
that appeared before the erased one. If you wish to erase the entire message, press and hold
Cancel . Check THE KEYPAD section in the THE TELEPHONE section to read more information about how to write and edit text messages.
Page 45
44
7.2 Unread Messages
To read your unread messages, go to the
Messages (2)/Unread Messages (2)
menu and press
Accept . The set of messages will be listed off, and if the message is from a contact stored
in your phone book, the contact’s name will be read along with the time and date the message
was received. If the list is empty, you will hear the indication "No messages".
Once read, press
Cancel to leave the menu or Accept to select one of the following
options:
•
Delete (1): Press Accept to delete the selected message.
•
Forward (2): Press Accept to forward the message. You will enter to the
Send new mes-
sage
menu. Enter the text, the destination number and press
Send
now to forward the mes-
sage to another recipient.
•
Answer (3): Press Accept to answer the message.You will enter to the menu
Send new
message
where the destination number appears automatically as the number of the received
message.
•
Call (4): Makes a call to the number that sent the message.
•
Delete all messages (5): Press Accept to erase the complete list of unread messages.
•
Add number to phone book (6): Press Accept to save the number to the phone book of
the telephone. Pressing
Accept you access to the submenu:
-
New Contact (1) to create a new contact.
-
Existing contact (2) to add the number to the list (home, work, mobile) of an existing contact.
The number of unread messages is also available by pressing and hold the
Status key . With
the menu keys you can access the list of unread messages. Press
Accept to read the message.
Page 46
7.3 Read Messages
When you receive a text message, your phone will emit a tone and a short vibration indicating
that a new message has been received. Once read, messages are stored in the list of "Read
Messages".
To read the received message, go to the
Messages (2)/Read Messages (3)
menu. If the message is from a contact stored in your phone book, this contact’s name will be read, along with the
time and date the SMS was received. If the list is empty you will hear "No messages". Select the
message you wish to read with the navigation keys and press
Accept to read or Cancel
to quit.
Once the message is read, press
Cancel to leave the menu and read the message later, or
Accept to select from one of the following options:
Delete (1), Forward (2), Answer (3), Call
(4), Delete all messages (5), Add number to phone book (6)
.
Consult the section 7.2 UNREAD MESSAGES to obtain information on erasing and forwarding
messages.
7.4 Sent Messages
Through this menu, you can review the messages that you have sent.
Go to
Messages (2)/Sent Messages (4)
. With this option you will be able to:
Access the list where you will hear the creation date, the destination phone number, and the
text.
Select one of these options using the navigation keys and press
Accept .
If the list is empty, you will hear the message “No messages”.
45
Page 47

Once you have read the messages, push Accept to achieve one of the following:
Delete (1), Forward (2), Answer (3), Call (4), Delete all messages (5), Add number to phone book (6).
Consult the section 7.2 UNREAD MESSAGES to obtain information on erasing and forwarding
messages.
7.5 Unsent Messages
In this menu you will be able to revise the messages that were not sent successfully to their
destinations.
Go to
Messages (2)/Unsent Messages (5)
By selecting this option, you will be able to:
Access the list where you will hear the creation date, destination phone number, and the text.
Select one of these options by using the navigation keys and press
Accept .
If the list is empty, you will hear the message “No messages”.
Once you have read the messages, push
Accept to achieve one of the following:
Delete (1), Forward (2), Answer (3), Call (4), Delete all messages (5), Add number to phone book (6).
For further information about these options go to CHAPTER 7.2.
7.6 Voice Mailbox
This service allows those who call you to leave a voice message when your phone cannot or you
do not want to answer an incoming call.
Check the availability of this service with your operator.
Go to
Messages (2)/Voice mailbox (6)
and choose one of the two available options:
46
Page 48
• Read mailbox (1). This option makes a call to the number of the voicemail previously defined.
•
Set mailbox phone number (2). Choose this option to store the number of your voice mailbox
and press
Accept . Enter the number and press Accept to store it.
If you wish, you can divert you calls to your voice mailbox.
To activate this service, read the
Call divert (1)
section in the
Call information (4)/Manage Calls (6)
.
You can call your voice mailbox by pressing and holding the
1 key or through the menu by selec-
ting the option
Messages (2)/Voice mailbox (6)/Read mailbox (1).
7.7 Message Options
Go to
Options (7)
in the
Messages (2)
menu to check the number of your associated SMS Centre:
Press
Accept and you will go to the number of your Service Centre. You can change the
name of your service centre. If you want to modify this number you must delete the stored one
before entering the new number of Service Centre and press
Accept . To exit, press
Cancel .
47
To call the voice mailbox by pressing and holding the key 1 the voicemail number must be
previously stored.
Page 49
48
8 CONFIGURATION
Your phone allows you to make some adjustments. You can do this by accessing the
Configuration (3)
menu.
8.1 Sounds and Alarms
Through this option you can choose between different tones and melodies to identify your incoming calls,
adjusting the volume to the desired level. From the main menu select
Configuration (3)/Sounds
and
alarms (1)/Ring volume (1)
and press Accept . You will be taken to the following submenus:
8.1.1 Ring Volume
In Sounds and
alarms (1) /Ring volume (1)
press Accept and adjust the volume of the ring
for the incoming calls to the desired level using the menu keys.
You will hear a default tone or melody established by default for your incoming calls with the volume
fixed the last time. Press the navigate by menu keys to adjust the volume to the desired level between the defined maximum and minimum values. Confirm the selection by pressing
Accept .
8.1.2 Vibrating Alert
Go to Sounds and
Alerts (1) /Vibrating alert (2)
and use the navigation keys to access the following options:
•
Active (1): Press Accept to activate the vibrator for your incoming calls.
•
De-activate (2): Press Accept to disable the vibrator for your incoming calls.
You can also press and hold the key
5 to activate the silent mode. This will automatically enable
the vibrator instead of the ringing tones.
If your attempts at adjusting the volume are not having an effect, make sure that your phone is
not in the silent mode.
Page 50
49
8.1.3 Ringing Tones
Select one of the melodies available on your phone for your incoming calls.
Once in the
Sounds and alarms (1)
menu, choose the option
Ringing tones (3).
Your phone will at first
play the default melody at the call tone fixed volume. Listen to the various tones and melodies available
using the
navigate by menu keys and press Accept to choose the desired option. The telephone
will ask “Save melody?”. Choose the option pressing
Accept . Press Cancel to leave the menu.
If you wish to disable the melody and substitute by the vibrating alert, activate the
Silent Mode
by pres-
sing and hold the
5 key from standby mode
8.1.4 Initial Tone
Choose this option in
Configuration (3)/Sounds
and
alarms (1)/Initial tone (4)
, to
Deactivate(1)
or
Activate (2)
the melody that usually accompanies the start up of the telephone.When this initial
tone is deactivated, the welcome message of the owasys22C will be given in private mode.
8.1.5 Coverage alert
The owasys22C is able to alert by means of specific tones when coverage is loss and recovered again.
Choose
Configuration (3)/Sounds and alarms(1)/Initial tone(4)
to
Deactivate(1)
or
Activate(2)
these alerts.
8.2 Adjust Date and Time
To adjust the date and the time on your telephone, from the main manu select
Configuration
(3)/Date and Time (2)
and then press Accept .
8.2.1 Set Time
Follow the instructions your phone will give you in the
Time and Date (2)/Set Time (1)
menu.
Remember that when the initial tone is deactivated, the telephone will not emit any tone during the
star-up. After a seconds, it will only vibrate that indicates that it is ready to enter the PIN code.
Page 51
Enter the hours and press Accept . Then enter the minutes and minutes. Press
Accept to validate or Cancel to leave the menu.
8.2.2 Changing the Hour Format
Time can be showed in a 12 hour format (AM/PM) or in a 24 hour format. To change the format
of the time, select
Time format (2)
from the menu
Time and Date (2)
. Choose one of the two
available options, 24 hours or AM/PM. Your phone will ask you if you want to save the said format. Press Accept to confirm the selected option.
8.2.3 Changing the Date
To adjust the date, select
Set Date (3)
from the
Time
and
Date (3)
menu. First, your phone will ask
you to enter in the year. Enter then press
Accept . Enter the month and the day in the same
way as for the year was entered. Type them in and press the
Accept key . The telephone will
ask you if you want to save this date. Press
Accept to confirm the data entered.
8.3 Locks
This menu includes a series of security functions designed to protect your phone and SIM card.
8.3.1 Lock the Card
Through this option you can activate/deactivate the PIN card lock and change the PIN code.
Go to
Configuration (3)/Locks (3)/SIM Lock (1)
. Press Accept and you will access to the
following sub options in the menú:
•
Protection (1): The phone indicates “PIN code locked/unlocked”. Press Accept . The phone will
ask if you want to lock/unlock the PIN code. Press
Accept to validate the option selected.
In both cases you will be asked to enter the PIN code. Once entered press
Accept .
50
Page 52
• Change PIN Code (2): Through this option the PIN code can be modified. The phone will ask you to enter
the old PIN 4 digit code. Enter the new one and press
Accept . Re-enter the PIN code and press
Accept . You will hear a message indicating that the PIN code has been successfully changed.
8.3.2 Lock the Telephone
This lock protects the phone against unauthorised use. This option is not enabled when the
phone is purchased.
To activate this option, the 8 digit security lock code 00000000 programmed by the factory is needed.
You can change this lock/unlock code to the number that you wish. If you activate the phone lock, you
will be asked to enter the unlock code (after the PIN code) when you are using a SIM card different
from the one with which you activated the lock. Go to
Configuration (3)/Locks (3)/Phone Lock (2)
and
you will be able to check the status of the phone lock and to change the security lock code.
The following options are also available:
•
Protection (1): You can choose one of the following phone lock options: Activated or
Deactivated. With the navigation keys choose one of the previous options and press
Accept .
When you wish to activate the lock, the telephone will ask for the security key. Enter it in and
press
Accept . You will hear the message “Phone locked”.
•
Change the lock key (2): Choose this option to modify the lock code. The telephone will ask you to enter
the old key. Enter it and press
Accept . Enter the new key and press Accept again. Re-enter
the new key and press
Accept . You will hear a message telling you that the key has been changed.
8.4 Voice Synthesis Configuration
Your telephone lets you choose from various pitches and speeds for the spoken text.
51
Changing the lock code should be done before activating the phone lock.
Page 53

8.4.1 Selecting the Speed of the Spoken Text
To change the speed at wich you hear your telephone’s spoken text, from the main menu go to
Configuration (3)
and select
Speech configuration (4) /Speed (1)
. With the navigation keys cho-
ose the desired speech and press
Accept .
From this moment you will hear the text-to-speech at the speed that you just selected.
8.4.2 Selecting the Pitch of the Spoken Voice
To change the pitch of the spoken text, go to the main menu and select
Configuration (3)/Speech
configuration (4) /Pitch (2)
.
With the navigation keys choose the desired pitch and press
Accept .
From this moment the spoken text will be configurated to the selected pitch.
8.5 Versions
Go to
Configuration (3)/Versions (5)
to consult the software version installed on the telephone.
Information is given as: Owasys22C English R7A.
8.6 Factory Settings
To return to the default settings programed in the factory, choose the option
Master Reset (6)
in the
Configuration (3) menu
. When the phone asks you if you wish to return to default factory set-
tings, press
Accept .
Wait a few moments while your phone reverts to its default settings, after which you will hear
the message “Factory defaults”.
52
Page 54
53
9 CALL INFORMATION
9.1 Call Information
Your phone will provide the following information about the numbers and the times of the following calls:
• Last calls received
• Last calls received that were missed (including rejected calls)
• Last calls made
9.2 Call Log Memory
Press Accept and use the navigation keys to go through the list of dialled calls. From the
menu is also possible to access to the call list. Go to
Call Information (4)
and select:
•
Missed calls (1): You will see the list of missed calls with information about date and time and number.
•
Accepted calls (2): You will see the list of accepted calls with the date, time and number.
•
Dialled calls (3): You will see the list of dialled calls with information about date, time and number.
Select a call with the menu keys, press
Accept and you will be able to:
•
Call now (1): Makes a call to the selected number.
•
Delete (2): Delete the selected number from the call list asking for confirmation.
•
Add number to phone book (3): Allows to insert the number to the phone book. Press
Accept to create a
New Contact (1)
or add the number to the list of telephones (home, work,
mobile) of an
Existing contact (2)
.
9.3 Delete Call List
To delete the call list go to
Call information (4)/Clear call list (4) and p
ress Accept .
Page 55
54
10 MANAGE CALLS
10.1 My Number
This option allows you to configure your phone to show or hide your phone number from the
person you are calling. Go to
Manage Calls (5)/My number (1)
and press the Accept key to
select either one of the following options:
Show number (1)
or
Hide number (2)
.
10.2 Call Divert
Through this menu, you will be able to redirect your incoming calls to another number, including your voicemail box numbe in various circumstances.
Select the
Call divert (2)
option from the
Manage calls (5) menu:
• Divert always (1): To configure the systematic rejection of all your incoming calls.
•
On busy (2): Only if your line is engaged.
• No answer
(3): If there is no answer.
•
If not reachable (4): Only if your phone is not available (i.e. outside the network coverage)
•
Cancel all diverts (5): Enable to cancel all the diverts previously set.
Press
Accept to select one of the following options. For each of the above options, you may:
•
Activate, which diverts the calls that fall under the selected category. Press the Accept
key
to select this function. Immediately you will be asked to “Write divert number” that
you wish to forward your calls the alphanumeric keypad to enter the number or select it from
the phone book (using the phone book key) and press
Accept . While this is processing, a
message will indicate that call divert has been correctly activated. Through this option you will
be able to, for example, redirect these calls to your voicemail box.
Page 56
55
• Deactivate the diversion of the group of selected numbers. Press the Accept key to can-
cel forwarding of the select group of numbers. You will hear a message indicating that call
rejection has been deactivated.
•
Get status: Provides information about active and inactive call forwarding. Press Accept
and you will be given information regarding the status of all your rejected numbers as well as
if call forwarding has been activated or not.
10.3 Call Barring
This network service allows you to restrict pre-determined outgoing and incoming calls to limitthe use of your telephone.
To access these subscription services a private key is required. Check the availability of this service with your operator.
To access the menu of these services, select the
Call Barring (3)
option in the information menu
Manage calls (5)
. You can select one of the restriction options that will be stated in the following
order:
• All
outgoing calls (1): Prohibits all outgoing calls.
•
All international outgoing calls (2): Prohibits outgoing international calls from being made.
•
Roaming outgoing calls (3): Prohibits all international calls except those going to your own
country from being made.
•
All incoming calls (4): Prohibits all incoming calls
•
Roaming incoming calls (5): Prohibits all incoming calls in roaming.
If you divert your incoming calls you will not be able to activate some restriction options and
vice-versa. Check the CALL BARRING section.
Page 57
Use the navigate by menu keys to select one of the available options and press the Accept
key
to select the desired option.
For each of the call restriction options described, you can
Activate (1), Deactivate (2)
, or
Get sta-
tus (3)
of the associated restrictions. Enter in the required key (which comes with your subs-
cription to this service) and press
Accept . This process may take a few seconds.
Immediately afterward, you will be informed of the status of the restrictions.
Along with the above call restriction options, it is also possible to cancel all restrictions and
change your access key:
•
Cancel all restrictions (6). Select this option to cancel all the restrictions activated.
•
Change password (7). To change the access key to your call restriction service, select this
option by pressing the
Accept key . Your phone will ask you to enter in your current code,
and press
Accept . You will then be asked to enter in your new code. Enter it in a second
time and press
Accept . You will hear a message that will confirm the changing of the key.
56
If you reject your incoming calls you will not be able to activate some restriction options and
vice-versa. Check the earlier CALL DIVERT section
Page 58

10.4 Call Waiting
2
This service allows you to keep one call on the line while you accept and/or make a second call.
Select
Call waiting (3)
from the
Call information (4)/Manage calls (5)
menu and press
Accept . You can activate, deactivate it, or check the call waiting status.
With the menu keys you can access the following options:
• Activate (1): To activate the service, select the Activate option by pressing Accept . Press
the
Status key to know who is calling. Next, you will hear a message indicating
that the Call waiting has been successfully activated.
•
Deactivate (2): To deactivate the service, select the Deactivate option. The phone will ask for
confirmation. Press
Accept to validate the option.
•
Get status (3): To check if the service is activated or not, select the Status option. Press
Accept and you will be informed as to whether the call waiting service is activated or not.
Once you have activated this option, you can:
1. Reject the call on hold by pressing
0 + Accept .
2. Attend to the call on hold and terminate the current call by pressing
1 + Accept .
3. Retain the current call and attend to the pending call by pressing
2 + Accept .
57
2
Consult with your operator the availability of this service.
Page 59
58
11 EXTRAS
11.1 Turning off the telephone
To switch off, go to
Extras (5)/Switch off (1)
. Press Accept to switch the telephone off. You will
be asked for confirmation in turning off the telephone, and will hear a farewell message before the
phone is completely turned off.
Page 60

59
12 ACCESSORIES
Your telephone owasys22C has the following accessories available:
• Battery charger
• Spare batteries
• Portable handsfree device
• Protective case
• Data cable
Ask your service provider about the availability of these accessories.
Page 61

60
13 FDA STATEMET
The U.S. Food and Drug Administration's Center for Devices and Radiological Health
Consumer Update on Mobile Phones
FDA has been receiving inquiries about the safety of mobile phones, including cellular phones
and PCS phones. The following summarizes what is known—and what remains unknown—
about whether these products can pose a hazard to health, and what can be done to minimize
any potential risk. This information may be used to respond to questions.
Why the concern?
Mobile phones emit low levels of radio frequency energy (i.e., radio frequency radiation) in the
microwave range while being used. They also emit very low levels of radio frequency energy (RF),
considered non-significant, when in the stand-by mode. It is well known that high levels of RF can
produce biological damage through heating effects (this is how your microwave oven is able to
cook food). However, it is not known whether, to what extent, or through what mechanism, lower
levels of RF might cause adverse health effects as well. Although some research has been done
to address these questions, no clear picture of the biological effects of this type of radiation has
emerged to date. Thus, the available science does not allow us to conclude that mobile phones
are absolutely safe, or that they are unsafe. However, the available scientific evidence does not
demonstrate any adverse health effects associated with the use of mobile phones.
What kinds of phones are in question?
Questions have been raised about hand-held mobile phones, the kind that have a built-in antenna that is positioned close to the user's head during normal telephone conversation. These
types of mobile phones are of concern because of the short distance between the phone's
Page 62

antenna —the primary source of the RF— and the person's head. The exposure to RF from
mobile phones in which the antenna is located at greater distances from the user (on the outside of a car, for example) is drastically lower than that from hand-held phones, because a person's RF exposure decreases rapidly with distance from the source. The safety of so-called
“cordless phones,” which have a base unit connected to the telephone wiring in a house and
which operate at far lower power levels and frequencies, has not been questioned.
How much evidence is there that hand-held mobile phones might be harmful?
Briefly, there is not enough evidence to know for sure, either way; however, research efforts are
on-going. The existing scientific evidence is conflicting and many of the studies that have been
done to date have suffered from flaws in their research methods. Animal experiments investigating the effects of RF exposures characteristic of mobile phones have yielded conflicting
results. A few animal studies, however, have suggested that low levels of RF could accelerate
the development of cancer in laboratory animals. In one study, mice genetically altered to be
predisposed to developing one type of cancer developed more than twice as many such cancers
when they were exposed to RF energy compared to controls. There is much uncertainty among
scientists about whether results obtained from animal studies apply to the use of mobile phones. First, it is uncertain how to apply the results obtained in rats and mice to humans. Second,
many of the studies that showed increased tumor development used animals that had already
been treated with cancer-causing chemicals, and other studies exposed the animals to the RF
virtually continuously—up to 22 hours per day.
For the past five years in the United States, the mobile phone industry has supported research
into the safety of mobile phones. This research has resulted in two findings in particular that
merit additional study:
1 In a hospital-based, case-control study, researchers looked for an association between mobi-
le phone use and either glioma (a type of brain cancer) or acoustic neuroma (a benign tumor
61
Page 63

of the nerve sheath). No statistically significant association was found between mobile phone
use and acoustic neuroma. There was also no association between mobile phone use and
gliomas when all types of types of gliomas were considered together. It should be noted that
the average length of mobile phone exposure in this study was less than three years.
When 20 types of glioma were considered separately, however, an association was found between mobile phone use and one rare type of glioma, euroepithelliomatous tumors. It is possible with multiple comparisons of the same sample that this association occurred by chance. Moreover, the risk did not increase with how often the mobile phone was used, or the
length of the calls. In fact, the risk actually decreased with cumulative hours of mobile phone
use. Most cancer causing agents increase risk with increased exposure. An ongoing study of
brain cancers by the National Cancer Institute is expected to bear on the accuracy and repeatability of these results.
3
2 Researchers conducted a large battery of laboratory tests to assess the effects of exposure to
mobile phone RF on genetic material. These included tests for several kinds of abnormalities,
including mutations, chromosomal aberrations, DNA strand breaks, and structural changes
in the genetic material of blood cells called lymphocytes. None of the tests showed any effect
of the RF except for the micronucleus assay, which detects structural effects on the genetic
material. The cells in this assay showed changes after exposure to simulated cell phone
radiation, but only after 24 hours of exposure. It is possible that exposing the test cells to
radiation for this long resulted in heating. Since this assay is known to be sensitive to heating,
heat alone could have caused the abnormalities to occur. The data already in the literature on
the response of the micronucleus assay to RF are conflicting. Thus, follow-up research is
necessary.
4
FDA is currently working with government, industry, and academic groups to ensure the proper
follow-up to these industry-funded research findings. Collaboration with the Cellular
Telecommunications Industry Association (CTIA) in particular is expected to lead to FDA provi-
62
Page 64

3
Muscat et al. Epidemiological Study of Cellular Telephone Use and Malignant Brain Tumors. In: State of the
Science Symposium;1999 June 20; Long Beach, California.
4
Tice et al. Tests of mobile phone signals for activity in genotoxicity and other laboratory assays. In: Annual Meeting
of the Environmental Mutagen Society; March 29, 1999, Washington, D.C.; and personal communication, unpublished results.
5
Preece, AW, Iwi, G, Davies-Smith, A, Wesnes, K, Butler, S, Lim, E, and Varey, A. Effect of a 915-MHz simulated
mobile phone signal on cognitive function in man. Int. J. Radiat. Biol., April 8, 1999.
6
Hardell, L, Nasman, A, Pahlson, A, Hallquist, A and Mild, KH. Use of cellular telephones and the risk for brain
tumors: a case control study. Int. J. Oncol., 15: 113-116, 1999.
ding research recommendations and scientific oversight of new CTIA funded research based on
such recommendations.
Two other studies of interest have been reported recently in the literature:
1 Two groups of 18 people were exposed to simulated mobile phone signals under laboratory
conditions while they performed cognitive function tests. There were no changes in the subjects' ability to recall words, numbers, or pictures, or in their spatial memory, but they were
able to make choices more quickly in one visual test when they were exposed to simulated
mobile phone signals. This was the only change noted among more than 20 variables compared.
5
2 In a study of 209 brain tumor cases and 425 matched controls, there was no increased risk of
brain tumors associated with mobile phone use. When tumors did exist in certain locations,
however, they were more likely to be on the side of the head where the mobile phone was
used. Because this occurred in only a small number of cases, the increased likelihood was
too small to be statistically significant.
6
63
Page 65

In summary, we do not have enough information at this point to assure the public that there are,
or are not, any low incident health problems associated with use of mobile phones. FDA continues to work with all parties, including other federal agencies and industry, to assure that research is undertaken to provide the necessary answers to the outstanding questions about the
safety of mobile phones.
What is known about cases of human cancer that have been reported in users of hand-held
mobile phones?
Some people who have used mobile phones have been diagnosed with brain cancer. But it is
important to understand that this type of cancer also occurs among people who have not used
mobile phones. In fact, brain cancer occurs in the U.S. population at a rate of about 6 new cases
per 100,000 people each year. At that rate, assuming 80 million users of mobile phones (a number increasing at a rate of about 1 million per month), about 4800 cases of brain cancer would
be expected each year among those 80 million people, whether or not they used their phones.
Thus it is not possible to tell whether any individual's cancer arose because of the phone, or
whether it would have happened anyway. A key question is whether the risk of getting a particular form of cancer is greater among people who use mobile phones than among the rest of
the population. One way to answer that question is to compare the usage of mobile phones
among people with brain cancer with the use of mobile phones among appropriately matched
people without brain cancer. This is called a case-control study. The current case-control study
of brain cancers by the National Cancer Institute, as well as the follow-up research to be sponsored by industry, will begin to generate this type of information.
64
Page 66

What is FDA's role concerning the safety of mobile phones?
Under the law, FDA does not review the safety of radiation emitting consumer products such as
mobile phones before marketing, as it does with new drugs or medical devices. However, the
agency has authority to take action if mobile phones are shown to emit radiation at a level that
is hazardous to the user. In such a case, FDA could require the manufacturers of mobile phones to notify users of the health hazard and to repair, replace or recall the phones so that the
hazard no longer exists. Although the existing scientific data do not justify FDA regulatory
actions at this time, FDA has urged the mobile phone industry to take a number of steps to
assure public safety. The agency has recommended that the industry:
• support needed research into possible biological effects of RF of the type emitted by mobile
phones;
• design mobile phones in a way that minimizes any RF exposure to the user that is not neces-
sary for device function;
• cooperate in providing mobile phone users with the best possible information on what is
known about possible effects of mobile phone use on human health
At the same time, FDA belongs to an interagency working group of the federal agencies that
have responsibility for different aspects of mobile phone safety to ensure a coordinated effort at
the federal level. These agencies are:
• National Institute for Occupational Safety and Health
• Environmental Protection Agency
• Federal Communications Commission
• Occupational Health and Safety Administration
• National Telecommunications and Information Administration
The National Institutes of Health also participates in this group.
65
Page 67

In the absence of conclusive information about any possible risk, what can concerned individuals do?
If there is a risk from these products—and at this point we do not know that there is—it is probably very small. But if people are concerned about avoiding even potential risks, there are simple steps they can take to do so. For example, time is a key factor in how much exposure a person receives. Those persons who spend long periods of time on their hand-held mobile phones
could consider holding lengthy conversations on conventional phones and reserving the handheld models for shorter conversations or for situations when other types of phones are not available.
People who must conduct extended conversations in their cars every day could switch to a type
of mobile phone that places more distance between their bodies and the source of the RF, since
the exposure level drops off dramatically with distance. For example, they could switch to:
• a mobile phone in which the antenna is located outside the vehicle,
• a hand-held phone with a built-in antenna connected to a different antenna mounted on the
outside of the car or built into a separate package or
• a headset with a remote antenna to a mobile phone carried at the waist
Again, the scientific data do not demonstrate that mobile phones are harmful. But if people are
concerned about the radio frequency energy from these products, taking the simple precautions
outlined above can reduce any possible risk.
66
Page 68

Where can I find additional information?
For additional information, see the following Web sites:
Federal Communications Commission (FCC) RF Safety Program (select “Information on Human
Exposure to RF Fields from Cellular and PCS Radio Transmitters”):
http://www.fcc.gov/oet/rfsafety
World Health Organization (WHO) International Commission on Non-Ionizing Radiation
Protection (select Qs & As):
http://www.who.int/emf
United Kingdom, National Radiological Protection Board:
http://www.nrpb.org.uk
Cellular Telecommunications Industry Association (CTIA):
http://www.wow-com.com
U.S. Food and Drug Administration (FDA) Center for Devices and Radiological Health:
http://www.fda.gov/cdrh/consumer/
67
Page 69

14 MANUFACTURER´S LIMITED WARRANTY
In order to obtain the maximum use of this product, we recommend that you follow the practical advice and keep in mind the aforementioned precautions. You should save your sales receipt
and the warranty certificate that follows as they are necessary for any claims made during the
warranty period.
Owasys guarantees the absence of manufacturing defects in this owasys22C telephone from
the time of purchase as printed on the sales receipt and thereafter for a period of two (2) years.
The warranty for the battery and accessories will be for a time period of six (6) months from the
date of purchase.
If during the period of the limited warranty the telephone or its accessories become defective
as a consequence of improper workmanship,
Owasys will repair or replace said elements free
of charge, reserving the right to decide to repair or replace all or part of the materials declared
defective.
The validity of the warranty is subject to the following conditions
7
.
The purchaser will have to present at the point of claim the product to be substituted or replaced along with the warranty certificate contained in this manual, properly filled out and sealed
by the salesman. If that is unavailable, the sales receipt will suffice.
Owasys reserves the rights
to oppose or refuse this warranty service if the required information is not on the certificate or
has been modified since the time of the items purchase.
This warranty does not cover defects arising from incorrect use of the telephone, that is, use
contrary to the instructions contained in this manual.
7
Warranty conditions in effect in Europe
68
Page 70

69
This warranty does not cover damage to the product caused by software installation, modification, repairs, or the product’s being opened by unauthorised personnel. Manipulating any of the
labels and/or seals will void the warranty. Also, connecting accessories that are not originally
from
Owasys and designed specifically for this product will void the warranty.
This warranty does not apply in case of accident, theft, acts of vandalism or natural disasters.
Owasys will not be held responsible for connection problems attributed to a lack of coverage,
availability,and services from the network service provider.
Page 71
WARRANTY CERTIFICATE
TELEPHONE INFORMATION
Model:
(Please read the label below the battery to find the following information)
Serial Number of the Telephone:
Serial Number of the Battery:
IMEI Number:
SALES INFORMATION
Name of the Store:
Address of the Store:
Date of Purchase:
Seller’s Stamp and Signature
70
Page 72
SATISFACTION ENQUIRY
Your opinion is very important to us at Owasys. We wish to offer the best products and services.
Let us know your opinion by sending the following enquiry to us at:
OWASYS Advanced Wireless Devices
Parque Tecnológico de Vizcaya 207 B
48170 Zamudio-Vizcaya
[email protected]
Model: Serial number telephone:
COMMENTS:
Personal data:
Name: Surname:
Telephone number: Email:
Address:
To thank you for purchasing from us, and sending this to us, you will be enrolled in the “Owasys Club”. We
will keep you informed of the latest news and sales, as well as all the new features and releases on the
owasys22C. You can see all the advantages of joining by visiting us on the web at www.owasys.com
#
Page 73

 Loading...