

Page 1
LC2000
20" LCD Display
USER MANUAL
Page 2

Preface
About this Manual
This manual is designed to assist you in setting up and using your LCD display. Information
in this document has been carefully checked for accuracy; however, no guarantee is given to
the correctness of the contents. The information in this document is subject to change without
notice. This document contains proprietary information protected by copyright. All rights are
reserved. No part of this manual may be reproduced by any mechanical, electronic or other
means, in any form, without prior written permission of the manufacturer.
Copyright
Copyright 2003. All Rights Reserved.
Trademarks
VESA is a registered trademark of the Video Electronics Standards Association. DPMS and
DDC are trademarks of VESA.
ENGLISH
ENERGY STAR
ENERGY STAR
As an
theENERGY STAR® guidelines for energy efficiency.
®
is a registered trademark of the U.S. Environmental Protection Agency.
®
partner, the manufacturer has determined that this product meets
FCC Compliance Statement
This device complies with Part 15 of the FCC Rules. Operation is subject to the following
two conditions: (1) this device may not cause harmful interference, and (2) this device must
accept any interference received, including interference that may cause undesired operation.
Note: This equipment has been tested and found to comply with the limits for a Class B digital device, pursuant to part 15 of the FCC Rules. These limits are designed to provide reasonable protection against harmful interference in a residential installation. This equipment
generates uses and can radiate radio frequency energy and, if not installed and used in accordance with the instructions, may cause harmful interference to radio communications. However, there is no guarantee that interference will not occur in a particular installation. If this
equipment does cause harmful interference to radio or television reception, which can be
determined by turning the equipment off and on, the user is encouraged to try to correct the
interference by one or more of the following measures:
• Reorient or relocate the receiving antenna
• Increase the separation between the equipment and receiver
• Connect the equipment into an outlet on a circuit different from that to which the
receiver is connected
Caution: To comply with the limits for an FCC Class B computing device, always use the signal cord and power cord supplied with this unit. The Federal Communications Commission
warns that changes or modifications to the unit not expressly approved by the party responsible for compliance could void the user’s authority to operate the equipment.
i
Page 3

Important Safety Instructions
Read the following instructions carefully. Follow all instructions and heed all warnings to prevent personal injury or damage to the product. Keep these instructions in a safe place for future reference.
• To reduce the risk of fire or electric shock, do not expose this appliance to rain or moisture. Do
not place your LCD display near water. Exposing the apparatus to rain, water, moisture or sunlight can severely damage it.
• Clean only with a dry cloth.
• Do not block ventilation openings. Increased temperature may cause fire or device failure.
• Install in accordance with the manufacturer's instructions.
• Do not place the apparatus near any heat sources such as radiators, heat registers, stoves, or
other apparatus (including amplifiers) that produce heat.
• Do not defeat the safety purpose of the polarized or grounding-type plug. A polarized plug has
two blades with one wider than the other. A grounding type plug has two blades and a third
grounding prong. The wide blade or the third prong are provided for your safety. If the provided
plug does not fit into your outlet, consult an electrician for replacement of the obsolete outlet.
• Protect the power cord from being walked on or pinched particularly at plugs, convenience
receptacles, and the point where they exit from the apparatus.
• Only use the attachments and accessories that were included with the apparatus.
• Use only with the cart, stand, tripod, bracket, or table specified by the manufacturer, or sold with the apparatus. When a cart is used, use caution when moving
the cart/apparatus combination to avoid injury from tip-over.
• Unplug the apparatus during lightning storms or when unused for long periods
of time.
• Refer all servicing to qualified service personnel. Servicing is required when the apparatus has
been damaged in any way, such as power-supply cord or plug is damaged, liquid has been
spilled or objects have fallen into the apparatus, the apparatus has been exposed to rain or moisture, does not operate normally, or has been dropped.
• When unplugging the power cord, do not pull on the cable. Grasp the plug to safely unplug the
apparatus.
• If you notice smoke or any other odor or noise coming from the apparatus, stop using the product immediately and unplug the power cord. Contact a qualified service technician.
• Keep the apparatus at least four (4) inches away from the wall. Make sure there is sufficient airflow to ventilate the unit.
• Hold the apparatus with two hands at the base of the panel when moving it.
• Apparatus shall not be exposed to dripping or splashing and no object filled with liquids shall be
placed on the apparatus.
ENGLISH
ii
Page 4
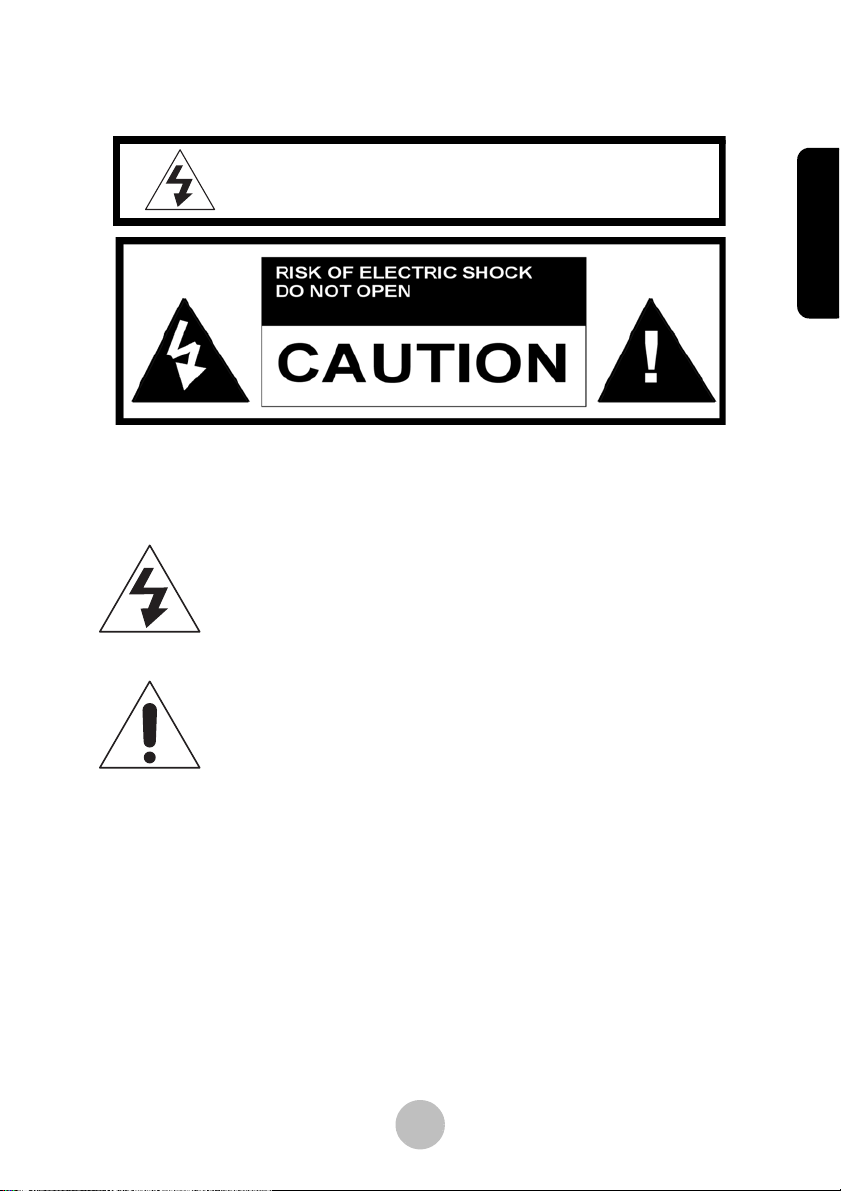
WARNING: TO REDUCE THE RISK OF FIRE OR!!
ELECTRIC SHOCK, DO NOT EXPOSE THIS PRODUCT!
TO RAIN OR MOISTURE.
.
CAUTION: TO REDUCE THE RISK OF ELECTRIC SHOCK, DO NOT REMOVE
COVER (OR BACK). NO USER-SERVICEABLE PARTS INSIDE. REFER SERVICING TO QUALIFIED SERVICE PERSONNEL.
The lightning flash with arrow head symbol, within an
equilateral triangle, is intended to alert the user to the
presence of uninsulated "dangerous voltage" within the
product's enclosure that may be of sufficient magnitude to
cons titute a risk of electric shock to persons.
The exclamation point within an equilateral triangle is
intended to alert the user to the presence of important
operating and maintenance (servicing) ins tructions in the
literature accompanying the appliance.
ENGLISH
iii
Page 5

Table of Contents
Preface ................................................................................................................. i
Introduction
Unpacking .......................................................................................................1
Getting to Know Your LCD Display
Views ..............................................................................................................2
Cables and Connectors .................................................................................... 2
Control Panel Keys .........................................................................................3
Remote Control (Optional) ............................................................................. 4
Remote Control Key Index ........................................................................ 5
Replacing the Remote Control Battery ..................................................... 6
Adjusting the Viewing Angle .........................................................................7
Setting Up the Optional Wall Mount ..............................................................7
Built-in Speakers ............................................................................................. 8
Connecting the AC Power Adapter ................................................................. 8
Turning On the LCD Display ..........................................................................8
Adjusting Settings
ENGLISH
Controlling the OSD ....................................................................................... 9
Setting the Main Display Mode .................................................................... 10
Setting the Picture-in-Picture Display Mode ................................................10
Adjusting the Display .................................................................................... 12
Television Settings (Optional) ...................................................................... 13
Setting Channels ...................................................................................... 13
Using Quick Channels .............................................................................14
Closed Captioning (North America Only) ..............................................15
Using the V-Chip (North America only) ................................................. 15
VGA (PC) Settings ........................................................................................ 17
Adjusting the VGA Display Automatically ............................................17
Adjusting the VGA Display Manually .................................................... 17
iv
Page 6

Table of Contents
Adjusting Geometric Settings .................................................................18
Adjusting Volume .........................................................................................18
Miscellaneous Settings .................................................................................. 19
Setting the OSD Timer ............................................................................ 19
Setting the OSD Language ......................................................................19
Changing the PIP Size .............................................................................19
Setting the PIP Position ...........................................................................19
Setting the Sleep Timer ...........................................................................19
Troubleshooting
Specifications
Index
ENGLISH
v
Page 7

Introduction
1 Introduction
Congratulations on your purchase of the 20-inch LCD display.
Your LCD display is designed to be versatile, ergonomic, and easy to use.
The display is capable of displaying most standard video signals, with VGA
resolution supported up to 1024x768 with a native resolution of 640x480.
A convenient control panel located on the top of the front panel and a handy
remote control allow you to easily adjust display parameters, change channels, and adjust the volume. The LCD display’s stereo speakers provide full
rich sound and a convenient audio output port lets you connect to an external
audio system.
The LCD display supports VGA, TV (NTSC, PAL, and SECAM), S-Video,
AV, Component, and YPbPr (480i/p & 576i/p) input devices. The Picture in
Picture (PIP) function lets you view two video sources at the same time
while an integrated V-chip allows you to block selected broadcasts.
1.1 Unpacking
After unpacking your LCD display, make sure the following items are
included in the box and are in good condition:
ENGLISH
• LCD display (LCD panel and display base)
• AC power cord and 100-240 VAC/60W power adapter
• Remote control (3-volt lithium battery included) (Optional purchasing)
• Cables:
• 15-pin D-sub VGA cable
• RCA video cable (Optional purchasing)
• RCA stereo audio cable (Optional purchasing)
• 3.5 mm stereo audio cable
• AC power cord
• Warranty Card
• Quick Installation Guide
If you find that any of these items are missing or appear damaged, contact
your dealer immediately. Do not throw away the packing materials or shipping carton in case you need to ship or store the LCD display in the future.
1
Page 8
Getting to Know Your LCD Display
2 Getting to Know Your LCD Display
The LCD display is designed to provide easy access to all controls and
connections. The following figures identify the LCD display’s components,
controls, and ports.
2.1 Views
Please refer to Quick Start Guide. (Front View, Side View and Rear View)
2.2 Cables and Connectors
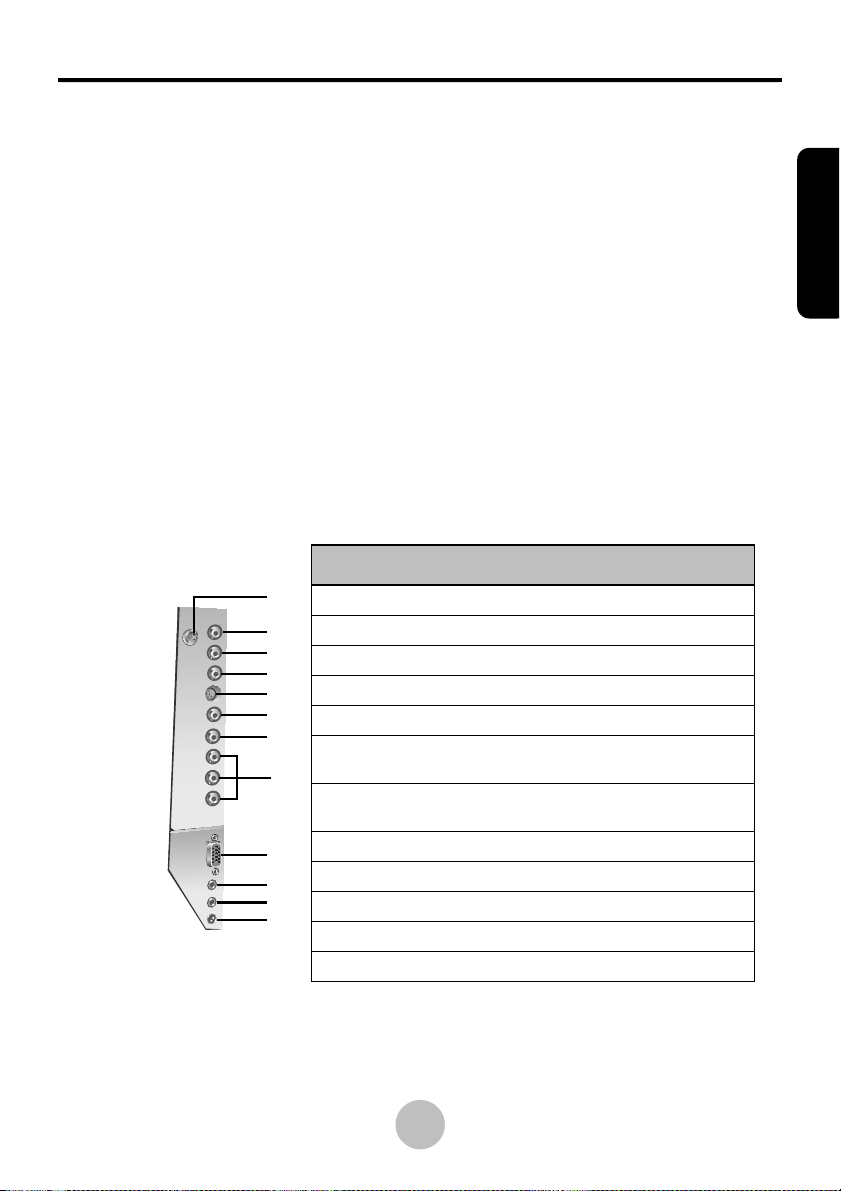
The LCD display is equipped with the following types of connectors that are
used to connect to external devices including VCRs, DVD players, camcorders, and computers.
No. Function Type
1
2
3
4
5
6
7
8
9
10
11
12
Cable TV/Antenna 75Ω F-Connector
1
AV Audio In (Right) RCA (red)
2
AV Audio In (Left) RCA (white)
3
Composite Video In RCA (yellow)
4
S-Video In 4-pin Mini-DIN
5
Audio In Left
6
(Component Video)
Audio In Right
7
(Component Video)
Component Video In RCA (Red, Green, Blue)
8
VGA In (RGB) 15-pin D-Sub
9
Audio Line In 3.5 mm stereo
10
Audio Line Out 3.5 mm stereo
11
DC Power In 2-pin DC plug
12
RCA (white)
RCA (red)
ENGLISH
Note: Item 1~8 are by optional.
Note: The AV Audio In is designed for share with both of AV & S-Video
resource.
2
Page 9
Getting to Know Your LCD Display
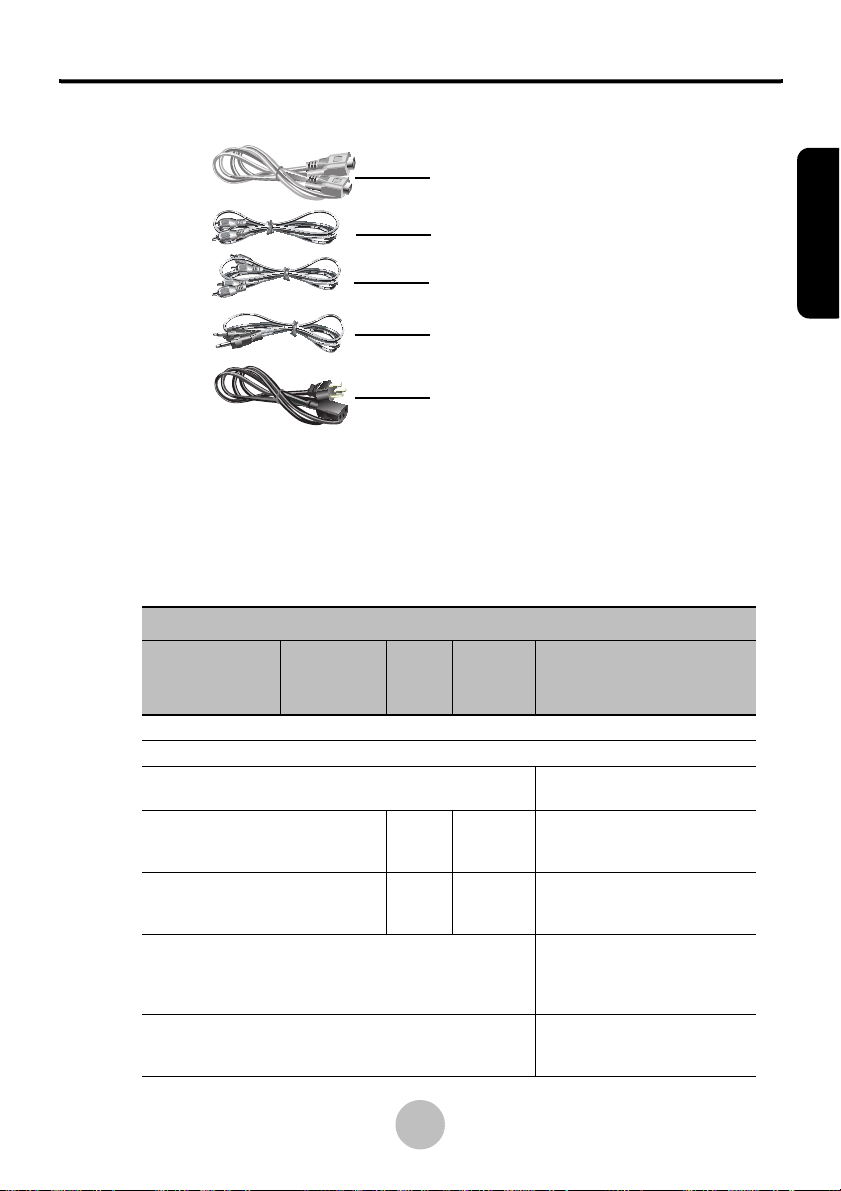
The LCD display comes with the following cables:
15-pin D-sub VGA cable
RCA video cable (Optional)
RCA stereo audio cable for AV &
S-Video (Optional)
3.5 mm stereo audio cable
AC power cord
2.3 Control Panel Keys
The control panel keys located at the top of the LCD display can be used to
adjust all available settings. The remote control keys (see “Remote Control
(Optional)” on page 4) have the same functionality.
Display Mode
AV
Key TV VGA
1 Power Turns the power on or off.
2 Source Selects the source signal to display on the main screen.
3 Menu
Program
4
Up
Program
5
Down
Volume
6
Decrease
Volume
7
Increase
Turns the on screen display
(OSD) menus on or off.
Increases
the channel
number.
Decreases
the channel
number.
Decreases the volume.
Increases the volume.
S-Video
YPbPr
N/A N/A
N/A N/A
OSD
Turns the OSD off.
Moves to the previous sub
menu item.
Moves to the next sub
menu item.
Moves to the previous
menu item or decreases
the value of the selected
setting.
Moves to the next menu
item or increases the value
of the selected setting.
ENGLISH
3
Page 10
Getting to Know Your LCD Display
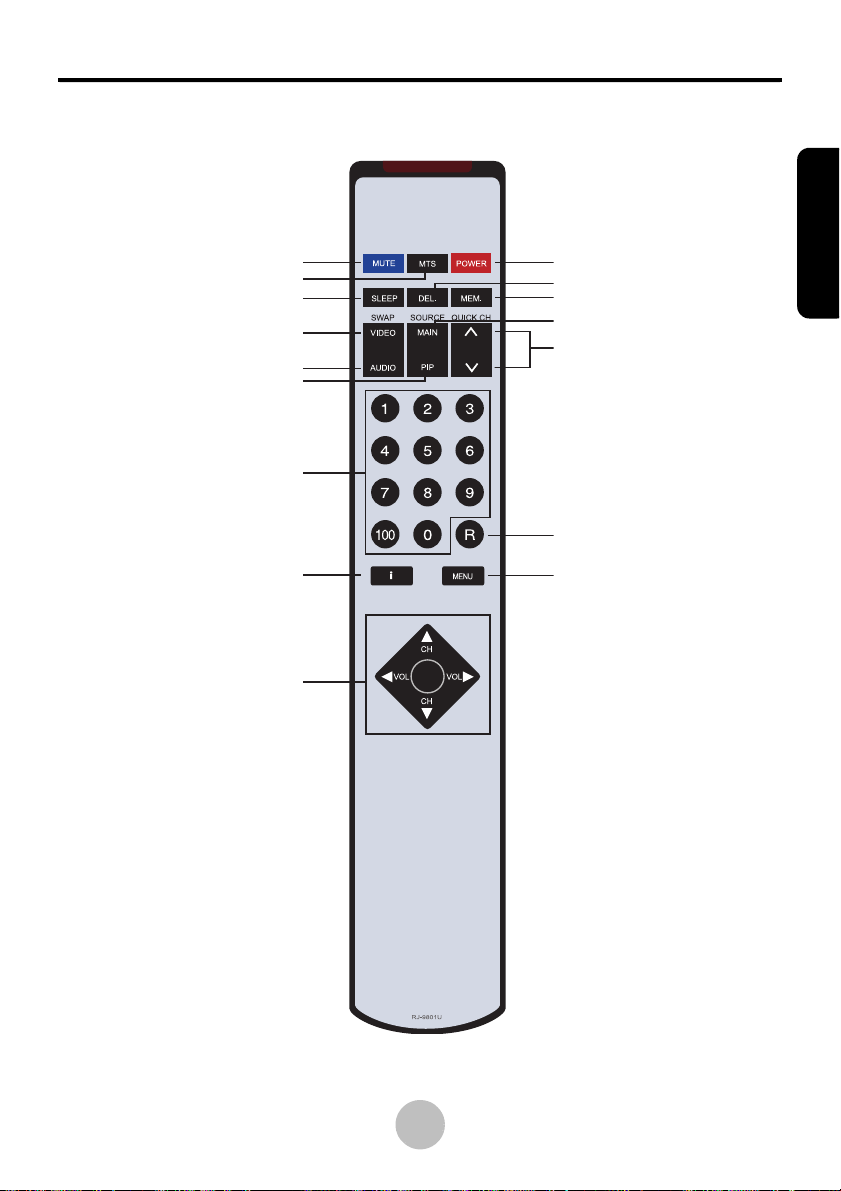
2.4 Remote Control (Optional)
1
2
3
4
5
6
7
8
9
10
11
12
13
14
15
16
ENGLISH
4
Page 11
Getting to Know Your LCD Display
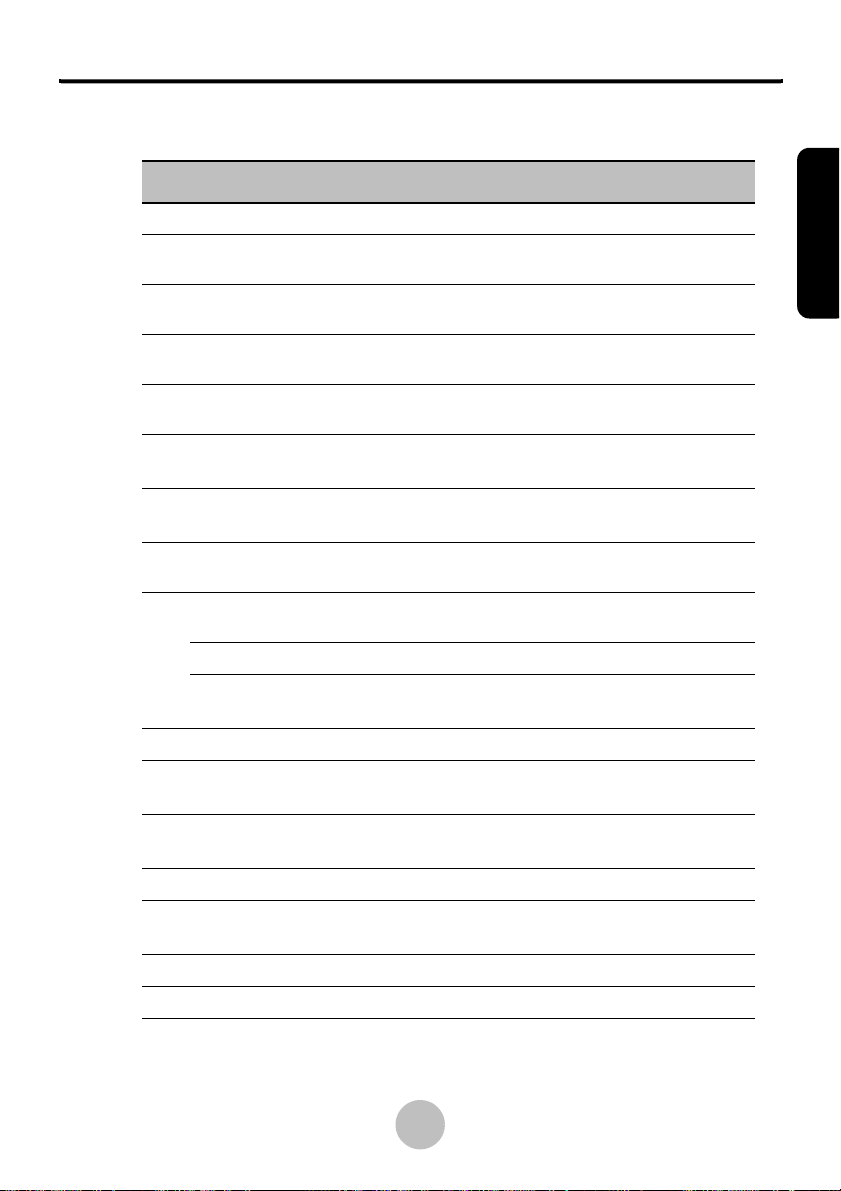
2.4.1 Remote Control Key Index
Key Description
1 Mute
2 MTS Selector
3 Sleep
4Video
5 Audio
Picture-in-Picture
6
(PIP) Source
Numeric Keys
7
(0 to 9, and 100)
8 Information
OSD Navigation
Channel Up/Down
9
Volume Increase/
Decrease
10 Power
Quick Channel
11
Memory Delete
Quick Channel Memory
12
Set
13 Main Source
Quick Channel Memory
14
Up/Down
15 Return
16 Menu
Turns the volume off completely.
Multi-channel Television Sound for full stereo
and bilingual broadcasts.
Automatically turns off the LCD display after a
preset period of time (30, 60, or 90 minutes).
Exchanges the Main and PIP video screens
(PIP appears on Main, Main appears in PIP).
Exchanges the Main and PIP audio
(listen to either the Main or PIP sources).
Selects the picture-in-picture video source.
Audio source remains with the main source.
Used to directly key in channel numbers.
Turns the on screen information display on or
off.
Navigates through the on screen display
(OSD) menus (up, down, left, right).
Increases or decreases the channel number.
Increases or decreases the volume.
Turns the LCD display on and off.
Deletes the selected quick channel number.
Sets the quick channel number
(between 0 and 9).
Selects the video source for the main screen.
Increases or decreases the favorite
channel number.
Switches to the previous channel.
Turns the screen display menu on.
ENGLISH
5
Page 12
Getting to Know Your LCD Display
Note:
• Using the remote control in direct sunlight reduces
the functional distance at which it can be used.
• Aim the remote control at the IR receiver on the
LCD display and ensure there are no object in the line
of sight.
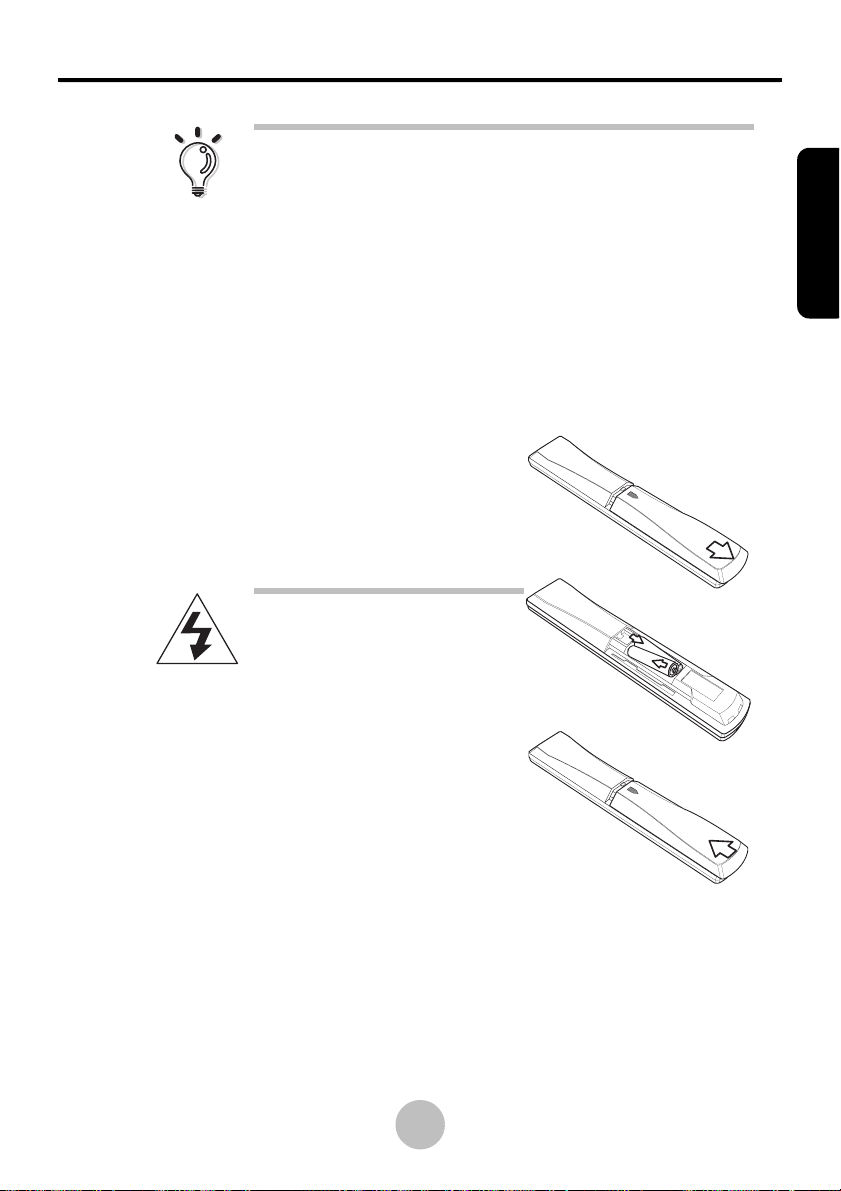
2.4.2 Replacing the Remote Control Battery
Refer to the following illustration for instructions on replacing the
remote control battery (CR2025 3V).
1 Slide the battery tray out (A).
2 Place the battery into the tray with the
positive polarity as shown (B).
A
3 Push the battery tray in (C).
Caution:
• Remove and store the battery in a cool dry place if the
remote control is not used
for long periods of time.
• Handle damaged or leaking
batteries with care. Wash
hands with soap if they
come in contact with leaked
chemical fluids.
• Refer to your local recycling
or waste disposal guidelines
for information on disposing of used batteries.
B
C
ENGLISH
6
Page 13
Getting to Know Your LCD Display
2.5 Adjusting the Viewing Angle
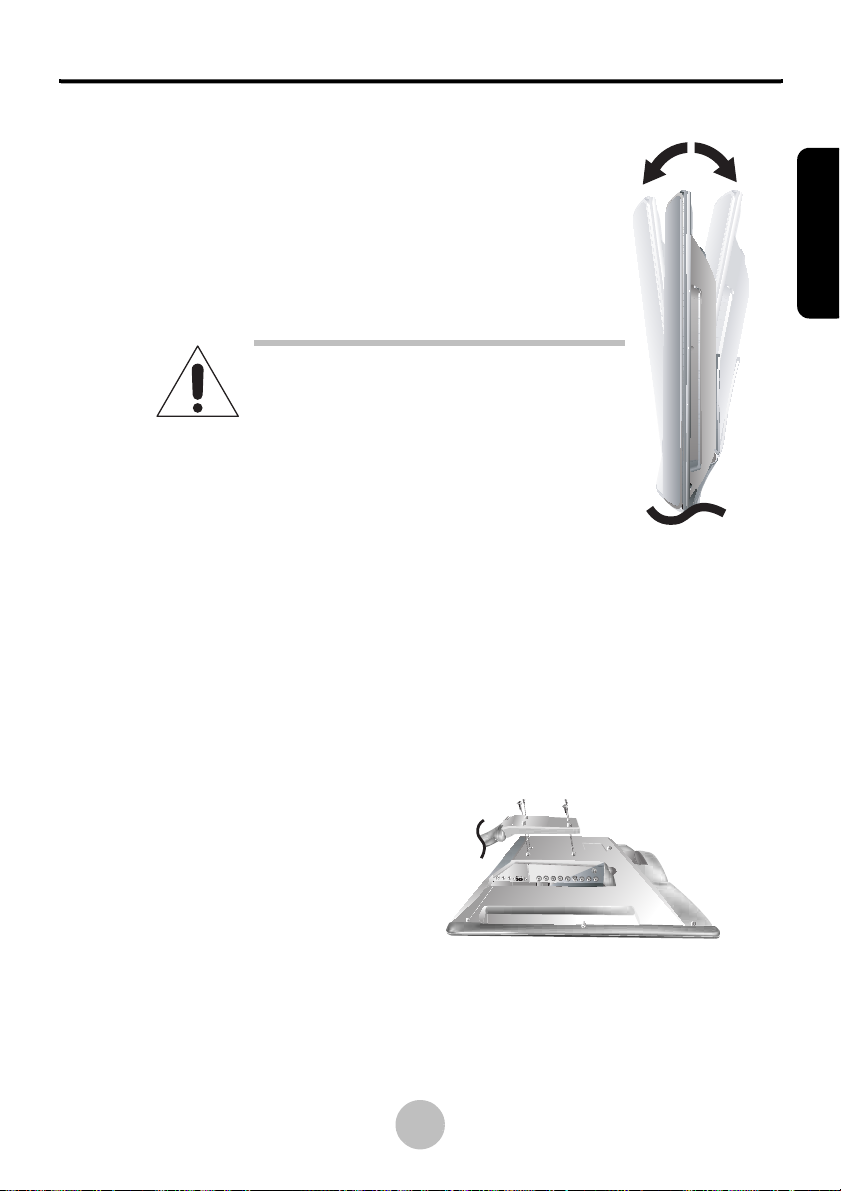
When used on a desktop or other flat surface, you can tilt
the LCD display back to achieve a more comfortable viewing angle.
You can adjust the LCD display viewing angle from an
upright position to a back-tilted angle of up to 7 degrees
and a forward-tilted angle of 4 degrees.
Warning:
Forcing the LCD display past its maximum
extension point will damage the unit.
When tilting the screen, hold the base firmly
and adjust the viewing angle by moving the
top of the display forward or backward. Do
not press the LCD panel when tilting the display.
4ą 7ą
2.6 Setting Up the Optional Wall Mount
Purchase a standard wall mount kit (100 mm x 100 mm screw mount area,
minimum 35 kg load-carrying weight) from a third-party vendor if you want
to attach the LCD display to a wall or other fixed surface.
ENGLISH
1 Prepare a flat, stable working area with a soft cloth or foam pad to
place the LCD display on.
2 Turn the LCD display
power off, disconnect it
from the power
adapter, and gently lay
the display on its front.
3 Remove the four
screws located at the rear of the LCD display as illustrated. Remove
the LCD display stand.
4 Refer to and follow the instructions included with the wall mount kit
that you purchased.
7
Page 14
Getting to Know Your LCD Display
1
2.7 Built-in Speakers
The LCD display comes with a pair of built-in stereo speakers located at the
front of the unit.
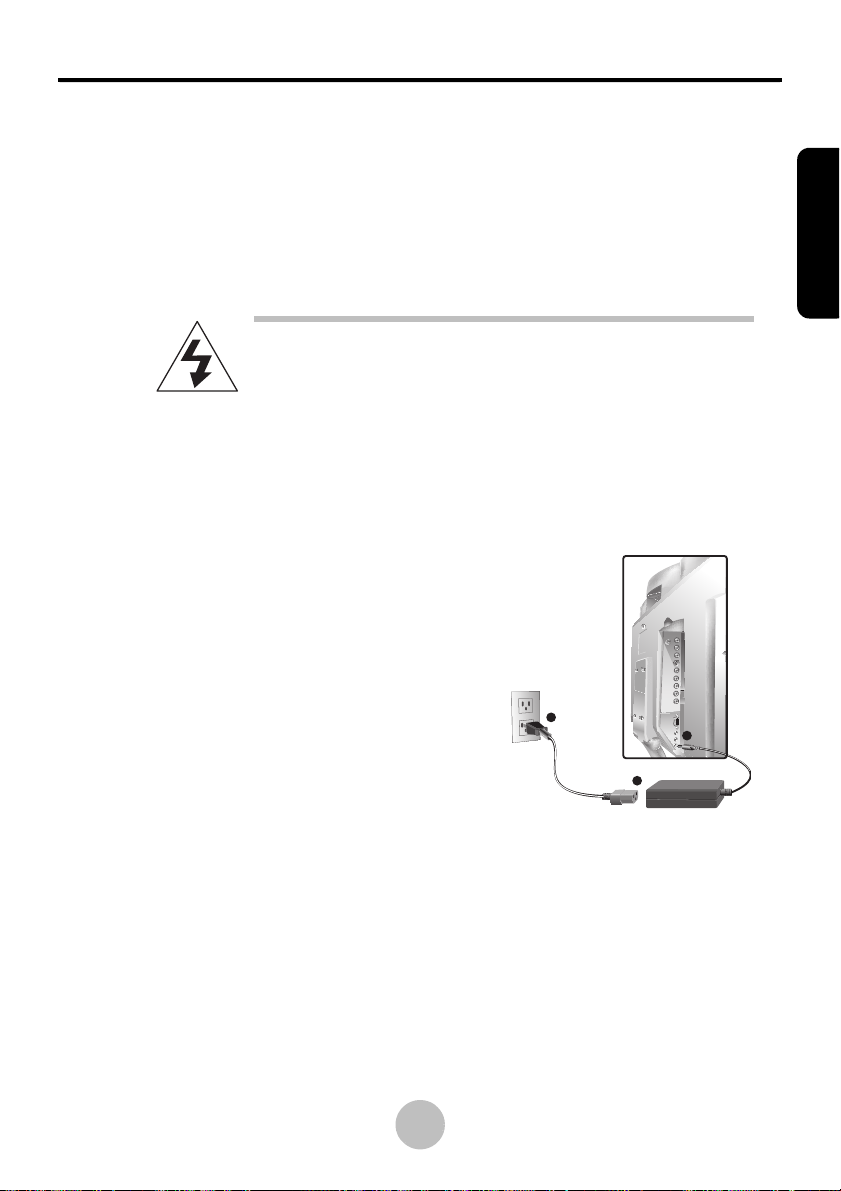
2.8 Connecting the AC Power Adapter
You must use the 100-240 VAC/60W power adapter that is included with the
LCD display.
Caution:
• Make sure you have read and understood the safety
notes before connecting the LCD display to the power
adapter and electrical outlet.
• Do not use any other AC power adapter except the
adapter that was included with your LCD display.
• Contact your dealer if you need a replacement adapter.
1 Connect the power cord to the AC
adapter.
2 Plug the power cord into an electrical
outlet. Contact your dealer or a quali
fied service technician if the plug
does not fit into the outlet.
3 Insert the small end of the adapter
cord into the DC-in connector at the
back of the LCD display. The power
LED on the front panel glows
orange.
-
3
2
ENGLISH
2.9 Turning On the LCD Display
1 Press the Power key on the LCD display control panel or remote
control to turn the LCD display on. The power LED on the front
panel glows green.
2 Press either Power key again to turn the LCD display off. The power
LED on the front panel glows orange.
8
Page 15
Adjusting Settings
3 Adjusting Settings
This chapter explains the LCD display’s On-Screen Display (OSD) menus.
These are used to adjust settings related to picture and audio quality,
as well as other features.
Using the OSD you can adjust the contrast, brightness, OSD position,
color temperature, stereo speaker volume, and other settings.
The OSD Menus can be accessed using either the remote control or the
display control panel located on the top of the LCD display.
3.1 Controlling the OSD
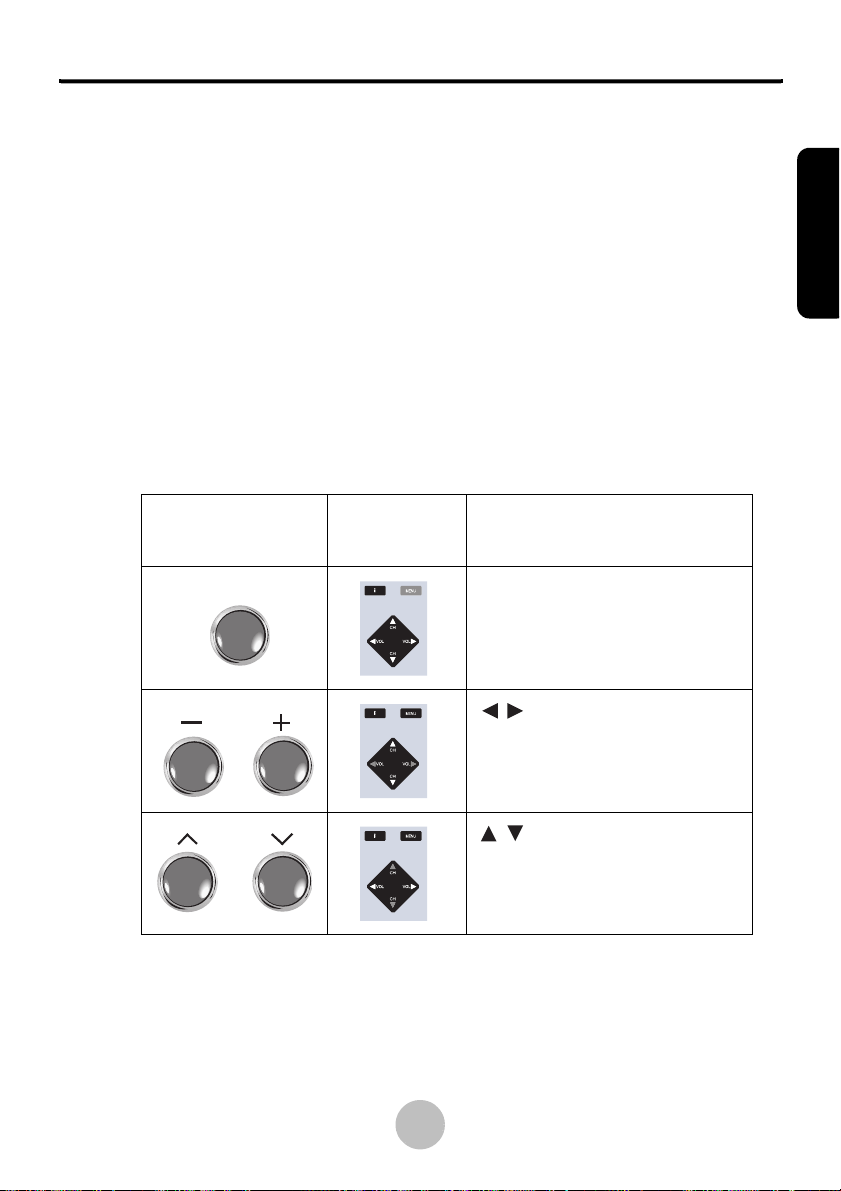
Press the MENU button to turn the OSD on or off.
LCD Control
Panel
MENU
VOL
PRG
Remote
Control
Description
MENU
• turns the OSD menu on
and off
• confirms a selection
/ arrow keys
• navigates through the
OSD menus
• adjusts value
/ arrow keys
• navigates through the
second level of the OSD
menus
ENGLISH
9
Page 16
Adjusting Settings
3.2 Setting the Main Display Mode
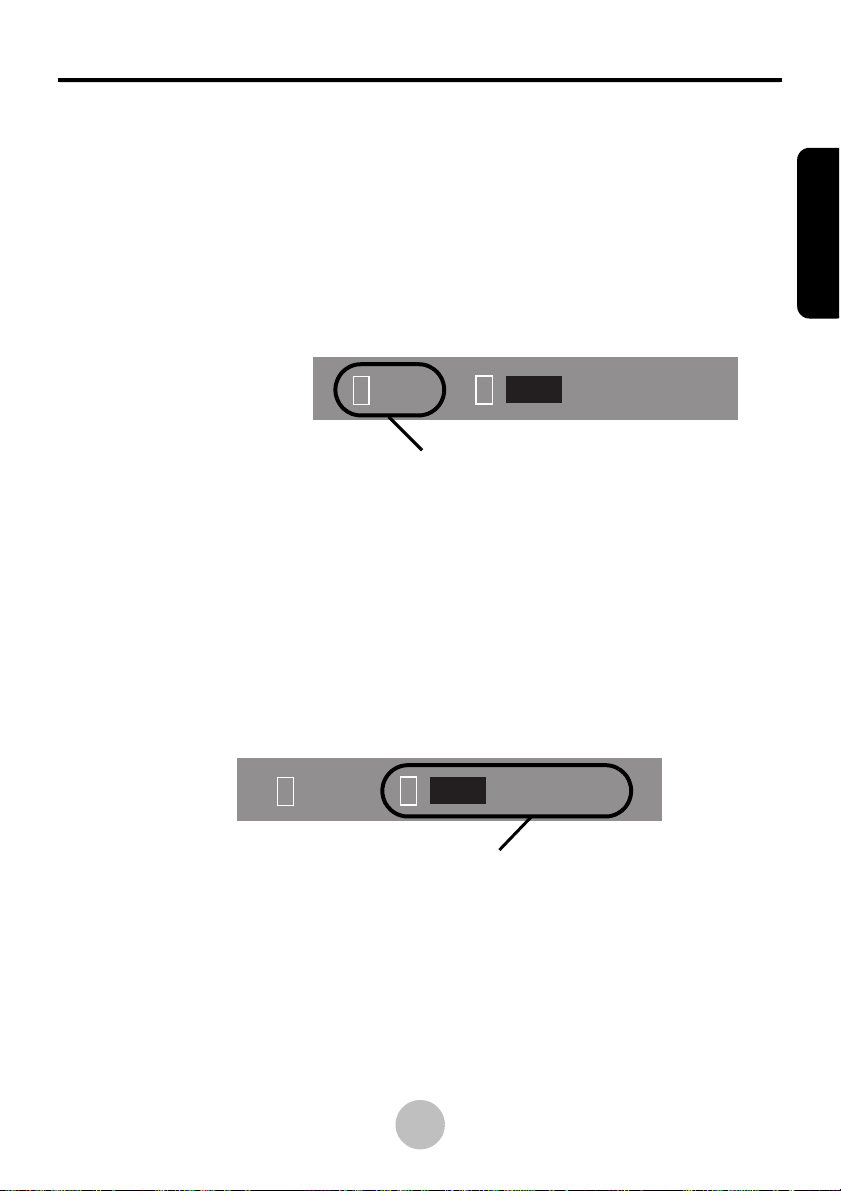
You can switch between input sources and display them on the main screen
in sequence by repeatedly pressing either:
• the MAIN key on the remote control
• the SOURCE key on the LCD control panel
The Main display mode rotates between:
•TV
•AV
•S-Video
• YPbPr
•VGA
The OSD menus for each display mode allow you to set options that are specific to the selected video signal format. Refer to “Adjusting Settings” on
page 9 for information on adjusting settings for each display mode.
1 : TV 2 : OFF VGA YPbPr
Main display mode indicator
3.3 Setting the Picture-in-Picture Display Mode
ENGLISH
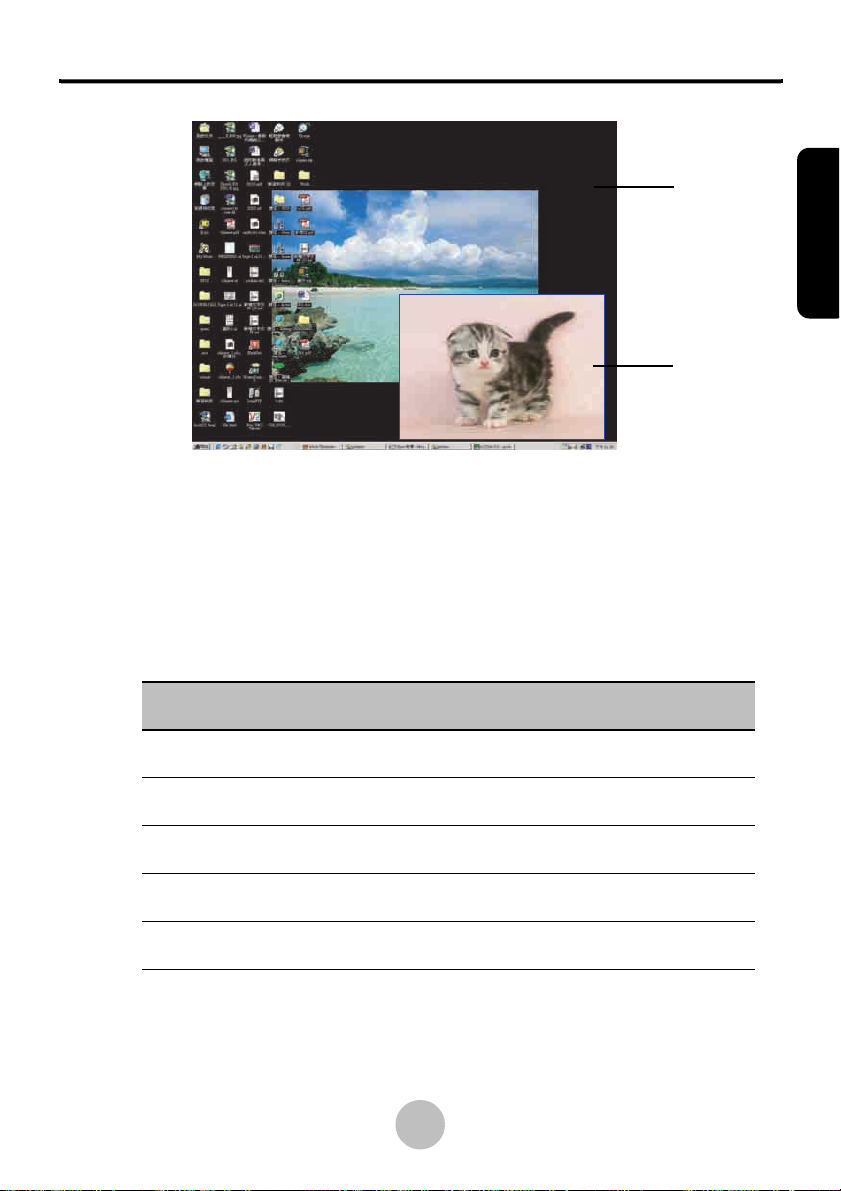
The LCD display is capable of displaying a second video input signal on the
LCD screen at the same time as the main signal. This second signal, or
source, is shown on the LCD screen in a box over top of the main image this is referred to as “Picture-in-Picture” (PIP).
1 : TV 2 : OFF VGA YPbPr
PIP display mode indicator
10
Page 17
Adjusting Settings
Select the PIP source by pressing the PIP key on the remote control.
There is no equivalent key on the LCD control panel.
Sub signal options vary according to the selected Main signal as shown
in the following table.
Main
ENGLISH
PIP
PIP (Picture-in-Picture)
Main OFF TV AV S-Video YPbPr VGA
TV
AV
S-Video
YPbPr
VGA
√− − − √ √
√− − − √ √
√− − − √ √
√√ √ √ − −
√√ √ √ − −
11
Page 18
Adjusting Settings
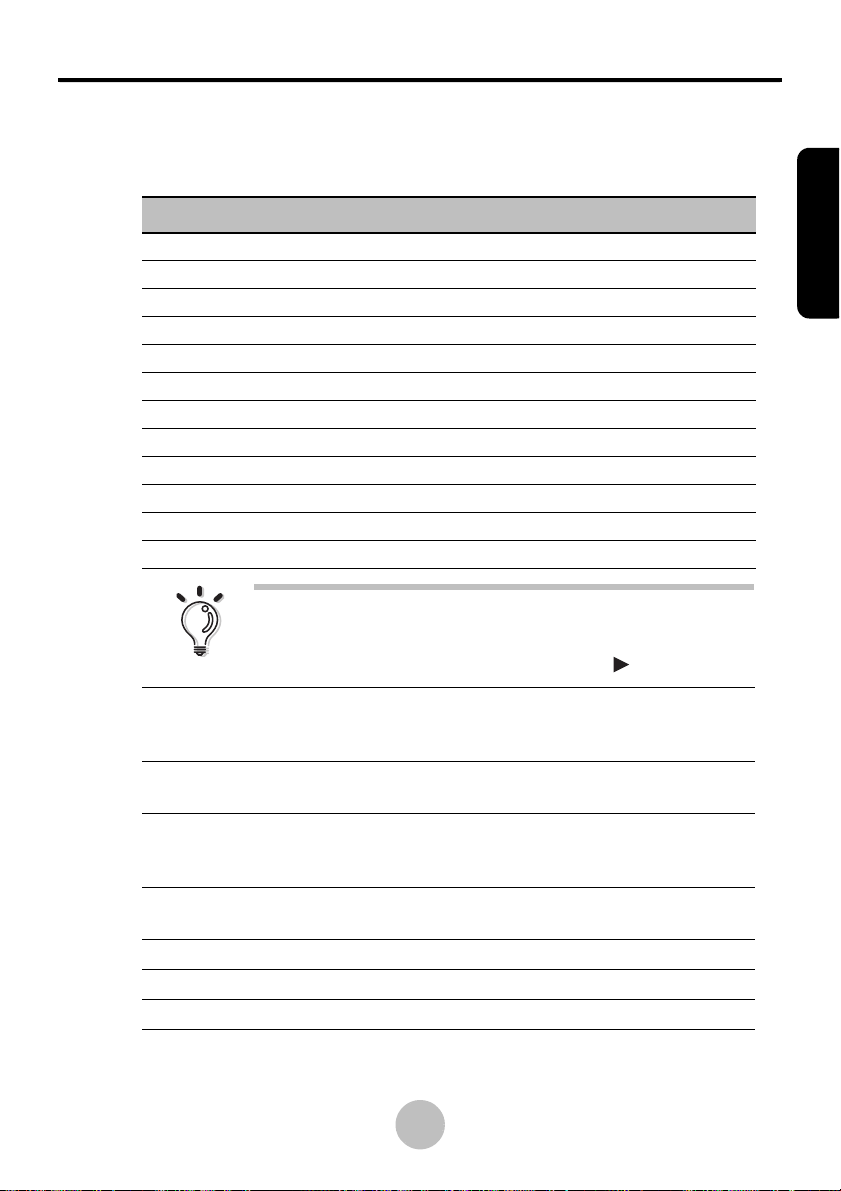
3.4 Adjusting the Display
The following table indicates the display settings that are available for each
Main display mode.
Setting TV AV S-Video YPbPr VGA
Contrast √√ √ √ √
Brightness √√ √ √ √
Color √√ √ √ −
Hue √√ √ √ −
Sharpness √√ √ √ −
Focus −− − √ −
Auto −− − − √
Color-Temp −− − − √
Red −− − − √
Green −− − − √
Blue −− − − √
White Balance −− − − √
NOTE:
To return all DISPLAY settings to their factory defaults,
select “Recall” from the menu and press the key.
ENGLISH
Contrast: enables you to adjust the difference between the lightest and darkest
areas of the LCD display screen. Contrast should be adjusted in conjunction with
the brightness item.
Brightness: enables you to adjust the light level of the LCD display’s screen. It
should be adjusted in conjunction with the contrast setting.
Color: lets you make changes to the LCD display’s color display. The available
options are User, Low, Middle and High. Select “User” to set a custom color temperature.
Hue: allows you to adjust the display hue. Hue is a measure of the saturation of a
color.
Sharpness: enables you to adjust the sharpness of the image.
Focus: allows you to adjust the focus of the image.
Recall: returns all display settings to their factory-set default values.
12
Page 19
Adjusting Settings
3.5 Television Settings (Optional)
3.5.1 Setting Channels
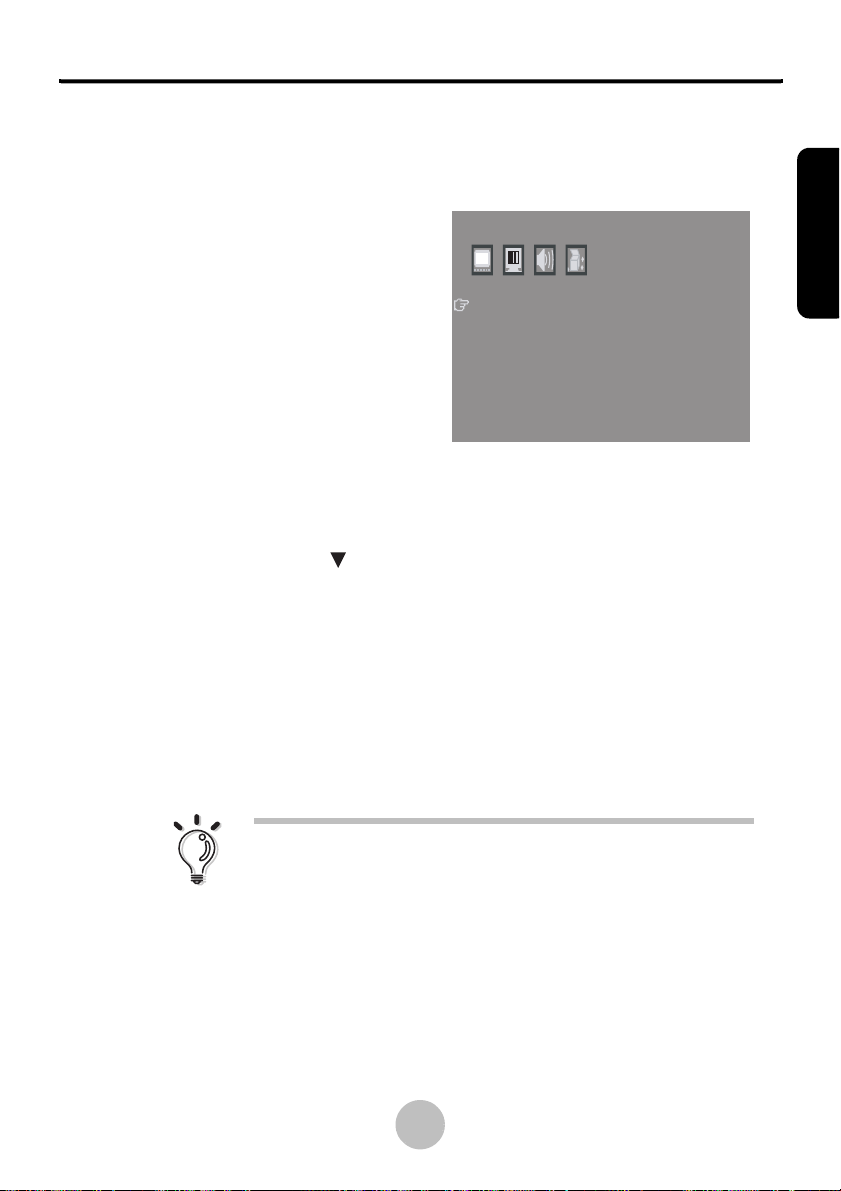
When connected to a television
antenna or CATV cable, the LCD
display can automatically scan
for available channels. Before
scanning, make sure you have
selected the correct TV
signal source: air (broadcast)
or CATV (cable TV).
To scan for channels:
1 Press MENU to turn the OSD on.
2 Press VOL+ to switch to the TV menu.
3 Press PRG/CH to select CH-Scan.
4 Press VOL + to begin scanning channels.
5 The screen displays a number incrementing from 1 to 125 (for NTSC
systems in the USA and other countries) as the LCD display scans for
available channels.
CH SCAN
TV
CCD
V-CHIP
CATV / AIR
CH ADD/DEL
ENGLISH
OFF
CATV
[–]
6 Scanning is complete when the channel number stops incrementing
(125 for NTSC systems). The channel switches back to the first avail
able channel found.
NOTE:
Several minutes are required for channel scanning to
complete.
13
-
Page 20
Adjusting Settings
3.5.2 Using Quick Channels
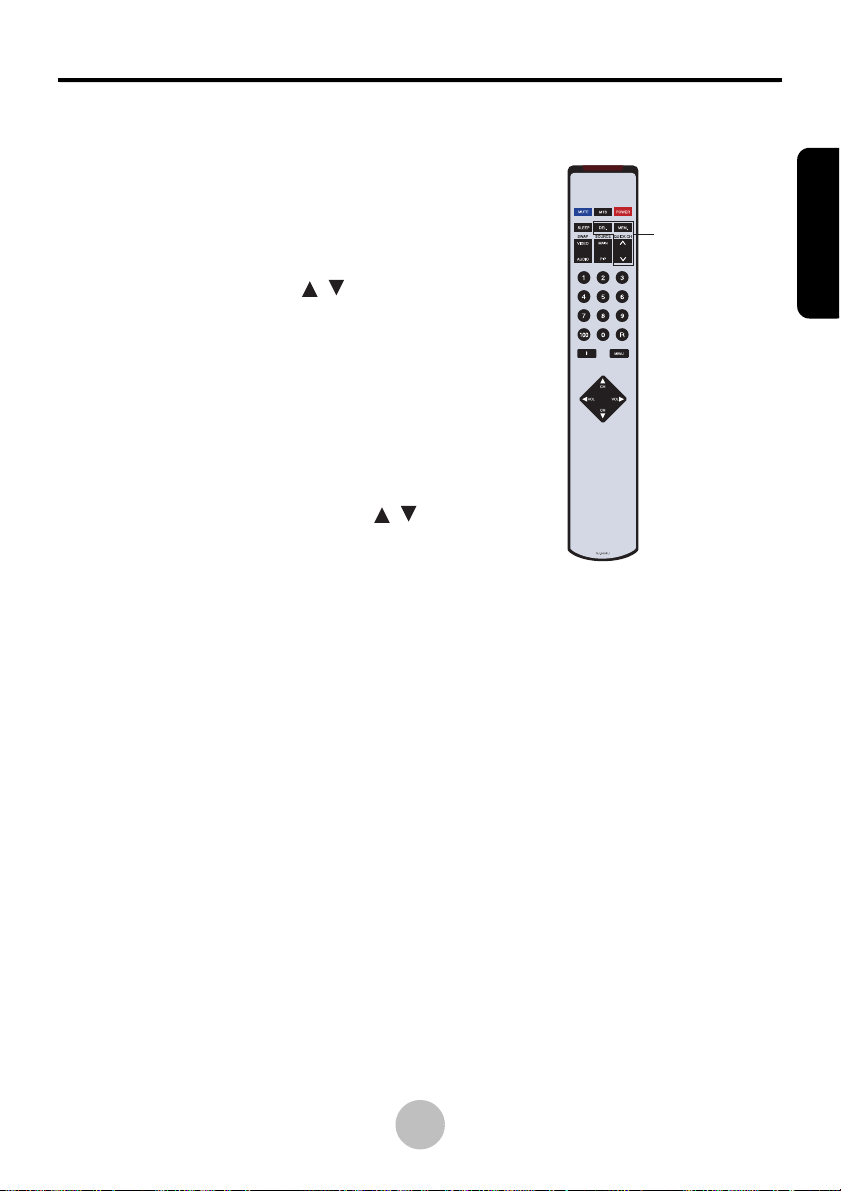
The quick channel function lets you
assign ten channels that can be accessed
by the quick channel keys on the
remote control.
Press PRG/CH / in the QUICK
CH block on the remote control to
switch between assigned quick
channels.
Quick
Channel
Block
Assigning Quick Channels
1 First choose a channel you want to
add to the quick channels by using
the normal PRG/CH
or by entering a channel number
directly with the number keys on
the remote control.
/ keys
2 Press the MEM key in the quick channel block on the remote control.
ENGLISH
3 Use the number keys to assign a number between 0 and 9 to the
current channel.
4 Wait five seconds. The quick channel screen disappears and the new
quick channel assignment is complete.
Deleting Quick Channels
1 First press the DEL key in the QUICK CH block on the remote
control.
2 The quick channel settings appear on the screen. Press the number
key (0 to 9) of the channel you want to delete. The setting for this
quick channel changes to “OFF”.
3 Wait five seconds. The quick channel screen disappears and the
quick channel is deleted.
14
Page 21
Adjusting Settings
3.5.3 Closed Captioning (North America Only)
Closed captioning allows you to view subtitles on your LCD display
display if your broadcast or cable TV provider supports this feature.
3.5.4 Using the V-Chip (North America only)
The V-Chip function reads information encoded in rated programs and
blocks programs from being viewed based on the rating selected by
the parent.
The LCD display allows you to use both “MPAA Ratings” and “TV
Parental Guidelines” to manage the ratings that are blocked or unblocked
on your TV. For information on the V-Chip, refer to the FCC’s website at:
http://www.fcc.gov/vchip/.
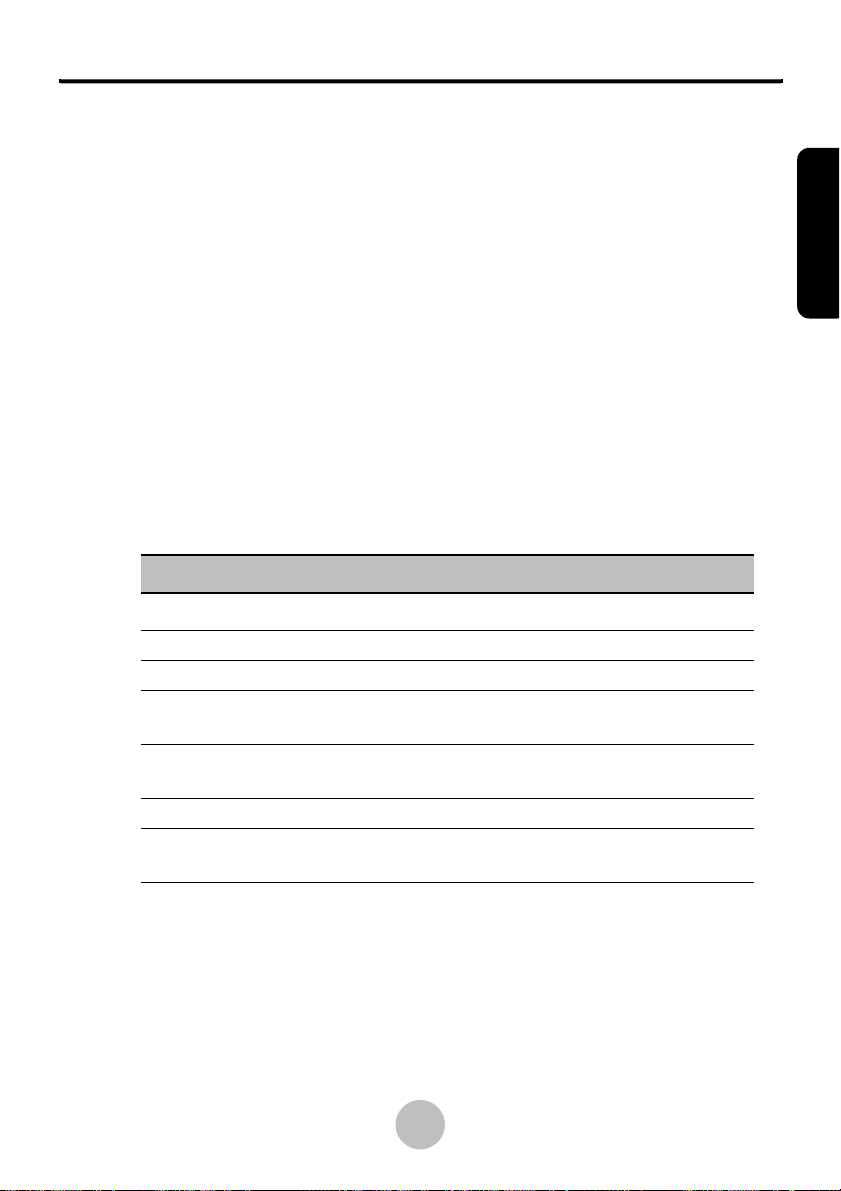
A list of the MPAA and TV ratings and their meanings is given in the
following tables.
MPAA Rating
Rating Description
G All ages admitted.
PG Some material may not be suitable for children.
PG-13 Some material may be inappropriate for children
under 13.
R For those under the age of 17 require accompany-
ing parent or adult guardian.
NC-17 NO ONE 17 AND UNDER ADMITTED.
X X is an older rating that unified with NC-17 but may
be encoded in the data of older movies.
ENGLISH
15
Page 22
Adjusting Settings
TV Parental Guidelines
Rating Description
TV-Y ALL CHILDREN. This program is designed to be
appropriate for all children.
TV-Y7 DIRECT TO OLDER CHILDREN. This program is
designed for children age 7 and above.
TV-G GENERAL AUDIENCE. Most parents would find
this program suitable for all ages.
TV-PG PARENTAL GUIDANCE SUGGESTED. This pro-
gram contains some material that parents may find
unsuitable for younger children.
TV-14 PARENTS STRONGLY WARNED. This program
contains some material that many parents would
find unsuitable for children under 14 years of age.
TV-MA MATURE AUDIENCE ONLY. This program is specif-
ically designed to be viewed by adults and therefore
may be unsuitable for children under 17.
Follow these steps to set up the ratings system on your LCD display.
ENGLISH
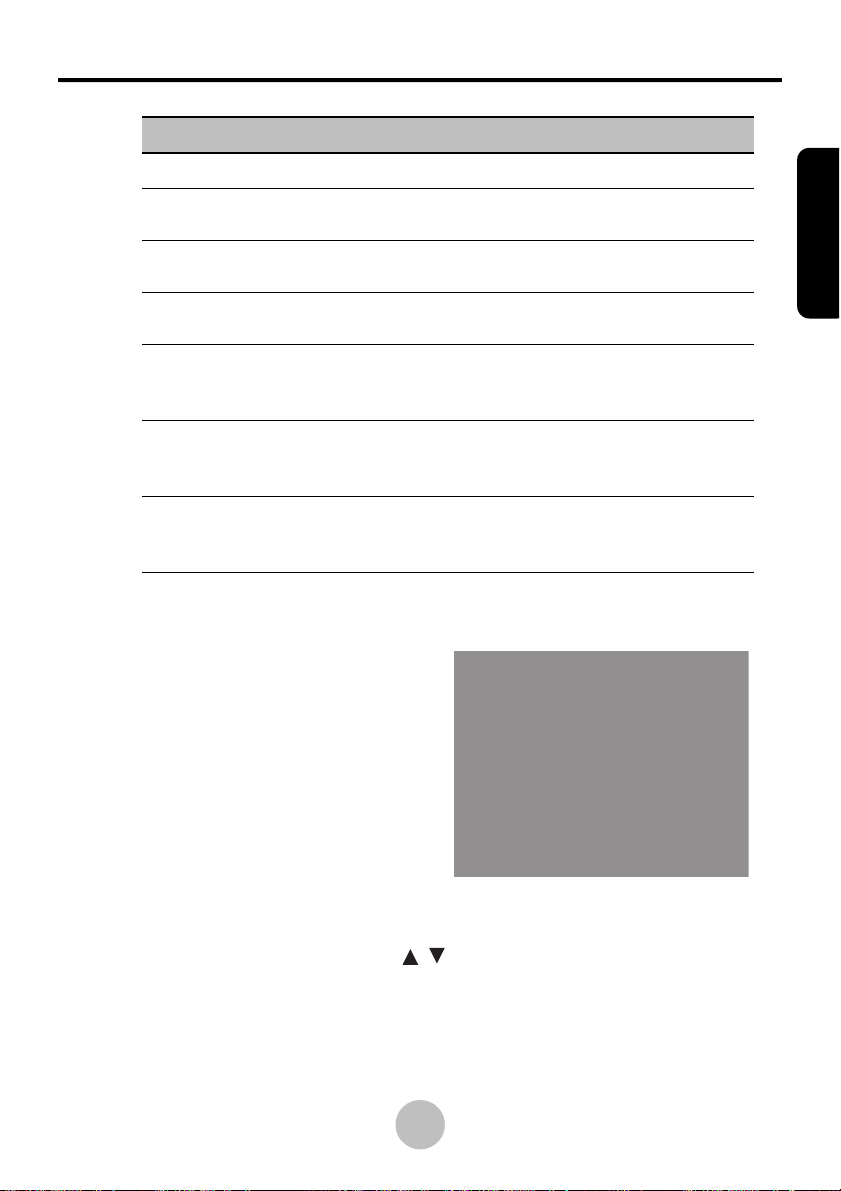
1 Select the V-Chip option in
the TV menu on the OSD and
press VOL+.
2 You are prompted for the
password. The default password is four zeros (0000).
Enter the password using the
numeric keys on the remote
control, then press the Return
G
PG
U
FV
U: UNBLOCK / B: BLOCK
V-CHIP
MPAA-RATING
PG-13
U
U
TV-RATING
UTV-Y7
UUUUTV-PG
UUUUTV-14
UUUTV-MA
NC-17
U
X
U
R
U
SLDV
key.
3 To block a particular program rating from being viewed, select the
field using the PRG/CH / keys. Press VOL+/– to change the
values:
B: blocked (this type of programming cannot be viewed)
U: unblocked (this type of programming can be viewed)
16
Page 23
Adjusting Settings
To reset the password, press the VOL+ and the PRG key on the control
panel simultaneously. Enter your new password at the prompt and wait five
seconds. The new password will be saved.
3.6 VGA (PC) Settings
The LCD display supports standard RGB VGA connections from a PC using
the included 15-pin D-sub cable.
Note:
For optimum results, set your PC’s video resolution to
640x480 pixels. If the resolution is set higher than this,
the picture may be unclear or not visible.
3.6.1 Adjusting the VGA Display Automatically
For most users, allowing the LCD display to automatically adjust VGA
display settings using the AUTO function in the OSD under VGA mode
gives the best results.
3.6.2 Adjusting the VGA Display Manually
You can adjust the various VGA display settings manually to suit your
personal preferences. Available settings include contrast, brightness,
color temperature, and white balance. Change the settings by navigating
through the OSD menu system to the Display menu. Use VOL+/– to
adjust values.
ENGLISH
White Balance
The LCD display provides automatic white balance adjustment. Make
sure the display is showing a white square (at least 4 cm x 4 cm) in the
center of the screen and select “White Balance” in the Display menu.
Press VOL+ to activate the white balance self-adjustment. The screen
flickers for a few moments and the brightness and contrast settings are
returned to default values. The color temperature is also reset to the User
setting. The screen displays “OK” when adjustment is complete.
17
Page 24
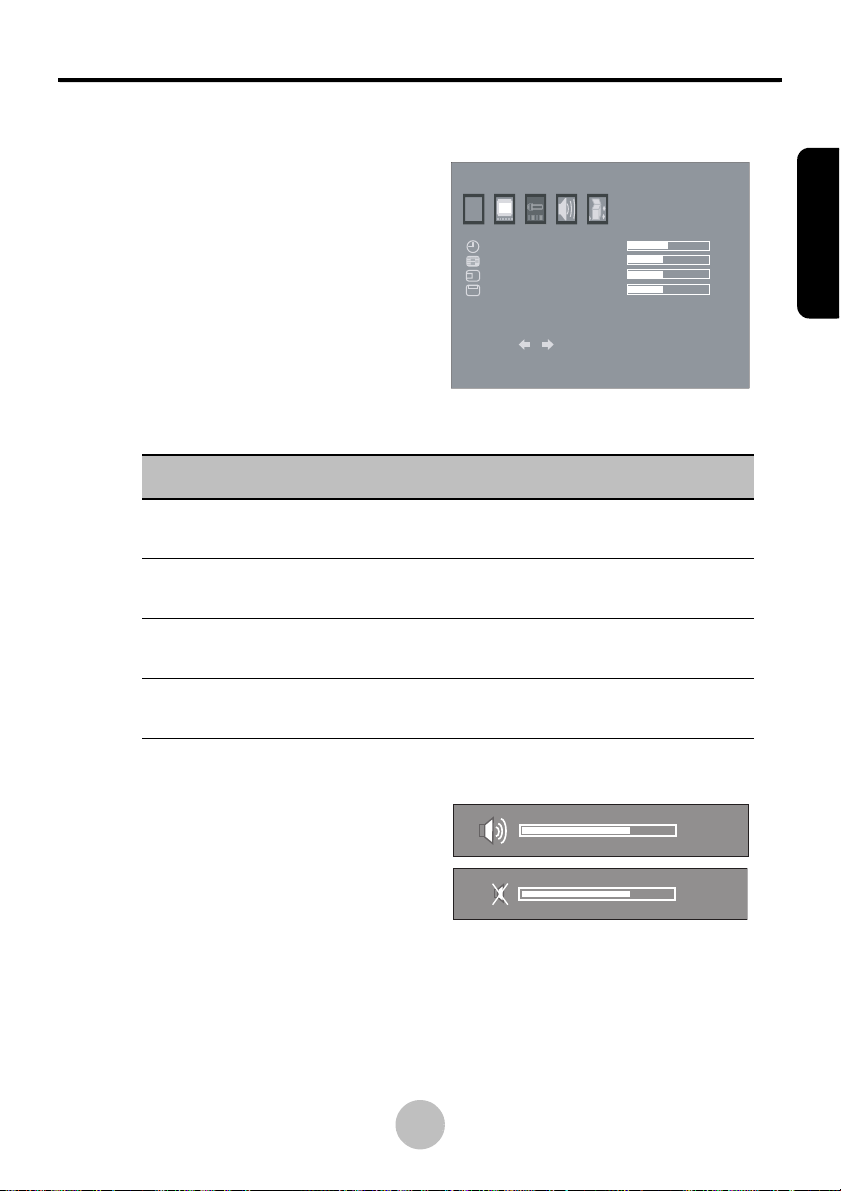
3.6.3 Adjusting Geometric Settings
There are four settings related to
VGA signal and screen positioning that can be adjusted when the
LCD display is in VGA mode:
clock, phase, h-position, and vposition. Each of these can be
adjusted on the “Geometric”
page of the OSD menu system
when the LCD display is in VGA
display mode.
Setting Description
AUTO
CLOCK
PHASE
H-POSITION
V-POSITION
RESET /
GEOMETRIC
Adjusting Settings
128
16
113
30
ENGLISH
Clock
Phase
H-Position
(Horizontal Position)
V-Position
(Vertical Position)
Adjusts pixel alignment to help stabilize the
VGA display.
Adjusts the focus and clarity of the VGA
display.
Centers the image on the display horizontally.
Centers the image on the display vertically.
3.7 Adjusting Volume
Use VOL+/– to increase or decrease
the volume.
Press MUTE to turn the sound off
completely. The mute function is
released automatically by pressing
MUTE again, by changing the volume or main display source, or by
turning the power on or off.
1818181818181818181818
1818181818181818181818
18
Page 25
Adjusting Settings
3.8 Miscellaneous Settings
3.8.1 Setting the OSD Timer
You can change the length of time the OSD will remain on the screen
after the last key has been pressed. Available options are: 5, 10, 15, 20,
25 or 30 seconds.
3.8.2 Setting the OSD Language
You can change the language in which the OSD menus appear. Available
languages are: English, Deutsch (German), Français (French), Italiano
(Italian), Español (Spanish), Japanese, Simplified Chinese and Traditional Chinese.
3.8.3 Changing the PIP Size
When two or more video sources are connected to the LCD display, you
can set one to appear on the full screen (Main) and one to appear in the
Picture-in-Picture screen (PIP or Sub).
NOTE:
To return all audio settings to their factory defaults,
select “Recall” from the menu and press VOL+.
ENGLISH
There are fiver different PIP sizes to choose from in the OSD menu: 1/2,
1/4, 1/8, 1/16, and 1/32.
3.8.4 Setting the PIP Position
The position of the picture-in-picture window on the screen can be
adjusted to suit your preferences. Each position is numbered from upperleft (0) to lower-right (3). The center position is number 4.
3.8.5 Setting the Sleep Timer
The sleep timer turns the LCD display off after a preset period of time.
Press the SLEEP button on the remote control to select the length of time
from the available settings: 30 minutes, 60 minutes, or 90 minutes. Select
“Off” if you do not want the LCD display to shut off automatically.
19
Page 26

4 Troubleshooting
Q: Why doesn’t the LCD display turn on?
A1: Check the AC power adapter to make sure it is securely connected to the
DC-in power jack at the rear of the LCD display. Make sure the power cord
is plugged into a functioning electrical outlet.
Q: Why is the power LED on but the screen is blank?
A1: Make sure the video cable is securely connected to both the LCD display and the device you have attached.
A2: Make sure you have correctly connected all of the cables required for
your device. Refer to the user’s manual that came with your equipment for
further information.
Q: Why is my display too dark or too bright?
A: You can adjust the brightness of the LCD screen. Refer to “Adjusting the
Display” on page 12.
Q: Why is there no sound coming from the built-in speakers?
A1: Check your audio cables to make sure they are connected properly.
A2: Make sure the mute is turned off. Refer to “Adjusting Volume” on
page 18.
A3: Check the sound mode by press the MTS or Sound key on the remote
control to switch between SAP, Mono and Stereo. Press the Display key
to view the setting on the screen.
Q: Why is the display blurred when I connect the LCD display to my
computer?
A1: The LCD display supports VGA (640x480) video mode. Make sure the
display settings of your computer are adjusted to this setting. Setting your
computer’s display resolution to a higher resolution will result in a poor
quality image or no picture at all.
Q: Why can’t I view any TV channels?
A: You must scan for channels before you can view TV channels. See
“Setting Channels” on page 13
Q: Why is my reception bad when watching TV?
A: Use a coaxial cable for TV input. Reception is best from cable TV
or from a high-powered rooftop antenna.
Q: Why is the screen too light or too dark when in VGA mode?
A1: Adjust the white balance. See “White Balance” on page 17.
A2: Adjust the brightness. See “Adjusting the Display” on page 12.
Troubleshooting
ENGLISH
20
Page 27
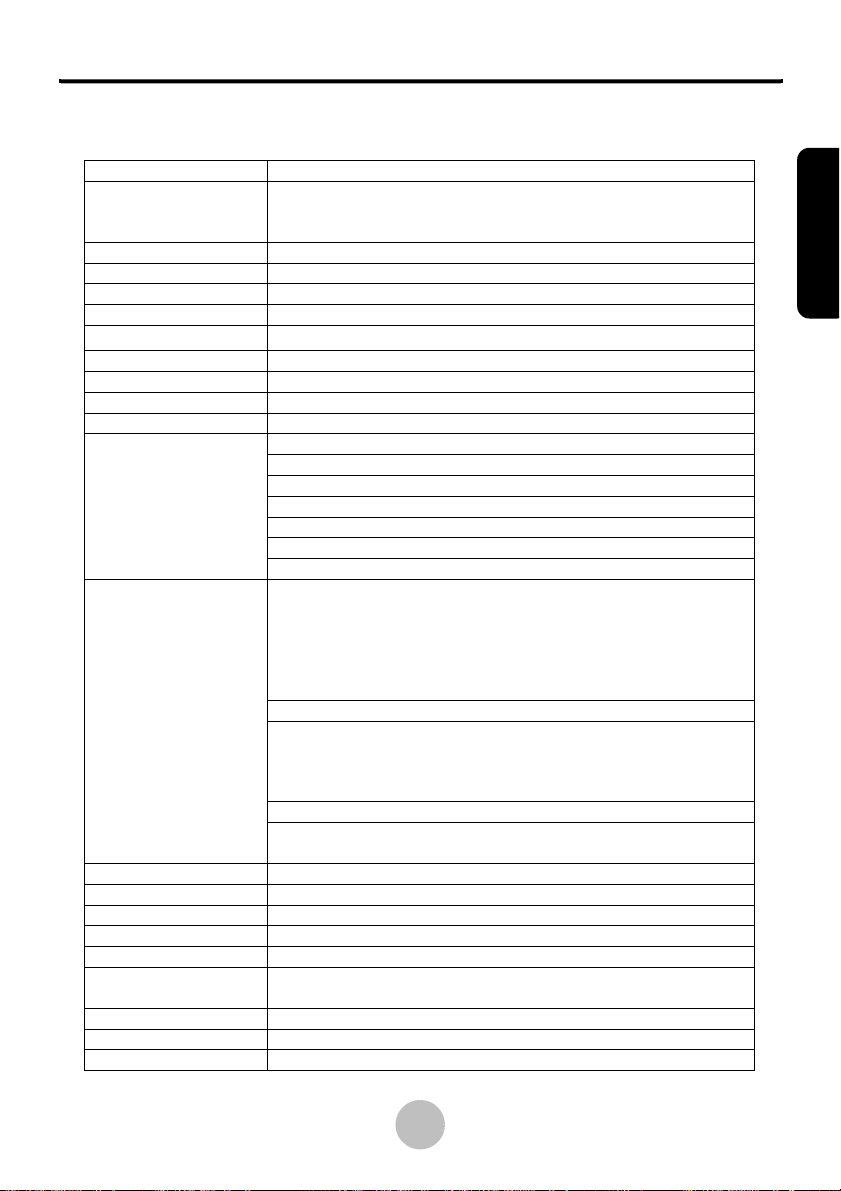
Specifications
5 Specifications
Pixel Pitch 0.6375 mm (H) x 0.6375 mm (W)
Max. Display Area 408 mm (H) x 306 mm (V)
(16.063 in. x 12.047 in.)
20.1-inches diagonally
Aspect Ratio 4:3
Native Resolution VGA (640 x 480)
Display Colors 16.7 million colors (RGB 8-bit color)
Contrast Ratio 500:1
Brightness
Response Time 16 ms typical (Tr + Tf)
View Angle (CRŠ10) Horizontal: 80º/80º, Vertical: 75º/65º (typ.)
Horizontal Frequency 31 KHz ~ 65 KHz
Vertical Frequency 56 Hz ~ 75 Hz
Signal Input/Output
Ports
TV Systems NTSC
Plug and Play Supports VESA DDC1 and DDC2B functions
Lock Kensington
Power Consumption Power off: < 8W
Power Source 12 VDC/5A (60W)
Speakers 5W (max.) x 2
Dimensions 600 mm x 446 mm x 174 mm (W x H x D)
Wall Mount Area 100 mm x 100 mm (3.9 in. x 3.9 in.)
Net Weight 8 kg (17.64 lbs)
Operating Temperature 0ºC ~ 40ºC (10% to 90% RH)
450 cd/m
Standard VGA 15-pin D-Sub
Composite Video (RCA x 1) (optional)
Audio for Composite & S-Video (RCA x 2) (optional)
S-Video (optional)
Component Audio (RCA x 2) (optional)
Tuner (optional)
Component Video (YPbPr RCA x 3) (optional)
PAL (B/G, D/K, I) or SECAM (D/K, L) (not available for US region)
480i/p & 576i/p SDTV support
PIP function
De-interlace support
3D noise reduction filter
NTSC:
BTSC support (USA only)
EIAJ support (Japan only)
SAP/MTS
V-Chip & Closed Captioning (North America Only)
PAL: (not available for US region)
A2 and NICAM support
Teletext
23.6 in. x 17.6 in. x 6.9 in.
2
(typical)
ENGLISH
21
Page 28

Index
6 Index
A
Adjusting settings
available settings, 12
on-screen display
menus, 9
AV
main display mode, 10
picture-in-picture mode,
11
B
Brightness
definition of, 12
C
Cables
15-pin D-sub VGA cable,
3
3.5 mm stereo audio cable, 3
AC power cord, 3
RCA stereo audio cable,
3
RCA video cable, 3
Cables, 2
Closed captioning, 15
Color
definition of, 12
Components
front view, 2
Computer
connecting to, 2
troubleshooting, 20
Connectors, 2
Contrast
definition of, 12
Control panel
keys 3
D
Display mode
setting the main display,
10
E
External devices
camcorders, 2
computers, 2
DVD players, 2
VCR, 2
G
Geometric settings
adjusting, 18
clock, 18
horizontal position, 18
phase, 18
vertical position, 18
H
Hue
definition of, 12
M
Miscellaneous settings
OSD language, 19
OSD timer, 19
PIP position, 19
PIP size, 19
sleep timer, 19
O
On-screen display
adjusting settings, 9
menus, 9
OSD, 9
using the control panel, 9
using the remote control,
9
P
Power adapter
connecting to LCD TV, 8
replacement adapter, 8
safety notes, 8
troubleshooting, 20
Q
Quick channels
assigning, 14
deleting, 14
R
Ratings
setting channel ratings,
15
Recall
default settings, 12
Remote control
disposing of used batteries, 6
illustration of, 4
key index table, 5
replacing the battery, 6
safety notes, 6
S
Scanning
for channels, 13
Sharpness
definition of, 12
Speakers
description, 8
troubleshooting, 20
Specifications
table, 21
S-Video
main display mode, 10
picture-in-picture mode,
11
T
Television settings
setting channels, 13
troubleshooting, 20
Troubleshooting, 20
Turning on the LCD display, 8
V
V-Chip
about, 15
MPAA Ratings, 15
resetting password, 17
TV Parental Guidelines,
15
VGA
adjusting settings automatically, 17
adjusting settings manually, 17
main display mode, 10
picture-in-picture mode,
11
troubleshooting, 20
Viewing angle
adjusting, 7
maximum angle, 7
W
Wall mount, 7
White balance
adjusting, 17
Y
YPbPr
main display mode, 10
picture-in-picture mode,
11
ENGLISH
22
 Loading...