

Page 1
Portable Multimedia Player/Recorder
User’s Manual
AVIAh
Thank you for purchasing the Ovideon AVIAh Portable Multimedia Player/Recorder/TV.
Read this manual carefully before using the AVIAh. A good understanding of its features and operation
will allow you to achieve optimum performance and enjoyment.
Please keep this manual for future reference.
The content of this manual is furnished for informational use only; it is subject to change
without notice, and should not be construed as a commitment by Ovideon Inc..
Ovideon assumes no responsibility or liability for any errors or inaccuracies that may appear in this
document.
Page 2
2
General Features
* What is AVIAh?
The Ovideon AVIAh Portable Multimedia Player/Recorder/TV features one of the world’s first implementations
of OLED (Organic Light Emitting Diode) technology in a portable media recorder/player/TV. The AVIAh is a
personal TV receiver (Off Air or Cable) with program recording and playback capability. The Ovideon AVIAh
also features a Multi-Media Video Player, MP3 and WMA Music Player, JPEG slide show viewer and
audio/video recorder. Enjoy your media on the stellar OLED screen or connect the video/audio output to your
projector or TV for an enhanced viewing experience.
Its small, light, compact and sleek contemporary design
makes it highly fashionable and cool. The AVIAh fits
easily in your shirt pocket, purse or in the palm of your
hand, and weighs in at only 5.1 ounces with the battery!
The AVIAh is the ultimate in portable entertainment.
Small and Light
No matter how you hold the AVIAh you can be rest
assured that the picture displayed on this Portable
Multimedia Recorder/Player/TV will be clear and bright
from any viewing angle. The integrated OLED (Organic
Light Emitting Diode) display is a revolution in display
technology. It offers brilliant, vivid and vibrant color with
striking brightness unmatched by any other small
screen portable player. The picture quality of AVIAh
OLED is phenomenal!
Integrated OLED Screen
With our industry leading 5ms panel response time
moving objects are not blurred and video is seen with
the utmost clarity, sharpness and detail.
Super Fast OLED Response Time
Listen to your favorite music in either MP3 or WMA file
format. Just drag and drop your music files directly into
the AVIAh and enjoy!
Music Player
AVIAh’s integrated Digital Album allows you to drag
and drop your JPEG digital camera pictures into the
Player and create slide shows or slide presentations.
Share your pictures with family and friends!
JPEG Picture Viewer
The integrated USB2.0 interface allows easy drag and
drop file transfer capability. The on screen display
navigation is a dream to use. You can access your files
and play them with just the flip of a joy stick. It’s that
easy!
EASY to Use
Page 3

General Features
3
The AVIAh offers you the ultimate in video media
flexibility. You can store and play video files such as
DIVX, XVID, WMV9, AVI and ASF. Its not enough just
to take your music with you, with the AVIAh you can
take your videos with you too. Now that’s convenience!
Video Player
Connect the included telescoping antenna or attach a
cable line to your AVIAh and tune in your favorite
shows or sports programs. You can watch your favorite
programs and record them! While you’re at it, you can
also rewind and fast forward through them too!
TV/Cable Ready Tuner and Recorder
Record your family videos, your company training
videos or connect directly to your video camera for
some real time recording. The integrated audio/video
input and recording capability of the AVIAH allows you
to connect to your DVD or VCR so you can take your
favorite video recordings with you wherever you go.
Real Time Recorder
Since the AVIAh acts as a mass storage device you
can download or back up virtually any file to the internal
1" subminiature HDD. You can carry your files
wherever you go and have them ready whenever you
need them.
File Storage and Back up
The integrated Voice recorder allows you to record
meetings and conversations or just to take notes. It’s a
great way to remember your next appointment or to
create a to-do and shopping list.
Voice Recorder
For the ultimate in viewing pleasure the integrated
video output of the AVIAh allows you to connect it to
your big screen TV or projector. Any video or music file
recorded on the AVIAh can be watched on your big
screen display or heard on your stereo system.
Big Screen Playback
Page 4

Contents
4
Before Using
General Features 2~3
What is included in the box? 7
Controls and Connections 8
Important Product Safety Instructions 9~11
How to turn the power ON/OFF? 12
How do I connect to my computer and how do I download files? 13
Can I format the AVIAh internal Hard Drive? 14
My Portable Media Player is displaying a “There is not enough HDD space” message. 15~16
Is it possible to see files other than multimedia files in HDD? 17
Can I connect the AVIAh to external A/V equipment? 18
How do I connect the antenna and cable? 19
Are there any precautions when using the battery? 20
What are the functions of each button? 21~22
Page 5

5
Contents
How to Operate each Mode
When Watching TV [NTSC System] 23~24
When Watching TV [PAL System] 25~28
When Listening to the Radio [Option] 29~30
When Displaying an Image File 31~32
Can I change the Background Images of the On Screen Display? 33
When Playing a Moving Picture File 34~36
When Playing Audio Files 37~39
Does the Portable Media Player have an Audio Equalizer? 40
Can I create Playlists? 41~43
When Recording Voice 44~45
Picture Adjustment
46~47
System Setup
48
Setting Other Functions 49
How to perform System Set Up
Page 6

6
Product Specifications & Features 59
Product Inquiry & Customer Service 60-61
Trouble Shooting 62
PRODUCT WARRANTY 63
Limited Warranty 64-65
Contents
Other Functions
Installing Windows 98 SE/ME Driver
50
Upgrading Firmware
51
Installing TransC Software on your PC
52
Using AVIAh TransC 53~58
*
AVIAh TransC Conversion Program
54
To ask for our service through the Internet
Notices
FCC Information
Page 7
7
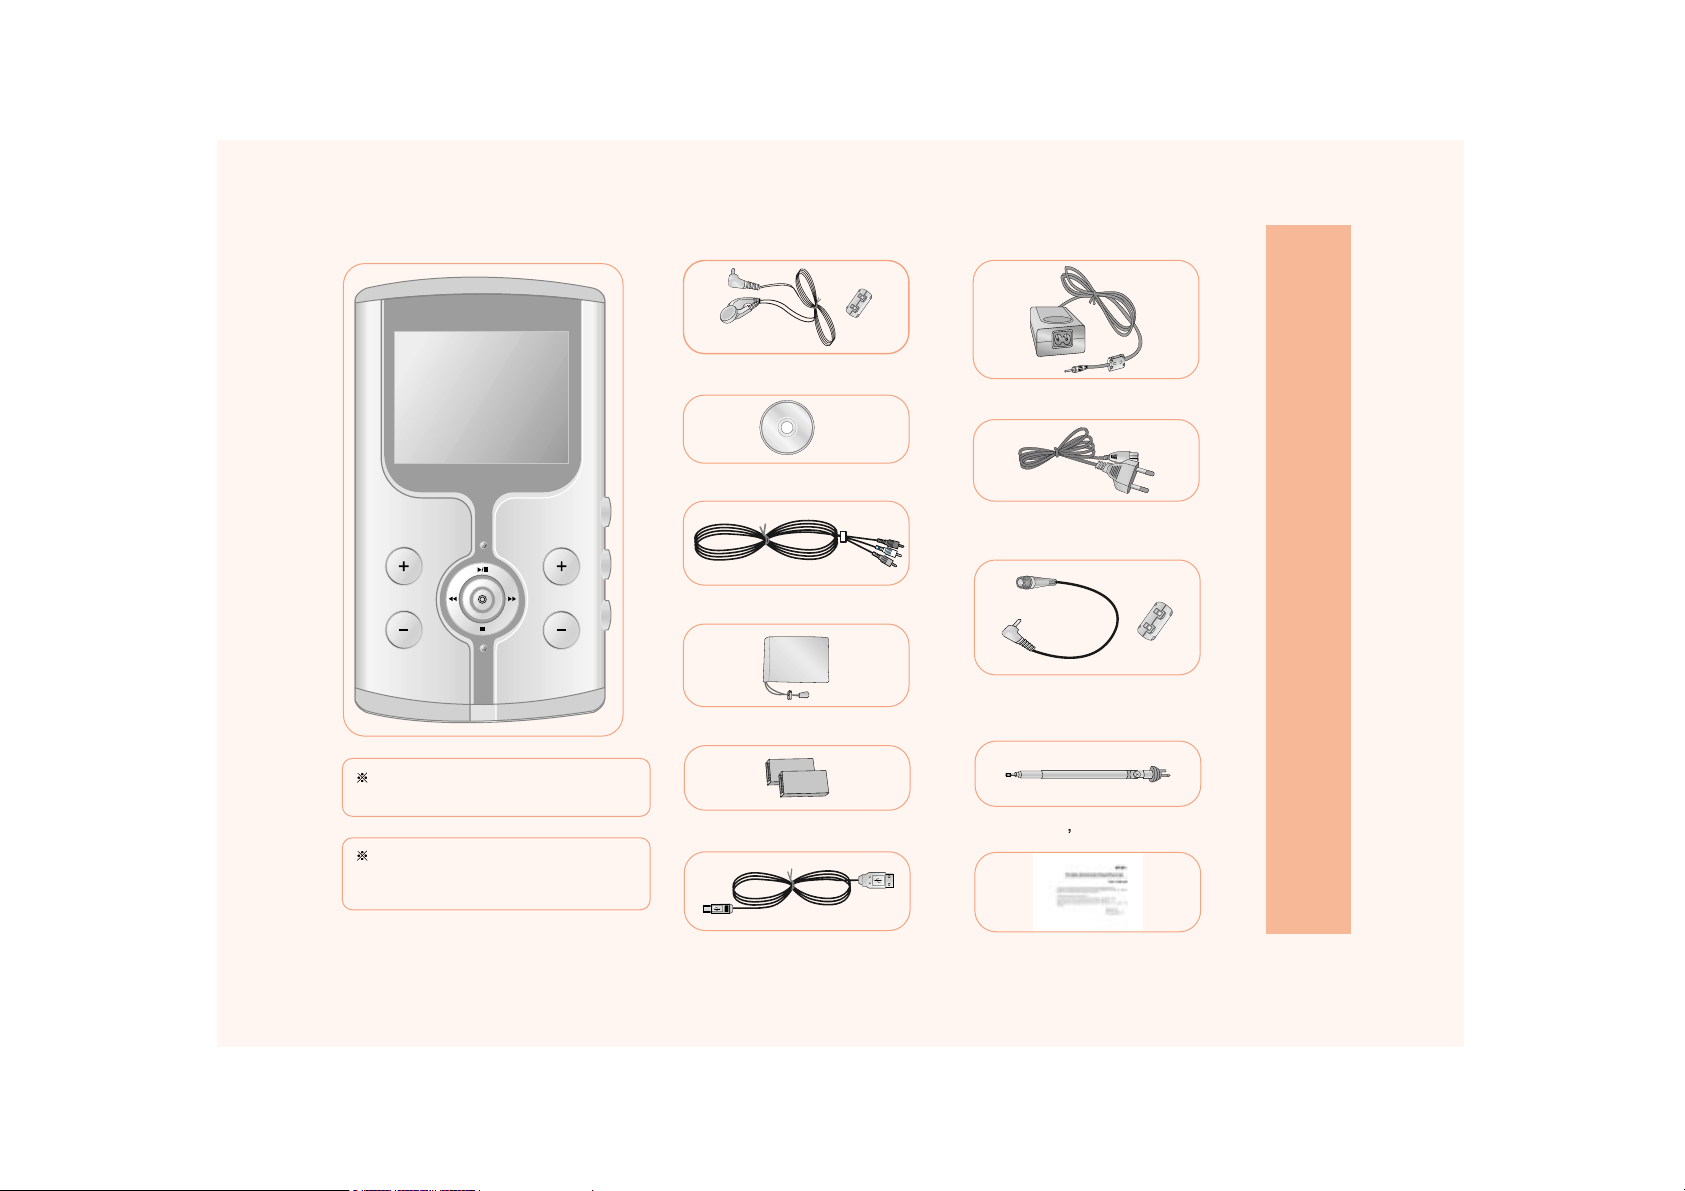
What is included in the box?
AVIAh Portable Recorder
VOL CH
Portable Multimedia Recorder
AVIAh
Installation CD
Audio / Video In/Out Cable
Battery
USB Cable
DC AdapterEarphone / Ferrite Core
Carrying Case
Detachable Antenna for
Outdoor
Power Supply Cord
User s manual
Indoor Antenna Cable /
Ferrite Core
Accessories are subject to change
without notice.
When connecting earphone / core
- Refer to the antenna connection
diagram located on page 16
Page 8
8
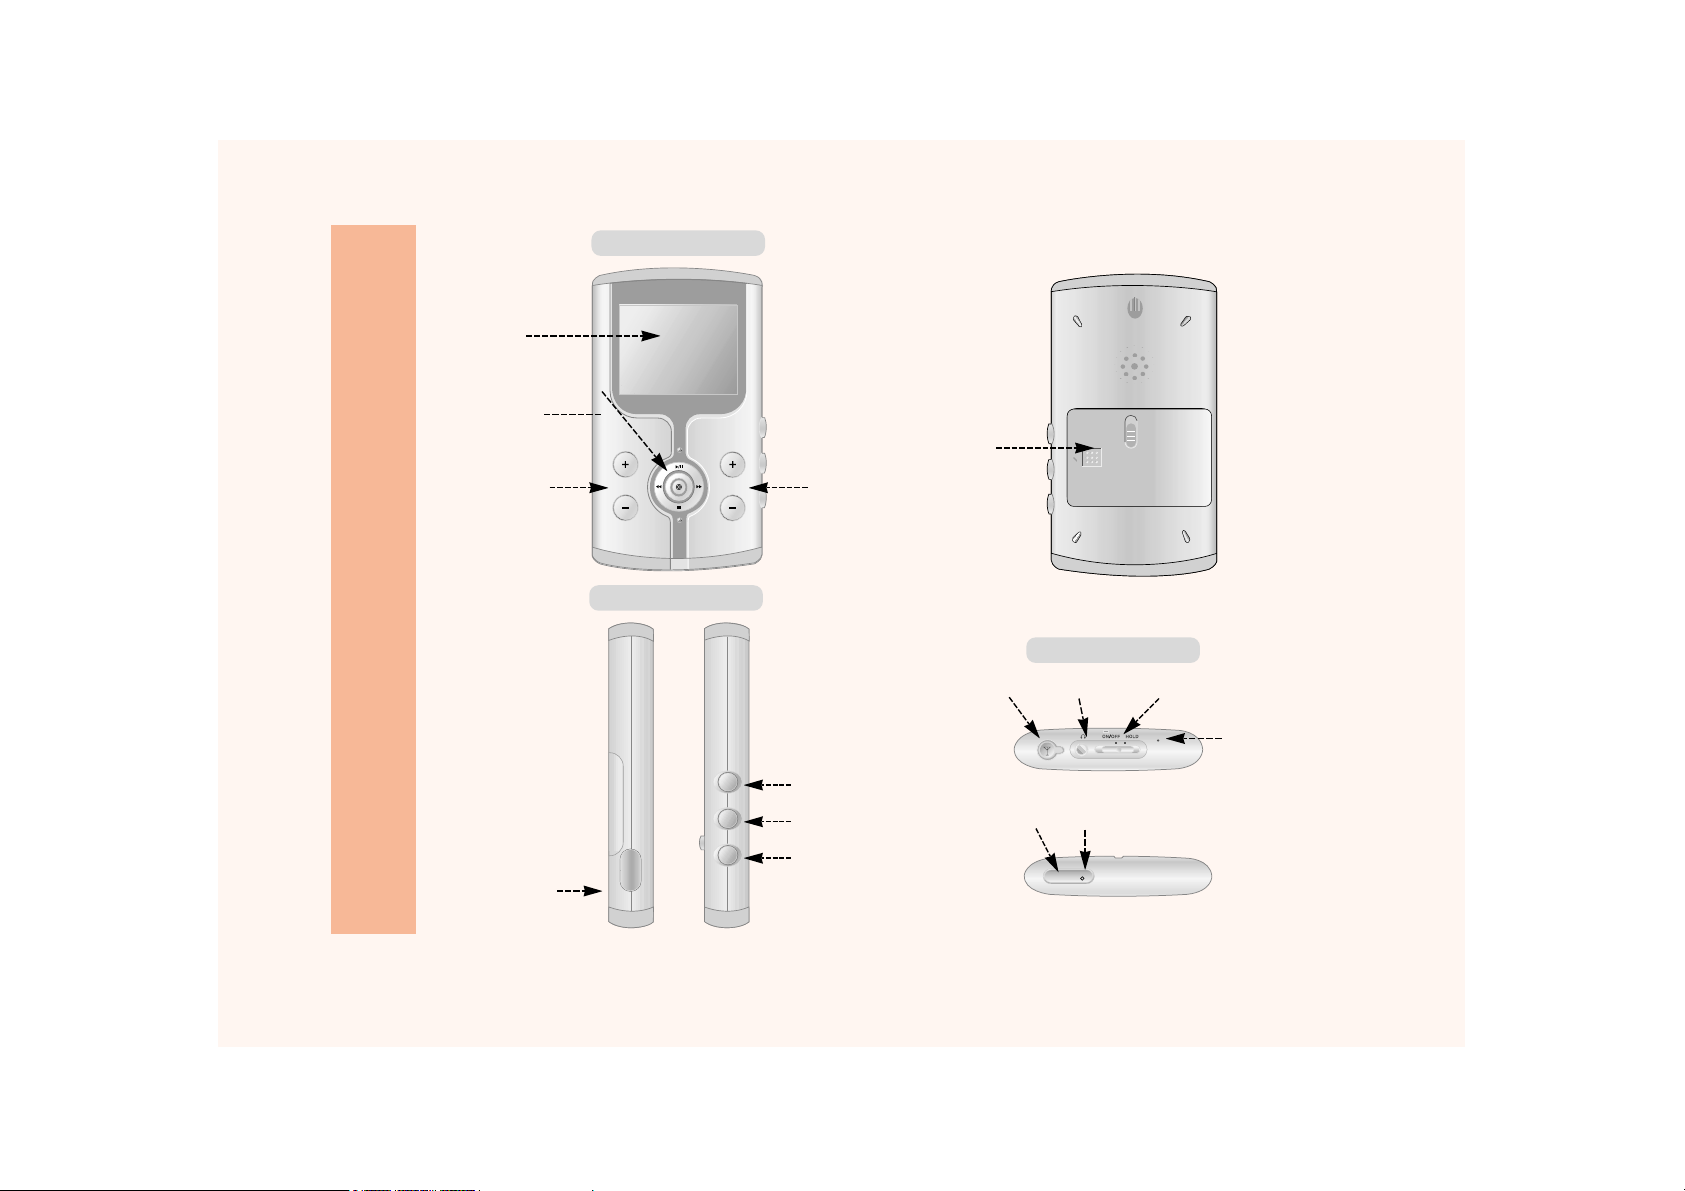
Front/Rear
Left/Right Side
Top/Bottom Side
VOL CH
Portable Multimedia Recorder
AVIAh
OUT IN
DC IN 4.0V
USB
MIC
REC
DISP
MODE
OLED
SCREEN
VOLUME
UP/DOWN
CHANNEL
UP/DOWN
BATTERY
JOG BUTTON
MODE
DISP
AV IN/OUT
TV ANT EARPHONE
USB DC IN
ON/OFF HOLD
REC
BUILT-IN
MICROPHONE
Controls and Connections
Page 9
9
CAUTION!
WARNING!
Other Warnings & Precautions
Do not attempt to open and service this product yourself. Doing so may further damage the product.
If any service is required, please contact the location of purchase or our website (www.ovideon.com).
Follow and obey all warnings and instructions. For your safety, please read all of the safety
and operating instructions before you operate this product and keep this booklet for future
reference.
Copying CD, music, video, image files for sales purpose violates the copyright law.
Copying all or part of data, art, presentation protected by copyright law may require authorization from
the owner of the copyright; hence you should be aware of the all laws governing copyright in your
country.
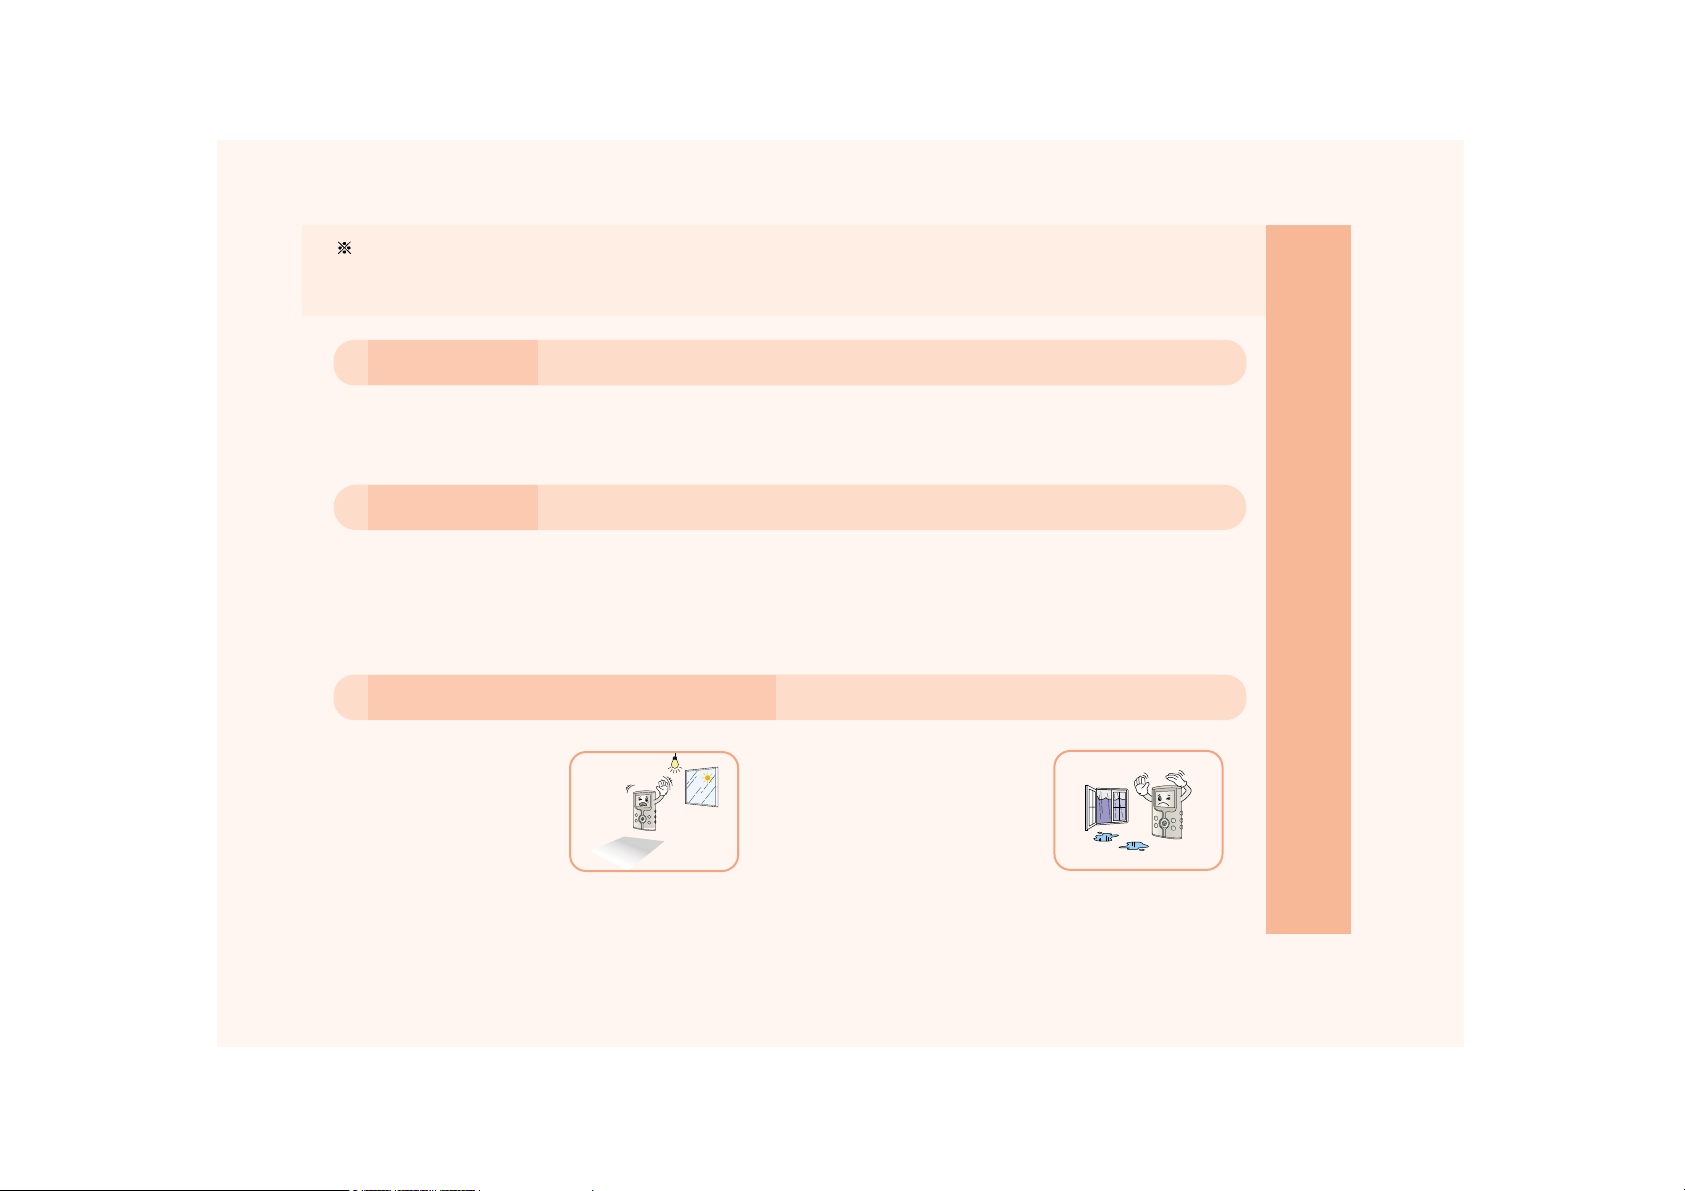
Avoid exposure to direct
sunlight, and do not place this
unit near any heat sources
such as radiators, heat
registers, stoves, etc..
Do not place this unit near water
or moisture for extended periods
of time.
Important Product Safety Instructions
Page 10
10
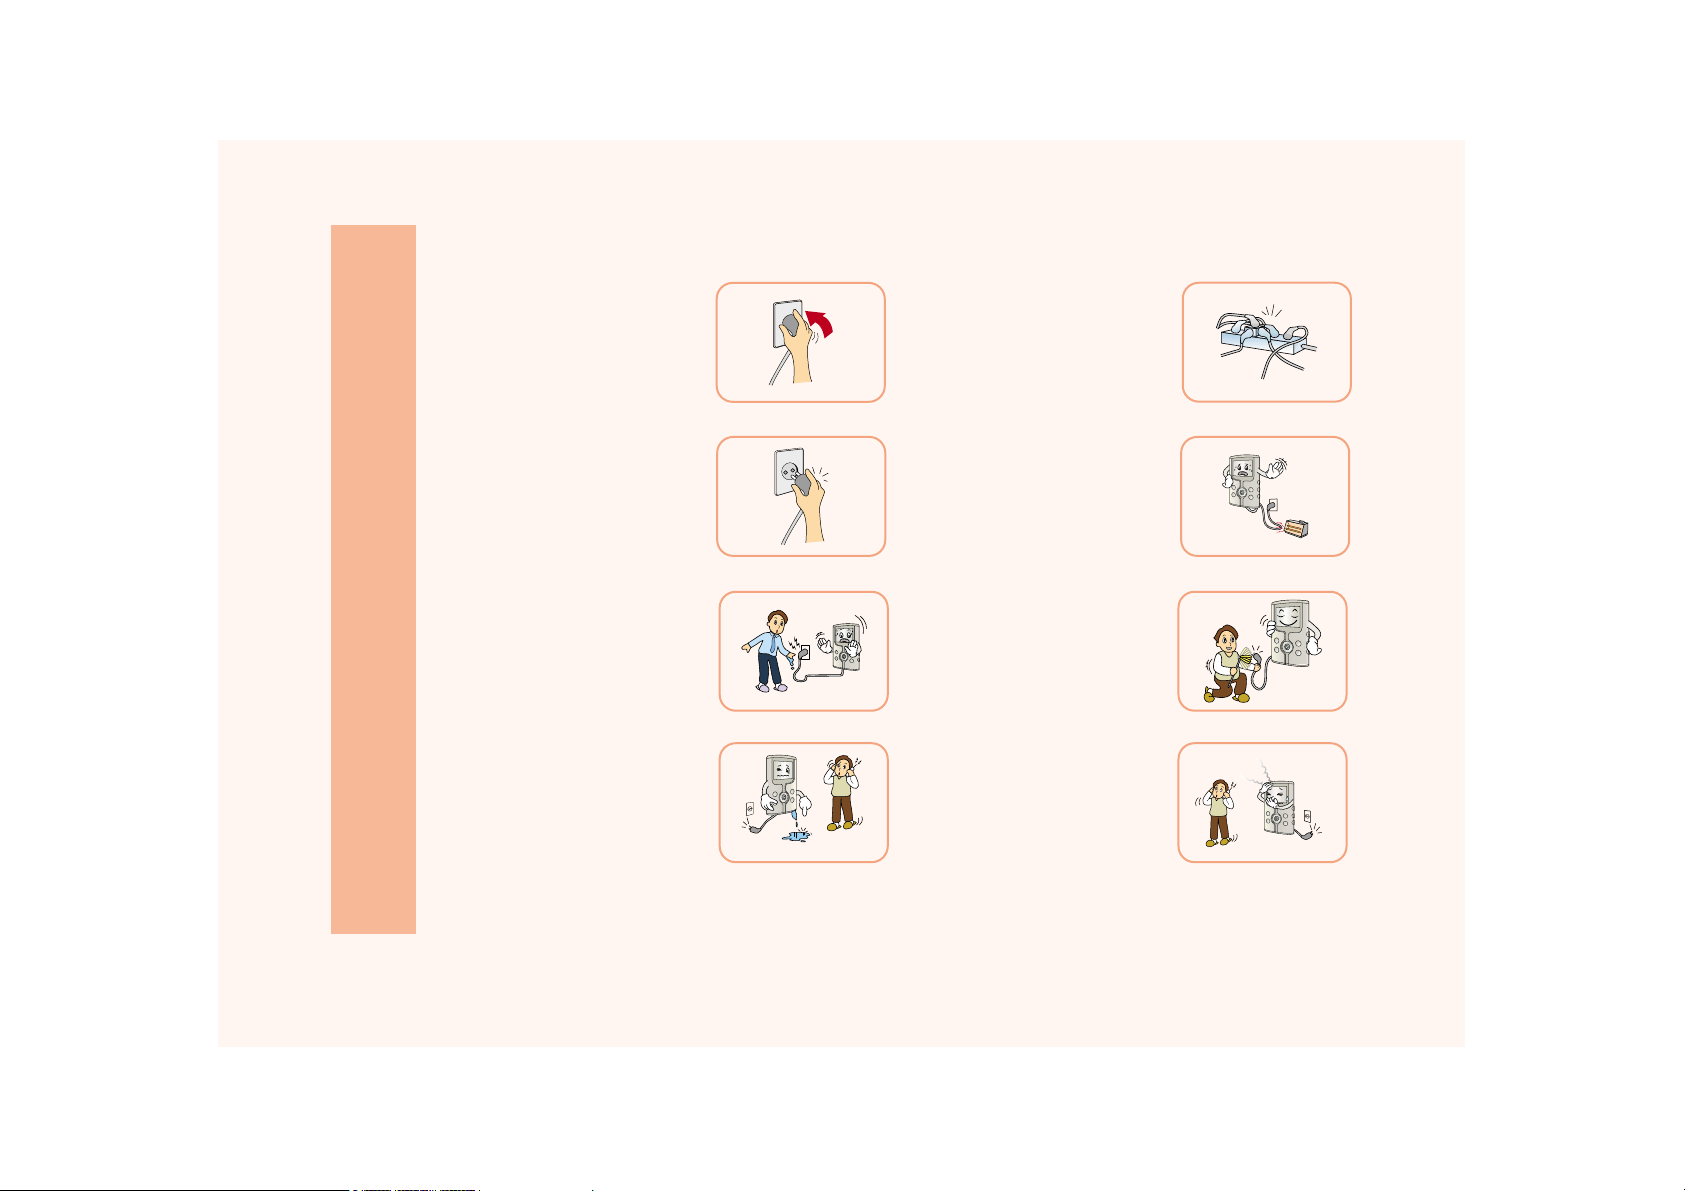
The plug should fit into the
power outlet completely.
When unplugging the power
supply cord, be sure to grasp the
power supply plug firmly and
remove.
Do not place the power supply
cord near heat sources.
When water or foreign material
gets inside the unit, first turn off
the power switch on the unit,
remove the battery and then call
your Purchase location for
service.
When smoke or strange
smells occur, or foreign
material is inserted, turn off
the power, then call your
Purchase location.
Do not touch the power supply
cord when your hands are wet.
When the power plug pins
are contaminated with dirt;
wipe them clean before
plugging into the outlet.
When using a power strip, do
not overload it by connecting
too many devices.
Important Product Safety Instructions
Page 11
11
Important Product Safety Instructions
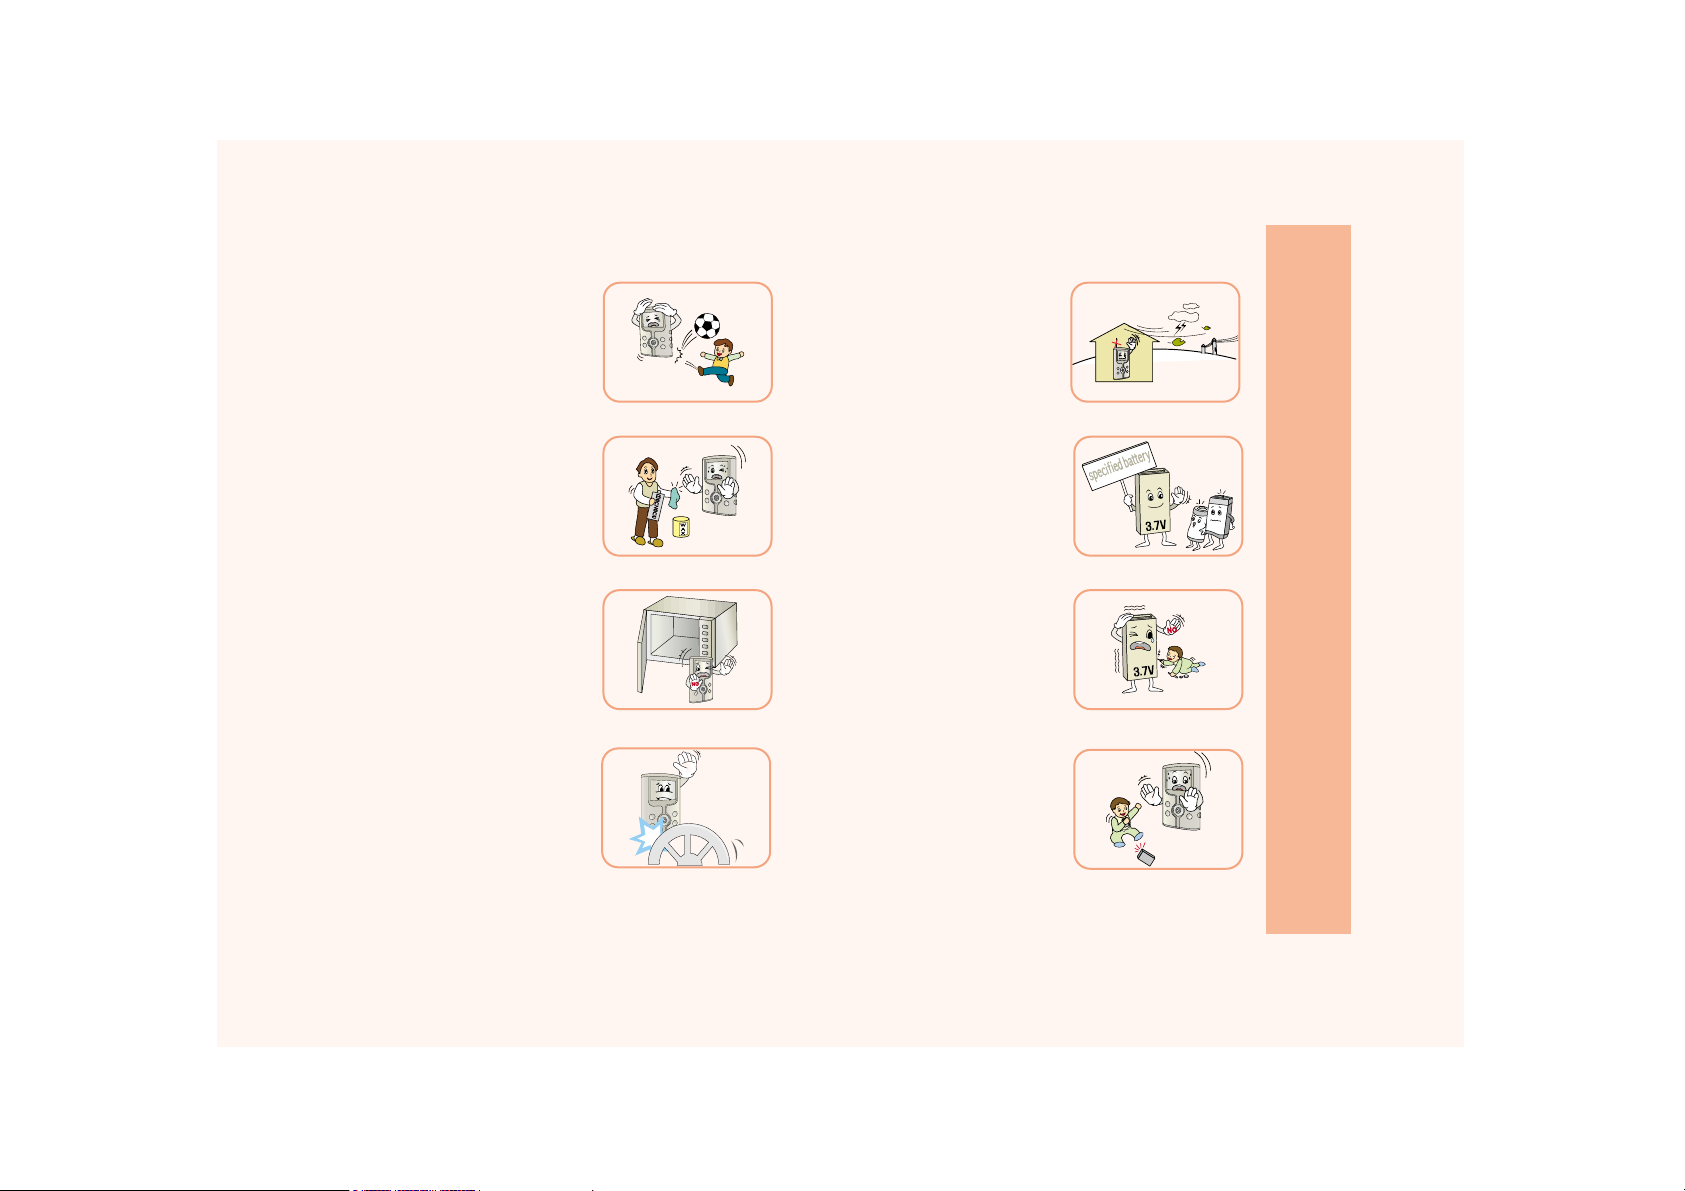
When cleaning this unit, wipe with
soft clean cloth. Do not use wet
cloth, polishing agent, benzene,
wax, or alcohol.
Only use specified batteries.
Do not substitute.
Do not put this unit into heating
appliances such as a microwave
or oven.
Do not damage the battery by
sharp objects (awl, knife). Do not
short circuit the battery contacts.
Do not use this unit while driving or
walking. (You may cause or be
involved in an accident).
Keep batteries away from
children. Do not allow children
to put the batteries in their
mouths.
Do not drop or strike the unit.
When thunder or lightening
occurs, do not watch TV.
Page 12
12
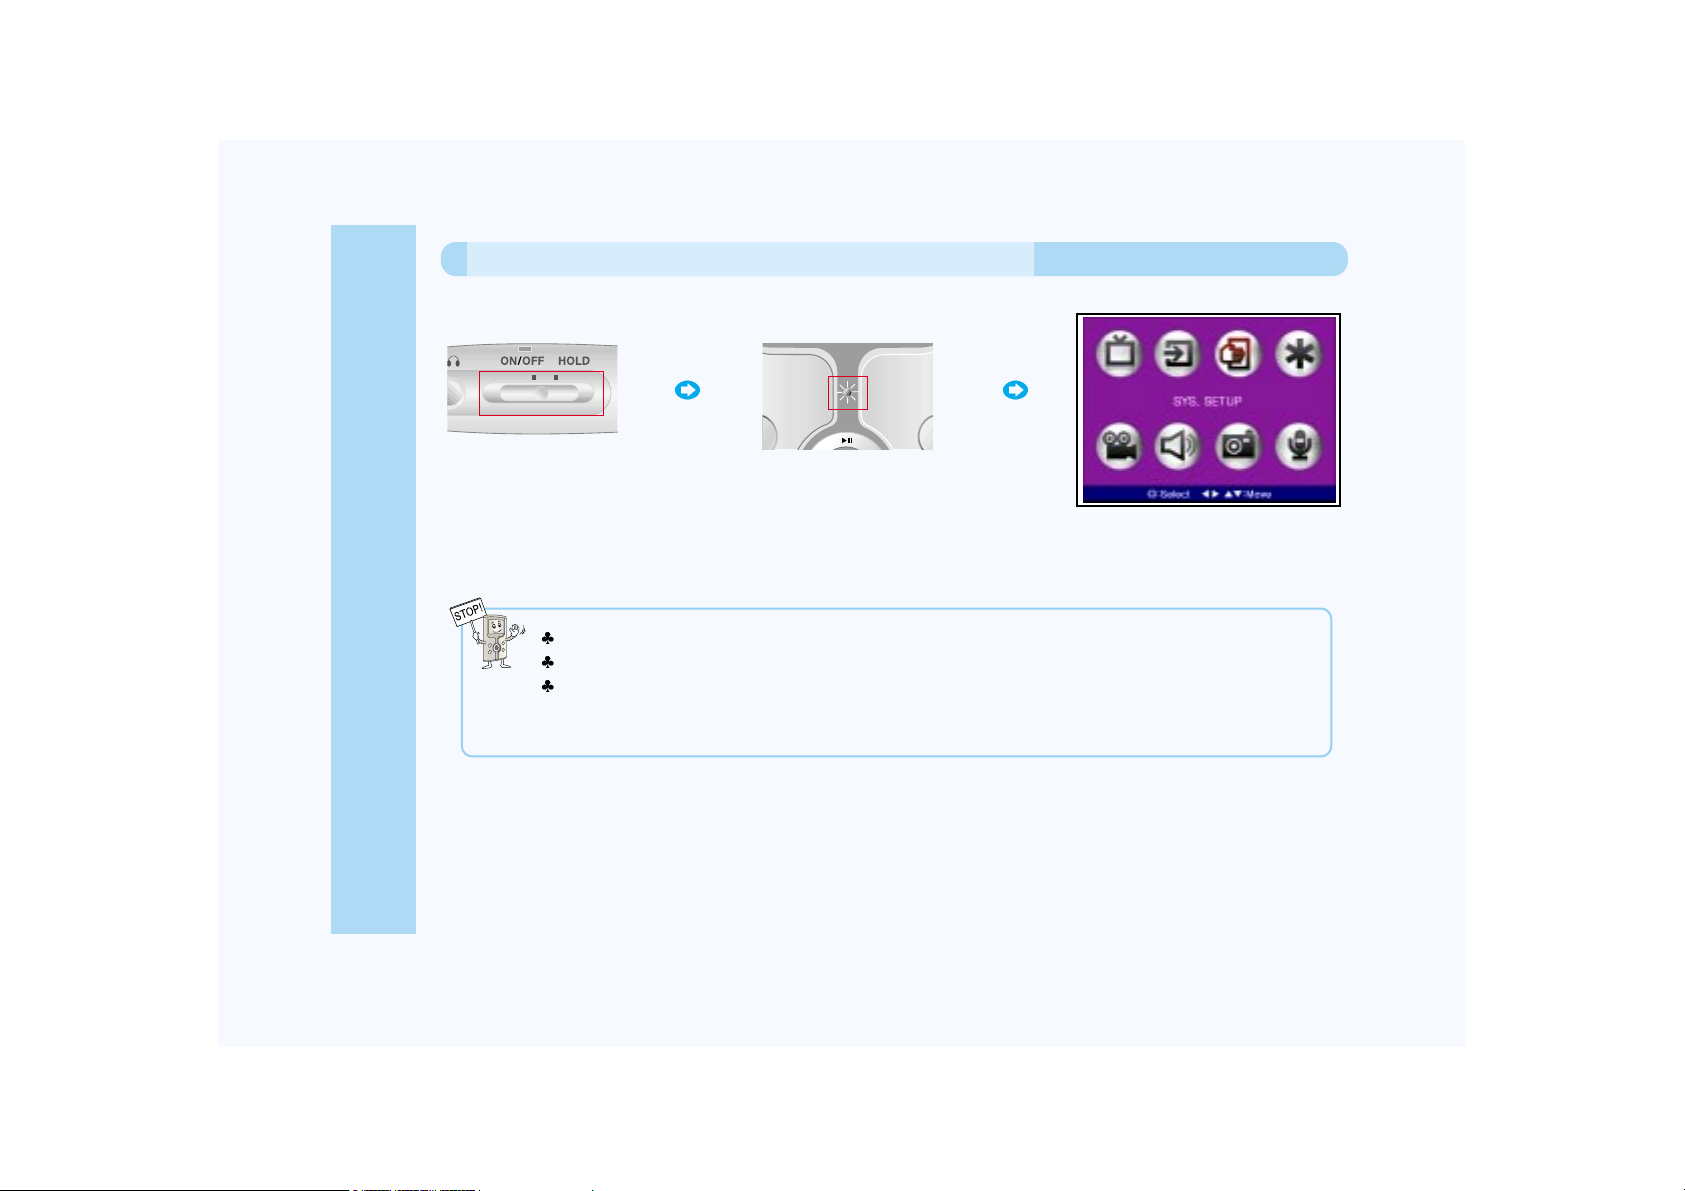
Pull and hold the Sliding Switch to the
ON/OFF position for 3 seconds, then
release.
The green lamp will flicker and the
AVIAh will turn on.
Green lamp will flicker.
After boot up, the home page will appear.
To turn the power ON/OFF, pull and hold the Sliding Switch to the ON/OFF position, then release.
If using the AC adapter; turn the power ON/OFF using the Sliding ON/OFF Switch AFTER the green lamp turns off.
If the system will not operate:
- Pull the Sliding Switch to the ON/OFF position for approximately 10 seconds, then release. The system will restart
automatically.
If the system still does not work, disconnect the batteries and the AC adapter. Reconnect the power supplies and try again.
How to turn the power ON/OFF?
Before using
Page 13
13
Before using
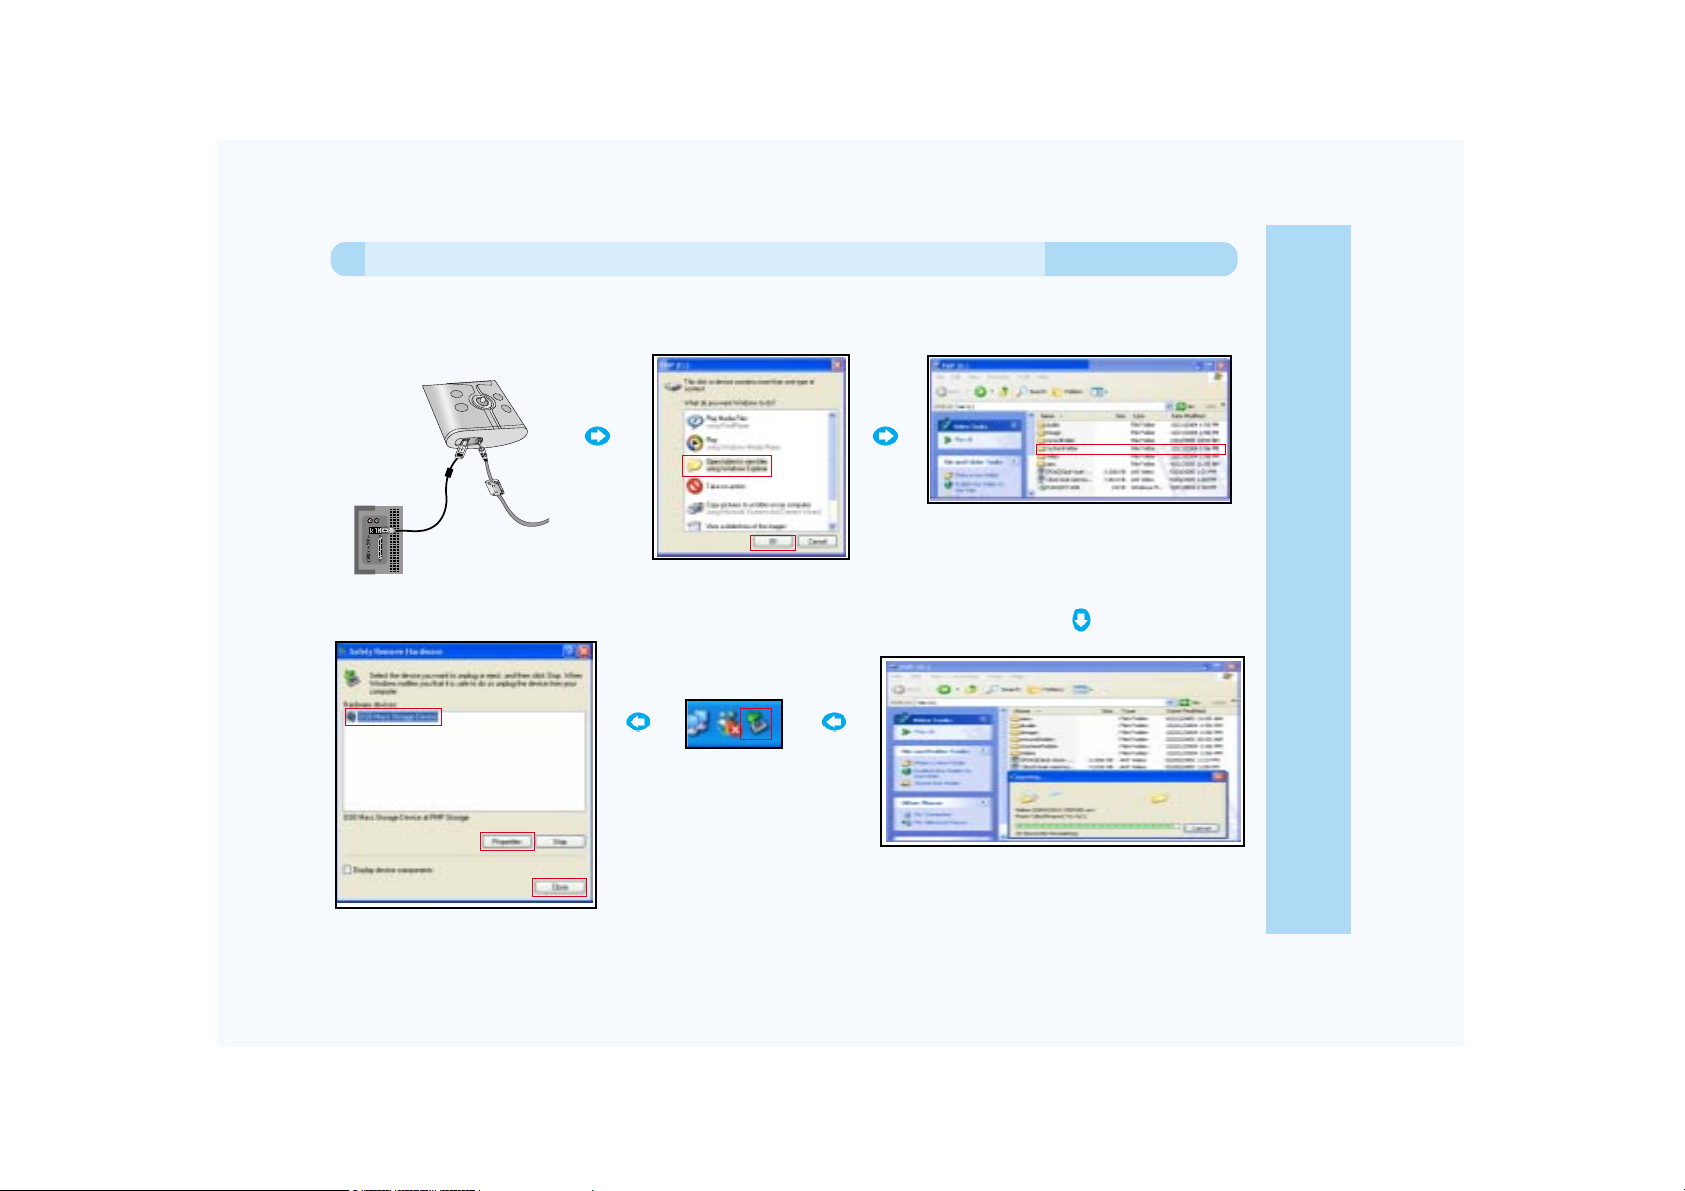
When connecting this unit to your computer for an extended period of time, check that the battery has a sufficient charge.
If the battery is running low please connect the AC adapter immediately to avoid any loss of data.
(E.g.) WINDOW XP
Connect the AVIAh to
your computer with the
USB cable.
After connecting, the PC recognizes
AVIAh as new hardware.
The AVIAh will appear as a logical
HDD on your PC.
Select a folder or file to be copied from "My
Computer" or "File Search".
Drag and drop the file into the AVIAh HDD. You
can create your own folders as desired.
Downloading will be carried out through the USB cable.
After finishing all downloads,
execute "Hardware Safe
Removal". This safely disconnects
the AVIAh from your PC. After
executing "Hardware Safe
Removal", detach the USB cable.
How do I connect to my computer and how do I download files?
Page 14
14
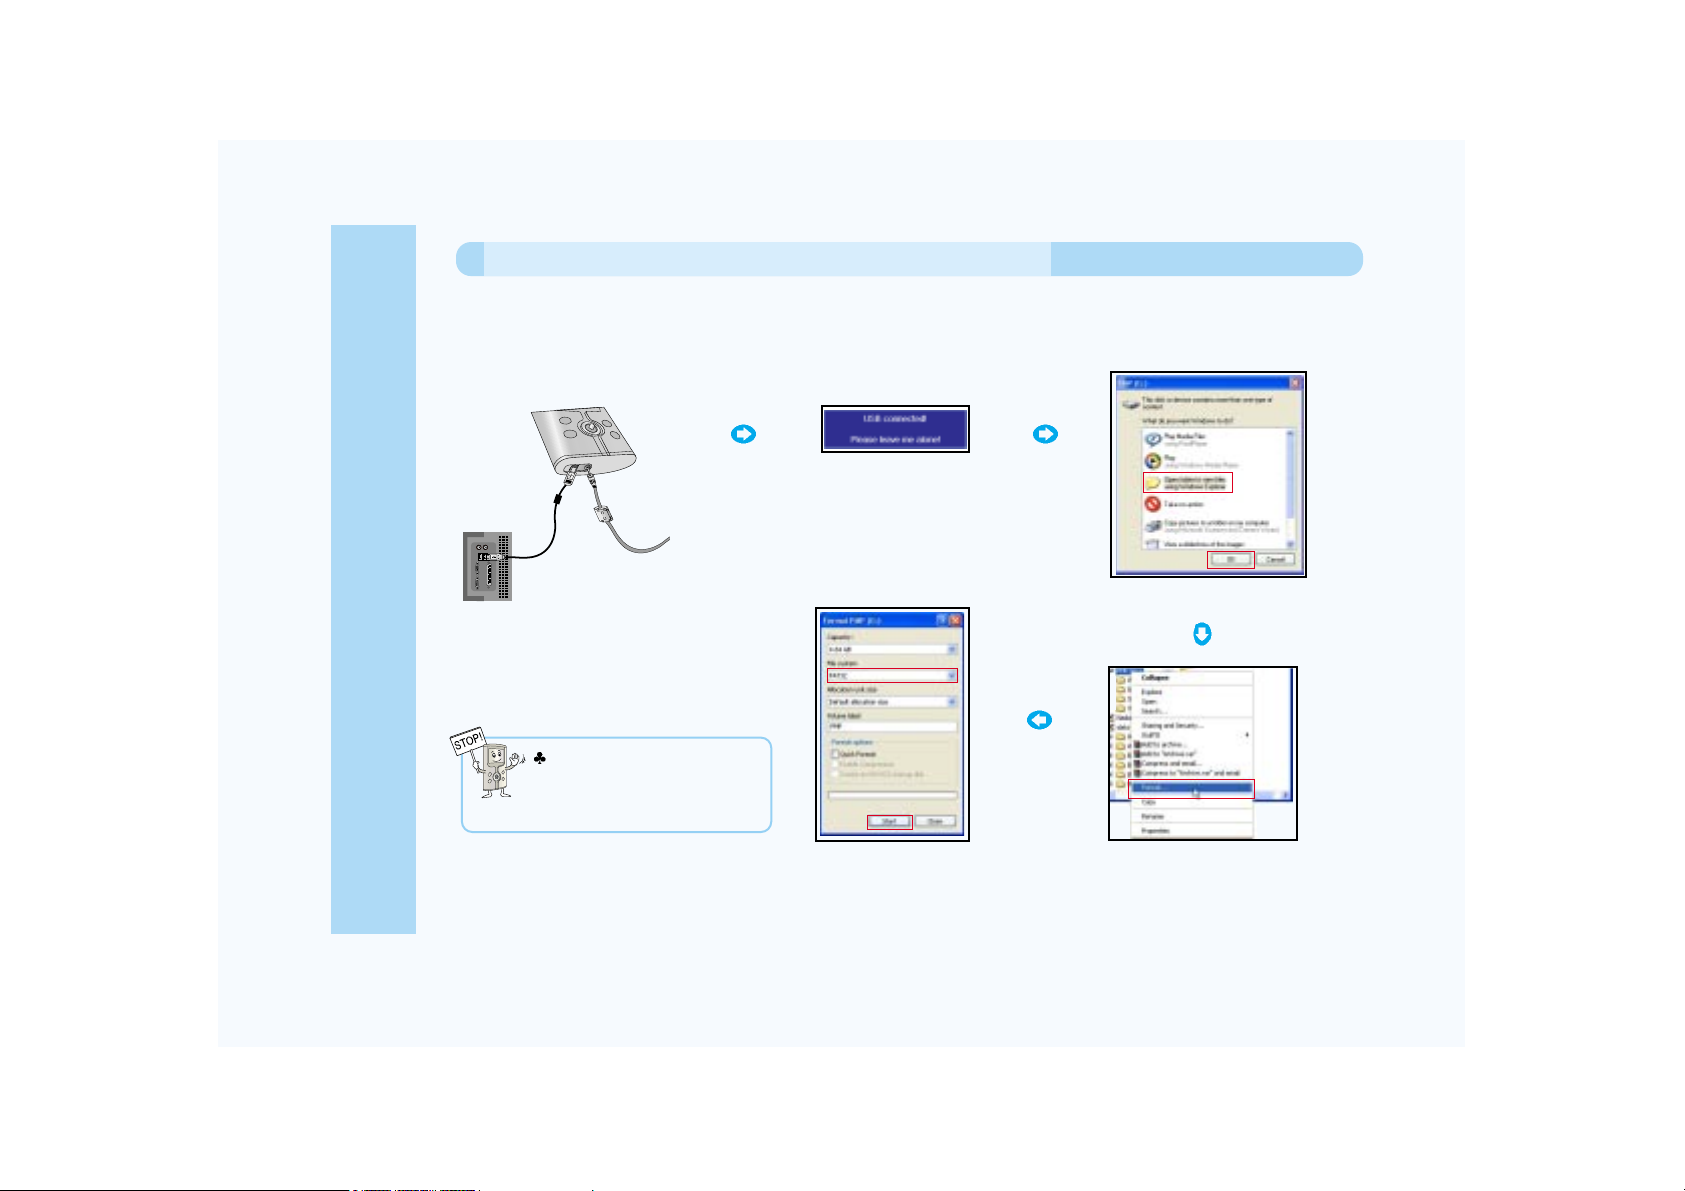
Yes, but it is not necessary to do so. The AVIAh comes ready to use. If you desire to format the HDD then first backup all of
the files contained in the "Systems Folder" of the AVIAh before formatting the hard drive (HDD) of this unit. After formatting
the HDD, make a "System Folder" on the AVIAh HDD and copy the back up files into the folder.
When formatting, select file
system as FAT for 2.5GB hard
disk AVIAh, and FAT32 for 5GB
AVIAh.
Connect the AVIAh to your PC
with the supplied USB cable.
Right Click on the AVIAh folder
and select " FORMAT ".
This message will appear on the
screen of the AVIAh when
connected to the PC via USB.
Press " OK ".
Select the Capacity and File
System, then press " START ".
Can I format the AVIAh internal Hard Drive?
Before using
Page 15
15
Before using
If you encounter a condition as described above there may be file errors or file access errors on the Portable Media Players
Hard Drive. To check and fix any file errors please follow the procedure outlined below.
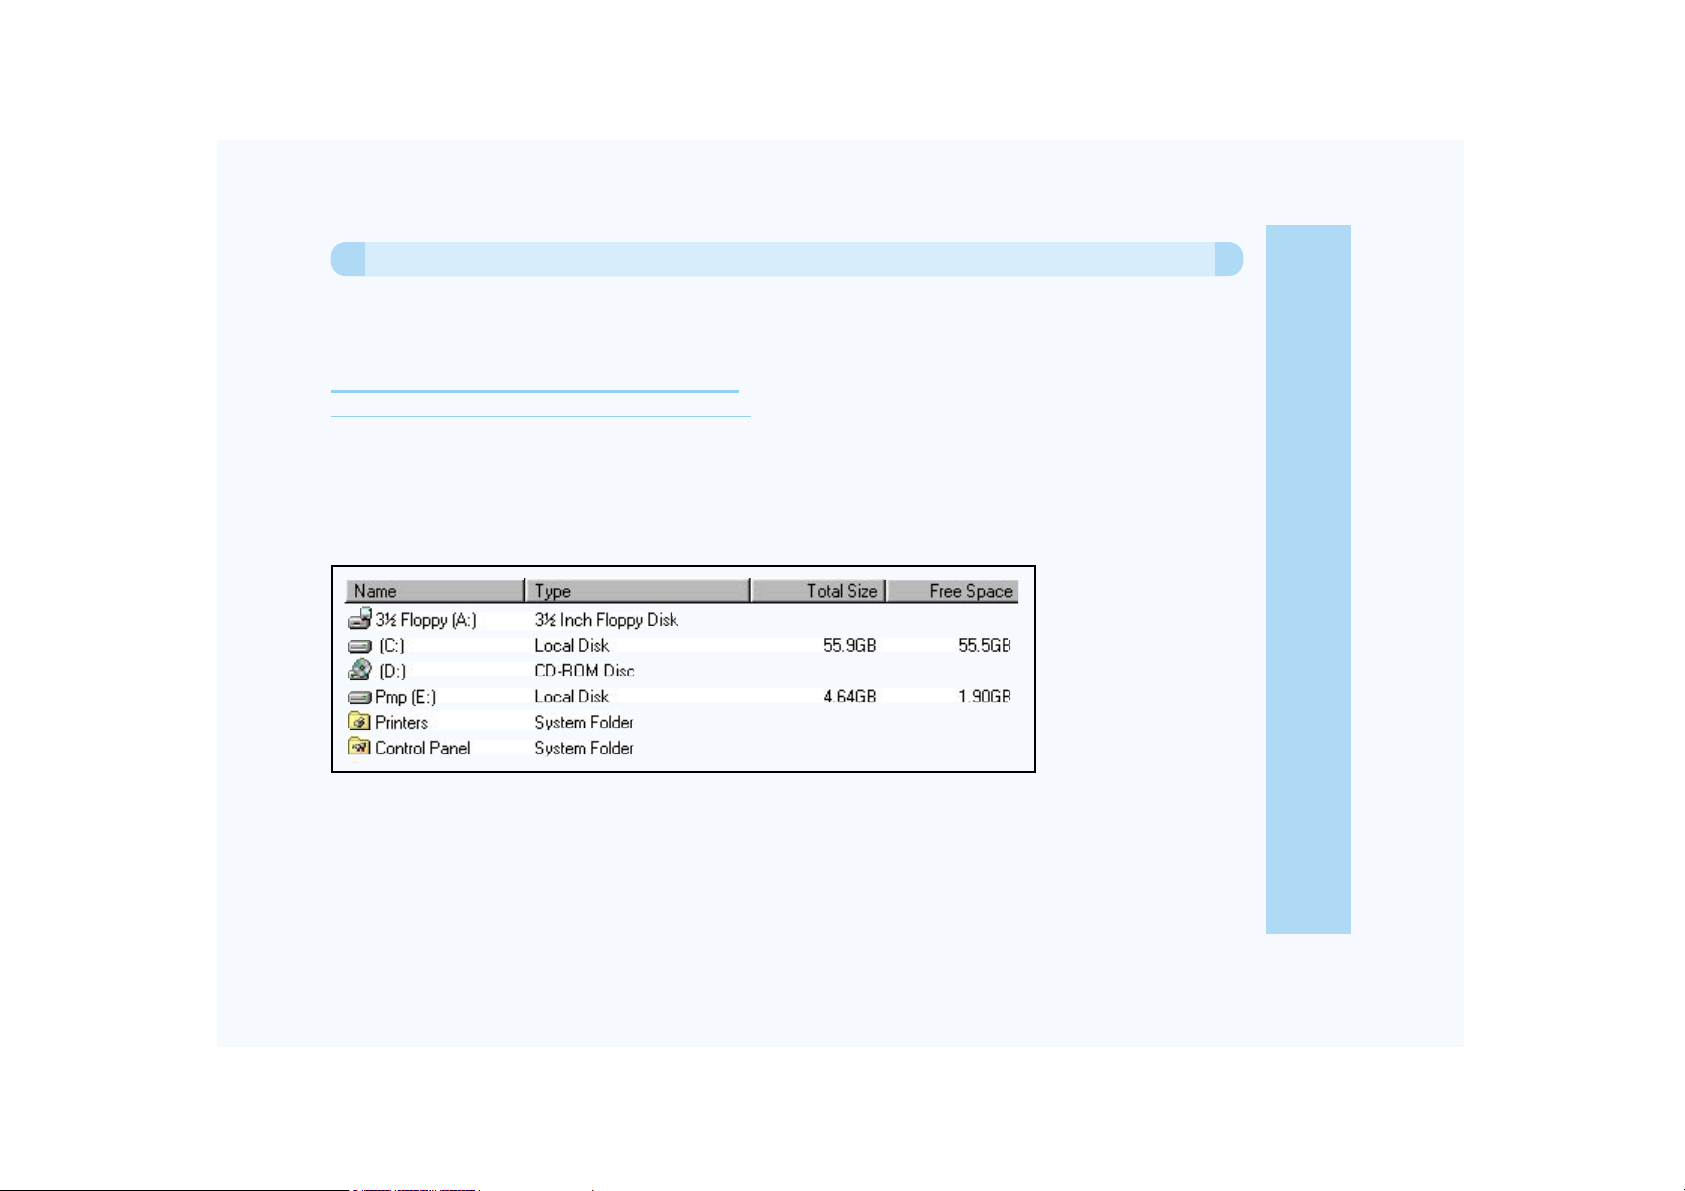
Please connect Portable Media Player to your PC via the supplied USB cable. The Portable Media Player will be recognized
as a logical Hard Drive on you PC. See example below.
My Portable Media Player is displaying a "There is not enough HDD space" message.
My battery ran out while I was connected to my PC via the USB cable and now my Portable
Media Player will not boot up.
What can I do to fix this problem?
Page 16
Before using
16
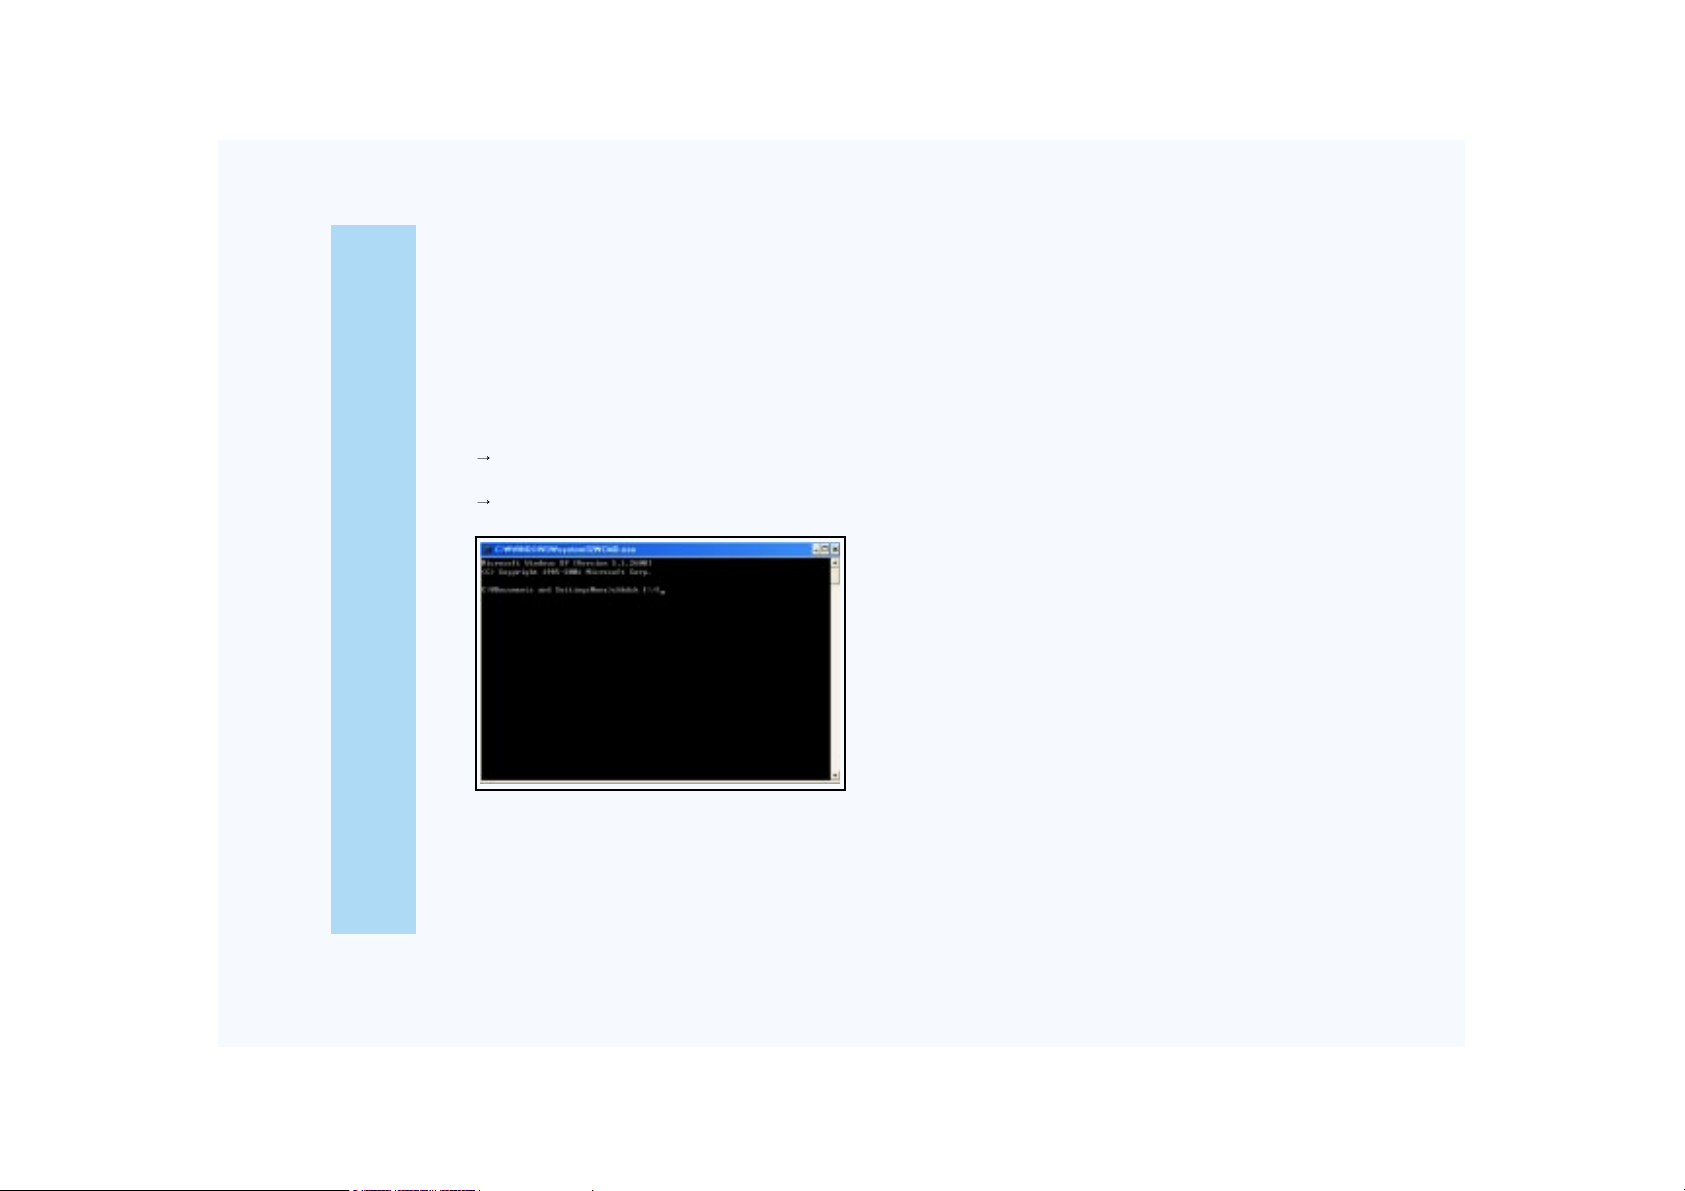
In order to check the file integrity of the Players
HDD and to fix any errors from Windows Start
Menu go to Start>RUN. In the RUN prompt window
type ‘CMD’ and hit the ‘ENTER’ Key.
The DOS prompt will open.
In the DOS prompt type ‘CHKDSK f: /f’ and press
the ENTER key.
f: is the Portable Media Players Drive Letter (This
drive letter may be different on your PC)
/f: tells Windows to fix any HDD problems
After performing CHKDSK on the Portable Media
Player and fixing any file issues restart your
Portable Media Player. The Player should function
normally.
Performing CHKDSK regularly on any HDD device
will help maintain good functionality.
Page 17
Before using
17
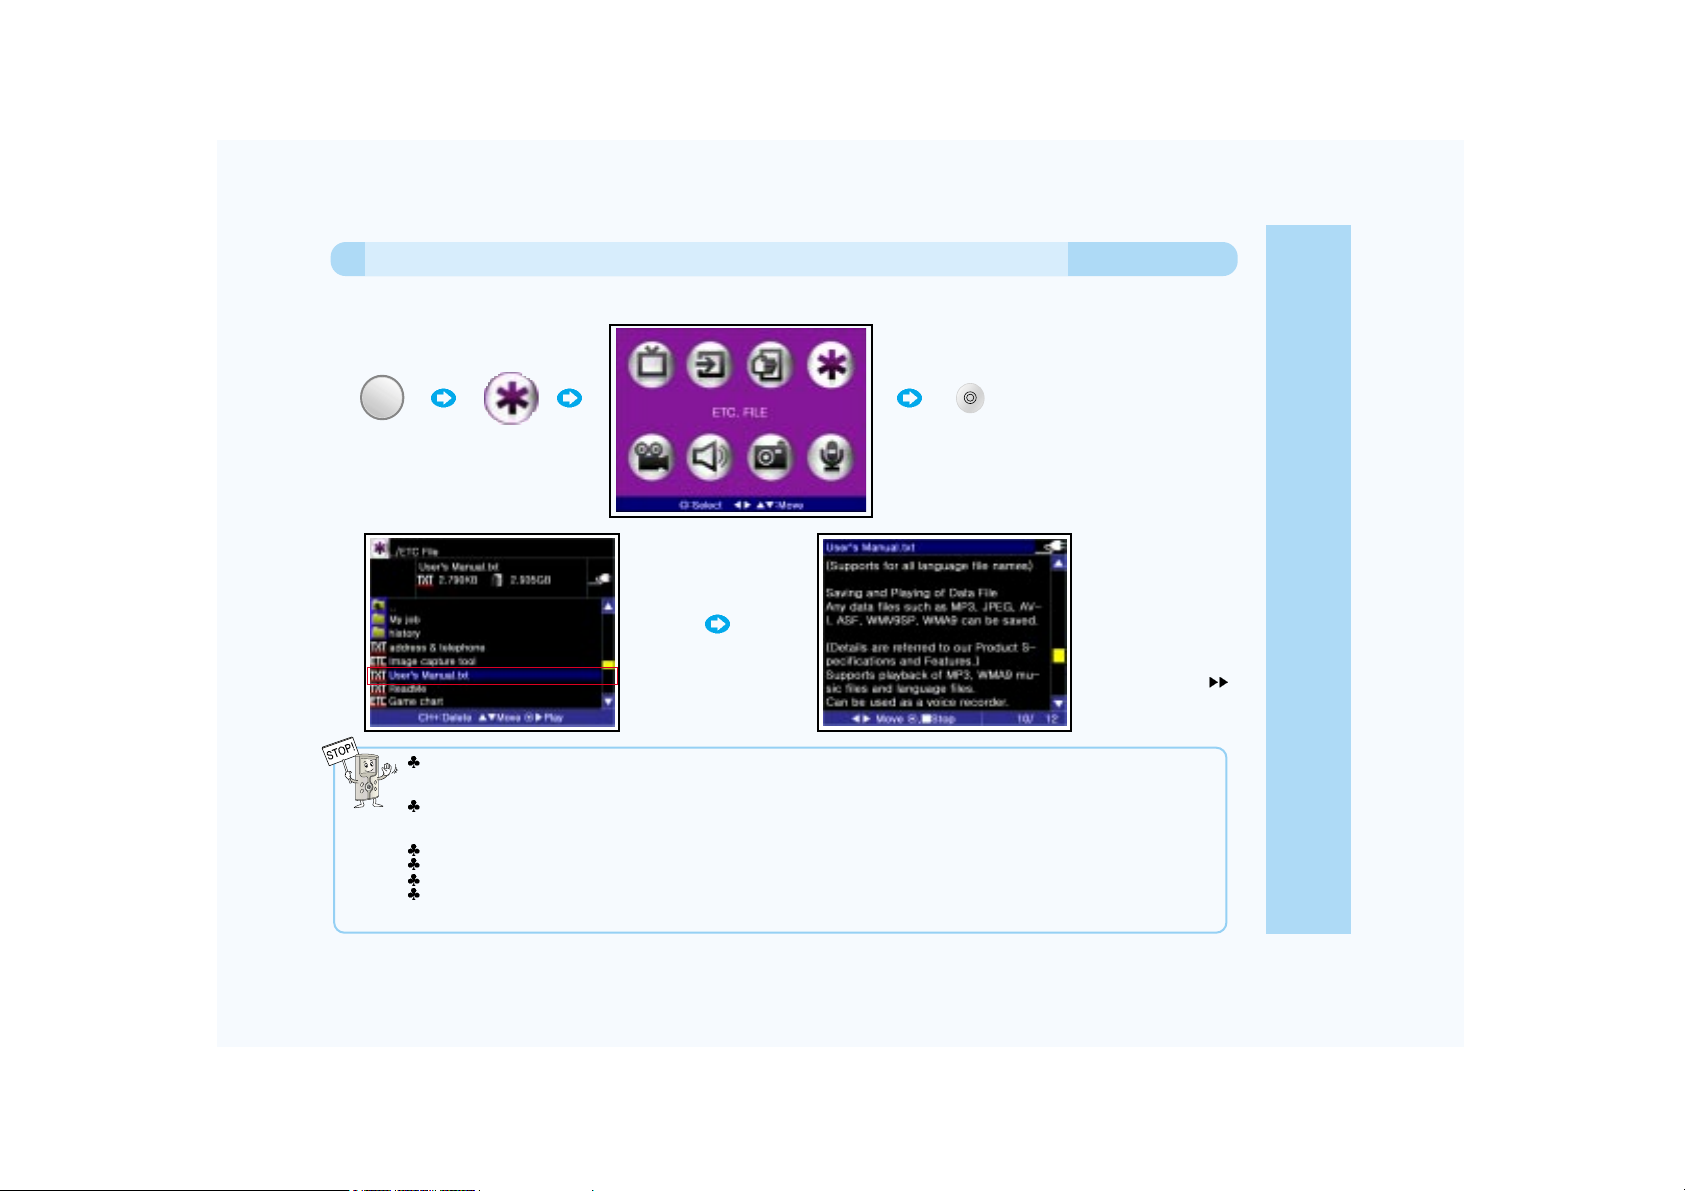
The AVIAh has the capability of displaying Text (.txt) files. Just download your text files into the AVIAh and use the * ETC file
button from the Main Start Up screen to access the file. Basically any document that is converted to or is originally a .txt file can
be viewed.
Highlight the Text file you would like to see and push the Joystick to the right to display the text. If the text file is long, pushing
the Joystick to the right again will display the next page of the document. Pushing the Joystick to the left will display the
previous page. In addition, the text will be presented with word wrap functionality.
In order to get out of the Text File View Mode push down on the Joy stick.
The AVIAh will also automatically recognize UTF-8/UNICODE/UNICODE-BE text files.
However, word wrap is not supported for UTF-8/UNICODE/UNICODE-BE, Korean, Japanese or Chinese text.
Deleting a large file may take a longer than usual period of time. On occasion, during the deletion of a file the AVIAh may
appear to have paused or stopped responding. This is temporary; after the file deletion has been completed, normal operation
will resume.
Various types of files
can be shown in the
Search File windows.
Yes, files stored in the hard disk other than video, audio, JPEG, voice recording can be viewed by pressing the " Mode " Button
and selecting the " ETC.FILE " Icon.
MODE
Is it possible to see files other than multimedia files in HDD?
The jog button to
direction is pushed,
You can read text file.
Page 18
18
Can I connect the AVIAh to external A/V equipment?
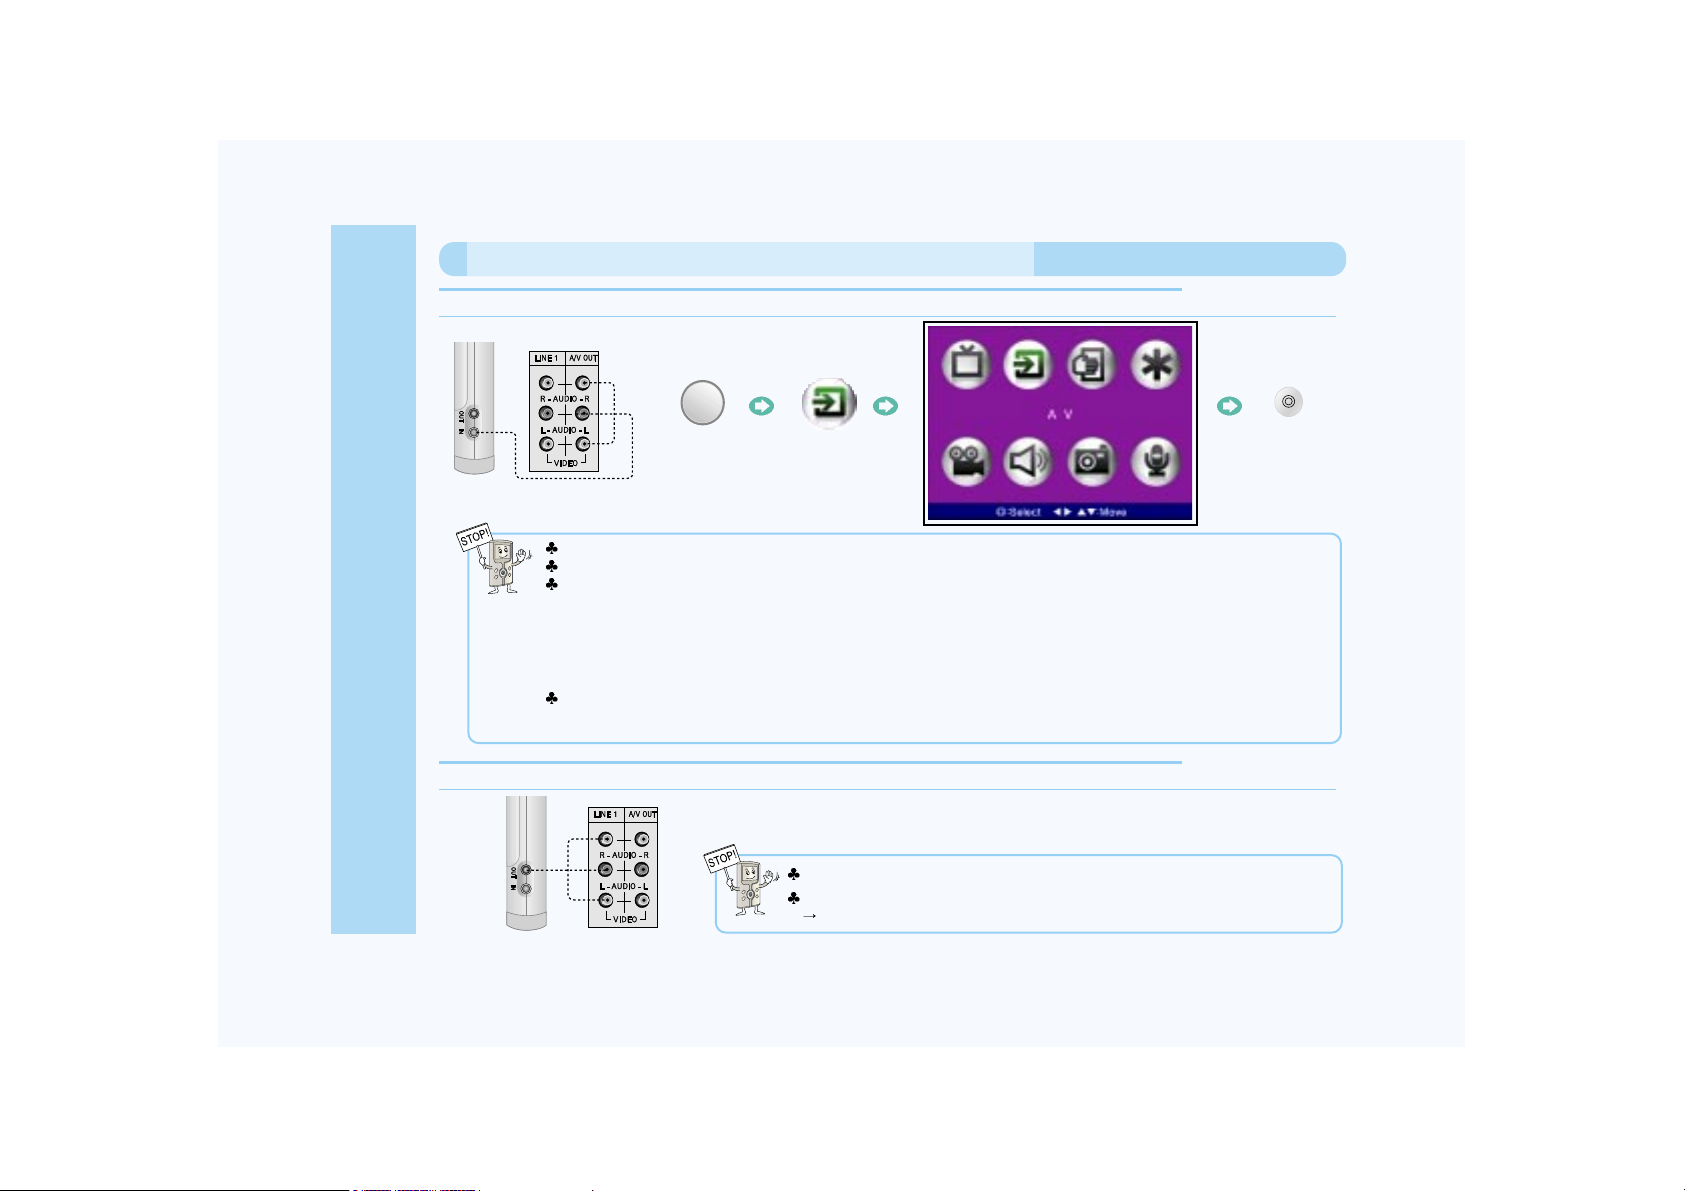
When viewing a file stored in the AVIAh on any external AV equipment (TV, monitor) (OUT)
Yes. You may connect other Video and Audio devices such as a TV receiver, DSS, or VCR to the AV IN Connector.
Settings for external input are referred to Page 49. (When recording)
To record while watching a program, press the REC button. To end the recording session, press the REC button again.
The filename will vary for a recorded file depending on the external input signal.
1. A Video signal will be saved as VID_0000.ASF. Adding another video recording will increase the file number by one. E.g.
VID_00001.ASF.
2. A TV signal, when recording via the antenna, will be saved as A0000000.ASF, whereas C0000000.ASF is for cable
recordings. Additional recordings will increase the file number by one.
(The 3-digit numbers immediately following the A and/or C in the file name will denote the channel that was recorded.
Example: C0350002.ASF means that the recording was made from Cable Channel 35 and is the second recording.)
You may select to record in ASF or JPG file format in the system set-up menu of the Other Function sub-menu (Page 38). If
for example the REC button is pressed while watching TV and the JPG recording format is selected, a frame of the incoming
signal will be captured and will be saved as a JPG file.
Be sure to use the cable supplied with this unit.
Settings for output through the OUT terminal is referred to on Page 37
OLED Display, Output Color System
Before using
MODE
Page 19
19
Before using
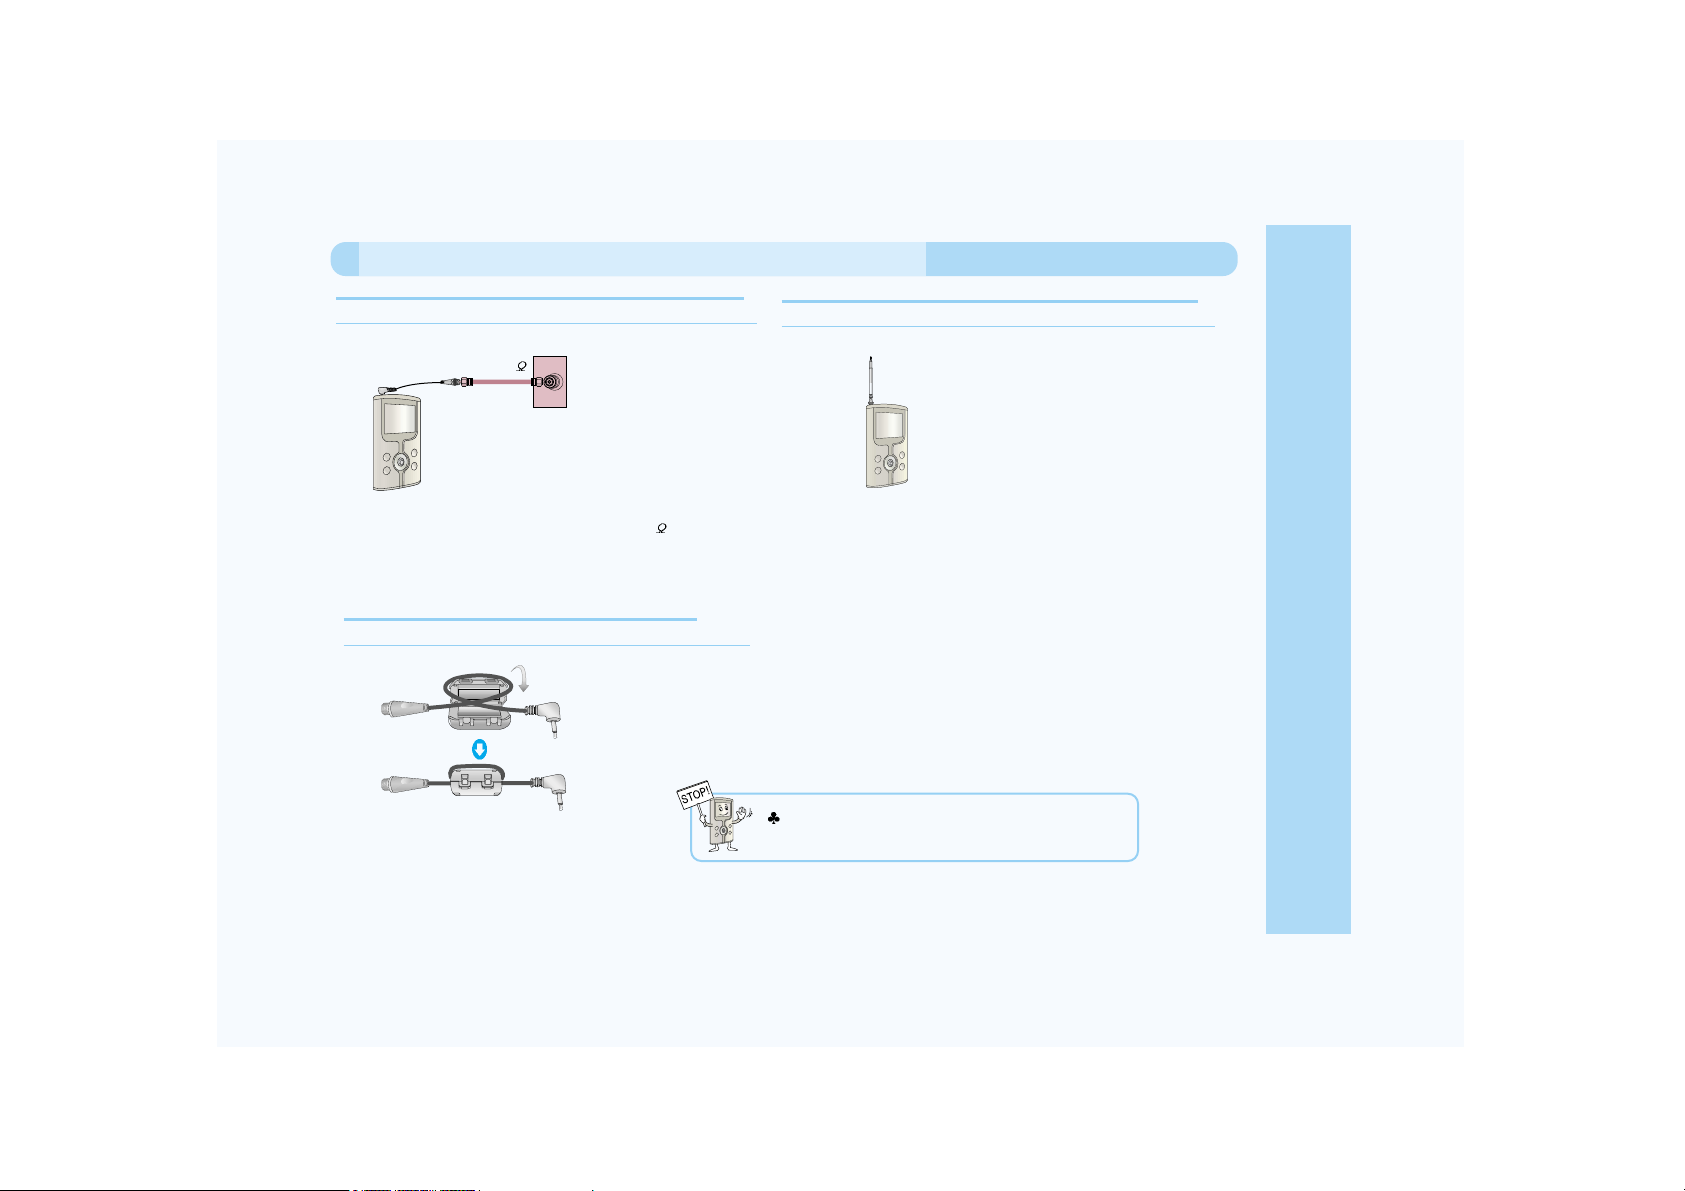
Connect TV Indoor Antenna/Cable and the RF line from
the Antenna or Cable (Terminal Lead axial line 75
).
Wall Connecting
Terminal
Lead axial line 75
How do I connect the antenna and cable?
To connect cable antenna when viewing this unit.
To connect the telescoping antenna when viewing this unit.
Watch TV by installing the TV outdoor
antenna/telescoping antenna.
To connect the indoor antenna/cable with the Core.
Open the Core, insert the antenna wire,
and close the Core.
Installing a ferrite core around the indoor antenna/cable
will generally remove any noise in the picture.
Page 20
20
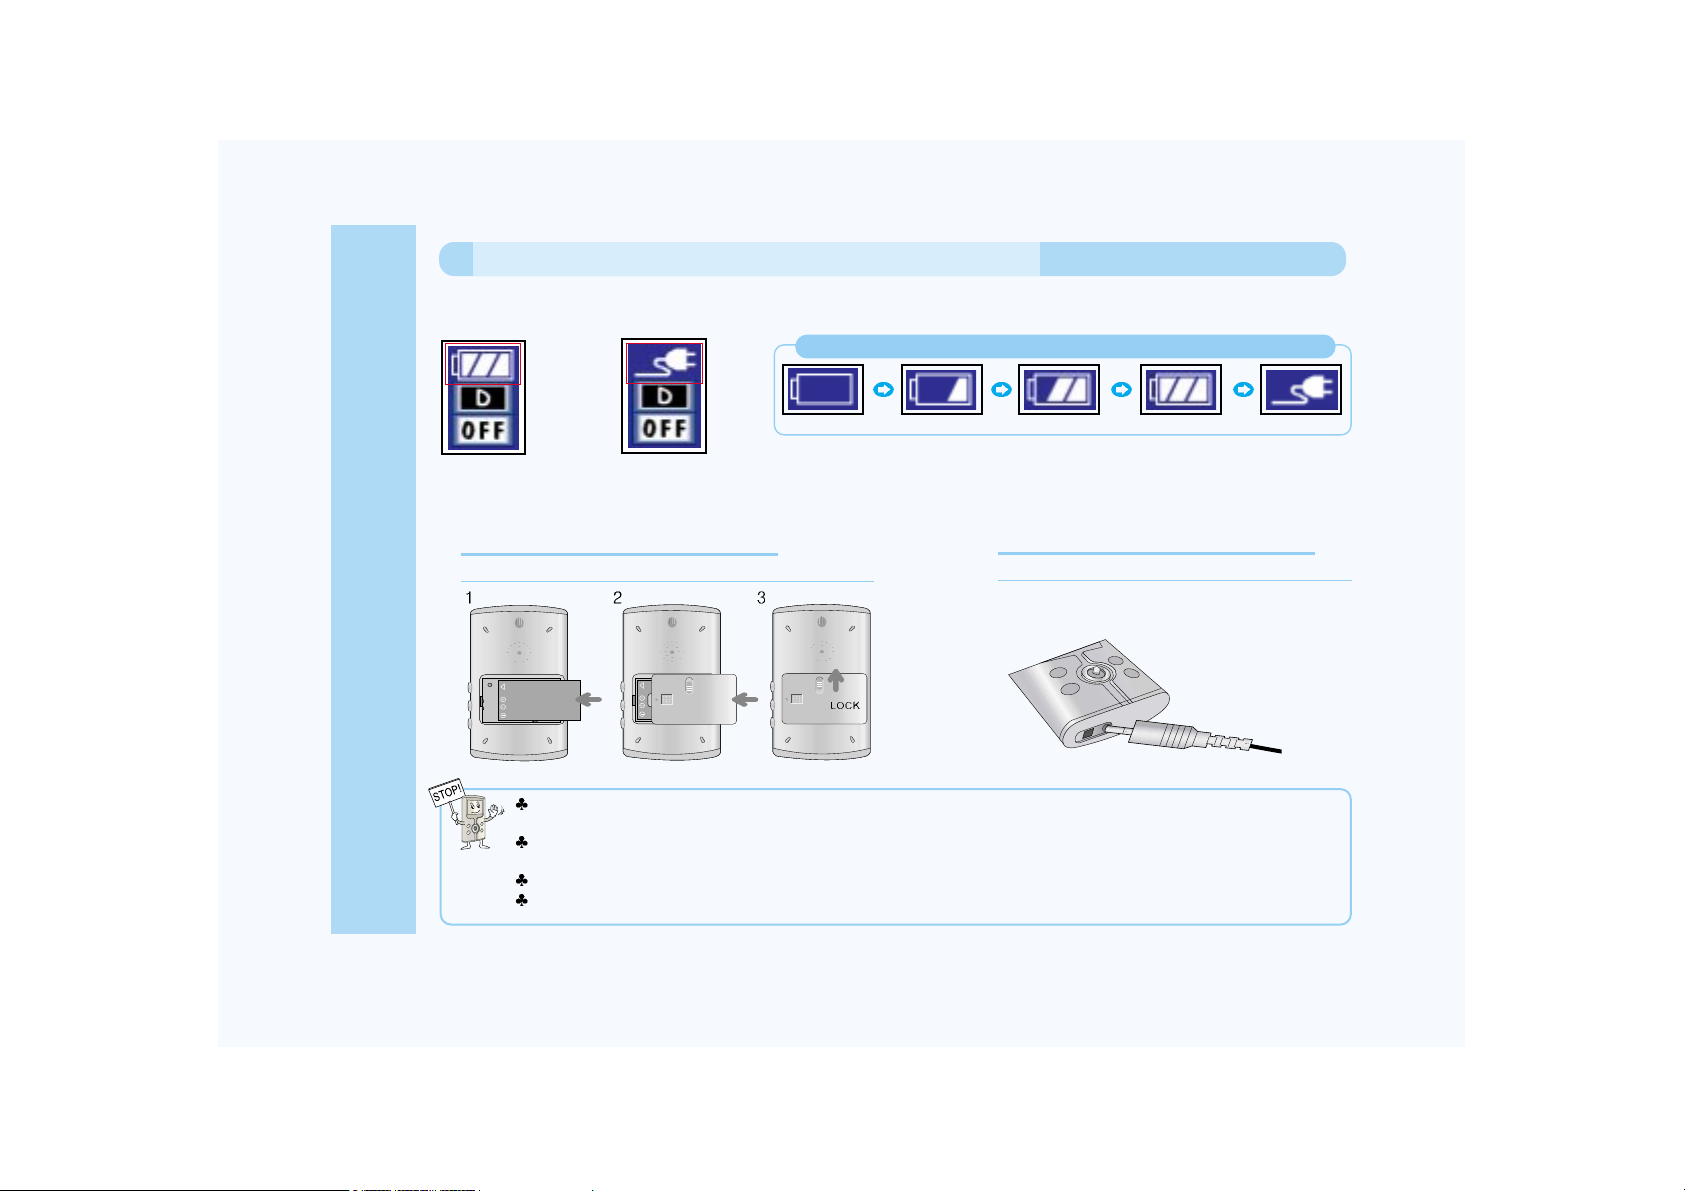
Yes. When using this unit, the current battery charge will be displayed on the screen. If the battery charge is insufficient, the
battery indicator will flicker, and the power will automatically turn off in 1 or 2 minutes.
When the battery indicator icon flickers, this unit may not operate at its full potential. Turn OFF the unit and replace the battery
with a fully charged battery or use the AC adapter as your power source.
If you do not plan to use the unit for a prolonged period of time, you should remove the battery from the unit as a precaution
against the possibility of over discharging the battery.
Always dispose of spent batteries properly. Never throw batteries in a fire, as they could explode.
Always turn the unit OFF with the Sliding Switch BEFORE replacing the battery. You could damage the hard drive if you remove
the battery during video or audio playback.
The battery recharge process may be checked by looking at the battery indicator.
When using this
unit, the current
battery charge
status is displayed.
Are there any precautions when using the battery?
The battery is fully charged
when the power cord image is
displayed, when the battery
and DC power are connected.
- Replacing the battery.
- Charging with the AC adapter.
Before using
Page 21
21
Before using
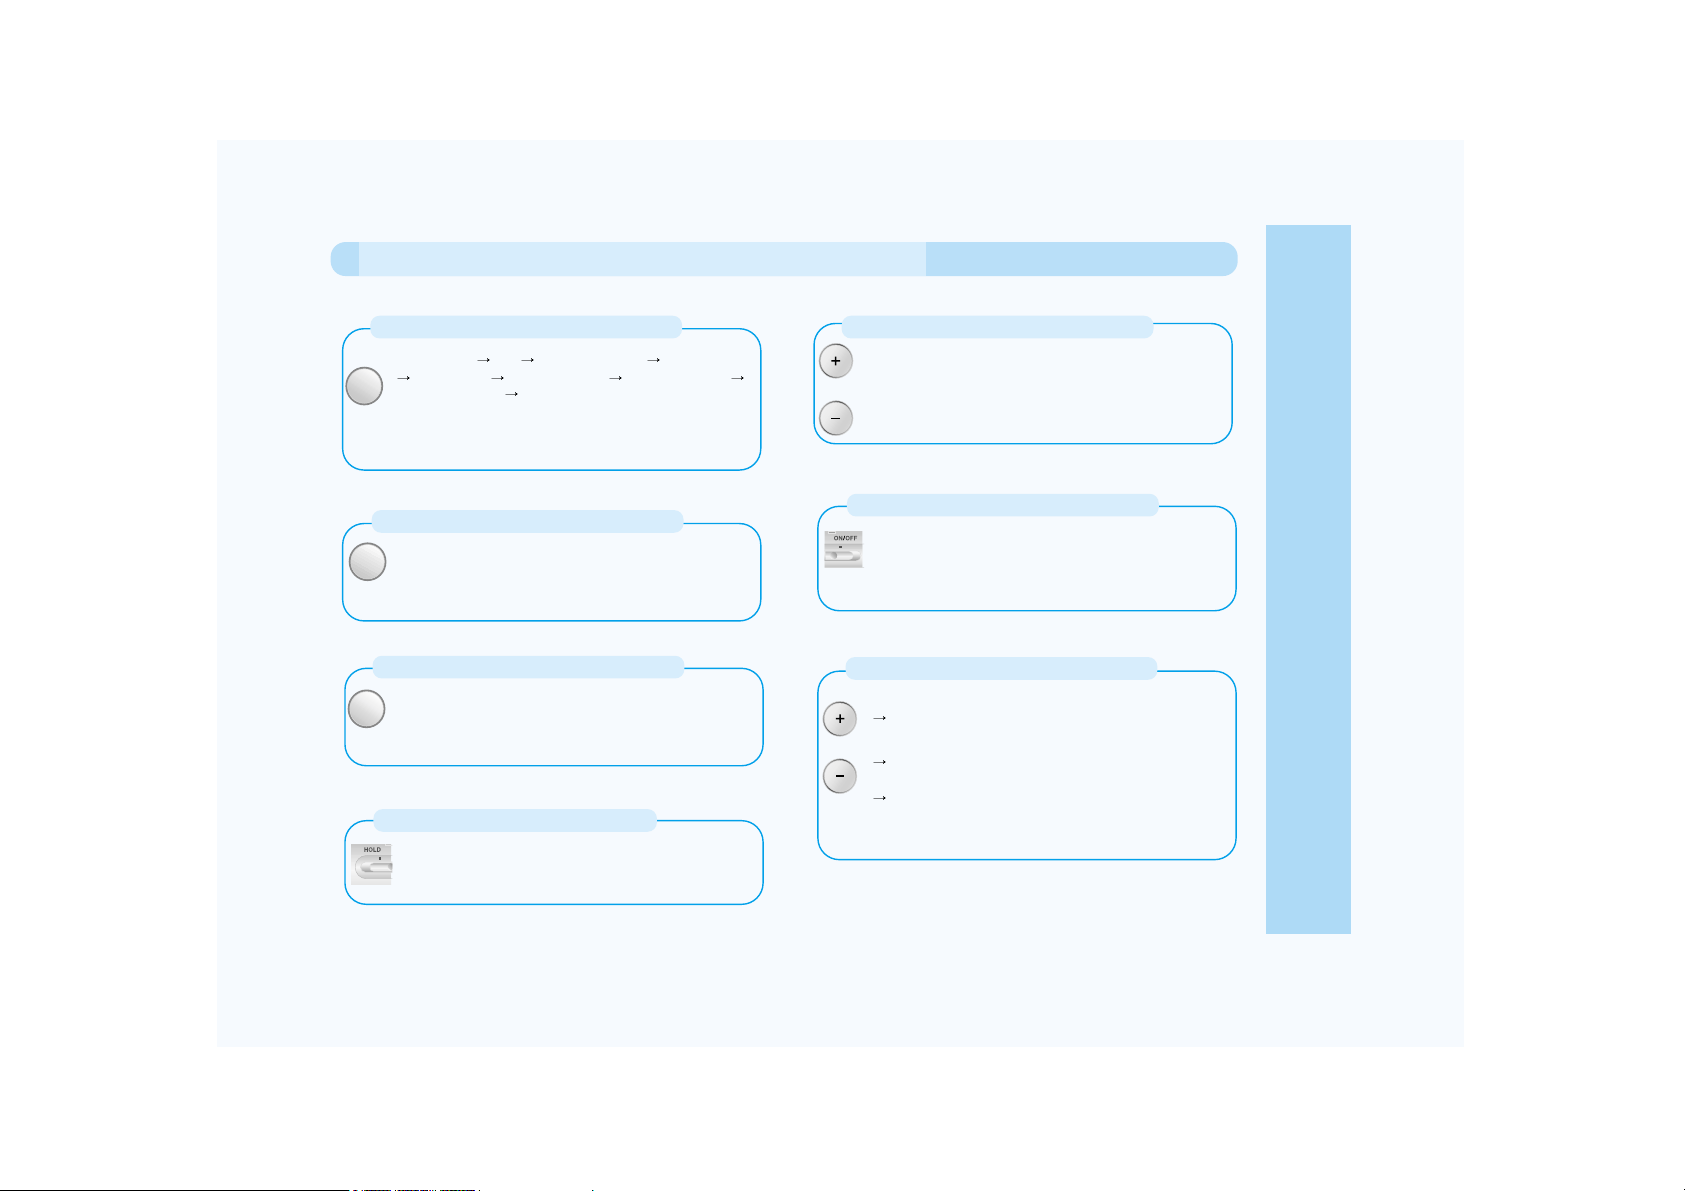
TV (Option) AV RADIO (Option) SYS.SETUP
ETC.FILE VIDEO PLAY AUDIO PLAY
SLIDE SHOW VOICE REC will be viewed in
sequence.
- Depending on product options, the number of menu
items displayed on the screen may vary.
DISP Button
This button displays the present status for various
modes.
While playing back MP3/Voice, if you set Repeat
Menu(D/R) to ON, the next track will be played back.
REC Button
TV/AV signal can be saved as a moving picture file,
and/or a desired image can be captured and saved as a
JPG formatted file. In VOICE REC, voice can be
recorded via a built-in microphone.
VOL +/- Button
This button adjusts the earphone volume level.
CH +/- Button (* Fn +/-)
While in TV mode / Radio mode
Channel Up/Down can be selected.
While in VIDEO PLAY / AUDIO PLAY mode
While in Playback Mode, Repeat Menu and Loop
Repeat Function can be selected.
While not in Playback Mode, File Deleting Function
can be selected with CH+ Button.
* Depending on Option, " CH " can be indicated as " Fn ".
POWER Button
This button is a sliding type switch for Power ON/OFF.
This switch is also used to reset the system. Just pull
the switch to the ON/OFF position for approximately 10
seconds, then release. The system will reset
automatically.
MODE
DISP
REC
VOL
CH
Function of Button?
What are the functions of each button?
MODE Button
HOLD Button
This button is used to prevent other keys from operating.
It locks the keys to prevent accidental operation.
Page 22
22
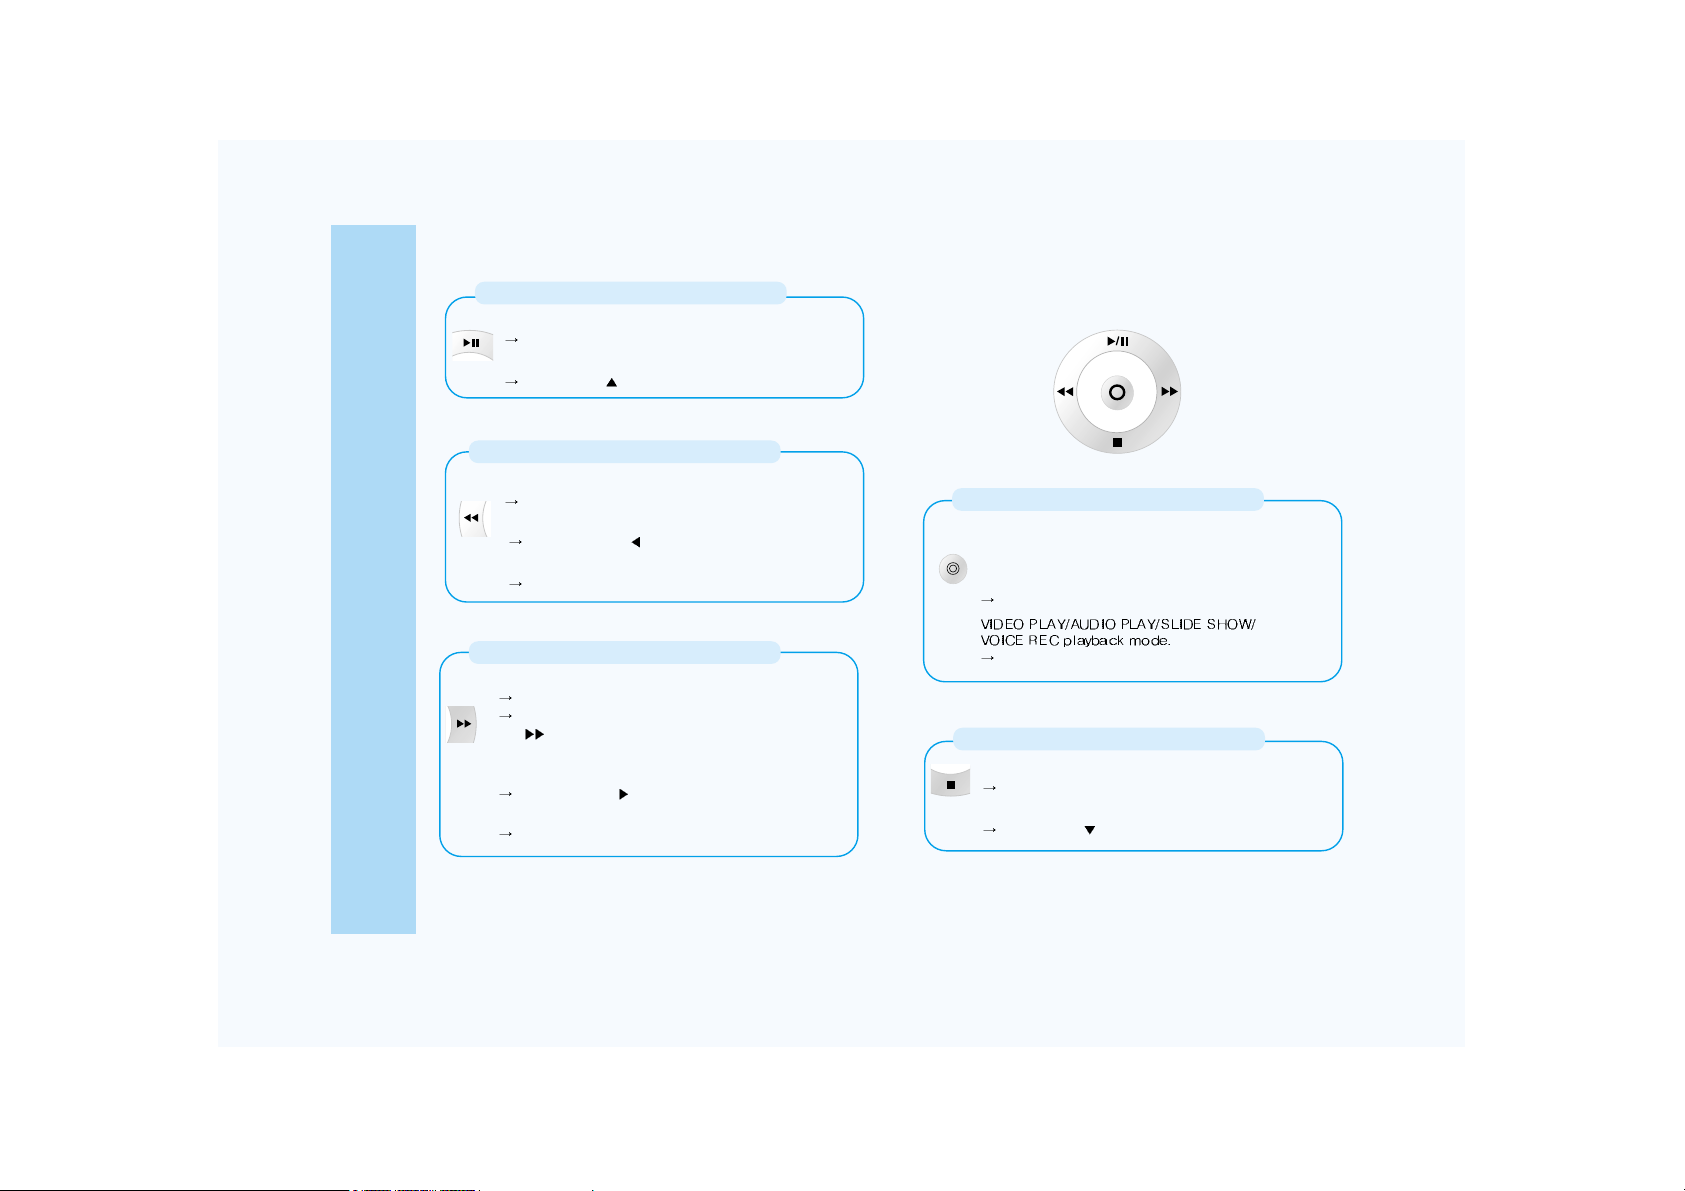
FF Button
While in VIDEO PLAY / AUDIO PLAY mode
Forwarding (x2/4/8/16) can be selected.
After locating the cursor on a desired file, pressing
(
) Button will allow Full-screen Play Function to
operate.
While in Menu mode
Data adjusting ( ) can be done.
While in SYS.SETUP mode
This button is used to select the sub-menu.
While in VIDEO PLAY / AUDIO PLAY mode
Playback/Pause Function can be selected.
While in Menu mode
Cursor Key ( ) is used.
STOP Button
While in VIDEO PLAY / AUDIO PLAY mode
This button is used to stop playback of a file.
While in Menu mode
Cursor Key ( ) is used.
OK Button
This button is used to select the Menu for various modes.
While in VIDEO PLAY/AUDIO PLAY/SLIDE SHOW/
VOICE REC mode
You can play or preview the selected contents.
Folder and file will be displayed.
PLAY/PAUSE Button
While in VIDEO PLAY / AUDIO PLAY mode
Rewinding (x2/4/8/16) can be selected.
While in Menu mode
Data adjusting ( ) can be done.
While in SYS.SETUP
EXIT Key is used to exit the current menu.
REW Button
Before using
Page 23
23
How to Operate each Mode
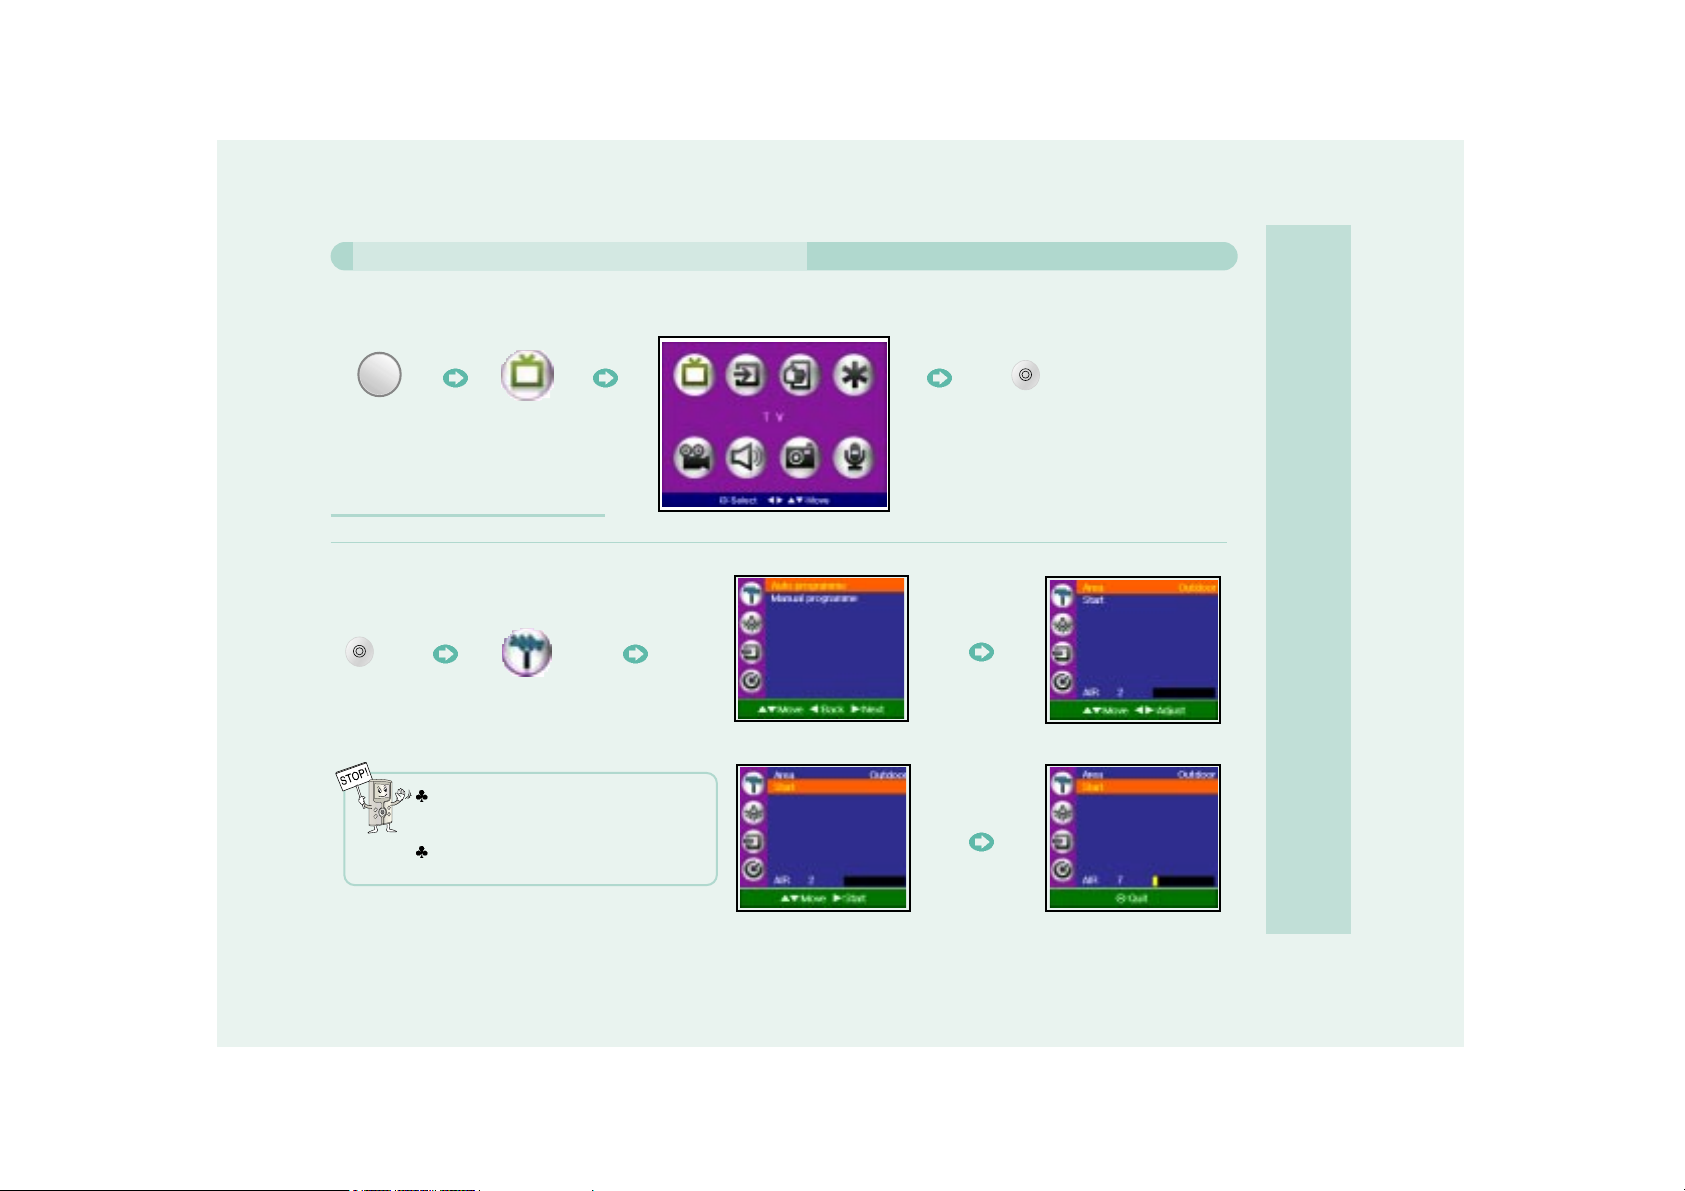
When setting the Antenna Mode, you can
either select Indoors (telescoping antenna)
or Outdoors (RF Antenna/Cable).
After completing the Save, select the desired
channel by CH +/-.
When Watching TV (NTSC System)
If you want to watch TV outdoors, use the telescoping antenna. The AVIAh reception quality will vary according to the proximity
of the broadcast station. The further away you are from a broadcast station the weaker your reception will be. For watching TV
indoors, connect the antenna/cable to the antenna terminal.
- Auto Channel Setup [ NTSC ]
This function is to search the receiving signal automatically, and save it into memory.
MODE
Select Auto program.
Select Area.
Select "Start" in Auto program.
Channel Search starts.
Press the Button.
Select the Icon.
Page 24
24
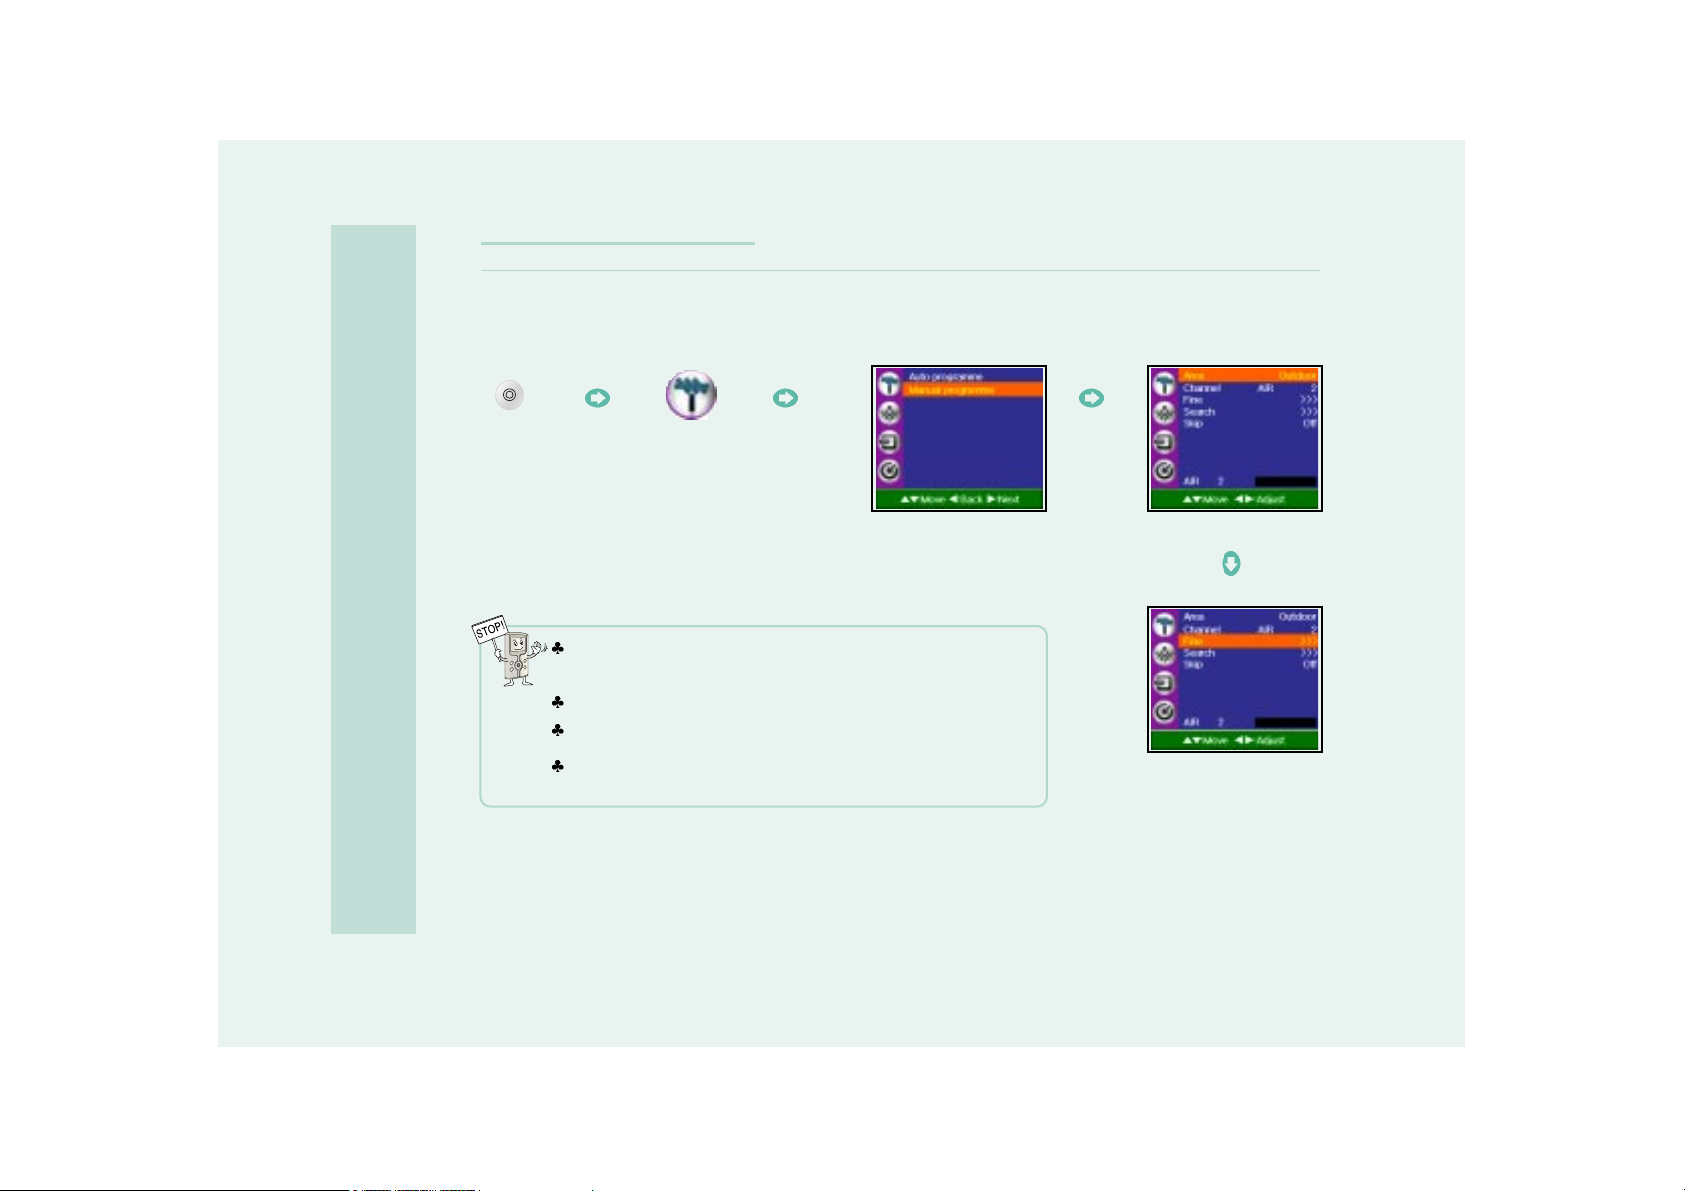
Select Manual program. Select Area.
Adjust settings after selecting
a desired mode.
Press the
Button.
Select the
Icon.
- Manual Channel Setup [ NTSC ]
The antenna for the indoors setting can receive cable broadcast signals,
whereas the outdoors setting can only receive public broadcasting signal.
While in the Area line item, select indoors or outdoors.
After saving, select a desired channel by pressing CH +/-.
To modify Indoors and Outdoors Mode while watching TV, pressing CH +/-
Button repeatedly will display antenna modes (Indoors, Outdoors)
This function allows you to delete the channel saved by the Auto program, and allows you to manually select and
save the channels.
How to Operate each Mode
Page 25
25
How to Operate each Mode
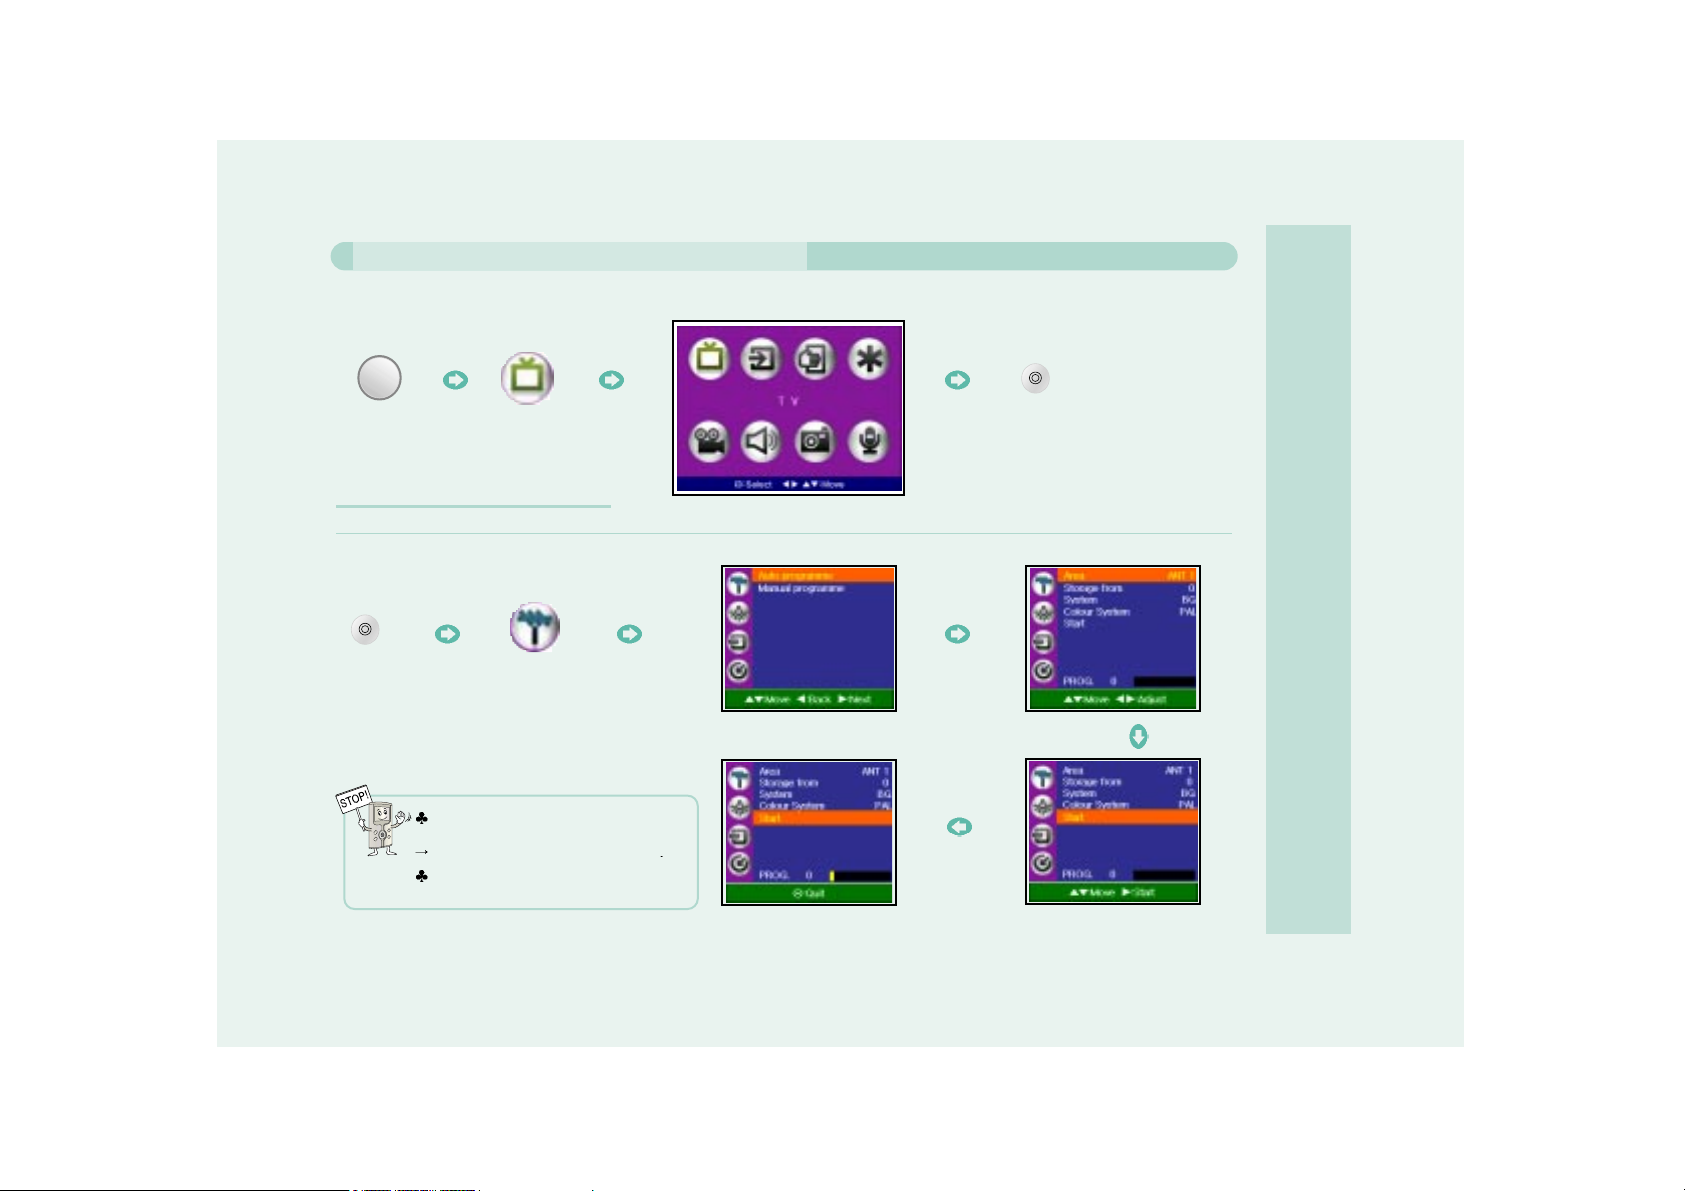
Area can be done in 4 modes.
(ANT1, ANT2, ANT3, ANT4)
There is a possibility for local set up
After completing save, select the desired
channel by CH +/-.
When Watching TV (PAL System)
If you want to watch TV outdoors, use the detachable telescoping antenna when there is a strong broadcast signal, and for
watching TV indoors, connect the cable signal to the antenna terminal. The cable tuner can receive analog signals; it will not
accept digital cable.
- Auto Channel Setup [ PAL, SECAM ]
This function is to search the receiving signal automatically, and save it into memory.
MODE
Select Auto program. Select Area.
Select "Start" in Auto program.
Channel Search starts.
Press the
Button.
Select the
Icon.
Page 26
26
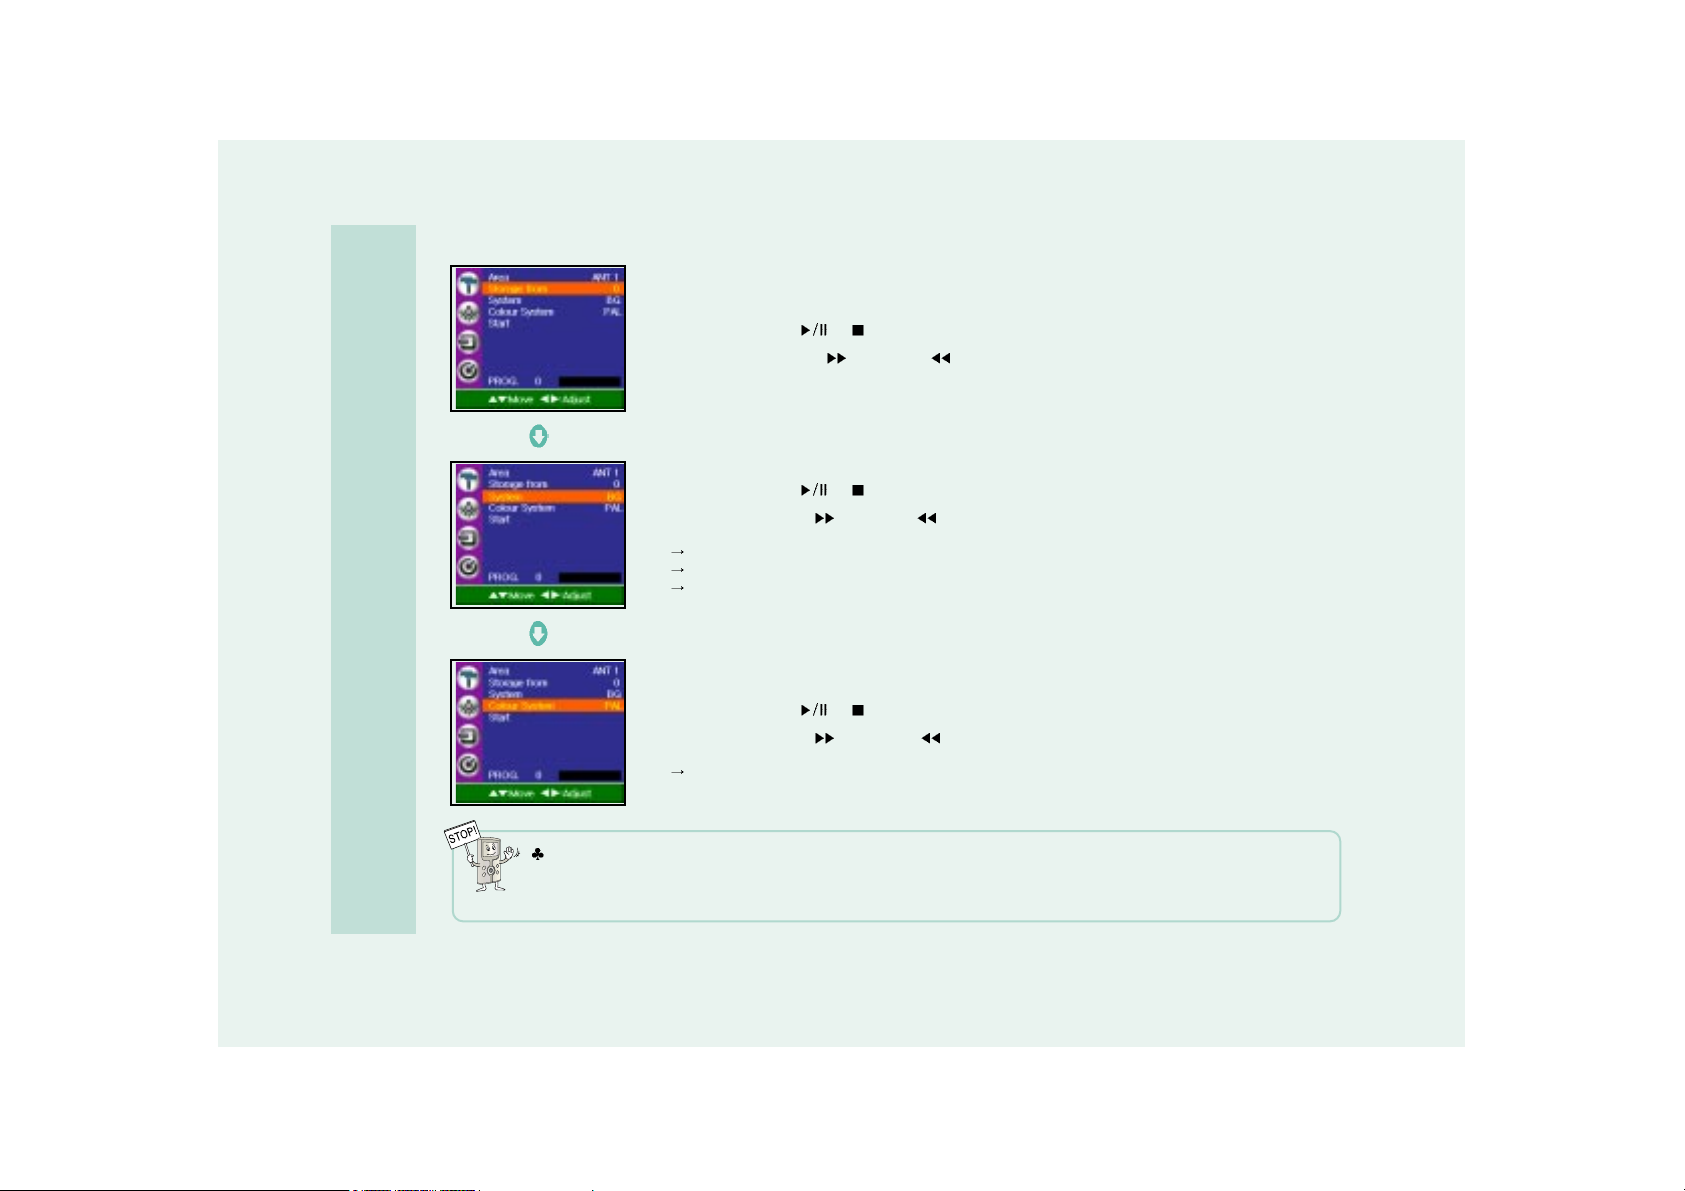
1. Use the Jog button ( or direction) to select " Storage from ".
2. Push the Jog button to
direction or direction. Select the beginning
program number.
1. Use the Jog button (
or direction) to select " System ".
2. Push the Jog button to
direction or direction to change a TV System.
TV System modes.
BG : PAL B/G, SECAM B/G (Asia/New Zealand/Europe/East Europe)
I : PAL I/II (U.K./leland/Hong Kong/South Africa)
DK : PAL D/K, SECAM D/K (East Europe/China/Africa/Russia)
1. Use the Jog button (
or direction) to select " Color System ".
2. Push the Jog button to
direction or direction to change a color System.
Color System modes.
PAL, SECAM, NTSC
After setting " Storage from ", " System, Color System " above, Select " Start " then Push the Jog button direction to
begin the Auto Program.
- All receivable stations are stored.
How to Operate each Mode
Page 27
27
How to Operate each Mode
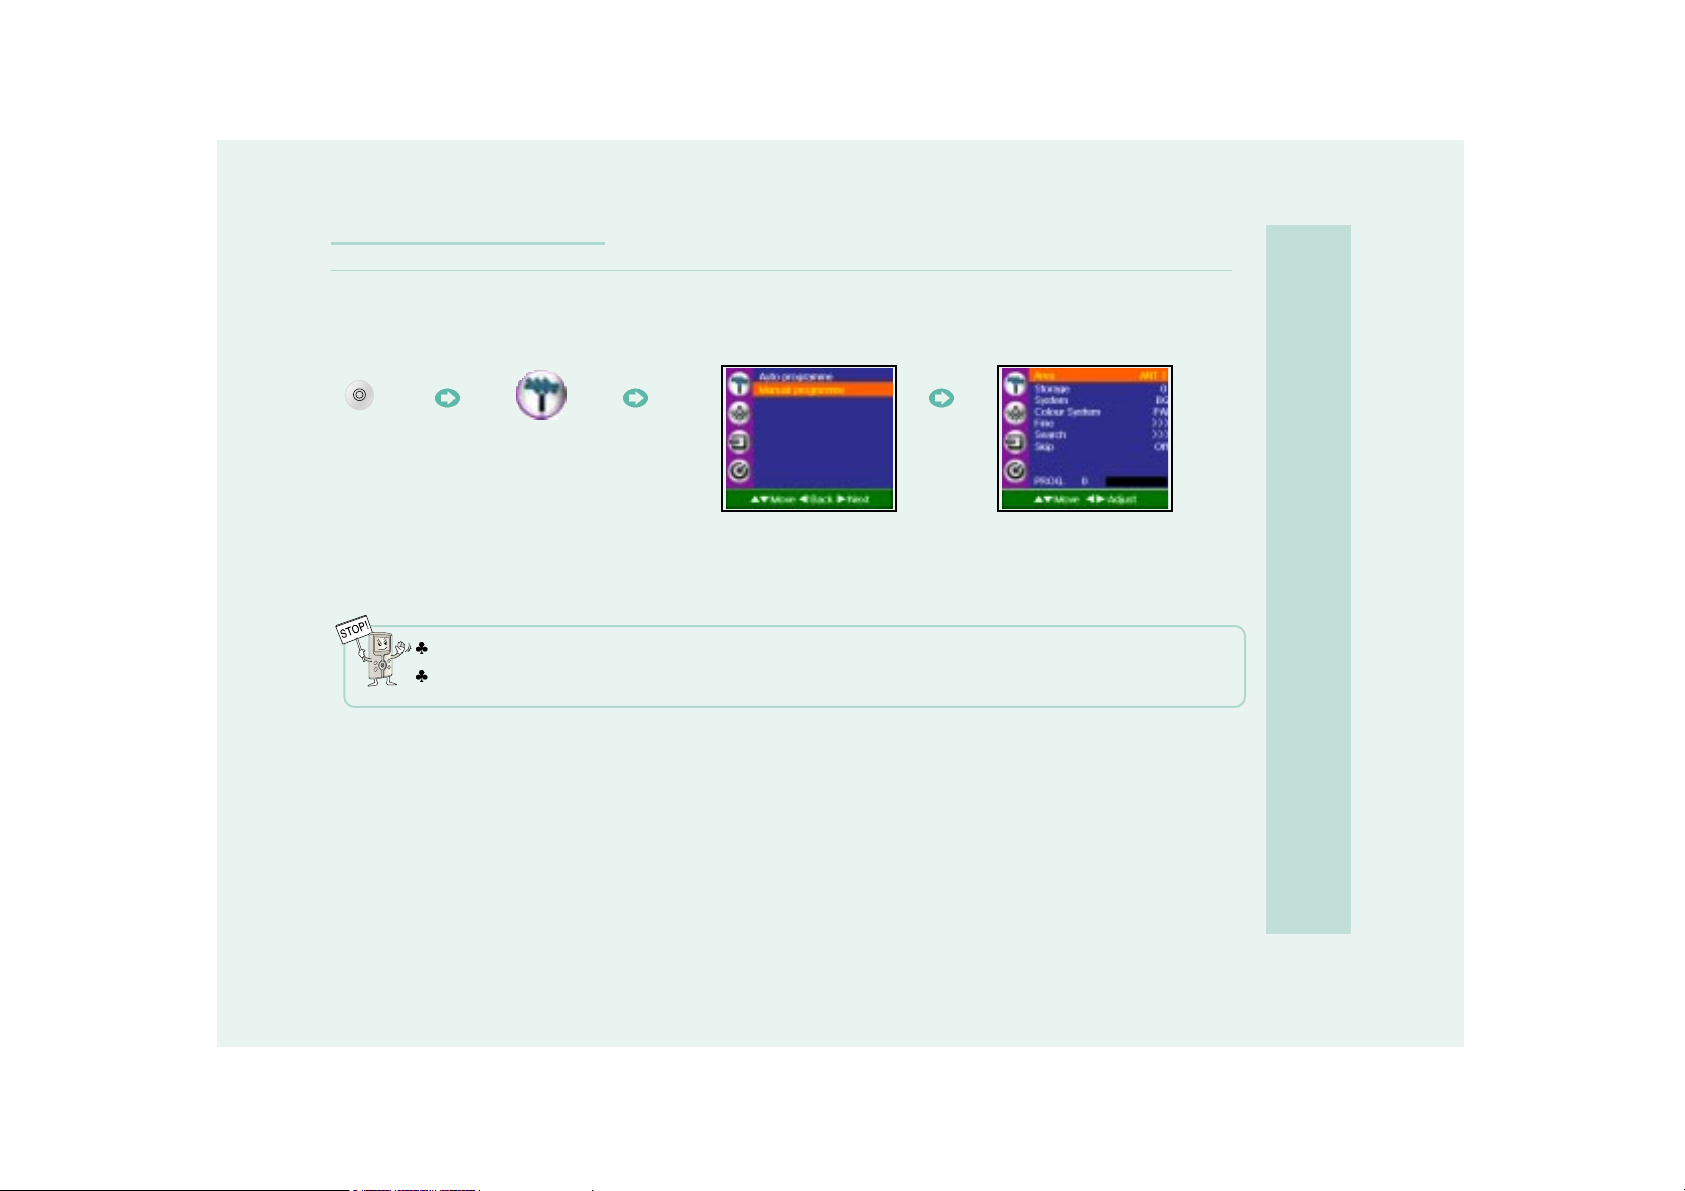
Select Manual program. Select Area.
Press the
Button.
Select the
Icon.
- Manual Channel Setup [ PAL, SECAM ]
While in Area, select ANT1, ANT2, ANT3, ANT4.
After saving, select a desired channel by CH +/-.
This function allows you to delete the channel saved by the Auto Program, and select the channels manually and save them.
Page 28
28
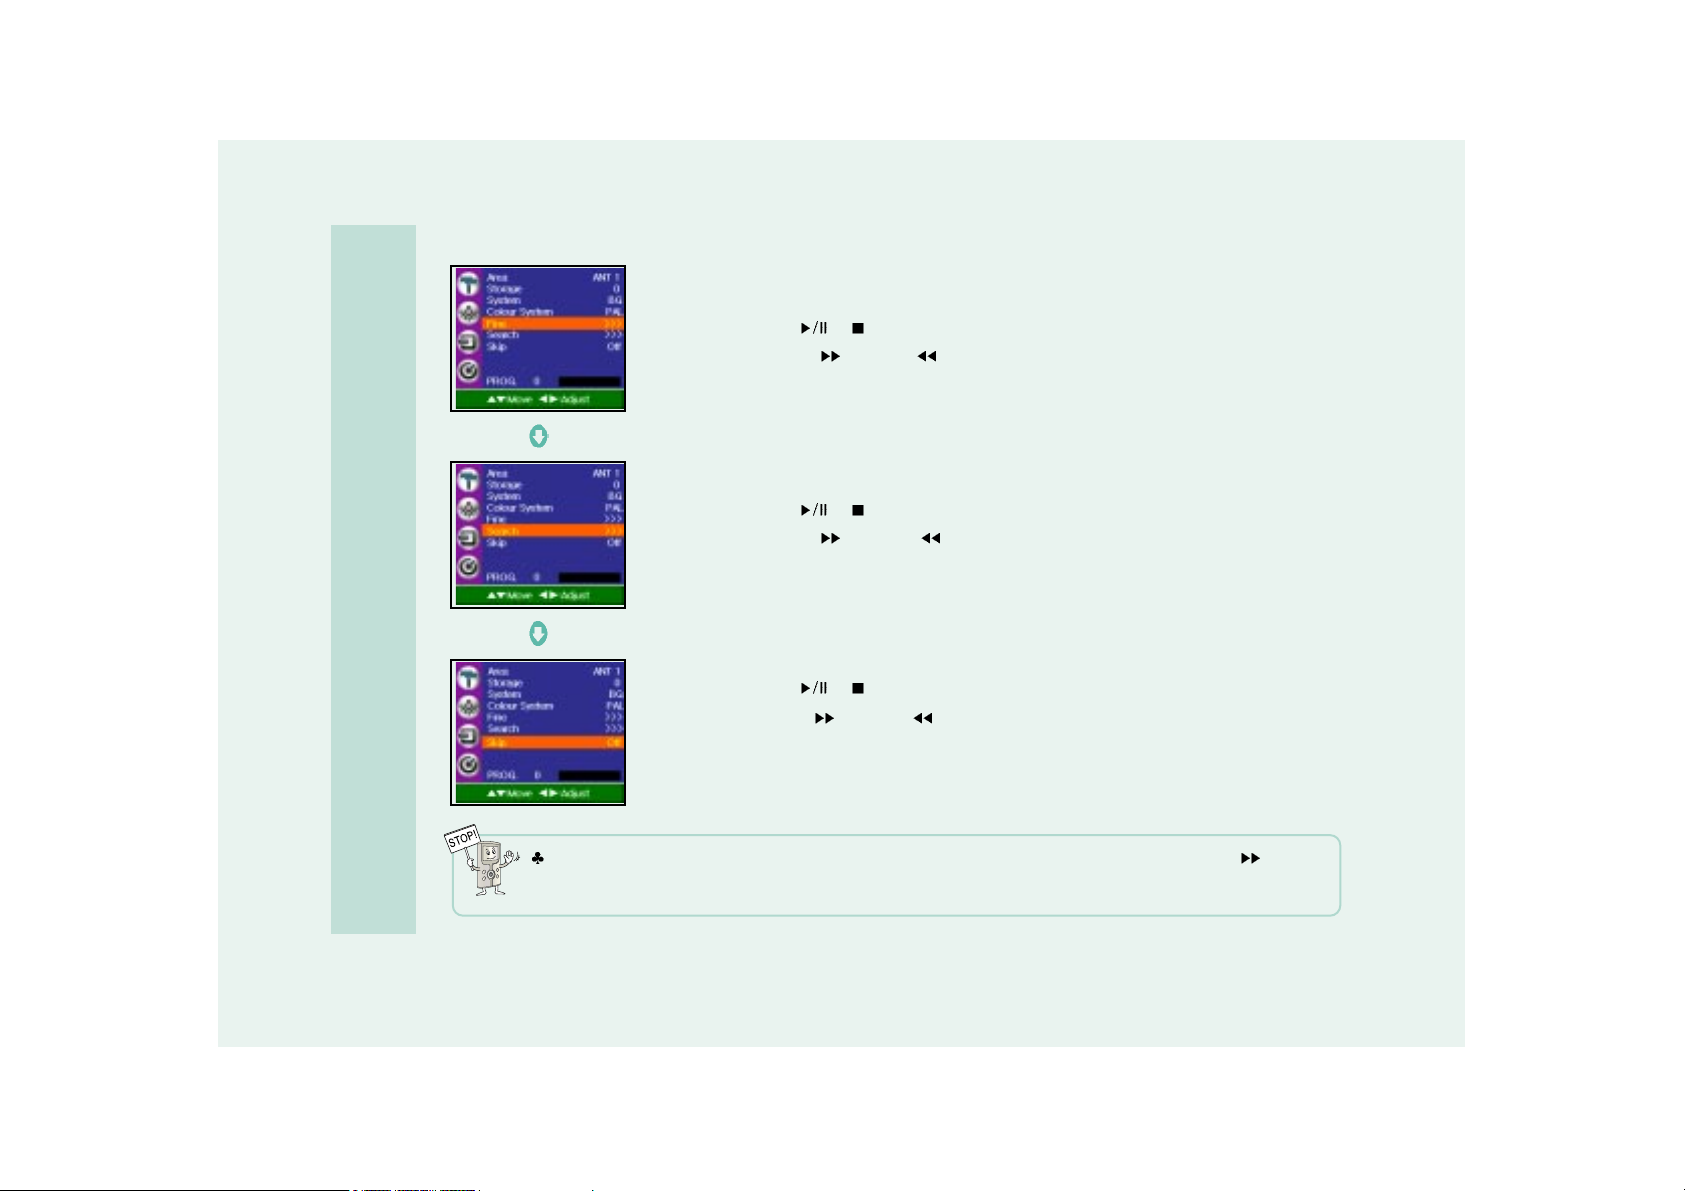
1. Use the Jog button ( or direction) to select " Fine ".
2. Push the Jog button to
direction or
direction to fine tune for the best
picture and sound on the Fine pull-down menu.
3. Press the OK button.
Normally, fine tuning is only necessary if the reception is poor.
1. Use the Jog button (
or direction) to select " Search ".
2. Push the Jog button to
direction or direction to commence searching on
the Search pull-down menu.
If a station is found the search will stop.
3. Press the OK button to store it.
1. Use the Jog button (
or direction) to select " Skip ".
2. Push the Jog button to
direction or direction to select " On " or " Off ".
3. Press the OK button.
4. When the Skip setting is " On ", it means that you will be unable to find the
skipped channel using the CH+/- button during normal TV viewing.
After setting " Storage from ", " System ", "Color System " above; Select " Start " then Push the Jog button direction to
begin the Auto Program.
- All receivable stations will be stored.
How to Operate each Mode
Page 29
29
How to Operate each Mode
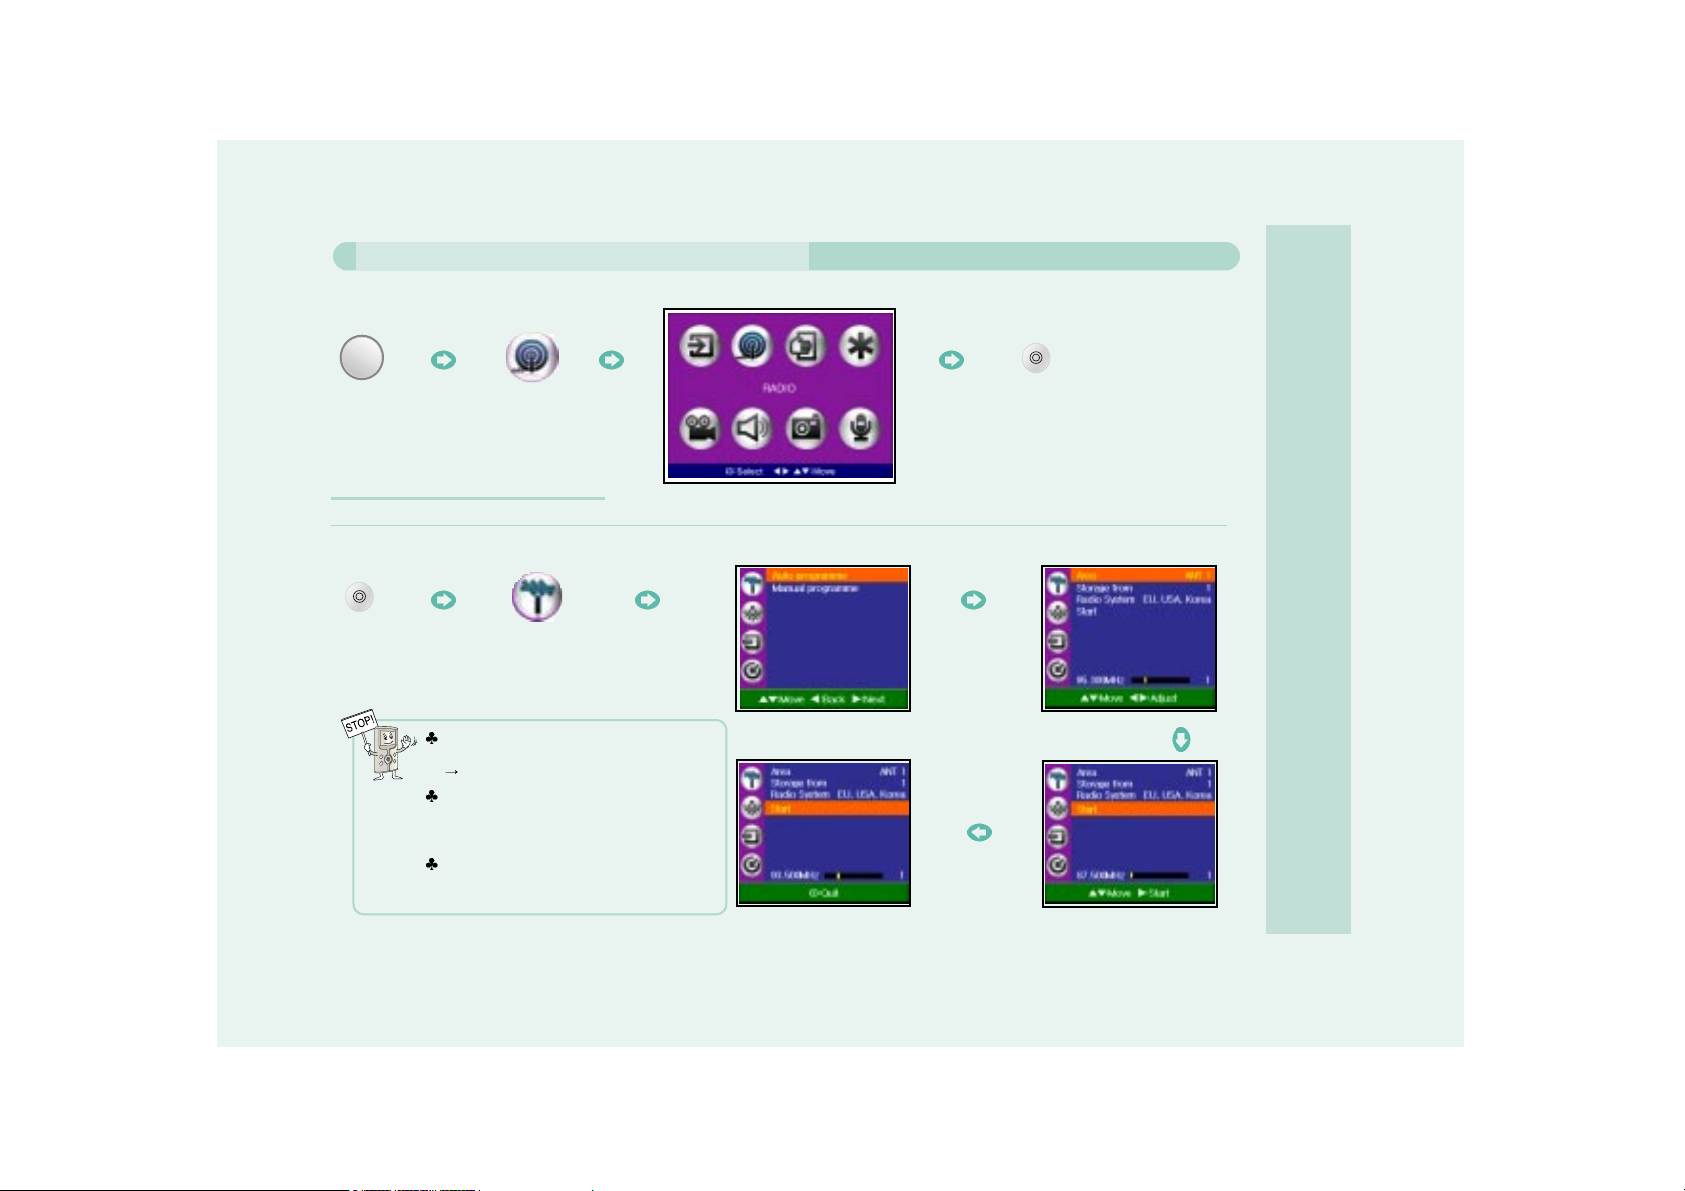
When Listening to the Radio (Option)
If you want to listen to the Radio outdoors, use the detachable telescoping antenna where the reception sensitivity is good.
MODE
This setup will search receiving signals automatically and save them to the unit’s memory.
Select Auto program.
Select Area.
Select " Start " in Auto program.
Channel Search starts.
Area can be done in 4 modes.
(ANT1, ANT2, ANT3, ANT4)
There is a possibility for local set up.
The System can be set as global radio
system or Japanese radio system.
(EU, USA, KOREA, JAPAN)
Pushing the jog button to direction when
starting Auto Channel Setup, the signal will
be stored automatically.
Press the
Button.
Select the
Icon.
- Auto Channel Setup
Page 30
30
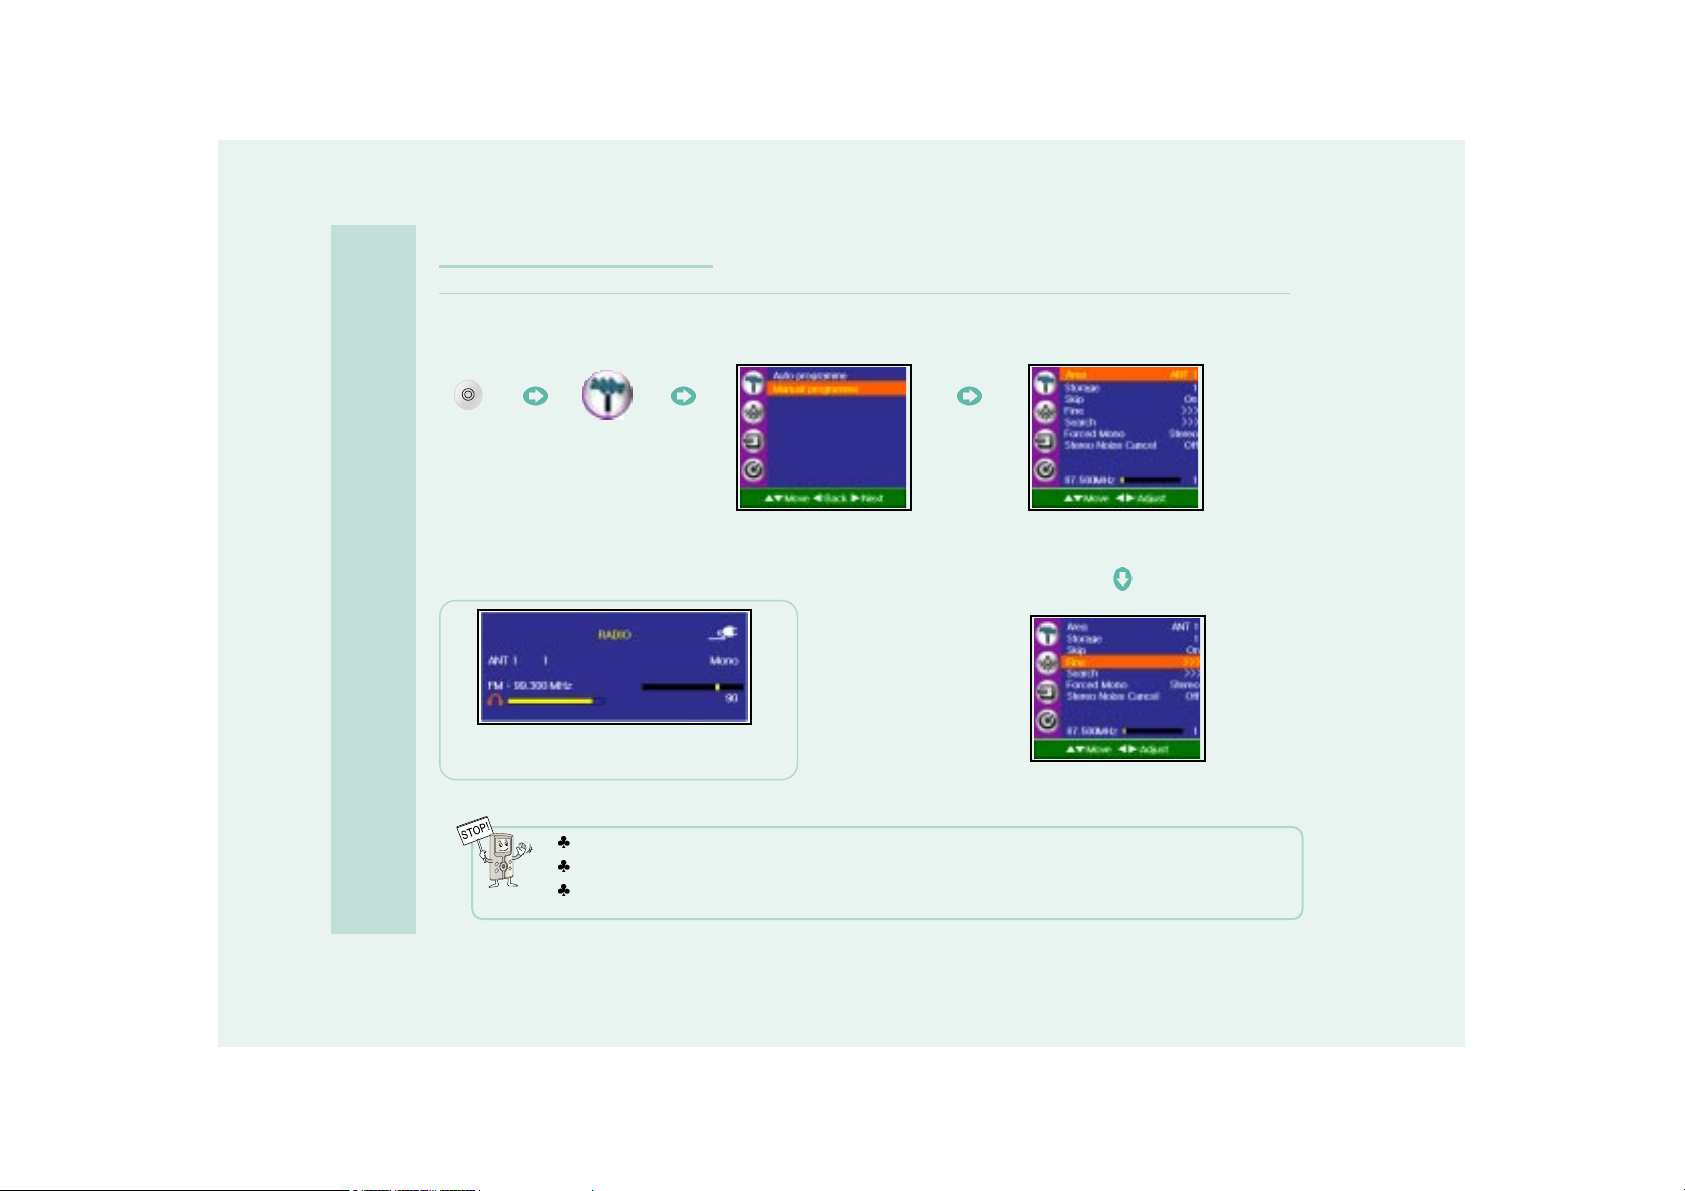
This method can be used to erase the channel saved by the Auto Program, or catch and save the station manually.
- If you are listening to the radio after setting the radio
channel, a radio menu will be displayed to select a
desired channel.
Area can be done in 4 modes. (ANT1, ANT2, ANT3, ANT4).
After saving, select a desired channel by CH +/-.
When there is a serious noise in the stereo signal, setting Forced Mono or Stereo Noise Cancel will allow you to
listen to a cleaner signal
Select Manual program.
Select Area.
Adjust settings after selecting
a desired mode.
Press the
Button.
Select the
Icon.
- Manual Channel Setup
How to Operate each Mode
Page 31
31
How to Operate each Mode
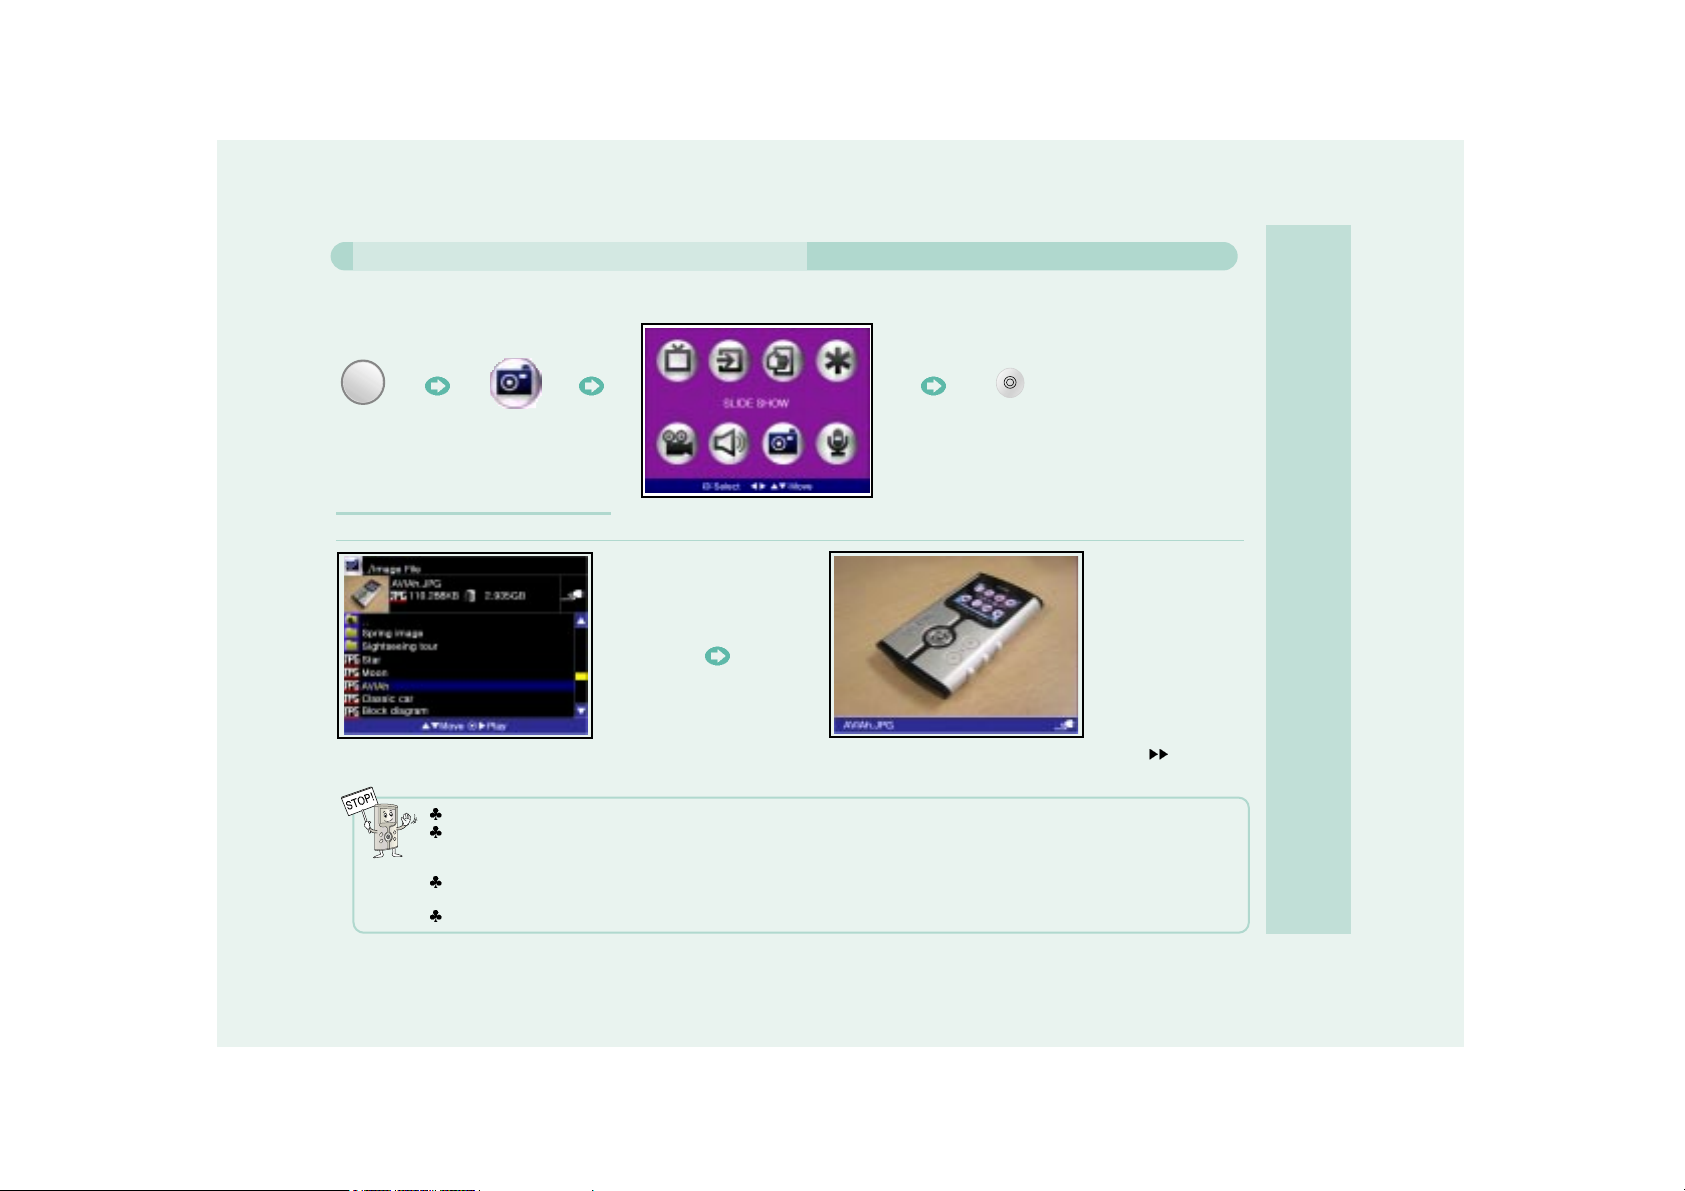
Picture files stored in the AVIAh can be displayed individually or as part of a slide show.
MODE
After moving to a desired file, pressing the OK Button will
allow you to preview in a small screen in the upper left side.
If the OK Button is pressed or the jog button to
direction is
pushed, the current image file will be displayed in full screen.
Repeatedly pressing the DISP Button will provide information on the filename of the displayed image .
When deleting an image file without previewing it first a confirmation warning question appears. If the CH+ Button is pressed,
the following warning question appears " Do you want to delete? " If you select " YES ", and you press the OK Button, the
corresponding file will be erased.
While displaying a picture in the Picture View Mode pressing down on the Joystick button will allow you to zoom in on the
picture. You can zoom in 2X or 4X. Pushing the button once will zoom in 2X. Pushing the Joystick button again will zoom in 4X.
While zoomed in on a picture you can also pan across the picture by using the Joystick.
When Displaying an Image File
- When Viewing Image Files
Page 32
How to Operate each Mode
32
MODE
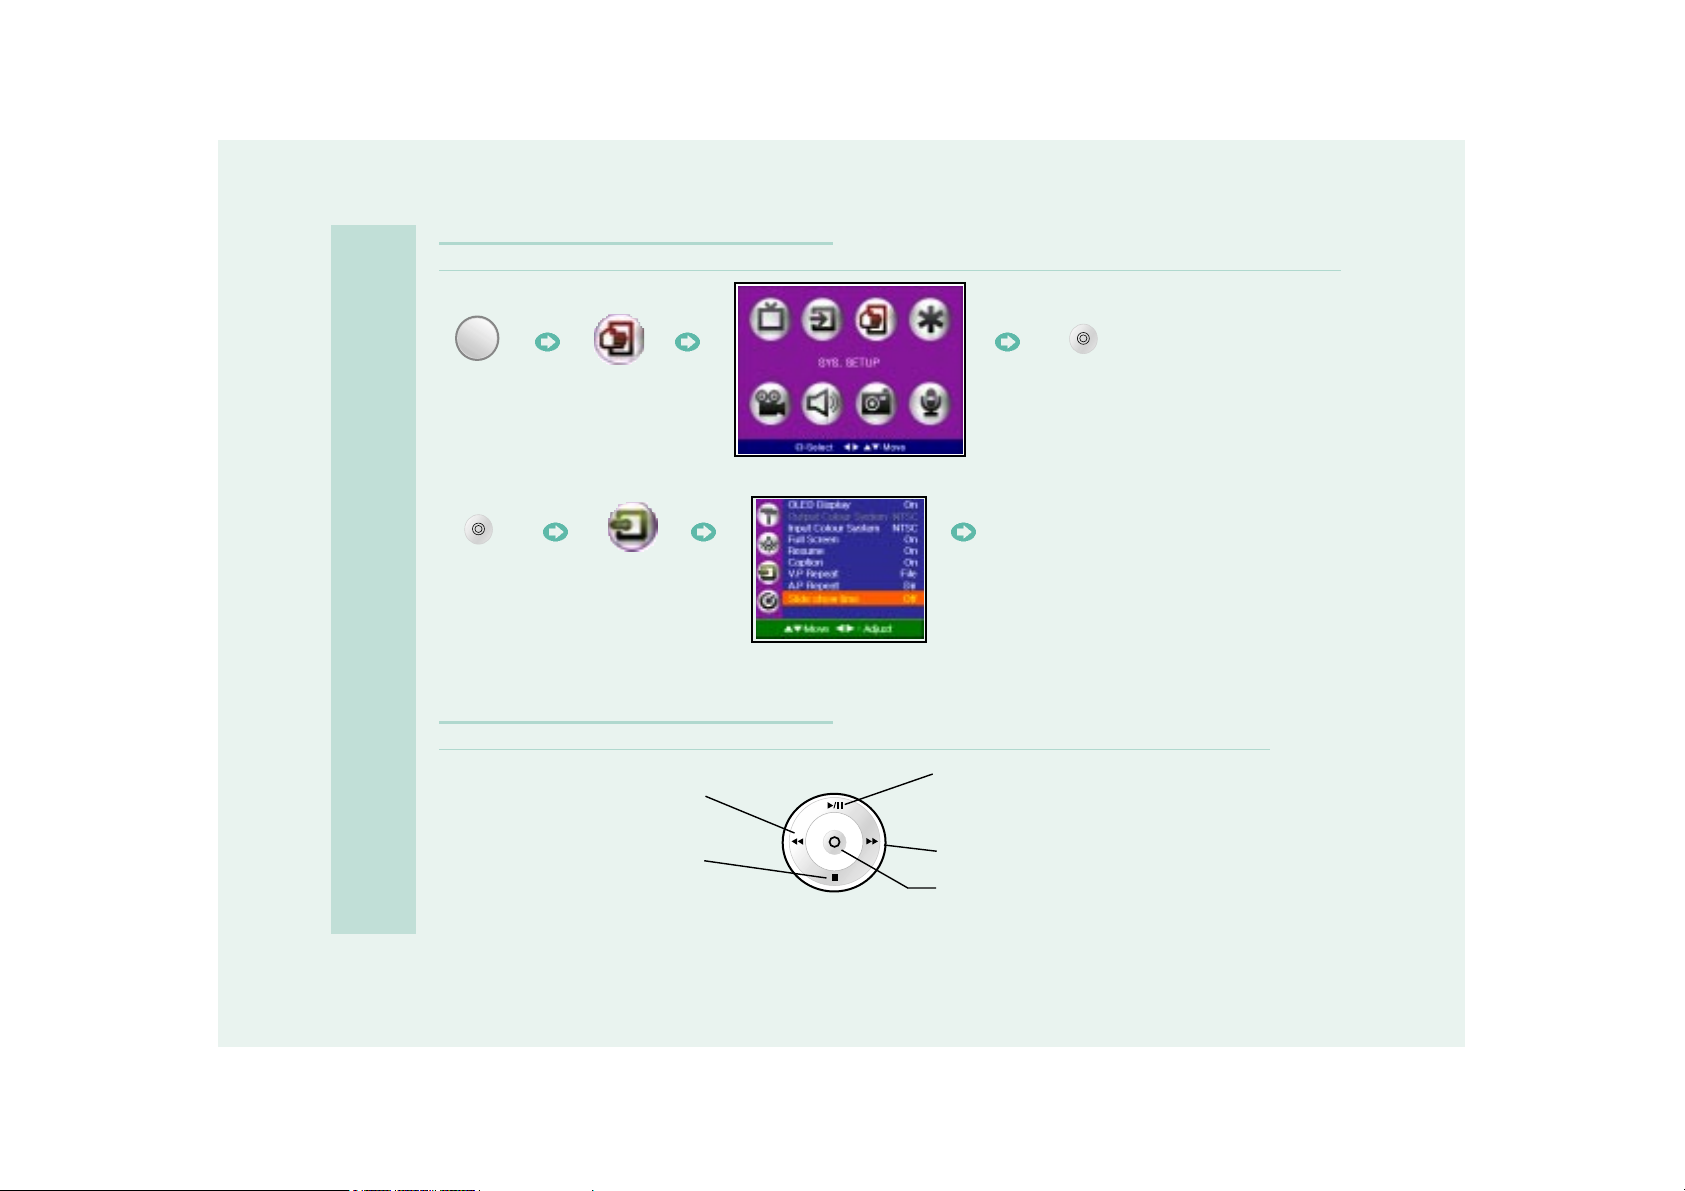
After selecting the Slide show time, adjust the Display Time.
(None, 2, 4, 6, 8, 10, 15, 30 seconds can be selected.)
If the OK Button is pressed twice,
The Menu will disappear and the
slide show function will run.
Select the
Icon.
Press the
Button.
- When Viewing an Image File with the Slide Show Function
- When Viewing a Slide Show; the Jog Button:
If the Button is not pressed while
in ll(Pause) status, the Slide Show
will resume within 30 seconds.
Viewing Previous File
Viewing Next File
Zoom In (X2, X4)
Slide Show Termination
Page 33
How to Operate each Mode
33
You can download a new image of your choice in .JPG format and use it as the background for the On Screen Display.
1. Save your JPG file of Choice to the SystemFolder of the Portable Media Player. At this time you can save only two .JPG files
to the SystemFolder.
2. When you save them, the file names should be wall.jpg and window.jpg.
3. wall.jpg is shown as a background when you push the mode button. It is also the background shown in the main menu.
window.jpg is shown as a background in Video, Audio, Slide Show, REC and ETC file mode.
Can I change the Background Images of the On Screen Display?
If you do not want to have any background images, please delete the image files in System Folder or change the file name of
wall.jpg and window.jpg to some other name.
Page 34
How to Operate each Mode
34
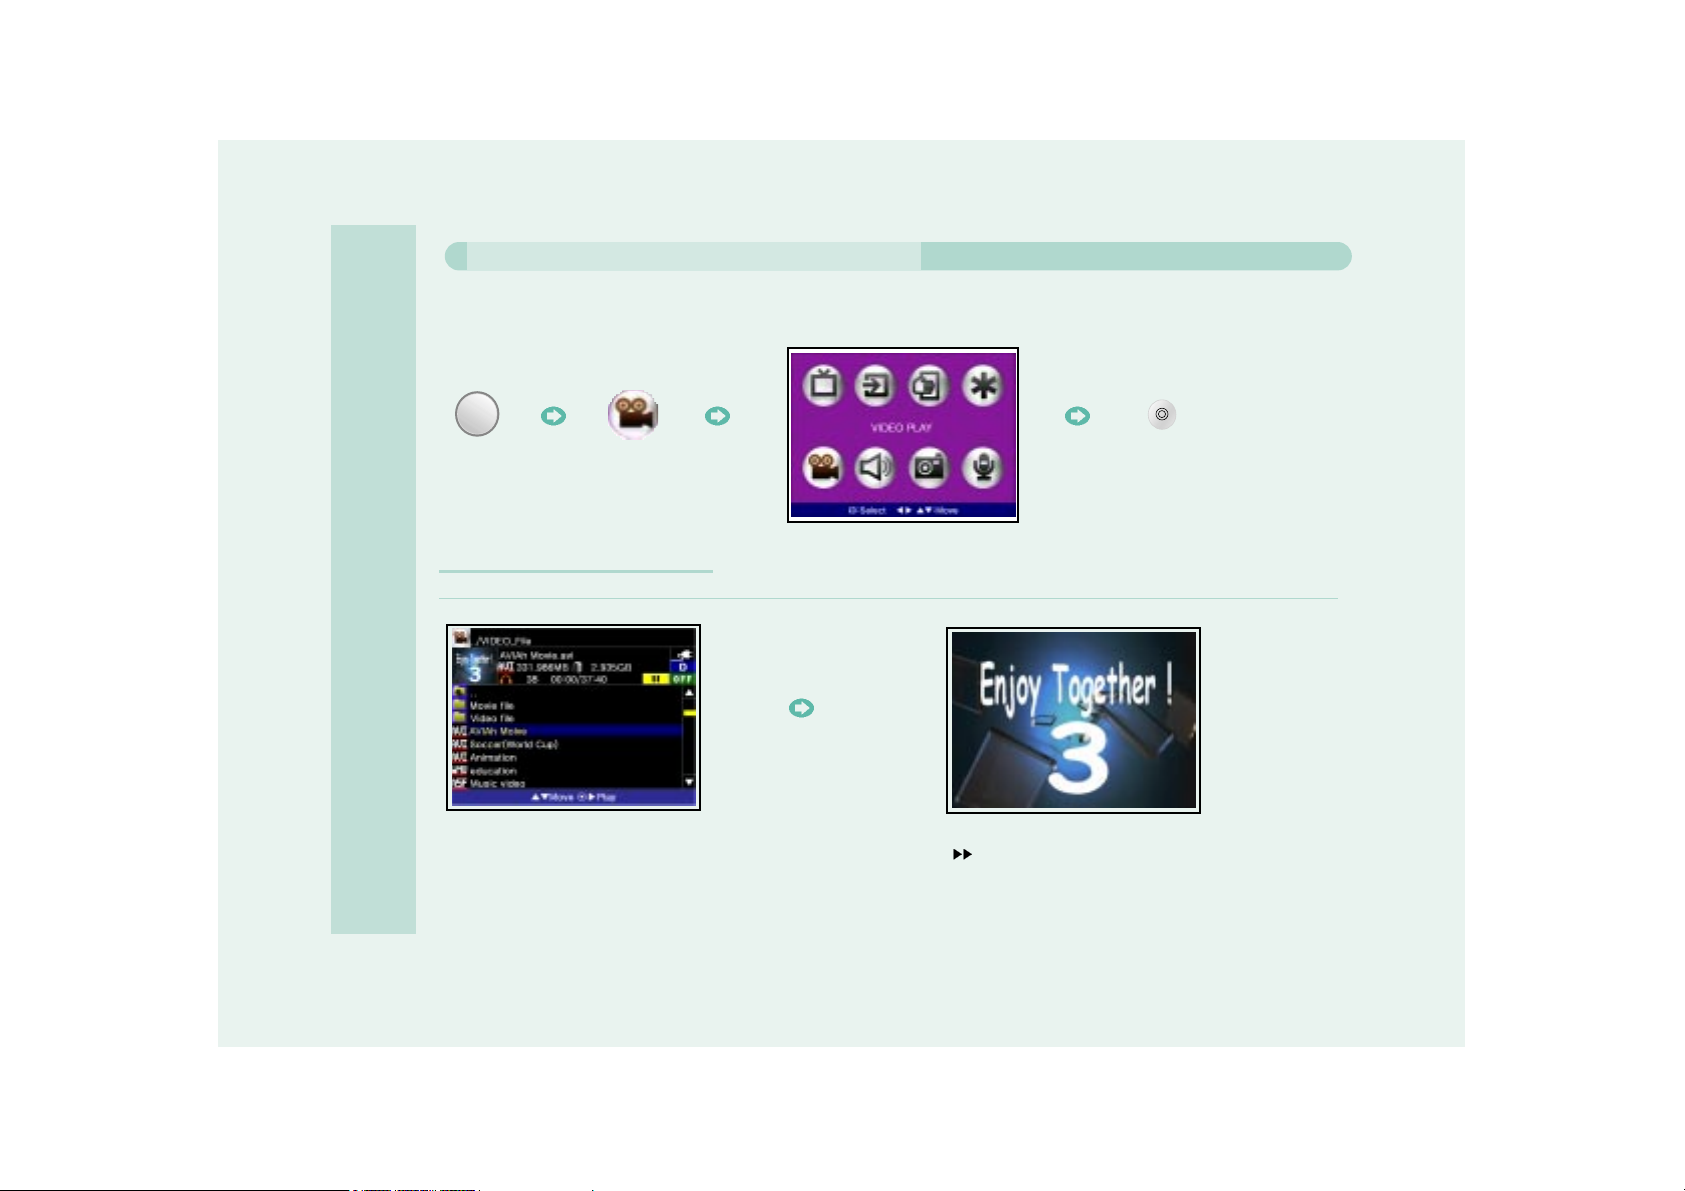
Moving pictures stored in the AVIAH can be viewed. The AVIAH can play many different types of Moving picture files including
MPEG4, DIVX, XVID, AVI, ASF and WMV9.
MODE
After moving to a desired file, pressing the OK
Button will allow you to preview the file in a small
screen in the upper left side.
When Playing a Moving Picture File
- Playing a Moving Picture file
If the OK Button is pressed or the jog button to
direction is pushed, the current video will be
displayed in full screen.
Page 35
How to Operate each Mode
35
- To pause play: Push the jog button to direction.
- To resume playback: Push the jog button to direction.
- To setup playback speed: Push the jog button to or direction. ( x2, x4, x8, x16, x32)
When deleting a video file without previewing it first a confirmation warning question appears. If the CH+ Button is pressed,
the following warning question appears " Do you want to delete? " If you select " YES ", and press the OK Button, the
corresponding file will be erased.
Larger files take longer to delete.
When deleting moving picture files, if there is subtitle data, by pressing REC button to select one of
Korean/Chinese/Japanese/… to decode property, so if you select Japanese, you can decode the subtitle file in Japan. In
case of English subtitle file, there is no need to press REC button to select one of Korean/Chinese/… format to decode.
Page 36
36
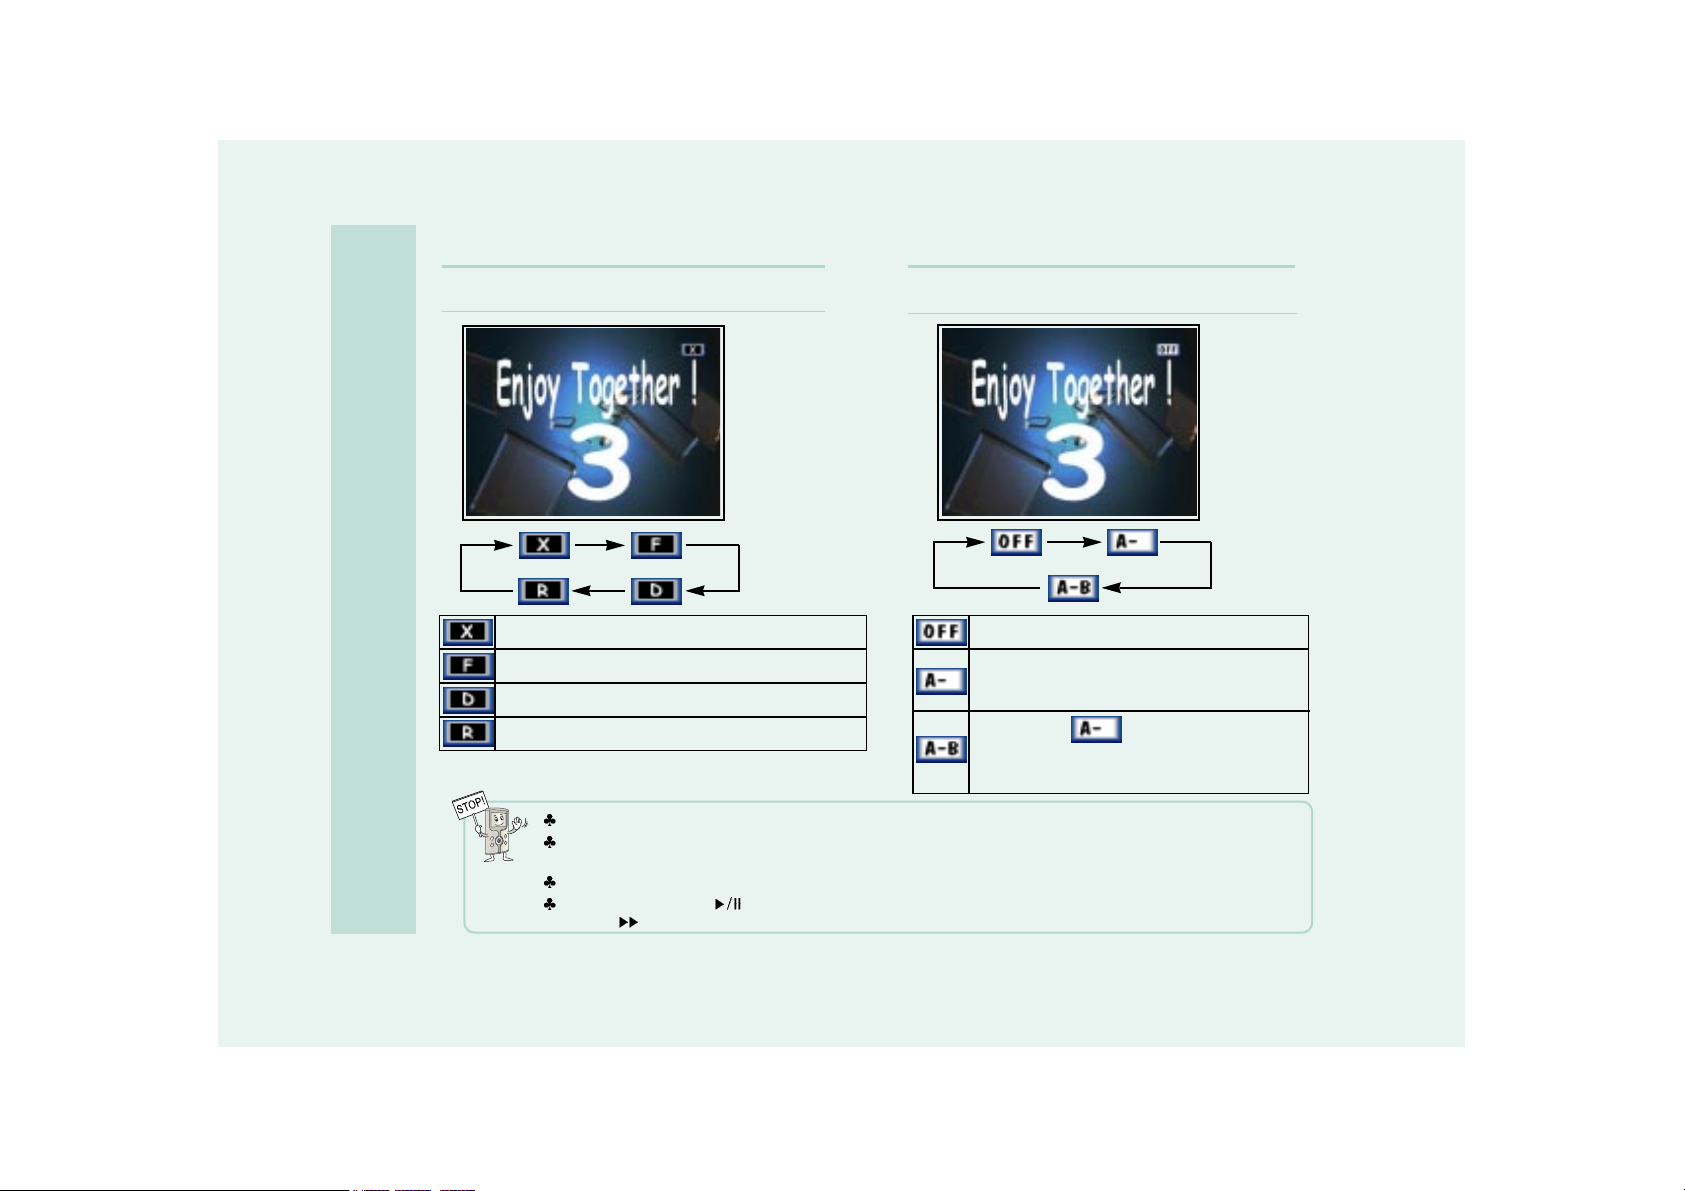
Depending on the type of moving picture files, the above Loop Repeat Function may not be available.
While playing a Video file, pressing down on the Joystick button will allow you to zoom in on the Video.
You can zoom in 2X or 4X. Pushing the button once will zoom in 2X. Pushing the Joystick button again will zoom in 4X.
While zoomed in on the Video you can also pan across it by using the Joystick.
Push Joystick button to while the video is playing back to pause the moving picture. When you push the Joystick
button to
, you can advance the video frame by frame.
The file being played runs once, then stops.
The file being played will be repeated.
All the files in the folder will be played repeatedly.
Files to be played will be selected randomly and played.
Loop Repeat Function is not used.
Pressing
CH- Button while a moving picture file is
being played will setup the beginning of a Loop
Repeat.
After the above icon is displayed, if you want
to setup the end of a Loop Repeat, press CH-Button
once more, then the specified loop will be played
back repeatedly.
- When Pressing the CH+ (*Fn+) Button
While Playing a Moving Picture File
- When Pressing the CH- (*Fn-) Button
While Playing a Moving Picture File
How to Operate each Mode
Page 37
37
How to Operate each Mode
MODE
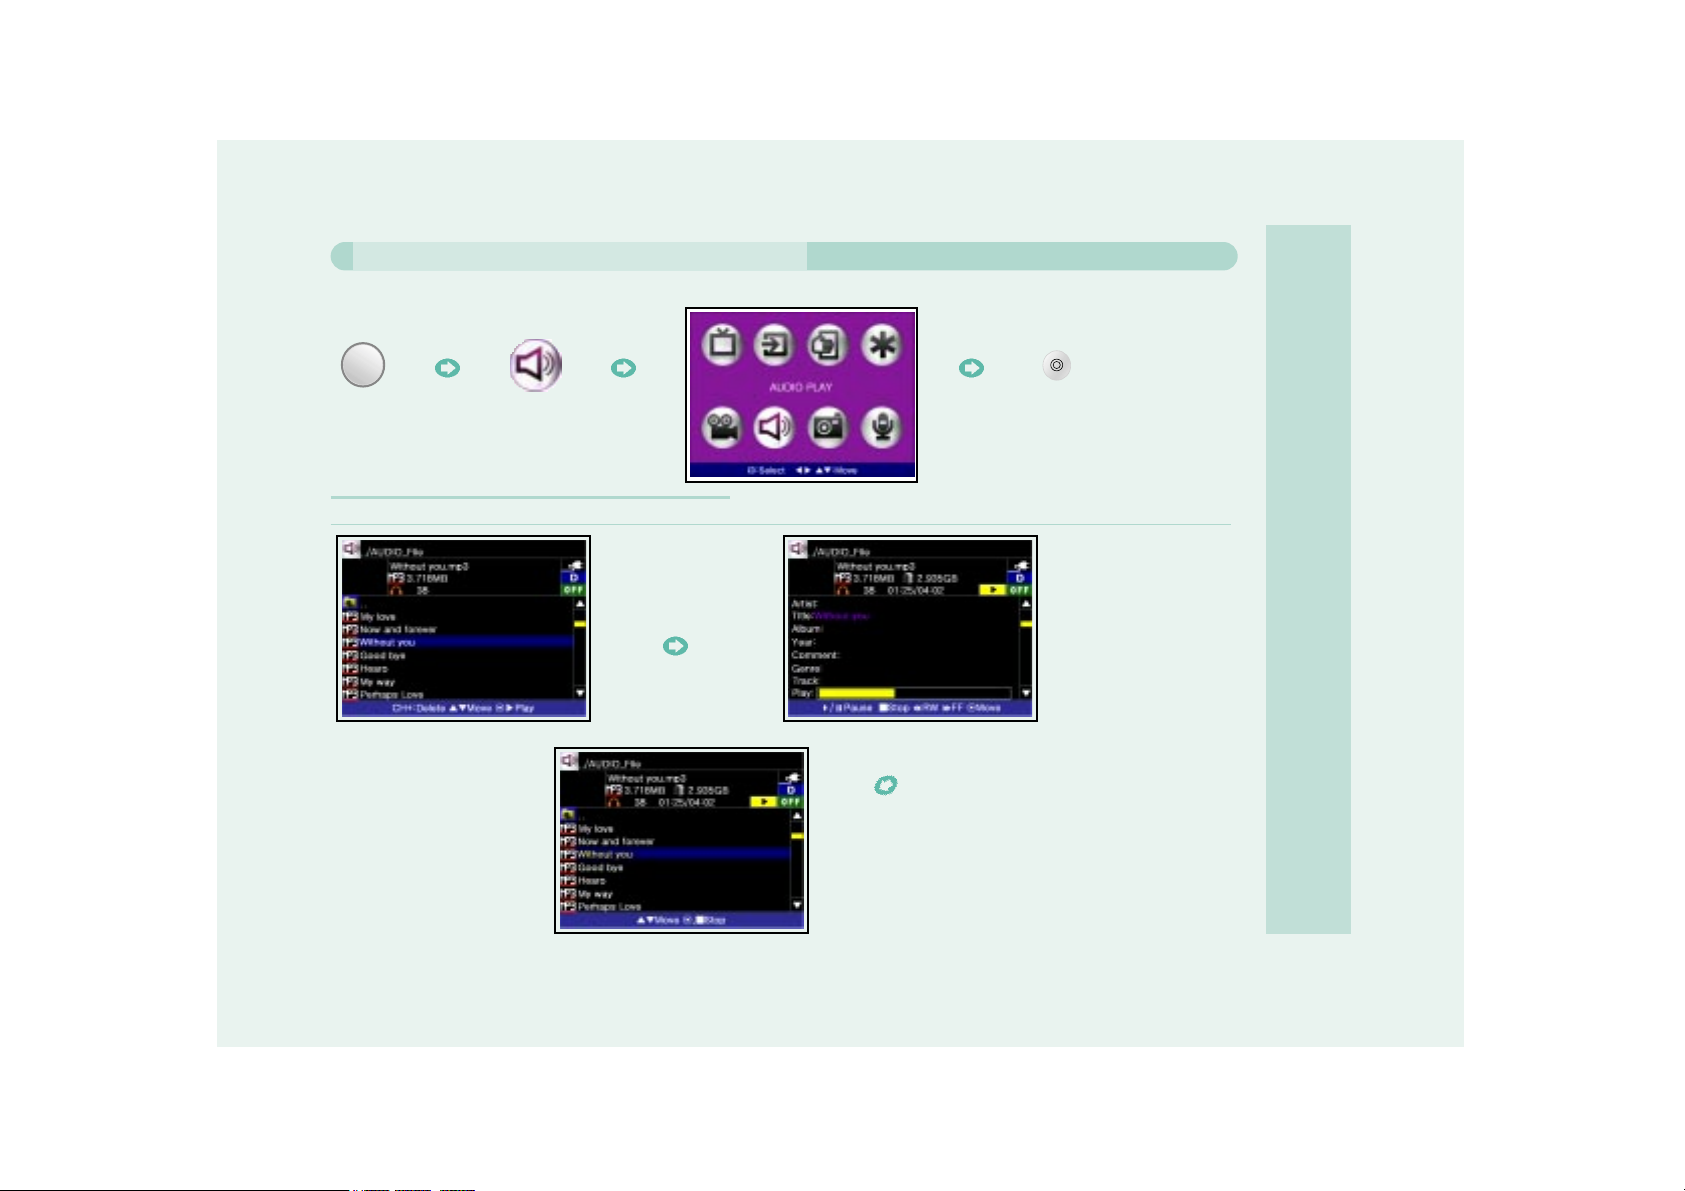
You can enjoy music files stored in the AVIAh.
To play an audio file, highlight
the desired file.
Push the jog button
to the direction.
Press OK Button.
As an audio file is played,
information on the selected
audio file will appear in the
upper part of the screen.
Will be played back while Directory
Menu is displayed.
When Playing Audio Files
- Playing an Audio File (MP3 or WMA9 files)
Page 38
38
How to Operate each Mode
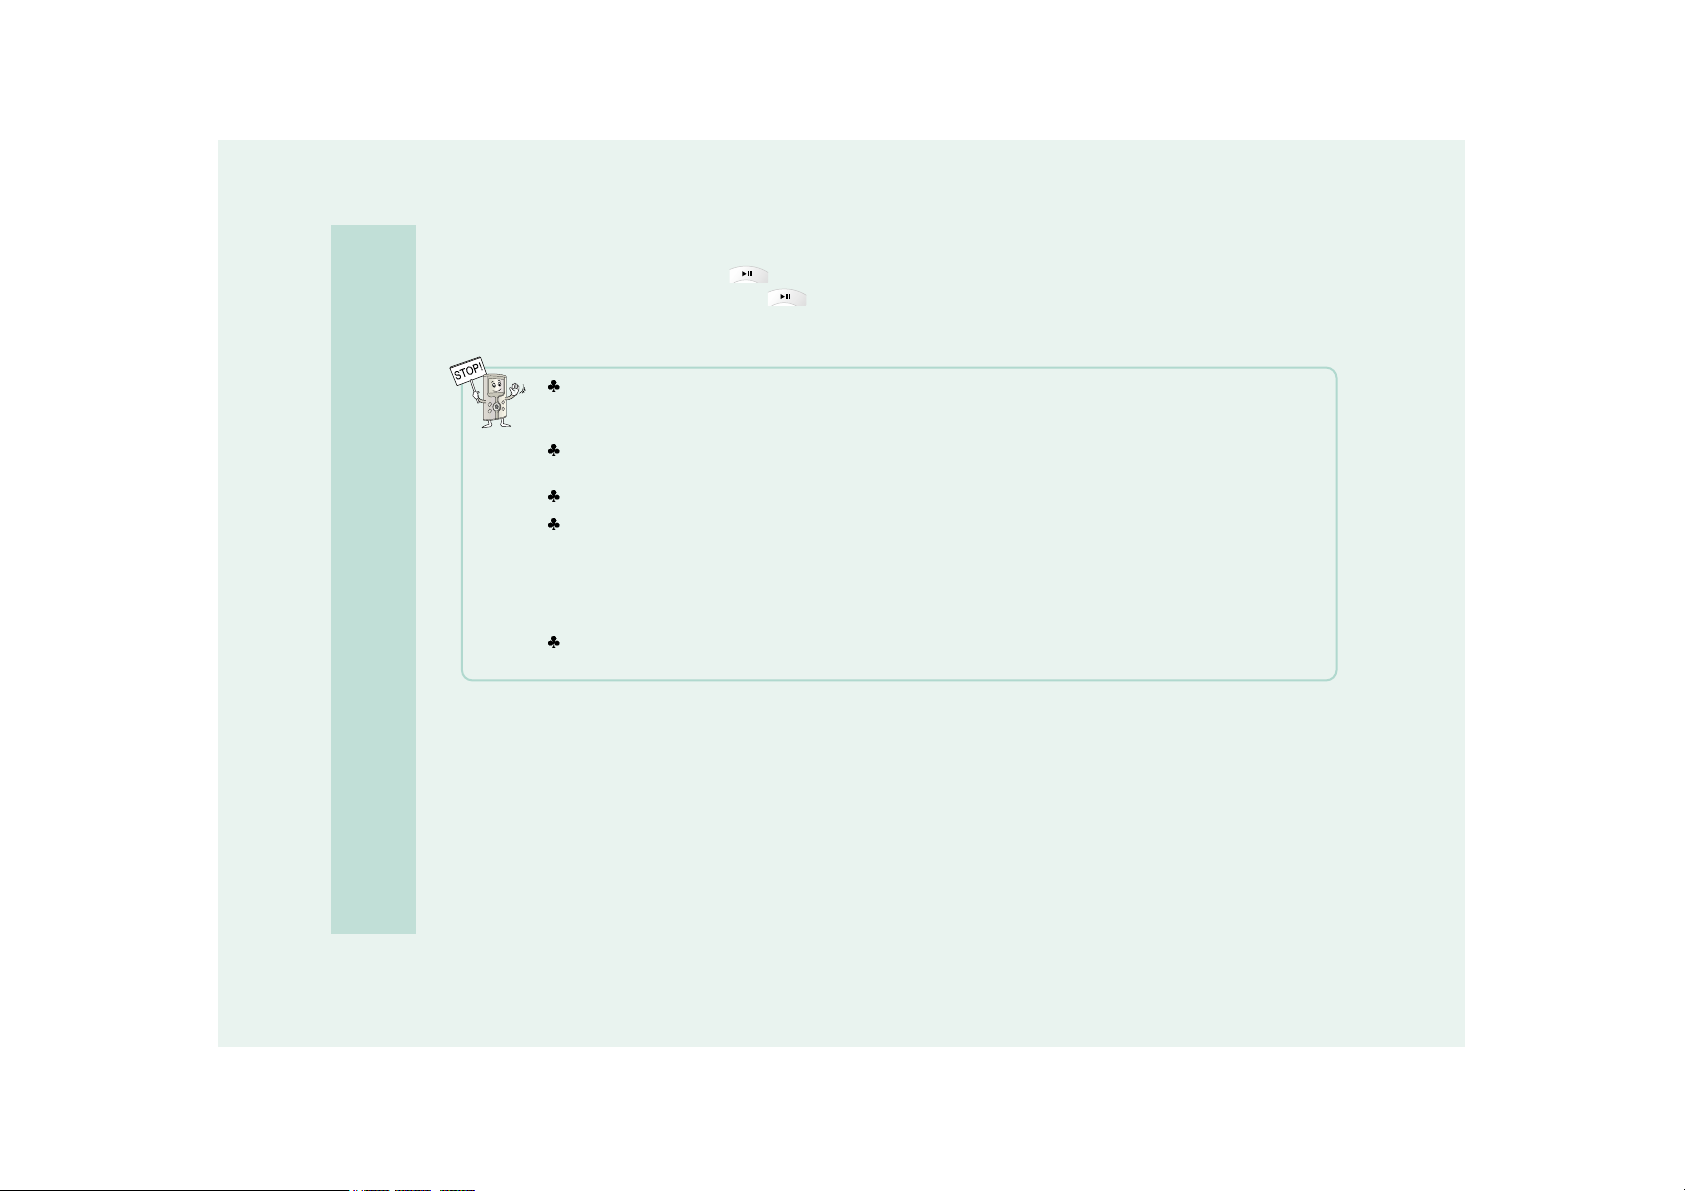
- To pause play: Push the jog button to the direction.
- To resume playback: Push the jog button to the direction.
When deleting a music file without previewing it first a confirmation warning question appears. If the CH+ Button is
pressed, the following warning question appears " Do you want to delete? " If you select " YES ", and press the OK
Button, the corresponding file will be erased.
In the case of an MP3 file : If the OK Button is pressed during playback, another audio file can be selected without
stopping the music being played.
In the case of a WMA9 file : During play back, another audio file can not be selected.
While in the System Setup menu find the OLED Display On/Off menu item. Activating the OLED "Off" menu item will turn
off the OLED the next time you activate an audio file for playback. The OLED will continue to stay turned off even if you
push the Volume Up/Down or Display buttons. This allows you to play and navigate through audio files without using the
OLED screen thus, conserving battery life.
Note 1: The Volume up/down buttons will continue to function normally.
Note 2: Pushing the Display button will allow you to skip through audio files without activating the OLED screen.
In addition, as an alternative method, you can force the OLED to turn off by pushing and holding the Display Button for 5
seconds. This will temporarily disable the OLED screen. When you push any button the OLED screen will turn on again.
Page 39
How to Operate each Mode
39
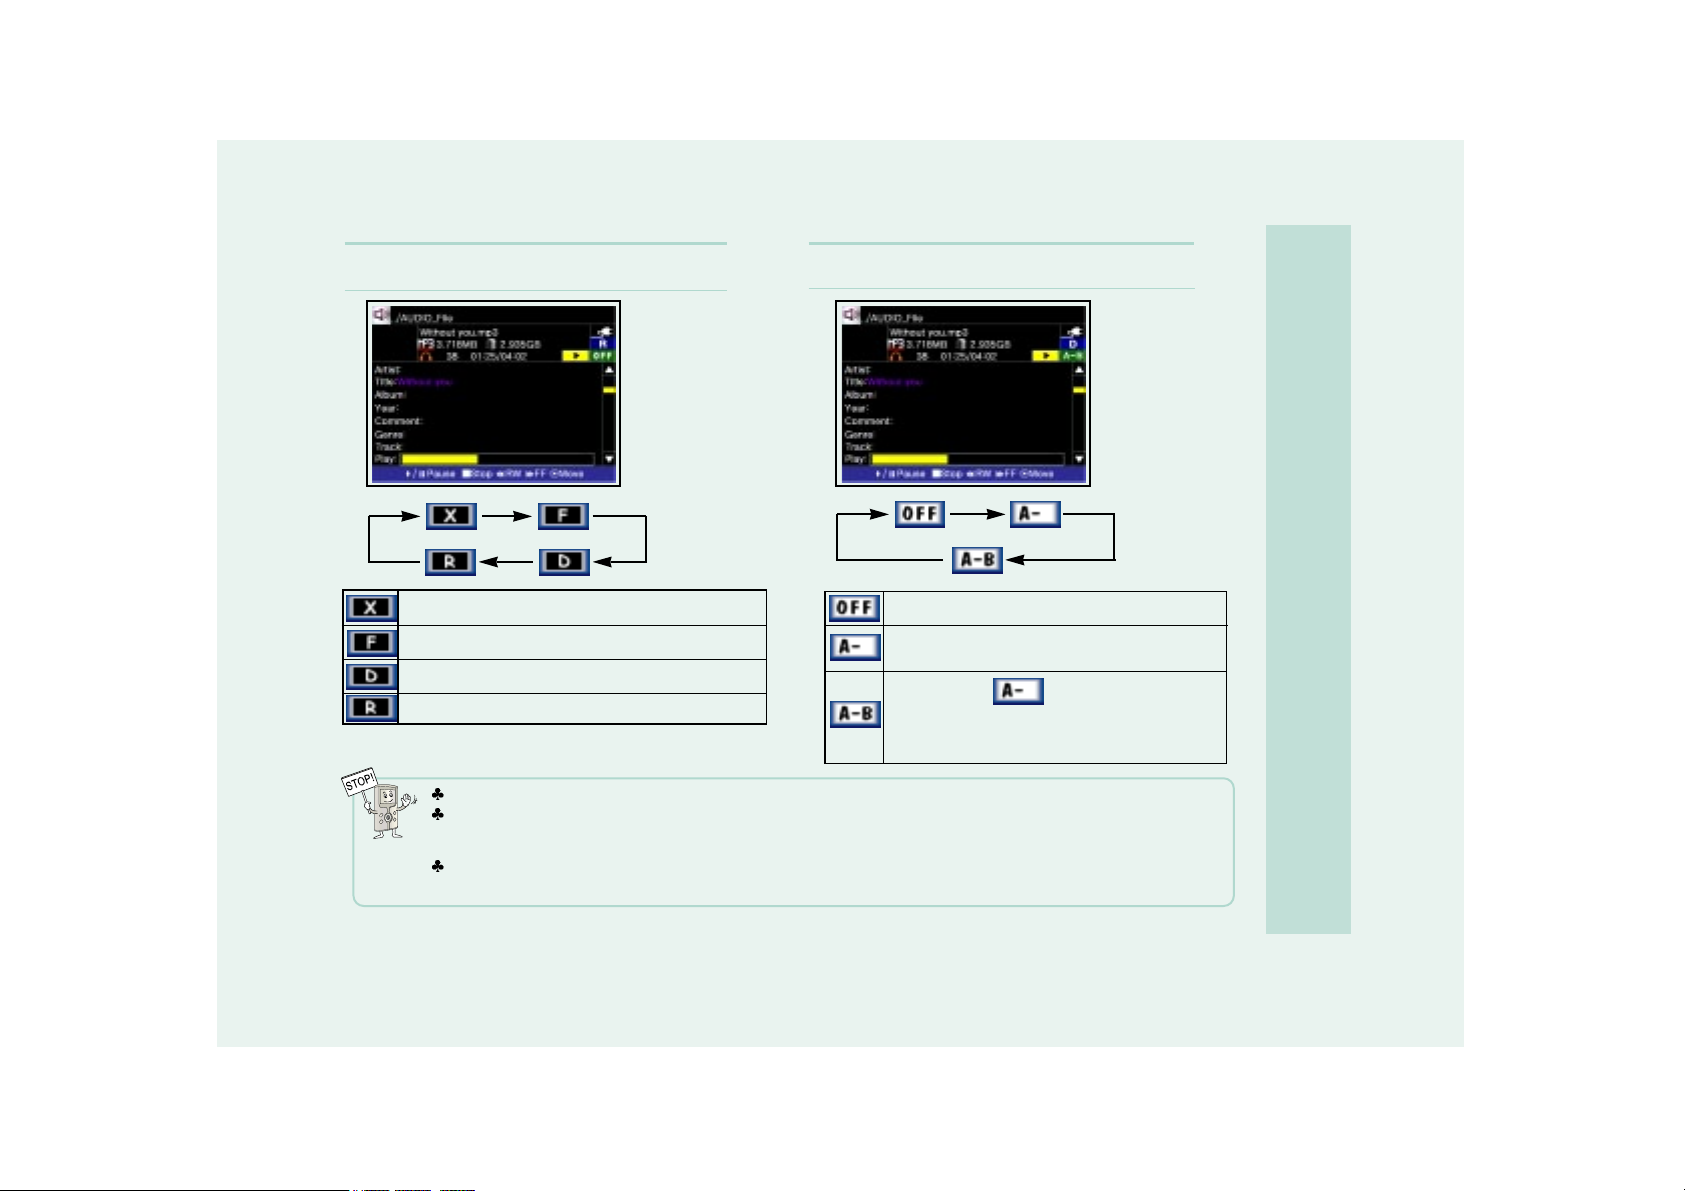
The file being played runs once, then stops.
The file being played will be repeated.
All the files in the folder will be played repeatedly.
Files to be played will be selected randomly and played.
Loop Repeat Function is not used.
Pressing CH- Button while Audio file is played will
setup the beginning of a Loop Repeat.
After the above icon is displayed,
if you want to setup the end of a Loop Repeat, press
CH- Button once more, then the specified loop will
be played back repeatedly.
Depending on audio content, the above Loop Repeat Function may not be available.
If there are audio file A.mp3, and A.txt file in the same folder together, lyrics of the song can be displayed by using OK button
after audio file playback. In this mode, FF/RW button can be used for page Up/Down function. If you repress OK button,
Audio playback mode will be shown on screen.
By pressing REC button to select one of Korean/Chinese/Japanese/... to decode properly, ID3 information of MP3 in China
also can be decoded in Chinese properly. In case of English ID3 information, there is no need to press REC button to select
one of Korean/Chinese/Japanese/... format to decode.
- When Pressing the CH+ (*Fn+) Button
While Playing an Audio File
- When Pressing the CH- (*Fn-) Button
While Playing an Audio File
Page 40
How to Operate each Mode
40
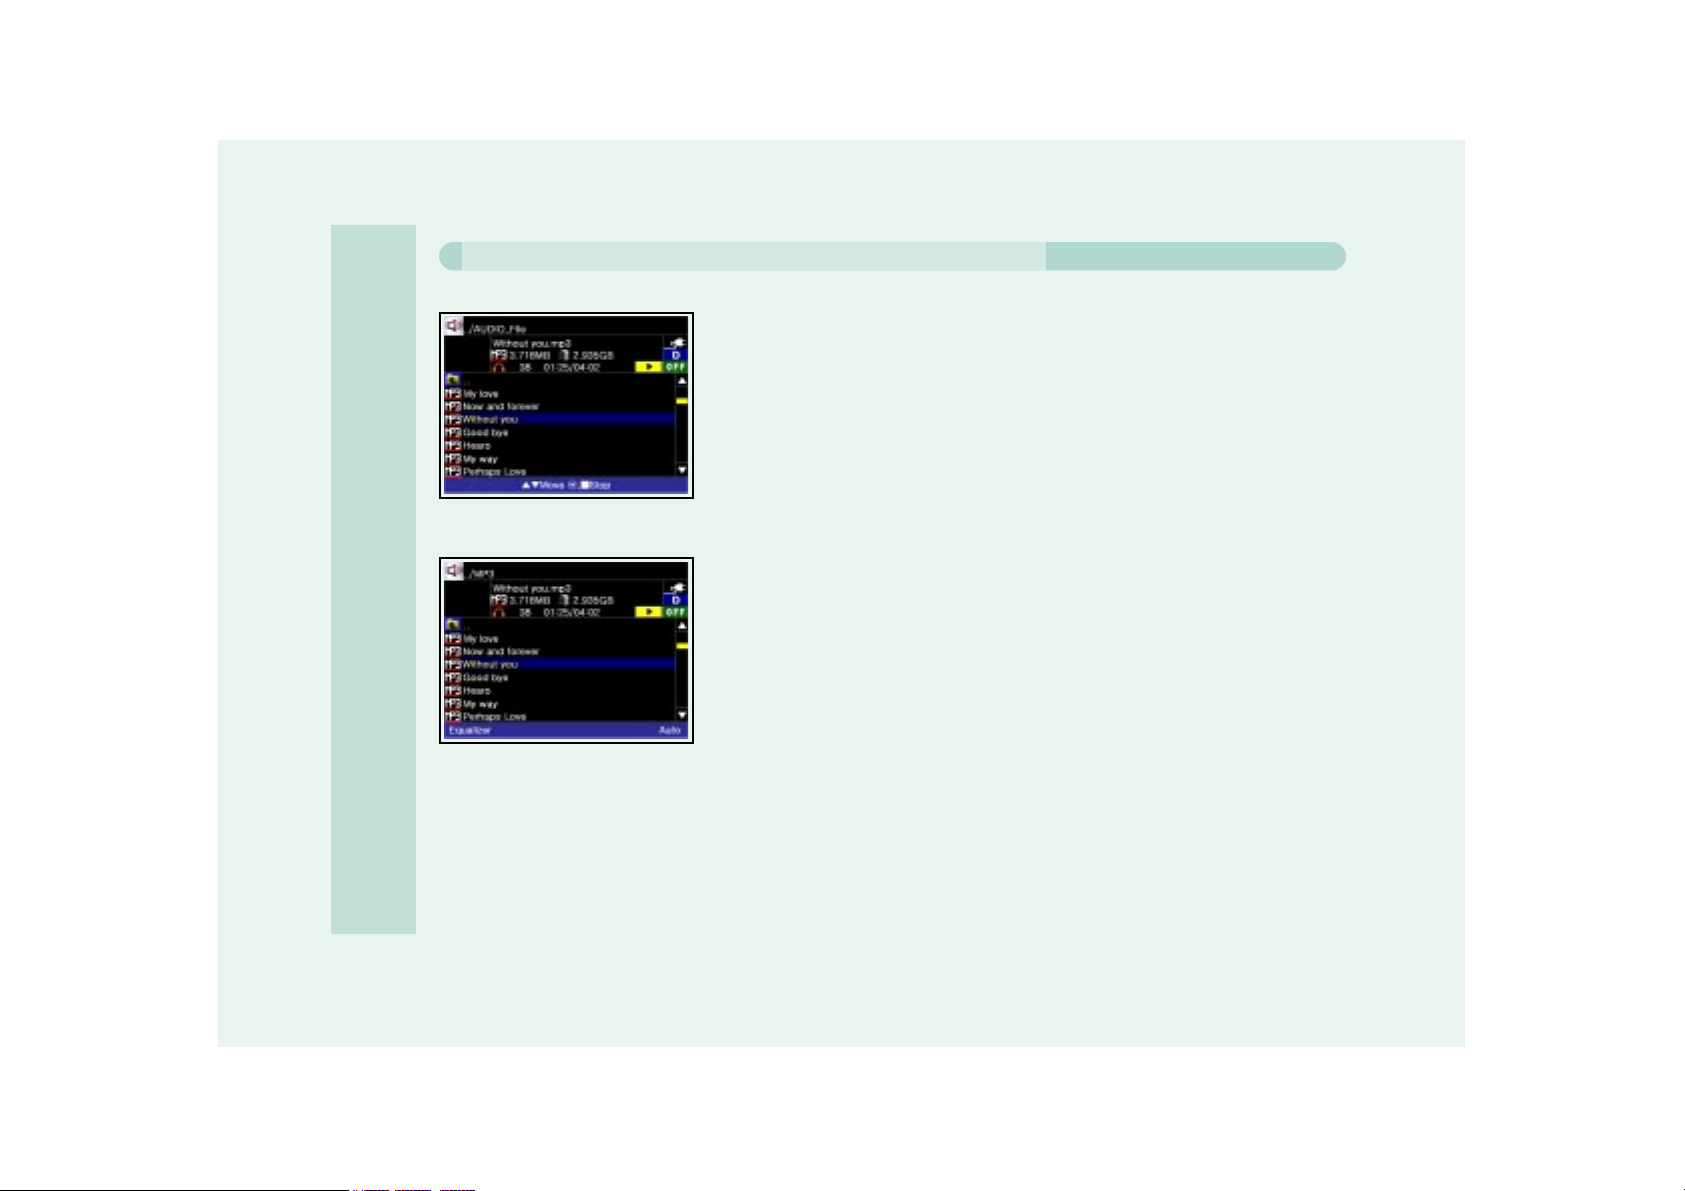
1. This Portable Media Players features an automatic/selectable equalizer that allows
you to set the EQ according to the Genre of the music file. In the Automatic mode
the EQ is automatically set by the Genre information contained in the ID3
information of the music file. Example: If the Genre of a music file is "Rock" the
Player will automatically select the "Rock" EQ.
Does the Portable Media Player have an Audio Equalizer?
2. While a music file is playing you can also select the EQ manually. As the file is
playing push the REC button and the EQ selection will be displayed. Pushing the
REC button repeatedly will cycle through the following EQ List: Off–Auto-Rock-RapGrunge-Metal-Dance–Techno–Country-Jazz-Acoustic-Folk-NewAge-Classic-BluesReggae-Opera-Swing-Voice–Ultra Bass
3. The EQ cannot be accessed while in the ID3 View Mode
4. You can also select the EQ while in the Playlist Mode by pushing the REC button as described previously.
Page 41
41
How to Operate each Mode
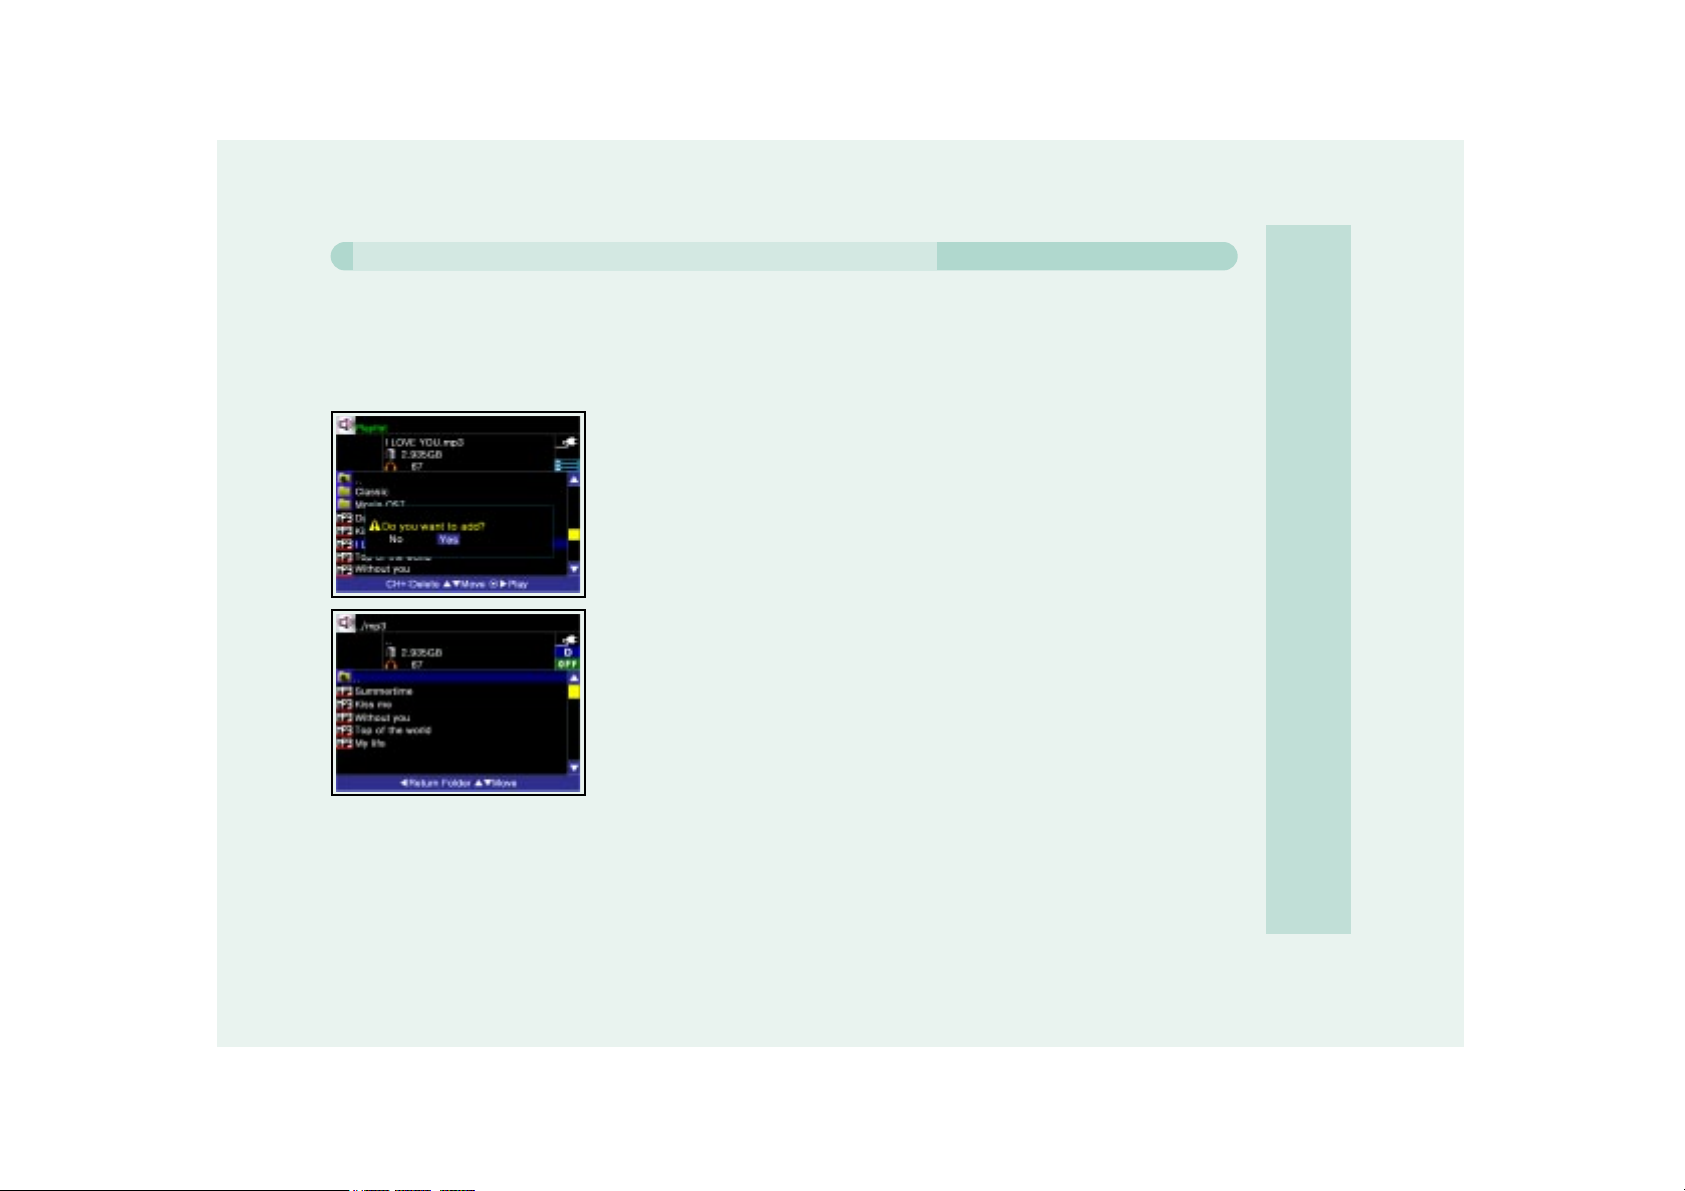
1. The AVIAh allows you to create playlists in two different ways. A playlist can be created internally on the unit, or by using
Windows Media Player.
2. Playlists can be created using mixed file formats. You can create a playlist that incorporates Video, Audio as well as Picture
files. A maximum of 500 files can be added to the playlist.
3. What is the procedure for creating a playlist internally on the player?
a. Highlight an Audio, Video or Picture file and push the CHANNEL- button.
b. A " Do you want to add?" message will appear. Select "Yes" with the joystick and
the file will be added to the playlist.
c. Once the files are added the player will enter the playlist mode and display all the
files contained in the playlist
d. To exit the playlist push the joystick to the left
e. To add another file to the playlist, repeat the above procedure.
5. How do I access the playlist?
a. Highlight any folder (Except for the return folder) and push the CHANNEL- button. The playlist will be displayed.
4. Can I add more than one file at a time?
a. Yes, it is possible to add more than one file at a time. Please follow the procedure
outlined below.
1. Access the folder containing the files you would like to add.
2. Highlight the folder (Folder with the return arrow pictured on it) located at the top
of the file list and push the CHANNEL – button.
i. A " Do you want to add?" message will appear. Select "Yes" with the joystick
and the files in the folder will be added to the playlist.
ii. Once the files are added the player will enter the playlist mode and display
all the files contained in the playlist
iii. To exit the playlist push the joystick to the left
iv. To add another set of files to the playlist repeat the above procedure.
Can I create Playlists?
Page 42
How to Operate each Mode
42
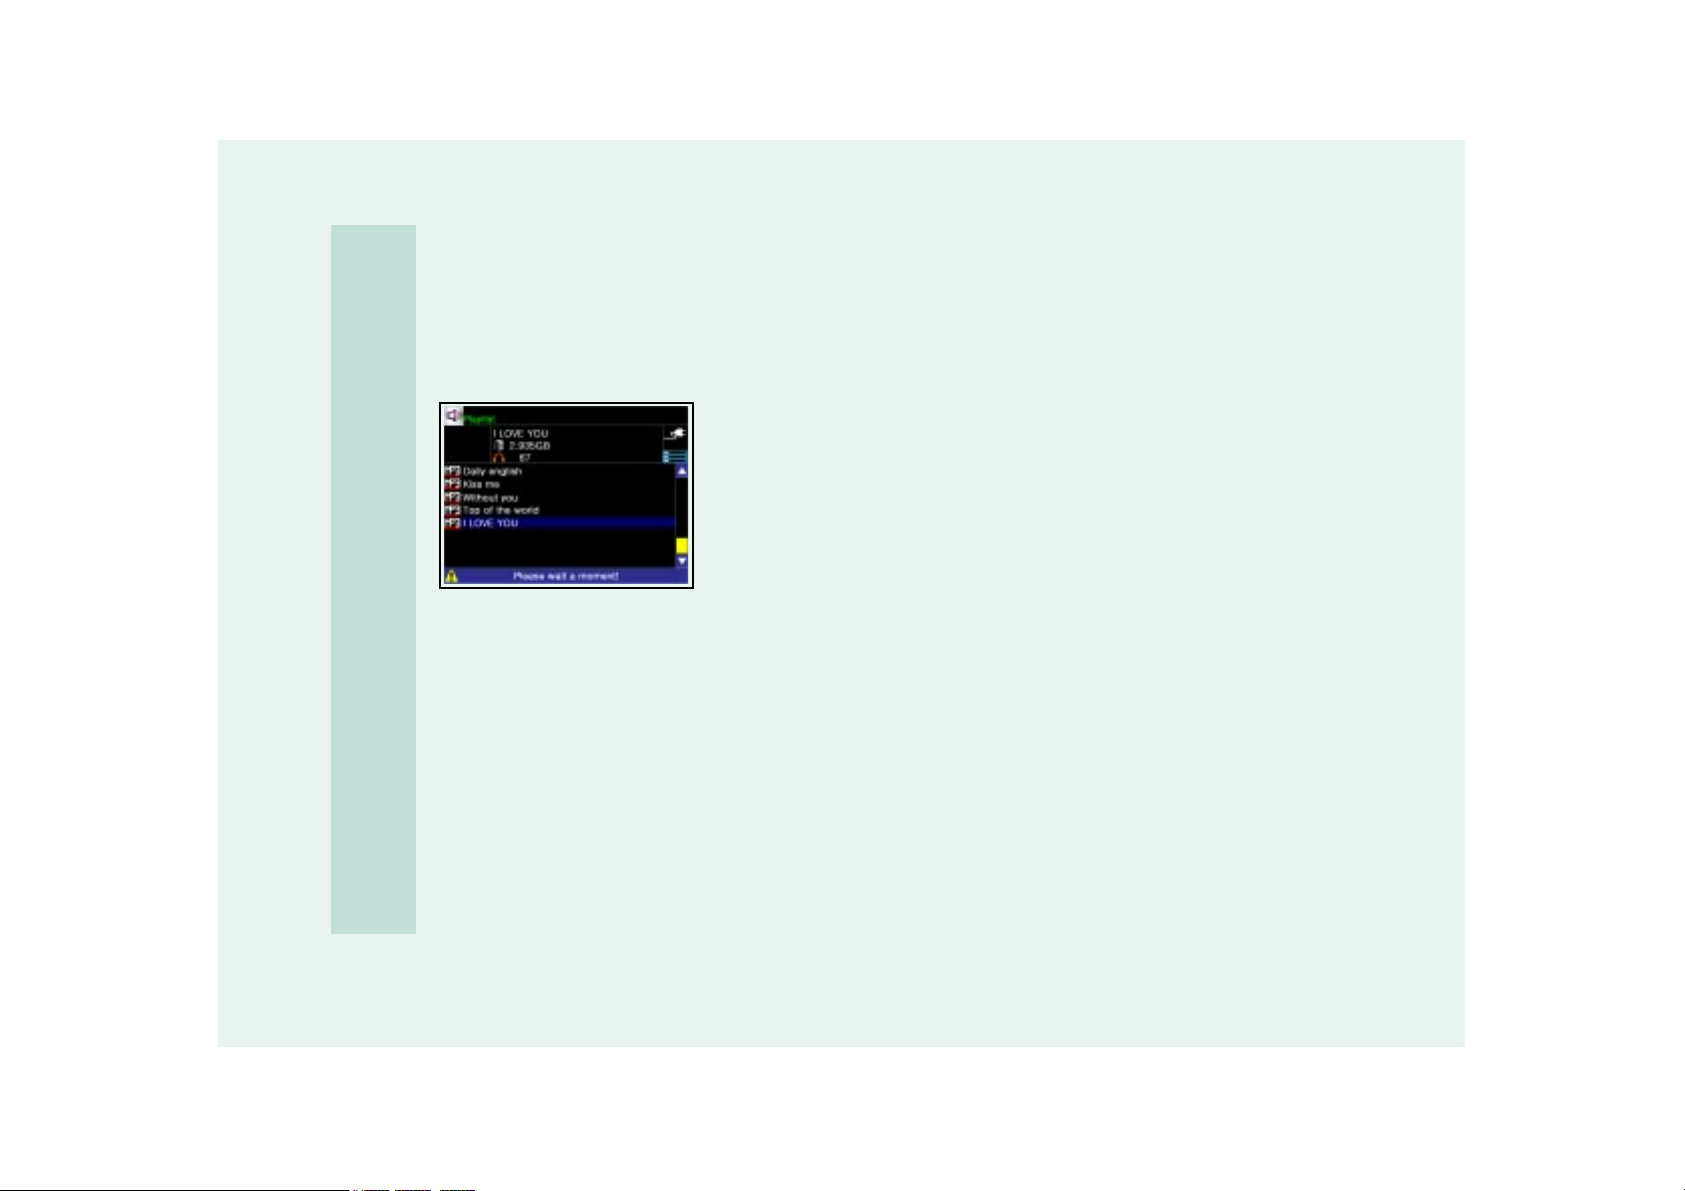
6. How do I delete files from the playlist?
a. Enter the Playlist Mode as described above
b. Highlight the file that you would like to delete from the playlist and push the CHANNEL + button.
c. A " Do you want to delete?" message will be displayed. Selecting "Yes" will remove the selected file from the playlist.
d. Removing a file from the playlist does not delete it from the Hard Drive.
8. How do I delete a playlist?
a. From the main menu screen select the * (ETC File View Menu)
b. You will see the PLAYLIST.WPL file in the root menu
c. Highlight the PLAYLIST.WPL file and push the CHANNEL+ button
d. A " Do you want to delete?" message will appear. Select "YES" to delete the playlist file.
9. How do I play the files in my Playlist?
a. Enter the Playlist mode by highlighting a folder and pushing the CHANNEL – button
b. Highlight a file from the playlist and push the Joystick to the right. The file will begin to play.
1) While playing a file if you push the DISPLAY button the next file in the list will begin to play.
Push the Display button again to get to the next file and so on.
2) If you move the Joystick to the left the selected file will stop playing.
10. How do I get out of the Playlist mode?
1) While in the Playlist push the joystick to the left.
7. How do I save the Playlist?
a. After you add the first file to the playlist a PLAYLIST.WPL file is automatically
created in the root directory of the Hard Drive.
b. Any subsequent file additions will be automatically added to the PLAYLIST.WPL
file.
Page 43
How to Operate each Mode
43
11. Can I make a Playlist by using Windows Media Player?
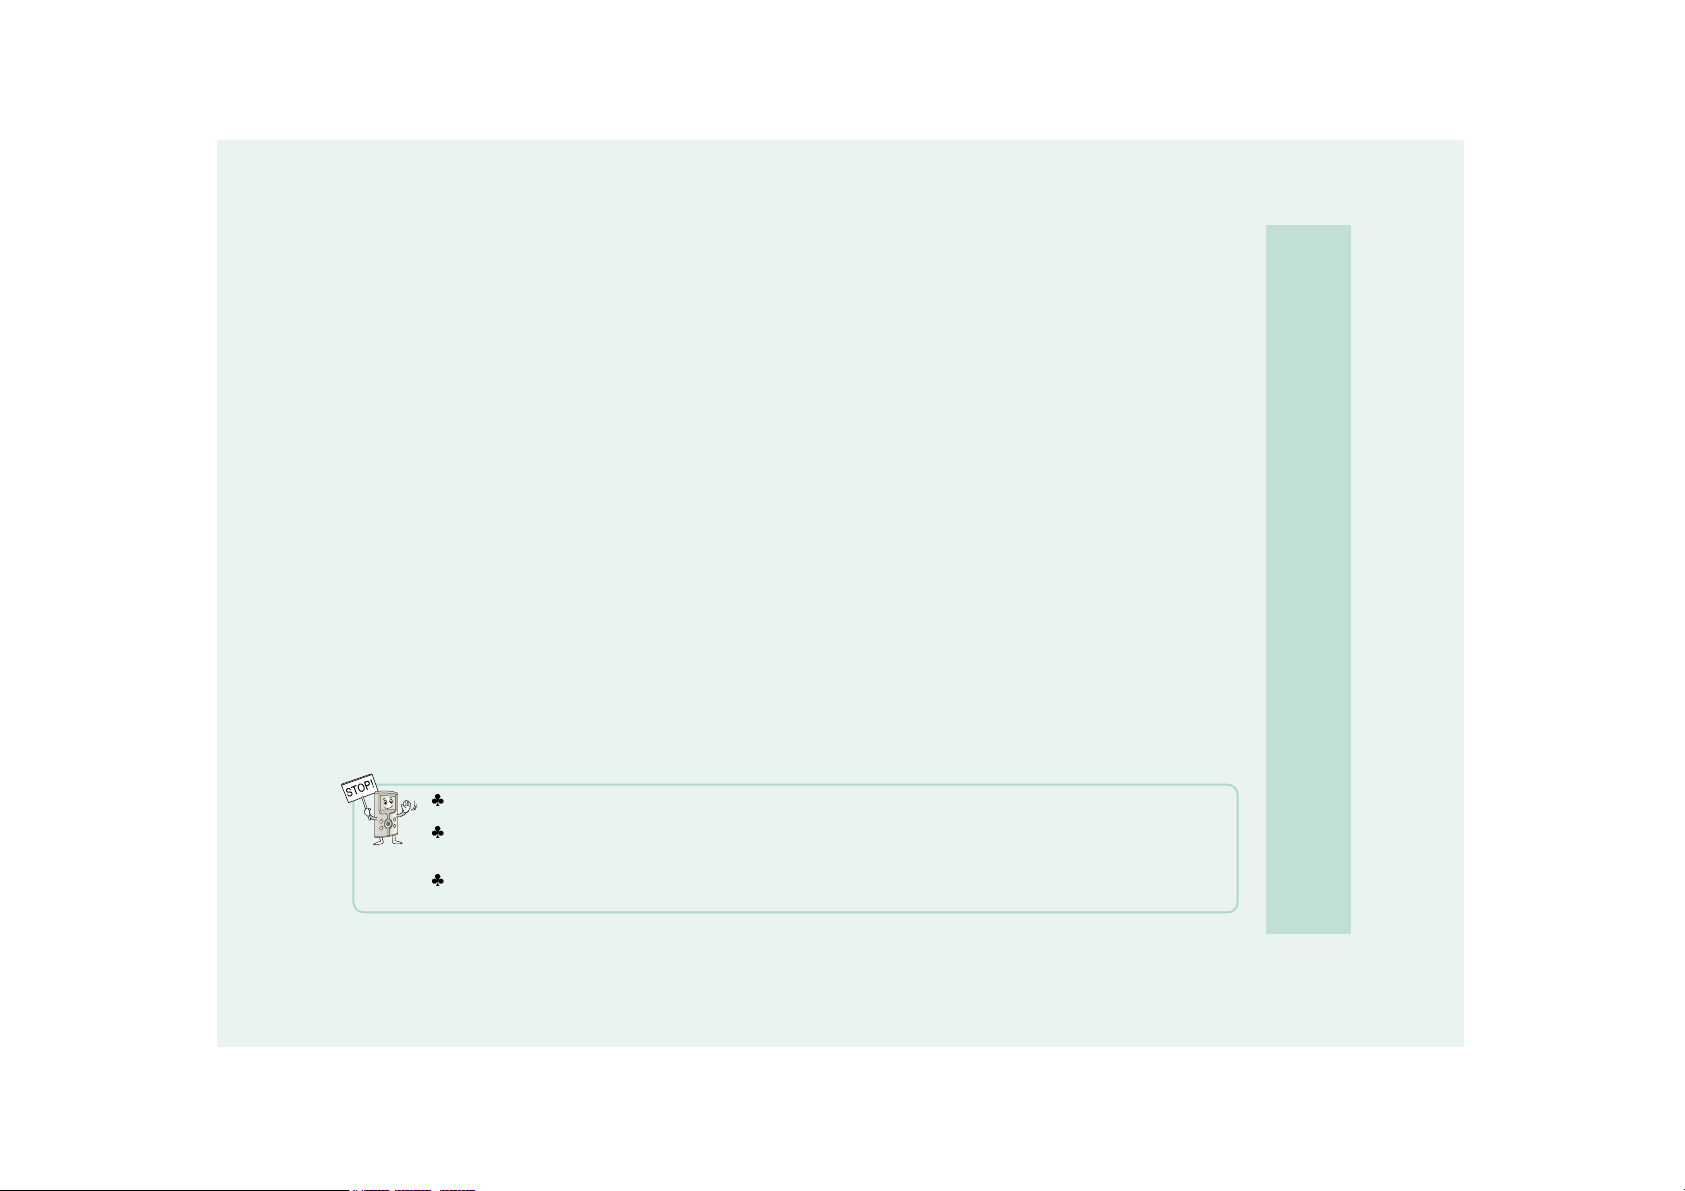
a. You can use Windows Media Player to view and play the playlist that you created on the Portable Media Player. Also,
you can create a playlist in Windows Media Player and save it to the portable media player.
b. Connect the Portable Media Player to your PC via USB
c. From Windows Media Player go to File>Open and select the PLAYLIST.WPL file from the root directory of the Portable
Media Player. The playlist that you created in the Portable Media Player will be displayed. Now you can activate the
playlist from Windows Media Player. The files will be played in sequence according to the playlist.
d. You can also create a playlist in Windows Media Player and save it to the Portable Media Player.
1) Create your playlist in Windows Media Player
2) Select Playlist> Save as and save the file into the root directory of the portable Media Player. Name the file
PLAYLIST.WPL
3) The .WPL file is saved as a windows text file which the Portable Media player is not able to read at this time. You
will need to open the file in Windows Notepad and re-save it as a UNICODE file. Once this is done the Portable media
player will be able to read the playlist.
4) If you created a playlist that contains a reference to files not contained on the Portable Media Player Hard Drive a
playlist error will occur. Add the referenced files to the Hard Drive of the Portable Media Player.
While in the * ETC file view Mode if you erase the PLAYLIST.WPL file from the root directory the playlist will be deleted.
In Playlist mode, only playback of the added files is available. Playback of files from the Playlist Mode does not support
RW/FF, Section repeat, ID3 view, and song text view.
You can add up to 500 files to the playlist. If you add more than 500 files the player will only read up to the 500th file and
then go back to the first item in the list. It will ignore all files after the 500th file.
Page 44
How to Operate each Mode
44
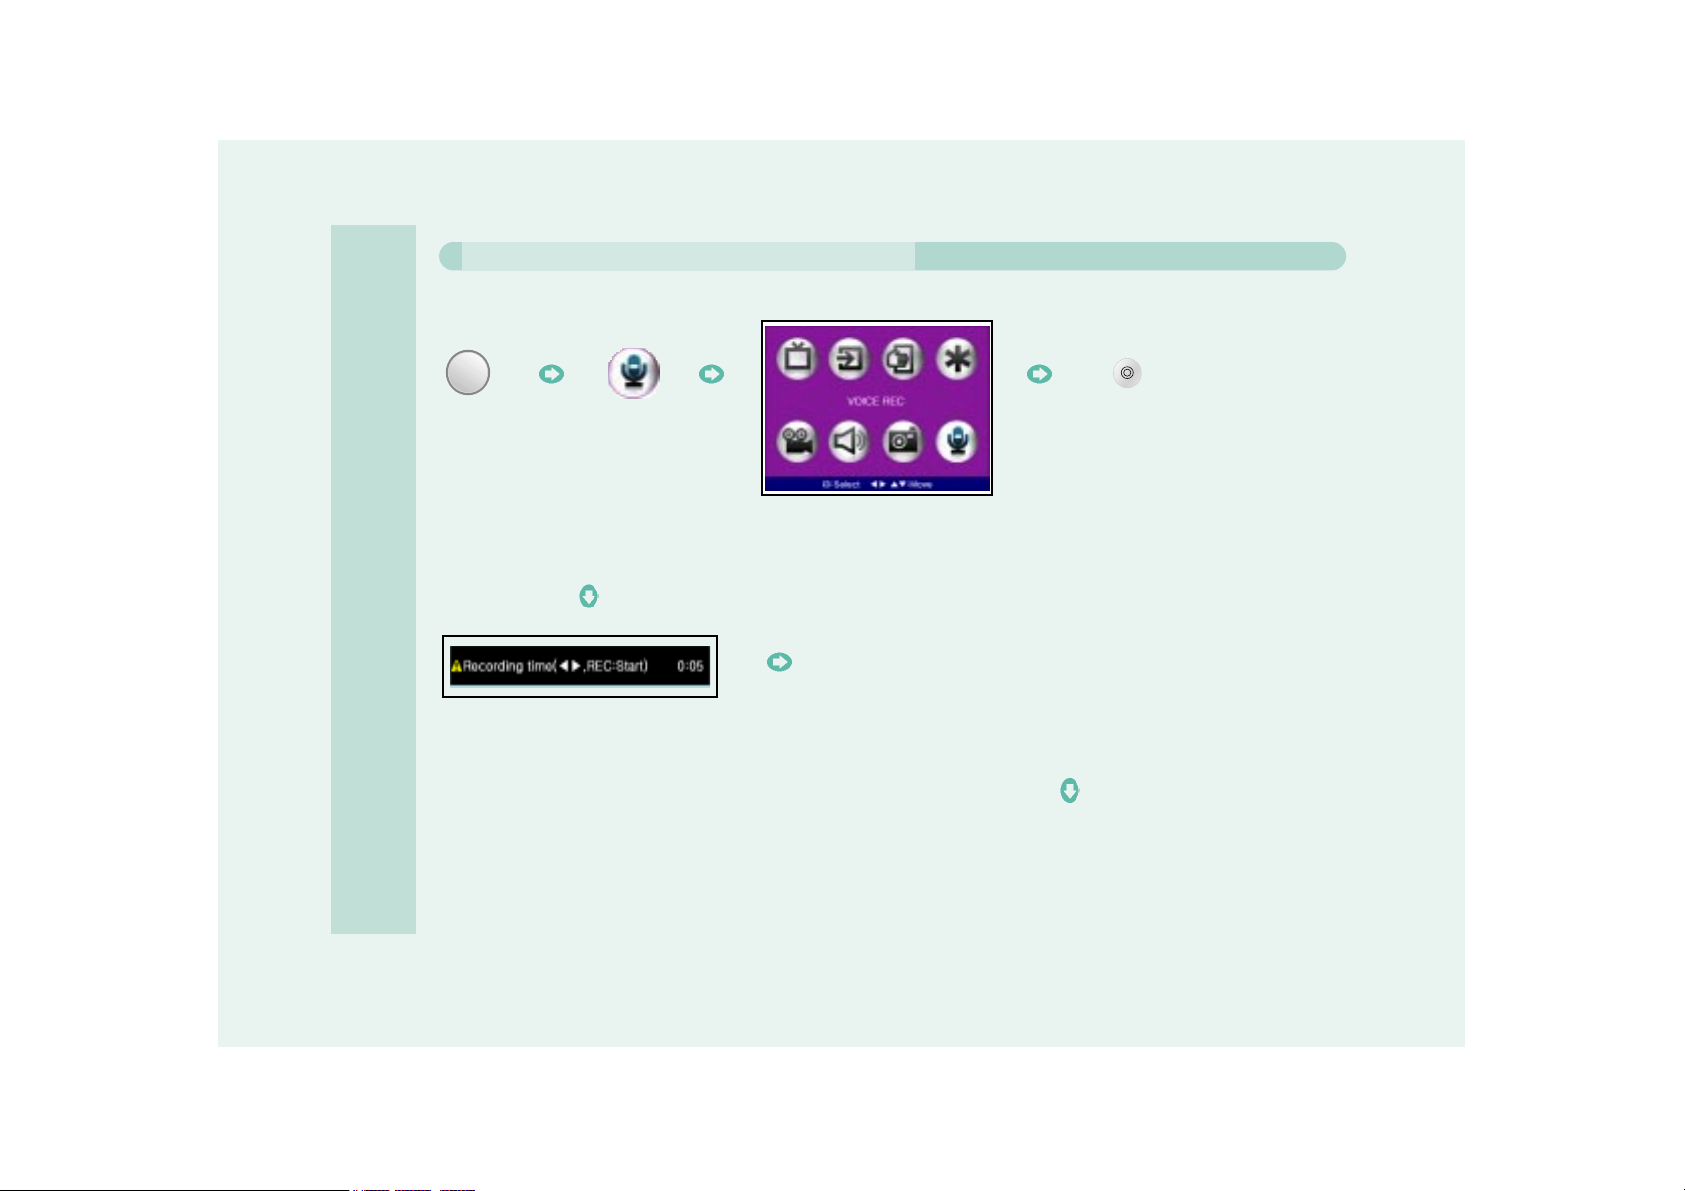
MODE
The AVIAh can be used as a voice recorder.
After pushing the REC button a "Recording Time" message will appear. Use the
Joystick to set the length of your recording. The recording length can be set in 5
minute increments; from a minimum of 5 minutes to a maximum of 24 hours.
Once the Portable Media Player reaches the end of the allotted recording time it
will automatically stop recording.
-In the "Recording Time" window if you select - - : - - , the Portable Media Player
will continue to record without any time limit.
While in the Voice Record Mode pressing the REC button will start the voice recording process,
automatically create a file and will automatically save the file in the RecordFolder/Audio.
When Recording Voice
Continues in the next page.
Page 45
How to Operate each Mode
45
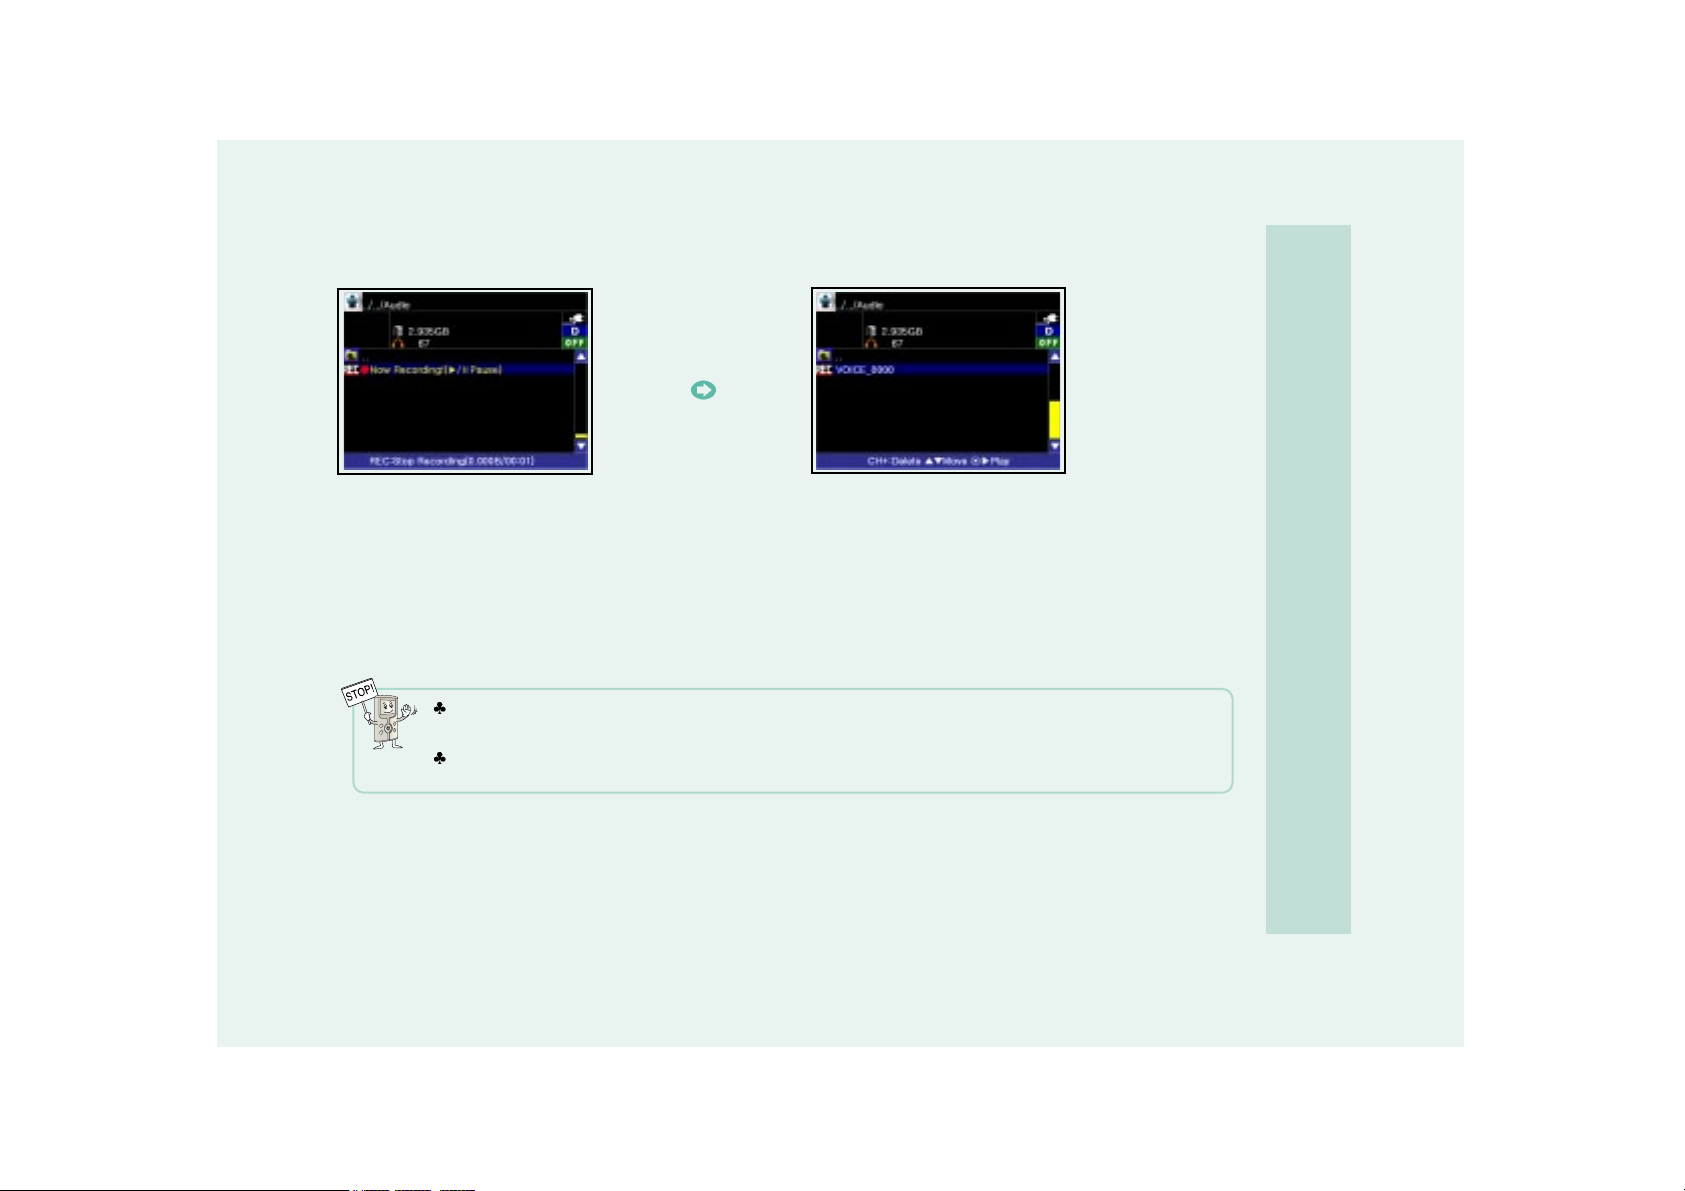
The filename will be saved as VOICE_0000.REC. If a second etc. recording is made by pressing the REC Button, the file
number increases by one. E.g. VOICE_0001.REC, VOICE_0002.REC, ...and so on.
In the case of the REC in RADIO mode, the filename to be saved will be RADIO_0000.REC, RADIO_0001.REC,…and so
on.
After pushing the REC button a "Please wait a moment"
message will appear as the Portable Media Recorder
prepares to record. A " Now Recording" message will
appear once the recording process begins.
To stop recording push the REC button again.
-While recording if you push the Joystick up you can PAUSE
the recording process. Pushing the Joystick up again will
resume recording.
Page 46
46
MODE
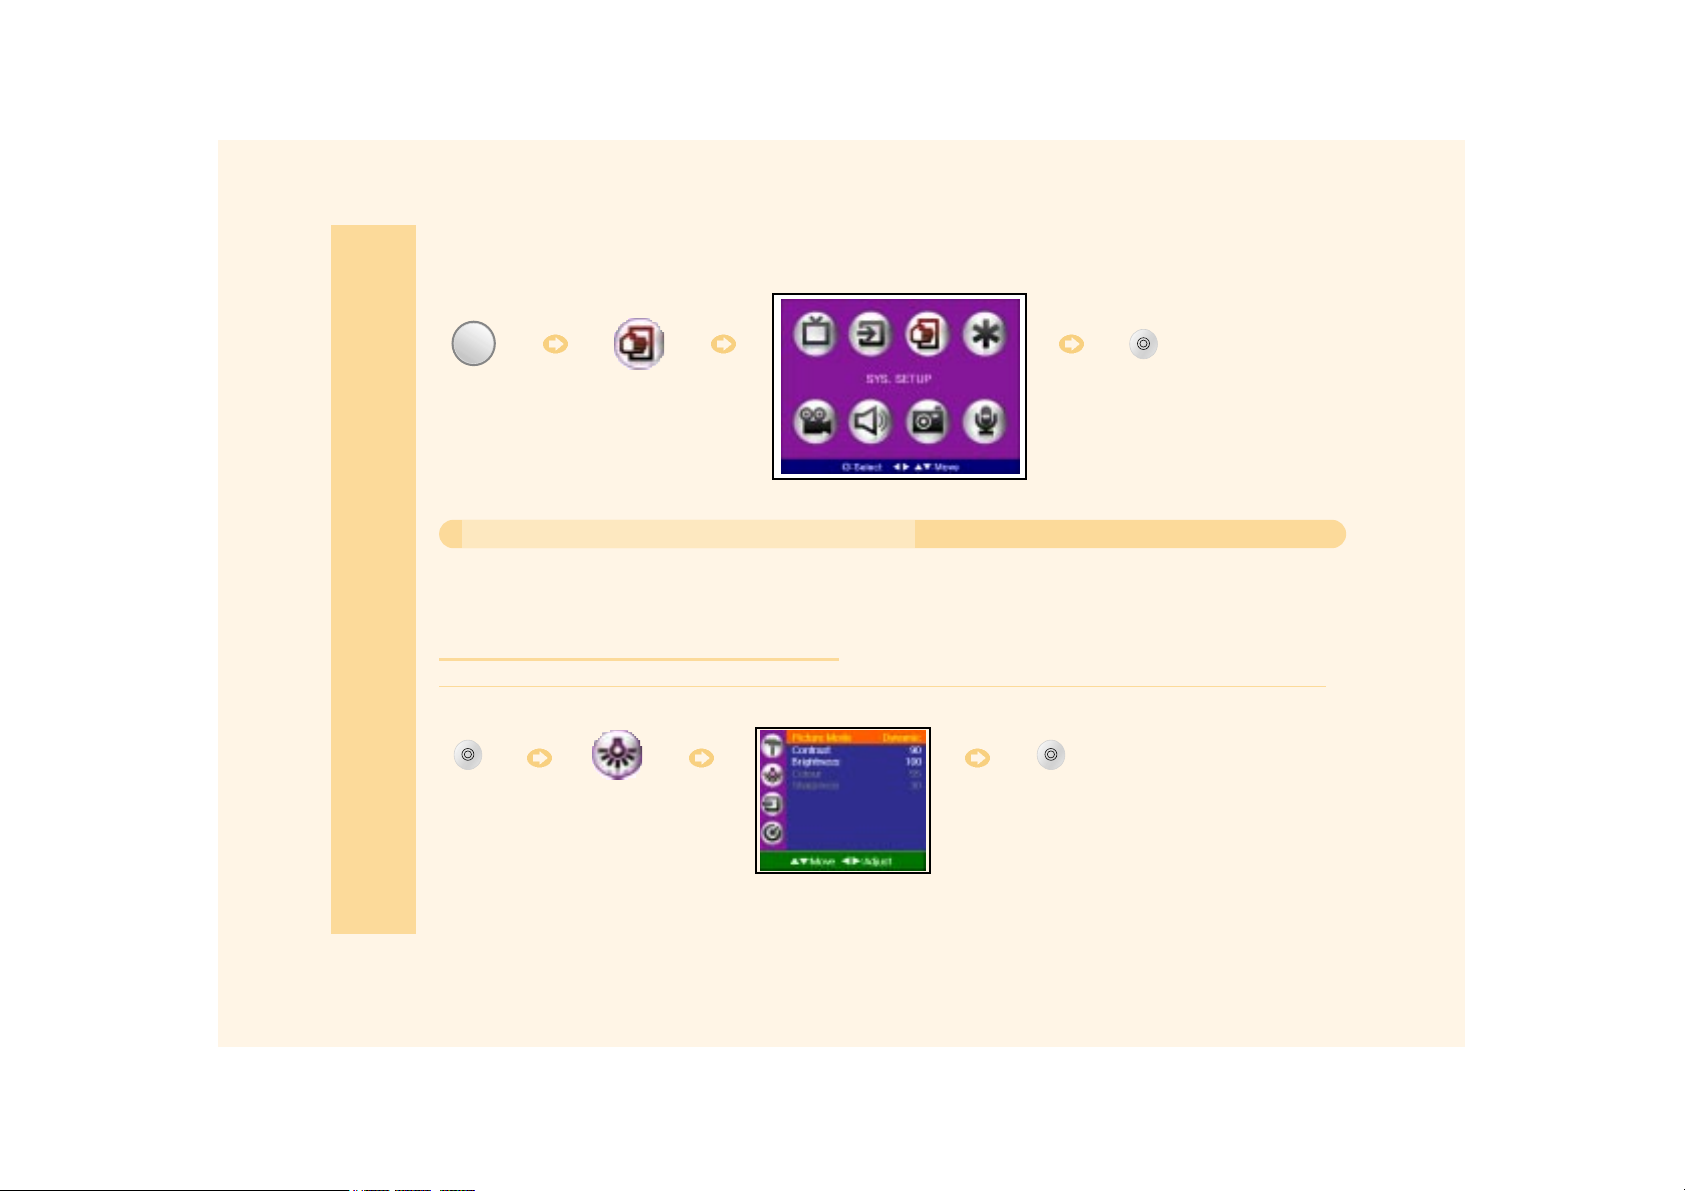
You can customize the AVIAh environment and functionality.
After selecting the Picture Adjustment Icon, you can adjust the Picture Mode, Contrast, Brightness, Color, Sharpness and
Tint (NTSC AV only) to the levels you prefer.
Repeated pressing of the Button will exit
you from the System Set Up Menu.
Press the
Button.
Select the
Icon.
Adjust your settings after selecting a desired mode.
(Color and Sharpness levels cannot be changed)
Picture Adjustment
- While Playing Contents File in Radio Mode
How to perform System Set Up
Page 47
47
How to perform System Set Up
Repeated pressing of the Button will exit
you from the System Set Up Menu.
Press the
Button.
Select the
Icon.
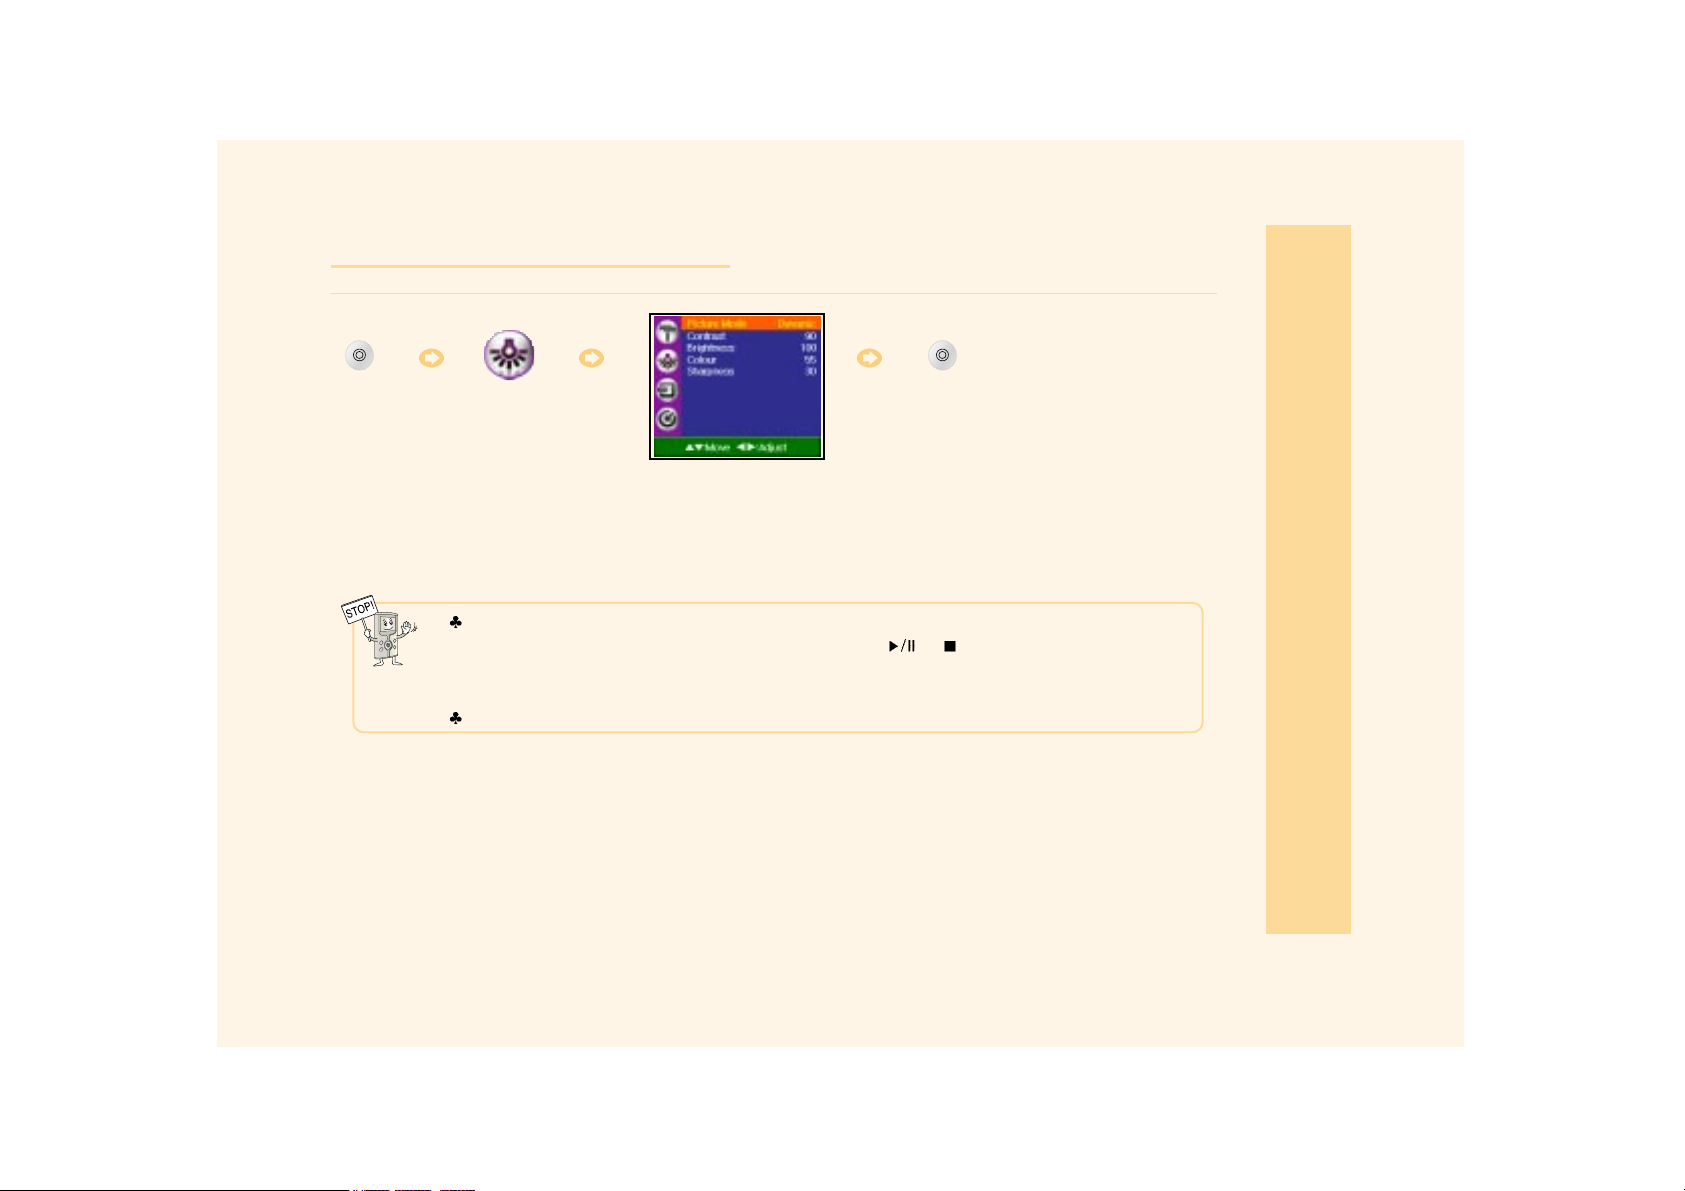
Adjust settings after selecting a desired mode.
(When Input Color System is NTSC only Tint appears
on the Picture Adjustment menu.)
- While Watching TV/AV
When adjusting images, the quick Image Adjusting Menu will be displayed, so you can view the changes being made
to the current image. At this time, if you move the jog button to
or direction, other image items can be
selected. When the OK Button is pressed, you will go back to the Image Adjusting Mode.
While in Picture Mode, you can select one of four choices : Dynamic, Standard, Mild, User.
Page 48
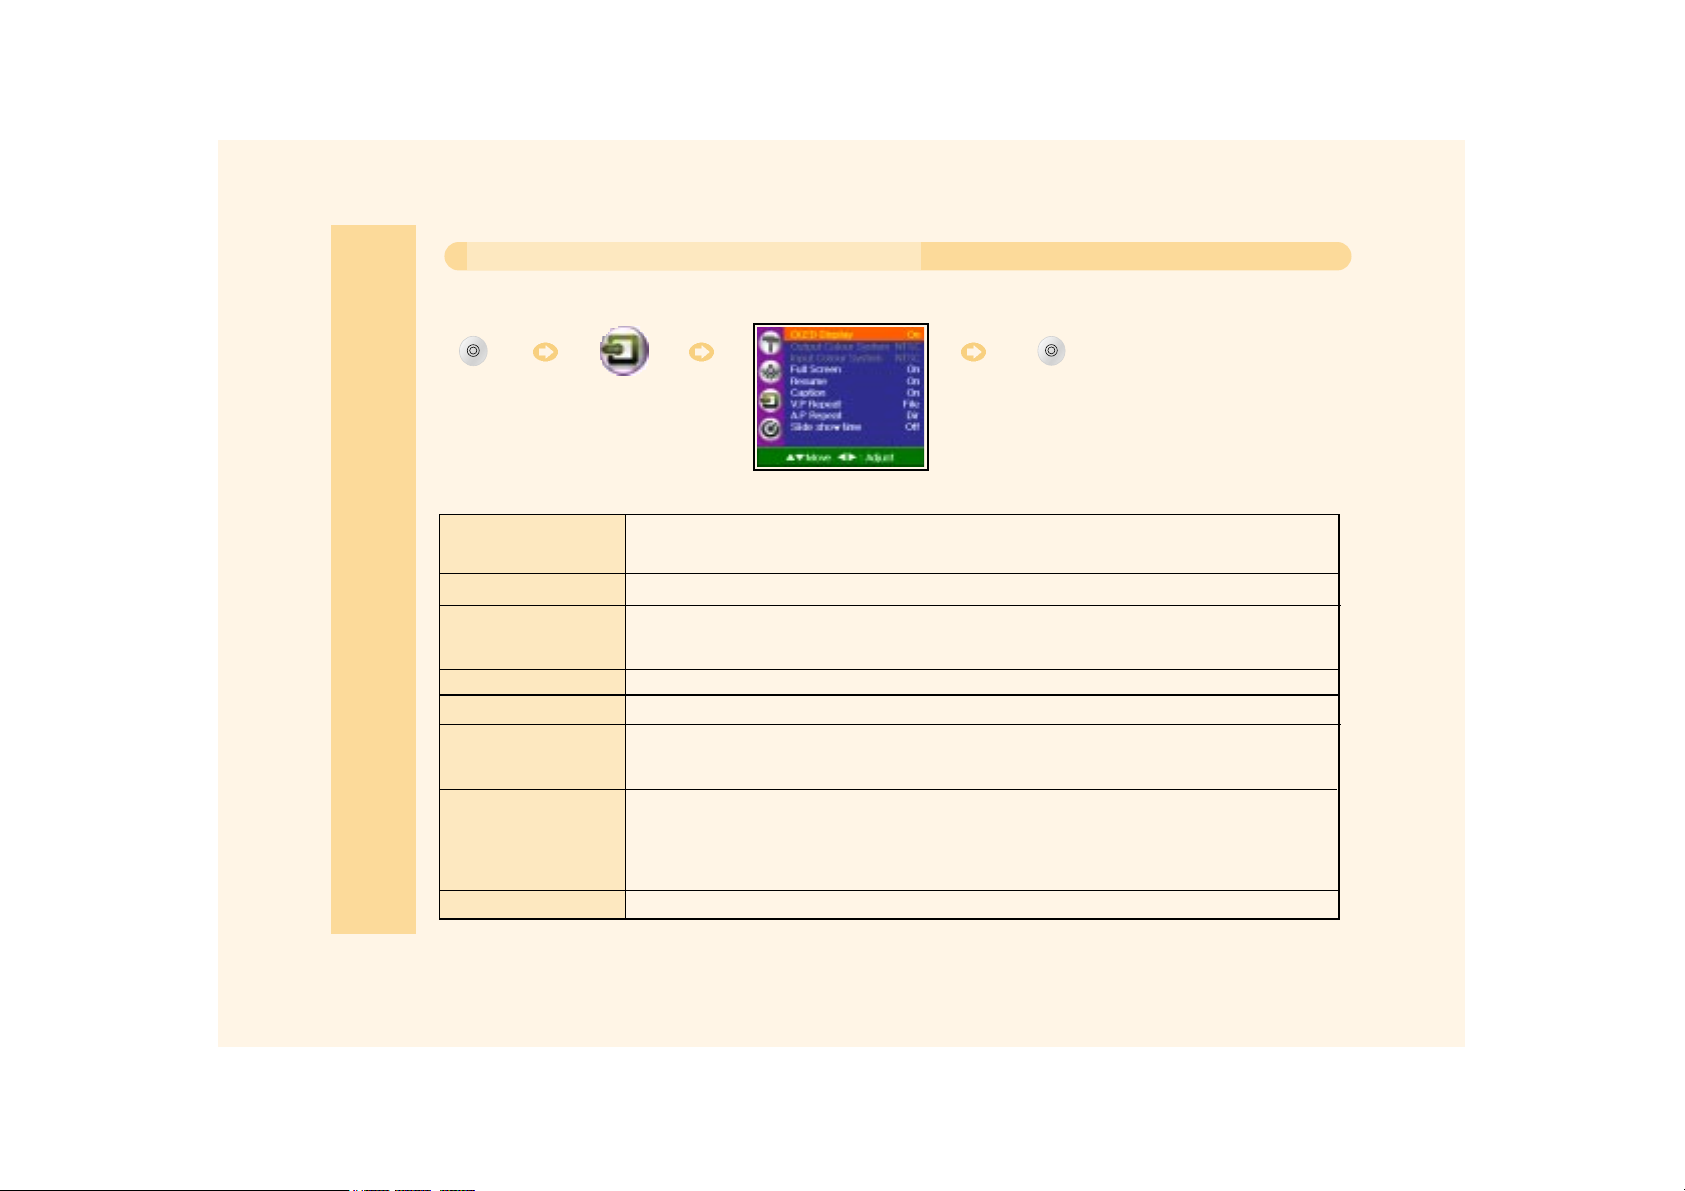
This function is for turning the OLED Display ON/OFF. After selecting OFF, if the external device
(TV, Monitor) is connected to the AV OUT, you can enjoy your image and sound on a bigger
display.
This function is for changing the Output Color System (NTSC,PAL,SECAM)
This function is for changing the Input Color System (NTSC,PAL,SECAM) in AV mode (When the
Color System is PAL/SECAM, only the Input Color System item appears on the system set-up
menu.)
This function allows for full screen display.
This function will make the unit remember the position where the video/audio was stopped.
This function activates/deactivates subtitling on moving picture files. The subtitle file should
be in the same folder together with the moving picture file.
("same file name.smi" or "file name.sami")
This mode allows Repeat Menu Setting of video/audio content.
Off : Returns to the Menu after playing the current file.
File : Repeats playing the current file.
Dir : Plays all files in the folder in sequence.
Rand : Plays files in random order
Sets the display time of image file (*.jpg)
OLED Display
Output Color System
Input Color System
Full Screen
Resume
Caption
V.P/A.P
Repeat
Slide show time
48
Exit out of the System Menu by
repeatedly pressing the button.
Adjust settings after selecting a desired mode.
Press the
Button.
Select the
Icon.
System Setup
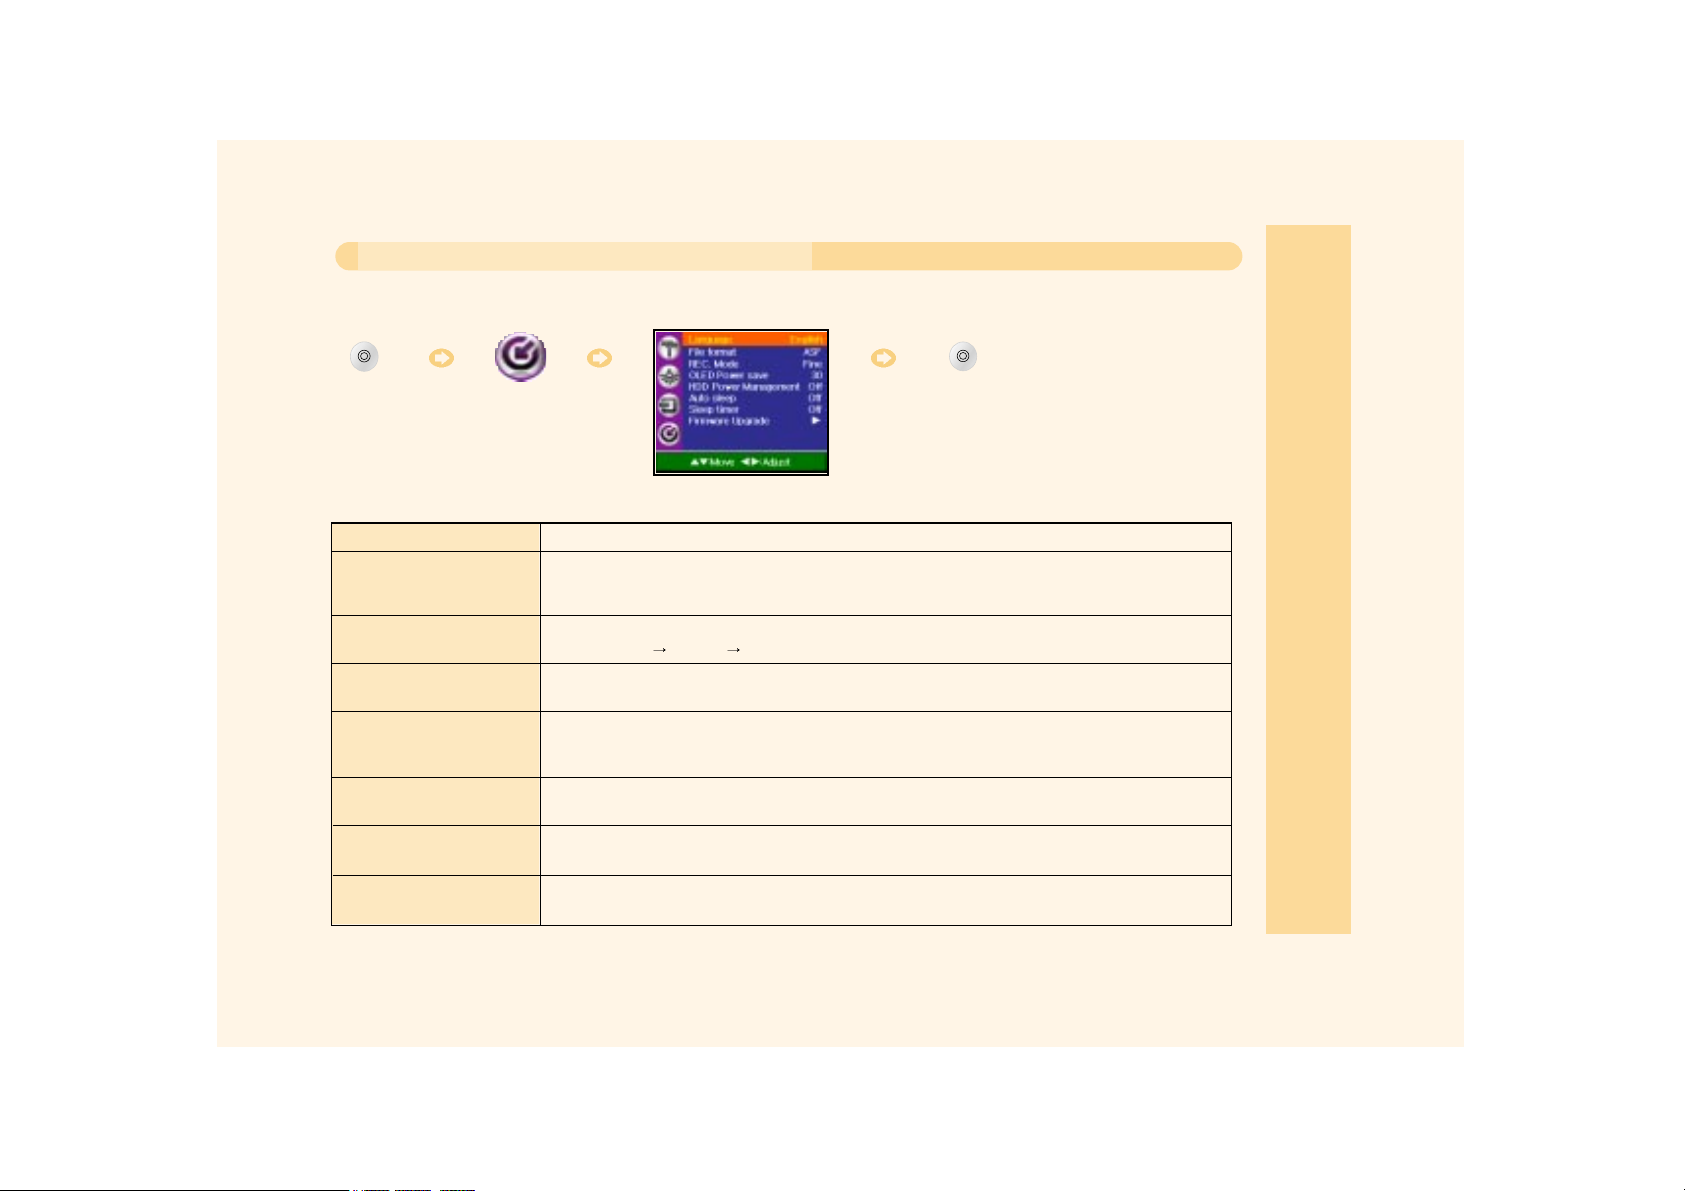
After selecting the System Set Up Icon, you can set-up a specific feature.
How to perform System Set Up
Page 49
49
How to perform System Set Up
Sets the language displayed on the screen.
Formats the file to be recorded.
- ASF : mode for recording moving picture.
- JPG : mode for recording still picture.
Selects the Quality of the moving picture recording.
Economic Normal Fine
When no button is pressed within a specified time, the OLED screen will turn off.
- 10, 20, 30, 40, 50, 60 seconds.
You can select ON/OFF
When selecting "ON", the power consumption for HDD is economized. The system response
will be slower then if the HDD power management is set to OFF.
In the TV/Video mode, when 3 minutes elapses without signal reception, the power will turn off
automatically.
Automatically turns power off after a fixed time.
Time range can be set from 10 to 240 minutes (None, 10, 20, 30, 60, 90, 120, 180, 240).
Allows firmware upgrade by downloading the new version firmware from the Internet. Before
upgrading, be sure to check if the USB is connected and the battery charge is sufficient.
Language
File format
REC. Mode
OLED Power save
HDD Power Management
Auto sleep
Sleep timer
Firmware Upgrade
Repeatedly pressing the Button will exit you
from the System SetUp Menu.
Adjust settings after selecting a desired mode.
Press the
Button.
Select the
Icon.
After selecting the Set-Up Icon, you can adjust set-up values.
Setting Other Functions
Page 50
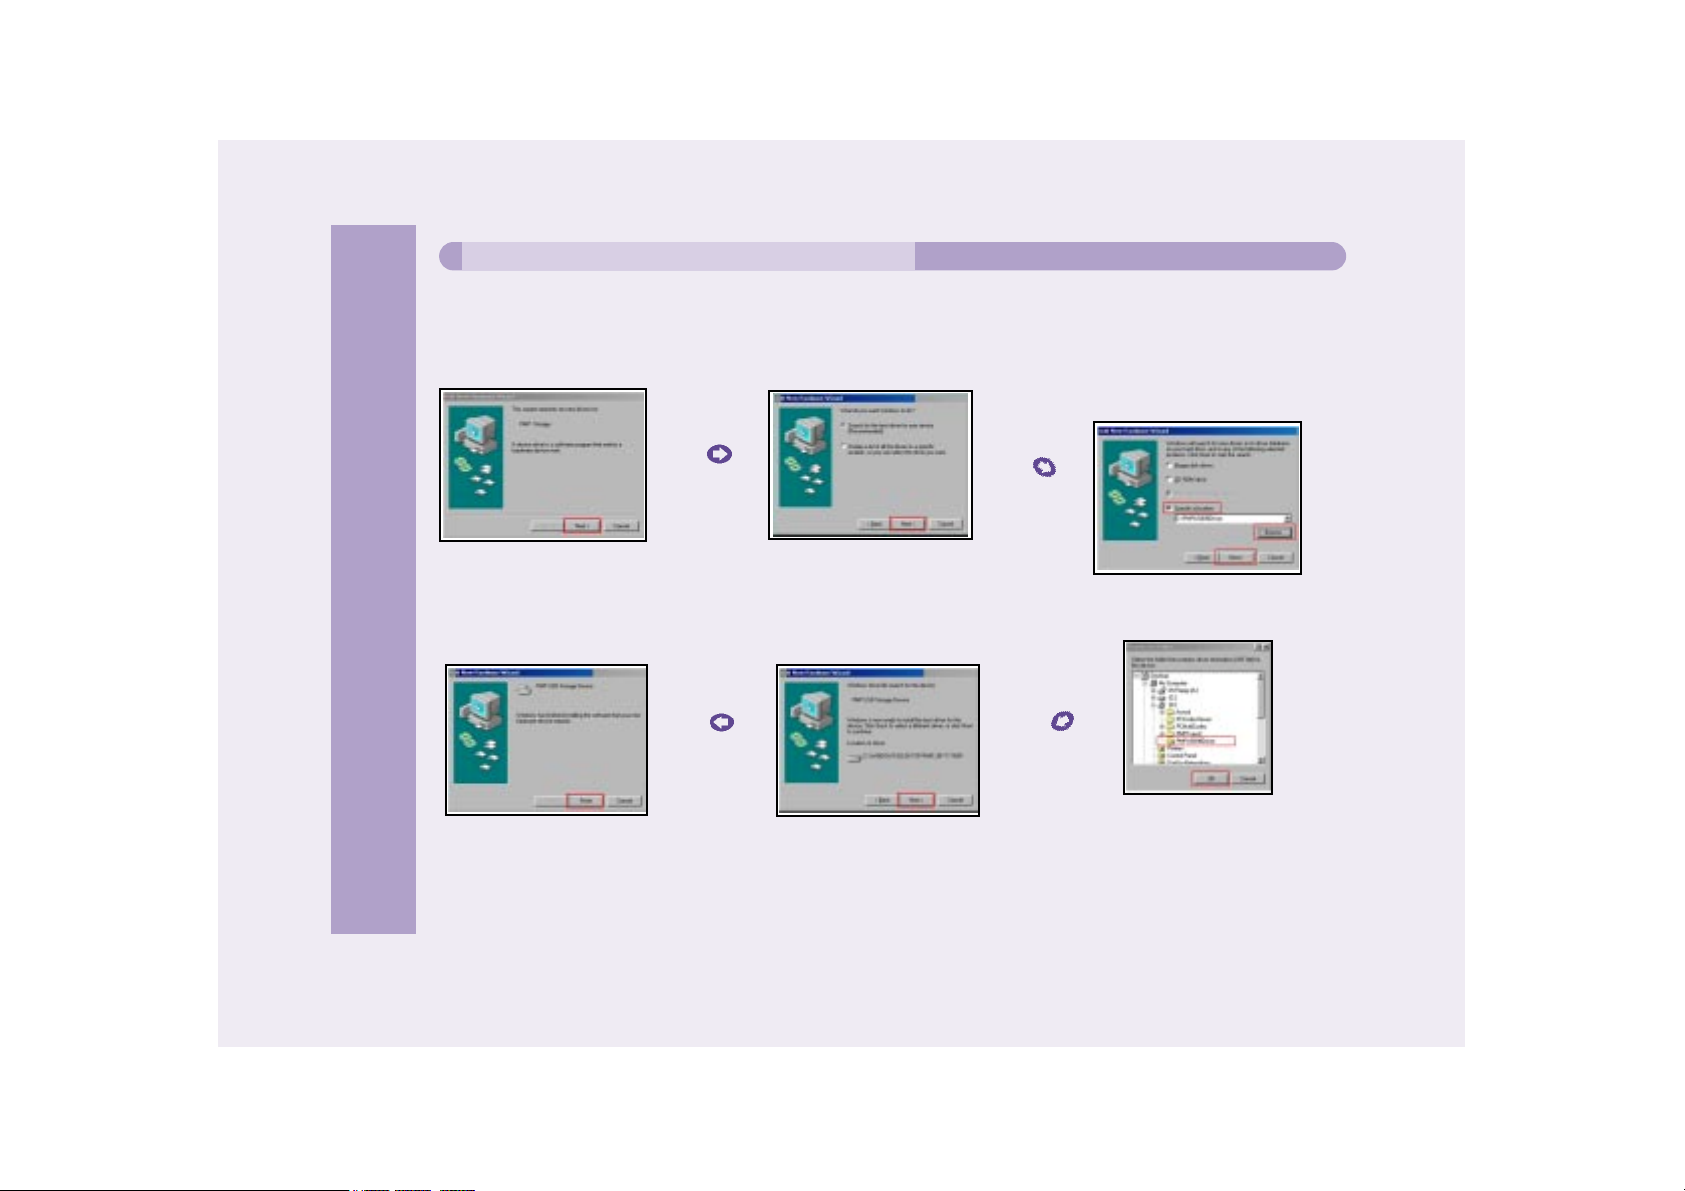
When you connect the AVIAh to a Windows 98SE computer, it recognizes the AVIAh as hardware, and asks for a driver
installation. At that point, insert the supplied installation CD into CD-ROM drive.
1. Press the Next button.
2. Press the Next button.
5. Press the FINISH Button.
4. Press the Next button.
3. Input the path or search for
a desired folder directly.
Installing Windows 98SE/ME Driver
50
Other Functions
Page 51
51
Other Functions
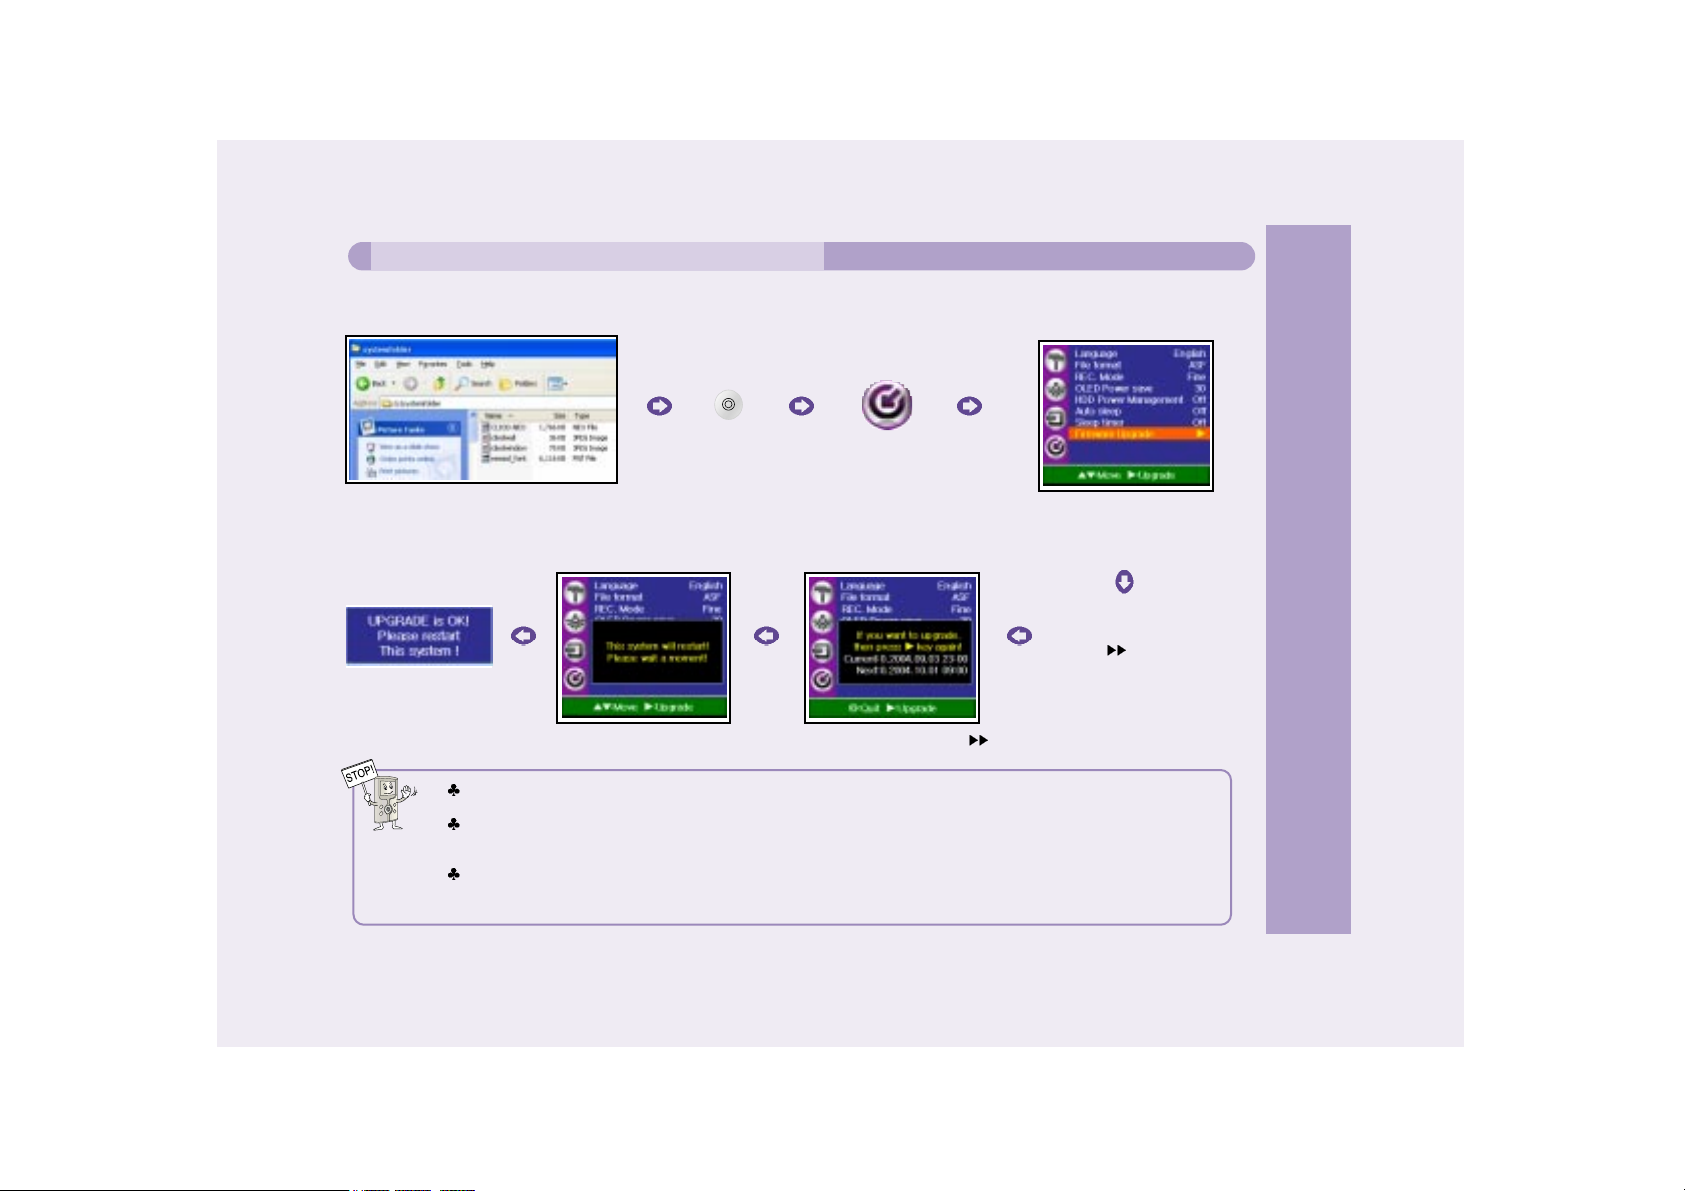
After copying the firmware file into the System Folder from " www.aviah.com " or " www.ovideon.com ", change the file
name to " system.rom ", and proceed as follows.
Connect the PC and this unit with the
USB cable, then download the firmware
file to the " System Folder ".
Select the
Firmware Upgrade Mode.
Press the jog button
to the
direction.
Press the jog button to the direction.
After rebooting the system
the firmware updating
procedure will be complete.
Press the
Button.
Select the
Icon.
Upgrading Firmware
The downloaded firmware file should be saved in the " System Folder ".
If there is no firmware upgrade file, the following screen will appear. Connect the USB and download the filename into
" System Folder ", then start upgrading.
Please do not change the name of the "SystemFolder" located on the Portable Media Player’s Hard Disk. The Portable
Media Player expects to find all system related files in this folder. Changing the name of his folder or deleting it will cause
the Player to stop working. Treat the SystemFolder with respect and your player will work great for years to come.
Page 52
52
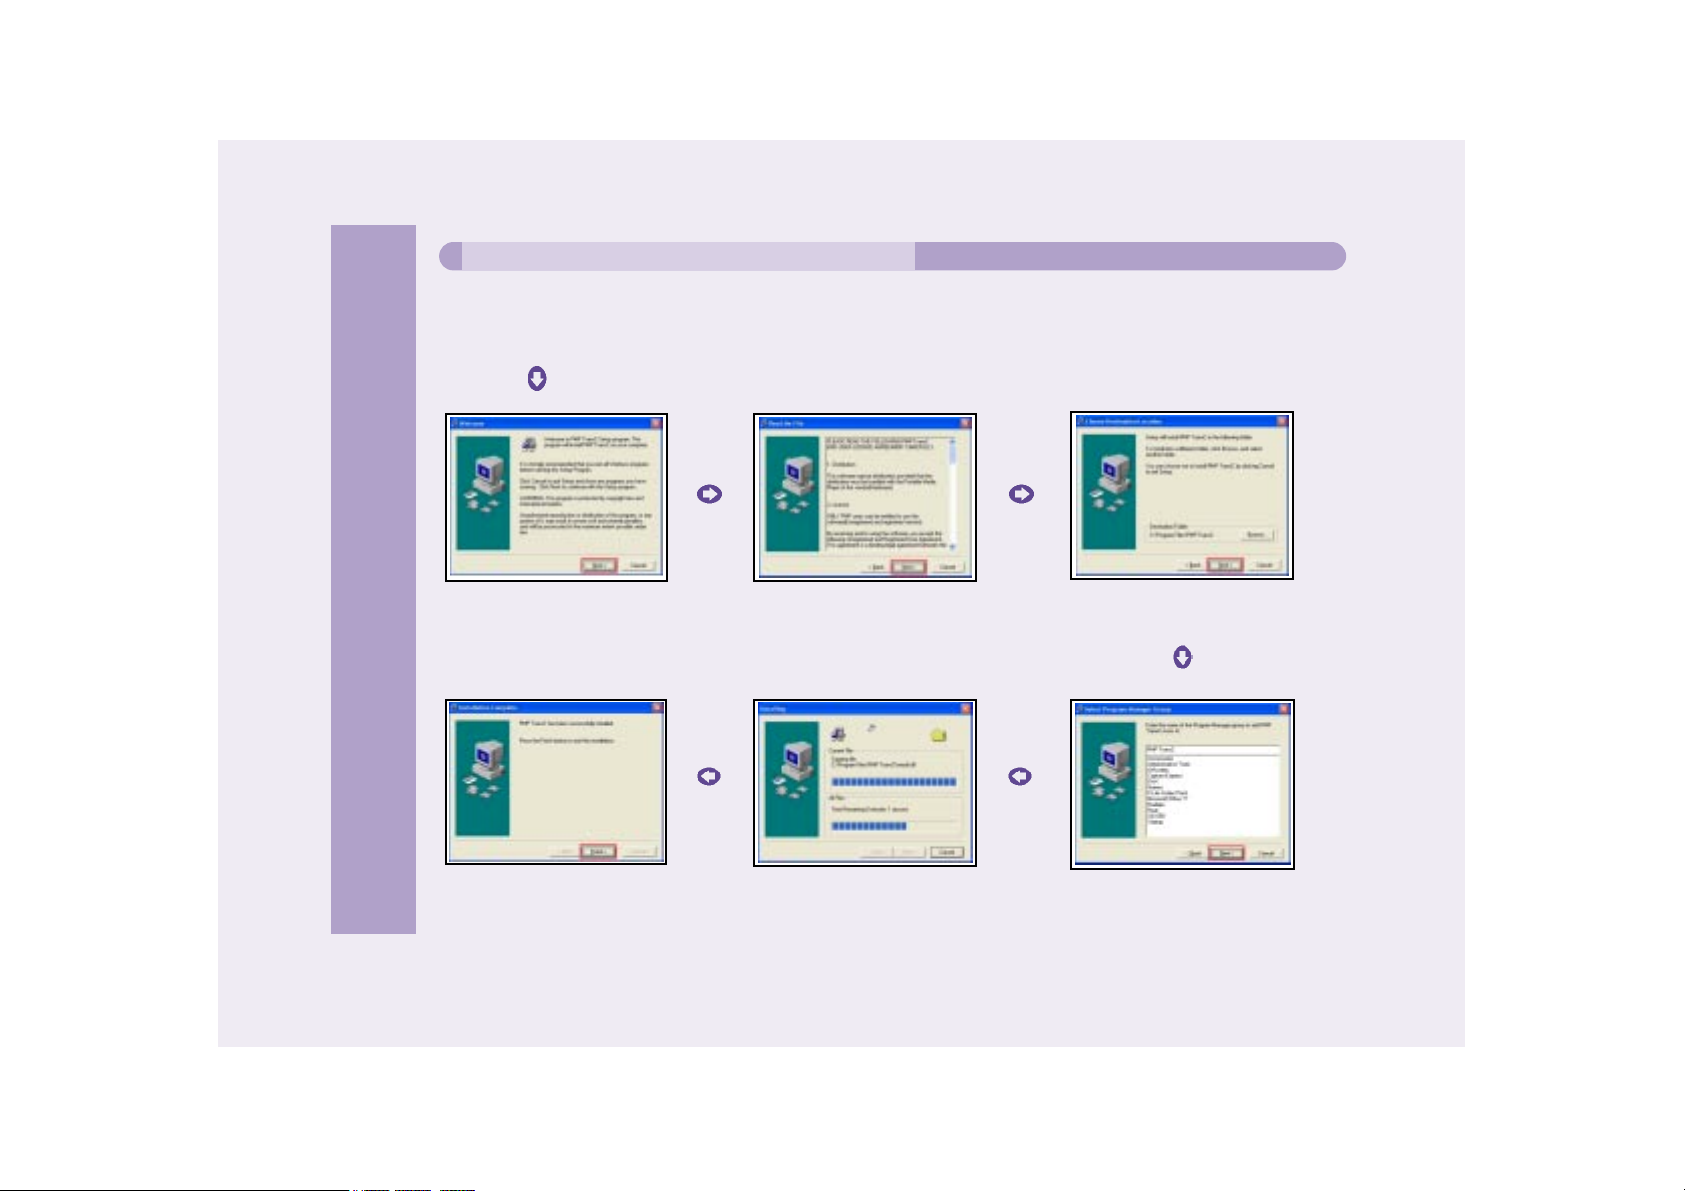
When the moving picture has Codec or a resolution not supported in the AVIAh, you can transcode the file by using the
TransC Software located on the Installation CD.
Click the TransC icon on the installation CD to begin installation
1. Press the Next button.
2. Press the Next button.
3. Designate where you would like the
program to be installed.
6. Press the Finish Button.
5. Program Installation is carried out.
4. Press the Next button.
Installing TransC Software on your PC
Other Functions
Page 53
53
Other Functions
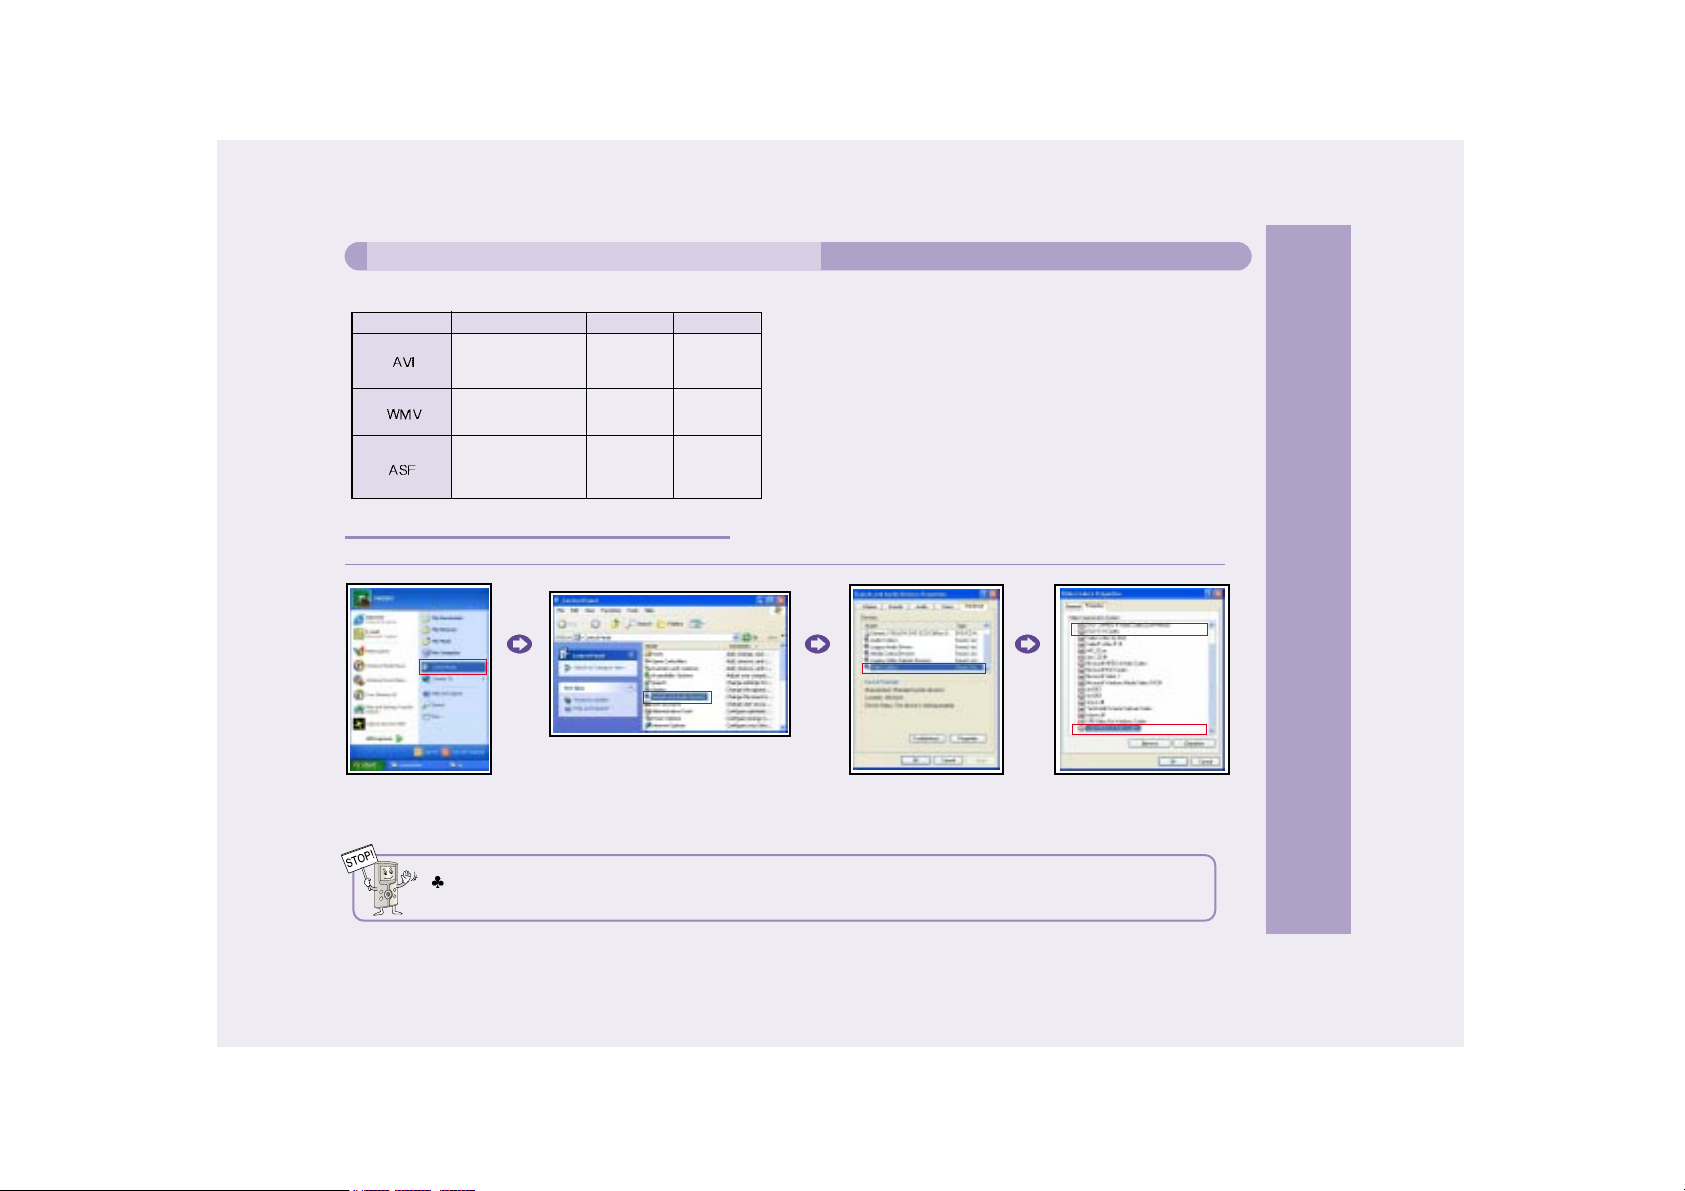
720*480
352*240
720*480
Resolution
G.726
MP3
PCM
WMV9
G.726
MP3
PCM
Audio Codec
XviD, DIVX
WMV9 SP
(Simple Profile)
MS ISO MPEG-4
Video Codec
Kinds of File
1. Select Control Panel
2. Select Sound and Audio Devices.
3. Select Hardware, and
press Video Codec.
4. You can view Video Codec
and Audio Codec installed
in PC from the list.
* AVIAh supports the following Codecs
If XviD Codec is not in the list, download the Integrated Codec from Internet, and install in your PC.
Using AVIAh TransC
* When Checking Codecs (Audio/Video) stored in PC
Page 54
54
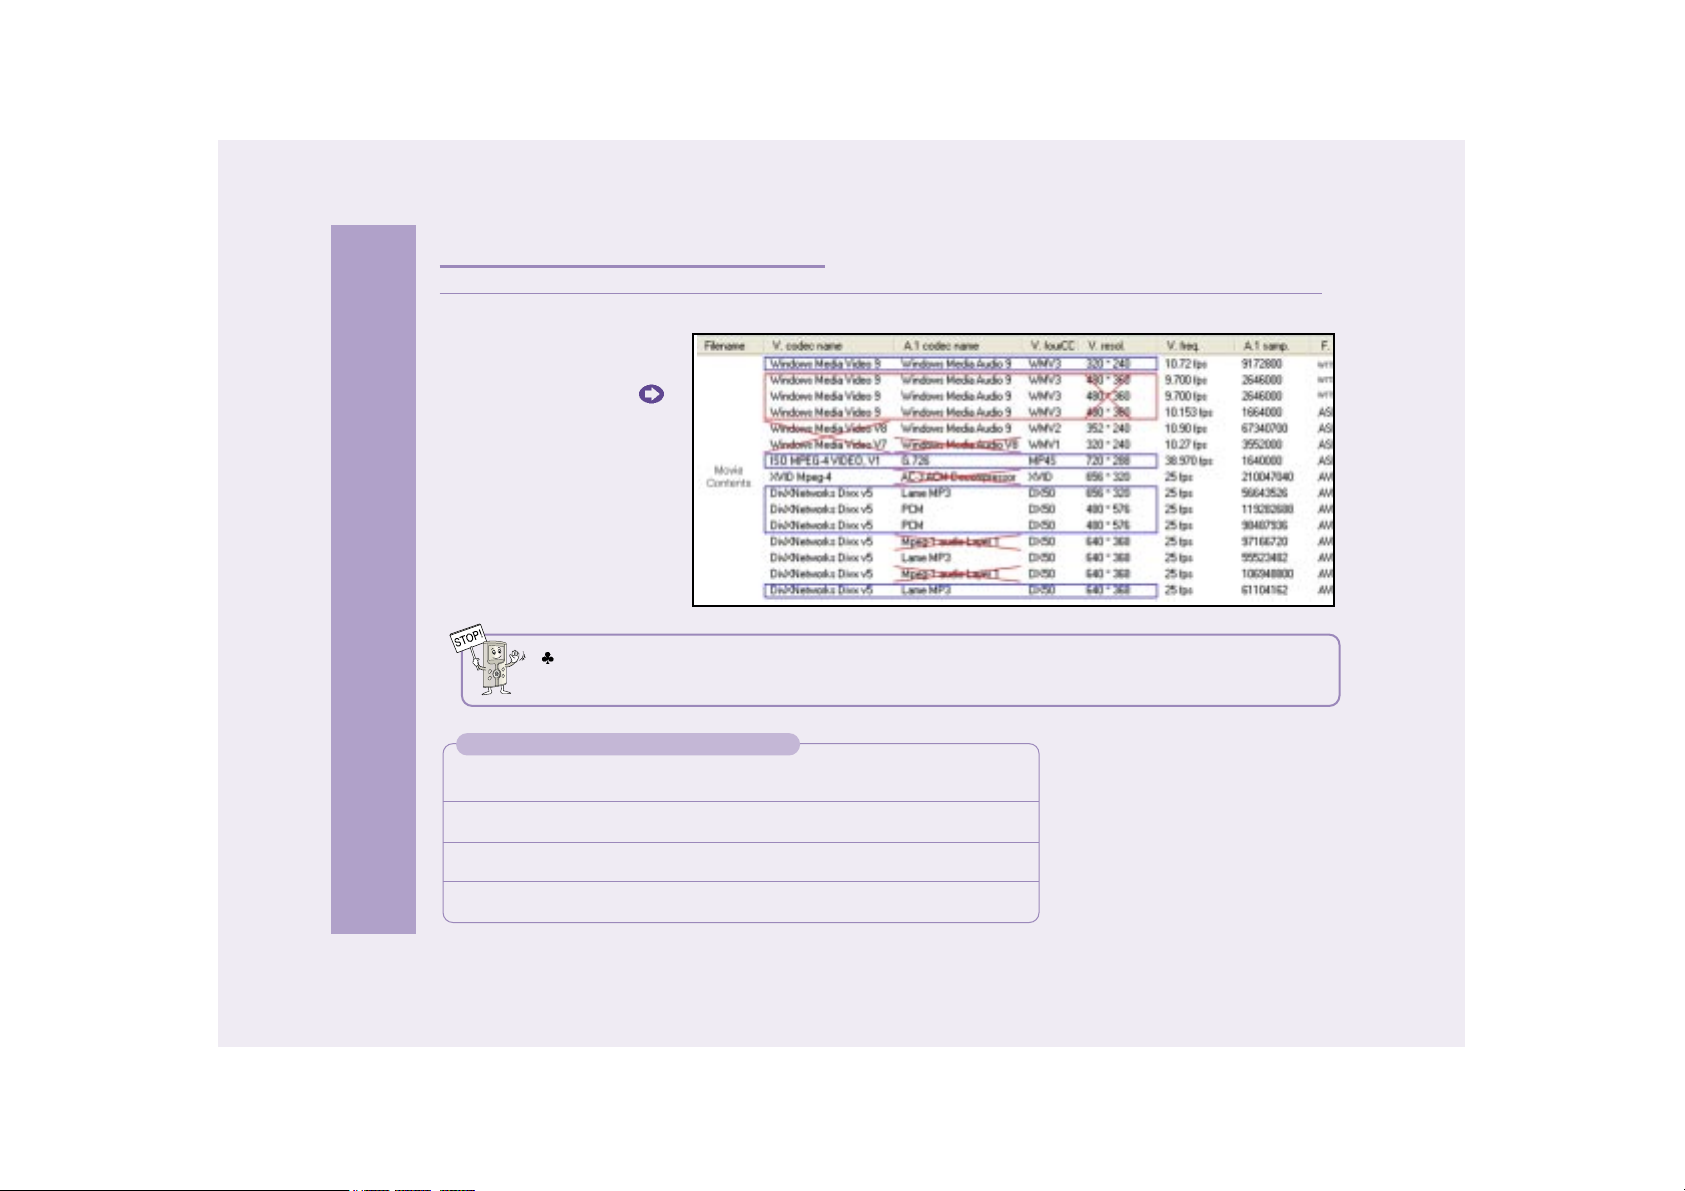
You can check compatibility with the Codec Information Check Program.
Execute the Codec
Information Check Program.
* AVIAh TransC Conversion Program
VCD/MPEG/AVI/WMV/ASF Conversion Function
dat, mpeg, mpg, avi, wmv, asf ... AVI, XviD format, WMV format, MP4 format.
RealVideo Conversion Function
rm, rv, rmvb ... AVI, XviD format, WMV format, MP4 format.
QuickTime Conversion Function
mov, qt, mp4 ... AVI, XviD format, WMV format, MP4 format.
DVD Conversion Function
ifo, vob ... AVI, XviD format, WMV format, MP4 format.
- Moving picture with box mark :
File supported in AVIAh
- Moving picture with X mark :
File not supported in AVIAh
Although you may have Codec not supported by AVIAh, if you encode it in your PC with the TransC software, it can be
played.
Download the Codec Viewer from the Internet, then install it in your PC.
* If you are not sure about whether the moving picture file is supported in AVIAh
Other Functions
Page 55
55
Other Functions
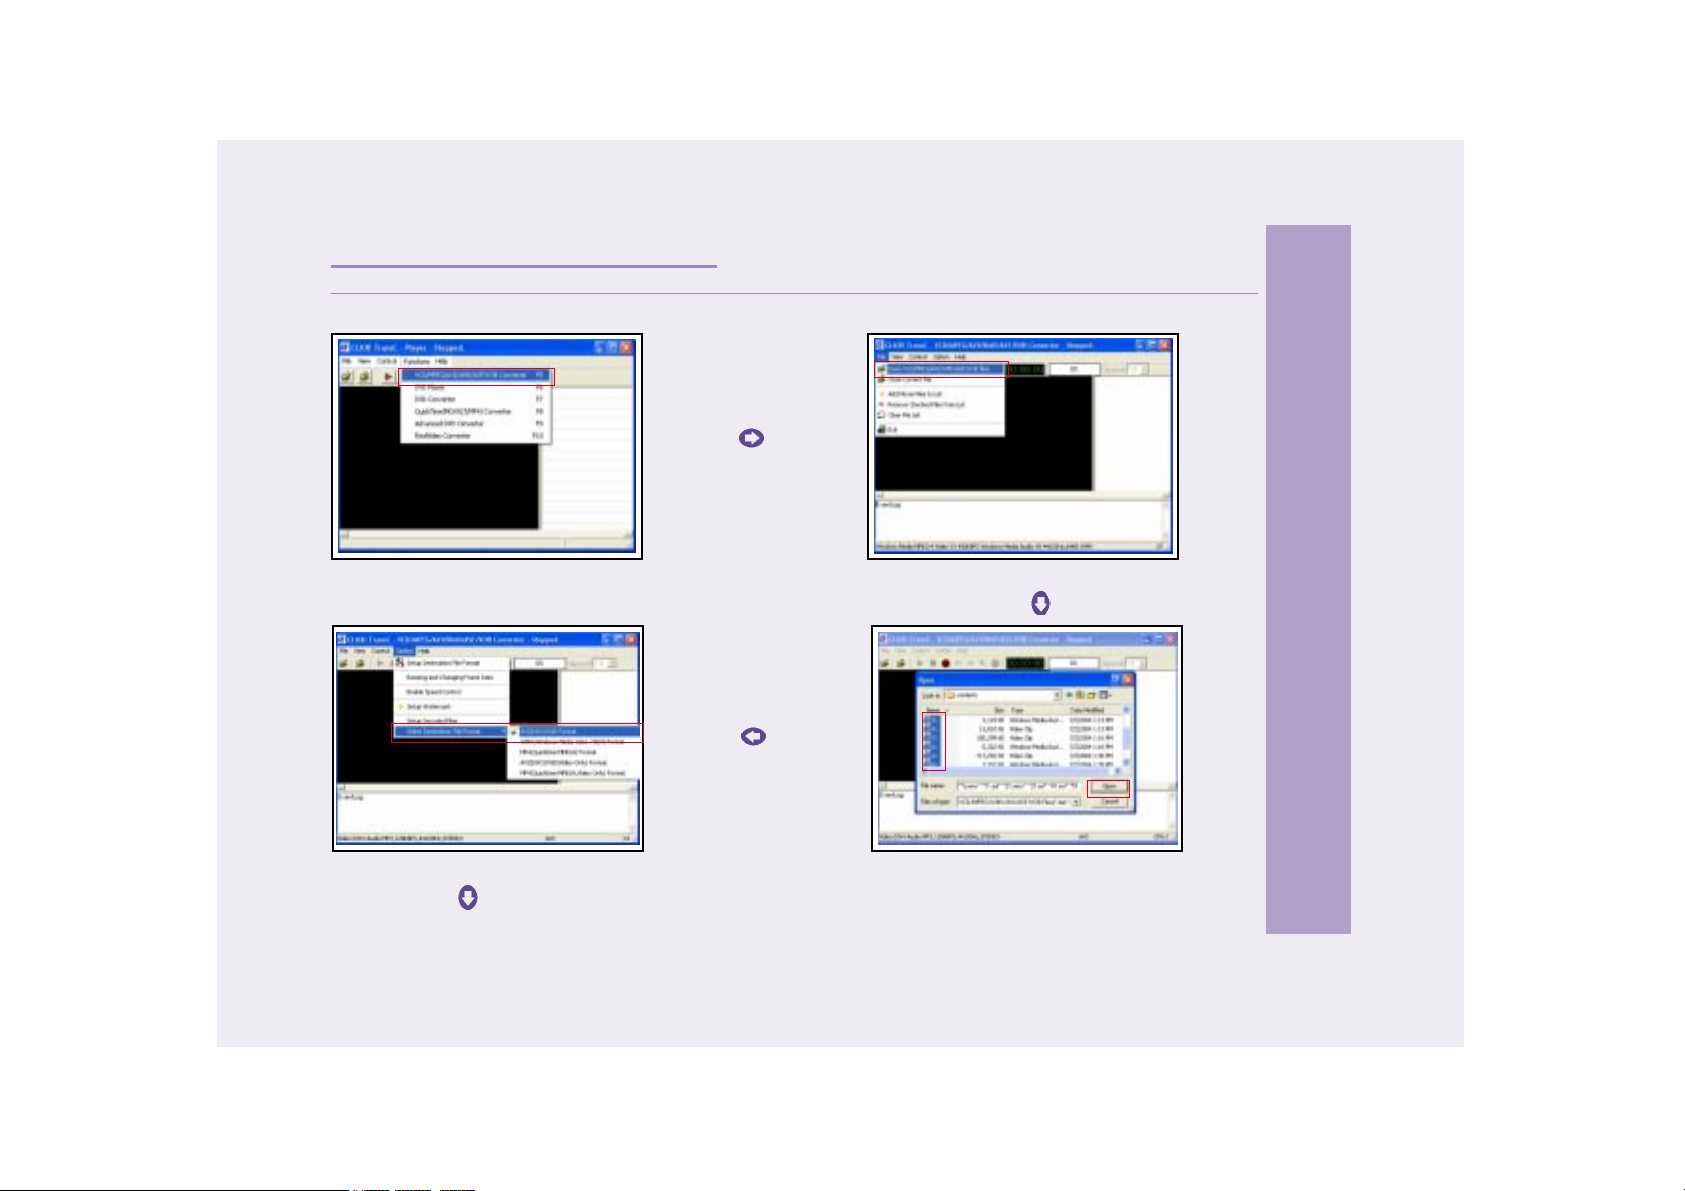
3. Open " Moving Pictures not supported in AVIAh ".
4. Select " AVI Format ".
When running AVIAh TransC, the following will be displayed in the screen.
1. Select " VCD/MPEG/AVI/WMV/ASF converter ". 2. Select " Open VCD/MPEG/AVI/WMV/ASF/VOB files ".
Continues in the next page.
* When playing moving pictures being not supported in AVIAh
Page 56
56
Other Functions
Continues in the next page.
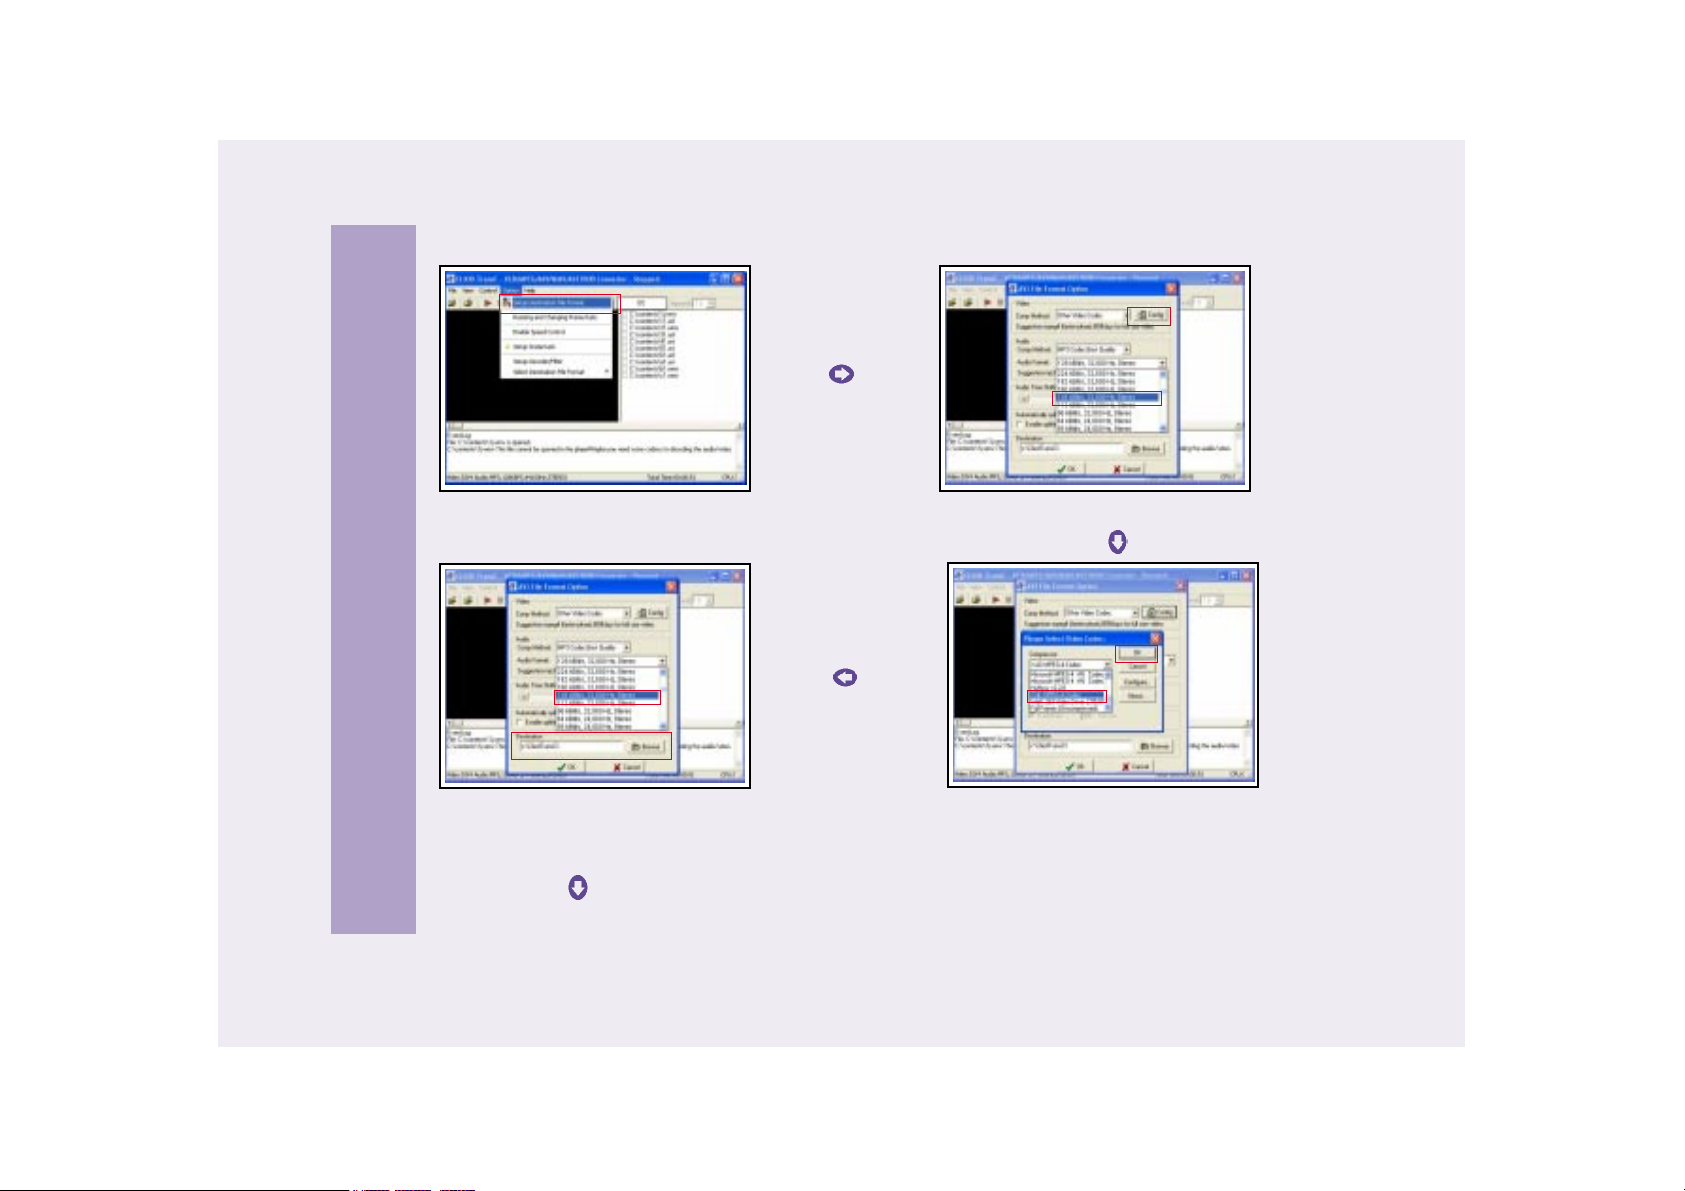
5. Select " Setup Destination File Format ".
6. Select " Other Video Codec ", and press " Config ".
8. Select the " MP3 Codec ", then the Audio Bitrate Mode,
Sampling, Audio Mode. (e.g., 128kBit/s, 32,000 Hz, stereo) After
selecting, specify in the " Browse " menu the location where you
would like to save the file.
7. Select the " XviD ".
Page 57
57
Other Functions
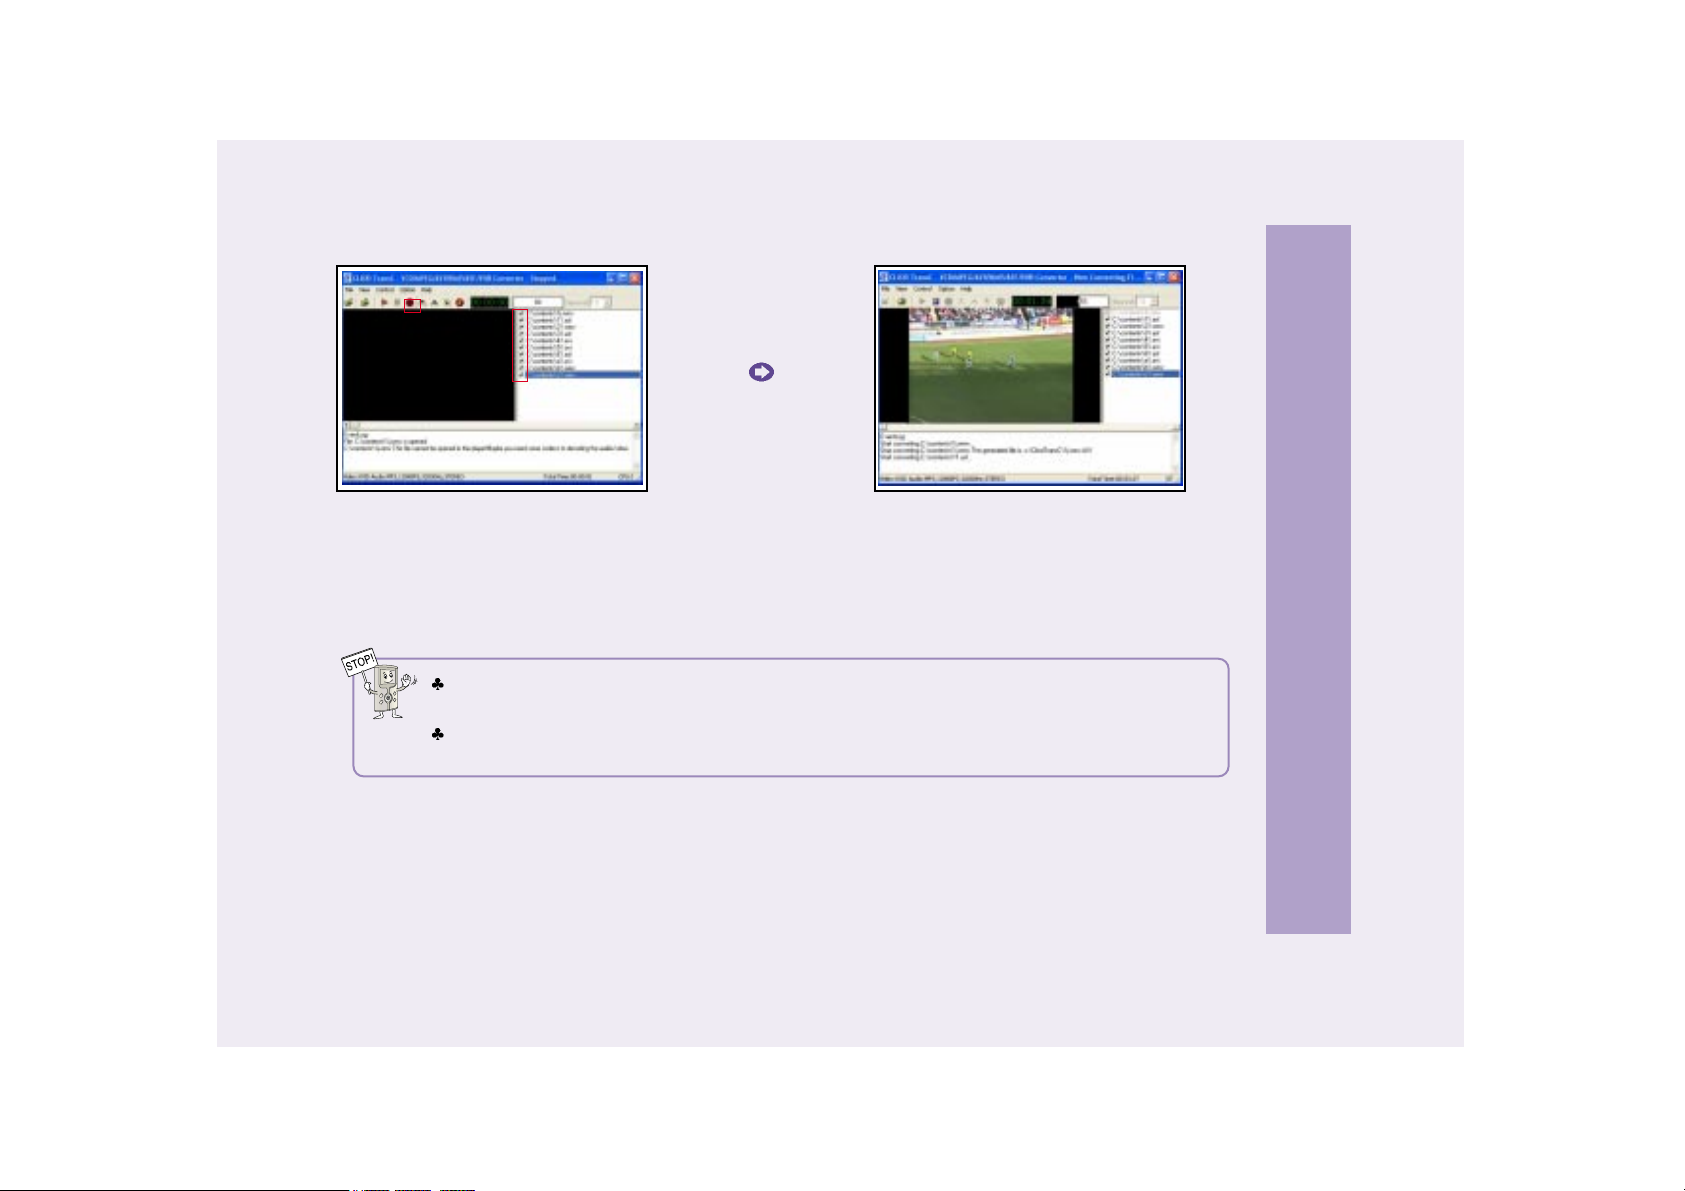
9. After selecting the file(s) to be transcoded
push the red Icon Command Button (Ctrl + C).
10. You can view the transformation process on the upper
screen.
When the Codec installed onto your PC causes a problem, only a portion of the file can be transformed. Please install a
stable and well-recognized Codec onto your PC.
To change file formats such as RealVideo Converter (rm, rv, rmvb) or Quick Time Converter (mov, qt, mp4), be sure to
install RealVideo, Quick Time Codec onto your PC. You can download additional Codecs from the Internet.
Page 58
58
Other Functions
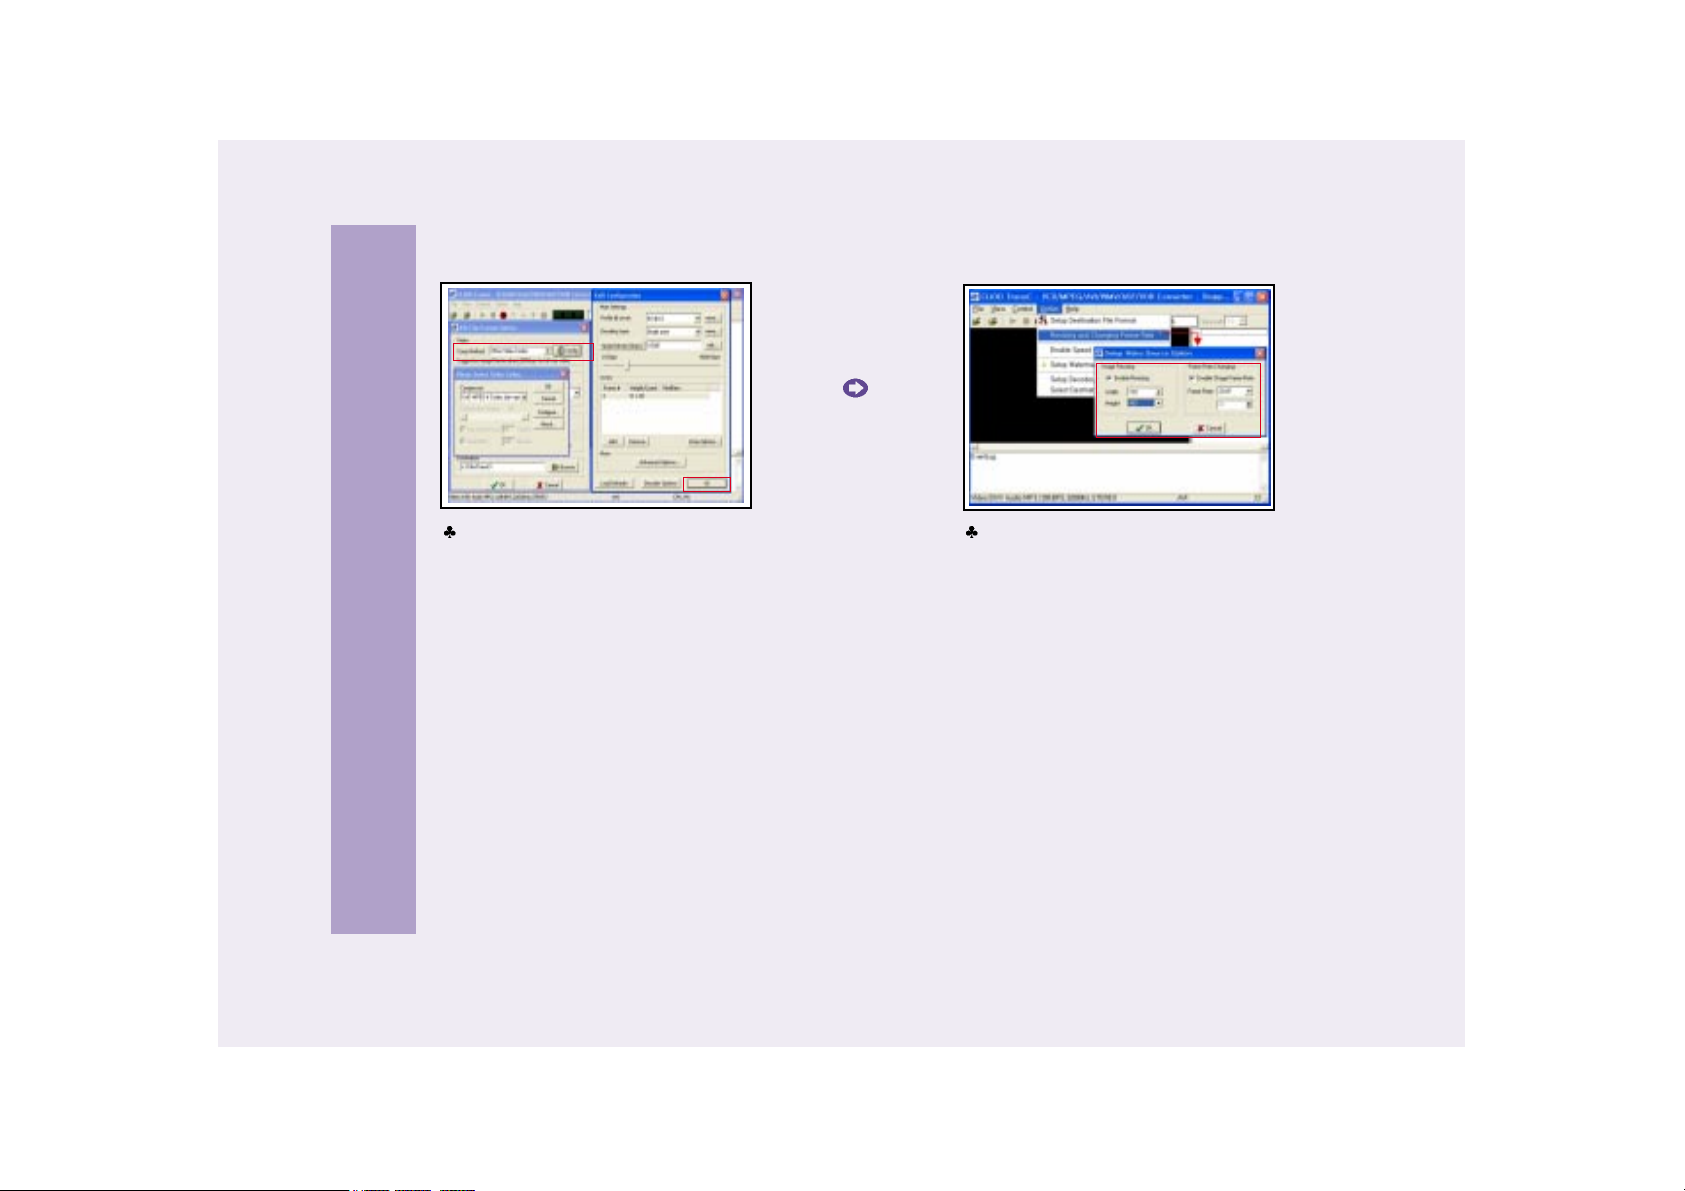
If the transcoded moving picture quality is not
acceptable, click the "Configure" command
button after video codec selectionand set the
bitrate(kbps) higher than normal and start
encoding. This will allow for better quality
moving pictures.
If the transcoded moving picture quality is not
acceptable, set the resolution higher than normal,
which will allow for better quality moving pictures.
Note: Resolution may differ according to Codec, so
if you encode higher than the compatible resolution,
it will not run in AVIAh (e.g., in the case of Xvid,
resolution should not be higher than 720x480.)
Page 59
59
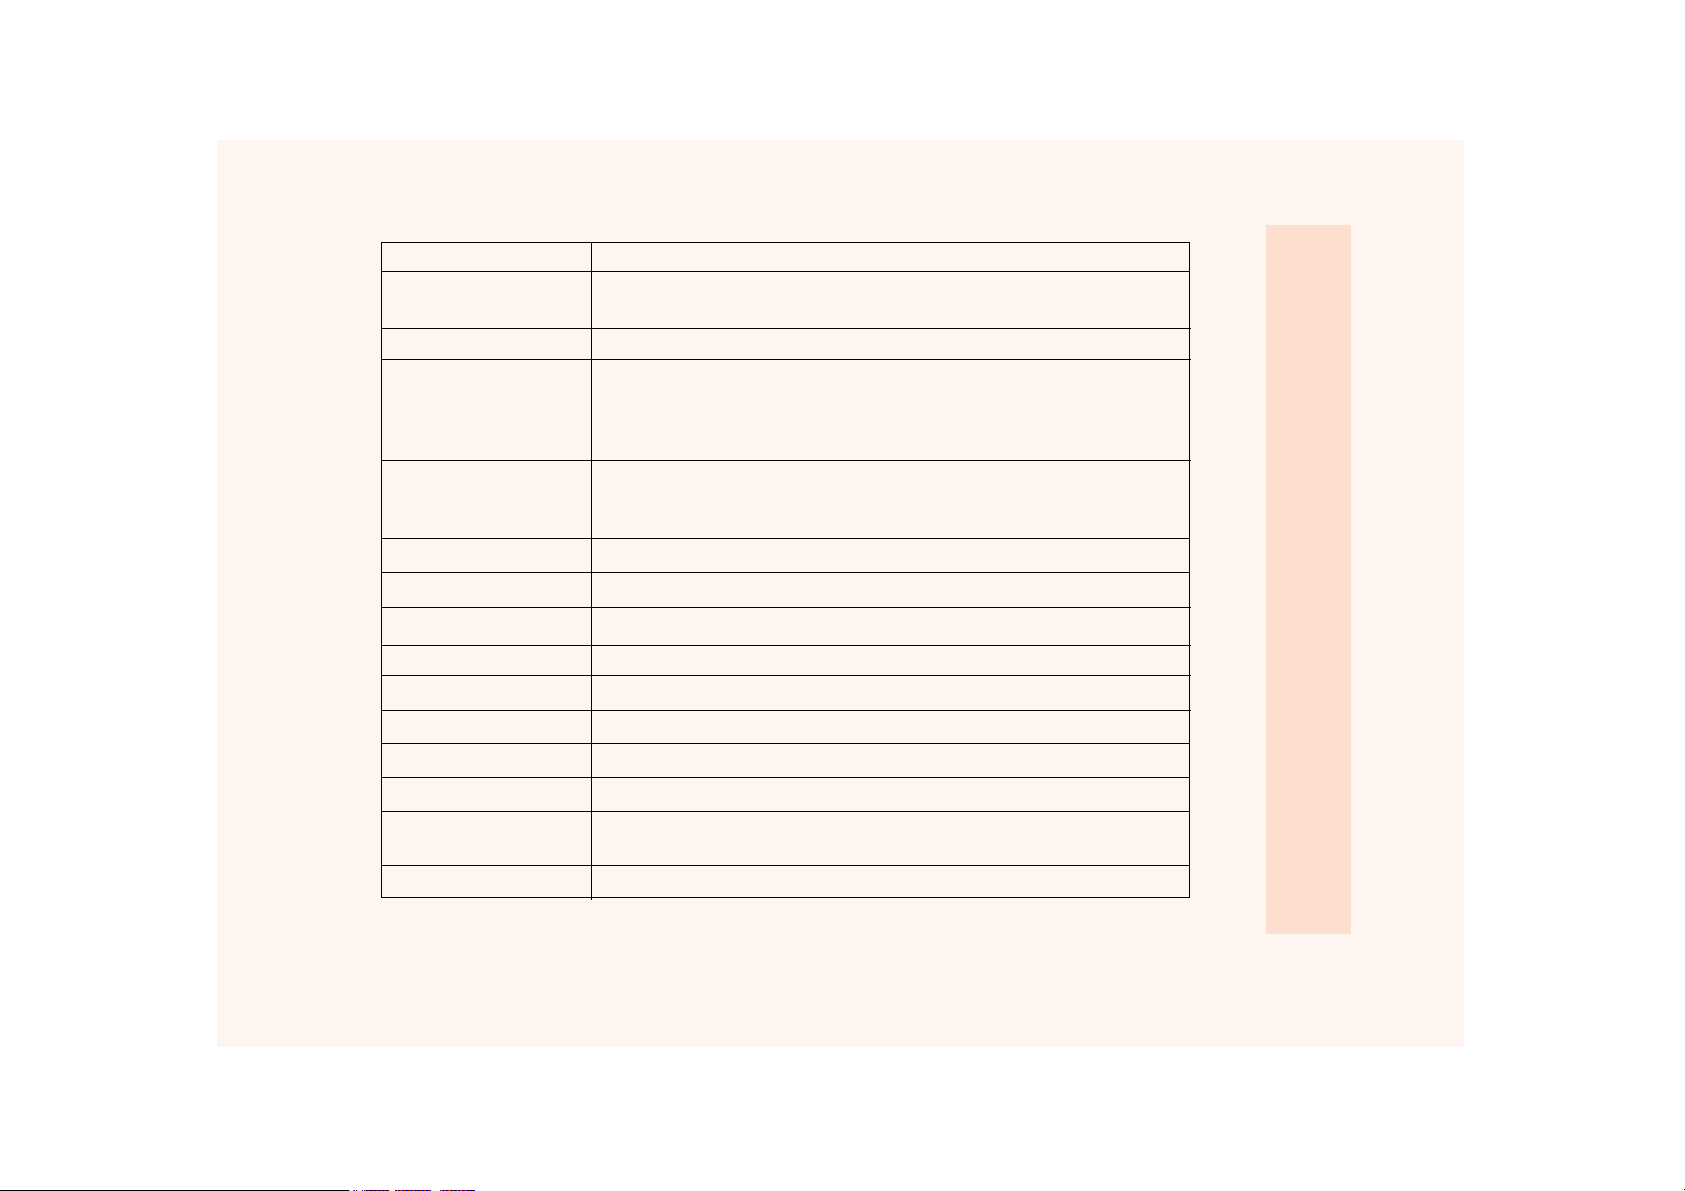
Product Specifications & Features
Hard Disc
Screen (Panel)
Slide Show
Moving Picture Playback
Video Recording
PC Interface
Audio Playback
TV(Television)
AV(External Input)
Firmware Update
Voice Recording
Power
Product Dimensions
OSD
System Environment
1 inch Hard Disk 5.0GB
OLED Color AM 2.2" / 16,700K Colors / Pixel Format : 521*218
Viewing Angle : Free / Response Time : 5ms
JPEG (irrespective of image size)
MP4 MPEG-4 SP@ML Compliant Video Codec
ASF( Microsoft ISO MPEG4 ) : Supports up to Max. Resolution 720*480
AVI( DivX,XviD etc) : Supports up to Max. Resolution 720*480
WMV9 : Supports up to Max. Resolution CIF( 352*288 )
Supports Resolution 352*240 (288) : 3 Screen Resolution Modes
(Fine, Normal, Economic)
Video Capture ( JPEG Encode )
High Speed USB 2.0 ( Compatible with USB 1.1 )
MPEG-1 Layer 3 Audio Decode / WMA9 Level 2A Audio Decode
NTSC System or PAL/SECAM System
AV Composite Video/Audio LR-in/out
www.ovideon.com
G.726 Compliant Voice Codec
5V, 2A DC Adapter, 3.7V 1100mAh Li-ion Battery (x2)
69( W ) x 119( H ) x 20( D ) mm / 145g
Menu
English, Spanish, French, Italian, Russian, Korean, Chinese, Japanese
Windows 98SE/ME/2000/XP
Page 60

60
If any problem persists, consult your AVIAh dealer or contact support at www.ovideon.com
* Find information on our company, products, and customer and technical support.
* Update your AVIAh Firmware.
* Consult the product Q&A
* Register your AVIAh product online so that our Customer Service Center is able to provide support as efficiently as
possible.
The following cases will not be covered by In Warranty Service.
1. Defects or damage caused by accident, misuse, abuse, neglect, fire, flood, lightning or other acts of nature.
2. Damage caused during shipment or handling.
3. If you drop or hit the unit. (This unit has a built-in one inch hard drive, any physical impact on the unit may cause
malfunction.)
4. Repair or attempted repair by anyone not authorized by Ovideon.
5. Products with altered or removed serial numbers.
6. Products purchased in "as is" condition.
7. Improper operation, improper connection to peripherals, improper electrical connections, power surges or not
following the user’s manual.
To ask for our service through the Internet
Notices
Product Inquiry & Customer Service
Page 61

61
Product Inquiry & Customer Service
This device complies with part 15 of the FCC Rules. Operation is subject to the following two conditions: 1) This device may
not cause harmful interference, and 2) this device must accept any interference received, including interference that may
cause undesired operation.
This equipment has been tested and found to comply with the limits for a Class B digital device, pursuant to part 15 of the
Federal Communications Commission rules and regulations. These limits are designed to provide reasonable protection
against radio and television interference in a residential installation. This device uses and generates radio frequency energy
and if not installed and used in accordance with the instructions can cause interference with radio communications.
However, there is no guarantee that interference will not occur in a particular installation.
If this equipment does cause harmful interference to radio or television reception, which can be determined by turning the
equipment off and on, the user is encouraged to try to correct the interference by one or more of the following measures:
Reorient or relocate the receiving antenna.
Increase the separation between the equipment and the receiver.
Connect the equipment into an outlet on a circuit difference from that to which the receiver is connected.
Consult the dealer or an experienced radio/TV technician for help.
Declaration of Conformity
We, Ovideon, Inc., P.O. Box 9219, Aurora, IL 60598, U.S.A. declares under our sole responsibility that the AVIAh 1000
Portable Multimedia Recorder/Player/TV has been tested and found to comply with the limits for a Class B digital device,
pursuant to part 15 of the FCC Rules.
This device complies with part 15 of the FCC Rules. Operation is subject to the following two conditions: 1) This device may
not cause harmful interference, and 2) this device must accept any interference received, including interference that may
cause undesired operation.
Warning
Any changes or modifications to the unit, not expressly approved by Ovideon, Inc. could void the user’s authority to operate
the equipment.
FCC Information
Page 62

62
Trouble Shooting
Q : The picture on the display screen stops, turns off or des not work?
A : Connect the AC Adaptor to the AVIAh; normal operation should resume. Please recharge the
battery.
Q : I connected the AVIAh to my computer via the USB but my computer does not recognize
it?
A : Verify which operating system is on your computer. If you are using Windows 98 (SE) then
insert the Windows 98 (SE) CD and install the USB drivers.
Q : I push the buttons on the AVIAh and nothing happens?
A : Check if the sliding power switch is in the HOLD position. If it is, slide it out of the HOLD
position to restore functionality to all the buttons. The HOLD feature is used to disable the
buttons in order to avoid accidental usage.
Q : The picture is too bright or too dark?
A : Adjust the picture controls found in the SET UP menu. There are some presets available for
you to use but if you choose you can make adjustments to your liking too.
Q : I cannot hear any sound coming from the AVIAh?
A : First, the AVIAh does not have built in speakers, so you are out of luck there. Second, check
that the volume level is sufficient for listening through the earphones. You did plug in the
earphones in the correct slot…didn’t you?
Page 63
63
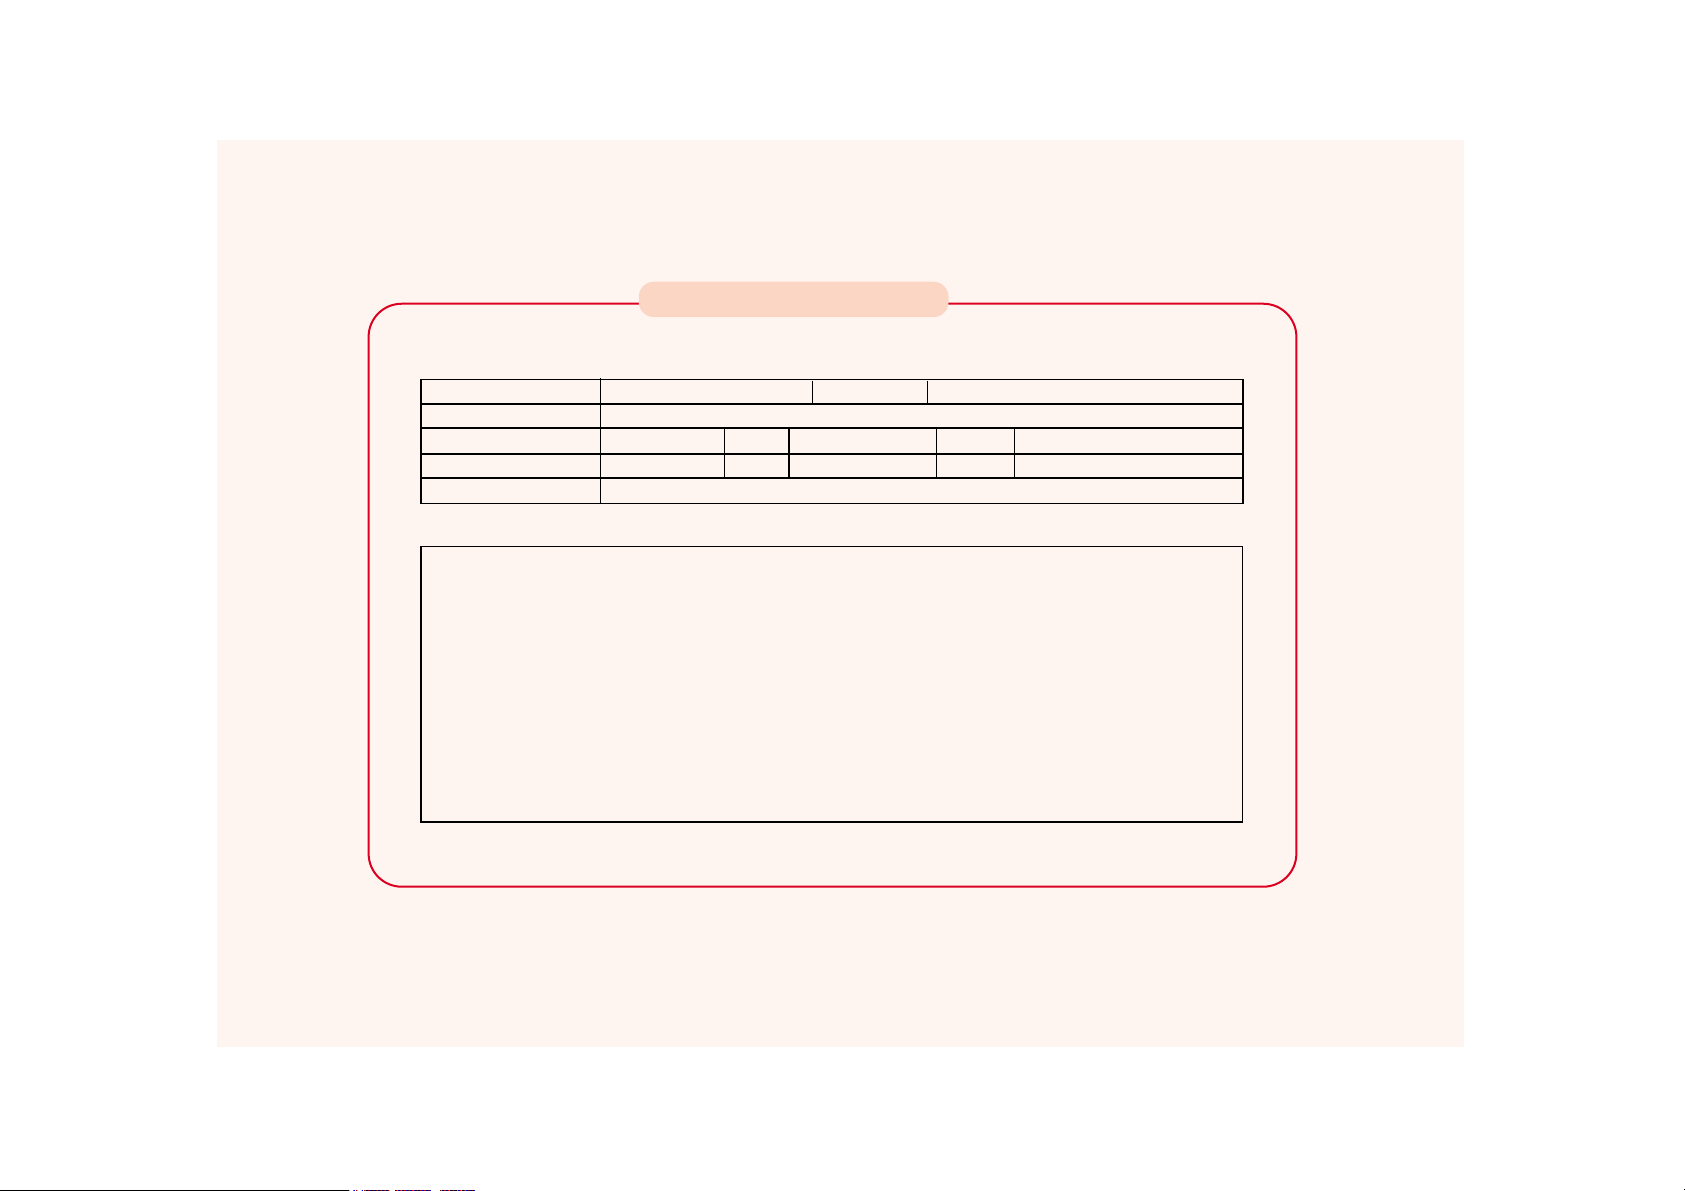
Product Name
Purchase Date
Customer
Location of Purchase
Warranty Period
Model
Year Month Date
Tel. Address
Tel.
Address
Two year from the date of purchase (OLED: One Year)
* When requesting repair, for warranty service please present this warranty with the
date of purchase recorded.
* During the warranty period we will repair any defect in material occurred under
normal conditions free of charge, labor included.
* When warranty period has elapsed, or even during warranty period, we may
charge for our repair service if it is justified to do so.
PRODUCT WARRANTY
Page 64

Limited Warranty
64
Ovideon, Inc. (hereinafter referred as Ovideon) hereby warrants all Ovideon products
sold by Ovideon or by Ovideon authorized distributors, resellers and retailers to be free from defects in material and
workmanship in accordance with the following terms and conditions.
Length of Warranty
From the date of original purchase this product is warranted for a period of (2) years on parts and labor and (1) year on the
OLED panel. This warranty may be enforced only by the original purchaser of the product. A sales receipt, invoice or other
proof of purchase must be presented within the warranty period in order to obtain warranty service. Upon expiration of this
warranty the expense of product repair becomes the responsibility of the purchaser. This warranty is valid only for products
purchased and used in the United States of America and Canada.
Obtaining Warranty Service
To obtain service on your product, take the defective product to an authorized Ovideon service center or ship it freight prepaid
to said service center. If shipping the product please use the original packaging of the product or equivalent. Ovideon will not
be responsible for damages due to improper packaging. For information on the location of an authorized Ovideon
Service Center please call 630-236-9917
Terms of Warranty
This warranty covers all defects in material and workmanship in this product except as specified below.
1. Defects or damage caused by accident, misuse, abuse, neglect, fire, flood, lightning or other acts of nature.
2. Damage caused during shipment or handling.
3. Repair or attempted repair by anyone not authorized by Ovideon.
4. Products with altered or removed serial numbers.
5. Products purchased in "as is" condition.
6. Improper operation, improper connection to peripherals, improper electrical connections, power surges or not
following the user’s manual.
Page 65

Limited Warranty
65
Responsibility
Ovideon will pay for labor and materials during the length of warranty for a period of two (2) years from the original date of
purchase. Ovideon will repair the defective product with new or refurbished parts or, at our option, replace the defective product.
Ovideon will not pay for the following:
1. Removal or installation of Ovideon products.
2. Cost of Initial set up.
3. Payment of shipping charges.
Implied Warranties
All Implied warranties, including warranties of merchantability and fitness for a particular purpose, are limited in duration to the
length of this warranty.
Exclusions to Warranty
Ovideon’s liability for any defective product is limited to the repair or, at Ovideon’s option, replacement of the product. Ovideon
shall not be liable for:
1. Damage to other property caused by any defects in this product, damage based on inconvenience, loss of time or
commercial loss.
2. Any other damages whether incidental, consequential or otherwise.
State Law and this Warranty
Some states do not allow the exclusion or limitation of incidental or consequential damages and /or the limitation of how long an
implied warranty may last so the above limitations and exclusions may not apply to you. This warranty gives you specific legal
rights, and you may also have other rights which may vary from state to state.
Page 66

Note
66
Page 67

Note
67
Page 68

 Loading...