

Page 1

1
EH150
COMPLETE USER GUIDE
Page 2

2
TABLE OF CONTENTS
1. Technical Specifications
2. Features
3. Main Menu Options
4. Operation
Page 3
3
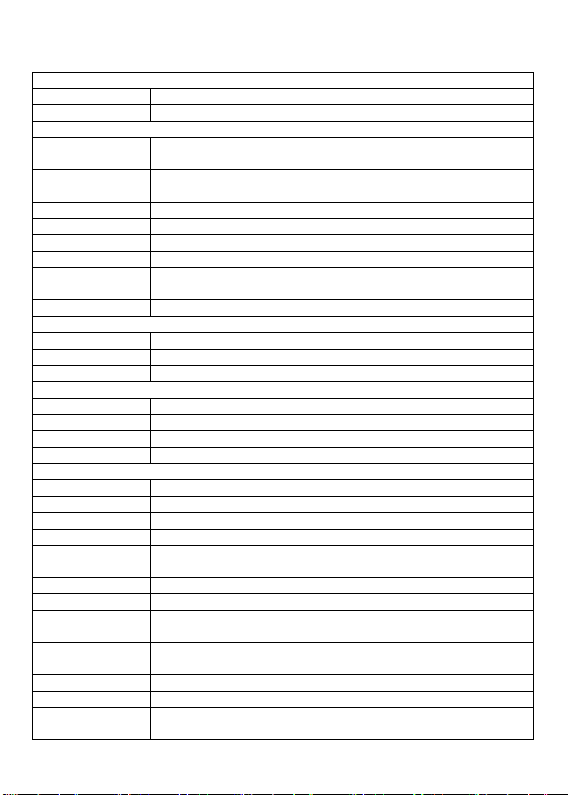
1. Technical Specifications
Camera
Sensor
5MP CMOS
Wide Angle
140 degree wide angle lens
Video
Video Resolution
2304x1296 30p/ 1920x1080 30p/ 1440x1080 30p /1280x720 60p
/1280x720 30p / 848x480 60p/ 848x480 30p/ 720x480 30p
Video
Compression
H.264/MPEG4
Audio
High Quality Build-in Microphone
Audio Format
WAV
Watermark
User ID, Time and Date
Pre-record
Support
Password
protection
Administrator password to prevent video deletion
Video Section
3min/5min/10min/15min/30min/45min
Snap Shot
Image
Max 32 Megapixels
Image Format
JPEG
Burst
2/3/5/10/15/20 Snap Shots
Video/Image Review
LCD Screen
2.0in TFT-LCD High-Resolution Color Display
Audio Playback
Yes
Video Output
Not support
Video Transfer
USB 2.0
General
GPS location
Support
IR LED
4
IR LED switch
Auto/manual
IR Distance
10 Meters
One Button
Recording
Support One Button Record
Motion detection
Auto/manual
Built-in Storage
32GB (64GB/128GB)
Working
Temperature
-40~60 degrees Celsius
Storage
temperature
-20~55 degrees Celsius
Dimension
3.54" x 2.17" x 1.10"
Weight
175g
Standard
Accessories
Charging dock, USB cable, charger, User Manual, Universal Clip,
Epaulette Clip
Page 4
4
2. Features
Page 5
5
Page 6
6
Item
Description
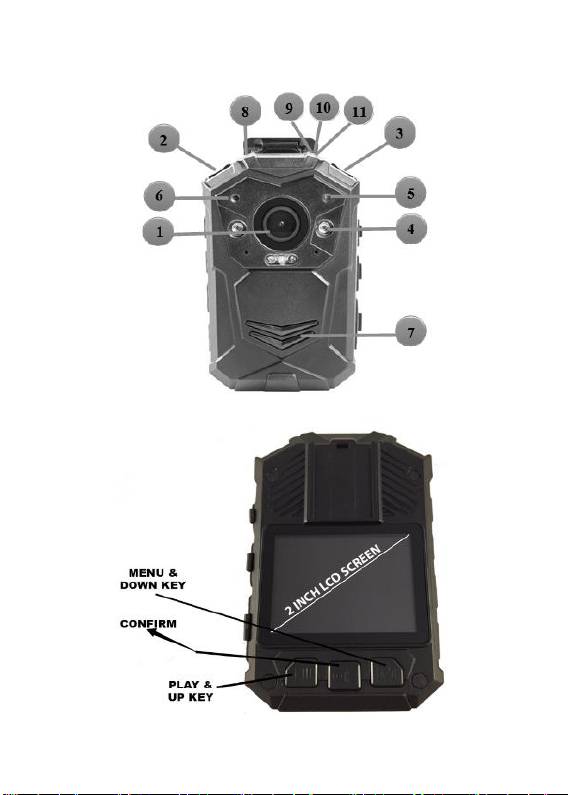
1.Camera Lens
High Definition Camera
2. Power Button
a). Hold for 3 seconds to turn camera on; Hold for 3
seconds to turn off camera
b). Press to enter or exit screen saver when camera
is on
3.IR/White
Light button
a). Press to turn IR light on/off;
b). Hold to turn on/off white light
4.Infrared LEDs
Records clear image in low light situation. Enable
Clear face view with up to 10 meters
5.Light Sensor
Detect changes in light and auto turn on IR for
low-light recording
7.Speaker
Built-in speaker
8. Indicator LED
Blue: Charging Status
Green: camera is powered up and in standby mode
9.10.11. Status
Indicator LED
Green: camera is powered up and in standby mode,
not recording
Page 7

7
Flashing Red: camera is recording video
Flashing Yellow: camera is recording audio only
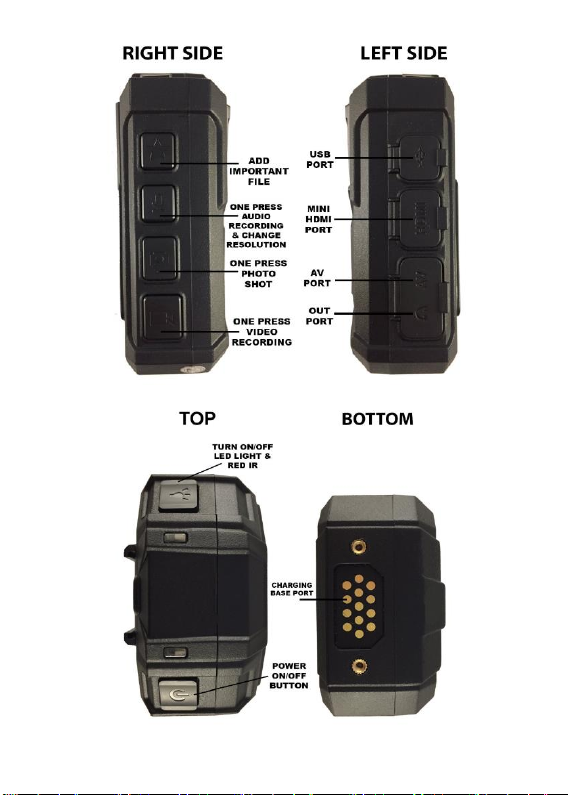
PLAY & UP KEY
a). Press to scroll up in menu mode
b). In play mode, hold to zoom out the playing image
c). In play mode, press to rewind video
CONFIRM KEY
a). Press to make a selection in menu mode
b). In play mode, press to pause/resume video or
audio playback.
c). In standby mode, press to review files.
MEMU &
DOWN KEY
a). Press to enter into menu mode
b). Press to scroll down in menu mode
c). In play mode, hold to zoom out the playing image
d). In play mode, press to fast forward video
ADD
IMPORTANT FILE
Press to tag importance to audio/video file when
camera is on recording
ONE PRESS AUDIO
RECORDING &
CHANGE
RESOLUTION
a). Press to record audio when not in
video-recording mode
b). Press to mute/unmute video when camera is on
video recording
c). Hold to change resolution between 480P and
720P
ONE PRESS
PHOTO SHOT
a). Press to take pictures in standby mode
b). Press to take a single snapshot image while in
video recording
ONE PRESS
VIDEO
RECORDING
a). Press to start/stop recording
b). Hold to power up camera and start video
recording immediately when camera is powered off.
USB PORT
Connects to USB cable for charging or connection to
PC
PS: optionally connects to external camera
HDMI PORT
Connects to 1.3 HDMI cable for video playback only
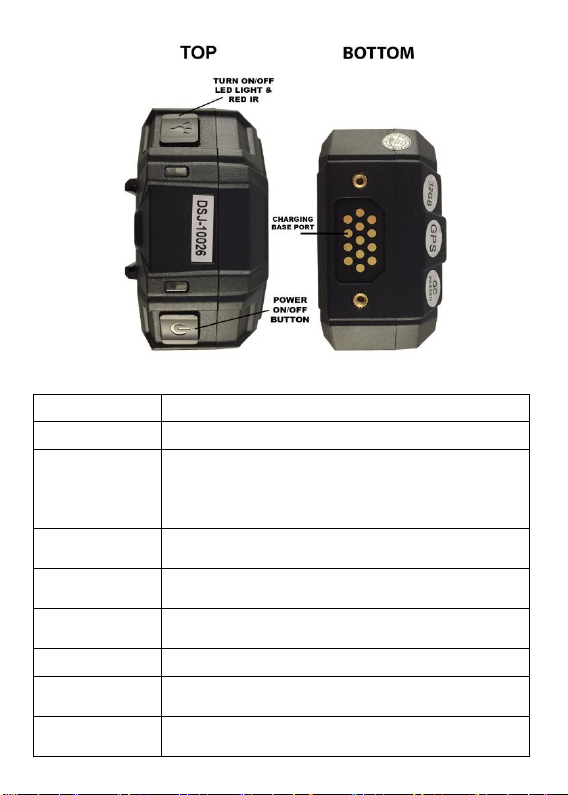
CHARGING BASE
PORT
Connect to charging dock to charge the camera
Page 8
8
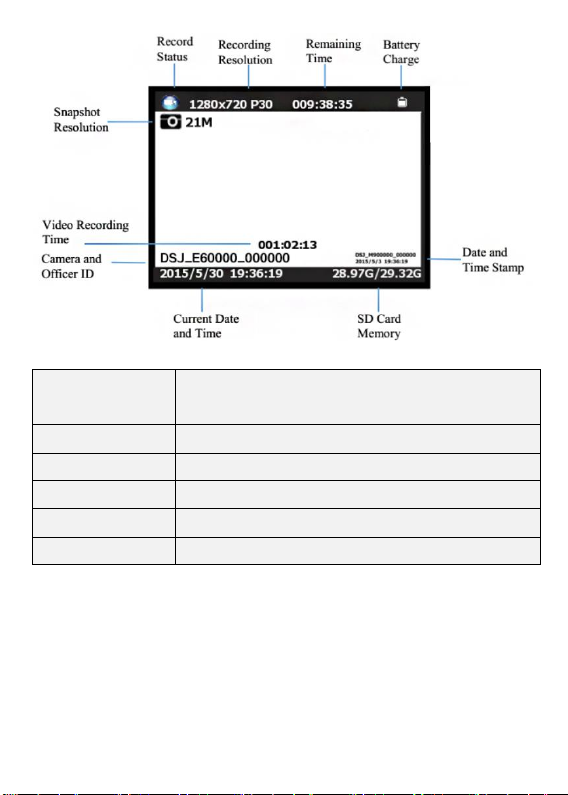
Record Status
Red blinking record status icon indicates camera is recording,
white solid is standby mode.
Video Recording Time
Recorded time of current clip
Battery Charge
Current battery charge level
Camera and Officer ID
Assigned camera and Officer IDs
Remaining Time
Estimated recording hours remaining
SD Card Memory
Internal SD Card capacity: Free space/Total capacity
Page 9
9
3. Main Menu Options
To enter the setting menu:
1. Press Menu ( ) button and then enter a password.
2. Enter the password by using the following commands:
⚫ Press Scroll Up ( ) button to change the character to the
previous letter or number.
⚫ Press Menu ( ) button to change the character to the next
letter or number.
⚫ Press OK ( ) button to move to the next character
PS: The default password is 000000.
3. After selecting the last character, press OK ( ) button to enter the
setting menu.
To navigate the settings menu:
➢ Press Menu ( ) button to select next setting or option.
➢ Press Scroll Up ( ) button to select the previous setting or option.
➢ Press OK ( ) button to move to confirm your selection or enter the
submenu.
➢ Press Power ( ) button to return to the previous menu without
changing anything.
Following is a list of the available settings and options. The bold items are
the default options.
Page 10

10
Setting
Description
Options
Resolution
The image resolution for video
2304×1296 30P
1920×1080 30P
1440×1080 30P
1280×720 60P
1280×720 30P
848×480 60P
848×480 30P
720×480 30P
Megapixels
The image resolution for photos
32M (7600×4275 16:9)
30M (7304×4104 16:9)
28M (7056×3968 16:9)
25M (6664×3752 16:9)
23M (6480×3648 16:9)
21M (6144×3456 16:9)
20M (5960×3352 16:9)
16M (5336×3000 16:9)
12M (4608×2592 16:9)
10M (4384×2466 16:9)
8M (3456×1944 16:9)
5M (3008×1688 16:9)
Burst
The number of images captured
when you take a photo.
Off, 2, 3, 5, 10, 15,
20
Self Timer
The amount of time the camera
waits to take a photo after you press
Snapshot button.
off, 5 sec, 10 sec
Continuous
shooting
When on, pressing the snapshot
button will activate continuous
shooting during which the camera
will automatically taking a picture at
regular intervals. Press this button
again to stop shooting. When off,
this feature will be disabled.
off, 5 sec, 10 sec
Quality
The quality of the image for video
and photo files.
S. Fine, Fine,
Normal
Page 11

11
Pre-record
When on, any video you record will
include some of the time that
elapsed before you press the Record
button (stored in the camera buffer);
When off, any video you record will
include only video and audio from
the point after you press the Record
button.
Off, On
Delay
Record
The amount of the time the camera
waits to stop recording video after
you press the Record button.
off, 5 sec, 1 minute,
10 minutes
Car DVR
Mode
When on, camera will power up
automatically and start video
recording when it is charged.
Camera will power off as it normally
does when it is disconnected from
the power source.
Off, On
Loop
Recording
When on, camera will overwrite the
oldest video file with the most
current video file once its memory is
full. This setting can be selected only
when car DVR mode is on.
Off, On
Split Time
While recording video, the camera
will automatically split its recording
into files of this length.
3min, 5 min, 10
min, 15 min, 30
min, 45min
Slides Show
When on, viewing photo file will
start a slideshow where each photo
will be shown for around 5 seconds.
Off, on
Infrared
When set to manual, you will need
to hold Snapshot button to turn IR
LEDs on/off. When set to Auto, these
lights will activate automatically
based on the light sensor's reading.
Manual, Auto, off
Page 12
12
White Led
White Led light to offer light source
Off, On
Laser
Pointer
Laser source to locate
Off, On
Motion
Detect
When on, camera will start recording
when front movement is detected
by the lens.
Off, On
Recording
warning
When on, you will hear a voice
confirmation when you start
recording. When off, voice
confirmation is disabled.
Off, On
GPS
When GPS is on, position of video
will be recorded and can be
reviewed by GPS player.
Off, On
Time Zone
Adopt local time in real time zone
-12 to +12
Language
The language of the text in camera
interface
Englsih, 繁體中文,
Pусский,
Jezyk Polski, French,
日本語,
Portuguese
Screen
Saver
The amount of the time the camera
can be idle before deactivating the
display to conserve power.
Off, 30 sec, 1 min, 3
min, 5 min
LCD
Brightness
Screen lighting to view
High, Low
Auto Power
off
The amount of the time the camera
can be idle before powering off.
Off, 30 sec, 1 min, 3
min, 5 min
LED Light
When on, indicator LED will tell
the status of the camera; When off,
camera is entering covert mode
On, Off
Page 13

13
Key Tone
When on, camera will play a tone
each time you press a button. When
off, tone is disabled.
On, Off
Password
If password is on, user needs to
enter password to get access to
setting and connection to PC
On, Off
Volume
The volume of camera speaker. This
affects the loudness of video
playback, audio playback, the key
tone, record warning, and any other
sounds played by camera. This
doesn't affect the volume of the
recorded video or audio files
themselves.
0-12
ID setting
User can set Device SN and Person
SN
Alphanumeric
characters
Change
Password
Password can be set or changed
Alphanumeric
characters
Time Setup
Adjust time to real location
yyyy/mm/dd __:__
Default
setting
Use this to return camera to its
original settings. This does not erase
the memory.
O (Yes), X (No)
Page 14

14
4. Operation
5.1 Power on/off
1) Power on: when camera is off, press ( ) button, camera will power up
and enter standby mode;
⚫ Boot up image shows up;
⚫ Working status LED indicator turns green;
⚫ Boot up music;
⚫ Camera vibrates;
⚫ Camera voice “beeps” when [Record Warning] is ON.
2) Power off: press and hold power ( ) button for 2 seconds to turn off
working-status camera:
⚫ Save video/audio files before power-off;
⚫ Working status indicator turns off;
⚫ Power off image;
⚫ Power off music;
⚫ Camera vibrates.
5.2 Resetting
Press reset button (inside HDMI port) to have camera resetting when
camera works abnormally. Please note: DO NOT PRESS this button except
wrong operation.
5.3 Infrared Night Vision
While under dark circumstances, infrared LED will help to record clear image
or video in HD.
In standby mode, PRESS Menu ( ) button to navigate. Find option
【Infrared】, PRESS OK ( ) button to enter sub-menu: Manual & Auto,
press OK ( ) button to select.
1) Auto infrared mode:
In low light situations (3 Lux), 8 IR LEDs will be turned on automatically,
camera switches on infrared filter lens, video image turn black and white.
Page 15

15
Otherwise, when circumstance brightness grew up, IR LED turns off, and
image becomes colorful again.
2) Manual infrared mode:
When night vision is needed, PRESS IR light button to switch to Infrared
mode, IR LEDs will be turned on, black and white image. PRESS this button
again to turn off IR LEDs, image becomes colorful.
5.4 Take Photos
In standby, PRESS snapshot ( ) button to take a snapshot, with a sound
“Click”, LED working status indicator will flash green once, and the photo
stored. The photo resolution and quality can be set in the settings.
5.5 Snapshot
While camera is video recording, PRESS snapshot ( ) to take a snapshot.
On the LCD display, there will be a flashing green square, which refers to
that a photo has been taken while video is recording.
5.6 Video Recording
In standby mode, PRESS record ( ) button, indicator LED flashes Alternate
Red and Green, then camera “beep” and vibrates, starts video recording. If
the voice is on, camera will start video recording with indication voice. PRESS
record ( ) button again, video recording stops and camera switches to
standby mode, working status indicator changes to green.
5.7 Motion Detection
In settings, please find [Motion Detect] option. PRESS OK ( ) button to
select.
Sub options: ON/OFF
PRESS record ( ) button to activate motion detection, any moments are
detected, camera will start recording. If there are no movements for 10
seconds, camera will stop recording. Once any movements detected, camera
will start video recording again.
Page 16
16
5.8 Audio Recording
In standby mode, PRESS Audio ( ) button, with a beep and camera
vibration, LED indicator turn yellow and flashes, audio recording started.
PRESS Audio ( ) button again to stop audio recording.
5.9 One Button recording
When camera is powered off, HOLD Record ( ) button, camera will
initiate and start video recording immediately.
5.10 Tag Important file
In audio or video recording, PRESS importance tag ( ) button, camera
vibrates, the audio or video file will be tagged important, with a yellow icon
( ) showing on the top right of the LCD screen.
5.11 Device ID/ User ID
In standby mode, PRESS Menu ( ) button to enter settings. Find [ID
setting], PRESS OK ( ) button to select, then the Device & Person SN
interface will show up, 5 characters for device and 6 characters for Person.
PRESS scroll-Up ( ) button or Scroll-down ( ) button to highlight a
character, then PRESS OK ( ) button to select.
5.12 Time Setting
In standby mode, PRESS Menu ( ) button to enter settings. Find Time bar,
for example, 2008/02/02 07:40. PRESS OK ( ) button and enter the
password, then users can change the date and time.
Press Scroll-Up ( ) button or Scroll-down ( ) button to highlight a
character, the PRESS OK ( ) button to select.
5.13 USB Driver and video/picture/audio deletion
After being connected to PC, password interface shows up, please enter the
Page 17

17
password(default password is 000000), the camera will be recognized by the
computer as Extra drive. User can go to camera folder and delete those files
not needed.
5.14 Playback
1) In playback mode, PRESS OK ( ) to pause/resume playback; PRESS
Scroll-Up ( ) button to rewind, PRESS Scroll-down ( ) button to fast
forward, then PRESS OK ( ) to play normally. You can fast forward or
rewind 2x, 4x, 8x, 16x, 32x, 64x, 128x.
2) Exit the Playback mode:
In Playback mode, PRESS Power ( ) button to get back to standby mode
step by step.
5.15 External Mini Camera (optional)
Connect the external camera to USB port, the audio and video signal input
will be switched to external camera automatically. Meanwhile, the external
camera can be controlled by the main body camera.
Drive-by-wire button operating instructions: When the camera is in standby
mode: A, HOLD the button for 3 seconds to have the external camera
start/stop video recording; B, PRESS the button to take a picture through
external camera.
5.16 Charging
When camera batter is low, the battery icon will flash in the display, and you
will hear a alert tone. When this happens, charge the camera.
While camera is charging, indicator lights blue and will turn off after camera
is fully charged. It will take approximately 4 hours to fully charge the
camera.
Charging methods:
1). Use a USB cable to connect camera’s USB port to one of the following:
Page 18
18
⚫ A USB port on your computer (powered on)
⚫ The included USB power adapter (connect to a power outlet)
⚫ The included car charger.
2). Attach camera to the docking bay. Use a USB cable to connect the
docking bay to one of the following:
⚫ A USB port on your computer (powered on)
⚫ The included USB power adapter (connect to a power outlet)
⚫ The included car charger.
5.17 GPS tag
When GPS turns on, camera will record specific location information along
with body camera footage, and the tags are stored in the video metadata,
pinpointing the location when the footage is reviewed.
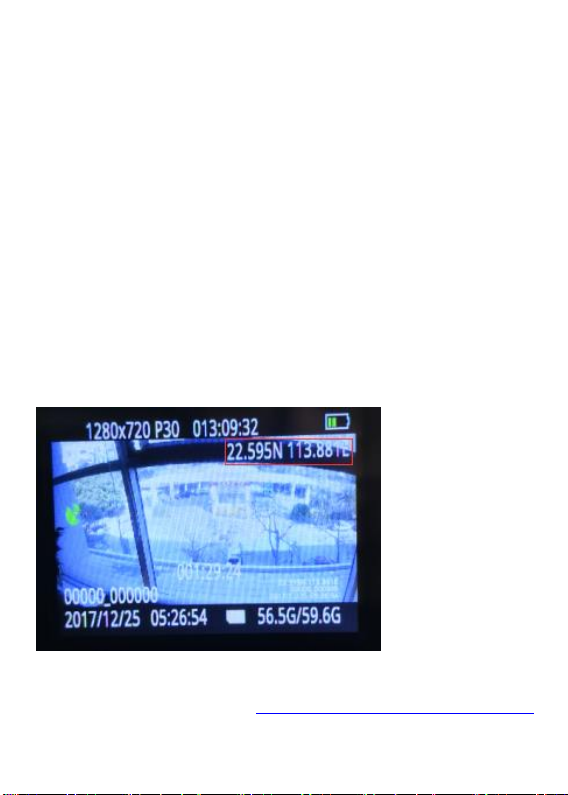
There will be GPS coordinate (longitude and latitude) showing up in the
upper right corner of LCD screen when GPS signal is received.
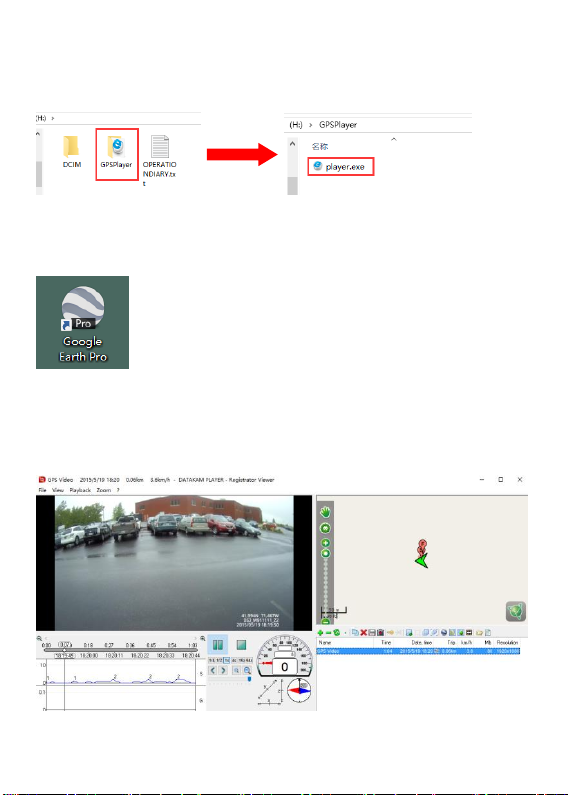
To view GPS tags, User will need to use GPS player (stored in camera
memory) and Google Earth (go to https://www.google.com/earth/desktop/
to download Google Earth to your PC).
Page 19
19
GPS Player
Google Earth
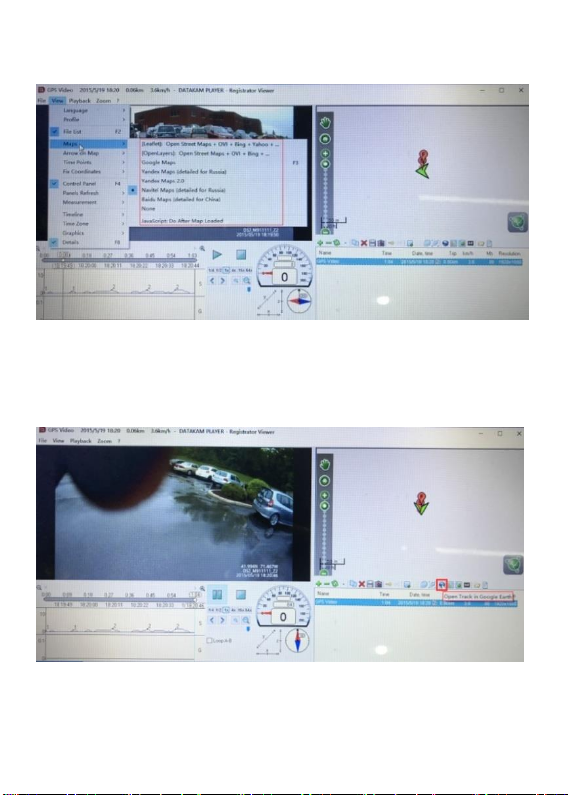
Run GPS player and Google Earth. Open the video (with GPS tags) footage by
the GPS player.
Page 20
20
PS: you could choose related maps in your region.
Click “Google Earth” icon to review GPS route on Google Earth program. (PS:
make sure Google Earth program is working in your PC.)
Page 21
21
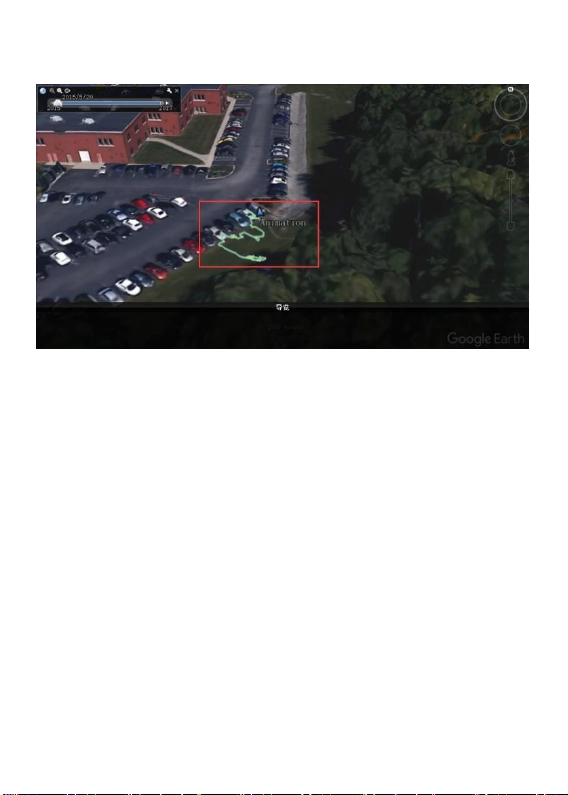
GPS tags on Google Earth.
 Loading...