

Page 1

Gaming Laptop Series
GAME
ON
USER MANUAL
GAMING LAPTOP: OP-LP3
Page 2

Page 3

NOTICE
The information in this user’s manual is protected by
copyright laws, all parts of this manual, including the
products and software described in it, can not be
reproduced, transmitted, transcribed, stored in a retrieval
system, nor translated into any language.
THE MANUFACTURER OR RESELLER SHALL NOT BE
LIABLE FOR ERRORS OR OMISSIONS CONTAINED IN THIS
MANUAL AND SHALL NOT BE LIABLE FOR ANY
CONSEQUENTIAL DAMAGES, WHICH MAY RESULT FROM
THE PERFORMANCE OR USE OF THIS MANUAL.
The illustrations in this user’s manual are for reference only.
Actual product specifications may vary with territories.
The information in this user’s manual is subject to change
without notice.
OVERPOWERED Products
800-379-3820
Page 4

TABLE OF CONTENTS
Notice ................................................................................................... 3
Preface ................................................................................................. 6
1.1 Regulations Information ........................................................ 7
1.2 Safety Instructions .................................................................. 8
Getting to Know the Basics ............................................................ 9
2.1 Product Specification ........................................................... 10
2.2 Preparing Your Computer ................................................... 13
2.3 Product Overview ................................................................... 14
Getting Started ................................................................................. 21
3.1 AC Adapter ............................................................................. 22
3.2 Knowing the Keyboard ........................................................ 23
3.2.1 For Keyboard Users ............................................................. 24
3.3 Using the Touchpad/Clickpad ........................................... 27
Customize Your Sound ........................................................ 28
Page 5

BIOS Setup ....................................................................................... 29
4.1 About BIOS Setup ................................................................. 30
4.1.1 When to Use BIOS Setup? .................................................. 30
4.1.2 How to Run BIOS Setup? .................................................... 30
4.2 BIOS Setup Menu ................................................................. 31
4.2.1 Main Menu ............................................................................... 32
4.2.2 Advanced Menu ................................................................... 34
4.2.3 Security Menu ........................................................................ 35
4.2.4 Boot Menu .............................................................................. 37
4.2.5 Exit Menu ................................................................................ 38
Important Product Information .................................................. 39
5.1 FCC (SAR) Statement ........................................................... 39
5.2 Disposal and Recycling Information ................................ 40
5.3 Contact Information ............................................................. 43
Page 6

CHAPTER
PREFACE
6
Page 7
. Regulations Information
CE compliance
This device is classified as a technical information equipment
(ITE) in class B and is intended for use in living room and office.
The CE-mark approves the conformity by the EU-guidelines:
— EMC Directive 2014/30/EU,
— Low Voltage directive 2014/35/EU (equals A2: 2013),
— R&TTE Directive 1999/5/EC
The unit can be operated at an ambient temperature
of max. 35°C (95°F). Do not subject it to temperatures
below 5°C (41°F) or above 40°C (104 °F).
CAUTION:
By an incorrect type dispose of used batteries
according to the instructions.
PREVENTION OF HEARING LOSS
CAUTION:
Listening to music at high volume levels and for
extended durations can damage ones’ hearing. In
order to reduce the risk of damage to hearing, one
should lower the volume to a safe, comfortable
level, and reduce the amount of time listening at
high levels. Headsets should comply with EN
50332-2 requirements.
7
Page 8
1.2 Safety Instructions
100kg
1
5
2
34
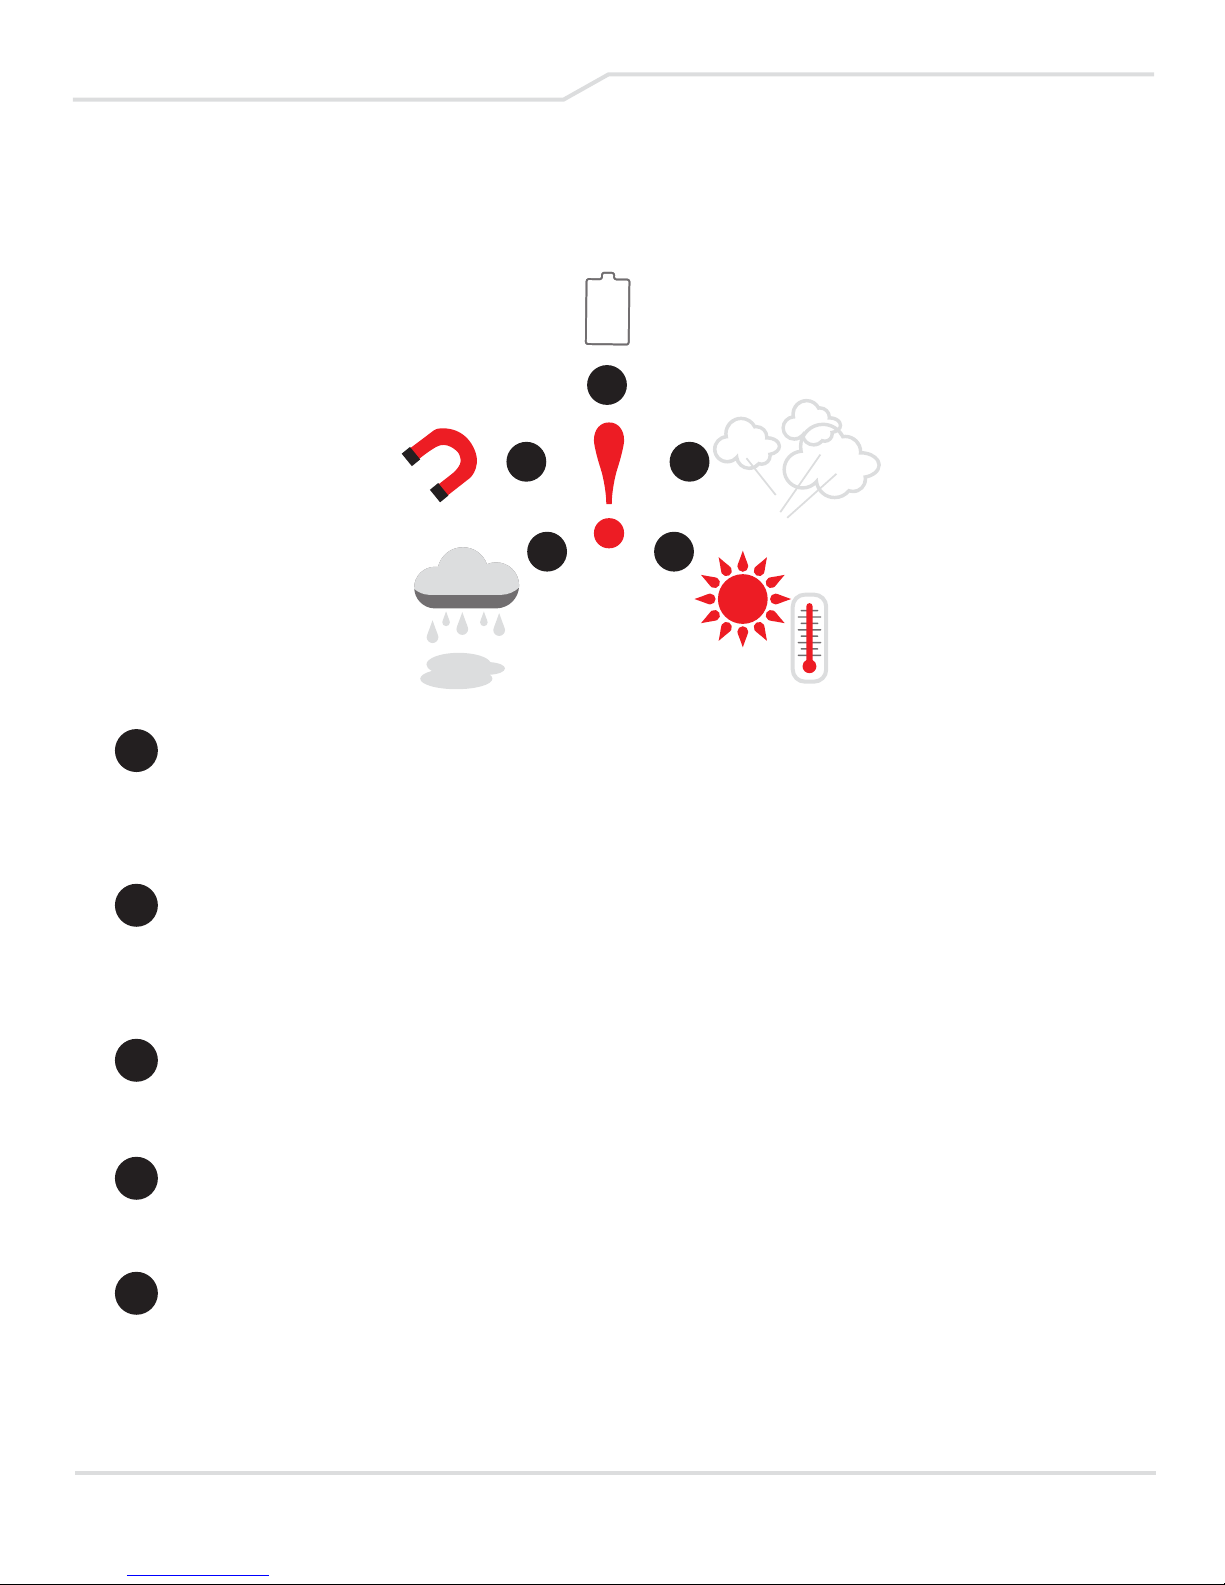
1 Do not apply heavy pressure to the computer or subject it to
any form of strong impact as this can damage the
computer's components or otherwise cause it to malfunction.
2 Never cover or block the air vents including those located at
the base of the computer. Never cover your computer or AC
adapter with any object.
3 To keep your computer in prime operating condition,
protect your work area from direct sunlight.
4 Do NOT expose to or use near liquid, rain, or moisture.
Do NOT use the modem during electrical storms.
5 Do not use or expose this device around magnetic fields
as magnetic interference may affect the performance of
the device.
8
Page 9

CHAPTER
GETTING
TO KNOW
THE BASICS
9
Page 10

. OPLP Product Specifications
This user’s manual provides technical information of
instructions and illustrations on how to operate this
notebook for the customer. Please read this manual
carefully before using this notebook.
Physical Characteristic
Dimension ............................................ (WxDxH) 15.6”x10.26”x1”
Weight ................................................................................... 5.2 lbs.
CPU
Support Processor ...................................... Intel Core i7-8750H
GPU
Support Processor ......................................... NVIDIA GTX 1060
Memory
RAM ....................................................... 32GB, DDR4 2666 MHz
I/O Port
DC-in ............................................................................................. (x1)
USB-C 3.1 (Gen1) ......................................................................... (x1)
USB 3.1 (Gen1) ............................................................................. (x2)
USB 2.0 ......................................................................................... (x1)
Ethernet ........................................................................................ (x1)
2 in 1 Card Reader (MMC/SD/SDHC/SDXC) ........................ (x1)
HDMI ............................................................................................. (x1)
Audio-out & Mic-in .................................................................... (x2)
Mini DP ........................................................................................ (x2)
10
Page 11

Audio
Audio Codec ....................................................... Azalia Standard
D3 Mode
Speaker ......................................... (x2) Realtek Audio (2W each)
Digitial Microphone Support with Camera
Inputs
Keyboard ............................................. Mechanical KB LED RGB
Touch Pad .................................... (WxD) 5.1”x2.8” (Mylar/Glass)
Display
LCD ............................................................ 17.3", FHD, 16:9, 144Hz
Resolution .................................................................. 1920x1080p
Communication Port
LAN .................................................................. 10/100/1000 MBps
Wireless LAN ............... M.2 2230 with CNVI Interface (Intel 9)
IEEE802.11 b/g/n
AC Mode
Webcam
HD Webcam ....................................... IR Camera with D-MICx2
Storage
HDD ............................................................................................. 2TB
SSD ....................................................................................... 256GB
Slot 1: SATA+PCIE 3.0 by 4 (Supports NVMe)
Slot 2: PCIE 3.0 by 4 (Aupports NvMe)
RAID 0/1
11
Page 12

Power
AC Adapter
(Automatics voltage adjustment) .................... 100 - 240VAC 50/60Hz
180 Watts (19.5V/9.23A), 3 Pins
Battery ................... Soft pack LiPo Battery, SW Gas Gauge IC
3 cells (3s1p 4100mAh) 46.74wh
CAUTION:
MODEL IS DESIGNED TO USED
WITH THE DC INPUT:
19.5V/9.23A
12
Page 13
2.2 Preparing Your Computer
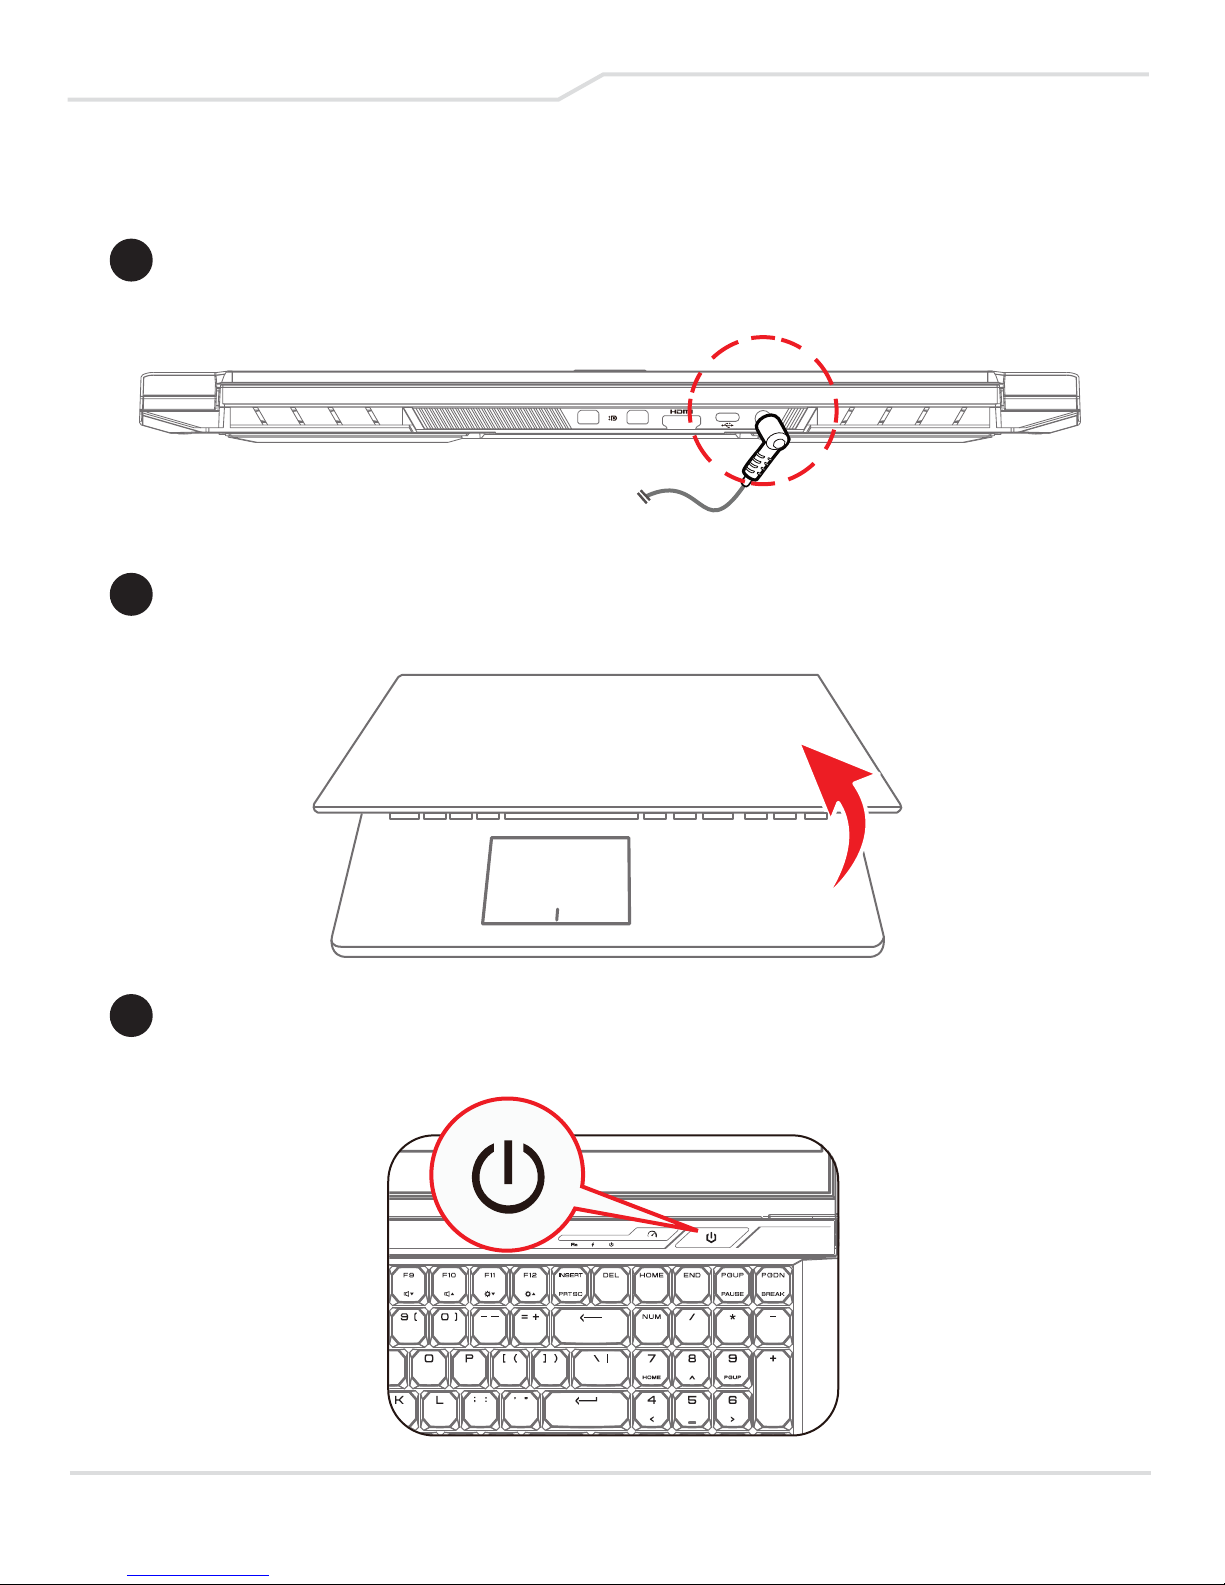
A Connect the AC adapter’s DC output plug to the DC IN jack.
B The display panel can be opened to a wide range of angles
for optimal viewing.
C Press the power button to turn on your notebook computer.
13
Page 14
2.3 Product Overview
Please become familiar with each component before you
operate the computer.
Top-Open View
The product’s color/ LED color, I/O port,
indicator location, and specification will depend
upon the actual shipping product.
1
3
7
8
2
4
5
6
CAUTION:
When computer is not in use, keep LCD screen
closed for dust prevention.
14
9
Page 15

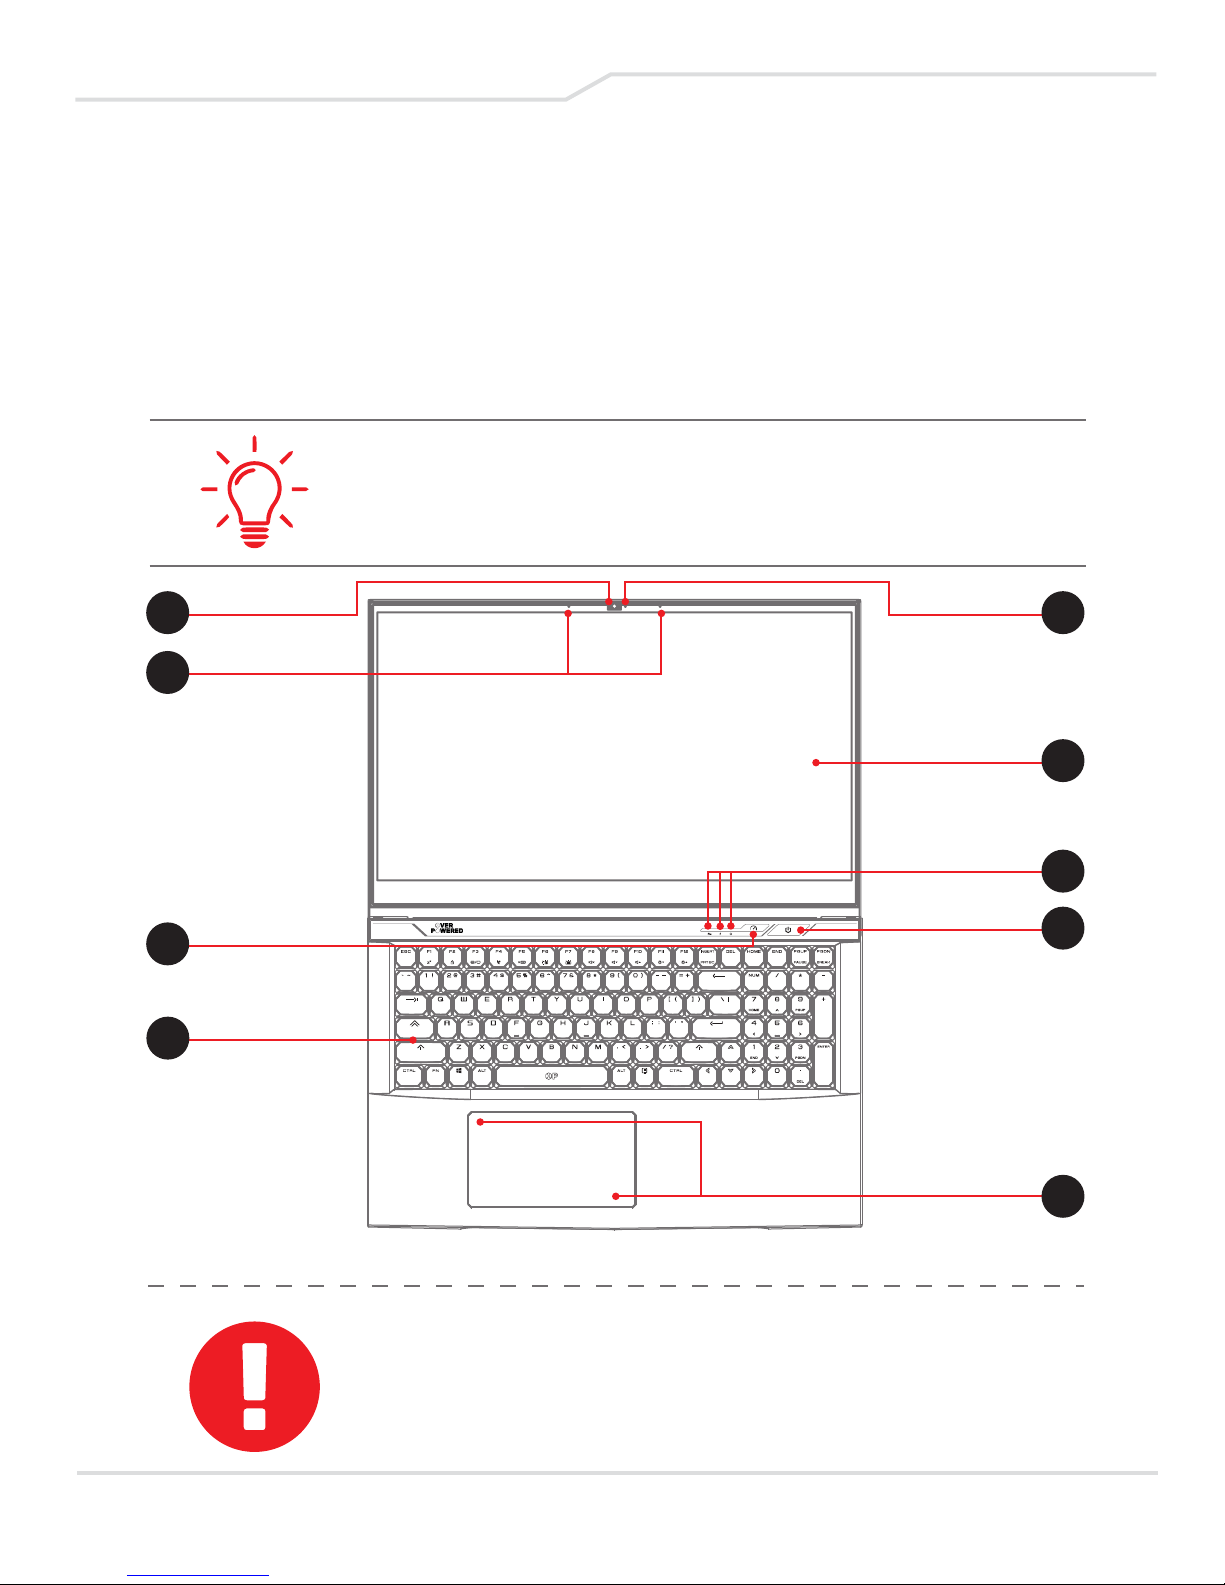
1 Webcam
The built-in webcam allows picture taking or video recording
from your computer.
2 Camera Status LED
The LED indicator shows when the build-in camera is in use.
3 Microphone
Built-in microphone.
4 LCD screen
Your notebook computer's default display.
5 Caps Lock Status LED
Default: Green.
Charging & Battery indicator
Charging(Power ON): Orange
Charging(Power Off): Orange
Battery Low (<6%): Orange (3 Sec/Cycle)
Charging finish (w/AC ): Green, (w/o AC): Off
Power Indicator
Power ON: Green
Suspend: Green, Slow/Smooth, Blinking Green (3
Sec/Cycle)
Power Off: OFF
6 Power Button
Press this button to turn the computer's power on or off.
15
Page 16
7 Office/Gaming Mode Button
Gaming Mode increases preformance and power consumption.
8 Keyboard
Full keyboard with RGB backlight support.
(The keyboard will depend upon the actual product shipped)
9 TouchPad/ClickPad
Touch-sensitive pointing device which functions like the mouse.
Touchpad LED indicator/Touchpad switch
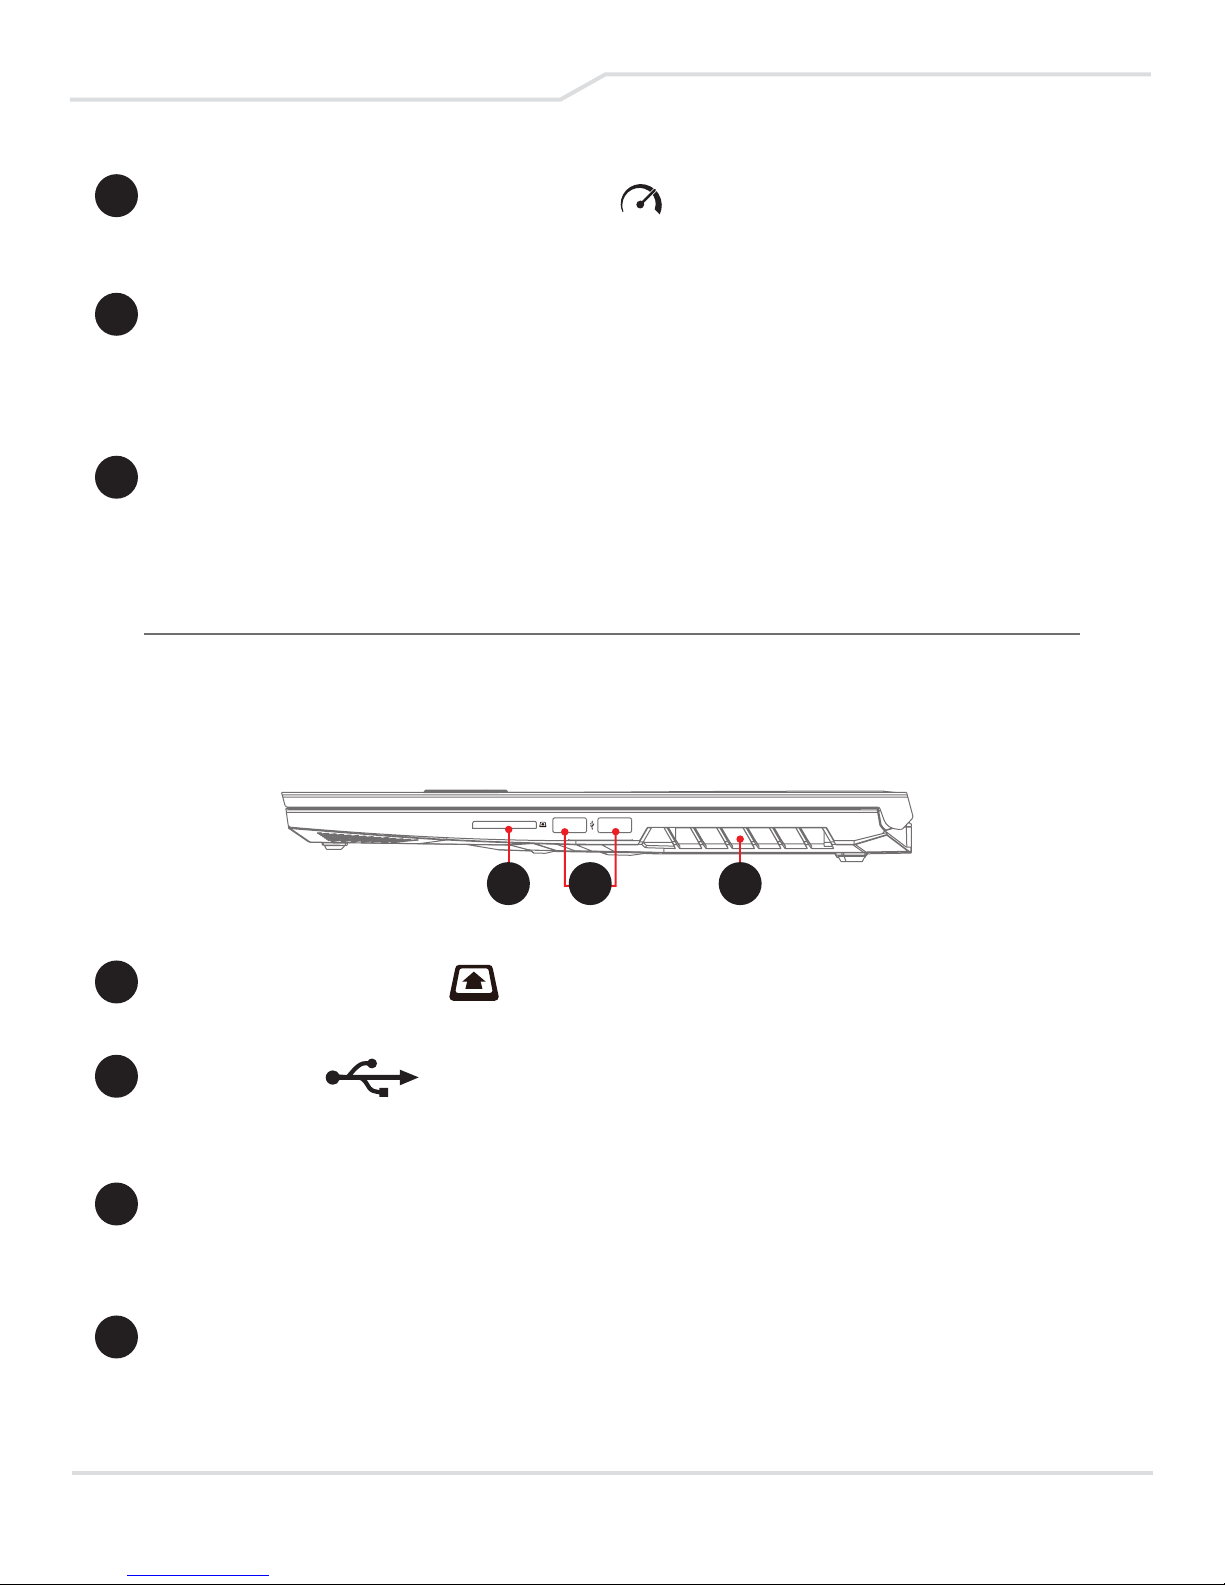
Right Side View
1 2
3
1 2 in 1 Card Reader
Supports 2 types of memory cards.
2 USB Ports
Connects any USB device.
(such as USB Zip drive, keyboard or mouse).
3 Vents
The thermal vents are designed to cool the internal
components and avoid overheating.
4 LCD Screen
Your notebook computer's default display.
16
Page 17
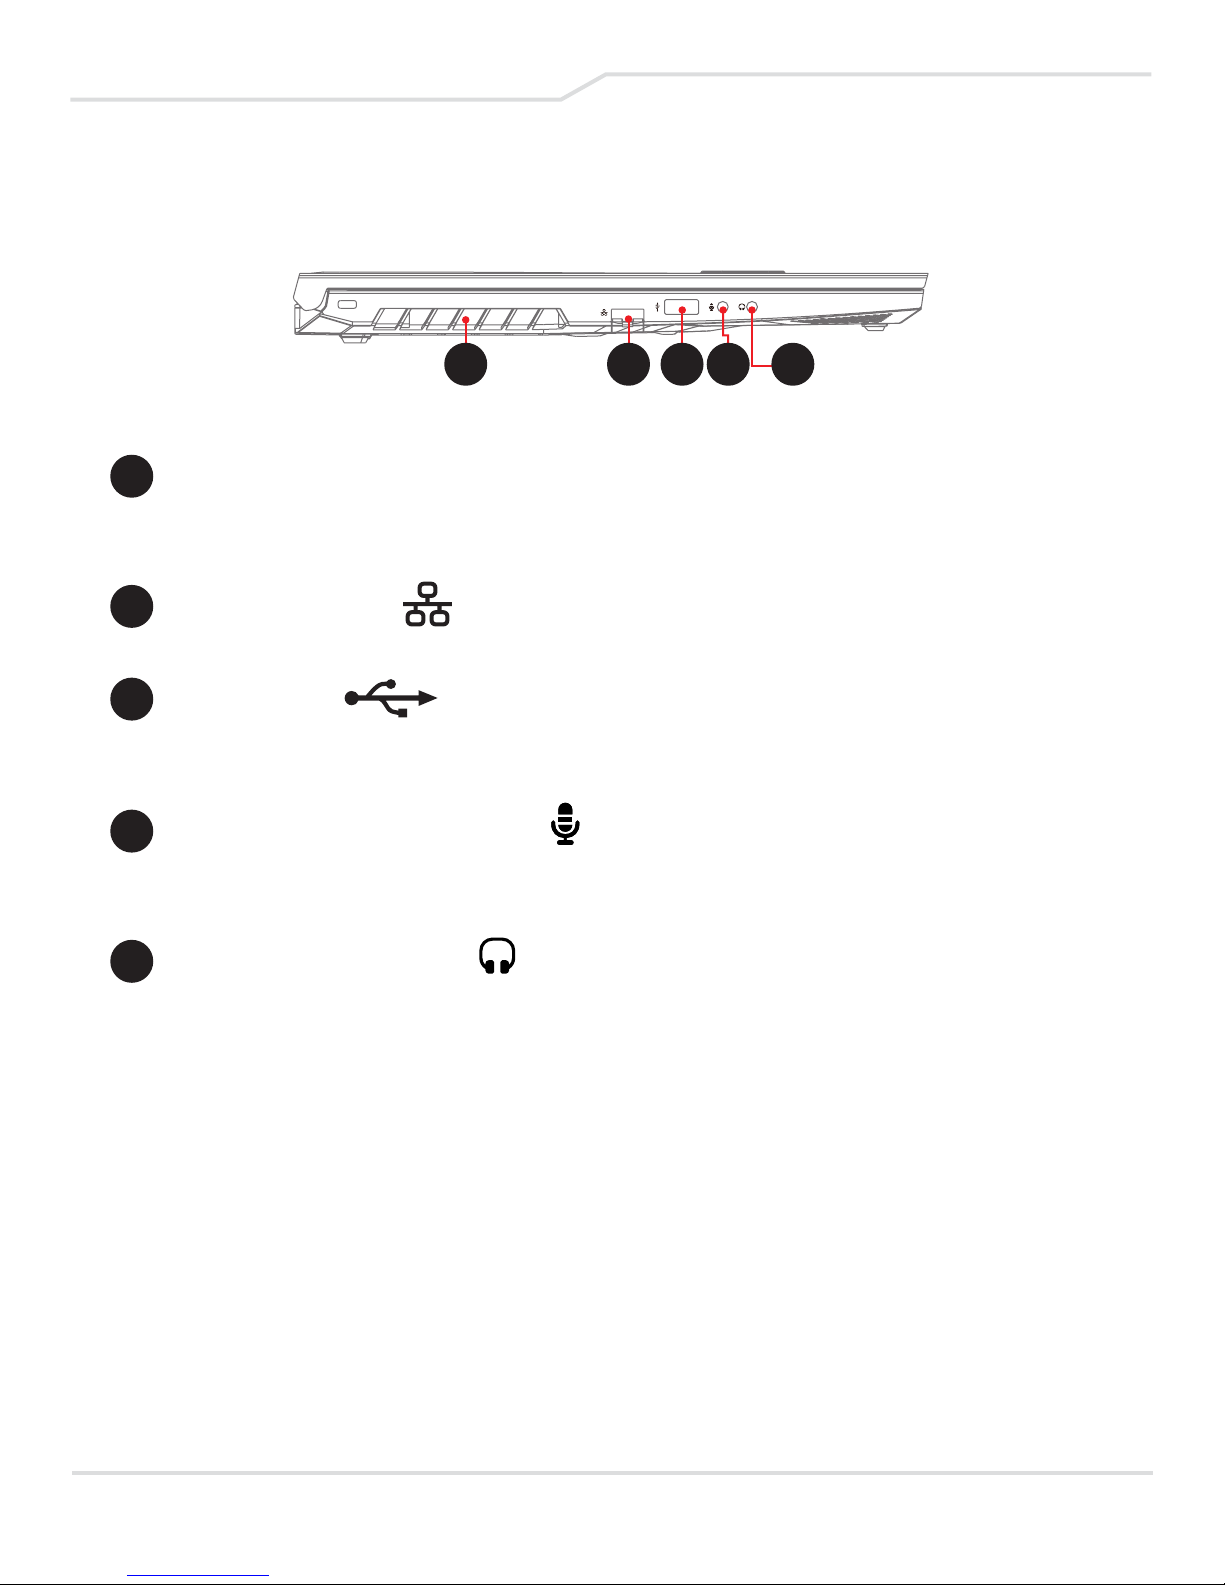
Left Side View
1 2 3 4 5
1 Vents
The thermal vents are designed to cool the internal
components and avoid overheating.
2 Network Jack
This jack lets you connect to a LAN.
3 USB Ports
Connects any USB device.
(such as USB Zip drive, keyboard or mouse).
4 Microphone Input Jack
Connects amplified speakers, headphones or microphone
into this jack.
5 Audio Output Jack
Connects amplified speakers, headphones or microphone
into this jack.
17
Page 18
1
2
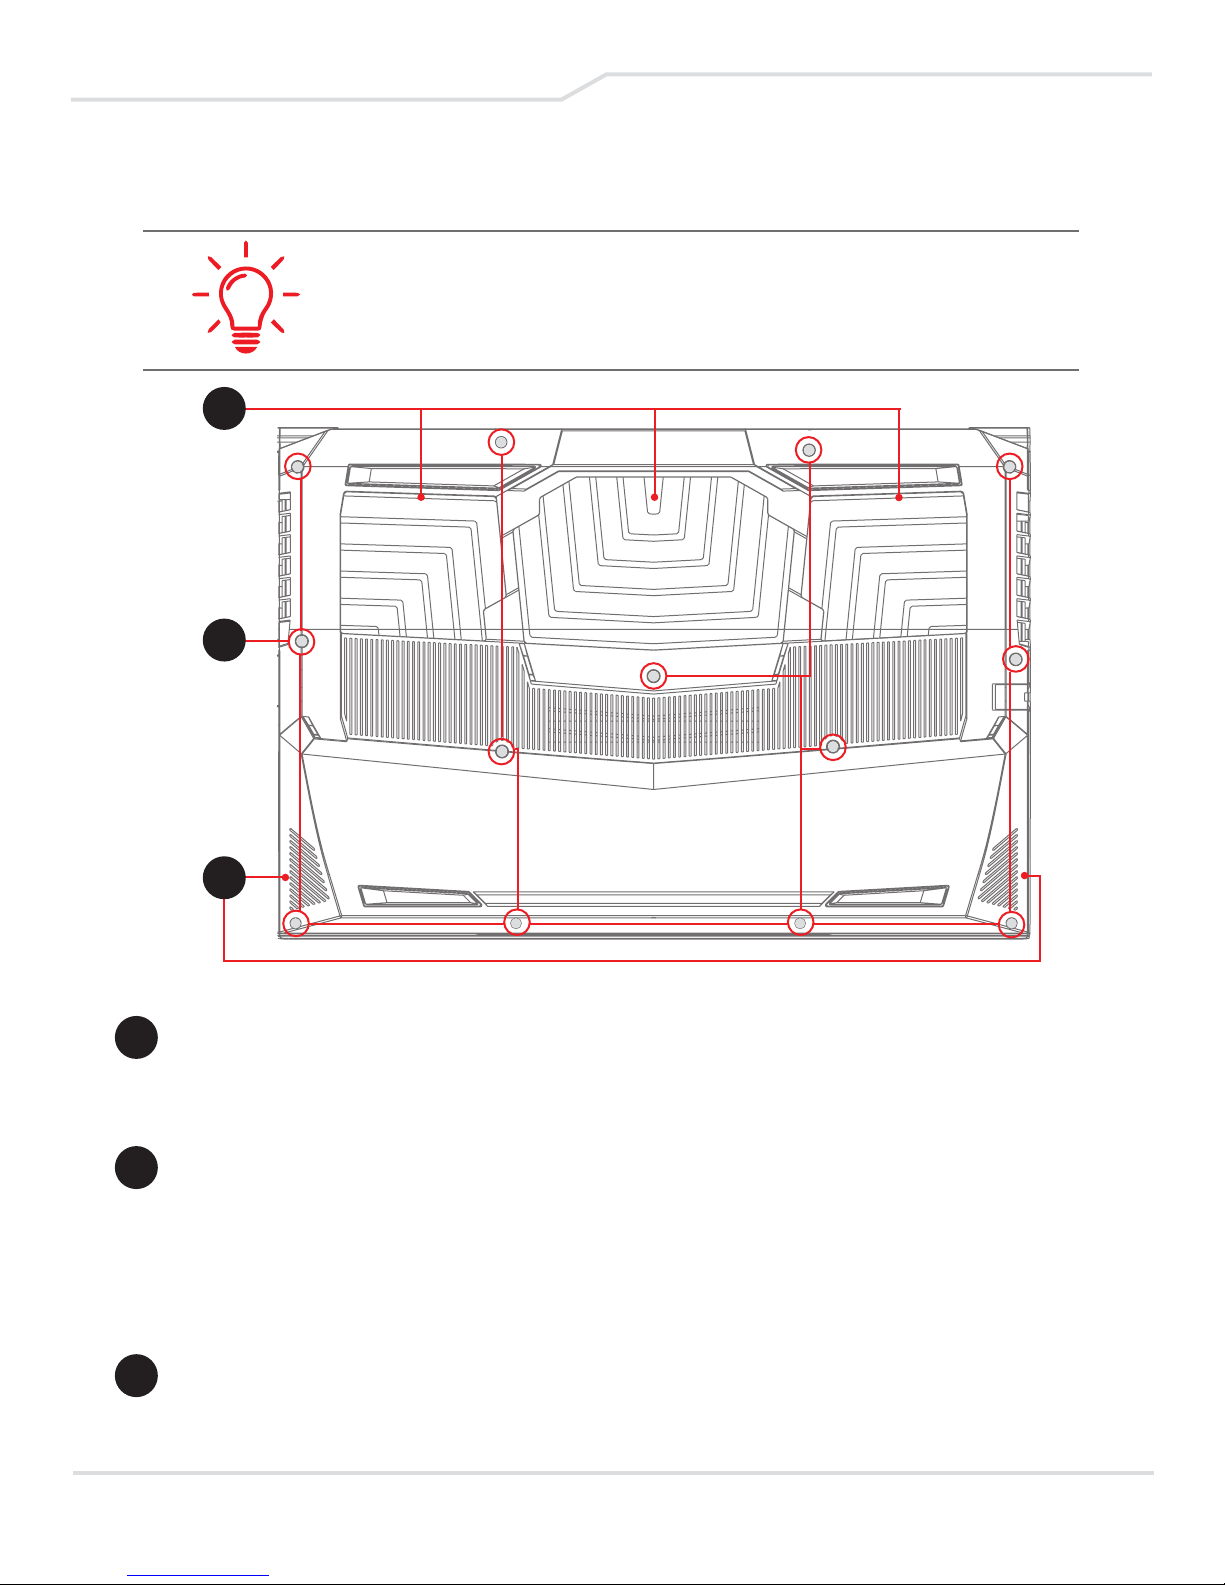
Bottom View
The product’s thermal vent will depend upon the
actual shipping product.
3
1 Vents
The thermal vents are designed to cool the internal
components and avoid overheating.
2 HDD / RAM / SSD / WLAN Compartment Cover Screws
You can remove the screws to install or remove the HDD /
RAM / SSD / WLAN compartment cover. ( Please refer to the
HDD / RAM / SSD / WLAN compartment view on the
following page.)
3 Speakers
18
Page 19
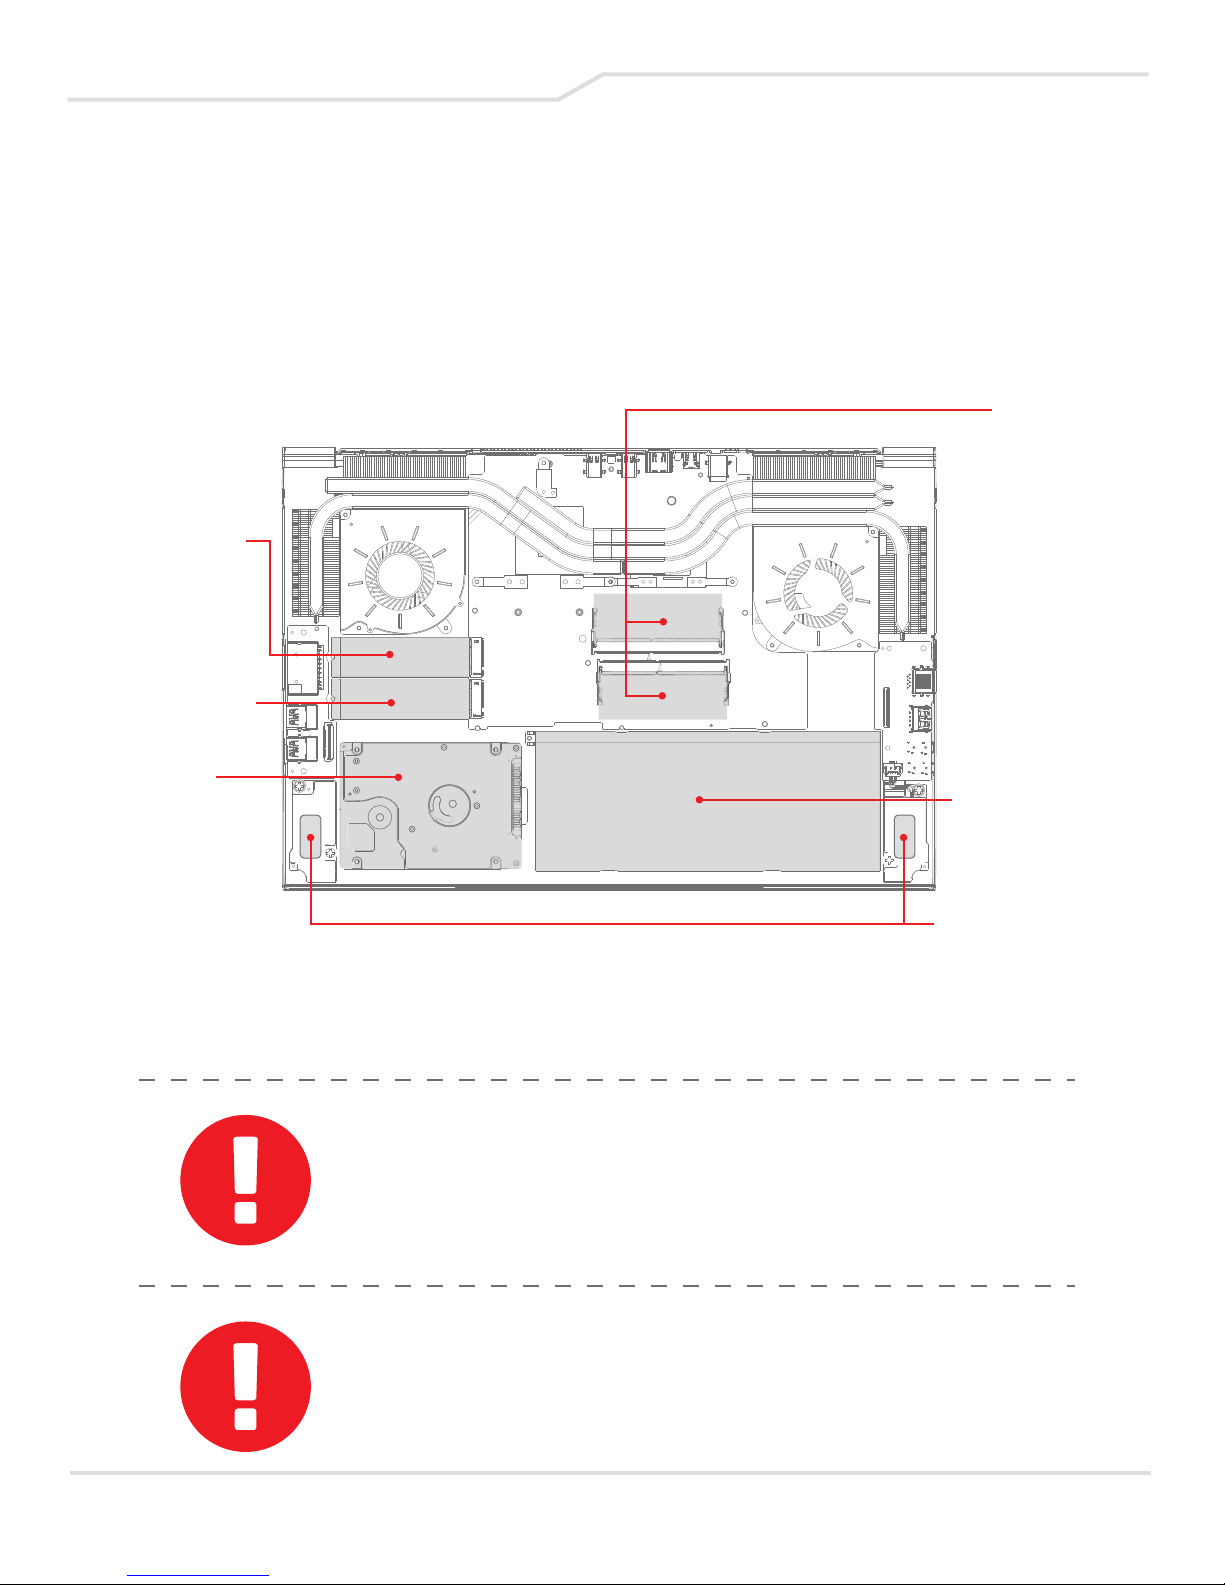
HDD / RAM / SSD / WLAN Compartment View
(Optional)
RAM
SSD
NVME
SSD
NVME
(SATA)
HDD
Battery
Speaker
If need to upgrade SATA SSD to PCIE SSD:
Please contact technical support and
after-sales service.
CAUTION:
Do not put the computer on your lap or other parts
of the body to avoid injury from the heat.
19
Page 20
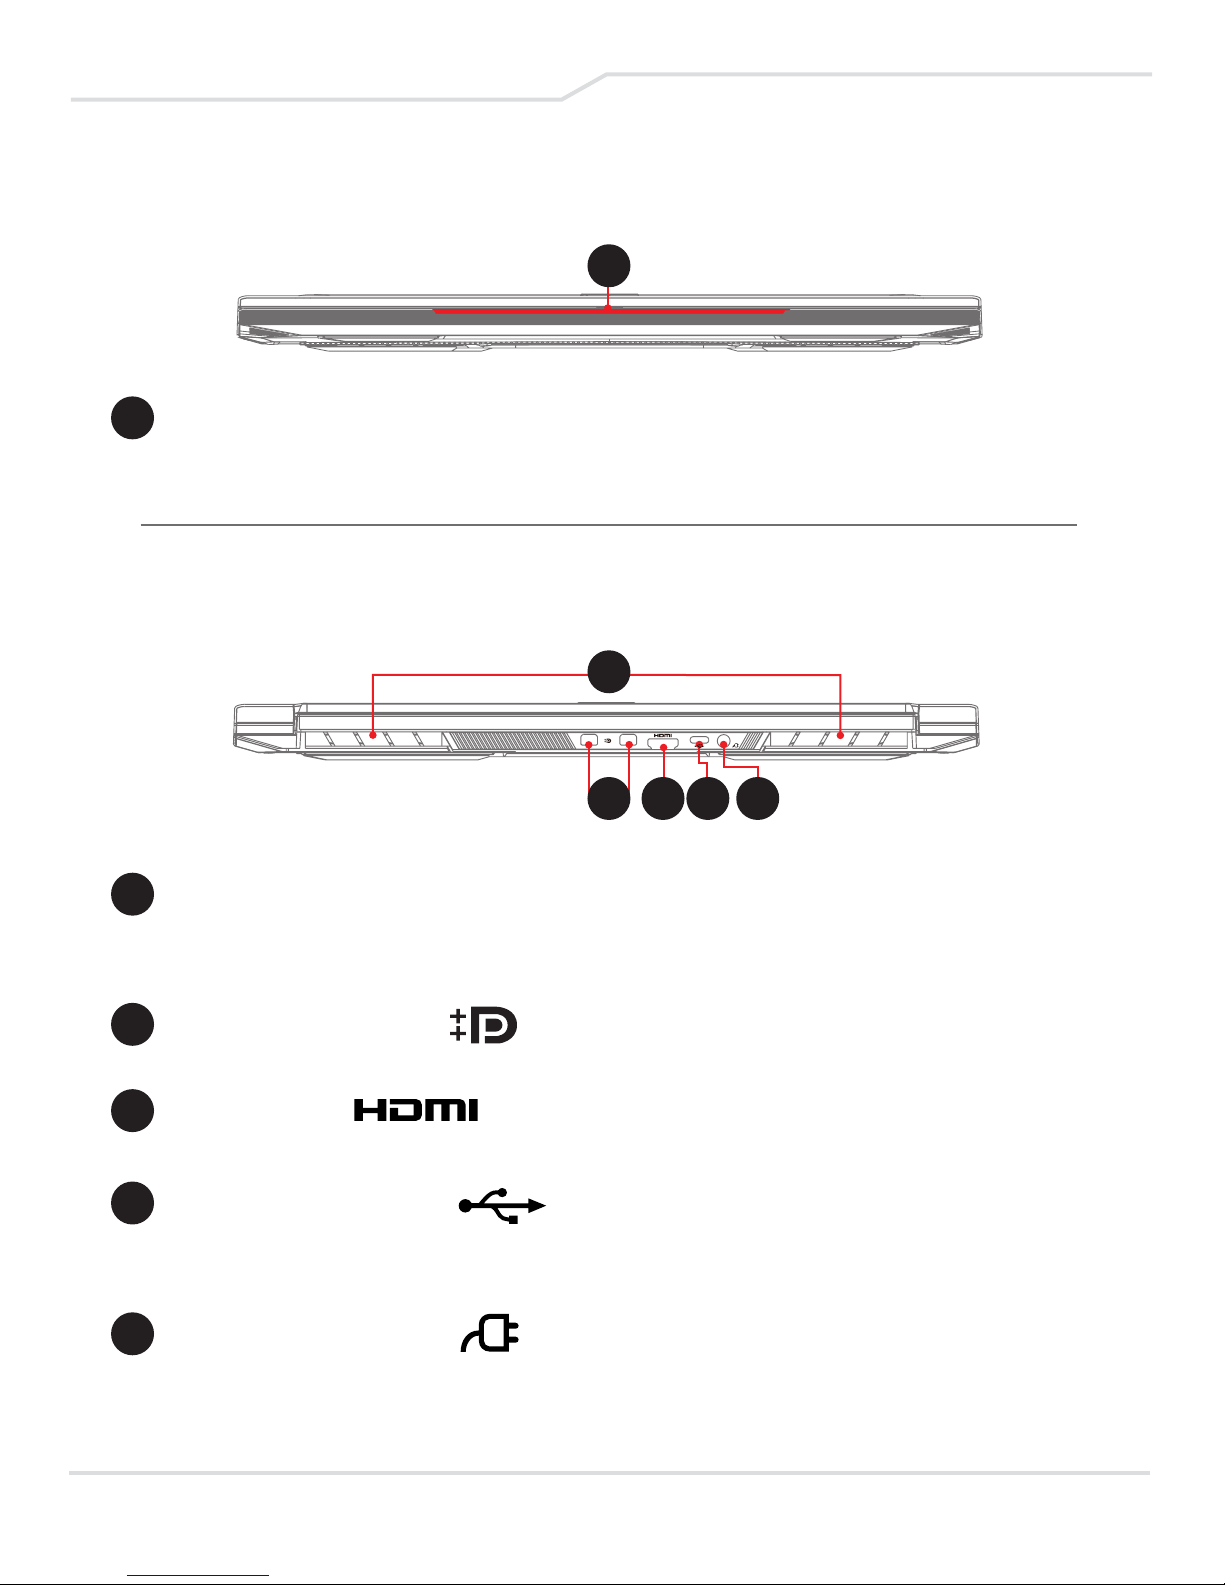
Front Side View
1 Light Bar
Light bar (choose color from APP).
Back Side View
1
1
2 3 4 5
1 Vents
The thermal vents are designed to cool the internal
components and avoid overheating.
2 Mini DisplayPort
Connect to an external display, monitor, or home theater system.
3 HDMI Port
Supports high-definition digital video connections.
4 USB Port (USB-C)
Connects any USB device (such as USB Zip drive, keyboard
or mouse) into jack. Allows for charging.
5 Power Connector
Connects through AC adapter.
20
Page 21

CHAPTER
GETTING
STARTED
21
Page 22
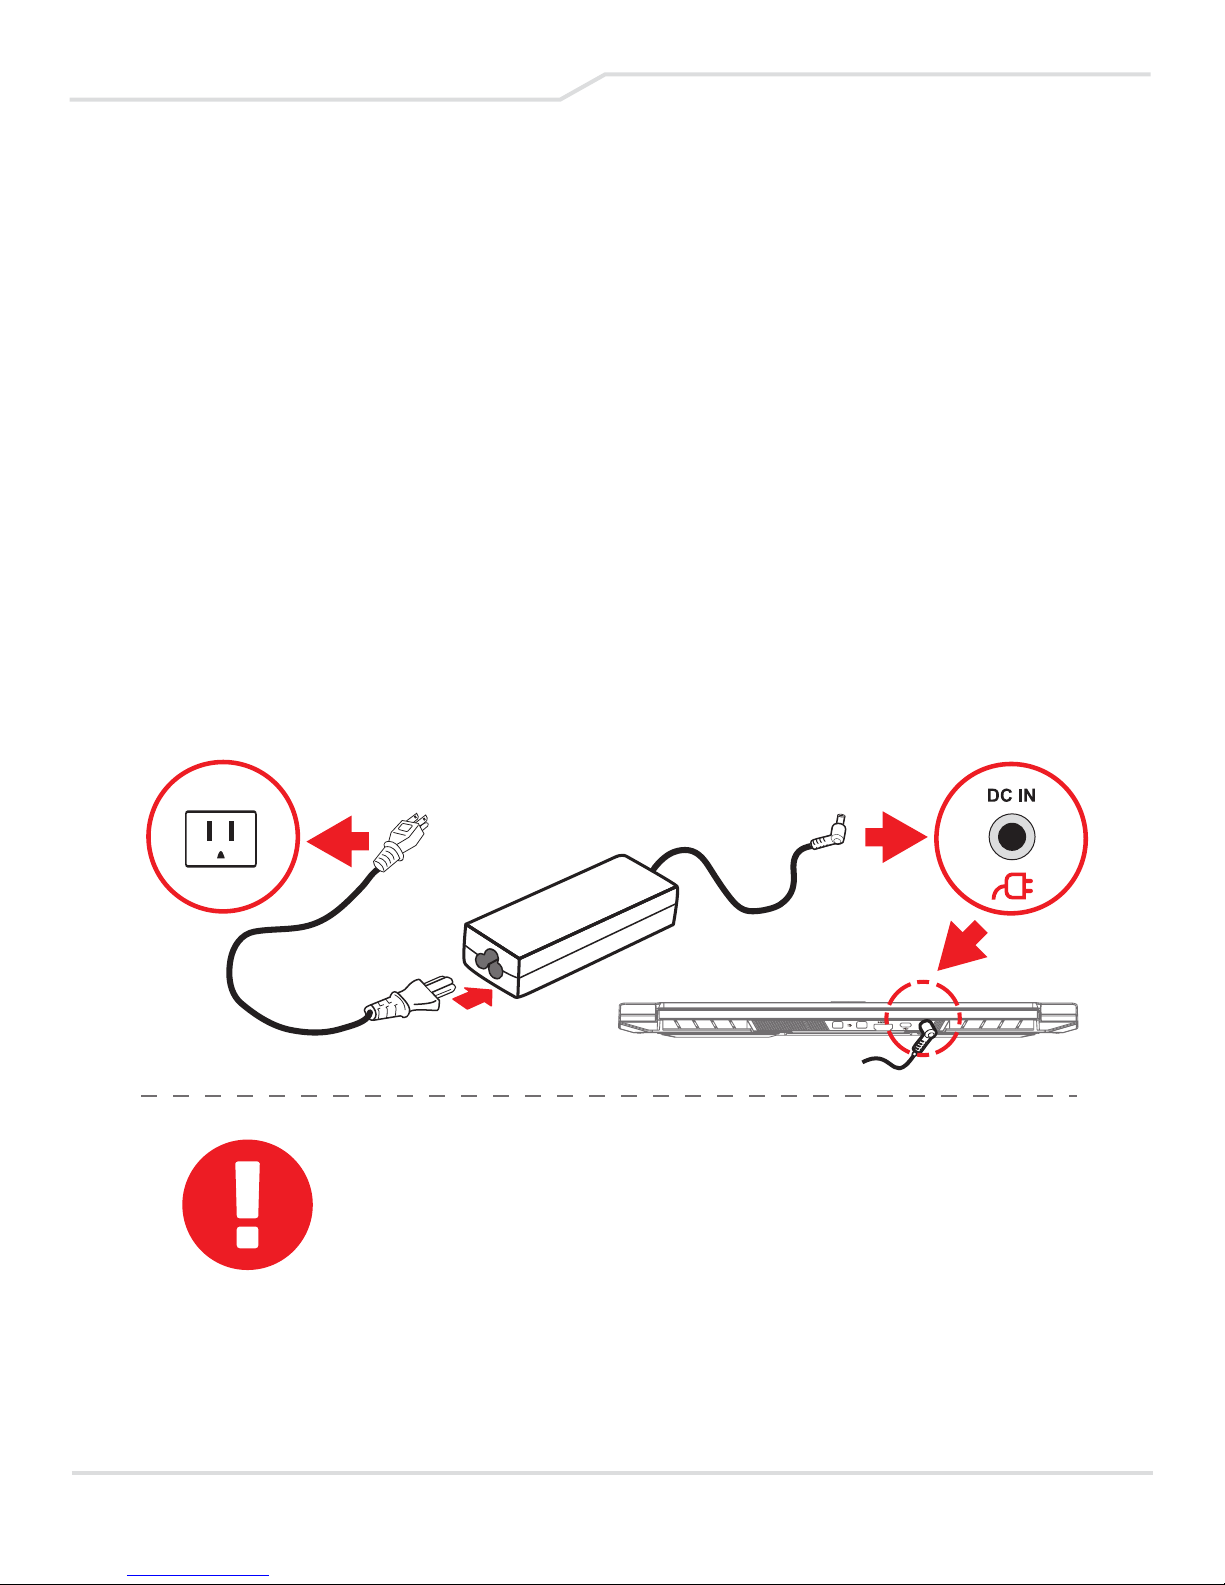
3.1 AC Adapter
Please note that it is strongly recommended to connect the
AC adapter and use the AC power while using this notebook
for the first time. When the AC adapter is connected, the
battery is being charged immediately. Attach the AC
adapter when you need to charge the battery or want to
operate from AC power. It is also the fastest way to get
started, because the battery pack will need to be charged
before you can operate from battery power.
Note that the AC adapter included in the package is approved
for your notebook; using another adapter model may damage
either the notebook or other devices attached to it.
CAUTION:
The use of inferior extension cords may result in
damage to your notebook. Your notebook comes
with its own authorized AC adapter. AC adapter or
cable extension, which is not authorized for use,
will void warranty protection if damage to
hardware is found in association to said adapter
or extension cable.
22
Page 23
NOTE: The power adapter can become hot
when in use. Please be sure the AC adapter is
not covered with any materials and kept away
from exposed parts of your body. The AC
adapter appearance may vary depending on
your region.
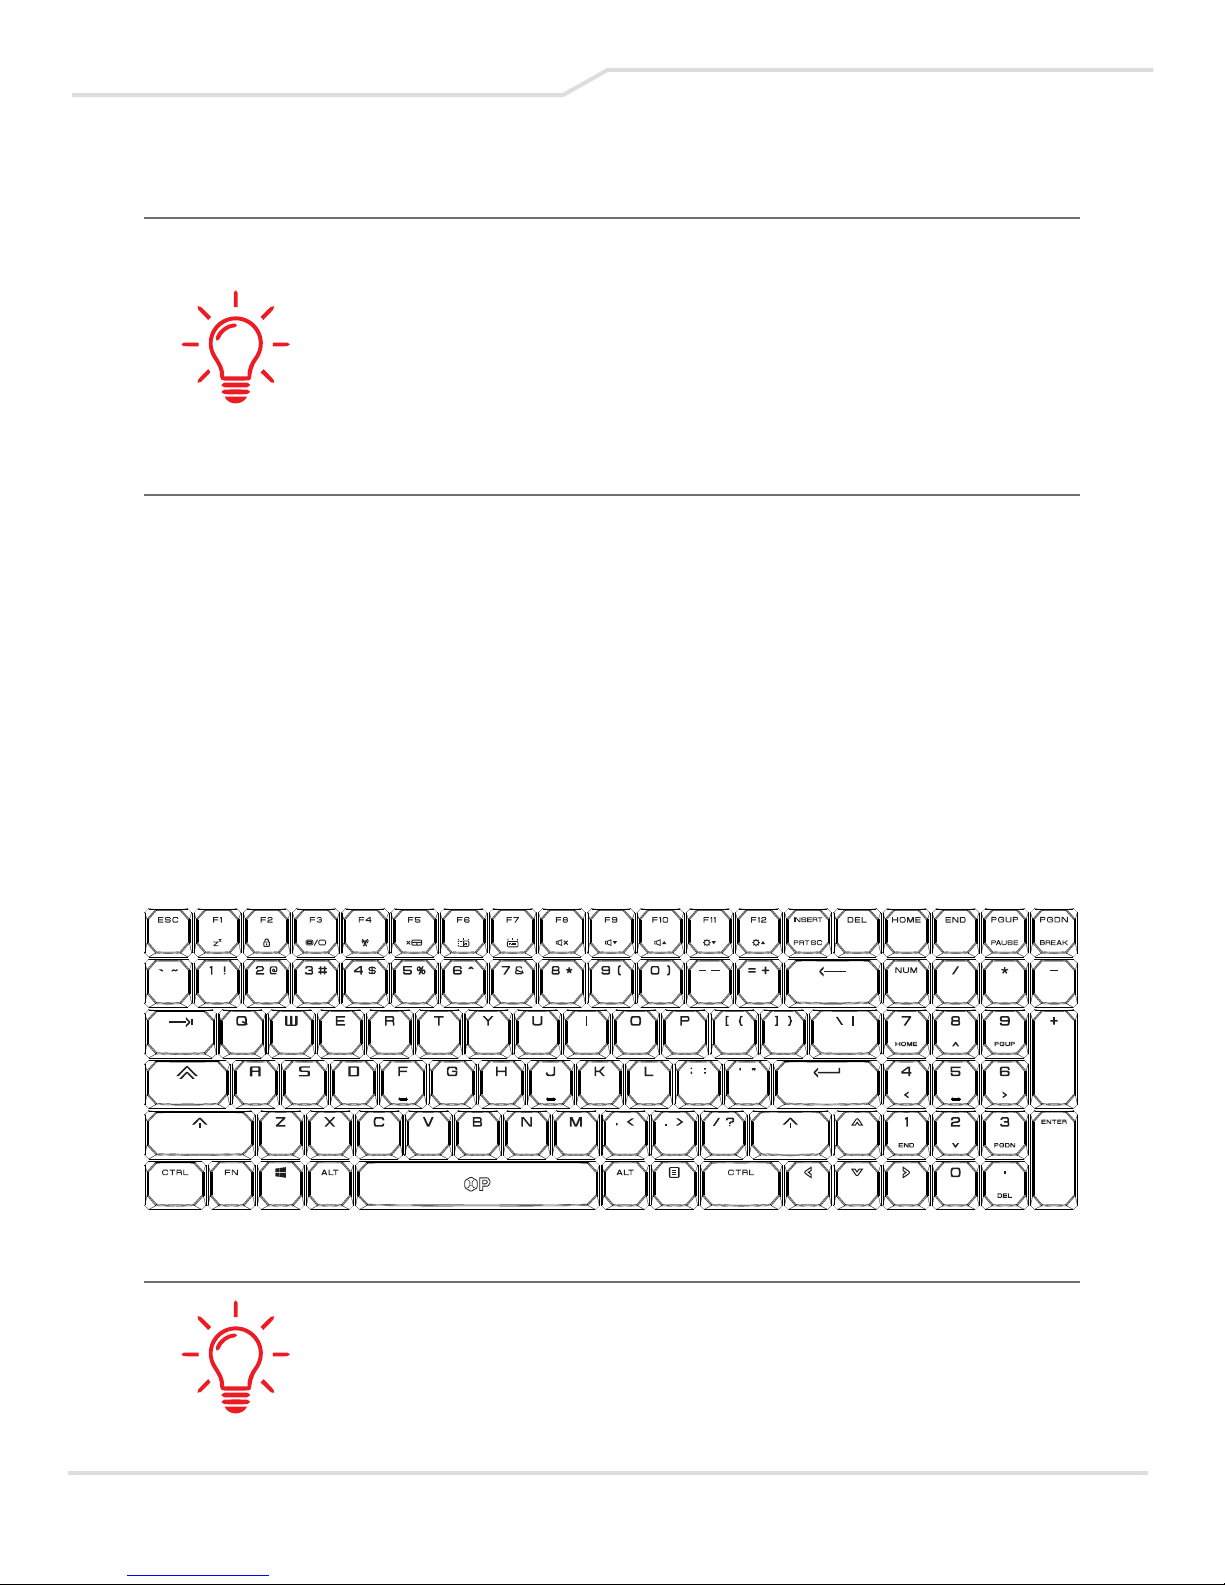
3.2 Knowing the Keyboard
The following defines the colored hot keys on the Keyboard.
The colored commands can only be accessed by first
pressing and holding the function key while pressing a key
with a colored command.
NOTE: The number of keys available on your
keyboard will depend on the country/region in
which the keyboard was designed and built.
23
Page 24
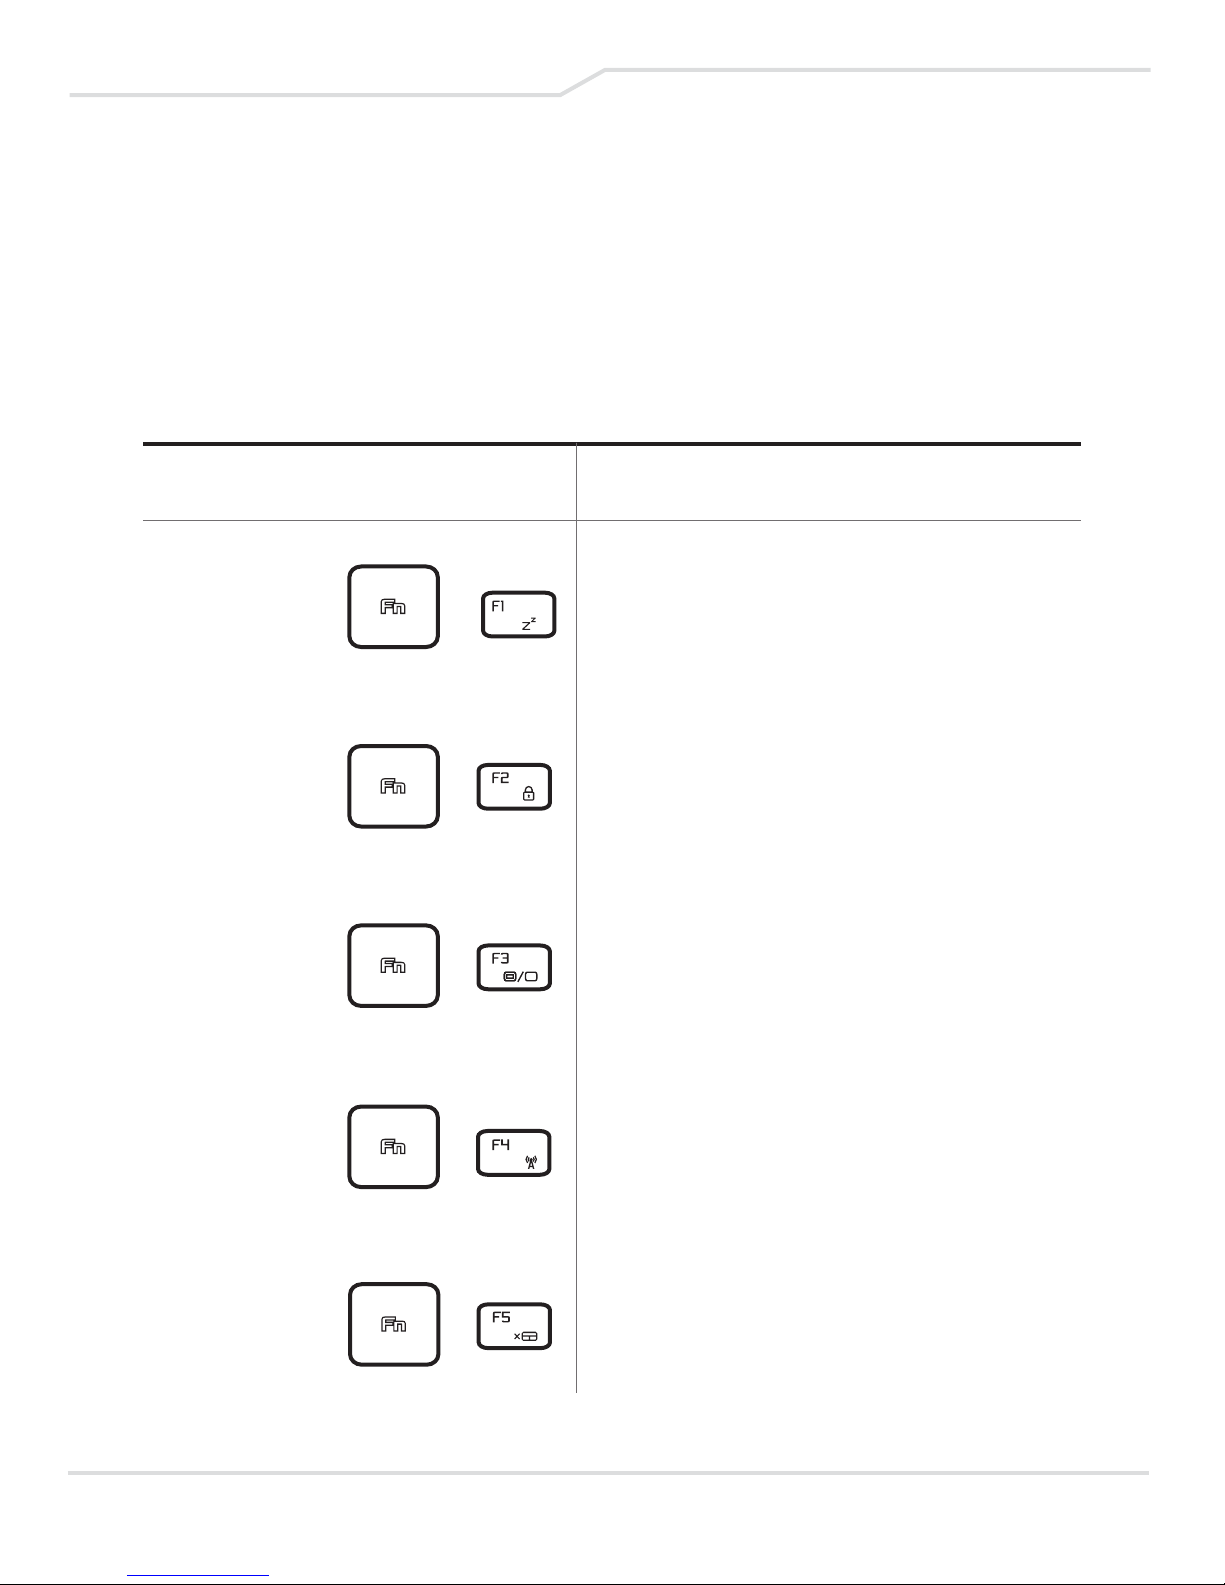
3.2.1 For Keyboard Users
To activate these functions, press the hot key associated
with the desired function as below:
Function Keys
Function DescriptionKeypad
Suspend:
Windows
Lock/On:
Display
Mode:
Radio
On/Off:
+
+
+
+
Press this key combination
(Fn+F1) to enter sleep mode.
Press this key combination
(Fn+F2) to turn Windows
Lock/On.
Press this key combination
(Fn+F3) to enable Display Mode.
Press this key combination
(Fn+F4) to turn all radios on
or off.
.
Touchpad
On/Off:
24
+
Press this key combination
(Fn+F5) to On/Off Touchpad mode.
Page 25
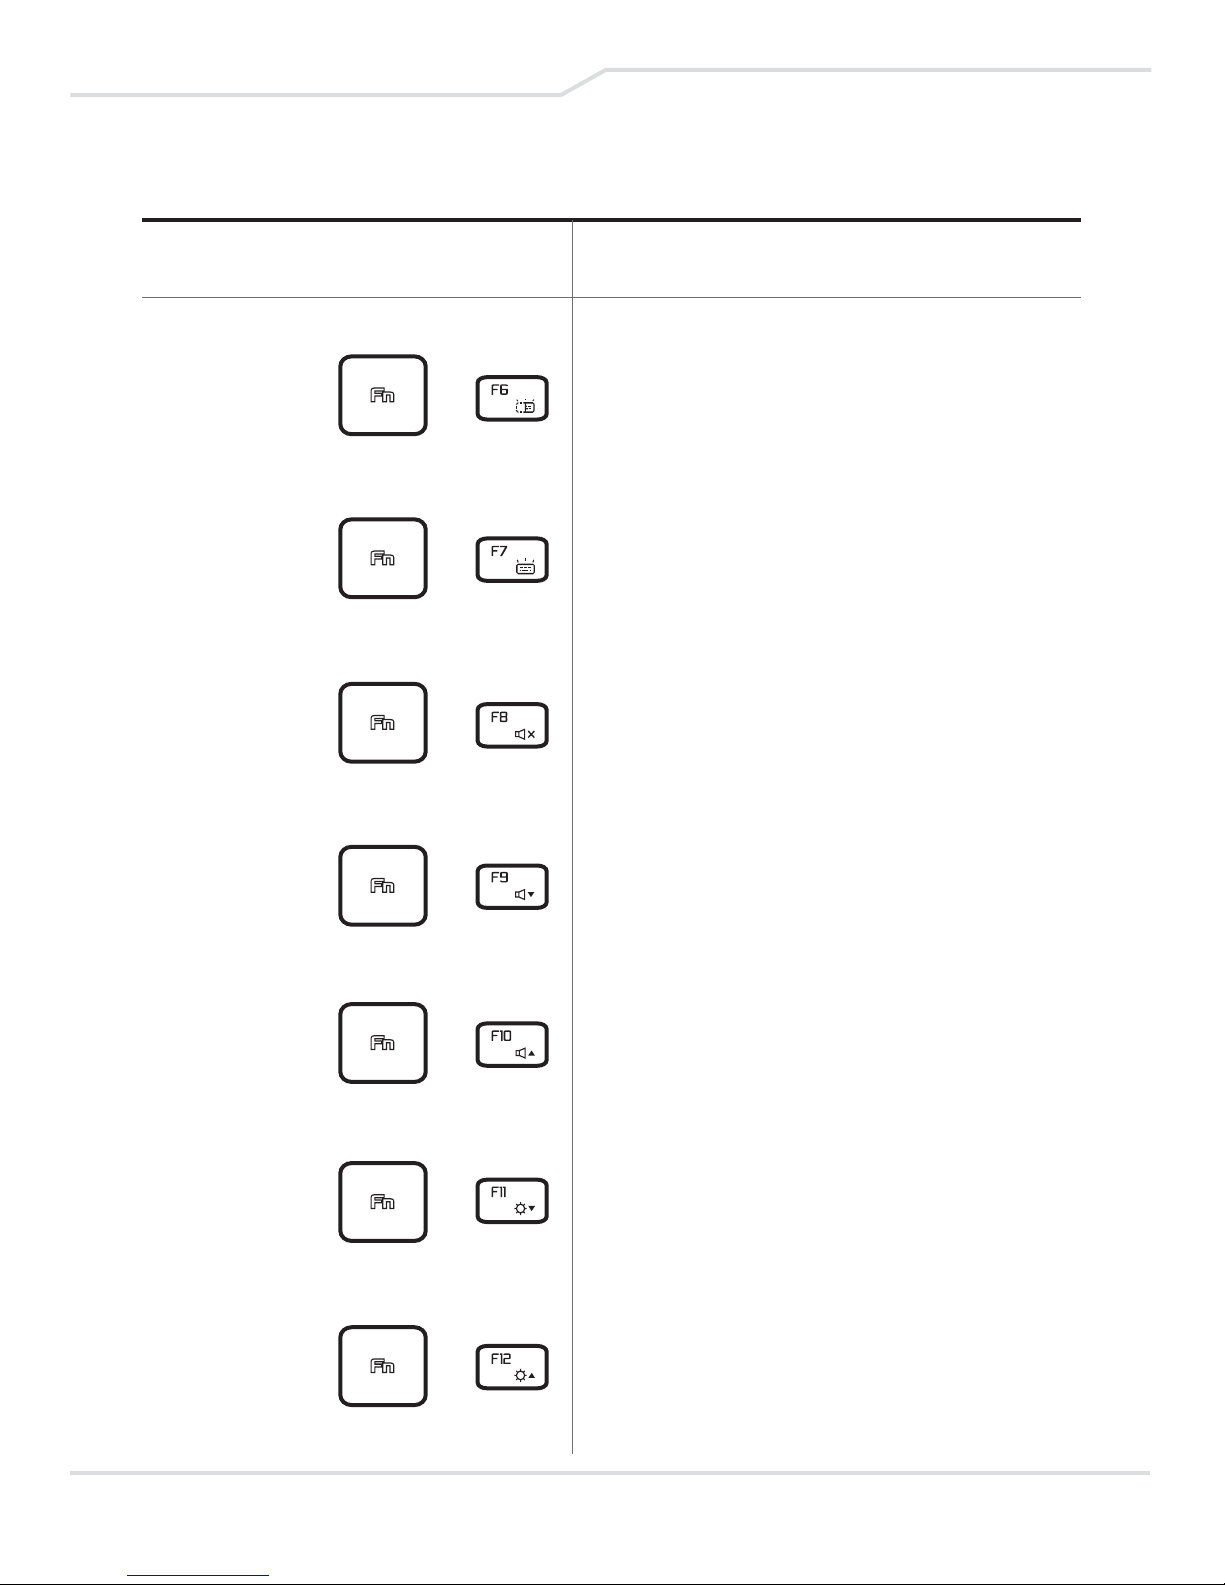
Function DescriptionKeypad
Keyboard
Brightness
down:
Keyboard
Brightness
up:
Mute:
Volume
down:
+
+
+
+
Press this key combination
(Fn+F6) to decrease brightness
of Keyboard.
Press this key combination
(Fn+F7) to increase brightness
of Keyboard.
Press this key combination
(Fn+F8) to enter Mute Mode.
Press this key combination
(Fn+F9) to turn the volume down.
Volume
up:
Brightness
down:
Brightness
up:
+
+
+
Press this key combination
(Fn+F10) to turn the volume up.
Press this key combination
(Fn+F11) to decrease brightness
of LCD display.
Press this key combination
(Fn+F12) to increase brightness
of LCD display.
25
Page 26
Function DescriptionKeypad
Search
Charm:
(Optional)
Settings
Charm:
(Optional)
Share
Charm:
(Optional)
Devices
Charm:
(Optional)
+
+
+
+
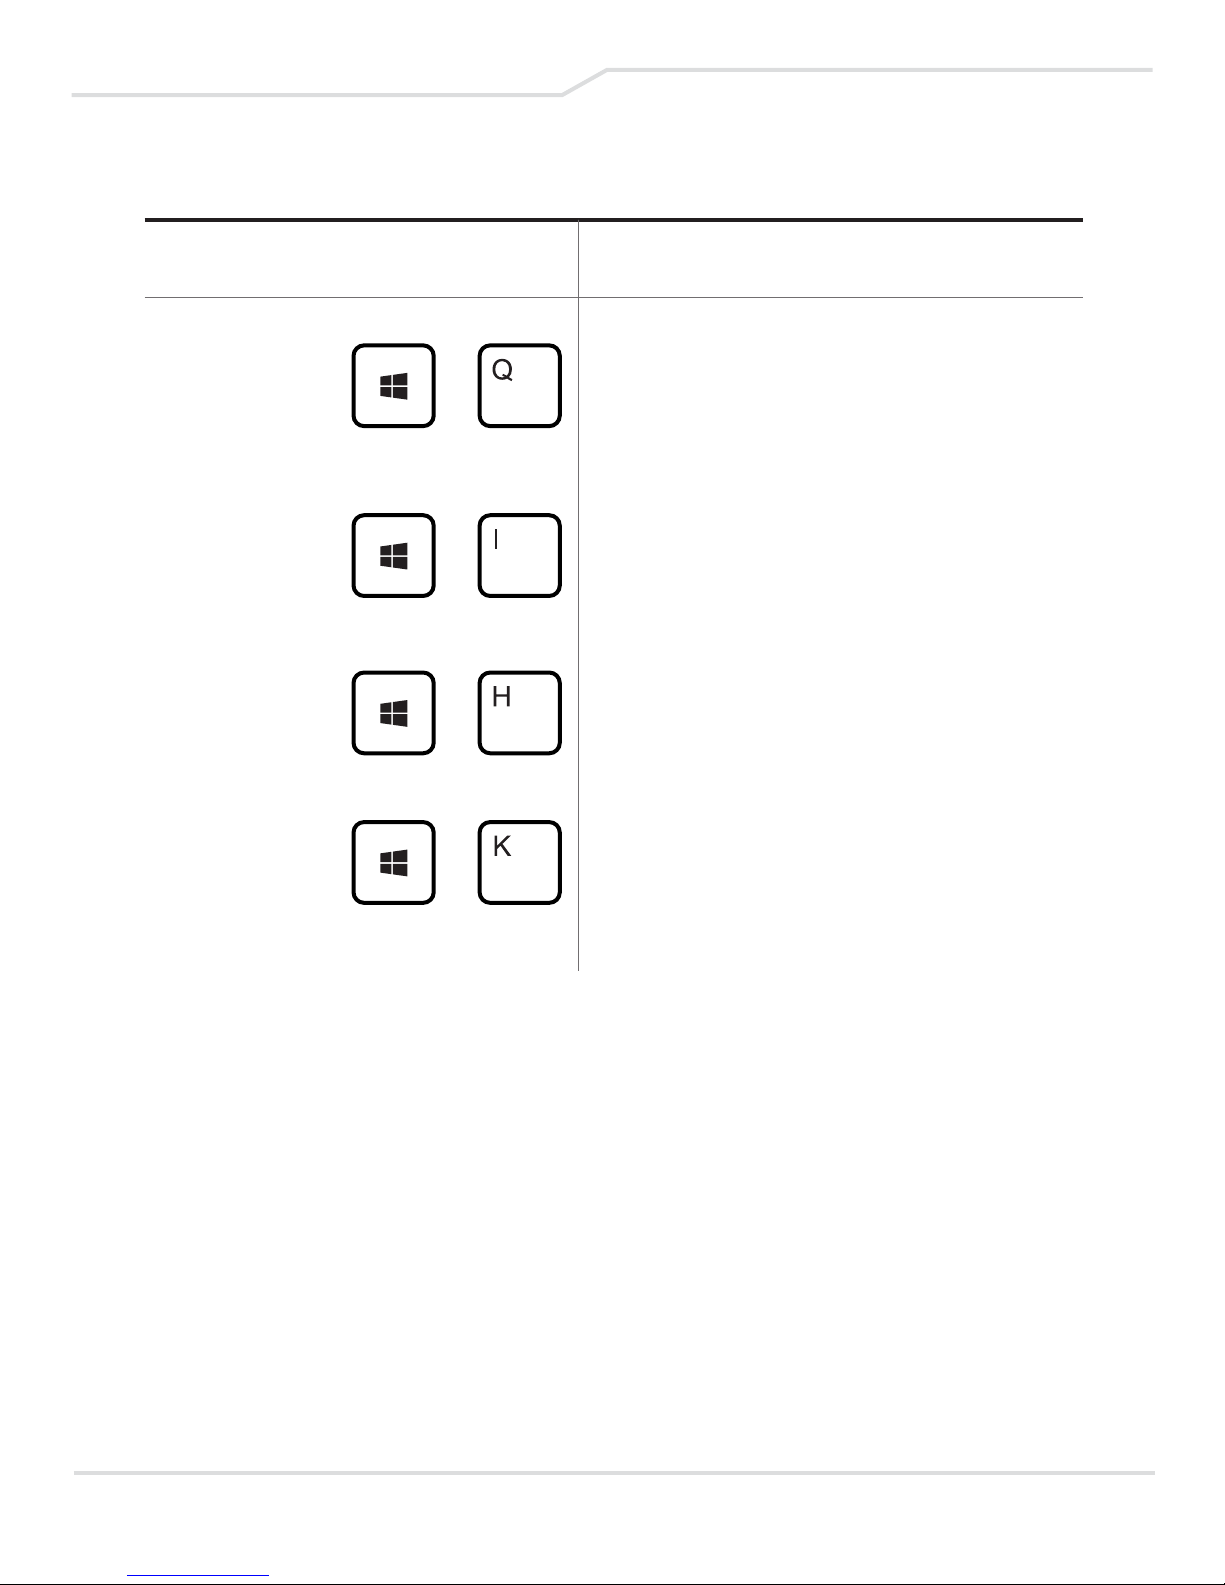
Press this key combination
(Windows logo key+Q) to open the
search charm and search apps.
Press this key combination
(Windows logo key+I) to open the
settings charm.
Press this key combination
(Windows logo key+H) to open the
share charm.
Press this key combination
(Windows logo key+K) to open the
devices charm.
26
Page 27
3.3 Using the TouchPad/ClickPad
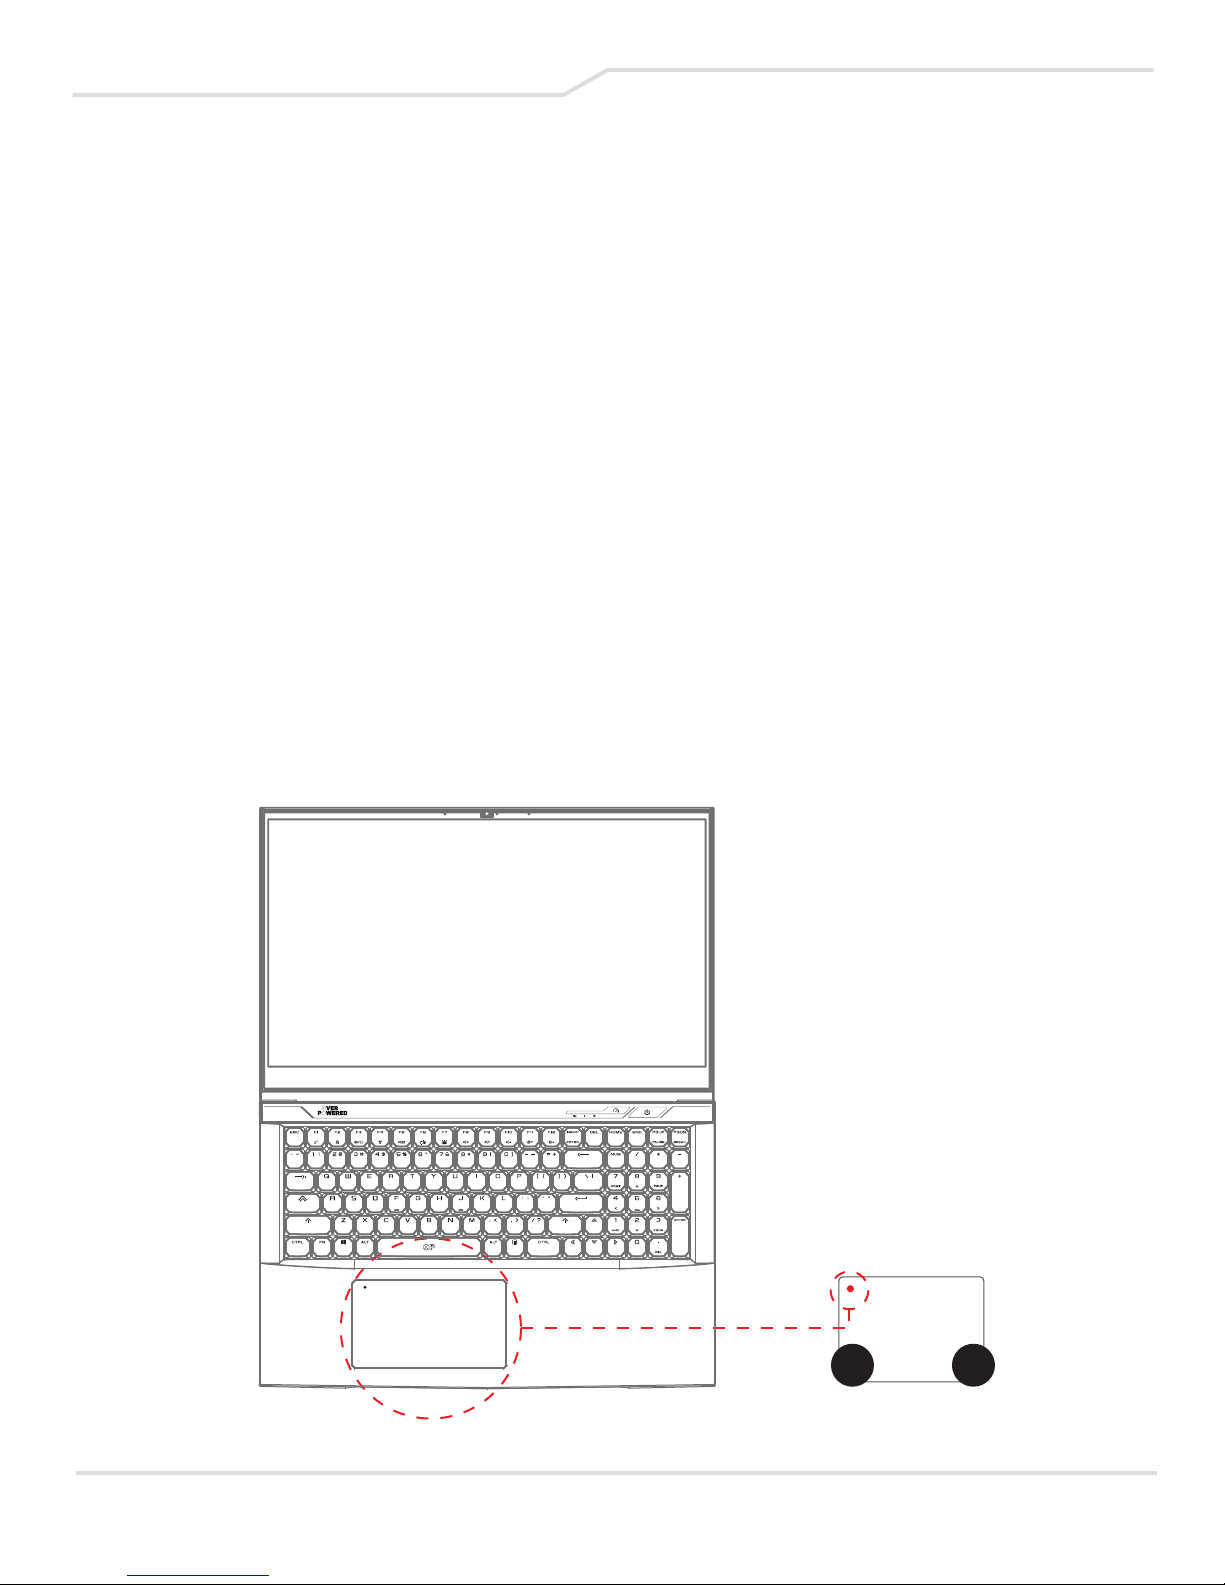
The TouchPad/ClickPad is a rectangular electronic panel
located just below your keyboard. Click twice within 0.5”x0.5”
of left corner to open or close (Green light) TouchPad
functionality. You can use the static-sensitive panel of the
TouchPad/ClickPad to slide and move the cursor.
Press the left (1) and right (2) buttons located on the edge of
the TouchPad/ClickPad to make selections and run
functions. Both buttons replicate to that of the left and right
buttons on a desktop mouse. Tapping on the
TouchPad/ClickPad will produce similar functions.
Clicking twice will
open (or close)
TouchPad
functionality
1 2
27
Page 28

3.4 Customize Your Sound
To adjust and optimize EQ, microphone gains and overall
sound experience, please use the Sound Blaster Program
installed in the device.
1 Click the Window icon on the lower left corner of
the screen.
2 In the search box type “Sound Blaster Connect” and launch
the program.
3 Sound Experience is found on the top left corner.
Increase EQ settings and Voice Enhancer to amplify
your experience.
28
Page 29

CHAPTER
BIOS SETUP
29
Page 30

4.1 About BIOS Setup
4.1.1 When to Use BIOS Setup ?
You may need to run the BIOS Setup when:
• An error message appears on the screen during system
boot-up and requesting to run SETUP.
• You want to change the default settings for customized features.
• You want to reload the default BIOS settings.
4.1.2 How to Run BIOS Setup ?
To run the BIOS Setup Utility, turn on the notebook and
press the [Del] key during the POST procedure.
If the message disappears before you respond and you still
wish to enter Setup, either restart the system by turning it
OFF and ON, or simultaneously pressing [Ctrl]+[Alt]+[Del]
keys to restart.
Be noted that the screen snaps and setting options in this
chapter are for your references only.The actual setting
screens and options on your Notebook may be different
because of BIOS update.
The setup function only can be invoked by pressing [Del] or
[F2] key during POST that provide an approach to change
some setting and configuration the user prefers, and the
changed values will save in the NVRAM, and will take effect
after the system rebooted. The Setup uses a menu interface
to allow the user to configure their system and it’s features
that are briefly listed as follows.
Press [F7] key for Boot Menu.
30
Page 31

NOTE: The drivers, BIOS and utilities bundled in
the support DVD may vary by model and are
subject to change without notice.
4.2 BIOS Setup Menu
Once you enter the BIOS Setup Utility, the Main Menu will
appear on the screen. Select tags to enter the other menus.
Main Menu
Show system overview about memory size, main HDD or
ODD and setting of system time and date.
Advanced Menu
To select the XD feature either enable or disable the XD feature.
Security Menu
Install or clear the password settings for supervisor and user.
Boot Menu
Configure Settings during System Boot.
EXIT Menu
Save or discard the changes before leaving the BIOS
Setup Menu.
31
Page 32
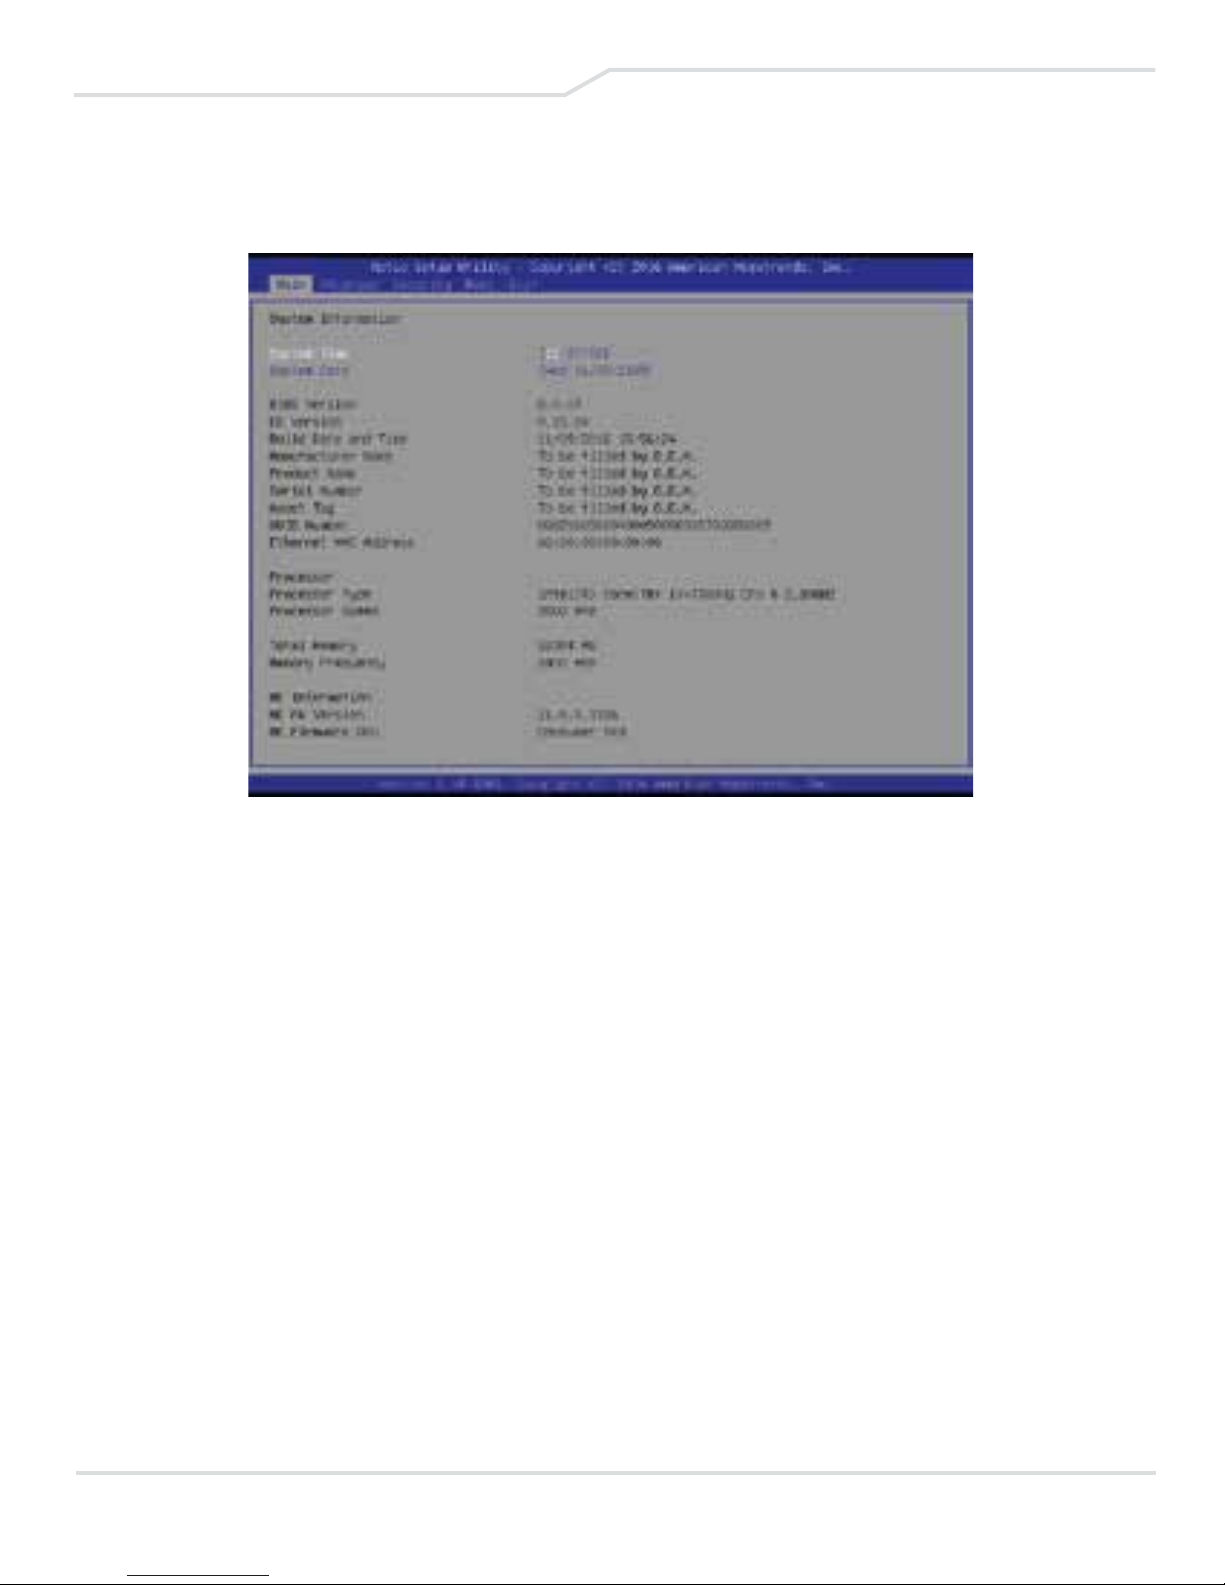
4.2.1 Main Menu
System Time
This item allows you to set the system time. There is a small
internal (CMOS) battery which is designed to maintain your
system clock. It is designed to maintain time even when the
PC is powered down or in sleep mode. The time format is
[hour:minute:second].
Use [+] or [-] to configure system Time.
System Date
This item allows you to set the system date. The date format
is [day:month:date:year].
Use [ENTER], [TAB] or [SHIFT-TAB] to select a field.
32
Page 33

Day
Day of the week, from Sun to Sat, which
is determined by BIOS (read-only).
Month
The month from 01 (January)
to 12 (December).
Date The date from 01 to 31.
Year The year can be adjusted by users.
Total Memory
This allows you to see the total amount of memory.
33
Page 34
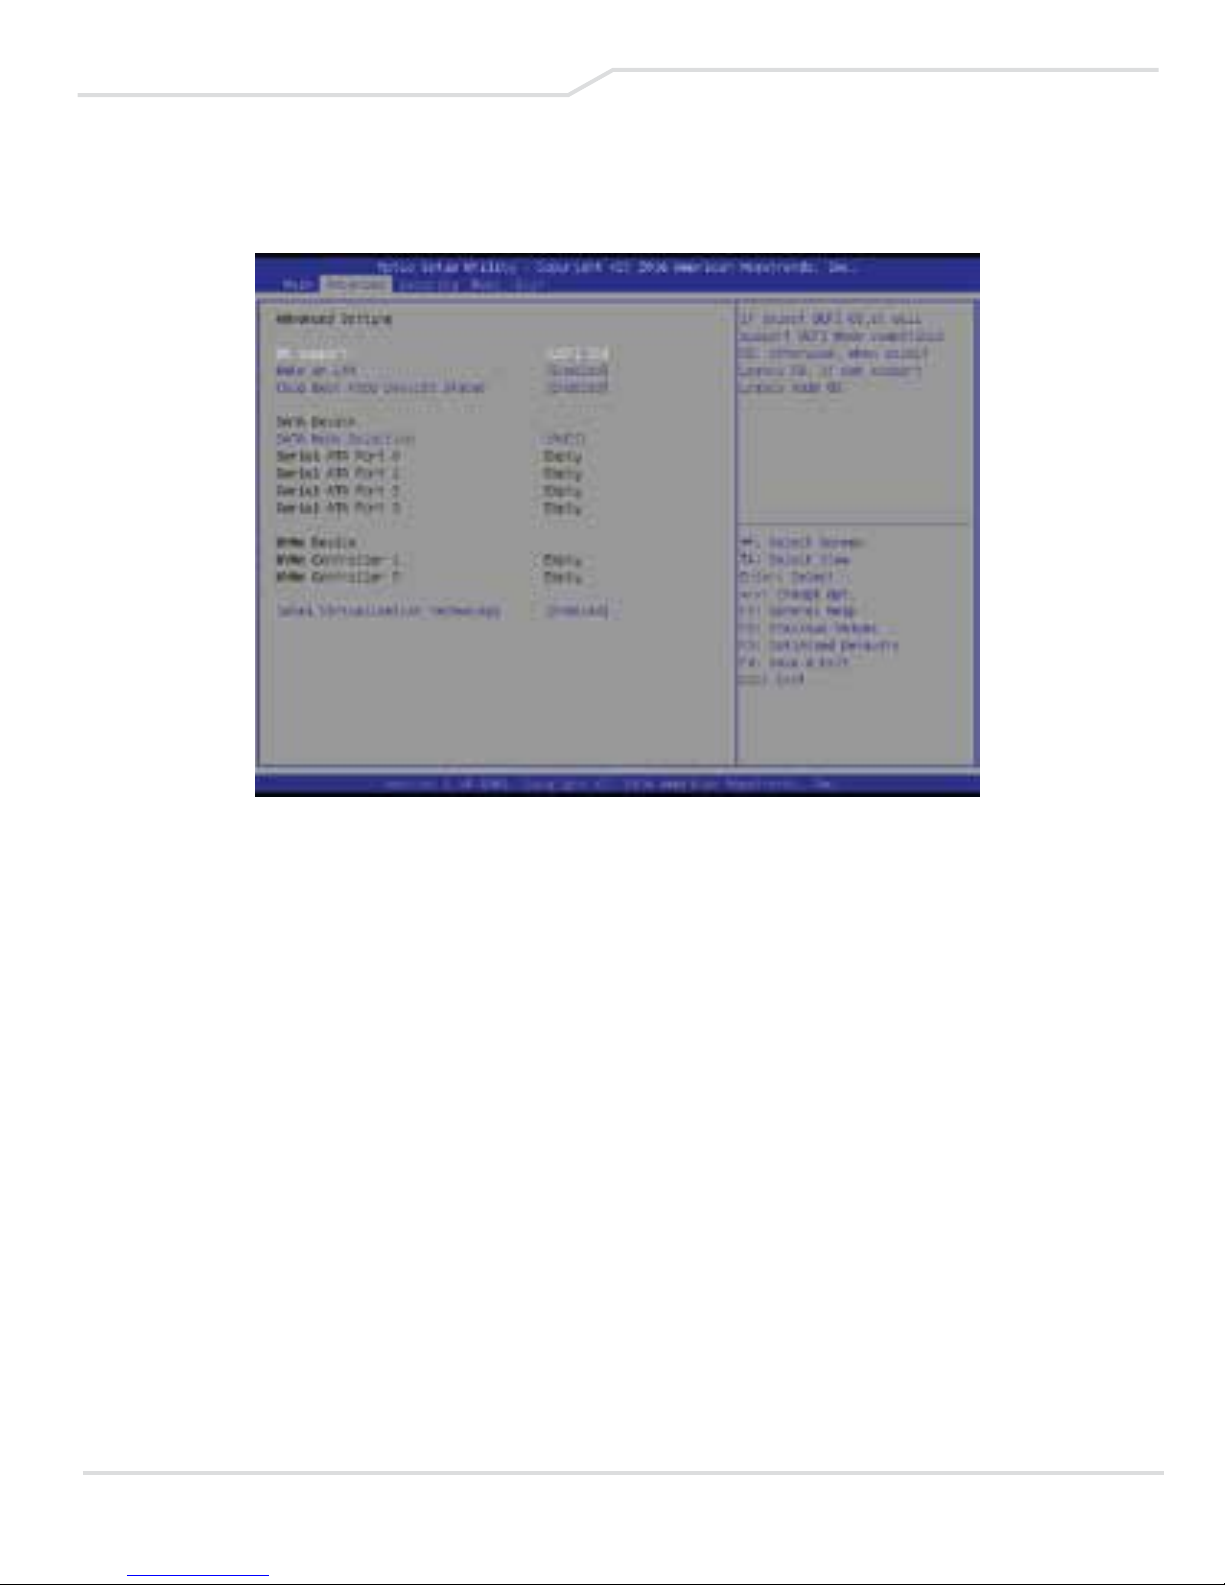
4.2.2 Advanced Menu
Wake on LAN
Enable/Disable integrated LAN to wake the system.
Serial ATA HDD
It will show AHCI SATA HDD info.
NVMe Device
Will show NVMe Device info.
Intel Virtualization Technology
When enabled, a VMM can utilize the additional hardware
capabilities provided by Vanderpool Technology.
RAID mode reminder
Please update strip size in BIOS to 128K in order for RAID to
optimize performance.
34
Page 35
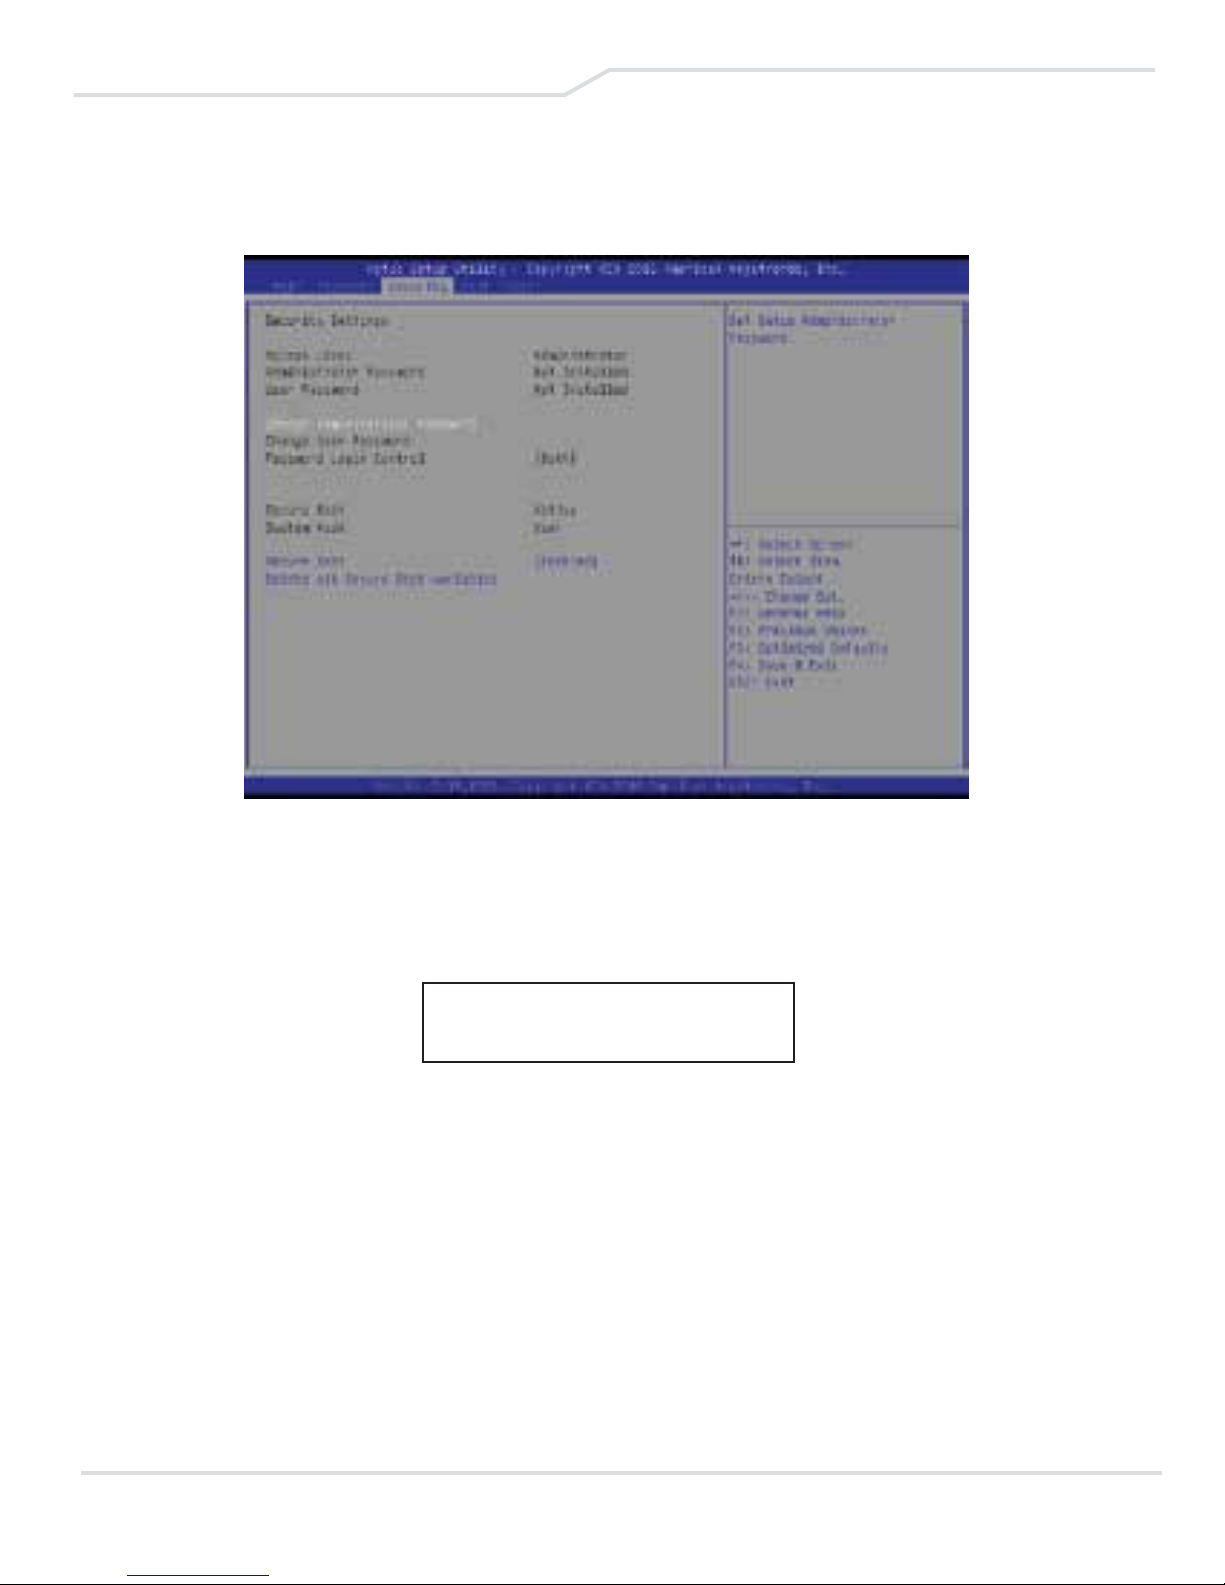
4.2.3 Security Menu
Change Administrator Password
When this item is selected, a message box shall appear on
the screen as below:
Enter New Password
Type a maximum of 20-digit password and press [Enter].
The password typed now will replace any previously set
password from CMOS memory. You may also press [ESC]
to abandon new password setting. It is extremely important
to keep record for any BIOS password which is set as it can
not be reset even with the removal of a CMOS battery for
the security of your PC.
35
Page 36

Select “Change User Password” to give or to abandon
password setting, same as Change Administrator Password
item above.
Note that Administrator Password field allows users to enter
and change the settings of the BIOS SETUP UTILITY, while
User Password field only allows users to enter the BIOS
SETUP UTILITY without having the authorization to make
any change.
The Password Check item is used to specify the type of
BIOS password protection that is implemented.
To clear a set Administrator Password/ User Password,
simply press [Enter] under Change Administrator Password/
Change User Password field when you are prompted to
enter the password. A message box will pop up cconfirming
the password will be disabled. Once the password is
disabled, the system will boot and user can enter setup
without entering password.
36
Page 37
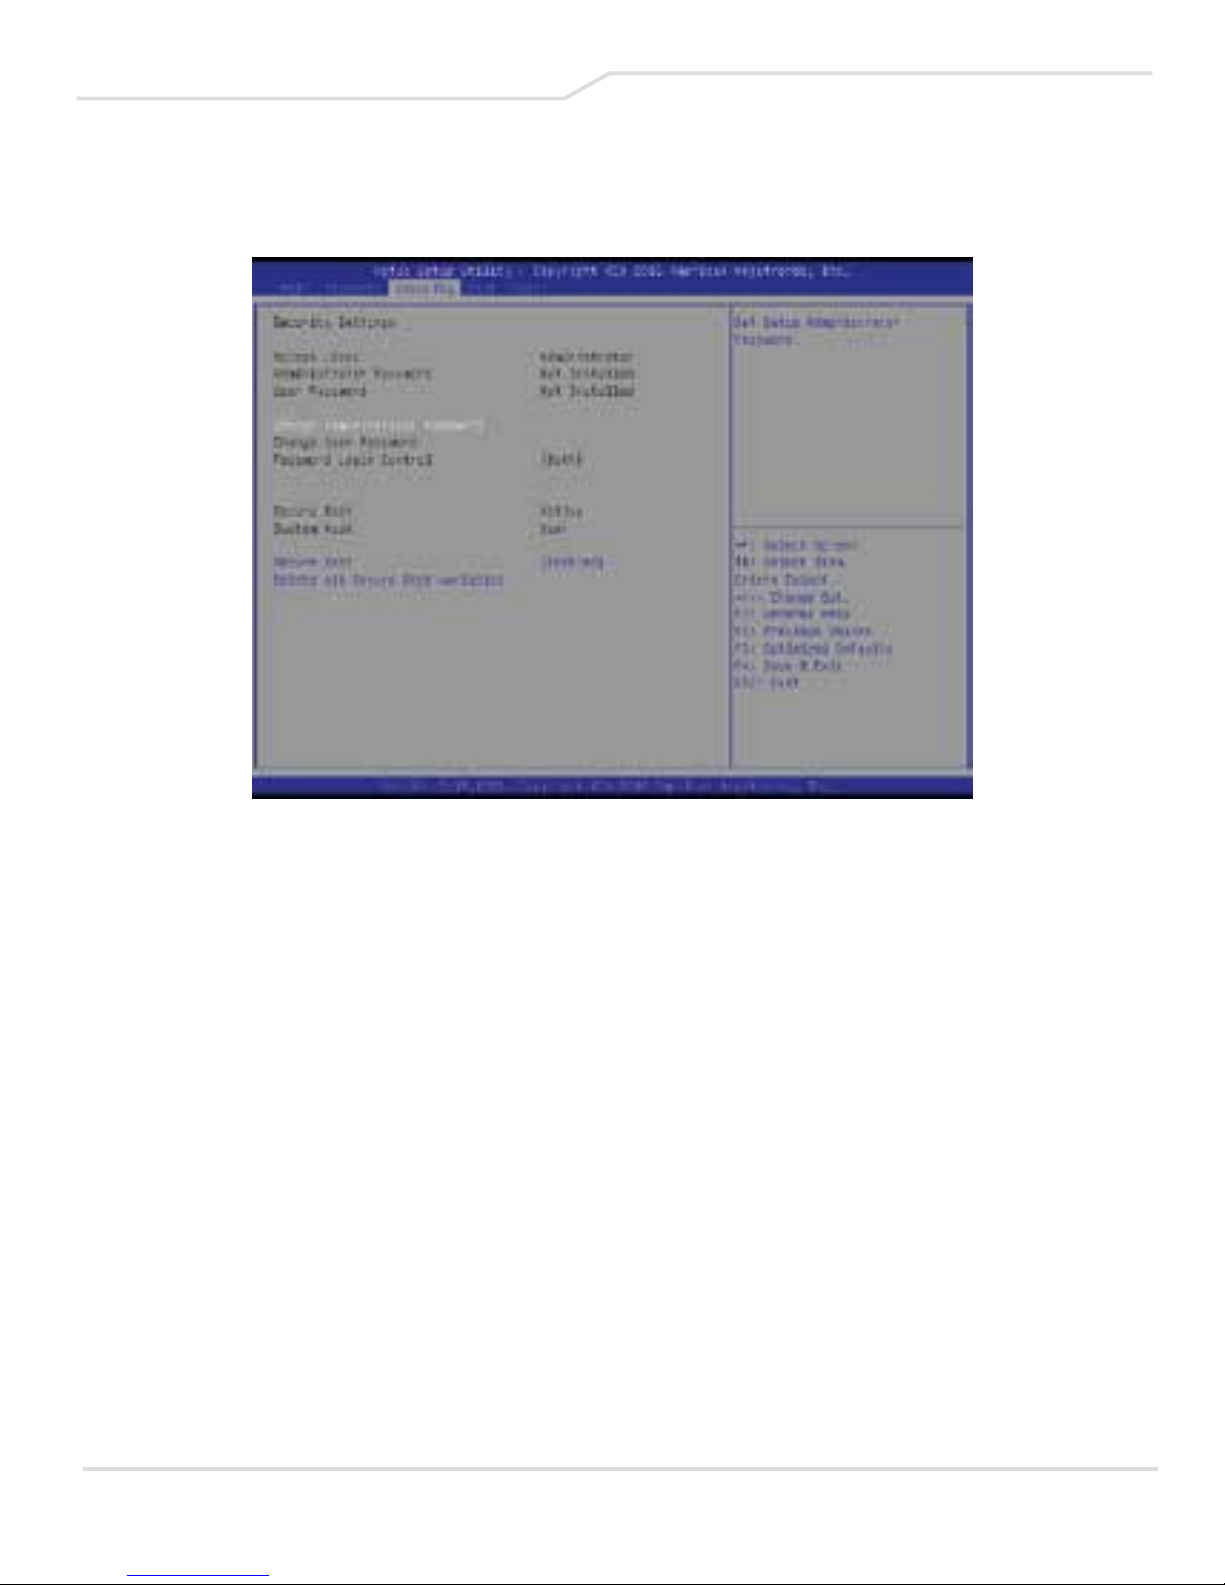
4.2.4 Boot Menu
• Boot Configuration
Configure Settings during System Boot.
• LAN Remote Boot [Disable]: Boot from LAN or not.
• Set Boot Priority (1st/2nd/3rd/..... Boot)
Specify the boot sequence from the available devices. A
device enclosed in parenthesis has been disabled in the
corresponding type menu.
• Hard Disk Drive / USB HardDisk Drive
Specify the Boot Device Priority sequence.
37
Page 38
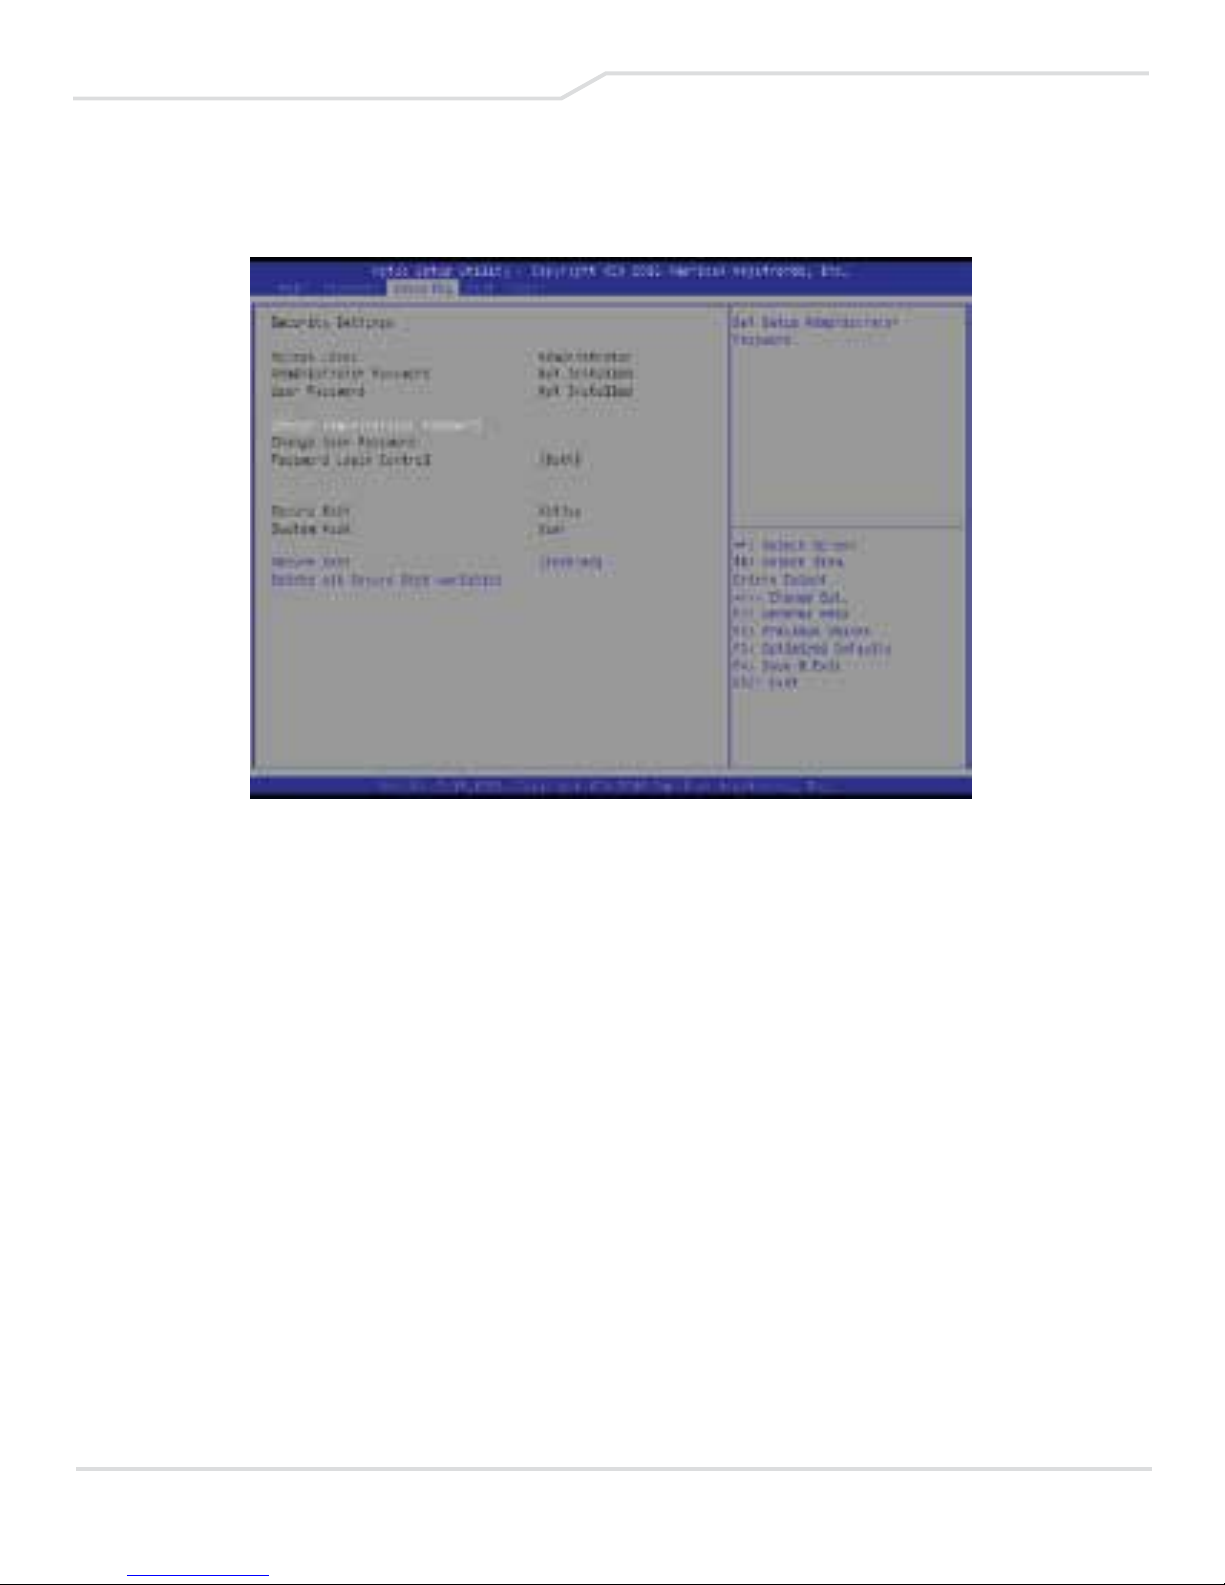
4.2.5 Exit Menu
• Save Changes and Reset
Exit system setup after saving the changes. F4 key can be
used for this operation.
• Discard Changes and Exit
Exit system setup without saving any changes. ESC key
can be used for this operation.
• Restore Defaults
Restore/Load Defaults values for all the setup options. F3
key can be used for this operation.
38
Page 39

Important Product Information
This product information pamphlet contains important information about your Overpowered (or
“Product”) and how to use it as well as the One-year Limited Warranty provided by Overpowereds,
LLC (the “Company”), included with your purchase.
Failure to follow these safety instructions could result in fire, electric shock, damage to your Product or
property, or serious injury to you or others.
• Do not disassemble, open, crush, incinerate, paint, shred, or insert foreign objects into your Product.
• Do not use your Product in wet or damp locations.
• Avoid spilling any liquid or food on your Product.
• Before cleaning your Product, make sure it is in the "OFF" position and disconnect all cables from your
Product and electrical outlets.
• Do not attempt to dry your Product with an external heat source such as a microwave or hair dryer.
Charging your Product
When charging your Product, please adhere to the following guidelines and suggestions for proper use:
• Allow adequate space and ventilation around the Product while charging.
• Do not connect the power cord when your hands are wet or near any liquid.
• Do not connect the power cord to the Product if it has been damaged in any way.
5.1 FCC (SAR) Information
Federal Communications Commission Interference Statement
This equipment has been tested and found to comply with the limits for a Class B digital device, pursuant
to part 15 of the FCC Rules. These limits are designed to provide reasonable protection against harmful
interference in a residential installation. This equipment generates, uses and can radiate radio frequency
energy and, if not installed and used in accordance with the instructions, may cause harmful interference
to radio communications. However, there is no guarantee that interference will not occur in a particular
installation. If this equipment does cause harmful interference to radio or television reception, which can
be determined by turning the equipment off and on, the user is encouraged to try to correct the
interference by one or more of the following measures:
• Reorient or relocate the receiving antenna.
• Increase the separation between the equipment and receiver.
• Connect the equipment into an outlet on a circuit different from that to which the receiver is connected.
• Consult the dealer or an experienced radio/ TV technician for help.
This device complies with Part 15 of the FCC Rules. Operation is subject to the following two conditions:
(1) this device may not cause harmful interference, and
(2) this device must accept any interference received, including interference that may cause
undesired operation.
39
Page 40

RF Exposure Information (SAR)
This device meets the government’s requirements for exposure to radio waves. This device is designed
and manufactured not to exceed the emission limits for exposure to radio frequency (RF) energy set by
the Federal Communications Commission of the U.S. Government.
The exposure standard employs a unit of measurement known as the Specific Absorption Rate, or SAR.
The SAR limit set by the FCC is 1.6 W/kg. Tests for SAR are conducted using standard operating positions
accepted by the FCC with the EUT transmitting at the specified power level in different channels.
The FCC has granted an Equipment Authorization for this device with all reported SAR levels evaluated
as in compliance with the FCC RF exposure guidelines. SAR information on this device is on file with the
FCC and can be found under the Display Grant section of www.fcc.gov/eot/ea/fccid after searching on
FCC ID: 2AKHF9560NG
5.2 Disposal and Recycling Information
Correct Disposal of this product.
This icon indicates that this product should not be disposed of with other household waste throughout
the USA. To prevent possible harm to the environment or human health from uncontrolled waste
disposal, recycle it responsibly to promote the sustainable reuse of material resources. To return your
used device, please use the return and collection systems or contact the retailer where the product
was purchased. They can take this product for environment safe recycling.
One (1) Year Limited Warranty
Overpowereds, LLC stands behind its Products and proudly offers the following "Limited Warranty" policy:
This Overpowered purchased and delivered new in the original packaging to the original purchaser is
warranted for personal use by Overpowereds, LLC. against manufacturing defects in materials and
workmanship for a limited warranty period of Ninety (90) Days for labor and One (1) Year for Hardware
from the original date of purchase. However, the warranty on this Product is limited to a Ninety (90) day
hardware and labor limited warranty when purchased or used for commercial purposes. The Company
is not responsible for software defects. In the event you encounter a problem with software on your
product, please refer to your Owner's Manual for software provider contact information. This Limited
Warranty does not apply to store display Products, Products sold as a "marked down" special, in "as is"
condition, "close outs", "liquidation sales”, clearance sales", or "open box", Products missing
accessories with no fault found or damaged at time of delivery to the Company authorized service
center listed below. Proof of purchase in the form of a Bill of Sale, Receipt or Receipted Invoice is your
evidence that the Product is within the Limited Warranty period. The Bill of Sale, Receipt or Receipted
Invoice must be presented to the Company as a condition to obtaining the Limited Warranty service.
This Limited Warranty begins on the original date of purchase, and is valid only on products purchased
through Overpowereds, LLC. authorized dealers and used in the United States, Canada, and Puerto
Rico by the original purchaser. To receive Limited Warranty service, the purchaser must contact the
Company for problem determination, troubleshooting and service procedures. Warranty service may
only be performed by the Company’s authorized service center. The original dated Bill of Sale, Receipt
or Receipted invoice must be presented upon request as proof of purchase. The Overpowered Service
Center listed below will repair your Product or if repairs cannot be made, Overpowered will replace your
40
Page 41

Product with the same or similar Product at no charge to you. If the Product is defective as specified in
this Limited Warranty during the Limited Warranty period, then the Company may use new, refurbished
or remanufactured hardware or products to repair or replace the Product with a similar Product at its
sole discretion. Once the Company determines to replace a Product with the same or similar Product,
all Products delivered to Overpowered for warranty service or replacement then become the sole and
exclusive property of Overpowereds, LLC. Replacement hardware and Products assume the remaining
original Limited Warranty policy, or Ninety (90) days, whichever is longer.
Product freight must be prepaid by original purchaser and shipped in either its original packaging or
packaging affording an equal degree of protection. Overpowered shall not be responsible for or
obligated to replace Products or goods damaged in transport when received by the Company. If the
Product is received damaged by the Overpowered service center, it is the responsibility of the
consumer to file a claim against the shipping carrier. The Overpowered service center will only store
the damaged product for thirty (30) days and reserves the right, in its sole discretion to dispose of the
damaged product or ship it back to the consumer at consumer's expense after thirty (30)days.
This Limited Warranty covers manufacturing defects in materials and workmanship encountered in
normal, and except to the extent otherwise expressly provided for in this statement, noncommercial
use of this product, and shall not apply to the following: damage occurring in shipment; delivery and
installation; applications and uses for which this product was not intended; altered product or serial
numbers; cosmetic damage or exterior finish; accidents, abuse, neglect, fire, water, lightning or other
acts of nature; use of products, equipment, systems, utilities, services, hardware, supplies,
accessories, applications, installations, repairs, external wiring or connectors not supplied or
authorized by Overpowereds, LLCwhich damage this Product or result in service problems; incorrect
electrical line voltage, fluctuations and surges; customer adjustments and failure to follow operating
instructions, cleaning, maintenance and environmental instructions that are covered and prescribed in
the instruction book; reception problems and distortion related to noise, echo, interference or other
signal transmission and delivery problems; burned-in images. The Company does not warrant
uninterrupted or error-free operation of the Product.
THERE ARE NO EXPRESS OR IMPLIED WARRANTIES OTHER THAN THOSE LISTED AND DESCRIBED
ABOVE, AND NO WARRANTIES WHETHER EXPRESS OR IMPLIED, INCLUDING, BUT NOT LIMITED TO,
ANY IMPLIED WARRANTIES OF MERCHANTABILITY OR FITNESS FOR A PARTICULAR PURPOSE,
SHALL APPLY AFTER THE EXPRESS LIMITED WARRANTY PERIODS STATED ABOVE, AND NO OTHER
EXPRESS WARRANTY OR GUARANTY GIVEN BY ANY PERSON, FIRM OR CORPORATION WITH
RESPECT TO THIS PRODUCT SHALL BE BINDING ON Overpowereds, LLC. REPAIR OR
REPLACEMENT AS PROVIDED UNDER THIS LIMITED WARRANTY IS THE EXCLUSIVE REMEDY OF
THE PURCHASER. THE COMPANY SHALL NOT BE LIABLE FOR ANY INCIDENTAL, OR
CONSEQUENTIAL DAMAGES FOR BREACH OF ANY EXPRESS OR IMPLIED WARRANTY ON THIS
PRODUCT; EXCEPT TO THE EXTENT PROHIBITED BY APPLICABLE LAW, ANY IMPLIED WARRANTY
OF MERCHANTIBILITY OR FITNESS FOR A PARTICULAR PURPOSE ON THIS PRODUCT IS LIMITED
FOR THE DURATION OF THIS LIMITED WARRANTY. THIS LIMITED WARRANTY SHALL NOT EXTEND
TO ANYONE OTHER THAN THE ORIGINAL PURCHASER OF THIS PRODUCT, IS NONTRANSFERABLE
AND STATES YOUR EXCLUSIVE REMEDY.
Some states do not allow limitations on how long an implied warranty lasts, or the exclusion or limitation
of incidental or consequential damages, so the above limitations or exclusions may not apply to you.
This warranty gives you specific legal rights, and you may also have other rights which vary from state to
state. Any provision contained herein which is found contrary to state or local laws shall be deemed null
and void and all remaining provisions shall continue in full force and effect.
41
Page 42

ALL DISPUTES ARISING IN ANY WAY FROM THIS LIMITED WARRANTY OR THE SALE, CONDITION OR
PERFORMANCE OF THE PRODUCT SHALL BE RESOLVED EXCLUSIVELY THROUGH FINAL AND
BINDING ARBITRATION, AND NOT BY A COURT OR JURY.
Any such dispute shall not be combined or consolidated with a dispute involving any other person’s or
entity’s Product or claim, and specifically, without limitation of the foregoing, shall not under any
circumstances proceed as part of a class action. The arbitration shall be conducted before a single
arbitrator, whose award may not exceed, in form or amount, the relief allowed by the applicable law. The
arbitration shall be conducted by the American Arbitration Association (AAA) pursuant t
o its Consumer Arbitration Rules (AAA Rules). The Federal Arbitration Act governs this provision. The
arbitrator shall decide all issues of interpretation and application of this arbitration provision and the
Limited Warranty.
For any arbitration in which your total damage claims, exclusive of attorney fees and expert witness
fees, are $5,000.00 or less ("Small Claim"), the arbitrator may, if you prevail, award your reasonable
attorney fees, expert witness fees and costs as part of any award, but may not grant Overpowereds,
LLC. its attorney fees, expert witness fees or costs unless it is determined that the claim was brought in
bad faith. In a Small Claim case, you shall be required to pay no more than half of the total
administrative, facility and arbitrator fees, or $50.00 of such fees, whichever is less, and
Overpowereds, LLC. shall pay the remainder of such fees. Administrative, facility and arbitrator fees for
arbitrations in which your total damage claims, exclusive of attorney fees and expert witness fees,
exceed $5,000.00 ("Large Claim") shall be determined according to AAA Rules. In a Large Claim case,
the arbitrator may grant to the prevailing party, or apportion among the parties, reasonable attorney
fees, expert witness fees and costs. Judgment may be entered on the arbitrator's award in any court of
competent jurisdiction.
This arbitration provision also applies to claims by you, the purchaser of the Product, and all those in
privity with you, including your family members, beneficiaries and assigns, against Overpowereds, LLC.
parent(s), subsidiaries and affiliates, any person or entity that licensed, supplied, sold or distributed the
Product, and each of their officers, employees, representatives, licensors/licensees, agents,
beneficiaries, predecessors in interest, successors, and/or assigns.
You may opt out of this dispute resolution procedure by providing notice to the Company no later than
thirty (30) calendar days from the date of the first consumer purchaser’s purchase of the Product. To
opt out, you must send notice by e-mail to the Company at
[email protected] , with the subject line:
“Arbitration Opt Out.” You must include in the opt out e-mail (a) your name and address; (b) the date on
which the Product was purchased; (c) the Product model name or model number; and (d) the IMEI or
MEID or Serial Number if applicable, if you have it. Alternatively, you may opt out by calling
888-999-1682 no later than 30 calendar days from the date of the first consumer purchaser’s purchase
of the Product and providing the same information. These are the only two forms of notice that will be
effective to opt out of this dispute resolution procedure. Opting out of this dispute resolution
procedure will not affect the coverage of the Limited Warranty in any way, and you will continue to enjoy
the benefits of the Limited Warranty.
42
Page 43

5.3 Contact Information
To obtain Warranty service, please contact
OVERPOWERED Products
800-379-3820
CAUTION:
Any changes or modifications not expressly
approved by the grantee of this device could void
the user's authority to operate the equipment.
43
Page 44

by ESPORTS ARENA
GAME
OVER
 Loading...