

Page 1

MULTIDO
Instrukcja obsługi
Page 2

Wprowadzenie
Drogi Kliencie!
Dziękujemy za obdarzenie nas zaufaniem i wybranie marki
Overmax Home.
Oddajemy w Twoje ręce produkt idealny do codziennego
użytkowania dzięki wykorzystaniu wysokiej jakości materiałów i
nowoczesnych rozwiązań technologicznych.
Jesteśmy pewni, że dzięki ogromnej staranności wykonania
spełni on Twoje wymagania.
Przed użyciem produktu zapoznaj się dokładnie z poniższą
instrukcją obsługi.
Jeśli masz jakiekolwiek uwagi lub pytania do zakupionego
produktu, skontaktuj się z nami:
Page 3

Dla własnego bezpieczeństwa
Przed użyciem urządzenia należy starannie przeczytać
niniejszą instrukcję obsługi, aby zapoznać się ze
wskazówkami bezpieczeństwa i obsługi.
Producent nie odpowiada za ewentualne szkody spowodowane
zastosowaniem urządzenia w sposób niezgodny z jego
przeznaczeniem lub niewłaściwą jego obsługą.
Niniejsze urządzenie nie jest przeznaczone do użytku
komercyjnego lecz skonstruowane z przeznaczeniem do
przetwarzania ilości typowych dla gospodarstwa domowego itp.
Użytkowanie o charakterze podobnym do domowego obejmuje
np. używanie urządzenia w pomieszczeniach kuchennych w
sklepach, biurach, gospodarstwach rolnych lub innych
(małych) przedsiębiorstwach oraz w pensjonatach, małych
hotelach itp. Używać tylko dla takiej ilości produktów i czasu
przygotowania, które są typowe dla gospodarstwa domowego.
Niniejsze urządzenie nadaje się do mieszania, zagniatania,
ubijania, cięcia na plasterki i tarcia na wiórki produktów
spożywczych. Przy zastosowaniu wyposażenia dodatkowego
dopuszczonego przez producenta możliwe są dalsze
zastosowania. Nie wolno używać urządzenia do przetwarzania
innych przedmiotów lub substancji oprócz tych zaleconych przez
producenta. Urządzenie eksploatować tylko z oryginalnym
wyposażeniem. Instrukcję obsługi proszę starannie
przechowywać. Proszę przekazać instrukcję wraz z urządzeniem
ewentualnemu kolejnemu właścicielowi.
Ogólne wskazówki bezpieczeństwa
Niebezpieczeństwo porażenia prądem elektrycznym
Nie wolno dzieciom obsługiwać tego urządzenia.
Urządzenie wraz z elektrycznym przewodem zasilającym
należy przechowywać z dala od dzieci. Urządzenia mogą być
obsługiwane przez osoby o ograniczonych
zdolnościach fizycznych, czuciowych lub umysłowych albo nie
posiadających odpowiedniego doświadczenia/wiedzy tylko pod
kontrolą osoby odpowiadającej za bezpieczeństwo osoby
Page 4

obsługującej urządzenie lub po dokładnym przeszkoleniu w
obsłudze urządzenia oraz po zrozumieniu
zagrożeń wynikających z obsługi urządzenia.
Nie pozwalaj dzieciom na zabawę urządzeniem.
Urządzenie należy podłączyć i użytkować zgodnie z parametrami
podanymi na tabliczce znamionowej. Używać tylko w
zamkniętych pomieszczeniach. Urządzenie można używać tylko
wtedy, gdy elektryczny przewód zasilający i samo urządzenie nie
są uszkodzone. Zawsze wyłączać urządzenie gdy jest bez
nadzoru, przed montażem i demontażem oraz przed
czyszczeniem. Nie wolno ocierać elektrycznego przewodu
zasilającego o ostre krawędzie ani gorące powierzchnie. Aby
uniknąć zagrożeń w przypadku uszkodzenia
przewodu zasilającego należy zlecić jego wymianę wyłącznie
producentowi albo jego autoryzowanemu serwisowi lub osobie o
podobnych kwalifikacjach i odpowiednich uprawnieniach.
Naprawy urządzenia może przeprowadzić tylko nasz
autoryzowany punkt serwisowy.
Wskazówki bezpieczeństwa dla pracy z niniejszym
urządzeniem
Niebezpieczeństwo skaleczenia
Niebezpieczeństwo porażenia prądem elektrycznym
W przypadku przerwy w dopływie prądu, urządzenie pozostaje
włączone i po przerwie wznawia pracę.
Wyposażenie i akcesoria wymieniać tylko po wyłączeniu
urządzenia (przełącznik obrotowy w pozycji 0/off) i wyjęciu
wtyczki z gniazdka sieciowego.
Korpusu urządzenia nigdy nie zanurzać w żadnych płynach,
nigdy nie myć pod bieżącą wodą ani w zmywarce do naczyń.
Przed przystąpieniem do usuwania usterek należy wyjąć wtyczkę
z gniazdka sieciowego.
Niebezpieczeństwo skaleczenia obracającymi się
narzędziami!
Podczas pracy urządzenia nie wolno wkładać rąk do misy. Do
popychania składników używać tylko i wyłącznie popychacza. Po
wyłączeniu urządzenia napęd pracuje jeszcze przez krótki czas.
Narzędzia wymieniać tylko wtedy, gdy napęd jest wyłączony i
nieruchomy.
Page 5
Przed wymianą elementów wyposażenia lub części
dodatkowych, które znajdują się w ruchu podczas pracy
urządzenia, należy bezwzględnie wyłączyć urządzenie i wyjąć
wtyczkę z gniazdka sieciowego.
Niebezpieczeństwo skaleczenia ostrymi nożami!
Nóż uniwersalny chwytać tylko za uchwyt z tworzywa sztucznego
(brzeg). Jeżeli nóż uniwersalny nie jest używany, wtedy należy
go umieścić w osłonie. Nie wkładać rąk do otworu wsypowego.
Produkty popychać tylko popychaczem.
Nie dotykać ostrych noży i krawędzi tarcz rozdrabniających.
Tarcze rozdrabniające chwytać tylko za brzeg!
Niebezpieczeństwo skaleczenia ostrymi
nożami/obracającym się napędem!
Nigdy nie wkładać rąk do założonego miksera! Mikser
zakładać/zdejmować tylko wtedy, gdy urządzenie jest wyłączone
a napęd nieruchomy. Noży miksera nie należy chwytać gołymi
rękoma. Do czyszczenia używać szczotki.
Niebezpieczeństwo poparzenia!
Podczas przetwarzania gorących produktów przez lejek w
pokrywie wydostaje się para.
Opis urządzenia
Page 6
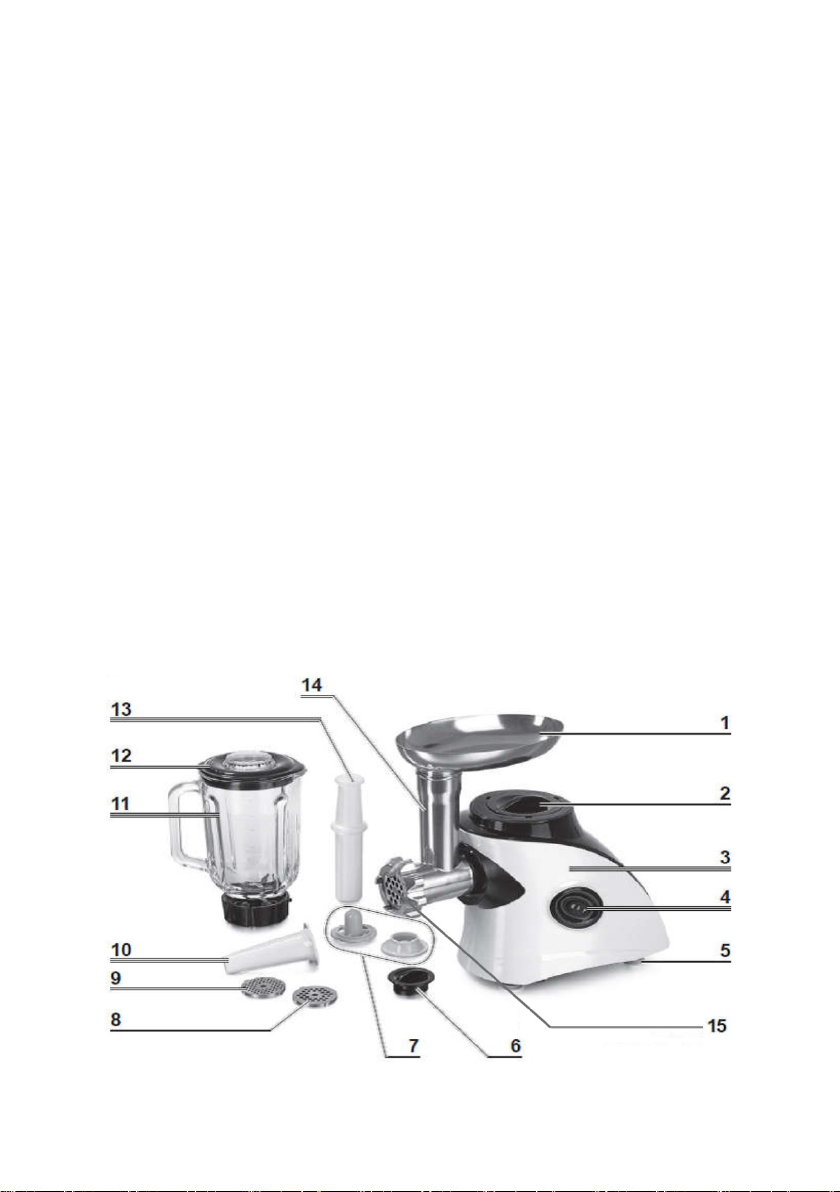
1. Taca aluminiowa
2. Zaślepka mechanizmu górnego
3. Stacja główna (w środku silnik)
4. Włącznik ON/0/P (włączony/wyłączony/pulsacyjnie)
5. Stopki z przyssawkami
6. Zaślepka przedniego mechanizmu
7. Wkładka do lodów i deserów
8. Rozdrabniacz średni
9. Rozdrabniacz mały
10. Końcówka do wyrobu kiełbas
11. Zbiornik blendera
12. Pokrywa zbiornika blendera
13. Popychacz
14. Maszynka do mięsa
15. Rozdrabniacz duży
16. Pierścień rozdrabniacza
17. Korpus maszynki do mięsa
18. Tarki do warzyw
19. Taca z tworzywa sztucznego
Page 7
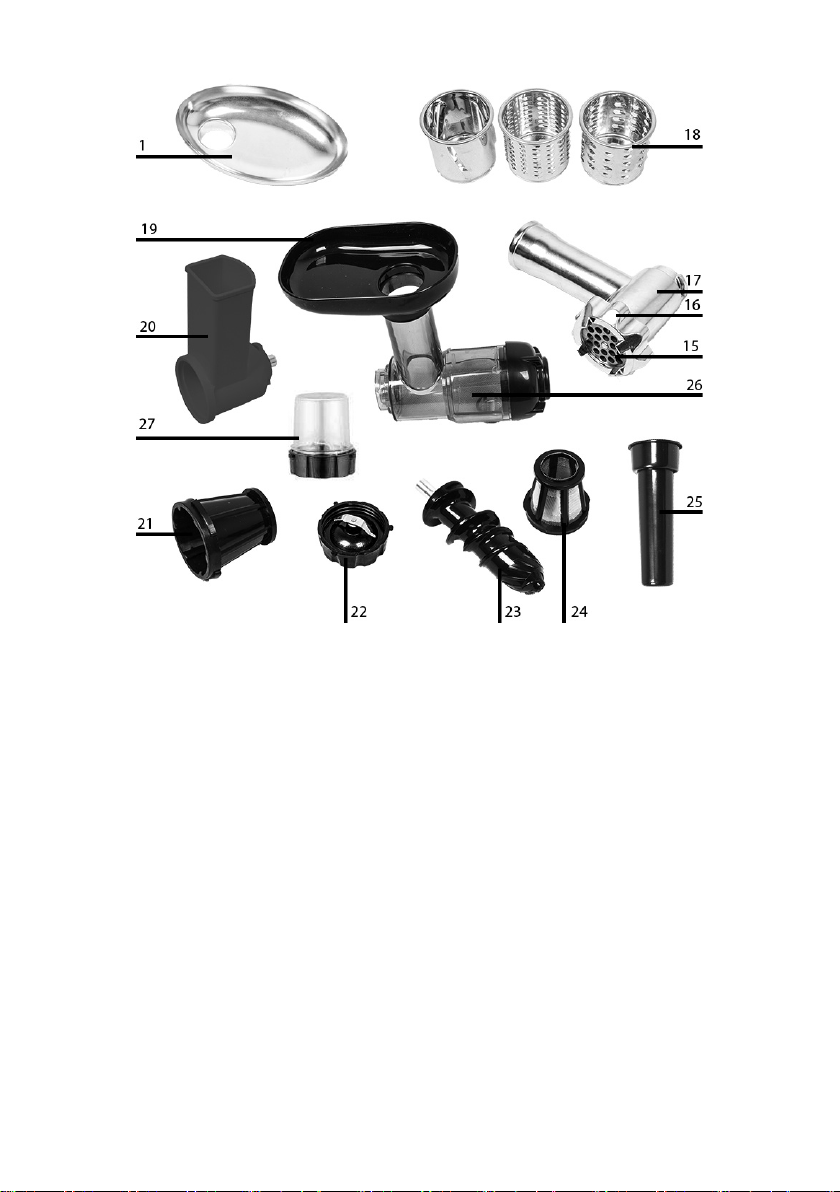
20. Maszynka do warzyw
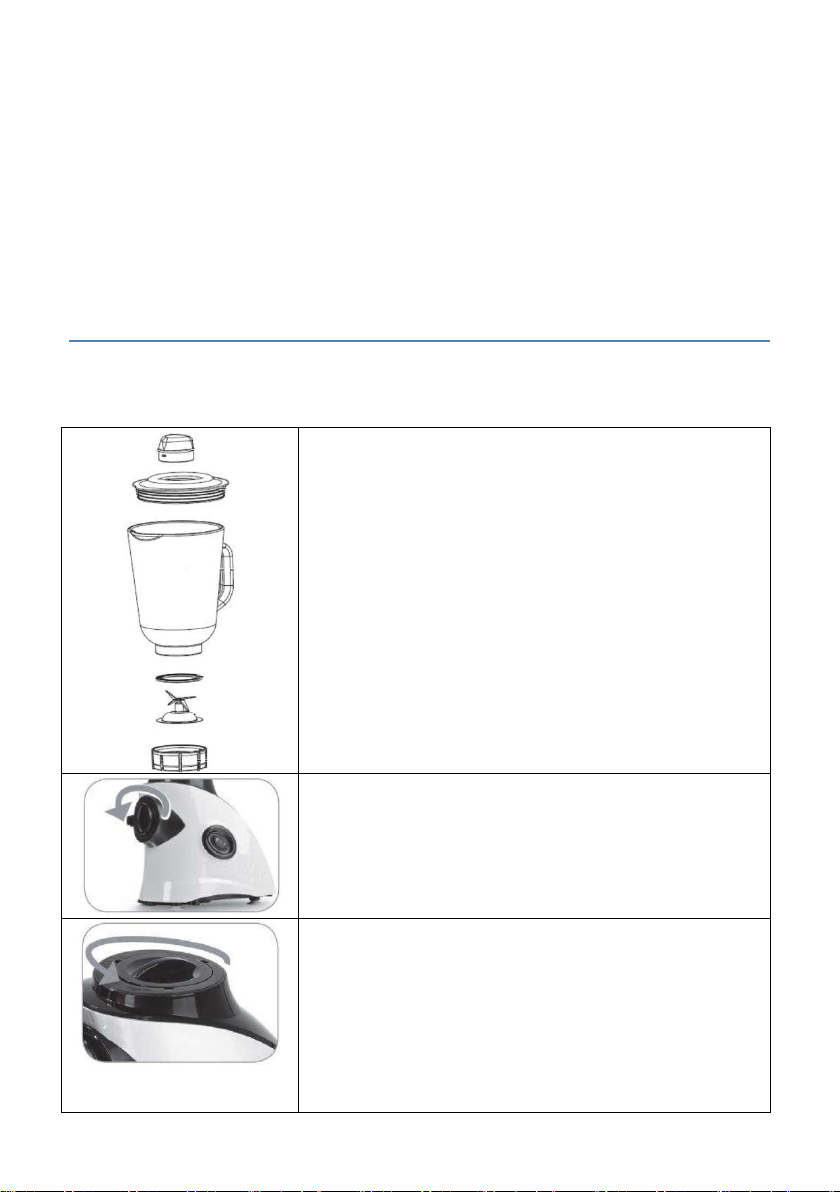
1. Przygotuj wszystkie elementy
6. Zamocuj zaślepkę przedniego
7. Zdejmij zaślepkę mechanizmu
do wgłębień na uchwycie stacji.
21. Nakładka do lodów
22. Ostrze do mielenia (urządzenie wyposażone jest również w
drugie ostrze blendera)
23. Ślimak wyciskarki wolnoobrotowej
24. Sito wyciskarki wolnoobrotowej
25. Popychacz
26. Wyciskarka wolnoobrotowa
27. Młynek do kawy
Obsługa
Blender
przedstawione na ilustracji obok.
2. W pierścień włóż ostrze.
3. Do pierścienia włóż uszczelkę.
4. Przykręć pierścień do zbiornika.
5. Umieść stację główną na płaskiej
suchej powierzchni, tak aby stopki z
przyssawkami przyczepiły się do
powierzchni blatu.
mechanizmu, obracając ją w ruchu
przeciwnym do wskazówek zegara.
górnego, odkręcając ją zgodnie z
ruchem wskazówek zegara.
8. Umieść zbiornik blendera na stacji
głównej, zaczepy blokujące na
pierścieniu zbiornika muszą pasować
Page 8
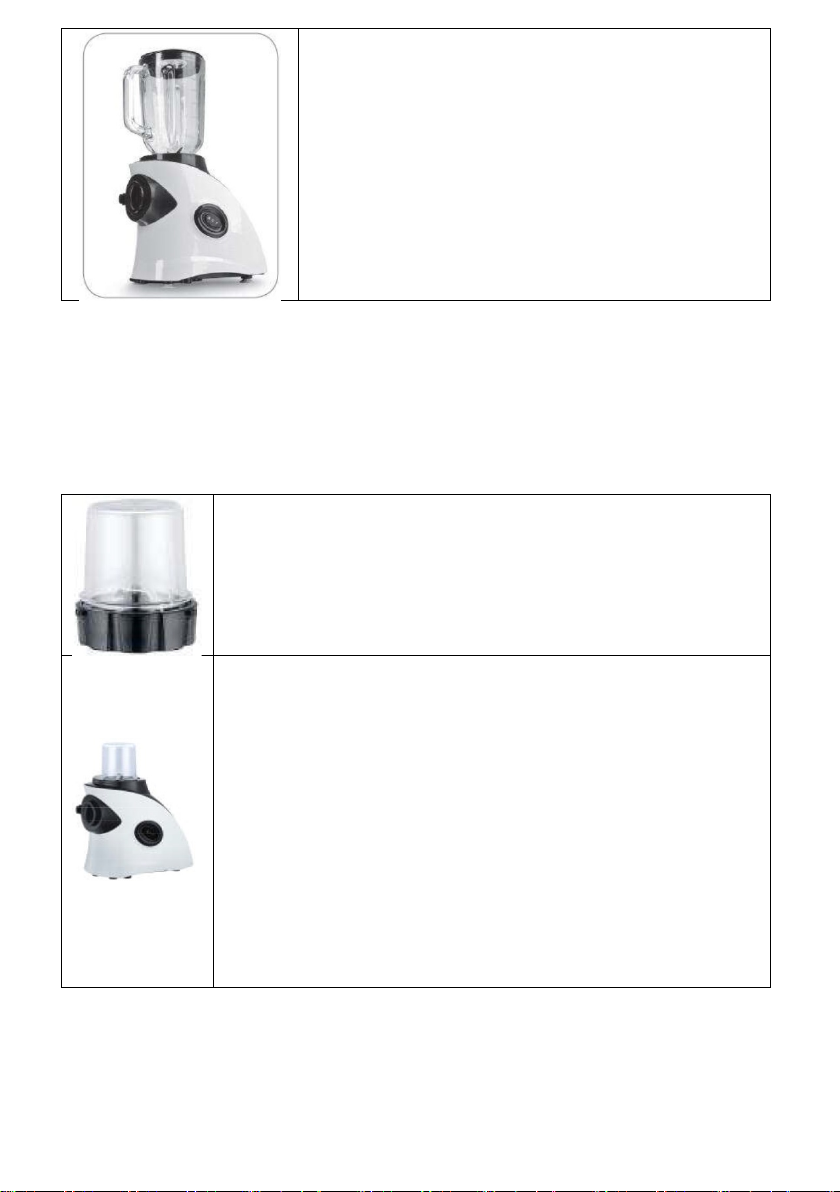
9. Dociśnij zbiornik i przykręć go
obracając w lewą stronę do momentu
1. Do pojemnika wsyp kawę, maksymalnie 2/3
4. Umieść stację główną na płaskiej suchej
lewą stronę do momentu zablokowania.
zablokowania.
Urządzenie jest gotowe do użycia, po
włożeniu produktu, należy przykryć
zbiornik blendera. Przyciskiem ON/0/P
uruchom/zakończ blendowanie.
Aby zdemontować blender, odłącz urządzenie od prądu i
wykonaj wszystkie powyższe kroki w odwrotnej kolejności.
Młynek do kawy
pojemnika.
2. W pierścień włóż ostrze.
3. Do pierścienia włóż uszczelkę.
Aby zdemontować młynek, odłącz urządzenie od prądu i wykonaj
wszystkie powyższe kroki w odwrotnej kolejności.
powierzchni, tak aby stopki z przyssawki
przyczepiły się do powierzchni blatu.
5. Zamocuj zaślepkę przedniego mechanizmu,
obracając ją w ruchu przeciwnym do
wskazówek zegara.
6. Umieść zbiornik młynka na stacji głównej,
zaczepy blokujące na pierścieniu zbiornika
muszą pasować do wgłębień na uchwycie
stacji.
7. Dociśnij zbiornik i przykręć go obracając w
Page 9
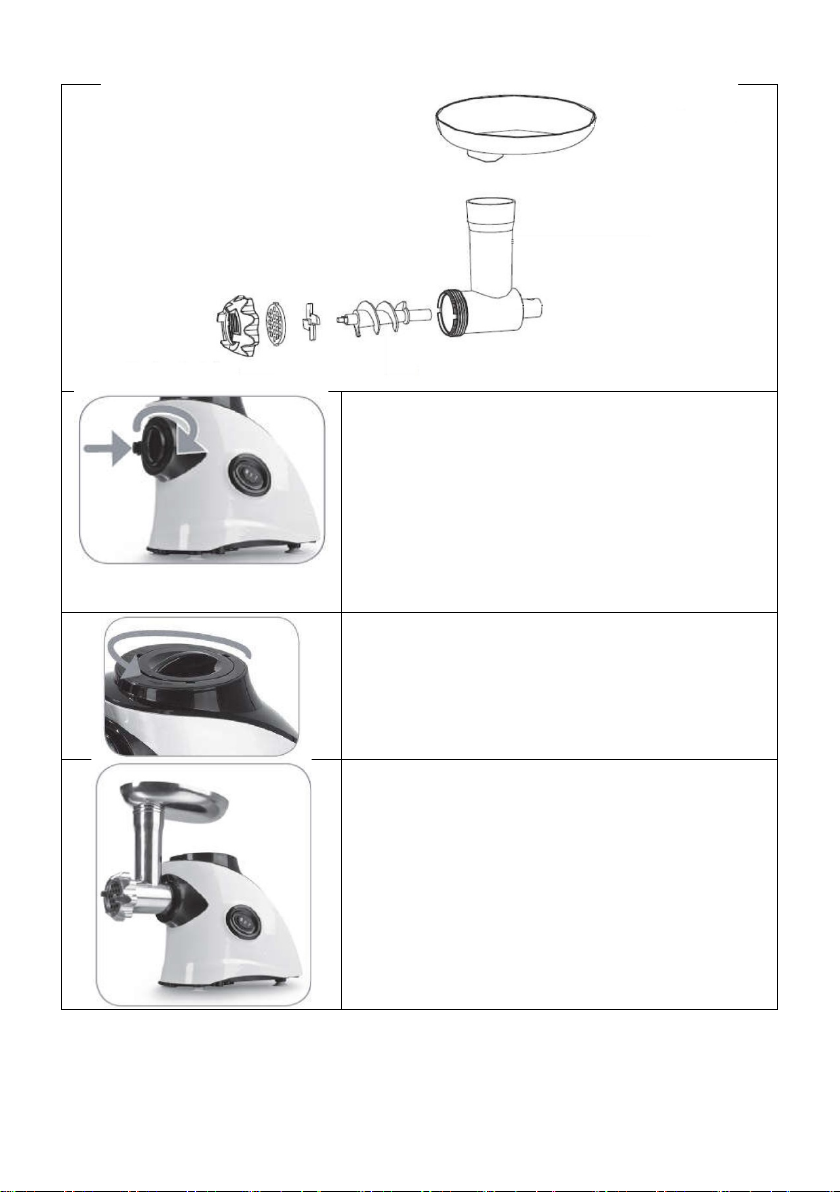
Maszynka do mięsa
1. Przygotuj wszystkie części
rysunku.
4. Zamocuj zaślepkę mechanizmu
5. Zamontuj maszynkę do
przedstawione na powyższym
rysunku.
2. Zdemontuj zaślepkę przedniego
mechanizmu.
3. Połącz wszystkie części
przedstawione na powyższym
górnego, obracając ją w ruchu
przeciwnym do wskazówek
zegara.
mielenia mięsa w stacji głównej,
aby to zrobić wprowadź trzon
maszynki pod kątem 90 stopni
do stacji głównej, następnie
dociskając przekręć maszynkę
Aby zdemontować maszynkę do mielenia mięsa, odłącz
urządzenie od prądu i wykonaj wszystkie powyższe kroki w
odwrotnej kolejności.
do pozycji pionowej.
Page 10
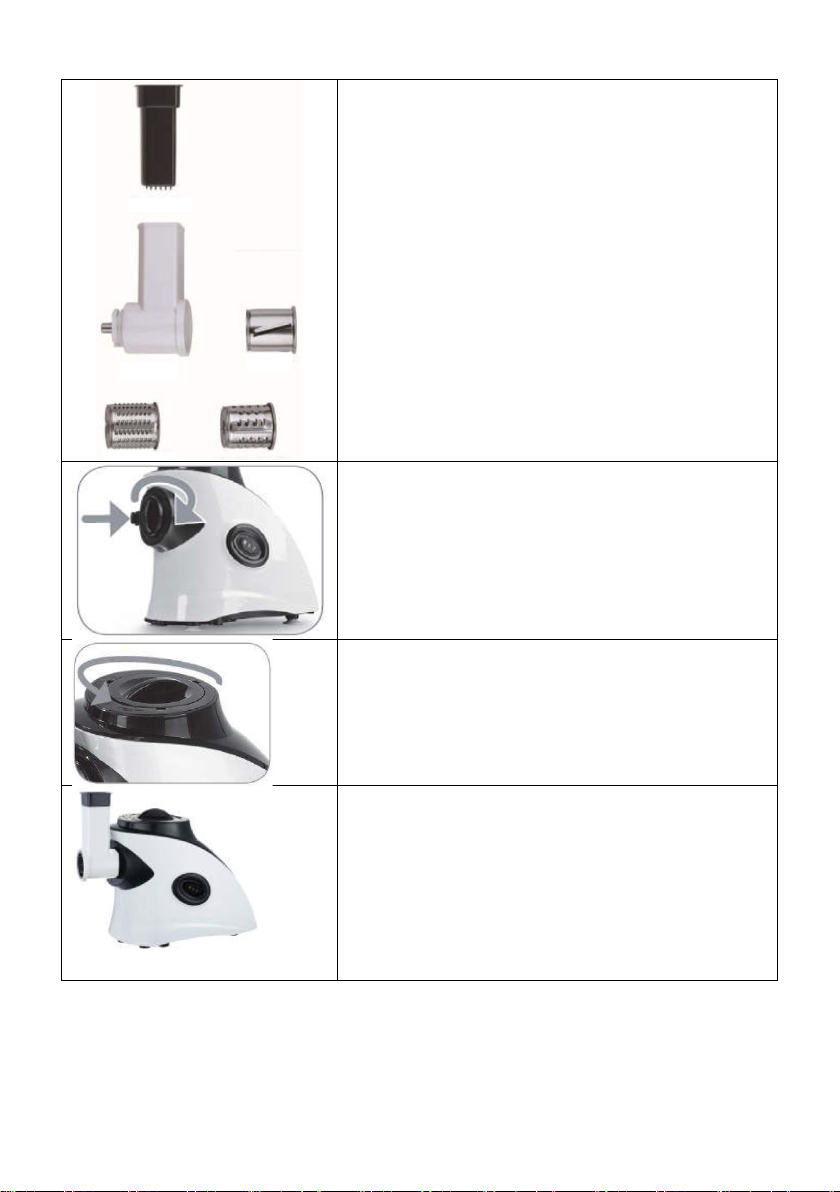
Szatkownica do warzyw
1. Przygotuj wszystkie części
3. Zdemontuj zaślepkę przedniego
4. Zamocuj zaślepkę mechanizmu
5. Zamontuj szatkownicę w stacji
pionowej.
przedstawione na rysunku.
2. Połącz wszystkie części
przedstawione na rysunku obok.
mechanizmu.
górnego, obracając ją w ruchu
przeciwnym do wskazówek
zegara.
głównej, aby to zrobić wprowadź
trzon tarki pod kątem 90 stopni
do stacji głównej, następnie
dociskając przekręć
Aby zdemontować szatkownicę, odłącz urządzenie od prądu i
szatkownice do pozycji
wykonaj wszystkie powyższe kroki w odwrotnej kolejności.
Page 11
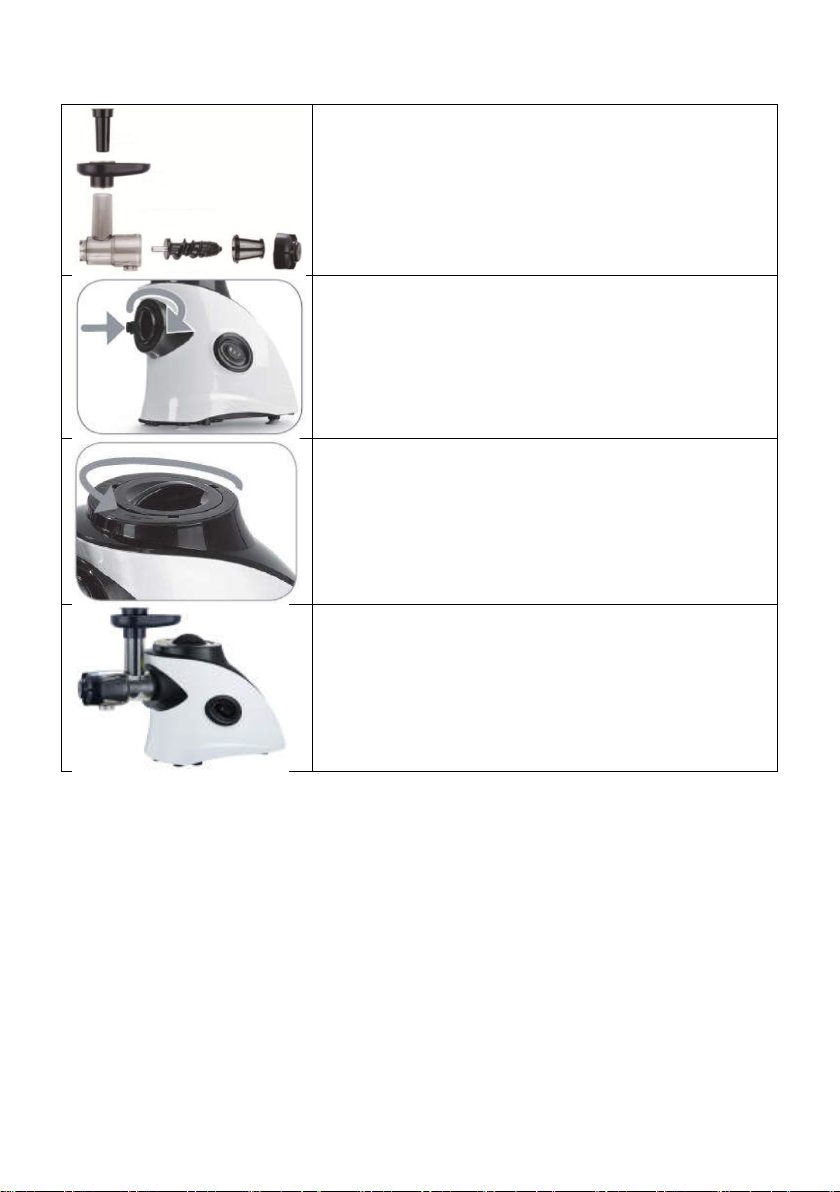
1. Przygotuj wszystkie części
3. Zdemontuj zaślepkę przedniego
4. Zamocuj zaślepkę mechanizmu
5. Zamontuj wyciskarkę w stacji
pozycji pionowej.
Wyciskarka wolnoobrotowa
przedstawione na rysunku.
2. Połącz wszystkie części
przedstawione na rysunku obok.
mechanizmu.
górnego, obracając ją w ruchu
przeciwnym do wskazówek
zegara.
głównej, aby to zrobić wprowadź
trzon tarki pod kątem 90 stopni do
stacji głównej, następnie
dociskając przekręć wyciskarkę do
Aby zdemontować wyciskarkę, odłącz urządzenie od prądu i
wykonaj wszystkie powyższe kroki w odwrotnej kolejności.
Page 12
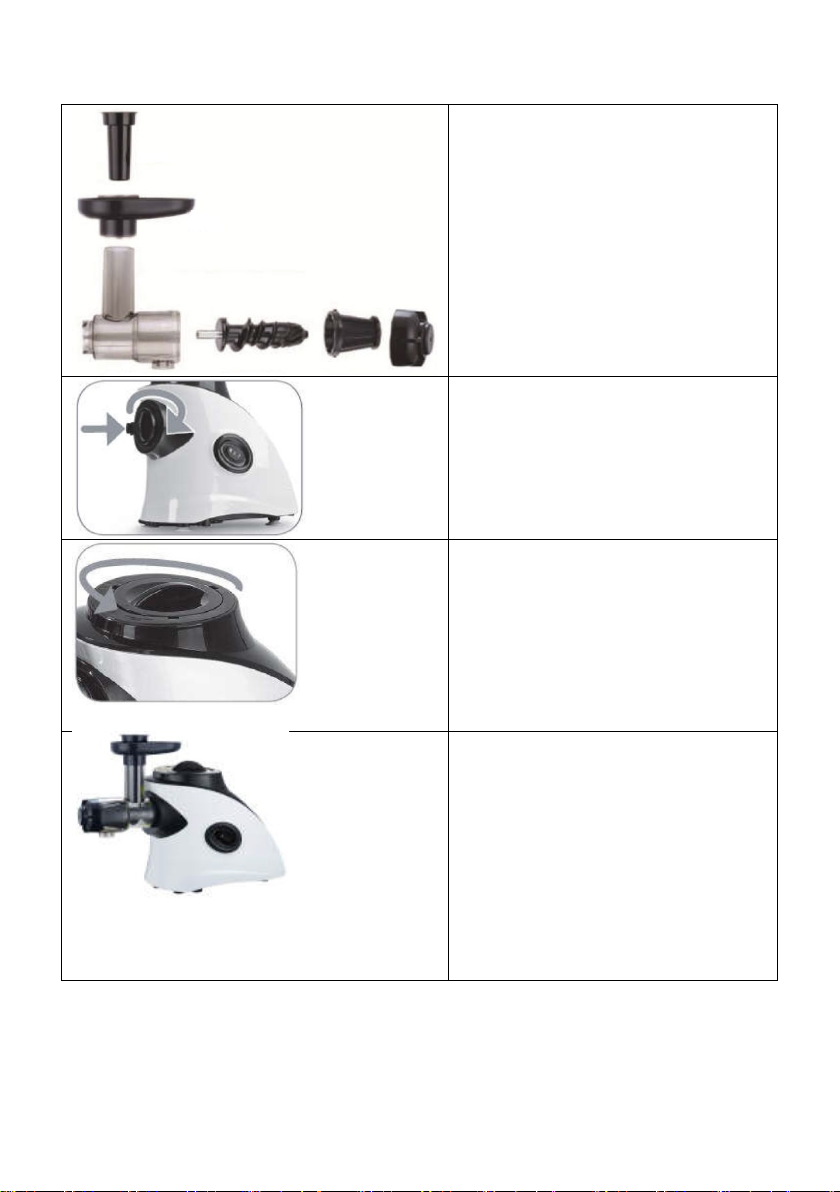
1. Przygotuj wszystkie
3. Zdemontuj zaślepkę
4. Zamocuj zaślepkę
5. Zamontuj nakładkę
do pozycji pionowej.
Nakładka deserowa
części przedstawione
na rysunku.
2. Połącz wszystkie
części przedstawione
na rysunku obok.
przedniego
mechanizmu.
mechanizmu
górnego, obracając ją
w ruchu przeciwnym
do wskazówek
zegara.
Aby zdemontować nakładkę deserową, odłącz urządzenie od
prądu i wykonaj wszystkie powyższe kroki w odwrotnej
kolejności.
deserową w stacji
głównej, aby to zrobić
wprowadź trzon tarki
pod kątem 90 stopni
do stacji głównej,
następnie dociskając
przekręć wyciskarkę
Page 13

Page 14

MULTIDO
Manual
Page 15

Introduction
Dear customer!
Thank you for placing trust in us and choosing Overmax Home.
We provide you with a product perfect for everyday use thanks to
high-quality materials and modern solutions.
We are sure that the product will satisfy your requirements as it
has been designed with utmost care.
Before you use the product, please read this manual carefully.
Should you have any remarks or questions related to the product,
please do not hesitate to contact us:
Page 16

For own safety
Before you use the product, please re a d t his manual
carefully to see safety and operation tips.
The manufacturer shall not be held responsible for potential
damage arising from the use of the product at variance with its
intended use or improper operation.
This device is not intended for commercial use. The number of
products has been adapted to the household use, etc. The use
similar to the household use includes among others using the
device in kitchens in stores, offices, farms or other (small-sized)
enterprises and guest houses, small hotels, etc. The use must be
adapted to the number of products and preparation time typical of
households. This device allows mixing, crushing, whipping,
slicing and grating food products. If additional equipment,
authorized by the manufacturer, is used, further applications are
possible. It is forbidden to use the device to process other items
or substances than specified by the manufacturer. The device
must be operated with original equipment only. The manual must
be stored carefully. When handing this device over to another
user, please provide the manual as well.
General safety tips
Electric shock risk
The device must not be used by children.
The device and electric feeder must be kept out of the reach of
children. The device can be used by disabled persons (physically
or mentally) or persons who lack suitable experience/knowledge
if supervised by person who is responsible for user’s safety or
after a suitable training has been conducted or after getting
familiar with hazards related to the use of the device.
Do not let children play with the device.
The device must be connected and used in accordance with
parameters specified in the rating plate. Use in closed rooms
only. The device must be used when the electric feeder and the
device are not damaged. Always switch off the device when it is
unattended, before assembly and disassembly and before
Page 17

cleaning. Do not let the electric feeder come into contact with
sharp edges or hot surfaces. To avoid hazards arising from
damage to the feeder, the feeder must be replaced by the
manufacturer or its authorized service technicians or persons
with similar competence and relevant licenses. Only our
authorized service point is allowed to repair the device.
Safety tips for using this device
Cut risk
Electric shock risk
In the event of a power failure, the device remains switched on
and resumes operation after the break.
The equipment and accessories must be replaced provided the
device has been switched off (rotational switch in 0/off position)
and unplugged.
Never immerse the body of the device in any liquids, never wash
with running water or in the dishwasher.
Before you start removing defects, unplug the device.
Rotating tool cut risk!
When the device is working, do not put your hands in the bowl.
To push ingredients, use a prodder only. After the device has
been switched off, its drive remains active for a short period of
time. Tools must be replaced solely when the drive is inactive
and immobile.
Before you replace elements of the equipment or additional parts
which are in motion when the device operates, it is necessary to
switch off and unplug the device.
Sharp knife cut risk!
Grab an all-purpose knife with a plastic handle (edge). If you do
not use the all-purpose knife, place it in the cover. Do not put
your hands in the input hole. Push products with a prodder.
Do not touch sharp knives and edges of grinding discs.
Grab edges of grinding discs only!
Sharp knife/rotating drive cut risk!
Never put your hands in the assembled mixer! The mixer must be
assembled/disassembled solely when the device is switched off
and its drive immobile. Do not grab mixer knives with bare hands.
Use a brush to clean it.
Page 18
Burning risk!
When processing hot products through a funnel, there is a steam
in the cover.
Description
Page 19
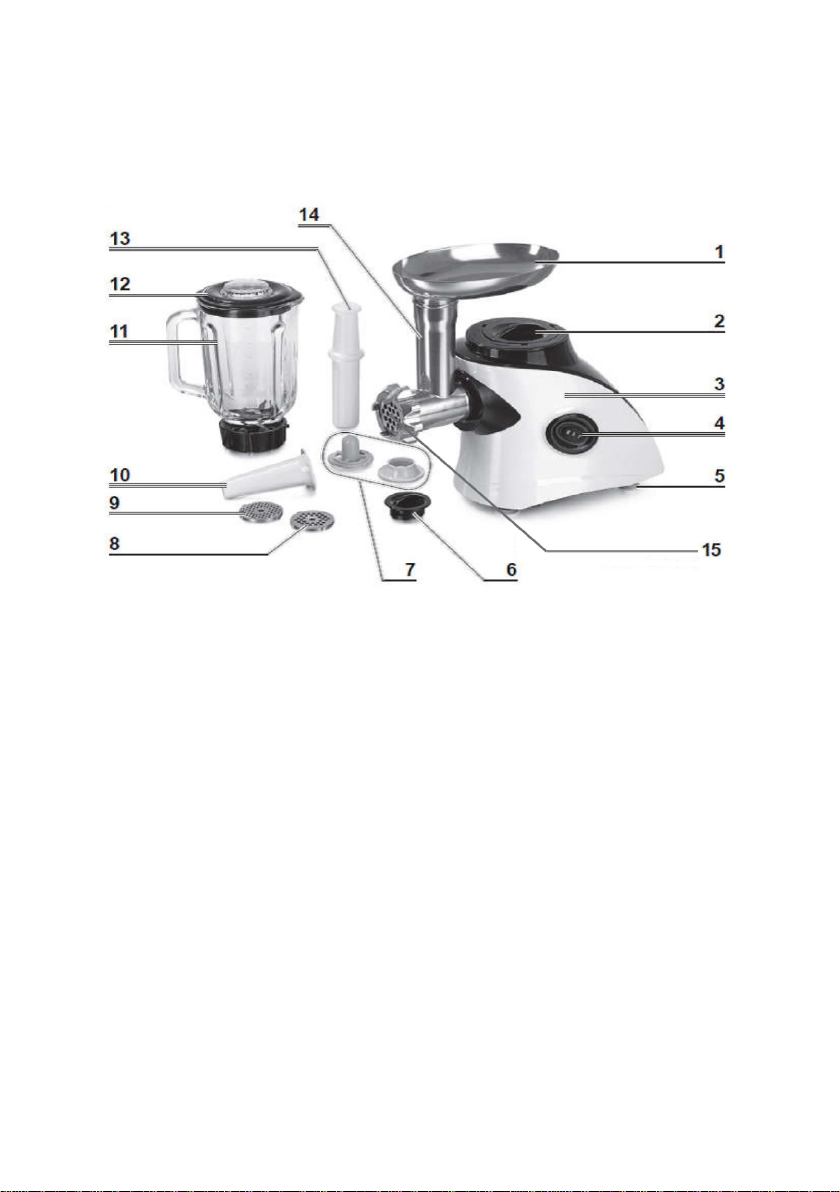
1. Aluminum tray
2. Upper mechanism end cap
3. Main station (motor inside)
4. ON/0/P switch (active/inactive/pulsating)
5. Feet with suckers
6. Front mechanism end cap
7. Ice and dessert sheath
8. Medium grinder
9. Small grinder
10. Sausage production tip
11. Blender reservoir
12. Blender reservoir cover
13. Prodder
14. Meat grinder
15. Large grinder
16. Grinder ring
17. Meat grinder body
18. Vegetable grater
19. Plastic tray
20. Vegetable grinder
Page 20
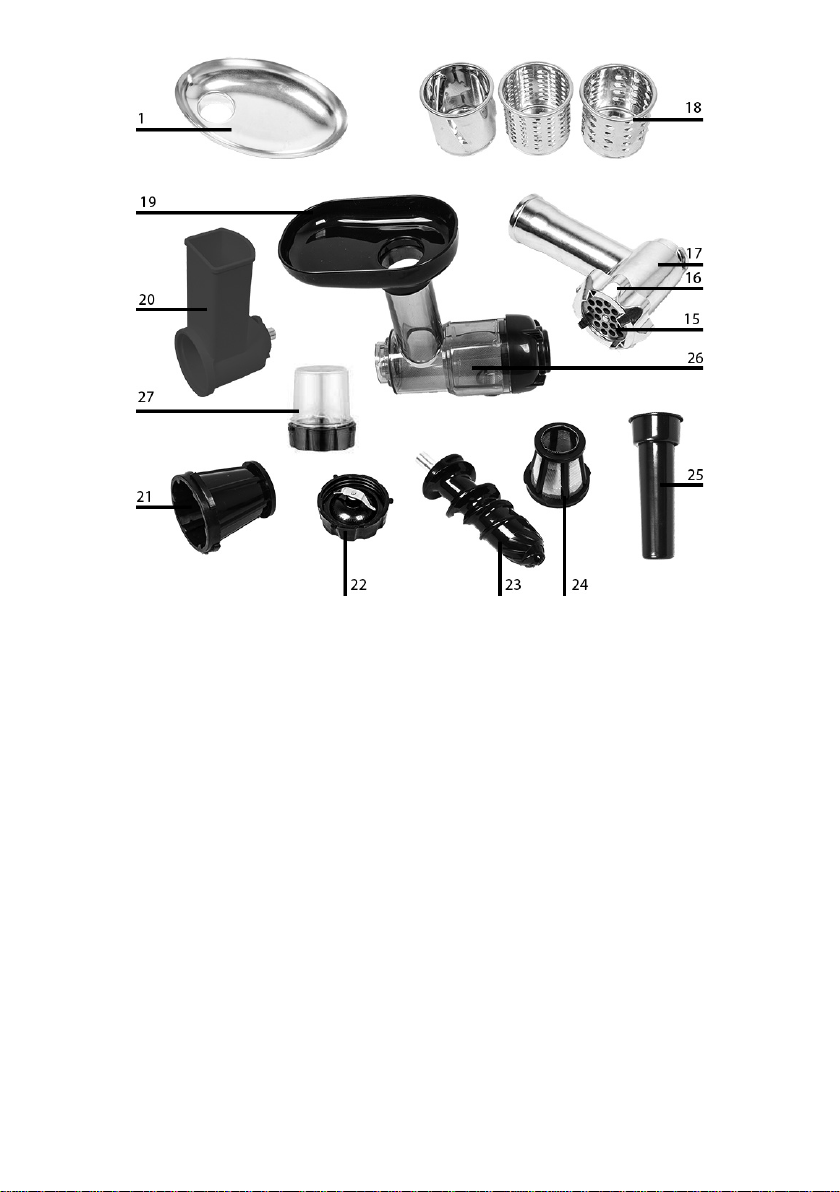
21. Ice sheath
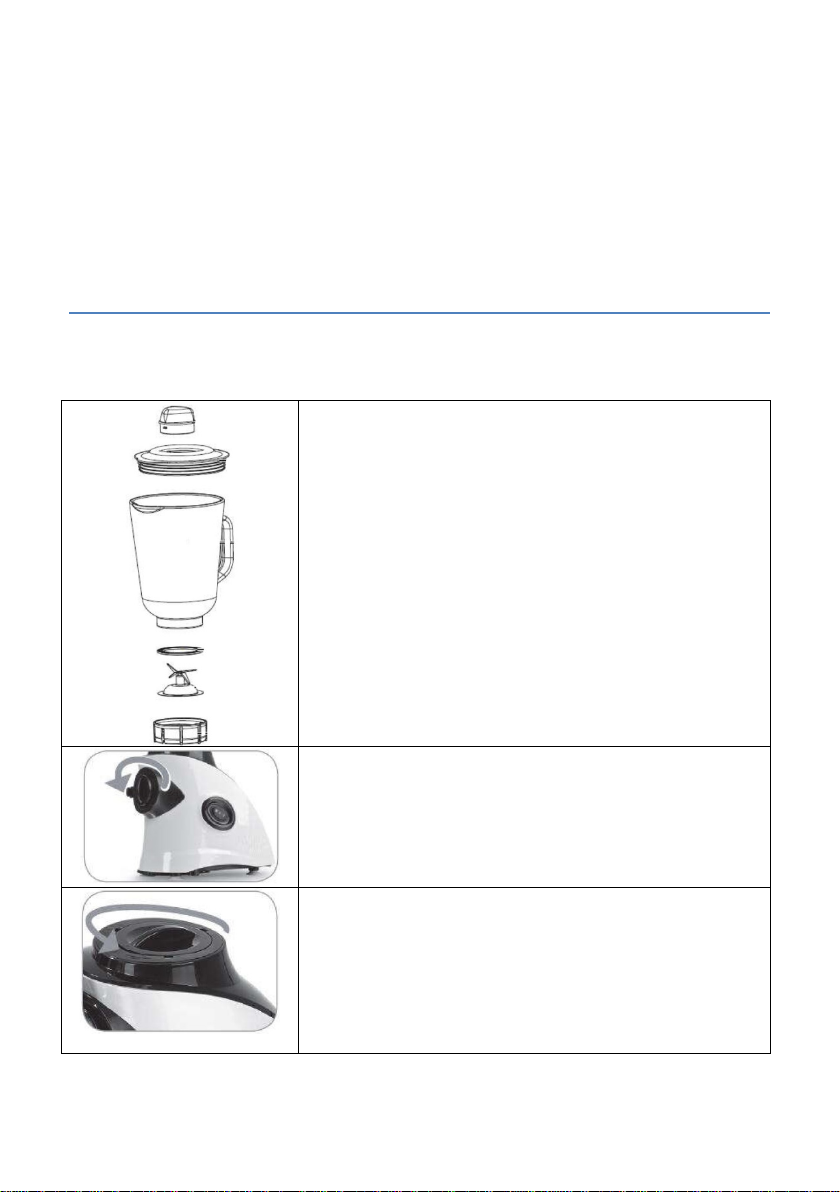
1. Prepare all elements presented in the
6. Fix front mechanism end cap by
7. Remove upper mechanism end cap by
hollows.
22. Grinding blade (the device is also equipped with second
blender blade)
23. Low-speed squeezer worm
24. Low-speed squeezer sieve
25. Prodder
26. Low-speed squeezer
27. Coffee grinder
Operation
Blender
picture.
2. Put the blade in the ring.
3. Insert a seal in the ring.
4. Screw the ring in the reservoir.
5. Place the main station on the flat and
dry surface so that feet with suckers
are attached to the surface of the top.
rotating it in an anti-clockwise direction.
rotating it in a clockwise direction.
8. Place the blender reservoir on the
main station, locking hooks on the
reservoir ring must fit station handle
Page 21
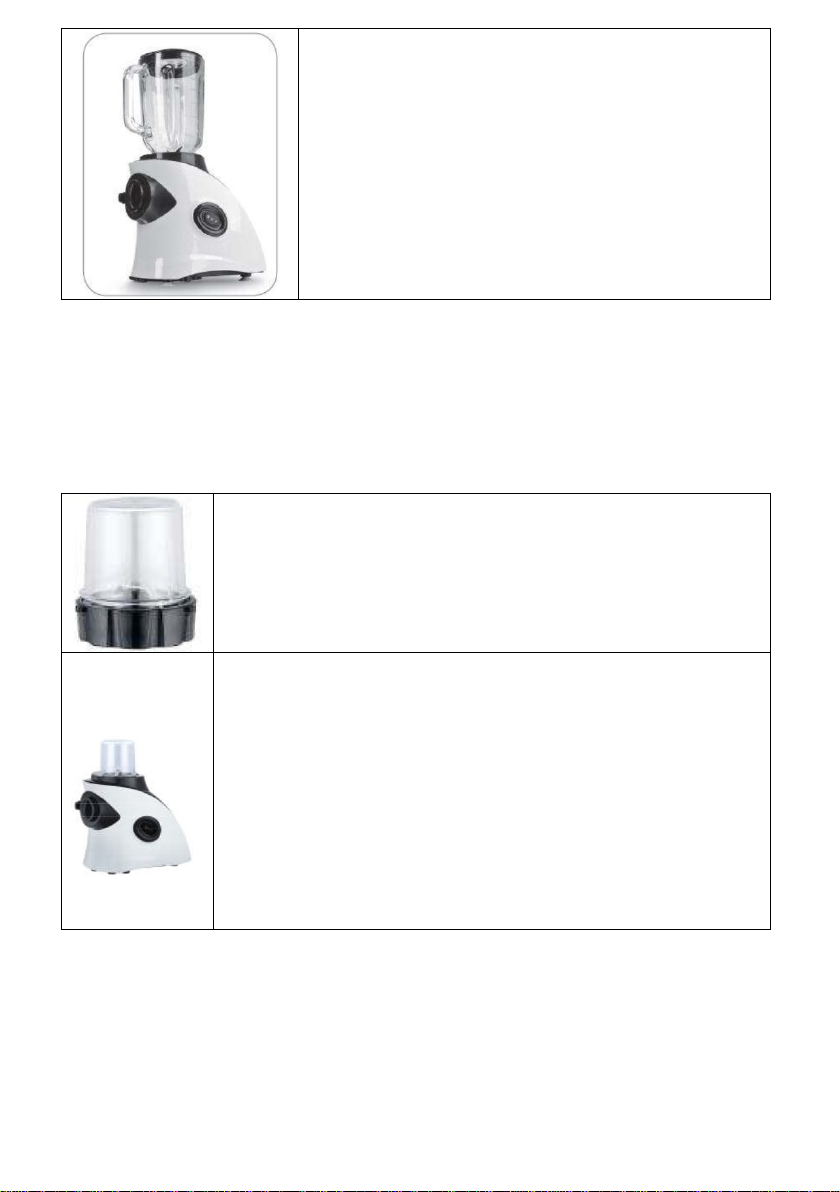
9. Press the reservoir and tighten in up by
rotating in the left direction until locked
1. Pour coffee in the reservoir, max. 2/3.
4. Position the main station on a flat and dry
in a left direction until locked in place.
in place.
The device is now ready, after you have
put the product in, cover the blender
reservoir. Press ON/0/P to start/finish
blending.
To disassemble the blender, unplug the device and follow the
steps above in a reversed order.
Coffee grinder
2. Put a blade in the ring.
3. Insert a seal in the ring.
To disassemble the grinder, unplug the device and follow the
steps above in a reversed order.
surface so that the feet with suckers are
attached to the surface of the top.
5. Fix a front mechanism end cap by rotating it in
an anti-clockwise direction.
6. Position the grinder reservoir on the main
station, locking hooks on the reservoir ring
must fit station handle hollows.
7. Press the reservoir and tighten it up by rotating
Page 22
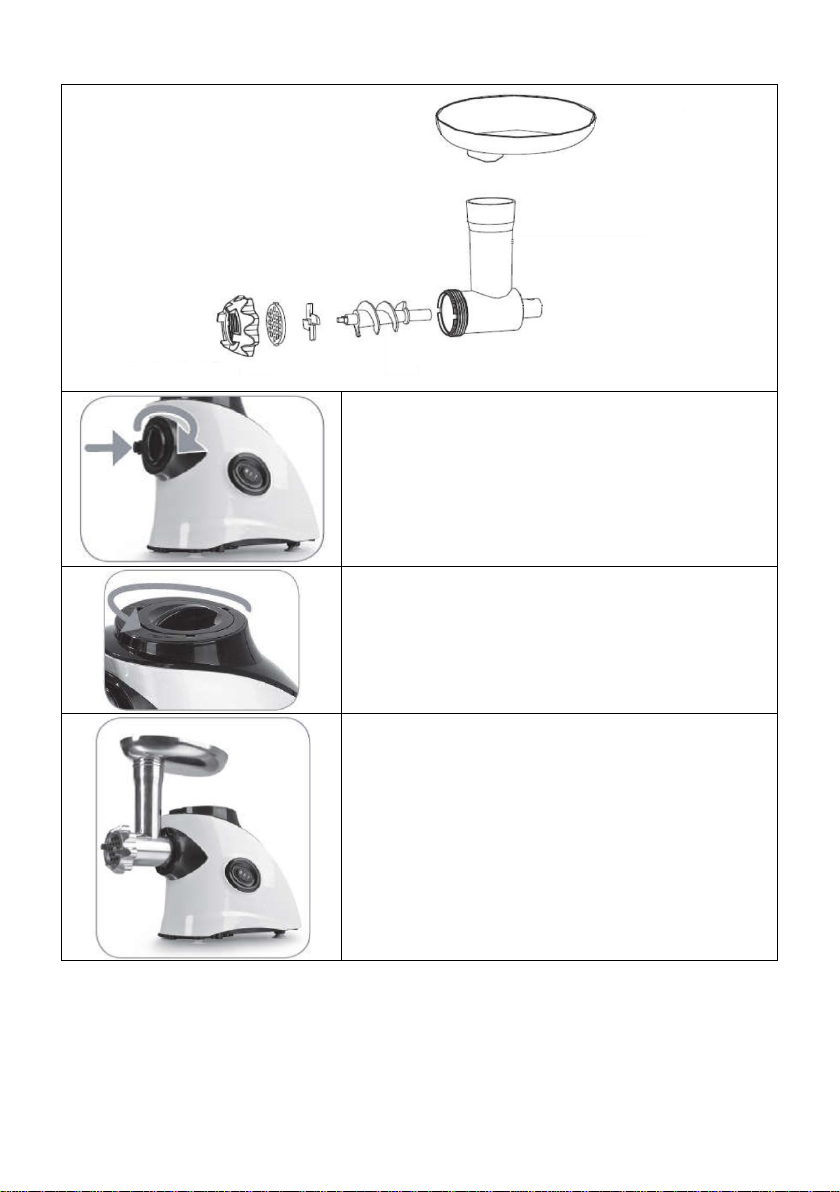
Meat grinder
1. Prepare all parts presented in
4. Fix the upper mechanism end
5. Fix the meat grinder in the main
the picture above.
2. Disassemble a front mechanism
end cap.
3. Connect all parts presented in
the picture above.
cap by rotating it in an anticlockwise direction.
station. To do so, insert the
grinder shaft at the angle of 90
degrees in the main station,
next press and rotate the
grinder to the vertical position.
To disassemble the meat grinder, unplug the device and follow
the steps above in a reversed order.
Page 23
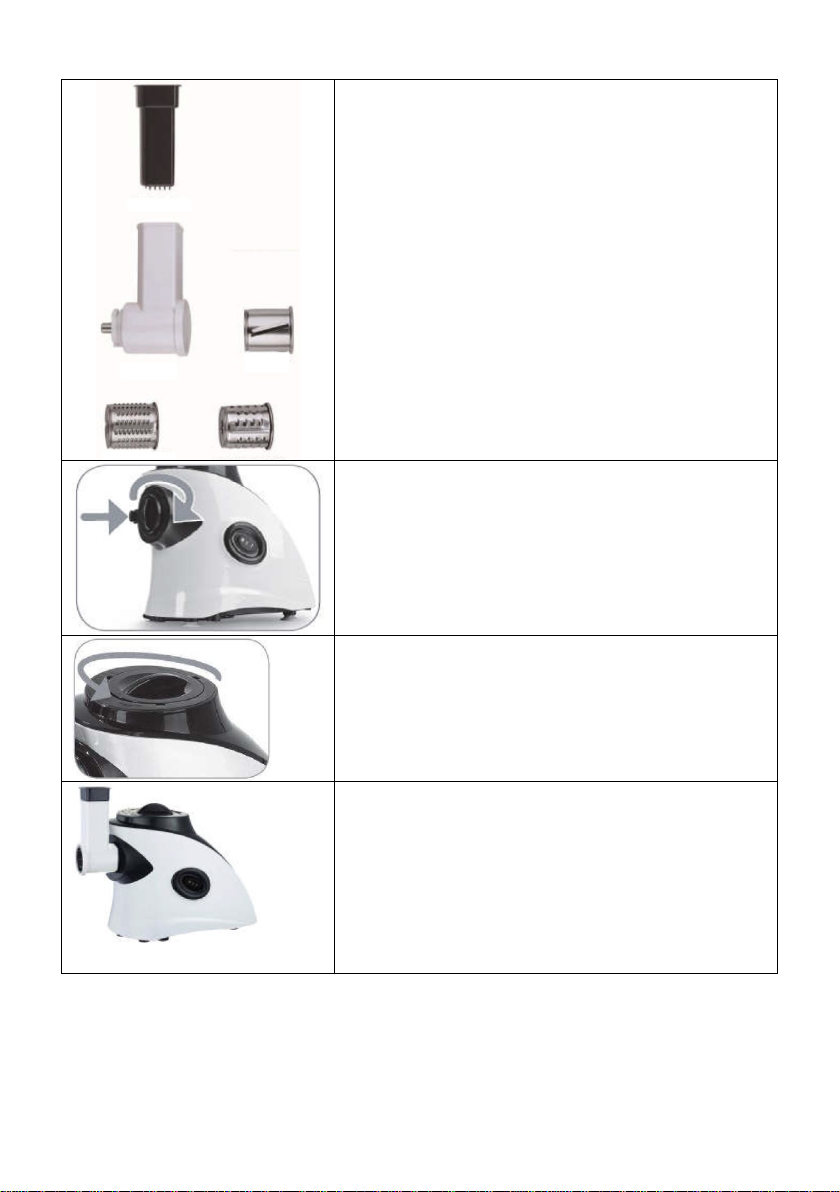
Vegetable shredder
1. Prepare all parts presented in
3. Disassemble a front mechanism
4. Fix the upper mechanism end
5. Fix the shredder in the m ain
the picture.
2. Connect all parts presented in the
picture on the left.
end cap.
cap by rotating it in an anticlockwise direction.
station. To do so, insert the
shredder shaft at the angle of 90
degrees in the main station, next
press and rotate the shredder to
To disassemble the shredder, unplug the device and follow the
steps above in a reversed order.
the vertical position.
Page 24
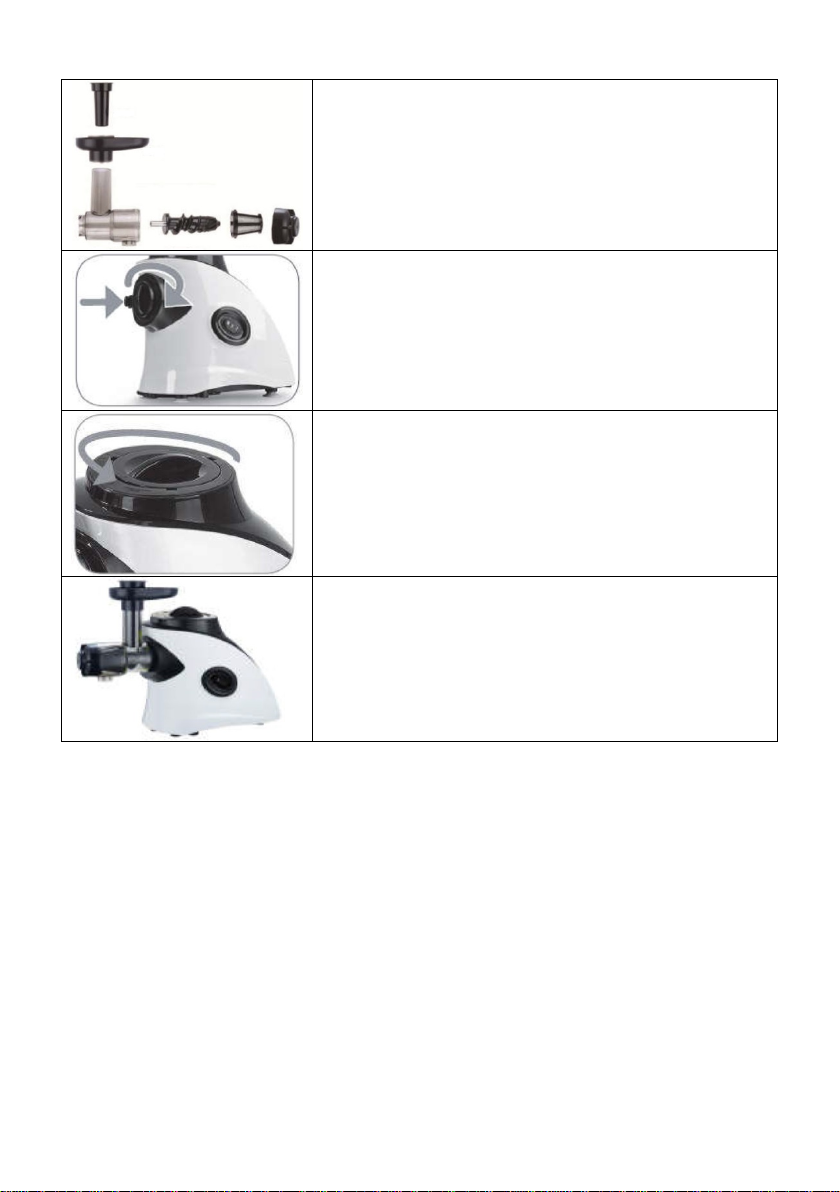
Low-speed squeezer
1. Prepare all parts presented in the
3. Disassemble a front mechanism
4. Fix the upper mechanism end cap
5. Fix the squeezer in the main station.
picture.
2. Connect all parts presented in the
picture on the left.
end cap.
by rotating it in an anti-clockwise
direction.
To do so, insert the shaft at the angle
of 90 degrees in the main station,
next press and rotate the squeezer to
the vertical position.
To disassemble the squeezer, unplug the device and follow the steps
above in a reversed order.
Page 25
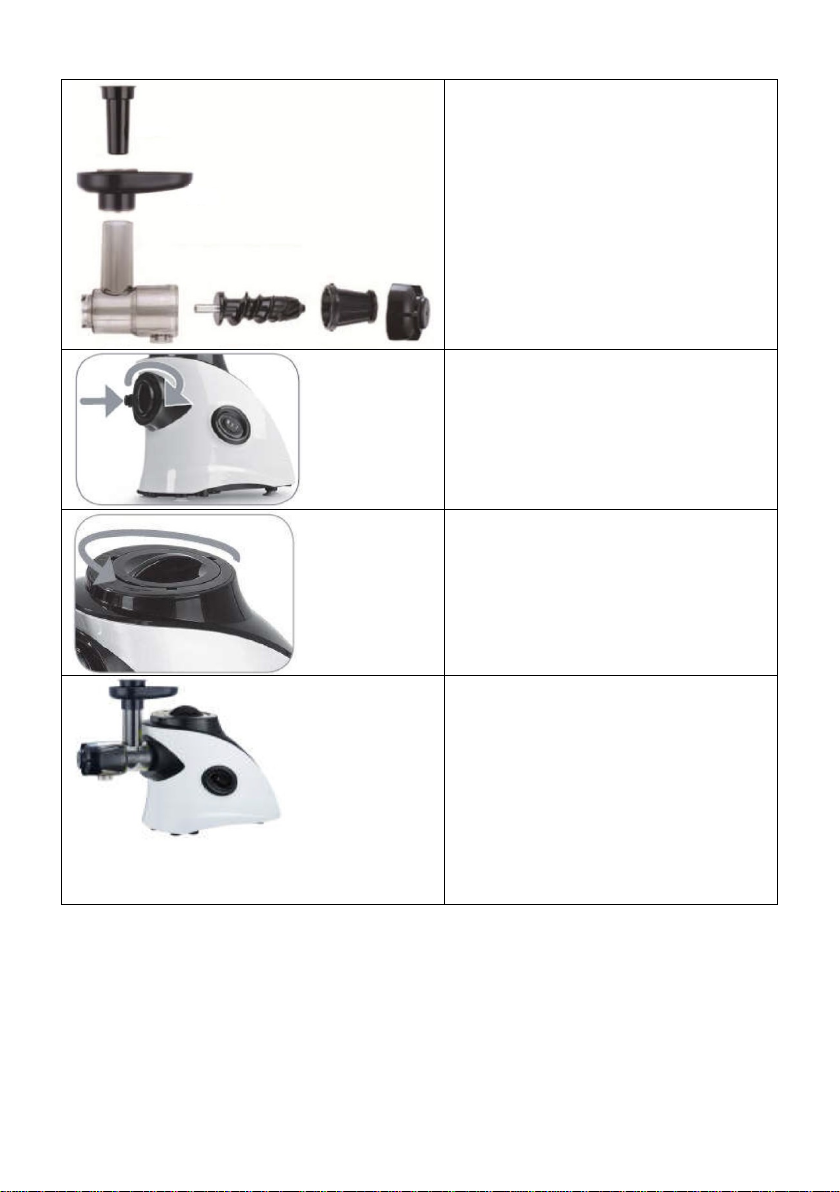
Dessert sheath
1. Prepare all parts
3. Disassemble a front
4. Fix the upper
5. Fix the dessert sheath in
presented in the
picture.
2. Connect all parts
presented in the
picture on the left.
mechanism end cap.
mechanism end cap
by rotating it in an
anti-clockwise
direction.
To disassemble the dessert sheath, unplug and device and follow
all steps above in a reversed order.
the main station. To do
so, insert the grater
shaft at the angle of 90
degrees in the main
station, next press and
rotate the squeezer to
the vertical position.
Page 26
Page 27
 Loading...