

Page 1
CamRoad 6.0
Page 2

Camroad 6.0
User Manual
User manual
Before using, please read the user manual
carefully
.
Page 3

All the contents of the manual are subject to
change without prior notice.
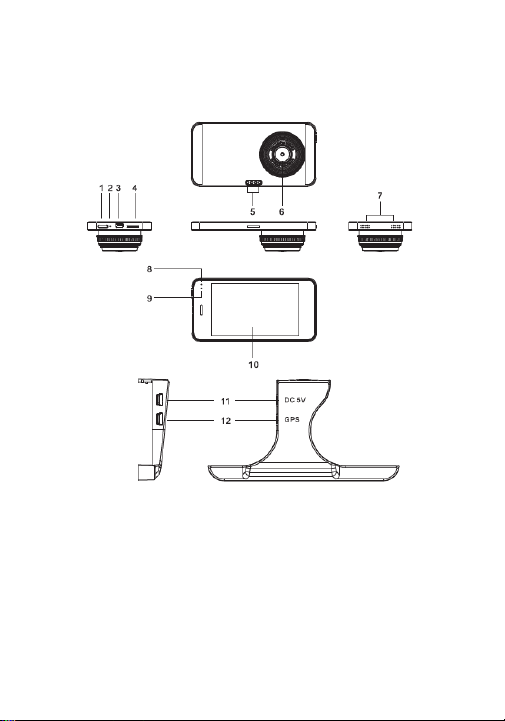
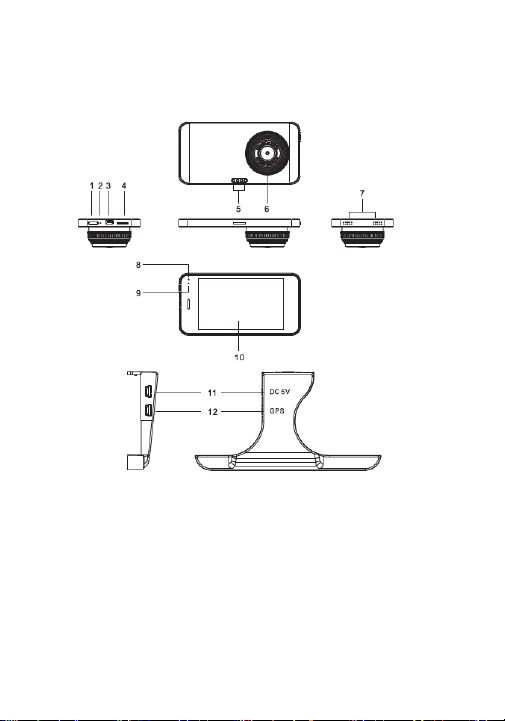
Product illustration:
1. Display Power
button
2. Reset
3. MiniUSB port
4. MicroSD memory
card slot
5. Car handle charging
port
6. Lens
7. Speaker
8. Power LED
9. Charging LED
10. Display
11. MiniUSB port (DC
5V)
12. MiniUSB port (GPS
module) - not
included
Page 4
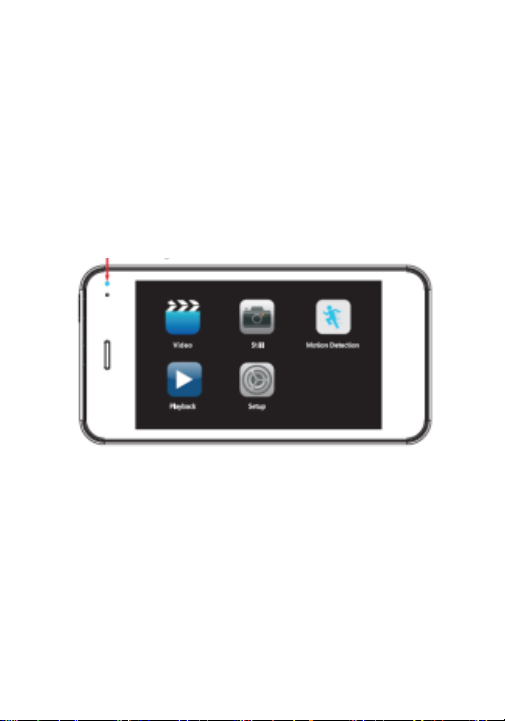
Functions
Blue LED power indicator
1. Turning on / off
1.1. Turning the device on:
Press and hold the Power button to turn
the device on.
The OVERMAX logo appe ars on the screen, and
then it switches to the main menu. At the same
time the blue LED turns on indicating the power
status of the device.
Once connected to the car charger, the device
turns on automatically and starts recording.
If there is no microSD card plugged into the
device, the camera does not start recording.
Instead, the display shows the followi ng mes sage:
“Please insert a microSD card”.
If you insert or rem ove the m icroSD car d while t he
device is on, it will turn off.
Page 5
Turning the device off:
Press and hold the Power button to turn the
device off.
2. Battery charging
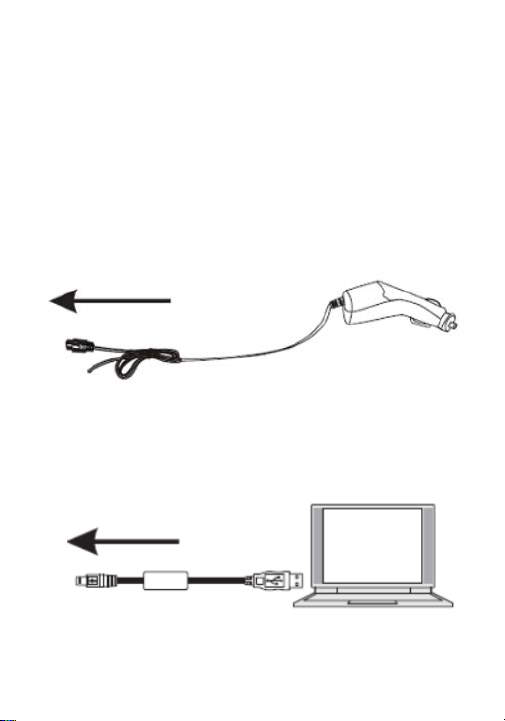
2.1. Using a car charger:
The charging process starts automatically
when you connect the c amera to a car charg er.
It is not necessary to turn on the camera in
order to charge it.
2.2. Using a USB port:
You can also charge your camera by
connecting it to a USB port in a computer using
a USB cable. It is not necessary to turn on the
camera in order to charge it.
Note:The red LED glows stead ily during c harging.
Page 6

Memory card insertion / removal
2.3. Insert a microSD memory card into the
camera card slot according to the
indicated direction, and make sur e that it
is properly secured.
2.4. In order to remove the c ard f rom the slot,
push it gently to un lock it and then pull it
out.
Remarks:
• If the camera is on, it turns off
automatically just after the card insertion.
In order to start to use it, you need to tur n
the camera on again.
• If a memory card is not recognized,
remove it and then insert it into the
camera card slot again. If it does not
work, please try to use another card.
• We recommend using MicroSD c ards with
a Speed Class 6 or 10.
Page 7

3. Recording
In order to start recording, tap the recording
icon in the main menu.
In order to start recording, tap the red icon on
the right side of the screen.
The red icon and blue LED flash during
recording. In order to stop recording, tap the
corresponding icon again. The icon and the
LED will stop flashing.
4. Video mode settings
4.1. In the video mode, press the Menu
button to open the video settings screen.
• Resolution: 1920*1080/ 1208*720/ 848*480/
640*480/
• Loop recording: Off / 2 minutes / 5 minutes /
10 minutes (recording file length)
• G-sensor: Off / low / medium / high
• Date and time stamp: Off / Date / Date and
time
• GPS: On / Off
• LDWS: On / Off
• Number plates: On / Off
Page 8
4.2. Other video options
• Back to main menu
• Sound recording on Sound
recording off
• Manual saving of a current video as
a file Tap to disable
5. Ta king photos
When the device enters the phot o mode, the
camera icon appears on the s creen. Point the
camera lens at the subject and tap the
camera icon on the right side of the screen
to take a picture.
6. Photo mode settings
In the photo mode, press the Menu button to
display the photo settings screen.
• Capture mode: single photo / self timer (2
seconds / 5 seconds / 10 seconds).
• Resolution: 12M / 10M / 8M / 5M.
• Sequence: On / Off
• White balance: Auto / Daylight / Cloudy /
Tungsten light / Fluorescent lamp
• Available colors: Colors / Black-White /
Page 9

Sepia
• ISO: Auto / 100 / 200 / 400
• Date and time stamp: Off / Date / Date
and time
7. Motion detection
Tap the icon to enter the motion
detection mode. When the camera detects
motion, it starts recording automatically. The
recording stops if the camera doesn’t detect
any motion for 10 seconds.
8. Motion detection settings
8.1. In the video mode, press the Menu
button to open the video settings screen.
• Resolution: 1920*1080/ 1208*720/
848*480/ 640*480/
• Loop recording: Off / 2 minutes / 5
minutes / 10 minutes (recording file
length)
• G-sensor: Off / low / medium / high
• Date and time stamp: Off / Date / Date
and time
• GPS: On / Off
• LDWS: On / Off
• Number plates: On / Off
Page 10
8.2. Other video options
• Back to main menu
• Sound recording on Sound
recording off
• Manual video saving. Tap to disable
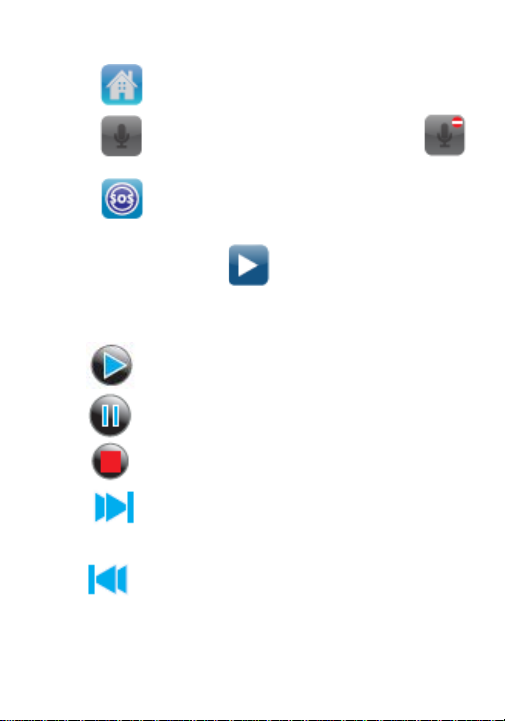
9. Preview mode
The preview mode allows you to pl a y back
previously recorded files or delete them from
the microSD card.
• Playing back the recorded videos
• Pause
• Stop
• Next recording / pict ure . W hen pla ying
back a video, tap it to fast forward; tap it
again to double the speed (up to 8x)
• Previous recording / picture. When
playing back a video, tap it to fast
backward; tap it again to double the
speed (up to 8x)
Page 11

• Go to the recorded files
• Back to main menu
• Tap to delete a selected video or photo
file
10. System settings
• Date and time
• Automatic shutdown
• Sound
• Language
• Frequency
• Screen timeout
• Automatic off delay
• Automatic time update
• Formatting microSD
• Restore the factory settings
• Software version
11. Data backup
11.1. Storage mode
Use the USB cable t o connect your camer a
to a computer. The camera will turn on
automatically. In the popped-up window
Page 12

select "Storage". The camera display will
turn blue and there will be the “Storage”
message on the screen. U se the computer
to open the "My Computer" folder on the
desktop. There will be a new removable
disk icon in it. Double-click it and open the
“CARDV” folder. Photo files are saved in the
"PHOTO" folder, while t he recorded videos
can be found in the "MOVIE" one.
11.2. PC camera mode
Use the USB cable t o connect your camer a
to a computer. The camera will turn on
automatically. In the popped-up window
select "PC camera". The camera display
will turn blue and there will be the “PC
camera” message on the screen. You can
check whether the camera works properly
with one of the apps that use external
cameras (e.g. Skype).
12. Additional information
- Supported computer operating systems: XP /
VISTA / Windows 7 / Windows 8 / Windows 8.1.
- You can choose the "PC camera" option in the
popped-up window (while turning the camera on)
to use the device as a webcam.
- The camera turns off when you disconnect the
USB cable.
Page 13
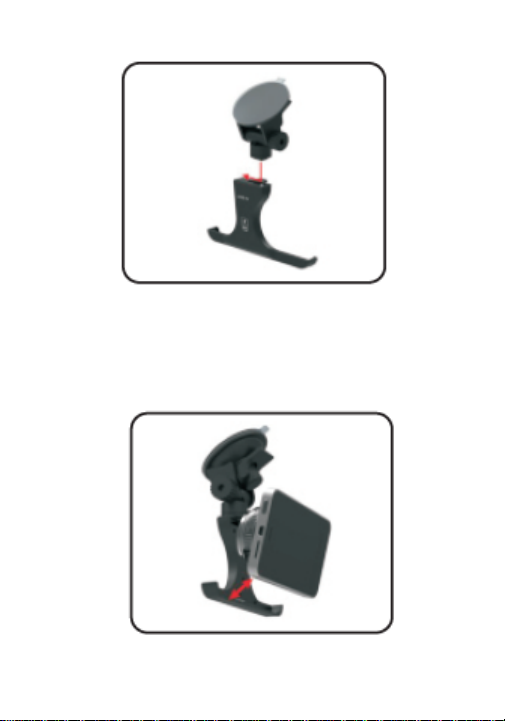
13. Car handle installation
2
3
4
1.
Page 14

1.
2.
3.
Page 15

Camroad 6.0
User Manual
Instrukcja użytkownika
Przed rozpoczęciem korzystania z urządzenia
prosimy o uważne przeczytanie instrukcji obsługi.
Page 16
Wszystkie informacje zawarte w niniejszej
instrukcji mogą ulec zmianie lub rozszerzeniu bez
konieczności powiadomienia użytkownika
Schemat produktu:
1. Przycisk Power
(włącznik)
2. Reset
3. Port miniUSB
4. Port karty microSD
5. Port ładowania przez
uchwyt samochodowy
6. Obiektyw
7. Głośnik
8. Dioda pracy urządzenia
9. Dioda ładowania
10. Wyświetlacz
11. Port miniUSB (DC 5V)
12. Port miniUSB (moduł
GPS - brak w zestawie)
Page 17

Funkcje
Niebieska dioda informująca o pracy urządzenia
1. Włączanie / Wyłącznie
1.1. Włączanie urządzenia:
Aby włączyć urządzenie należy
przytrzymać dłużej przycisk Wł./Wył.
Zostanie wyświetlone logo OVERMAX,
urządzenie uruchomi menu główne, w tym czasie
zaświeci się również niebieska dioda informująca
o pracy urządzenia.
Jeżeli wyłączone urządzenie podłączymy do
ładowarki samochodowej, włączy się
automatycznie i rozpocznie nagrywanie.
W przypadku braku karty microSD, urządzenie nie
włączy automatycznie nagrywania tylko wyświetli
komunikat :Proszę włożyć kartę microSD.
Jeżeli karta microSD zostanie włożona lub
wyciągnięta podczas pracy kamery, kamera
Page 18
wyłączy się.
Wyłączanie urządzenia: Aby wyłączyć urządzenie
należy przytrzymać dłużej przycisk Wł./Wył.
2. Ładowanie baterii
2.1. Za pomocą ładowarki samochodowej: po
podłączeniu kamery do ładowarki w
samochodzie rozpoczęty zostanie proces
ładowania baterii. Kamera nie musi być
wówczas włączona.
2.2. Za pośrednictwem USB: baterię można
również podładować po podłączeniu kamery
do komputera za pomocą przewodu USB.
Kamera nie musi być wówczas włączona.
Uwaga: Podczas ładowania baterii na urządzeniu
będzie się świecić czerwona dioda.
Page 19

3. Wkładanie i wyjmowanie karty pamięci SD
3.1. Wsuń kartę pamięci microSD do portu
kart zgodnie z podanym kierunkiem i
upewnij się, że została ona poprawnie
zamocowana.
3.2. Aby wyjąć kartę z portu, wciśnij ją
delikatnie, aż zostanie odblokowana i
wysunięta, a następnie wyciągnij ją.
Uwagi:
• Po wpięciu karty microSD do włączonej
kamery, kamera automatycznie wyłączy
się. Aby rozpocząć pracę z wpiętą kartą
pamięci, należy ponownie ją włączyć.
• Jeśli dana karta pamięci nie jest
kompatybilna z urządzeniem, należy
wyjąć ją i włożyć ponownie lub spróbować
użyć innej karty.
• Zalecane jest używanie szybkich kart
pamięci microSD, klasy 6 lub 10.
Page 20

4. Nagrywanie
Aby rozpocząć nagrywanie, w menu głównym
kliknij ikonę nagrywania.
Aby rozpocząć nagrywanie, wciśnij czerwoną
ikonę z prawej strony ekranu.
Podczas nagrywania czerwona ikona oraz
niebieska dioda na urządzeniu będą migać.
Ponowne naciśnięcie ikony zatrzymuje
nagrywanie, ikona oraz diody przestają
mrugać.
5. Ustawienia trybu nagrywania
5.1. W trybie nagrywania, wciśnij przycisk
Menu, aby otworzyć menu ustawień.
• Rozdzielczość: 1920*1080/ 1208*720/
848*480/ 640*480/
• Nagrywanie cykliczne: Wyłączone / 2 minuty /
5 minut / 10 minut (długość pliku nagrania)
• G-sensor: Wyłączone / niskie / średnie /
wysokie
• Znacznik daty i godziny: Wyłączone / Data /
Data/czas
• GPS: Wł/Wył
• LDW S: Wł/Wył
• Numery rejestracyjny\e: Wł/Wył
Page 21
5.2. Dodatkowe opcje na ekranie nagrywania
• Powrót do menu głównego
• Nagrywanie dźwięku włączone
Nagrywanie dźwięku wyłączone
• Manualne zapisanie bieżącego
nagrania video do pliku Naciśnij aby
wyłączyć tą funkcję
6. Robienie zdjęć
Po włączeniu trybu aparatu, na
wyświetlaczu kamery pojawi się ikonka
aparatu. Aby rozpocząć wykonywanie zdjęć
skieruj obiektyw kamery na obiekt, który
chcesz sfotografować. Wciśnij ikonę aparaty
z prawej strony ekranu, aby zrobić
zdjęcie.
7. Ustawienia trybu aparatu
W trybie aparatu, wciśnij przycisk Menu, aby
otworzyć menu ustawień.
• Tryb zdjęć: zdjęcie pojedyncze /
samowyzwalacz (2 sek und y / 5 sekund /
10 sekund).
Page 22
• Rozdzielczość:12M/10M/8M/5M.
• Sekwencja: Wł. / Wył.
• Balans bieli: Auto / Dzień / Pochmurno /
Sztuczne światło / Świetlówka
• Kolory: Kolory / Czarno/białe / Sepia
• ISO: Auto/100/200/400
• Znacznik daty i godziny: Wyłączone /
Data / Data/czas
8. Detekcja ruchu
Naciśnij ikonę aby włączyć detekcję
ruchu. W momencie wykrycia ruch przez
kamerę, automatycznie włączy się
nagrywanie. Kamera przestanie rejestrować
obraz jeżeli nie będzie wykrywać ruchu przez
10 sekund.
9. Ustawienia detekcji ruchu
9.1. W trybie nagrywania, wciśnij przycisk
Menu, aby otworzyć menu ustawień.
• Rozdzielczość: 1920*1080/ 1208*720/
848*480/ 640*480/
• Nagrywanie cykliczne: Wyłączone / 2
minuty / 5 minut / 10 minut (długość pliku
nagrania)
• G-sensor: Wyłączone / niskie / średnie /
Page 23
wysokie
• Znacznik daty i godziny: Wyłączone /
Data / Data/czas
• GPS: Wł/Wył
• LDWS: Wł/Wył
• Numery rejestracyjny\e: Wł/Wył
9.2. Dodatkowe opcje na ekranie nagrywania
• Powrót do menu głównego
• Nagrywanie dźwięku włączone,
Nagrywanie dźwięku wyłączone
• Manualne zapisanie bieżącego
nagrania video do pliku Naciśnij aby
wyłączyć tą funkcję
10. Tryb podglądu
W trybie podglądu można przejrzeć
zapisany materiał oraz go usunąć z pamięci
microSD.
• Odtwarzanie
• Pauza
• Stop
Page 24

• Następne nagranie / zdjęcie. Podczas
odtwarzania spełnia funkcję przewijania
do przodu, ponowne naciśnięci ikony
yspiesza przewijanie dwukrotnie,
prz
przewijanie może być przyspieszone do 8
razy
• Poprzednie nagranie / zdjęcie.
Podczas odtwarzania spełnia funkcję
przewijania do tyłu, ponowne naciśnięci
ikony przyspiesza przewijanie dwukrotnie,
przewijanie może być przyspieszone do 8
razy
• Przejście do zarejestrowanych
materiałów
• Powrót do menu głównego
• Usunięcie wybranego materiału wideo lub
zdjęcia
11. Opcje systemowe
• Data / Czas
• Automatyczne wyłączanie
• Dźwięk
• Język
• Częstotliwość
Page 25

• Wygaszacz ekranu
• Opóźnienie wyłączenia
• Automatyczna aktualizac ja c as u
• Format karty pamięci microSD
• Przywrócenie ustawień fabrycznych
• Wersja oprogramowania
12. Kopie zapasowe danych
12.1. Tryb pamięci masowej
Podłącz kamerę do komputera za
pomocą przewodu USB, kamera uruchomi
się automatycznie, a następnie z okna
dostępnych opcji wybierz "Pamięć
masowa”, wyświetlacz kamery będzie
świecił na niebiesko z informacją „Pamięć
masowa”. Z poziomu komputera otwórz
folder “Mój komputer” znajdujący się na
pulpicie. Pojawi się w nim ikona
przenośnego dysku (pamięci masowej
kamery). Po jego otwarciu należy wejść w
folder CARDV, pliki zdjęć można znaleźć w
folderze PHOTO a nagrań w folderze
MOVIE.
12.2. Tryb Kamery PC
Podłącz kamerę do komputera za pomocą
przewodu USB, kamera uruchomi się
automatycznie, a następnie z okna
dostępnych opcji wybierz "Kamera PC”,
Page 26
wyświetlacz kamery będzie świecił na
2
niebiesko z informacją „Kamera PC”.
Poprawność działania kamery można
sprawdzić dzięki programom
współpracującym z zewnętrznymi kamerami
(np. Skype).
13. Dodatkowe informacje
- Obsługiwane systemy operacyjne komputera:
XP/VISTA/Windows 7/Windows 8/Windows 8.1.
- Po wybraniu opcji Kamera PC, urządzenie może
być wykorzystywane jako kamera internetowa.
- Po odłączeniu przewodu USB, kamera wyłączy
się.
14. Montaż uchwytu samochodowego
1.
Page 27

2.
3.
4.
Page 28

Camroad 6.0
Manual de utilizare
Manual de utilizare
Inainte de utilizare va rugam sa cititi cu atentie
manualul.
Page 29
Intregul continut al manualului este subiect al
schimbarii fara notificare prealabila.
Ilustrarea produsului:
1. Buton pornire display
2. Reset
3. Port MiniUSB
4. Slot card de memorie
MicroSD
5. Suport auto cu port
de incarcare
6. Obiectiv
7. Difuzor
8. LED alimentare
9. LED incarcare
10. Display
11. Port MiniUSB (DC
5V)
12. Port MiniUSB (modul
GPS) – nu este
inclus
Page 30
Functii
LED albastru – indicator de alimentare
1. Pornire/oprire
1.1. Pornirea dispozitivulu i:
Apasati si tineti apasat butonul de
alimentare pentru a porni dispozitivul.
Logo-ul OVERMAX apare pe ecran si apoi trece la
meniul principal. In acelasi timp, LED-ul albastru
se aprinde indicand starea de alimentare a
dispozitivului.
Odata conectat la incarcatorul de masina,
dispozitivul porneste automat si incepe sa
inregistreze.
Daca nu exista un card microSD introdus in
dispozitiv, camera nu incepe sa inregistreze. In
schimb, display-ul afiseaza urmatorul mesaj: “Va
rugam sa introduceti un card microSD”.
Daca introduceti sau inlaturati cardul microSD in
timp ce dispozitivul este pornit, acesta se va
inchide.
Page 31

Oprirea dispozitivului: Apasati si tineti apasat
butonul de alimentare pentru a opri dispozitivul.
2. Incarcarea bateriei
2.1. Utilizand un incarcator de masina:
Procesul de incarcare incepe automat cand
conectati camera la inc arc a tor ul de masina. Nu
este necesar sa porniti camera pentru a o
incarca.
2.2. Utilizand un port USB:
De asemenea, puteti sa incarcati camera
conectand-o la un port USB al unui calculator
utilizand un cablu USB. Nu este necesar sa
porniti camera pentru a o incarca.
Nota: LED-ul rosu lumineaza in mod constant in
timpul incarcarii.
Page 32

3. Introducerea / inlaturarea ca rdului de
memorie
3.1. Introduceti un card de m emorie microSD
in slotul de card al camerei in
conformitate cu directia indicata si
asiguraticorespunzator.
3.2. Pentru a inlatura cardul din
compartiment, apas ati-l usor pentru a se
debloca si apoi trageti-l afara.
Comentarii:
• Daca aveti camera pornita, se opreste
automat doar dupa intr oducerea cardului.
Pentru a incepe sa o utilizati, trebuie sa
porniti camera din nou.
• Daca un card de memorie nu este
recunoscut, inlaturat i-l si apoi introduceti-l
din nou in slotul d e card al camerei. Daca
nu functioneaza, incercati sa folositi alt
card.
• Va recomandam utilizarea cardurilor
MicroSD cu Speed Class 6 sau 10.
va ca acesta este fixat
Page 33

4. Inregistrare
Pentru a incepe inregistrarea apasati
pictograma de inregistrare in meniul principal.
Pentru a incepe inregistrarea apasati
pictograma rosie de pe partea dreapta a
ecranului.
Pictograma rosie si L ED-ul albastru clipesc in
timpul inregistrarii. Pe ntru a opri inregistrarea,
atingeti din nou pictograma corespunzatoare.
Pictograma si LED-ul nu vor mai clipi.
5. Setari mod video
5.1. In modul video apasati butonul de meniu
pentru a deschide ecranul cu setarile
video.
• Rezolutie: 1920*1080/ 1208*720/ 848*480/
640*480/
• Loop recording (inregistrare bucla): Oprit / 2
minute / 5 minute / 10 minute (durata de
inregistrare a fisierului)
• G-sensor: Oprit / scazut / mediu / ridicat
• Data si timbrul orei: Oprit / Data / Data si ora
• GPS: Pornit / Oprit
• LDWS: Pornit / Oprit
• Numere de inmatriculare: Pornit / Oprit
Page 34

5.2. Alte optiuni video
• Inapoi la meniul princi pa l
• Inregistrarea sunetului activata
Inregistrarea sunetului dezactivata
• Salvare manuala a videoclipurilor ca
fisiere
• Apasati pentru a dezactiva
6. Fotografiere
Cand dispozitivul intra in modul foto,
pictograma camerei apare pe ecran.
Indreptati obiectivul camerei catre subiect si
apasati pictograma c amer ei pe partea dreapta
a ecranului pentru a fotografia.
7. Setari mod foto
In modul foto apasati butonul de meniu pentru
a afisa ecranul cu setarile foto.
• Mod captura: o singura poza / timer auto
(2 secunde / 5 secunde / 10 secunde).
• Rezolutie: 12M / 10M / 8M / 5M.
• Secventa: Pornit / Oprit
• Balanta alb: Auto / Lumina zilei / Inorat /
Lumina Tungsten / Lampa fluorescenta
Page 35

• Culori disponibile:Colorate / Alb-negru /
Sepia
• ISO: Auto / 100 / 200 / 400
• Data si timbrul de timp: Oprit / Data / Data
si ora
8. Detectare miscare
Apasati pictograma pentru a introduce
modul de detectare al miscarii. Cand camera
detecteaza miscare incepe sa inregistreze
automat. Inregistrarea se opreste atunci cand
camera nu detecteaza miscare pentru mai
mult de 10 secunde.
9. Setari detectarea miscarii
9.1. In modul video apasati butonul de meniu
pentru a deschide ecranul cu setari
video.
• Rezolutie: 1920*1080/ 1208*720/
848*480/ 640*480/
• Loop recording (inregistrare bucla): Oprit /
2 minute / 5 minute / 10 minute (durata de
inregistrare a fisierului)
• G-sensor: Oprit / scazut / mediu / ridicat
• Data si timbrul de timp: Oprit / Data / Data
si ora
• GPS: Pornit / Oprit
Page 36

• LDWS: Pornit / Oprit
• Numere de inmatriculare: Pornit / oprit
9.2. Alte optiuni video
• Inapoi la meniul principal
• Inregistrarea sunetului activata
Inregistrarea sunetului dezactivata
• Salvare video manuala. Apasati
pentru a dezactiva.
10. Mod de previzualizare
Modul de previzualizare va permite sa redati
fisierele inregistr ate anterior sau s a le sterget i
de pe cardul microSD.
• Redarea videoclipurilor inregistrate
• Pauza
• Stop
• Urmatoarea inregistrare / imagine.
Cand redati un vide oclip apasati pentru a
derula inainte; apasati din nou pentru a
dubla viteza de derulare (pana la 8x)
Page 37

• Inregistrarea / imaginea anterioara.
Cand redati un videoclip apasati pentru a
derula inapoi; apasati din nou pentru a
dubla viteza de derulare (pana la 8x)
• Mergeti la fisierele inregistrate
• Inapoi la meniul principal
• Atingeti pentru a sterge un fisier video
sau foto selectat.
11. Setari sistem
• Data si ora
• Oprire automata
• Sunet
• Limba
• Frecventa
• Timeout ecran
• Intarziere automata
• Actualizare automata a timpului
• Formatare microSD
• Restabiliti setarile din fabrica
• Versiune software
Page 38

12. Date de rezerva
12.1. Mod de stocare
Utilizati cablul USB pentru a conecta
camera la un calculator. Camera va porni
automat. In fereastra afisata selectati
"Storage". Display-ul camerei va deveni
albastru apoi va fi afisat pe ecran mesajul
“Storage”. Utilizati calculatorul pentru a
deschide directorul "M y Computer" aflat pe
desktop. Va fi o noua pictograma de disc
amovibil. Faceti dublu-clic pe ea si
deschideti directorul “CARDV”. Fisierele
foto sunt salvate in directorul "PHOTO", in
timp ce videoclipurile inregistrate pot fi
gasite in "MOVIE".
12.2. Mod camera PC
Utilizati cablul USB pentru a conecta
camera la un calculator. Camera va porni
automat. In fereastra afisata selectati
"Camera PC". Disp lay-ul cam erei va deven i
albastru si mesaj ul “PC camera” va f i afisat
pe ecran. Puteti verifica daca aparatul
functioneaza cor ect cu una dintre aplicatiile
care folosesc camere externe (ex. Sk ype).
13. Informatii aditionale
- Sisteme de operare pe calculator suportate: XP /
VISTA / Windows 7 / Windows 8 / Windows 8.1.
Page 39

- Puteti alege optiunea "PC camera" din fereastra
2
2
4
afisata (in timp ce porniti camera) pentru a utiliza
dispozitivul ca pe webcam.
- Camera se opreste atunci cand deconectati
cablul USB.
14. Instalarea suportului de masina
1.
Page 40

3.
4.
5.
Page 41

Camroad 6.0
Használati útmutató
Használati útmutató
Használat előtt, figyelmesen olvassa a használati
útmutatót.
Page 42

A kézikönyv minden tartalma előzetes bejelentés
nélkül megváltoztatható.
Termék bemutatása:
1. Kijelző ki-, bekapcsoló
(Power) gomb
2. Reset
3. MiniUSB port
4. MicroSD
memóriakártya
foglalat
5. Autós töltő port
6. Lencsék
7. Hangszóró
8. Bekapcsolást
jelző LED
9. Töltést jelző LED
10. Kijelző
11. MiniUSB port
(DC 5V)
12. MiniUSB port
(GPS modul) –
nem tartozék
Page 43

Funkciók
Kék LED bekapcsolást jelző fény
1. Be / ki-kapcsolás
1.1. Készülék bekapcsolása:
Tartsa nyomva a Power gombot a
készülék bekapcsolásához.
Az OVERMAX l ogó, majd a főmenü megjelenik a
kijelzőn. Ezzel egy időben a kék LED fény is
világítani kezd, mely jelzi a készülék bekapcsolt
állapotát.
Az autós töltőhöz való csatlakoztatás után, a
készülék automatikusan bekapcsol és a rögzítés
megkezdődik.
Ha a készülékben nincs microSD kártya, a
kamera nem kezdi el a rögzítést. Ehelyett a
következő üzenet jelenik meg a kijelzőn: “Kérjük,
helyezze be a microSD kártyát”.
Ha eltávolítja vagy behelyezi a microSD kártyát,
miközben a készülék be van kapcsolva, akkor az
kikapcsol.
Page 44

1.2. Készülék kikapcsolása:
Tartsa nyomva a Power gombot a
készülék kikapcsolásához.
2. Akkumulátor töltése
2.1. Autós töltő használata:
A töltési folyamat automatikusan elindul, ha a
kamera csatlakoztatva van az autós töltőhöz.
Nem szükséges a kamerát bekapcsolni a
töltéshez.
2.2. USB port használata:
A kamerát a számítógép USB portjához való
csatlakozással is tudja tölteni az USB kábel
segítségével. Nem szükséges a kamerát
bekapcsolni a töltéshez.
Megjegyzés:A piros LED a töltés ideje alatt
villogni fog.
Page 45

Memóriakártya behelyezése/eltávolítása
2.3. Helyezze be a microSD memóriakártyát
a kamera kártyafoglalatába a megfelelő
módon és győződjön meg róla, hogy
helyesen tette-e be.
2.4. A kártya eltávolításához óvatosan nyomja
meg a kioldáshoz, majd húzza ki.
Megjegyzések:
• Ha a kamera be van kapcsolva és a
kártyát behelyezi, akkor a készülék
automatikusan kikapcsol. Ahhoz, hogy
tudja használni, szükséges a kamera
ismételt bekapcsolása.
• Ha a memóriakártyát a készülék nem
ismeri fel, távolíts a el és hel yezze be újra
a kártyafoglalatba. Ha még így sem
működik, kérjük, próbáljon meg egy másik
kártyát.
• Javasoljuk, hogy Class 6 vagy 10
MicroSD kártyákat használjon.
Page 46

3. Rögzítés
A rögzítés megkezdéséhez érintse meg a
rögzítés ikont a főmenüben.
A rögzítés megkezdéséhez érintse meg a
piros ikont a kijelző jobb oldalán.
A piros ikon és a kék LED fény villogni fog a
rögzítés közben. A leállításhoz érintse meg a
megfelelő ikont újra. Az ikon és LED villogása
is befejeződik.
4. Video mód beállításai
4.1. Videó módban nyomja meg a Menü
gombot a videó beállítások képernyő
megjelenítéséhez.
• Felbontás: 1920*1080/ 1208*720/ 848*480/
640*480/
• Folyamatos felvétel: Ki / 2 perc / 5 perc / 10
perc (rögzített fájl hossza)
• G-szenzor: Ki / alacsony / közepes / magas
• Dátum és idő bélyeg: Ki / Dátum / Dátum és
idő
• GPS: Ki / Be
• LDWS: Ki / Be
• Rajtszámok: Ki / Be
Page 47

4.2. Egyéb videó beállítások
• Vissza a főmenübe
• Hangrögzítés be
• Hangrögzítés ki
• Aktuális videó kézi mentése fájlként
•
• Érintse meg a leállításhoz
5. Képek készítése
Ha a készülék belép a kamera módba, a
kamera ikon megjelenik a kijelzőn. Irányítsa a
kamera lencséjét célra és érintse meg a
kamera ikont a kijelző jobb oldalán a
képkészítéshez.
6. Képkészítés mód beállításai
A képkészítés módban nyomja meg a Menü
gombot a képkészítés mód beállításainak
megjelenítéséhez.
• Rögzítési mód: egy kép / önkioldó (2
másodperc / 5 másodperc / 10
másodperc).
• Felbontás: 12M / 10M / 8M / 5M.
• Sorozatkép: Be / Ki
Page 48

• Fehéregyensúly: Automatikus / Napfény /
Felhős / Tungsram / Fluorescens
• Elérhető színek: Színes / Fekete-Fehér /
Szépia
• ISO: Automatikus / 100 / 200 / 400
• Dátum és idő bélyeg: Ki / Dátum / Dátum
és idő
7. Mozgásérzékelő
Érintse meg a(z) ikont a mozgásérzékelő
módba való belépéshez. Ha a kamera
mozgást érzékel a kamera, a rögzítés
automatikusan elindul. A rögzítés leáll, ha a
kamera 10 másodpercig nem érzékel
semmilyen mozgást.
8. Mozgásérzékelő beállításai
8.1. Videó módban nyomja meg a Menü
gombot a videó beállítások
megnyitásához.
• Felbontás: 1920*1080/ 1208*720/
848*480/ 640*480/
• Folyamatos felvétel: Ki / 2 perc / 5 perc /
10 perc (rögzített fájl hossza)
• G-szenzor: Ki / alacsony / közepes /
magas
• Dátum és idő bélyeg: Ki / Dátum / Dátum
Page 49

és idő
• GPS: Be / Ki
• LDWS: Be / Ki
• Rajtszámok: Be / Ki
8.2. Egyéb videó opciók
• Vissza a főmenübe
• Hangrögzítés be Hangrögzítés ki
• Kézi videó mentés. Érintse meg a
leállításhoz
9. Előnézeti mód
Az előnézeti mód lehetővé teszi,
hogy a korábban rögzített f áj lok lejátssza vagy
törölje őket a microSD kártyáról.
• Rögzített videók visszajátszása
• Szünet
• Stop
• Következő fájl / kép. Videó újra
lejátszása közben érintse meg a gyors
előretekeréshez; érintse meg újra dupla
Page 50

sebességű tekeréshez (max. 8x)
• Előző fájl / kép. Videó újra lejátszása
közben érintse meg a gyors
visszatekeréshez; érintse meg újra dupla
sebességű tekeréshez (max. 8x)
• Ugrás a rögzített fájlokhoz
• Visszalépés a főmenühöz
• Érintse meg a kiválasztott videó vagy kép
törléséhez
10. Rendszerbeállítások
• Dátum és idő
• Automatikus leállítás
• Hang
• Nyelv
• Frekvencia
• Képernyő kikapcsolása
• Automatikus kikapcsolás
• Automatikus időfrissítés
• MicroSD kártya formatálása
• Gyári beállítások visszaállítása
• Szoftver ver zió
Page 51

11. Adatok mentése
11.1. Tárhely mód
Az USB kábel segítségével csatlakoztassa
a kamerát a számítógéphez. A kamera
automatikusan bekapcsol.
ablakban válassza ki a "Tárhely/Storage"
opciót. A kamera kijelzője kék színű lesz és
megjelenik a “Tárhely/Storage” üzenet.
Használja a szám ítógépet és nyissa m eg a
"Számítógép/My Computer" mappát az
asztalon. Megjelenik a „Cserélhető lemez”
mappa/ikon. Klikkelj en duplán az ikonra és
nyissa meg a(z) “CARDV” mappát. Képeket
a készülék a(z) "PHOTO" m appába, míg a
rögzített videókat a "MOVIE" mappába
menti a készülék.
11.2. PC kamera mód
Az USB kábel segítségével csatlakoztassa
a kamerát a számítógéphez. A kamera
automatikusan bekapcsol.
ablakban válassza ki a "PC
kamera/camera" opciót. A kamera kijelzője
kék színű lesz és megjelenik a “PC
kamera/camera” üzenet. Egy alkalm azással
(pl. Skype) leellenőrizheti, hogy a kamera
megfelelően működik-e.
A felugró
A felugró
Page 52

12. További információk
2
2
4
- Támogatott számítógépes operációs rendszerek: XP /
VISTA / Windows 7 / Windows 8 / Windows 8.1.
- Kiválaszthatja a "PC kamera/camera" opc iót a felugró
ablakban (míg a kamera be van kapcsolva) a készülék
webkameraként való használatához .
- A kamera kikapcsol, ha az USB kábelt kihúzzák a
készülékből.
13. Autós tartó telepítése
1.
Page 53

3.
4.
5.
Page 54

Camroad 6.0
Kasutusjuhend
Kasutusjuhend
Lugege juhend enne kasutamist hoolikalt läbi.
Page 55

Kasutusjuhendis olev info võib ilma eelneva
hoiatuseta muutuda.
Toote illustratsioon:
1. Ekraani toitenupp
2. Lähtesta
3. MiniUSB pesa
4. MikroSD mälukaardi
pesa
5. Auto laadimispesa
6. Objektiiv
7. Kõlar
8. Toite LED
9. Laadimise LED
10. Ekraan
11. MiniUSB pesa (DC
5V)
12. MiniUSB pesa (GPS
moodul) - ei ole
kaasas
Page 56

Funktsioonid
Sinine LED toiteindikaator
1. Sisse/välja lülitamine
1.1. Seadme sisselülitamine:
Vajuta ja hoia seadme sisselülitamiseks
all toitenuppu.
Ekraanile ilmub OVERMAX logo ning seejärel
avaneb peamenüü. S amal ajal süttib sinine LED,
mis näitab seadme toiteolekut.
Pärast autolaadijaga ühendamist lülitub seade
automaatselt sisse ja hakkab lindistama.
Kui mikroSD kaar t pole seadmesse sisestatud, ei
hakka kaamera ka filmima. Ekraanile ilmub:
"Palun sisesta mikroSD kaart".
MikroSD kaardi sisestamisel või eemaldamisel
samal ajal, kui sead e on si sse lülitatud, lülitub see
välja.
Page 57

Seadme välja lülitamine:
Vajuta ja hoia seadme väljalülitamiseks all
toitenuppu.
2. Aku laadimine
2.1. Autolaadijaga:
Laadimine algab autom aatselt, kui sa kaam era
autolaadijaga ühendad. Laadimiseks ei pea
kaamerat sisse lülitama.
2.2. USB pesa kaudu:
Saad kaamerat ka USB kaabli abil laadida,
ühendades selle arvuti USB pesaga.
Laadimiseks ei pea kaamerat sisse lülitama.
Märkus:
Laadimise ajal põleb punane LED.
Page 58

3. Mälukaardi sisestamine/eemaldamine
3.1. Sisesta mikroSD mälukaart näidatud
suunas kaamera kaardi pesasse ning
veendu, et see oleks õigesti fikseeritud.
3.2. Kaardi pesast eemaldam iseks tuleb seda
õrnalt vajutada ning see seejärel välja
tõmmata.
Märkused:
• Kui kaamera on sisse lü litatud, lülitab see
ennast pärast kaardi sisestamist
automaatselt välja. Selle kasutama
hakkamiseks tuleb kaamera uuesti sisse
lülitada.
• Kui mälukaarti ei tuvast ata, siis tuleb see
eemaldada ning kaardi pesasse uuesti
sisestada. Kui see ei aita, siis tuleb
mõnda teist kaarti proovida.
• Soovitame kasutada kiirusklass 6 või
mikroSD kaarte.
Page 59

4. Lindistamine
Vajuta lindistama hakkamiseks peamenüüs
olevale lindistamise ikoonile.
Vajuta lindistama hakkamiseks ekraani
paremas küljes olevale punasele ikoonile.
Lindistamise ajal vilguvad punane ikoon ja
sinine LED. Lindistamise lõpetamiseks tuleb
uuesti vastavale ikoonile vajutada. Ikoon ja
LED lõpetavad vilkumis e.
5. Video seaded
5.1. Video režiimis saad menüü nupule
vajutades video seadetesse minna.
• Eraldusvõime: 1920*1080/ 1208*720/
848*480/ 640*480/
• Lõputu lindistamine: Väljas / 2 minutit / 5
minutit / 10 minutit (lindistatava faili pikkus)
• G-Sensor: Väljas /madal/keskmine/k õr ge
• Kuupäeva ja kellaaja tempel: Väljas /
kuupäev / kuupäev ja kellaaeg
• GPS: Sees /Vä lj a s
• LDWS: Sees/Väljas
• Numbrimärgid: Sees/Väljas
Page 60

5.2. Teised video valikud
• Tagasi peamenüüsse
• Helide salvestamine sees Helide
lindistamine vä lj as
• Praeguse video käsitsi salvestamine
Vajuta, et deaktiveerida
6. Pildistamine
Kui seade siseneb fotorežiimi, siis ilmub
ekraanile kaamera ikoon. Suuna kaamera
objektiiv pildistatava objekti suunas ning
vajuta pildistamiseks ekraani paremal küljel
olevale kaamera ikoonile.
7. Pildistamise seaded
Pildistamise režiimis saad menüü nupule
vajutades video seadetesse minna.
• Pildistamise režiim: üksik foto/taimer (2
sekundit / 5 sekundit / 10 sekundit)
• Eraldusvõime: 12M / 10M / 8M / 5M.
• Jada Sees/Väljas
• Valge tasakaal: Automaatne /
päevavalgus / pilvine / volfram /
fluorestsents
Page 61

• Saadavalolevad värvid: Värvid / must-
valge / seepia
• ISO: Automaatne / 100 / 200 / 400
• Kuupäeva ja kellaaja tempel: Väljas /
kuupäev / kuupäev ja kellaaeg
8. Liikumise tuvastamine
Vajuta liikumise tuvastamise režiimi
sisenemiseks ikoonile. Kaamera hakkab
liikumise tuvastamisel automaatselt
lindistama. Lindistamine peatud, kui kaamera
ei tuvasta 10 sekundi jooksul mingisugust
liikumist.
9. Liikumise tuvastamise seaded
9.1. Video režiimis saad menüü nupule
vajutades video seadetesse minna.
• Eraldusvõime: 1920*1080/ 1208*720/
848*480/ 640*480/
• Lõputu lindistamine: Väljas / 2 minutit / 5
minutit / 10 minutit (lindistatava faili
pikkus)
• G-Sensor: Väljas/madal/k esk mine/kõrge
• Kuupäeva ja kellaaja tempel: Väljas /
kuupäev / kuupäev ja kellaaeg
• GPS: Sees/Välja s
• LDWS: Sees/Väljas
Page 62

• Numbrimärgid: Sees/Väljas
9.2. Teised video valikud
• Tagasi peamenüüsse
• Helide salvestamine sees Helide
lindistamine vä lj as
• Käsitsi video salvestamine. Vajuta, et
deaktiveerida
10. Eelvaate režiim
Eelvaaterežiim võimaldab sul eelnevalt
lindistatud faile taases itada või neid mikroSD
kaardilt kustutada.
• Lindistatud videote esitamine
• Paus
• Peata
• Järgmine lindistus/pilt. Vajuta seda
video taasesitamise ajal, et edasi kerida;
vajuta uuesti, et kiirust kahekordistada
(kuni 8x).
• Eelmine lindistus/pi lt. Vajuta seda
Page 63

video taasesitamise ajal, et edasi tagasi;
vajuta uuesti, et kiirust kahekordistada
(kuni 8x).
• Mine lindistatud failide juurde
• Tagasi peamenüüsse
• Vajuta valitud video või foto
kustutamiseks
11. Süsteemi seaded
• Kuupäev ja kellaaeg
• Automaatne väljalülitamine
• Heli
• Keel
• Sagedus
• Ekraani sulgemise aeg
• Automaatse väljalülitamise viivitus
• Automaatne aja uuendamine
• MikroSD vormindamine
• Tehase algseadete taastamine
• Tarkvara versioon
12. Andmetest varukoopia tegemine
12.1. Salvestamise režiim
Page 64

Kasuta kaamera arvutiga ühendamiseks
USB kaablit. Kaamera lülitub automaatselt
sisse. Vajuta hüpikaknas "Storage".
Kaamera ekraan muutub siniseks ning
ekraanil kuvatakse "Storage". Ava arvutis
"My Computer" kaust. Sinna ilmub
eemaldatava ketta ikoon. Tee sellel
topeltklikk ja ava "CAR DV" kaust. Fotofail id
salvestatakse kausta "PHOTO", videod
leiab kaustast "MOVIE".
12.2. PC kaamera režiim
Kasuta kaamera arvutiga ühendamiseks
USB kaablit. Kaamera lülitub automaatselt
sisse. Vajuta hüpikaknas "PC kaamera".
Kaamera ekraan muutub siniseks ning
ekraanil kuvatakse "PC kaamera". Saad
kontrollida, kas k aamera töötab mõne välist
kaamerat kasutava rakendusega (näiteks
Skype) õigesti.
13. Täiendav info
- Toetatud arvuti operatsioonisüsteemid: XP /
VISTA / Windows 7 / Windows 8 / Windows 8.1.
- Saad avanenud aknas (kaamerat sisse lülitades)
valida "PC camera" valiku ning seejärel seadet
veebikaamerana kasutada.
- Kaamera lülitub välja, kui sa USB kaabli lahti
ühendad.
Page 65

14. Autohoidja paigaldamine
2
2
4
1.
Page 66

3.
4.
5.
Page 67

Camroad 6.0
Navodila za uporabo
Navodila za uporabo
Pred uporabo pros im previdno preberite navodila
za uporabo.
Page 68

Vse vsebina teh navodil je lahko predložena
spremembam brez predhodne napovedi le teh.
Ilustracija izdelka:
1. Gumb za vklop
zaslona
2. Ponastavi
3. MiniUSB priključek
4. MicroSD spominjska
kartica
5. Priključek za
polnjenje v
avtomobilu
6. Leča
7. Zvočnik
8. LED vklopa
9. Napajalni LED
10. Zaslon
11. MiniUSB priključek
(DC 5V)
12. MiniUSB prikljueč
(GPS modul) – ni
priložen
Page 69

Funkcije
Blue LED power indicator
1. Vključevanje on / off
1.1. Vključevanje naprave:
Za vklop pritisnite in zadržite gumb za
vklop.
Na zaslonu se pojavi OVERMAX logo, nato pa
preklopi v glavni meni. O benem se prižge modra
LED lučka, ki nakazuje stopnjo baterije naprave.
Ko je naprava povezana z avtomobilskim
napajalnikom, se samodejno vključi in prične s
snemanjem. Če v napravo ni vklopljena micro SD
kartica, se snemanje ne bo začelo. Namesto tega
se na zaslonu pojavi napis “prosim vstavite
microSD kartico”. Če v vklopljeno napravo vstavite
ali ven vzamete kartico, se bo ta izklopila.
Izklapljanje naprave:
Page 70

Če želite izklopiti napravo, prosim pritisnite in
pridržite gumb za vklop.
2. Polnjenje baterije
2.1. Uporaba avtomobilskega napajalnika:
Postopek polnjenja se začne samodejno, ko
kamero povežete z avtomobilskim
napajalnikom. Za polnjenje ni nujno, da
kamero prižgete.
2.2. Uporaba USB priključka:
Kamero lahko prav tako napajate tak o, da jo z
USB kablom povežete z računalnikom. Za
polnjenje ni nujno, da kamero prižgete.
Opomba: Med polnjenjem neprekijneno sveti
rdeča LED lučka.
Page 71

3. Vstavljanje/odstranjevanje spominske
kartice
3.1. MicroSD spominsk o kartico vstavite v za
to določen prostor na napravi. Bodite
pozorni, da jo namestite pravilno
obrnjeno in, da je ustrezno pritrjena.
3.2. Za odstranjevanje kartice z reže, nanjo
nežno pritisnite, da j o odklenete, nato pa
jo izvlecite.
Opombe:
• Če je kamera vključena, se bo samodejno
izklopila, ko boste vstavili kartico. Za
začetek uporabe m orate kamero ponovno
vklopiti.
• Če vaša spominska kartica ni
prepoznana, jo odstranite in ponovno
vstavite v za to primerno režo. Če to ne
deluje poskusite vstaviti drugo kartico.
• Priporočamo uporabo MicroSD kartice s
Hitrostnim razredom 6 ali 10.
Page 72

4. Snemanje
Za pričetek snemanja pritisnite na snemalno
ikono v glavnem meniju.
Za pričetek snemanja pritisnite na rdečo ikono na
desni strani zaslona.
Med snemanjem sveti rdeča ikona in modra LED
lučka. Če želite prenehati s snemanjem, ponovno
pritisnite na ustrezno ikono. Ikona in LED ne bosta
več svetila.
5. Nastavitve video načina
5.1. V video načinu pritisnite na gumb Meni in
odprite zason za nastavitve videa.
• Resolucija: 1920*1080/ 1208*720/ 848*480/
640*480/
• Krožno snemanje: Izklopljeno / 2 minuti / 5
minut / 10 minut (dolžina snemanja)
• G-senzor: izključen / nizek / srednji / visok
• Oznaka datuma in časa: Izklučena / Datum /
Datum in Čas
• GPS: Vklopljen / Izklopljen
• LDWS: Vklopljen / Izklopljen
• Številčne oznake: Vključene / Izklučene
Page 73

5.2. Druge možnosti videa
• Nazaj v glavni meni
• Snemanje zvoka vključeno
•
•
• Snemanje zvoka izključeno
•
• Ročno shranjevanje trenutnega
posnetka kot datoteke
• Pritisni za onemogočanje
6. Zajemanje slik
Ko naprava vstopi v način slikanja, se na
zaslonu pojavi ikona kamere. Lečo kamere
usmerite proti subjektu in pritisnite na ikono
kamere na desni strani zaslona, če želite
zajeti sliko.
7. Nastavitve načina slikanja
V načinu slikanja pritisnite na gumb meni, če želite
prikazati zaslon z nastavitvami za slikanje.
• Način zajemanja: ena slika /
samosprožilec (2 sekundi / 5 sekund / 10
sekund).
• Resolucija: 12M / 10M / 8M / 5M.
Page 74

• Zaporedje: Vključeno / Izključeno
• Uravnavanje beline: Samodejno / Dnevna
svetloba / Oblačno / volframova luč /
fluoroscentna luč
• Barvni načini: Barvno / Črno-Belo / Sepia
• ISO: Auto / 100 / 200 / 400
• Oznaka datuma in časa: Izklopljena /
Datum / Datum in čas
8. Zaznavanje gibanja
Pritisnite na ikono, če želite vstopiti v način
zaznavanja gibanja. Ko kamera zazna
gibanje, bo začela samodejno snemati.
Snemanje se ustavi, ko kamera 10 sekund ne
zazna nikakršnega gibanja.
9. Nastavitve zaznavanja gibanja
9.1. V video načinu pritisnite na gumb Meni,
če želite odpreti nastavitve videa.
• Resolucija: 1920*1080/ 1208*720/
848*480/ 640*480/
• Krožno snemanje: Izklopljeno / 2 minuti / 5
minut / 10 minut (dolžina snemanja)
• G-senzor: izključen / nizek / srednji / visok
• Oznaka datuma in časa: Izklučena / Datum /
Datum in Čas
• GPS: Vklopljen / Izklopljen
Page 75

• LDWS: Vklopljen / Izklopljen
• Številčne oznake: Vključene / Izklučene
9.2. Druge video možnosti
• Nazaj v glavni meni
• Snemanje zvoka vključeno
• Snemanje zvoka izključeno
• Ročno shranjevanje posnetka.
Pritisnite za onemogočanje
10. Način predogleda
Način predogleda omogoča predvajanje že
zajetih datotek, k i jih lahko prav tako i zbrišete
iz micro SD kartice.
• Predvajanje zajetih posnetkov
• Pavza
• Stop
• Naslednji posnetek / slika. Med
predvajanjem posnetka nanj pritisnite, če
ga želite prevrteti naprej; pritisnite še
enkrat, če želite podvojiti hitrost (do 8x)
Page 76

• Pojdi v posnete datoteke
• Nazaj v glavni meni
• Pritisnite za brisanje izbrane slike ali
posnetka.
11. Sistemske nastavitve
• Datum in čas
• Samodejni izklop
• Zvok
• Jezik
• Frekvenca
• Iztek zaslona
• Zamodejna zapoznitev izklopa
• Samodejna časovna posodobitev
• Formatiranje microSD
• Obnovi tovarniške nastavitve
• Različica programske opreme
12. Varnostno kopiranje podatkov
12.1. Način shranjevanja
Uporabite USB kabel, da svojo kamero
povežete z računalnikom. Kamera se bo
samodejno vklopila. V prikazanem oknu
Page 77

izberite “shramba.” Zason kamere se bo
obarval modro, na njem pa se bo prikazal
napis “Shramba.” Računalnik uporabite za
odpiranje mape “Moj računalnik”, kjer lahko
najdete odstranljivo napravo oziroma
kamero. Nanjo pritisnite in odprite “C ARDV”
mapo. Slikovne datoteke so shranjene v
mapi “SLIKE” posnetki pa v mapi “FILMI”.
12.2. PC način kamere
Uporabite USB kabel, da svojo kamero
povežete z računalnikom. Kamera se bo
samodejno vklopila. V prikazanem oknu
izberite “PC kamera.” .” Zason kamere se
bo obarval modro, na njem pa se bo
prikazal napis “PC kamera.” Če kamera
pravilno deluje lahko poskusite z
zaganjanjem ene izmed aplikacij, ki
uporablja zunanjo kamero (npr. Skype).
13. Dodatne informacije
- Podprti operacijski sistemi računalnika: XP /
VISTA / Windows 7 / Windows 8 / Windows 8.1.
- V pojavnem oknu lahko izberete "PC kamera"
(med vklapljanjem kamere) če želite kamero
uporabiti kot spletno kamero.
- Kamera se bo izklopila, ko boste izklopili USB
kabel.
Page 78

14. Namestitev avtomobilskega nosilca
2
2
4
1.
Page 79

3.
4
5
Page 80

Camroad 6.0
Naudojimo instrukcija
Naudojimo instrukcija
Atidžiai perskaitykite prieš naudodami
prietaisą
Page 81

Visas naudojimo instrukcijos turinys gali būti
keičiamas be išankstinio perspėjimo.
Gaminio iliustracija:
1. Ekrano maitinimo
mygtukas
2. Pradinių parametrų
atkūrimas
3. MiniUSB prievadas
4. MicroSD atminties
kortelės lizdas
5. Automobilinio
laikiklio įkrovimo
prievadas
6. Objektyvas
7. Garsiakalbiai
8. Maitinimo LED
9. Įkrovimo LED
10. Ekranas
11. MiniUSB prievadas
(DC 5V)
12. MiniUSB prievadas
(GPS modulis) nepridėtas
Page 82

Funkcijos
Mėlyna LED lemputė - maitinimo būsenos indikatorius
1. Įjungimas / išjungimas
1.1. Prietaiso įjungimas :
Norėdami prietaisą įjungti, palaikykite
nuspaudę Maitinimo mygtuką.
Ant ekrano išvysite “OVERMAX” logotipą, kuris
pereina į pagrindinį meniu. Tuo pat metu įsijungia
mėlyna LED lemputė, kuri nurodo prietaiso
maitinimo būseną.
Prijungus prietaisą prie automobilinio įkroviklio, jis
įsijungia automatiškai ir pradeda įrašinėti
(filmuoti).
Jei prietaise nėra microSD kortelės, kamera
filmuoti nepradeda. Ant ekrano atsiranda užrašas
“Prašome įdėti microSD kortelę”.
Jei įdėsite ar išimsite microSD kortelę prietaisui
esant įjungtam, jis išsijungs.
Page 83

Prietaiso išjungimas :
Norėdami prietaisą išjungti, palaikykite nuspaudę
Maitinimo mygtuką.
2. Baterijos įkrovimas
2.1. Automobilinio įkroviklio naudojimas:
Įkrovimas prasideda automatiškai vos
prijungus kamerą prie įkroviklio. Norint kamerą
įkrauti, jos įjungti nebūtina.
2.2. USB prievado naudojimas:
Savo kamerą taip pat galite įkrauti ją
prijungdami prie kompiuterio USB laidu. Norint
kamerą įkrauti, jos įjungti nebūtina.
Pastaba: Įkrovimo metu nuolatos šviečia raudona
LED lemputė.
Atminties kortelės įdėjimas/išėmimas
Page 84

2.3. Įdėkite microSD atminties kortelę į
kamerą pagal nurodytą kryptį ir
įsitikinkite, kad ji tinkamai užsifiksavusi.
2.4. Norėdami kortelę išimti iš lizdo, švelniai
ją spustelėkite, kad atblokuotumėte ir
tuomet ją ištraukite.
Pastabos:
• Jei kamera įjungta, ji išsijungs
automatiškai, vos įdėjus atminties kortelę.
Norėdami ja vėl naudotis, įjunkite kamerą
iš naujo.
• Jei kamera neatpažįsta atminties kortelės,
ją išimkite ir įdėkite iš naujo. Jei ji vis tiek
neveikia, pabandykite įdėti kitą atminties
kortelę.
• Mes rekomenduojame naudoti microSD
atminties korteles, kurių duomenų
perdavimo greičio klasė 6 ar 10.
Page 85

3. Vaizdo įrašymas
Norėdami pradėti vaizdo įrašymą, bakstelėkite
vaizdo įrašymo piktogramą, esančią
pagrindiniame meniu.
Norėdami pradėti vaizdo įrašymą, bakstelėkite
raudoną piktogramą, esančią ekrano dešinėje.
Įrašant vaizdą, blyksi ir raudona piktograma, ir
mėlyna LED lemputė. Norėdami nutraukti
vaizdo įrašymą, vėl bakstelėkite tą pačią
piktogramą. Tuomet raudona piktograma ir
mėlyna LED lemputė nustos blyksėti.
4. Filmavimo režimo nustatymai
4.1. Pasirinkus filmavimo režimą, norėdami
atidaryti filmavimo nustatymų ekraną,
paspauskite Meniu mygtuką.
• Geba (raiška): 1920*1080/ 1208*720/
848*480/ 640*480/
• Pasikartojantis interva lo pe rr aš ymas :
Išjungtas / 2 min / 5 min / 10 min
(įrašomo failo trukmė)
• G-jutiklis: Išjungtas / žemas / vidutinis /
aukštas
• Datos ir laiko spaudas: Išjungtas / Data /
Data ir laikas
• GPS: Įjungtas / Išjungtas
• LDWS: Įjungtas / Išjungtas
• Automobilių numeriai: Įjungtas / Išjungtas
Page 86

4.2. Kitos video parinktys
• Grižti atgal į pagrindinį meniu
• Garso įrašymas įjungtas
• Garso įrašymas išjungtas
• Dabartinio video kaip failo
išsaugojimas naudojant mechaninius
nustatymus (rankiniu būdu)
Bakstelėkite, norėdami funkciją išjungti
5. Fotografavimas
Parinkus fotografavimo režimą, ant ekrano
atsiras fotoaparato piktograma .
Nukreipkite fotoaparato objektyvą į norimą
objektą ir bakstelėkite fotoaparato piktogramą,
esančią dešinėje ekrano pusėje,
norėdami padaryti nuotrauką.
6. Fotografavimo režimo nustatymai
Esant fotografavimo režime , paspauskite
Meniu mygtuką, norėdami pamatyti fotografavimo
režimo nustatymų ekraną.
Page 87

• Fotografavimo režimas: viena nuotrauka /
automatinis laikmatis (2 s / 5 s / 10 s).
• Geba (raiška): 12M / 10M / 8M / 5M.
• Seka: Įjungta / Išjungta
• Baltos spalvos balansas: Automatinis /
Dienos šviesa / Debesuota / Volframo
šviesa / Fluorescencinė lempa
• Galimos spalvos: Spalvos / Juoda-balta /
Sepija
• ISO: Automatinis / 100 / 200 / 400
• Datos ir laiko spaudas: Išjungtas / Data /
Data ir laikas
7. Judesio aptikimas
Bakstelėkite piktogramą norėdami
pereiti į judesio aptikimo režimą. Kai kamera
aptinka judesį, ji automatiškai pradeda video
įrašymą. Įrašinėjimas baigiasi, jei kamera per
10 sekundžių neaptinka jokio judesio.
8. Judesio aptikimo nustatymai
8.1. Esant video režime , paspauskite
Meniu mygtuką, norėdami atidaryti video
nustatymų ekraną.
• Geba (raiška): 1920*1080/ 1208*720/
848*480/ 640*480/
• Pasikartojantis interva lo pe rr ašymas:
Išjungtas / 2 min / 5 min / 10 min (Įrašomo
Page 88

failo trukmė)
• G-jutiklis: Išjungtas / žemas / vidutinis /
aukštas
• Datos ir laiko spaudas: Išjungtas / Data /
Data ir laikas
• GPS: Įjungtas / Išjungtas
• LDWS: Įjungtas / Išjungtas
• Automobilių numeriai: Įjungtas / Išjungtas
8.2. Kitos video parinktys
• Grįžti atgal į pagrindinį meniu
• Garso įrašymas įjungtas
• Garso įrašymas išjungtas
• Video kaip failo išsaugojimas
naudojant mechaninius nustatymus
(rankiniu būdu). Bakstelėkite, norėdami
9. Peržiūros režimas
funkciją išjungti.
Peržiūros režimas leidžia peržiūrėti jau
įrašytą medžiagą arba ją ištrinti iš microSD
kortelės.
Page 89

• Įrašytos video medžiagos peržiūra
• Laikinas peržiūros sustabdymas
• Peržiūros sustabdymas
• Sekantis įrašas / nuotrauka.
Peržiūrint video medžiagą, bakstelėkite ją,
norėdami persukti ją į priekį, bakstelėkite
ją vėl norėdami padidinti peržiūros greitį
(iki 8 kartų).
• Prieš tai buvęs įrašas / nuotrauka.
Peržiūrint video medžiagą, bakstelėkite ją,
norėdami persukti ją atgal, bakstelėkite ją
vėl norėdami padidinti peržiūros greitį (iki
8 kartų).
• Eiti į įrašytų failų aplanką
• Grįžti atgal į pagrindinį meniu
• Bakstelėkite, norėdami ištrinti
pasirinktą video failą ar nuotrauką.
Page 90

10. Sisteminiai nustatymai
• Laikas ir data
• Automatinis išjungimas
• Garsas
• Kalba
• Dažnis
• Ekrano užsklanda
• Automatinis išjungimo delsimas
• Automatinis laiko tikslinimas
• Formatuoti microSD kortelę
• Gamyklinių parametrų atstatymas
• Programinės įrangos versija
11. Duomenų atsarginės kopijos
11.1. Saugojimo režimas
Norėdami prijungti savo kamerą prie
kompiuterio, naudokite USB laidą. Kamera
tuomet įsijungs automatiškai. Naujai
atsidariusiame langelyje pasirinkite
“Talpykla”. Tuomet kameros ekranas taps
mėlynas ir jame matysis “Talpykla” užrašas.
Naudodami savo kompiuterį, atidarykite
“Mano kompiuteris” aplanką, esantį
darbastalyje. Ten rasite naują “išimamas
diskas“ piktogramą. Spustelėkite ją du
kartus ir atidarykite “CARDV” aplanką.
Nuotraukų failai yra išsaugoti “PHOTO”
aplanke, o video failai – “MOVIE” aplanke.
Page 91

11.2. PC kameros režimas
Norėdami savo kamerą prijungti prie
kompiuterio, naudokite USB laidą. Kamera
tuomet įsijungs automatiškai. Naujai
atsidariusiame langelyje pasirinkite “PC
kamera”. Kameros ekranas taps mėlynas ir
jame matysis “PC kamera” užrašas.
Norėdami patikrinti, ar kamera tinkamai
veikia, galite pasirinkti vieną iš programėlių,
naudojančių išorines kameras (pvz.,
Skype).
12. Papildoma informacija
- Palaikomos kompiuterio operacinės sistemos:
XP / VISTA / Windows 7 / W indows 8 / Windows
8.1.
- Norėdami prietaisą naudoti kaip internetinę
kamerą, galite pasirinkti "PC kamera" parinktį
naujai atsidariusiame langelyje (įjungiant kamerą).
- Kamera išsijungia atjungus USB laidą.
Page 92

13. Automobilinio laikiklio pritvirtinimas
1.
Page 93

2.
3.
4.
Page 94

Camroad 6.0
Instrukcija
Instrukcija
Pirms lietošanas, lūgums, uzmanīgi izlasiet
instrukciju.
Page 95

Viss rokasgrāmatas saturs, var tikt mainīts bez
iepriekšējā brīdinājuma.
Produkta ilustrācija:
1. Barošanas poga
2. Noņemšana
3. MiniUSB ports
4. MicroSD ports
5. Uzlādes ports
6. Lēca
7. Skaļrunis
8. LED barošanas
indikātors
9. LED uzlādes
indikātors
10. Ekrāns
11. MiniUSB(DC 5V)
ports
12. MiniUSB(GPS
moduls) ports –
nav iekļeuts
komplektā
Page 96

Funkcijas
Zils LED barošanas indikātors
14. Ieslēgšana / izslēgšana
14.1. Iekārtas ieslēgšana:
Nospiediet un turiet ieslēgšanas pogu, lai
ierīce ieslēdzas.
The OVERMAX Logotips parādās uz ekrāna, un
pēc tam pāriet uz galveno izvēlni. Tajā pat laikā
zila gaismas diode ieslēgsies, norādot uz
barošanas ierīces stāvokli.
.
Pēc savienojuma ar automašīnas lādētāju, ierīce
automātiski ieslēgsies un sāks ierakstīšanu.
Ja ierīcei nav pieslēgta MicroSD karte, kamera
nesaks ierakstīt. Tā vietā uz ekrāna parādīsies
sekojošs paziņojums: "Lūdzu, ievietojiet MicroSD
karti».
Ja ievietot vai izņemt MicroSD karti, bet ierīce ir
ieslēgta, tad viņa izslēgsies.
Page 97

Izslēgt ierīci:
Nospiediet un turiet ieslēgšanas pogu, lai ieslēgtu
ierīci.
15. Akumulātora ieslēgšana
15.1. Auto uzlādes izmantošana:
Uzlādes process sākas automātiski pie
kameras ieslēgšanas auto uzlādes ierīcē.
Nevajag ieslēgt kameru, lai to uzlādētu.
2.2 USB porta lietošana:
Jūs arī varat uzlādēt kameru, pieslēdzot to USB
portam pie datora, lietojot USB kabeli. Nevajag
ieslēgt kameru, lai to uzlādētu.
Piezīme:
Sarkana LED gaismas diode degs uzlādes laikā.
Page 98

1. Atmiņas kartes Uzstādīšana/Noņemšana
1.1. Ievietojiet atmiņas karti kameras MicroSD
slotā saskaņā ar norādīto virzienu, un
pārliecinieties, ka viņa ir droši
nostiprināta.
1.2. Lai izņemtu karti no slota, viegli
piespiediet to, lai atbloķētu un pēc tam
izņemiet to.
Piezīme:
Ja kamera ir ieslēgta, viņa automātiski
izslēdzas, uzreiz pēc kartes ievietošanas.
Lai uzsāktu lietošanu, jums ir
nepieciešams ieslegt to vēl reizi.
• Ja atmiņas karte netiek lasīta, izņēmiet to,
un tad ievietojiet atkal kartes slotā. Ja viņa
nestrādā, mēģiniet lietot citu karti.
• Mēs rekomendējam lietot MicroSD kartes
ar ātrumu klassi 6 vai 10.
Page 99

2. Ierakstīšana
Lai uzsāktu ierakstīšanu, nospiediet
ierakstīšanas pogu galvenajā izvēlnē.
Lai uzsāktu ierakstīšanu, nospiediet sarkanu
pogu displeja labajā pusē.
Sarkana poga un zila LED gaisma
ierakstīšanas laikā. Lai pabeigtu ierakstīšanu,
nospiediet atkal atbilstošu pogu. Poga un LED
gaisma beigs mirgot.
3. Video režīma iestatījumi
3.1. Video režīmā, nospiediet Izvēlne pogu,
lai atvertu video iestatījumus.
• Izšķirtspēja: 1920*1080/ 1208*720/ 848*480/
640*480/
• Cilpveidīga ierakstīšana: Izslēgts / 2 minūtes
/ 5 minūtes / 10 minūtes (ierakstīšanas failu
garums)
• G-sensors: Izslēgts / zems / vidējs / augsts
• Datuma un laika zīmogs: Izslēgts / Datums /
Datums un laiks
• GPS: Ieslēgts / Izslēgts
• LDWS: Ieslēgts / Izslēgts
• Numura zīmes: Ieslēgts / Izslēgts
Page 100

3.2. Citas video iespējas
• Atpakaļ uz galveno izvēlni
• Skaņas ierakstīšana ieslēgta
Skaņas ierakstīšana izslēgta
• Manuāla tekošā video saglabāšana
failā Nospiediet deaktivēšanai
4. Fotografēšana
kad ierīce nonāk foto režīmā, kameras ikoniņa
parādās uz ekrāna. Pavērsiet kameras
objektīvu uz objektu un nospiediet kameras
ikoniņu ekrāna labajā pusē lai uztaisītu bildi.
5. Foto režīma iestatījumi
Foto režīmā, nospiediet pogu Izvēlne lai foto
iestatījumi parādās uz ekrāna.
• Notveršanas rezīms: viens foto / auto
taimeris (2 sekundes / 5 secundes / 10
secundes).
• Izšķirtspēja: 12M / 10M / 8M / 5M.
• Sekvence: Ieslēgts / Izslēgts
• Baltā balanss: Auto / Dienas gaisma /
Apmācies / Kvēlspuldze / Dienasgaismas
lampa
 Loading...