

Page 1
Quick Start Guide
and User CD
Kurzanleitung und Benutzer-CD
Guía de iniciación rápida y CD del usuario
Guide de mise en route rapide et CD de l’utilisateur
Guida rapida all’uso e CD utente
Р у к о в о д с т в о п о б ы с т р о й у с т а н о в к е и
компакт-диск User CD
Page 2
About This Guide
This guide shows you how to install your Snap Server 500 series or 600 series in a rack and connect the
server to your network. The instructions consist of 5 steps:
Step 1: Verify the contents of your shipping package.•
Step 2: Install the server in the rack.•
Step 3: Connect power and network cables.•
Step 4: Power on the Snap Server.•
Step 5: Connect to the Snap Server for the first time.•
Step 1: Verify the Contents of the Shipping Package
Before you begin installation, check to make sure you have all the hardware components required for your
system.
Check the contents of your Ship Kit to make sure you have all the components described in the •
Features
Gather any optional components that you need to complete your system (described below in the •
Hardware Components
section.
table).
Hardware
Optional
Optional Hardware Components
Component Description
Tape Backup Device(s)
and Cables
Power Supply Upgrade The Snap Server 520 and 620 can be upgraded to a second power supply. The
APC-brand UPS devices Snap Servers are designed to work with a USB- or network-based APC-brand
SAS HBA Upgrade The Snap Server 520 and 620 can be upgraded to include a SAS HBA to attach
Dual-Gigabit Ethernet
PCI Adapter
Memory Upgrades Memory upgrades are available for the Snap Server 520, 620, and 650. You
To attach a tape device via a SCSI connection to the Snap Server, you need a
68-pin VHDCI cable. For a list of compatible backup solutions, see the Support
section of the Snap Server Web site. To attach a tape device via USB, you need a
USB 2.0 cable.
Snap Server 650 comes with dual power supplies.
UPS. Visit the APC Web site for a list of APC models to use with your Snap Server.
to an expansion array. The Snap Server 650 comes equipped with a SAS HBA.
The Snap Server 520, 620, and 650 can be upgraded to 4 Ethernet Ports with
the installation of a dual-gigabit Ethernet Adapter.
can add memory up to 4 GB. However, you cannot install DIMMs of different
capacity on the same server. When adding memory to the Snap Server 650, you
must mirror the upgrade across both DIMM banks (for example, if you add an
additional 1 GB DIMM to one DIMM bank, you must mirror that addition in the
second DIMM bank).
Page 3
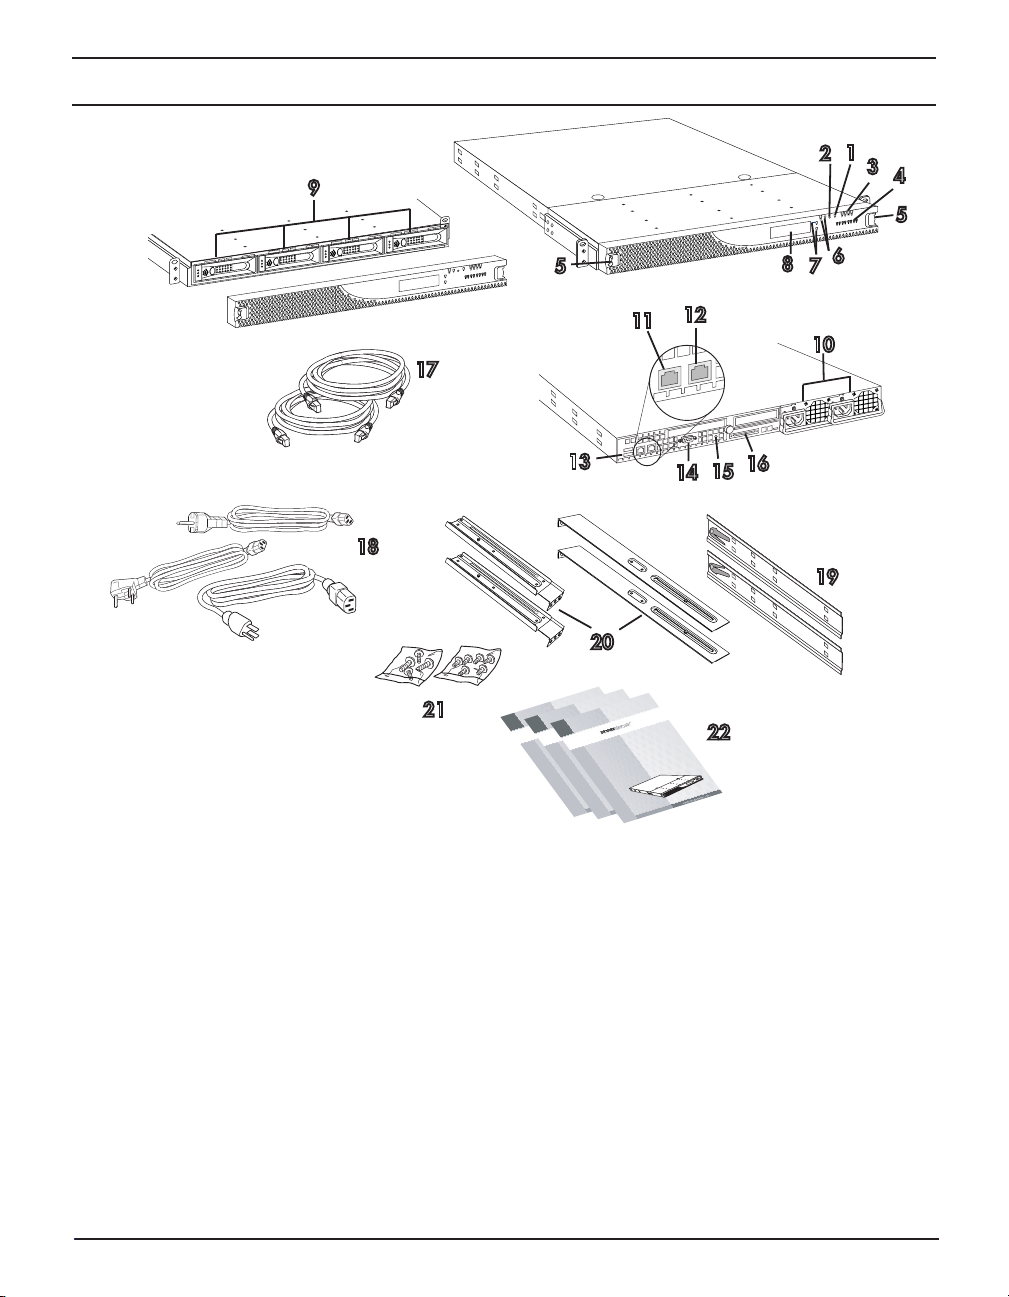
Hardware Features
7
10
12
11
13
15
14
22
16
18
9
20
19
17
8
2
1
3
4
5
5
6
21
Quick Start Guide
and User CD
Kurzanleitung und Benutzer-CD
Guía de iniciación
rápida
y CD del usuario
Guide de mise
en
r
oute rapide et CD de l’utili
sa
teur
Guida
rapida all’uso e CD utente
Руководство
по быстрой
установке и
компакт�диск
User CD
Quick Start Guide
and User CD
Kurzanleitung
und
Benutze
r
-CD
Guía
de
iniciación rápida y
CD
del usuario
Guide
de mise
en
route rapide et
CD de l’utilisateur
Guida rapida
all’uso e
CD
utente
Руководство
по быстрой установке и
комп
акт�диск User CD
Quick Start Guide
and User CD
Kurzanleitung
und Benutzer-CD
Guía de iniciación rápida y
CD del usuario
Guide
de
mise
en r
oute rapide et CD de l’utilisa
teur
Guida rapida
all’uso e CD utente
Руководство по быстрой установке и
компакт�диск User CD
1 Power button 9 Hot-swappable disk drives (4) 17 Ethernet cables (2)
2 Reset button 10 Power supply modules (2) * 18 Power cables (2 US, 2 UK, 2 EU)*
3 System status lights 11 Primary Ethernet port 19 Inner slide rails (2)
4 Disk drive status lights 12 Secondary Ethernet port 20 Outer slide rails (4)
5 Bezel release mechanisms 13 USB 2.0 ports (2) 21 Rack mount screws
6 Unit ID (UID) light and button 14 Service connector 22 Quick Start Guides and User CDs (3)
7 Not active (for future use) 15 Unit ID (UID) light and button
8 LCD (Liquid Crystal Display) 16 SCSI connector
* The Snap Server 520 and 620 have a single power supply and one power cable (1US, 1UK, 1EU).
Note: USB connectors cannot be used for administrative purposes. Snap Servers are managed via the browserbased Administration tool.
Page 4

Step 2: Install the Server in a Rack
Note The Snap Server 500 Series and 600 Series models can only be mounted in a four-post, 32-inch depth,
EIA-compliant rack. A two-post telco-style rack or a rack less than 32-inches in depth will not support the server.
As shown in the Hardware Features illustration, the Snap Server ships with two slide rail assemblies consisting of
inner rails to attach to the chassis, outer rails to attach to the rack, and a packet of screws for mounting the rails
to the chassis and to the rack. The rails are not universal. They are stamped Left and Right and must be mounted
correctly (stamped designation refers to left and right as you are facing the front of the unit).
You will need a Phillips screwdriver to mount the rails and a second person to help position the Snap Server into
the rack.
Attach the Sliders to the Chassis
1 Take the left inner slider and position it on the left side toward the rear of
the chassis. The tongues on the chassis should fit through the rectangular
holes on the rail, and the release mechanism should be facing out.
2 Slide the rail forward, and continue to slide until you can feel that it’s
attached securely (see illustration).
3 Fasten with the rail attachment Phillips screw.
4 Repeat Steps 1 through 3 for the right inner slider.
Attach the Slide Rail Assemblies to the Rack
1 Assemble the outer slide rail assemblies by fitting the longer rail piece
on top of the shorter rail piece and pulling outward until the two pieces
lock.
2 Position one of the rail assemblies in the rack (making sure you place
the right-stamped rail on the right side of the rack).
3 Align the front holes with the front
holes in the rack and screw a rail screw into the bottom hole. Note that the
rack holes are not evenly spaced. Be sure to align the rail so that the rail
holes match up with the rack holes.
4 Align the rear holes with the rear holes in the rack and screw rail screws in
the top and bottom holes.
5 Repeat Steps 2, 3, and 4 for the second rail.
Mount the Chassis in the Rack
1 Align the inner sliders (attached to the chassis) with the front ends of
the slide rail assemblies (attached to the rack) and slide the server
into the rack.
2 Line up the holes on the inner sliders with the holes on the rack/
outer rails, and secure the chassis with the remaining screws.
Page 5

Step 3: Connect Power and Network Cables
The server has Dual-Gigabit Ethernet ports that can connect to 10BaseT, 100BaseTx, or 1000BaseT networks. A
dual-port configuration offers added advantages, such as load balancing and failover. You may connect one or
both of the ports.
If you connect only one port, you must use the primary port on the back of the server, as shown in the •
Hardware Features illustration.
To take advantage of network bonding (load balancing or failover), both ports must be physically connected •
to the network; and (a) for load balancing, connected to the same switch on the same subnet; or (b) for
failover, connected to different switches on the same subnet (in case one switch fails).
Caution The speed/duplex setting on Snap Servers defaults to autonegotiate. The networking switch or hub
to which the server is connected must also be configured to autonegotiate; otherwise, network throughput or
connectivity to the server may be seriously impacted.
Cabling the Server to the Network
Use the provided Ethernet cables to connect the server to the network. When you connect the network cables to
active ports, the network lights on the bezel (LAN 1 and LAN 2) are green.
Connecting the Power Cord
Note The Snap Server 650 (shown)
has dual power supplies. The Snap
Server 520 and 620 (not shown) have
a single power supply and will require
only one UPS and/or electrical outlet for
installation.
As a data integrity measure, Overland Storage strongly recommends you connect each power supply module to a
separate power source via a separate UPS. Use the provided power cords to plug the modules into the UPSs or
properly grounded electrical outlet(s).
Note Snap Servers are designed to work with APC-brand, USB- or network-based UPS devices to automatically
shut down cleanly in the event of a power failure. You must configure the APC unit both in the Snap Server’s
Administration Tool and in the APC user interface.
Step 4: Power on the Snap Server
To turn on the server, press the power button on the front of the
server. The server takes a few minutes to initialize. The LCD will
display the server’s name and IP address when the system has fully
initialized.
Note If you are connecting an expansion array, use the array’s
documentation to install and connect the array before powering on the Snap Server.
Power
Page 6

Step 5: Connect to the Snap Server for the First Time
Snap Servers are preset to acquire an IP address from a DHCP server. If no DHCP server is found on the network,
the Snap Server defaults to an IP address of 10.10.10.10, and you may not be able to see the server on your
network. You can discover a Snap Server using either the default server name or the Snap Server Manager (SSM)
utility. Use the server name method if you are installing a Snap Server on a network with a DHCP server. Use SSM
if your network does not have a DHCP server or if your network does not have name resolution services.
To Connect to a Snap Server Using the Server Name
This procedure requires that name resolution services (via WINS or an equivalent service) be operational.
1 Find the server name. The default server name is SNAPnnnnnn, where nnnnnn is the server number.
For example, the name of a Snap Server with a server number of 610019 is SNAP610019. The server number
is a unique, numerics-only string that appears on a label affixed to the top of the server in the left front corner.
2 In a Web browser, enter the following URL:
http://SNAPnnnnnn (where SNAPnnnnnn is the server name)
3 Press Enter. The Web View screen opens.
4 Log into the Administration Tool and complete the Initial Setup Wizard.
Click the administration link. In the login dialog box, enter admin as the user name and admin as the
password, then click OK. Complete the setup procedure using the Initial Setup Wizard.
To Connect to a Snap Server Using Snap Server Manager
Snap Server Manager (SSM) is a Java-based, multiserver administrative application that runs on all major
client platforms. Use SSM to discover, configure, and monitor all local and remote GuardianOS Snap Servers.
You can download and install SSM using the Install_SnapServerTools.html file on your Snap Server User CD. Be
sure to install SSM on a computer residing on the same network segment as your Snap Server(s).
1 Launch SSM.
SSM discovers all Snap Servers on its local network segment and displays their server names, IP addresses,
and other status information in the main console. If you do not have a DHCP server, there might be a delay
before the server appears on the network.
Note: To distinguish multiple Snap Servers, you may
need to find their default server names as explained
in the previous procedure.
2 If using a DHCP server, proceed to Step 3.
Otherwise, assign an IP address to the server.
In SSM, right-click the server name and select Set
IP Address. Enter an IP address and a subnet mask,
then click OK.
3 Launch a server’s Administration Tool.
In SSM, right-click a server name and select Launch
Web Administration, as shown in the illustration.
4 Log into the Administration Tool and complete the Initial Setup Wizard.
Click the administration link. In the login dialog box, enter admin as the user name and admin as the
password, then click OK. Complete the setup procedure using the Initial Setup Wizard.
Page 7

User CD
Obtaining Service
To obtain service or technical support for your Snap
Server, please visit our Web site at http://www.snapserver.com,
or call 1-888-343-SNAP. For immediate response to a service inquiry, you can
submit a question to our technical support department using our Expert Knowledge Base
System http://www.snapserver.com/kb
Technischen Service
Sie finden den technischen Service oder Kundendienst für Ihren Snap Server auf unserer Website. Wenn Kunden
sofortige Antworten auf eine Serviceanfrage wünschen, können sie mit Hilfe unseres Expert Knowledge Base System
http://www.snapserver.com/kb
Obtención de servicio de asistencia
Para obtener servicio o asistencia técnica para su Snap Server, visite nuestro sitio Web. Para obtener respuesta inmediata a su
solicitud de asistencia, envíelas en la forma de preguntas a nuestro Sistema experto de base de conocimiento en
http://www.
snapserver.com/kb
Pour un entretien ou une assistance technique concernant votre Snap Server, vérifiez notre site web. Pour obtenir une réponse immédiate
Obtention d‘un entretien
à une demande de service, vous pouvez envoyer une question à notre service d‘assistance technique en utilisant notre système de base
de connaissances experte http://www.
Richiesta di assistenza tecnica
Per informazioni su come richiedere assistenza o supporto tecnici sulle unità Snap Server, visiti il nostro website. Per assistenza
immediata su un problema, è possibile inviare una richiesta al reparto di assistenza tecnica tramite il sistema Expert
Knowledge Base, disponibile all’indirizzo
http://www.snapserver.com/kb
Сервисное обслуживание
Сведения о сервисном обслуживании серверов Snap Server посетите наше веб-узле. Для
быстрого получения ответа на технические вопросы от службы поддержки их можно
размещать в базе знаний Expert Knowledge Base System по адресу
http://www.snapserver.com/kb
Copyright © 2009 Overland Storage, Inc. All rights reserved worldwide.
All other product names or company names are the property of their
respective owners.
Copyright © 2009 Overland Storage, Inc. Alle Rechte weltweit
vorbehalten. Alle anderen Produktnamen und Firmennamen sind Eigentum
der jeweiligen Unternehmen.
Copyright © 2009 Overland Storage, Inc. Reservados todos los derechos
en el ámbito internacional. Todos los otros nombres de productos o de
compañías son propiedad de susrespectivos priopietarios.
Copyright © 2009 Overland Storage, Inc. Tous droits réservés dans le
monde entier. Tous les autres noms de produit ou de société appartiennent
à leurs détenteurs respectifs.
snapserver.com/kb
www.snapserver.com 888-288-4206
Copyright © 2009 Overland Storage, Inc. Tutti i diritti riservati in tutti i
paesi del mondo. Tutti i nomi di prodotti e società sono di proprietà dei
rispettivi proprietari.
© Overland Storage, Inc., 2009. Все права защищены во всех странах.
Прочие названия изделий и компаний являются собственностью
соответствующих владельцев.
70990861-002 Rev B
 Loading...