


Overland
Storage
SnapScale
Administrator’s Guide
™
For a Clustered Network Running
™
RAINcloudOS
Version 4.0
December 2013
10400455-001

SnapScale/RAINcloudOS 4.0 Administrator’s Guide
Dec 2013 ©Overland Storage, Inc. All rights reserved.
Overland®, Overland Data®, Overland Storage®, ARCvault®, DynamicRAID®, LibraryPro®, LoaderXpress®, Multi-SitePAC®, NEO®, NEO Series®,
PowerLoader
and XchangeNOW
GuardianOS™, RAINcloud™, RapidRebuild™, SnapDisk™, SnapEDR™, Snap Enterprise Data Replicator™, SnapExpansion™, SnapSAN™,
SnapScale™, SnapServer DX Series™, SnapServer Manager™, and SnapWrite™ are trademarks of Overland Storage, Inc.
All other brand names or trademarks are the property of their respective owners.
The names of companies and individuals used in examples are fictitious and intended to illustrate the use of the software. Any resemblance to actual
companies or individuals, whether past or present, is coincidental.
PROPRIETARY NOTICE
All information contained in or disclosed by this document is considered proprietary by Overland Storage. By accepting this material the recipient agrees
that this material and the information contained therein are held in confidence and in trust and will not be used, reproduced in whole or in part, nor its
contents revealed to others, except to meet the purpose for which it was delivered. It is understood that no right is conveyed to reproduce or have
reproduced any item herein disclosed without express permission from Overland Storage.
Overland Storage provides this manual as is, without warranty of any kind, either expressed or implied, including, but not limited to, the implied
warranties of merchantability and fitness for a particular purpose. Overland Storage may make improvements or changes in the product(s) or programs
described in this manual at any time. These changes will be incorporated in new editions of this publication.
Overland Storage assumes no responsibility for the accuracy, completeness, sufficiency, or usefulness of this manual, nor for any problem that might arise
from the use of the information in this manual.
FW 4.0.061
®
, Protection OS®, REO®, REO 4000®, REO Series®, Snap Appliance®, Snap Care® (EU only), SnapServer®, StorAssure®, Ultamus®, VR2®,
®
are registered trademarks of Overland Storage, Inc.
Overland Storage, Inc.
9112 Spectrum Center Blvd.
San Diego, CA 92123
U.S.A.
Tel: 1.877.654.3429 (toll-free U.S.)
Tel: +1.858.571.5555, Option 5 (International)
Fax: +1.858.571.0982 (general)
Fax: +1.858.571.3664 (sales)
www.overlandstorage.com
10400455-001 December 2013 Dec 2013 ©Overland Storage, Inc. ii

Audience and Purpose
This guide is intended for system and network administrators charged with installing and
maintaining a SnapScale cluster running RAINcloudOS 4.0 on their network. It provides
information on the installation, configuration, security, and maintenance of the SnapScale
cluster and nodes.
Product Documentation
SnapScale product documentation and additional literature are available online, along with
the latest release of the RAINcloudOS 4.0 software.
Point your browser to:
http://docs.overlandstorage.com/snapscale
Follow the appropriate link on that page to download the latest software file or document.
Preface
For additional assistance, search at http://support.overlandstorage.com.
Overland Technical Support
For help configuring and using your SnapScale cluster, email our technical support staff at:
techsupport@overlandstorage.com.
You can get additional technical support information on the Contact Us web page at:
http://docs.overlandstorage.com/support
For a complete list of support times based on your type of coverage, visit our website at:
http://docs.overlandstorage.com/care
Software Updates
The latest release of the RAINcloudOS software can be obtained from the Downloads and
Resources (SnapScale Solutions) page at the Overland Storage website:
http://docs.overlandstorage.com/snapscale
Follow the appropriate instructions to download the latest software file.
For additional assistance, search at http://support.overlandstorage.com/.
10400455-001 Dec 2013 ©Overland Storage, Inc. iii
SnapScale/RAINcloudOS 4.0 Administrator’s Guide Preface
Conventions
This document exercises several alerts and typographical conventions.
Alerts
Convention Description & Usage
IMPORTANT An Important note is a type of note that provides information essential to
the completion of a task or that can impact the product and its function.
CAUTION A Caution contains information that the user needs to know to avoid
damaging or permanently deleting data or causing physical damage to
the hardware or system.
WARNING
ADVERTISSEMENT
Typographical Conventions
A Warning contains information concerning personal safety. Failure to
follow directions in the warning could result in bodily harm or death.
Un Canadien avertissement comme celui-ci contient des informations
relatives à la sécurité personnelle. Ignorer les instructions dans
l'avertissement peut entraîner des lésions corporelles ou la mort.
Convention Description & Usage
Button_name Words in this special boldface font indicate the names of command
buttons found in the Web Management Interface.
Ctrl-Alt-r This type of format details the keys you press simultaneously. In this
example, hold down the Ctrl and Alt keys and press the r key.
NOTE A Note indicates neutral or positive information that emphasizes or
supplements important points of the main text. A note supplies
information that may apply only in special cases, for example, memory
limitations or details that apply to specific program versions.
Menu Flow
Indicator (>)
Courier Italic A variable for which you must substitute a value.
Courier Bold
Information contained in this guide has been reviewed for accuracy, but not for product
warranty because of the various environments, operating systems, or settings involved.
Information and specifications may change without notice.
Words with a greater than sign between them indicate the flow of actions
to accomplish a task. For example, Setup > Passwords > User
indicates that you should press the Setup button, then the Passwords
button, and finally the User button to accomplish a task.
Commands you enter in a command-line interface (CLI).
Japanese Voluntary Control Council for Interference (VCCI)
10400455-001 Dec 2013 ©Overland Storage, Inc. iv

Preface
Chapter 1 - Overview
SnapScale Conventions ......................................................................................................................................1-1
SnapScale Node Requirements ..........................................................................................................................1-2
RAINcloudOS Specifications ...............................................................................................................................1-3
RAINcloudOS 4.0 Features ...................................................................................................................................1-4
Client and Storage Networks .............................................................................................................................. 1-5
Node/Switch Cabling Example .....................................................................................................................1-5
Node Port Configurations ....................................................................................................................................1-6
X2 Node Configurations ................................................................................................................................. 1-6
X4 Node Configurations ................................................................................................................................. 1-7
Chapter 2 - Setup and Configuration
Connecting for the First Time ..............................................................................................................................2-1
Connect Using the Node Name ...................................................................................................................2-1
Connect Using SSM .........................................................................................................................................2-2
Create a New SnapScale Cluster (via Wizard) .................................................................................................2-3
Step 1 – Select SnapScale Nodes .................................................................................................................2-3
Step 2 – Client Network Configuration Overview .......................................................................................2-5
Step 3 – Choose Client Network Static TCP/IP Settings ..............................................................................2-5
Step 4 – Configure Node Static IP Addresses ..............................................................................................2-6
Step 5 – Basic SnapScale Properties .............................................................................................................2-7
Step 6 – Set Date and Time ...........................................................................................................................2-8
Step 7 – Summary Verification & Cluster Creation .....................................................................................2-9
Join an Existing SnapScale Cluster (via Wizard) ..............................................................................................2-12
Web Management Interface ...........................................................................................................................2-13
Alert Messages ..............................................................................................................................................2-15
Site Map .........................................................................................................................................................2-16
Contact Information ....................................................................................................................................2-17
Contents
Chapter 3 - SnapScale Settings
SnapScale Properties ...........................................................................................................................................3-2
Date/Time ..............................................................................................................................................................3-3
Configure Date and Time Settings Manually ...............................................................................................3-3
Configure Date and Time Settings for Automatic Synchronization .......................................................... 3-4
SSH ..........................................................................................................................................................................3-5
UPS ..........................................................................................................................................................................3-5
Edit UPS Properties ..........................................................................................................................................3-6
Procedure to Configure UPS Protection .......................................................................................................3-7
Add Network UPS Device ..............................................................................................................................3-7
10400455-001 Dec 2013 ©Overland Storage, Inc. v

SnapScale/RAINcloudOS 4.0 Administrator’s Guide Contents
Change Network UPS Device .......................................................................................................................3-8
Delete Network UPS Device ..........................................................................................................................3-8
Chapter 4 - Network Access
View Network Information ...................................................................................................................................4-2
Client Network Information ............................................................................................................................4-2
Storage Network Information ........................................................................................................................4-4
TCP/IP Networking ................................................................................................................................................4-5
Bonding Options .............................................................................................................................................4-6
Guidelines in TCP/IP Configuration ...............................................................................................................4-7
Edit Storage Network Properties ...................................................................................................................4-8
Utility IP Address ..............................................................................................................................................4-9
Windows/SMB Networking .................................................................................................................................4-10
Support for Windows/SMB Networking .......................................................................................................4-11
Support for Windows Network Authentication ..........................................................................................4-12
Connect from a Windows Client ...............................................................................................................4-13
Connect a Mac OS X Client Using SMB .....................................................................................................4-13
Configure Windows/SMB Networking .........................................................................................................4-13
NFS Access ..........................................................................................................................................................4-16
Support for NFS ..............................................................................................................................................4-17
NFS Share Mounting .....................................................................................................................................4-17
NIS Domains ........................................................................................................................................................4-18
Guidelines for Configuring NIS .....................................................................................................................4-18
FTP/FTPS Access ..................................................................................................................................................4-19
Supported FTP Clients ...................................................................................................................................4-19
SNMP Configuration ...........................................................................................................................................4-20
Default Traps .................................................................................................................................................4-21
Supported Network Manager Applications and MIBs .............................................................................4-22
Configure SNMP ............................................................................................................................................4-22
Web Access ........................................................................................................................................................4-23
Configuring HTTP/HTTPS ................................................................................................................................4-23
Using Web Root to Configure the SnapScale as a Simple Web Server ..................................................4-24
iSNS Configuration ..............................................................................................................................................4-27
Chapter 5 - Storage Options
Peer Sets ................................................................................................................................................................5-1
Peer Sets and Recovery .................................................................................................................................5-2
Peer Set Utilization ...........................................................................................................................................5-4
Peer Set Basics .................................................................................................................................................5-4
Peer Sets Page ................................................................................................................................................5-5
Spare Disks Page .............................................................................................................................................5-6
Spare Distributor ..............................................................................................................................................5-7
Data Balancer .................................................................................................................................................5-9
Volumes ...............................................................................................................................................................5-11
Volume Overview .........................................................................................................................................5-11
Creating Volumes .........................................................................................................................................5-12
Edit Volume Properties .................................................................................................................................5-14
Deleting Volumes ..........................................................................................................................................5-14
Quotas .................................................................................................................................................................5-15
Default Quotas ..............................................................................................................................................5-16
Quotas for Volume Page .............................................................................................................................5-17
10400455-001 Dec 2013 ©Overland Storage, Inc. vi

SnapScale/RAINcloudOS 4.0 Administrator’s Guide Contents
Add Quota Wizard .......................................................................................................................................5-18
Editing or Removing Quotas ........................................................................................................................5-20
Snapshots ............................................................................................................................................................5-21
Snapshots Overview .....................................................................................................................................5-22
Creating Snapshots ......................................................................................................................................5-22
Adjusting Snapshot Space ...........................................................................................................................5-25
Accessing Snapshots ....................................................................................................................................5-26
Scheduling Snapshots ..................................................................................................................................5-26
Edit Snapshot Properties ...............................................................................................................................5-27
iSCSI Disks .............................................................................................................................................................5-27
Configuring iSCSI Initiators ...........................................................................................................................5-27
iSCSI Configuration on the SnapScale .......................................................................................................5-27
Create iSCSI Disks .......................................................................................................................................... 5-29
Edit iSCSI Disk Properties ...............................................................................................................................5-31
Delete an iSCSI Disk ......................................................................................................................................5-32
Configuring VSS/VDS for iSCSI Disks ............................................................................................................5-32
Nodes ...................................................................................................................................................................5-35
Nodes Overview ...........................................................................................................................................5-35
Edit Node Properties .....................................................................................................................................5-36
Node Drives ...................................................................................................................................................5-36
Adding Nodes ...............................................................................................................................................5-37
Removing Nodes ..........................................................................................................................................5-41
Node Identification ......................................................................................................................................5-42
Disks ......................................................................................................................................................................5-43
Replacing Drives ...........................................................................................................................................5-43
Adding Drives ................................................................................................................................................5-44
Chapter 6 - Security Options
Overview ...............................................................................................................................................................6-1
Guidelines for Local Authentication .............................................................................................................6-2
User and Group ID Assignments .................................................................................................................... 6-3
Security Guides ..................................................................................................................................................... 6-3
Windows Active Directory Security Guide ...................................................................................................6-4
Entire Volume Security Guide ........................................................................................................................6-5
Folder on Volume Security Guide .................................................................................................................6-5
Shares .....................................................................................................................................................................6-5
Share Security Overview ................................................................................................................................6-6
Create Shares ..................................................................................................................................................6-6
Edit Share Properties .......................................................................................................................................6-8
Delete Shares ..................................................................................................................................................6-9
Configuring Share Access .............................................................................................................................6-9
Local Users ...........................................................................................................................................................6-16
Create a User ................................................................................................................................................6-16
Edit User Properties .......................................................................................................................................6-17
Local User Password Policies .......................................................................................................................6-19
Assign User to Group ....................................................................................................................................6-20
Delete Local User ..........................................................................................................................................6-21
Local Groups .......................................................................................................................................................6-22
Create New Group .......................................................................................................................................6-22
Edit Group Properties ...................................................................................................................................6-23
Specify Users in Group ..................................................................................................................................6-24
10400455-001 Dec 2013 ©Overland Storage, Inc. vii

SnapScale/RAINcloudOS 4.0 Administrator’s Guide Contents
Delete Group ................................................................................................................................................6-24
Security Models ................................................................................................................................................... 6-25
Managing Volume Security Models ...........................................................................................................6-25
ID Mapping .........................................................................................................................................................6-25
Add Mapping ................................................................................................................................................6-26
Change Mapping .........................................................................................................................................6-29
Auto Mapping ...............................................................................................................................................6-31
Remove Mappings .......................................................................................................................................6-33
Remove Missing ID Mappings .....................................................................................................................6-36
Filesystem Updates .......................................................................................................................................6-37
Home Directories ................................................................................................................................................6-37
Configure Home Directories ........................................................................................................................6-38
Chapter 7 - System Monitoring
System Status .........................................................................................................................................................7-2
SnapScale Status ............................................................................................................................................7-2
Activity ...................................................................................................................................................................7-3
Active Users .....................................................................................................................................................7-3
Open Files ........................................................................................................................................................7-4
Network Monitor .............................................................................................................................................7-4
Event Log ...............................................................................................................................................................7-7
Filter the Log ....................................................................................................................................................7-7
Protocol Manager ................................................................................................................................................ 7-8
SnapScale Settings ...............................................................................................................................................7-9
Tape .....................................................................................................................................................................7-11
Chapter 8 - Maintenance
Shutdown and Restart .........................................................................................................................................8-2
Manually Powering Nodes On and Off ........................................................................................................8-2
Data Import ...........................................................................................................................................................8-2
Setting Up a Data Import Job .......................................................................................................................8-4
Stopping an Import Job .................................................................................................................................8-6
Recreating an Import Job .............................................................................................................................8-6
Preserving Permissions ....................................................................................................................................8-6
OS Update ............................................................................................................................................................. 8-7
Update the RAINcloudOS Software .............................................................................................................8-8
Software Update Notification .......................................................................................................................8-8
Configuring Update Notification ..................................................................................................................8-9
Manually Checking for Updates ...................................................................................................................8-9
Support ..................................................................................................................................................................8-9
Phone Home Support ...................................................................................................................................8-10
Registering Your Cluster ...............................................................................................................................8-12
Tools ......................................................................................................................................................................8-13
Email Notification ..........................................................................................................................................8-14
Host File Editor ...............................................................................................................................................8-15
Delete SnapScale Cluster ............................................................................................................................8-16
Chapter 9 - Misc. Options
Home Pages – Web/Admin .................................................................................................................................9-1
Web Home ......................................................................................................................................................9-2
Administration .................................................................................................................................................9-3
10400455-001 Dec 2013 ©Overland Storage, Inc. viii

SnapScale/RAINcloudOS 4.0 Administrator’s Guide Contents
SnapExtensions ......................................................................................................................................................9-5
Snap EDR .........................................................................................................................................................9-5
Snap Finder ...........................................................................................................................................................9-6
Edit Snap Finder Properties ............................................................................................................................9-7
Change Password ................................................................................................................................................ 9-8
Changing Your Password ...............................................................................................................................9-8
Management Interface Settings ........................................................................................................................9-9
Appendix A - Backup Solutions
Backup and Replication Solutions ..................................................................................................................... A-1
Snap Enterprise Data Replicator ....................................................................................................................... A-1
Snap EDR Usage ............................................................................................................................................ A-2
Configuring Snap EDR for RAINcloudOS .....................................................................................................A-2
Scheduling Jobs in Snap EDR ....................................................................................................................... A-3
Backup via SMB or NFS ........................................................................................................................................ A-3
Backup via Agent or Media Server ................................................................................................................... A-3
Utility IP Address ............................................................................................................................................. A-3
Appendix B - Security and Access
Security Model Rules ............................................................................................................................................B-1
Security Model Management .............................................................................................................................B-2
Special Share Options ..........................................................................................................................................B-2
Hiding Shares ...................................................................................................................................................B-2
Where to Place Shares ...................................................................................................................................B-3
File and Share Access ..........................................................................................................................................B-3
Cumulative Share Permissions .......................................................................................................................B-3
Snapshot Shares and On Demand File Recovery .......................................................................................B-3
Creating a Snapshot Share ...........................................................................................................................B-3
File-level Security ..................................................................................................................................................B-4
Security Personalities and Security Models ..................................................................................................B-4
Windows ACLs .................................................................................................................................................B-4
Appendix C - RAINcloudOS Ports
Appendix D - Troubleshooting
LED Indicators ....................................................................................................................................................... D-1
SnapScale X2 Node LEDs .............................................................................................................................. D-1
SnapScale X4 Node LEDs .............................................................................................................................. D-3
Network Reset ...................................................................................................................................................... D-3
Master Glossary & Acronym List
Index
10400455-001 Dec 2013 ©Overland Storage, Inc. ix
Chapter 1
Overview
SnapScale is a flexible, scalable, low-maintenance network-attached storage cluster
composed of a redundant array of independent nodes running RAINcloudOS. This guide
applies to SnapScale nodes running RAINcloudOS version 4.0.
Offering user-selectable levels of data redundancy, SnapScale uses File-level Striping to
write data across multiple nodes and drives simultaneously for instant protection and high
availability. With a SnapScale cluster, volumes can be configured, created, provisioned, and
grown on demand. Special features such as Data Balancer redistributes files to optimize
performance and Spare Distributor evenly distributes spare drives across nodes. Files can be
accessed either through NFS or CIFS/SMB protocols. SnapScale Flexible Volumes
automatically adjust capacity so they only occupy as much space as their data requires.
Topics in Overview:
• SnapScale Conventions
• SnapScale Node Requirements
• RAINcloudOS Specifications
• RAINcloudOS 4.0 Features
• Client and Storage Networks
• Node Port Configurations
SnapScale Conventions
The SnapScale cluster supports three or more nodes hosting redundant sets of data for data
protection. An Administrator can configure, add, or remove nodes on demand to change
storage requirements. The overall storage system is able to easily grow from three nodes to
meet your needs.
Peer sets are created using two or three drives (based on redundancy choices) located on
different nodes. Each peer set member has the same data and metadata as its peers.
10400455-001 Dec 2013 ©Overland Storage, Inc. 1-1

SnapScale/RAINcloudOS 4.0 Administrator’s Guide SnapScale Node Requirements
There are three different states for SnapScale nodes:
• Uninitialized node – an independent node that has not yet been joined to a
SnapScale cluster.
• SnapScale node – a healthy node that is a member of a fully-configured SnapScale
cluster. Both 2U nodes with up to 12 drives and 4U nodes with 36 drives are available.
• Management node – a SnapScale node with special duties involved in managing the
cluster. The Management node is selected automatically by the RAINcloudOS when
the cluster boots. Should that management node fail, another currently available node
is automatically chosen to become the new Management node. This Management node
also hosts peer sets with metadata and data just like all other SnapScale nodes.
Other key concepts include:
• Management IP – the IP address through which the administrator accesses the Web
Management Interface of the current Management node.
• Peer set – a set of two or three disks (each on a separate node) that have mirrored
data for redundancy.
• Cluster Name – the name visible to network clients and used to connect to the cluster
(similar to a server name), and resolvable to node IP addresses via round robin DNS.
• Cluster Management Name – the hostname resolvable to the Management IP for
Web Management Interface access or Snap EDR configuration.
• Data Replication Count – an administrator-specified, cluster-wide count of the
number of mirrored copies of data within the cluster. The Data Replication Count can
be either “2” or “3” and determines the number of drives in a peer set.
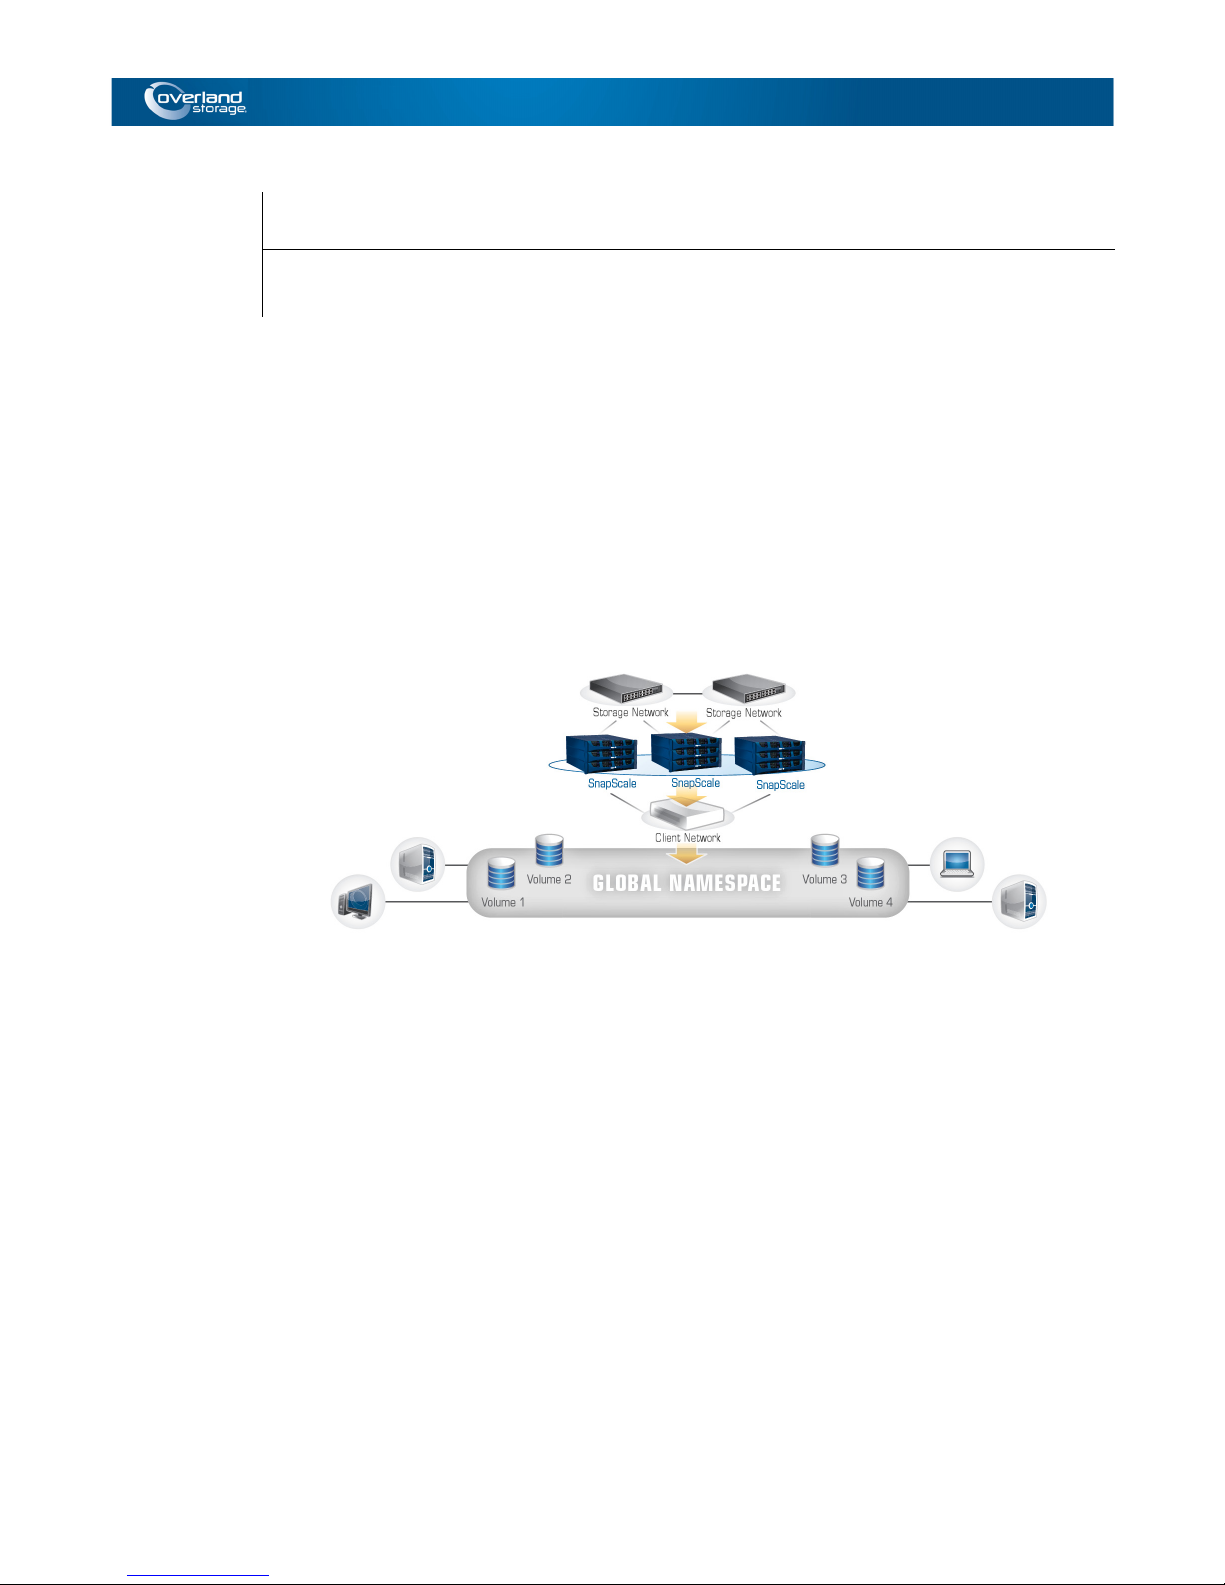
A SnapScale cluster consists of two separate networks:
• Client Network – used exclusively for client access. Clients can connect to any node
to access data anywhere on the cluster.
• Storage Network – an isolated network used exclusively by the cluster for inter-node
communications. This includes:
• Heartbeat (node health/presence) sensing.
• Synchronization of peer set members.
• Data transfer between nodes to facilitate clients reading from and writing to files.
SnapScale Node Requirements
The following table details the basic requirements for cluster nodes:
Requirement Detailed Description
Minimum number of nodes A SnapScale cluster must have a minimum of three (3) nodes to
No expansion units A SnapScale node cannot have any expansion units attached to it.
Minimum number of disks per
node
Maximum size of file on cluster While the system reports total free space across the entire cluster, the
operate normally.
Each node must have a minimum of four disks. Additional disks can be
added as needed.
maximum file size at any given time is dictated by free space on the
least-utilized peer set. This is reported in the Web Management
Interface.
10400455-001 Dec 2013 ©Overland Storage, Inc. 1-2

SnapScale/RAINcloudOS 4.0 Administrator’s Guide RAINcloudOS Specifications
Requirement Detailed Description
Common Storage network To form or join a SnapScale cluster, each Uninitialized node must be
connected to the same Storage network as the other nodes.
Storage network links To form or join a SnapScale cluster each Uninitialized node must have
connectivity (active link) on both Storage network ports.
Storage network usage Only a single cluster can use a given Storage network.
Client network separate from
Storage network
Nodes must be running same
RAINcloudOS version
Adding nodes When adding nodes to an existing cluster, the number of nodes added
Disk requirements All disks in the cluster must be the same type of disk (such as SAS)
The Client and Storage networks must be on different (independent)
networks, and the Storage network must be isolated from all other
networks.
To form a SnapScale cluster, all nodes must be running the same
version of RAINcloudOS.
To join an already configured SnapScale cluster, an Uninitialized node
must have the same version of RAINcloudOS as the other SnapScale
nodes:
• If the Uninitialized node has an older version of the RAINcloudOS,
the Uninitialized node must be upgraded to the later version.
• If the Uninitialized node has a newer version of the RAINcloudOS,
then all SnapScale nodes must be upgraded to the later version.
(The node can be reinstalled with a version matching the cluster if
the hardware supports it.)
at one time should be at least the same number as the Data
Replication Count. This ensures the new nodes and cluster are
efficiently utilizing increased storage space.
and same rotational speed.
RAINcloudOS Specifications
These specifications apply to all SnapScale nodes running RAINcloudOS 4.0:
Feature Specification
Network Transport Protocols TCP/IP (Transmission Control Protocol/Internet Protocol)
UDP/IP (User Datagram Protocol/Internet Protocol)
Network File Protocols Microsoft Networking (CIFS/SMB)
UNIX Network Filesystem (NFS) 3.0 only
Hypertext Transfer Protocol (HTTP/HTTPS)
Network Security • Microsoft Active Directory Service (ADS) (member server)
• UNIX Network Information Service (NIS)
• File and Folder Access Control List (ACL) Security for Users and
Groups
• Secure Sockets Layer (SSL v2/3) 128-bit Encryption
• SMTP Authentication and support for email encryption (STARTTLS
and TLS/SSL encryption protocols)
10400455-001 Dec 2013 ©Overland Storage, Inc. 1-3

SnapScale/RAINcloudOS 4.0 Administrator’s Guide RAINcloudOS 4.0 Features
Feature Specification
Network Client Types Microsoft Windows 2000 SP4/2003/2003 R2/2008 SP2/2008 R2
/XP SP3/Vista SP2/7/8/2012
Mac OS X 10.5/10.6/10.7/10.8 (via CIFS/SMB)
Sun Solaris 10 and 11
HP-UX 11
AIX 5.3/6
Red Hat Enterprise Linux (RHEL) 4.x/5.x/6.x
Novell SuSE Linux Enterprise Server (SLES) 10.x/11.x
Data Protection • Snapshots for immediate or scheduled point-in-time images of the
cluster filesystem
• Support for network backup via CIFS/SMB
• Support for Symantec Backup Exec 2010/2012 and NetBackup 7.5.
• APC® brand Uninterruptible Power Supply (UPS) with Network
Management Cards, a USB interface, or a serial interface (with USBto-Serial adapter) are supported for graceful system shutdown
System Management • Browser-based administration tool called the Web Management
Interface
• Read-only CLI support
• Environmental monitoring
• Email event notification
• Data importation (migration)
• SNMP (MIB II and Host Resource MIB)
• User disk quotas for Windows, UNIX/Linux, FTP/FTPS
• NIS Group disk quotas for UNIX/Linux
DHCP Support Only supports Dynamic Host Configuration Protocol (DHCP) in an
Uninitialized node for configuring or adding to a cluster.
RAINcloudOS 4.0 Features
NOTE: For details and descriptions of all the new features and a list of other improvements to the
operating system, see the Product Release Notes on the Overland SnapScale website.
With the release of RAINcloudOS 4.0, the following features and functionality are now
available:
Feature New Functionality
iSCSI Support SnapScale can now create and host iSCSI disk targets on
the cluster file system. These iSCSI disks can register with
an iSNS server, and can also be managed by Windows
VSS/VDS.
SMB2, FTP/FTPS, and SNMP
Support Added
Improved Network Monitoring The Network Monitor page provides additional information
Added User/Group Quotas per
Volume
10400455-001 Dec 2013 ©Overland Storage, Inc. 1-4
SMB2, FTP/FTPS, and SNMP are all now supported in
RAINcloudOS.
including high-water marks, network activity for the whole
cluster, and clearer labels.
Storage consumption and file count quotas can now be
configured for users and NIS groups per volume.
SnapScale/RAINcloudOS 4.0 Administrator’s Guide Client and Storage Networks
Feature New Functionality
Data Balancer & Spare
Distributor Improved
Client and Storage Networks
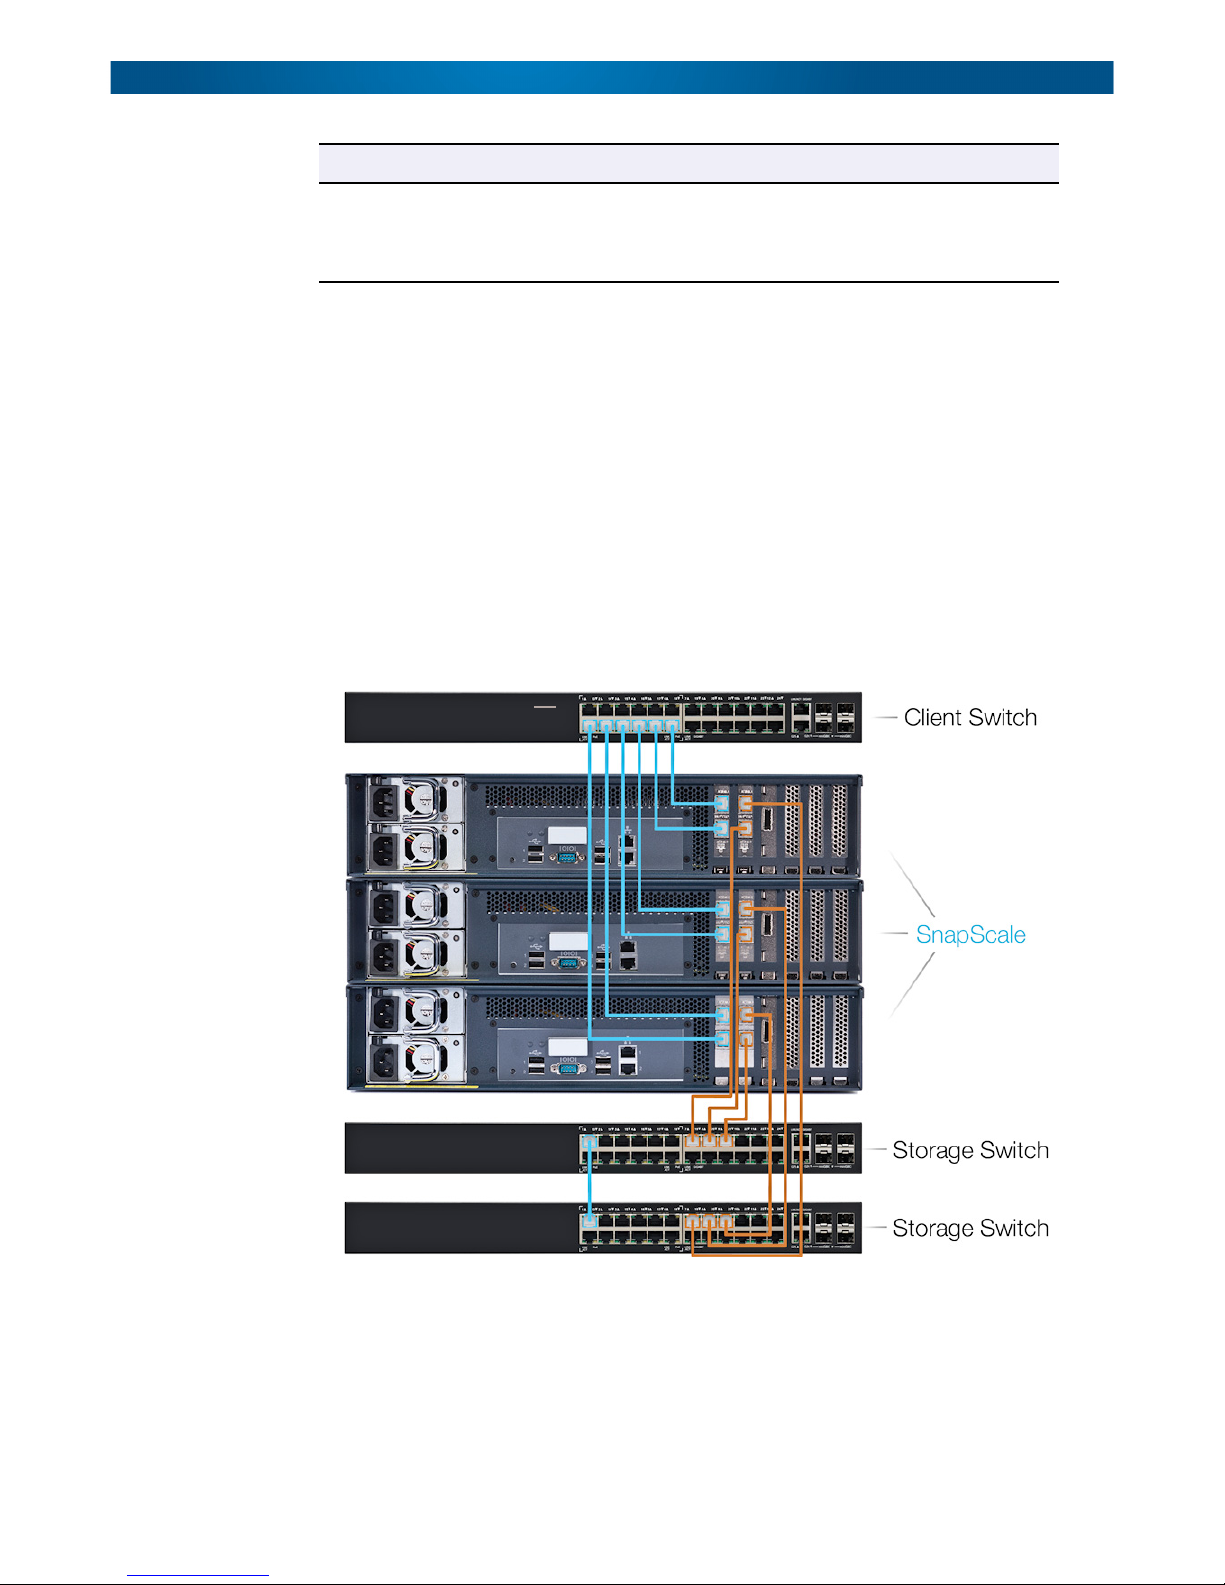
SnapScale requires two separate networks to function correctly: A public network (Client)
and a private network (Storage). To support failover, two Storage network switches must be
connected together (using a 1GbE or 10GbE cable between the switches). Each of the two
Storage network ports on the node need to be connected to a different Storage switch.
Node/Switch Cabling Example
The following example shows three dual 10GbE card X2 nodes and how to connect them to
the network switches. The cables used to connect to the Client side of the network (blue)
originate from the Client 10GbE card in slot 1. Two cables are used to connect both ports of
each node to the Client switch.
Data Balancer (formerly Capacity Balancer) redistributes
files to optimize performance. Spare Distributor (formerly
the Spare Disk Balancer) evenly distributes spare drives
across nodes. Both have been improved for faster results.
The cables used to connect to the Storage side of the network (orange) originate from the
Storage 10GbE card in slot 2. For each node, one cable is used to connect a one Storage port
of each note to one of the two Storage switches used for failover.
For connections between 10GbE cards and 10GbE switches, use either direct-attached
copper cables or fibre cables with SFP+ modules pre-installed in the card and switch ports.
10400455-001 Dec 2013 ©Overland Storage, Inc. 1-5
SnapScale/RAINcloudOS 4.0 Administrator’s Guide Node Port Configurations
IMPORTANT: If using fibre cables, you must use Overland-approved SFP+ modules. With the
cluster powered OFF, insert the modules into the card and switch ports. Connect the fibre
cable between the two SFP+ modules and restore power to the cluster.
Node Port Configurations
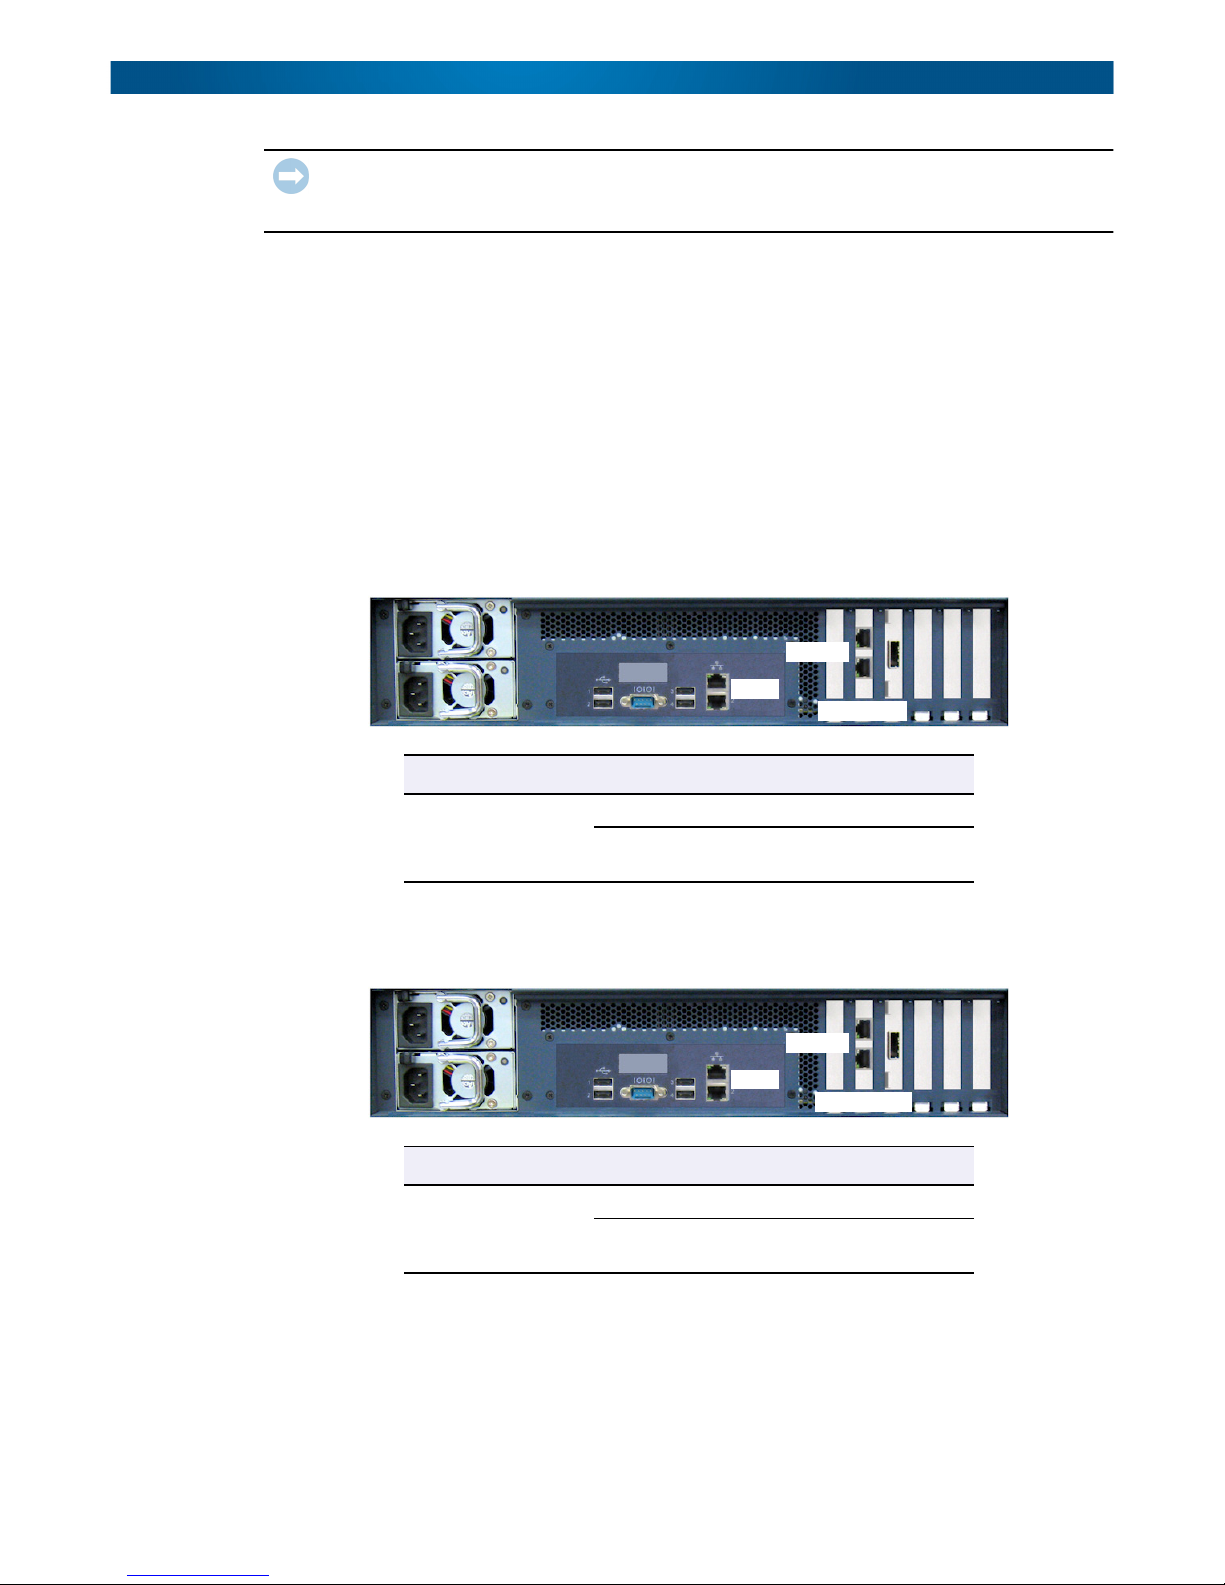
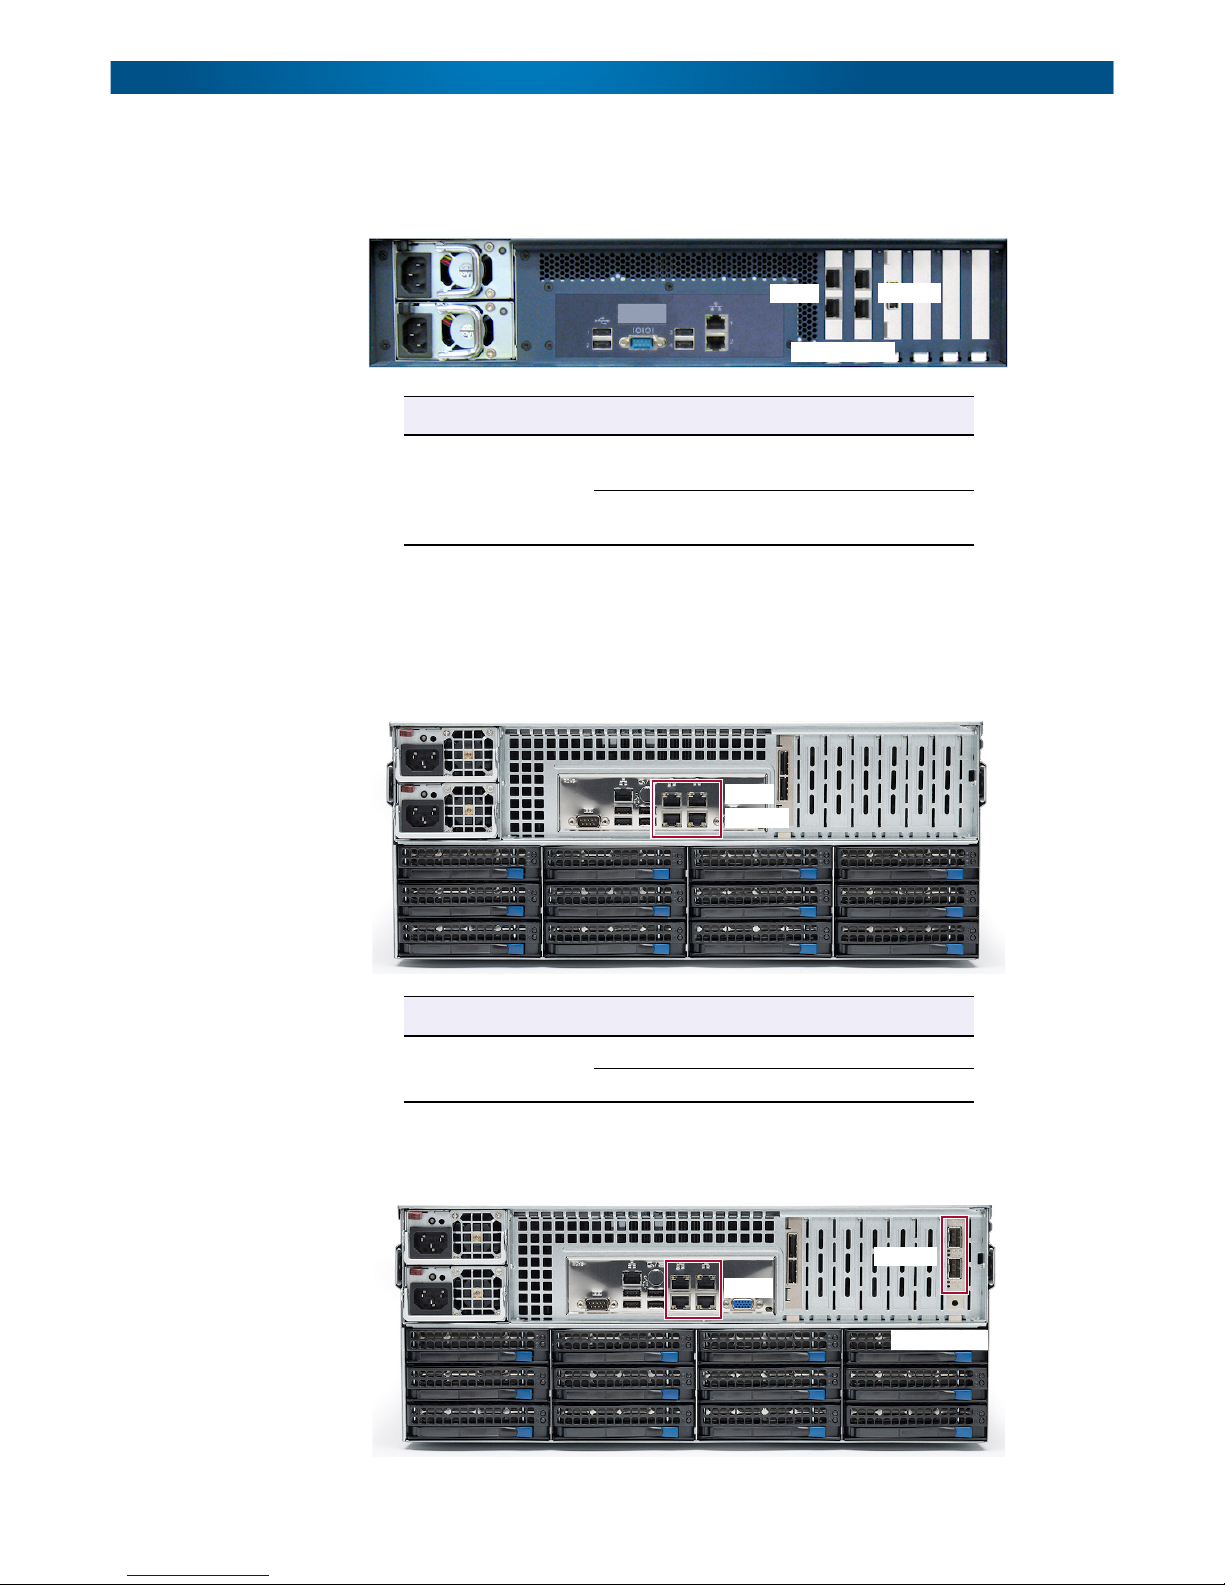
Both the X2 and X4 nodes come in three different configurations: 1GbE ports (both Client
and Storage ports), a single 10GbE card (with 1GbE Client ports), and dual 10GbE cards.
NOTE: If desired, optional 10GbE cards can be added later to upgrade the node.
X2 Node Configurations
Basic 1GbE. At the rear of the X2 node, the 1GbE ports connected directly to the
motherboard are configured to access the Client and Storage networks.
Storage
1
Client
2
Configuration Node GbE Ports Network Switch
Basic 1GbE X2 Ports 1 & 2 Client (public)
Slot 2 1GbE Card
(ports 3 & 4)
Storage (private)
3
4
1GbE Card
Single 10GbE. The single-card 10GbE configuration uses the two 1GbE ports for the Client
connection and the two 10GbE ports on the card for the Storage connections.
Storage
1
Client
2
Configuration Node GbE Ports Network Switch
Single 10GbE X2 Ports 1 & 2 Client (public)
Slot 2 10GbE Card
(ports 3 & 4)
Storage (private)
3
4
10GbE Card
10400455-001 Dec 2013 ©Overland Storage, Inc. 1-6
SnapScale/RAINcloudOS 4.0 Administrator’s Guide Node Port Configurations
Dual 10GbE. The dual-card configuration uses the left 10GbE card ports for the Client
connections and the right 10GbE card ports for the Storage connections. The 1GbE ports are
not used.
1
3
Client
10GbE Cards
Configuration Node GbE Ports Network Switch
Storage
4
2
Dual 10GbE X2 Slot 1 10GbE Card
X4 Node Configurations
Basic 1GbE. At the rear of the 1GbE configuration, there are two sets of 1GbE ports
connected directly to the motherboard for connecting to the switches. The top two are for the
Client network; bottom two for Storage.
Configuration Node GbE Ports Network Switch
(ports 1 & 2)
Slot 2 10GbE Card
(ports 3 & 4)
Client
341
2
Storage
Client (public)
Storage (private)
Basic 1GbE X4 Ports 1 & 2 Client (public)
Single 10GbE. The single-card 10GbE configuration uses the two 1GbE ports for the Client
connection and the two 10GbE ports on the card for the Storage connections.
10400455-001 Dec 2013 ©Overland Storage, Inc. 1-7
Ports 3 & 4 Storage (private)
Storage
341
Client
2
10GbE Card
5
6
SnapScale/RAINcloudOS 4.0 Administrator’s Guide Node Port Configurations
Configuration Node GbE Ports Network Switch
Single 10GbE X4 Ports 1, 2, 3, & 4 Client (public)
Slot 7 10GbE Card
(ports 5 & 6)
Storage (private)
Dual 10GbE. The dual-card configuration uses the left 10GbE card ports for the Client
connections and the right 10GbE card ports for the Storage connections. The 1GbE ports are
not used.
Client
Unused
341
2
10GbE Cards
567
8
Storage
Configuration Node GbE Ports Network Switch
Dual 10GbE X4 Slot 6 10GbE Card
(ports 7 & 8)
Slot 7 10GbE Card
(ports 5 & 6)
Client (public)
Storage (private)
10400455-001 Dec 2013 ©Overland Storage, Inc. 1-8

This section covers the initial setup and configuration of an individual SnapScale node
running RAINcloudOS 4.0. It also addresses how to use that node to set up a SnapScale
cluster of three or more nodes, or to add the node to an existing SnapScale cluster.
NOTE: For information concerning the installation and wiring of the SnapScale node hardware,
refer to either the SnapScale X2 Node Quick Start Guide or the SnapScale X4 Node Quick
Start Guide.
Topics in Setup and Configuration:
• Connecting for the First Time
• Create a New SnapScale Cluster (via Wizard)
• Join an Existing SnapScale Cluster (via Wizard)
• Web Management Interface
Connecting for the First Time
Setup and Configuration
NOTE: Uninitialized nodes are configured to acquire their IP address from a DHCP server. If no
DHCP server is found on the network, the node defaults to an IP address in the range of
169.254.xxx.xxx and is labeled in SnapServer Manager (SSM) as “ZeroConf”. You may not
be able to see Uninitialized nodes on your network until you discover them using either the
default node name or the SSM utility and optionally assign them an IP address.
Connect Using the Node Name
This procedure requires that name resolution services (via DNS or an equivalent service) be
operational.
NOTE: Any node that is selected to be part of a cluster can be used to create the cluster.
1. Find the node name of an Uninitialized node that is to be used to create a new
SnapScale cluster.
A SnapScale node name is of the format “Nodennnnnnn,” where nnnnnnn is the node
chassis number. The node number is a unique, numeric-only string that appears on a
label affixed to the bottom of the appliance.
2. In a web browser, enter the URL to connect to the node.
For example, enter “http://Nodennnnnnn” (using the node name).
3. Press Enter to connect to the Web Management Interface.
10400455-001 Dec 2013 ©Overland Storage, Inc. 2-1
SnapScale/RAINcloudOS 4.0 Administrator’s Guide Connecting for the First Time
4. In the login dialog box, enter admin as the user name and admin as the password
(the system defaults), then click OK.
5. Complete the Initial Setup Wizard to either create a new SnapScale cluster or join
an existing cluster.
Connect Using SSM
1. Launch SnapServer Manager (SSM).
SSM discovers all SnapServers, SnapScale clusters, and SnapScale nodes on its local
network segment and displays their names, IP addresses, and other information in the
main console. If you do not have a DHCP server, there might be a delay before the node
appears on the network.
NOTE: To distinguish multiple SnapServers or SnapScale nodes, you may need to find their
default names as explained in Connect Using the Node Name on page 2-1.
2. If using a DHCP server, proceed to Step 3; otherwise, assign an IP address to one of
the nodes to be configured in the cluster.
NOTE: Only one node needs to be configured with an IP address in order to create the cluster.
a. In SSM, right-click the node name.
b. Select Set IP Address.
c. Enter an IP address and a subnet mask, then click OK.
3. In SSM, right-click the node name and select Launch Web Administration.
4. Log into the Web Management Interface.
In the login dialog box, enter admin as the user name and admin as the password
(the system defaults), then click OK.
5. Complete the Initial Setup Wizard to either create a new SnapScale cluster or join
an existing cluster.
10400455-001 Dec 2013 ©Overland Storage, Inc. 2-2

SnapScale/RAINcloudOS 4.0 Administrator’s Guide Create a New SnapScale Cluster (via Wizard)
Create a New SnapScale Cluster (via Wizard)
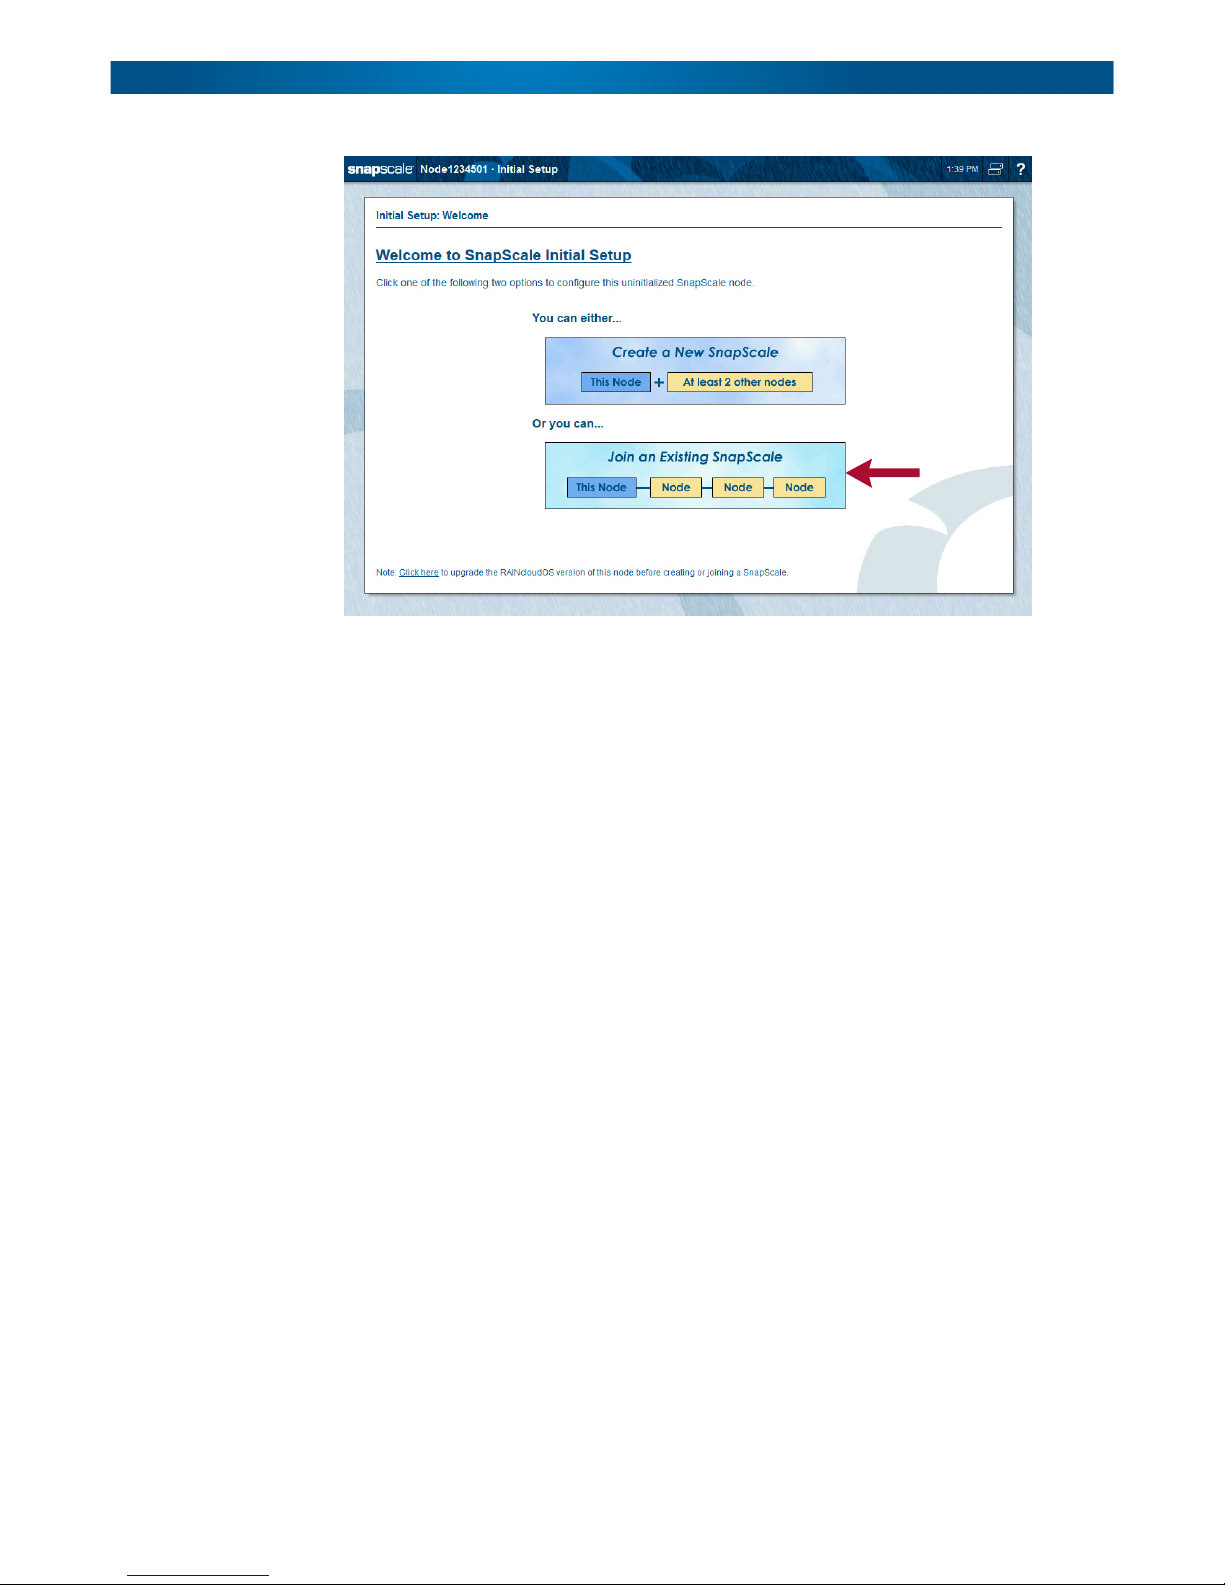
On a new node, once you log in, the Initial Setup Wizard runs displaying the Welcome page.
From the Initial Setup Wizard, you can use this node to create a new SnapScale cluster by
connecting to two or more other nodes. Click Create a New SnapScale to start the wizard.
The Initial Setup Wizard for creating a new SnapScale cluster consists of seven steps:
Step 1: Select the nodes to be included in the cluster.
Step 2: Review the Client network information.
Step 3: Choose the static TCP/IP settings for the Client network.
Step 4: Populate the Static IP addresses for the nodes.
Step 5: Enter the basic SnapScale properties.
Step 6: Set the date and time.
Step 7: Verify the settings and create a SnapScale cluster.
NOTE: After the cluster is created, you are asked to configure the Administrator’s password as part
of Step 7.
Step 1 – Select SnapScale Nodes
Select the nodes you want to use from the list of eligible nodes.
IMPORTANT: At least three nodes are required to create a SnapScale clustered network. All
nodes must have the identical version of RAINcloudOS (ROS) and be on a subnet that does not
contain an existing cluster. The Client network interfaces for all the nodes must be located on the
same public network subnet, and the Storage network interfaces for all nodes must be located on
the same private Storage network subnet. The nodes cannot have any expansion units attached.
10400455-001 Dec 2013 ©Overland Storage, Inc. 2-3
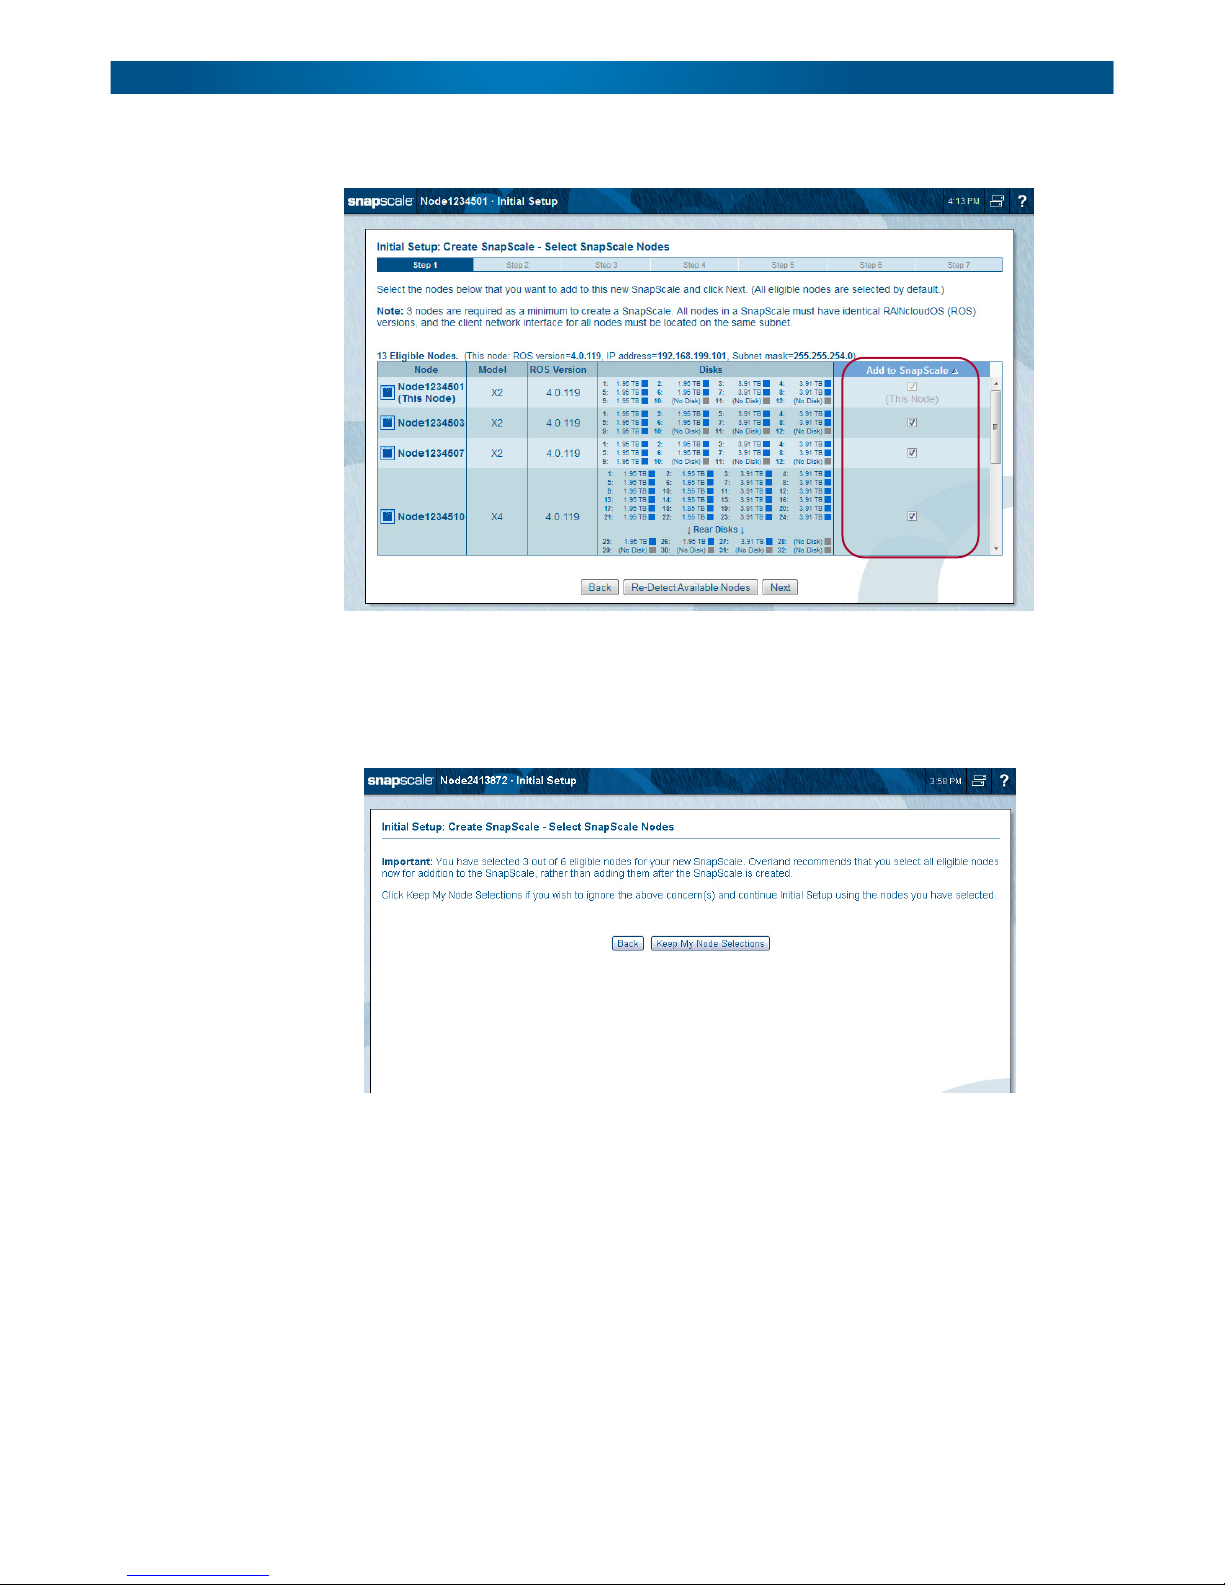
SnapScale/RAINcloudOS 4.0 Administrator’s Guide Create a New SnapScale Cluster (via Wizard)
Any combination of node types (X4 and X2) can be used to create a cluster.
Verify that the boxes in the Add to SnapScale column for the nodes you want to use are
checked. Click Re-Detect Available Nodes to refresh the list. When ready, click Next.
NOTE: If you deselect one or more of the detected nodes, when you click Next a message page is
displayed recommending that you add all the nodes at once.
10400455-001 Dec 2013 ©Overland Storage, Inc. 2-4
SnapScale/RAINcloudOS 4.0 Administrator’s Guide Create a New SnapScale Cluster (via Wizard)
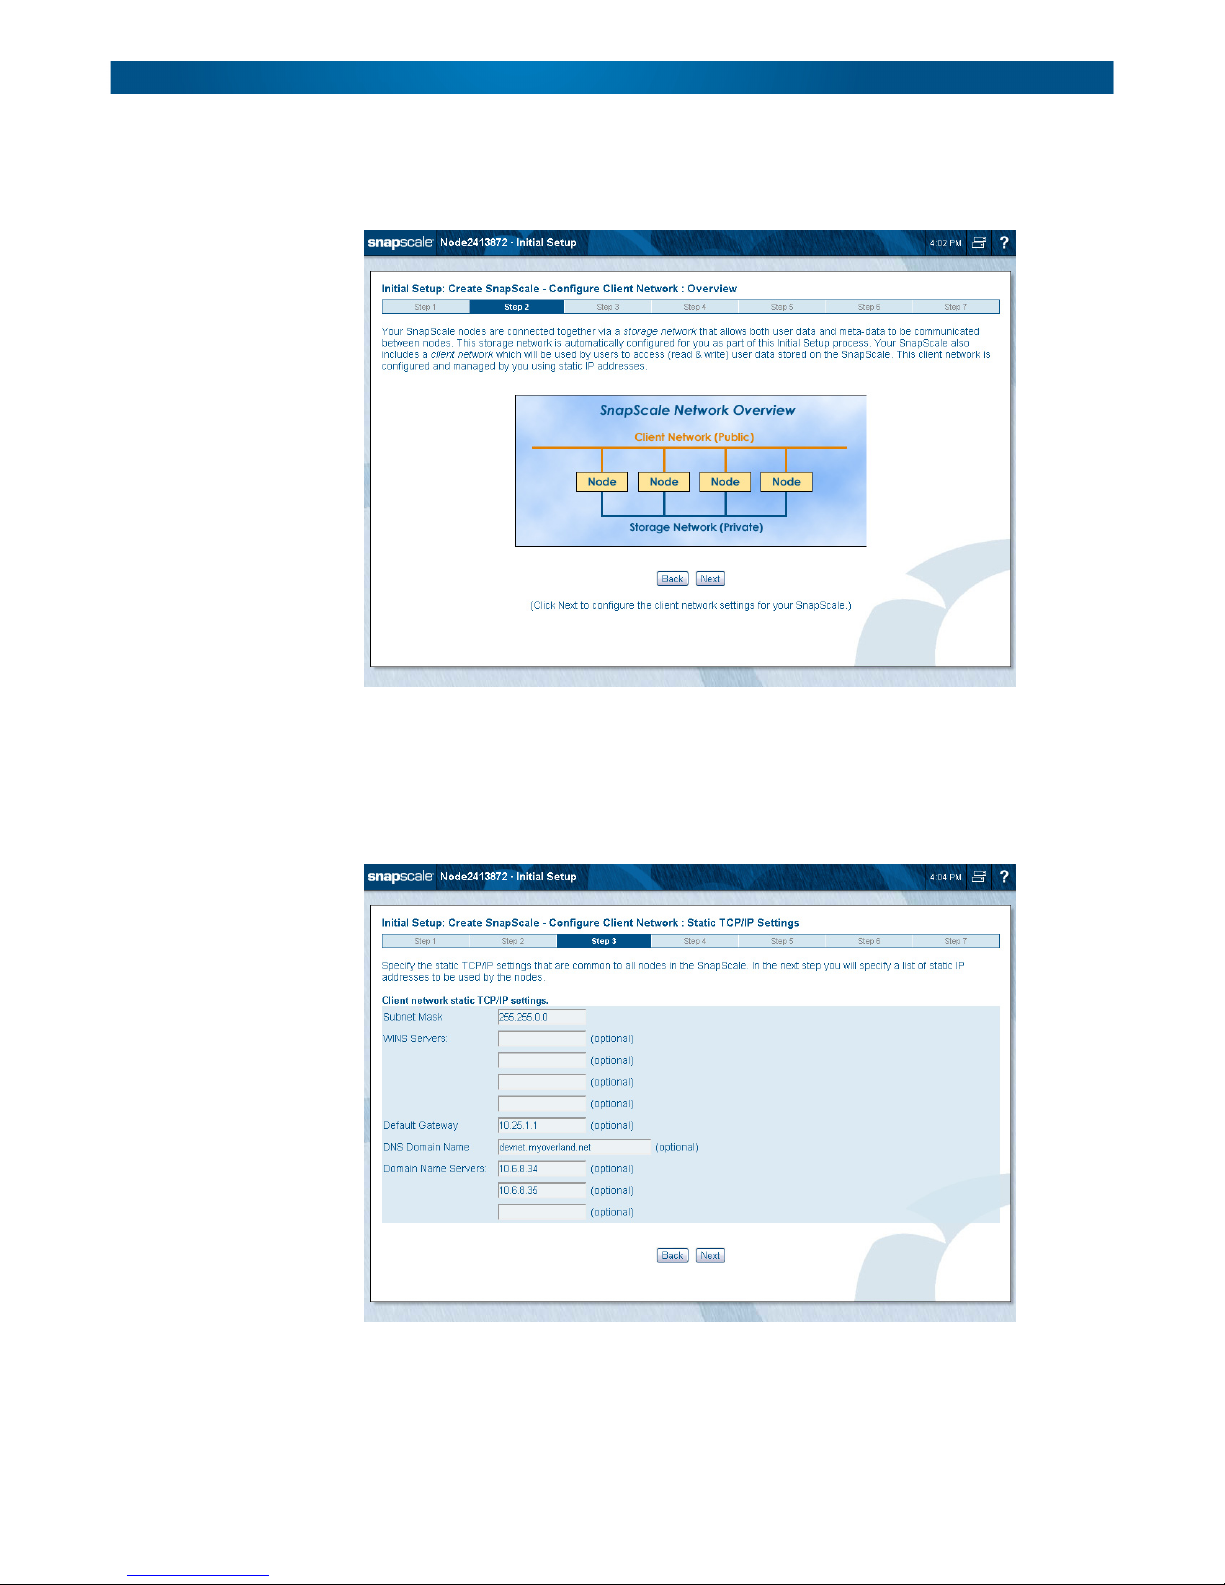
Step 2 – Client Network Configuration Overview
Review the information about setting up your Client network. Click Next to continue.
Step 3 – Choose Client Network Static TCP/IP Settings
Use this step to specify the static TCP/IP settings that will be common to all nodes in the
cluster. Then click Next to continue to the next page to set the actual node static IP
addresses.
10400455-001 Dec 2013 ©Overland Storage, Inc. 2-5
SnapScale/RAINcloudOS 4.0 Administrator’s Guide Create a New SnapScale Cluster (via Wizard)
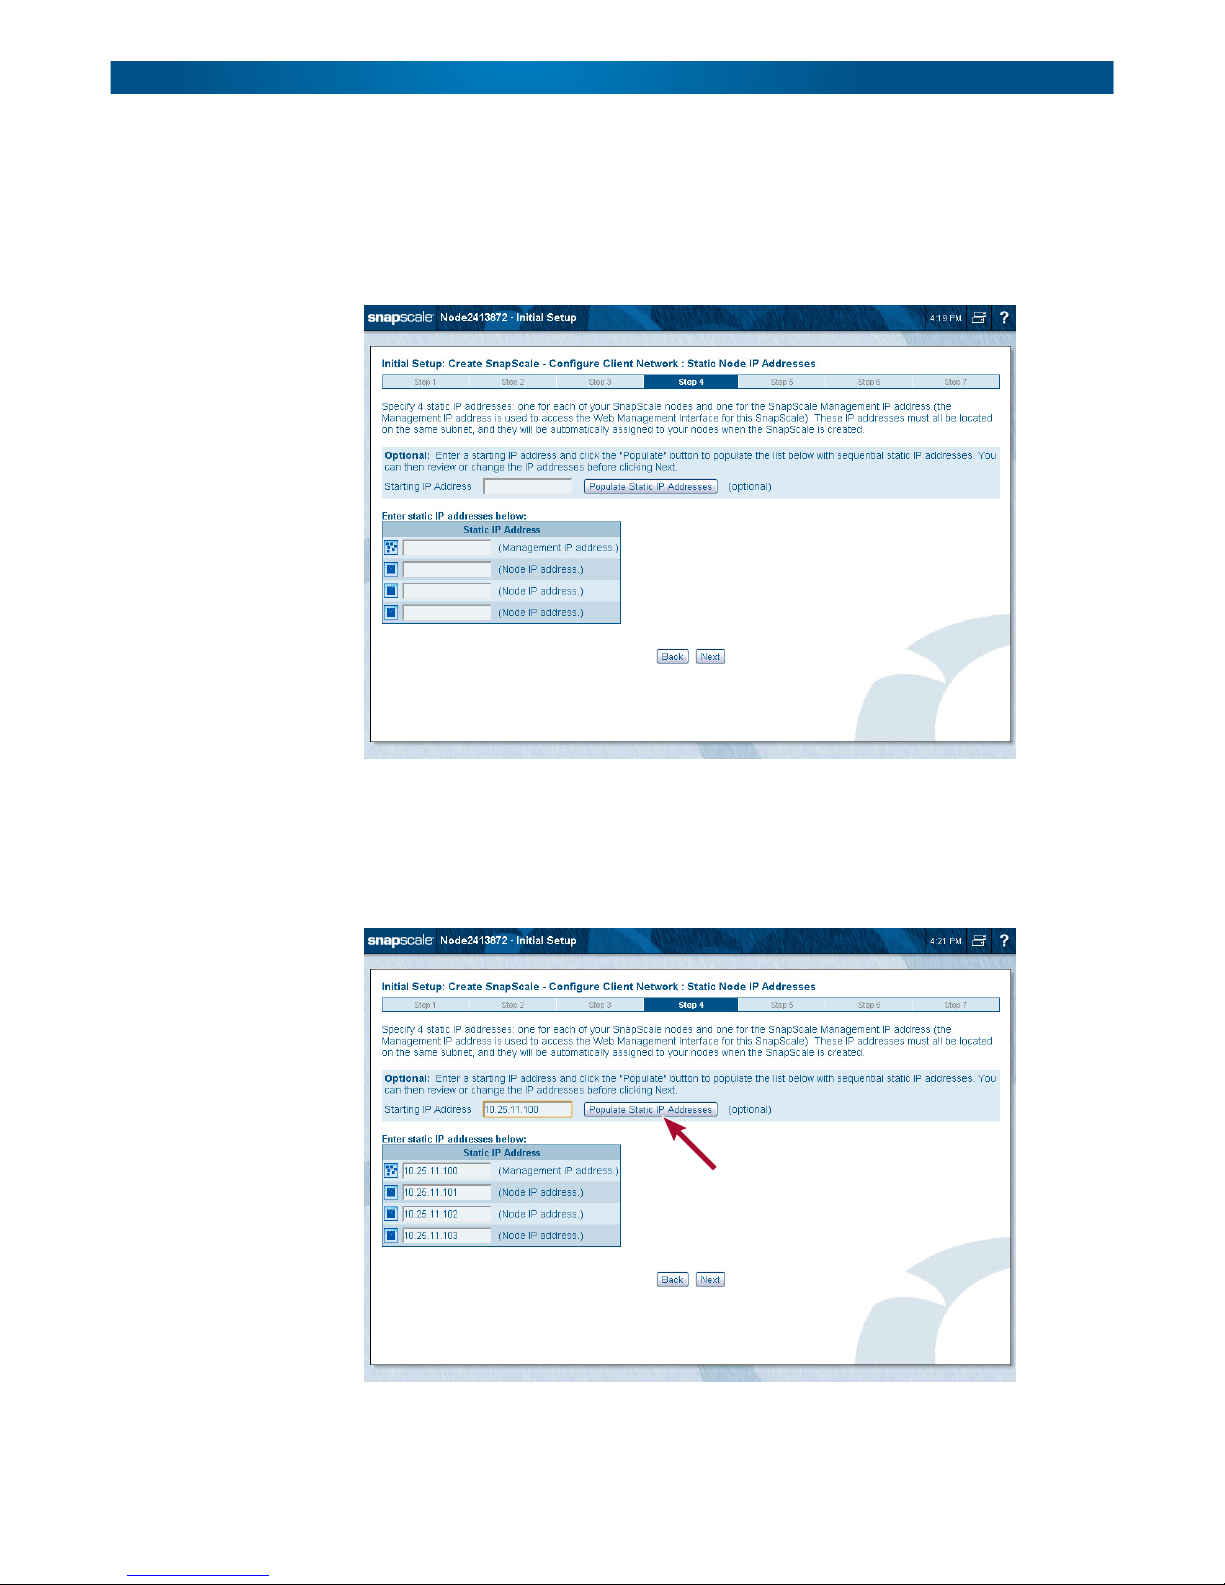
Step 4 – Configure Node Static IP Addresses
A SnapScale cluster requires a set of static IP addresses: one for each node, and one for the
Management IP. Use this page to specify the static IP addresses for each of your nodes and
for the SnapScale Management IP address used to access the Web Management Interface for
this cluster.
These IP addresses must all be located on the same subnet. They are automatically assigned
to your nodes when the SnapScale cluster is created.
The Populate Static IP Addresses button can be used to automatically enter a sequential list
of static IP addresses. Just enter an IP address on the subnet and click Populate Static IP
Addresses
. The fields below it are automatically populated.
Click Next to continue.
10400455-001 Dec 2013 ©Overland Storage, Inc. 2-6
SnapScale/RAINcloudOS 4.0 Administrator’s Guide Create a New SnapScale Cluster (via Wizard)
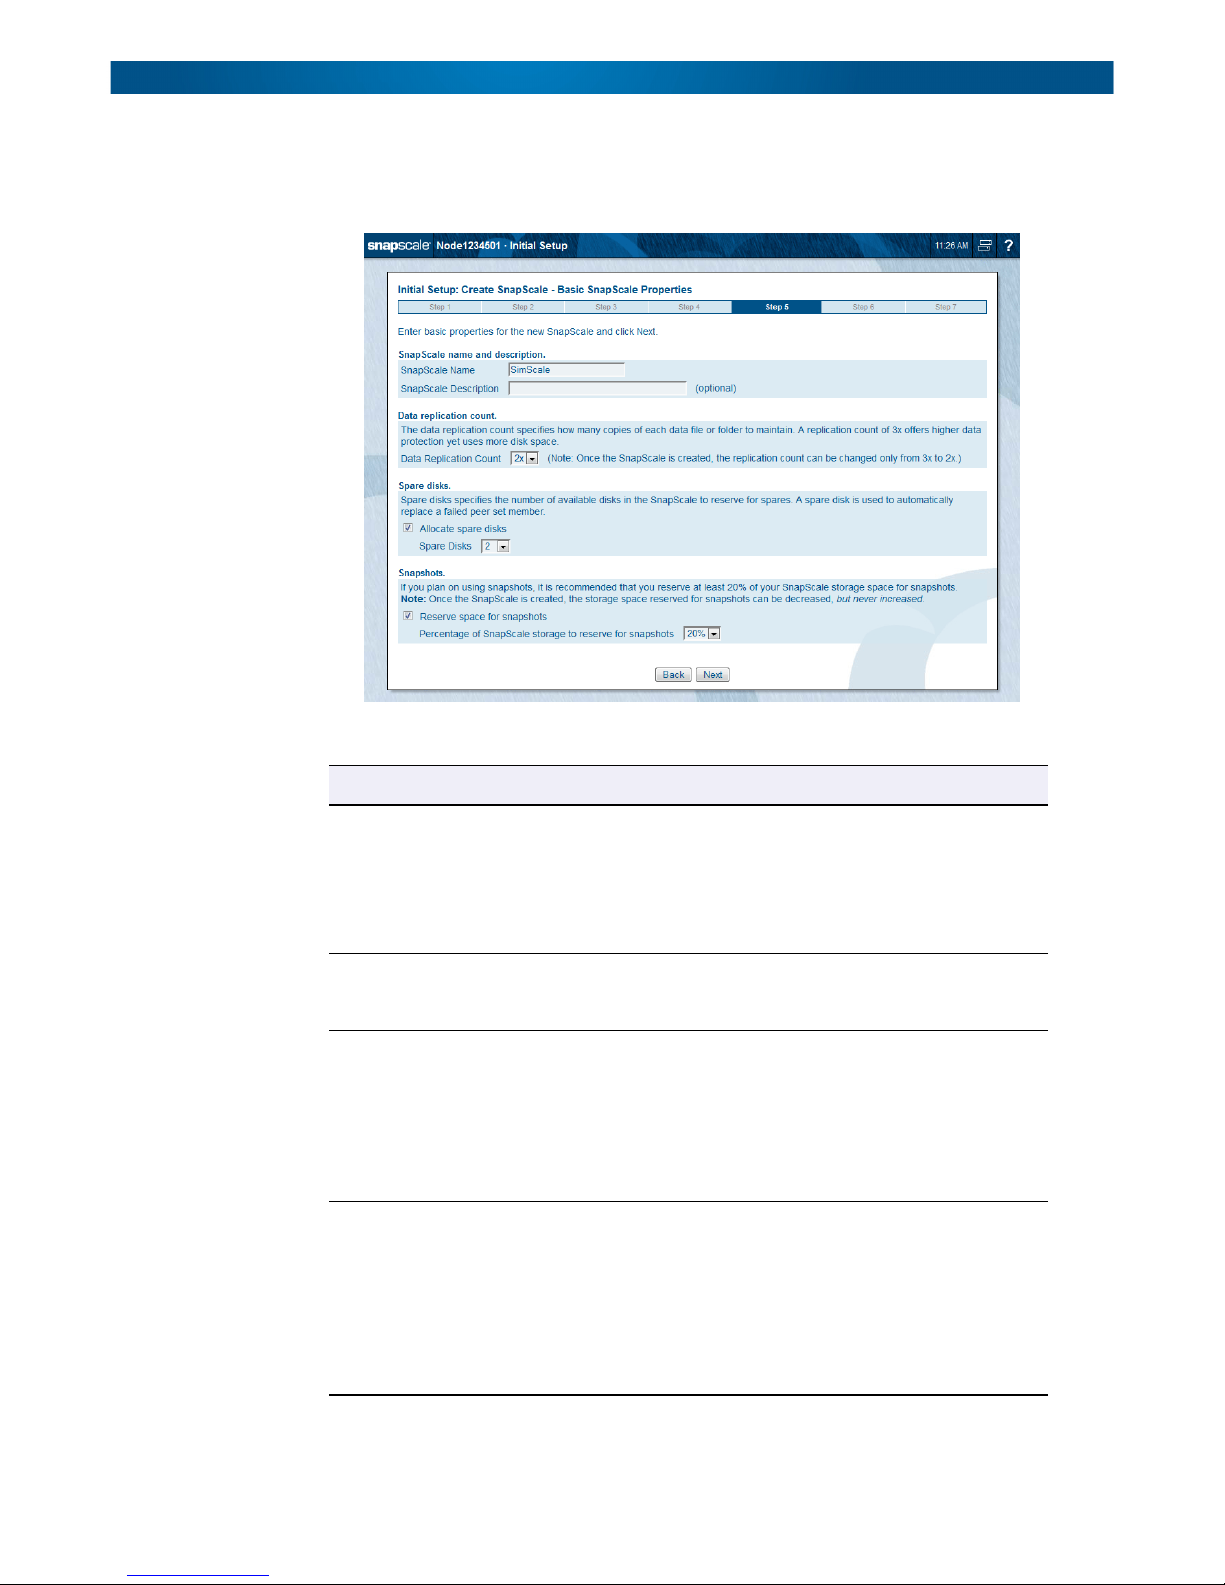
Step 5 – Basic SnapScale Properties
Use this step to enter the basic properties for your new SnapScale cluster, then click Next.
This table lists and describes the basic options:
Option Description
SnapScale Name Either accept the default name or enter an alphanumeric
name up to 15 characters in length. Network clients use this
name with round robin DNS name resolution to connect to
the cluster.
The default name is “Scalennnnnnn” (where nnnnnnn is the
appliance number of the node used to create the cluster).
SnapScale Description This optional field provides a place to define the cluster in the
overall scheme of your network and better identify the cluster
on a LAN.
Data Replication Count The data replication count establishes the level of data
redundancy in the cluster. The setting specifies how many
disks are in a peer set and as a result how many copies of
each data file or folder to maintain. A count of 3x offers
higher data protection but uses more disk space.
Once the cluster is created, the count can only be decreased
from 3x to 2x. It cannot be increased from 2x to 3x.
Spare Disks Allocation Check the box and select the number of spare disks you want
to reserve. A spare disk is used to automatically replace a
failed Peer Set member.
If there are unused drives remaining after allocating the
number of spares requested, they are used for other peer
sets. If there is an insufficient number of drives left to create
a final peer set, the drives are configured as additional
spares.
10400455-001 Dec 2013 ©Overland Storage, Inc. 2-7
SnapScale/RAINcloudOS 4.0 Administrator’s Guide Create a New SnapScale Cluster (via Wizard)
Option Description
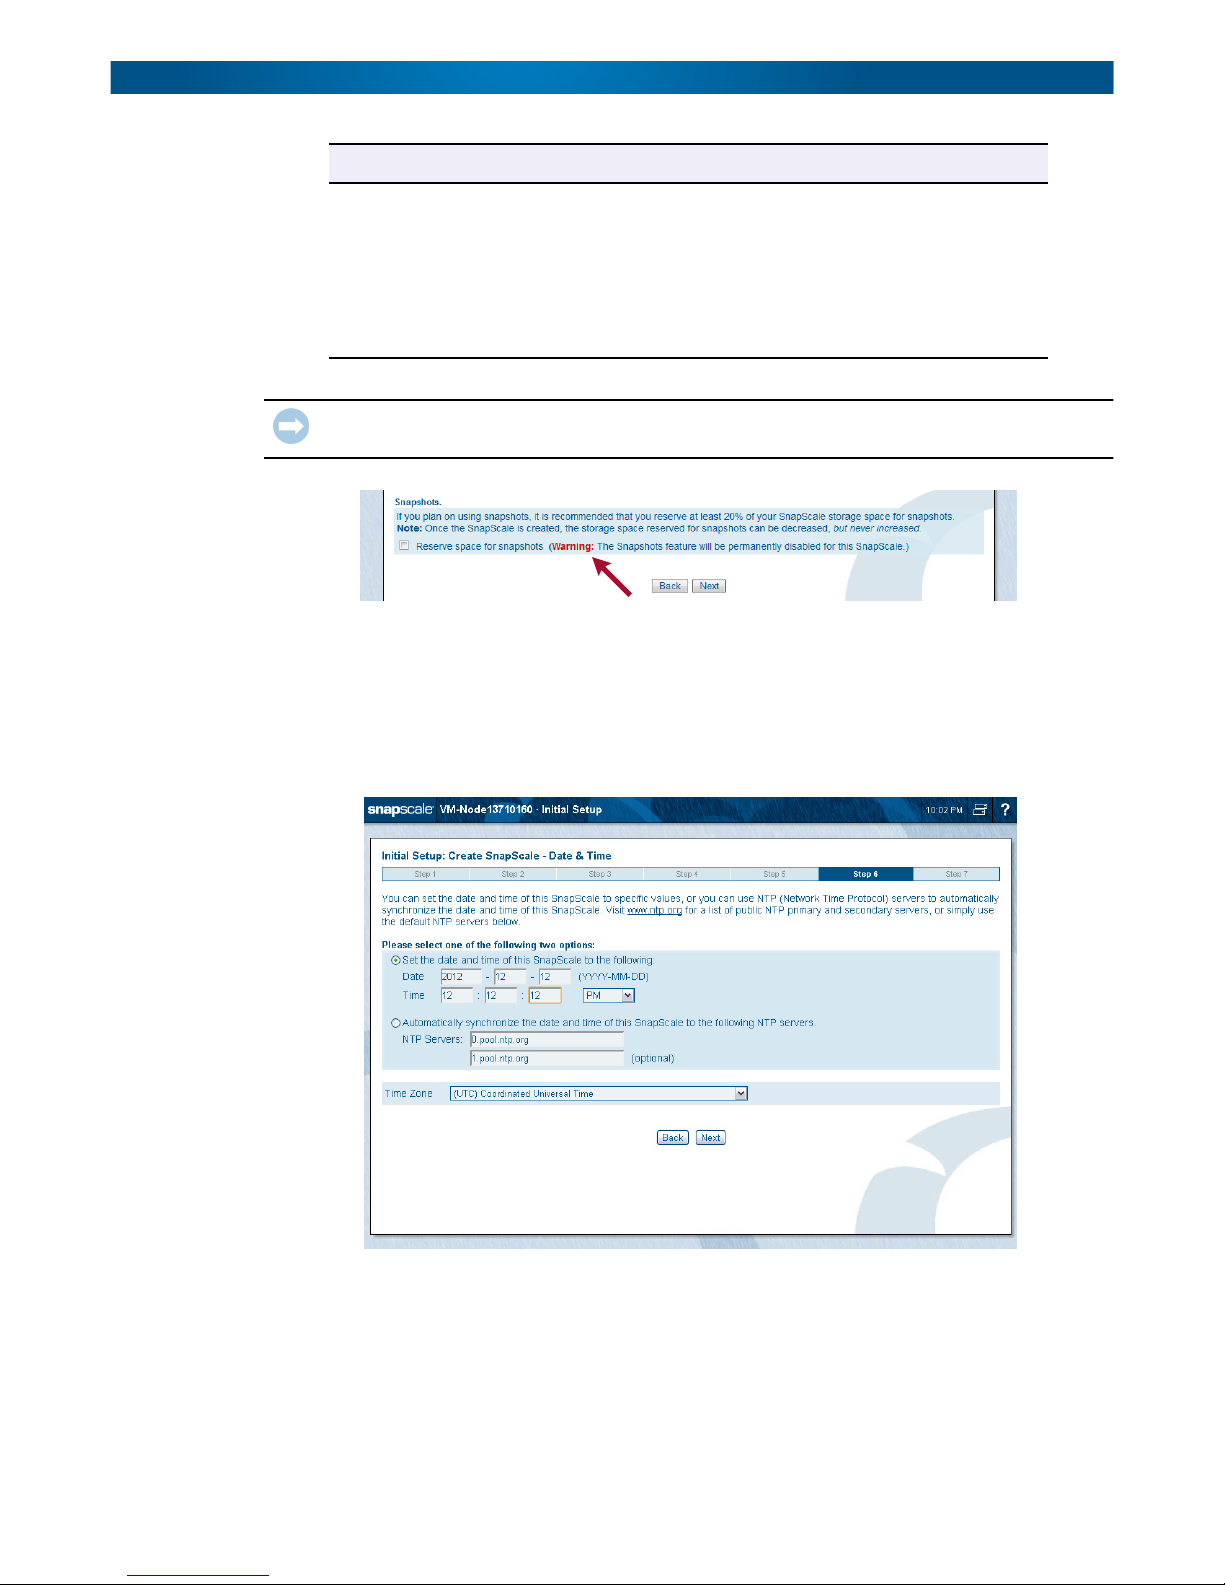
Reserve Space for
Snapshots
IMPORTANT: If you uncheck the box for reserving space for snapshots, an alert is displayed to
remind you that the feature will be permanently disabled for the cluster.
Step 6 – Set Date and Time
Nodes automatically synchronize time with one another. You can either manually set the
date and time to specific values, or you can use NTP (Network Time Protocol) servers to
automatically synchronize the date and time. Visit www.ntp.org for a list of public NTP
primary and secondary servers, or simply use the default NTP servers below.
Check the box and select the percentage of the storage
space you want to reserve for snapshots. It is recommended
that at least 20% of your SnapScale storage space be set
aside for snapshots.
NOTE: Once the SnapScale cluster is created, the storage
space reserved for snapshots can only be
decreased. It can never be increased.
If you intend to join the cluster to a Windows domain, configure the cluster using the manual
settings to set the date and time. Otherwise, configure the cluster to synchronize with up to
two NTP servers.
NOTE: NTP cannot be used if you are joining a Windows Active Directory domain.
Default NTP servers automatically populate the server fields. The Time Zone is set
automatically to UTC time but can be changed using the drop-down list.
10400455-001 Dec 2013 ©Overland Storage, Inc. 2-8
SnapScale/RAINcloudOS 4.0 Administrator’s Guide Create a New SnapScale Cluster (via Wizard)
Click Next to continue.
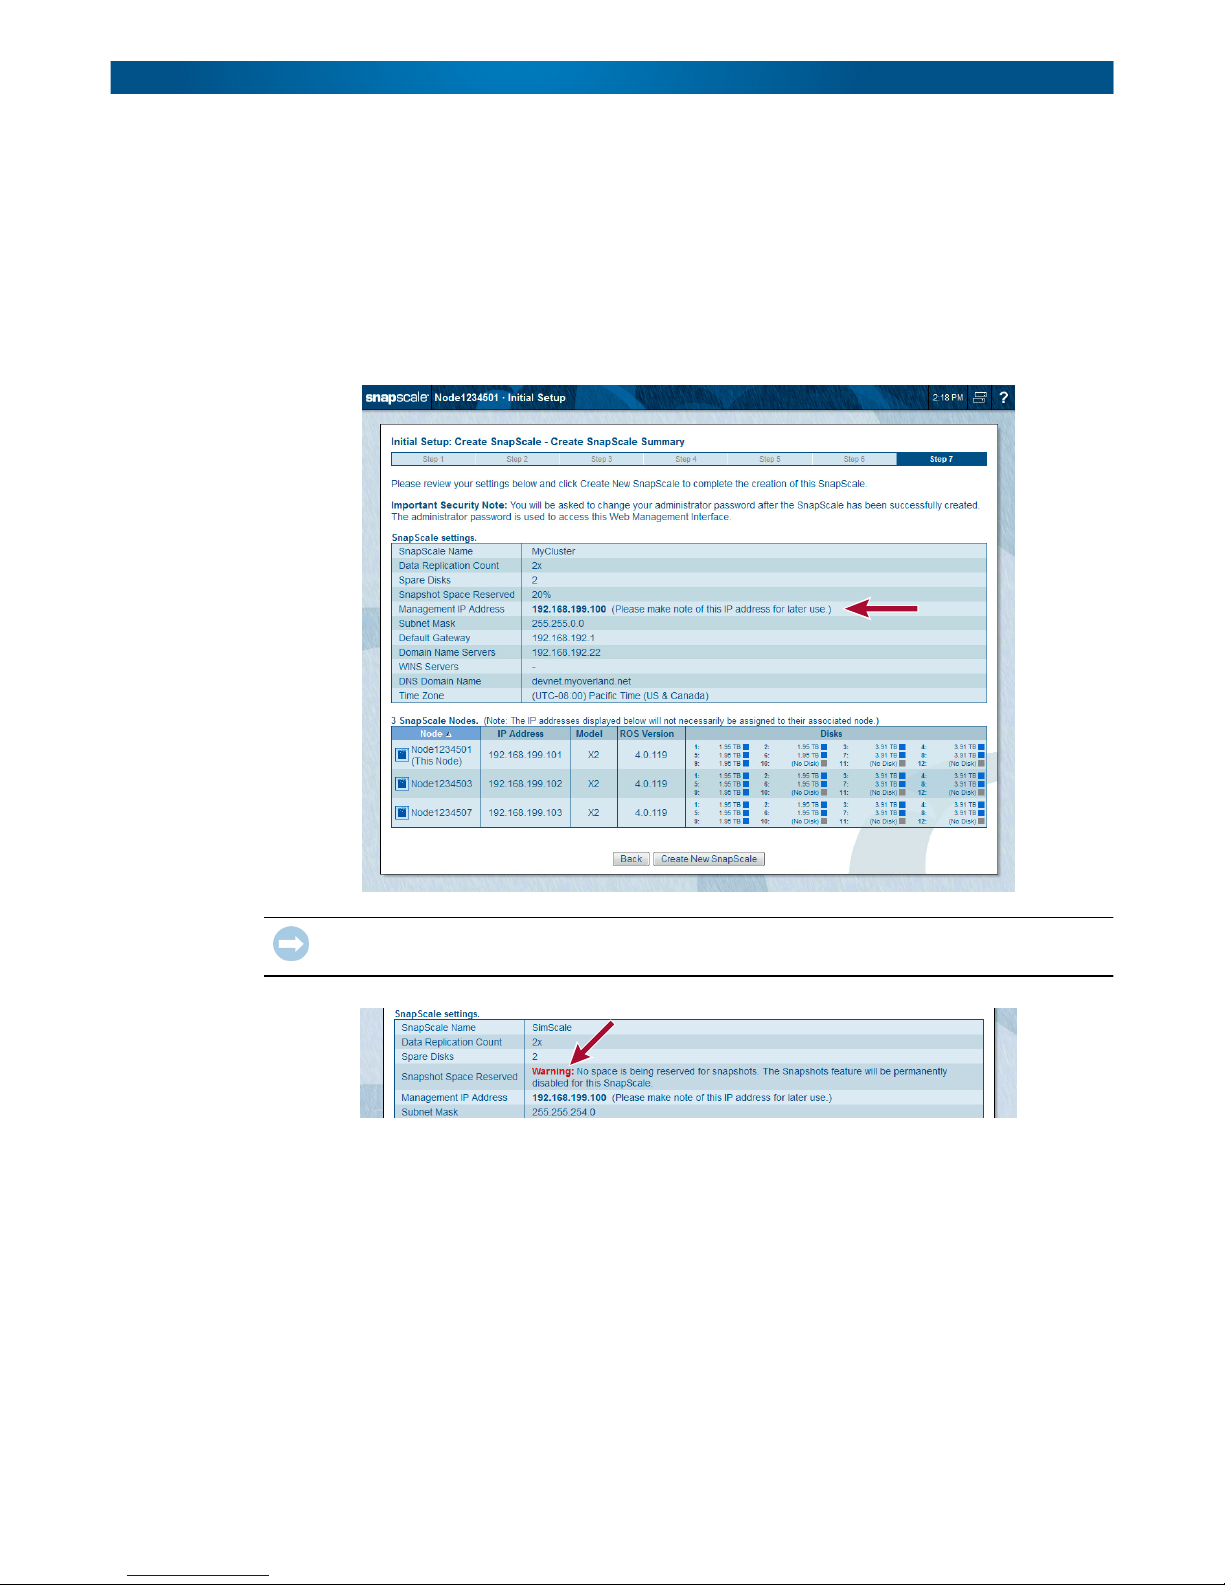
Step 7 – Summary Verification & Cluster Creation
At this step, review the current settings and go back if you need to make changes.
NOTE: Make note of the Management IP address for later use. Also, both the Client and Storage
network bond types can be changed after the cluster is created. See TCP/IP Networking in
Chapter 4.
IMPORTANT: If you uncheck the box for reserving space for snapshots, an alert is displayed to
remind you that the feature will be permanently disabled for the cluster.
10400455-001 Dec 2013 ©Overland Storage, Inc. 2-9
SnapScale/RAINcloudOS 4.0 Administrator’s Guide Create a New SnapScale Cluster (via Wizard)
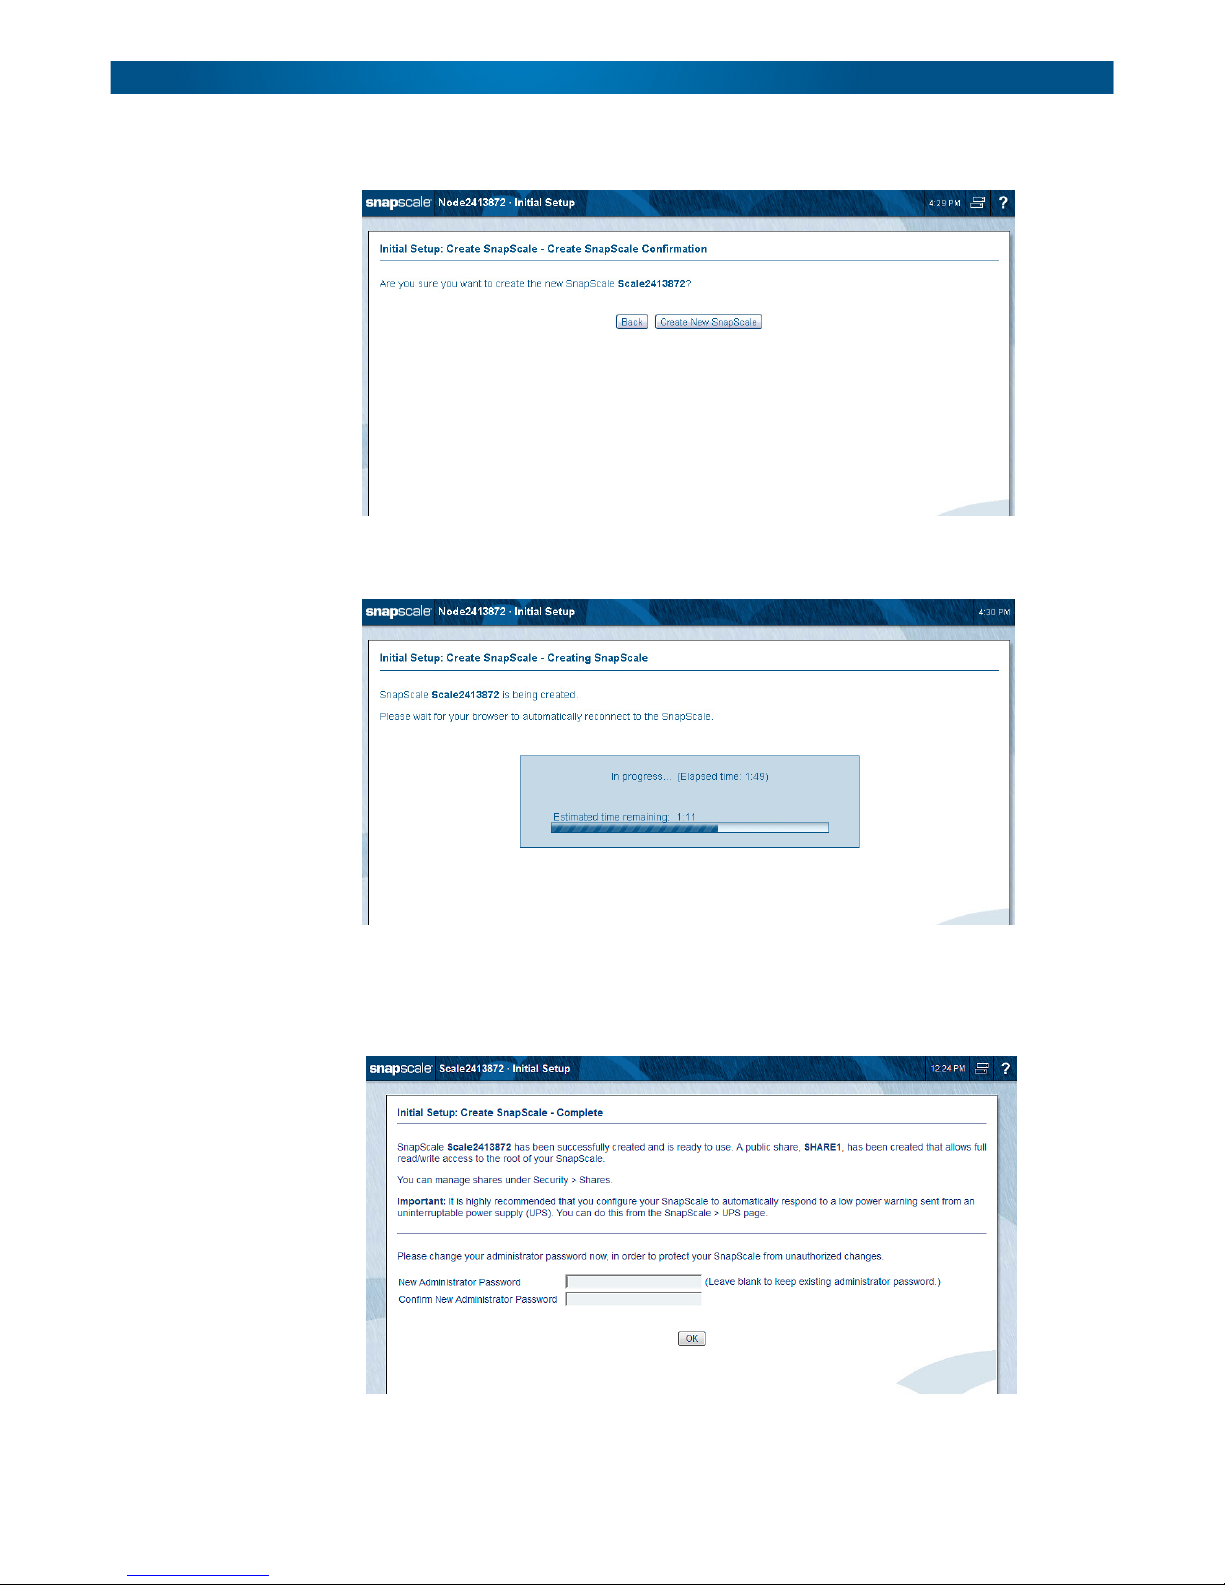
Click Create New SnapScale to complete the process. A confirmation page is shown.
Click Create New SnapScale again to create the cluster. A progress bar is displayed as the
SnapScale cluster is created.
Once the cluster is created and the system changes the uninitialized node IP addresses from
DHCP to the configured static IP address, a completion page is displayed stating that a
share was created and suggesting UPS units be enabled. To enhance security, you are asked
to change the default administrator password after the cluster has been successfully created:
It is highly recommended that you use the password fields at the bottom of the page to
change the Administrator’s password for the cluster.
10400455-001 Dec 2013 ©Overland Storage, Inc. 2-10

SnapScale/RAINcloudOS 4.0 Administrator’s Guide Create a New SnapScale Cluster (via Wizard)
After changing the Administrator’s password and clicking OK, a success page is shown:
Click OK to continue. The Login page is shown. Log in using the new password.
After changing the password and logging back in, the Registration page is displayed to
facilitate activating your warranty:
Complete the registration fields and then click Download Registration File. Email that file
(SnapScaleRegistration.csv) to Overland Storage Service (warranty@overlandstorage.com)
using the subject line “SnapScale Registration Request” to initiate your warranty coverage.
(See To Register Your Cluster in Chapter 8.)
Click Close. You will receive a confirmation email to confirm and complete the registration.
10400455-001 Dec 2013 ©Overland Storage, Inc. 2-11
SnapScale/RAINcloudOS 4.0 Administrator’s Guide Join an Existing SnapScale Cluster (via Wizard)
When you close that page, the Administration page is displayed:
It is recommended that you configure your DNS in your network so clients can resolve the
cluster using round-robin name resolution:
• Add a host record for the cluster management name (<clustername>–mgt) to resolve to
the Management IP address.
• Add multiple host records for the cluster name resolving to each of the node IP
addresses. The DNS resolves lookups for the cluster name via round robin.
Join an Existing SnapScale Cluster (via Wizard)
IMPORTANT: While the Initial Setup Wizard can be used to add one or more new nodes to an
existing cluster, it is recommended that you log into the existing cluster’s Web Management
Interface and add the nodes using the Add Nodes function (Storage > Nodes > Add Nodes).
Refer to Adding Nodes in Chapter 5 for more information.
At any time, one or more new nodes can be added to the cluster to expand the storage pool.
NOTE: To create new peer sets to expand cluster storage, it is recommended that the number of
new nodes you add is equal to the Data Replication Count being used (2x or 3x) and they all
be added at the same time.
When you log into any of the new, uninitialized nodes, the Initial Setup Wizard launches
displaying the Welcome page and its two options. To add this and other nodes to an existing
SnapScale cluster, click Join an Existing SnapScale.
10400455-001 Dec 2013 ©Overland Storage, Inc. 2-12
SnapScale/RAINcloudOS 4.0 Administrator’s Guide Web Management Interface
The Initial Setup Wizard then redirects you to the Add Nodes page in the Web Management
Interface where this node (and all other discovered/new nodes) can be easily added to the
cluster. (See Adding Nodes in Chapter 5 for more information.) You are then directed to select
the nodes to add, set the static IP addresses, and confirm the settings.
NOTE: If no existing SnapScale cluster is detected, a warning is displayed. Verify that the node is
on the same Storage network as the other nodes in the cluster, then click Re-Detect
SnapScale.
Web Management Interface
SnapScale nodes use a web-based graphical user interface (GUI), called the Web
Management Interface, to administer and monitor the cluster. It supports most common web
browsers. JavaScript must be enabled in the browser for it to work.
When connecting to the cluster with a web browser, the Web Home page (see Web Home in
Chapter 9) of the Web Management Interface is displayed. This page shows any shares at
the top, the three primary options below the shares list, and has special navigation buttons
displayed on the right side of the title bar (see the next table).
NOTE: If you have not gone through the initial setup or authentication is required, you may be
prompted to log in when you first access the Web Management Interface.
10400455-001 Dec 2013 ©Overland Storage, Inc. 2-13

SnapScale/RAINcloudOS 4.0 Administrator’s Guide Web Management Interface
The Web Home page displays the following icons and options:
Icons & Options Description
Change Password Click this icon to access the password change page. Passwords
are case sensitive. Use up to 15 alphanumeric characters.
Switch User Click this icon to log out and open the login dialog box to log in as
a different user.
Administration Click this icon to administer the node. If you are not yet logged in,
you are prompted to do so.
Navigation Buttons: The following navigation buttons are present in the upper right on
every Web Management Interface page:
Home – Click this icon to switch between the Web Home page
and the Admin Home page. If you have not yet logged in to the
Admin Home page, only the Web Home page is available.
Snap Finder – Click this icon to view a list of all SnapServers,
SnapScale clusters, and Uninitialized nodes on your network, and
to specify a list of remote servers that can access these servers,
clusters, and nodes on other subnets. You can access these
servers, clusters, and nodes by clicking the listed name or IP
address.
SnapExtensions – Click this to view the SnapExtensions page,
where you can acquire licenses for and configure third-party
applications.
Site Map – Click this icon to view a Site Map of the available
options in the Web Management Interface, where you can
navigate directly to all the major utility pages. The current page is
shown in orange text.
Help – Click this icon to access the web online help for the Web
Management Interface page you are viewing.
10400455-001 Dec 2013 ©Overland Storage, Inc. 2-14

SnapScale/RAINcloudOS 4.0 Administrator’s Guide Web Management Interface
Icons & Options Description
UI Appearance Click the Mgmt. Interface Settings link in the Site Map to
choose a background for the Web Management Interface. You
can select either a solid-colored background or a textured-graphic
background.
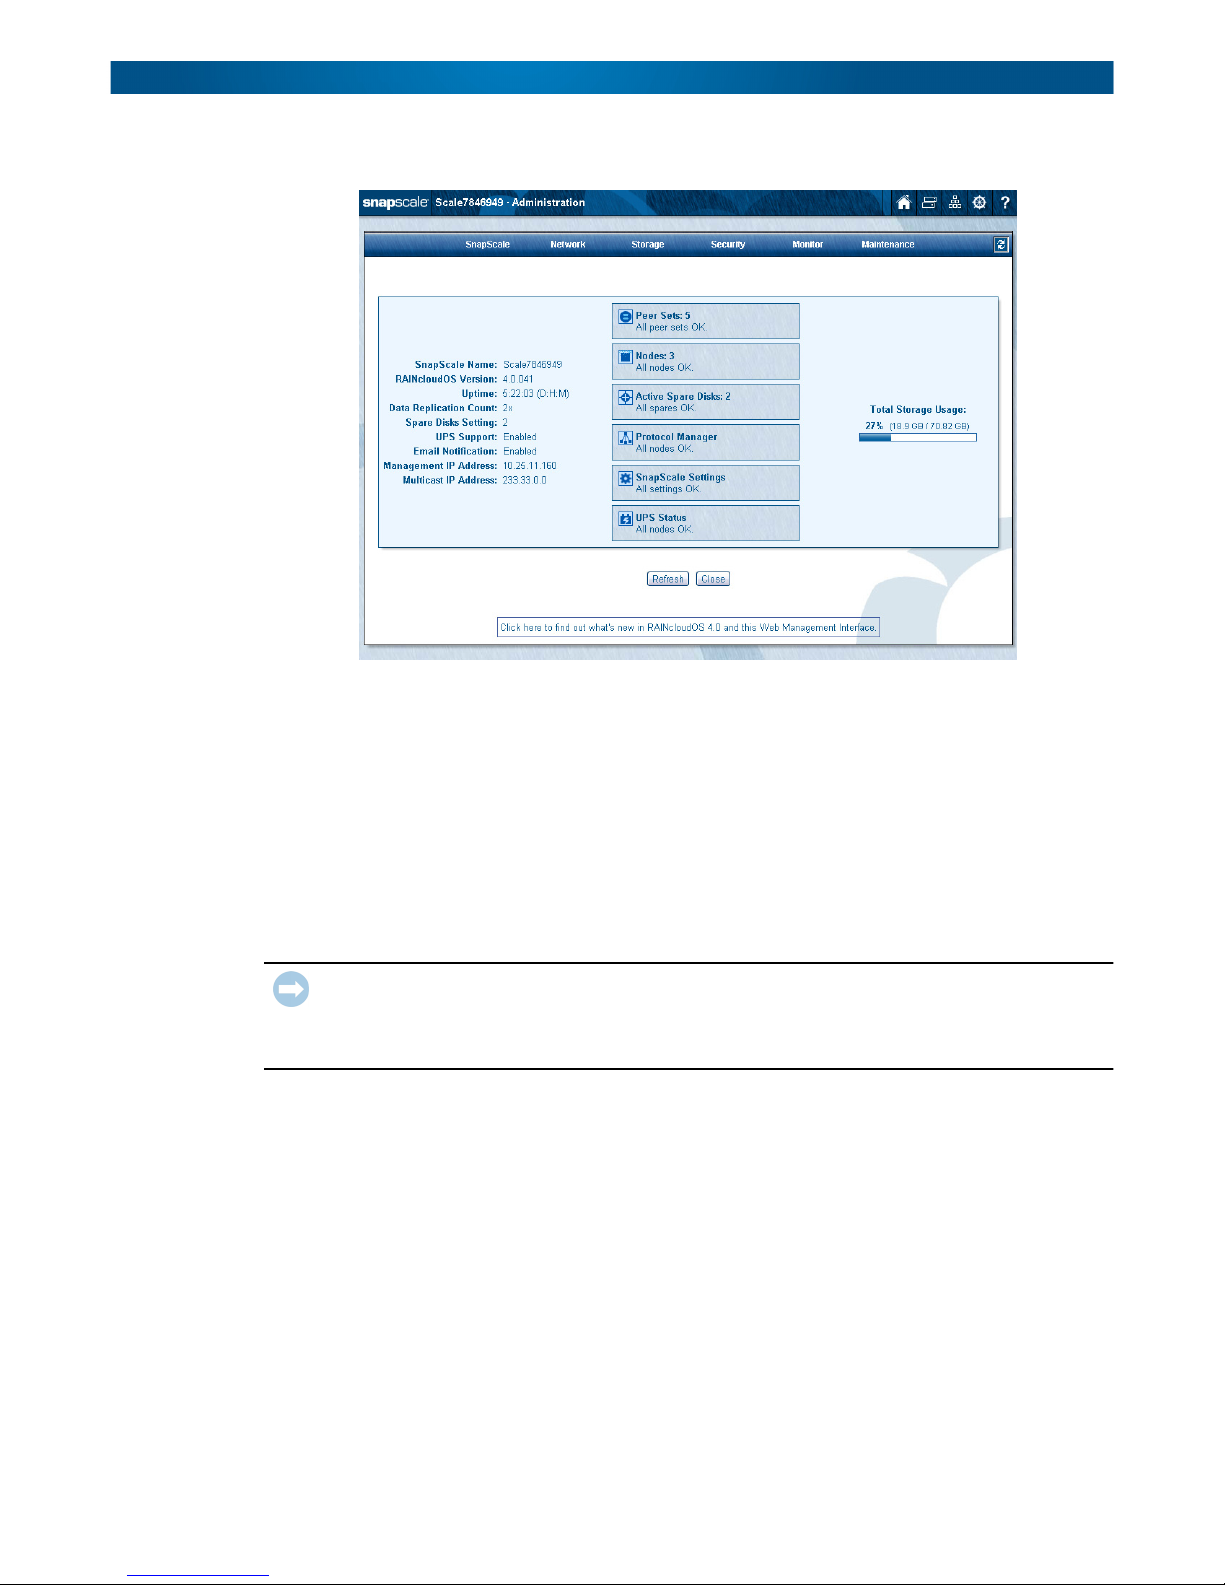
When logged in to the Administration page, details about the cluster’s health are shown:
The same icons are available at the top of the page plus a refresh icon ( ) for auto-refresh
pages located on the tab bar. For more information, see Web Home in Chapter 9.
Alert Messages
Alert messages are displayed on Administrator-level Web Management Interface pages that
display a menu. Some alerts (such as Spare Distributor and Data Balancer) have clickable
options:
• [Later] - Hides the alert for 24 hours or until after feature is run, whichever is first.
• [Hide] - Suppresses the alert. It will not be shown again until after the feature called
out in the alert is run and a new alert for that feature is generated.
10400455-001 Dec 2013 ©Overland Storage, Inc. 2-15

SnapScale/RAINcloudOS 4.0 Administrator’s Guide Web Management Interface
When a cluster is restarted, the Web Management Interface shows the status while the
cluster is booting. Because some components are not immediately available, an alert
message is displayed showing the percent done and as a reminder that the process is not
complete, some nodes may appear offline, and so forth. Some of the status boxes may show
warnings.
Site Map
The RAINcloudOS site map ( ) provides links to all the web pages that make up the Web
Management Interface. All the pages are each covered in detail in the following chapters.
To close the site map, click either Close or outside the map.
10400455-001 Dec 2013 ©Overland Storage, Inc. 2-16

SnapScale/RAINcloudOS 4.0 Administrator’s Guide Web Management Interface
Contact Information
From the Web Management Interface, click the SnapScale logo in the upper left corner of the
Web Management Interface to display the pertinent hardware, software, and contact
information:
Scroll down to view additional contact information. Click either Close or outside the box to
dismiss.
10400455-001 Dec 2013 ©Overland Storage, Inc. 2-17

Chapter 3
SnapScale Settings
This section covers the initial setup and configuration of a SnapScale cluster of three or more
nodes. The four basic options for cluster settings are found under the SnapScale tab. They
can also be accessed using the site map icon ( ).
Topics in SnapScale Settings:
• SnapScale Properties
• Date/Time
• SSH
• UPS
10400455-001 Dec 2013 ©Overland Storage, Inc. 3-1

SnapScale/RAINcloudOS 4.0 Administrator’s Guide SnapScale Properties
SnapScale Properties
These basic options are found under SnapScale Properties:
This table details the options on the
Option Description
SnapScale Name and
Description
Description This optional field provides a place to define the cluster in the
Data Replication Count The data replication count establishes the level of data
Spare Disks Check the box and select the number of spare disks you want
Storage Utilization Use the two drop-down lists to select the percentage of
Either accept the default cluster name or enter an
alphanumeric name up to 15 characters in length. Network
clients can use this name along with round robin DNS name
resolution to connect to the cluster.
The default name is “Scalennnnnnn” (where nnnnnnn is the
appliance number of the node used to create the cluster).
overall scheme of your network and better identify the cluster
on a LAN.
redundancy in the cluster. The setting specifies how many
copies of each data file or folder to maintain. A count of 3x
offers higher data protection but uses more disk space.
Once the cluster is created, the count can only be decreased
from 3x to 2x. It cannot be increased from 2x to 3x.
to reserve. A spare disk is used to automatically replace a
failed Peer Set member.
If there are unused drives remaining after allocating the
number of spares requested, they are used for other peer
sets. If there is an insufficient number of drives left to create a
final peer set, the drives are configured as additional spares.
storage used before a warning or critical notice is sent.
If not done already, use the link in this section to set up email
notification. See Email Notification in Chapter 8.
SnapScale Properties page:
10400455-001 Dec 2013 ©Overland Storage, Inc. 3-2

SnapScale/RAINcloudOS 4.0 Administrator’s Guide Date/Time
Date/Time
You can set the cluster date and time manually or have it set automatically via NTP or
Windows Active Directory domain membership. Nodes automatically synchronize time with
one another.
An ISO 8601 time stamp is applied when recording node activity in the Event Log (
tab), when creating or modifying files, and when scheduling snapshot operations. Use this
page to configure date and time settings:
Monitor
CAUTION: If the current date and time are reset to an earlier date and time, the change does
not automatically propagate to any scheduled events you have already set up for snapshot or
Snap EDR operations. These operations continue to run based on the previous date and time
setting. To synchronize these operations with the new date and time settings, you must reschedule
each operation.
Configure Date and Time Settings Manually
1. Click the Set the date and time button.
2. Edit date and time settings as described in this table:
Option Description
Date Enter the current date in the format indicated.
Time Enter the current time in the format indicated.
Time Zone Select the time zone that you want to use for this node.
3. From the drop-down list, select the Time Zone for the cluster.
4. Click OK when finished.
Once you join a Windows domain, the settings are automatically adjusted to synchronize
with the domain settings.
10400455-001 Dec 2013 ©Overland Storage, Inc. 3-3

SnapScale/RAINcloudOS 4.0 Administrator’s Guide Date/Time
NOTE: RAINcloudOS automatically adjusts for Daylight Saving Time, depending on your time zone.
Configure Date and Time Settings for Automatic Synchronization
If the cluster is not joined to a Windows Active Directory domain, you can use the automatic
synchronization option to configure the cluster to set date and time automatically via
Network Time Protocol (NTP).
:
1. Click the Automatically Synchronize button.
• Default NTP servers are displayed. To accept them, skip to Step 2.
• Otherwise:
• Enter the address for the primary NTP server.
• Optionally, enter a second IP address for a different NTP server as backup.
2. From the drop-down list, select the Time Zone for the cluster.
3. Click OK when finished.
In some cases, this change may require you to log back in to the Web Management
Interface.
10400455-001 Dec 2013 ©Overland Storage, Inc. 3-4

SnapScale/RAINcloudOS 4.0 Administrator’s Guide SSH
SSH
This page provides the ability to enable/disable Secure Shell (SSH) on the cluster for security
purposes. By default, it is enabled.
UPS
SnapScale supports automatic shutdown when receiving a low-power warning from an APC
uninterruptible power supply (UPS). Use SnapScale > UPS to manage this feature:
NOTE: If UPS devices have not been configured, the first time you select this option, you are
automatically shown the UPS Properties page. See Edit UPS Properties on page 3-6.
.
An APC Smart-UPS® series device allows the SnapScale cluster to shut down gracefully in
the event of an unexpected power interruption. You can configure the cluster to
automatically shut down when a low power warning is sent from one or more APC networkenabled or USB-based UPS devices (some serial-only APC UPS devices are also supported by
using the IOGear GUC232A USB to Serial Adapter Cable). To do this, you must enable UPS
support on the cluster, as described in this section, to listen to the IP address of one or more
APC UPS devices, and you must supply the proper authentication phrase configured on the
UPS devices.
10400455-001 Dec 2013 ©Overland Storage, Inc. 3-5

SnapScale/RAINcloudOS 4.0 Administrator’s Guide UPS
NOTE: Select a UPS capable of providing power to a SnapScale node for at least ten minutes. In
addition, in order to allow the cluster sufficient time to shut down cleanly, the UPS must be
configured to provide power for at least five minutes after entering a low battery condition.
Edit UPS Properties
To manage the network UPS devices, click the UPS Properties button:
NOTE: If UPS devices have not been configured, the first time you select that option, you are
automatically shown the UPS Properties page.
.
UPS Properties page options:
Option Description
Enable UPS Support Check the Enable UPS Support box to enable
Low battery response message Check the box to initiate a graceful shutdown
Network UPS Devices (#) This field shows a list of UPS devices that are
UPS Type
(Third column in Node table)
support.
only when both the primary and secondary UPS
devices for a node send a low battery message.
used with the cluster. Use the Add, Change,
and Delete buttons to manage the list.
Use the drop-down list in the third column of the
Node table to select which UPS device is used:
• USB – Select this option to use a directattached (USB) device.
• Network/Single – Use this option to select a
network UPS device.
• Network/Dual – Use this option to activate
the option of a secondary network UPS
device.
10400455-001 Dec 2013 ©Overland Storage, Inc. 3-6

SnapScale/RAINcloudOS 4.0 Administrator’s Guide UPS
Option Description
Primary UPS
(Fourth column in Node table)
Secondary UPS
(Fifth column in Node table)
Procedure to Configure UPS Protection
1. Check Enable UPS Support.
2. If desired, check the low battery message option.
This requires both Primary and Secondary UPS devices to have low batteries before
the notice is sent to initiate a graceful shutdown.
3. If necessary, add network UPS devices.
See Add Network UPS Device below.
4. Select or change the following from the drop-down lists in the UPS device table:
• UPS Type
• Primary UPS
• Secondary UPS
Selecting the Network/Single option under UPS
Type causes a drop-down list to be displayed in
this column. Select the primary UPS to associate
with the node from the list (which is based on
the Network UPS Devices table).
If supported, selecting the Network/Dual option
(under UPS Type) causes a drop-down list to be
displayed in this column. Select the secondary
UPS to associate with the node from the list
(which is based on the Network UPS Devices
table).
5. Click OK to finish.
Add Network UPS Device
Devices need to be added to the Network UPS Devices table on the UPS page for the nodes to
be associated with them.
1. Click the Add button to the right of the Network UPS Devices table.
10400455-001 Dec 2013 ©Overland Storage, Inc. 3-7

SnapScale/RAINcloudOS 4.0 Administrator’s Guide UPS
2. At the Add Network UPS Device page, enter:
• IP Address of the device
• APC User Name (usually the UPS administrator name, default is apc)
• APC Authentication Phrase (found under low battery shutdown configuration in
the APC UPS interface; it is NOT the Administrator password)
3. Click Add.
You are returned to the UPS page and the device is shown in the Network UPS Devices
table. The table title UPS count is increased by one. Repeat the process for additional
devices.
Change Network UPS Device
To change the settings of a network UPS device:
1. Select a device in the Network UPS Devices field to change.
2. Click Change.
3. Edit any of the three options for the device.
4. Click Change again.
Any changes you make are applied to all nodes that are currently using this device.
Delete Network UPS Device
To delete a network UPS device:
1. If the device is still connected to any nodes, deselect the device from the nodes.
2. Highlight the device in the Network UPS Devices field.
3. Click Delete.
The device is deleted from the list.
10400455-001 Dec 2013 ©Overland Storage, Inc. 3-8

Chapter 4
Network Access
This section addresses the options for configuring TCP/IP addressing, network bonding, and
file access protocols. Network bonding options allow you to configure the SnapScale’s Client
network for load balancing/failover, Switch Trunking, and Link Aggregation (802.3ad).
Network file protocols control how network clients can access the cluster. Access to the
cluster’s storage space is provided via Windows (SMB), UNIX (NFS), FTP/FTPS, and the
Web (HTTP/HTTPS).
NOTE: Uninitialized nodes are configured to use DHCP until they are added to a cluster when they
switch to the static IP addresses used by the cluster.1
Topics in Network Access:
• View Network Information
• TCP/IP Networking
• Windows/SMB Networking
• NFS Access
• NIS Domains
• FTP/FTPS Access
• SNMP Configuration
• Web Access
• iSNS Configuration
10400455-001 Dec 2013 ©Overland Storage, Inc. 4-1

SnapScale/RAINcloudOS 4.0 Administrator’s Guide View Network Information
IMPORTANT: The default settings enable access to the SnapScale cluster via all protocols
supported by the cluster. As a security measure, disable any protocols not in use. For example,
if NFS access to the SnapScale is not needed, disable the protocol in the Web Management
Interface under the Network tab.
View Network Information
The Network Information page displays either the SnapScale’s Client or Storage network
settings, and identifies the node currently serving as the management node. The information
is broken into two parts displaying the common and node-specific network information. Use
the View Network drop-down menu on the upper right side to select either the Client or
Storage network details. Error messages are also shown in this area.
Client Network Information
This page shows the information on the public Client network:
Field definitions are given in the following table:
SnapScale Client Network Information Section
Subnet Mask Combines with the IP address to identify the subnet on which
10400455-001 Dec 2013 ©Overland Storage, Inc. 4-2
the cluster's Client network interfaces are located.

SnapScale/RAINcloudOS 4.0 Administrator’s Guide View Network Information
SnapScale Client Network Information Section
Default Gateway The network address of the gateway is the hardware or
software that bridges the gap between two otherwise
unroutable networks. It allows data to be transferred among
computers that are on different subnets.
Domain Name The ASCII name that identifies the DNS domain name that is
added to the cluster name to form the fully-qualified host
name of the cluster. Additional space-separated domain
names are added to the cluster's domain search suffix list.
Domain Name Servers The IP address of up to three servers that maintain a mapping
of all host names and IP addresses for translating domain
names into IP addresses.
WINS Servers The IP address of up to four Windows Internet Naming Service
(WINS) servers which locate network resources in a TCP/IPbased Windows network by automatically configuring and
maintaining name and IP address mapping tables.
Bonding Status Shows Load Balance (ALB), Failover, Switch Trunking, or Link
Aggregation (802.3ad) as the selected bonding.
Management IP Address The IP address configured to access and manage the
SnapScale cluster through the Web Management Interface.
Node-specific Client Network Information Section
Node The name of the specific node. The node designated as the
Management node is so noted.
Ethernet Port Status Shows abbreviated references of the ethernet ports of the
node and their statuses.
• OK – A blue icon ( ) indicates a healthy connection.
• No Link – A yellow icon ( ) indicates no link for that port.
• Failed – A red icon ( ) indicates that the port has failed.
IP Address The unique 32-bit value that identifies the node on a network
subnet. This is automatically assigned to each node from the
pool of IP addresses configured on the cluster.
Speed/Duplex Status Speed: Ethernet link speed.
Duplex Status: Full-duplex; two-way data flow simultaneously.
Ethernet Address The unique six-digit hexadecimal (0-9, A-F) number that
identifies the Ethernet port (xx:xx:xx:xx:xx:xx).
10400455-001 Dec 2013 ©Overland Storage, Inc. 4-3

SnapScale/RAINcloudOS 4.0 Administrator’s Guide View Network Information
Storage Network Information
This page shows the information on the private Storage network:
Field definitions are given in the following table:
SnapScale Storage Network Information
Subnet Mask Combines with the IP address to identify the subnet on which
the cluster's Storage network interfaces are located.
Bonding Status Shows Load Balance (ALB), Failover, Switch Trunking, or Link
Aggregation (802.3ad) as the selected bonding.
Multicast IP Address Multicast address used for inter-node cluster messaging.
Node-specific Client Network Information Section
Node The name of the specific node. The node designated as the
Management node is so noted.
Ethernet Port Status Shows abbreviated references of the ethernet ports of the
node and their statuses.
• OK – A blue icon ( ) indicates a healthy connection.
• No Link – A yellow icon ( ) indicates no link for that port.
• Failed – A red icon ( ) indicates that the port has failed.
IP Address The unique 32-bit value that identifies the node on a network
subnet. This is automatically assigned to each node from the
pool of IP addresses configured on the cluster.
Speed/Duplex Status Speed: Ethernet link speed.
Duplex Status: Full-duplex; two-way data flow simultaneously.
10400455-001 Dec 2013 ©Overland Storage, Inc. 4-4

SnapScale/RAINcloudOS 4.0 Administrator’s Guide TCP/IP Networking
Node-specific Client Network Information Section
Ethernet Address The unique six-digit hexadecimal (0-9, A-F) number that
identifies the Ethernet port (xx:xx:xx:xx:xx:xx).
TCP/IP Networking
SnapScale nodes ship with either four 1GbE or 10GbE ports at the rear for network
connections. The Storage network ports are always bonded using Failover mode. The Client
network ports are bonded by default using Load Balance (ALB), but can be changed after the
cluster is created to one of the other bonding modes:
• Failover
• Switch Trunking
• Link Aggregation (802.3ad)
See Bonding Options on page 4-5 for descriptions.
The TCP/IP Networking page provides configuration of the common cluster network settings,
the static Management IP address, and the pool of static IP addresses to automatically
assign to cluster nodes.
NOTE: If the Client network runs a DHCP server, be sure the static IP addresses assigned to the
nodes and Management IP are excluded from DHCP assignment.
10400455-001 Dec 2013 ©Overland Storage, Inc. 4-5

SnapScale/RAINcloudOS 4.0 Administrator’s Guide TCP/IP Networking
The following table describes the configuration options found on the TCP/IP Networking
page:
Column Description
Subnet Mask Combines with the IP address to identify the subnet on which the
cluster's Client network interfaces are located.
WINS Servers The IP address of up to four Windows Internet Naming Service (WINS)
servers which locate network resources in a TCP/IP-based Windows
network by automatically configuring and maintaining name and IP
address mapping tables.
Default Gateway The network address of the gateway is the hardware or software that
bridges the gap between two otherwise unroutable networks. It allows
data to be transferred among computers that are on different subnets.
DNS Domain Name The ASCII name that identifies the DNS domain name that is added to
the cluster name to form the fully-qualified host name of the cluster,
and also serves as the primary DNS search suffix. Additional spaceseparated domain names can be specified to extend the domain
search suffix list.
Domain Name Servers The IP address of up to three servers that maintain a mapping of all
host names and IP addresses for translating domain names into IP
addresses.
Bond Type Use the drop-down list to select one of the four bonding modes for the
Client network interface on all nodes.
Static IP Address This table shows the SnapScale Management IP address and the pool
of Client network static IP addresses to be automatically assigned by
the cluster to the different nodes.
To change or populate the list with a contiguous range of IP
addresses, in the area to the right, enter a starting IP address and
click Populate Static IP Addresses.
Bonding Options
The bonding options available for SnapScale nodes:
• Failover – This default mode uses one Ethernet port as the primary network interface
and one port held in reserve as the backup interface. Redundant network interfaces
ensure that an active port is available at all times. If the primary port fails due to a
hardware or cable problem, the second port assumes its network identity. The ports on
a node should be connected to different switches (though this is not required).
Default ports are:
• Basic 1GbE X2 or X4 – Port 1.
• Single or Dual 10GbE Card X2 – Port 3.
• Single or Dual 10GbE Card X4 – Port 5.
NOTE: Failover mode provides switch fault tolerance, as long as ports are connected to
different switches.
10400455-001 Dec 2013 ©Overland Storage, Inc. 4-6

SnapScale/RAINcloudOS 4.0 Administrator’s Guide TCP/IP Networking
• (Automatic) Load Balance (ALB) – An intelligent software adaptive agent
repeatedly analyzes the traffic flow from the node and distributes the packets based on
destination addresses, evenly distributing network traffic for optimal network
performance. Both ports of the bond need to be connected to the same switch or logical
switch.
• Switch Trunking – This mode groups multiple physical Ethernet links to create one
logical interface. Provides high fault tolerance and fast performance between switches,
routers, and servers. Both ports of the bond need to be connected to the same physical
or logical switch, and the switch ports must be configured for static link aggregation.
• Link Aggregation (802.3ad) – This method of combining or aggregating multiple
network connections in parallel is used to increase throughput beyond what a single
connection could handle. It also provides a level of redundancy in case one of the links
fails. It uses Link Aggregation Control Protocol (LACP), also called dynamic link
aggregation, to autonegotiate trunk settings. Both ports of the bond need to be
connected to the same switch or logical switch.
Guidelines in TCP/IP Configuration
Consider the following guidelines when connecting a SnapScale cluster to the network.
Configure the DNS for Name Resolution and Round Robin Load Distribution
To evenly distribute client access loads to the cluster nodes, add a DNS A record for the
cluster name for each IP in the node IP address pool. The DNS server then rotates through
the node IP addresses in a round-robin basis when serving name resolution requests for the
cluster name.
Do not add an A record for the cluster name pointing to the Management IP address. If
desired, or if using Snap EDR, add an A record for the cluster name followed by “-MGT” for
the Management IP address. For example, if the cluster name is Scale1234567, create an A
record for hostname “Scale1234567-MGT.”
Make Sure the Switch is Set to Autonegotiate Speed/Duplex Settings
All Ethernet ports on the cluster nodes are set to autonegotiate speed and duplex settings
with the Ethernet switch. The switch to which the SnapScale is connected must be set to
autonegotiate; otherwise, network throughput or connectivity to the node may be seriously
impacted.
Cluster Restart Required when Switching the Storage Network to or from Switch
Trunking or Link Aggregation (802.3ad)
To prevent the interruption of communication on the Storage network during
reconfiguration of the Storage switch, the cluster must be shutdown before changing the
Storage network bond setting to or from Switch Trunking or Link Aggregation (802.3ad).
After all the Storage switches have been reconfigured, restart the cluster normally by
turning the nodes back on.
Configure the Client Switch for Load Balancing
If you select either Switch Trunking or Link Aggregation (802.3ad) network bonding
configuration for the Client network bond, be sure the switch is configured correctly for that
bonding method after configuring the bond on the node. No switch configuration is required
for Adaptive Load Balancing (ALB).
10400455-001 Dec 2013 ©Overland Storage, Inc. 4-7

SnapScale/RAINcloudOS 4.0 Administrator’s Guide TCP/IP Networking
Edit Storage Network Properties
IMPORTANT: Changing the bond type for your SnapScale's storage network may require
changes to your network switch.
The bond type for the Storage network of a SnapScale cluster can be changed as needed.
CAUTION: All cluster nodes must be online when their bond type is changed. After changing
the bond type, the cluster must be restarted. If the switch is being reconfigured, the cluster
must be shut down completely, the Storage network switches reconfigured to the new bond type,
and then all nodes restarted.
The following bond types are supported:
• Failover
• Load Balance (ALB)
• Switch Trunking
• Link Aggregation (802.3ad)
See Client and Storage Networks in Chapter 1 for descriptions.
The following page shows the bonding options available from the drop-down list:
When changing the bond type, depending on the type of change, the following requirements
must be met:
• If changing the Storage network between Failover and ALB, the cluster must reboot.
• If changing the Storage network to or from Switch Trunking or Link Aggregation
(802.3ad), the cluster must be shut down completely, the Storage network switches
reconfigured to the new bond type, and then all nodes restarted.
CAUTION: If you change the bonding mode from the default Failover to ALB, Switch Trunking,
or Link Aggregation (802.3ad), you MUST re-cable the Storage network ports on each node to
the same switch. You CANNOT straddle them across two Storage network switches like you do for
Failover.
10400455-001 Dec 2013 ©Overland Storage, Inc. 4-8

SnapScale/RAINcloudOS 4.0 Administrator’s Guide TCP/IP Networking
Cabling for ALB, Switch Trunking, or Link Aggregation (802.3ad) Example
*
Utility IP Address
To assign an additional static IP address to a specific node, click the Utility IP Address
button on the TCP/IP Networking page.
The Utility IP address can be used to reliably access a specific node by a known IP address,
and is particularly useful for backup agents and media server installations (see Appendix A,
Backup Solutions). The Utility IP address is assigned to the node in addition to its static IP
address automatically assigned from the cluster IP address pool, as well as the Management
IP if the node serves as the Management node.
IMPORTANT: The Utility IP address must be located on the same subnet as the SnapScale
Client network. The address should be assigned BEFORE installing a backup agent or media
server on a node. Once the Utility IP address has been assigned, you must add a host record to the
DNS server for the node name pointing to the Utility IP address (do NOT add it as another host record
for the cluster name).
10400455-001 Dec 2013 ©Overland Storage, Inc. 4-9

SnapScale/RAINcloudOS 4.0 Administrator’s Guide Windows/SMB Networking
Only one Utility IP address can exist on a cluster. The Web Management Interface will not
allow a new Utility IP address to be created if a Utility IP address currently exists, or when
an address does not exist but there are one or more offline nodes (which may have an address
already configured on them). The Utility IP address also must not be the same as the
Management IP address or any existing address in the cluster IP address pool.
To Configure a Utility IP Address:
1. On the Utility IP Address page, in the empty field, enter a static IP address on the
same subnet as the IP address pool on the Client network.
2. Using the drop-down list, select the cluster node to which the Utility IP address will
be assigned.
3. Click OK.
4. At the confirmation page, click Save Changes.
The Utility address is displayed on the Network Information page (Network > Information)
beneath the static address of the node on which it was configured. The Utility IP address
remains with the node, even if the node is restarted or goes offline.
Windows/SMB Networking
Windows/SMB and security settings are configured on the Windows/SMB page of the Web
Management Interface. You can configure the cluster as a member of either a Workgroup or
an Active Directory Domain, as shown below:
10400455-001 Dec 2013 ©Overland Storage, Inc. 4-10

SnapScale/RAINcloudOS 4.0 Administrator’s Guide Windows/SMB Networking
If you run Windows networking in domain mode, you must not configure Date/Time to
synchronize with an NTP server.
Support for Windows/SMB Networking
The default settings make the SnapScale available to SMB clients in the workgroup named
Workgroup. Opportunistic locking is enabled, as is participation in master browser elections.
Consider the following when configuring access for your Windows networking clients.
Support for Microsoft Name Resolution Servers
The SnapScale supports NetBIOS, WINS, and DNS name resolution services. However,
when you use Windows Active Directory Services (ADS), make sure forward and reverse
name lookups are correctly set up.
ShareName$ Support
RAINcloudOS supports appending the dollar-sign character ($) to the name of a share in
order to hide the share from SMB clients accessing the SnapScale.
NOTE: As with Windows servers, shares ending in '$' are not truly hidden, but rather are filtered out
by the Windows client. As a result, some clients and protocols can still see these shares.
To completely hide shares from visibility from any protocols, the Shares page (Security >
Shares)
HTTP/HTTPS clients. However, shares are not hidden from NFS clients, which cannot
connect to shares that are not visible. To hide shares from NFS clients, consider disabling
NFS access on hidden shares.
provides access to a special share option that hides a share from SMB and
For new shares, select Create Share and click the Advanced Share Properties button to
access the Hidden share option. For existing shares, select the share, click Properties, and
click Advanced Share Properties to access the Hidden share option.
10400455-001 Dec 2013 ©Overland Storage, Inc. 4-11

SnapScale/RAINcloudOS 4.0 Administrator’s Guide Windows/SMB Networking
Support for Windows Network Authentication
This section summarizes important facts regarding the RAINcloudOS implementation of
Windows network authentication.
NOTE: When a SnapScale cluster joins a domain, it does so under its cluster name
(Scalennnnnnn). When a domain user is authenticated on a node, the cluster name is used.
As such, a user can use any node of the cluster to be authenticated and log on.
Windows Networking Options
Windows environments operate in either workgroup mode, where each SnapScale cluster
contains a list of local users it authenticates on its own, or ADS domain mode, where domain
controllers centrally authenticate users for all domain members.
Option Description
Workgroup In a workgroup environment, users and groups are stored and
managed separately on each server or cluster in the workgroup.
Active Directory
Service (ADS)
When operating in a Windows ADS domain environment, the
SnapScale is a member of the domain and the domain controller is
the repository of all account information. Client machines are also
members of the domain and users log into the domain through their
Windows-based client machines. ADS domains resolve user
authentication and group membership through the domain
controller.
Once joined to a Windows ADS domain, the SnapScale
authenticate SMB users against the domain and can configure
share access for domain users. Thus, you must use the domain
controller to make modifications to user or group accounts.
Changes you make on the domain controller appear automatically
on the SnapScale.
NOTE: Windows 2000 domain controllers must run SP2 or later.
can
Kerberos Authentication
Kerberos is a secure method for authenticating a request for a service in a network. Kerberos
lets a user request an encrypted “ticket” from an authentication process that can then be
used to request a service from a server or cluster. The user credentials are always encrypted
before they are transmitted over the network.
The SnapScale supports the Microsoft Windows implementation of Kerberos. In Windows
ADS, the domain controller is also the directory server, the Kerberos Key Distribution
Center (KDC), and the origin of group policies that are applied to the domain.
NOTE: Kerberos requires the cluster’s time to be closely synchronized to the domain controller’s
time. This means that (1) the cluster automatically synchronizes its time to the domain
controller's and (2) NTP cannot be enabled when joined to an ADS domain.
Interoperability with Active Directory Authentication
The SnapScale supports the Microsoft Windows 2000/2003/2008 family of servers that run in
ADS mode. any SnapScale can join Active Directory Service domains as a member server.
References to the SnapScale’s shares can be added to organizational units (OU) as shared
folder objects.
NOTE: Windows 2000 domain controllers must run SP2 or later.
10400455-001 Dec 2013 ©Overland Storage, Inc. 4-12

SnapScale/RAINcloudOS 4.0 Administrator’s Guide Windows/SMB Networking
Guest Account Access to the SnapScale
The Windows/SMB page in the Web Management Interface contains an option that allows
unknown users to access the SnapScale using the guest account.
Connect from a Windows Client
Windows clients can connect to the SnapScale using either the cluster name or any IP
address in the node IP address pool. However, if possible, clients should use the cluster name
to benefit from round robin DNS resolution (see Configure the DNS for Name Resolution and
Round Robin Load Distribution on page 4-7).
To navigate to the cluster using Windows Explorer, use one of these procedures:
• For Microsoft Windows Vista, 2008, and 7 clients, navigate to Network > server_name.
• For Microsoft Windows XP, 2000, or 2003 clients, navigate to My Network Places >
workgroup_name > server_name.
Connect a Mac OS X Client Using SMB
Mac OS X clients can connect using SMB. Specify the cluster name (or an IP address from
the node IP address pool) in the Connect to Server window (from Finder press Cmd + K, or
select Finder > Go > Connect to Server) as one of the following:
NOTE: If possible, clients should use the cluster name to benefit from round robin DNS resolution
(see Configure the DNS for Name Resolution and Round Robin Load Distribution on
page 4-7).
• smb://cluster_name
• smb://node_ip_address
Tip: To disconnect from the SnapScale cluster, drag its icon into the Trash.
You can also browse the clusters in the Finder file window, under the Shared tab.
Configure Windows/SMB Networking
Windows SMB and security settings are configured from this page. The cluster can be
configured as part of a Workgroup or an Active Directory Domain.
Before performing the configuration procedures provided here, be sure you are familiar with
the information provided previously in Support for Windows/SMB Networking and Support
for Windows Network Authentication on page 4-12.
To Join a Workgroup
1. Go to Network > Windows/SMB.
10400455-001 Dec 2013 ©Overland Storage, Inc. 4-13

SnapScale/RAINcloudOS 4.0 Administrator’s Guide Windows/SMB Networking
2. At the Member list, verify that the default Workgroup is selected.
3. Edit the fields shown in the following table:
Option Settings
Enable Windows SMB Check the box to enable SMB and activate the options. Clear the
box to disable.
Member Of Verify that it is set to Workgroup.
NOTE: For the Active Directory Domain option, see the following
To Join an Active Directory Domain on page 4-15.
Workgroup Name The default settings make the SnapScale available in the
workgroup named Workgroup. Enter the workgroup name to
which the cluster belongs.
Enable Guest Account Check the box to allow unknown users or users explicitly logging in
as
Guest to access the SnapScale using the guest account. Clear
the box to disable this feature.
Enable Opportunistic
Locking
Allow Root
Authentication
Enable SMB2 Enabled by default. This more robust version of SMB reduces
Enabled by default. Opportunistic locking can help performance if
the current user has exclusive access to a file. Clear the box to
disable this feature.
Check the box to allow root login to the cluster; clear the box to
disable this feature.
NOTE: The root password is synchronized with the cluster’s
admin password.
protocol overhead and is used by default by Windows Vista and
later clients. Clear the box to disable this feature (clients that
default to SMB2 will automatically connect via SMB1).
4. Click OK to update Windows network settings immediately.
10400455-001 Dec 2013 ©Overland Storage, Inc. 4-14

SnapScale/RAINcloudOS 4.0 Administrator’s Guide Windows/SMB Networking
To Join an Active Directory Domain
When the cluster joins a domain, it does so as a single unit under the cluster name, and all
nodes operate equally under the cluster name to authenticate against the domain. This
provides multipoint access to the domain through each node.
1. Go to Network > Windows/SMB.
2. From the drop-down Member list, select Active Directory Domain to view the
configuration page.
NOTE: You cannot select Active Directory Domain if NTP is enabled.
3. Edit the fields shown in the following table:
Option Description
Enable Windows SMB Check the box to enable SMB and activate the options. Clear the
box to disable.
Member Of Verify it shows Active Directory Domain.
Domain Name The default settings make the SnapScale available in the
workgroup named Workgroup. Enter the domain name to which
the cluster belongs.
NOTE: Windows 2000 domain controllers must run SP2 or later.
Administrator Name /
Administrator Password
Organizational Unit To create a machine account at a different location than the
LDAP Signing Set LDAP signing for the ADS domain to Plain (no signing), Sign, or
If joining a domain, enter the user name and password of a user
with domain join privileges (typically an administrative user).
default, enter a name in the field. By default, this field is blank,
signaling the domain controller to use a default defined within the
controller.
NOTE: Sub-organizational units can be specified using Full
Distinguished Name LDAP syntax or a simple path
([organizational_unit]/[sub-unit1]/[sub-unit1a])
Seal, as appropriate for your domain. Default setting is Plain.
10400455-001 Dec 2013 ©Overland Storage, Inc. 4-15

SnapScale/RAINcloudOS 4.0 Administrator’s Guide NFS Access
Option Description
Enable Guest Account Check the box to allow unknown users or users explicitly logging in
as
Guest to access the SnapScale using the guest account. Clear
the box to disable.
Enable Opportunistic
Locking
Enable this SnapScale
as the Master Browser
Allow Root
Authentication
Disable NetBIOS over
TCP/IP
(Active Dir Domain only)
Enable Trusted
Domains
(Active Dir Domain only)
Enable SMB2 Enabled by default. This more robust version of SMB reduces
Enabled by default. Opportunistic locking can help performance if
the current user has exclusive access to a file. Clear the box to
disable opportunistic locking.
Enabled by default. The SnapScale can maintain the master list of
all computers belonging to a specific workgroup. (At least one
Master Browser must be active per workgroup.) Check the box if
you plan to install this cluster in a Windows environment and you
want this cluster to be able to serve as the Master Browser for a
workgroup. Clear the box to disable this feature.
Check the box to allow root login to the cluster.
NOTE: The root password is synchronized with the cluster’s
admin password.
Some administrators may wish to disable NetBIOS over TCP/IP.
Check the box to disable NetBIOS; clear the box to leave NetBIOS
enabled.
NOTE: If you disable NetBIOS and you are joining a domain, you
must enter the domain name as a fully qualified domain
name (such as, actdirdomname.companyname.com). A
short form such as ActDirDomName does not work.
SnapScale clusters recognize trust relationships established
between the domain to which the SnapScale is joined and other
domains in a Windows environment by default. Check the box to
enable this feature; clear the box to disable this feature.
NOTE: SnapScale clusters remember trusted domains. That is,
if this feature is disabled and then activated at a later
time, the previously downloaded user and group lists, as
well as any security permissions assigned to them, is
retained.
protocol overhead and is used by default by Windows Vista and
later clients. Clear the box to disable this feature (clients that
default to SMB2 will automatically connect via SMB1).
4. Click OK to update Windows network settings immediately.
NFS Access
NFS access to the cluster is configured on the NFS page of the Web Management Interface.
By default, NFS access is enabled and any NFS client can access the SnapScale via NFSv3
with non-root access.
NOTE: NFSv3 is enabled by default. NFSv2 and NFSv4 are not supported.
10400455-001 Dec 2013 ©Overland Storage, Inc. 4-16

SnapScale/RAINcloudOS 4.0 Administrator’s Guide NFS Access
NFS client access to shares can be specified by navigating to Security > Shares and clicking
the NFS Access link next to the share. You must configure the SnapScale cluster for the code
page being used by NFS clients.
Support for NFS
The NFS protocol does not support user-level access control, but rather supports host- and
subnet-based access control. On a standard UNIX server, this is configured in an exports file.
On SnapScale, the exports for each share are configured on the NFS Access page
independently of user-based share access for other protocols.
SnapScale supports these versions of the NFS protocol and related services:
Protocol Version Source
NFS 3.0 RFC 1094, RFC 1813, RFC 3530
Mount 1.0, 2.0, 3.0 RFC 1094 Appendix A, RFC 1813, RFC 3530
Lockd 1.0, 4.0 RFC 1094, RFC1813, RFC 3530
NFS Share Mounting
A share on a SnapScale is equivalent to an exported filesystem on an NFS server. NFS users
can mount SnapScale shares, or mount a subdirectory of a share, and access content directly
using the following procedure:
1. To mount an NFS client, enter the following command:
mount cluster_name:/share_name /local_mount
where cluster_name is the cluster name (or any address in the node IP address pool),
share_name is the name of the share you want to mount, and local_mount is the name
of the mount target directory.
NOTE: If possible, clients should use the cluster name to benefit from round robin DNS
resolution (see Configure the DNS for Name Resolution and Round Robin Load
Distribution on page 4-7). Syntax can vary depending upon the operating system.
2. Press Enter to connect to the specified share on the cluster.
10400455-001 Dec 2013 ©Overland Storage, Inc. 4-17

SnapScale/RAINcloudOS 4.0 Administrator’s Guide NIS Domains
NIS Domains
NIS domains are configured on the NIS page of the Web Management Interface.
The SnapScale cluster can join an NIS domain and function as an NIS client. It can then
read the users and groups maintained by the NIS domain. As such, you must use the NIS
server to make modifications. Changes you make on the NIS server do not immediately
appear on the SnapScale nodes; it may take up to 10 minutes for changes to be replicated.
Guidelines for Configuring NIS
Unless UID/GID assignments are properly handled, NIS users and groups may fail to
display properly. For guidelines on integrating compatible SnapScale node UIDs, see User
and Group ID Assignments in Chapter 6.
NIS identifies users by UID, not user name, and although it is possible to have duplicate
user names, Overland Storage does not support this configuration.
To Join an NIS Domain
1. Go to Network > NIS.
2. Edit the settings shown in the following table:
Options Description
Enable NIS Check the box to enable NIS.
NIS Domain Name Enter the NIS domain name.
NIS Server To bind to an NIS server, select either:
• Broadcast and Bind to Any NIS server to bind to any
available NIS servers.
• Broadcast and Bind to the following NIS server to bind to
a specific NIS server. Enter the NIS server IP address in the field
provided.
3. Click OK to update the settings immediately.
10400455-001 Dec 2013 ©Overland Storage, Inc. 4-18

SnapScale/RAINcloudOS 4.0 Administrator’s Guide FTP/FTPS Access
FTP/FTPS Access
FTP and FTPS settings are configured on the FTP page (Network > FTP) of the Web
Management Interface. FTPS adds encryption to FTP for increased security.
By default, FTP and FTPS clients can access the cluster using the anonymous user account,
which is mapped to the SnapScale cluster’s guest user account and AllUsers group account.
You can set share access and file access for anonymous FTP users by modifying permissions
for these accounts. For more granular control over FTP access, you must create local user
accounts for FTP users.
SnapScale also supports explicit FTPS (such as, FTPES or Auth TLS).
NOTE: If standard FTP is enabled, only the data channel is encrypted for FTPS connections – the
control channel (including user password) is not encrypted. To force FTPS to encrypt the
control channel as well, disable standard FTP.
Supported FTP Clients
SnapScale clusters have been tested with the most common FTP clients and work as
expected based on the commands required by RFC 959. SnapScale clusters have been proven
to work with these products for standard FTP.
NOTE: Most standard FTP clients do not support FTPS. A client designed to support FTPS is
required for FTPS connections.
To Configure FTP/FTPS Access
1. Go to Network > FTP.
2. Edit the settings shown in the following table:
Option Settings
Enable FTP Check the box to enable standard FTP services; leave the box blank
to disable access to this cluster via standard FTP.
Enable FTPS Check the box to enable FTPS services; leave the box blank to
disable access to this cluster via FTPS.
10400455-001 Dec 2013 ©Overland Storage, Inc. 4-19

SnapScale/RAINcloudOS 4.0 Administrator’s Guide SNMP Configuration
Option Settings
Allow Anonymous User
Access
3. Click OK to update the settings immediately.
To Connect via FTP/FTPS
1. To connect to the cluster:
• For standard FTP, enter the cluster’s name or IP address in the FTP Location or
Address box of a web browser or FTP client application.
• To connect via a command line, enter:
ftp cluster_name
• To connect via a Web browser, enter:
ftp://cluster_name
(where cluster_name is the name or IP address of the cluster)
• For secure FTPS, configure your FTPS client application to use explicit FTPS
(such as, FTPES or “Auth TLS”) and enter the cluster’s name or IP address.
When you allow anonymous login, FTP/FTPS users employ an email
address as the password. When you disallow anonymous login, only
FTP/FTPS users who are configured as local SnapScale users can
access the cluster.
• Check the box to allow users to connect to the cluster using the
anonymous user account. The anonymous user is mapped to the
cluster’s local guest user account. You can set share access for
anonymous FTP/FTPS users by granting either read-write (the
default access) or read-only access to the guest account on a
share-by-share basis.
• Leave the box blank so users cannot log in anonymously but
must instead log in via a locally created user name and
password.
NOTE: With anonymous login enabled, access to folders is determined by the share access
settings for the guest account. With anonymous login disabled, log into the cluster using
a valid local user name and password.
2. Press Enter to connect to the FTP root directory.
All shares and subdirectories appear as folders.
NOTE: FTP users cannot manage files or folders in the FTP root directory.
SNMP Configuration
The SnapScale can act as an SNMP agent. SNMP managers collect data from agents and
generate statistics and other monitoring information for administrators. Agents respond to
managers and may also send traps, which are alerts that indicate error conditions. The
cluster communicates with SNMP managers in the same community. A community name is
a password that authorizes managers and agents to interact. The cluster only responds to
managers that configure the same community strings.
10400455-001 Dec 2013 ©Overland Storage, Inc. 4-20

SnapScale/RAINcloudOS 4.0 Administrator’s Guide SNMP Configuration
SNMP configuration is accessed by navigating to Network > SNMP.
SNMP trap options are hidden until the Enable SNMP Traps option is selected.
Default Traps
A trap is a signal from the SnapScale cluster or any individual node informing an SNMP
manager program that an event has occurred. RAINcloudOS supports the default traps
shown in this table:
Trap Initiating Action
coldStart Whenever SNMP is enabled and a node boots.
10400455-001 Dec 2013 ©Overland Storage, Inc. 4-21

SnapScale/RAINcloudOS 4.0 Administrator’s Guide SNMP Configuration
Trap Initiating Action
linkDown A node’s Ethernet interface has gone offline.
linkUp A node’s Ethernet interface has come back online.
authenticationFailure An attempt to query the SNMP agent using an incorrect read-only
or read-write community string was made, and resulted in a failure.
enterpriseSpecific SnapScale-generated traps that correspond to the error-level,
warning-level, and fatal-error-level traps of RAINcloudOS. These
traps contain a descriptive message that helps to diagnose a
problem using the following OID’s:
• 1.3.6.1.4.1.6411.2000.1000.1:loglevel 0 syslog messages
(emergency)
• 1.3.6.1.4.1.6411.2000.1001.1:loglevel 1 syslog messages
(alert)
• 1.3.6.1.4.1.6411.2000.1002.1:loglevel 2 syslog messages
(critical)
• 1.3.6.1.4.1.6411.2000.1003.1:loglevel 3 syslog messages
(error)
NOTE: There is no specific MIB that defines traps sent by
SnapScale clusters or nodes.
Supported Network Manager Applications and MIBs
SnapScale clusters respond to requests for information in MIB-II (RFC 1213) and the Host
Resources MIB (RFC 2790 or 1514). You can use any network manager application that
adheres to the SNMP V2 protocol with the SnapScale. The following products have been
successfully tested with SnapScale clusters: CA Unicenter TNg, HP Open View, and Tivoli
NetView.
Configure SNMP
1. Navigate to Network > SNMP.
2. Check the Enable SNMP box.
3. Edit the settings as described in the following table, and then click OK. Once enabled,
SNMP managers can access MIB-II and Host Resources MIBs management data on
the cluster.
Option Description
Read-Only Community To enable SNMP managers to read data from this cluster,
enter a read-only community string or accept the default
snap_public.
NOTE: As a precaution against unauthorized access,
Overland Storage recommends that you create
your own community string.
Read-Write Community A read-write string is used for compatibility purposes. Enter
a read-write community string or accept the default
snap_private.
NOTE: As a precaution against unauthorized access,
Overland Storage recommends that you create
your own community string.
10400455-001 Dec 2013 ©Overland Storage, Inc. 4-22

SnapScale/RAINcloudOS 4.0 Administrator’s Guide Web Access
Option Description
Location Enter information that helps a user identify the physical
location of the cluster nodes. For example, you might
include a street address for a small business, a room
location such as Floor 37, Room 308, or a position in a
rack, such as rack slot 12.
Contact Enter information that helps a user report problems with
the cluster. For example, you might include the name and
title of the system administrator, a telephone number,
pager number, or email address.
Enable SNMP Traps Check the box to enable traps. Clear the box to disable
SNMP traps.
IP Address 1-4
(only when SNMP Traps are
enabled)
Send a Test Trap
(only when SNMP Traps are
enabled)
Enter the IP address of at least one SNMP manager in the
first field as a trap destination. You can enter up to three
additional IP addresses.
To verify your settings, check the box. A test message is
sent when you click OK.
Web Access
HTTP and HTTPS are used for browser-based access to the cluster via Web View, Web Root,
or the Web Management Interface. HTTPS enhances security by encrypting communications
between client and cluster, and cannot be disabled. You can, however, disable HTTP access
on this Web page. Additionally, you can require browser-based clients to authenticate to the
cluster.
Configuring HTTP/HTTPS
You can require web authentication, disable HTTP (non-secure) access, and enable the Web
Root feature. All HTTP access is made via the root node and the Management IP address.
To Require Web Authentication
Edit the following option and click OK.
10400455-001 Dec 2013 ©Overland Storage, Inc. 4-23

SnapScale/RAINcloudOS 4.0 Administrator’s Guide Web Access
Option Description
Require Web
Authentication
Check the Require Web Authentication box to require clients to
enter a valid user name and password in order to access the
cluster via HTTP/HTTPS. Leave the box blank to allow all
HTTP/HTTPS clients access to the cluster without authentication.
NOTE: This option applies to both Web View and Web Root
modes.
To Enable HTTP Access to the SnapScale Cluster
Edit the following option and click OK.
Option Description
Enable (non-secure)
HTTP Access
Check the Enable HTTP Access box to enable non-secure
HTTP access. Leave the box blank to disable access to the cluster
via HTTP.
NOTE: This option applies to both Web View and Web Root
modes.
To Connect via HTTPS or HTTP
1. Enter the cluster name, Management IP address, or any IP address from the node IP
address pool in a Web browser.
Web access is case-sensitive. Capitalization must match exactly for a Web user to gain
access. To access a specific share directly, Internet users can append the full path to
the SnapScale name or URL, as shown in the following examples:
https://Node2302216/Share1/my_files
https://10.10.5.23/Share1/my_files
2. Press Enter.
The Web View page opens.
Using Web Root to Configure the SnapScale as a Simple Web Server
When you enable the Web Root feature from the Web page, you can configure your
SnapScale cluster to open automatically to an HTML page of your choice when a user enters
the following in the browser field:
http://[cluster_name] or http://[IP address]
In addition, files and directories underneath the directory you specify as the Web Root can be
accessed by reference relative to http://[cluster_name] without having to reference a
specific share. For example, if the Web Root points to the directory WebRoot on share
SHARE1, the file SHARE1/WebRoot/photos/slideshow.html can be accessed from a web
browser:
http://[cluster_name]/photos/slideshow.html
The Web Root can also be configured to support directory browsing independent of Web View
(access through shares).
10400455-001 Dec 2013 ©Overland Storage, Inc. 4-24

SnapScale/RAINcloudOS 4.0 Administrator’s Guide Web Access
NOTE: SnapScale supports direct read-only web access to files. It is not intended for use as an
all-purpose Web Server, as it does not support PERL or Java scripting, animations,
streaming video, or anything that would require a special application or service running on
the SnapScale cluster.
Configuring Web Root
Check the Enable Web Root box to configure the SnapScale to serve the Web Root directory
as the top level web access to the SnapScale cluster, and optionally, automatically serve an
HTML file inside. When the box is checked, the options described below appear.
1. Complete the following information, then click OK.
Option Description
Allow Directory Listings If Allow Directory Listings is checked and no user-defined
index pages are configured or present, the browser opens to a
page allowing browsing of all directories underneath the Web
Root.
NOTE: Checking or unchecking this option only affects
directory browsing in Web Root. It does not affect
access to Web View directory browsing.
Create and configure a
Web Root share
Select one of the following:
• Automatically create and configure a Web Root
share: A share named “WebRoot” is automatically created.
By default, the share is hidden from network browsing and
has all network access protocols except HTTP/HTTPS
enabled (as such, it can be accessed from a browser as the
Web Root but can not be accessed via Web View). You can
change these settings at Security > Shares.
• Use existing share: From the drop-down list of existing
shares for selection, select a share and click the Properties
button to edit the selected share's properties (see Security
> Shares).
10400455-001 Dec 2013 ©Overland Storage, Inc. 4-25

SnapScale/RAINcloudOS 4.0 Administrator’s Guide Web Access
Option Description
Default Index File
Names
Files found underneath the Web Root with names matching
those in this list is automatically served to the web browser
when present, according to their order in the list. To add a
filename, click the Add button, enter the name of one or more
index HTML files, then click OK. The file you entered is shown
in the Index Files box.
NOTE: If no files are specified, index.html is automatically
used if found.
To delete a name, highlight it and click Delete. At the
confirmation page, click Delete again.
2. Map a drive to the share you have designated as the Web Root share and upload your
HTML files to the root of the directory, making sure the file names of the HTML files
are listed in the Index Files box.
Accessing the Web Management Interface when Web Root is Enabled
By default, when you connect to a SnapScale cluster with Web Root enabled, the browser
loads the user-defined HTML page or present a directory listing of the Web Root. To access
the Web Management Interface (for example, to perform administrative functions or change
a password), enter the following in the browser address field:
http://[nodename or ip address]/config
You are prompted for your User ID and password, then you are placed into the Web
Management Interface.
If you need to access the Web View page to browse shares on the cluster independent of Web
Root, enter this in the browser address:
http://[nodename or ip address]/sadmin/GetWebHome.event
10400455-001 Dec 2013 ©Overland Storage, Inc. 4-26

SnapScale/RAINcloudOS 4.0 Administrator’s Guide iSNS Configuration
iSNS Configuration
Microsoft iSNS Server can be used for the discovery of SnapScale iSCSI targets on an iSCSI
network.
To configure the iSNS settings:
1. If not already installed, install the iSNS service on a Windows server.
Note the IP address of the server or workstation on which the iSNS service is installed.
2. Configure iSNS on the SnapScale.
On the
iSNS server, and then click OK. If the iSNS server does not use the default port, the
iSNS port default value of 3205 can be changed on this page as well.
3. Configure the iSCSI initiator to discover iSCSI targets via the iSNS server.
NOTE: After you have completed this procedure, all the iSCSI targets on the SnapScale
Network > iSNS page, check the Enable iSNS box, enter the IP address of the
automatically appear in the Microsoft Initiators target list.
10400455-001 Dec 2013 ©Overland Storage, Inc. 4-27

Chapter 5
Storage Options
From the storage default page (Storage Settings), you can access and configure the storage
options for your SnapScale cluster including nodes and drives.
Topics in Storage Options:
• Peer Sets
• Volumes
• Quotas
• Snapshots
• iSCSI Disks
• Nodes
• Disks
Peer Sets
In a cluster, a node is a file server working in tandem with other nodes. The drives on every
node are grouped into peer sets or hot spares. Each peer set contains two or three drives,
depending on the Data Replication Count, that mirror the same data. To ensure availability,
each drive in a peer set resides in a different node.
10400455-001 Dec 2013 ©Overland Storage, Inc. 5-1

SnapScale/RAINcloudOS 4.0 Administrator’s Guide Peer Sets
SnapScale aggregates all the storage on the peer sets in the cluster to form a unified data
storage space for network client access. Data access is transparent between the cluster
storage space and the peer sets so that users never directly access the peer sets.
When you create a cluster or add new nodes to an existing cluster, SnapScale automatically
creates peer sets with the available drives. By distributing peer set members throughout the
cluster, the system ensures that content is protected from failure of either individual drives
or entire nodes. When they are created, peer sets are assigned a unique peer set ID.
Nodes can be added to expand cluster storage at any time. Based on the configuration
settings, the additional drives are either used to create more peer sets or left as hot spares.
Nodes can be removed from a cluster for replacement with a new node, and the drives in the
replacement node are automatically synchronized with the existing peer sets.
On a four-node cluster configured for 3x replication count, four hot spares, and four drives
per node, the peer set formation might look something like this:
Each peer set has members on three different nodes, shown below as peer set 0, 1, 2, and 3.
Hot spares are automatically distributed throughout the cluster in order to replace any
failed peer set member. When a peer set member fails, a hot spare is assigned from a node on
which the peer set does not already have an active member.
The example above uses a 3x Data Replication Count, which means that each peer set
contains three members, and as a result all data is replicated three times. The cluster can
also be configured for a 2x Data Replication Count, in which case the distribution of twomember peer sets would be different. The system automatically determines which drives are
used to form each peer set; you cannot choose them.
NOTE: The Data Replication Count can be decreased from 3x to 2x to increase cluster storage, but
cannot be increased from 2x to 3x once the cluster is created.
Peer Sets and Recovery
Though data on peer sets is served indirectly by the unified cluster storage space, access to
files stored on a given peer set is dependent on the health of that peer set. When a drive in a
peer set fails, data is served from the remaining peer set member drives. If there is a spare
reserved for the cluster that does not exist on the same node as another active member of the
peer set and is not smaller than other members, the peer set can claim the drive and rebuild
the data (using the integrated RapidRebuild feature) onto that spare without administrator
intervention.
10400455-001 Dec 2013 ©Overland Storage, Inc. 5-2

SnapScale/RAINcloudOS 4.0 Administrator’s Guide Peer Sets
If a peer set is missing one drive but at least one other drive is available, the peer set
continues to be accessible but is in degraded mode. This table shows the different peer set
statuses:
Peer Set Status Failure Type Data Availability
OK The peer set drives are healthy and
connected.
RapidRebuild Spare made available to rebuild the peer
set using RapidRebuild.
Degraded One drive missing from the peer set Data is fully available for read and
Degraded –
Cannot repair;
no spares
Degraded –
Cannot repair;
spares too small
Degraded –
Cannot repair;
spares on same
node
Failed All drives in peer set have failed. No availability. Contact Overland
Initializing The peer set is being created or
Inconsistent The peer set has more members than the
The peer set cannot be repaired because
there are no spare drives.
The peer set cannot be repaired because
all eligible spares are too small.
The peer set cannot be repaired because
the only eligible spares are located on the
same node as an active member of the
peer set.
initialized.
data replication count.
Data is fully available for read and
write.
Data is fully available for read and
write.
write.
Data is fully available for read and
write.
Data is fully available for read and
write.
Data is fully available for read and
write.
Support.
Data is not yet available.
Contact Overland Support.
10400455-001 Dec 2013 ©Overland Storage, Inc. 5-3

SnapScale/RAINcloudOS 4.0 Administrator’s Guide Peer Sets
Peer Set Utilization
Each file's data is spread across multiple peer sets, and the cluster automatically distributes
data for different files throughout the peer sets in the cluster. Metadata for files and
directories is independently distributed among different peer sets using a hash algorithm for
optimum performance and protection.
Peer Set Basics
New drives are initially configured automatically as spare drives. Subsequently, if enough
spare drives exist on different nodes to construct new peer sets but still satisfy the spare
count setting, the SnapScale automatically creates new peer sets and expand cluster storage
space.
Drives in a cluster do not all need to have the same capacity, but drives in a given peer set
should have the same capacity or space is wasted on the larger drives.
The following points must be observed in regards to drives used in the cluster:
• The drives in a cluster must all be the same type of drive (such as SAS) and the same
rotational speed.
• The storage capacity of a peer set is limited to the smallest capacity drive in the peer
set.
In case of peer drive failure, RAINcloudOS continues to serve data reads and writes to that
peer set from another member of the peer set as long as the peer set is not offline. If clients
are currently using data on the peer set, it continues to operate as-is.
Data Replication Count is an administrator specified, cluster-wide count of the degree of
redundancy of data on the cluster. The Data Replication Count can be either 2x or 3x and
determines the number of drives (2 or 3) that make up each peer set.
Hot Spares
Each node can have a number of hot spares in the event of a drive failure. The total number
of hot spares for the cluster is user selectable. A suggested number of hot spares for various
node sizes is provided. If a peer set member drive fails, data from a healthy peer set drive on
another node is re-synced onto an available spare on any node that doesn't have another
active member of that peer set, and the spare then becomes a member of that peer set.
Drives added to nodes as additions or as replacements to failed drives are automatically
configured as spares. If enough spares exist across different nodes to satisfy the Data
Replication Count and the spare drives count, the cluster automatically creates a new peer
set out of available spare drives.
Snapshot Limitations
• All snapshots are deleted when:
• New peer sets are automatically created when new drives are installed.
• One or more new nodes are added to a cluster.
• If a complete peer set fails.
• A Snapshot may be deleted if:
• Any peer set member drive runs out of snapshot space.
• A second member of a peer set (containing unique snapshot data) fails, even though
the main file system data may still be healthy.
10400455-001 Dec 2013 ©Overland Storage, Inc. 5-4

SnapScale/RAINcloudOS 4.0 Administrator’s Guide Peer Sets
Peer Sets Page
The following table covers the items listed on this page:
Option Description
# Peer Sets
(above table, left)
Data Replication Count
(above table, left)
Active Spare Disks
(above table, right)
Peer Set Lists the peer set name and shows a usage bar.
Status Shows the current status. Refer to Peer Sets and Recovery on
Member 1 Shows the node, drive/slot number, and the size of the first
Member 2 Shows the node, drive/slot number, and the size of the
Displays the total number (#) of peer sets configured and
shown in the table.
Displays the cluster-wide replication count and links to the
SnapScale Properties page.
Shows the number of drives allocated as spares. They are
broken out to show the status of spares and the number of
spares with that status.
• OK – A blue icon ( ) indicates spares are active and
available.
• Too Small – A yellow icon ( ) indicates spares are too
small to be used in some of the peer sets. A yellow icon with
an “X” ( ) indicates a spare is too small to use with any
available peer set.
• Failed – A red icon ( ) indicates spares have failed.
Clicking this link opens the Spare Disks page. This is the
same as clicking the Spare Disks button at the bottom of
the page.
Position the cursor over a name (or usage bar) to show the
percentage and actual amount of storage space used.
page 5-2 for complete details.
member of this peer set. Click to view the Disks page and
identify the specific disk drive's location.
second member of this peer set. Click to view the Disks page
and identify the specific disk drive's location.
10400455-001 Dec 2013 ©Overland Storage, Inc. 5-5

SnapScale/RAINcloudOS 4.0 Administrator’s Guide Peer Sets
Option Description
Member 3 (if shown) Shows the node, drive/slot number, and the size of the third
member of this peer set when the Data Replication Count
is set to “3x.” Click to view the Disks page and identify the
specific disk drive's location.
DSM
(Drive Size Mismatch)
Spare Disks (button) Launches the Spare Disks page. See Spare Disks Page
Spare Distributor (button) Launches the Spare Distributor page. See Spare
Data Balancer (button) Launches the Data Balancer page. See Data Balancer
Refresh (
Close (button) Closes this page and returns to the Storage Settings page.
button) Refreshes the page when clicked.
Shows either OK or mismatch size difference. If the member
drives are not the exact same size, then capacity is limited to
the smallest drive in the peer set, and extra space on larger
drives is wasted. In this case, the size displayed reflects the
unutilized capacity of the peer set.
Position the cursor over a name (or usage bar) to show the
unutilized capacity of the peer set.
below.
Distributor below.
below.
Spare Disks Page
When you click the Spare Disks button (or the Active spares link on the upper right above
the table on the Peer Sets page), the Spare Disks page opens.
The following table covers the items listed on this page:
Option Description
# Spare Disks
(above table, left)
Active Spares
(above table, left)
10400455-001 Dec 2013 ©Overland Storage, Inc. 5-6
Displays the total number (#) of spare drives configured and
shown in the table.
Displays the cluster-wide number of spares usable by all peer
sets.

SnapScale/RAINcloudOS 4.0 Administrator’s Guide Peer Sets
Option Description
Spare Disks Setting
(above table, right)
Spare Disk Displays disk drive capacity and type. Click a name in the
Node Displays the name of the node in which the drive resides. Click
Slot Displays the slot number of the listed node where this spare
Spare Status Shows the current status:
Refresh (
Close (button) Closes this page and returns to the main Peer Sets page.
button) Refreshes the page when clicked.
Displays the quantity set for spare drives. Clicking this link
takes you to the SnapScale Properties page to edit the
setting.
NOTE: This setting may not equal the number of spare drives
currently displayed if there are fewer spare drives
available than the setting specifies, or if there is an
insufficient number of extra drives to automatically
create a new peer set and satisfy the cluster's Data
Replication Count.
column to open the Disks page and identify a specific disk
drive's location.
a name in the column to open the Node Properties page for
the specific node.
drive is located.
• OK – Spare drive is healthy and can be used by all peer sets.
• Spare Too Small – Spare is too small to either repair any
existing peer sets or repair n existing peer sets.
• Failed – Spare drive has failed.
Spare Distributor
Spare Distributor (formerly the Spare Disk Balancer) evenly redistributes spares and peer
set members across the cluster nodes. Maintaining a balance of spare drives helps ensure
that spares are available if a peer set member should fail.
Using Spare Distributor
When the cluster detects an uneven distribution of spare drives, an alert banner is displayed
in the Web Management Interface and the Spare Distributor page is enabled.
NOTE: You can click Later to turn off the alert for 24 hours or Hide to dismiss the alert.
10400455-001 Dec 2013 ©Overland Storage, Inc. 5-7

SnapScale/RAINcloudOS 4.0 Administrator’s Guide Peer Sets
1. Go to Storage > Peer Sets > Spare Distributor.
If responding to an alert, you can click the Spare Distributor link in the alert to go
directly to the page.
2. Click the Start Spare Distributor button to start the process.
The Spare Distributor redistributes spares and peer set members across the cluster
nodes to provide spares on different nodes for better spare availability. Go to the Peer
page to view the status of the balancer.
Sets
If needed, click Stop Spare Distributor on the Spare Distributor page to stop the
operation. Any peer sets currently degraded and being rebuilt by the Spare Distributor
will continue with the rebuilding process until completed.
10400455-001 Dec 2013 ©Overland Storage, Inc. 5-8

SnapScale/RAINcloudOS 4.0 Administrator’s Guide Peer Sets
Data Balancer
Data Balancer (formerly Capacity Balancer) redistributes peer set utilization by moving
data from more to less heavily used peer sets. Maintaining a balance of peer set capacity
improves performance by assuring a balance of read and write traffic across all peer sets.
Using Data Balancer
If the peer set data utilization becomes unbalanced, an alert banner is displayed in the Web
Management Interface.
NOTE: You can click Later to turn off the alert for 24 hours or Hide to dismiss the alert.
1. Go to Storage > Peer Sets > Data Balancer.
If responding to an alert, you can click the Data Balancer link in the alert to go directly
to the page.
10400455-001 Dec 2013 ©Overland Storage, Inc. 5-9

SnapScale/RAINcloudOS 4.0 Administrator’s Guide Peer Sets
2. Review the default File Size Limit and change it, if needed.
The File Size Limit represents the maximum size of a file the Data Balancer will
attempt to move to rebalance peer set consumption. The default is 2GB.
3. Click the Start Data Balancer button to start the process.
The Data Balancer moves files between peer sets to improve performance and
usability. A table is displayed showing that the Data Balancer is running and the
percent completed. If needed, click Stop Data Balancer to end the operation.
NOTE: The cluster continues to be available for client access during the process. The Data
Balancer will skip any file that is currently opened by clients, and will abort moving a file
if a client opens it during the move.
An alert banner is displayed on any Administration-level page showing the progress.
10400455-001 Dec 2013 ©Overland Storage, Inc. 5-10

SnapScale/RAINcloudOS 4.0 Administrator’s Guide Volumes
Volumes
Use the Volumes page (Storage > Volumes) to manage the volumes that have been created.
From this page, you can:
• Create a new volume.
• Edit or delete the volume (by clicking the name to access the
Properties page).
Volume Overview
All the peer sets are unified into a single cluster storage space that can be accessed from any
node thus providing multiple access points. One or more volumes can be created to provision
the cluster storage:
• All volumes share the same cluster storage space and are thinly provisioned to provide
better utilization rates of the space.
• Volumes can be configured with a maximum size setting (quota) to prevent one volume
from consuming too much shared cluster storage space. See Creating Volumes on
page 5-12.
10400455-001 Dec 2013 ©Overland Storage, Inc. 5-11

SnapScale/RAINcloudOS 4.0 Administrator’s Guide Volumes
Creating Volumes
By default, the full cluster storage space is accessible as one large storage space. However,
the storage space can be divided into multiple volumes in order to thinly provision space for
specific projects, departments, or roles. Volumes can be constrained to use no more than a
certain amount of space available in the clustered storage space. This is done starting at the
Volumes page:
1. At Storage > Volumes, click the Create Volume button to open the Create Volume
page.
2. Make any necessary changes to the options.
• It is recommended to enter a Volume Name to easily identify the specific volume.
• If desired, keep the default of No Limit to allow the volume to consume an unlimited
amount of cluster storage.
• Otherwise, enter a size, changing the measurement units if needed.
10400455-001 Dec 2013 ©Overland Storage, Inc. 5-12

SnapScale/RAINcloudOS 4.0 Administrator’s Guide Volumes
3. Click the Create Volume button again. A confirmation page is shown:
4. At the confirmation page, click Create Share to create a share pointing to this volume
(takes you to the Shares page).
Click to display options shown below
NOTE: The snapshot options at the bottom are only shown if snapshot space has been
reserved.
5. Enter the appropriate data and select the necessary options, then click Create Share.
Additional options can be accessed by clicking the Advanced Share Properties link at
the bottom. See Shares in Chapter 6 for complete details.
6. Click Close twice to return to the Admin Home page.
10400455-001 Dec 2013 ©Overland Storage, Inc. 5-13

SnapScale/RAINcloudOS 4.0 Administrator’s Guide Volumes
Edit Volume Properties
By clicking a volume’s name on the main page, details of that particular volume are shown
on the Volume Properties page.
From this secondary page, you can:
• Change the volume name.
• Set maximum volume size (specific limit or no limit).
• Delete the entire volume.
Rename a Volume
In the Volume Name field, enter a unique volume name of 32 alphanumeric characters and
spaces, then click OK.
Specify Maximum Volume Size
There are two options controlling the maximum size of a volume:
• No Limit – This is the recommended option because it allows the volume to consume
space as needed.
• Limit Volume to – Establish a maximum volume size limit by entering the amount
and selecting a unit of measure (MB, GB, TB, or PB). The volume then grows in size
until it reaches its maximum. If email notification has been enabled, alerts are sent as
the maximum is approached. (To enable email notification, see Email Notification in
Chapter 8)
NOTE: If you reset the maximum size of a volume to less than its current size, the volume is
treated as full and no more data can be written to it until the actual space consumed
drops below the maximum size again. When done, click OK.
Deleting Volumes
To delete a volume, go to the Volume Properties page and click the Delete Volume button. At
the confirmation page, click the Delete Volume button again. You are returned to the
Volumes page and the volume is deleted in the background.
CAUTION: Deleting a volume deletes all the shares and data on the volume.
10400455-001 Dec 2013 ©Overland Storage, Inc. 5-14

SnapScale/RAINcloudOS 4.0 Administrator’s Guide Quotas
Quotas
Quotas are configured by accessing the Storage > Quotas page of the Web Management
Interface. This default page shows all volumes on the cluster and their space/file quotas.
Assigning quotas ensures that no one user or group consumes a disproportionate amount of
volume capacity measured by either space consumed or number of files created. The Quotas
page also displays space consumed and files created by each user or NIS group regardless of
whether a quota is applied to them, allowing for precise tracking of usage patterns. You can
set individual quotas for any NIS, Windows domain, or local user known to the SnapScale.
Group quotas are available only for NIS groups.
For users and groups, there are no pre-assigned default quotas on the SnapScale. When
quotas are assigned, you can assign a default space or file quota for all users, or allow all
users to have unlimited space on the volume. Unless you assign individual user or group
quotas, all users and groups will receive the default quota.
10400455-001 Dec 2013 ©Overland Storage, Inc. 5-15

SnapScale/RAINcloudOS 4.0 Administrator’s Guide Quotas
In calculating usage, the SnapScale looks at all the files on the server that are owned by a
particular user and adds up the file sizes. Every file is owned by the user who created the file
and by the primary group to which the user belongs. When files are copied to the cluster,
their size and count are applied against both the applicable user and NIS group quotas.
Default Quotas
On the main Quotas page (Storage > Quotas), the last two columns of the table show the
default quotas for disk space and number of files. To change these settings, click the number
(or no limit text) in the row under the default space or file quota column. A page is shown for
the appropriate quota type options:
Default Space Quota Page
To make changes, choose to either use the entire disk or a space of a specific size. For a
specific size, enter the maximum amount and select the units. Click OK to accept.
Default File Quota Page
To make changes, choose either to have no limit or a specific number of files. For a specific
limit, enter the maximum number of files. Click OK to accept.
10400455-001 Dec 2013 ©Overland Storage, Inc. 5-16

SnapScale/RAINcloudOS 4.0 Administrator’s Guide Quotas
Quotas for Volume Page
From the Quotas page, you can create, view, or modify user and group quotas for a volume by
clicking the volume’s name in the Volume column on the far left. A Quotas for Volume page
is displayed:
The page shows the available search and view options for the selected volume and the
Default user space/file quotas. The two defaults shown can be either an amount or a text
string:
• An amount – the default quota size or file count assigned to users in that volume who
do not have a specific quota assigned to them.
• A text string – the text strings No space limit and/or No file limit are displayed
when quotas are enabled but the default space size and/or file count of no limits are
configured for users in that volume. This means the users can consume the entire disk,
or as many files as desired, respectively.
The space and file count limits also double as links to access the Web Management Interface
pages where default space and file quotas can be configured.
Search for Quotas or Space Consumed by a User or NIS Group
To narrow down the list shown on this page or find a specific user or NIS group, first use the
search bar just under Default user space/file quotas.
1. Select the Type, Sort By, and View parameters.
10400455-001 Dec 2013 ©Overland Storage, Inc. 5-17

SnapScale/RAINcloudOS 4.0 Administrator’s Guide Quotas
• Type – Choose Space or File.
• Sort by – Select Name, Limit, Used, or Used (%).
View – Choose one of these view options:
•
•
Only assigned quotas
• Only with files used / Only with space used (depends on Type setting)
• Assigned or files used
• > 95% used
2. Select Find All or Find.
When entering a search string for Find:
• Returned results will include all users and groups whose name contains the string
entered.
• To search a specific Windows or NIS domain, enter the domain name followed by a
slash (/) or backslash (\) before the search string.
• To search only local users and groups, enter “local” followed by a backslash (\)
before the search string.
3. Click Search.
A detailed list of users or NIS groups that match the parameters is displayed including
the quota and space used numbers:
NOTE: The search results returned may be automatically limited. Fine tune your search by
using a more specific string to return a shorter list or the name desired.
Parentheses around a quota amount indicates the volume default quota is being used.
If the volume's default quota is set to “no limit,” then “(no limit)” is displayed. If the
volume's default quota is set to an actual value, such as 500GB, then “(500 GB)” is
displayed.
No parentheses around the quota amount indicates a specific quota has been assigned.
If the default quota limit is set to “no limit” but a particular user’s or group’s quota is
set to 750GB, then “750 GB” is shown instead of the default “(no limit).”
The one exception to this is NIS groups. They don't use a volume default quota, so “no
limit” (without parentheses) is shown.
4. To make changes, click the user or NIS group name.
See Editing or Removing Quotas on page 5-20.
Add Quota Wizard
1. Click the Volume name link on the Quotas initial page to open the Quotas for Volume
page for that volume.
10400455-001 Dec 2013 ©Overland Storage, Inc. 5-18

SnapScale/RAINcloudOS 4.0 Administrator’s Guide Quotas
2. Click Add Quota to launch the search wizard.
3. To search for a user or NIS group, select the local or domain option from the Search
drop-down list, enter the search string (or select Find All), and click Search.
NOTE: For domains that require authentication (by showing an “(A)” after the name), after
selecting the domain name, enter the User Name and Password for that domain.
• Returned results will include all users and NIS groups whose name begins with
the string entered in the Search field.
• The search results returned may be limited. Fine tune your search by using a more
specific string to return the names desired.
• On the rare occasion you need to search for a Windows domain that's not listed
(“remote domain”), select a Windows domain from the Search drop-down list
through which to search, then enter in the Find box the name of the remote
domain, followed by a slash (/) or backslash (\) and the user name for which you are
searching (for example, remote_domain\user_name). After you click Search,
another authentication prompt may be presented to authenticate with the remote
domain.
10400455-001 Dec 2013 ©Overland Storage, Inc. 5-19

SnapScale/RAINcloudOS 4.0 Administrator’s Guide Quotas
4. From the search results, select the appropriate user or NIS group, and click Next to
show the configuration page for that user or group.
5. Select or enter the desired space or file quota amounts, and click OK.
NOTE: NIS groups do not display the third option for using the default user space or file quota.
Editing or Removing Quotas
NOTE: Any changes override the default volume quota for this user or NIS group.
To edit or remove quotas of users or groups that have used space on this volume or have had
specific quotas assigned to them from the volume:
1. Click the Volume name link on the Quotas initial page to open the Quotas for Volume
page for that volume.
2. If necessary, search for a specific user to narrow the list to a more reasonable number.
See Search for Quotas or Space Consumed by a User or NIS Group on page 5-17.
10400455-001 Dec 2013 ©Overland Storage, Inc. 5-20

SnapScale/RAINcloudOS 4.0 Administrator’s Guide Snapshots
3. To edit or remove the quota, from the search results select the appropriate user or
NIS group from the left column to open the Quotas settings page.
4. Select or enter the quota desired:
• When editing, choose a limit or the default quotas.
• To remove a specific quota limit, set both the space and file quotas to no limit.
Snapshots
NOTE: NIS groups do not display the third option for the default space or file quotas.
5. Click OK.
A snapshot is a consistent, stable, point-in-time image of the cluster storage space that can
be backed up independent of activity on the cluster storage. Snapshots can also satisfy shortterm backup situations such as recovering a file deleted in error without resorting to tape.
Perhaps more importantly, snapshots can be incorporated as a central component of your
backup strategy to ensure that all data in every backup operation is internally consistent
and that no data is overlooked or skipped.
NOTE: To preserve your cluster configuration and protect your data from loss or corruption, it is
critical to schedule backups and snapshots.
10400455-001 Dec 2013 ©Overland Storage, Inc. 5-21

SnapScale/RAINcloudOS 4.0 Administrator’s Guide Snapshots
Navigate to Storage > Snapshots in the browser-based Web Management Interface to
create or schedule snapshots:
Snapshots Overview
When working with snapshots, consider the following caveats:
• It is recommended that snapshots be taken when the system is idle or under low data
traffic to minimize conflicts.
• Snapshots for the cluster storage space use snapshot space reserved on each peer set
member drive. If no space is reserved (by unchecking the option box), snapshots are
permanently disabled on the cluster.
• While 1% to 90% of the space can be reserved for snapshots, it is recommended that
snapshot space be set to 20% of the cluster storage space during setup. Once set, the
snapshot space can only be reduced, never increased.
• Snapshot space reserved from each peer set member drive is not necessarily identical
to snapshot space of other drives in the same peer set. (This is most likely to occur if
two or more drives in the same peer set have recently failed, even if they've been
replaced with spares.) As a result, failure of a drive with unique snapshot data may
cause one or more snapshots to be automatically deleted.
• Addition of a peer set to the cluster (including automatic peer set creation using new
drives inserted into nodes or the addition of new nodes to the cluster) deletes all
existing snapshots.
• Failure of a peer set deletes all snapshots.
Creating Snapshots
Creating a snapshot involves naming, scheduling, and setting the duration of the snapshot.
For regular data backup purposes, create a recurring snapshot. A recurring snapshot
schedule works like a log file rotation, where a certain number of recent snapshots are
automatically generated and retained as long as possible, after which the oldest snapshot is
discarded. You can also create individual, one-time-only snapshots as needed.
10400455-001 Dec 2013 ©Overland Storage, Inc. 5-22

SnapScale/RAINcloudOS 4.0 Administrator’s Guide Snapshots
If no snapshots are currently configured, you only see an empty page:
Once a snapshot is created, the page is populated with options for managing the snapshots:
These options are available in the Snapshots section of the Web Management Interface:
Action Procedure
Create a New Snapshot Click Create Snapshot. The process involves first defining snapshot
parameters, and then scheduling when and how often to run the
snapshot.
Do not take more snapshots than your system can store, or more than
250 snapshots. Under normal circumstances, nine or ten snapshots
are sufficient to safely back up any system.
Edit a Snapshot Schedule Click the Snapshot Schedules button, and then click the snapshot
name. You can modify all snapshot parameters.
Adjusting Snapshot Space
Size
Specify the percentage of your SnapScale storage space to reserve for
snapshots.
NOTE: The storage space reserved for snapshots can be reduced, but
it can never be increased once it is created.
10400455-001 Dec 2013 ©Overland Storage, Inc. 5-23

SnapScale/RAINcloudOS 4.0 Administrator’s Guide Snapshots
Action Procedure
Edit and Delete Click the snapshot’s name in the Snapshot column to open the
Snapshot Properties page. You can edit the snapshot’s name and
duration, or delete the snapshot.
Refresh the Page Clicking the Refresh button updates the page. This is helpful when
waiting for a snapshot to complete.
When single snapshots are originally created or while recurring snapshots are active, the
Refresh icon ( ) is displayed on the right of the tab bar. It indicates that the snapshot data
in the table is being refreshed every 5 minutes and can be clicked to manually refresh the
data.
Clicking the Close button returns you to the Storage Settings page.
NOTE: The presence of one or more snapshots on a cluster can impact write performance.
Additional snapshots do not have additional impact; in other words, the write performance
impact of one snapshot on a cluster is the same as the impact of 100 snapshots.
Snapshots and Backup Optimization
When you back up a live volume directly, files that reference other files in the system may
become out-of sync in relation to each other. The more data you have to back up, the more
time is required for the backup operation, and the more likely these events are to occur. By
backing up the snapshot rather than the volume itself, you greatly reduce the risk of
archiving inconsistent data.
To Create a Snapshot
Using the Snapshots page in the Web Management Interface, you can create a snapshot
now, later, or on a recurring schedule. When you select the Create Snapshot Later option,
additional options are displayed.
Follow these steps to create a snapshot:
1. Go to Storage > Snapshots, and click Create Snapshot.
2. Enter or select the options for the snapshot:
a. Type in the Snapshot Name (20 character maximum).
10400455-001 Dec 2013 ©Overland Storage, Inc. 5-24

SnapScale/RAINcloudOS 4.0 Administrator’s Guide Snapshots
b. Specify when to create the snapshot.
• Click Create Snapshot Now to run the snapshot immediately.
• Click
When you select the Create Snapshot Later button, a new input section appears
below the option. Enter the Start Date and Start Time. Select either to create the
snapshot only once (
an interval in hours, days, weeks, or months.
c. Specify the duration of the snapshot.
NOTE: In the Duration field, specify how long the snapshot is to be active in hours, days,
3. Create the snapshot by clicking Create Snapshot.
If you elected to run the snapshot immediately, it appears in the Current Snapshots
table. If you scheduled the snapshot to run at a later time, it appears in the Scheduled
Snapshots table.
Create Snapshot Later to schedule the snapshot for a later time.
One Time) or to have it recurring periodically (Recurring) using
weeks, or months. The SnapScale automatically deletes the snapshot after this
period expires, as long as no older unexpired snapshots exist on which it depends.
If any such snapshot exists, its termination date is displayed at the bottom of the
page. You must set the duration to a date and time after the displayed date.
Adjusting Snapshot Space
NOTE: Once the SnapScale cluster is created, the storage space reserved for snapshots can only
be decreased. It can never be increased.
If you have reserved storage space for snapshots during the setup of your cluster, you can
use the Snapshot Space button to access the page where you can decrease the size of the
space.
1. Go to Storage > Snapshots, and click Snapshot Space.
2. Reduce or remove the reserved space:
• Using the drop-down list, choose a lower percentage of reserved space.
• Uncheck the reserve space for snapshots box to release all reserved space.
CAUTION: Unchecking the reserve space box causes all the reserved space to be
released, deletes all existing snapshots, and permanently disables snapshots on the
cluster.
10400455-001 Dec 2013 ©Overland Storage, Inc. 5-25

SnapScale/RAINcloudOS 4.0 Administrator’s Guide Snapshots
3. Click OK to complete the process.
Accessing Snapshots
After snapshots are created, they can be accessed via a snapshot share. Just as a share
provides access to a portion of a live volume, a snapshot share provides access to the same
portion of the filesystem on all current snapshots of the volume. The snapshot share’s path
into snapshots mimics the original share’s path into the live volume. The snapshot share is
created in the Shares section under the Security tab. See Shares in Chapter 6 for details.
Scheduling Snapshots
To view when snapshots are currently scheduled to occur, click Snapshot Schedules:
The Snapshot Schedules page shows a list of scheduled snapshots pending. Repeat Interval
and Next Snapshot Time shows the details of when snapshots are scheduled to be taken.
Snapshots should ideally be taken when your system is idle. It is recommended that
snapshots be taken before a backup is performed. For example, if your backup is scheduled
at 4 a.m., schedule the snapshot to be taken at 2 a.m., thereby avoiding system activity and
ensuring the snapshot is backed up.
10400455-001 Dec 2013 ©Overland Storage, Inc. 5-26

SnapScale/RAINcloudOS 4.0 Administrator’s Guide iSCSI Disks
Edit Snapshot Properties
From the Snapshot primary page table, you can click a snapshot name to access the
Snapshot Properties page. There you can edit the name and duration, or delete the
snapshot:
iSCSI Disks
Edit a Snapshot
You can edit the name and duration by changing the data in the detail fields, and then
clicking OK.
Delete a Snapshot
Click Delete Snapshot and then click it again on the confirmation page. The snapshot is
deleted.
Internet SCSI (iSCSI) is a standard that defines the encapsulation of SCSI packets in
Transmission Control Protocol (TCP) and their transmission via IP. On SnapScale clusters,
an iSCSI disk consumes cluster storage space as a single large file, but appears to a client
machine as a local SCSI drive. This storage virtualization frees the administrator from the
physical limitations of direct-attached storage media and allows capacity to be expanded
easily as needed. Unlike standard volumes, SnapScale cluster iSCSI disks can be formatted
by the iSCSI client to accommodate different application requirements.
Configuring iSCSI Initiators
Overland Storage has qualified a number of software initiators, PCI cards, and drivers to
interoperate with SnapScale clusters. Refer to the vendor’s documentation to properly install
and configure you initiator to connect to the SnapScale iSCSI disks.
iSCSI Configuration on the SnapScale
iSCSI disks are created on the Storage > iSCSI page of the Web Management Interface.
Before setting up iSCSI disks on your SnapScale cluster, carefully review the following
information.
10400455-001 Dec 2013 ©Overland Storage, Inc. 5-27

SnapScale/RAINcloudOS 4.0 Administrator’s Guide iSCSI Disks
Basic Components of an iSCSI Network
iSCSI is used to facilitate data transfers over intranets and to manage storage over long
distances. A basic iSCSI network has two types of devices:
• iSCSI initiators, either software or hardware, resident on hosts (usually servers), that
start communications by issuing commands.
• iSCSI targets, resident on storage devices, that respond to the initiators’ requests for
data.
The interaction between the initiator and target mandates a server-client model where the
initiator and the target communicate with each other using the SCSI command and data set
encapsulated over TCP/IP.
Back up an iSCSI Disk from the Client, not the SnapScale
An iSCSI disk is not accessible from a share and thus cannot be backed up from the
SnapScale cluster. The disk can, however, be backed up from the client machine from which
the iSCSI disk is managed.
NOTE: While some third-party, agent-based backup packages could technically back up an iSCSI
disk on the SnapScale cluster, the result would be inconsistent or corrupted backup data if
any clients are connected during the operation. Only the client can maintain the filesystem
embedded on the iSCSI disk in the consistent state that is required for data integrity.
iSCSI Multi-Initiator Support
Check the Support Multiple Initiators box to allow two or more initiators to simultaneously
access a single iSCSI target. Multiple initiator support is designed for use with applications
or environments in which clients coordinate with one another to properly write and store
data on the target disk. Data corruption becomes possible when multiple initiators write to
the same disk in an uncontrolled fashion.
NOTE: RAINcloudOS supports Windows 2003 and Windows 2008 Server failover clustering.
When the box for Support Multiple Initiators is checked, a warning message appears:
Uncontrolled simultaneous access of multiple initiators to the same
iSCSI target can result in data corruption. Only enable MultiInitiator Support if your environment or application supports it.
It functions as a reminder that data corruption is possible if this option is used when
creating an iSCSI disk.
Disconnect iSCSI Disk Initiators before Shutting Down the Cluster
Shutting down the cluster while a client initiator is connected to an iSCSI disk appears to
the client initiator software as a disk failure and may result in data loss or corruption. Make
sure any initiators connected to iSCSI disks are disconnected before shutting down the
cluster nodes.
iSCSI Disk Naming Conventions
iSCSI disks are assigned formal iSCSI Qualified Names (IQNs). These are used when
connecting an initiator to an iSCSI target, and differ from the iSCSI Disk Name (alias)
assigned when the iSCSI disk is created in the Web Management Interface. The full IQN is
displayed for each iSCSI disk.
10400455-001 Dec 2013 ©Overland Storage, Inc. 5-28

SnapScale/RAINcloudOS 4.0 Administrator’s Guide iSCSI Disks
The format of IQNs for new SnapScale iSCSI disks is:
iqn.1997-10.com.snapscale:[clustername]:[blockdevice]
where [clustername] is the name of the SnapScale cluster, and [blockdevice] is the
internal identifier of the iSCSI disk on the target SnapScale cluster. All the
[blockdevice] names are automatically created using the term snapbd appended with a
sequence number (such as, snapbd0, snapbd1, and so on).
iqn.1997-10.com.snapscale:Scale1234567:snapbd0
The format of IQNs for VSS-based iSCSI disks on the SnapScale cluster is:
iqn.1997-10.com.snapscale:[clustername]:[blockdevice].[nnn]
where [clustername] is the name of the SnapScale cluster, [blockdevice] is the internal
identifier of the iSCSI disk on the target SnapScale cluster, and [nnn] is a sequential
number starting from 000. For example:
iqn.1997-10.com.snapscale:Scale1234567:snapbd0.000
The format of IQNs for VDS-based iSCSI disks on the SnapScale cluster is:
iqn.1997-10.com.snapscale:[clustername]:[blockdevice]
and the format for IQNs for snapshots of iSCSI disks on the SnapScale cluster is:
iqn.1997-10.com.snapscale:[clustername]:[blockdevice]-snap[n]
where, in both cases, [clustername] is the name of the SnapScale cluster, [blockdevice]
is the internal identifier of the iSCSI disk on the target SnapScale cluster, and [n] is a
sequential number starting from 0. For example:
iqn.1997-10.com.snapscale:Scale1234567:snapbd0-snap0
Create iSCSI Disks
Navigate to Storage > iSCSI and click Create iSCSI Disk to create, edit, or delete iSCSI
disks on the SnapScale cluster. Be sure to read iSCSI Configuration on the SnapScale on
page 5-27 before you begin creating iSCSI Disks.
10400455-001 Dec 2013 ©Overland Storage, Inc. 5-29

SnapScale/RAINcloudOS 4.0 Administrator’s Guide iSCSI Disks
The creation process involves first defining iSCSI parameters, then setting up security, and
finally confirming your settings.
1. Navigate to Storage > iSCSI and click Create iSCSI Disk.
2. Enter the iSCSI settings for the disk name and size (16GB minimum).
Accept the default name or enter a new one. Use up to 20 alphanumeric, lowercase
characters. Accept the default size of the remaining cluster space or enter a different
size.
3. If you want your iSCSI Disk to allow multiple initiator connections, check that box.
NOTE: Data corruption is possible if this option is checked. See iSCSI Multi-Initiator Support on
page 5-28 for more information.
4. If desired, enable CHAP authentication by checking the Enable CHAP Logon box to
display the hidden options.
Enter a User Name and Target Secret (password), and then confirm the password.
Consider the following:
• Both items are case-sensitive.
• The user name range is 1 to 223 alphanumeric characters.
• The target secret must be a minimum of 12 and a maximum of 16 characters.
5. Click the Create iSCSI Disk button and, at the confirmation page, verify the settings.
6. Click the Create iSCSI Disk button again to complete the process.
You are returned to the iSCSI page and the new iSCSI disk is displayed in the table
there with the following information:
10400455-001 Dec 2013 ©Overland Storage, Inc. 5-30

SnapScale/RAINcloudOS 4.0 Administrator’s Guide iSCSI Disks
Label Description
iSCSI Disk The name of the iSCSI disk.
Status Current condition of the iSCSI disk:
• OK – The iSCSI disk is online and accessible.
• Stopped – The iSCSI disk is currently stopped.
• Failed – The iSCSI disk has failed.
Active Clients The number of current sessions.
IP Address The IP address used by the iSCSI disk.
Authentication Either CHAP or None.
Size The size of the iSCSI disk.
Edit iSCSI Disk Properties
NOTE: You cannot edit an iSCSI disk until all active clients have been disconnected from that disk.
The hostname and IQN name of all connected initiators are displayed in the table.
After disconnecting all client initiators, click the iSCSI disk name in the table on the
primary iSCSI page to display the iSCSI Disk Properties page.
1. On this page, you can do the following:
• View the iSCSI Disk IQN.
• Increase (but not decrease) the size of the iSCSI disk (if space is available).
• Enable or disable support for multiple initiators.
• Enable or disable CHAP logon.
2. Click OK to accept the changes (or Cancel to cancel).
10400455-001 Dec 2013 ©Overland Storage, Inc. 5-31
 Loading...