

Page 1
Storage
Overland
NEO® S-Series Tape Library
Service Manual
January 2015
10400666-001
Page 2

NEO S-Series User Guide
©2015 Overland Storage, Inc. All rights reserved.
Overland®, Overland Storage®, ARCvault®, DynamicRAID®, GuardianOS®, NEO®, NEO Series®, PowerLoader®, Protection OS®, RAINcloud®, REO®, REO 4000®, REO
®
, Snap Appliance®, Snap Care® (EU only), SnapSAN®, SnapScale®, SnapScale X2®, SnapServer®, StorAssure®, Ultamus®, VR2®, and XchangeNOW® are registered
Series
trademarks of Overland Storage, Inc.
®
Tandberg Data
StorageLoader
RapidRebuild™, SnapExpansion XSR™, SnapScale X4™, SnapServer DX Series™, SnapServer XSD Series™, SnapServer XSD 40™, SnapServer XSR Series™,
SnapServer XSR 40™, SnapServer XSR 120™, and SnapServer Manager™ are trademarks of Overland Storage, Inc.
BizNAS™ and QuadP ak™ are trademarks of Tandberg Data, Inc.
All other brand names or trademarks are the property of their respective owners.
The names of companies and individuals used in examples are fictitious and intended to illustrate the use of the software. Any resemblance to actual companies or
individuals, whether past or present, is coincidental.
PROPRIETARY NOTICE
All information contained in or disclosed by this document is considered proprietary by Overland Storage. By accepting this material the recipient agrees that this
material and the information contained therein are held in confidence and in trust and will not be used, reproduced in whole or in part, nor its contents revealed to
others, except to meet the purpose for which it was delivered. It is understood that no right is conveyed to reproduce or have reproduced any item herein disclosed
without express permission from Overland Storage.
Overland Storage provides this manual as is, without warranty of any kind, either expressed or implied, including, but not limited to, the implied warranties of
merchantability and fitness for a particular purpose. Overland Storage may make improvements or c hanges in the product(s) or programs described in this manual at
any time. These c hanges will be incorporated in new editions of this publication.
Overland Storage assumes no responsibility for the accuracy, completenes s, sufficiency, or usefulness of this manual, nor for any problem that might arise from the use
of the information in this manual.
, AccuGuard®, AccuVault®, DPS1000 Series®, DPS1100®, DPS1200®, DPS2000®, Magnum®, QuikStation®, QuikStor®, RDX®, RDXPRO®, StorageLibrary®,
®
, Tandberg SecureService®, Tandberg StorageLibrary®, and VXA® are registered trademarks of Tandberg Data, Inc.
10400666-001 © 2014 Overland Storage, Inc. Page 2
Page 3

NEO S-Series User Guide
10400666-001 © 2014 Overland Storage, Inc. Page 3
Contents
1 Introduction ................................................................................................................................... 5
Document Purpose ..................................................................................................................................... 5 1.1
Product Warranty Caution .......................................................................................................................... 5 1.2
2 General Warnings .......................................................................................................................... 6
Document Conventions: ............................................................................................................................. 6 2.1
General Product Warnings ......................................................................................................................... 6 2.2
3 Troubleshooting ............................................................................................................................ 8
Installation problems ................................................................................................................................... 8 3.1
SCSI ID .......................................................................................................................................... 8 3.1.1
SCSI host adapter installation ........................................................................................................... 8 3.1.2
LUN scanning ................................................................................................................................. 8 3.1.3
SCSI cabling ................................................................................................................................... 8 3.1.4
Termination ..................................................................................................................................... 8 3.1.5
Compatibility .................................................................................................................................. 9 3.1.6
Backup application installation.......................................................................................................... 9 3.1.7
Device driver installation .................................................................................................................. 9 3.1.8
Troubleshooting table ............................................................................................................................... 10 3.2
Removing stuck tape cartridges from the library ...................................................................................... 14 3.3
Emergency release ................................................................................................................................... 15 3.4
Upgrade the library firmware .................................................................................................................... 15 3.5
General diagnostic .................................................................................................................................... 16 3.6
1.6.1
System test .................................................................................................................................. 16
Slot-to-Slot test ............................................................................................................................ 16 3.6.1
Library verify test ......................................................................................................................... 16 3.6.2
Error codes ............................................................................................................................................... 17 3.7
1.7.4
Error messaging .......................................................................................................................... 17
Error structure ............................................................................................................................. 17 3.7.1
OCP error reporting ..................................................................................................................... 17 3.7.2
RMU error reporting .................................................................................................................... 18 3.7.3
Main error codes ......................................................................................................................... 19 3.7.4
Sub error codes related to the robotic ......................................................................................... 27 3.7.5
Sub error codes related to the library .......................................................................................... 29 3.7.6
4 Servicing ...................................................................................................................................... 30
Possible tools needed ............................................................................................................................... 30 4.1
Electrostatic discharge .............................................................................................................................. 30 4.2
Removing a tape drive .............................................................................................................................. 31 4.3
Page 4

NEO S-Series User Guide
10400666-001 © 2014 Overland Storage, Inc. Page 4
Replacing a tape drive .............................................................................................................................. 31 4.4
Removing the library controller ................................................................................................................. 32 4.5
Replacing the library controller ................................................................................................................. 32 4.6
Removing a power supply ........................................................................................................................ 33 4.7
Replacing the power supply ..................................................................................................................... 33 4.8
Servicing a magazine ............................................................................................................................... 34 4.9
Removing the base chassis ...................................................................................................................... 34 4.10
Preparing to remove the base chassis ........................................................................................ 34 4.10.1
Removing the base chassis from the rack .................................................................................. 35 4.10.2
Replacing the base chassis ...................................................................................................................... 35 4.11
5 Packaging before transportation................................................................................................ 36
6 Technical specifications ............................................................................................................. 39
Hardware specifications............................................................................................................................ 39 6.1
Operating environment ............................................................................................................................. 40 6.2
Maximum storage capacity and data transfer rate ................................................................................... 41 6.3
7 Agency Certifications .................................................................................................................. 43
Recycling and disposal ............................................................................................................................. 43 7.1
Device standards ...................................................................................................................................... 44 7.2
CE mark .................................................................................................................................................... 44 7.3
ETL mark .................................................................................................................................................. 44 7.4
FCC (United States) ................................................................................................................................. 45 7.5
Canadian verification ................................................................................................................................ 45 7.6
Page 5

NEO S-Series User Guide
10400666-001 © 2014 Overland Storage, Inc. Page 5
1 Introduction
Document Purpose 1.1
This document provides information to inst a ll, operate, and upgrade the NEO S-Series Scalable Tape Library.
The instructions are intended for the trained System Administrators and technicians who need physical and
functional knowledge of the S-Series library.
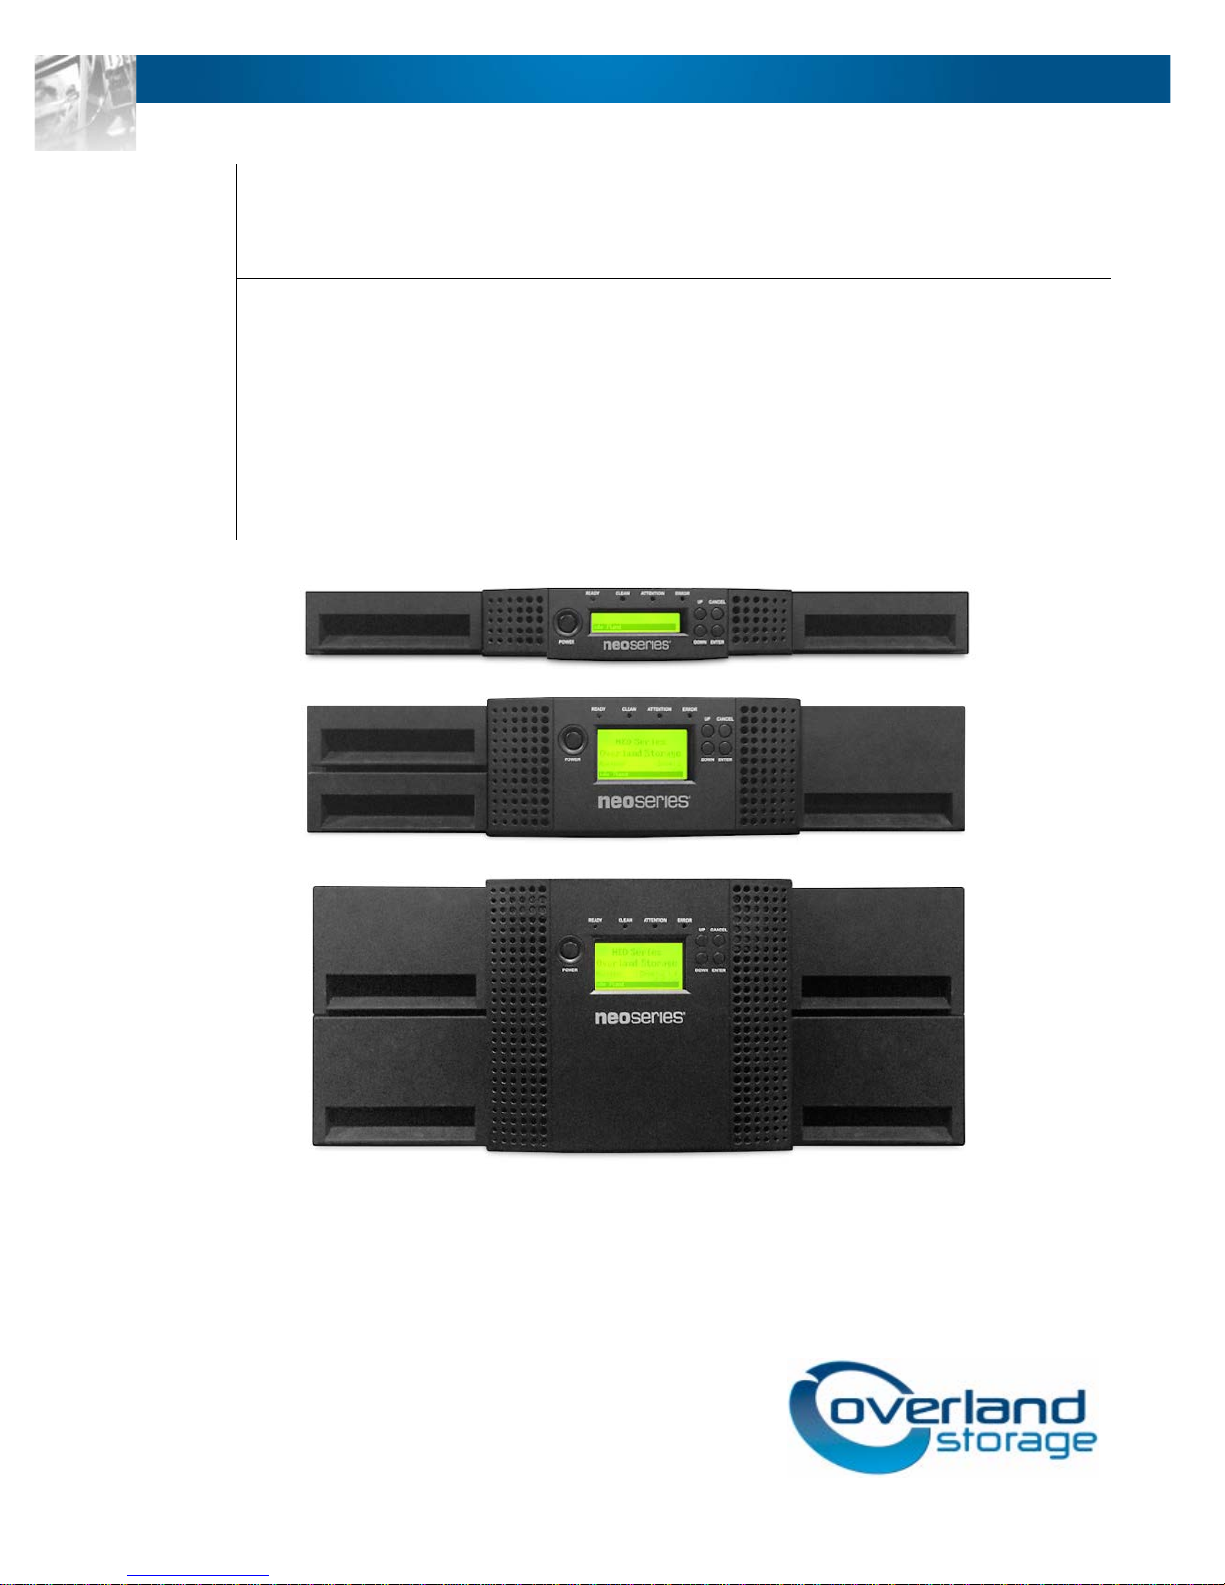
The main components are:
Base library
Expansion module
Product Warranty Caution 1.2
The customer should only perform the service and repair actions on the tape library components listed in this
document. Any other actions needed should only be performed by an authorized service center.
The warranty for the tape library shall not apply to failures of any unit when:
The tape library is repaired or modified by anyone other than the manufacturer’s personnel or approved
agent.
The tape library is physically abused or used in a manner that is inconsistent with the operating
instructions or product specification defined by the manufacturer.
The tape library fails because of accident, misuse, abuse, neglect, mishandling, misapplication, alteration,
faulty installation, modification, or service by anyone other than the factory service center or its approved
agent.
The tape library is repaired by anyone, including an approved agent, in a manner that is contrary to the
maintenance or installation ins truc tio ns supp lied b y the m anuf ac tur er.
The manufacturer's serial number tag is removed.
The tape library is damaged because of improper packaging on return.
Warranty will become immediately void in the event of unauthorized repairs or modifications.
Page 6

NEO S-Series User Guide
10400666-001 © 2014 Overland Storage, Inc. Page 6
2 General Warnings
Document Conventions: 2.1
WARNING
Indicates that failure to follow directions could result in bodily harm or
death.
CAUTION
Indicates that failure to follow directions could result in damage to
equipment or data.
!
IMPORTANT
Provides clarifying information or specific instructions.
NOTE
Provides additional information.
TIP
Provides helpful hints and shortcuts.
General Product Warnings 2.2
DANGER
High voltage
Risk of electric shock
Do not remove covers (top, bottom or rear). No user-serviceable
parts are inside.
Refer servicing to qualified service personnel.
WARNING
Product Weight
Risk of personal injury
Before lifting a library:
Observe local health and safety requirements and guidelines for
manual material handling.
Remove all tapes to reduce the weight.
Remove all tape drives to reduce the weight.
Obtain adequate assistance to lift and stabilize the library during
installation or removal.
Risk of damage to devices
When placing a library into or removing the library from a rack:
Extend the rack’s leveling jacks to the floor.
Ensure that the full weight of the rack rests on the leveling jacks.
Install stabilizing feet on the rack.
Extend only one rack component at a time.
Page 7
NEO S-Series User Guide
10400666-001 © 2014 Overland Storage, Inc. Page 7
CAUTION
Static Sensitive
Risk of damage to devices
A discharge of static electricity damages static-sensitive devices or
micro circuitry.
Proper packaging and grounding techniques are necessary
precautions to prevent damage.
NOTE
Ventilation – Place the product in a location that does not interfere with
proper ventilation.
Heat – Place the product in a location away from heat sources.
Power sources – Connect the product to a power source only of the type
directed in the operating instructions or as marked on the product.
Power cord protection – Place the AC line cord so that it is not possible to be
walked on or pinched by items placed upon or against it.
Object and liquid entry – Insure that objects do not fall onto and that liquids
are not spilled into the product’s enclosure.
Page 8

NEO S-Series User Guide
10400666-001 © 2014 Overland Storage, Inc. Page 8
3 Troubleshooting
This chapter provides information for verifying correct installation and tro ub le shooting the library.
Installation problems 3.1
Problems encountered d uring the inst allation of the library are usuall y caused by imp roper SCSI bus configura tion,
application software configuration errors, or an incorrectly configured operating system.
If the used application software is not c ommunicating with the library after installation, check the followi ng:
SCSI ID 3.1.1
The library uses a single SCSI ID. Depending on other devices attached to the same SCSI bus and their SCSI IDs,
change the SCSI ID of the library or tape drive before use the library.
Review the manuals for the other devices on the SCSI bus or the operating sys t em to determine which S C S I IDs are
currently in use.
SCSI host adapter installation 3.1.2
1. Verify that the SCSI host adapter is ins ta lle d correctly.
Refer to the manual that came with the SCSI host adapter for installation a nd troubleshooting instructions.
2. Pay particular attention to any steps de scribing the settings of various jumpers and/or switches on the host adapter,
if applicable.
3. Make sure that the host adapter is properly seated in the motherboard slot and the operating system correctly detects
the host adapter.
4. Make sure that the proper device driver is installed for the SCSI host adapter.
LUN scanning 3.1.3
Use dual LUNs to control the tape drive (LUN 0) and library robotic (LUN 1). These models require an HBA that
supports LUN scanning and LUN scanning must be enabled.
SCSI cabling 3.1.4
1. Verify that all SCSI cables are securely connected at both ends.
2. Check the l ength and int egrity of the SCSI cabling.
3. Check the SCSI connector for bent pins.
The length of the internal SCSI cabl ing inside the library is 2 feet (60 cm). This length must be included in a ny
calculations of cable length.
• For LVD SCSI the maximum length for a single device is 82 feet (25 meters).
• For multiple devices, the maximum combined internal/external length is 40 feet (12 meters).
• If you have a combinatio n of LVD and SE devices on the bus, the maximum cable length re verts to the SE
specification, which for ultra devices is 10 feet (3 meters) for four or fewer devices, and 5 feet (1.5 meters) for
more than four devices.
Termination 3.1.5
If the library is the only SCSI device — other than the SCSI host adapter — on the selected SCSI bus, it must be
terminated. Likewise, if the libr a ry is physically the last SCSI device on the SCSI bus, it must be terminated.
Only the devices physically located at the beginning and end of the SCSI bus should be terminated.
Refer to the manuals supplied with other devices on the SCSI bus for information on enabling or disabling termination
on those devic es.
Page 9
NEO S-Series User Guide
10400666-001 © 2014 Overland Storage, Inc. Page 9
If available, take the terminator from the accessories bag. The supplied terminator is “dual mode” and will work on both
Low-Voltage Differential (LVD) and Single Ended (SE) SCSI buses.
To terminate the library, see Chapter Connecting the parallel SCSI cable, Page Error! Bookmark not defined..
Check all SCSI and power connections and confirm that the library is attached to a valid SCSI SE or LVDS bus.
Compatibility 3.1.6
Ensure that the library is compatible with the SCSI host adapter and backup application you plan to use. For a list of
compatible SCSI adapters and application software, check with your SCSI host adapter manufacturer or backup
application vendor.
NOTE
The host bus adapter for the library should be SCSI-3 LVDs. A
single-ended SCSI host bus adapter will severely degrade
performance. Also, if there is any SE devices on the same SCSI bus,
the entire SCSI bus will negotiate down to SE speed and severely
degrade performance
Backup application installation 3.1.7
Refer to the documentation included with your backup application for instructions on how to verify proper installation.
Some backup software packages require an additional module to communicate with the library robotics.
Device driver installation 3.1.8
Make sure that the proper device driver, if applicable, is installed for the library. Contact your support representative for
more information
NOTE
Many backup applications use their own drivers for the library and
tape drive. Before installing a driver , make sure it will not be in
conflict with the software.
Page 10
NEO S-Series User Guide
10400666-001 © 2014 Overland Storage, Inc. Page 10
Troubleshooting table 3.2
Problem
Solution
Poor throughput performance
• Try a new tape. A marginal tape can cause performance problems due to
bad spots on the tape requiring retries.
• Backing up data that compresses poorly or is already compressed will
lower performance.
• Check the size of the files. Small file size can impact performance.
• Confirm that the backup application is utilizing block sizes of at least
32KB, preferably 64KB. Refer to the backup application documentation
for details.
• Check the network bandwidth from the host computer. If you are backing
up data over a network, consider comparing to a local-only backup.
• Make sure the backup server has enough memory to handle the bandwidth
of the backup or restore.
• Clean the tape drive with:
OCP, see Chapter Cle aning tape drives, Page Error! Bookmark not
defined..
RMU, see Chapter Cleaning tape dr ive(s), Page Error! Book mark not
defined..
Cleaning
Cannot load the cleaning
cartridge
• M ake sure you are using an Ultrium universal cleaning cartridge.
See Chapter Tape cartridge type, Page Error! Bookmark not defined..
• Contact your service representative.
Device Not Detected on SCSI Bus
Connected to a high voltage
differential SCSI bus/host
adapter
• Attach device to a LVDS SCSI host adapter/bus.
• SCSI cable length exceeded, use shorter cable, or removes other devices
from the bus.
• Check for conflictin g SCSI IDs.
• Check that the HBA supports LUN scanning and this feature is ena bled.
• Device not properly terminated. See Chapter Termination, Page 8.
• P o wer up device before powering up the host computer.
• Check that the device has been powered up and is not in an error state.
• Check the SCSI connector for bent pins.
Page 11
NEO S-Series User Guide
10400666-001 © 2014 Overland Storage, Inc. Page 11
Problem
Solution
Errors Displayed on Operator Control Panel
“!” in library operator panel
inventory display
Export the tape cartridge marked with an “!” in the inventory. The tape
cartridge is either damaged, incompatible with the tape drive, or the wrong
type for the attempted operation.
To find the compatible tape cartridges for your library:
See Chapter Tape cartridge type, Page Error! Bookmark not defined..
There is an error code on the
LCD
Look up the error code, try to resolve the failure, and power cycle.
See Chapter Error codes, Page 17.
Media
Cleaning or data tape
incompatible with drive.
• Make sure you are using data and cleaning tapes that are compatible with
the drive and model of your library.
The library automatically unloads incompatible tapes, the <Media
Attention> LED flashes, and an exclamation mark (!) is displayed in the
inventory display for the indicated slot number.
• Export the media in order to clean the state.
Cannot write to or read from
tape.
• Make sure that the tape is write enabled (move the write-protect switc h to
the enabled position).
• Make sure you have the appropriate data tape for your library model.
• Make sure you are using an ultrium tape that has not been degaussed. Do
not degauss ultrium tapes.
• Make sure that the tape has not been exposed to harsh environmental or
electrical conditions and is not ph ysically damaged in any way.
• Many backup applications do not read or write to tapes that were created
using a different backup application. In this case, perform an erase, format,
or label operation on the tape.
• Make sure you understand any data protection or overwrite protection
schemes that your backup application may be using, which coul d prevent
you from writing to a given tape.
• Retry the operation with a different, known good tape.
• Clean the tape drive with:
OCP, see Chapter Cle aning tape drives, Page Error! Bookmark not
defined..
RMU, see Chapter Cleaning tape drive(s), Page Error! Bookmark not
defined..
Page 12

NEO S-Series User Guide
10400666-001 © 2014 Overland Storage, Inc. Page 12
Problem
Solution
<Media Atte ntion> LED issues
Contamination by loose
debris.
Avoid contamination by ensuring that the library is installed in a clean,
contamination-free environment. Tapes should be stored vertically in their
plastic cases. Continue cleaning the tape drive as needed.
Non-acclimated media.
A tape should be acclimated for at least 24 hours before being used,
particularly if it has been stored at a substantially different temperature or level
of humidity than the library.
Tape cartridge is
incompatible.
Use only tapes that are compatible with the tape drive type.
See Chapter Tape cartridge type, Page Error! Bookmark not defined..
Expired cleaning cartridge.
Make sure you are using an ultrium universal cleaning tape. (max. 50 cleans)
Bad/defective/contaminated
media.
If the <Media Attention> LED is cleared and –although the ta pe drive has b een
cleaned – immediately re-displays each time a particular tape is reloaded that
tape should be suspected as being defective.
• Export the tape and load a known good tape. In some cases, a tape can be
worn out, have a defective tape memory, or have been formatted as a
Firmware Upgrade Cartridge.
• Any tape that is suspected of being defective or contaminated should NOT
be reused in any drive.
Power
Library does not power up.
• Check all power cord connections.
• Make sure the power switch on the front panel is in the <ON> position.
• Make sure there is power to the outlet. Try another working outlet.
• Replace the power cord.
• Contact your service representative.
No display messages appear.
• Make sure the power cord is connected.
• Make sure the power switch is on.
• Power cycle the library.
• Download the library firmware.
• Contact your service representative.
Page 13

NEO S-Series User Guide
10400666-001 © 2014 Overland Storage, Inc. Page 13
Problem
Solution
SCSI ID
Changed drive SCSI ID, b ut
the host serve r does not
recognize the new ID.
• Make sure that all SCSI devices on the same bus have unique ID numbers.
If the SCSI bus is narrow, (50-pin) only SCSI IDs 0 through 7 are
available.
• Make sure that you cycle power on the library after changing the SCSI ID.
• Reboot the host server. Tape library performance. The library is not
efficiently backing up data.
• Make sure the library and tape drive are on their own SCSI bus and not
daisy-chained to another tape drive or to the hard drive being backed up.
• Make sure the library is connected to a LVDs SCSI bus and there are no
SE devices on the same bus, because this will cause the entire bus to
negotiate down to SE speed.
• U se an Ultra32 0 SCSI bus and high quality cabling with the library.
• Do not connect the library to a narrow SCSI bus.
Tape cartridge movement
Tape cartridge stuck in tape
drive.
• Power cycle the library, allow it to c omplete initialization, which in rare
cases can take as long as 10 minutes, and then retry unloading the tape
using the library operator control panel.
• Allo w t he tape drive to complete all ope rations. This may take as long as
ten minutes if you reset or cycle power up the library while the cartridge is
positioned at the physical end of the media.
• Make sure that the backup software is not reserving the slot or preventing
the tape drive from ejecting the tape. The backup software needs to cancel
the reservation and any hold it has on the tape drive. Temporarily
disconnecting the library from the host server and power cycling
eliminates the host and its software as a problem source.
• Contact your service representative.
Tape stuck in s torage slot.
See Chapter Removing stuck tape cartridges from the library, Page 14.
Table 1 Troubleshooting table
Page 14
NEO S-Series User Guide
10400666-001 © 2014 Overland Storage, Inc. Page 14
Removing stuck tape cartridges from the library 3.3
WARNING
Stuck tape cartridges in the NEO S-Series Tape Library
Risk of damage devices
When the library is moved, any tape cartridge can become
dislodged from the magazines and damage the tape cartridges
left in the library and library robo tic .
To avoid damaging the libraries, remove the tape cartridges
before moving the libraries.
Indications for a stuck tape cartridge are e.g. cartridge cannot be removed via OCP/RMU; robotic movement
blocked when pulling a cartridge (see error codes); strange noises of the robotic; no read/write operation
possible in the drive
To remove a stuck tape cartridge, adhere the following steps:
1. Unlock the magazine (with / without mailslot) us e the:
• OCP, see Chapter Releasing and replacing magazines, Page Error! Bookmark not defined.
RMU, see Chapter Releasing and replacing , Page Error! Bookmark not defined.
• Emergency release, if you are not able to unlock the magazine with the OCR or RMU,
see Chapter Emergency release, Page 15
2. If applicable, pull the mail slot magazine out to access the tape cartridge.
3. To remove the tape cartridge from the mail slot area see Figure 100 / from the cpl. Magazine see 9.4
• Use the finger holes to push the tape o ut o f the mail slot.
• If required insert a new tape cartridge.
• Repeat this process until all stuck tape cartridges are removed.
In the following figure, an triple mailslot is shown as an example.
Figure 1 Removing a stuck tape
4. Push the mail slot magazine back into the library.
Page 15

NEO S-Series User Guide
10400666-001 © 2014 Overland Storage, Inc. Page 15
Emergency release 3.4
NOTE
Use only in emergency fall
The emergency release is similar for all library unit heights..
If you cannot remove the complete magazines via the OCP or RMU, do the following:
1. Press the power button on the front bezel to power down the library.
2. Unplug the power cord from the library.
3. From the rear panel of the library, find the access holes for the right and left magazines.
Figure 2 Rear panel (access holes)
1 - Access hole for the right magazines
2 - Access hole for the left magazines
4. Push the end of a small metal pin or straightened paper clip into the magazine access hole at the back of the device.
While holding the pin or clip, have a second person attempt to pull the magazine o ut of the front of the unit.
For the 4U, all magazines on a side are released and should be removed at the same time.
Figure 3 4U Front panel (magazine remove)
5. If necessary, repeat the steps 3 and 4 for the other magazine.
6. If other tape cartridges are still in the library, or if you were unable to manually remove the magazines and tape
drive, contact the service for further instructions. See Chapter Contacting , Page Error! Bookmark not defined..
Upgrade the library firmware 3.5
The firmware version for the libraries must be compatible with all implemented devices. Verify that the libr a ry has the
latest released version of firmware loaded.
Page 16

NEO S-Series User Guide
10400666-001 © 2014 Overland Storage, Inc. Page 16
NOTE
After upgrading the library firmware, the library system restarts
automatically.
To upgrade the library firmware, navigate with RMU or OCP:
RMU screen: > Service > Firmware > Upgrade Library Firmware > Upgrade
OCP screen: > Main Menu > Service > Service Library > Library FW Upgrade by USB
The actual library FW must be loaded on an USB stick to be connected on the backside of the unit. When Browse button
is pressed, the FW file name will be displayed and can be selected for upgrading.
General diagnostic 3.6
1.6.1 System test
The System Test: is a general test to veri f y the usability and reliability of the library. The duration is depending on the
test cycles defined.
To run the system test, navigate with RMU or OCP:
RMU screen: > Service > General Diagnostic > System Test
OCP screen: > Main Menu > Service > Service Library > Run Tests > System Test
Slot-to-Slot test 3.6.1
The Slot-to-Slot test shuffles the tapes between the slots to exercise the robotic. At the end of the test the tapes are not
returned to their original slots.
To run the Slot-to-Slot test, navigate with RMU or OCP:
RMU screen: > Service > General Diagnostic > Slot to Slot
OCP screen: > Main Menu > Service > Service Library > Run Tests > Slot to Slot Test
Library verify test 3.6.2
NOTE
The library will remove any tape from the tape drives and go offline
when running the test. Verify that any ap plications using the library
have completed before starting the test.
The Library verify test is a diagnostic routine called Library Health Chec k (L H C) .
This routine allows:
• to functionally test all library and drive hardware with the exception of exter nal interfaces (SCSI).
• to verify a newly installed machine.
• to verify repair actions.
To run Library verify test, navigate with OCP:
OCP screen: > Main Menu > Service > Service Library > Library Verify
Operations during the Library Health Check (LHC):
Page 17

NEO S-Series User Guide
10400666-001 © 2014 Overland Storage, Inc. Page 17
1. The user starts the test from the master library OCP. The administrator password is required. The test requires user
interaction and can only be run from t he OCP.
2. The master library performs a self-test, verifies that it can communicate with the tape drives and the library
extender, and then the lower library performs a self-test.
3. The library returns any tapes from the tape drives to their home slots. If the home slot for a tape is unknown, the
library will move the tape to the mail slot a nd prompt the user to remove it.
4. The library prompts the user to enter the number of cycles to run the test. The library runs up to 10 cycles.
5. The library opens the mail slot in the extended library, which will generall y be in the lower library, and prompts the
user to insert a scratch tape
6. The user inserts a scratch tape into the lowest-numbered mail slot. If no mail slots are enabled or the user closes the
mail slot without inserting a tape into the lowest-numbered mail slot, the library will perform a shortened version o f
the test, skipping step 7.
7. The library loads the scratch tape into the first tape drive, unloads the scratch tape from the tape drive, and returns
the scratch tape to the mail slot. If the user selected to test all of the tape drives, the library will load the scratch tape
into each tape drive before returning it to the mail slot.
8. The library moves the tape from the four top-row corner slots of both libraries to the tape drive load point and then
returns the tape to its slot. If none of the top -row corner slot positions of either library contains a tape, the test stops
and the library displays an error message.
9. If additional cycles remain to be run, the tes t will return to step 7 if there is a tape in the mail slot or
step 8 if there is not a tape in the mail slot.
10. At the conclusion of the test, the library pops open the mail slot and waits for the user to remove the scratch tape
11. The library displays the test complet ion status, including any recoverie s or errors that may have occurred.
Error codes 3.7
1.7.4 Error messaging
The internal error messaging between the differ ent modules and tasks contain the following information:
• Error code
• Sub error code
• Affected source element
• Affected target element
• Affected library in stacked mode (Master/Slave)
• Additional information depending on context and error code
Error structure 3.7.1
The error messaging is a fixed 4-byte structure with the following content:
• Error type
• Error code
• Sub error code
• Internal code (active command code)
OCP error reporting 3.7.2
In case of an error or a warning, a popup message appears on the OCP. The information is shown in 3 different message
displays, like shown in the following example:
Page 18

NEO S-Series User Guide
10400666-001 © 2014 Overland Storage, Inc. Page 18
1. General <Error> display
Select the <Hint> button
to show the <Hint> display.
2. <Hint> display
Select the <Detail> button
to show the<Detail> display
3. Detail display
Figure 4 4U OCP Error display
RMU error reporting 3.7.3
In case of an error or a warning, the following popup message appears on the RMU. All information will be available in
one message box, like shown in the following example:
Figure 5 RMU Error display
Unable to pull cartridge
-
cartridge stucked
Mag
: Low
/Left Slot
:
5
<OK
> <
Hint
>
Error
Check cartridge status by
removing the
corresponding magazine
<OK> <Detail>
Error -> Hint
Error : 8A 65
Initiator : Robotic
Time : 09/01/28 10:55:00
<OK> <Back>
Error->DetailsError -> Details
Page 19

NEO S-Series User Guide
10400666-001 © 2014 Overland Storage, Inc. Page 19
Main error codes 3.7.4
Error
Code
Description
User Action
Critical Component Status
80
Barcode Reader Error,
cannot initialize BCR
Retry operation; after
several occurrences contact
technical support
Robotic probably defect
• Flexi cable to BCR not properly
connected.
• Flexi cable to BCR damaged.
• Barcode engine defect.
81
Barcode Reader Error, no
response from BCR
Retry operation; after
several occurrences contact
technical support
Robotic probably defect
• Flexi cable to BCR not properly
connected.
• Flexi cable to BCR damaged.
• Barcode engine defect.
82
EEPROM Error, no
response from EEPROM
(located on robotic
controller)
Retry operation; after
several occurrences contact
technical support
Robotic probably defect
• Robotic controller not working
(hardware problem, EEPROM
defect).
83
Robotic controller generic
problem
Reset the unit and retry
operation. After several
occurrences contact
technical support
Robotic probably defect
• Robotic hardware not working
(cables, distribution boards,
robotics controller).
84
Setting of gripper motor
parameters failed
Reset the unit and retry
operation. After several
occurrences contact
technical support
Robotic probably defect
• Elevator distribution board
defect.
• Cabling incorrect.
85
Setting of slider motor
parameters failed
Reset the unit and retry
operation. After several
occurrences contact
technical support
Robotic probably defect
• Elevator distribution board
defect.
• Cabling incorrect.
86
Setting of elevator motor
parameters failed
Reset the unit and retry
operation. After several
occurrences contact
technical support
Robotic probably defect
• Elevator distribution board
defect.
• Cabling incorrect.
87
Setting of rotation motor
parameters failed
Reset the unit and retry
operation. After several
occurrences contact
technical support
Robotic probably defect
• Robotics controller defect.
88
Setting of sled motor
parameters failed
Reset the unit and retry
operation. After several
occurrences contact
technical support
Robotic probably defect
• Robotics controller defect.
89
Gripper blocked
Run ‘Library Verify Test’,
after several occurrences
contact technical support
Robotic probably defect
• Gripper motor not connected or
defect.
• Gripper motor voltage to low.
• Robotics controller or
distribution boards defect.
• Check gripper mechanism
according stiffness in movement.
Page 20

NEO S-Series User Guide
10400666-001 © 2014 Overland Storage, Inc. Page 20
Error
Code
Description
User Action
Critical Component Status
8A
Slider blocked
Run ‘Library Verify Test’,
after several occurrences
contact technical support
Robotic probably defect
• Slider Motor not connected or
defect.
• Slider motor voltage to low.
• Robotics controller or
distribution boards defect.
• Check slider mechanism
according stiffness in movement.
8B
Elevator blocked
Run ‘Library Verify Test’,
after several occurrences
contact technical support
Robotic probably defect
• Elevator motor not connected or
defect.
• Elevator motor voltage to low.
• Robotics controller or
distribution boards defect.
• Check elevator mechanism
according stiffness in moveme nt
8C
Rotation blocked
Run ‘Library Verify Test’,
after several occurrences
contact technical support
Robotic probably defect
• Rotation motor not connected or
defect.
• Rotation motor voltage to low.
• Rotation home sensor defect.
• Rotation sensor connecting cable
damaged.
• Robotics controller or
distribution boards defect.
8D
Sled blocked
Run ‘Library Verify Test’,
after several occurrences
contact technical support
Robotic probably defect
• Sled motor not connected or
defect.
• Sled motor voltage to low.
• Sled home sensor defect.
• Sled sensor connecting cable
damaged.
• Robotics controller or
distribution boards defect.
• Check sled mechanism (guide
rail, ducktail) according stiffness
in movement.
8E
Cannot find gripper block
within the expected range
Run ‘Library Verify Test’,
after several occurrences
contact technical support
Robotic probably defect
• Elevator distribution board
defect.
• Cabling incorrect.
• Check gripper gears.
8F
Cannot find slider block
within the expected range
Run ‘Library Verify Test’,
after several occurrences
contact technical support
Robotic probably defect
• Elevator distribution board
defect.
• Cabling incorrect.
• Check slider gears.
Page 21

NEO S-Series User Guide
10400666-001 © 2014 Overland Storage, Inc. Page 21
Error
Code
Description
User Action
Critical Component Status
90
Cannot find elevator block
within the expected range
Run ‘Library Verify Test’,
after several occurrences
contact technical support
Robotic probably defect
• Elevator distribution board
defect.
• Cabling incorrect.
• Check elevator gears.
91
Cannot find rotation block
within the expected range
Run ‘Library Verify Test’,
after several occurrences
contact technical support
Robotic probably defect
• Cabling incorrect.
• Check rotation gears.
92
Cannot find sled block
within the expected range
Run ‘Library Verify Test’,
after several occurrences
contact technical support
Robotic probably defect
• Cabling incorrect.
• Check sled gears.
93
Gripper outside range,
Gripper has reached a
position beyond the
expected range
Run ‘Library Verify Test’,
after several occurrences
contact technical support
Robotic probably defect
• Elevator distribution board
defect.
• Cabling incorrect.
• Check gripper gears.
94
Slider outside range,
Slider has reached a
position beyond the
expected range
Run ‘Library Verify Test’,
after several occurrences
contact technical support
Robotic probably defect
• Elevator distribution board
defect.
• Cabling incorrect.
• Check slider gears.
95
Elevator outside range,
Elevator has reached a
position beyond the
expected range
Run ‘Library Verify Test’,
after several occurrences
contact technical support
Robotic probably defect
• Elevator distribution board
defect.
• Cabling incorrect.
• Check elevator gears.
96
Rotation outside range,
Rotation has reached a
position beyond the
expected range
Run ‘Library Verify Test’,
after several occurrences
contact technical support
Robotic probably defect
• Cabling incorrect.
• Check rotation gears.
97
Sled outside range,
Sled has reached a
position beyond the
expected range
Run ‘Library Verify Test’,
after several occurrences
contact technical support
Robotic probably defect
• Cabling incorrect.
• Check sled gears.
98
Cartridge prese nt sensor
not found
Run ‘Library Verify Test’,
after several occurrences
contact technical support
Robotic probably defect
• Robotics controller defect.
• Cartridge present sensor defect
(mechanics, electronics).
• Cabling incorrect.
99
Sled home sensor not
found
Run ‘Library Verify Test’,
after several occurrences
contact technical support
Robotic probably defect
• Robotics controller defect.
• Slider home sensor defect
(mechanics, electronics).
• Cabling incorrect.
Page 22

NEO S-Series User Guide
10400666-001 © 2014 Overland Storage, Inc. Page 22
Error
Code
Description
User Action
Critical Component Status
9A
Rotation home sensor not
found
Run ‘Library Verify Test’,
after several occurrences
contact technical support
Robotic probably defect
• Robotics controller defect.
• Rotation home sensor defect
(mechanics, electronics).
• Cabling incorrect.
9B
Sled position sensor
(prism sensor) not found,
Run ‘Library Verify Test’,
after several occurrences
contact technical support
Robotic probably defect
• Robotics controller defect.
• Sled home sensor defect
(mechanics, electronics).
• Cabling incorrect.
9C
Gripper range out of
specification
Run ‘Library Verify Test’,
after several occurrences
contact technical support
Robotic probably defect
• Gripper motor not connected or
defect.
• Robotics controller or
distribution boards defect.
• Check gripper mechanism
according stiffness in movement
9D
Slider range out of
specification
Run ‘Library Verify Test’,
after several occurrences
contact technical support
Robotic probably defect
• Slider motor not connected or
defect.
• Robotics controller or
distribution boards defect.
• Check slider mechanism
according stiffness in movement.
9E
Elevator range out of
specification
Run ‘Library Verify Test’,
after several occurrences
contact technical support
Robotic probably defect
• Elevator motor not connected or
defect.
• Robotics controller or
distribution boards defect.
• Check elevator mechanism
according stiffness in movement.
9F
Rotation range out of
specification
Run ‘Library Verify Test’,
after several occurrences
contact technical support
Robotic probably defect
• Rotation motor not connected or
defect.
• Robotics controller or
distribution boards defect.
• Check rotation mechanism
according stiffness in movement.
A0
Sled range out of
specification
Run ‘Library Verify Test’,
after several occurrences
contact technical support
Robotic probably defect
• Sled motor not connected or
defect.
• Robotics controller or
distribution boards defect.
• Check sled mechanism according
stiffness in movement.
Page 23

NEO S-Series User Guide
10400666-001 © 2014 Overland Storage, Inc. Page 23
Error
Code
Description
User Action
Critical Component Status
A1
Open Mail Slot
(Import/Export Element)
failed
Retry operation, after
several occurrences contact
technical support
Mail Slot release mechanism defect
B0
Robotic controller
response timeout. A
command did not
complete in the required
amount of time.
Reset the unit and retry
operation. After several
occurrences contact
technical support
Robotic probably defect
• No communication from library
controller to robotic controller.
• Robotic hardware not working
(cables, distribution boards,
robotics controller).
• Download robotic firmware fails.
B1
NACK received from
robotic controller
Reset the unit and retry
operation. After several
occurrences contact
technical support
Robotic probably defect
• Communication from library
controller to robotic controller
disturbed.
• Robotic hardware not working
(cables, distribution boards,
robotics controller).
• Download robotic firmware fails.
B2
Robotic controller
communication failed
Reset the unit and retry
operation. After several
occurrences contact
technical support
Robotic probably defect
• No communication from librar y
controller to robotic controller.
• Robotic hardware not working
(cables, distribution boards,
robotics controller).
• Download robotic firmware fails.
B3
Robotic controller urgent
stop due to a released
magazine
Check if magazine are
completely inserted and
retry operation. After
several occurrences contact
technical support
Magazines released
• Magazine present sensor defect.
B4
Cartridge did not transport
completely
Gripper could not pick
cartridge and CP sensor
not present
After pushi ng the cart CP
sensor still present
CP sensor defect
Cartridge sticks in slot/drive
B5
Robotic controller doesn’t
respond on command
Reset the unit and retry
operation. After several
occurrences contact
technical support
Robotic probably defect
• No communication from librar y
controller to robotic controller.
• Robotic hardware not working
(cables, distribution boards,
robotics controller).
• Download robotic firmware fails.
C0
Network initialization
failed
Check network cable and
network configuration. If
the error recurs, contact
technical support
Library controller probably defect
probably a hardware problem, check
library controller
Page 24

NEO S-Series User Guide
10400666-001 © 2014 Overland Storage, Inc. Page 24
Error
Code
Description
User Action
Critical Component Status
C1
Telnet Interface
initialization failed
Check network cable and
network configuration. If
the error recurs, contact
technical support
Library controller probably defect
probably a hardware problem, check
library controller
C2
Web server initialization
failed
Check network cable and
network configuration. If
the error recurs, contact
technical support
Library controller probably defect
probably a hardware problem, check
library controller
C6
Ping command did not
reached target
Check network cable and
network configuration. If
the error recurs, contact
technical support
Library controller probably defect
probably a hardware problem, check
library controller
C7
Cannot Upgrade from
USB
Retry of Firmware upgrade,
if not successful contact
technical support
Library controller probably defect
probably a hardware problem, check
library controller
C8
Cannot Upgrade from FTP
Retry of Firmware upgrade,
if not successful contact
technical support
Library controller probably defect
probably a hardware problem, check
library controller
C9
Cannot Upgrade Robotic
from Flash
Retry of Firmware upgrade,
if not successful contact
technical support
Library controller probably defect
probably a hardware problem, check
library controller
D0
ROM error.
ROM checksum incorrect
Retry of Firmware upgrade,
if not successful contact
technical support
Library controller probably defect
probably a hardware problem, check
library controller
D1
RAM error.
Power on Self Test (
POST ) has failed,
Retry operation; after
several occurrences contact
technical support
Library controller probably defect
RAM defect, check library controller
D2
NVRAM error.
R/W operation to
NVRAM has failed
Retry operation; after
several occurrences contact
technical support
Library controller probably defect
probably a hardware problem, check
library controller
D3
CTC Error.
Timer unit has failed
during POST.
Retry operation; after
several occurrences contact
technical support
Library controller probably defect
probably a hardware problem, check
library controller
D4
UART Error.
Frame overrun or Parity
Error on serial Interface.
Retry operation; after
several occurrences contact
technical support
Check library and robotics controlle r
D5
Display Error
Communication to display
failed
Retry operation; after
several occurrences contact
technical support
Check library controller and OCP
D6
Memory Error, Stack and
heap overflow.
Retry operation; after
several occurrences contact
technical support
Library controller probably defect
D7
Fatal system error
Retry operation; after
several occurrences contact
technical support
Library controller probably defect
probably hardware problem, check
library controller
D8
Data base error
Retry operation; after
several occurrences contact
technical support
Library controller probably defect
probably hardware problem, check
library controller
Page 25

NEO S-Series User Guide
10400666-001 © 2014 Overland Storage, Inc. Page 25
Error
Code
Description
User Action
Critical Component Status
D9
No SCSI IC detected
Retry operation; after
several occurrences contact
technical support
SCSI controller probably defect
Check SCSI controller and libra ry
controller
DA
In Library Verify Test the
barcode reader has read
different barcode data for
the same cartridge label
Check barcode label on
scratch cartridge and run
Library Verify Test again.
If the error recurs, contact
technical support
DB
Warning event!
See section below
DC
I²C Bus Failure
Retry operation; after
several occurrences contact
technical support
Failure in I² C bus communication.
• Check library controller and
connections t o OCP and
backplane.
• Check OCP.
• Check backplane.
• Check drive sl eds.
DD
Warning event!
See section below
DE
Warning event!
See section below
DF
Warning event!
See section below
E0
Incompatible magazine
detected
Check type of lowest left
magazine
Magazine type not supported
E2
Unsupported hardware
detected – Library
firmware upgrade required
Library Extender was
installed without upgrading
the library firmware.
Upgrade library code to
revision which suppor t s this
feature
EB
Power supply health check
failed due to a power
supply failure. Please
contact service.
Contact technical support
Power supply probably defect
F0
Drive Over temperature
Condition
The sub code indicates
which drive is affected
Example:
Sub code 01: drive #1
Check ambie nt temperature
conditions and check all
fans, after several
occurrences contact
technical support
Drive probably defect
F1
Drive Communication
Error,
Library controller has lost
communication to drive
The sub code indicates
which drive is affected
Example:
Sub code 01: drive #1
Retry operation; if not
successful contact technical
support
Communication cable between drive
and drive sled controller defect.
Drive sled controller defect
Check cabling drive sled controller backplane
Check cabling backplane library
controller
Drive defect / check drive
Page 26

NEO S-Series User Guide
10400666-001 © 2014 Overland Storage, Inc. Page 26
Error
Code
Description
User Action
Critical Component Status
F2
Drive sled not present
The sub code indicates
which drive sled is
affected
Example:
Sub code 01: drive sled #1
Retry operation; if not
successful contact technical
support
Drive probably defect
• Check if dri ve sled is completely
inserted
• Drive sled controller defect.
• Drive defect.
F3
Drive Hardware Error
The sub code indicates
which drive is affected
Example:
Sub code 01: drive #1
Cycle Power, after several
occurrences contact
technical support
Drive probably defect
F4
Drive Load Timeout
Drive has ru n in a timeout
while loading a tape
The sub code indicates
which drive is affected
Retry operation; if not
successful contact technical
support
Drive probably defect
• Drive leader bent.
• Drive initialize repeatedly.
• Drive defect (no function).
F5
Drive Unload Timeout
Drive has ru n in a timeout
while unload ing a tape
The sub code indicates
which drive is affected
Retry operation; if not
successful contact technical
support
Drive probably defect
• Drive leader bent.
• Drive initialize repeatedly.
• Drive defect (no function).
F8
Invalid drive command
Retry operation; if not
successful contact technical
support
Drive probably defect
F9
Invalid drive parameter
Retry operation; if not
successful contact technical
support
Drive probably defect
FA
SDCI microcode error
Retry operation; if not
successful contact technical
support
Drive probably defect
FB
Drive logged out
Retry operation; if not
successful contact technical
support
Drive probably defect
FC
Internal SCSI command
failed with check
condition
Retry operation; if not
successful contact technical
support
Drive probably defect
FD
Internal SCSI command
timeout
Retry operation; if not
successful contact technical
support
Drive probably defect
Table 2 Error codes
Page 27

NEO S-Series User Guide
10400666-001 © 2014 Overland Storage, Inc. Page 27
Sub error codes related to the robotic 3.7.5
01 Mechanical initialization failure
02 Connection to slave robotic failed
03 Error motor initialization
04 Error during gripper close
05 Error slider home positioning
06 Error elevator home movement
07 Error during sled move ment to rotation position
08 Error during rotation initialization, get range failed
09 Error elevator init
0A Error during rotation to far position
0B E r ror first sled init, move to sensor failed
0C Error during sled movement to rotation position
0D Error during rotation to drive position
0E Error slider init, get range failed
0F Error during slider forward movement
10 Error gripper init, get range failed
11 Error during slider home movement
12 Error during rotation to FAR position
13 Error sled init, move to sensor failed
14 Error during sled move – check shipping lo ck
20 Error Inventory scan
21 Error during gripper close
22 Error slider home movement
23 Error during move gripper to scan pos
24 Error reading barcode label
25 Error during move sled to sc an position
26 Error during move elevator to scan position
27 Error during sled preposition movement
29 Error during closing gripper
2A Error slider preposition movement
2B Error during opening gripper
2C Error during sled movement up to sensor
2D Error slider preposition backwar ds mov em en t
30 Error slot preposition
31 Error during sled move ment in <FLMove Rot at io n> f unc tion
32 Command sending to robotic failed
33 Error during elevator move ment in <FLMoveRotatio n> function
34 Error during rotation in <F LMoveRotati on> f unct i on
35 Error during elevator move ment in <FLMoveSled> function
36 Error during sled movement in <FLMove Sled> functi on
37 Error during sled positioning to sensor in <FLMoveSled> function
38 Error during sled positioning to mail slot in <FLMoveSled> function
39 Error during sled positioning without sensor
3A Error during elevator movement without sen so r
3B Error slot position sensor not found
Page 28

NEO S-Series User Guide
10400666-001 © 2014 Overland Storage, Inc. Page 28
40 Movement to/from slot failed
41 Error during first slider movement
42 Error during first gripper movement
43 Error during second slid er mo ve me nt
44 Error during second gripper movement, get range failed
45 Error during third slid e r movement, move ho me fail ed
46 Error during set hold current to avoid torsion
50 Preposition to drive failed
51 Elevator movement to home sensor failed
52 Sled movement to home sensor failed
53 Error during sled movement to drive position
54 Error during rotation to drive position
55 Error during elevator movement in drive position
56 Error during sled movement to rotation position
57 Error during rotation to end position
60 Move from/to drive failed
61 Error during first slider movement
62 Error during first gripper movement
63 Error during second slid er mo ve me nt
64 Error during second gripper movement, get range failed
65 Error during third slid e r movement, move ho me fail ed
70 Release magazine failed
71 Error during sled movement to rotation position
72 Error during rotation to unlock position
73 Error during move sled to block
80 Opening mail slot failed
81 Error during movement to mail slot open position
82 Error during moving back - sensor was fou nd
90 Movement to home position failed
91 Elevator movement to home position failed
92 Error during sled movement to rotation position
93 Error during rotation to home or far position
94 Sled movement to home sensor position failed
95 Sled movement to transport position failed
99 Error during rotation movement to rotation min po sitio n
A0 Movement to mail slot failed
A1 Sled movement to sensor failed
A2 Sled movement to rotation position failed
A3 Elevator movement to home position failed
A4 Error during rotation to far position
A5´ Sled movement to mail slot position failed
A6 Error during ele vator movement to position
A7 Error during mail s lot detection
Page 29

NEO S-Series User Guide
10400666-001 © 2014 Overland Storage, Inc. Page 29
B0 EEPROM on robotics controller not accessible or error during r/w operation
B1 Save/restore configuration settings: not enough internal memory available for creating the file and
restoring the file respectively
B2 Save/restore configuration settings: restore buffer corrupted, checksum calculation failed
B3 Save/restore configuration settings: data base field corrupted
B4 Save/re sto re configuration settings: invalid personality
B5 Save/re sto re configuration settings: invalid file
Sub error codes related to the library 3.7.6
All libraries
81 Tape drive wake up failed
88 Error accessing slot status
90 Robotic load not reached tape present sensor
91 No activity after <Load> command
92 Timeout while loading tape
93 No activity after <Load> command
94 Timeout drive unload
95 Tape drive terminated unsuccessfully
96 Tape not ejected at robot unload
97 Slot not free at robot unload
98 Tape not seated in <Load> phase 1
1U library
C0 Check magazine failed
C1 Error during rotation movement
C2 Error during elevator movement
C3 Error during sled moveme nt
C4 Error during sled movement to sensor
Page 30

NEO S-Series User Guide
10400666-001 © 2014 Overland Storage, Inc. Page 30
4 Servicing
This chapter provides ins tructions for servicing the S-Series library.
Possible tools needed 4.1
To service a library you may need one or more of the following tools:
• Flat-blade screwdrivers (large and small)
• #2 and #3 Phillips screwdriver
• Ground strap
Electrostatic discharge 4.2
CAUTION
Static sensitive
Risk of damage devices
A discharge of static electricity can damage static-sensitive
devices or micro circuitry.
Proper packaging and grounding techniques are necessary
precautions to prevent damage.
To prevent damaging the system, be aware of the precautions you need to follow when setting up the system or
handling parts. A discharge of static electricity from a finger or other conductor may damage system boards or
other static-sensitive devices. This type of damage may reduce the life expectancy of the device.
To prevent electrostatic damage, observe the following precautions:
• Transport products in static-safe containers such as conductive tubes, bags, or boxes.
• Keep electrostatic-sensitive parts in their containers until the y ar rive at static-free workst a ti o ns.
• Cover the library with approved static-dissipati ng material.
• Provide a wrist strap connected to the work surface and properly grounded tools and equipment.
• Place parts on a grounded surface before removing them from their containers.
• Keep the work area free of non-conducting materials, such as ordinary plastic assembly aids and foam
packing.
• Make sure you are always properly grounded when touching a static-sensitive component or assembly.
• Avoid touching pins, leads, or circuitry.
• Use conductive field service tools
• If you do not have any of the suggested eq ui pment for pr oper grounding, have an authorized reseller
install the part.
Page 31

NEO S-Series User Guide
10400666-001 © 2014 Overland Storage, Inc. Page 31
Removing a tape drive 4.3
NOTE
A tape drive is hot pluggable. It is not manda tory to power down the
library to replace a drive.
Adhere strictly the following steps to remove a tape drive:
1. Unload the tape cartridge(s) from the tape drive; with
OCP, see Chapter Moving media within the li br ary, Page Error! Bookmark not defined.
RMU, see Chapter Move Media w ithin the library, Page Error! Bookmark not defined.
2. Remove all affected tape drive cables on the rear panel.
3. Loosen the blue thumbscrews 2x located on the rear of the tape drive with your fingers.
4. Slightly pull out and push down the pullout tab for the product ID label so it does not inte rfere with the tape
drive as shown in Figure 105, Step 1.
5. Pull the tape drive on the handle straight out of the li brary as shown in Figure 105, Step 2.
Figure 6 Remove a tape drive
6. To store or ship the removed tape drive, repackage it in the original or replacement device packaging
materials.
Replacing a tape drive 4.4
Use this procedure to replace the tape drive with another tape drive:
1. To remove the tape drive from the library,
see Chapter Removing a tape drive, Page 31.
2. To install the new tape drive, see Chapter Installing a tape drive, Page Error! Bookmark not defined..
Page 32

NEO S-Series User Guide
10400666-001 © 2014 Overland Storage, Inc. Page 32
Removing the library controller 4.5
Adhere strictly the following steps to remove a library controller:
1. Power down the library by pressing the power button on the front panel.
2. Remove the power cord on the rear panel of the library.
3. Remove all affected library controller cables and if available the USB device on the rear panel of the library.
4. Loosen the blue thumbscrews located on the rear of the library controller with your fingers.
5. Pull the library controller strai ght out of the library as shown in Figure 106.
Figure 7 Remove the library controller
6. To store or ship the removed library controller, repackage it in the original or replacement device ESD
packaging materials.
Replacing the library controller 4.6
Use this procedure to replace the library controller with another library controller:
1. To remove the library controller from the library, see Chapter 10.5 Removing the library controller
2. Install the new library controller as described in 7.11 Installing the libra ry controller.
3. Reconnect the power cord to the power supply at the back of the library and all affected library controller
cables
4. Power on the library using the power button on the front panel.
5. After power is restored to the library controller card, the library will disp lay "VPD Selection" on the OCP.
Note: Use care when selecting the appropriate VPD from which or to which to restore. An error in selection
here could cause a long downtime.
6. Verify the serial number, firmware versions, and configurations.
7. Package the failed library controller card in the same packaging that was used to ship the controller card to
you and return it to Overland Storage.
Page 33

NEO S-Series User Guide
10400666-001 © 2014 Overland Storage, Inc. Page 33
Removing a power supply 4.7
Adhere strictly the following steps to remove a power supply:
1. Power down the library by pressing the power button on the front panel.
2. Remove the power cord on the rear panel of the library.
3. Loosen the blue thumbscrews 2x located on the rear of the power supply with your fingers.
4. Pull the power supply straight out of the library as shown in Figure 107.
Figure 8 Remove the power supply
5. To store or ship the removed power supply, repackage it in the original or replacement device packaging
materials.
Replacing the pow e r suppl y 4.8
Use this procedure to replace the power supply with ano th er power supply:
1. To remove a power supply from the library,
see Chapter Removing a power supply, Page 33.
2. To install the new power supply, see Chapter Installing a power supply, Page Error! Bookmark not
defined..
NOTE
A second power supply can be installed without powering down the
library.
Page 34

NEO S-Series User Guide
10400666-001 © 2014 Overland Storage, Inc. Page 34
Servicing a magazine 4.9
1. To remove a magazine, adhere the following steps:
• Unlock the appropriate magazine, with:
OCP, see Chapter Releasing and replacing magazines, Page Error! Bookmark not defined.
RMU, see Chapter Releasing and replacing , Page Error! Bookmark not defined.
• Emergency release, if you are not able to unlock the magazine with the OCR or RMU,
see Chapter Emergency release, Page 15.
2. Pull the released magazine out of the library.
3. Remove all tape cartridges from the magazine.
4. To store or ship the removed magazine, repackage it in the replacement device packaging materials.
5. Insert an appropriate magazine into the empty magazine slot of the library.
6. Slide the magazine completely into the library. The magazine will lock into place once it is correctly
installed.
Removing the base chassis 4.10
WARNING
Weight of Tape Library
Risk of personal injury
Before lifting a library:
Observe local health and safety requirements and guidelines for
manual material handling.
Remove all tape cartridges to reduce the weight.
Obtain adequate assistance to lift and stabilize the library during
installation or removal.
Preparing to remove the base chassis 4.10.1
Adhere strictly the following steps:
1. If the OCP or RMU works:
• Write down / save the system, drive, and network configuration settings.
You will need these settings to r e -configure/ restore the library after replacing the base chassis.
OCP: Configuration>Save / Restore Library Config>save to/restore from USB
RMU: Configuration>Restore Defaults>Save / Restore Con f ig to file
• Remove all tape cartridges to reduce the weight,
see Chapter Removing stuck tape cartridges from the library, Page 14.
• Remove the magazines from the library, with:
OCP, see Chapter Releasing and replacing magazines, Page Error! Bookmark not defined.
RMU, see Chapter Releasing and replacing , Page Error! Bookmark not defined..
2. If the OCP or RMU does not work:
• Remove the magazines manually from the library; see Chapter Emergency release, Page 15.
3. Power down the library by pressing the power button on the front panel.
Page 35

NEO S-Series User Guide
10400666-001 © 2014 Overland Storage, Inc. Page 35
4. Remove the cables on the rear panel of the library.
5. Remove the power supply; see Chapter Removing a power supply, Page 33.
6. Remove the tape drive(s); see Chapter Removing a tape drive, Page 31.
7. Remove the library controller; see Chapter Removing the library controller, Page 32.
Removing the base chassis from the rack 4.10.2
To remove the base chassis from the rack, adhere strictly the following steps:
1. Using a 3# Phillips screwdriver placed through the small holes in the mounting bracket to loosen the M5
screw(s) on each side of the library.
2. Remove the library from the rack rails.
3. Remove the mounting brackets of the library.
4. If available:
• Remove the shipping lock and the yellow label on the rear panel.
• Replace the shipping lock on the top of the library.
• Replace yellow label to securing the shipping lock on the top of the library
5. To store or ship the removed base chassis, repackage it in the original packaging materials,
see Chapter Packaging, Page 36.
Replacing the base chassis 4.11
Use this procedure to replace the base chassis with another base chassis:
1. To remove the base chassis from the rack,
see Chapter Removing the base chassis, 10.10. To install the new base chassis and its components, see
Chapter Installing,7.
Page 36

NEO S-Series User Guide
WARNING
Weight of Tape Library
NOTE
Only for 1U, 2U and 4U libraries:
5 Packaging before transportation
Risk of personal injury
Before packaging the library as shown in the figures below:
Before lifting a library:
Observe local health and safety requirements and guidelines for
manual material handling.
Obtain adequate assistance to lift and stabilize the library during
packaging.
Before transport the library, it is recommended that the shipping
lock and the yellow label is replaced from the rear panel on the top
cover of the library (see also chapter 7.8).
1. Before sending back the defect library:
• P lace shipping lock in the un it:
Remove the yellow label that is securing slot for the shipping lock on the top of the library.
Figure 9 Remove the yellow label
Remove the s hipping lock from the holder on the back of the unit and place the shipping lock (orientation a s shown by arrow) in
the slot on top of the unit to se c ure the r obotic
Figure 10 Placing the shipping lock and securing with yellow label
Holder position for the shipping lock on the rear panel 1U; 2U or 4U library, see section 6.3 Rear panel - A
Stick the yellow label on the top of the library to secure the shipping lock (or use any other tape)
10400666-001 © 2014 Overland Storage, Inc. Page 36
Page 37

NEO S-Series User Guide
• Pull out the pull-out tab with the pro duct ID label; see Figure 110, Step 1.
• Note the part and serial number; see Figure 110, Step 2.
Figure 11 Product ID label
• Contact the service. See Chapter Contacting , Page Error! Bookmark not defined..
2. Use the appropriate figure and table for your library and follow the packaging steps.
• For 1 U and 2U libraries, see Figure 111 below, Table 15 on Page 38.
• For 4 U librar ies, see Figure 112 below, Table 15 on Page 38.
Figure 12 Packaging the library (1U and 2U)
10400644-001 © 2014 Overland Storage, Inc. Page 37
Page 38

NEO S-Series User Guide
Step
Description
1
Packaging b ox
2
Bottom shell
3
Library
4
Middle shell
5
Top shell
Figure 13 Packaging the library (4U)
Table 3 Packaging the library (1U, 2U and 4U)
10400666-001 © 2014 Overland Storage, Inc. Page 38
Page 39

NEO S-Series User Guide
Form
1U
2U
4U
Height
Product alone:
Product alone:
Product alone:
Width
Product alone:
Product alone:
Product alone:
Depth
Product alone:
Product alone:
Product alone:
Weight
1 HH drive unit:
1 FH drive unit:
1 FH drive unit:
Weight
1 HH drive unit:
1 FH drive unit:
1 FH drive unit:
6 Technical specifications
Hardware specifications 6.1
factor
without
media
45.6 mm
Packaged:
235 mm
444.5 mm
Packaged:
589 mm
789.5 mm
Packaged:
989 mm
11.4 kg
87.6 mm
Packaged:
248 mm
447.5 mm
Packaged:
598 mm
740 mm
Packaged:
993 mm
14.7 kg
2 HH drive unit:
15.6 kg
175,2 mm
Packaged:
330 mm
447.5 mm
Packaged:
585 mm
740 mm
Packaged:
990 mm
21,3 kg
2 FH drive unit:
24,3 kg
1 HH drive unit:
22,2 kg
with
media
Table 4 Hardware specifications
10400644-001 © 2014 Overland Storage, Inc. Page 39
13.1 kg
20.2 kg
2 HH drive unit:
21.1 kg
4 HH drive unit
26,1 kg
30,6 kg
2 FH drive unit:
33,6 kg
2 HH drive unit:
31,4 kg
4 FH drive unit:
35,3 kg
Page 40

NEO S-Series User Guide
Operating
Temperature
10°C to 35°C
Max. temperature rise
10 °C / hour
Humidity
20 % RH to 80 % R.H. (non condens ing)
Maximum wet bulb
26 °C
Max. humidity rise
10% / hour
Altitude operating
0 to 10.000 ft (3000 m) at 25 °C ambient
Non Operating
Temperature
-30 °C to +60 °C
Max. temperature rise
20°C / hour
Humidity
10 % RH to 90% RH (non condensing)
Altitude
-22 to 33000 feet (-7 m to 10000 m)
Operating environment 6.2
Storage and
Shipping
Table 5 Operating environme n t
10400666-001 © 2014 Overland Storage, Inc. Page 40
Page 41

NEO S-Series User Guide
Characteristics
Specification
NEO S-Series tape library with LTO4 drive(s)
Maximum storage capacity
Native: 6,4/19,2/38,4TB
Maximum data transfer rate
Native: 120 MB/s (432 GB/h)
Interface
Ultra320 SCSI LVD
NEO S-Series tape library with LTO5 drive(s)
Maximum storage capacity
Native 12/36/72 TB
Maximum data transfer rate
Native: 140 MB/s (504 GB/h)
Interface
6 GB/s SAS
NEO S-Series tape library with LTO6 drive(s)
Maximum storage capacity
Native 25/77/144 TB
Maximum data transfer rate
Native: 210 MB/s (756 GB/h)
Interface
6 GB/s SAS
Maximum storage capacity and data transfer rate 6.3
(8/24/48/96 data cartridges)
(single drive)
(drive dependent)
(8/24/48/96 data cartridges)
(single drive)
Compressed: 12,8/38,4/76,8TB
(assuming 2:1 compression)
Compressed: 240 MB/s (864 GB/h)
(assuming 2:1 compression)
3 GB/s SAS
4 GB/s FC
Compressed: 24/72/144 TB
(assuming 2:1 compression)
Compressed: 280 MB/s (1,0 TB/h)
(assuming 2:1 compression)
(drive dependent)
(8/24/48data cartridges)
(single drive)
(drive dependent)
Table 6 Maximum storage capacity and data transfer rate
For additional information, see :
10400644-001 © 2014 Overland Storage, Inc. Page 41
8 GB/s FC
Compressed: 64/192/384TB
(assuming 2,5:1 compression)
Compressed: 525 MB/s (1,9 TB/h)
(assuming 2,5:1 compression)
8 GB/s FC
Page 42

NEO S-Series User Guide
1. Supported configurations, Table 1, Page Error! Bookmark not defined.
2. T ape cartridge type, Table 8, Page Error! Bookmark not defined.
3. Backward compatibility (tape cartridge), Table 8, Page Error! Bookmark not defined.
10400666-001 © 2014 Overland Storage, Inc. Page 42
Page 43

NEO S-Series User Guide
NOTE
To comply with the follo wing regulations and standards, the libra ry
NOTE
Disposal of waste equipment by users in private household in the
7 Agency Certifications
must be properly installed in an office or industrial environment
with shielded cables and adequate grounding of the SCSI bus and
the input power.
Recycling and disposal 7.1
European Union and Norway.
Figure 14 WEEE symbol
This symbol on the product or on its packaging indicates that this product must not be disposed of with your other household
waste. Instead, it is your responsibili ty to dispose of your equipment by handling it over to a designated collectio n p oint for the
recycling of waste electrical and electronic equipment. The separate collection and recycling of your waste equipment at this time
of disposal will help to conserve natura l resources and ensure that it is rec ycled in a manner that protects human health and the
environment. For more information about where you can drop off your waste equipment for recycling, please contact your local
city office, your household waste disposal service or the shop where you purchased the product.
10400644-001 © 2014 Overland Storage, Inc. Page 43
Page 44

NEO S-Series User Guide
Standard
European Community
CE scheme according to EN/IEC 60950
USA/Canada
FCC, ETL according to UL 60950
Device standards 7.2
• ANSI Small Computer System Interface-2 (SCSI-2), X3.131 – 1994
• ANSI SCSI-3 Primary Commands, X3.301 - 1997
• ANSI Information and Technology. SCSI-3 Medium Changer Commands (SMC), NCITS.314:1998
• ANSI SCSI Parallel Interface-2 (SIP-2), X3.302:1998
• IEC 60297 Rack Standards
Countries
CE mark 7.3
Figure 15 CE mark
The CE mark is a mandatory conformity mark on many products placed on the single market in the European
Economic Area (EEA). The CE marking certifies that a product has met EU consumer safety, health or environmental
requirements.
ETL mark 7.4
Figure 16 ETL mark
The ETL mark is alternative to the UL and CSA marks in the USA. This mark is issued by Intertek. This mark shows
that your product meets all the appropriate safety and performance specifications for your market of sale (generally
identical to the standards set by UL and CSA).
10400666-001 © 2014 Overland Storage, Inc. Page 44
Page 45

NEO S-Series User Guide
FCC (United States) 7.5
The computer equipment described in this manual generates and uses radio frequency (RF) energy. If the equipment
is not installed and operated in strict accordance with the manufacturer’s instructions, interference to radio and
television reception might result.
Figure 17 FCC mark
This equipment complies with Part 15 of the FCC Rules. Operation is subject to the following conditions: (1) This
device may not cause harmful interference, and (2) this device must accept any interference received, including
interference that may cause undesired operation.
Part 15, Class A, of the FCC Rules, is designed to provide reasonable protection against radio and television
interference in a residential installation. Although the equipment has been tested and found to comply with the
allowed RF emission limits, as specified in the above-cited Rules, there is no guarantee that interference will not occur
in a particular installation. Interference can be determined by turning the equipment off and on while monitoring radio
or television reception. The user may be able to eliminate any interference by implementing one or more of the
following measures:
• Reorient the affected device and/or its receiving antenna.
• Increase the distance between the affected device and the computer equipment.
• Plug the computer and its peripherals into a different branch circuit from that used by the affected device.
• If necessary, consult an experienced radio/television technician for additional suggestions.
Canadian verification 7.6
This Class A digital apparatus meets all requirements of the Canadian Interference-Causing Equipment Regulations
(ICES-003, Class A).
10400644-001 © 2014 Overland Storage, Inc. Page 45
 Loading...