

Page 1
Page 2

1.
Specifications..................................................................................
1
2.
Features..........................................................................................
2
3.
Unit Exterior...................................................................................
3
4.
Warnings and Safety Notes............................................................
4
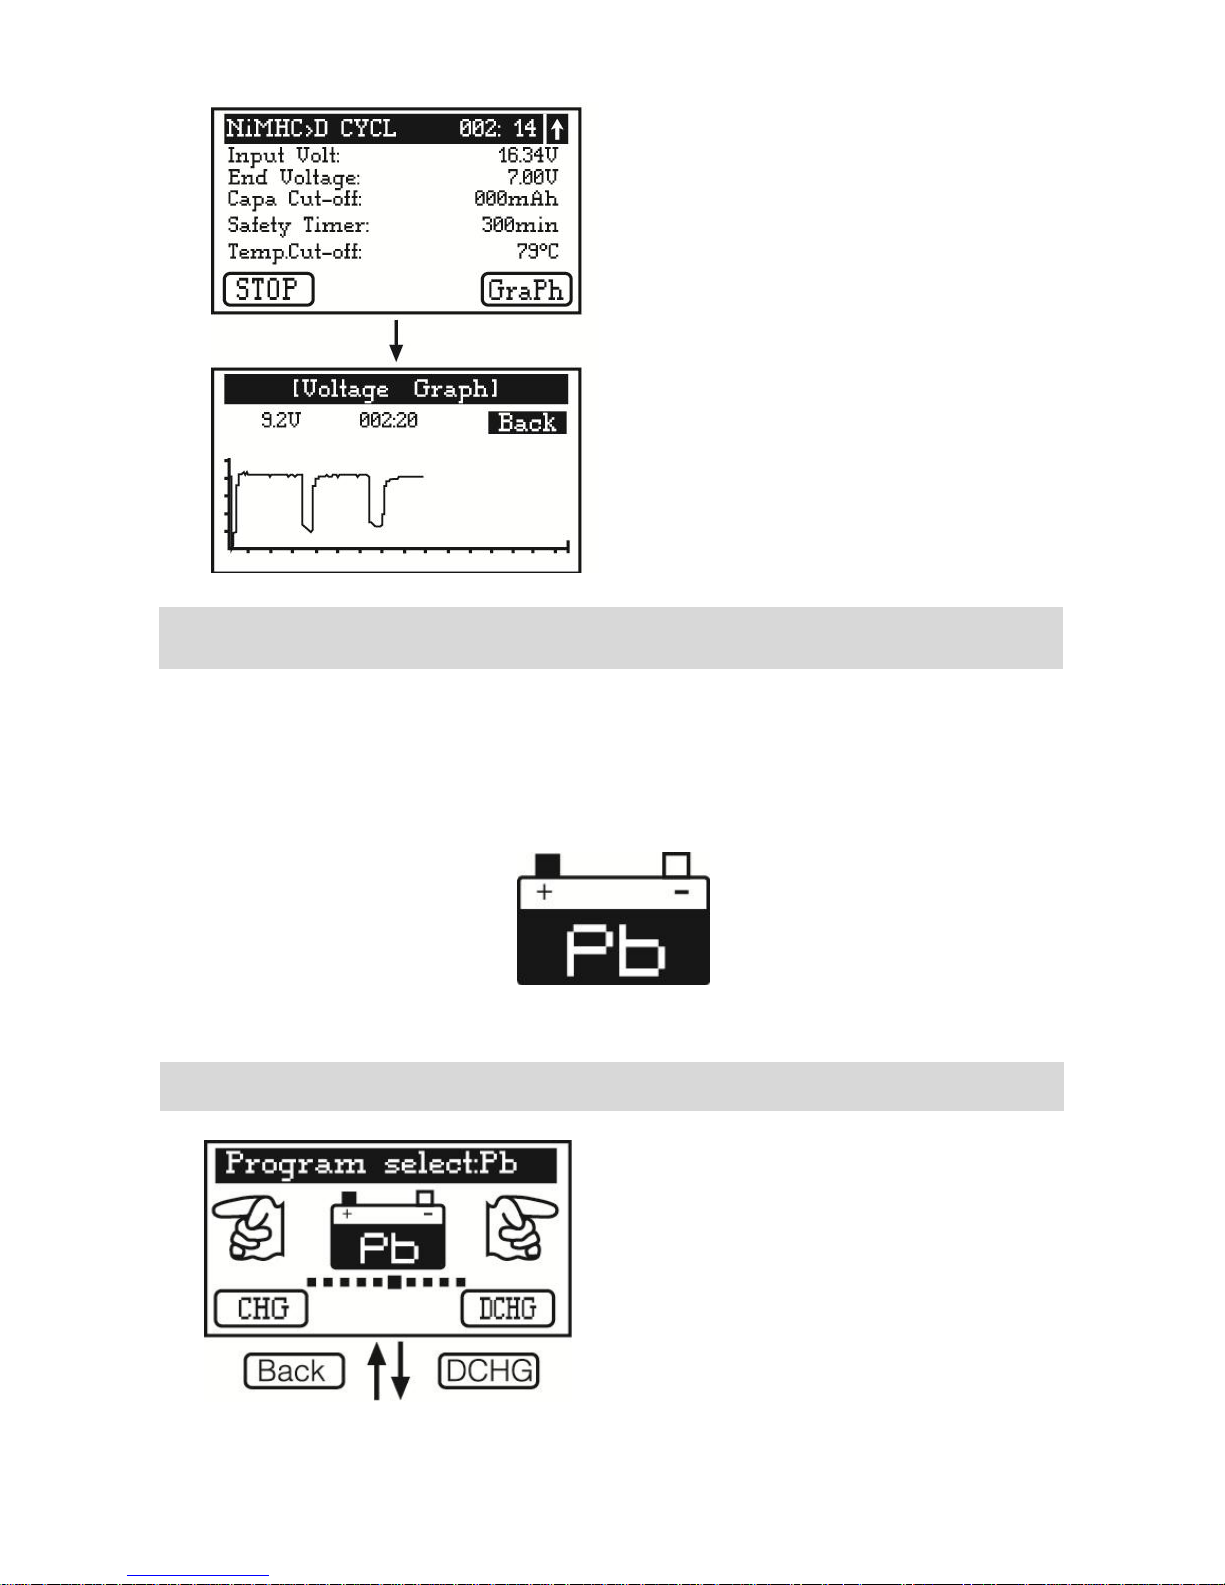
5.
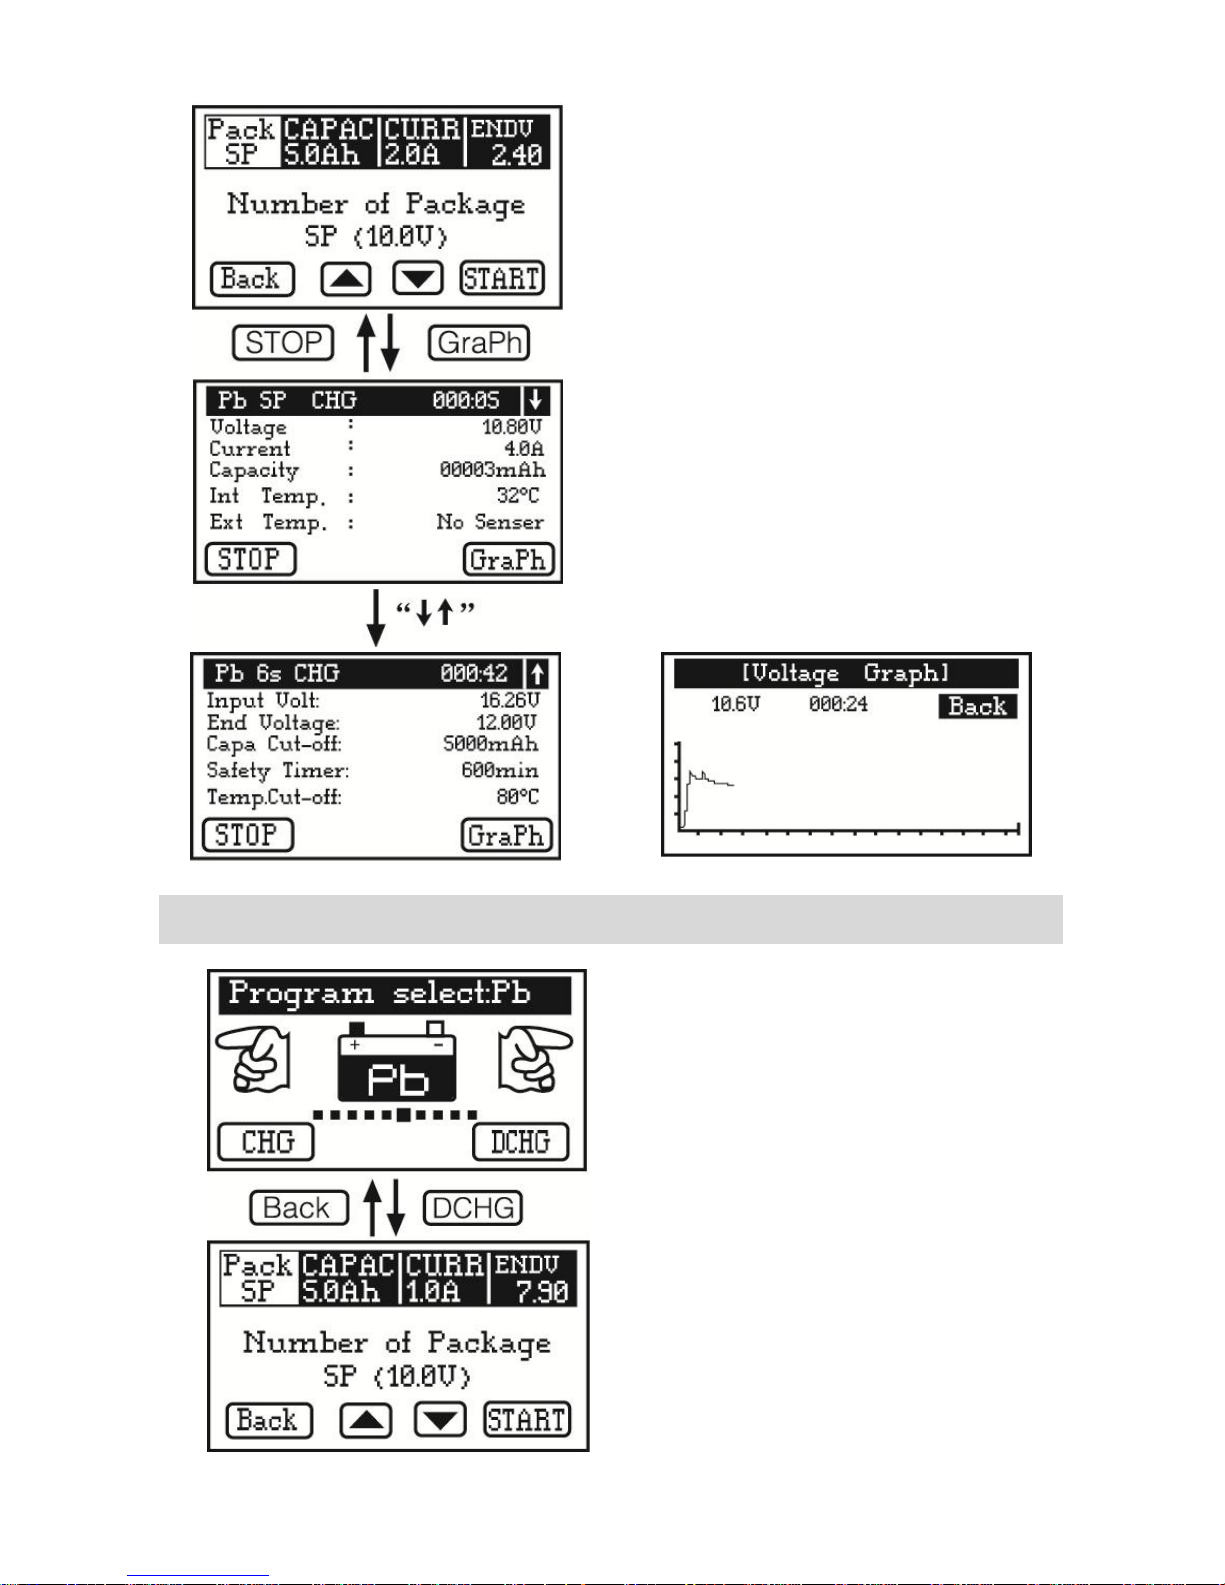
Program Flow Chart........................................................................
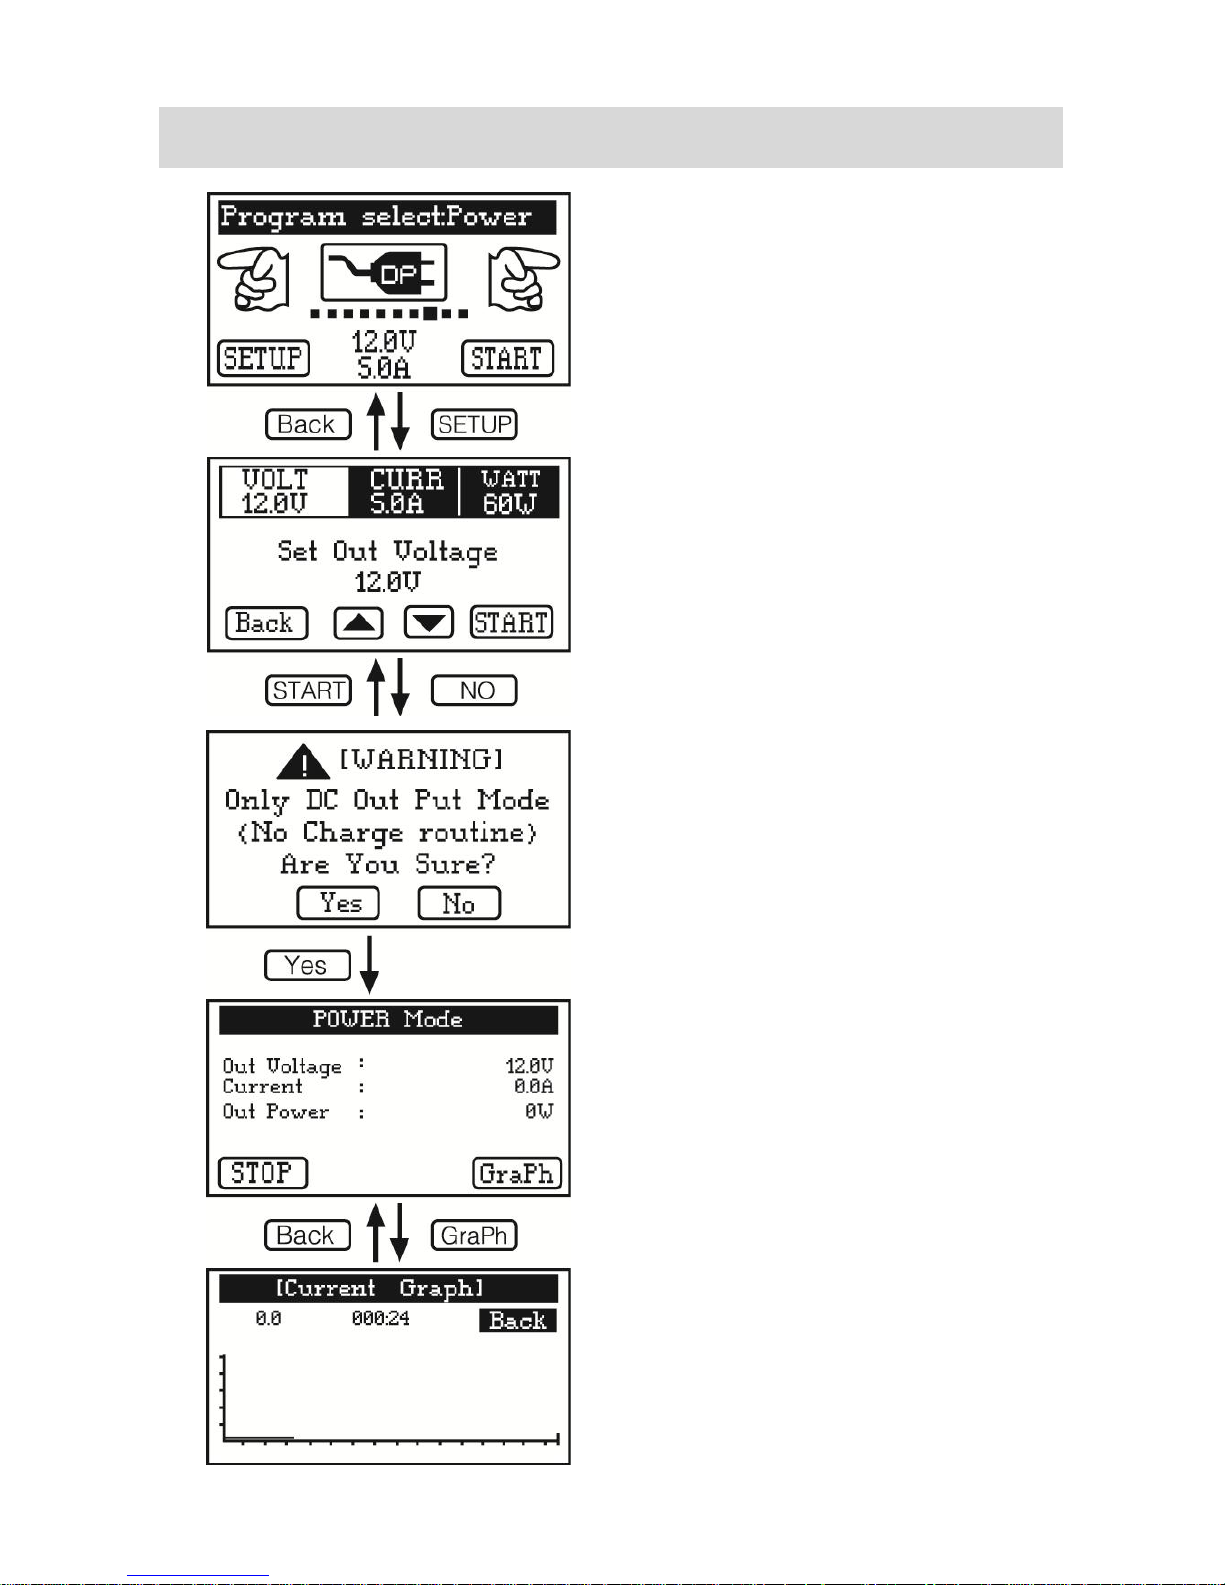
5
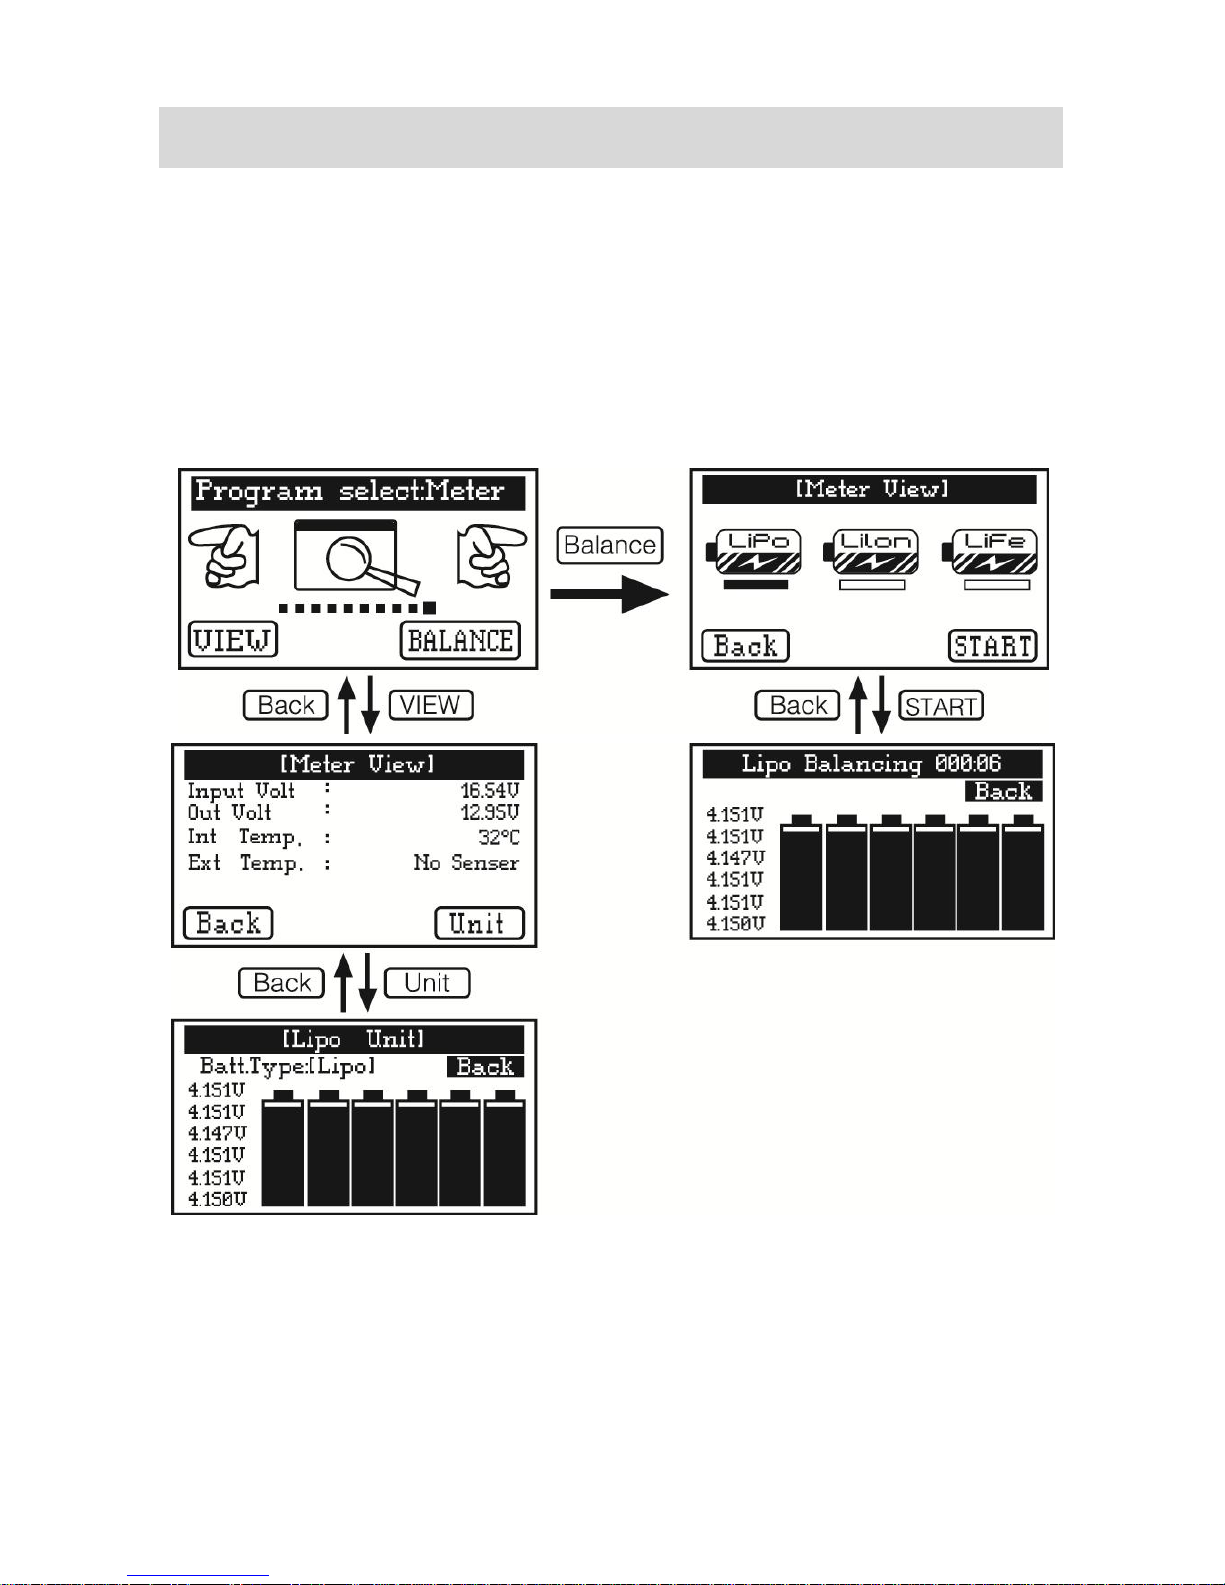
6.
Parameter Set Up...........................................................................
6
7.
Lithium Battery Program................................................................
8
7.1. Lithium Battery Charging.........................................................
8 7.2. Lithium Battery Storage Control............................................
10 7.3. Lithium Battery Discharging.....................................................
10
8.
NiMH/NiCd Battery Program.........................................................
11
8.1. NiMH/NiCd Battery Charging...................................................
11 8.2. NiMH/NiCd Battery Discharging...............................................
12 8.3. NiMH/NiCd Battery Cyclic Charge/Discharge...........................
12
9.
Pb Battery Program........................................................................
14
9.1. Pb Battery Charging.................................................................
14 9.2. Pb Battery Discharging.............................................................
15
10.
Digital Power Supply Program.......................................................
16
11.
Check Status...................................................................................
17
12.
Warnings and Error Messages........................................................
18
13.
Warrant and Services.....................................................................
18
Contents
Page 3
[1]
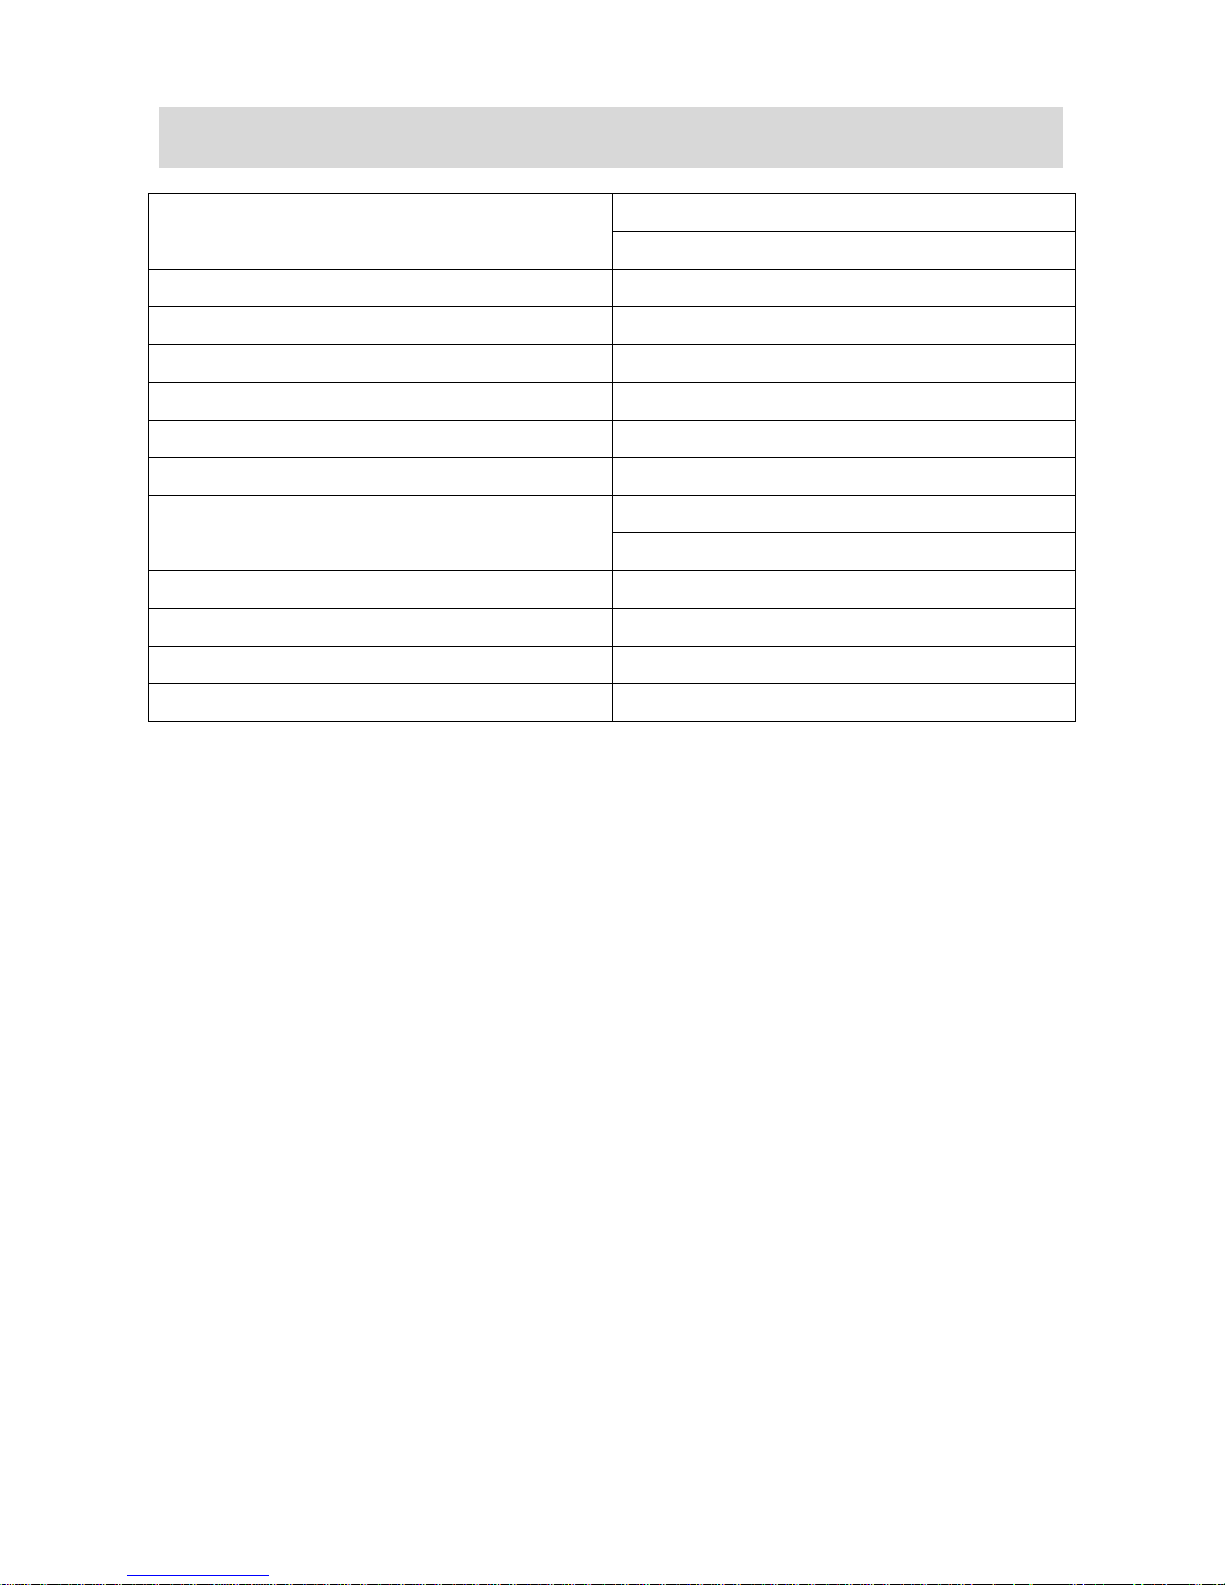
Input Voltage
DC 10-18V
AC 100-240V
Charge Current
0.1-10A
Discharge Current
0.1-2A
Charge Power
Max 80W
Discharge Power
Max 20W
Balance Current
Max 200mA
Balance Tolerance
± 0.01V
Charging Capacity
NiMH/NiCd 1-16 Cells
LiPo/LiFe/LiIon 1-6 Cells
Pb Battery Voltage
2-20V
Discharge Battery
LiPo/LiFe/LiIon 3.0-4.4V/Cell
Weight (g)
420
Dimensions (mm)
164 x 133 x 50
1. Specifications
Page 4

[2]
Optimised Operating System
Touch screen control allows you to easily set up and monitor the charging/discharging process
of the battery via the touch screen. The “AUTO” function sets the current automatically when
charging or discharging, preventing the battery from over-charging. These specifications can
also be set by the user.
High-power and high-performance circuit
The max output is 80W. The max charge is 10A. The max discharge current is 2A. The CPU or
operating program works under such power as the charger is fitted with a highly efficient
cooling system.
Balance voltage for Lithium battery packs
The charger has a special internal function for Lithium battery voltage balancing. You do not
require an additional balancer to balance the voltage when charging Lithium batteries
(LiPo/LiFe/LiIon).
Balance and monitor individual cells in process of discharging
The charger also monitors and balances the individual cells of a Lithium battery pack during the
charging process. If the voltage of any cell varies abnormally, the process will be stopped
automatically and an error message will appear on the screen.
Accept various types of batteries
This charger can be used with a wide range of batteries with different chemistries (LiPo, LiFe,
LiIon, NiMH, NiCd and Pb). Choose the corresponding program, setting the parameters on the
base of the battery type and specifications, before you start to charge/discharge.
“Fast” and “Storage” mode for Lithium battery packs
The “Fast” charge reduces the charging time of Lithium batteries. The “Storage” mode controls
the nominal voltage of the battery to make it suitable for long-term storage.
Cyclic Charging/Discharging for NiMH/NiCd battery packs
With this charger you can perform 1-4 cycles of charge>discharge or discharge>charge
continually for battery refreshing and balancing.
Maximum Safety
- Delta-peak Sensitivity: when the battery voltage of NiMH/NiCd batteries reaches the highest
point and begins to drop, the charging process with automatically stop.
- Capacity Limit: the charging process with terminate automatically when the maximum capacity
value that is set is reached.
- Temperature Limit: the temperature of the battery will rise during the charging process due to
internal chemical reactions. In order to prevent overheating the charging process will forcibly
end if the temperature limit that is set is reached. This function is only available by connecting
an optional temperature probe, which is not included in the package. Available from
Overlander (SKU: 2598).
- Charge Time Limit: charging will stop when charge time limit set is reached to avoid any
possible over-charging/over-discharging.
2. Features
Page 5
[3]
- Input Current Check: to prevent the battery from being damaged by the input current, the
charger monitors the voltage and ends the process automatically when the voltage drops below
the lowest limit.
- Automatic cooling fan: the automatic electric cooling fan controls the internal temperature of
the charger to prevent over-heating.
3. Unit Exterior
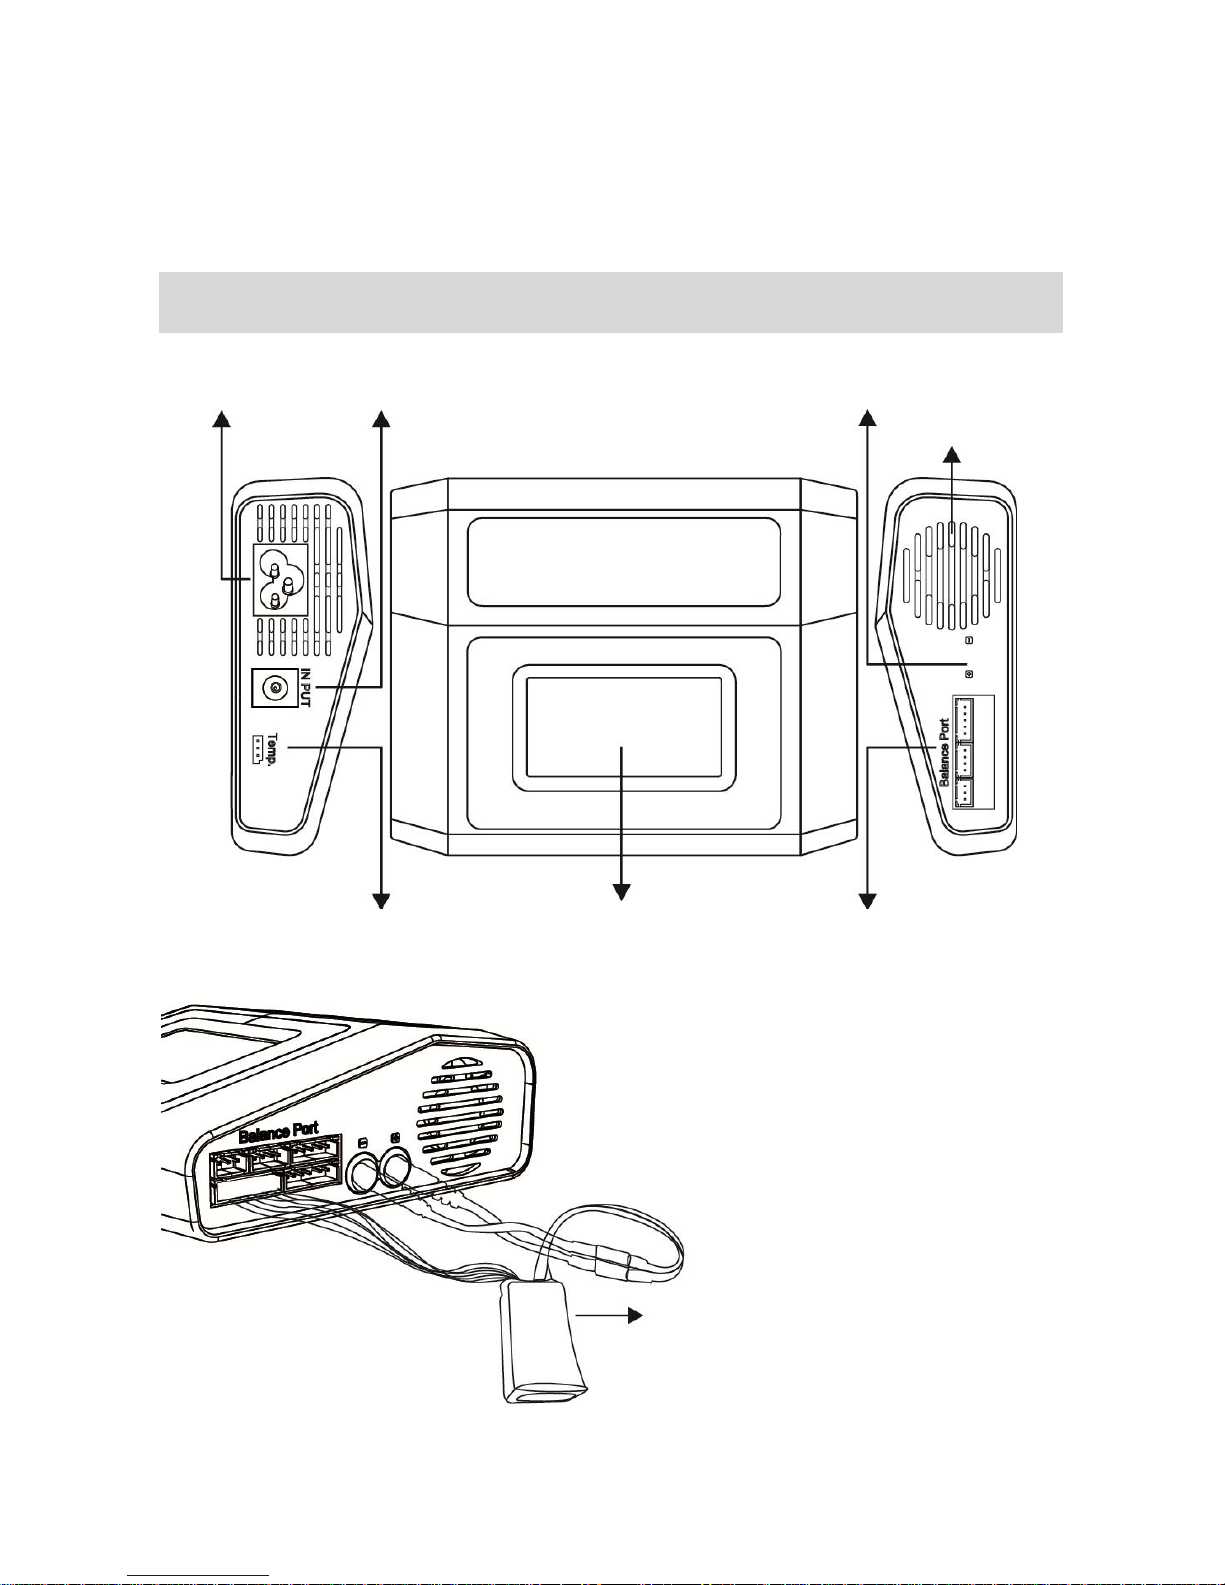
Input AC power
100-240W
DC Port
10.18V
Positive & Negative
Battery Port
Air Outlet
6S LiPo Battery
Temperature
Sensor Port
Touch Screen
Balance Port
Page 6

[4]
IMPORTANT! Please follow these instructions for maximum safety, otherwise the
charger and/or battery could be badly damaged and may lead to fire, explosion,
injury or property loss.
Never leave the charger unattended when it is connected to its power supply.
If any malfunction is observed, terminate the process immediately and refer to the manual
Keep the charger away from dust, damp, humidity, rain, heat, direct sunshine and vibration.
The circuit of the unit is designed to be powered by 10-18V DC or 100-240V AC only.
Do not place the charger on flammable or conductive surfaces when charging/discharging.
Never use the charger on car seats, carpets or similar surfaces. Do not operate near anything
with the potential to catch fire or explode.
Ensure the unit remains well ventilated by making sure that all ventilation holes are unblocked
and uncovered.
Set the parameters correctly, otherwise the battery could be severely damaged. Lithium
batteries especially can cause a fire or explosion when over-charged.
NiMH/NiCd
Voltage level: 1.2V/cell
Allowable fast charge current: 1C-2C depending on cell performance
Discharge voltage cut-off level: 1.0V/cell (NiMH) and 0.85V/cell (NiCd)
LiIon
Voltage level: 3.6V/cell
Max charge voltage: 4.1V/cell
Allowable fast charge current: 1C or less
Min discharge voltage cut-off level: 2.5V/cell or higher
LiPo
Voltage level: 3.7V/cell
Max charge voltage: 4.2V/cell
Allowable fast charge current: 1C or less
Min discharge voltage cut-off level: 3.0V/cell or higher
LiFe
Voltage level: 3.3V/cell
Max charge voltage: 3.6V/cell
Allowable fast charge current: 4C or less
Min discharge voltage cut-off level: 2.0V/cell or higher
Pb
Voltage level: 2.0V/cell
Max charge voltage: 2.46V/cell
Allowable fast charge current: 0.4C or less
Min discharge voltage cut-off level: 1.5V/cell or higher
To avoid short-circuits between the wires, always connect the charge cable to the unit first and
then to the battery. Reverse the sequence when disconnecting.
Always check the capacity and voltage of a Lithium battery pack before starting any process. It
may be a mixture of parallel and series connections. In parallel, individual cell capacity
4. Warnings and Safety Notes
Page 7
[5]
multiplied by the cell count is the pack capacity, but the voltage remains the same. It is
important to enter the correct parameters in order to prevent the risk of fire or explosions.
When setting the discharge parameter, it must be according to the residual capacity of the pack
to lower the voltage of the battery. To avoid over-discharging, please set the nominal discharge
correctly. The voltage of Lithium batteries must not be discharged lower than the minimum
voltage because this can lead to a rapid loss of capacity or a total failure. Generally there is no
need to discharge a Lithium battery.
Some batteries have a ‘memory’, in that if the capacity is only partially used the battery will
‘remember’ to just use the same amount in the future:
NiMH and NiCd batteries do have a memory function, but usually run complete cycles. This
means they are fully charged and then completely used.
Lithium batteries prefer a partial rather than full discharge. Frequent full discharge should
be avoided if possible. Instead you should charge the battery more often or keep the
nominal voltage.
This charger is not a domestic appliance. It should be used and positioned in the correct
environment and should not be used in a domestic setting. Due to the power and volatility of
Lithium batteries the charger and battery should be placed on a fireproof base at least 1.5
metres from any flammable materials. Overlander or its retailers accept no liability for losses to
3rd party items caused by failure to follow these instructions.
By purchasing this product the user assumes all risks associated with its use. If you do not agree
with this clause then please return the item immediately before use.
Failure to comply with these instructions will result in all warranties being deemed void.
5. Program Flow Chart
Page 8
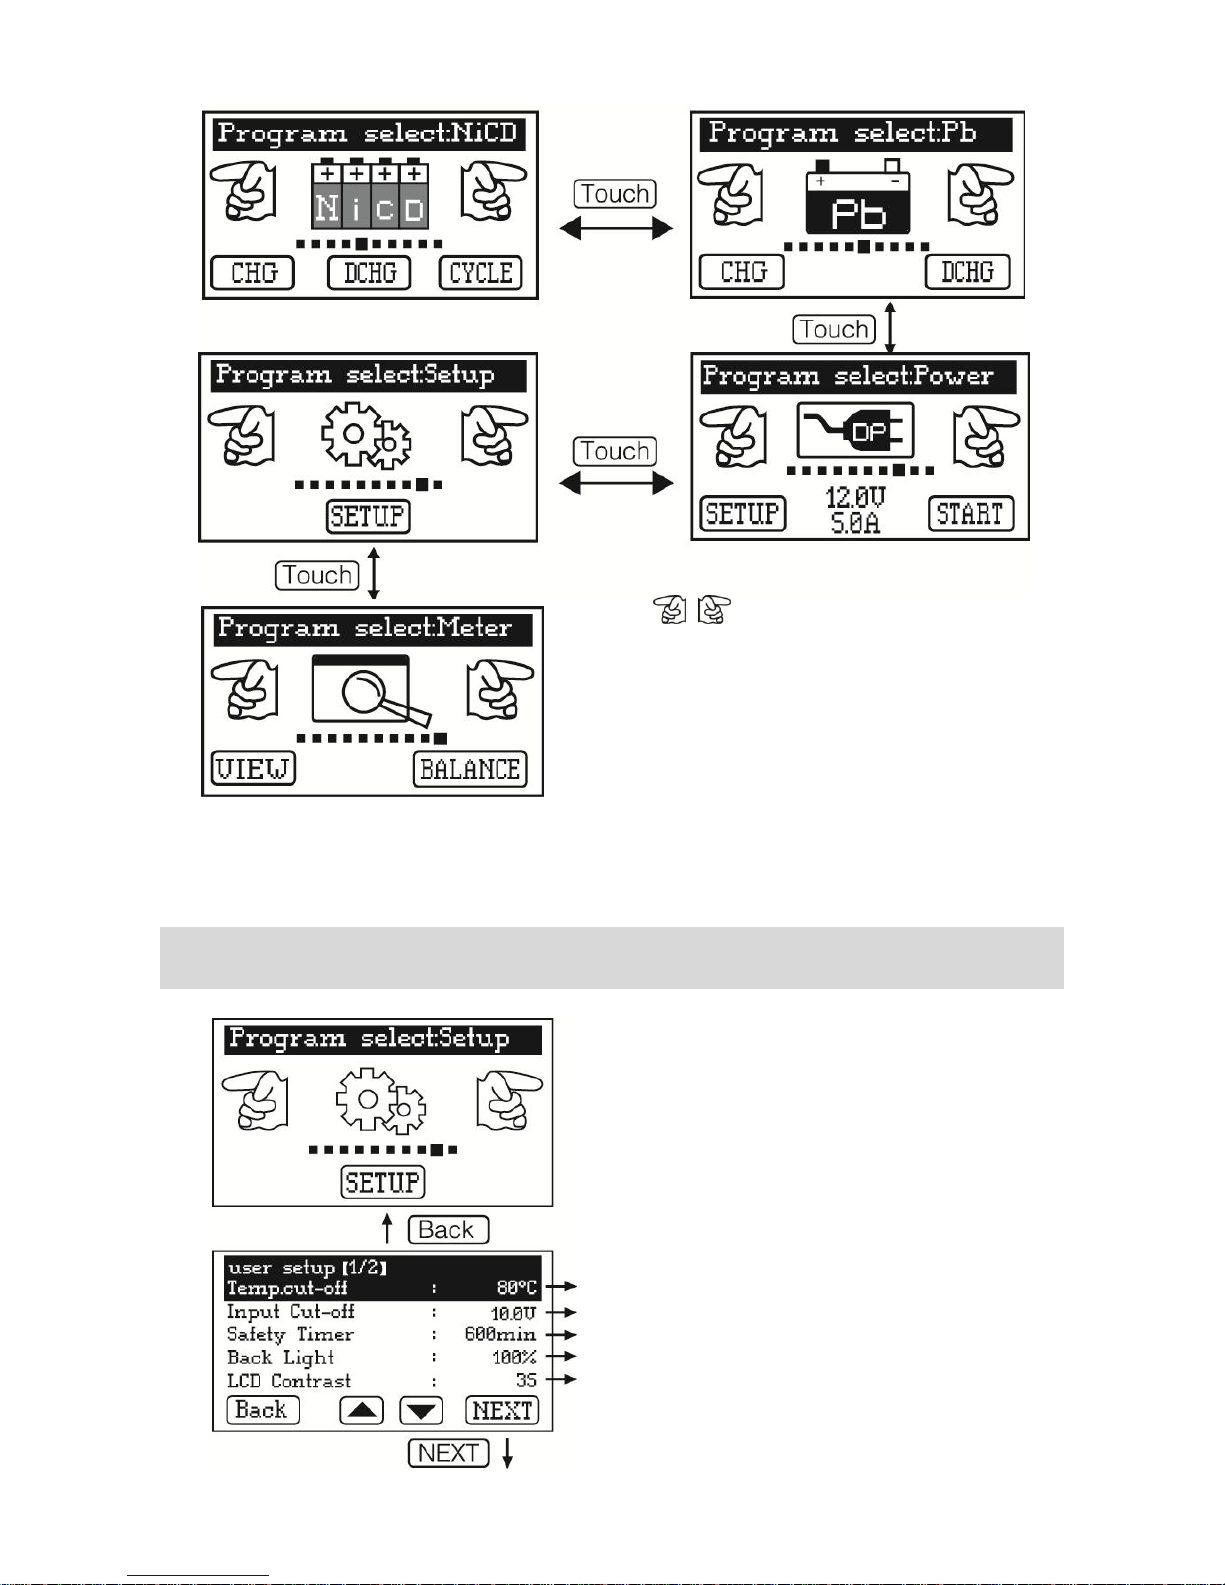
[6]
6. Parameter Set Up
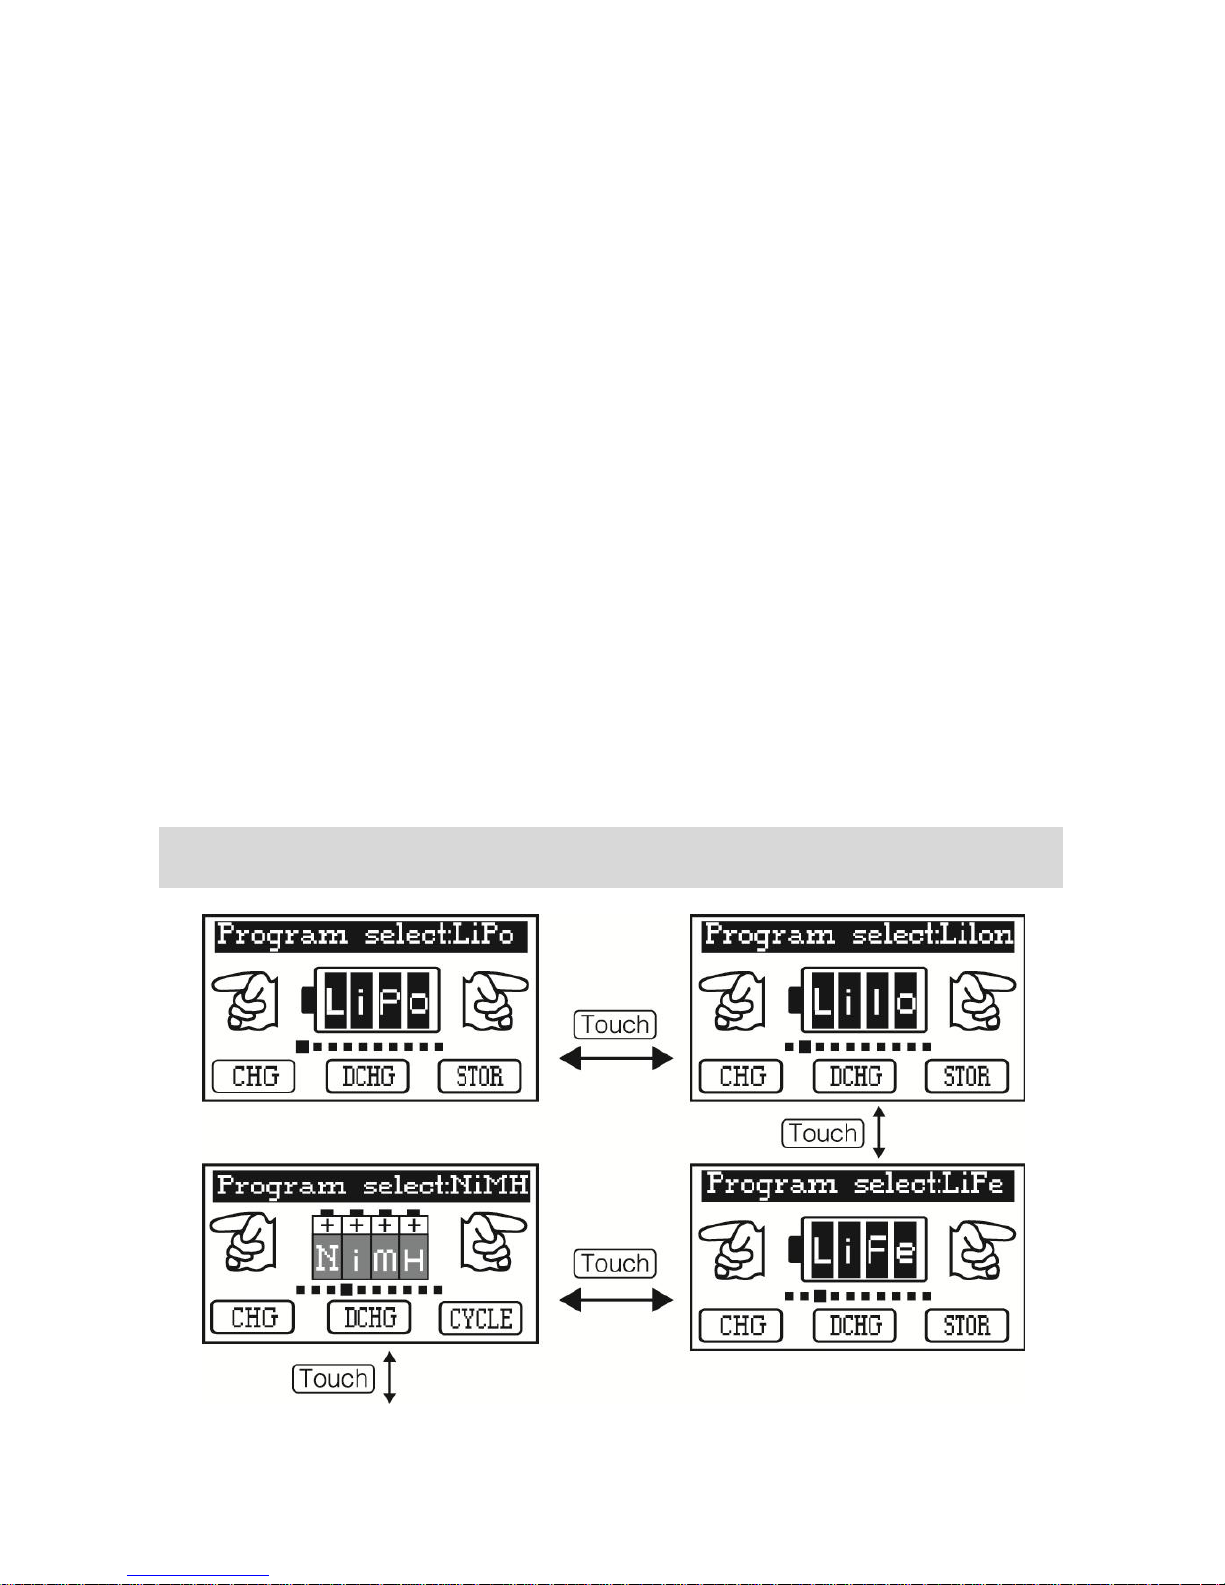
Choose battery types and program
“CHG” Enter Charge Mode
“DCHG” Enter Discharge Mode
“BALANCE” Enter Balance Charge Mode
“STOR” Enter Storage Mode
“CYCLE” Enter Cycle Mode
“SETUP” Enter System Settings Mode
“VIEW” Enter Preview Mode
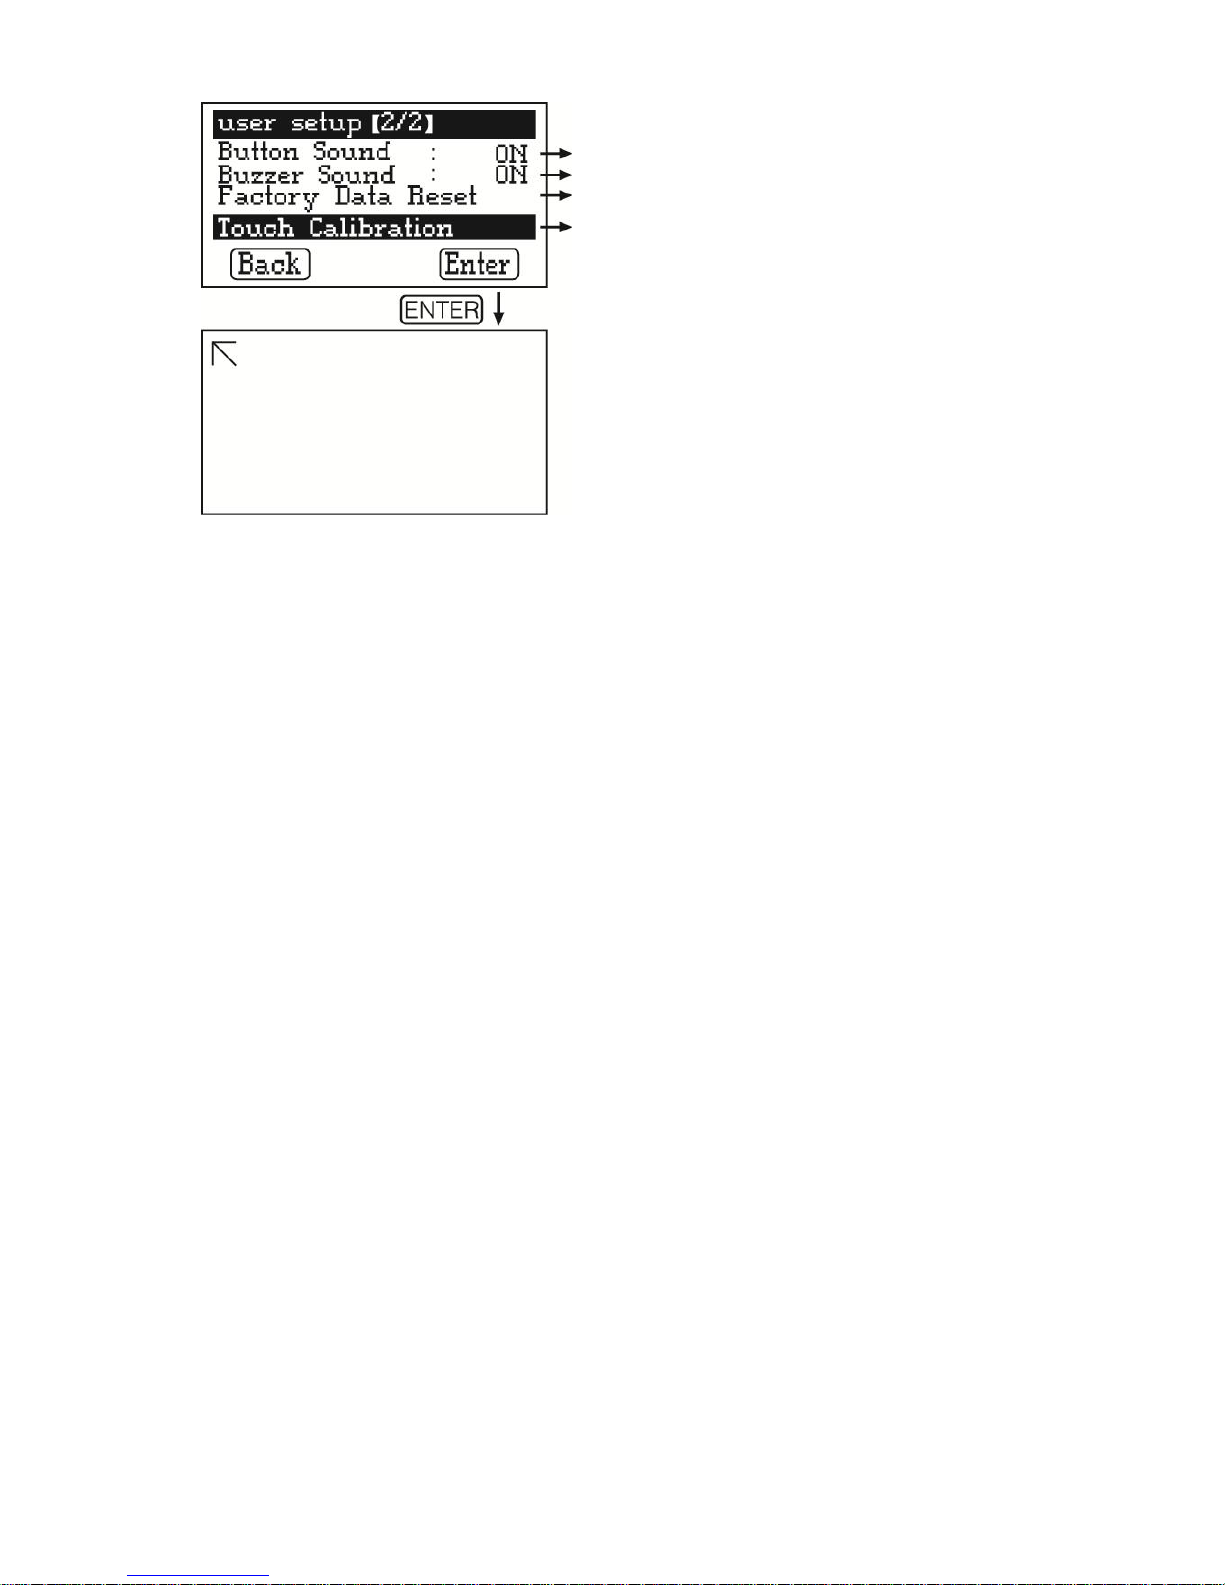
Touch the “SETUP” button to go to the data set
menu. The default settings will show when
connected to the power supply for the first time. If
necessary users can change all of the parameters
by touching “SETTING”. Click the parameter which
you wish to modify, enter the desired value and
then save the change. Once happy with all of the
parameters, press “Back” to return to the last
Menu.
20°C - 80°C (68F - 176F)
10 - 18V
1 min - 720 min
0% - 100%
35 - 50
Page 9
[7]
Safety Temperature
There is a 3 pin temperature sensor port on the left of the charger. Fit the temperature sensor
onto the surface of the battery to closely monitor its temperature. To avoid damage caused by
overheating, which can result in fire or explosion, the charger will stop charging/discharging
when the monitored value exceeds the set value.
Input Voltage
The Input DC Voltage of this charger is 10-18V. This program will monitor the input voltage of
the battery automatically, and if it is lower than the set value the operation will be forcibly
stopped to protect the equipment of the input terminal.
Safety Time
Once this function is activated, the safety timer will automatically begin timing from when the
charger first starts to work. This program can help to prevent the battery from being
overcharged when the system can’t detect whether the battery has reached its full capacity.
The safety time should be set for long enough to ensure the battery is fully charged.
Contrast Ratio of the LED Screen
This program is used to adjust the contrast ratio and the clarity of the screen.
Key Beep ON/OFF
Once this function is first activated the charger will make a sound to confirm the operation. The
charger will then make different sounds in order to alert you of various warning situations or
errors.
Factory Data Reset
Once activated all parameters will be rest to the standard factory settings.
Touch Screen Calibration
This should be used when the touch position is deviated or is not sensitive enough. Click
“Enter” to go to the Calibration Menu, and click the four arrowheads that will appear in each
corner of the screen one by one. This will complete calibration.
Button Sound
Buzzer Sound
Factory Data Reset
Touch Calibration
Page 10
[8]
Different chemistries have their own specifications, so it is important that the correct program is
selected before any operations are started. The following programs are only suitable for charging
and discharging Lithium batteries:
(Lithium Battery Program Icons)
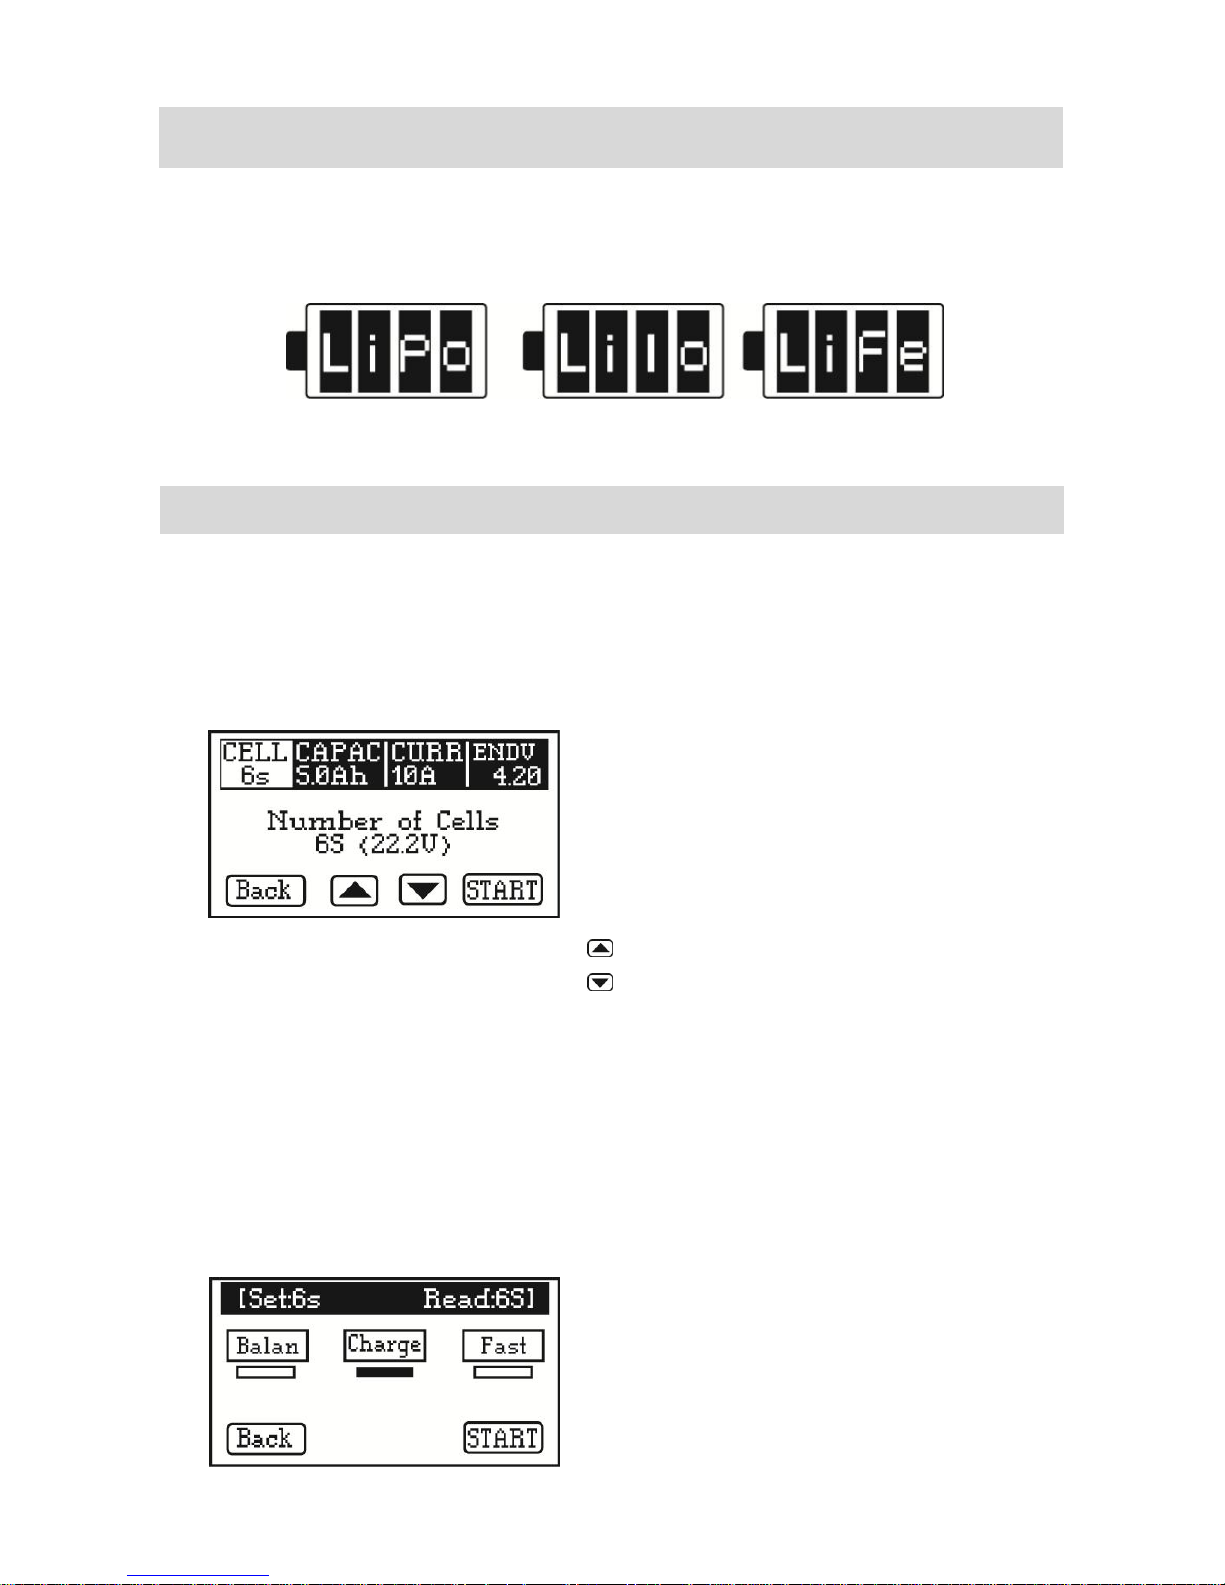
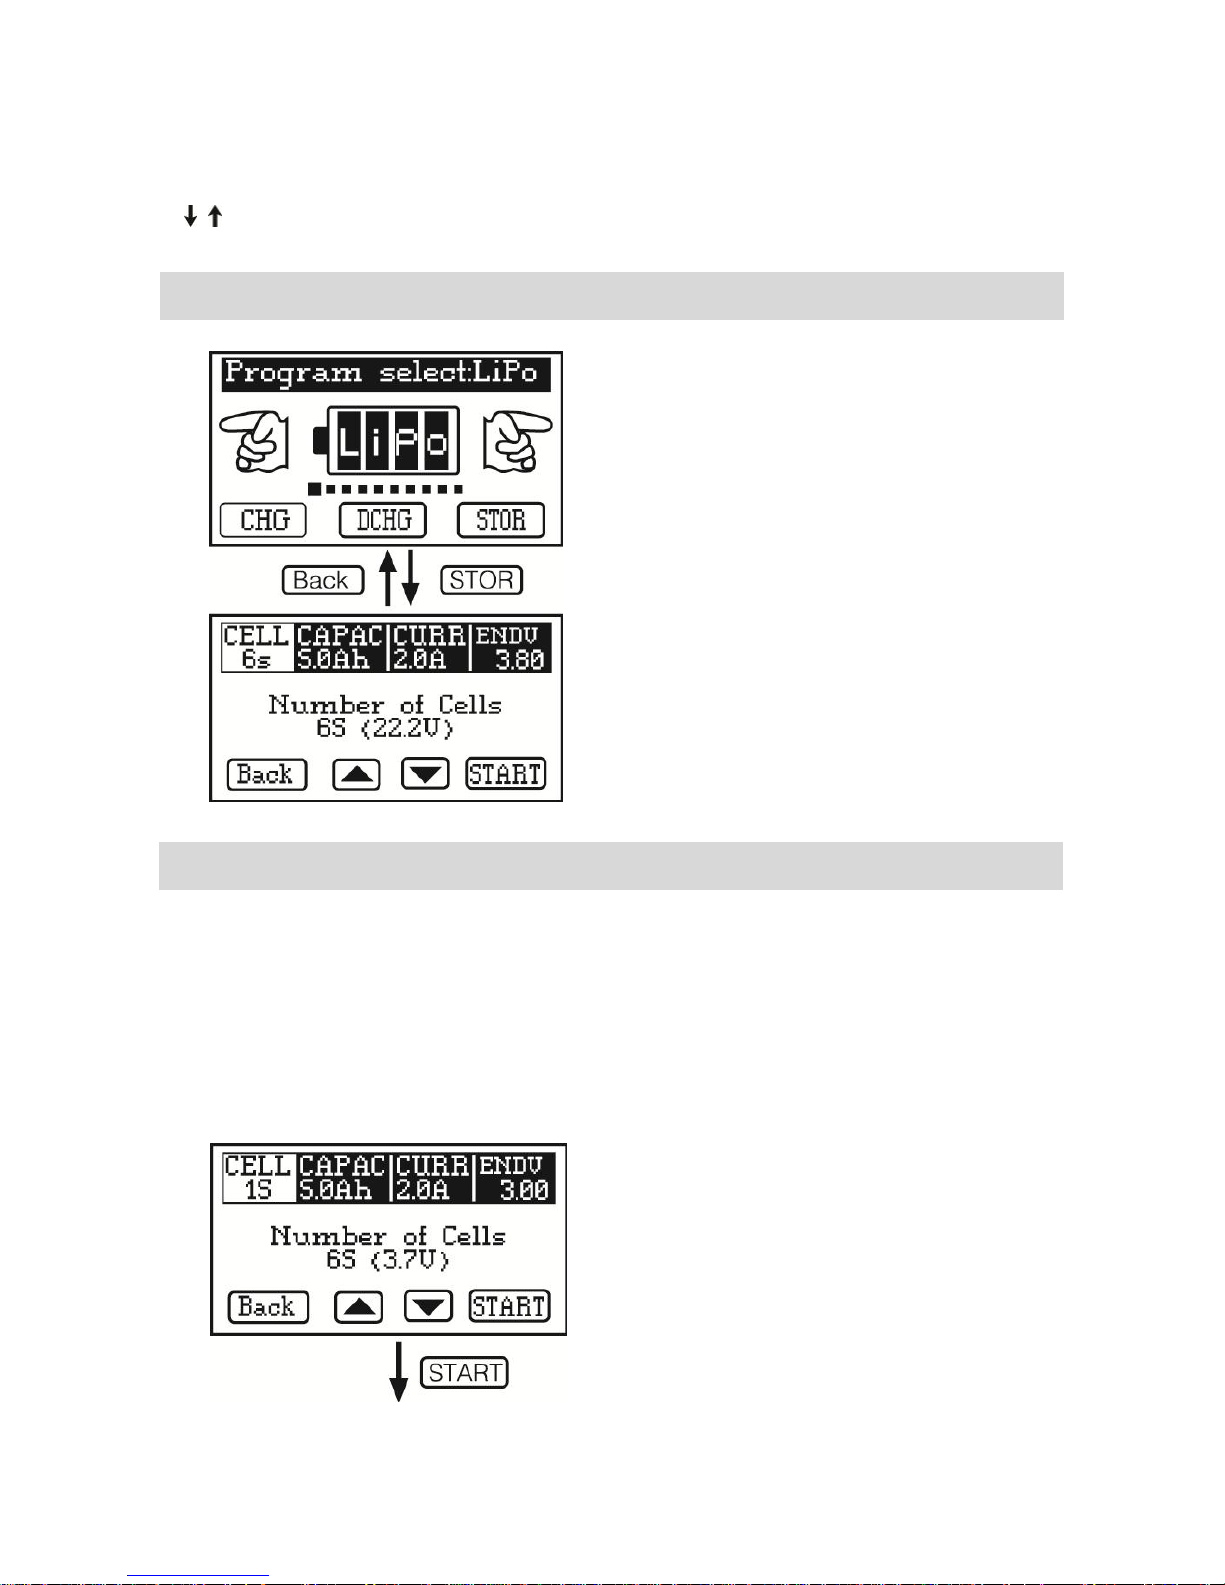
Enter the Lithium Battery Program Menu and select the Charging Program. Press “Start” for 2
seconds to enter the menu where you can enter the charging parameters.
Please set the charge current according to the battery capacity and performance. The cell count
of the battery is also very important, so make sure the current and nominal voltage are set
correctly before beginning the charging process.
After setting the Lithium battery charge parameters, press “START” for 2 seconds to enter the
Lithium Charge Mode Menu. Press “Back” to go back to the previous menu if you wish to reselect
the battery type and program.
7.1. Lithium Battery Charging
7. Lithium Battery Program
“Cell 6S” Charges 1-6S. Select the cell count of the
batteries you wish to charge.
“CAPAC 5.0Ah” Maximum charge capacity setting.
Select the capacity of the battery.
“CURR 10A” Charge current setting (0.1-10A). Select
the charge rate you wish to charge your battery at.
“ENDV 4.20” This is the maximum voltage that each
cell within the battery will charge to. This voltage is not
to be exceeded.
“Back” Takes you back to the previous menu.
Increase/up button.
Decrease/down button.
“START” Start/confirm button.
“Set:6S Read:6S” This checks the cell count.
There are three Charging Modes for Lithium battery
charging:
“Balan” Balance Charge Mode
“Charge” Normal Charge Mode
“Fast” Fast Charge Mode
Page 11
[9]
Balance Charging
Use this mode to make the voltage of each cell balanced after charging. The charger will
monitor and control the voltages of each cell to balance the individual call voltage. You must
connect the battery to both the output port and balance port of the charger to allow this mode
to work.
Fast Charging
The charging current continually reduces as the charging process finishes. The Fast Charging
program will finish charging slightly in advance and then omit some CV and complete the
balance process. When the process is completely finished the charging current will go to 1/5 of
the initial value. The charging capacity may be a bit smaller than normal charging capacity, but
the charging time will be decreased.
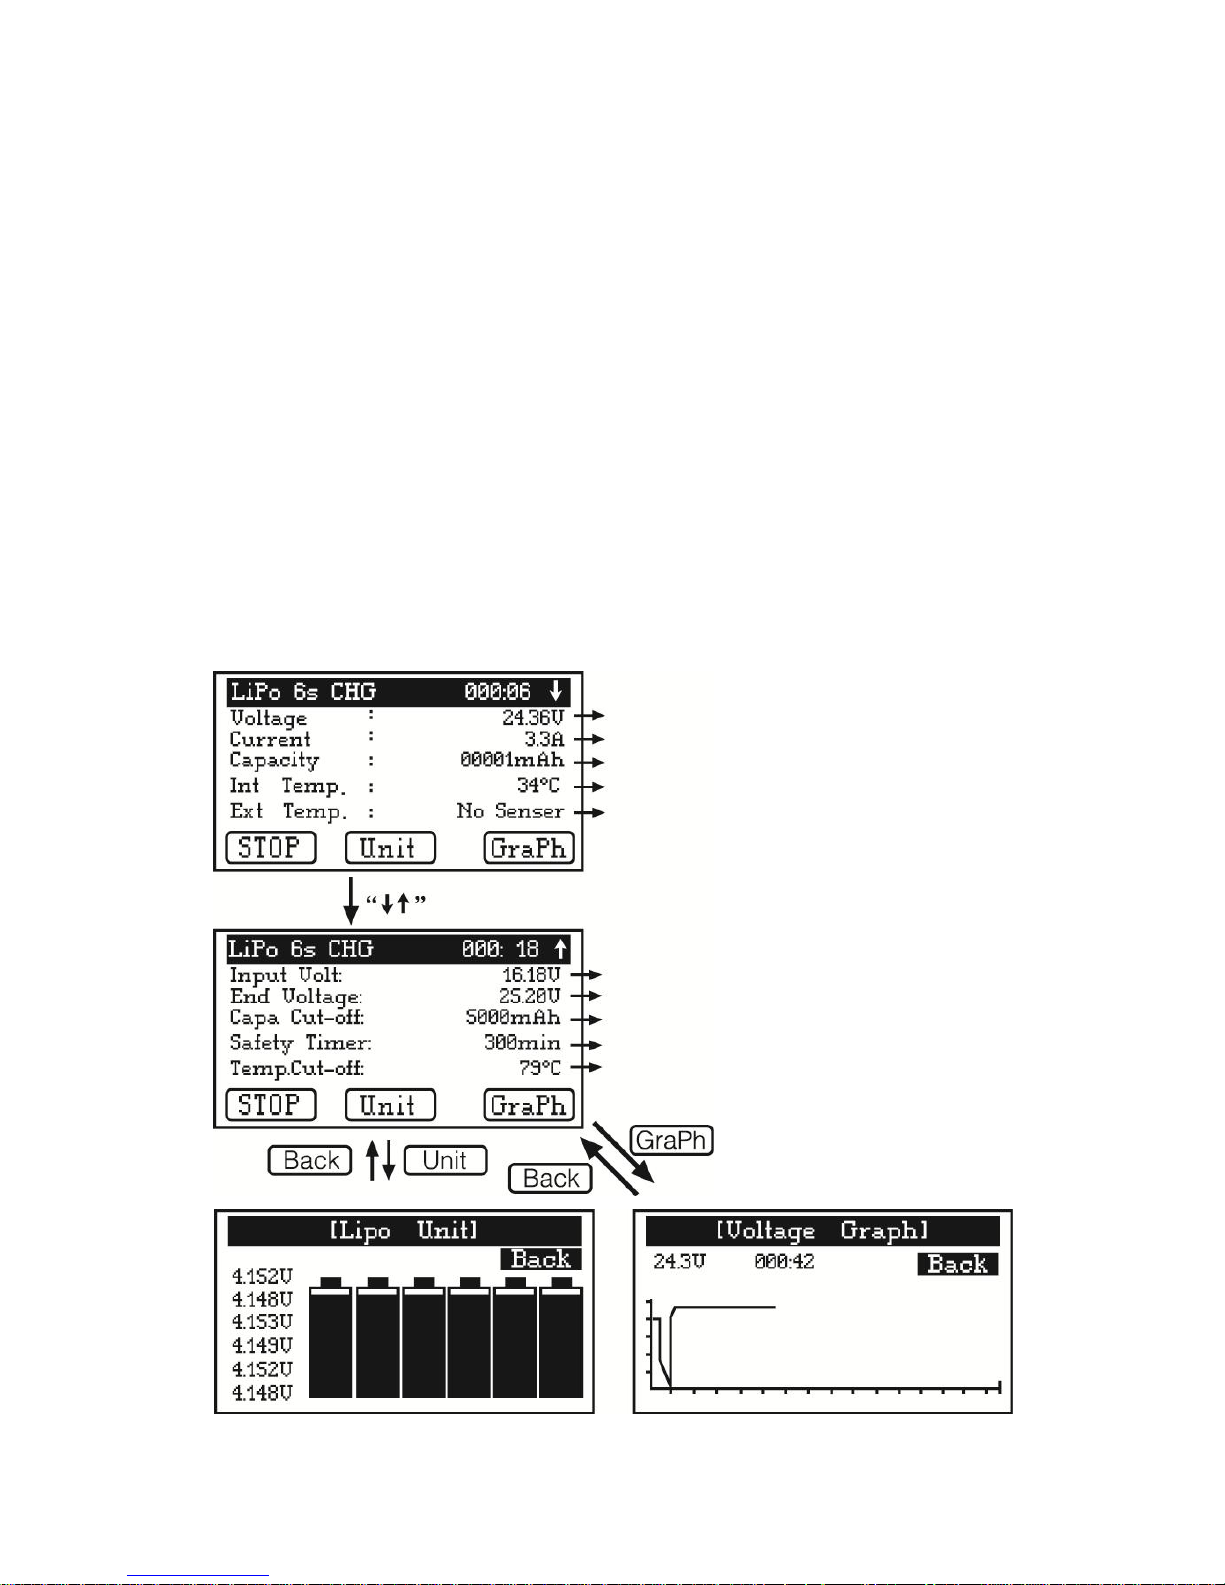
The set cell count and the detected cell count will be displayed on the top of the screen (“Set” is
the cell count the user set in the previous menu, and “Read” is the charger detected cell count). If
the data is the same, charging will begin once you have pressed “Start” for 2 seconds. If the data is
different, please touch “Back” to go back to the charging parameter menu and check the cell count
before charging. The charger will also be able to detect the external temperature of the battery if
a temperature-sensor is connected to the corresponding port.
Whole Voltage
Charge Current
Battery Capacity
Internal Temperature
External Temperature (when cable is connected)
Input voltage
End Voltage
Capacity Cut-off
Safety Timer
Temperature Cut-off
Page 12
[10]
This program is used to adjust each type of
battery’s voltage to a level in which it is suitable for
long-term storage (LiPo: 3.85V, LiFe: 3.3V, LiIon:
3.75V). This process will discharge the cells if the
initial voltage is higher than the storage voltage, or
charge them if the voltage is too low.
Select the Lithium battery program, and touch
“STOR” to enter the storage mode parameter
setting interface. Once you have entered in all of
the correct parameters, hold “START” for 2 seconds
to begin the storage mode. This process will stop
automatically when the battery voltage reaches the
set storage voltage, or can be stopped manually by
touching the “STOP” button.
The purpose of discharging is to confirm the remaining capable capacity of a battery. To avoid
over-discharging it is important to set up the correct nominal voltage before beginning the
discharging process. The voltage of Lithium batteries should never be lower than the battery
manufacturer’s recommended voltage as this could irreparably damage the cells. Usually it is not
necessary to discharge a Lithium battery. In order to ensure safety, this charger does not allow the
discharge current of a battery to exceed the maximum discharge current as set by the user, which
will be displayed on the screen.
“CURR 2.0A” Discharge current setting (0.1-2.0A)
“ENDV 3.00” Discharge end voltage
7.3. Lithium Battery Discharging
7.2. Lithium Battery Storage Control
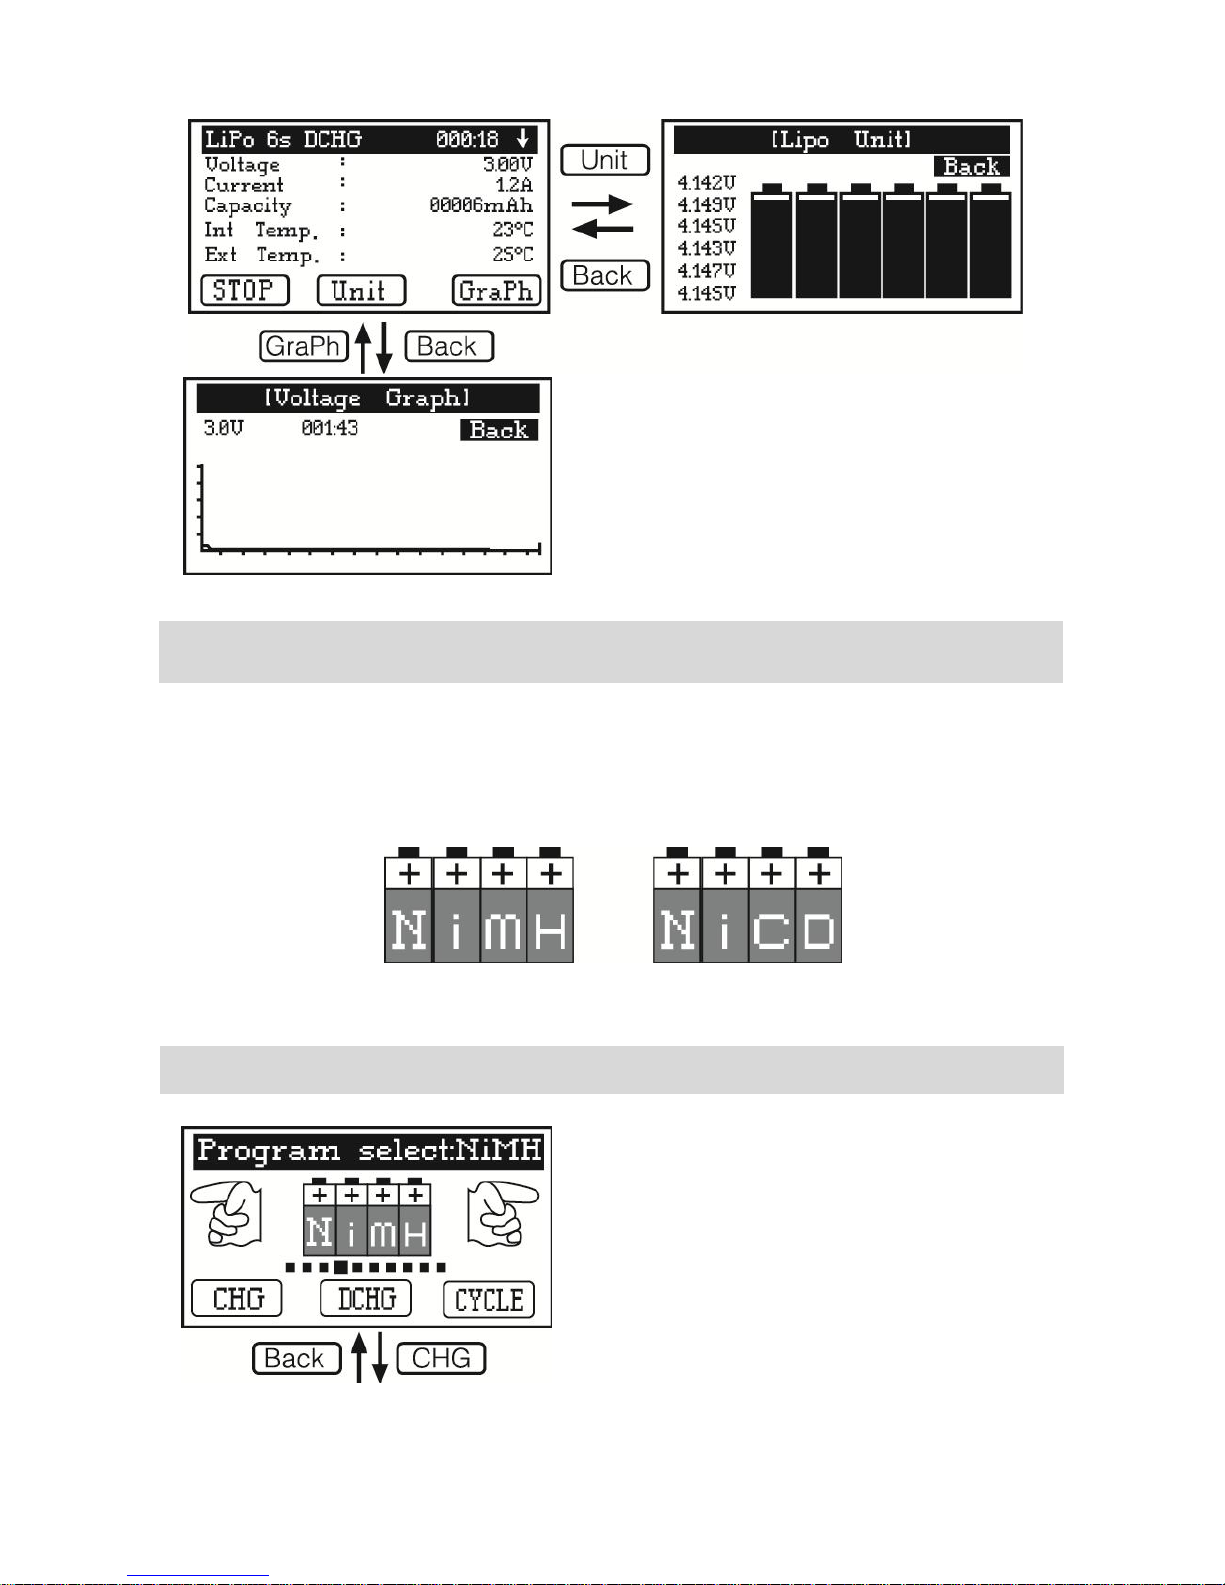
“CHG” The selected Charge Mode
CHG: Charge
BALA: Balance Charge
Change interface
“UNIT” View unit settings
“GraPh” View battery charging graph
“Back” Back to previous menu
Page 13
[11]
After selecting the correct battery program, click
“DCHG” to enter the discharge data setting
interface. Once the discharge parameters have
been set press “START” for 2 seconds to begin the
discharging process. Click “Back” to return to the
previous menu.
This program has been specially designed to also charge and discharge NiMH and NiCd batteries.
Once the appropriate program has been selected, use the “INC” and “DEC” buttons to alter the
parameters. When modification is complete, press the “START” button for 2 seconds to begin the
chosen process.
(NiMH/NiCd Battery Program Icons)
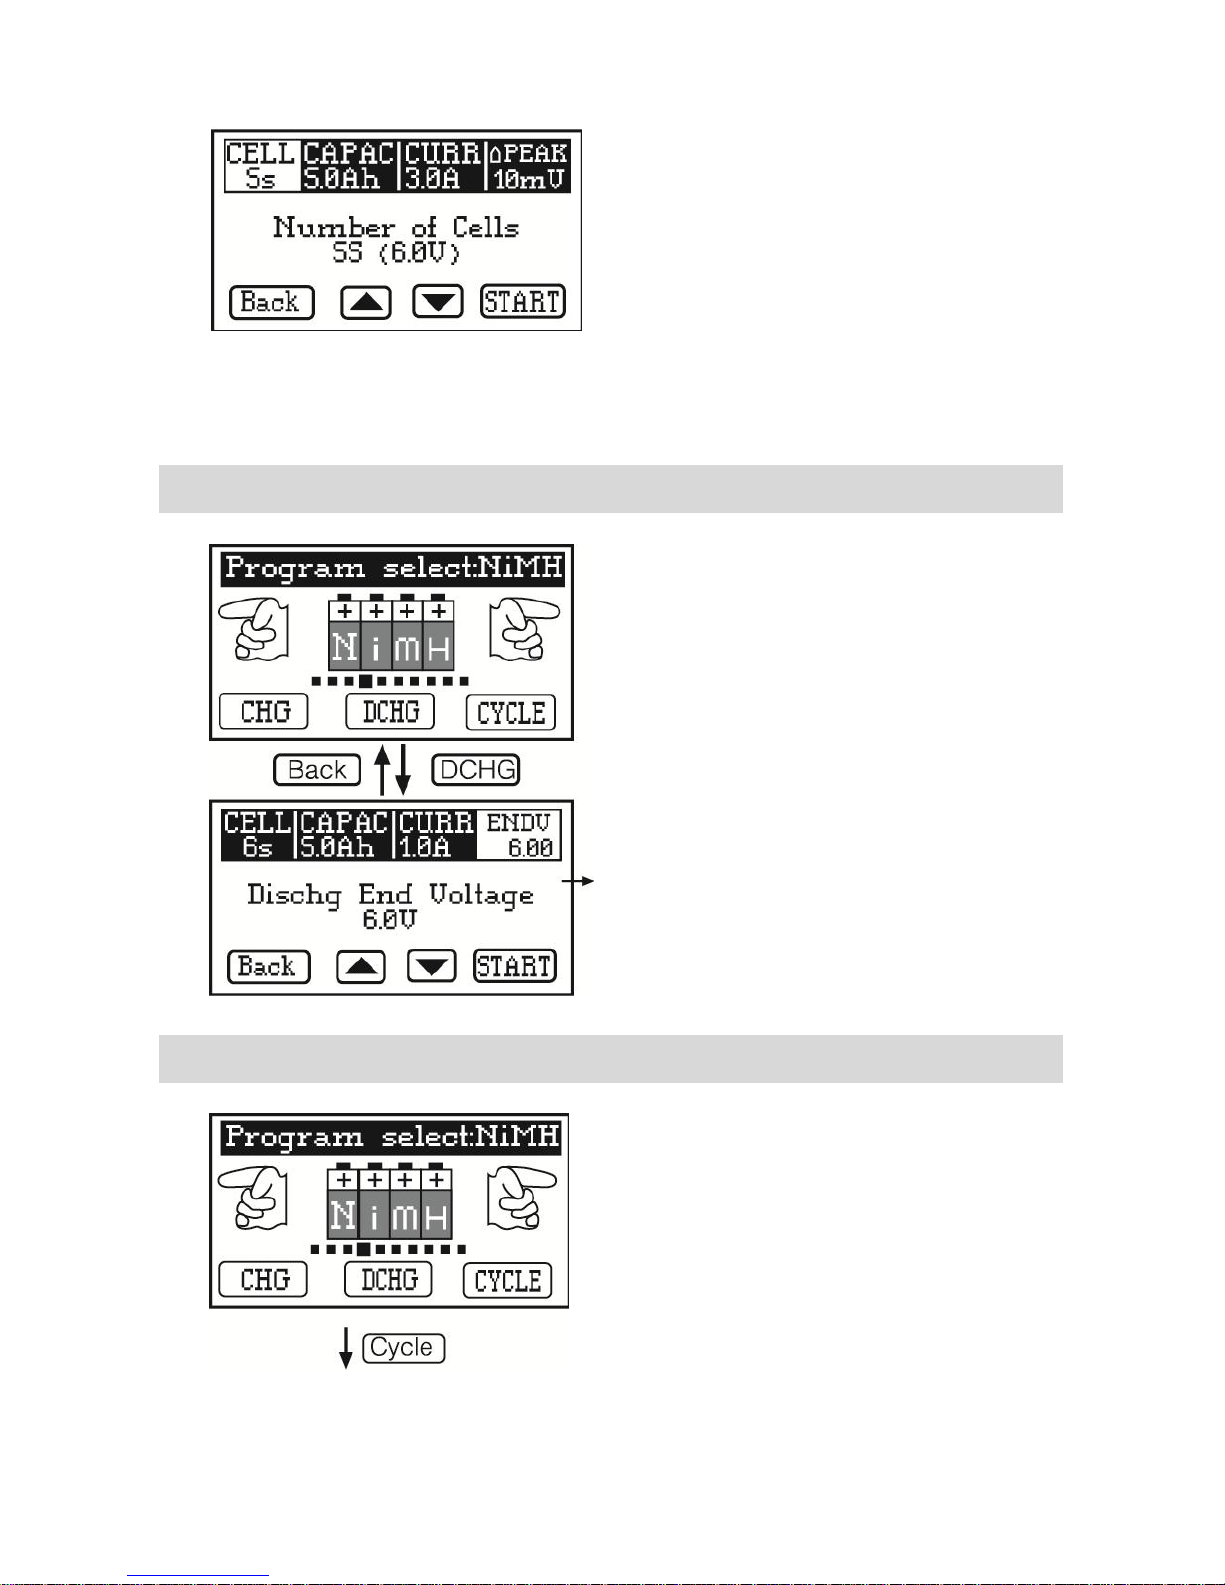
Press the “CHG” button to enter the battery
charging parameter setting interface. Once the
correct settings have been entered press the
“START” button for 2 seconds to begin the
charging process. The system should
automatically detect the battery connection
when charging begins, but if an error message
reading “CONNECTION BREAK” appears on the
screen, check to make sure that the battery has
been correctly connected to the charger.
8.1. NiMH/NiCd Battery Charging
8. NiMH/NiCd Battery Program
Page 14
[12]
The screen will display the current charging
status, and will stop automatically once this
process is complete sounding and audio
reminder to notify you when this is done. You
can also stop the process manually by pressing
“STOP”.
If possible always monitor the external temperature of the NiMH/NiCd battery with a temperature
sensor (not included in the set) in order to prevent safety issues caused by overcharging and
overheating.
Press “DCHG” to enter the battery discharging
parameter setting interface. Once all of the
correct settings have been entered press
“START” for 2 seconds to start the discharging
process. This will stop automatically when the set
end voltage is reached, or can be manually ended
by pressing the “STOP” button.
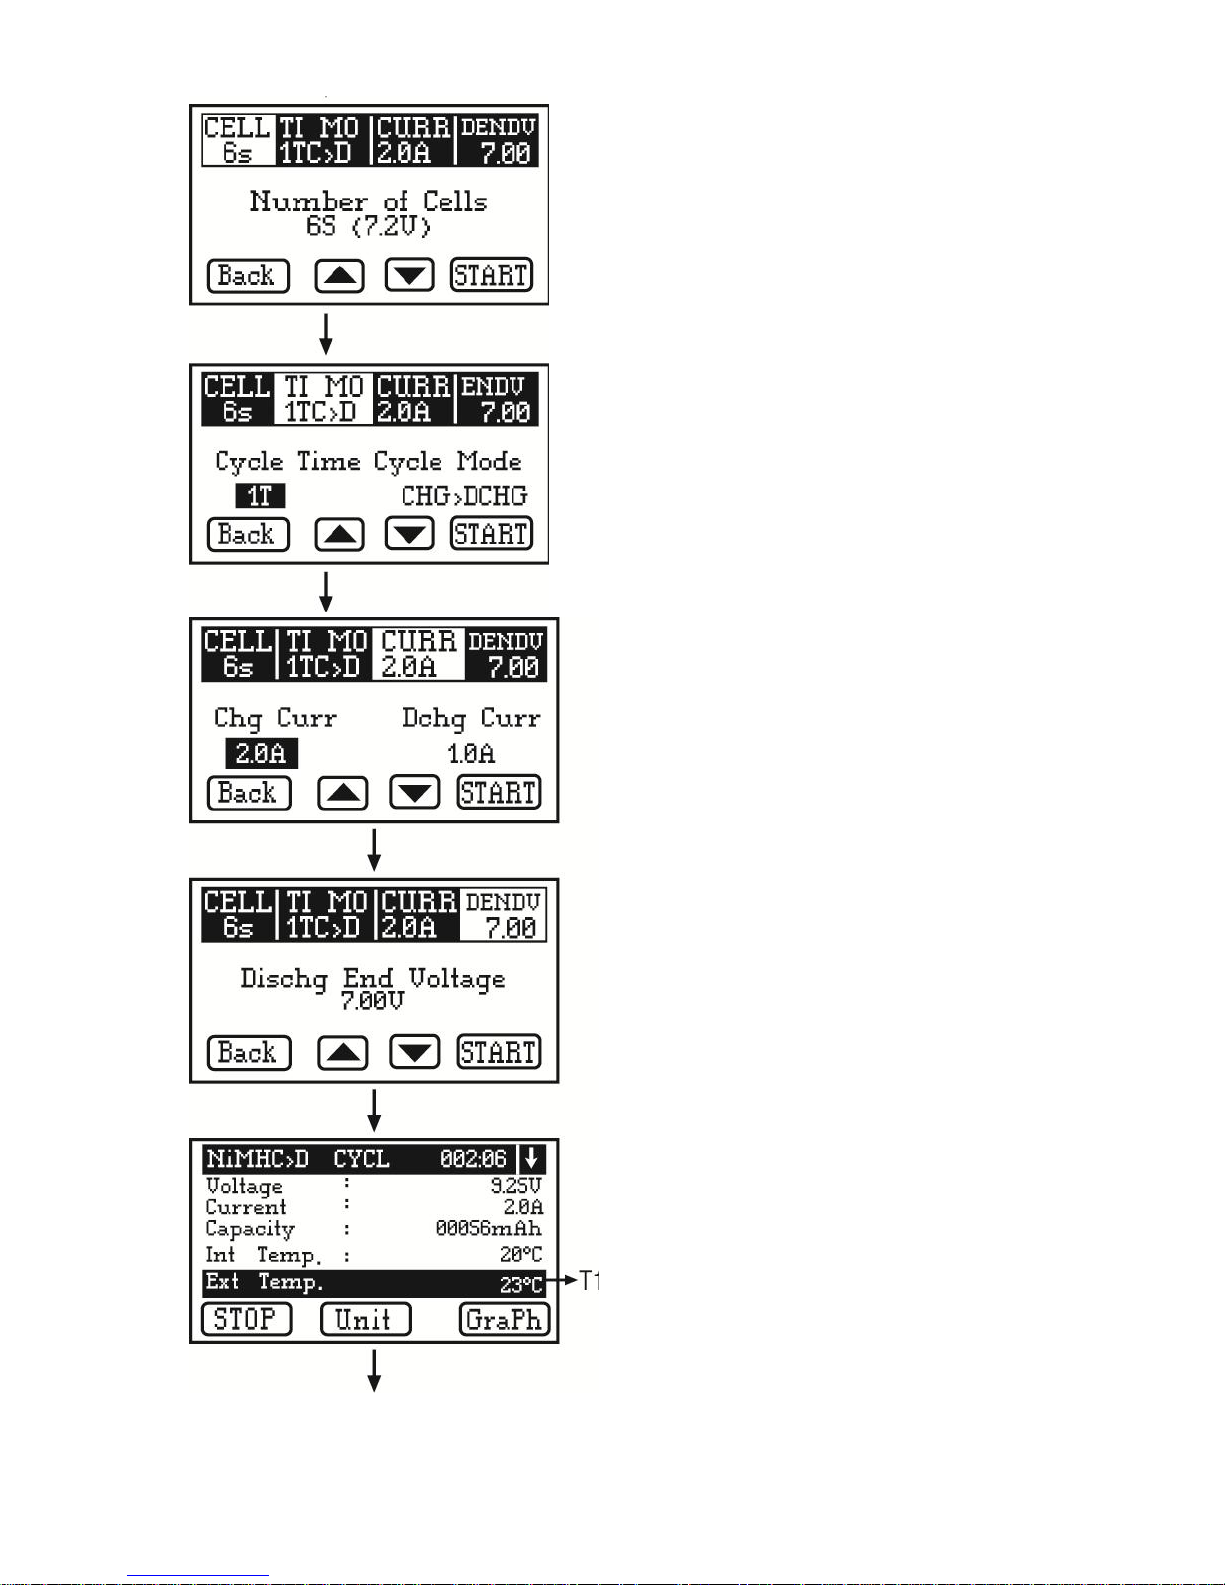
This program is used to balance, refresh and
confirm a battery’s performance. To avoid
overheating set a cooling-off period in the “User
Settings” menu after every cycle of charging and
discharging. The cyclic range is 1-4.
8.3. NiMH/NiCd Cyclic Charge/Discharge
8.2. NiMH/NiCd Battery Discharging
End voltage of discharging
Page 15
[13]
Select the appropriate NiMH/NiCd battery cell
count using the “INC” and “DEC” arrow buttons.
Press “Cycle Time” to set how many times you
wish to cycle the battery, and press “Cycle Mode
to set the sequence of charging and discharging.
Set the charge/discharge current. Touch “Chg
Curr” to set the charge current (0.1-10A) and
touch “Dchg Curr” to set the discharge current
(0.1-2A).
Set the discharge end voltage of the pack.
Once the cycling process has begun the data
interface will be shown on the screen. If you
have connected a temperature sensor, data of
this will also be displayed (see T1).
Page 16
[14]
Press the arrow in the top right-hand corner to
view more of the data interface. The cycle
sequence will show at the top of the screen.
“C>D” Charging
“D>C” Discharging
Touch “GraPh” to view the voltage chart under
cycle mode.
This program is designed for charging/discharging Pb batteries with a nominal voltage of 2-20V. It
is important that you do not select the incorrect chemistry program. There is a limit to the current
when charging as the Pb battery’s maximum charge current should be 1/10 of its capacity. Fast
charge is not available for this chemistry.
(Pb Battery Program Icon)
Select the Pb battery program and press the
“CHG” button to enter the charging parameter
settings menu.
9.1. Pb Battery Charging
9. Pb Battery Program
Page 17
[15]
Once all of the correct parameters have been
set, press “START” for 2 seconds to begin the
charging process.
The system should automatically detect the
battery connection when charging begins, but if
an error message reading “CONNECTION BREAK”
appears on the screen, check to make sure that
the battery has been correctly connected to the
charger.
The screen will display the current charging
status, and will stop automatically once this
process is complete sounding and audio
reminder to notify you when this is done. You
can also stop the process manually by pressing
“STOP”.
Select the Pb battery program and press “DCHG”
to enter the Pb battery discharge parameter
settings menu.
Once all of the correct settings have been
entered press “START” for 2 seconds to start the
discharging process. This will stop automatically
when the set end voltage is reached, or can be
manually ended by pressing the “STOP” button.
9.2. Pb Battery Discharging
Page 18
[16]
In this program the charger can be used as a power
supply to other equipment rather than
charging/discharging the battery. Yje supply voltage
range is 3-24V, the current range is 0.1-10A and the
power is 80W. Select the “DP” programme and
press “SETUP” to bring up the DP parameter
settings interface.
Here can enter the voltage, current and power of
the digital power supply. Press “Start” for 2 seconds
to bring up the reminder screen.
Press “Yes” to continue using the charger as a
power supply, or press ”No” to cancel the program.
If “Yes” is selected the output voltage, current and
power data will be displayed on the screen. Press
“GraPh” to display the output current graph. Press
“STOP” to return to the parameter settings
interface.
10. Digital Power Supply Program
Page 19
[17]
Using this program will allow you to easily discover the input voltage of the power supply, the
general voltage of your battery pack, the voltage of each individual cell and the internal
temperature of the battery. If you have a temperature sensor (not included in the set) connected,
the external temperature of the battery can also be checked.
It is important to select the correct chemistry when using the balance function. Make sure that
battery is connected to the charger via the balance leads as well as the output port. Press “START”
for 2 seconds to enter he balancing charge mode and begin the balancing process. For further
instructions please refer to the Lithium Battery Charging information (page 8).
11. Check Status
“BALANCE” Enter Balance Charging Mode
“UNIT” Select correct Lithium chemistry
“Back” Go back to the previous menu
Page 20
[18]
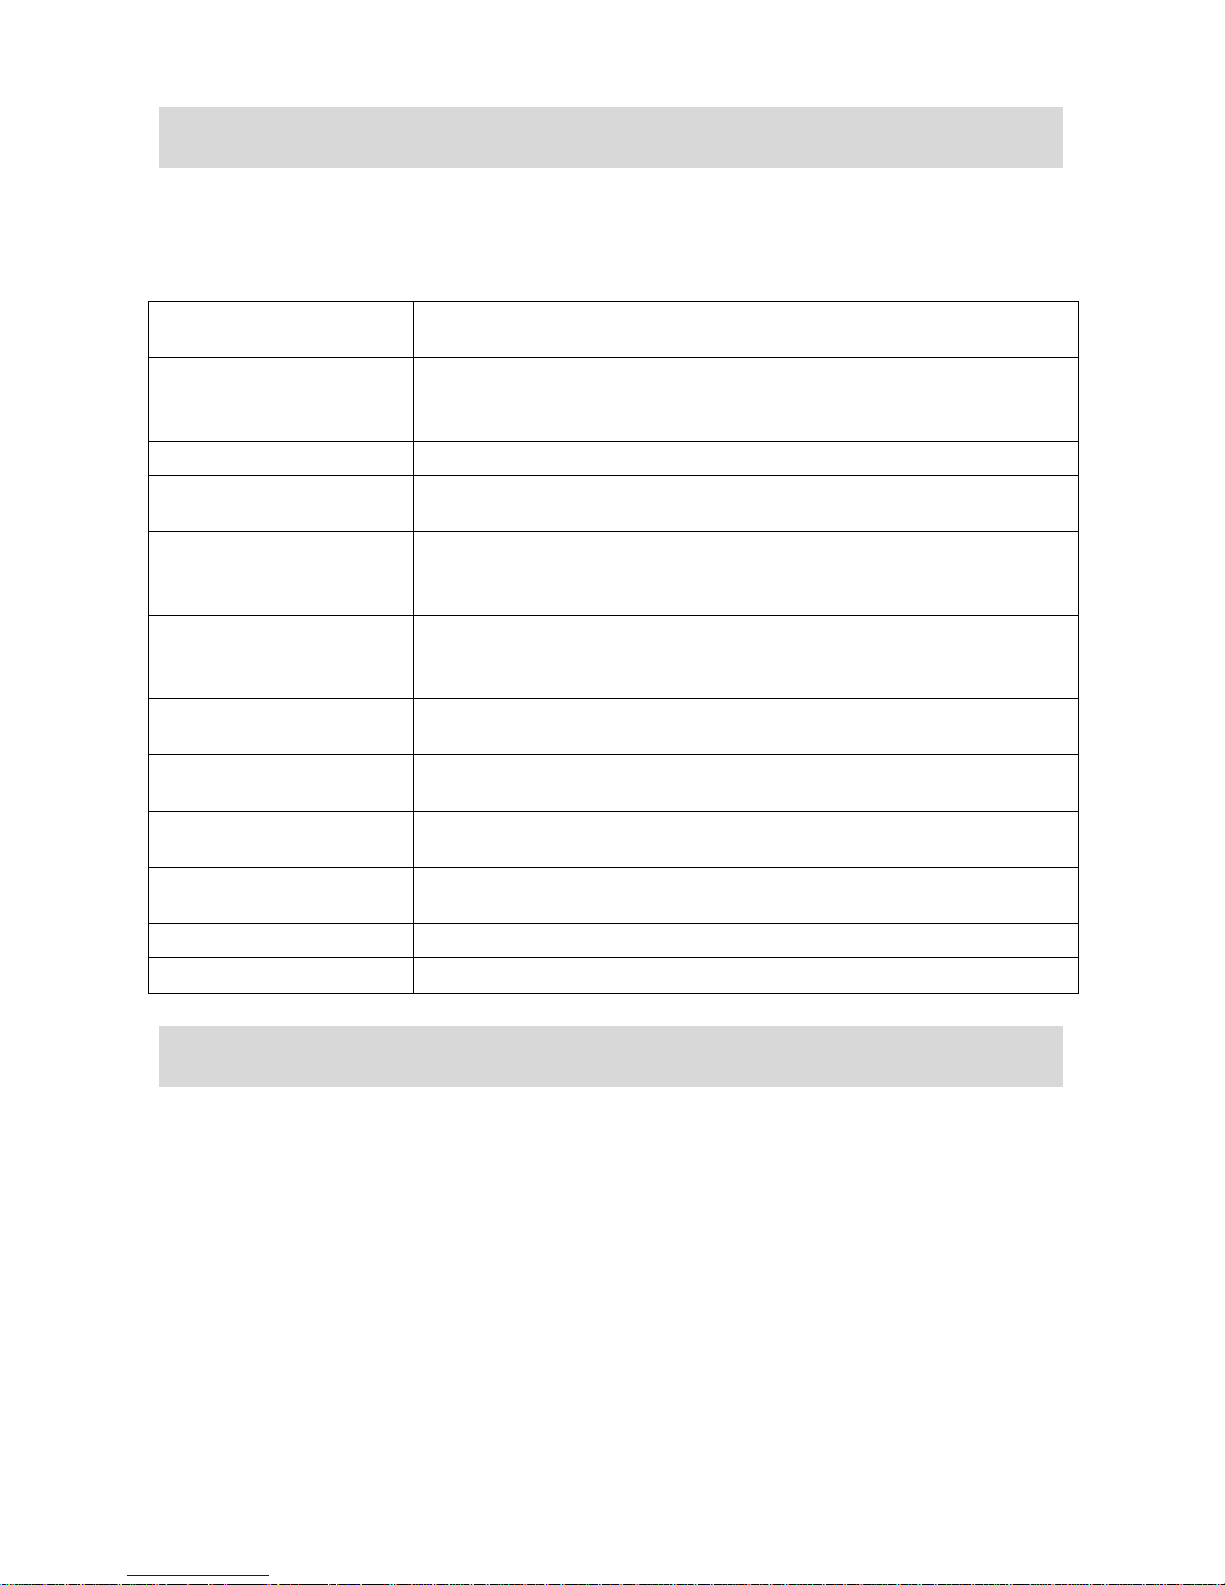
This charger is equipped with various safety monitors to ensure it’s safe and proper use. If there
seems to be an error with the charger and/or battery pack one of the following notifications may
appear on the screen:
REVERSE POLARITY
The polarity is reversed. The anode and cathode in the output port of
the battery is incorrectly connected.
CONNECTION BREAK
The connection between the battery and the output port is broken, or
the charging lead is not properly connected when attempting to
charge/discharge.
OUTPUT SHORT CIRCUIT
The output port has short-circuited. Please check the charging cables.
INPUT VOLTAGE ERROR
The input voltage has been set incorrectly. Please make sure that the
input voltage is not higher than the limit.
BATTERY LOW VOLTAGE
The detected battery voltage is too low compared to the battery
setting voltage. Please check the cell count of the battery has been set
correctly.
BATTERY HIGH VOLTAGE
The detected battery voltage is too high compared to the batter
setting voltage. Please check the cell count of the battery has been set
correctly.
CELL LOW VOLTAGE
The cell voltage of at least one cell in the pack is too low. Please check
the voltage of each individual cell.
CELL HIGH VOLTAGE
The cell voltage of at least one cell in the pack is too high. Please
check the voltage of each individual cell.
CELL CONNECT ERROR
The connection between the Battery and the charger is faulty. Please
check that all connections have been done correctly.
CHARGER OVERHEATING
The internal temperature of the charger is too high. The internal heat
of the battery should now be decreasing.
OVER POWER
The digital power supply caused the power to exceed the set limit.
MAX CURRENT
The digital power supply caused the current to exceed the set limit.
We warrant this product for a period of one year (12 months) from the date of purchase. The
guarantee applies only to material or operational malfunctions. During that period, we will try to
replace or repair the unit without any service fee. Receipt or proof of purchase is required. This
warranty does not cover damaged due to wear, overloading, improper handling, the use of
incorrect accessories or failure to follow the supplied warnings and safety instructions.
13. Warranty and Service
12. Warnings and Error Messages
 Loading...