

oventrop R-Tronic RT B, R-Tronic RTFC K, R-Tronic RTF B, Aktor MH CON B, Aktor MD CON B Instruction Manual
Page 1
1
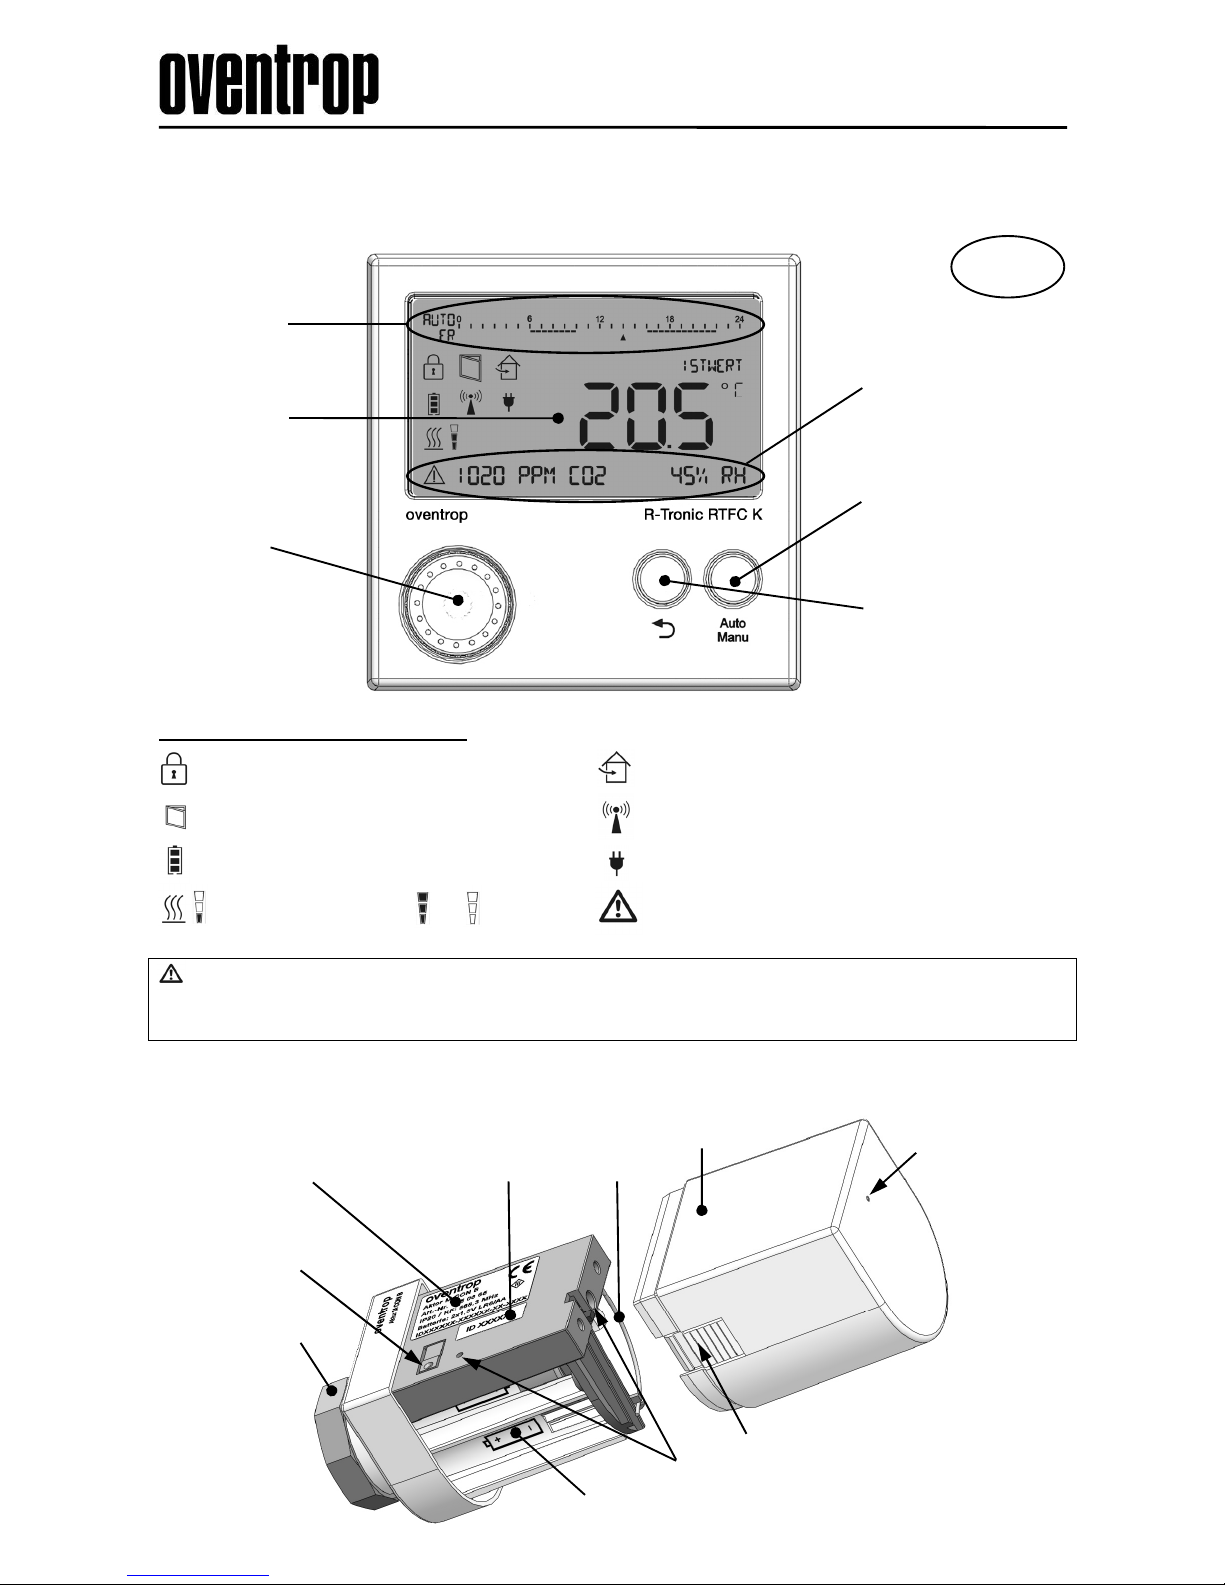
Zurück-Taste:
Menüebene zurück;
gedrückt halten: zurück
zur Standard-Ansicht
Auto/Manu-Taste:
Umschaltung zwischen
den Standardheizprofilen
Textzeile Display:
mit Informationen zu
- Messwerten
- Menüstruktur
- Diagnose (Hinweisen)
Menü-Knopf:
Navigation und
Sollwertverstellung
durch Drehen
und Drücken
(Eingabebestätigung)
Batteriefach für zwei Batterien (AA 1,5 V Mignon)
Gehäusedeckel
Typenschild
Anlern/Justiertaste
Befestigungsmutter
(nur bei
Ausführung
MH CON B)
o.Abbildung:
MD CON B mit
Klemmanschluss
Antenne
2 x Hinweis-LED
A
ktor-ID
Sichtfenster
Hinweis-LED
Entriegelungslasche
Betriebsmodus-
und Zeitprofil
Display (beleuchtet):
Symbole und
Anzeigeeinheiten.
Premium Armaturen + Systeme
„R-Tronic RT B / RTF B / RTFC K“
„Aktor MH CON B / MD CON B"
Kurzanleitung
„R-Tronic“ (Klima-Anzeige/Regelungen mit Funktechnik)
Im Display angezeigte Symbole
WARNUNG
Lassen Sie die Montage und den Anschluss an das 230-Volt-Netz nur von einem
Elektrofachhandwerker ausführen!
Innenansicht des Funk-Stellantriebs (hier „Aktor MH CON B“)
Kindersicherung aktiviert
Fenster geöffnet (sensorgesteuert)
Batteriestatus (voll, mittel, leer)
Heizbetrieb / Ventil AUF ZU
Empfehlung zur Raumlüftung (nur R-Tronic „RTFC K“)
Funk aktiv (mindestens ein Stellantrieb angelernt)
Stromversorgung über externes Netzteil
wichtige Information im Menü (Anzeige von
Hinweisen und Fehlermeldungen)
D
Page 2
2
Navigation und Menüstruktur Kurzanleitung
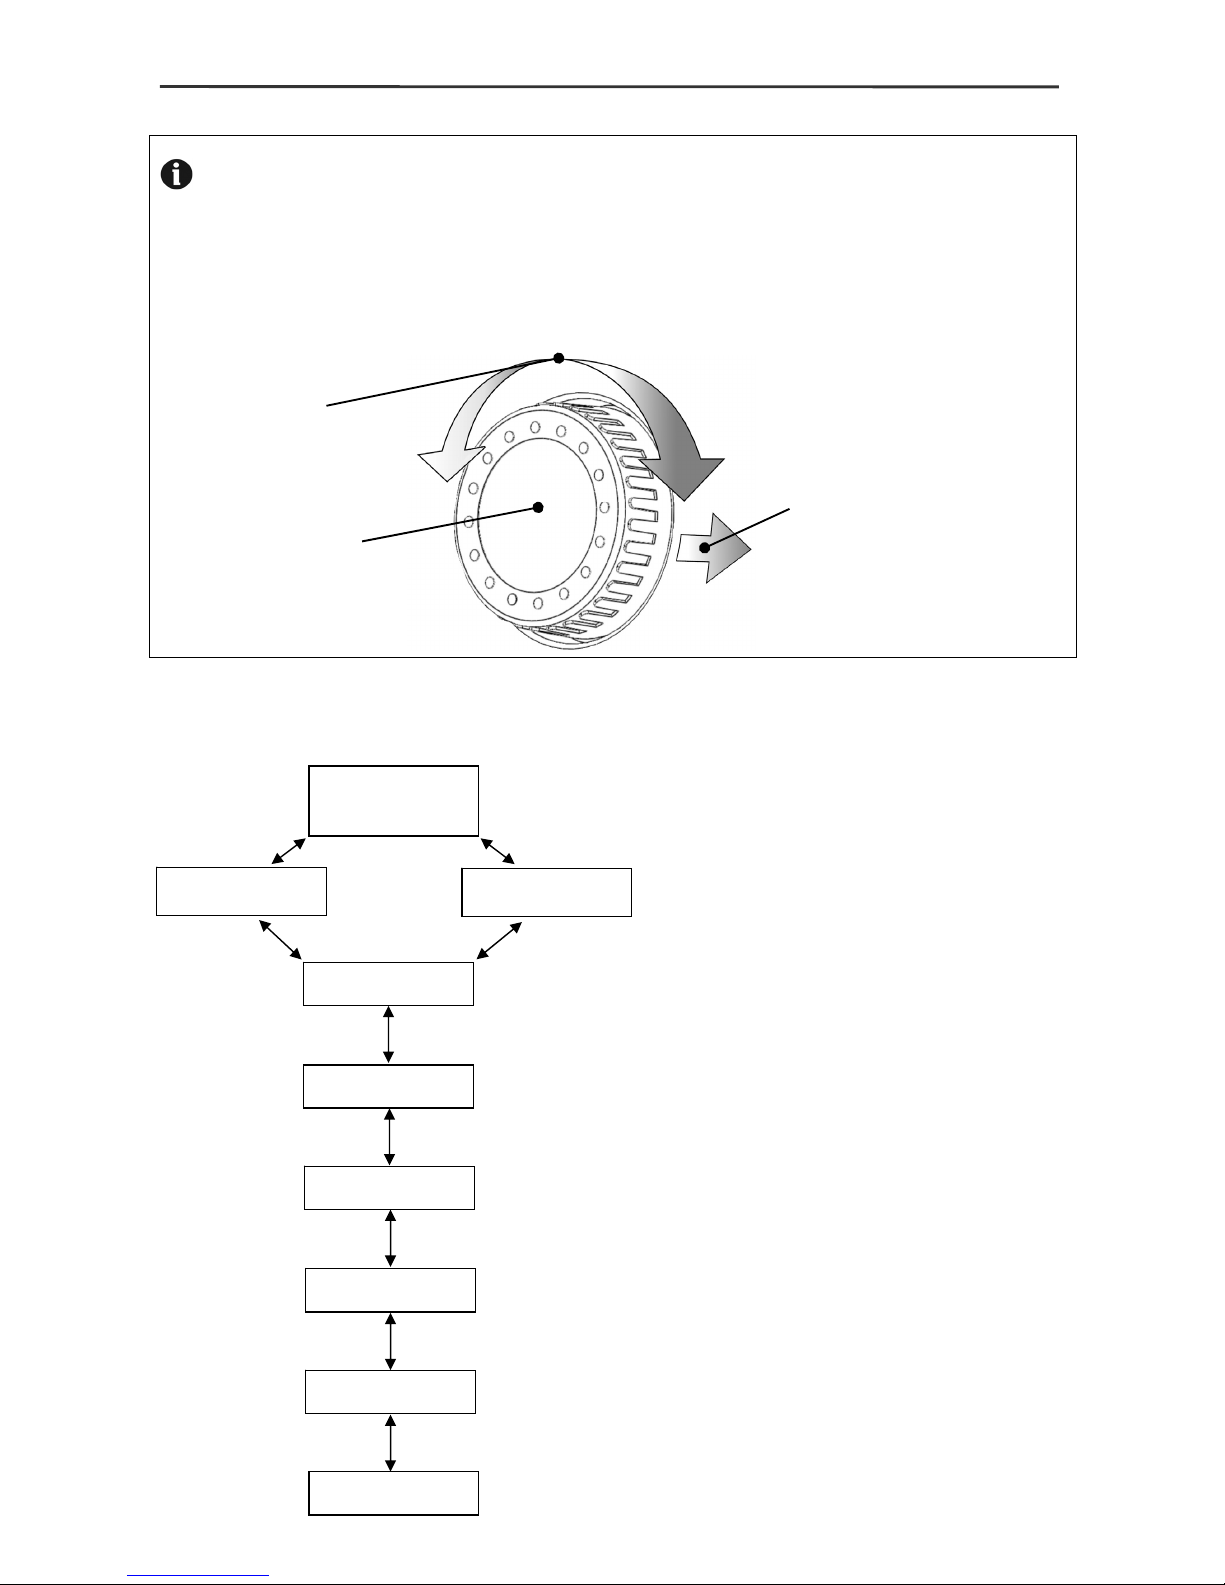
Navigation und Funktionsauswahl mit dem Menü-Knopf
Die Navigation in den „R-Tronic“-Menüs sowie die Auswahl der gewünschten Funktionen nehmen Sie immer über den Menü-Knopf vor. Sie erreichen alle Untermenüs und
Funktionen durch Drehen (Navigation) und Drücken (Bestätigen der getroffenen Auswahl
und Speichern).
Schematischer Aufbau der „R-Tronic“-Menüstruktur (1. und 2. Ebene)
Zeigt die aktuell von der „R-Tronic“
gemessene Raumtemperatur an.
Über die direkte Sollwert-Vorgabe
geben Sie eine unmittelbar wirksame
Wunschtemperatur vor.
Der Einstieg in die Untermenüs
bzw. die Funktionsauswahl erfolgt
grundsätzlich über das Hauptmenü.
Auswahl von Heizprofilen und
Programmierung von Individualprofilen.
Vorgabe einer von den Voreinstellungen
(20 °C bzw. 17 °C) abweichenden
Komfort- und/oder Absenktemperatur.
Konfiguration von Sonderfunktionen
für den Heizbetrieb, wie Boost, Urlaub
(Abwesenheit) oder „Partymodus“.
Herstellen der Funkverbindung zu den
Stellantrieben; Datum und Uhrzeit;
Zurücksetzen auf Werkseinstellung.
Diagnose von Betriebsstörungen in
der „R-Tronic“ und den Stellantrieben.
HAUPTMENÜ
FUNKTIONEN
EINSTELLUNGEN
INFORMATIONEN
ZEITPROFIL
TEMPERATUREN
SOLLWERT
SOLLWERT
ISTWERT
TEMPERATUR
Hersteller: OVENTROP GmbH & Co. KG, Paul-Oventrop-Straße 1
D-59939 Olsberg E-Mail [email protected] www.oventrop.com
Technische Änderungen vorbehalten. 115068281 11/2014 (V 1.1)
Drehen
Navigation in
den Untermenüs
Menü-Knopf
Drücken
Bestätigen der
Auswahl und Speichern
Page 3
3
Herstellen der Funkverbindung Kurzanleitung
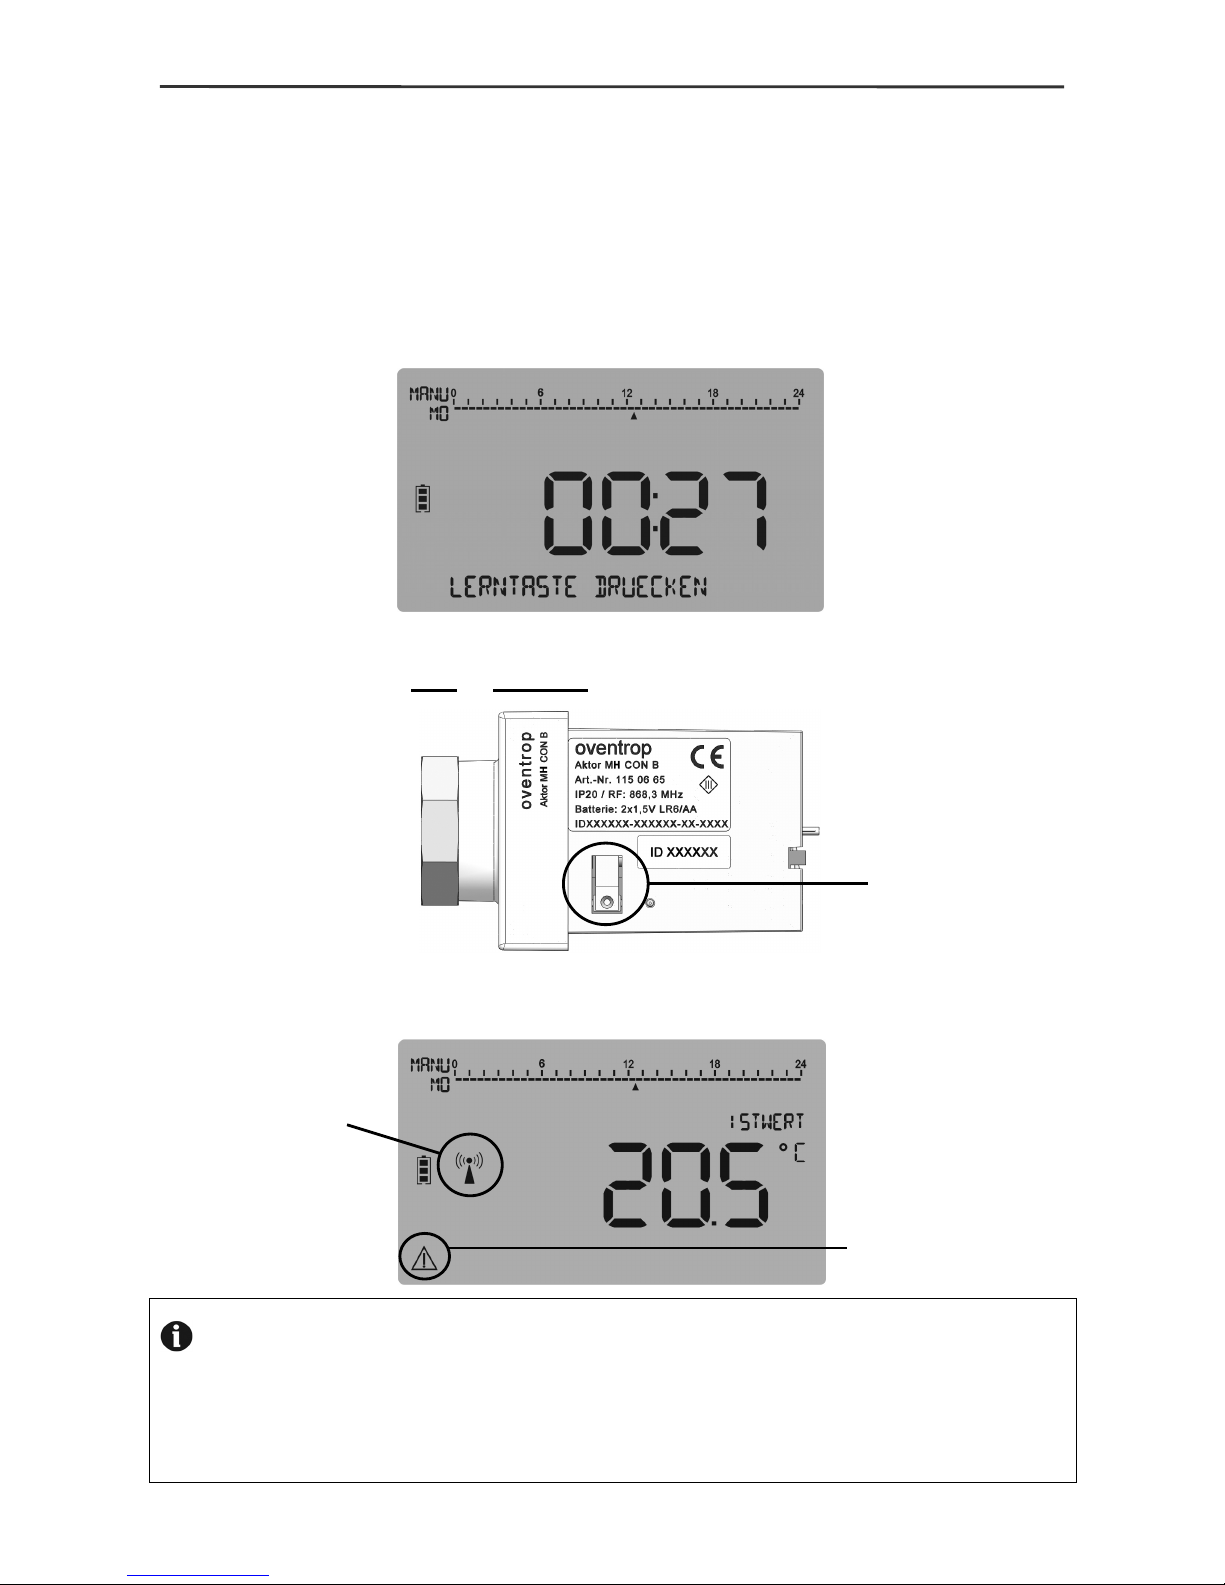
Anlernen des Funk-Stellantriebs an die „R-Tronic“
1. Stellen Sie das Datum und die Uhrzeit ein. Auf dem „R-Tronic“-Display erscheint die
Standardanzeige mit der aktuellen Raumtemperatur (ISTWERT).
2. Begeben Sie sich nun in das folgende Menü:
HAUPTMENÜ ► EINSTELLUNGEN ► INSTALLATION ► ANLERNEN
3. Starten Sie den Anlernvorgang (Menü-Knopf drücken). Das Display zeigt Ihnen eine
Zeitangabe von 30 Sekunden an, die im „Count down“ abläuft.
4. Innerhalb dieses Zeitraums von 30 Sekunden muss nun am Stellantrieb die
Anlern-/Justiertaste kurz (!) gedrückt werden.
5. Wenn der Anlernvorgang erfolgreich war, zeigt Ihnen das „R-Tronic“-Display kurz die
Meldung ERFOLREICH an und folgendes Funksymbol erscheint:
Das Funksymbol
signalisiert, dass
der Anlernvorgang
erfolgreich war.
HINWEIS bei gescheitertem Anlernvorgang
Der Anlernvorgang kann scheitern, wenn räumliche Faktoren wie die Raumgeometrie,
vorhandene Gegenstände, Materialien und Störquellen die Funkverbindung unterbrechen.
In diesem Falle sollten Sie die „R-Tronic“-Einheit an einer anderen Stelle montieren
und den Anlernvorgang erneut ausführen.
Anlern-
/
Justiertaste
Das Warnsymbol signalisiert,
dass die „Justierfahrt“
des Stellantriebs
noch auszuführen ist.
Page 4
4
Einrichtung des Stellantriebs Kurzanleitung
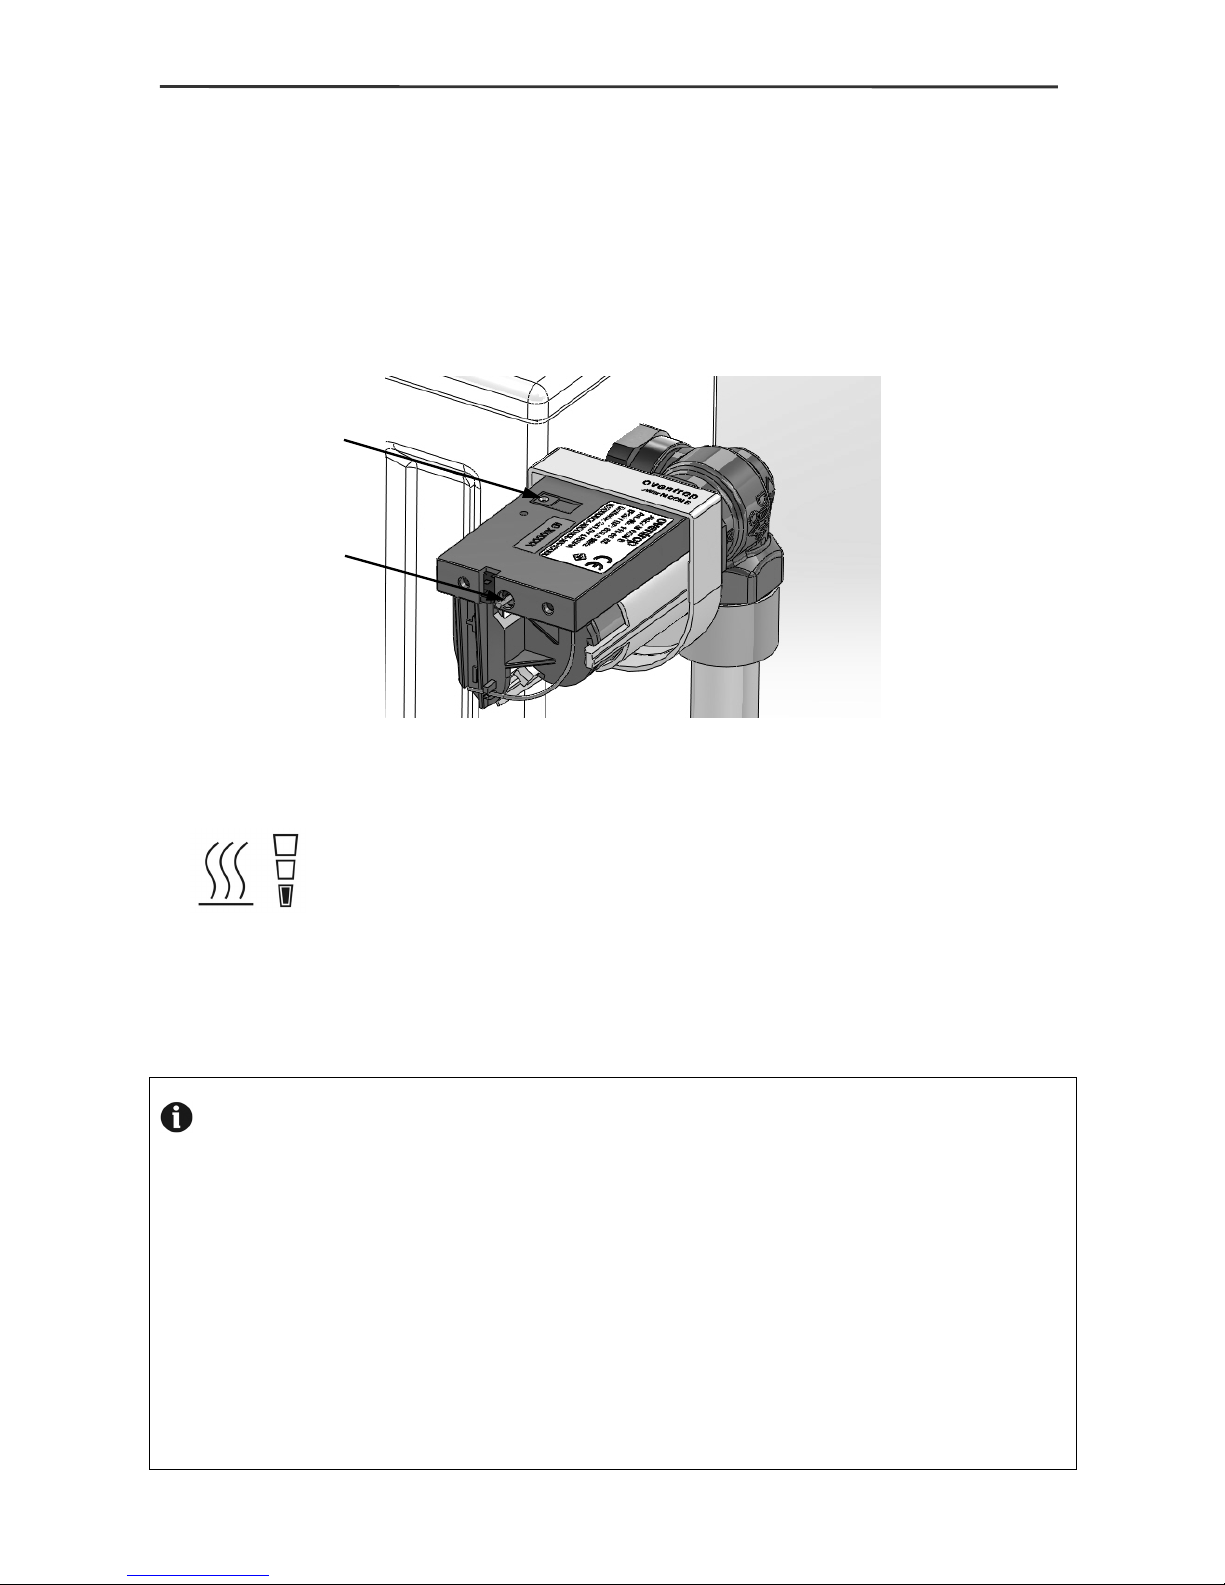
„Justierfahrt“ des Stellantriebs „Aktor MH CON B“ / „Aktor MD CON B“
Nachdem Sie die Funkverbindung erfolgreich hergestellt haben, muss der Stellantrieb auf
das Ventil Ihres Heizkörpers eingestellt werden. Dies nennt man „Justierfahrt“.
1. Entfernen Sie den Gehäusedeckel vom Stellantrieb (bereits bei der Montage).
2. Halten Sie die Anlern-/Justiertaste für mindestens 2 Sekunden gedrückt, um die
„Justierfahrt“ einzuleiten. Der Stellantrieb schließt jetzt das Heizungsventil.
Wenn der Vorgang abgeschlossen ist, wird dies am Stellantrieb durch ein dreifaches
grünes Blinken (langsam) beider LEDs signalisiert. Das „R-Tronic“-Display zeigt mit
diesem Symbol die Funktionsbereitschaft des Stellantriebs an:
Diese Anzeige erscheint erstmalig nach dem nächsten Sendeintervall (Taktung:
150 Sekunden). Sie signalisiert den anlaufenden Heizbetrieb gemäß der Einstellungen
in der „R-Tronic“ (Heizkörperventil wird wieder geöffnet).
3. Setzen Sie den Gehäusedeckel auf den Stellantrieb, bis er hörbar einrastet.
HINWEIS zur Grundeinstellung von Heizprofilen
Über die Auto/Manu-Taste können Sie für eine erste Grundeinstellung des Systems eines
von drei Standard-Heizprofilen aktivieren.
Mit Inbetriebnahme der „R-Tronic“ ist immer die Einstellung PROFIL AN wirksam, die die
Raumtemperatur konstant auf 20 °C regelt.
Wählen Sie PROFIL AUS, um die Raumtemperatur dauerhaft auf 17 °C zu senken.
Wenn Sie keinen konstanten Heiz- bzw. Absenkbetrieb gemäß nur einer Einstellung wünschen, wählen Sie PROFIL TAG / NACHT. Dieses senkt zwischen 22.00 Uhr abends und
6.00 Uhr morgens die Raumtemperatur auf 17 °C ab. Tagsüber wird der Raum auf die
„Komforttemperatur“ von 20 °C geregelt.
Detaillierte Informationen finden Sie in der ausführlichen Bedienungsanleitung!
Anlern-/Justiertaste
Hinweis-LED
(auch bei
geschlossenem
Gehäusedeckel
sichtbar)
Page 5
5
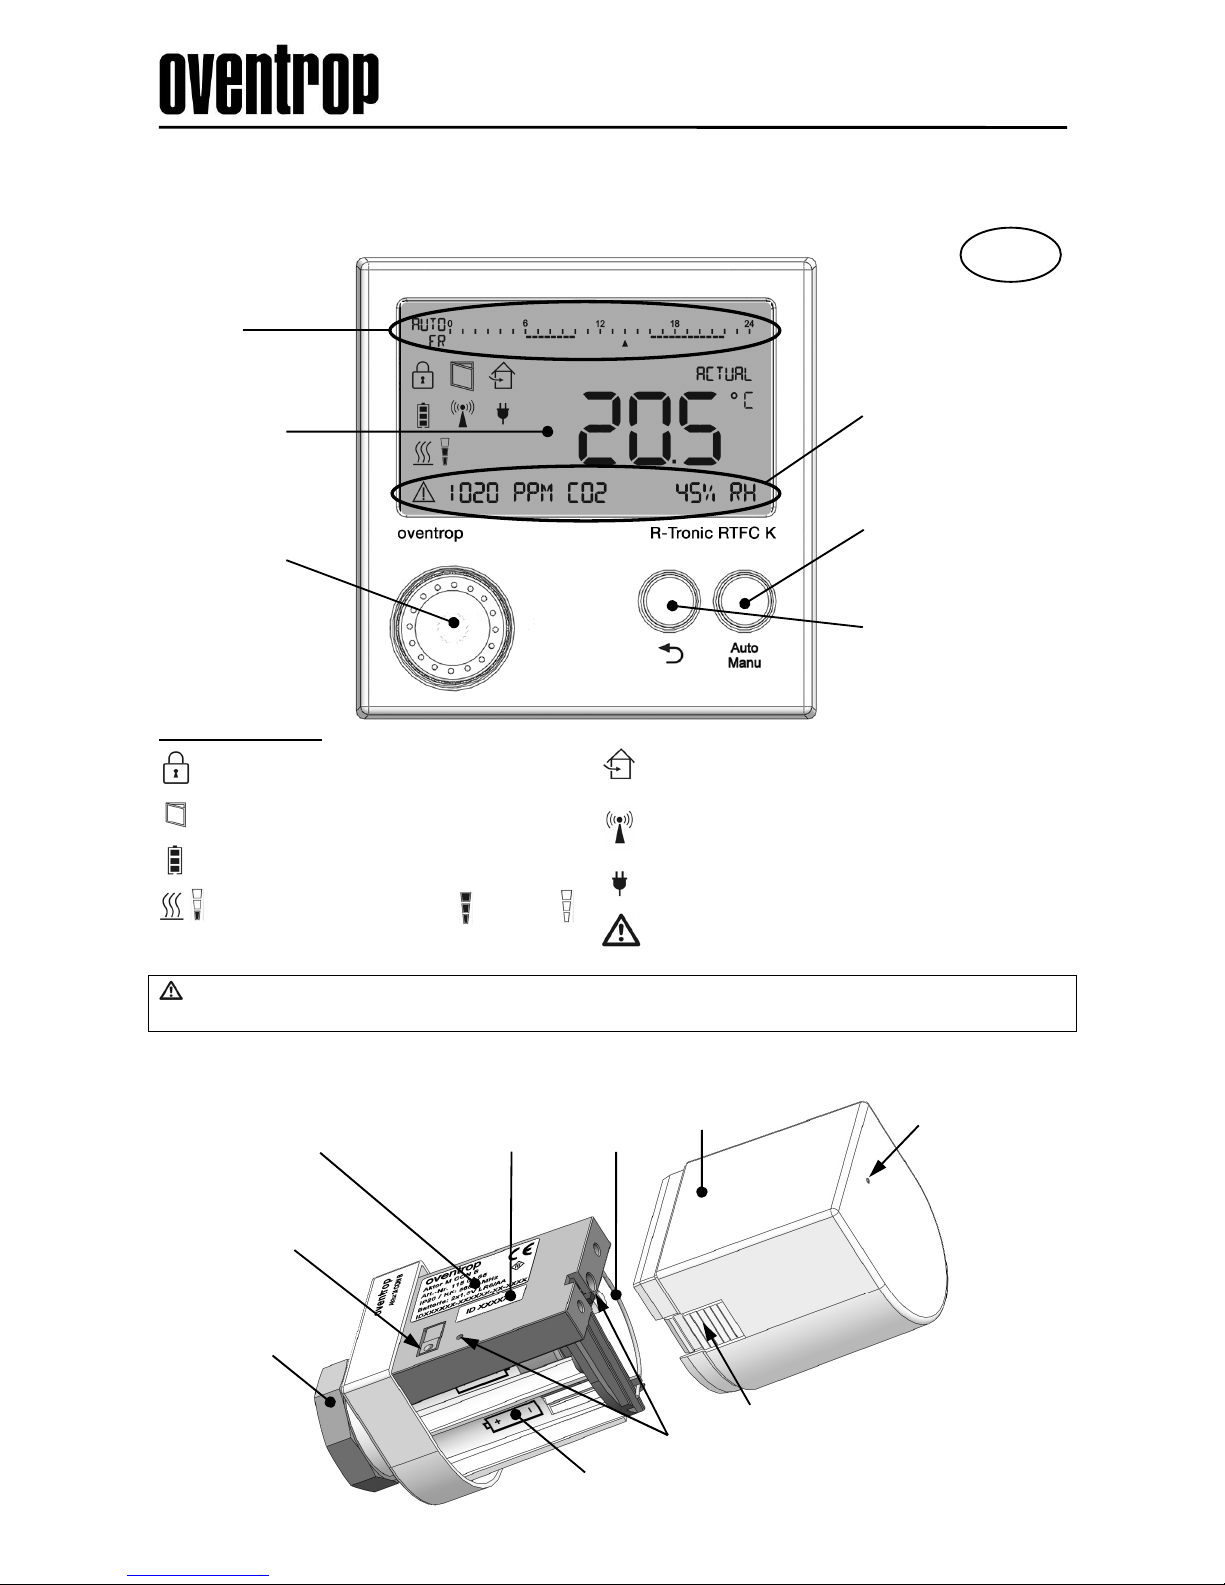
Battery case for two batteries (AA 1,5 V round cell)
Casing cover
Type plate
Teach in/adjustment
button
Collar nut
(MH CON B)
Squeeze
Connection:
MD CON B
[not pictured]
Antenna
2 x info LED
A
ktor-ID
Viewer
info LED
Release tab (press to remove)
Valves, controls + systems
"R-Tronic RT B / RTF B / RTFC K"
"Aktor MH CON B / MD CON B"
Brief instruction
“R-Tronic” (Climate display device/control)
Display symbols
WARNING
Electrical Connections must only be carried out by qualified electricians!
“Aktor MH/MD CON B” (Actuator for radiators, radio controlled)
GB
Recommendation for room ventilation
(only “R-Tronic RTFC K“)
Wireless control active
(at least one “teached in” actuator)
Current supply via external power pack or mains adaptor
Important information in the menu (display of notes
and error messages)
Return-button:
Previous menu level;
keep pressed: return to
default view
Auto/Manu-button:
Switching between the
standard heating profiles
Text line display:
supplies information on
- Measured values
- Menu structure
- Diagnosis (advice)
Menu-button:
Navigation and
nominal setting
by turning
and pressing
(confirmation)
Operating mode-
and time profile
Display (illuminated):
Symbols and
display units.
Child-proof lock activated
Window open (sensor controlled)
Battery status (fully charged, low, empty)
Heating period / Valve OPEN CLOSED
Page 6
6
Navigation and menu structure Brief instruction
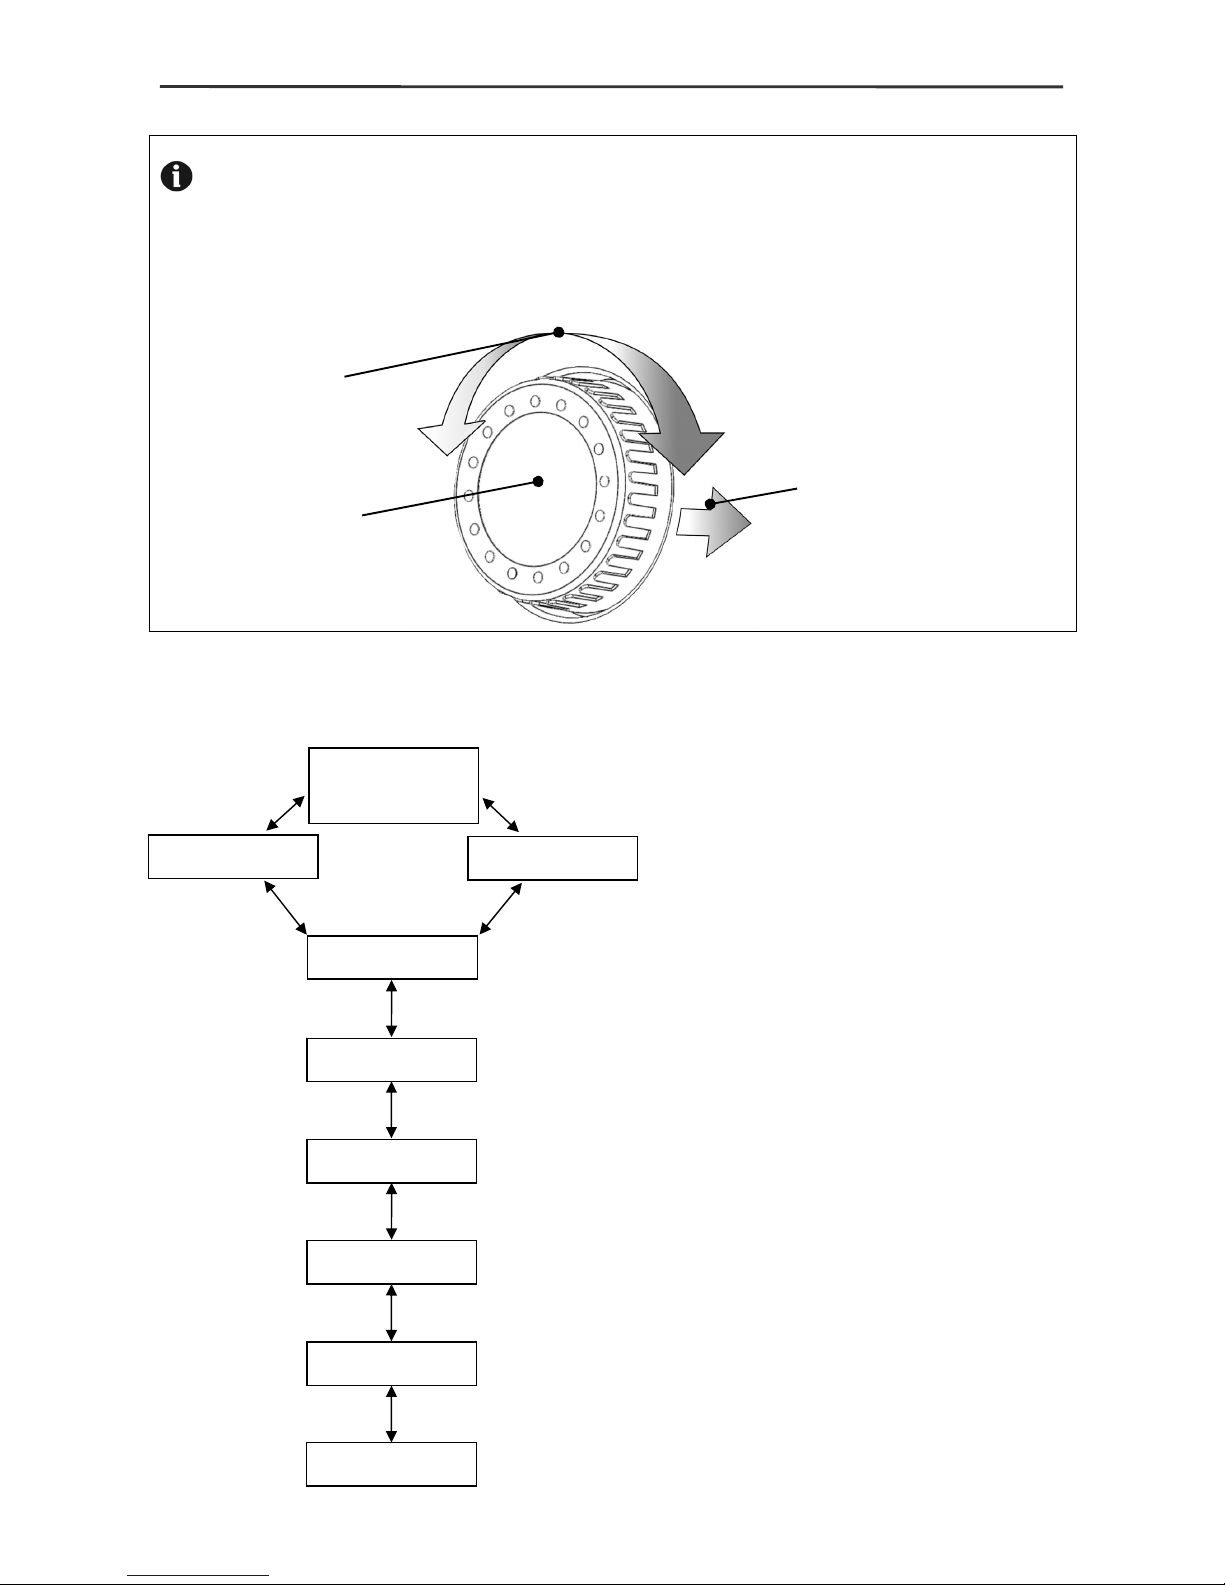
Navigation and function selection via the Menu-button
Navigation in the “R-Tronic” menu and selection of the required functions are always
carried out via the menu-button. All submenus and functions can be reached by turning
(navigation) and pressing (confirmation and storage of selection).
Schematic configuration of the “R-Tronic” menu structure (1. and 2. level)
Current room temperature
measured by the “R-Tronic”.
Setting of the required temperature.
Access to submenus and
function selection via the main menu.
carried
Selection of heating profiles and
programming of individual profiles.
Setting of a comfort and/or setback
temperature deviating from the
presetting (20°C or 17°C).
Configuration of special functions for
the heating period, such as boost,
vacation (absence) or “party mode”.
Creation of a radio communication
with the actuators; date and time;
reset to factory settings.
Diagnosis of malfunctions of
“R-Tronic” and actuators.
Turning
Navigation in
the submenus
Menu-button
Pressing
Confirmation of
selection and storage
Manufacturer: OVENTROP GmbH & Co. KG, Paul-Oventrop-Straße 1
D-59939 Olsberg E-Mail [email protected] www.oventrop.com
Subject to technical modifications. 115068281 11/2014 (V 1.1)
MAIN MENU
FUNCTIONS
SETTINGS
INFORMATION
TIME PROFILE
TEMPERATURES
SET VALUE
SET VALUE
ACTUAL VALUE
TEMPERATURE
Page 7
7
Creation of radio communication Brief instruction
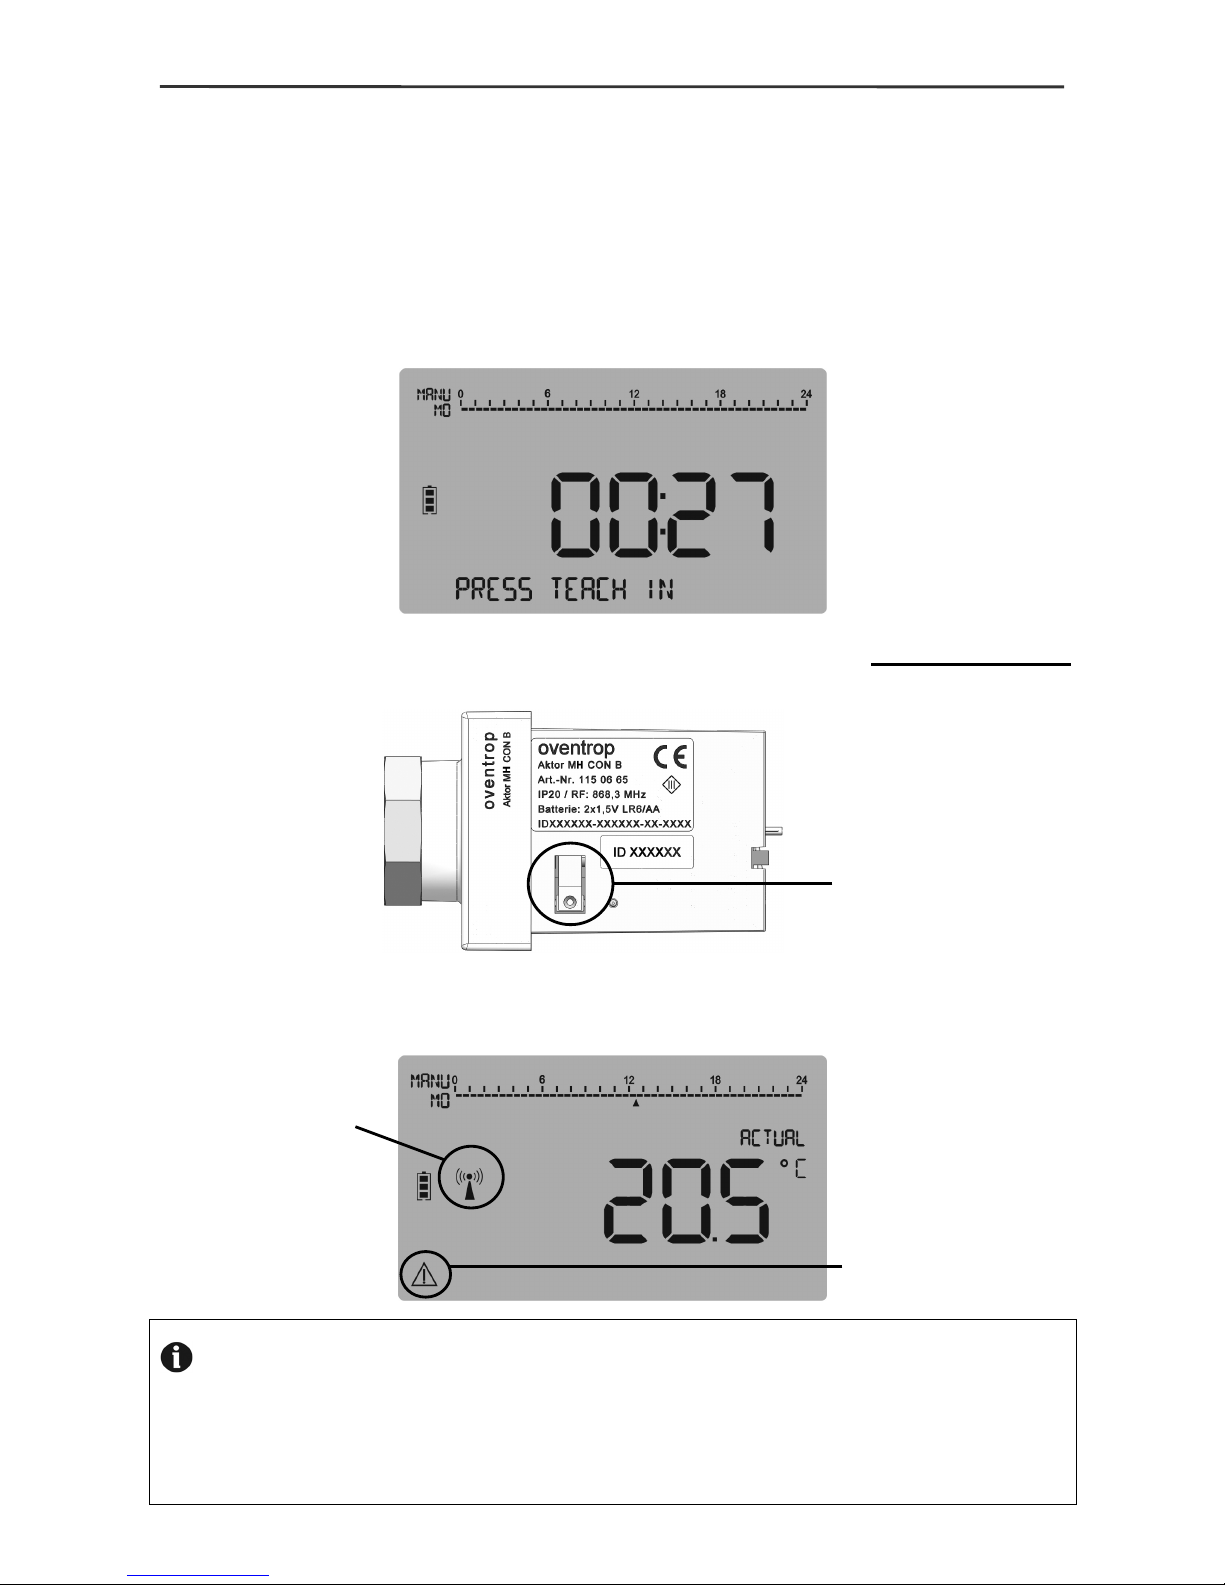
Adaptation of the wireless actuator to the “R-Tronic”
1. Set date and time. The standard display with the current room temperature appears on
the display of the “R-Tronic” (ACTUAL VALUE).
2. Now proceed to the following menu:
MAIN MENU ► SETTINGS ► INSTALLATION ► TEACH IN
3. Start “teach” in process (Press Menu-button). A running count down of 30
seconds is displayed.
4. Now the “teach in”/adjustment button at the actuator has to be pressed quickly (!)
within this countdown.
5. The message SUCCESS which shortly appears on the “R-Tronic” display signalizes
that the “teach in” process has been completed successfully and the following radio
symbol is displayed:
The wireless symbol
signalizes that the
“teach in” process has
been completed
successfully.
NOTE of an unsuccessful “teach in” process
The “teach in” process may fail if the radio communication is interrupted by spatial factors,
such as room geometry, existing objects, materials and interference sources. In this case,
the “R-Tronic” should be installed at a different location and the “teach in” process
should be repeated.
Teach in
/adj
ustment button
The warning symbol signalizes that the “adjustment
run” of the actuator still has
to be carried out.
Page 8
8
Adjustment of the actuator Brief instruction
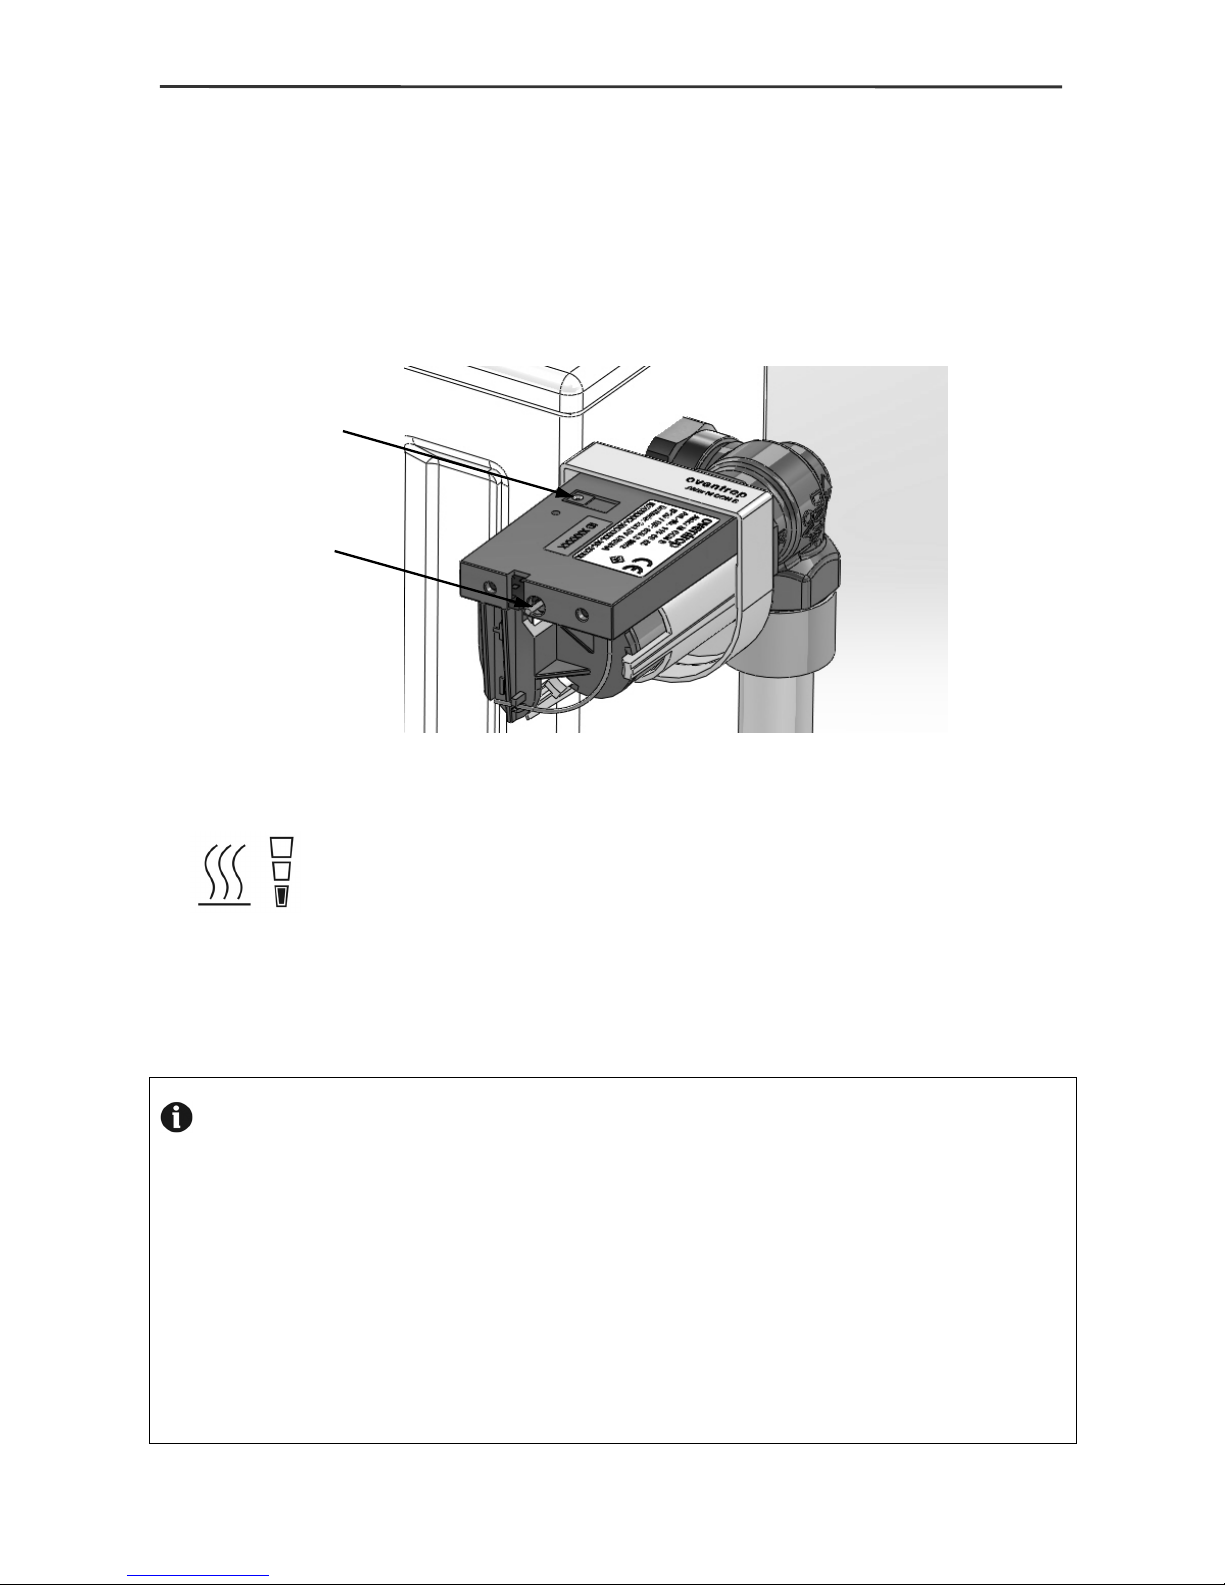
“Adjustment run” of the actuator “Aktor MH/MD CON B”
After having created the radio connection, the actuator has to be adjusted to the valve of
your radiator. This process is called “adjustment run”.
1. Remove the casing cover of the actuator (during installation).
2. Keep the “teach in”/adjustment button pressed for at least 2 seconds to launch the
“adjustment run”. The valve is now closed by the actuator.
Completion of the process is signalized by a triple green flashing (slowly) of both
LEDs. The operational readiness is displayed by the following symbols on the
“R-Tronic” display:
This display will appear for this first time after the next transmission interval (cycle:
150 seconds). It signalizes the start of the heating period according to the “R-Tronic”
settings (radiator valve is opened again).
3. Mount the casing cover onto the actuator until it engages audibly.
NOTE regarding basic setting of heating profiles
One of three standard heating profiles can be activated via the Auto/Manu-button for a
first basic setting of the system.
When putting the “R-Tronic” into operation, the setting PROFILE ON will be active
constantly and adjust the room temperature to 20 °C.
Select PROFILE OFF for a constant reduction of the room temperature to 17°C.
If you do not wish a constant heating or setback operation according to only one setting,
select PROFILE DAY/NIGHT. The room temperature will be reduced to 17°C between
22.00 h and 06.00 h and be adjusted to a “comfort temperature” of 20°C during the day.
More information can be obtained from the detailed operating instructions!
“Teach in”/adjustment button
LED info
(visible even
when the casing
cover is closed)
Page 9
9
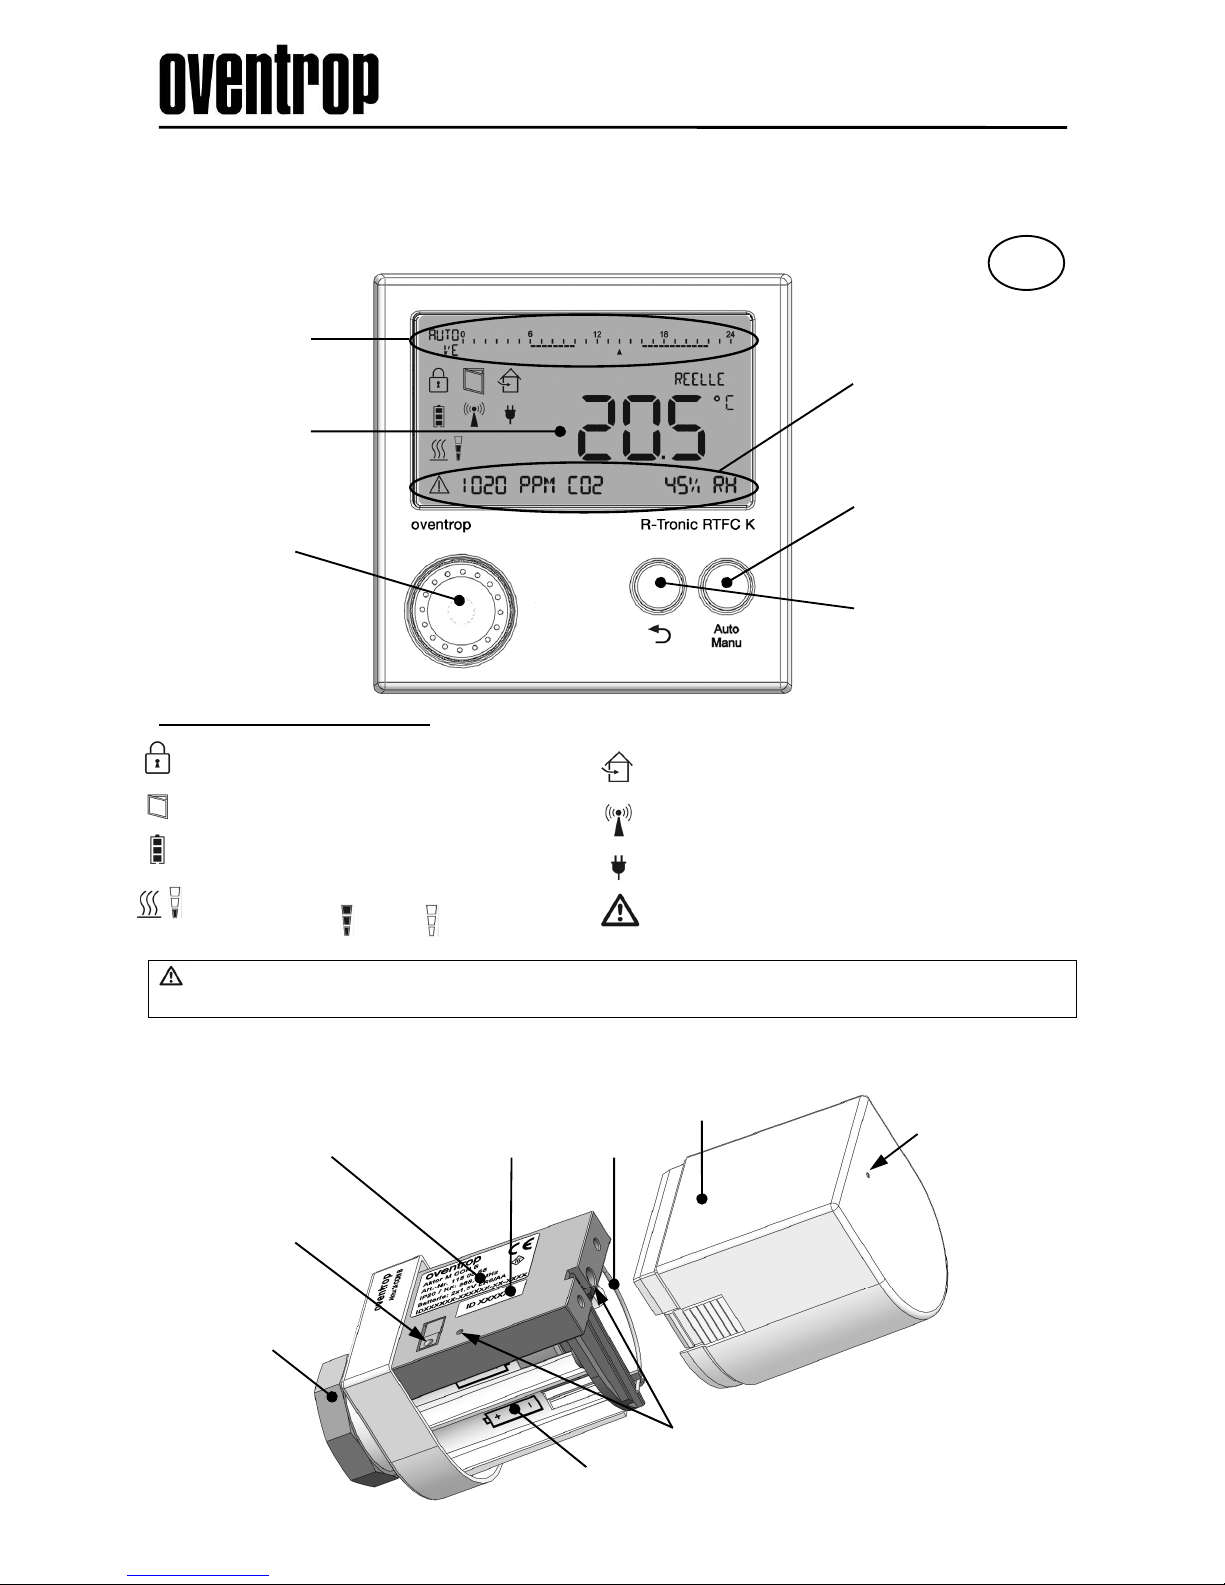
Touche « Retour »:
Retour au menu précédent;
maintenir enfoncée: Retour
à l’affichage par défaut
Touche « Auto/Manu »:
Commutation entre les
profils horaires standards
Ligne de texte de
l’affichage :
avec informations sur
- Valeurs mesurées
- Structure du menu
- Diagnostic
(recommandations)
Bouton « Menu »:
Navigation et
réglage de la valeur de
consigne en
tournant et pressant
(confirmation de la saisie)
Mode de service
et profil horaire
Affichage digital
(avec éclairage):
Symboles et
unités d’affichage.
Robinetterie « haut de gamme » + Systèmes
« R-Tronic RT B / RTF B / RTFC K »
« Aktor MH CON B / MD CON B »
Notice condensée
« R-Tronic » (Indicateur/régulateur d'ambiance)
Symboles affichés à l’écran
AVERTISSEMENT
Les raccordements électriques ne doivent être effectués que par du personnel qualifié !
« Aktor MH/MD CON B » (moteur de radiateurs, radiocommandé)
Sécurité enfants activée
Fenêtre ouverte (commandé par capteur)
Etat des piles (chargée, à mi-charge, déchargée)
Service de chauffage /
Robinet OUVERT FERMÉ
F
Recommandation d’aération de la pièce
(seulement R-Tronic « TFC »)
Mode radio activé (apprentissage d’au moins un moteur)
Alimentation secteur
Information importante disponible dans le menu
(affichage de recommandations ou de messages d’erreur)
Compartiment pour deux piles (AA 1,5 V Mignon)
Couvercle du boîtier
Plaque signalétique
Touche d’apprentissage
/d’ajustage
Ecrou de serrage
MH CON B
Fixation à griffes:
MD CON B
[sans image]
Antenne
2 x Info-LED
Aktor-ID
Fenêtre
Info-LED
Page 10
10
Navigation et structure du menu Notice condensée
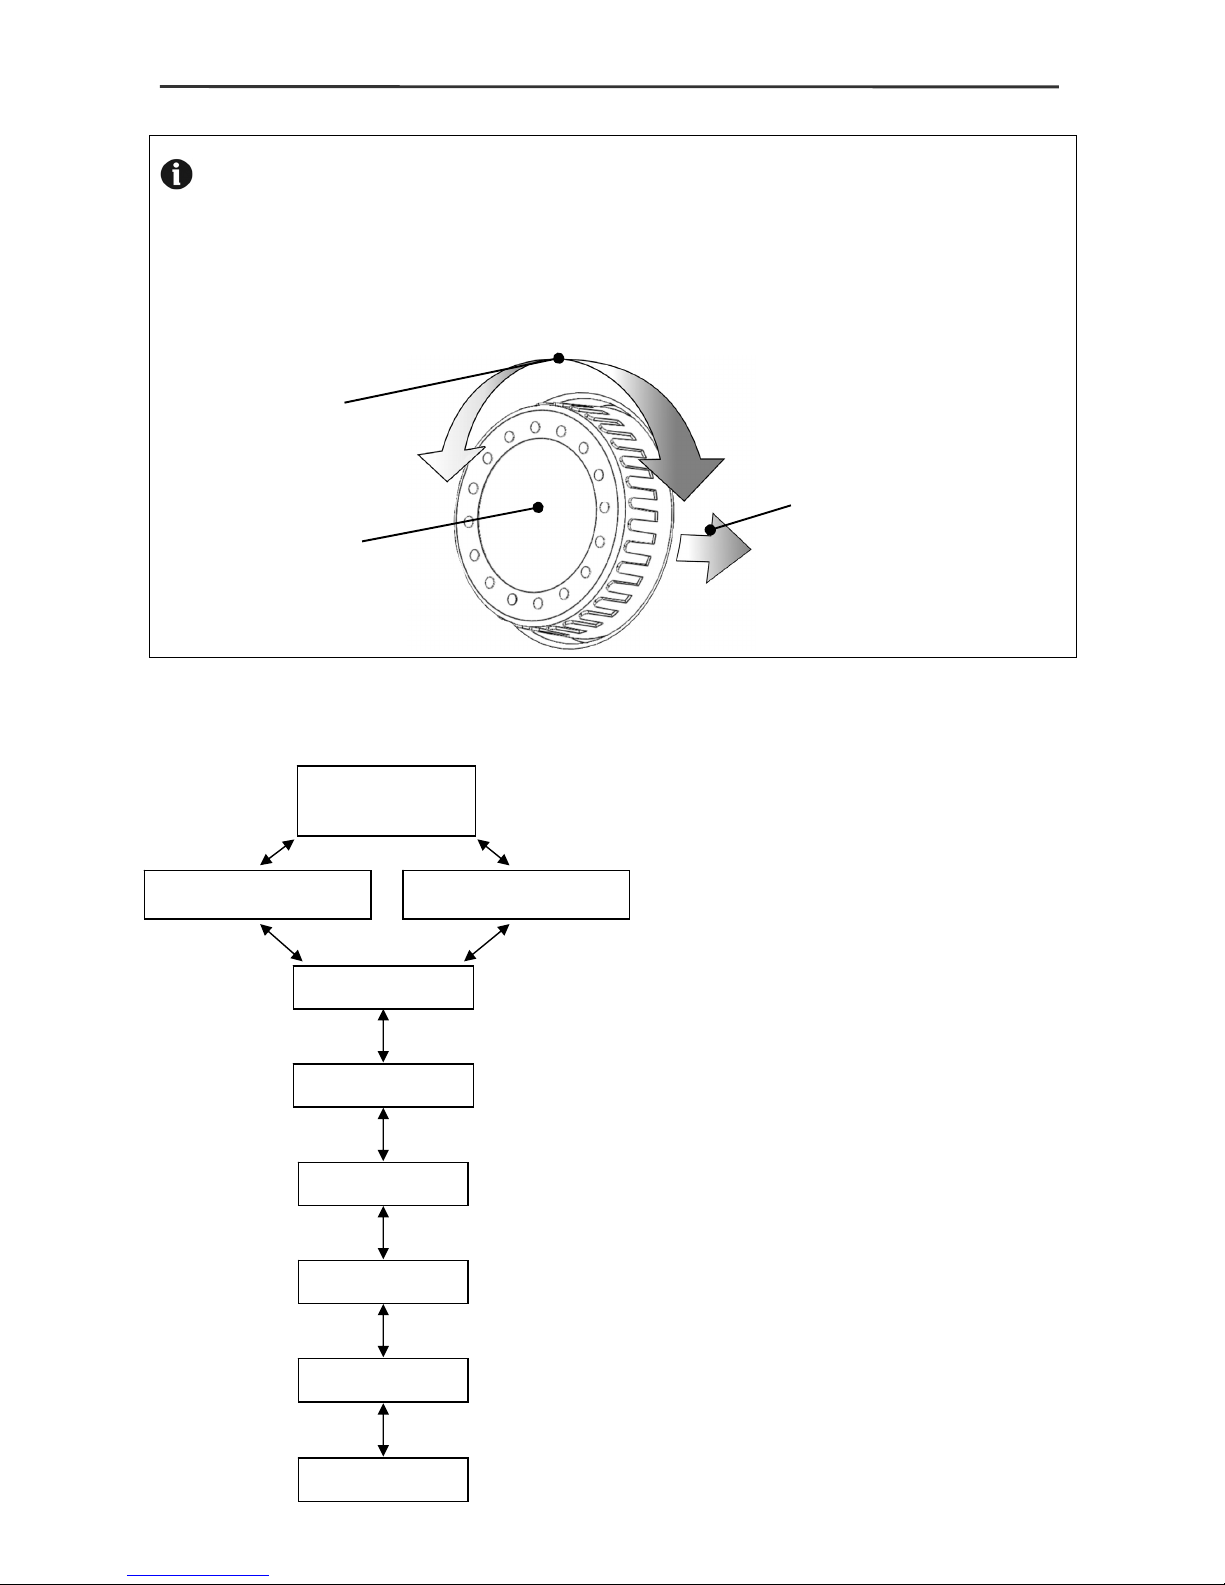
Navigation et sélection de la fonction à l’aide du bouton « Menu »
La navigation dans les menus du « R-Tronic » et la sélection des fonctions
souhaitées se fait toujours à l’aide du bouton « Menu ». On accède aux sous-menus et
fonctions en tournant (navigation) et pressant (confirmation de la sélection et
enregistrement).
Conception schématique de la structure du menu « R-Tronic » (1
ier
et 2
ième
niveau)
Température ambiante actuelle
mesurée par le « R-Tronic ».
Réglage de la température de confort
désirée.
Accès aux sous-menus et sélection
des fonctions toujours à travers
le menu principal.
Sélection de profils de chauffage et
programmation de profils individuels.
Réglage d’une température de confort
ou d’abaissement s’écartant des
préréglages (20°C ou 17°C).
Configuration de fonctions spéciales
pour le service de chauffage, comme
chauffe rapide, vacances (absence) ou
marche forcée.
Etablissement d’une liaison radio avec
les moteurs; date et heure;
réactivation des réglages sortie d’usine.
Diagnostic de dysfonctionnements dans
le « R-Tronic » et les moteurs.
MENU PRINCIPAL
FONCTIONS
REGLAGES
INFORMATIONS
PROFIL HORAIRE
TEMPERATURES
VALEUR DE CONSIGNE
VALEUR DE CONSIGNE
VALEUR REELLE
TEMPERATURE
Tourner
Navigation dans
les sous-menus
Bouton « Menu »
Presser
Confirmation de la
sélection et
enregistrement
Fabricant: OVENTROP GmbH & Co. KG, Paul-Oventrop-Straße 1
D-59939 Olsberg E-Mail [email protected] www.oventrop.com
Sous réserve de modifications techniques. 115068281 11/2014 (V 1.1)
Page 11
11
Etablissement de la liaison radio Notice condensée
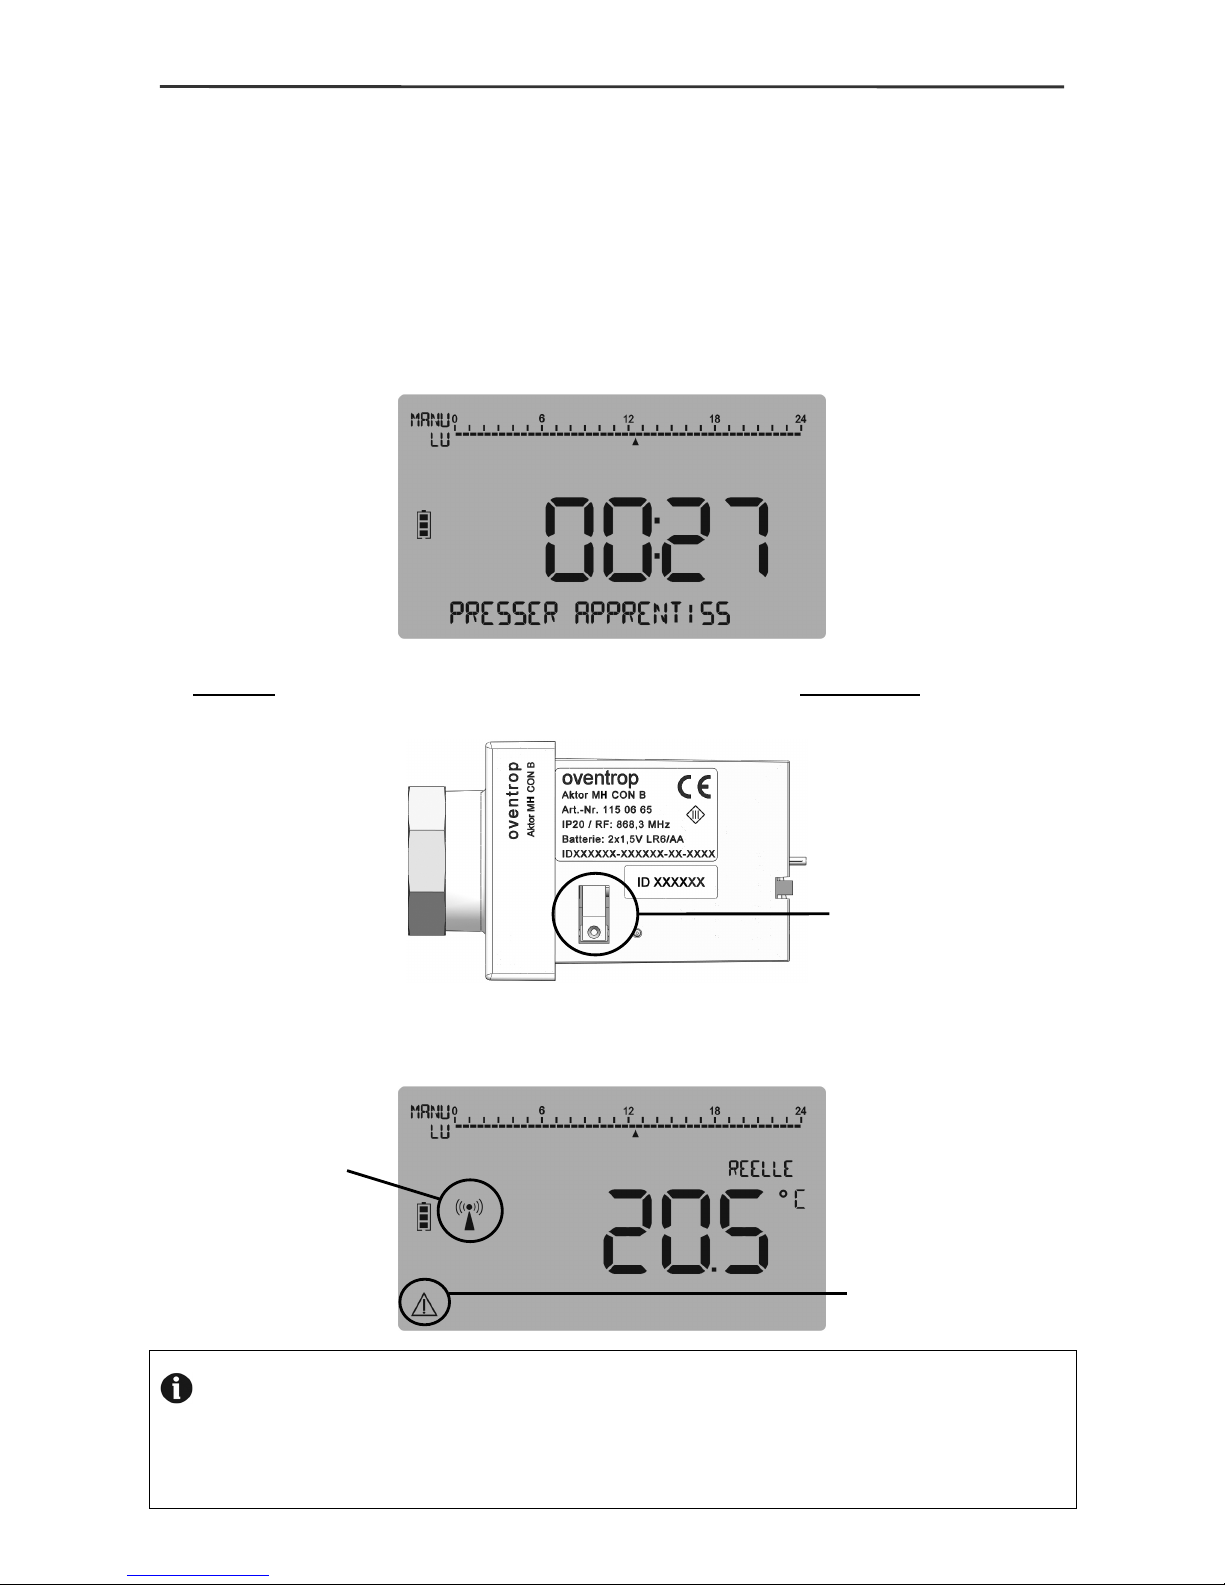
Apprentissage du moteur radio au « R-Tronic »
1. Régler la date et l’heure. L’affichage par défaut avec la température ambiante
(VALEUR REELLE) apparaît à l’écran du « R-Tronic ».
2. Passer au menu suivant:
MENU PRINCIPAL ► REGLAGES ► INSTALLATION ► APPRENTISSAGE
3. Démarrer l’apprentissage (presser le bouton « Menu »). Un compte à rebours de 30
secondes qui commence à être décompté est affiché.
4. Presser la touche d’apprentissage/d’ajustage au moteur brièvement (!) pendant
le compte à rebours.
5. Le message REUSSI qui est brièvement affiché à l’écran du « R-Tronic » indique que
l’apprentissage a été effectué avec succès et le symbole radio suivant apparaît :
Le symbole radio
indique que
l’apprentissage a
été effectué avec
succès.
NOTE dans le cas d’un apprentissage échoué
L’apprentissage peut échouer si la liaison radio est interrompue par des facteurs spatiaux,
tels qu’objets existants, matériaux ou sources parasites. Dans ce cas, le « R-Tronic »
doit être monté à un autre endroit et l’apprentissage doit être répété.
Touche
d’apprentissage/d’ajustage
Le symbole d’avertissement
et le message
FONCTION DIAGNOSTIC
indiquent que la course
d’ajustage du moteur doit
encore être effectuée.
Page 12
12
Ajustage du moteur Notice condensée
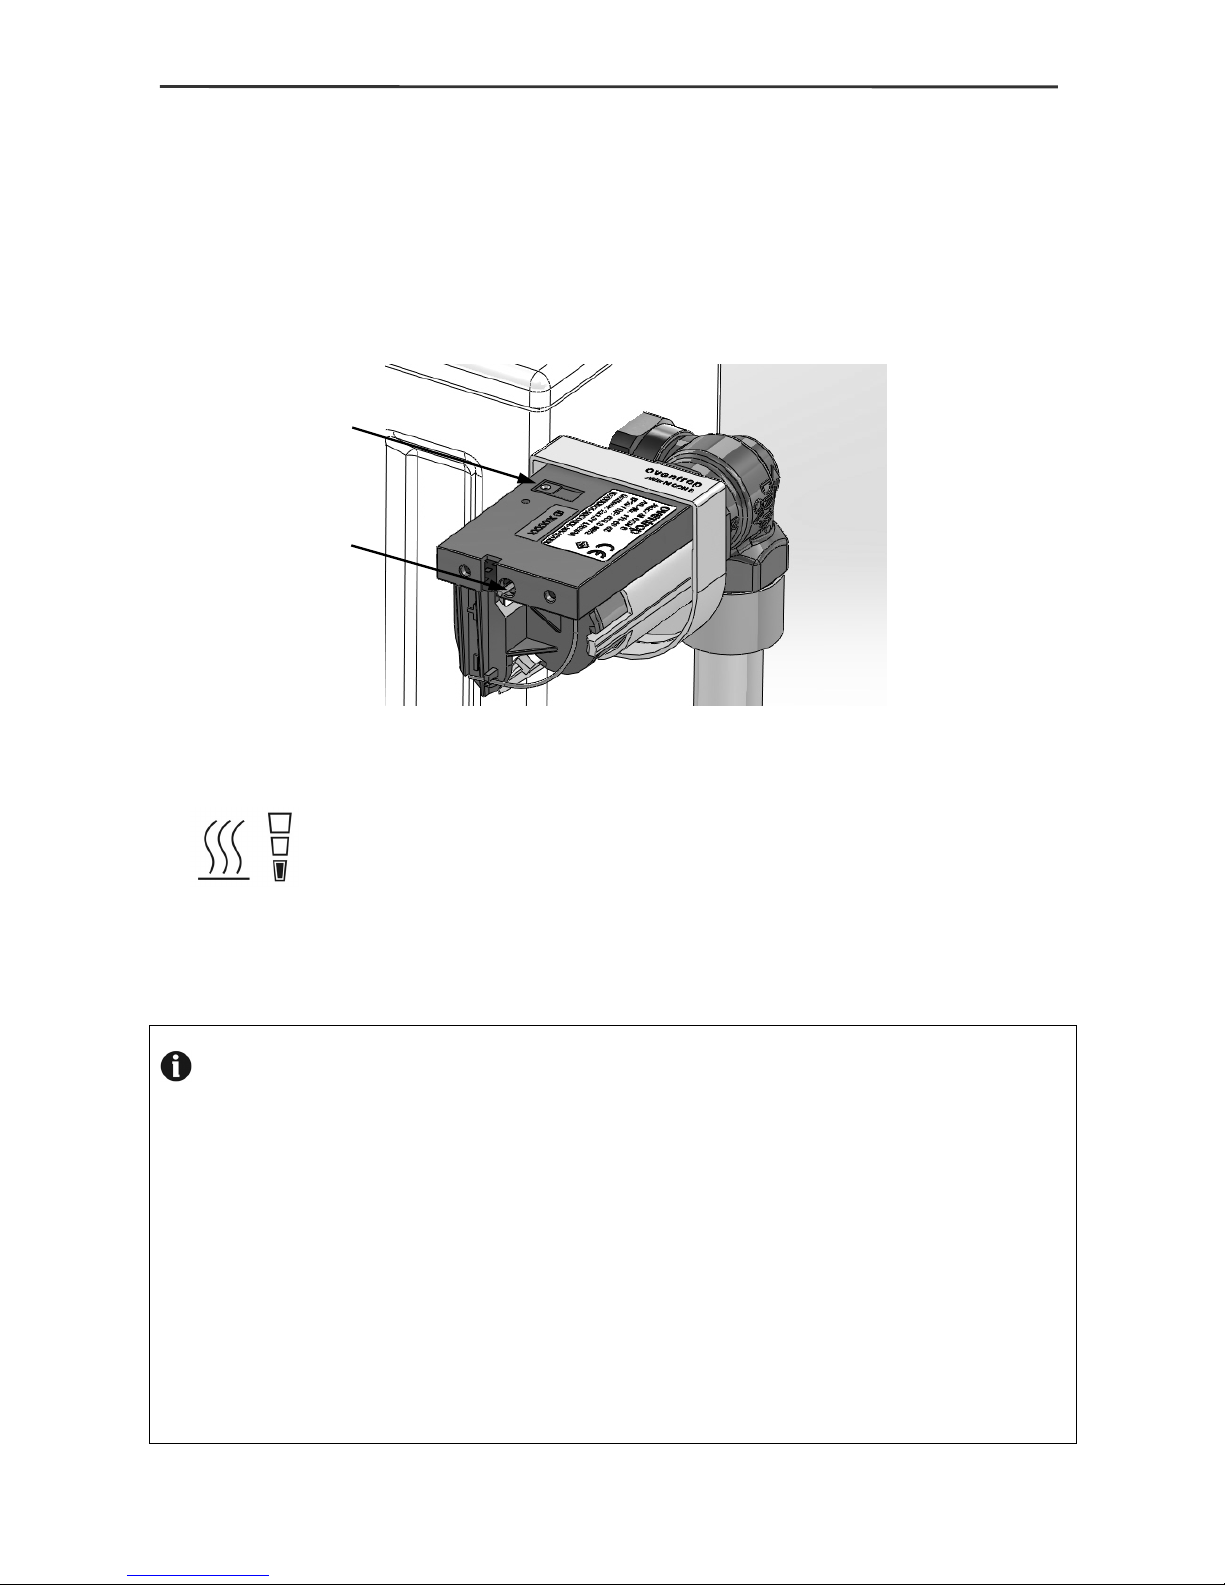
« Course d’ajustage » du moteur « Aktor MH/MD CON B »
Après avoir établi la liaison radio avec succès, le moteur doit être ajusté au robinet de
votre radiateur. C’est ce que l’on appelle « course d’ajustage ».
1. Enlever le couvercle du boîtier du moteur (pendant le montage).
2. Presser la touche d’apprentissage/ajustage pendant au moins 2 secondes pour
démarrer la « course d’ajustage ». Maintenant le moteur ferme le robinet du radiateur.
L’achèvement de la « course d’ajustage » est indiqué par trois clignotements verts
(lents) des deux LED au moteur. Le fonctionnement de service du moteur est affiché à l’écran du « R-Tronic » par le symbole suivant :
Cet affichage apparaîtra à l’écran pour la première fois après le prochain intervalle
d’émission (cycle: 150 secondes). Il signale le démarrage du service de chauffage
selon les réglages sur le « R-Tronic » (le robinet de radiateur s’ouvre à nouveau).
3. Monter le couvercle du boîtier sur le moteur jusqu’à ce que vous entendiez un clic.
NOTE concernant le réglage de base de profils de chauffage
Un des trois profils de chauffage standards peut être activé à l’aide de la touche Au-
to/Manu pour un premier réglage de base du système.
Le réglage PROFIL MARCHE réglant la température ambiante à une valeur constante de
20 C, sera toujours actif lors de la mise en service du « R-Tronic ».
Sélectionner PROFIL ARRET pour un abaissement permanent de la température ambiante à 17°C.
Si vous ne désirez pas de service de chauffage ou d’abaissement permanent selon un
seul réglage, sélectionnez PROFIL JOUR/NUIT. La température ambiante sera réduite à
17°C entre 22.00 h et 6.00 h et sera réglée à une « température confort » de 20°C pendant la journée.
Merci de consulter la notice d’utilisation détaillée pour des informations plusprécises!
Touche d’apprentissage/ajustage
Info-LED
(visible même avec
le couvercle du
boîtier monté)
 Loading...