

Page 1
START HERE
Installation Guide
for R-Tronic Wireless
Thermostat
and
Actuator
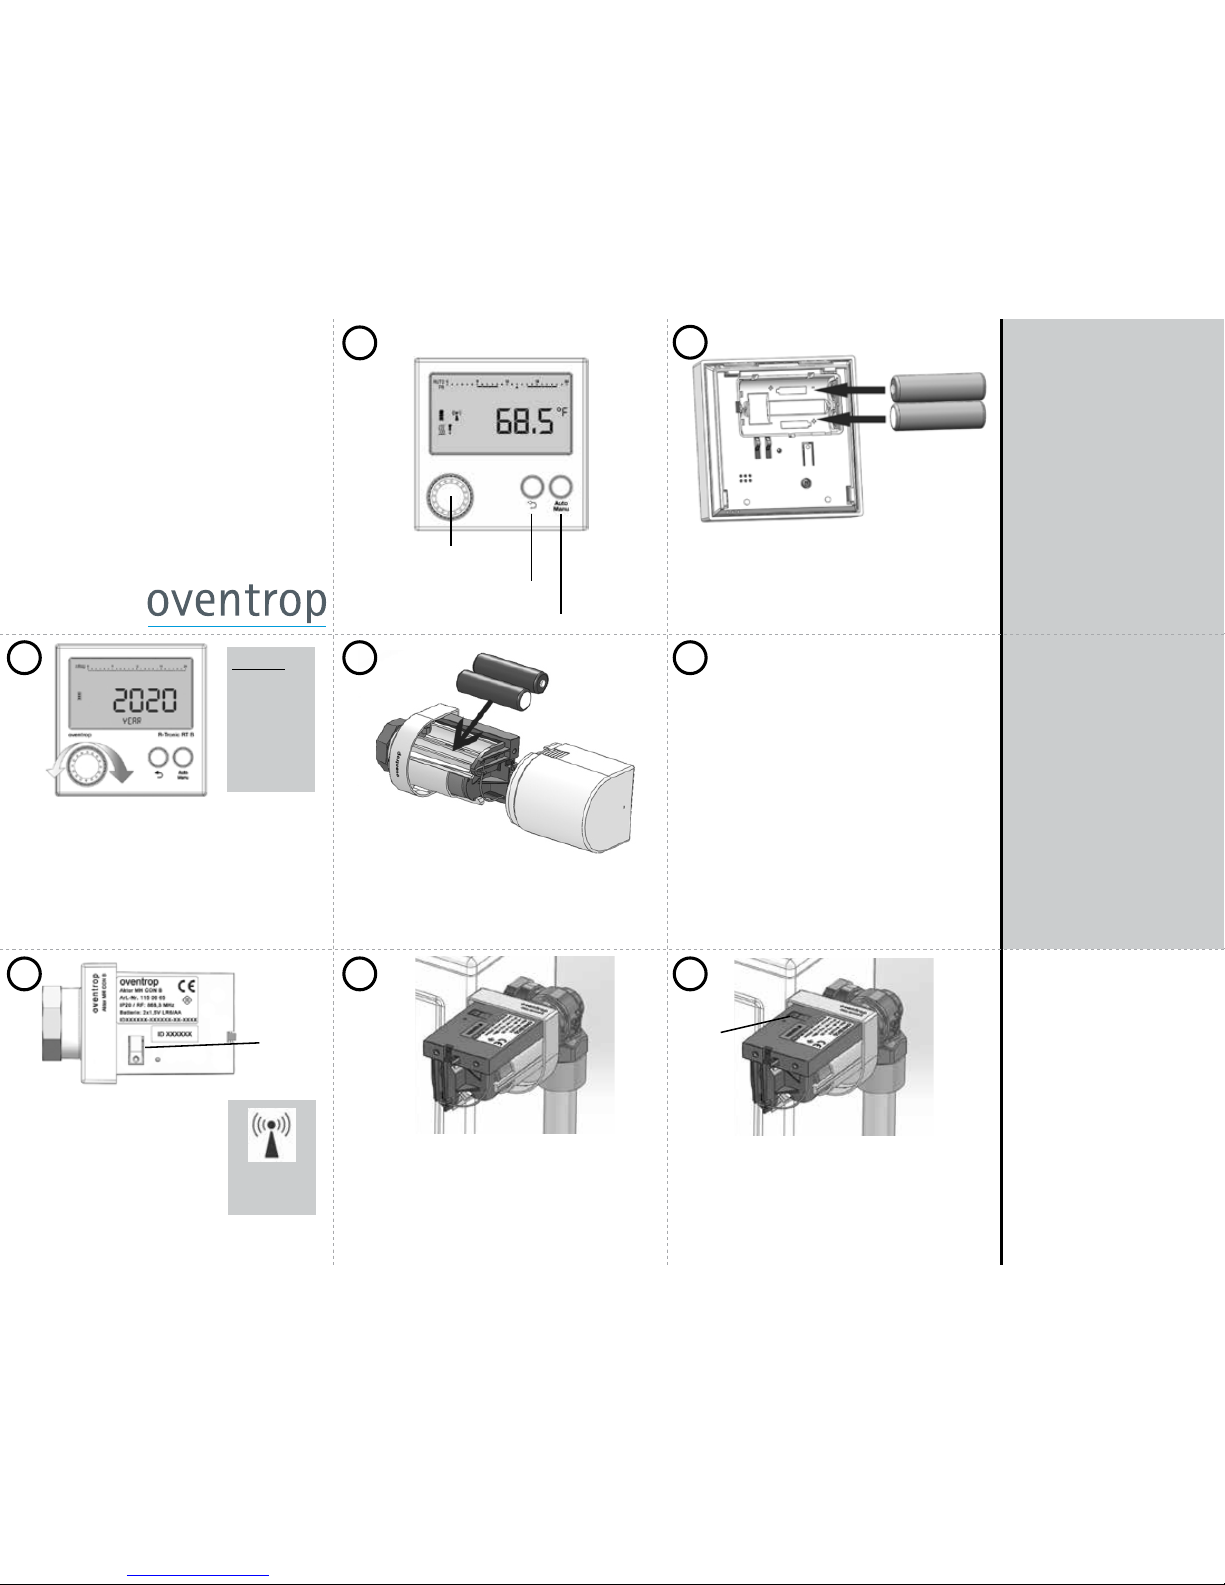
Select and Scroll knob
Back button
Setting mode toggle button
Front Back
Insert two LR6 AA batteries into
the thermostat. Take note of the
polarity markings on the device.
+
-
+
-
See operators manual
on back for programming
instructions.
Thermostat default
program is set to
maintain 68 °F.
Follow the prompts on the
screen to set the DATE and
TIME by pushing the select
and scroll knob.
Used to undo an action
or exit a menu item.
Actuator
Button
1
2
4 5
6 7 8
Insert two LR6 AA batteries into
the actuator. Take note of the
polarity markings on the device.
Select and Scroll knob
Back button
Setting mode toggle button
Actuator Button
3
1) Year
2) Month
3) Day
4) Hour
5) Minute
Steps:
Push then turn the Select
and Scroll knob to the
MAIN MENUE, then push
to select.
Turn the knob to SETTINGS,
then push to select.
Push again to select
INSTALLATION.
Holding the actuator within
two feet of the thermostat,
push to select TEACH IN.
Within 30 seconds
push the actuator
button. The signal
symbol will display
when the pairing is
successful.
Signal
Symbol
Thread the actuator on the
valve. Do not use tools to
mount the valve.
Once the actuator is mounted,
push and hold the actuator button
to calibrate it. The green LED will
blink three times once calibrated.
Actuator
Button
FINISH
Used to navigate
through the thermostat’s
menus and change
settings.
Used to switch between
program modes.
Used to pair and
calibrate actuator.
Page 2
Operation Manual
for R-Tronic Wireless
Thermostat
and
Actuator
Menu Map:
TIME PROFILE
PROGRAMME SELECTION
PROGRAMMING
TEMPERATURES
COMFORT TEMPERATURE
SETBACK TEMPERATURE
LIMITATION
TEMPERATURE UNIT
FUNCTIONS
BOOST HEATING
VACATION
PARTY MODE
CHILD LOCK
VALVE PROTECTION
SETTINGS
INSTALLATION
DATE/TIME
LANGUAGE
DISPLAY
CONTROL
SUMMER-/WINTERTIME
BACKLIGHT
ROOM DESIGNATION
FACTORY SETTINGS
RESET
INFORMATION
VERSION (FIRMWARE)
DIAGNOSIS
Programming:
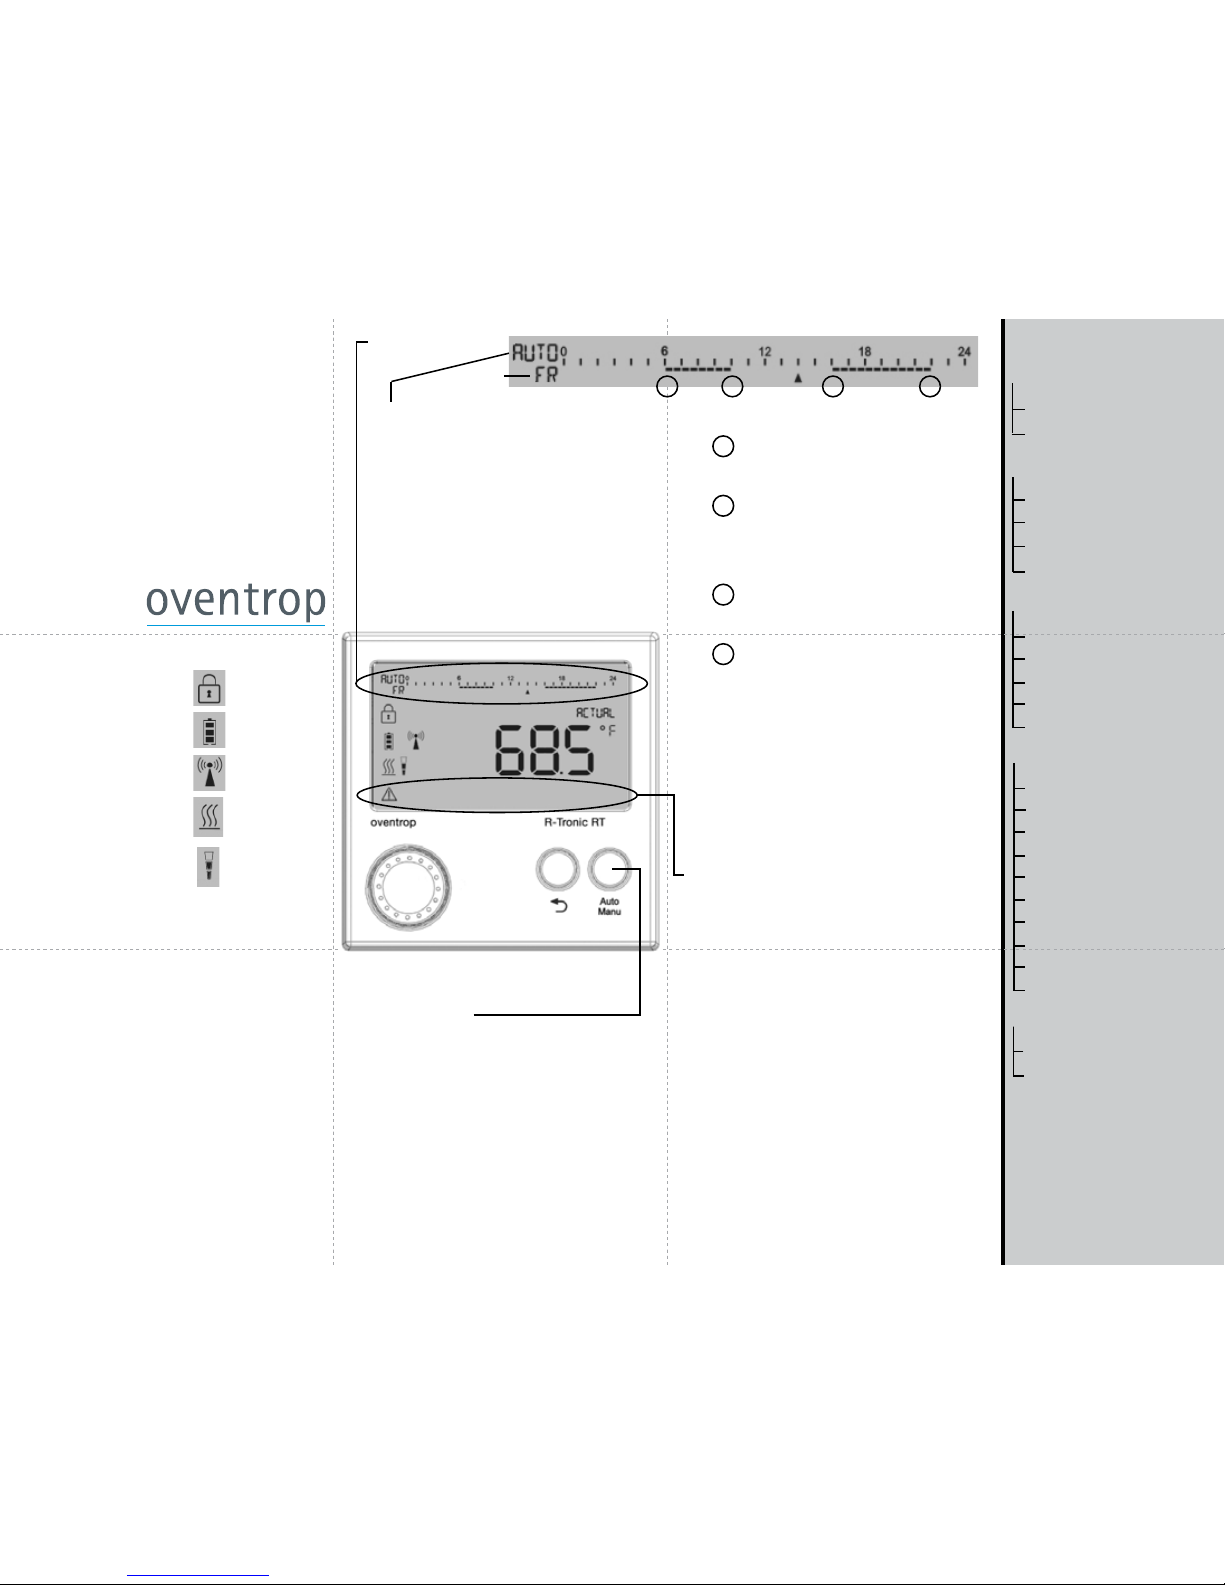
Text Line Display:
Child Lock
Activated
Battery Status
Indicator
Actuator
Paired
Heating Mode
Active
Actuator
Position
Indicator
Manu: Prole ON - Set to maintain the comfort
temperature
Prole OFF - Set to maintain the
setback temperature
Auto: Prole Day/Night - Maintains comfort
temperature from 6a to 10p, and
setback temperature from 10p to 6a
Individual Prole:
MO - SU: Weekly schedule
MO - FR / SA SU: Weekday/Weekend schedule
INDIVIDUAL DAYS: Daily schedule
Day
1 2 3 4
1
2
3
4
Comfort temperature start time
(Example: This would be the time you would
wake up in the morning.)
Comfort temperature end time
(Example: This would be the time you leave
for work.)
Comfort temperature start time
(Example: This would be the time you get
home from work.)
Comfort temperature end time
(This would be the time you go to sleep at
night.)
When the next heating period is listed,
scroll until the screen reads: “READY”
and push to skip the next heating period if
desired.
CONTINUE THROUGH ALL SCHEDULE
BLOCKS.
Time
First Heating Period
Second Heating Period
Menu listing / instructions
Thermostat or actuator faults
Thermostat or actuator information
Display Symbols:
BOOST HEATING
VACATION
PARTY MODE
CHILD LOCK
VALVE PROTECTION
Functions:
Increases the the actuator
to full ow for a user
selected amount of time.
Party mode allows the
user to over ride the
thermostat programming
for an adjustable period of
time. The user selects the
length of the over ride in
hours and the desired over
ride temperature.
Vacation mode allows
the user to set a reduced
temperature for a
selectable number of days.
To turn off the function, push
and hold the back button.
While the child lock is
active the settings of
the thermostat cannot
be changed. To turn off
the child lock, press and
hold the Auto/Manu and
back button for at least 3
seconds.
The valve protection
function opens and
closes the valve weekly
to prevent seizing during
the off season.
Programming:
Manu: Prole ON - Set to maintain the comfort
temperature
Prole OFF - Set to maintain the
setback temperature
Auto: Prole Day/Night - Maintains comfort
temperature from 6a to 10p, and
setback temperature from 10p to 6a
For more detailed
information please see the
manual
www.ovtrv.com
 Loading...