

Page 1
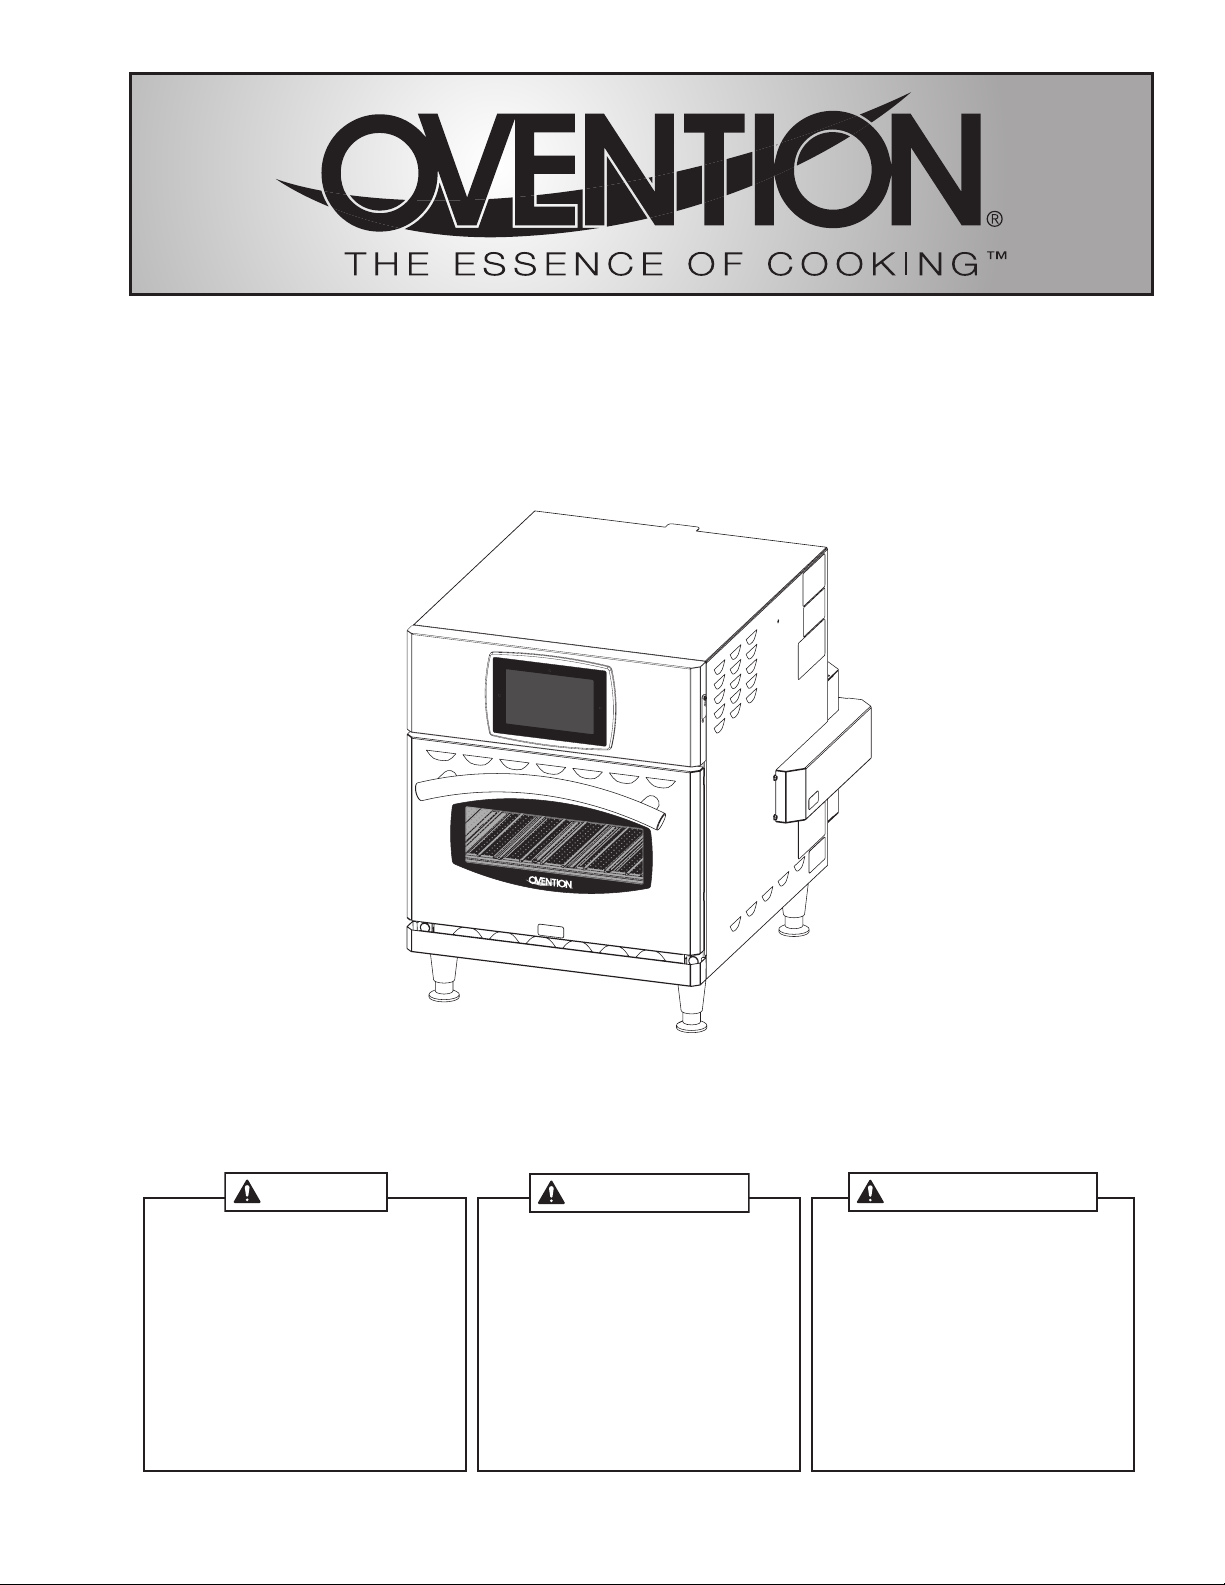
Single MiLO
WARNING
ADVERTENCIA
Model MiLO-14
™
Oven
Installation and Operating Manual
Do not operate this equipment unless you
have read and understood the contents
of this manual! Failure to follow the
instructions contained in this manual
may result in serious injury or death.
This manual contains important safety
information concerning the maintenance,
use, and operation of this product. If
you’re unable to understand the contents
of this manual, please bring it to the
attention of your supervisor. Keep this
manual in a safe location for future
reference.
P/N 07.04.893.00 © 2018 Ovention, Inc.
No opere este equipo al menos que haya
leído y comprendido el contenido de este
manual! Cualquier falla en el seguimiento
de las instrucciones contenidas en
este manual puede resultar en un serio
lesión o muerte. Este manual contiene
importante información sobre seguridad
concerniente al mantenimiento, uso y
operación de este producto. Si usted
no puede entender el contenido de
este manual por favor pregunte a su
supervisor. Almacenar este manual en
una localización segura para la referencia
futura.
AVERTISSEMENT
Ne pas utiliser cet équipement sans avoir
lu et compris le contenu de ce manuel ! Le
non-respect des instructions contenues
dans ce manuel peut entraîner de
graves blessures ou la mort. Ce manuel
contient des informations importantes
concernant l’entretien, l’utilisation et le
fonctionnement de ce produit. Si vous ne
comprenez pas le contenu de ce manuel,
veuillez le signaler à votre supérieur.
Conservez ce manuel dans un endroit
sûr pour pouvoir vous y référer plus tard.
Page 2
WARNING
CAUTION
NOTICE
CONTENTS
Important Owner Information .............................................. 2
Introduction ...........................................................................2
Important Safety Information .............................................. 3
Model Description ................................................................4
Model Designation ...............................................................5
Specifications ....................................................................... 5
Plug Configurations ............................................................. 5
Electrical Rating Chart ......................................................... 5
Temperature Range .............................................................5
Dimensions .......................................................................... 6
Installation .............................................................................7
General ................................................................................ 7
Operation ...............................................................................8
General ................................................................................ 8
Recipe Information ..............................................................8
Startup ................................................................................. 8
IMPORTANT OWNER INFORMATION
Record the model number, serial number, voltage, and purchase
date of the unit in the spaces below (specification label located
on the right side of the unit). Please have this information
available when calling Ovention® for service assistance.
Model No. _______________________________________
Serial No. ________________________________________
Voltage __________________________________________
Date of Purchase __________________________________
Cooking ...............................................................................9
Standby Shutdown ............................................................10
Shutdown ........................................................................... 10
Programming Categories/Recipes .....................................10
Editing/Creating Setpoint Temperatures ............................ 13
Changing Temperature Unit of Measure ...........................14
Uploading from a USB Drive ............................................. 14
Maintenance ........................................................................ 15
General .............................................................................. 15
Daily Cleaning ...................................................................15
Weekly Cleaning ................................................................ 15
Monthly Cleaning ............................................................... 16
Troubleshooting Guide ......................................................18
Options and Accessories .................................................. 19
Limited Warranty ................................................................20
Business
Hours: 7:00 am to 5:00 pm Monday–Friday
Central Standard Time (CST)
(Summer Hours: June to September—
7:00 am to 5:00 pm Monday–Thursday
7:00 am to 4:00 pm Friday
Central Daylight Time [CDT])
Telephone: 855-298-6836 (Ovention Hotline)
E-mail: [email protected]
INTRODUCTION
Ovention Single MiLO™ ovens set a new standard in cooking
quality, speed, flexibility, and efficiency. A new discovery in air
handling not only speeds the cooking process, but “scrubs”
and recirculates the air through the oven—eliminating the
need for a hood system in most installations. Using an icondriven touchscreen, operators can use, edit, and develop over
4000 custom recipes. Recipes can be developed to include up
to three cooking stages—each with varying heat profiles, air
velocity settings, timing, and chamber exhaust vent settings.
Ovention Single MiLO ovens are products of extensive
research and field testing. The materials used were selected
for maximum durability, attractive appearance, and optimum
performance. Every unit is inspected and tested thoroughly
prior to shipment.
This manual provides the installation, safety, and operating
instructions for Ovention Single MiLO ovens. Ovention
recommends all installation, operating, and safety instructions
appearing in this manual be read prior to installation or
operation of the oven.
Additional information can be
found by visiting our web site at
www.oventionovens.com.
Need help?
Call our 24 hour, toll-free
Ovention Hotline
Safety information that appears in this manual is identified by
the following signal word panels:
WARNING indicates a hazardous situation which, if not
avoided, could result in death or serious injury.
CAUTION indicates a hazardous situation which, if not
avoided, could result in minor or moderate injury.
NOTICE is used to address practices not related to personal
injury.
2
Form No. OVMILOSM-0718
Page 3

IMPORTANT SAFETY INFORMATION
WARNING
CAUTION
WARNING
Read the following important safety information before using this equipment to avoid
serious injury or death and to avoid damage to equipment or property
.
ELECTRIC SHOCK HAZARD:
• Plug unit into a properly grounded electrical receptacle
of the correct voltage, size, and plug configuration. If
plug and receptacle do not match, contact a qualified
electrician to determine and install proper voltage and
size electrical receptacle.
• Unit must be grounded properly. Failure to ground unit
properly could result in serious personal injury or death.
• Place unit in standby, allow unit to cool, turn off GFCI
switch, turn off Control Reset switch, and unplug
unit before performing any cleaning, adjustments, or
maintenance.
• DO NOT submerge or saturate with water. Unit is not
waterproof. Do not operate if unit has been submerged
or saturated with water.
• Unit is not weatherproof. Locate unit indoors where
ambientairtemperatureisaminimumof70°F(21°C).
• Do not steam clean or use excessive water on unit.
• This unit is not “jet-proof” construction. Do not use
jet-clean spray to clean this unit.
• Do not clean unit when it is energized or hot.
• Do not clean unit with metal scouring pads. Metal pieces
can break off pad and touch electrical components,
creating risk of electric shock.
• Do not pull unit by power cord.
• Keep power cord away from heated surfaces.
• Do not allow power cord to hang over edge of counter.
• Discontinue use if power cord is frayed or worn.
• Do not attempt to repair or replace a damaged power
cord. Cord must be replaced by an Authorized Ovention
Service Agent or a person with similar qualifications.
• This unit must be serviced by qualified personnel only.
Service by unqualified personnel may lead to electric
shock or burn.
• Use only Genuine Ovention Replacement Parts when
service is required. Failure to use Genuine Ovention
Replacement Parts will void all warranties and may
subject operators of the equipment to hazardous
electrical voltage, resulting in electrical shock or burn.
Genuine Ovention Replacement Parts are specified to
operate safely in the environments in which they are
used. Some after-market or generic replacement parts
do not have the characteristics that will allow them to
operate safely in Ovention equipment.
EXPLOSION HAZARD: Do not store or use gasoline or
other flammable vapors or liquids in the vicinity of this or
any other appliance.
Install unit in accordance with installation instructions in
this manual.
This oven is designed specifically to heat or cook—NOT
for industrial or laboratory use.
In the event of emergency, unplug unit.
Unit may be located adjacent to a slippery floor.
FIRE HAZARD:
• Installwith a minimum of1″ (25mm) ofspace from
rear of unit to any surface. If safe distances are not
maintained, discoloration or combustion could occur.
• Install on non-combustible surface if used without legs
or casters.
• Do not block or cover any cabinet venting.
• Do not use an extension cord. If power cord is too
short, contact a qualified electrician to determine and
install proper voltage and size electrical receptacle
near unit.
Make sure all operators have been instructed on the safe
and proper use of the unit.
This unit is not intended for use by children or persons
with reduced physical, sensory, or mental capabilities.
Ensure proper supervision of children and keep them
away from the unit.
This unit has no “user-serviceable” parts. If service is
required on this unit, contact an Authorized Ovention
Service Agent or contact the Ovention Hotline at
855-298-6836.
BURN HAZARD:
• Some exterior surfaces on unit will get hot. Avoid
unnecessary contact with unit.
• Pan/tray will be very hot upon removal—use oven mitt,
pan gripper, or other utensil to remove.
Do not turn off GFCI switch or unplug unit immediately
after use. Internal fans must cool oven to avoid damage to
electrical components.
Locate unit at proper counter height in an area that is
convenient for use. Location should be level to prevent
unit or its contents from falling accidentally and strong
enough to support the weight of the unit and contents.
DO NOT lift unit by door handle on front of oven. Door
handle is not designed to support weight of unit. Lift from
underneath unit only.
Do not move or relocate unit for cleaning. Unit is bulky
and heavy.
Do not place anything on top of unit; doing so may subject
personnel to injury or could damage unit.
Do not heat sealed containers or products such as whole
eggs in oven. These items may explode.
Do not store any materials or items inside oven chamber
when not in use.
Never use steel pads, wire brushes, or scrapers to clean
unit.
Form No. OVMILOSM-0718
3
Page 4
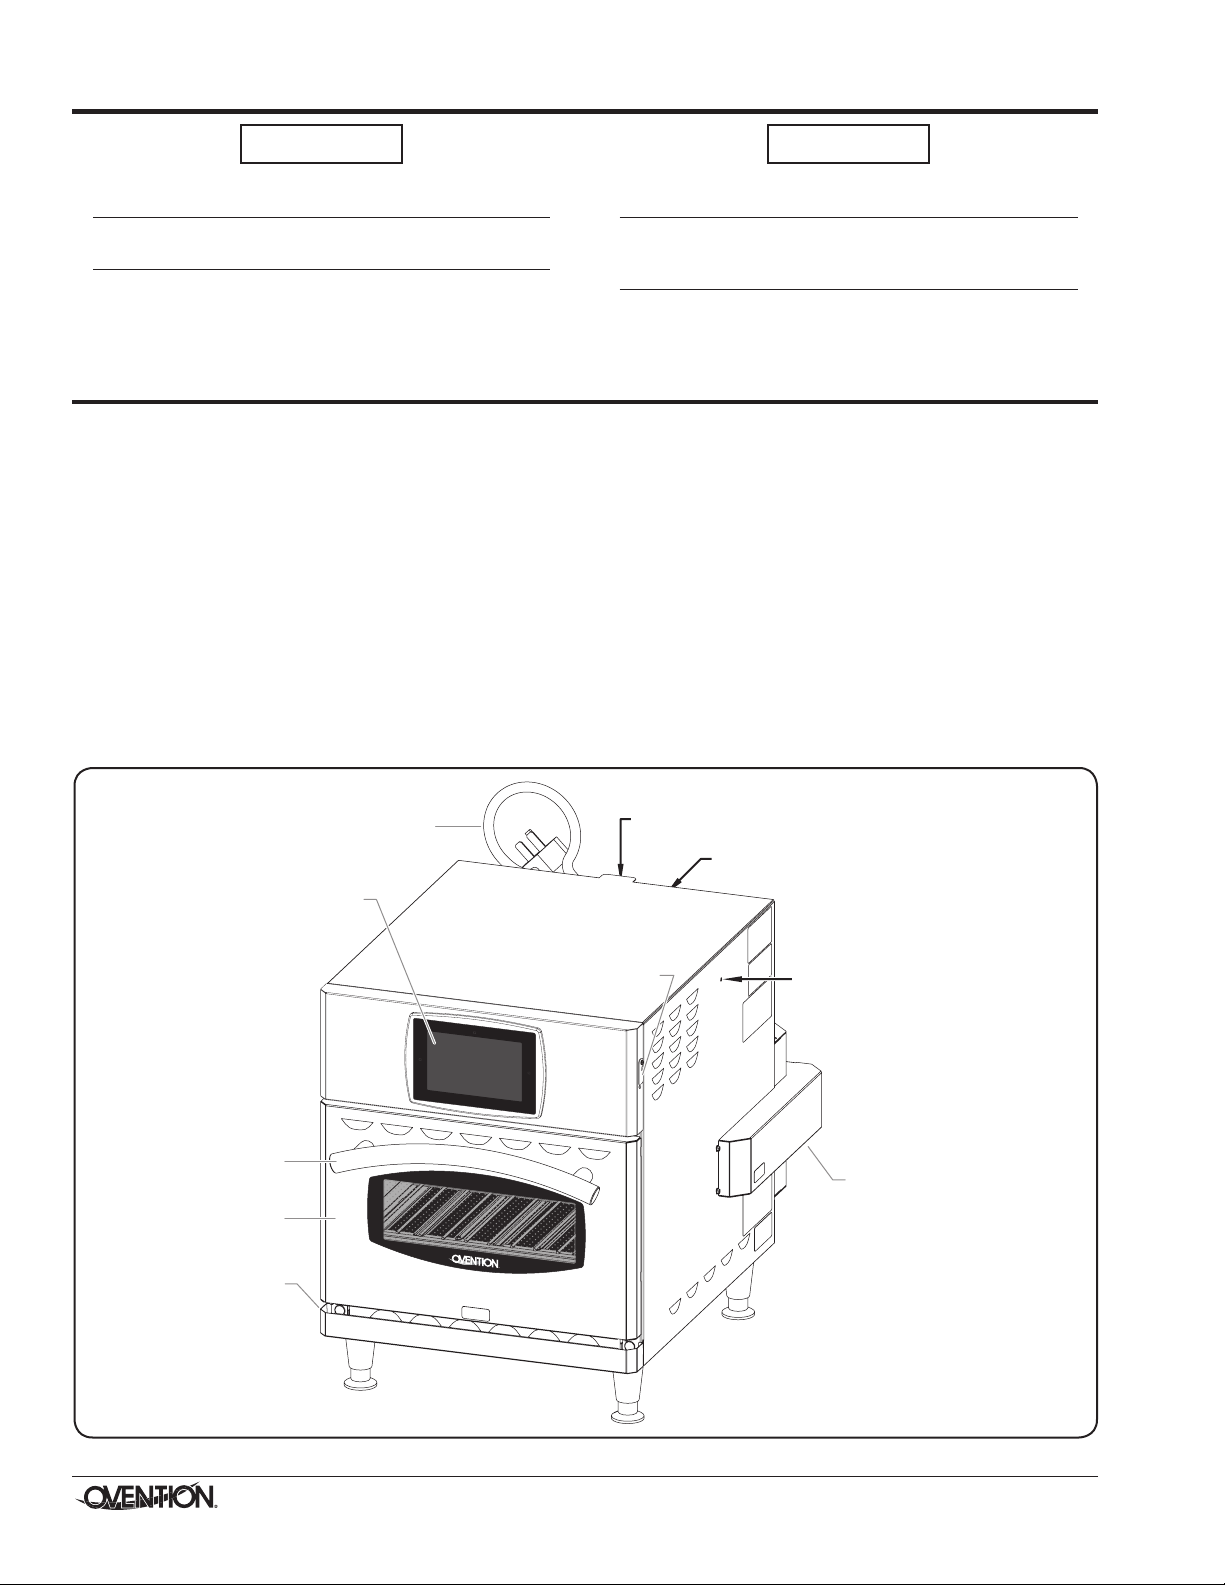
IMPORTANT SAFETY INFORMATION
Chamber Exhaust
Vent Channel
USB Port
Power Cord
Temperature High Limit
Reset Button
GFCI Switch (on back)
Control Reset Switch
(on back)
Touchscreen
Oven Door
Door Handle
Drip Tray
NOTICE
Improper cleaning of oven could damage catalyst and will
void unit warranty.
Wear protective rubber gloves and protective eye wear
when cleaning unit.
Do not cover racks or any other part of oven with metal
foil. Airflow restriction will cause oven to overheat.
MODEL DESCRIPTION
All Models
Ovention® Single MiLO™ ovens are designed to provide
unequaled flexibility in both kitchen and front-of-the-house
installations. The variety of menu options, small footprint,
low heat escape, and hood-less installation make the Single
MiLO™ oven a single solution alternative to multiple pieces of
cooking equipment.
The Single MiLO oven chamber has upper and lower infrared
(IR) heating elements and a convected air blower. The upper
and lower infrared elements provide traditional cooking and
food finishing from above and below the food product. The
convected air blower directs heated air through the upper and
lower IR element packs and throughout the inside of the oven
chamber for fast and even cooking. Both types of heat are
adjustable in both duration and intensity by developing/using
programmed recipes on the touchscreen.
NOTICE
Do not lay unit on its side in any direction. Damage to unit
could occur.
Use non-abrasive cleaners and cloths only. Abrasive
cleaners and cloths could scratch finish of unit, marring its
appearance and making it susceptible to soil accumulation.
Clean unit daily to avoid malfunctions and maintain
sanitary operation.
Operator controls for the oven consist of a touchscreen, a
GFCI switch, and a Control Reset switch. A USB port allows the
uploading of pre-programmed recipes, installation of software
updates, and the opportunity for service diagnostics. A 6′
(1829 mm) cord and plug set is standard.
Any oven-safe pan can be used in the oven chamber of the
Single MiLO oven. Each chamber has a capacity of a standard
1/4 sheet pan or up to a 14″ pizza.
Model Description (Model MiLO-14 shown)
4
Form No. OVMILOSM-0718
Page 5
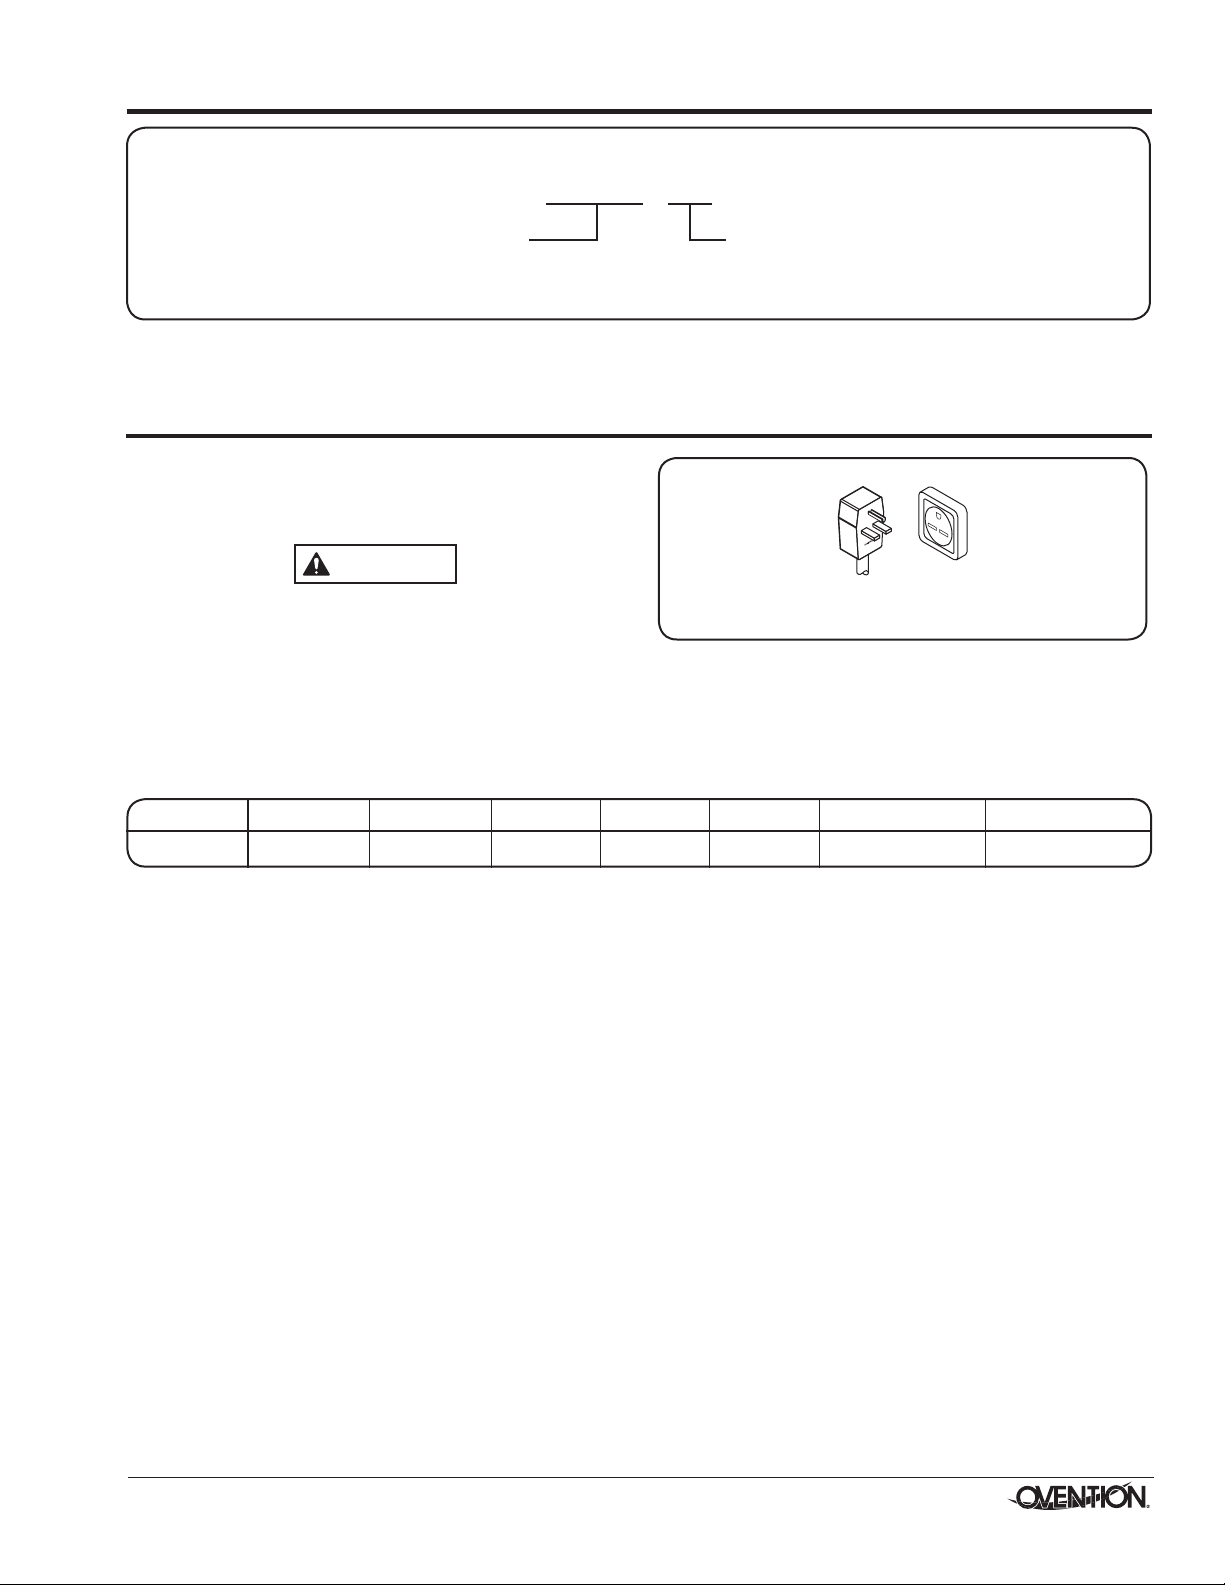
M i L O - x x
Oven Type:
Manual Loading Oven
Maximum Product Width
(in inches)
Plug Configurations
WARNING
NEMA 6-30P
Units are equipped with an electrical cord and plug appropriate
for the electrical rating of the unit. Unit must be connected to a
dedicated circuit.
ELECTRIC SHOCK HAZARD: Plug unit into a properly
grounded electrical receptacle of the correct voltage,
size, and plug configuration. If plug and receptacle do not
match, contact a qualified electrician to determine and
install proper voltage and size electrical receptacle.
MODEL DESIGNATION
SPECIFICATIONS
Plug Configurations
NOTE: Receptacle not supplied by Ovention.
Electrical Rating Chart
Model Voltage Watts Amps Phase Hertz PlugConguration Unit Weight
MiLO-14 208–240 5658–7152 27.2–29.8 1 60 NEMA 6-30P 163 lbs. (74 kg)
NOTE: Ovention MiLO ovens are designed to accept 208 VAC
through 240 VAC. The oven will adjust automatically to
the input voltage.
NOTE: The specification label is located on the right side of the
unit. See the label for the serial number and verification
of unit electrical information.
Temperature Range
The operating temperature range of the oven is 82°–600°F
(28°–316°C).
Form No. OVMILOSM-0718
5
Page 6

SPECIFICATIONS
Specification
Label on right
side of unit.
A
B
C
D
E
F
Front View Side View
Dimensions
Width
Model
MiLO-14 23-7/16″
(A)
(595 mm)
Depth
(B)
32-3/16″
(817 mm)
Height
(C)
25-3/4″
(654 mm)
Footprint
Width(D)
18-7/8″
(479 mm)
Footprint
Depth(E)
21-3/16″
(537 mm)
Door Open
Depth(F)
41-3/8″
(1051 mm)
Oven Cavity Dimensions
Model MiLO-14
15-1/2″ W x 14″ D x 4″ H
(393 x 356 x 102 mm)
6
Form No. OVMILOSM-0718
Page 7
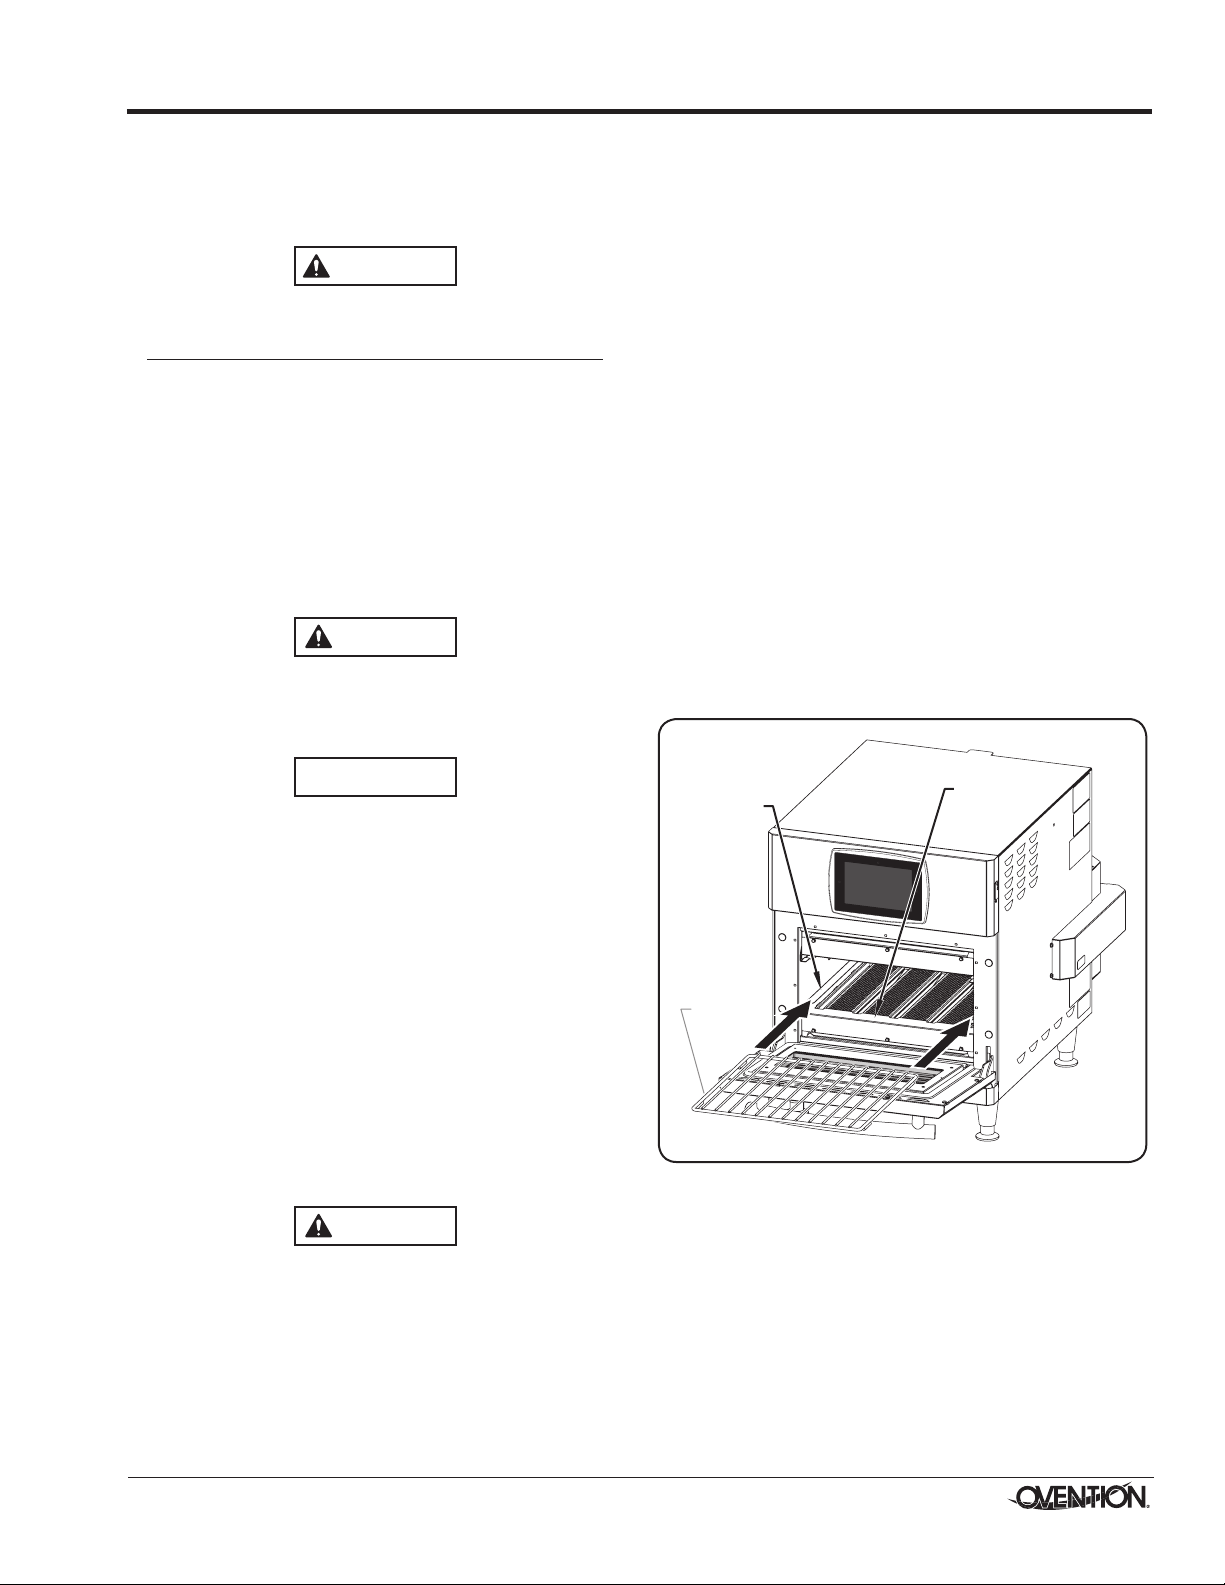
INSTALLATION
WARNING
CAUTION
CAUTION
Cooking
Rack
Raised
Flange
Lower IR
Element
Pack
General
Ovention® Single MiLO™ ovens are shipped with most
components pre-assembled. Care should be taken when
unpacking the shipping carton to avoid damage to the unit and
components enclosed.
ELECTRIC SHOCK HAZARD: Unit is not weatherproof.
Locate unit indoors where ambient air temperature is a
minimumof70°F(21°C).
FIRE HAZARD:
• Installwithaminimum of 1″ (25 mm)of space from
rear of unit to any surface. If safe distances are not
maintained, discoloration or combustion could occur.
• Install on non-combustible surface if used without legs
or casters.
• Do not block or cover any cabinet venting.
• Do not use an extension cord. If power cord is too
short, contact a qualified electrician to determine and
install proper voltage and size electrical receptacle
near unit.
Locate unit at proper counter height in an area that is
convenient for use. Location should be level to prevent
unit or its contents from falling accidentally and strong
enough to support the weight of the unit and contents.
6. Place the unit in the desired location. Make sure to lift from
underneath the oven only.
• Locate the unit in an area where the ambient air
temperature is constant and a minimum of 70° F
(21° C).
• Make sure the unit is at the proper counter height in an
area convenient for use.
• Make sure the countertop/table is level and strong
enough to support the weight of the unit and food
product.
• Position with a minimum of 1″ (25 mm) of space from the
rear of the unit to any surface.
NOTE: The above dimensions are minimum spacing
requirements. Placing the unit with enough space to
allow access to the USB port, GFCI switch, control
reset switch, air filters, and high limit reset button on
the back of the unit is advisable.
• Make sure all the feet on the bottom of the unit are
positioned securely on the countertop/table.
7. Install the cooking rack into the oven chamber. To install
the rack:
a. Open the oven door.
b. Slide the cooking rack into the desired position in the
oven chamber. The cooking rack can be positioned either
directly on the lower IR element pack or on the raised
flanges of the lower IR element pack (recommended).
NOTICE
Do not lay unit on its side in any direction. Damage to unit
could occur.
NOTE: Due to the size and weight of the oven, use the proper
number of people for installation based on the weight
of the oven.
1. Inspect the shipping container for obvious signs of
transit damage. If damaged, inform the freight company
immediately. CAUTION! Stop! Do not attempt to use a
damaged oven. Contact Ovention for assistance.
2. Cut and remove the shipping bands from around the oven
packaging.
3. Remove tape and protective packaging from all surfaces
of the unit.
4. Remove the two cooking racks from packaging.
5. Inspect the oven for freight damage such as dents in the
housing or inside the oven chambers. If damaged, inform
the freight company immediately.
DO NOT lift unit by door handle on front of oven. Door
handle is not designed to support weight of unit. Lift from
underneath unit only.
Installing the Cooking Rack
8. Plug the unit into a properly grounded electrical receptacle
of the correct voltage, size, and plug configuration. See the
SPECIFICATIONS section for details.
NOTE: The oven is suitable for 208 VAC through 240 VAC and
will adjust automatically to the voltage being supplied.
Form No. OVMILOSM-0718
7
Page 8
OPERATION
WARNING
CAUTION
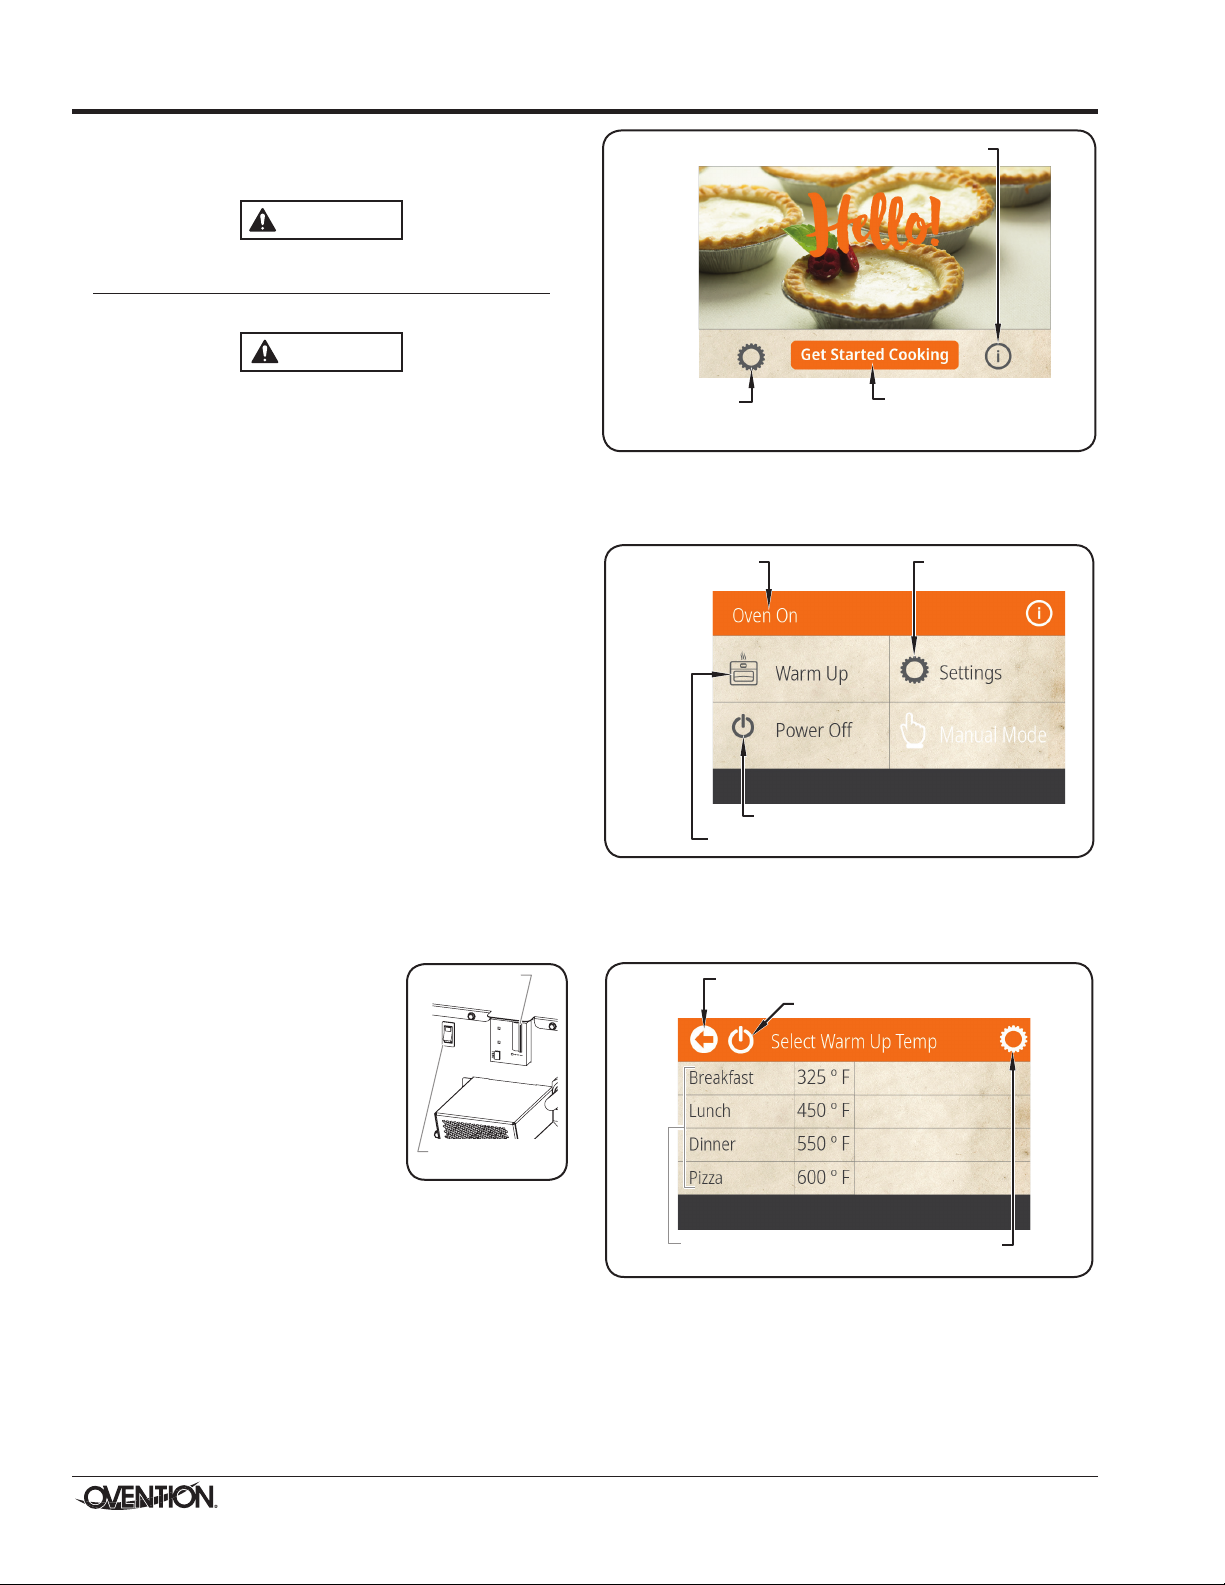
GFCI
Switch
Control Reset
Switch “On”
Touch to access
Settings screen.
Touch to access About This Oven screen.
Touch to access
Startup screen and
prepare oven for cooking.
Touch to shut down oven.
Touch to access
Settings screen.
Touch to select oven setpoint temperature.
Oven status
shown as “On”.
Touch to shut down oven.
Touch to access
Settings Menu screen.
Touch desired
temperature.
Touch to return to previous screen
General
Use the following information and procedures to operate an
Ovention® Single MiLO™ oven.
Read all safety messages in the IMPORTANT SAFETY
INFORMATION section before operating this equipment.
In the event of emergency, unplug unit.
BURN HAZARD:
• Some exterior surfaces on unit will get hot. Avoid
unnecessary contact with unit.
• Pan/tray will be very hot upon removal—use oven mitt,
pan gripper, or other utensil to remove.
Recipe Information
Single MiLO ovens are designed to provide unequaled flexibility
and efficiency. The touchscreen controller has the capability
of storing over 4000 custom recipes. Recipes are organized
into categories that group together similar items, such as lunch
recipes or different varieties of pizza.
At initial startup, the Categories screen will show an
“Uncategorized” category and either a sample category or
customer-specific, preloaded categories. If the Categories
screen shows a sample category with recipes, these recipes
can be used to help develop specific recipes appropriate for the
installation. Refer to the “Programming Categories/Recipes”
procedure in this section for instructions on creating recipes
and categories.
Hello Screen
4. Touch GET STARTED COOKING on the Hello screen
to prepare the oven for cooking. The Startup screen will
appear.
Startup
Use the following procedure to start up the oven.
1. Make sure the unit is plugged into a properly grounded
electrical receptacle of the correct voltage, size, and plug
configuration. See the SPECIFICATIONS section for
details.
2. Make sure the GFCI switch is in the I
(On) position.
3. Make sure the Control Reset switch
is in the “On” position.
• The touchscreen will energize and
show the logo screen followed by
a progress circle.
• After the software loads, the Hello
screen will appear.
Startup Screen
5. Touch WARM UP on the Startup screen. The Warm Up
Temp screen will appear.
• Several pre-set setpoint temperatures are available.
Warm Up Temp Screen
8
Form No. OVMILOSM-0718
Page 9
6. Touch the desired setpoint temperature on the
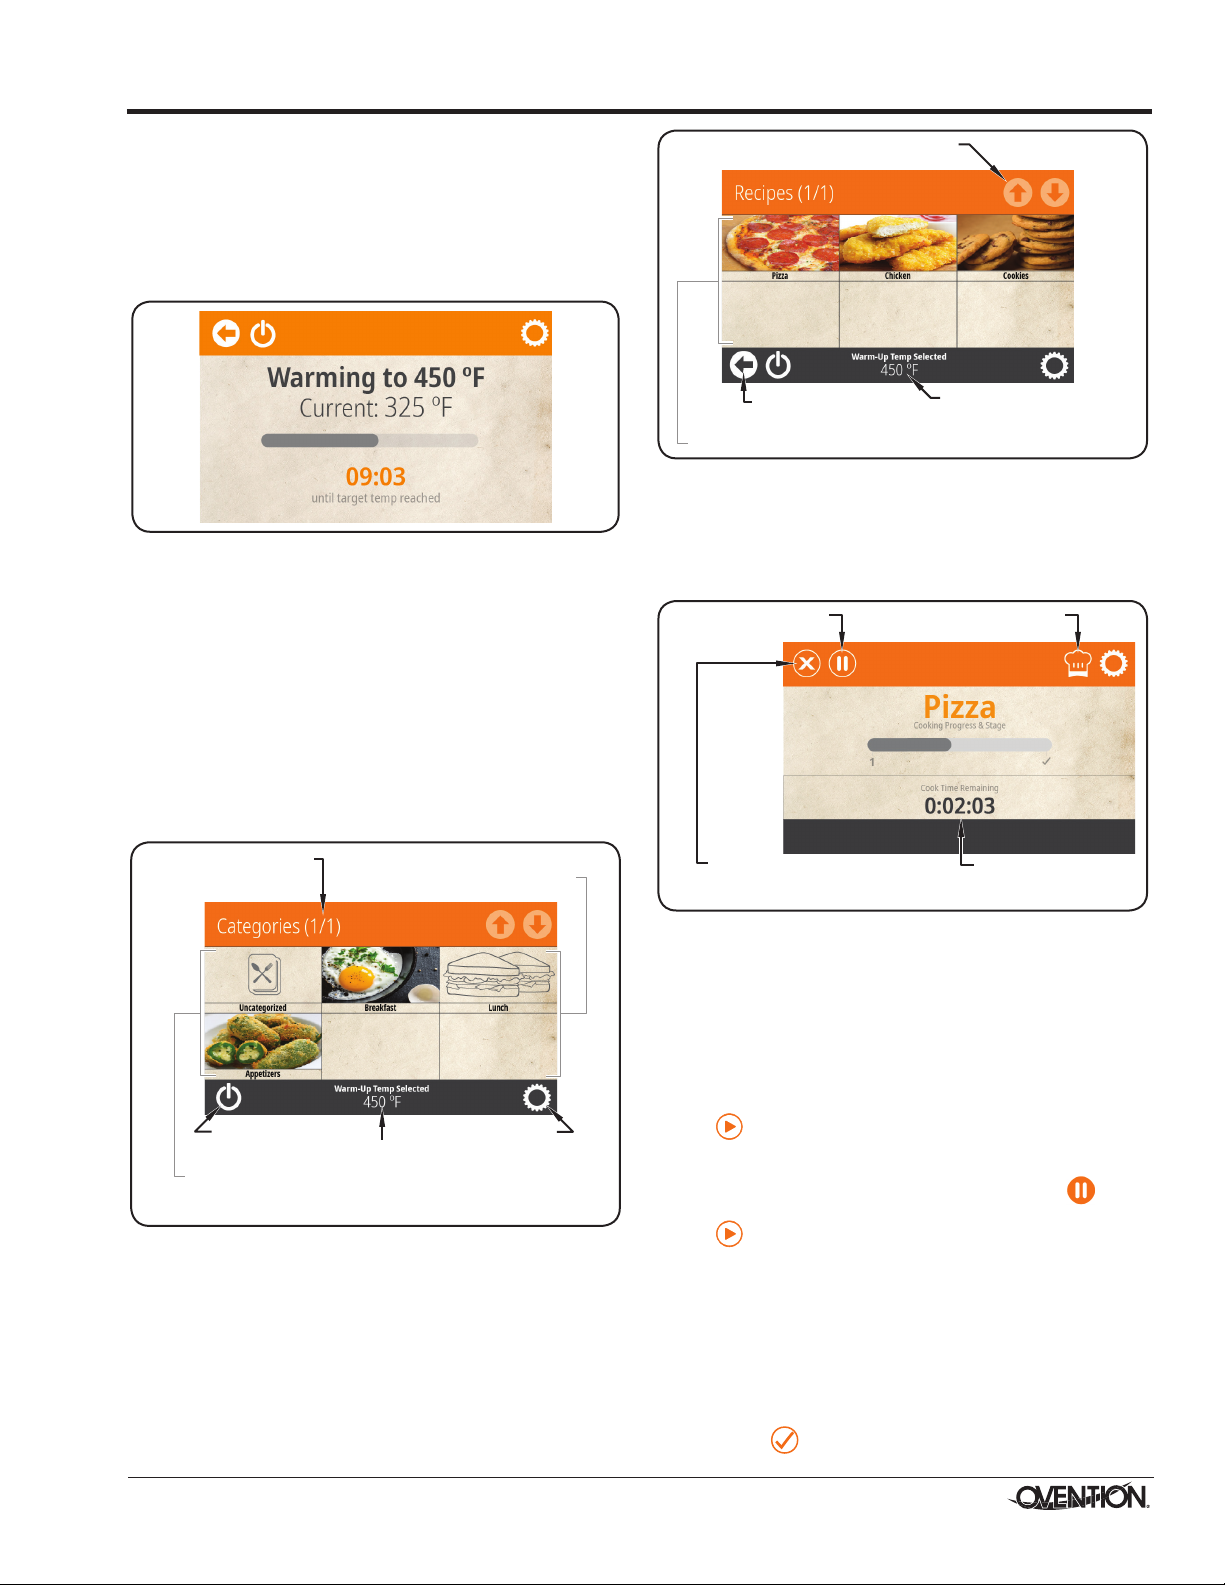
Touch to shut
down oven.
Touch to
access
Settings
screen.
Touch desired
Category to
access Recipes.
Touch desired Category
to access Recipes.
Indicates
oven
setpoint
temperature.
Indicates number
of Category
screens available.
Touch to return
to previous screen.
Touch desired Recipe to start cooking sequence.
Indicates oven setpoint
temperature.
Use arrows to scroll through
multiple Recipes screens.
Touch to pause
cooking sequence.
Touch to cancel cooking
sequence. Touchscreen
returns to the Recipes screen.
Indicates remaining
cook time.
Touch to show settings
for active recipe.
touchscreen.
• The IR elements, air blowers, and cooling fans will start
up. Allow 20–30 minutes for the oven to reach setpoint
temperature.
• The touchscreen shows the selected setpoint
temperature, the current chamber temperature, and the
time remaining for warmup.
Warmup Status Screen
When the oven reaches setpoint temperature, the Categories
screen appears on the touchscreen. The oven is now ready
for cooking.
Cooking
Use the following procedures to cook food product in the Single
MiLO oven.
NOTE: If the oven door is left open for more than 15 seconds
during a cooking sequence, a “Close Door” pop up will
appear on the touchscreen.
1. Make sure the oven chamber has reached setpoint
temperature. The Categories screen will appear on the
touchscreen.
OPERATION
Recipes Screen
4. Touch the desired recipe on the touchscreen.
• The oven chamber illuminates and the cooking
sequence begins.
• The touchscreen changes to the Cooking screen and
shows the remaining cook time for the selected recipe.
NOTE: The Categories and Recipes shown are for example
2. Open the oven door, and place the pan/tray with food
product into the oven chamber. CAUTION! BURN
HAZARD—Always use a paddle, pan gripper, or other
utensil to load and unload food product.
3. Touch the desired category on the touchscreen. The
Recipes screen will appear.
Form No. OVMILOSM-0718
Categories Screen
only. Depending on the configuration of the oven, these
screens will show either sample items or customerspecific, preloaded items.
Cooking Screen
• If the selected recipe contains any Cook Events, the
Cooking screen will change to show the name of the
recipe cooking as well as a countdown to the Cook
Event. When the Cook Event occurs, the cooking
sequence pauses and the Cook Event screen will appear
on the touchscreen. Open the oven door, remove the
pan/tray with food product, complete the action on the
food product, place the pan/tray with food product back
into the oven chamber, close the oven door, and touch
on the Cook Event screen to continue the cooking
sequence. See “Programming a Cook Event” in this
section for a detailed description of Cook Events.
• To pause a cooking sequence, touch . The
touchscreen will show “COOKING PAUSED”. Touch
to resume the cooking sequence.
• When the cooking sequence is finished, the touchscreen
shows “[Recipe] DONE” and an audible alert sounds.
5. Open the oven door. Using a paddle, pan gripper, or other
utensil, remove the cooked food product and close the
oven door. CAUTION! BURN HAZARD—Always use
a paddle, pan gripper, or other utensil to load and
unload food product.
• The touchscreen will return to the Recipes screen.
NOTE: Touch on the “DONE” screen to return to the
Recipes screen without opening the oven door.
9
Page 10
OPERATION
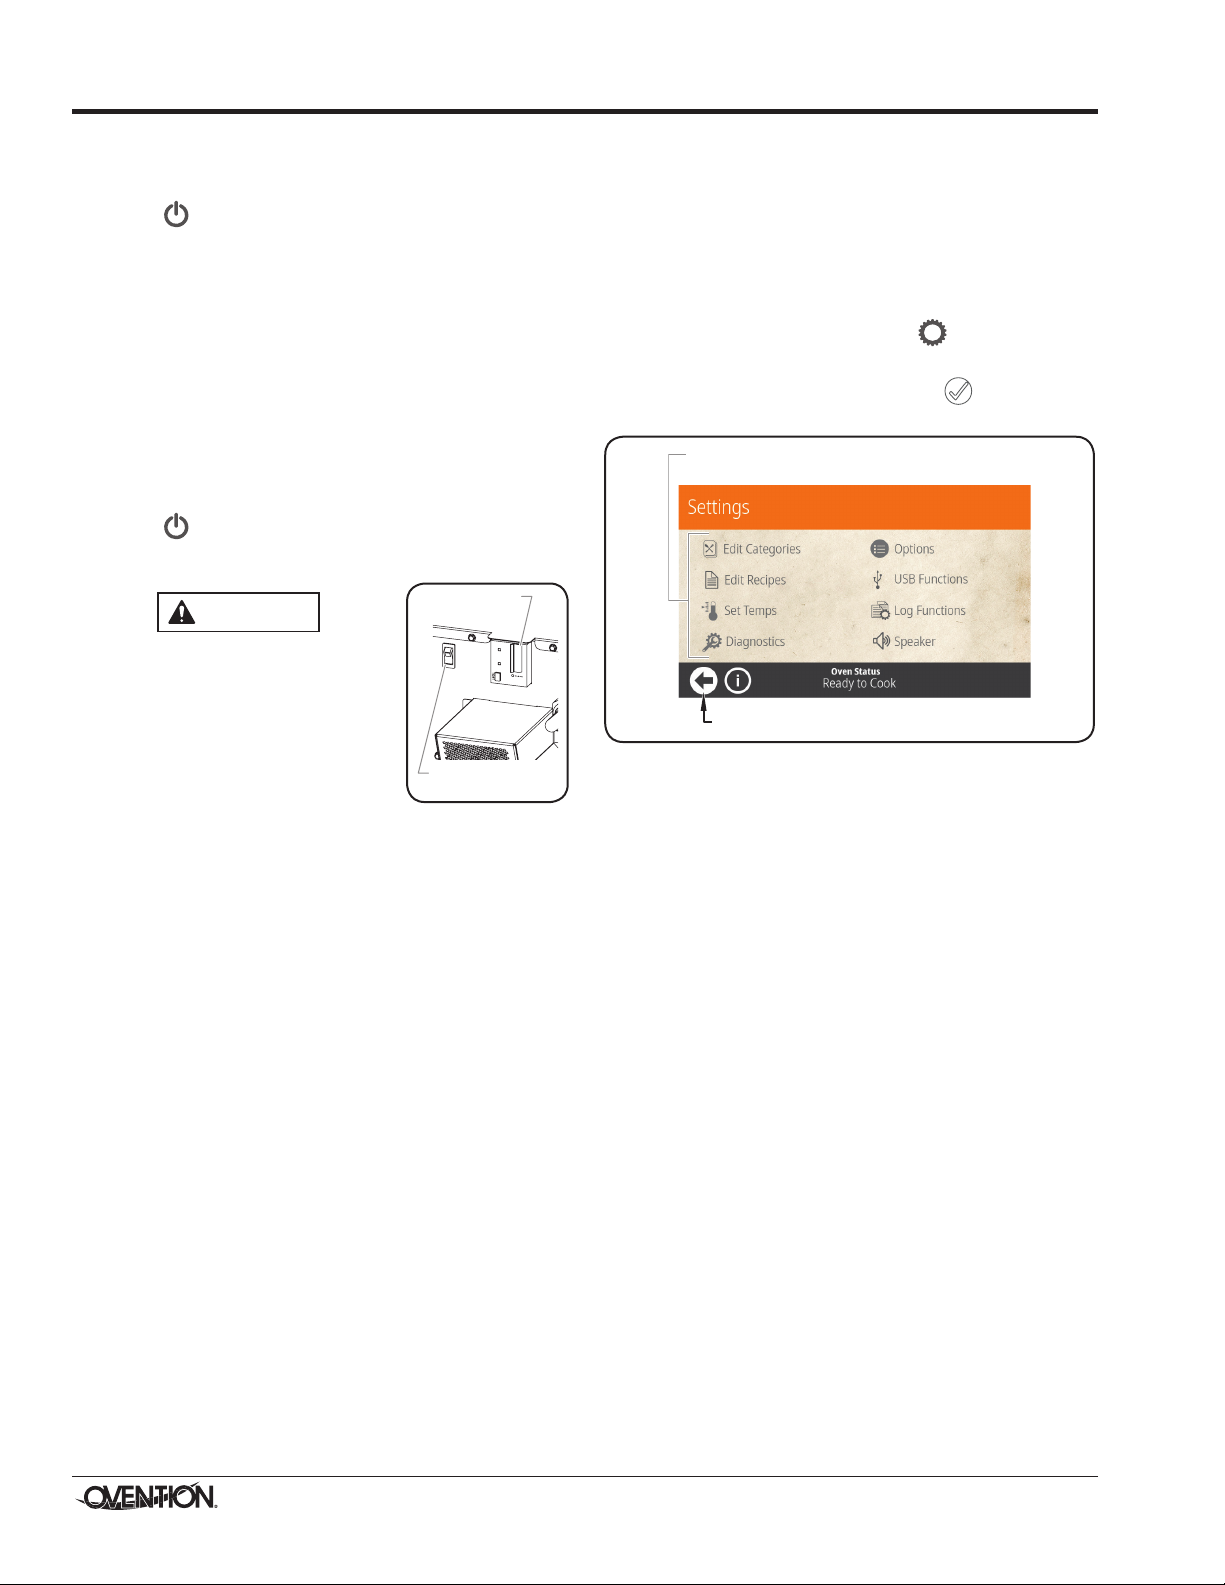
GFCI
Switch
Control Reset
Switch “Off”
CAUTION
Touch to return to Categories screen.
Touch desired icon to view/edit/create
corresponding setting.
Standby Shutdown
Use the following procedure to put the oven into standby
shutdown during extended periods of non-use.
1. Touch on the touchscreen to shut down operation and
put the oven in standby.
• The elements will shut off, and the Cooling screen will
appear on the touchscreen,
• The air blowers and cooling fans will continue to operate
until the oven chamber temperature drops below 140°F
(60°C).
• After the chamber is cool, the oven status will read
“Oven Off”. After a period of time, the touchscreen will
darken to a screen saver.
Shutdown
Use the following procedure to disconnect the oven from power
for cleaning and maintenance as well as long term shutdown.
1. Touch on the touchscreen to shut down operation and
put the oven in standby. Cooling fans will operate until the
oven chamber temperature drops below 140°F (60°C).
Do not turn off GFCI switch or unplug
unit immediately after use. Internal
fans must cool oven to avoid damage
to electrical components.
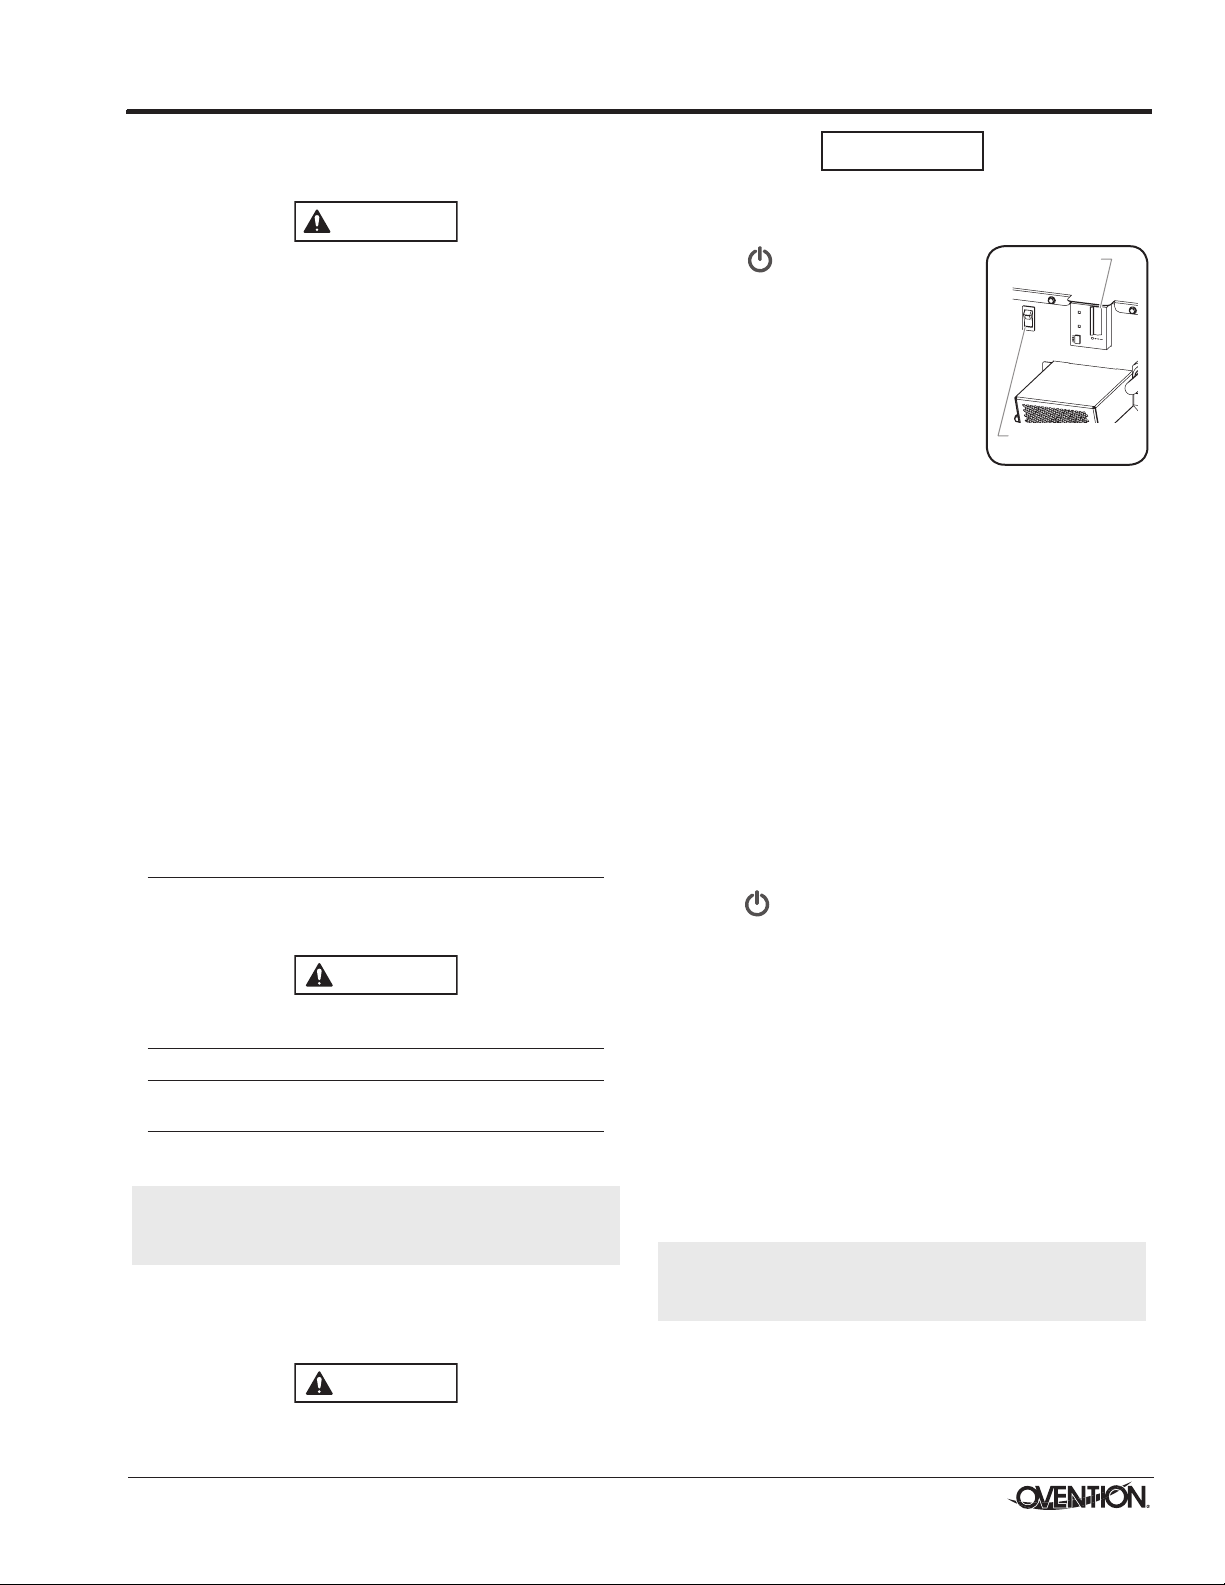
2. After the cooling fans shut off:
a. Move the GFCI switch on the back
of the oven to the O (Off) position.
b. Move the Control Reset switch to
the “Off” position.
c. Unplug the power cord.
Programming Categories/Recipes
Use the following procedures to edit, create, or delete
categories and recipes. These procedures require access
to password-protected screens and should be performed by
authorized personnel only.
NOTE: The USB port allows the uploading of pre-programmed
recipes from an external USB drive. Refer to the
“Uploading from a USB Drive” procedure in this section
for details.
1. From the Categories screen, touch .
• A password keypad will appear on the touchscreen.
2. Input the password “12345” , and touch .
• The Settings screen will appear on the touchscreen.
Settings Screen
3. Touch either EDIT CATEGORIES or EDIT RECIPES on
the Settings screen, depending on the desired function.
Then, refer to the appropriate procedure in this section.
10
Form No. OVMILOSM-0718
Page 11
OPERATION
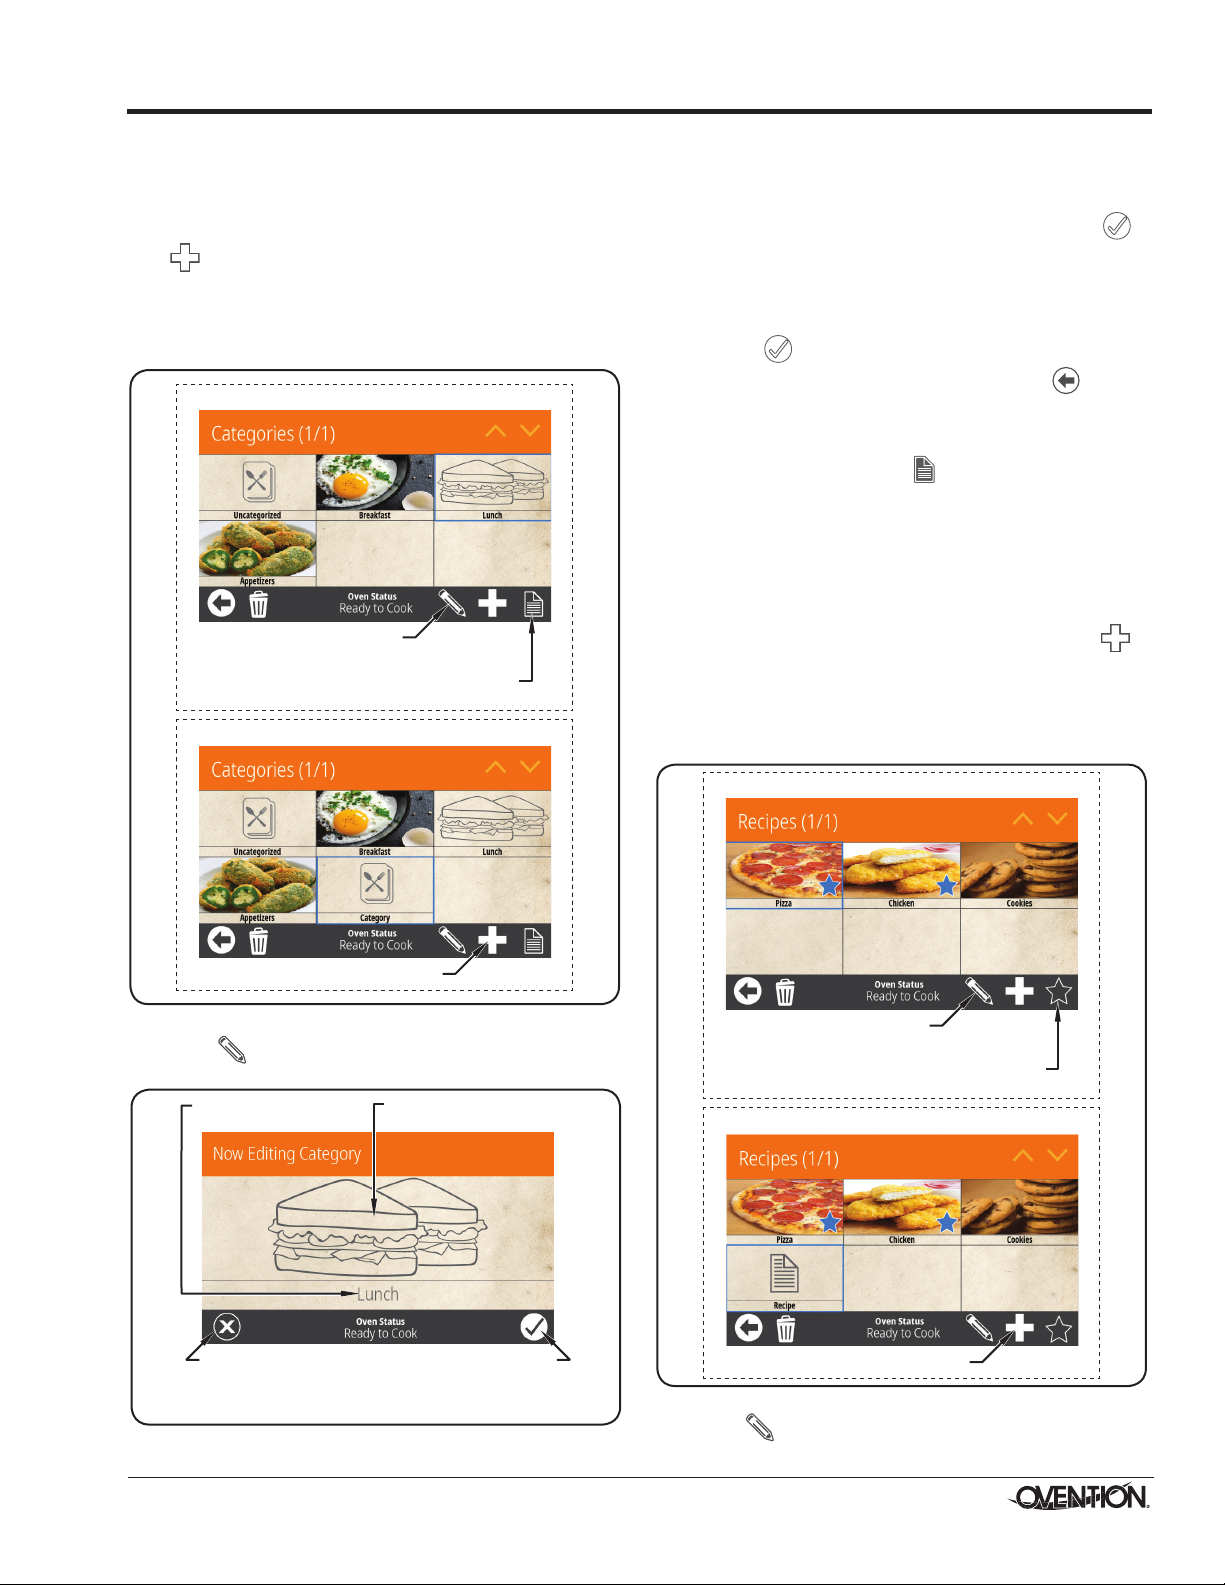
Touch to edit/create Recipes
in selected Category.
Touch to edit selected
Category.
Touch to add new Category.
Editing Existing Category
Creating New Category
Touch to cancel
changes and return
to Edit Categories
screen.
Touch here to
edit image.
Touch Category
name to edit.
Touch to save
changes and return
to Edit Categories
screen.
Touch to designate recipe a favorite.
Recipe moves to top and gets blue star.
Touch to edit
selected Recipe.
Touch to add new Recipe.
Editing Existing Recipe
Creating New Recipe
Editing/Creating Categories
After touching EDIT CATEGORIES on the Settings screen, the
Edit Categories screen will appear. This screen will look similar
to the Categories Screen.
1. Touch an existing category to edit the category, or touch
to create a new category.
• For existing categories, a blue box will highlight the
category.
• For new categories, a new category will appear
highlighted by a blue box.
3. Touch the category image to select the icon or photo used
for the category. The Select Image screen appears and
shows two tabs—one for icons and one for photos.
a. Use the arrows to scroll through the desired tab.
b. Touch the desired image to select, then touch to
save and return to the Now Editing screen.
4. Touch the category name to edit.
a. Use the keypad that appears to edit the name. Names
can have up to 20 characters.
b. Touch to save and return to the Now Editing screen.
5. When category editing is complete, touch twice to
return to the Categories screen.
NOTE: Recipes related to a category can be edited/created
from the Edit Categories screen. With the category
highlighted, touch the icon to access the Edit
Recipes screen. Refer to “Editing/Creating Recipes” in
this section for details.
Editing/Creating Recipes
After touching EDIT RECIPES on the Settings screen, the Edit
Recipes screen will appear. This screen will look similar to the
Recipes Screen.
1. Touch an existing recipe to edit the recipe, or touch to
create a new recipe.
• For existing recipes, a blue box will highlight the
recipe.
• For new recipes, a new recipe will appear highlighted
by a blue box.
Edit Categories Screen
2. Touch to edit/create the category. The Now Editing
Category screen appears.
Form No. OVMILOSM-0718
Now Editing Category Screen
Edit Recipes Screen
2. Touch to edit/create the recipe. The Now Editing
screen appears.
continued...
11
Page 12
OPERATION
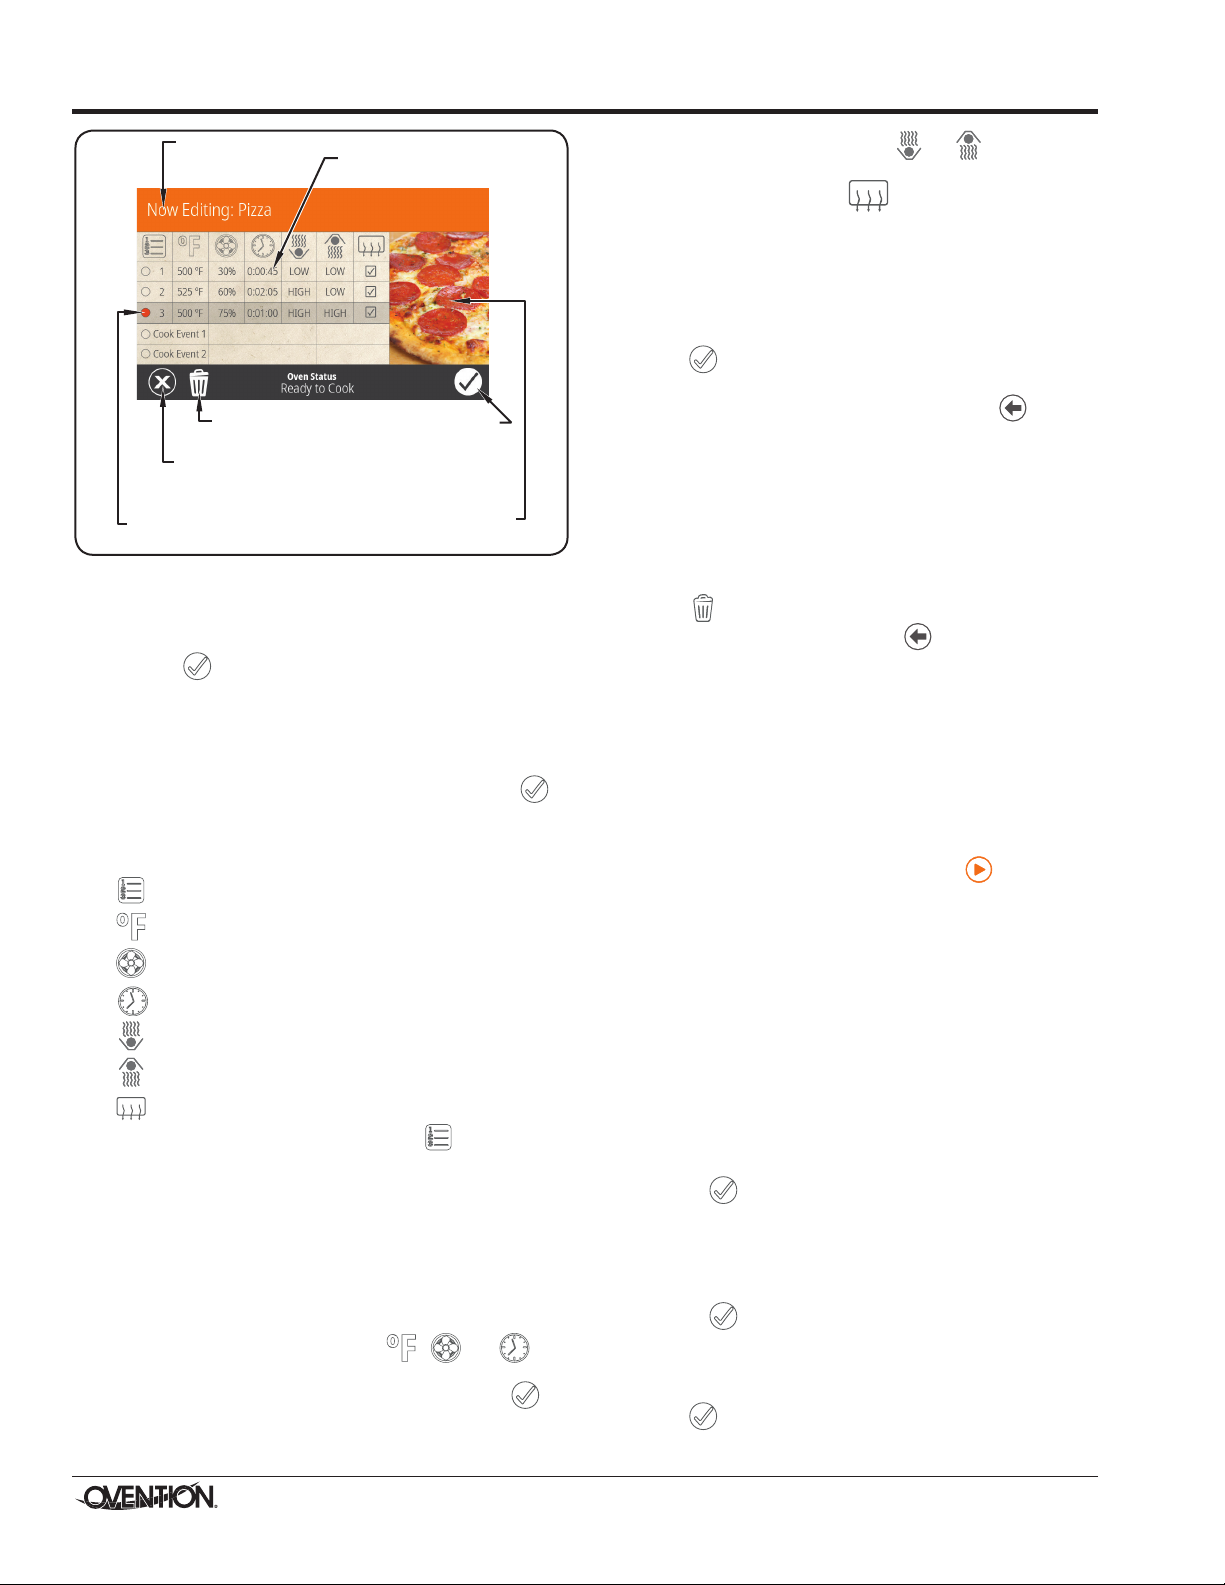
Touch to cancel
changes and return
to Edit Recipes screen.
Touch to save
changes and
return to Edit
Recipes screen.
Touch to delete
active stage.
Indicates active
stage for editing.
Touch here to edit
recipe image.
Touch setting
values to edit.
Touch here to
edit Recipe
name.
Now Editing Screen
3. Touch the recipe name to edit.
a. Use the keypad that appears to edit the name. Names
can have up to 20 characters.
b. Touch to save and return to the Now Editing screen.
4. Touch the recipe image to select the icon or photo used for
the recipe. The Select Image screen appears and shows
two tabs—one for icons and one for photos.
a. Use the arrows to scroll through the desired tab.
b. Touch the desired image to select, then touch to
save and return to the Now Editing screen.
5. Touch each setting on the Now Editing screen to edit the
corresponding setting. The Settings include:
= Stage
= Cook Temperature
= Blower Percentage
= Cook Duration
= Infrared (IR) Bottom Intensity
= Infrared (IR) Top Intensity
= Active Venting
• Touching number 1, 2, or 3 under the icon will make
that stage active for editing. The radio button will glow
and the entire row will be highlighted. Each recipe can be
programmed to have up to three stages, depending on
the food product. Stages are programmed with unique
settings to create a customized cooking sequence for
the recipe.
NOTE: It is not necessary to create stages for a recipe if it is
not required by the food product. If unique stages are
not required, leave settings for stages 2 and 3 blank.
• Touching the setting value for , , or will
bring up a keypad specific to the setting. Enter the
desired value using the keypad, then touch to
return to the Now Editing screen.
• Touching the setting value for or will toggle the
setting between OFF, LOW, MED, and HIGH.
• Touching the box in the column will either “check”
or “uncheck” the box.
- An unchecked box indicates active venting is enabled.
The oven chamber exhaust vents will open and close
automatically based on chamber temperature.
- A checked box disables active venting and indicates
the vents are open for that stage.
6. Touch to save the recipe settings and return to the Edit
Recipes screen.
7. When all recipe editing is complete, touch twice to
return to the Categories screen.
Deleting Categories/Recipes
The procedure for deleting categories and recipes is the same.
After touching EDIT CATEGORIES or EDIT RECIPES on the
Settings screen, the corresponding “Editing” screen will appear.
1. Touch a category/recipe to select. A blue box will highlight
the category/recipe.
2. Touch to delete the category/recipe.
3. When deleting is complete, touch twice to return to the
Categories screen.
Programming a Cook Event
A Cook Event is a feature that can be programmed into recipes
that allows an action to be taken on a food product during a
cooking sequence (example: ADD CHEESE). A Cook Event
pauses an in-progress cooking sequence and signals the
operator to open the oven door and move the food product
out of the oven chamber. After the action is taken on the food
product, the operator puts the product back into the oven
chamber, closes the oven door, and touches on the Cook
Event screen. The cooking sequence resumes. Up to two Cook
Events can be programmed into a recipe. Use the following
procedure to program a Cook Event.
1. Follow the procedure for creating or editing a recipe
described earlier in this section.
2. After programming the settings for the desired number of
stages on the Now Editing screen, touch the Cook Event 1
row, to make that cook event active for editing. The radio
button will glow and the entire row will be highlighted.
3. Touch “Cook Event 1” in the center box of the active cook
event row to name the cook event.
a. Use the keypad that appears to edit the name. Names
can have up to 20 characters.
b. Touch to save and return to the Now Editing screen.
4. Touch setting value in the right-side box of the active
cook event row. This value sets the time into the cooking
sequence when the cook event should occur.
a. Use the keypad that appears to enter the value.
b. Touch to save and return to the Now Editing screen.
5. If a second Cook Event is required, touch the Cook Event
2 row to make that cook event active for editing. Repeat
steps 3 and 4.
6. Touch to save the recipe settings and return to the Edit
Recipes screen.
12
Form No. OVMILOSM-0718
Page 13
OPERATION
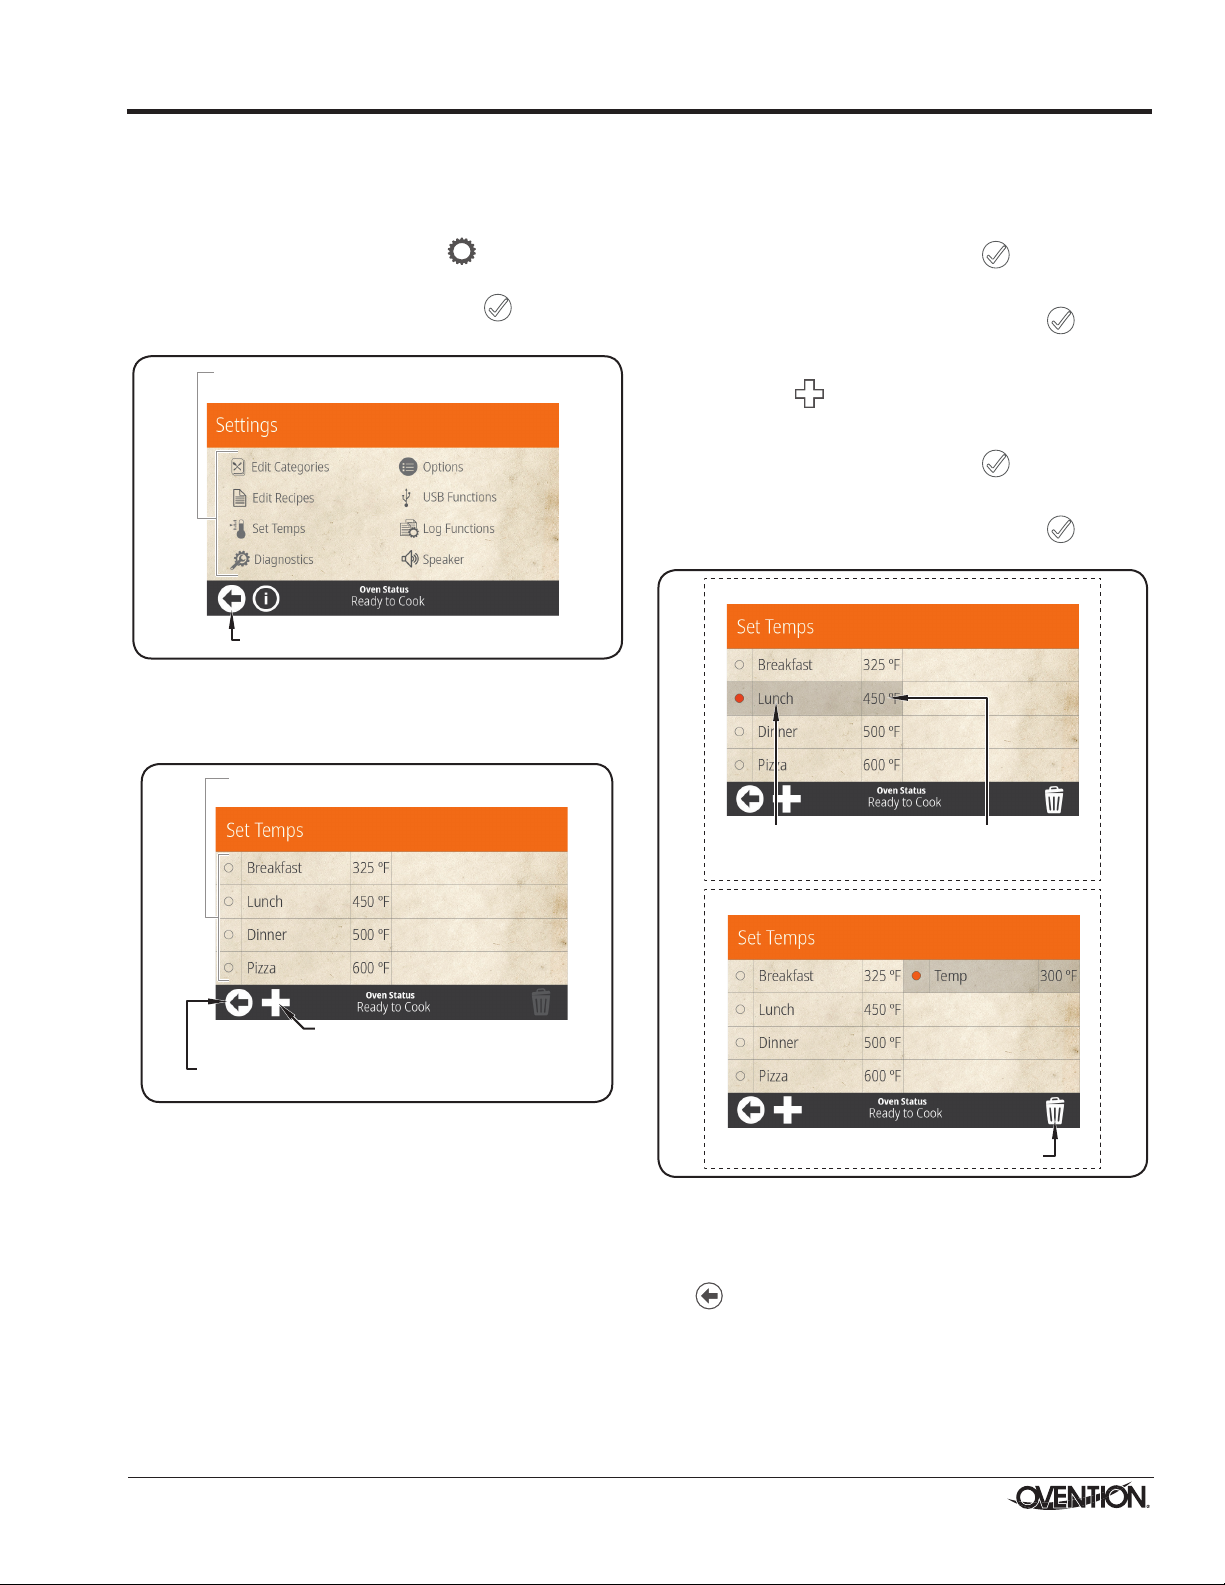
Touch to return to Categories screen.
Touch desired icon to view/edit/create
corresponding setting.
Touch to select existing setpoint
temperature for editing.
Touch to return to
previous screen
Touch to create new
setpoint temperature
Touch to delete highlighted setpoint.
Editing Existing Setpoint
Creating New Setpoint
Touch to edit
setpoint
name.
Touch to edit
setpoint
temperature.
Editing/Creating Setpoint Temperatures
Use the following procedure to edit or create the setpoint
temperature(s) available at oven startup. This procedure
requires access to password-protected screens and should be
performed by authorized personnel only.
1. From the Categories screen, touch .
• A password keypad will appear on the touchscreen.
2. Input the password “12345” , and touch .
• The Settings screen will appear on the touchscreen.
Settings Screen
3. Touch SET TEMPS on the Settings screen. The Set Temps
screen appears.
• The oven can store up to eight setpoint temperatures.
4. Edit/create the desired setpoint temperature.
To edit an existing setpoint:
a. Touch the desired setpoint to edit. The setpoint will be
highlighted.
b. Touch the name to edit the setpoint name using the
keypad that appears, then touch . The Set Temps
screen reappears.
c. Touch the temperature to edit the setpoint temperature
using the keypad that appears, then touch . The Set
Temps screen reappears.
To create a new setpoint:
a. Touch the icon. A new temperature setpoint named
“Temp” will appear and remain highlighted.
b. Touch the name to edit the setpoint name using the
keypad that appears, then touch . The Set Temps
screen reappears.
c. Touch the temperature to edit the setpoint temperature
using the keypad that appears, then touch . The Set
Temps screen reappears.
Set Temps Screen
Form No. OVMILOSM-0718
Edit Setpoint Screen
5. Repeat step 4 to edit/create additional setpoint
temperatures.
6. When setpoint temperature changes are complete, touch
twice to return to the Categories screen.
13
Page 14

Touch to return to Categories screen.
Touch desired icon to view/edit/create
corresponding setting.
Touch to return to
Settings screen.
Touch desired icon to
view/edit/create
corresponding setting.
Drag slider between “ºC” and “ºF”
to toggle setting.
Touch to return to Settings screen.
Touch desired function.
OPERATION
Changing Temperature Unit of Measure
Use the following procedure to change the temperature unit
of measure between Fahrenheit and Celsius. This procedure
requires access to password-protected screens and should be
performed by authorized personnel only.
1. From the Categories screen, touch .
• A password keypad will appear on the touchscreen.
2. Input the password “12345” , and touch .
• The Settings screen will appear on the touchscreen.
Settings Screen
3. Touch OPTIONS on the Settings screen. The Options
screen appears.
4. Touch and drag the slider below the “°F” and “°C” on the
Options screen to toggle the unit of measure between
Fahrenheit and Celsius.
Importing from a USB Drive
Use the following procedure to import pre-programmed recipes
or firmware updates from an external USB drive. This procedure
requires access to password-protected screens and should be
performed by authorized personnel only.
NOTE: USB drive must have a capacity of 64 GB or less.
1. Slide the cover away from the USB port next to the
touchscreen, and insert the USB drive into the port.
2. From any screen, touch .
• A password keypad will appear on the touchscreen.
3. Input the password “12345” , and touch .
• The Settings screen will appear on the touchscreen.
4. Touch USB FUNCTIONS on the Settings screen. The USB
Functions screen appears.
USB Functions Screen
IMPORTANT NOTE:
For the following USB functions, the oven must be cool and
in an idle state: CONFIG IMPORT, SOFTWARE UPDATE UI,
and SOFTWARE UPDATE RB.
Options Screen
5. When finished changing the unit of measure, touch
twice to return to the Categories screen.
5. Touch the desired function to begin the corresponding
import.
• Select the import file from the list that appears.
• A screen will appear to indicate that the import is in
progress.
6. When the import is complete:
• For USB functions RECIPE EXPORT, RECIPE IMPORT,
and CONFIG IMPORT—The touch screen will return to
the USB Functions screen. Remove the USB drive from
the USB port, and slide the USB cover over the port.
• For USB functions SOFTWARE UPDATE UI and
SOFTWARE UPDATE RB—The oven will restart. Do
not remove the USB drive from the USB port until the
touchscreen reads “Remove the USB.” Slide the USB
cover over the port.
14
Form No. OVMILOSM-0718
Page 15
MAINTENANCE
CAUTION
GFCI
Switch
Control Reset
Switch “Off”
General
Ovention® Single MiLO™ ovens are designed for maximum
durability and performance with minimum maintenance.
WARNING
ELECTRIC SHOCK HAZARD:
• Place unit in standby, allow unit to cool, turn off GFCI
switch, turn off Control Reset switch, and unplug
unit before performing any cleaning, adjustments, or
maintenance.
• DO NOT submerge or saturate with water. Unit is not
waterproof. Do not operate if unit has been submerged
or saturated with water.
• Do not steam clean or use excessive water on unit.
• This unit is snot “jet-proof” construction. Do not use
jet-clean spray to clean this unit.
• Do not clean unit when it is energized or hot.
• Do not clean unit with metal scouring pads. Metal pieces
can break off pad and touch electrical components,
creating risk of electric shock.
• This unit must be serviced by qualified personnel only.
Service by unqualified personnel may lead to electric
shock or burn.
• Use only Genuine Ovention Replacement Parts when
service is required. Failure to use Genuine Ovention
Replacement Parts will void all warranties and may
subject operators of the equipment to hazardous
electrical voltage, resulting in electrical shock or burn.
Genuine Ovention Replacement Parts are specified to
operate safely in the environments in which they are
used. Some after-market or generic replacement parts
do not have the characteristics that will allow them to
operate safely in Ovention equipment.
This unit has no “user-serviceable” parts. If service is
required on this unit, contact an Authorized Ovention Service
Agent or contact the Ovention Hotline at 855-298-6836.
CAUTION
Do not move or relocate unit for cleaning. Unit is bulky
and heavy.
Never use steel pads, wire brushes, or scrapers to clean unit.
Wear protective rubber gloves and protective eye wear
when cleaning unit.
Improper cleaning of oven could damage catalyst and will
void unit warranty.
IMPORTANT NOTE:
Use of cleaning chemicals not approved by Ovention when
cleaning the oven chamber will void the warranty.
Daily Cleaning
To maintain performance and preserve the finish of the
Ovention Single MiLO oven, clean the unit daily.
Do not turn off GFCI switch or unplug unit immediately
after use. Internal fans must cool oven to avoid damage to
electrical components.
Form No. OVMILOSM-0718
NOTICE
Use non-abrasive cleaners and cloths only. Abrasive
cleaners and cloths could scratch finish of unit, marring its
appearance and making it susceptible to soil accumulation.
1. Touch on the touchscreen to
shut down and allow oven to cool.
Cooling fans will operate until the
oven chamber temperature drops
below 140°F (60°C).
2. After the cooling fans shut off:
a. Move the GFCI switch on the back
of the oven to the O (Off) position.
b. Move the Control Reset Switch to
the “Off” position.
c. Unplug the power cord.
3. Remove and discard any remaining food product.
4. Remove and clean the cooking rack using a damp nonabrasive cloth or nylon scouring pad (a non-abrasive
cleaner may be used for difficult stains).
5. Remove any spillages using damp paper towel or a nonabrasive cloth.
6. Wipe down all exterior surfaces using a non-abrasive,
damp cloth (a non-abrasive cleaner may be used for
difficult stains).
7. Wipe dry all surfaces using a non-abrasive, dry cloth.
8. Polish the exterior surfaces of the oven using a good
quality stainless steel cleaner.
9. Reinstall the cooking rack (See INSTALLATION section for
details.
Weekly Cleaning
1. Touch on the touchscreen to shut down and allow oven
to cool. Cooling fans will operate until the oven chamber
temperature drops below 140°F (60°C).
2. After the cooling fans shut off:
a. Move the GFCI switch on the back of the oven to the O
(Off) position.
b. Move the Control Reset Switch to the “Off” position.
c. Unplug the power cord.
3. Remove and discard any remaining food product.
4. Remove and clean the cooking rack using a damp non-
abrasive cloth or nylon scouring pad (a non-abrasive
cleaner may be used for difficult stains).
5. Remove any spillages using damp paper towel or a non-
abrasive cloth.
IMPORTANT NOTE:
Use of cleaning chemicals not approved by Ovention® when
cleaning the oven chamber will void the warranty.
6. Carefully spray Chemco Dirt Buster III Oven Cleaner onto
a non–abrasive nylon scouring pad.
NOTE: Do not spray cleaner directly into the oven chamber or into
the fan opening at the rear inside of the oven chamber.
continued...
15
Page 16
MAINTENANCE
Drip Tray
Tab
Rear
Support
Slot
GFCI
Switch
Control Reset
Switch “Off”
Large
Air Filter
Filter Bracket
Filter
Bracket
Small
Air Filter
7. Using the non–abrasive nylon scouring pad, clean
the interior surfaces and the inside of the oven
door of the oven chamber. Clean any other visible
area affected by the grease from cooking as well.
• Reapply Chemco Dirt Buster III Oven Cleaner onto the
nylon scouring pad as needed.
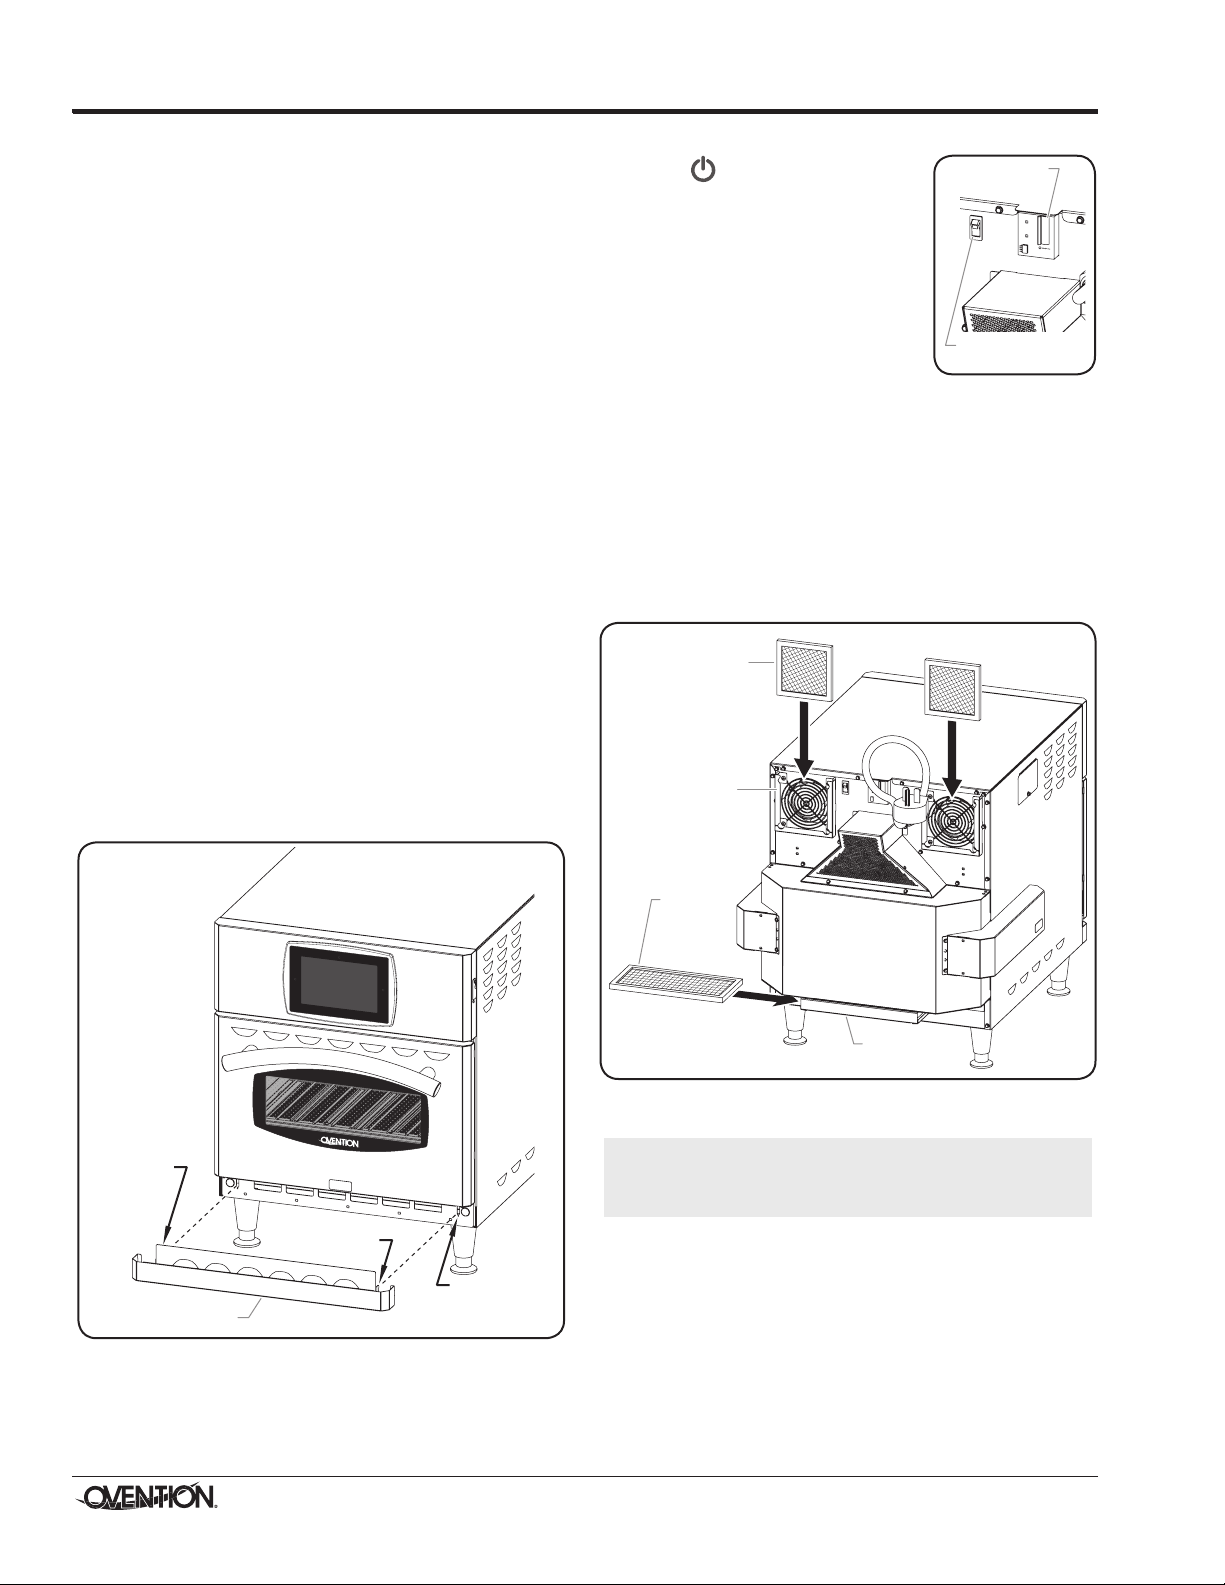
8. Remove and clean the drip tray. To clean the drip tray:
a. Lift up the drip tray, then angle the tray out to release
the tabs on each side of the tray from the slots located
directly below each side of the oven door.
b. Spray Chemco Dirt Buster III Oven Cleaner onto both
sides of the drip tray. Allow the cleaner to sit for 3–5
minutes.
c. Using a non–abrasive nylon scouring pad, apply
pressure to wipe away grease residue.
d. Wipe the drip tray clean using a damp, non-abrasive
cloth and allow to air dry.
9. Wipe all surfaces clean using a damp, non-abrasive cloth.
10. Wipe dry all surfaces using a non-abrasive, dry cloth.
11. Reinstall the drip tray. To install the drip tray:
a. Angle the rear support on the drip tray up behind the
oven door.
b. Align the tabs at each end of the drip tray with the slots
directly below each side of the oven door.
c. Lower the tabs on the drip tray into the slots on the
oven.
12. Reinstall the cooking rack (See INSTALLATION section for
details.
13. Polish the exterior surfaces of the oven using a good
quality stainless steel cleaner.
Monthly Cleaning
1. Touch on each touchscreen to
shut down and allow oven to cool.
Cooling fans will operate until the
oven chamber temperature drops
below 140°F (60°C).
2. After the cooling fans shut off:
a. Move both GFCI switches on the
back of the oven to the O (Off)
position.
b. Move both Control Reset Switches
to the “Off” position.
c. Unplug the power cord.
3. Remove and clean the two small air filters and the single
large air filter on the back of the oven. To remove and clean
each filter:
a. Slide the filter straight out of the filter bracket.
b. Spray the filter with water and/or soak in soap and water.
c. Rinse clean and allow the filter to air dry.
d. When the filter is dry, reinstall the filter into the filter bracket.
Cleaning the Drip Tray
Cleaning the Air Filters
4. Remove each cooking rack.
IMPORTANT NOTE:
Use of cleaning chemicals not approved by Ovention when
cleaning the oven chamber will void the warranty.
16
Form No. OVMILOSM-0718
Page 17
MAINTENANCE
Lower
Crumb Tray
Retaining
Latch
Front of Lower
IR Element
Pack in raised
position.
Upper
Crumb Tray
Front of Upper
IR Element
Pack in lowered
position.
Back edge
of crumb
tray.
Retaining
Latch
Retaining Latch
Gap
Air
Channel
Gap
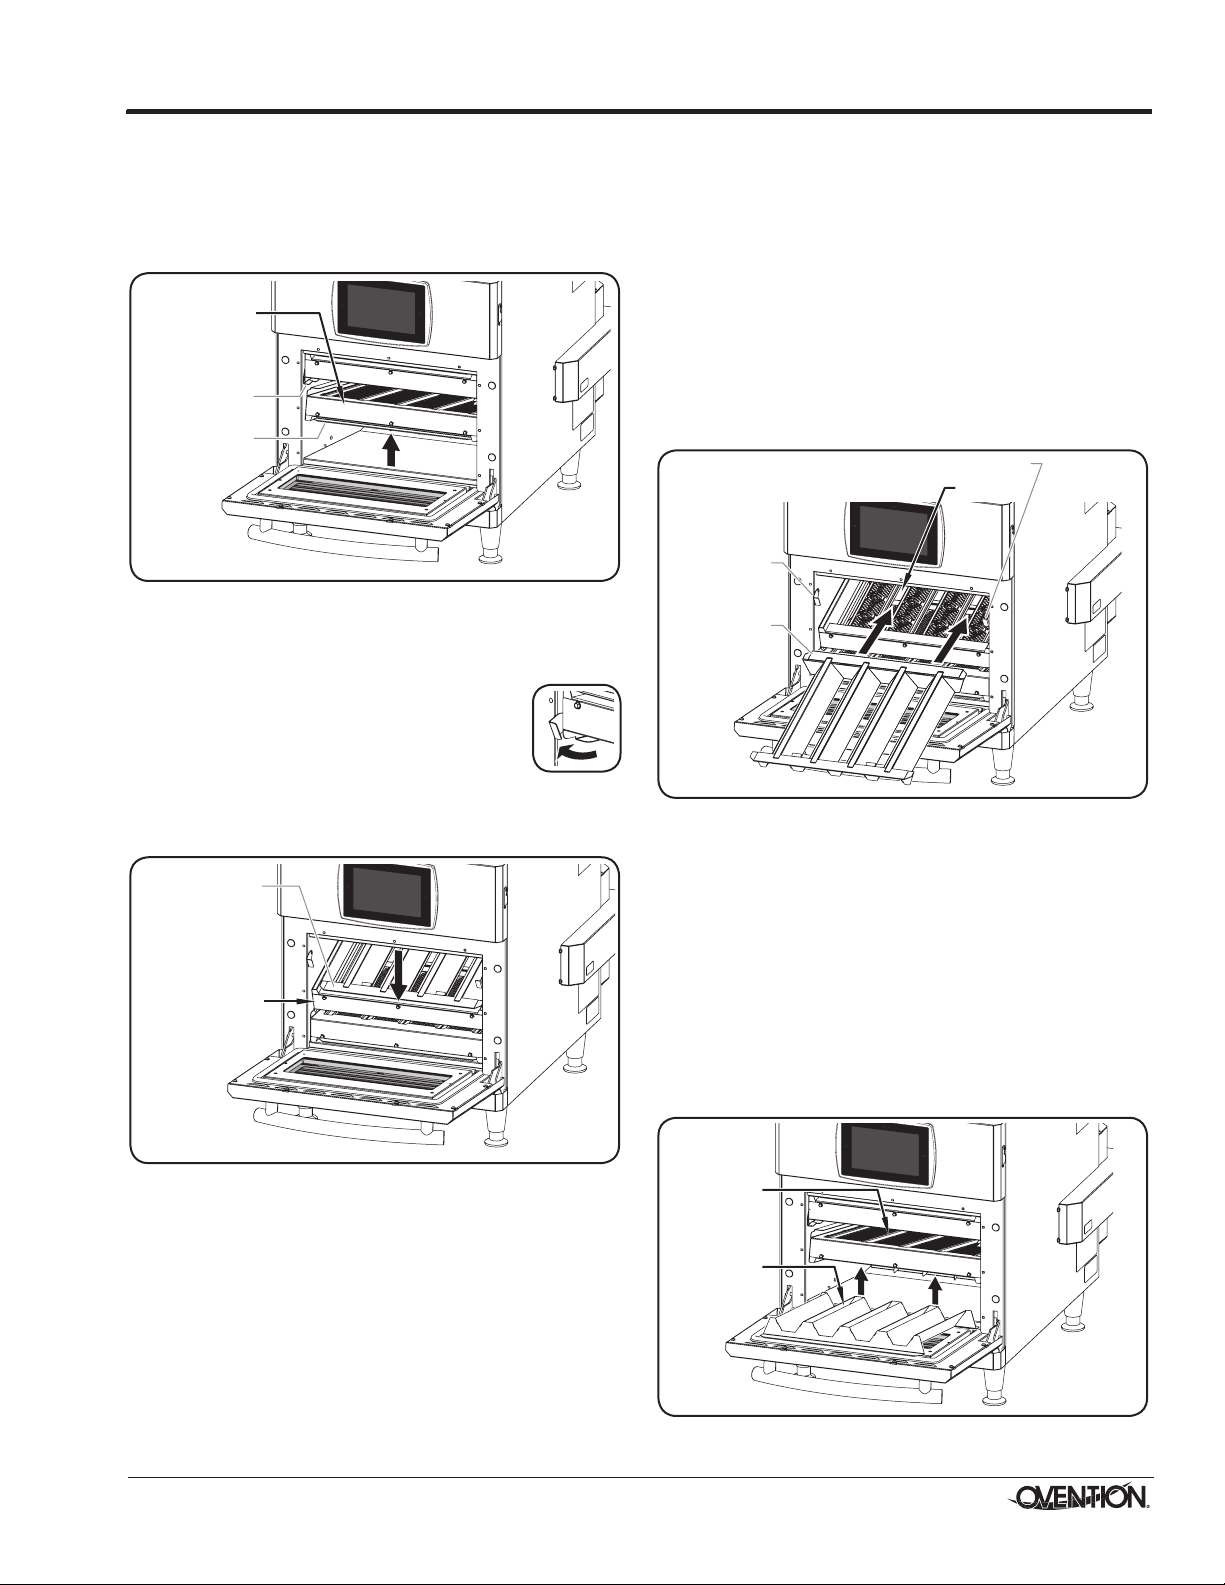
5. Remove and clean the upper and lower crumb trays in the
oven chamber. To clean the crumb trays:
a. Open the oven door.
b. Remove the lower crumb tray:
• Lift up the front of the lower IR element pack, and hold
in the raised position.
Removing a Lower Crumb Tray
• Remove the crumb tray by pulling it down and out of
the lower IR element pack.
• Pull the crumb tray out of the oven chamber.
c. Remove the upper crumb tray:
• Rotate out the two retaining latches
that hold the upper IR element pack in
position.
• Lower the front of the upper IR element pack.
NOTE: The upper and lower IR element packs are hinged on
the back side.
6. Reinstall the upper and lower crumb trays into the oven
chamber. To install the crumb trays:
a. Open the oven door.
b. Install the upper crumb tray:
• Align the air channels on the crumb tray with the gaps
on the upper IR element pack.
• Push the back edge of the crumb tray into the slot
along the back side of the oven chamber, above the
IR element pack.
• Raise the upper IR element pack while guiding the
crumb tray into the element pack.
• Rotate the retaining latches into position underneath
the upper IR element pack to secure the element pack
in position.
Replacing an Upper Crumb Tray
c. Install the lower crumb tray:
• While holding up the lower IR element pack, align the
air channels on the crumb tray with the gaps on the IR
element pack.
• While holding the crumb tray flat horizontally, push the
back edge of the tray into the slot along the back side
of the oven chamber, below the IR element pack.
• Lower the upper IR element pack while guiding the
crumb tray into the element pack.
NOTE: The lower crumb tray will rest flat on the oven chamber
floor when installed correctly. Remove and reinstall if
the tray appears angled down toward the rear of the
chamber.
Removing an Upper Crumb Tray
• Remove the crumb tray by lifting it up and out of the
upper IR element pack.
• Pull the crumb tray out of the oven chamber.
d. Spray Chemco Dirt Buster III Oven Cleaner onto both
e. Using a non–abrasive nylon scouring pad, apply
pressure to wipe away grease residue.
f. Wipe the crumb trays clean using a damp, non-abrasive
cloth and allow to air dry.
Form No. OVMILOSM-0718
sides of each crumb tray. Allow the cleaner to sit for 3–5
minutes.
Replacing a Lower Crumb Tray
7. Perform the “Weekly Cleaning” procedure in this section.
17
Page 18
GFCI
Switch
Control Reset
Switch “On”
Temperature
High Limit
Reset Button
TROUBLESHOOTING GUIDE
WARNING
WARNING
This unit must be serviced by qualified personnel only.
Service by unqualified personnel may lead to electric
shock or burn.
ELECTRIC SHOCK HAZARD: Place unit in standby, allow
unit to cool, turn off GFCI switch, turn off Control Reset
switch, and unplug unit before performing any cleaning,
adjustments, or maintenance.
Symptom Probable Cause Corrective Action
Oven does not operate (blank
touchscreen).
Improper cooking of food. Incorrect setpoint temperature or recipe
Unit unplugged. Make sure unit is plugged in.
Control Reset switch in Off position.
GFCI switch in the O (Off) position. Move GFCI switch to the I (On) position.
GFCI tripped. Reset GFCI by moving GFCI switch to the O (off) position
Unit connected to incorrect power supply. Refer to SPECIFICATIONS section for unit electrical
selection.
Move Control Reset switch to the
On position.
and back to the I (On) position. If GFCI continues to trip,
contact Authorized Service Agent or Ovention Hotline for
assistance.
specifications. Contact a qualified electrician to determine
and install proper voltage and size electrical receptacle.
Verify desired setpoint temperature and recipe selection.
Change to proper settings, if necessary (refer to
OPERATION section).
GFCI switch in the O (Off) position. Move GFCI switch to the I (On) position.
Crumb tray(s) installed incorrectly or missing. Reinstall crumb tray(s). Refer to MAINTENANCE section for
IR Element pack or air flow malfunction. Contact Authorized Service Agent or Ovention Hotline for
Oven not heating. GFCI switch in the O (Off) position. Move GFCI switch to the I (On) position.
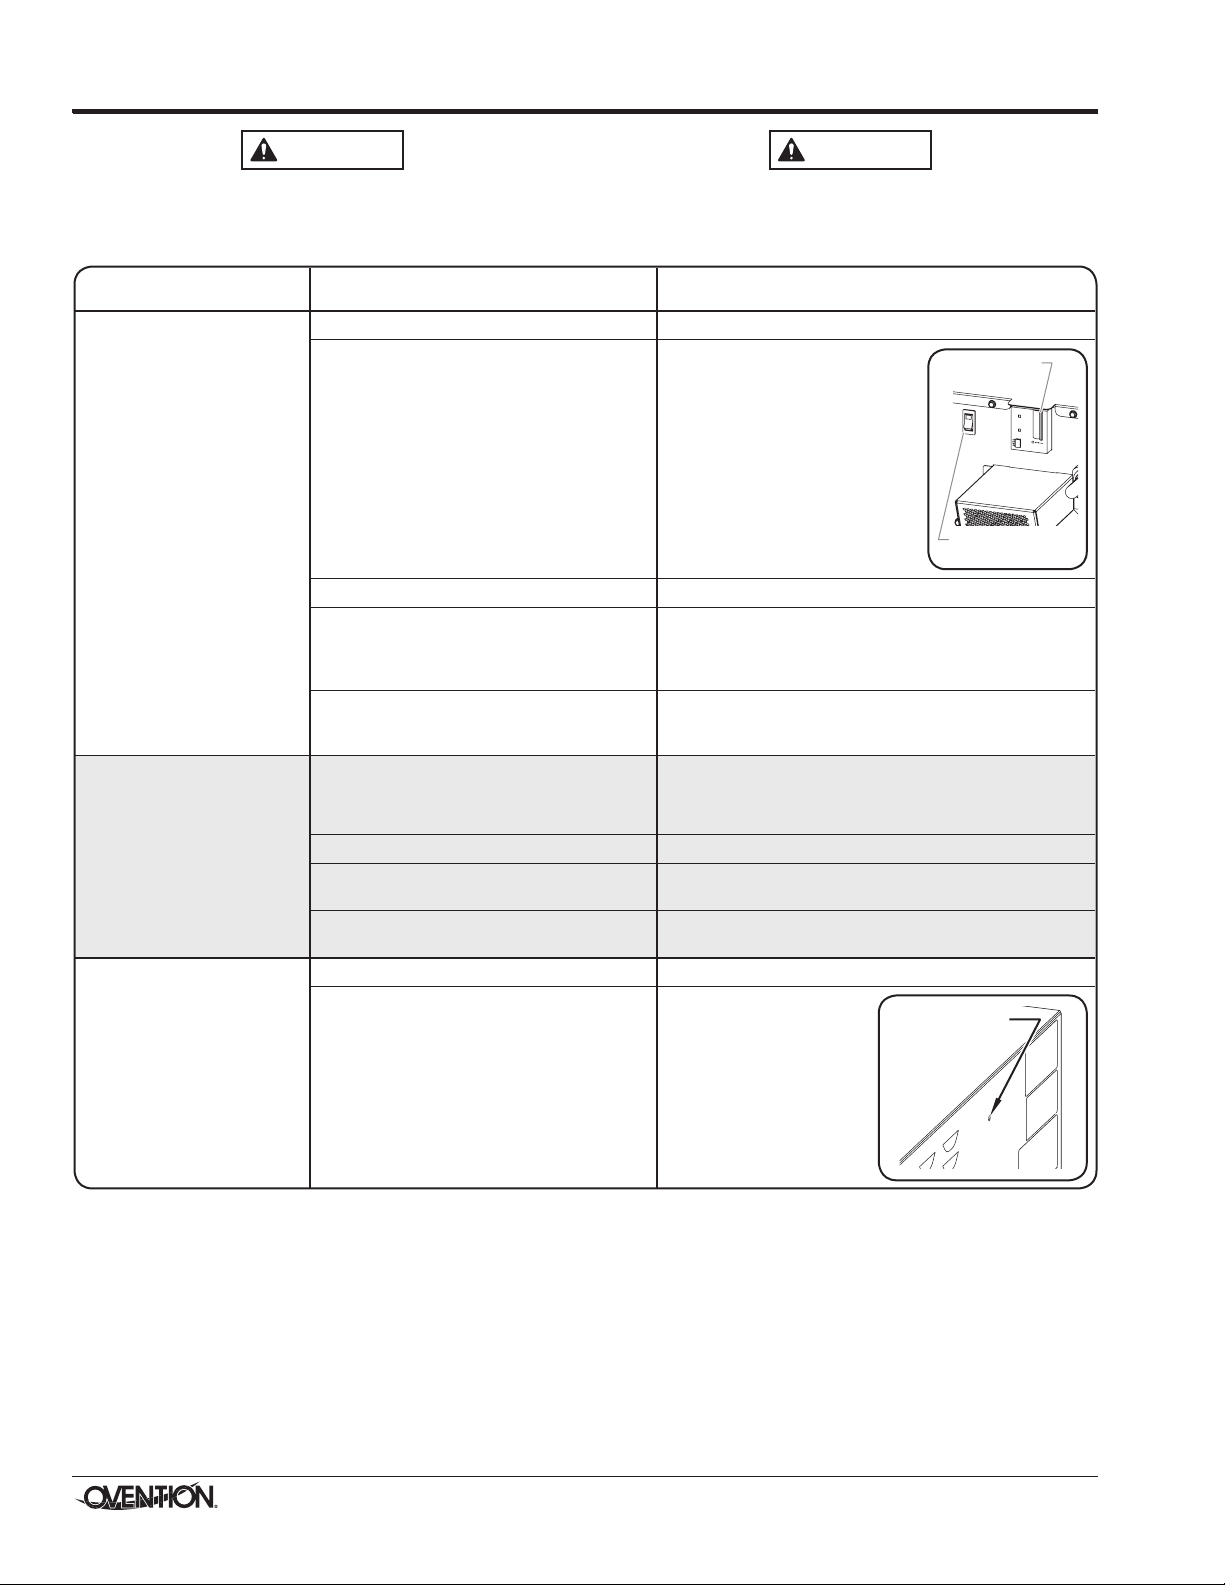
Temperature High Limit switch has tripped.
NOTE: To locate an Authorized Ovention® Service Agent, access
the Ovention website at www.oventionovens.com and
select the Service & Support tab, or call the Ovention
Hotline at 855-298-OVEN(6836).
installation procedure.
assistance.
Using a pen, screwdriver, or
other similar device, press
the Temperature High Limit
Reset Button located on the
right side of the oven near the
top. If switch continues to trip,
contact Authorized Service
Agent or Ovention Hotline for
assistance.
18
Form No. OVMILOSM-0718
Page 19
OPTIONS AND ACCESSORIES
Metal Paddle
Round
Panini Grill Pan
Round Pizza Screen
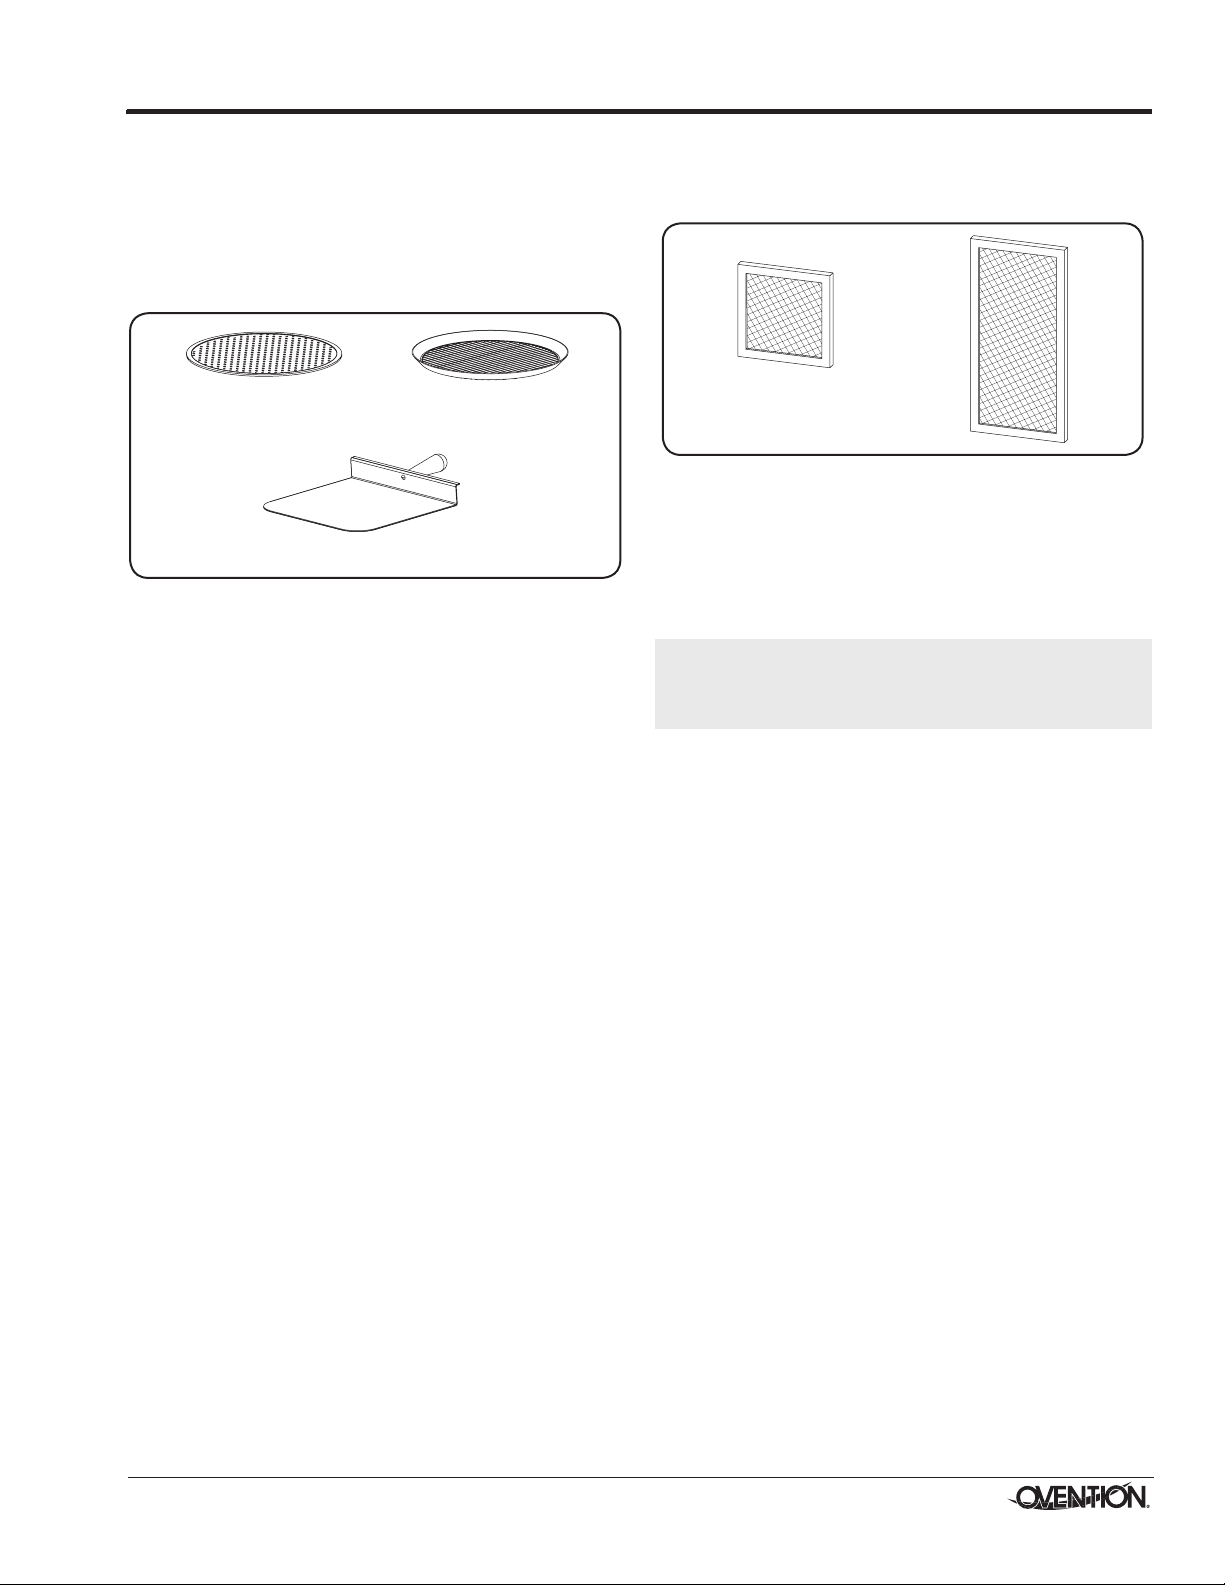
Trays, Racks, and Other Utensils
Several types of pans, screens, and utensils are available for
the Single MiLO oven.
OVNTN-PS12 ......... Round Pizza Screen, 12” (305 mm)
M1313-PG .............. Round Panini Grill Pan
OVNTN-PDL ........... Metal Paddle
Miscellaneous
OV-FIL-360.........Replacement Air Filter, Small
OVNTN-FIL ........ Replacement Air Filter, Large
OVNTN-CLNR .... Oven Cleaner, case of six bottles
NOTE: Use Oven Cleaner to clean cooking grease and residue
safely from the crumb trays and oven chamber.\
IMPORTANT NOTE
Additional accessories are available for Ovention Ovens.
Contact the Ovention Hotline at 855-298-OVEN(6836) for
information.
Form No. OVMILOSM-0718
19
Page 20

Need help?
Call our 24 hour, toll-free
Ovention Hotline
LIMITED WARRANTY
1. PRODUCT WARRANTY
Ovention®, Inc. (“Ovention”) warrants the products that it
manufactures (the “Products”) to be free from defects in
materials and workmanship, under normal use and service,
for a period of one (1) year from the date of purchase when
installed and maintained in accordance with Ovention’s
written instructions or 18 months from the date of shipment
from Ovention. Buyer must establish the product’s purchase
date with Ovention sales representative or by other means
satisfactory to Ovention in its sole discretion.
Ovention warrants the following Product components to be free
from defects in materials and workmanship from the date of
purchase (subject to the foregoing conditions) for the period(s)
of time and on the conditions listed below:
• Ninety(90)DayParts-OnlyWarranty:
Replacement Parts
THE FOREGOING WARRANTIES ARE EXCLUSIVE AND
IN LIEU OF ANY OTHER WARRANTY, EXPRESSED OR
IMPLIED, INCLUDING BUT NOT LIMITED TO ANY IMPLIED
WARRANTY OF MERCHANTABILITY OR FITNESS FOR
A PARTICULAR PURPOSE OR PATENT OR OTHER
INTELLECTUAL PROPERTY RIGHT INFRINGEMENT.
Without limiting the generality of the foregoing, SUCH
WARRANTIES DO NOT COVER: Damage to touchscreens
from abuse or impact; Wear items such as air filters and
conveyor belts; Damage to catalyst from use of nonapproved cleaning products; Product misuse, tampering
or misapplication; improper installation; lack of or improper
cleaning; or application of improper voltage.
2. LIMITATION OF REMEDIES AND DAMAGES
Ovention’s liability and Buyer’s exclusive remedy hereunder will
be limited solely, at Ovention’s option, to repair or replacement
by an Ovention-authorized service agency (other than where
Buyer is located outside of the United States, Canada, United
Kingdom or Australia, in which case Ovention’s liability and
Buyer’s exclusive remedy hereunder will be limited solely to
replacement of part under warranty) with respect to any claim
made within the applicable warranty period referred to above.
Ovention reserves the right to accept or reject any such claim in
whole or part. Ovention will not accept the return of any Product
without prior written approval from Ovention, and all approved
returns shall be made at Buyer’s sole expense. OVENTION
WILL NOT BE LIABLE, UNDER ANY CIRCUMSTANCES, FOR
CONSEQUENTIAL OR INCIDENTAL DAMAGES, INCLUDING
BUT NOT LIMITED TO LABOR COSTS OR LOST PROFITS
RESULTING FROM THE USE OF OR INABILITY TO USE
THE PRODUCTS OR FROM THE PRODUCTS BEING
INCORPORATED IN OR BECOMING A COMPONENT OF
ANY OTHER PRODUCT OR GOODS.
Ovention, Inc.
Milwaukee, WI 53234-0500 U.S.A.
P.O. Box 340500
855-298-OVEN(6836)
www.oventionovens.com
Printed in U.S.A. July 2018 P/N 07.04.893.00 Form No. OVMILOSM-0718
 Loading...