

Page 1
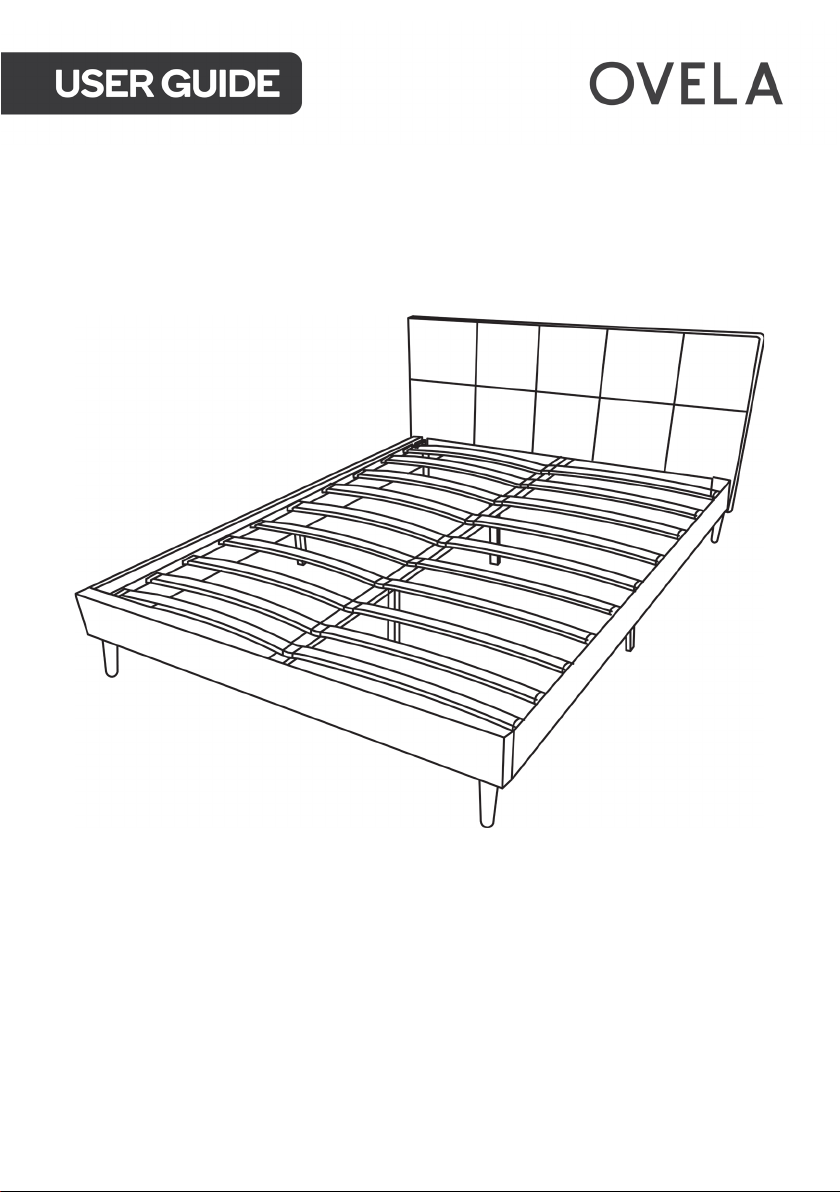
THEODORE BED FRAME
DOUBLE
OVTHEOBFDGA, OVTHEOBFDCA, OVTHEOBFDBA
Page 2

Page 3
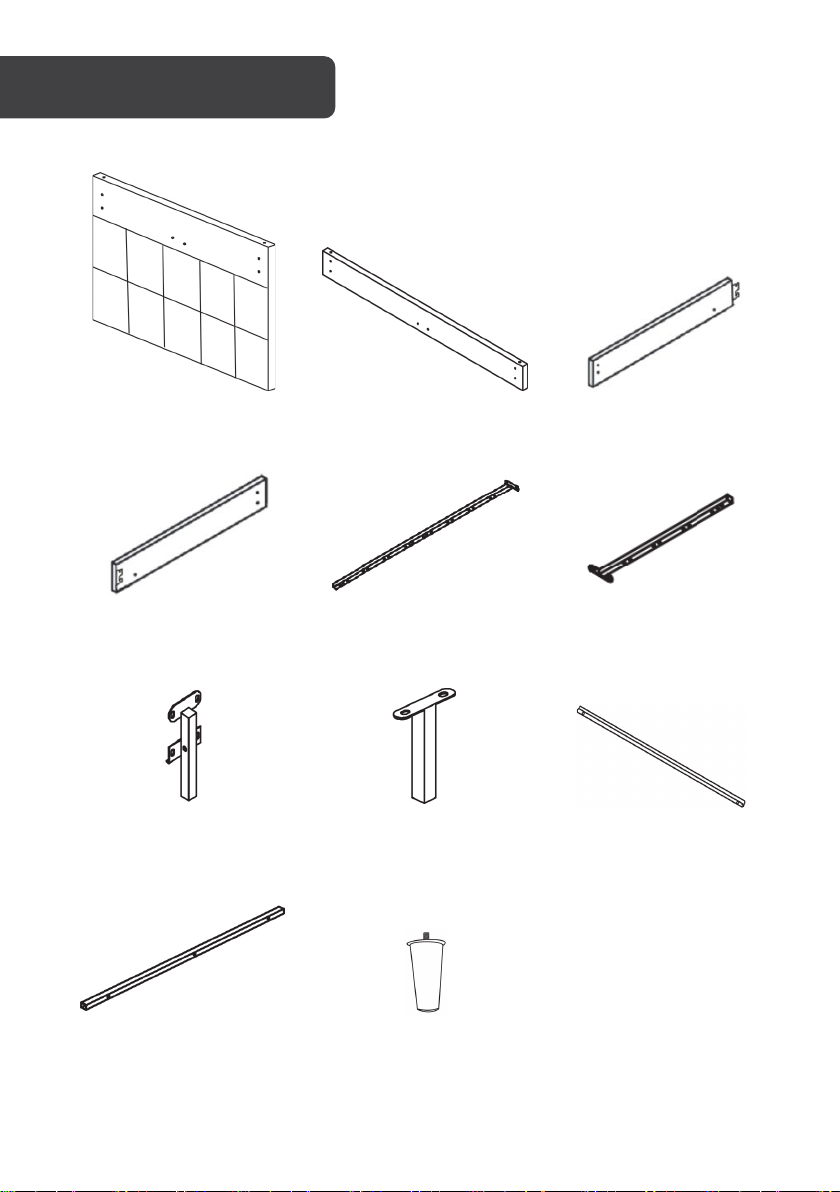
A Headboard (x1)
B Footboard (x1)
C Upper sideboard (x2)
D Lower sideboard (x2)
E Upper slat support (x1)
F Lower slat support (x1)
G Sideboard leg support (x2)
H Leg support (x2)
I Horizontal slat support (x1)
J Sideboard rail (x4)
K Leg (x4)
COMPONENTS
Page 4
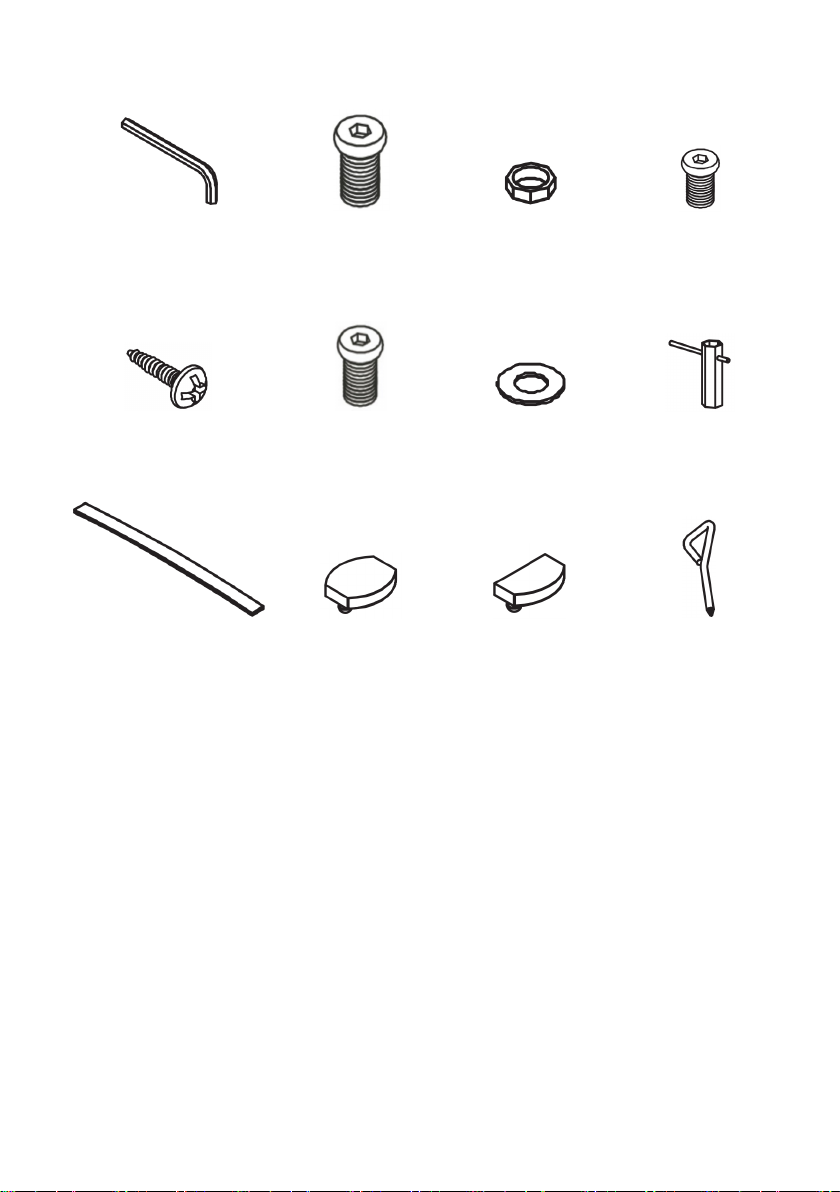
Hardware
1 Allen key (x1)
2 50mm M8
3 Nut (x6)
4 20mm M8
5 40mm M4 screw (x4)
6 40mm M8
7 Washer (x16)
8 T-handle Allen
9 Slat (x20)
10 Inner cap (x10)
11 End cap (x20)
12 Screwdriver (x1)
screw (x2)
screw (x12)
screw (x16)
key (x1)
Page 5
ATTENTION
B
K A K
BEFORE ASSEMBLY
Remove all components from the packaging and check all components are accounted for.
If any components are missing, contact help.Kogan.com for assistance.
ASSEMBLY
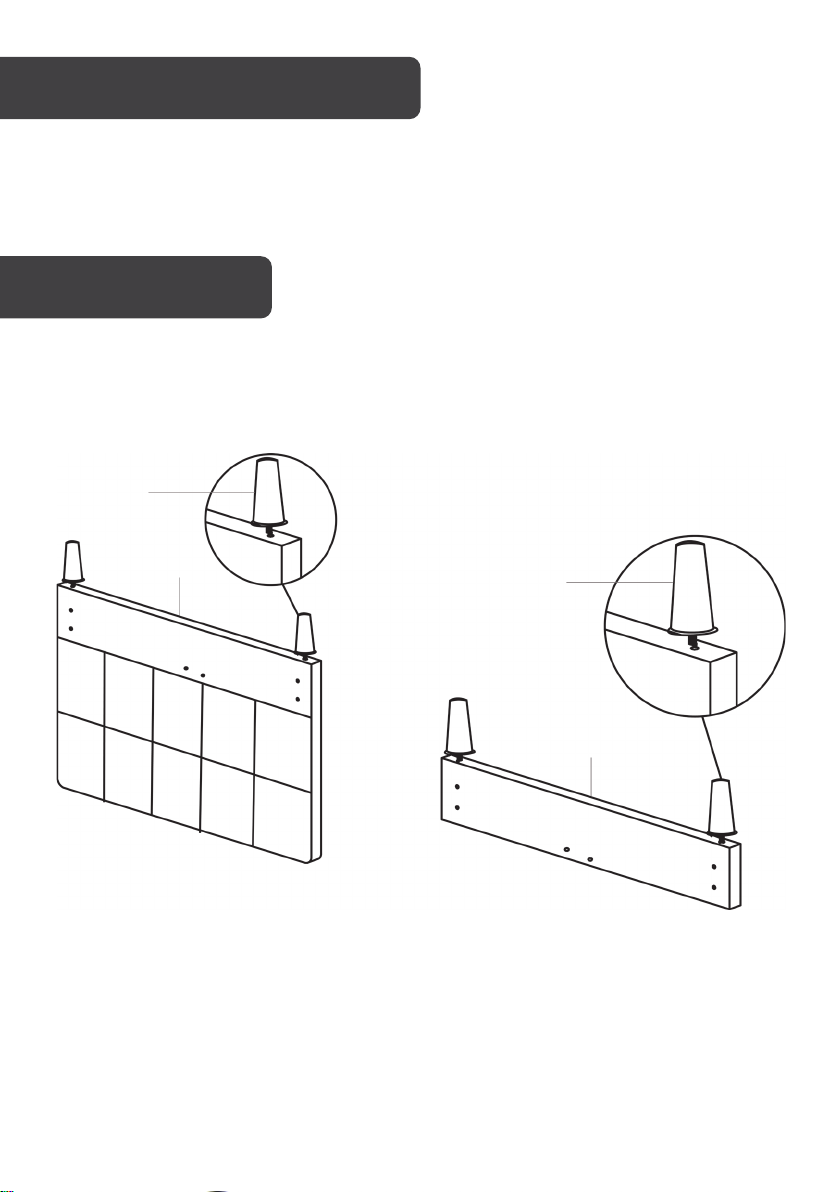
Step 1: Secure four legs (K) onto the headboard (A) and footboard (B).
Page 6
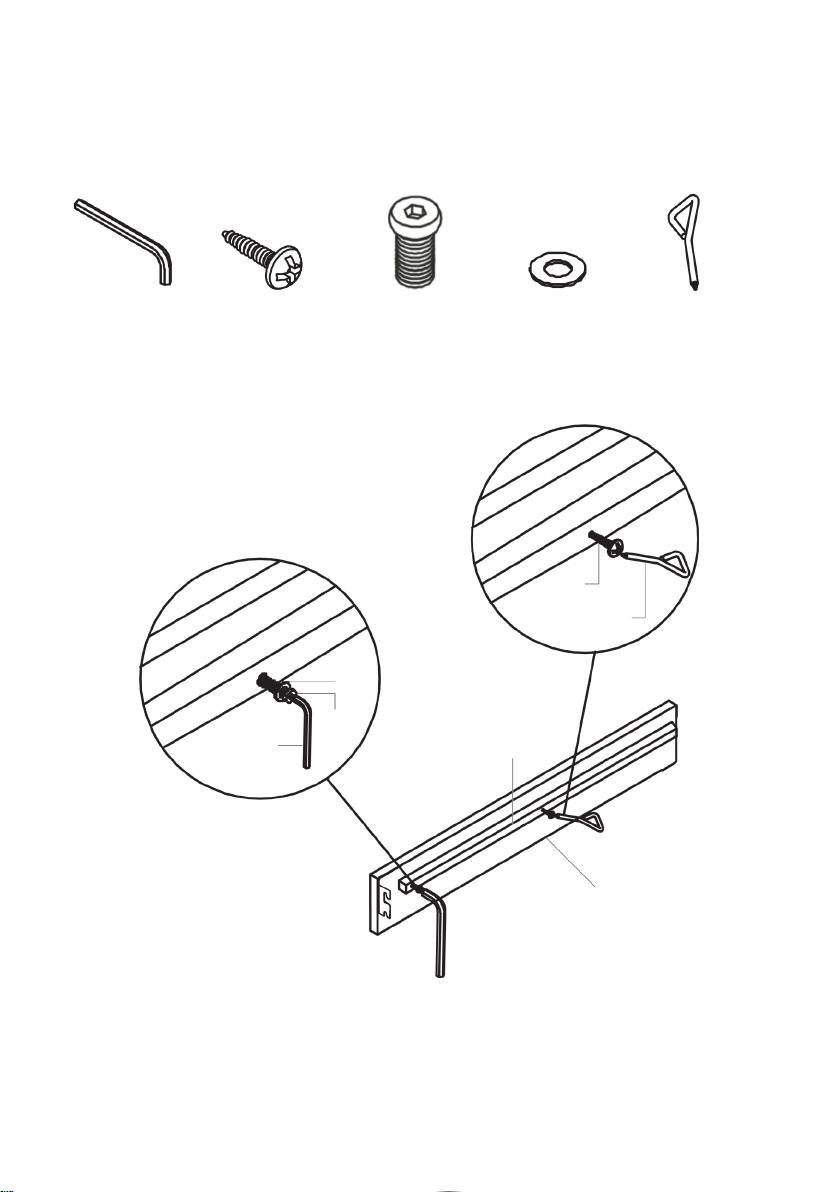
Step 2: Align one sideboard rail (J) with one lower sideboard (D). Place a washer (7) over the
1 (x1)
5 (x2)
6 (x2)
7 (x2)
12 (x1)
x2
1
7
6
12
5
D
J
hole at the end of the sideboard rail (J), then using the Allen key (1), secure a 40mm M8
screw (6) through the washer (7).
Using the screwdriver (12), secure a 40mm M4 screw (5) through the middle hole.
Repeat this process one more time to create two lower sideboard assemblies.
Page 7
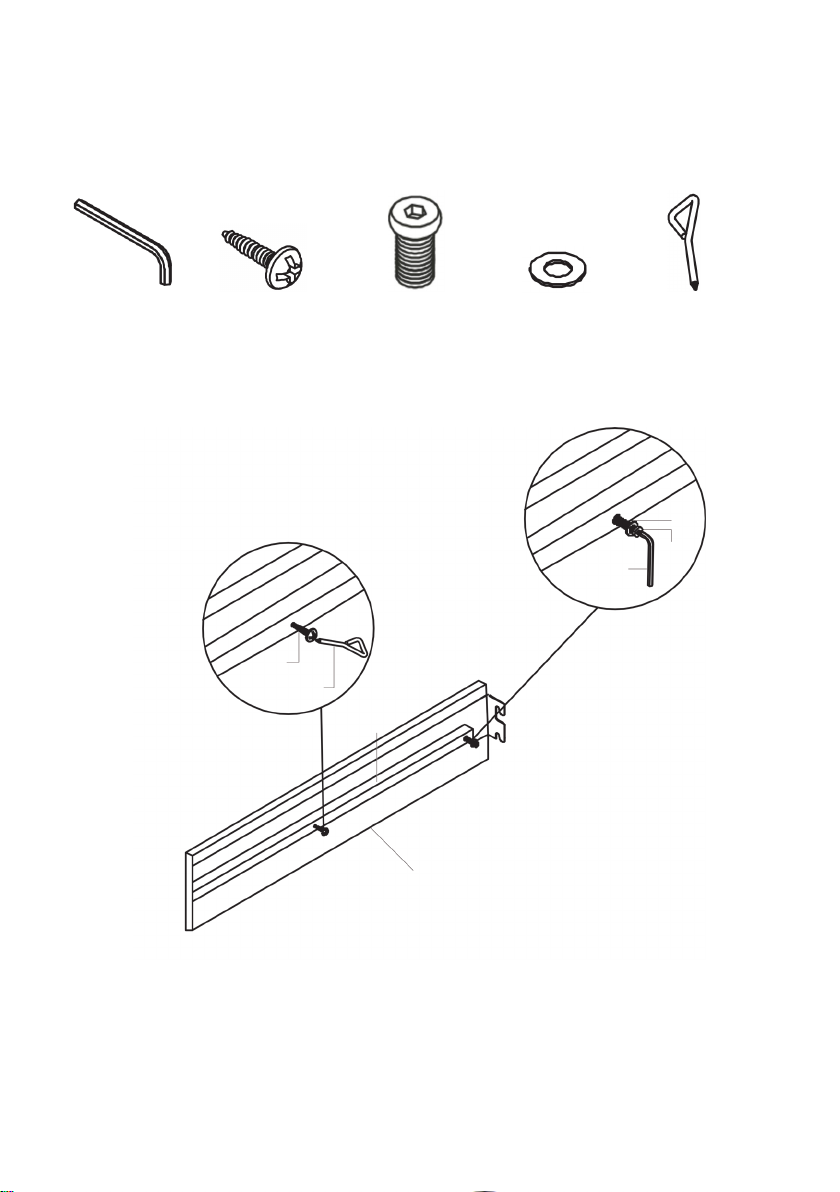
Step 3: Align one sideboard rail (J) with one upper sideboard (C). Place a washer (7) over
1 (x1)
5 (x2)
6 (x2)
7 (x2)
12 (x1)
x2
C 5 12
1 7 6
J
the hole at the end of the sideboard rail (J), then using the Allen key (1), secure a 40mm M8
screw (6) through the washer (7).
Using the screwdriver (12), secure a 40mm M4 screw (5) through the middle hole.
Repeat this process one more time to create two upper sideboard assemblies.
Page 8
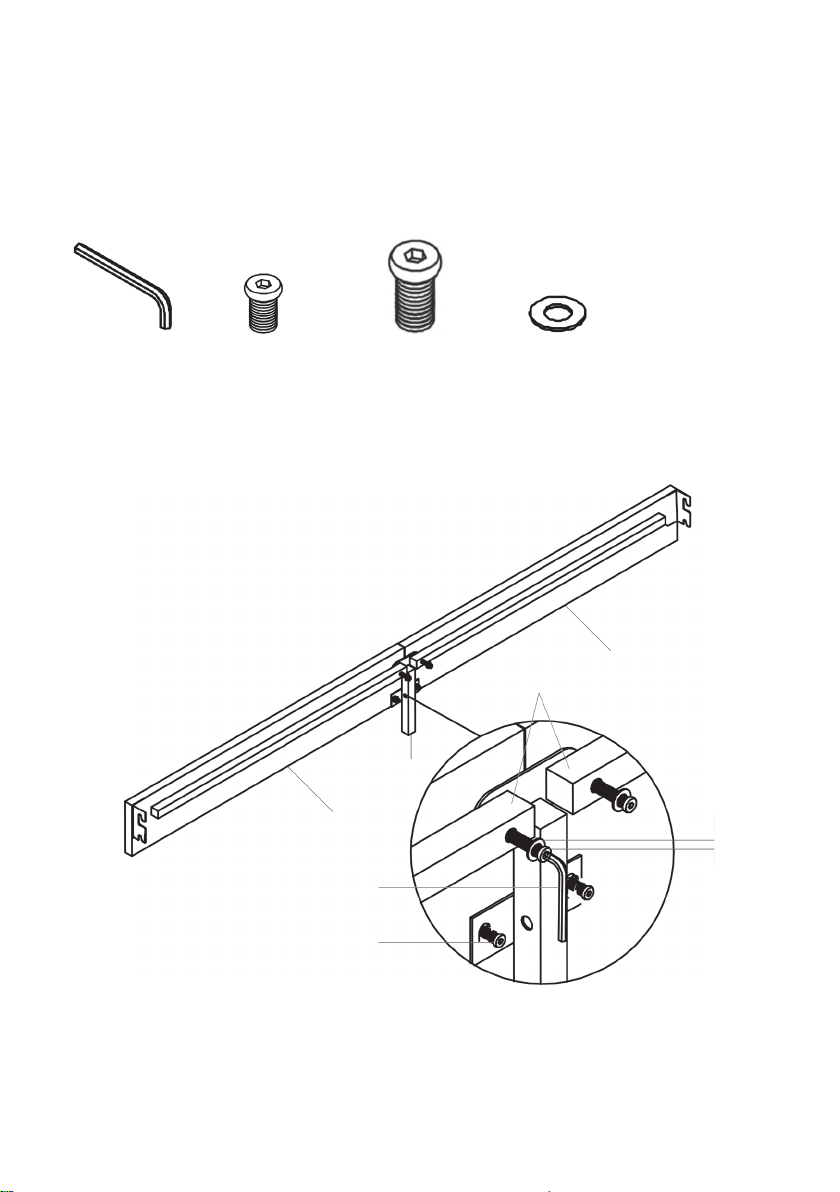
Step 4: Align one lower and upper sideboard assemblies with a sideboard leg support (G),
1 (x1)
4 (x4)
6 (x4)
7 (x4)
x2
7
6
1
4
D C G
J
ensuring the sideboard leg support (G) is fitted behind the sideboard rails (J).
Place two washers (7) over the upper holes of the sideboard leg support (G), then using the
Allen key (1), secure two 40mm M8 screws (6) through the washers (7). Using the Allen key
(1), secure the lower holes with two 20mm M8 screws (4).
Repeat this process with the remaining lower and upper sideboard assemblies to create two
sideboard assemblies.
Page 9
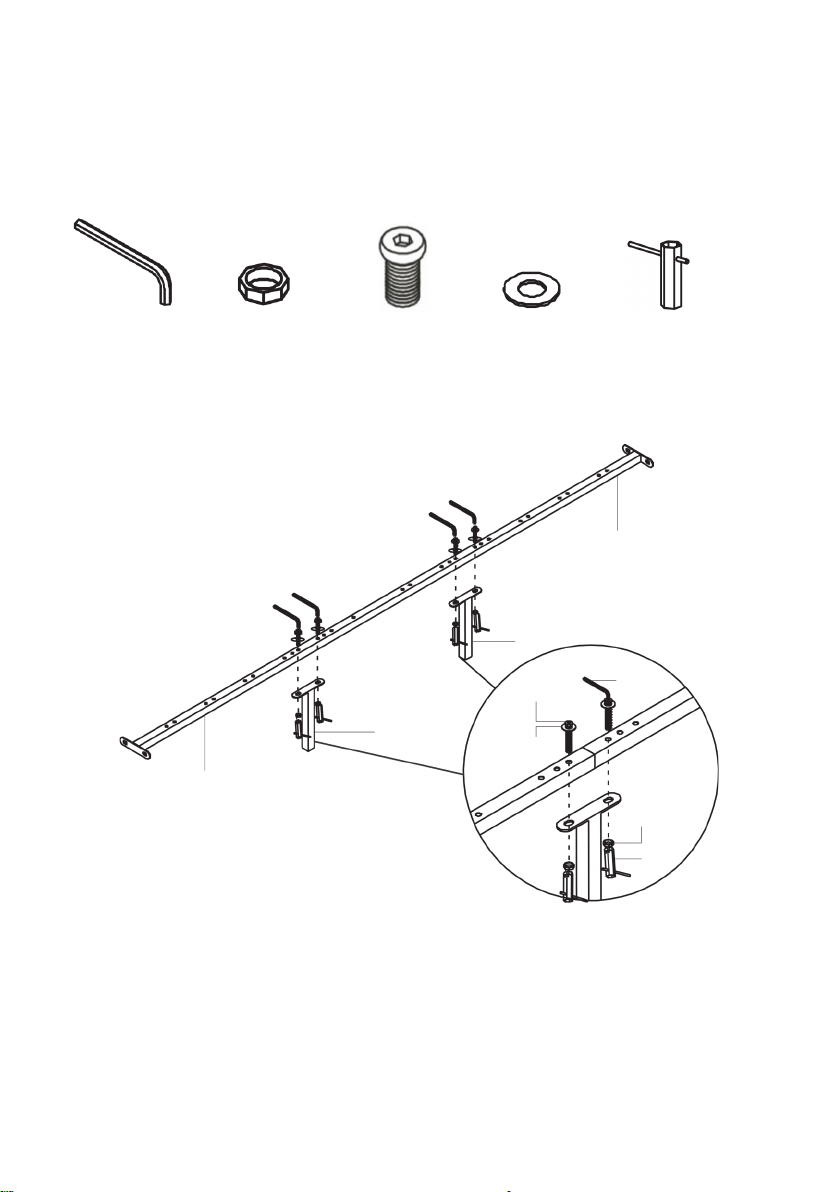
Step 5: Connect the lower slat support (F) with the upper slat support (E), then align the
1
3
6
7
8
H
H 1 6
7
3 8 F
E
holes of the leg supports (H) with the lower and upper slat supports (F, E).
Place four washers (7) over the holes, then using the Allen key (1), secure four 40mm M8
screws (6) through the washers (7). Using the T-handle Allen key (8), secure the underside of
the holes with four nuts (3).
This creates the slat support assembly.
(x1)
(x4)
(x4)
(x4)
(x1)
Page 10
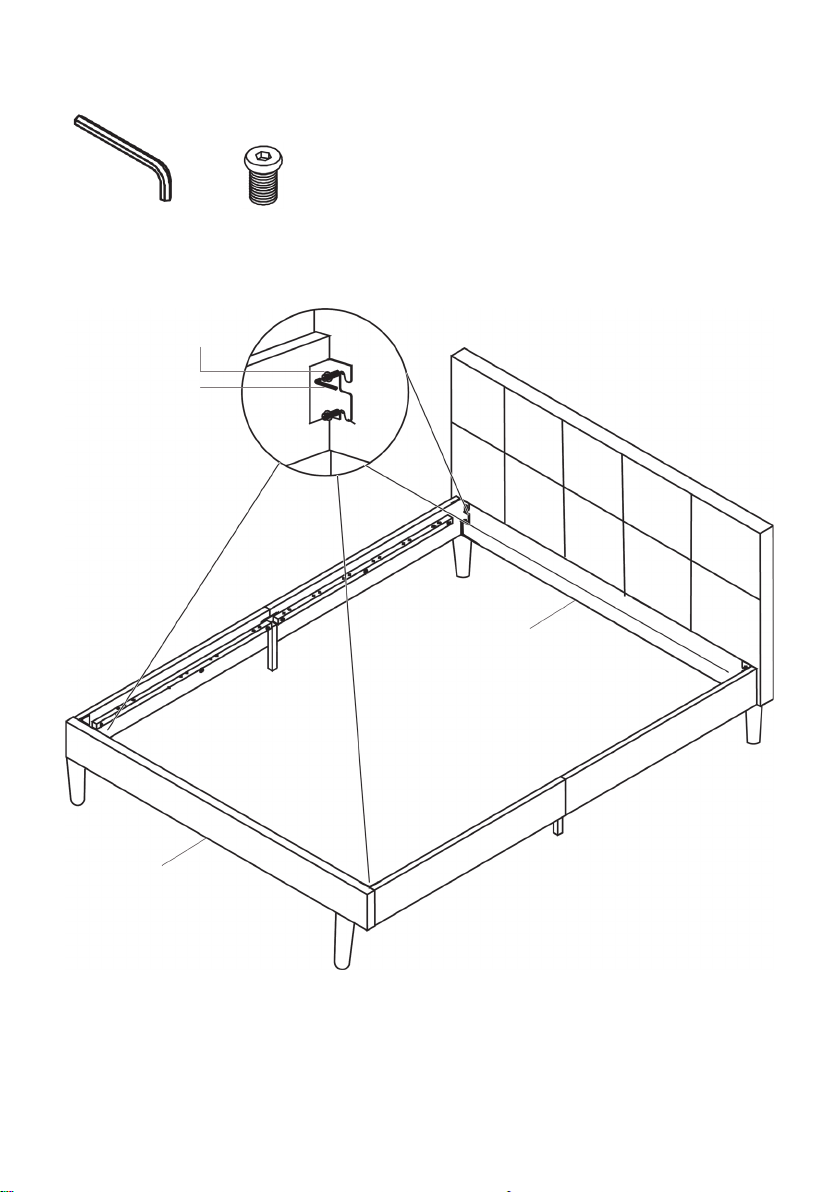
Step 6: Align the brackets on the sideboard assemblies with the headboard (A) and
1
4
1
4 A B
footboard (B). Using the Allen key (1), secure the brackets with eight 20mm M8 screws (4).
(x1)
(x8)
Page 11
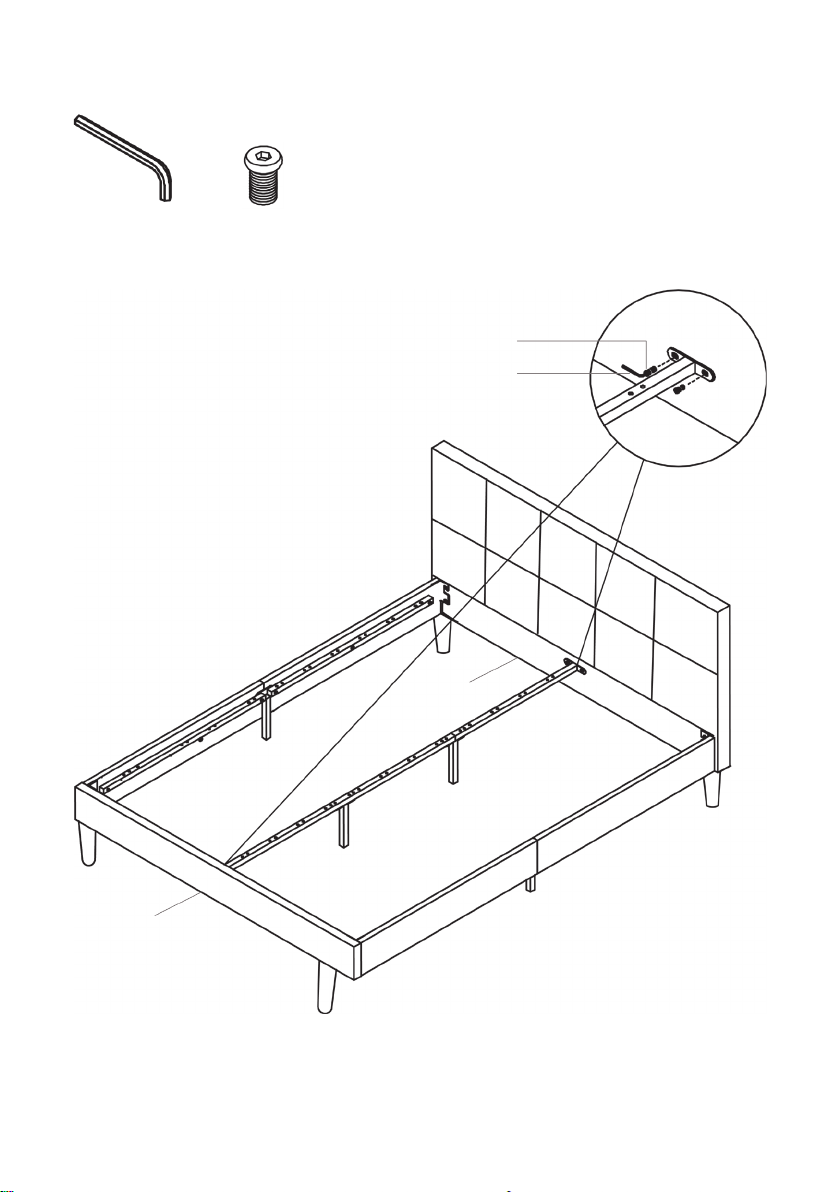
Step 7: Align the slat support assemblies with the headboard (A) and footboard (B). Using
1
4
1 4 A
B
the Allen key (1), secure the slat support assemblies with four 20mm M8 screws (4).
(x1)
(x4)
Page 12
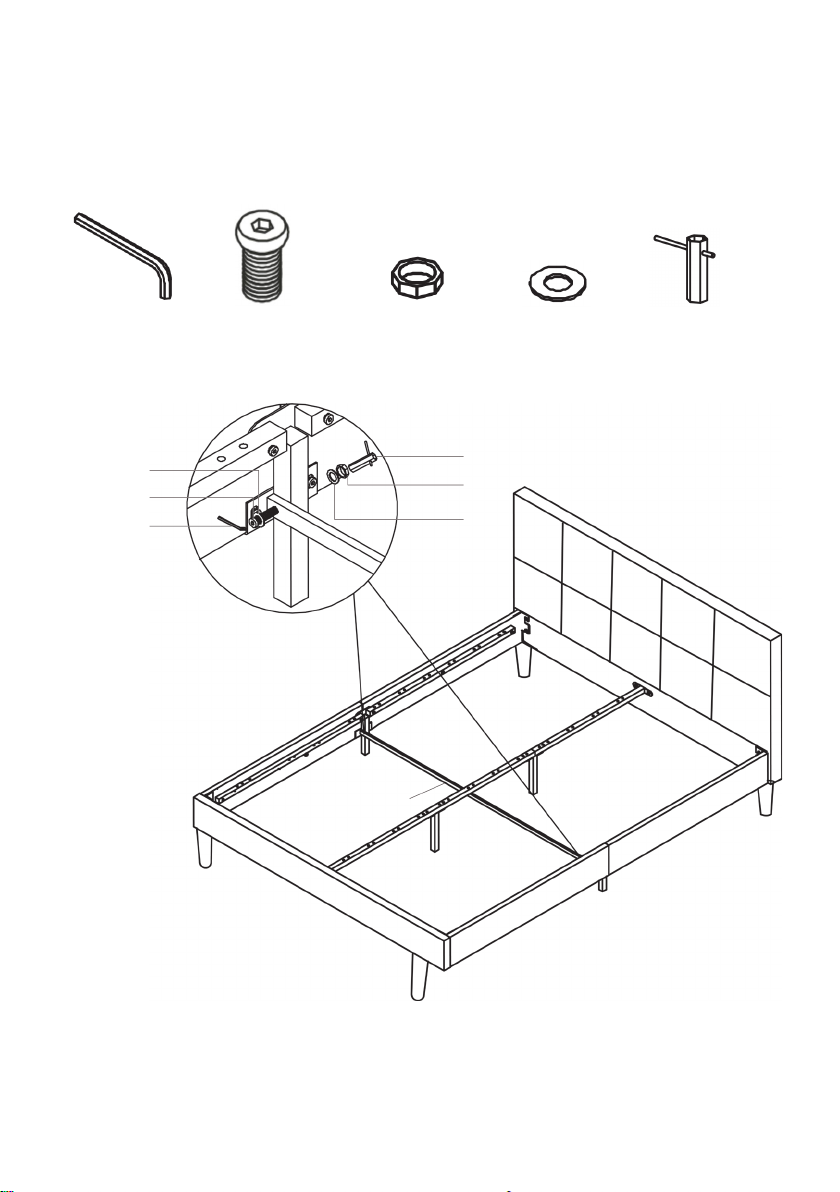
Step 8: Align the horizontal slat support (I) with the sideboard assemblies. On the ends of
1 (x1)
2 (x2)
3 (x2)
7 (x4)
8 (x1)
I 1 2 7 8
3 7 I
the horizontal slat support (I), place two washers (7) over the holes on one side, then using
the Allen key (1), secure two 50mm M8 screws (2) through the washers (7). The screws (2)
should now be protruding out the other side.
On the other side, secure two washers (7) and two nuts (3) over the screws (2) using the
T-handle Allen key (8).
Page 13
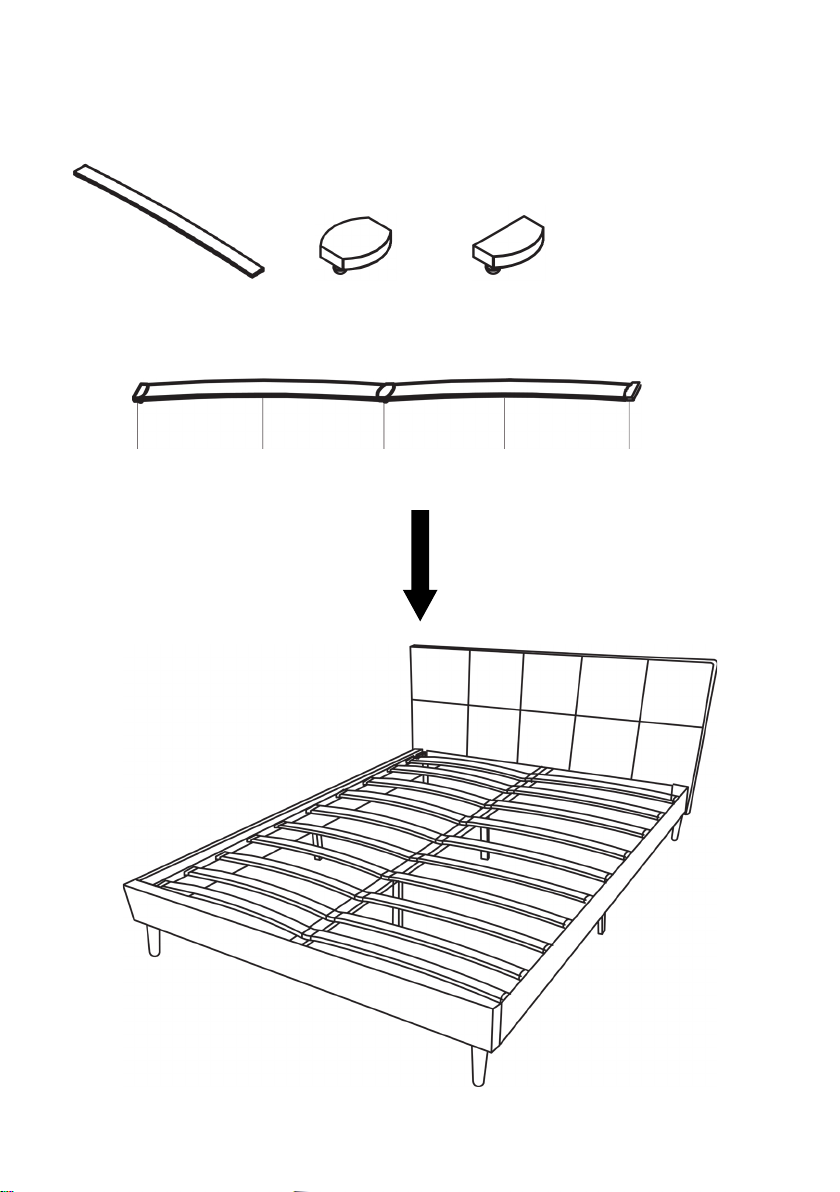
Step 9: Connect two slats (9) with two end caps (11) and one inner cap (10) to create a slat
9 (x20)
10 (x10)
11 (x20)
x10
11 9 10
9
11
assembly. Repeat this process until you have ten slat assemblies.
Secure the slat assemblies by aligning the holes on the end caps (11) and inner caps (10)
with the markers on the bed.
Page 14
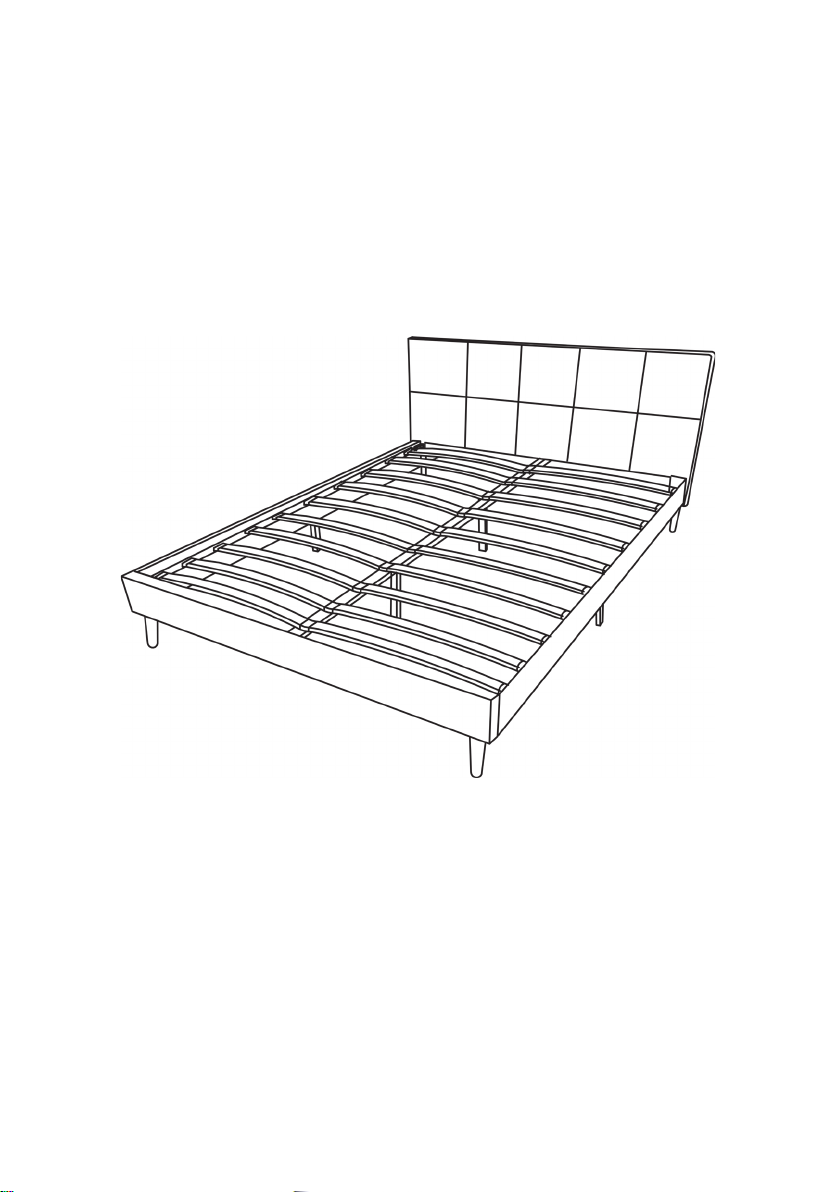
Assembly is complete.
Page 15

Page 16

Need more information?
We hope that this user guide has given you
the assistance needed for a simple set-up.
For the most up-to-date guide for your product,
as well as any additional assistance you may require,
head online to help.kogan.com
 Loading...