

Ovation Systems AfterBurner-2 User Manual

User Guide
Manual Issue 1.42 Ovation Systems Ltd. Page 1
AfterBurner-2 Firmware 1.4 www.ovation.co.uk
AfterBurner-2
Time-Lapse DVD
Video Recorder
User Guide
Ovation Systems Ltd.
Springfield Barn
London Road
Milton Common
Oxfordshire
OX9 2JY
UK
Tel: +44 1844 279 638
Fax: +44 1844 279 071
Email: support@ovation.co.uk
Web: www.ovation.co.uk

User Guide
Manual Issue 1.42 Ovation Systems Ltd. Page 2
AfterBurner-2 Firmware 1.4 www.ovation.co.uk
Contents
1 Introduction .................................................................................................................... 3
2 Quick-Setup Guide......................................................................................................... 4
2.1 Installation......................................................................................................................................... 4
2.2 Operation Overview........................................................................................................................... 4
2.3 Front Panel Controls.......................................................................................................................... 4
2.4 Record Set-up................................................................................................................................... 5
2.5 Start / Stop Recording ....................................................................................................................... 7
2.6 Record Pause ................................................................................................................................... 7
2.7 Burning a DVD .................................................................................................................................. 8
2.8 Playing DVDs.................................................................................................................................... 9
3 Advanced Menus.......................................................................................................... 10
3.1 Set Disk Options.............................................................................................................................. 11
3.2 Burn Options................................................................................................................................... 12
3.3 Set Record Timer ............................................................................................................................ 13
3.4 Set Alarm Options ........................................................................................................................... 14
3.5 Set Video Options............................................................................................................................ 15
3.6 Set Onscreen Display (OSD) Format................................................................................................ 16
3.7 Set System Options......................................................................................................................... 18
3.8 Set Time & Date.............................................................................................................................. 19
3.9 Set Comms Options......................................................................................................................... 20
3.10 Set network’ menu:.......................................................................................................................... 20
3.11 Set Active Keyes ............................................................................................................................. 21
3.12 Set Fault Enables............................................................................................................................ 21
3.13 Set Configuration............................................................................................................................. 22
3.14 System Information:......................................................................................................................... 22
4 Rear Panel Interface..................................................................................................... 22
4.1 External I/O & Control...................................................................................................................... 23
4.2 Rear Panel Configuration Switches .................................................................................................. 25
4.3 Examples of External Control........................................................................................................... 26
5 Ethernet Port ................................................................................................................ 26
5.1 Setting the IP Address..................................................................................................................... 27
5.2 Webpage Interface.......................................................................................................................... 28
5.3 File List Webpage............................................................................................................................ 29
5.4 Alarm List Webpage ........................................................................................................................ 30
5.5 Motion Detection ............................................................................................................................. 31
6 AfterBurner-2 PC Configuration Utility....................................................................... 32
6.1 Installing the PC Configuration Utility................................................................................................ 32
6.2 Running the PC Configuration Utility ................................................................................................ 33
6.3 Picture in Picture Setup ................................................................................................................... 33
6.4 Motion Detection ............................................................................................................................. 34
7 Firmware Upgrades...................................................................................................... 35
7.1 CD Disk Upgrade ............................................................................................................................ 35
7.2 Ethernet upgrade............................................................................................................................. 35

1 Introduction
Designed specifically for police video surveillance operations, AfterBurner-2 is able to record
video in real-time, or in time-lapse, to DVD write once disks. Once burnt, the disks are
viewable on either a PC or consumer market DVD video players.
AfterBuner-2 replaces the highly successful AfterBurner-1 DVD recorder and retains all the
capabilities of its predecessor. The basic operation of AfterBurner-2 is essentially the same
as AfterBurner-1 with the addition of the following key features:
Ethernet port with a webpage interface that allows for remotely configuring the
AfterBurner, previewing the video inputs, listing and downloading files and alarm
events.
Four video inputs with an internal picture-in-picture video quad with 27 preset
screen layouts together with one user programmable setting.
Motion detection on all four video inputs. Motion detection zones can be setup
using the Ethernet port or via a PC configuration utility.
12 V DC output added to the rear panel external control & I/O connector for
powering cameras.
Optional MD5 hash coding of the video files to provide an additional data
integrity check.
Please Note:
With firmware version 1.4 the USB ports have limited functionality. The USB-2 ports for
viewing files on the disk / MultiBurner will only be available via a future firmware upgrade.
2 Quick-Setup Guide
2.1 Installation
123
4
VIDEO
OUT
SERIAL
1 2 3 4 5 6 7
8 9 10 11 12 13 14
a
b c d
CONFIG
INTERNAL
DISK
EXTERNAL
DRIVES
ETHERNET
VIDEO IN
1
3
2
4
IN
O
UT
AUDIO
L
R
I
N
1 Alm Start
2 Alm Stop
3 Record
4 Time
5 Chain
6
Wake Up
7
Ground
OUT
8 Recor d
9 Disk Ful
10 Alar m
11 T ime
12 Ch ain
1
3 Fault
14 DC Power
POWER
+12V DC @ 3.5A (max)
+
12V
N
C
+12 V DC
(500mA Max)
DC Ground
V
ideo to Input 1
Camera
To open the wire receptacle, insert
small flat-bladed screwdriver
horizontally into the square hole.
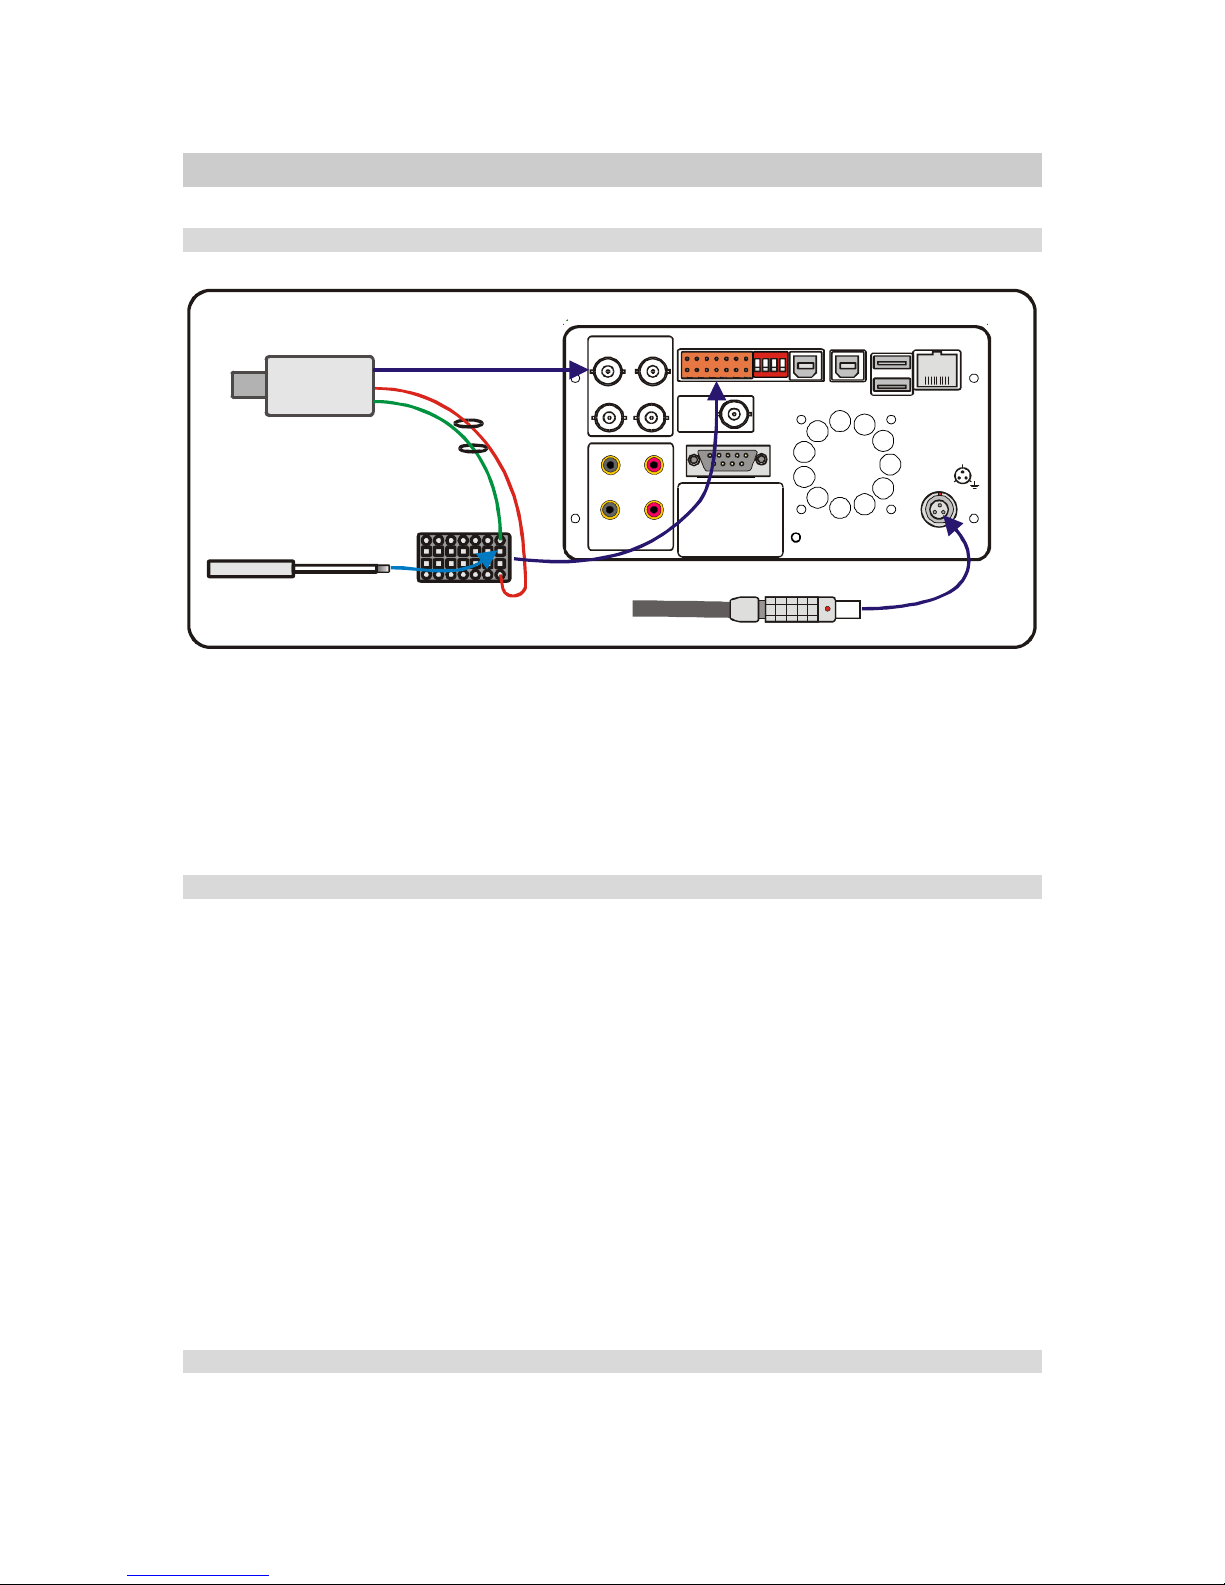
Figure 1: Basic AfterBurner-2 Installation
Basic installation is shown in Figure 1 above. The camera is connected to video input 1
and the DC power supply connected to the “Power” input. Further cameras can then be
connected to video inputs 2,3,4. AfterBuner-2 can be used to provide 12 V DC power to
external cameras, with a maximum current of 500mA via the rear panel I/O connector
(as shown in Figure 1).
2.2 Operation Overview
AfterBurner is primarily intended for use in long-term police surveillance operations.
Video is recorded to its internal hard drive and evidence is then burnt to DVD. Each
DVD holds up to 3 hours of real-time video, which can be extended to 24 hours (or
more) when set to record in time-lapse (which increases record time per DVD by storing
fewer pictures per second).
AfterBurner-2 writes video to its internal hard disk and when it has enough data, and
there is a blank DVD in its drive, it automatically burns a DVD. If there is no DVD in the
drive, AfterBuner-2 continues to record to the internal disk. Files are then be selected
and burnt as required via the front panel LCD and keypad (See Section 2.7, page 8).
NB: Afterburner is a video (and audio) recorder and is not a player. The only way to
view the recordings is by burning them onto DVD or downloading files from the internal
hard disk via the USB or Ethernet ports.
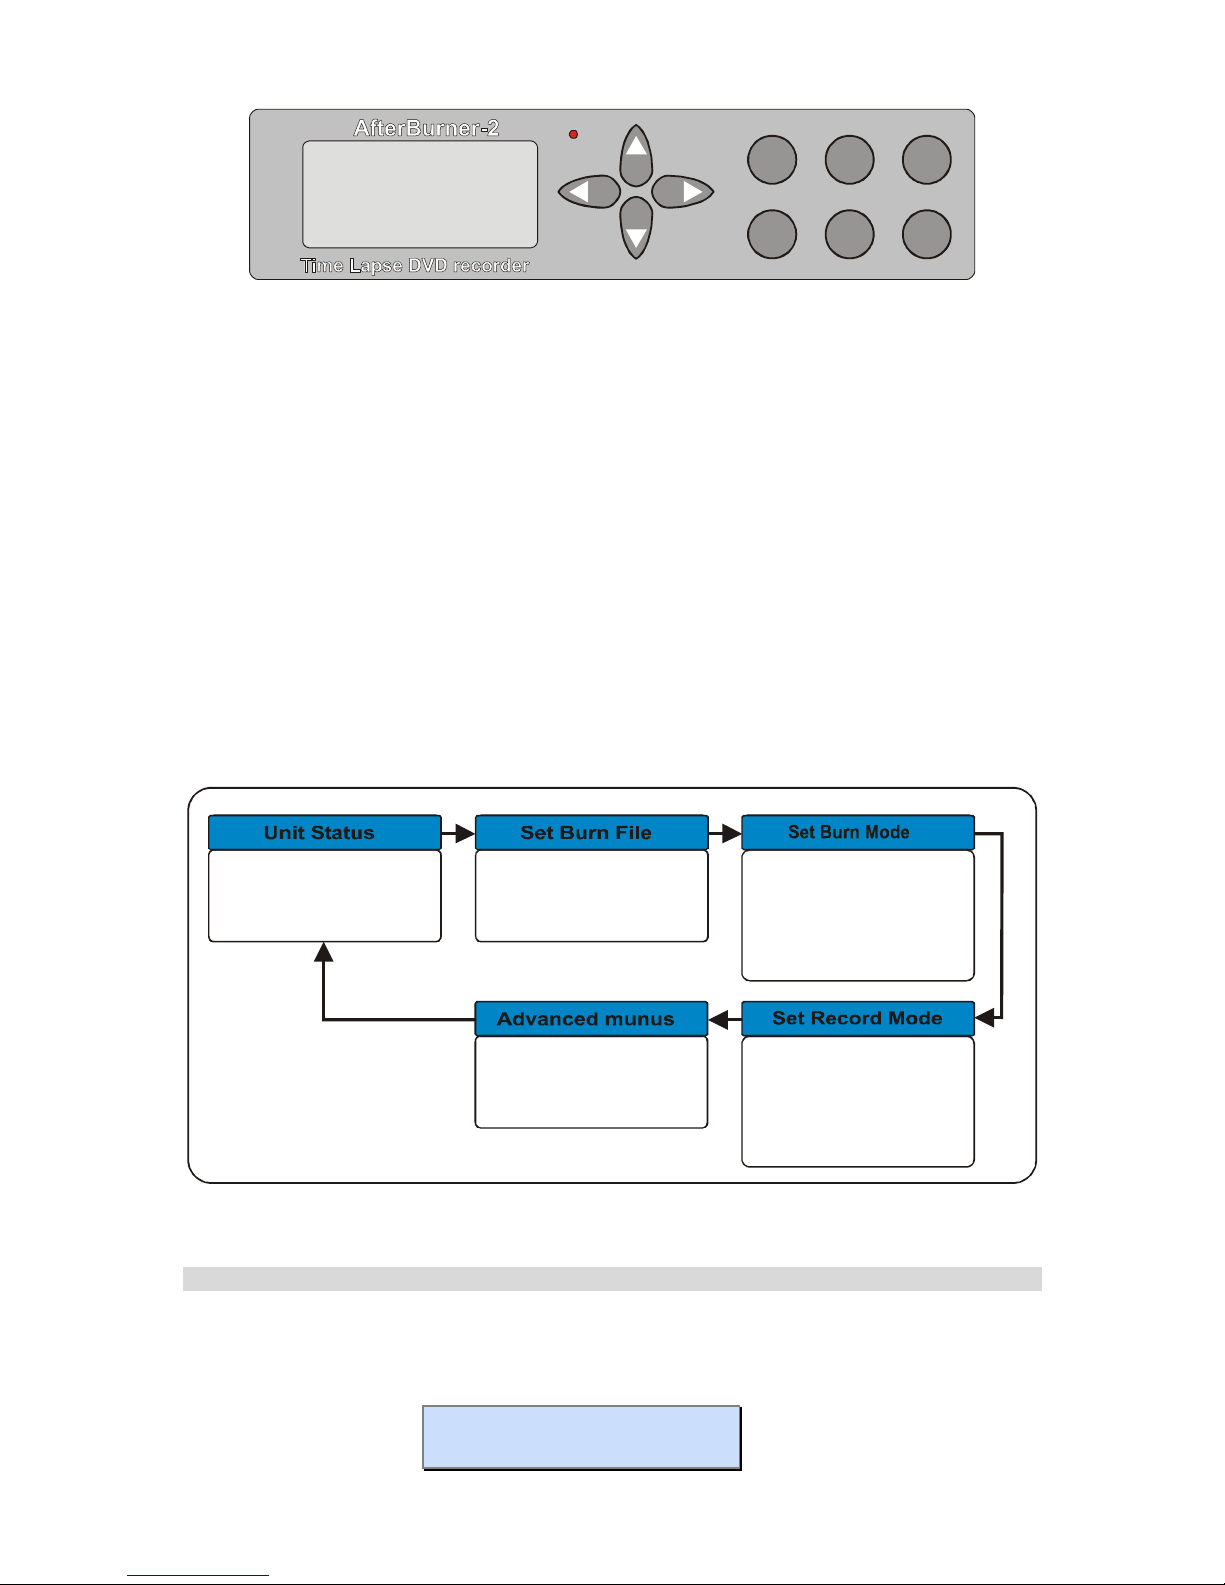
2.3 Front Panel Controls.
The front panel controls are shown below.
ON
STBY
RECMun+
Mun- DVD
Figure 2: AfterBurner-2 Buttons.
JKL M Navigation buttons
Mnu+ / Mnu- Steps though main menu items (At any point, pressing for
more than 2 seconds exits all menus).
REC Starts / stops recording (shows red when recording, flashing
red when recording in time-lapse).
DVD Powers up DVD drive, opens / closes tray, starts DVD burn.
ON Power-up unit.
STBY Power down unit (standby for timer modes).
In general, the “Mun+” or “Mun-“ keys are used to navigate a list of top-level menus. The
J
M keys are then used to scroll through the list of items within that top-level menu. The
selected parameter within the menu list is shown flashing and is adjusted by using the K L
keys. Once a parameter has been adjusted, it is automatically stored when moving to the
next menu.
TipM At any point when navigating the LCD menus, it is possible to return to the start-up
screen by pressing the either the “Mun+” or “Mun-“ keys for 2 seconds.
The buttons list the files on
the internal disk. Once selected,
press “DVD” to burn. buttons
scroll through the f ile properties.
LCD scrolls through various key
settings and status.
enter the Advanced menus
Burn:
Eject:
Auto Mode, Manual only, at
given time.
Manual, when burnt
MB No. of copies:
1, 2, 3, 4, 5, 6,
7, 8
DVD:
Quality:
Set time per DVD 24hr
default
Very low, low, medium,
high, very high
Video only, audio + video, audio
Figure 3: AfterBuner-2 Top Level Menus
2.4 Record Set-up
As standard, AfterBurner-2 is shipped configured for 24 hour time-lapse recording (at 2
pictures per second) in medium quality. This may be altered by pressing the “Mnu+” key
3 times to show the following screen:
Set Record Mode
===================

DVD: 24.0h 2.08fps
Quality: M Vid-only
Initially, the record time per DVD flashes, indicating it may be altered by the K L keys.
Once set to the required record time per DVD, press M to scroll to the next parameter,
in this case video quality. Again use K L to select the required quality setting. Press
M to enable / disable audio recording. Audio recording should only be enabled in realtime record modes, as audio is not useful with time-lapse video (even when shown as
enabled).
TIPM Pressing the “MENU” key, or letting the screen time-out, stores the new
configuration.
DVD: 2, 4, 6, 8, 10, 12, 18, 24, 36, 48 Hours, 7 days, 1 month, 1 year.
Estimated record time per DVD disk.
fps: record rate in frames per second (fps) or frames per minute
(fpm) calculated from the record time / quality settings.
Quality: VH (very high), H (high), M (medium), L (low) VL (very low).
Record Mode: Video only: video only recording (default)
Aud+Vid: audio & video recording (use with real-time recording
only)
Aud-mode: records a stereo audio track along side a low
resolution video feed extending record time to approximately 8
hours per DVD.
NB: a video feed to the AfterBurner (preferably black) is required
for Audio-Mode operation.

2.5 Start / Stop Recording
Once the record time per DVD, quality and burn options are configured, the recorder
starts recoding by pressing the “REC” key. This key will show constant red when
r
ecording in real-time, flashing red when recording in time-lapse. Pressing the record
key again causes the unit to enter “Stop” or “Record-Pause” (see below).
Whilst recording, the LCD scrolls though a summary of the machine’s status including:
Whether recording is taking place, in either time-lapse, real-time or record-
pause.
The size of the video file so far (4.7 GB max)
Estimated burn time, taking into account if burn “at given time” option has been
set in the “Set Burn Mode” main menu
The remaining free space, shown as GB and estimated time, on the internal
hard disk (except endless loop mode).
2.6 Record Pause
Record-pause mode is selected in the “Set System Options” advanced menu (Section
3.7, page18). In this mode, pressing the “Record” button whilst recording causes
AfterBurner to “Pause” indicated by a slowly flashing record button. A short press of the
“Rec” button then starts recording again to the same file. Pressing the record button for
2 seconds stops recording and closes the file on the hard disk.
TIPM This mode is especially useful when the recorder is being started and stopped
frequently as all the recordings are appended to one DVD file, rather than
generating many separate files.

2.7 Burning a DVD
1 From the default screen, press the “MENU” once to show a list of files on the hard
disk. The file to be burnt may be selected by the K L keys. For each file, the start
times, finish times & dates are shown as well as the number of times the file has
been burnt to DVD disc.
Set Burn file #001
===================
$ 09:21 05Apr Burnt
09:20 06Apr no
TIPM When a file is shown, pressing the M key scrolls through additional
information about the file including size, duration, frames per second, whether
alarms were active etc.
TIPM It is possible to change the file-listing screen to sort the files showing the
oldest or youngest file fist along with either a sequential or unique file number.
See Section 3.2 page 12, “Set Burn Options”
NB: If AfterBurner is recording, the current file will be shown with an end time
of “now”. If this file is selected to be burnt, the resulting DVD contains video
up to the point when the burn commenced. AfterBurner will continue to record
to the same file while burning the DVD.
2 Once the required file is displayed, press the “DVD” key. This powers up the DVD
drive and checks for a blank DVD disk.
3 If a “Tray Empty” message is shown, press the “DVD” key again to open the DVD
tray (at this point, the tray can also be opened by the DVD drive’s own eject button).
Place a blank DVD±R disk in the tray and close by pressing the “DVD” key. The LCD
shows “Checking tray..” for a few seconds and then shows “Media blank” when
the DVD is ready to burn. If the media is not blank, the LCD shows “DVD burnt”.
4 Press the “DVD” button once more. At which point AfterBurner gives the option to
abort the burn within 10 seconds. The LCD then shows “Preparing image” >
“Burning lead-in” > “Burning xx% done” > “Burning lead-out”.
NB: For a full DVD (4.7GB) burning takes approximately 15 minutes
TIPM It is possible to configure the system to automatically open the DVD tray to
open once a burn has been completed. See Section 3.2, page 12.

5
2.8 Playing DVDs
The DVDs produced by AfterBurner are formatted for playing on standard (consumer
market) DVD players. The disks may also be played on a PC with a suitable DVD player
application.
Playing time-lapse recordings
Time-lapse recordings appear to playback at a fast rate because frames have been
dropped from the recording. Most DVD players have the ability to replay in slow motion,
which will show the recording closer to real-time. E.g. playing a 24-hour time-lapse
recording (with a time-lapse rate of 1 in 12) at 1/8 speed will be close to real-time.
Playing back time-lapse recordings at normal rate has the advantage of showing all the
recorded information condensed into 2 to 3 hours, speeding-up the general review
process. Pause, slow motion forwards and backwards allows closer examination of any
specific events.
TIPM Ovation Systems offer a PC application called DVD Explorer, which is designed
specifically for the review of AfterBurner DVDs. DVD Explorer provides quick
navigation to any date and time on the DVD review along with the ability to single
step forwards and backwards. For more information see:
www.ovation.co.uk/DVD_Explorer/
Chapter Markers
Most DVD players have the ability to jump to DVD chapters so, to aid navigation,
AfterBurner adds a chapter maker to every 5 minutes of real-time video (approximately
24 markers per disk). With time-lapse recordings the time between markers is extended
by the time-lapse ratio e.g. in 24 hour mode the 5 minutes x 12 = 60 minutes.
If AfterBurner is set to alarm mode, a chapter marker is inserted at the point of each
alarm, up to a maximum of 99. If there are more than 99 alarms, the DVD file on the
internal hard disk is closed and a new file opened. Please note that when alarm mode
is active, chapter markers are no longer inserted every 5 minutes.
DVD Serial Number
Each DVD is burnt with unique DVD volume label. The format is DVDxxxx-yyyyyyyy,
where xxxx is the serial number of the AfterBurner and yyyyyyyy is a unique date code.
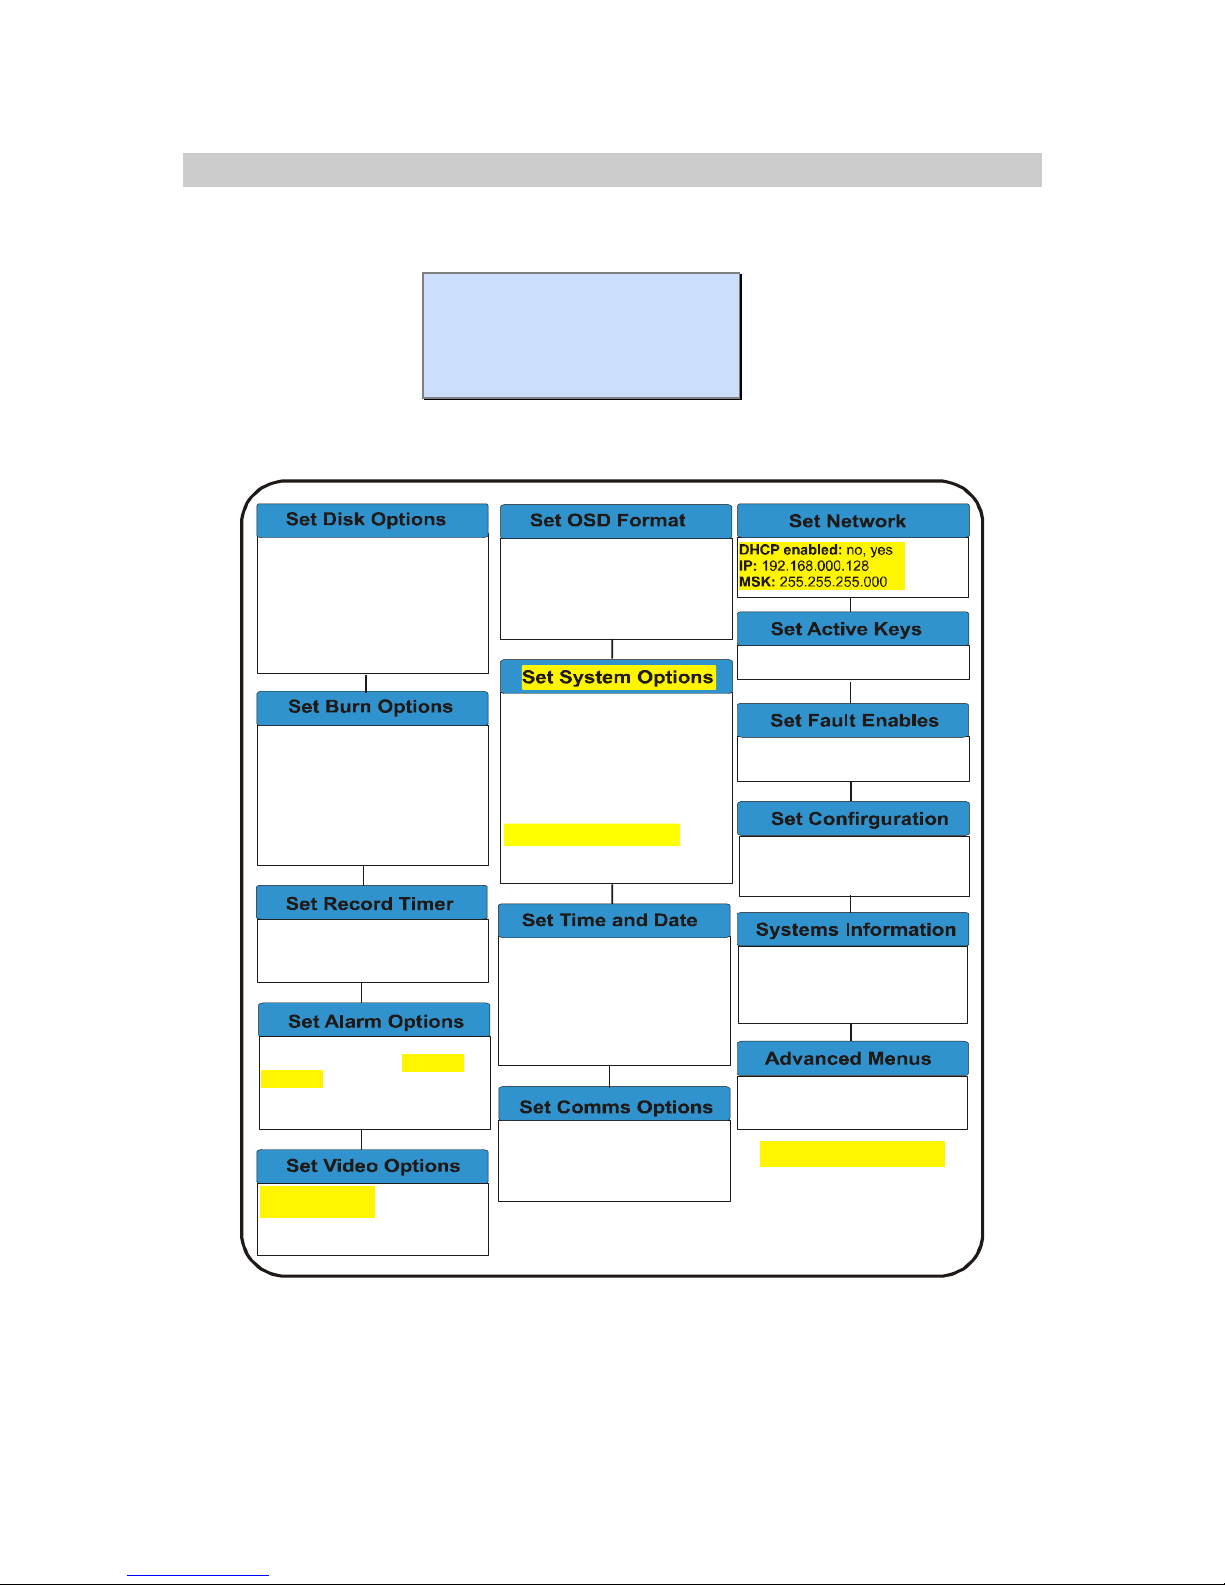
3 Advanced Menus
The advanced menus are accessed by pressing the “MENU” key until “Advanced
Menus” is shown. Then press M to enter this option.
Advanced Menus
===================
to enter
The advanced Menu items are shown below:
Timer:
1, 2, 3, 4
- Disabled, daily, manual
range, monthly
Mnu, Rec, DVD, Stby,
DSK:
Quick Erase:
Full Erase:
Disk Format:
Endl ess loop, stop on
unburnt, stop when full
No, Yes
No, Yes
No, Yes
Pick:
Index:
Join Files:
Full Verify:
Oldest unburnt, youngest
first
Sequential, unique
No, Yes
Off, On
OSD:
Locale:
Set A,B,C,User,D,E,F, None
UK, EU, USA, AU, UNI
Enter time and date
Country:
Daylight Savings:
Time-Sync:
select from list
Off / On
03.00am, None, FR-
Record Pause:
Audio format:
Auto Shutdown:
MD5 video files:
DVD Type:
Off, Stop, Timer,
Both
MPEG, AC-3,
LPCM
Smart, Off, On
no / yes
Normal, Dual
Comm1:
Unit:
38400, 19200, 09600,
57600
1 to 60
Systems Integrators Use Only
Default values:
Load CD/DVD Ini:
No, Yes
No, Yes
Versi on:
Serial No.
Disc Capacity: 120GB, 250GB
>> to exit
PIP,
Inputs
Level
various
auto, fixed
, auto, fixed
- Colour, mono
New for AfterBurner-2
Alm Mode:
Alm rate:
Alm time:
Disabled, start/stop
Enter fps
HH, MM, SS
on closed, on opened, motion
detection
Figure 4 Advanced Menu Items

3.1 Set Disk Options
Set disk options
===================
DSK: endless loop
Quick wipe: No
DSK: endless loop: (default) the unit fills the disk as it records. Once full,
AfterBurner then automatically overwrites the oldest data.
stop when full: stops recording when the internal disk is full (i.e.
no overwrite).
stop on unburnt: keeps recording to the hard disk in a loop
(overwriting the oldest data) until it encounters an un-burnt DVD
file.
Quick erase: (Yes/No) use the K L buttons to select yes and then Mtwice to
invoke a quick disk erase that clears the file tables (takes about 10
sec).
Full erase: (Yes/No) use the K L buttons to select yes and then Mtwice to
invoke a full disk erase, clearing all data on the disk (takes about
60 mins).
TIPF Unless security is of prime importance, quick erase is usually
sufficient as a full erase can take up to an hour.
 Loading...