

Ovation Systems Time-Lapse DVD Recorder, AfterBurner User Manual

Manual Issue 046 Ovation Systems Ltd. Page 1
Time-Lapse DVD Recorder
User Guide
AfterBurner
Time-Lapse DVD
Video Recorder
User Guide
Ovation Systems Ltd.
Springfield Barn
London Road
Milton Common
Oxfordshire
OX9 2JY
UK
Tel: +44 1844 279 638
Fax: +44 1844 279 071
Email: support@ovation.co.uk
Web: www.ovation.co.uk
Afterburner firmware .046 www.ovation.co.uk

Manual Issue 046 Ovation Systems Ltd. Page 2
Time-Lapse DVD Recorder
User Guide
1 Introduction....................................................................................................................... 3
2 Hardware Installation........................................................................................................4
2.1 Hardware Set-Up ...................................................................................................................... 4
3 Basic Operation & Configuration .................................................................................... 5
3.1 Front Panel Controls................................................................................................................. 6
3.2 Record Set-up .......................................................................................................................... 7
3.3 Set The Burn Mode .................................................................................................................. 8
3.4 Start / Stop Recording .............................................................................................................. 9
3.5 Burning a DVD........................................................................................................................ 10
3.6 Playing DVDs ......................................................................................................................... 11
4 Advanced Menus ............................................................................................................12
4.1 Set Disk Options ..................................................................................................................... 13
4.2 Burn Options........................................................................................................................... 14
4.3 Set Record Timer ................................................................................................................... 15
4.4 Set Alarm Options .................................................................................................................. 16
4.5 Set Video Options................................................................................................................... 17
4.6 Set Onscreen Display (OSD) Format ..................................................................................... 18
4.7 Set Time & Date ..................................................................................................................... 20
4.8 Set Comms Options ............................................................................................................... 20
4.9 Set Active Keyes .................................................................................................................... 21
4.10 Set Fault Enables ................................................................................................................... 21
4.11 Set Configuration.................................................................................................................... 22
4.12 System Information:................................................................................................................ 22
5 Rear Panel Interfaces:....................................................................................................23
5.1 External I/O & Control............................................................................................................. 24
5.2 Examples of External Control ................................................................................................. 26
5.3 Rear Panel Configuration Switches........................................................................................ 27
6 Appendix1: AfterBurner Operation Hits & Tips ........................................................... 28
6.1 Reviewing The Unit’s Configuration ....................................................................................... 28
6.2 Reset to Factory Defaults ....................................................................................................... 28
6.3 Transferring AfterBurner Configuration to Other Units........................................................... 28
6.4 Join a Number Of Small Files Together ................................................................................. 29
6.5 Create one DVD file per day starting midnight ....................................................................... 29
6.6 Record only alarms................................................................................................................. 29
6.7 Enable Record Pause............................................................................................................. 29
7 Appendix 2: User Firmware Upgrades..........................................................................30
7.1 Download Latest AfterBurner Firmware ................................................................................. 30
8 Appendix 4: Specification..............................................................................................32
Afterburner firmware .046 www.ovation.co.uk
Manual Issue 046 Ovation Systems Ltd. Page 3
Time-Lapse DVD Recorder
User Guide
1 Introduction
Designed specifically for video surveillance operations, AfterBurner is able to record video in
real-time, or in time-lapse, onto DVD-R write once disks. Once burnt, the disks are viewable
on either a PC or standard, low-cost, DVD players.
AfterBurner may be configured for video quality and record rate via its front panel LCD
display or serial interface. It is able to record 2 to 3 hours of high quality real-time video per
DVD, which may be extended to 24 hours (or more) in time-lapse mode.
When deployed, the system records to an internal hard disk buffer. As soon as 4.7 GB of
data is available (1 DVD), AfterBurner automatically starts burning the recorded video to
DVD. Once complete, a new blank disk may be inserted ready for the next download.
Alternatively, the system may be used for long-term unattended recording, storing up to 16
DVDs of video to internal disk before burning. The recorder is 12 V DC powered and suitable
for battery operation, ideal for covert installations.
AfterBurner offers all the benefits of the very latest DVD digital video technology with the
versatility of a traditional time-lapse VCR. Operationally, it has been designed in accordance
with the UK’s Police Scientific Development Branch Digital Imaging Procedures by producing
video evidence on closed, write once read many (WORM) media that cannot be altered.
This has the major benefit of allowing the use of standard (VCR tape based) evidential
procedures and audit trails.
Play
on a PC
Play on a low-cost DVD
player
Archive
DVD +/-R
Video Disk
(real-time or time-lapse)
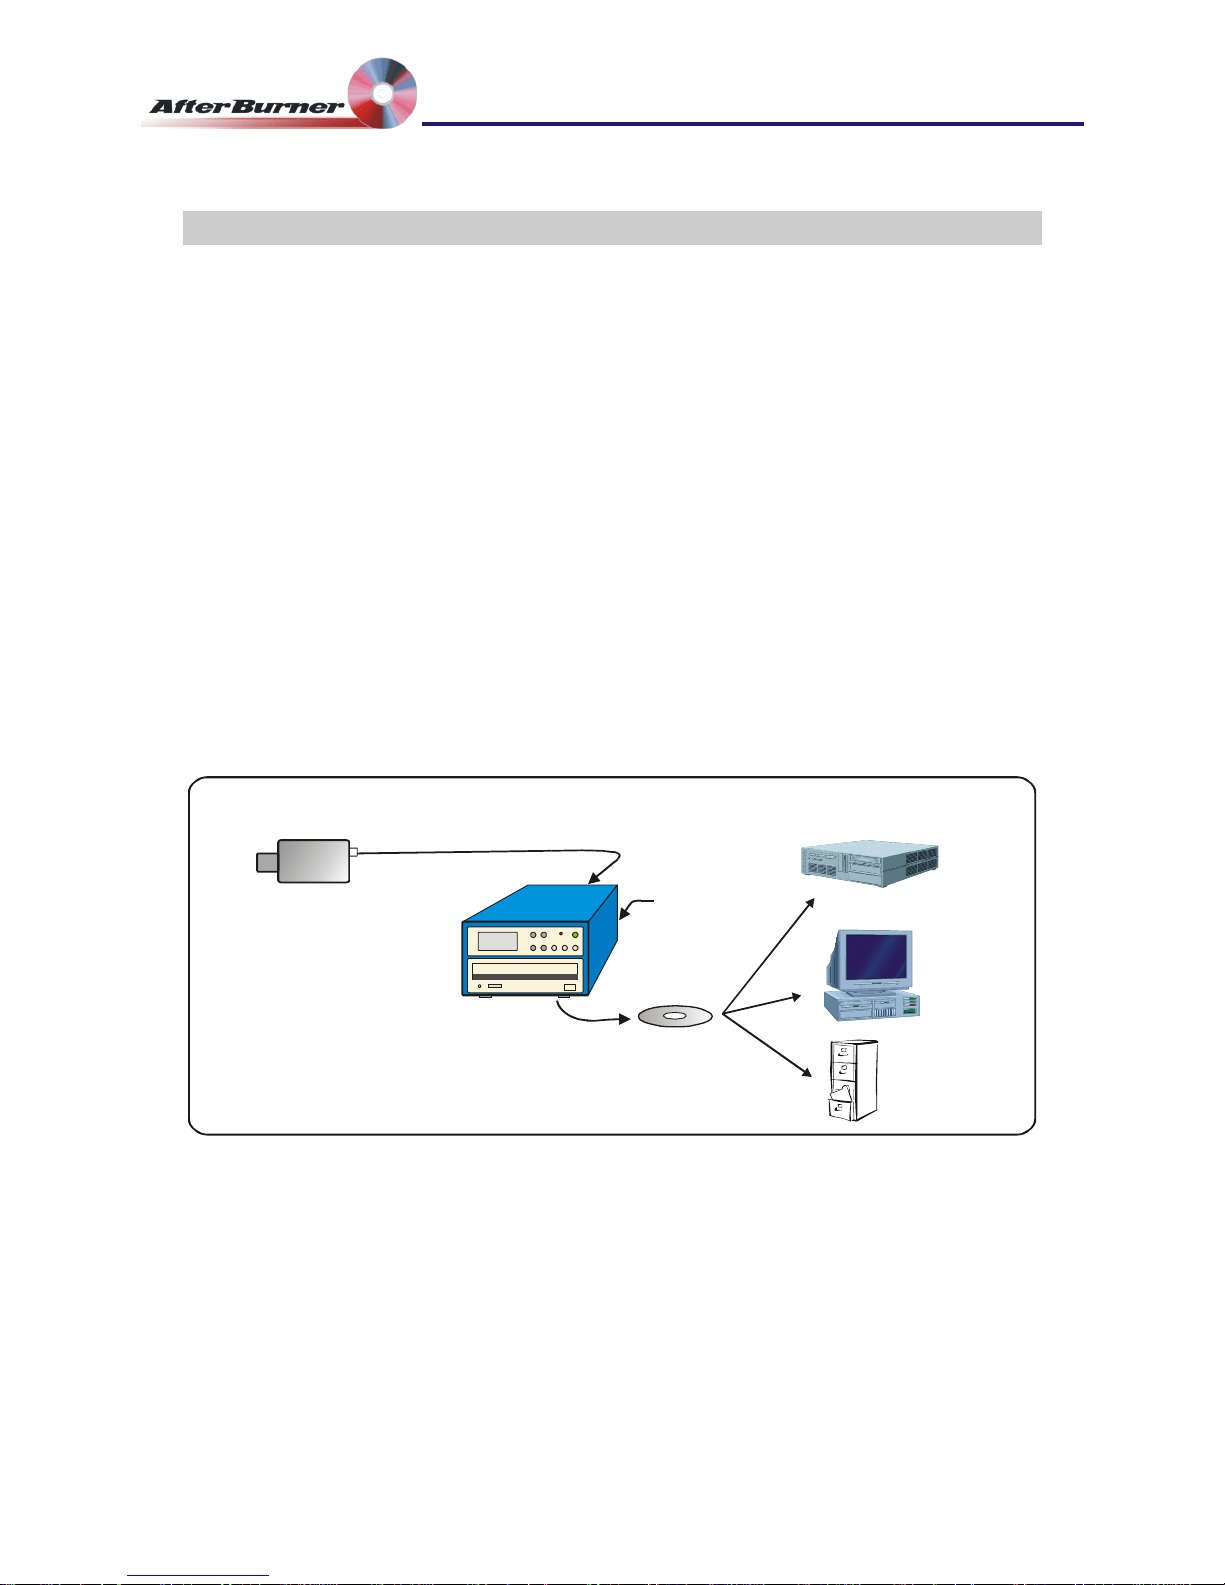
Camera
AfterBurner
DVD Recorder / Burner
12 V DC
AfterBurner
Figure 1: Typical AfterBurner Application
AfterBurner records to a hard-disk which allows the re-burn of disks in the event of a power
failure or malfunction and to provide duplicates when required. It is also possible to leave the
unit unattended for a week or more, collecting data that can be downloaded to DVD at a later
date.
Afterburner firmware .046 www.ovation.co.uk

Manual Issue 046 Ovation Systems Ltd. Page 4
Time-Lapse DVD Recorder
User Guide
2 Hardware Installation
2.1 Hardware Set-Up
1 Connect power to the unit via the 12 V DC supply provided or if using an external
supply, AfterBurner requires a 10 to 20 V DC supply, drawing approximately 0.7A at
12 V when recording, 1.2 A when burning DVDs.
2 Connect a camera to the BNC video input. AfterBurner automatically configures itself
for PAL or NTSC operation. If required, the VIDEO OUT connector provides a
monitor of the video input with the AfterBurner onscreen display included.
NB: In time-lapse mode, best results are obtained by using a fixed camera.
3 If required, connect left & right audio inputs. The audio input is at line level (300mV
peak to peak nominal, 2.5 V pp max) with an input impedance of > 10 kΩ.
NB: Audio will only be successfully recorded when the video set to real-time mode.
With the video is set to time-lapse mode, it is strongly recommended the audio
recording is not enabled unless audio is required during alarm recording. See
Section 4.4.
Afterburner firmware .046 www.ovation.co.uk

Manual Issue 046 Ovation Systems Ltd. Page 5
Time-Lapse DVD Recorder
User Guide
3 Basic Operation & Configuration
AfterBurner is simple to set-up and operate via its front panel LCD and control buttons.
Please note: Afterburner is a video (and audio) recorder (not a player). The only way to view
the recordings is by burning them onto DVD.
AfterBurner is primarily intended for use in surveillance operations in 24-hour time-lapse
mode. In this mode, it may be operated in 3 main ways:
1. Manual
The unit records to its internal hard disk and the user can then manually burn video to
blank DVD when required. In this mode, AfterBurner will divide the video into 4.7 GB
files (the capacity of a DVD) and user can select which file is burnt from a list.
2. Retrieval of One DVD Per Day
This is where the unit is set recording with a blank disk in the drive. 24 hours later the
unit burns the previous 24 hours of video to DVD disk. The user can then retrieve the
burnt DVD and insert a new blank DVD ready for burning the following day.
Tip: In 24 hour mode, it is possible to configure AfterBurner to burn a disk at a given
time of day. See Section 3.3, Set The Burn Mode, page 8.
3. Long-Term Unattended Operation
AfterBurner can record up to 16 DVDs of data (24 DVDs with the 128 GB disk option)
to its internal hard drive with the option of stopping or overwriting data when the disk
becomes full (see section 4.1, page 12). In 24-hour mode, this allows the unit to be
left record unattended for 16 days, after which the video can be burnt to 16 separa
DVDs.
Tip: Ovation Systems manufacture MultiBurner, a 7 way DVD burner stack that
speeds up the burning of multiple DVDs. It is especially useful in long-term
surveillance operations as up to 8 DVDs can be automatically burnt without the need
for any user input.
te
NB: It is possible to record and burn simultaneously.
Afterburner firmware .046 www.ovation.co.uk

Manual Issue 046 Ovation Systems Ltd. Page 6
Time-Lapse DVD Recorder
User Guide
3.1 Front Panel Controls
15:25:34 21FEB05
Recording-TL
Serial No 000005
▲ Up
▼ Down
► Select a menu item.
MENU Steps though main menu items (At any point, pressing for
more than 2 seconds exits all menus).
REC Starts / stops recording (shows red when recording, flashing
red when recording in time-lapse).
DVD Powers up DVD drive, opens / closes tray, starts DVD burn.
ON Power-up unit.
STBY Power down unit (standby for timer modes).
In general, a parameter flashes when it can be adjusted by the ▲ ▼ keys. The new
setting may be stored by pressing the MENU key. Alternatively, the current status will
be automatically stored when the screen times-out after 3 minutes. When not
recording, AfterBurner automatically enters stand-by when no key is pressed for 5
minutes.
Tip: At any point when navigating the LCD menus, it is possible to return to the start-
up screen by pressing the MENU key for 2 seconds.
Tip: During set-up, the LCD text is duplicated onscreen on the rear panel’s BNC video
monitor output.
The top-level menu items are shown below. They are displayed by repeatedly pressing
the “Menu” button.
DVD:
Quality:
Set time per DVD 24hr
default
Very low, low, medium,
high, very high
Video only, audio + video, audio
mode
MB No. of copi es:
1, 2, 3, 4, 5, 6,
7, 8
Burn:
Eject:
Auto Mode, Manual only, at
given time.
Manual, when burnt
Lists files recorded on AfterBurner
Figure 2:Top Level Menu Items
Afterburner firmware .046 www.ovation.co.uk

Manual Issue 046 Ovation Systems Ltd. Page 7
Time-Lapse DVD Recorder
User Guide
3.2 Record Set-up
As standard, AfterBurner is shipped configured for 24 hour time-lapse recording (at 2
pictures per second) in medium quality. This may be altered by pressing the “MENU”
key 3 times to show the following screen:
Set Record Mode
===================
DVD: 24.0h 2.08fps
Quality: M Vid-only
Initially, the record time per DVD is flashing, indicating it may be altered by the ▲ ▼
keys. Once set to the required record time per DVD, press ► to scroll to the next
parameter, in this case video quality. Again use ▲ ▼ to select the required quality
setting. Press ► to enable / disable audio recording. Audio recording should only be
enabled in real-time record modes, as audio is not useful with time-lapse video (even
when shown as enabled).
TIP: pressing the “MENU” key, or letting the screen time-out, stores the new
configuration.
DVD: 2, 4, 6, 8, 10, 12, 18, 24, 36, 48 Hours, 7 days, 1 month, 1 year.
Estimated record time per DVD disk.
fps: record rate in frames per second (fps) or frames per minute
(fpm) calculated from the record time / quality settings.
Quality: VH (very high), H (high), M (medium), L (low) VL (very low).
Record Mode: Video only: video only recording (default)
Aud+Vid: audio & video recording (use with real-time recording
only)
Aud-mode: records a stereo audio track along side a low
resolution video feed extending record time to approximately 8
hours per DVD.
NB: a video feed to the AfterBurner (preferably black) is required
for Audio-Mode operation.
Afterburner firmware .046 www.ovation.co.uk

Manual Issue 046 Ovation Systems Ltd. Page 8
Time-Lapse DVD Recorder
User Guide
3.3 Set The Burn Mode
Set Burn Mode
===================
Burn: auto mode
Eject: manual
Set the burn options by pressing the “MENU” key again. In auto-mode (the default), once
AfterBurner has enough data, and if there is a suitable blank disk in the DVD tray,
AfterBurner will automatically burn a DVD (4.7 GB). For example, if the unit has been set to
record in 24 hour mode, it will start burning a DVD 24 hours after recording starts. If a DVD is
unavailable to burn, AfterBurner starts a new file on the internal hard disk, which can be
burnt when complete.
The burn options are as follows and selected by the ▲ ▼ keys:
MB num of copies: 1 to 8 sets the number of copies of each file burnt to DVD,
partiality when a MultiBurner is connected to the unit.
Burn: auto mode : (default) unit records to internal hard disk, closes the
record file and attempts to burn a DVD x hours after the recording
started (where x is the AfterBurner mode, e.g. 24 hours).
When recording with MultiBurner connected, AfterBurner attempts
to burn a new DVD each time a new compete file becomes
available. NB: As of version 45c Auto-mode replaces MB Cascade
mode.
manual only: unit records to internal hard disk but only burns a
DVD under user instruction. This mode can be used when
AfterBurner is left recording unattended collecting several DVDs of
data.
at given time: forces AfterBurner to attempt a burn at a given time
of day, to the nearest hour (if blank disk in drive). Even if a blank
disk is unavailable a new DVD file will be created.
NB1: AfterBurner will only automatically start burning when a
suitable blank DVD disk is in the drive.
NB2: Once recording has started, it is possible to override the
above setting and burn a DVD manually, see Section 3.5 page 10.
Eject: manual: (default) control of disk eject. Note: DVD drive has to be
switched on via the DVD button before disk can be manually
ejected.
when burnt: the DVD is automatically ejected once a burn is
complete.
Afterburner firmware .046 www.ovation.co.uk

Manual Issue 046 Ovation Systems Ltd. Page 9
Time-Lapse DVD Recorder
User Guide
3.4 Start / Stop Recording
Once the record time, quality and burn options are set, the recorder may be set into
record mode by pressing the “REC” key. The key will show constant red when
recording in real-time, flashing red when recording in time lapse. Pressing the record
key again will cause the unit to enter “stop” or “Record-Pause” (see below).
IMPORTANT: Record-pause mode is new feature for firmware version 043c onwards,
Feb 2007. Record-pause mode is selected in the “Set Disk Options”
advanced menu, see Section 4.1 page 12. In this mode, pressing the
“Record” button whilst recording causes AfterBurner to enter “Recordpause”, indicated by a slowly flashing record button. A short press of
the “Record” button then starts recording again to the same file.
Pressing the record button for 2 seconds stops recording and closes
the file on the hard disk.
This mode is especially useful when the recorder is being started and
stopped frequently as all the recordings are appended to one DVD file,
rather than generating many separate files.
Whilst recording, the LCD scrolls though a summary of the machine’s status including:
● Whether recording is taking place, in either time-lapse, real-time or recordpause.
● The size of the video file so far (4.7 GB max)
● Estimated burn time, taking into account if burn “at given time” option has been
set in the “Set Burn Mode” main menu (see Section 3.3, page 8).
● The remaining free space, shown as GB and estimated time, on the internal
hard disk (except endless loop mode).
NB: It is possible to record and burn simultaneously.
Afterburner firmware .046 www.ovation.co.uk

Manual Issue 046 Ovation Systems Ltd. Page 10
Time-Lapse DVD Recorder
User Guide
3.5 Burning a DVD
1 From the default screen, press the “MENU” once to show a list of files on the hard
disk. The file to be burnt may be selected by the ▲ ▼ keys. For each file, the start
times, finish times & dates are shown as well as the number of times the file has
been burnt to DVD disc.
► Set Burn file #001
===================
● 09:21 05Apr Burnt
09:20 06Apr no
TIP: When a file is shown, pressing the ► key scrolls through additional information
about the file including size, duration, frames per second, whether alarms were
active etc.
TIP: It is possible to change the file-listing screen to sort the files showing the oldest
or youngest file fist along with either a sequential or unique file number. See Section
4.2 page 8, “Set Burn Options”
NB: If AfterBurner is recording, the current file will be shown with an end time of
“now”. If this file is selected, the resulting DVD contains video up to the point when
the burn commenced. AfterBurner will continue to record to the same file while
burning the DVD.
2 Once the required file is displayed, press the “DVD” key. This powers up the DVD
drive and checks for a blank DVD disk.
3 If a “Tray Empty” message is shown, press the “DVD” key again to open the DVD
tray (at this point the tray can also be opened by the DVD drive’s own eject button).
Place a blank DVD±R disk in the tray and close by pressing the “DVD” key. The LCD
will show “Checking tray..” for a few seconds and then shows “Media blank”. If
the media is not blank, the LCD shows “DVD burnt”, which means it cannot be
used.
4 Press the “DVD” button once more. AfterBurner will now give the option to abort the
burn within 10 seconds. The LCD will show then show “Preparing image” >
“Burning lead-in” > “Burning xx% done” > “Burning lead-out”.
NB: For a full DVD (4.7GB) burning takes approximately 15 minutes (x 4 or higher
media).
TIP: It is possible to configure the system to automatically open the DVD tray to
open once a burn has been completed. See Section 3.3 page 8.
Afterburner firmware .046 www.ovation.co.uk
 Loading...