

Page 1

The
Sound
Localization
Guidebook
Activities for
developing sound
localization
skills
Louisville, KY
PROTOTYPE
The Sound Localization Guidebook Prototype | i
17820 Sound Local.ind i 6/24/05, 11:32:43 AM
Page 2

The
Sound
Localization
Guidebook
Roy J. Brothers, Ed.D.
Roger A. Huff, M.S.
Fourth Edition
The research used to write the fi rst edition (1973) of this
book was performed pursuant to a grant with the Bureau
of Education for the Handicapped, U.B. Offi ce of Education,
Department of Health, Education, and Welfare.
Grant OEG•2.6-062289.1582-720E7163.
ii | The Sound Localization Guidebook Prototype The Sound Localization Guidebook Prototype | iii
17820 Sound Local.ind ii-iii 6/24/05, 11:33:01 AM
Page 3

BROTHERS, ROY J., 1928-
This publication is protected by copyright and permission
The sound localization guidebook: activities for developing
sound localization skills/Roy J. Brothers, Roger A. Huff.
In keeping with our philosophy to provide access to
information for people who are blind or visually impaired,
the American Printing House for the Blind provides this book
in large print and braille.
Catalog Number 8-16080-00
© 1973, 1975, 1984, 2005
American Printing House for the Blind
All rights reserved. Printed in the United States of America
should be obtained from the publisher prior to any
reproduction, storage in a retrieval system, or transmission
in any form or by any means electronic, mechanical,
photocopying, recording, or otherwise, unless where noted
on specifi c pages. For information regarding permission,
write to American Printing House for the Blind,
1839 Frankfort Avenue, Louisville, KY 40206-0085.
Project Leader and Revision Editor:
Tristan G. Pierce
Editorial Assistant and Proofreader:
Monica Vaught
Graphic Design, Layout, and Illustration:
Bernadette S. Mudd
Front Cover Photography:
Crack the Whip by Seward Johnson, courtesy of
The Sculpture Foundation, Chicago
iv | The Sound Localization Guidebook Prototype The Sound Localization Guidebook Prototype | v
17820 Sound Local.ind iv-v 6/24/05, 11:33:17 AM
Page 4

Table of Contents
Preface ........................................................................... ix
Chapter 1: Introduction.................................................. 1
Purpose....................................................................... 6
Program...................................................................... 6
Familiarization............................................................. 9
Chapter 2: Learner Stationary
and Sound Source Stationary ...................................... 15
Chapter 3: Learner Stationary
and Sound Source Moving.......................................... 25
Chapter 4: Learner Moving
and Sound Source Stationary ...................................... 33
Chapter 5: Learner Moving
and Sound Source Moving.......................................... 45
Chapter 6: Practicing Skills Through Group Activities...... 57
Appendices..................................................................... 67
A. Using sound in performing O&M tasks ................... 69
B. Playing games with a sound source......................... 79
C. Sound source adaptations for
recreational/sport activities ..................................... 95
Reference Section ........................................................... 103
Bibliography................................................................ 105
Additional Reading...................................................... 109
vi | The Sound Localization Guidebook Prototype The Sound Localization Guidebook Prototype | vii
17820 Sound Local.ind vi-vii 6/24/05, 11:33:17 AM
Page 5

Preface
As with the original edition, the specifi c objective of this
revised book is to meet the sound localization needs of
young learners who are blind. The activities presented are
suited to a variety of situations and learners. Every effort has
been made to provide the classroom teacher, aide, physical
education instructor, and orientation and mobility specialist
with a basic inventory of activities to use in the development
of sound localization skills. The activities outlined also
include ones permitting participation of individuals or small
groups of learners who are blind with their sighted peers.
In addition, this new edition includes a list of sport activities
that can be taught to children and enjoyed by individuals
of any age.
The fi rst edition of this book was a product of the
Sound Localization Institute held in April, 1972 at the
American Printing House for the Blind (APH), Louisville,
Kentucky. Drawn from the extensive experience of the
participants, the activities and learning situations represent
a variety of successful approaches to teaching sound
localization. Undoubtedly other activities and approaches
are also effective. The reader is invited and encouraged to
send APH additional activities or simple procedures that
foster sound localization skills. Suggestions for revising or
editing activities that have been presented as well as new
activities or approaches will be considered for inclusion
in the next edition.
viii | The Sound Localization Guidebook Prototype The Sound Localization Guidebook Prototype | ix
17820 Sound Local.ind viii-ix 6/24/05, 11:33:18 AM
Page 6

APH wishes to acknowledge the members of the 1972
Notice : The changes or modifications not expressly approved by the
party responsible for compliance could void the user’s authority to
operate the equipment.
Sound Localization Institute:
M. Bernadette Alber
Ralph Brewer
Gary Coker
Will Evans
Robert Gockman
Ned Jackson
Gloria I. Roddey, Editorial Assistant
Forty-two O&M instructors and/or P.E. teachers
participated in a product specifi c survey (2002) and
recommended that APH include some new games, along
with instructions and/or adaptations on how to play the
games. Robert Wall, Ph.D., Western Michigan University,
and Rebecca Price, COMS, Western Pennsylvania School
for Blind Children reviewed the updated manuscript and
provided guidance on the reorganization of the 2005
edition. Dr. Wall authored Appendix A.
[Number to come] young learners participated in the fi eld
test evaluation of the revised manual and the Portable Sound
Source, Sport Edition, accompanying it. The results of the
fi eld test study showed... [will complete after fi eld testing].
APH gratefully acknowledges and thanks the following
professionals who participated in the fi eld evaluation.
[List fi eld test sites and evaluators]
x | The Sound Localization Guidebook Prototype The Sound Localization Guidebook Prototype | xi
17820 Sound Local.ind x-xi 6/24/05, 11:33:19 AM
Page 7

xii | The Sound Localization Guidebook Prototype The Sound Localization Guidebook Prototype | xiii
17820 Sound Local.ind xii-xiii 6/24/05, 11:33:19 AM
Page 8

Chapter
One
Introduction
xiv | The Sound Localization Guidebook Prototype The Sound Localization Guidebook Prototype | Chapter 1 | 1
17820 Sound Local.ind xiv-1 6/24/05, 11:33:19 AM
Page 9

Introduction
In most instances the success of the educational process
depends on effective communication. For the learner who
has a visual impairment, the auditory channel is especially
important. A young learner with a visual impairment, striving
to function in a sighted environment, places great reliance
upon the auditory modality for gaining information. As a
result, educators of learners with visual impairments began
to construct procedures to encourage effective listening
behavior. In preparing this manual, the authors have
proceeded on the principle that any skill can be enhanced
through a program of sequential developmental activities.
Basically there are fi ve levels of learning that characterize the
effective use of sounds in the environment.
1. Awareness
2. Discrimination
3. Interpretation
4. Localization
5. Conversion
Awareness is the recognition of sound in the environment.
The learner should realize that sounds are all around
him. Discrimination is the ability to recognize a particular
sound within a background of noise or as distinct from
other sounds. The use of sounds around him requires an
interpretation, which is the association of a sound with the
object producing it. Ideally the learner will want to know
2 | Chapter 1 | The Sound Localization Guidebook Prototype The Sound Localization Guidebook Prototype | Chapter 1 | 3
17820 Sound Local.ind 2-3 6/24/05, 11:33:34 AM
Page 10

more about the source of a sound and will display inquisitive
environmental sounds may in fact be a discrimination task or
behavior. Localization is the identifi cation of the exact source
of the sound. The sound may be located in reference to
the learner’s position or some other referent being used.
Depending on the learner and the environment, localization
may precede interpretation. Conversion is the utilization
of the sound as an aid to the learner’s interaction with the
environment. The conversion of a sound requires awareness,
as well as interpretation and localization. While all of
the above levels should be included in a comprehensive
listening program, the activities in this manual are primarily
concerned with the enhancement of localization skills.
Remember that to effi ciently localize a sound, a student
must fi rst be aware of a sound, and must be able to
discriminate that sound from other sounds
an association with a particular location and not a situation
that emphasizes or requires a specifi c localization.
Recent sound localization studies have shown that blind
and sighted individuals did not differ when asked to attend
to a sound placed centrally in front of them (Lessard, Paré,
& Lassonde, 1998; Röder, Teder-Sälejärvi, Sterr, Rösler,
Hillyard, & Neville, 1999). However, blind subjects did
map the environment better than sighted subjects when
attending to sounds in peripheral auditory space (Röder
et al., 1999). Surprising to researchers, blind subjects with
peripheral residual vision did not localize sounds as well as
blind or sighted individuals (Lessard et al., 1998; Röder et al.,
1999). In general, however, young learners who are blind
in the environment.
The original study used in 1972 to develop this manual
surveyed orientation and mobility specialists and
classroom teachers relative to the development of
sound localization skills. The survey revealed a paucity of
applicable information, thus placing upon the Institute the
responsibility for developing virtually a whole new curricular
approach to teaching sound localization skills. The survey
revealed that the visually impaired learners were generally
instructed to rely extensively upon environmental sounds.
Instructors often used sounds in the natural environment,
but ones that could be partially controlled by the instructor.
However, the assumption that the student’s use of a familiar
have thresholds of sound localization equivalent to those
of sighted children (Ashmead, Wall, Ebinger, Hill, Yang, &
Eaton, 1998). Observed differences, often in favor of children
who are blind, appear to be due to practice. Improved
sound localization skills demonstrated by blind individuals
can be achieved by sighted individuals who are given sound
localization training (Lewald, 2002). The reader should
recognize that localization skills are developmental in nature
and accuracy requires practice. “Neither mother’s own voice
nor sound-making toys can successfully be used to encourage
movement until both permanence of sound producers and
localizing skills have been acquired” (Sonksen, 1984, p. 284).
In the interest of effi cient instruction of young learners, APH
voice, the sound of a distinctive motor, or wind chimes
enhances localization skills may be questioned. Such use of
4 | Chapter 1 | The Sound Localization Guidebook Prototype The Sound Localization Guidebook Prototype | Chapter 1 | 5
17820 Sound Local.ind 4-5 6/24/05, 11:33:35 AM
developed a highly controllable artifi cial sound source, called
the Portable Sound Source (PSS). Several times over the
Page 11

years, the Technical Research Department has refi ned the
• Chapter 2 presents activities where both the learner
design and made it more portable and user friendly.
Characteristics of the PSS lend themselves readily to the
development of sound localization skills. Its size and weight
permit easy manipulation and direction of the sound. It may
be moved in a horizontal plane to any point around the
learners, and within a vertical plane raised to head level and
above or placed on the ground. Tone, volume, and signal
rate can all be varied to make the sound more discriminable
by learners. The use of a highly discriminable sound source
helps to alleviate problems associated with awareness and
identifi cation, and allows learners to devote full attention to
the development of sound localization skills.
and the sound source are stationary. Although the
activities in this chapter are described for individualized
instruction, they can be used in small group settings
as well, with participants replying in unison, raising
their hands, or being called on, when verbal
responses are required.
• Chapter 3 presents activities where the learner is
stationary and the sound source is moving.
• Chapter 4 presents activities where the learner is
moving and the sound source is stationary.
• Chapter 5 presents activities where both the learner
Purpose
The purpose of this manual is to provide teachers of visually
impaired young learners with a few selected activities that
may be used to develop sound localization skills.
Program
Chapters 2-5 focus on individualized skills that are
preliminary to the group skills presented in chapter 6. The
individualized activities are instructionally sequenced how a
teacher and young learner may best use the sound source.
and the sound source are moving.
• Chapter 6 introduces group play/activities that help
the learner(s) practice localization skills learned in
the previous chapters.
Implicit in the chapter sequence are situations that increase
in complexity. Each chapter represents a different set of
factors based on the relationship of the learner to the
sound source. Activities within a chapter also represent the
sequential development of skills. This provision for chapter
and activity sequence offers fl exibility for the instructor in
the arrangement of experiences that are provided. Likewise,
if a learner has suffi cient skill, he can move quickly through
the fi rst few sections as a test phase, before going on to
6 | Chapter 1 | The Sound Localization Guidebook Prototype The Sound Localization Guidebook Prototype | Chapter 1 | 7
17820 Sound Local.ind 6-7 6/24/05, 11:33:35 AM
Page 12

higher level tasks. Always keep in mind that is not necessary
to attain skill or even attempt all activities in one chapter
Familiarization
before moving to the next.
When using chapter 6, it is possible for the teacher to make
continuous observations of the learner’s skill level while
participating in the group activities, and if necessary return
to specifi c individualized activities presented in the previous
chapters for practice and reinforcement of skills.
The activities are intended as a guide for the teacher.
The reader should become thoroughly familiar with the
types of activities presented, try them out with learners,
and then make some preliminary decisions regarding the
sequence, level of diffi culty, and their appropriateness for
each learner’s situation.
Before the introduction of formalized activities, the
learner must be familiarized with the sound device.
Since variation in the device’s rate, volume, and tone are
possible, the learner should fi rst become familiar with
these characteristics. Complete familiarization includes the
operation of all controls and recognition of the resulting
effect. The familiarization should be used to decrease fear or
negative feelings. It should also act to reinforce the learner’s
level of awareness and identifi cation. The familiarization
underlies many of the preliminary activities that have been
suggested, but there are also specifi c topics and situations
that will aid in the overall process.
Planned learning situations familiarize the learner with
While the development of sound localization skills is
the continuing and dominant objective, the games and
activities presented may be useful in the accomplishment
of several objectives. Many of the games and activities
introduce an element of competition either with members
of the group or with oneself. Since the ability to localize is
related to successful performance, the activity approach is
highly motivating. Of course, in a class of sighted and blind
learners, all derive educational benefi ts from participation.
Once the focus of the activity is clearly on the development
of sound localization skills, teachers can effectively apply
their own distinctive styles of teaching with no fear of
the device’s capabilities.
1. Introduce the sounds of the device when conducting
sound discrimination activities such as listening to
recorded environmental sounds. These are quite
different from ordinary sounds learners might hear.
2. Introduce the sounds of the device when discussing
loudness and softness (volume). Demonstrate a loud
signal and a soft signal.
3. Introduce the sounds of the device in the course of
discussing high and low sounds (pitch or tone). Ask
the learner to discriminate between a high sounding
signal and a lower sounding signal.
obscuring the basic objectives.
8 | Chapter 1 | The Sound Localization Guidebook Prototype The Sound Localization Guidebook Prototype | Chapter 1 | 9
17820 Sound Local.ind 8-9 6/24/05, 11:33:36 AM
Page 13

4. Introduce the sounds of the device during or
following a discussion of rhythm. Use the device
Model: Portable Sound Source, Sport Edition
to demonstrate three different speeds (rate)
of signal frequency.
Physical activities readily lend themselves to demonstrating
and emphasizing the foregoing suggestions.
1. Ask the learner(s) to spread her arms wide apart when
the sound is loudest and bring her hands together
when it is softest.
2. Ask the learner(s) to stand as tall as he can when
the sound is high and to squat down as the sound
becomes lower in tone. By varying the tone and
volume the result can be a series of deep knee bends
or arm and shoulder extensions.
The push button model has 30 stepped levels of rate,
tone, and volume. It can be operated by pushing
the tactile buttons on the device, or by using the
tactile remote control.
1. Encourage the learners
to examine the shape of
the device. Point
out the speaker, the
carrying strap, the off/
on two-position power
switch, and the
eight control buttons.
2. The off/on two-position
3. Ask the learner(s) to hop on one foot in the same
rhythm as the signal — the activity may be varied
by jumping or raising up to tiptoe in time with the
signal. The learner(s) may be asked to clap in rhythm.
4. Require the learners to respond to the absence
of sound. A variation of Musical Chairs may be
used in which the learners squat down when
the signal is discontinued. The last learner
responding is eliminated.
The teacher may wish to use some discretion in allowing
young learners to manipulate the controls. For those
who are given the opportunity, the following suggestions
are made.
power switch is centrally
located at the top of
the device. This switch must be pushed to the right
before the Play button will activate. This switch also
allows for the operation of the remote. When not in
use for extended periods of time, the switch should
be pushed to the left to conserve battery life.
3. The fi rst two buttons (black north and south pointing
raised carets) are the Rate buttons. The upper button
increases the rate or makes the repetitive sound go
faster. The bottom button decreases the rate or
makes it go slower.
10 | Chapter 1 | The Sound Localization Guidebook Prototype The Sound Localization Guidebook Prototype | Chapter 1 | 11
17820 Sound Local.ind 10-11 6/24/05, 11:33:37 AM
Page 14

4. The second set of buttons (blue north and south
3. The fi rst knob on the left controls the rate at which
pointing raised carets) regulates the Tone. The upper
button makes the tone (or pitch) higher, and the
lower button makes the tone lower.
5. The third set of buttons (white north and south
pointing raised carets) controls the Volume. The
upper button increases the volume, and the lower
button decreases the volume.
6. The last set of buttons controls the Play/Stop
action. The upper button (a green raised circle)
starts the device. The lower button (a red raised X)
stops the device.
Model: Portable Sound Source 2003
the beeping signal is emitted. The rate increases as
the knob is turned clockwise.
4. The second knob controls volume, which increases as
the knob is turned clockwise.
5. The third knob from the left controls the tone (or
pitch) of the signal. Turning the knob in a clockwise
direction increases frequency.
Suggest activities to help learners refi ne their abilities to
follow directions. One, two, or a series of directions may
be used. Games such as Simon Says and Mother May I may
provide structure for the learners’ responses and insure that
they are attending to the task.
The turn knob model produces continuous sounds, allowing
for the option to create slurring effects by slowly or quickly
turning the knobs.
1. The control panel consists
of three knobs and a
two-position switch.
2. The device is activated
by pushing up the switch
located on the left of the
control panel.
Directions such as the following would be appropriate in the
familiarization process.
a. (“Simon says”) Locate the handle/carrying strap.
b. Carry the device by the handle. (“Mother
may I?”)
c. Carry it by placing your hands under it
on the base.
d. Touch the speaker.
e. Place the speaker toward you.
f. Turn the speaker away from you.
g. Locate the off/on switch (and play button if
applicable), turn the device on.
12 | Chapter 1 | The Sound Localization Guidebook Prototype The Sound Localization Guidebook Prototype | Chapter 1 | 13
17820 Sound Local.ind 12-13 6/24/05, 11:33:39 AM
Page 15

h. Locate the tone control, increase and decrease
the frequency.
i. Locate the volume control, increase and decrease
the volume.
j. Locate the rate control, increase and decrease
the rate.
Chapter
Two
Learner Stationary
and Sound Source
Stationary
14 | Chapter 1 | The Sound Localization Guidebook Prototype
17820 Sound Local.ind 14-15 6/24/05, 11:33:41 AM
Page 16

Learner Stationary and
Sound Source Stationary
The general purpose of activities in chapter 2 is to provide
further familiarization with the device and to introduce
beginning localization skills.
Stationary refers to the spatial position assumed by the
learner and the sound source. The activities and localization
tasks are specifi cally designed for the blind learner who
has observable needs in the area of sound localization,
and provide a series of skill-related activities that are
fundamental to localization situations. It is a relatively
simple task to make direct applications of the activities
listed to situations commonly encountered in orientation
and mobility instruction. However, in an effort to achieve
wider acceptance and usage of the fundamentals in the
classroom, the opportunity to make specifi c applications to
formal O&M instruction has been deferred in this chapter.
The approach used is essentially individualized instruction for
development of sound localization skills.
Several conditions are noted for each activity listed in
chapter 2. The conditions may vary as to the placement
of the sound source spatially and the characteristics of
the sound (volume, rate, and tone). In the initial phases
of instruction an effort should be made to select a sound
characteristic and instructional area which will facilitate a
positive attitude on the part of the learner.
The Sound Localization Guidebook Prototype | Chapter 2 | 17
17820 Sound Local.ind 16-17 6/24/05, 11:33:56 AM
Page 17

Again, it should be remembered that activities are intended
Demonstrate:
as a guide for the teacher. The situations are instructional in
nature, and dialogue between teacher and learner is given
only to facilitate an accurate description of the situation and
potential interaction between the learner and the teacher.
Diagrams are provided for several conditions to illustrate the
logistics involved in performing a demonstration.
Each activity is performed with the learner and the sound
source in a stationary position at the time the sound is being
emitted. After each condition is performed, the sound source
is turned off and then moved to another position when
necessary. The next condition is explained to the learner,
and then the sound source is turned on. The purpose is to
increase the student’s ability to recognize and describe
a. loud volume
b. soft volume
c. high tone
d. medium tone
e. low tone
f. slow rate
g. fast rate
2. Repeat all conditions and allow the learner to identify
the sound characteristics after hearing each sound.
Instructor: “Describe the sound you are hearing.”
accurately the location of sound.
Activity One: Introducing the sound characteristics
of the sound source
1. Assume initial position: The sound source is placed
directly in front of the learner at head height and at
the distance of 4 to 10 feet.
Describe each sound characteristic prior to
the demonstration.
3. Have the learner give other examples of auditory
sounds that he has heard in the school or home
environment and describe their characteristics.
Activity Two: Locating height of sound source
1. Assume initial position: Sound source is placed directly
in front of the learner at a distance of 4 to 10 feet.
Describe the sound in terms of its height. The sound
characteristics should remain the same for the complete
range of height position (e.g., soft sound, medium tone,
slow rate).
18 | Chapter 2 | The Sound Localization Guidebook Prototype The Sound Localization Guidebook Prototype | Chapter 2 | 19
17820 Sound Local.ind 18-19 6/24/05, 11:33:56 AM
Page 18

Demonstrate:
Instructor: “The sound you hear will be in front of you.”
a. sound source at fl oor level
b. sound source at learner’s waist level
c. sound source at learner’s head level
d. sound source above learner’s head level
2. Repeat condition one and allow the learner to
identify the height location of the sound after
hearing each sound.
Instructor: “How high is the sound?”
3. Repeat previous conditions by varying volume, tone,
and rate.
2. Repeat all conditions and allow the learner to identify
the body relationship after hearing the sound.
Instructor: “Where is the sound?”
3. Repeat the conditions, varying the volume, tone, rate,
and height position in relation to the body.
Activity Four: Determining relative distance
of sound source
1. Assume initial position: Sound source is placed
directly in front of the learner at head height in a
Activity Three: Locating the sound source in
relation to the body
1. Assume initial position: Sound source is placed at
head height at a distance of 4 to 10 feet from the
learner. Place the sound source as follows:
a. in front of learner
b. behind learner
c. left of learner
d. right of learner
near position. Near is defi ned as the space around
the learner within reaching/touching distance;
approximately one to three feet.
Instructor: “Is the sound near you?” Provide feedback to the
learner by allowing him to touch the sound source.
2. Take subsequent position: Sound source is placed
directly in front of the learner at head height in a far
position. Far is defi ned as space around the learner
beyond touching distance; approximately four feet
and beyond.
The sound characteristic used in condition one should be
Body relationships should be understood by the learner
prior to the demonstration.
20 | Chapter 2 | The Sound Localization Guidebook Prototype The Sound Localization Guidebook Prototype | Chapter 2 | 21
17820 Sound Local.ind 20-21 6/24/05, 11:33:57 AM
the same for this condition.
Page 19

Instructor: “Is the sound near you or far from you?” (Let the
learner know if he responds accurately.)
Activity Six: Requiring a physical response
The conditions are not dependent on a large area for
3. Introduce remaining body relationships.
After an understanding has been established of near and
far with reference to the frontal position, the remaining
body relationships (behind, left, right) should be
introduced. Volume, tone, and rate may be varied when
presenting the remaining relationships. Help the learner
understand that “softness” does not always directly relate
to distance. Sound may be near and soft or far and loud.
Activity Five: Familiarization tasks
The conditions may be conducted individually with a
learner, or in the classroom, incorporating the use of the
instruction. The purpose is to develop pointing and body
directional skills. For example, the learner might be asked to:
1. Point to the sound source using the hand or
index fi nger.
2. Turn to face the sound (i.e., toes and nose directed
toward the sound).
3. Turn in place to position the sound behind one’s self.
4. Turn in place to position the sound to one’s right or
left (i.e., three o’clock or nine o’clock positions).
5. When the sound source is being held by the teacher,
squat down until it is above head level.
6. Clap in rhythm to the sound.
sound source into regular class work. For example, in the
area of arithmetic say to the learner(s):
1. “Count the number of signals you hear.”
Obtain a response.
2. “Count the signals, and add ___________ .” Provide
additional number and obtain learner response.
3. “Count the signals and subtract ____________ .”
Provide additional number and obtain
learner response.
Several variations are possible, but the general process is
a good way to reinforce basic number combinations with
different and novel media.
Activity Seven: Requiring a verbal response
The conditions may be conducted in the classroom. The
purpose is to discriminate when changes in direction
of sound occur and respond verbally. For example, a
procedure should provide opportunities for the learner to
react to changes in directional sounds and receive feedback
concerning his accuracy. Situational questions follow:
1. Is the speaker directed toward you?
2. Is the speaker directed away from you?
22 | Chapter 2 | The Sound Localization Guidebook Prototype The Sound Localization Guidebook Prototype | Chapter 2 | 23
17820 Sound Local.ind 22-23 6/24/05, 11:33:58 AM
Page 20

Place the sound source on a desk or hold it above the head
of the learner and ask:
3. Is it above your head?-below your ear level?
Vary the volume of the sound source and ask:
4. Does it sound like the sound source is moving toward
you (increasing volume)?
5. Does it sound like the sound source is moving away
from you (decreasing volume)?
The sound source is not moved, only the volume
is changed.
Activity Eight: Requiring complex responses
A larger area is required for the suggested conditions.
1. Place the sound source in the bottom of a large box
and toss bean bags or small playground balls toward
and into the box. In the beginning, toss from a
position relatively close to the box. When retrieving
Chapter
Three
Learner Stationary
and Sound
Source Moving
the bean bag or ball, indicate the distance from the
sound source to the throwing line.
2. Place the sound source directionally behind an object
(e.g., bowling pin, Indian club) and practice tossing,
rolling, or throwing a ball in a specifi c direction.
24 | Chapter 2 | The Sound Localization Guidebook Prototype
17820 Sound Local.ind 24-25 6/24/05, 11:33:59 AM
Page 21

Learner Stationary and Sound
Source Moving
Each of the following activities should be demonstrated
at distances near and far from the learner (Approximately:
near-1 to 3 feet; far-4 to 15 feet). Aim sound source directly
toward learner at all times.
Activity One: Localizing sound in relation to each
side of the body
1. Assume initial position: Instructor stands a specifi c
distance in front of learner with sound source aimed
at learner’s head level.
Instructor: “Where is the sound?”
Learner: “In front of me.”
Continue moving around the learner stopping on the right
side, behind, and left side of the learner.
Instructor: “Where is the sound in relation to your body?”
If the learner is familiar with telling time and understands
the relationship of the situation, describe the localization in
terms of clock positions (i.e., three, six, nine o’clock). If the
learner has diffi culty with this task, have him point to the
sound source continually as it moves.
The Sound Localization Guidebook Prototype | Chapter 3 | 27
17820 Sound Local.ind 26-27 6/24/05, 11:34:15 AM
Page 22
2. Repeat condition one but vary the height of the
Supply information regarding distances of learner from
sound source.
Instructor: “How high is the sound, and where is the sound
in relation to your body?”
Activity Two: Localizing a moving sound in relation to
each side of the body
This activity provides practice in localizing sound that is
moving away from the learner.
1. Assume initial position: Instructor stands directly in
front of the learner with sound source aimed at head
sound source as this will provide additional informational
input to the student. For example, tell the learner when the
sound is 3, 4, 8, or 10 feet from him.
4. Experiment with the learner’s ability to estimate his
distance from the sound source in feet and/or yards.
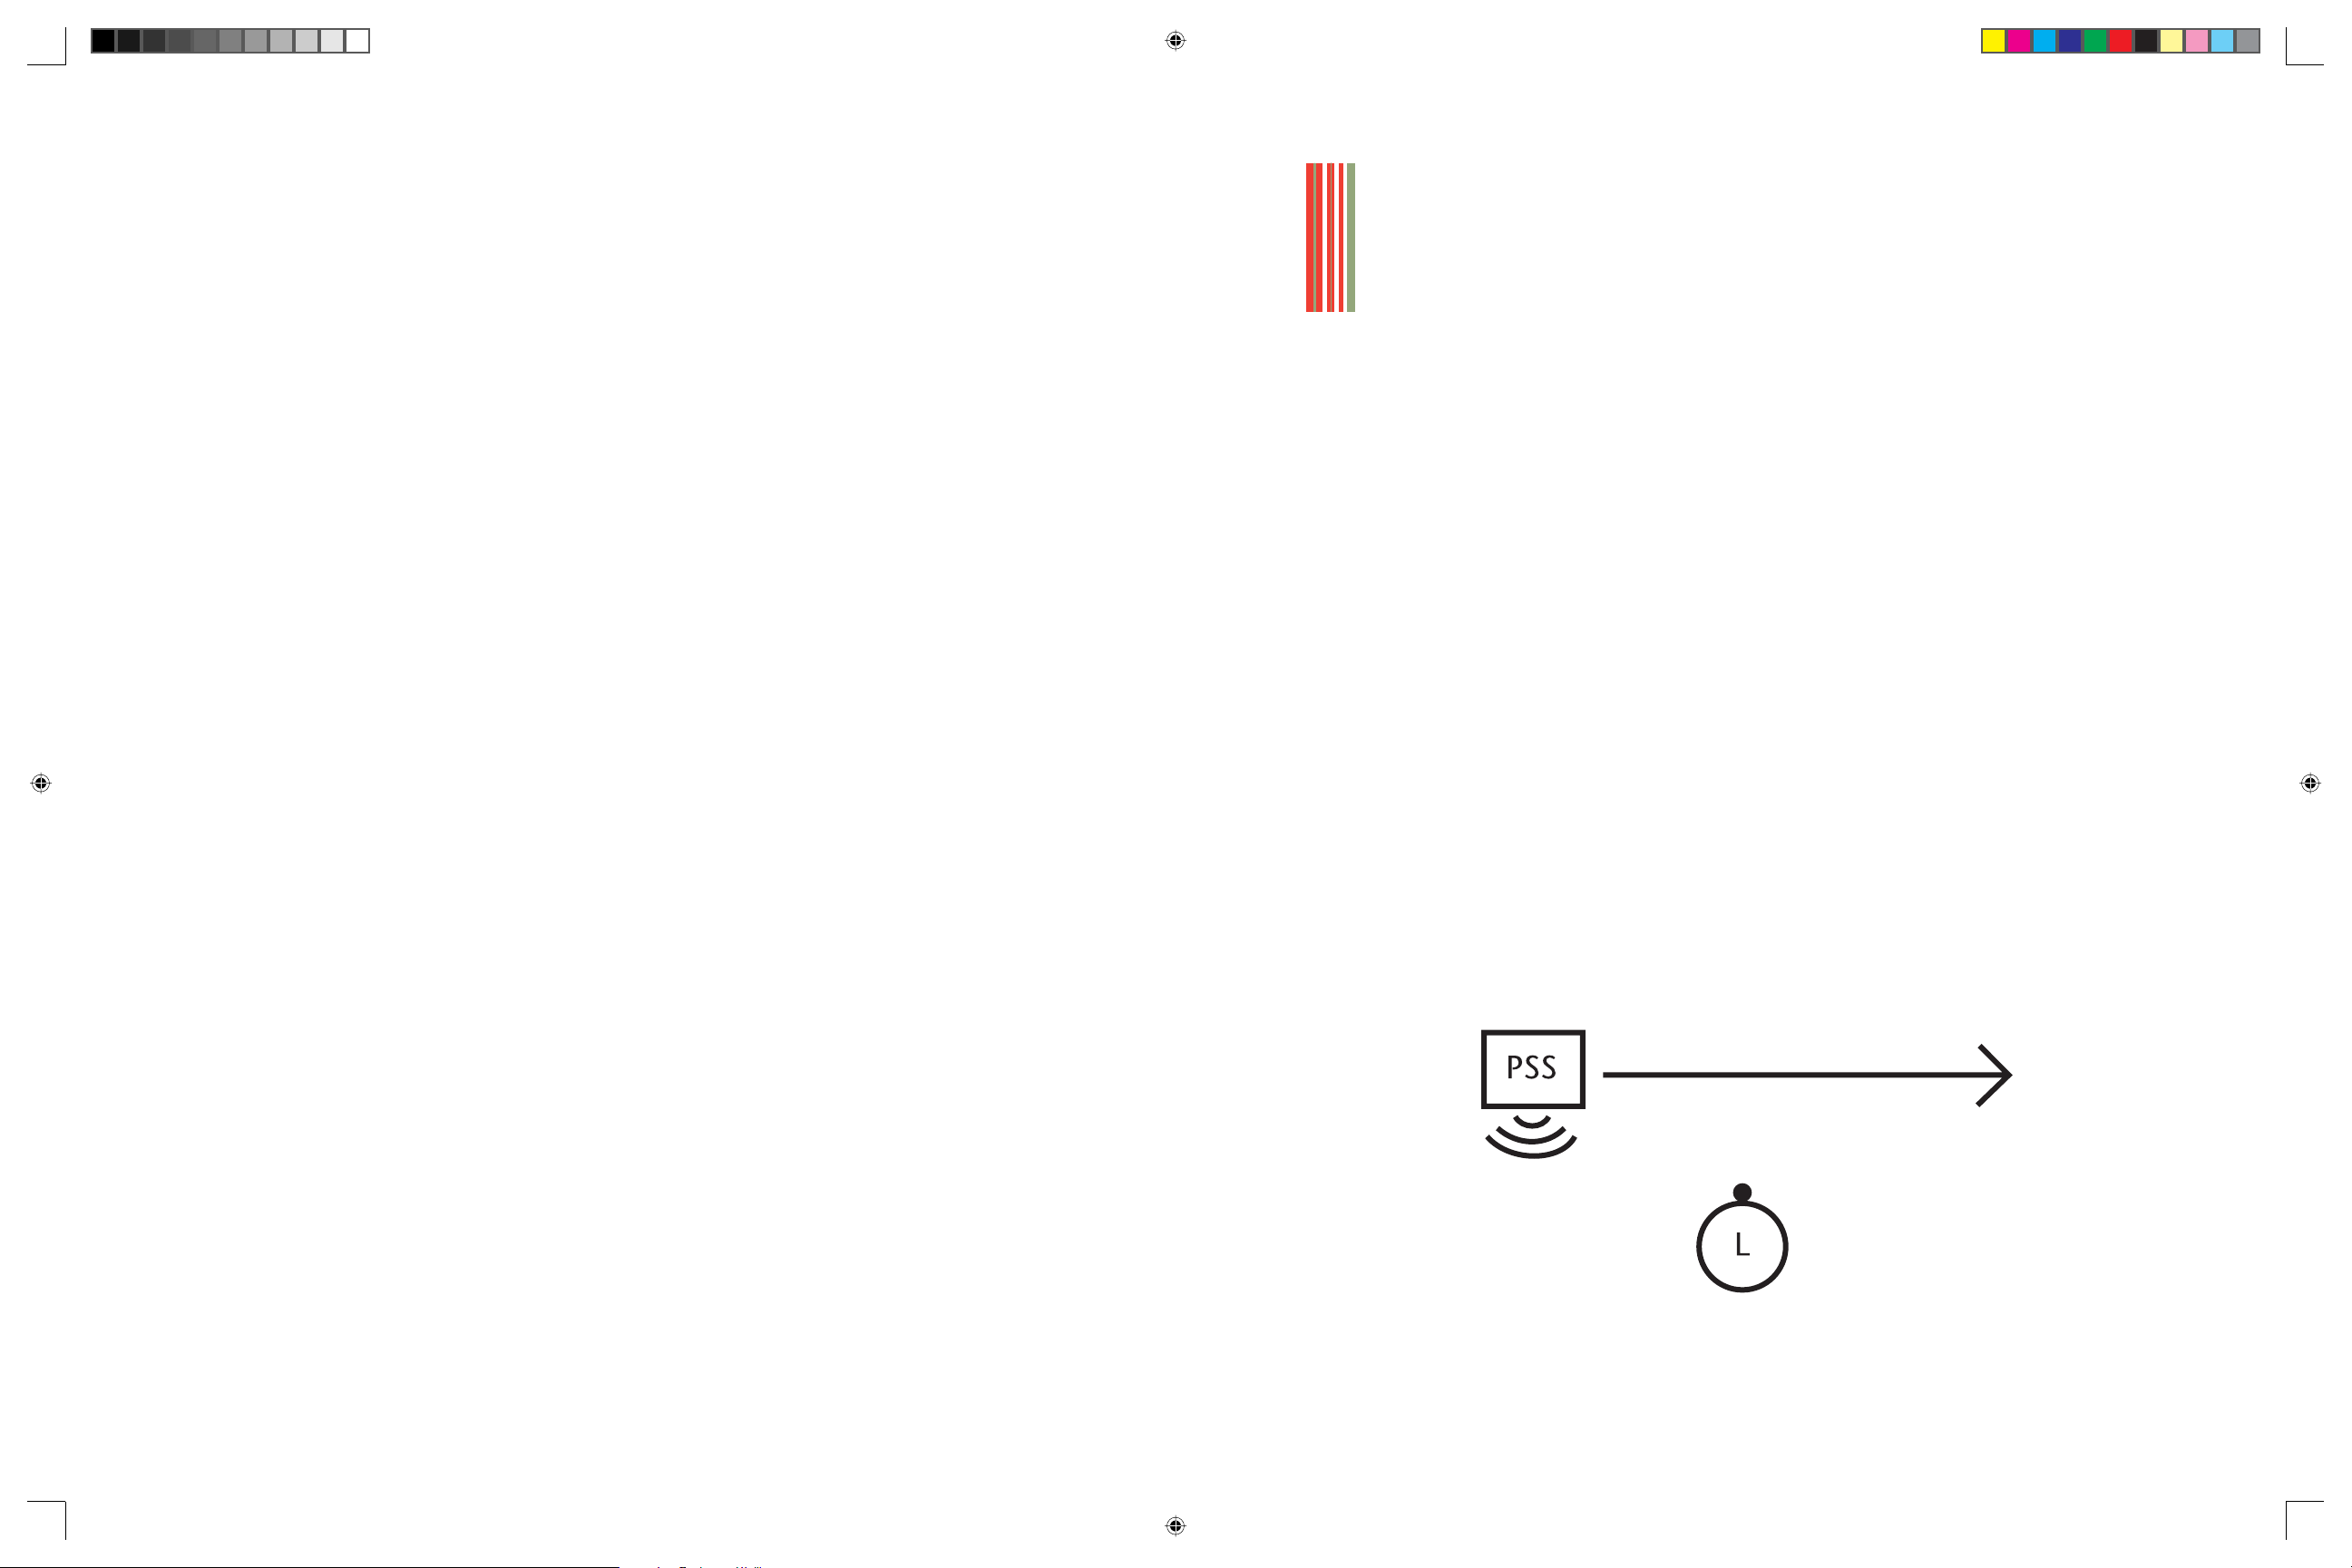
Activity Three: Localizing a sound moving parallel to
the learner
This activity introduces sound moving in a straight line of
direction, parallel to each side of the learner’s body.
level. Instructor backs up specifi ed distances from the
learner. A continuing sound should be emitted while
it is being moved.
Instructor: “Listen to the sound as it moves away from you.”
2. Repeat the previous condition by placing the
sound source on the right, behind, and left side
of the learner.
3. Demonstrate each condition with the sound source
aimed at head level. After each demonstration, vary
the height of the sound and ask if it is above, below,
or at head level.
1. Assume initial position: Instructor stands in front and
to the left of learner with sound source aimed at head
level. Instructor walks from the learner’s left to right
side parallel to the learner’s front side.
Instructor: “Listen to the sound as it moves from your left to
your right.” (See Figure 1.)
Figure 1
28 | Chapter 3 | The Sound Localization Guidebook Prototype The Sound Localization Guidebook Prototype | Chapter 3 | 29
17820 Sound Local.ind 28-29 6/24/05, 11:34:16 AM
Page 23
2. Repeat condition one by moving the sound from the
right to the left.
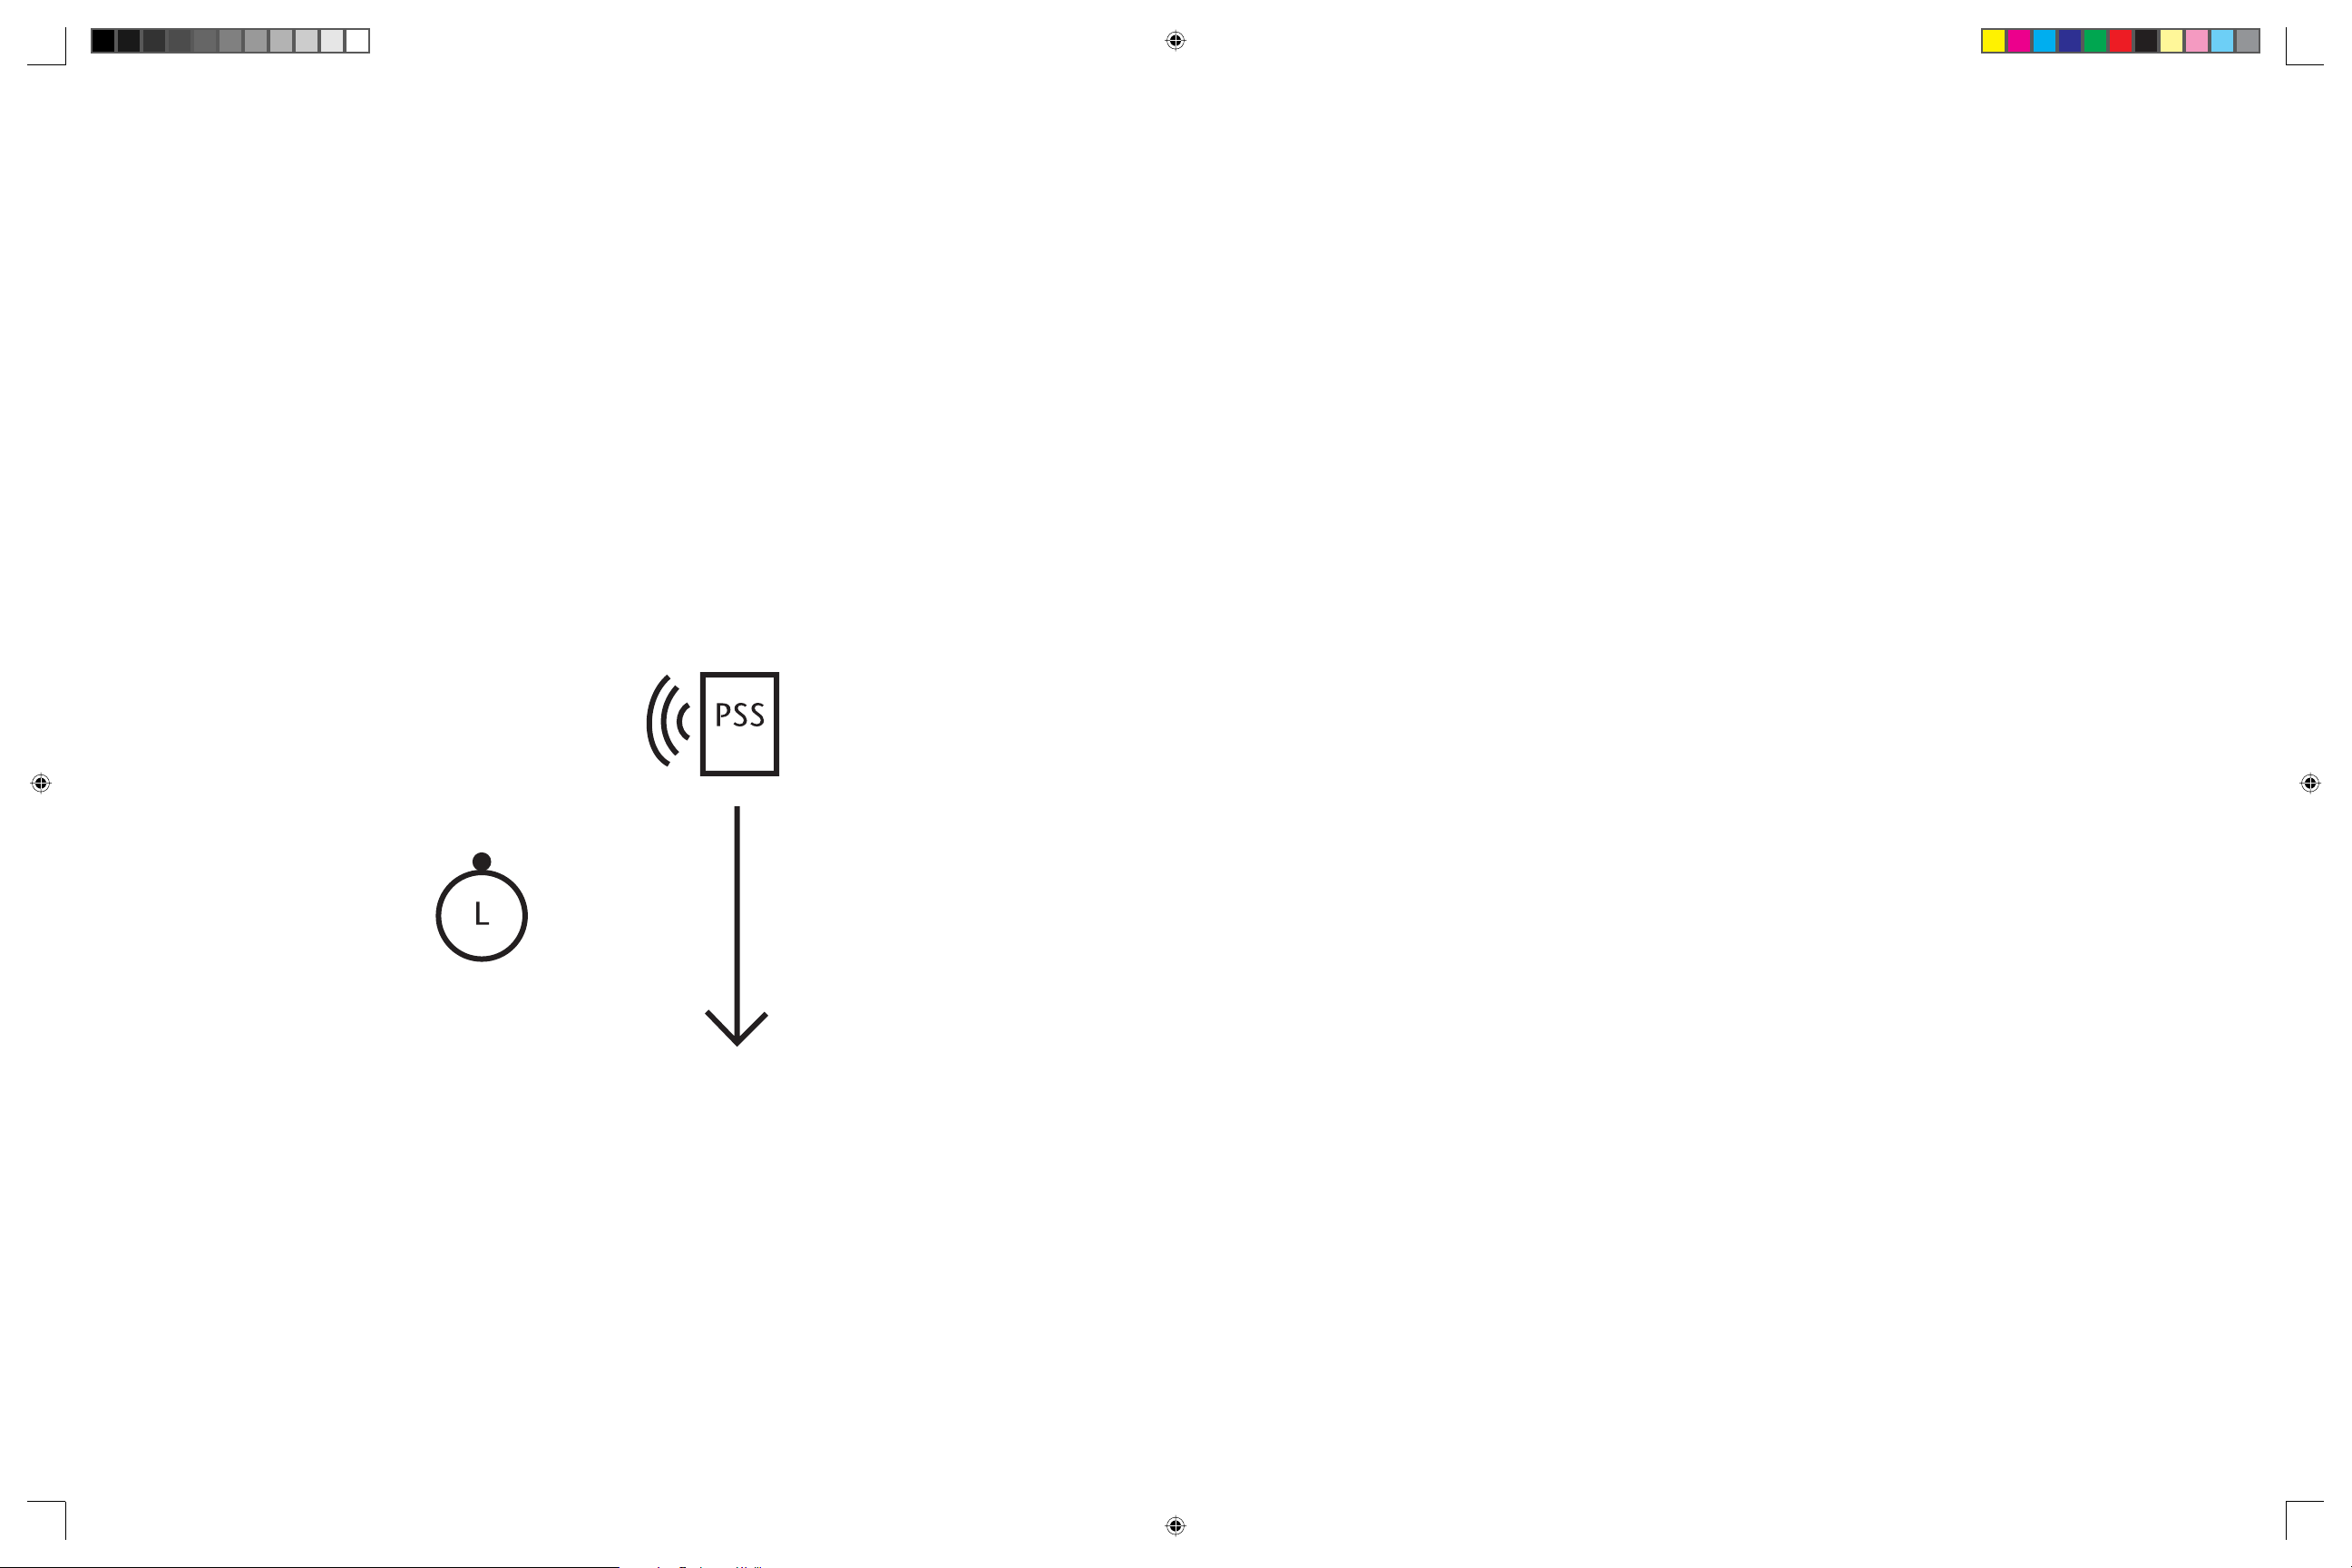
Activity Four: Responding to a moving sound
3. Repeat condition one and two behind the learner.
4. Take second position: Instructor stands in front and to
the right of learner with sound source aimed at head
level.
Instructor walks past learner, parallel to the learner’s
right side.
Instructor: “Listen to the sound as it moves from in front of
you to behind you.” (See Figure 2.)
Repeat the previous activity but have the learner tell the
instructor to stop when the moving sound is directly
opposite each side of his body.
Instructor: “Tell me to stop when the sound is directly in
front of you .... in back of you .... directly on your right ....
directly on your left.”
Figure 2
5. Repeat condition four on the left side of the learner.
6. Repeat condition four and fi ve by walking from
behind to in front of the learner.
30 | Chapter 3 | The Sound Localization Guidebook Prototype The Sound Localization Guidebook Prototype | Chapter 3 | 31
17820 Sound Local.ind 30-31 6/24/05, 11:34:17 AM
Page 24
Chapter
Four
Learner Moving
and Sound
Source Stationary
32 | Chapter 3 | The Sound Localization Guidebook Prototype
17820 Sound Local.ind 32-33 6/24/05, 11:34:18 AM
Page 25

Learner Moving and
Sound Source Stationary
Each activity within this category is performed with the
learner moving his head or entire body at the time the
sound is being emitted. The sound source remains in a
stationary position. After each condition is performed, the
sound source is turned off. When necessary the instructor
will specifi cally position the learner to perform a task before
turning on the sound source. The fi rst three activities should
be demonstrated at near range initially. All conditions should
be explained to the learner before the demonstration.
Activity One: Introducing facing movement by only
moving the head
Explain to the student that the tasks to be performed
involve positioning the head so that the nose is pointed
directly at the sound source. The sound source should be
placed at head level for the initial demonstration of the fi rst
three conditions. After each condition, the instructor should
position the learner to facilitate the next facing movement
(conditions two and three).
1. Assume initial position: Learner stands directly in front
of sound source.
Instructor: “Where is the sound?”
Learner: “In front of me.”
The Sound Localization Guidebook Prototype | Chapter 4 | 35
17820 Sound Local.ind 34-35 6/24/05, 11:34:50 AM
Page 26

2. Place sound source on learner’s left side.
Instructor: “Where is the sound?”
Learner: “On my left.”
Instructor: “Turn only your head and face the sound.”
3. Place sound source on learner’s right side.
Instructor: “Where is the sound?”
Learner: “On my right.”
Instructor: “Turn only your head and face the sound.”
1. Assume initial position: Learner stands directly in front
of sound source.
Instructor: “Where is the sound?”
Learner: “In front of me.”
Instructor: “Are you facing the sound?”
Learner: “Yes.”
2. Have learner stand with sound source on left side.
Instructor: “Where is the sound?”
Activity Two: Moving the entire body to face
the sound source
This activity repeats conditions presented in the previous
activity; however, the learner must move his entire body
when facing the sound source. Each condition should be
explained to the student prior to the demonstration. Show
the learner how to correctly align his head with his body
when facing the sound source. Place the sound source at
head height for the initial demonstration of the fi rst four
conditions. When necessary the instructor should position
the learner to perform facing movements (conditions two,
Learner: “On my left.”
Instructor: “Turn and face the sound.”
3. Have learner stand with sound source on right side.
Instructor: “Where is the sound?”
Learner: “On my right.”
Instructor “Turn and face the sound.”
4. Have learner stand with sound source behind him.
Instructor: “Where is the sound?”
three, and four).
Learner: “Behind me.”
Instructor: “Turn and face the sound.”
36 | Chapter 4 | The Sound Localization Guidebook Prototype The Sound Localization Guidebook Prototype | Chapter 4 | 37
17820 Sound Local.ind 36-37 6/24/05, 11:34:51 AM
Page 27

5. Repeat the previous conditions; vary height of
Instructor: “Turn only your head and face the sound. Use
sound source.
Instructor: “How high is the sound? Turn and face
the sound.”
Activity Three: Pointing and facing
This activity introduces pointing with facing movements.
Pointing behavior is intended to further assist the learner
in localizing sound. As with previous activities, the
instructor should position the learner to perform the
conditions that follow.
1. Assume initial position: Learner stands directly in front
of sound source.
your left hand and point toward the sound.”
3. Have learner stand with sound source on right side.
Instructor: “Where is the sound?”
Learner: “On my right.”
Instructor: “Turn only your head and face the sound. Use
your right hand to point to the sound.”
4. Have learner stand with sound source on left side.
Instructor: “Where is the sound?”
Learner: “On my left.”
Instructor: “Where is the sound?”
Learner: “In front of me.”
Instructor: “Are you facing the sound?”
Learner: “Yes.”
Instructor: “Use either hand and point at the sound.”
2. Have learner stand with sound source on his left side.
Instructor: “Where is the sound?”
Learner: “On my left.”
Instructor: “Turn your body to face the sound source. Point
at the sound source using either hand.”
5. Have learner stand with sound source on right side.
Instructor: “Where is the sound?”
Learner: “On my right.”
Instructor: “Turn your body to face the sound. Point at the
sound using either hand.”
38 | Chapter 4 | The Sound Localization Guidebook Prototype The Sound Localization Guidebook Prototype | Chapter 4 | 39
17820 Sound Local.ind 38-39 6/24/05, 11:34:52 AM
Page 28

Activity Four: Walking toward a sound source
Instructor: “Walk straight ahead until you are directly
between the two sounds, then stop. Turn right and face that
The following conditions involve localizing a sound by
walking an arbitrary distance to locate the position of the
sound source. The distance a learner must walk to locate
the sound source is left up to the instructor’s judgment.
If a learner has had little experience with this activity,
starting at a distance of 5 feet and working up to
distances of 30 feet may be a successful approach. Skill
in localizing sound will increase with practice; therefore,
the following conditions may be performed as many times
as needed. However, do not be discouraged if a learner is
less precise at farther distances. This is a natural outgrowth
of the human perceptual system and takes much practice
to counter.
sound. Point at the sound, then walk to the sound.”
4. Repeat condition three by having learner turn left
when he reaches the midpoint between the two
sound sources.
5. Repeat condition three and four but eliminate the
sound source opposite the direction in which the
learner is turning.
Activity Five: Walking away from a sound source
Repeat each of the conditions in the previous activity by
reversing each walking pattern.
1. Assume initial position: Learner stands facing sound
source, a specifi c distance from sound source.
Instructor: “Walk to the sound.”
2. Have learner stand with sound source behind him, a
specifi c distance from sound source.
Instructor: “Make a half-turn to the left/right; walk to
the sound.”
3. Have learner stand in front and equidistant from two
sound sources (i.e., Place one sound source on the
right and one sound source on the left).
1. Assume initial position: Learner stands with sound
source behind him, a specifi c distance away from
sound source.
Instructor: (Standing behind the learner and the sound
source) “Walk straight away from the sound. Stop walking
when I turn off the sound.”
2. Have learner stand facing sound source, a specifi c
distance away from the sound source.
Instructor: “Turn around so that your back is facing the
sound. Walk away from the sound. Stop walking when I turn
off the sound.”
40 | Chapter 4 | The Sound Localization Guidebook Prototype The Sound Localization Guidebook Prototype | Chapter 4 | 41
17820 Sound Local.ind 40-41 6/24/05, 11:34:53 AM
Page 29

3. Have learner stand with his back next to one sound
2. Repeat condition one by having learner stand with his
source. Place another sound source directly in front of
him, a specifi c distance away.
Instructor: “Walk toward the sound in front of you. When
you are directly between (middle) the two sounds, stop.
Turn right and walk until I turn off the sound.”
4. Repeat condition three by having learner turn to
the left.
5. Repeat condition three and four but eliminate the
sound source in front of the learner.
Activity Six: Walking around a sound source
left side facing sound source.
3. Repeat previous conditions by varying the distance
the learner stands away from sound source.
Experiment with eliminating the rope/pole after
several practice trials.
This activity provides practice in localizing sound while
walking in a circle. Providing the learner contact with a
pole or rope connected to the center of the circle will assure
that an accurate circular pattern is walked.
1. Assume initial position: Learner stands with his right
side facing and a specifi c distance away from sound
source. Instructor will stand behind sound source with
rope/pole in his hand. Learner will grasp the other
end of the rope/pole with his right hand.
Instructor: “Hold on to the rope/pole and walk around
the sound. Stop when your right ear is again in line with
the sound.”
42 | Chapter 4 | The Sound Localization Guidebook Prototype The Sound Localization Guidebook Prototype | Chapter 4 | 43
17820 Sound Local.ind 42-43 6/24/05, 11:34:54 AM
Page 30

Chapter
Five
Learner Moving
and Sound
Source Moving
44 | Chapter 4 | The Sound Localization Guidebook Prototype
17820 Sound Local.ind 44-45 6/24/05, 11:34:55 AM
Page 31

Learner Moving and Sound Source Moving
Each activity within the category is performed with
the learner moving his head or entire body at the
same time the sound source is being moved by the
instructor. All conditions of an activity should be
explained to the learner before turning on the sound
source. Provide feedback relative to movement performance
and distance judgements.
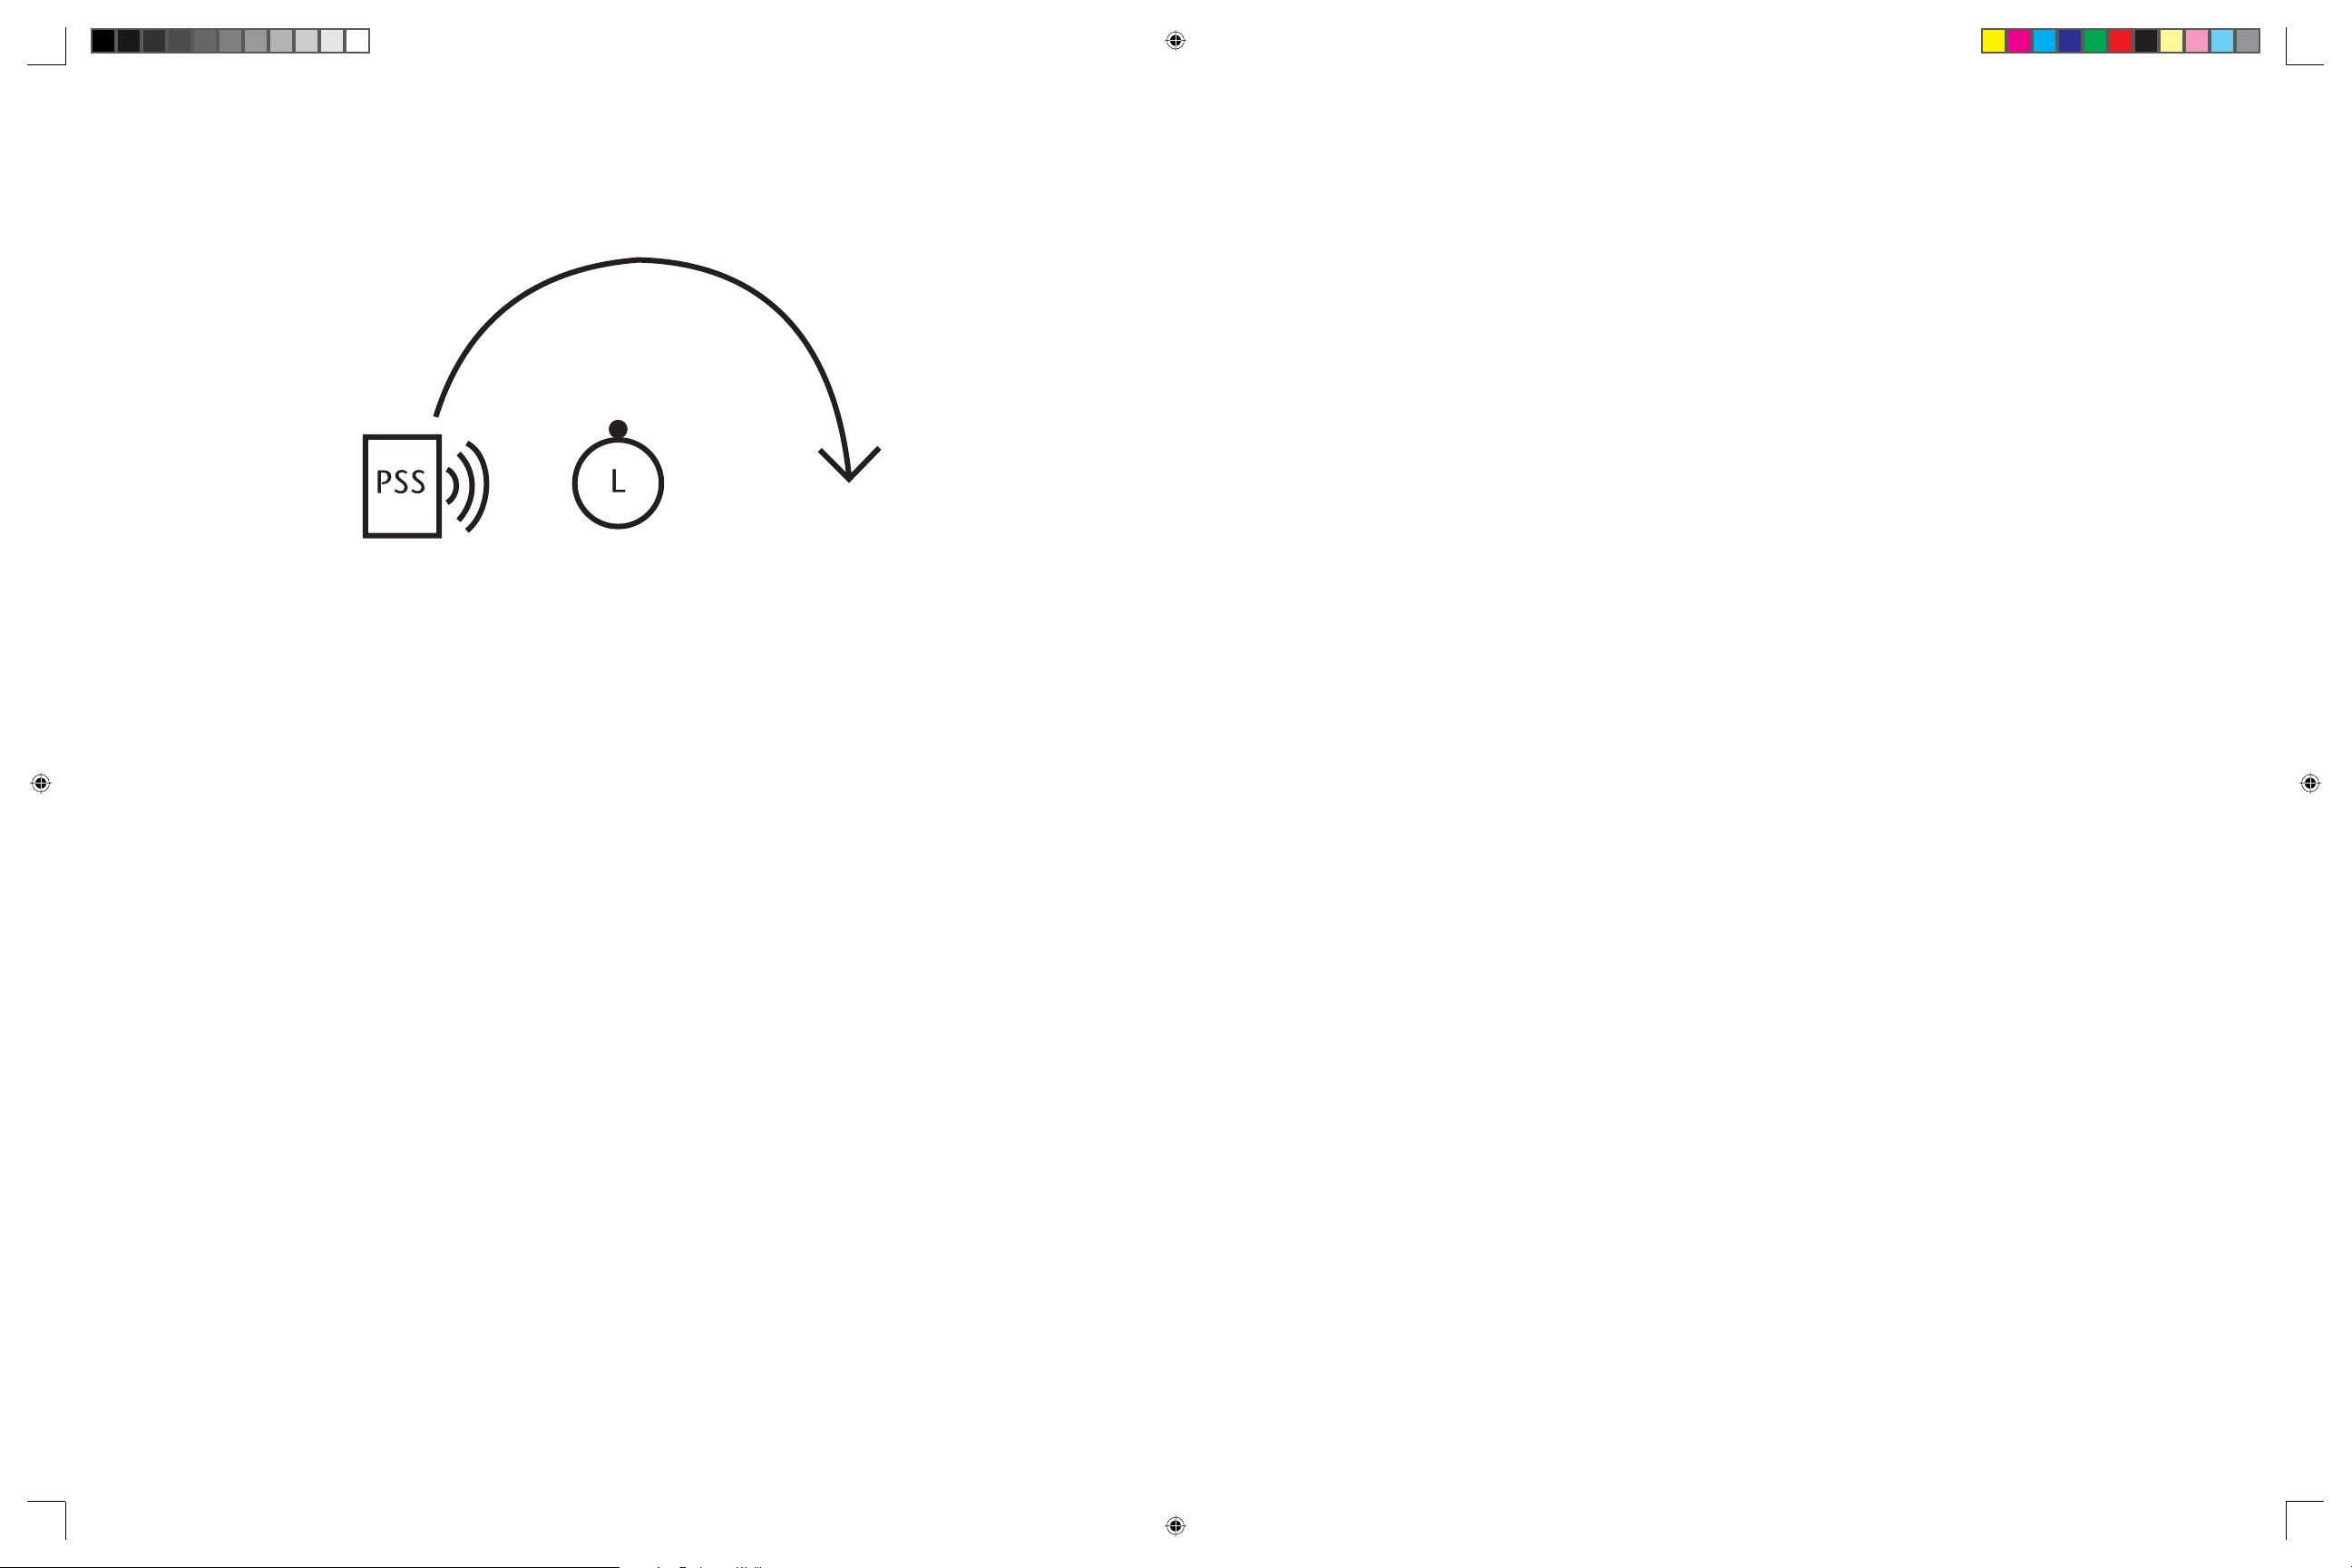
Activity One: Tracking a sound source by moving
only the head
1. Initial position: Instructor, facing learner’s right side,
aims sound source at learner’s head. Instructor walks
in half circle (180° sweep) from the learner’s right side
to the learner’s left side. Sound is constantly aimed at
learner’s head. (See Figure 3.)
Instructor: “Move only your head and follow the sound as it
moves from your right to your left.”
Figure 3
The Sound Localization Guidebook Prototype | Chapter 5 | 47
17820 Sound Local.ind 46-47 6/24/05, 11:35:22 AM
Page 32
2. Repeat condition one by moving the sound from left
4. Repeat condition three by having the learner point at
to right. (See Figure 4.)
Figure 4
Activity Two: Tracking a sound source moving the
entire body
the moving sound.
Activity Three: Following a moving sound source
1. Initial position: Instructor and learner face each
other. Instructor aims sound source at learner’s
head. Instructor will back up in straight line, then a
random pattern. Learner follows instructor. Sound
remains constant.
Instructor: “Follow the sound as it moves away from you.”
2. Repeat condition one and have learner stop and start
as sound is turned off and on.
1. Repeat conditions one and two in the previous activity
by having the learner move his entire body when
tracking the sound in a half circle (180° sweep).
Instructor: “Move your whole body and follow the sound as
it moves from your right to your left; from your left to your
right.”
2. Repeat the previous conditions by having the learner
point at the moving sound.
3. Repeat condition one and two moving in a
360° circle.
3. Repeat condition one by having learner stop and
start when instructor stops and starts. Sound
remains constant.
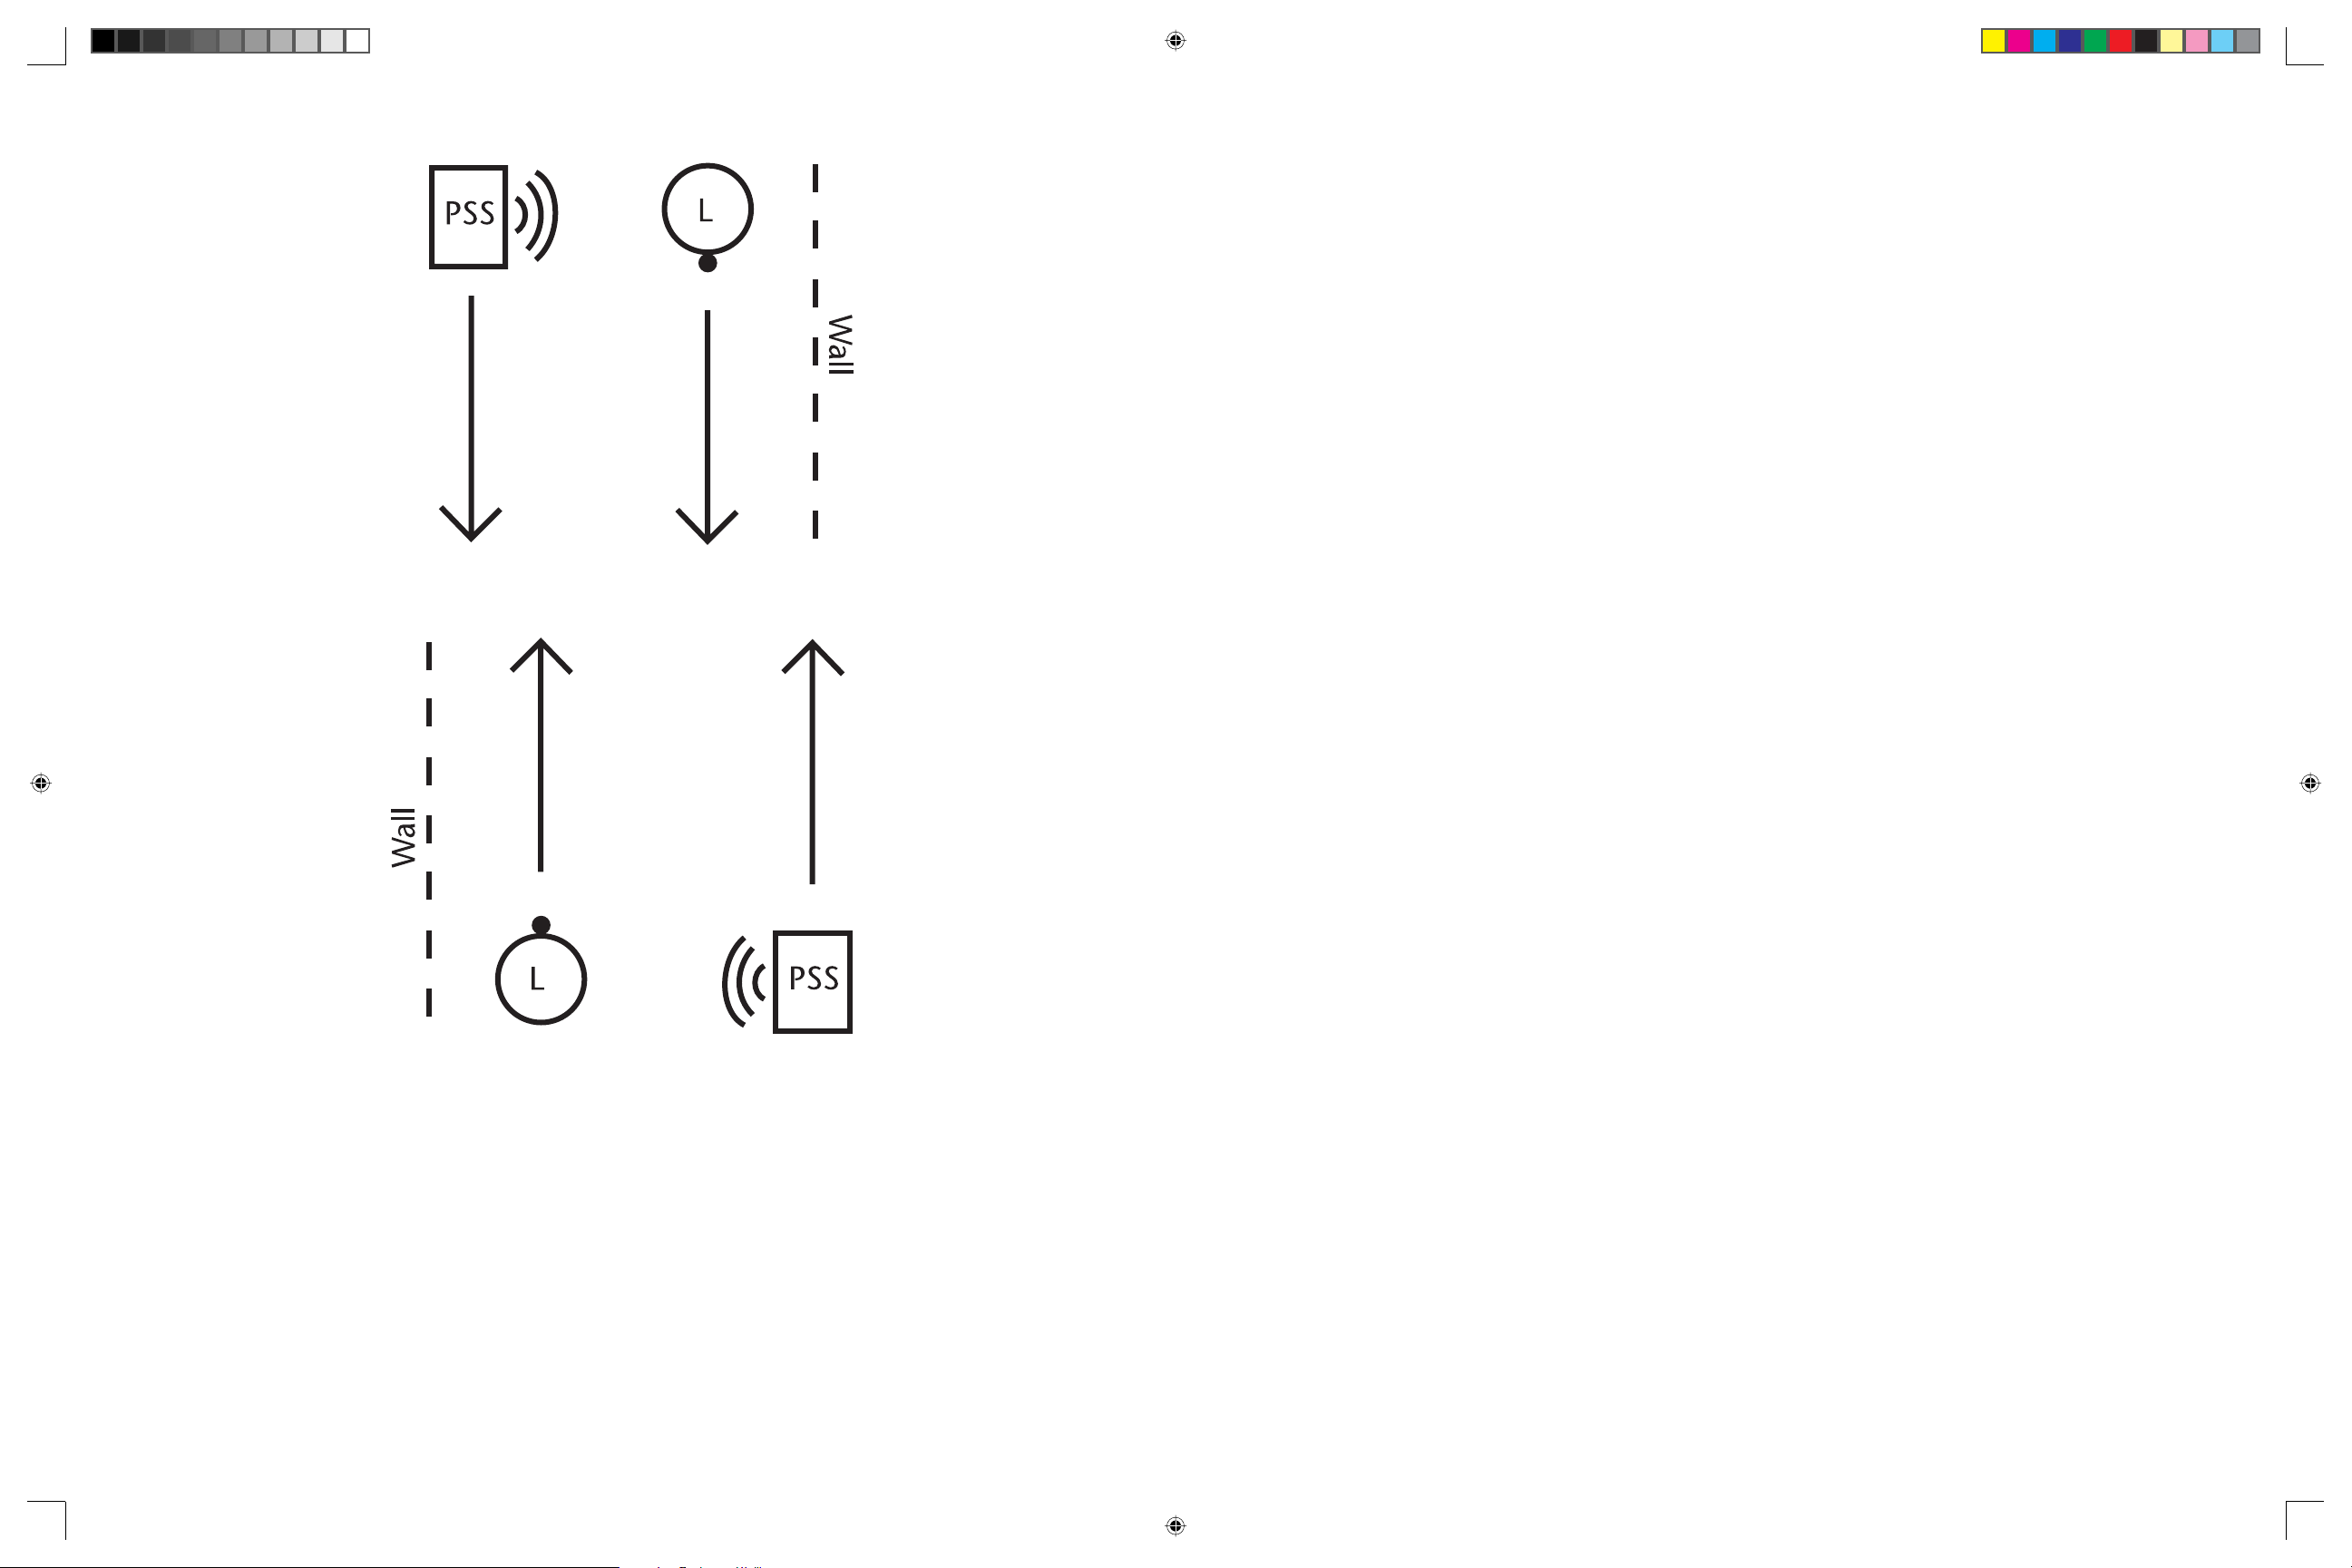
Activity Four: Walking parallel to a moving sound
1. Initial position: Learner stands next to a wall or a
guideline/wire that he trails. Instructor stands next
to learner aiming sound source at learner’s head.
Instructor and learner walk side by side in a parallel
line. (See Figure 5.)
Instructor: “Trail the wall and follow the sound.”
Instructor: “Move your whole body and follow the sound as
it moves in a circle around you.”
48 | Chapter 5 | The Sound Localization Guidebook Prototype The Sound Localization Guidebook Prototype | Chapter 5 | 49
17820 Sound Local.ind 48-49 6/24/05, 11:35:23 AM
Page 33
2. Repeat condition one by having the learner walk in
tandem with the instructor. Eliminate trailing the
wall. Experiment with increasing distance between
instructor and learner using sighted guide technique,
extended arms, and pole or rope of various lengths.
3. Repeat condition two with no physical contact
between the learner and the instructor.
4. Repeat condition three by having learner stop when
sound source is turned off and start when sound is
turned on.
Figure 5
50 | Chapter 5 | The Sound Localization Guidebook Prototype The Sound Localization Guidebook Prototype | Chapter 5 | 51
17820 Sound Local.ind 50-51 6/24/05, 11:35:24 AM
Page 34
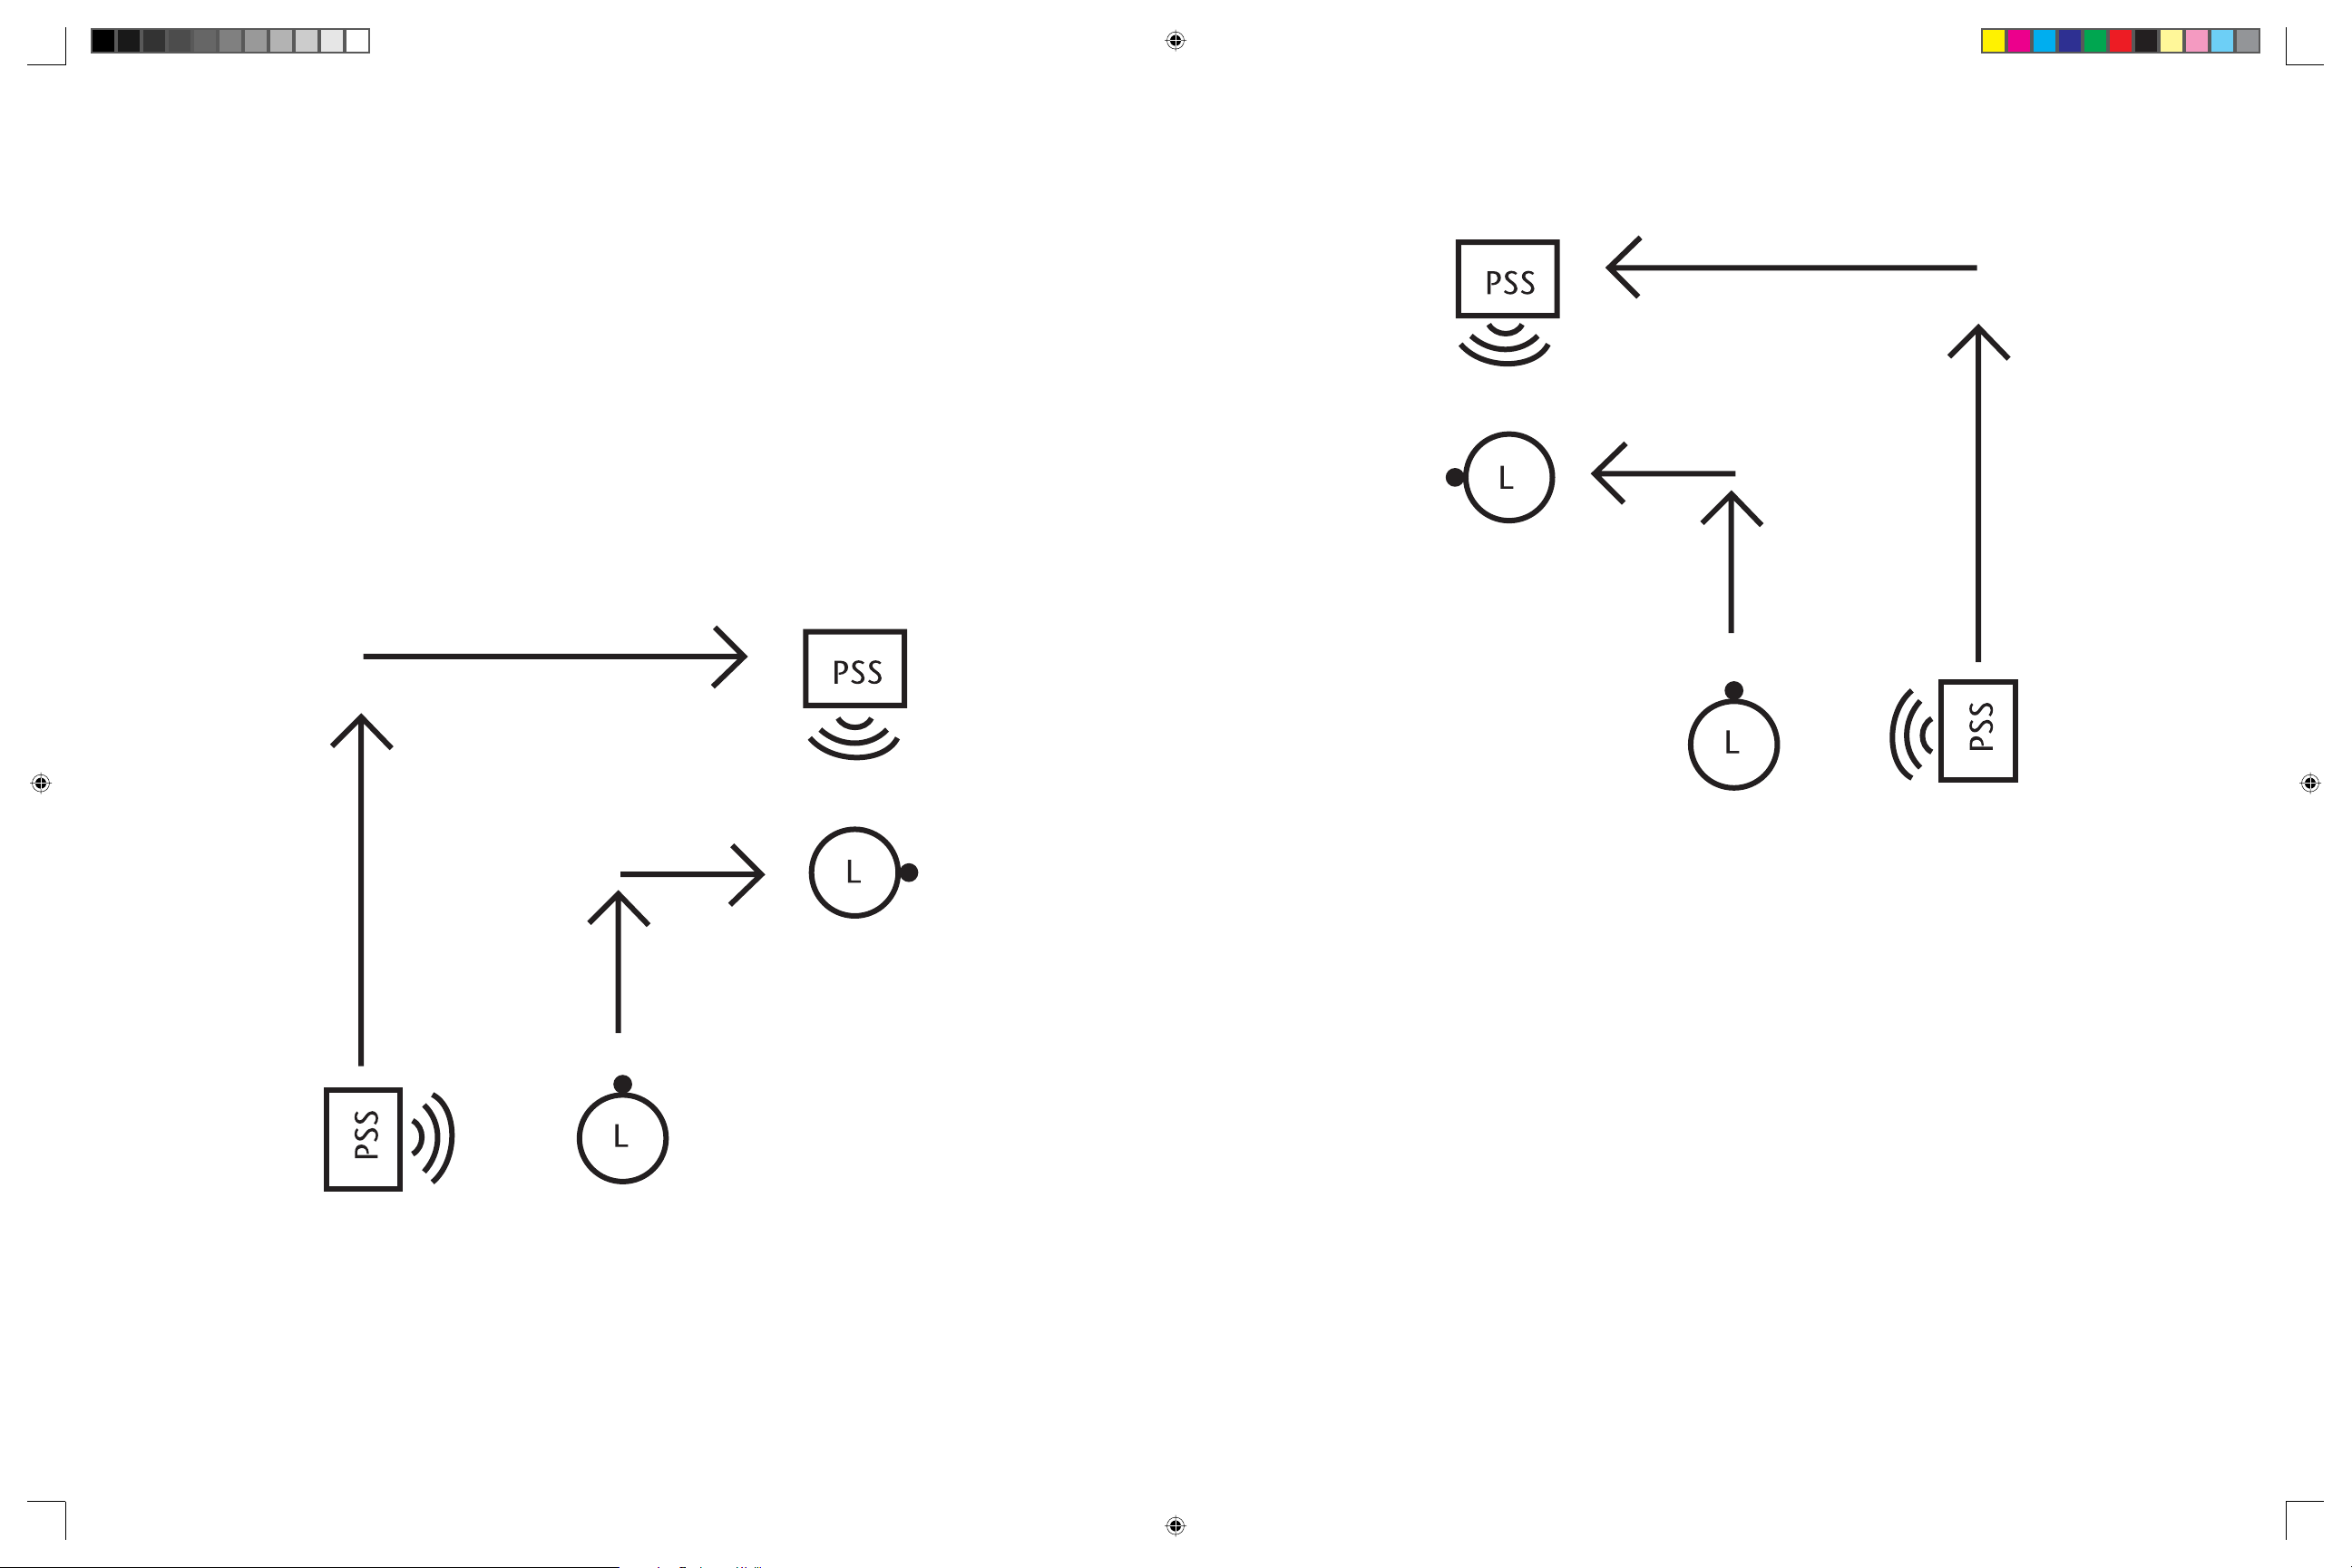
Activity Five: Walking parallel to a sound while
walking a 90° angle
1. Assume initial position: Instructor and learner stand
side by side a specifi c distance apart. Sound source is
aimed at learner’s head. Instructor and learner walk in
a parallel direction side by side. (See Figure 6.)
Instructor: “Walk beside the sound. After we have
walked several steps, we will turn right; then we will
continue walking.”
2. Repeat condition one by turning left. (See Figure 7.)
Figure 6
Figure 7
3. Repeat condition one and two by placing sound on
opposite side of learner.
52 | Chapter 5 | The Sound Localization Guidebook Prototype The Sound Localization Guidebook Prototype | Chapter 5 | 53
17820 Sound Local.ind 52-53 6/24/05, 11:35:25 AM
Page 35
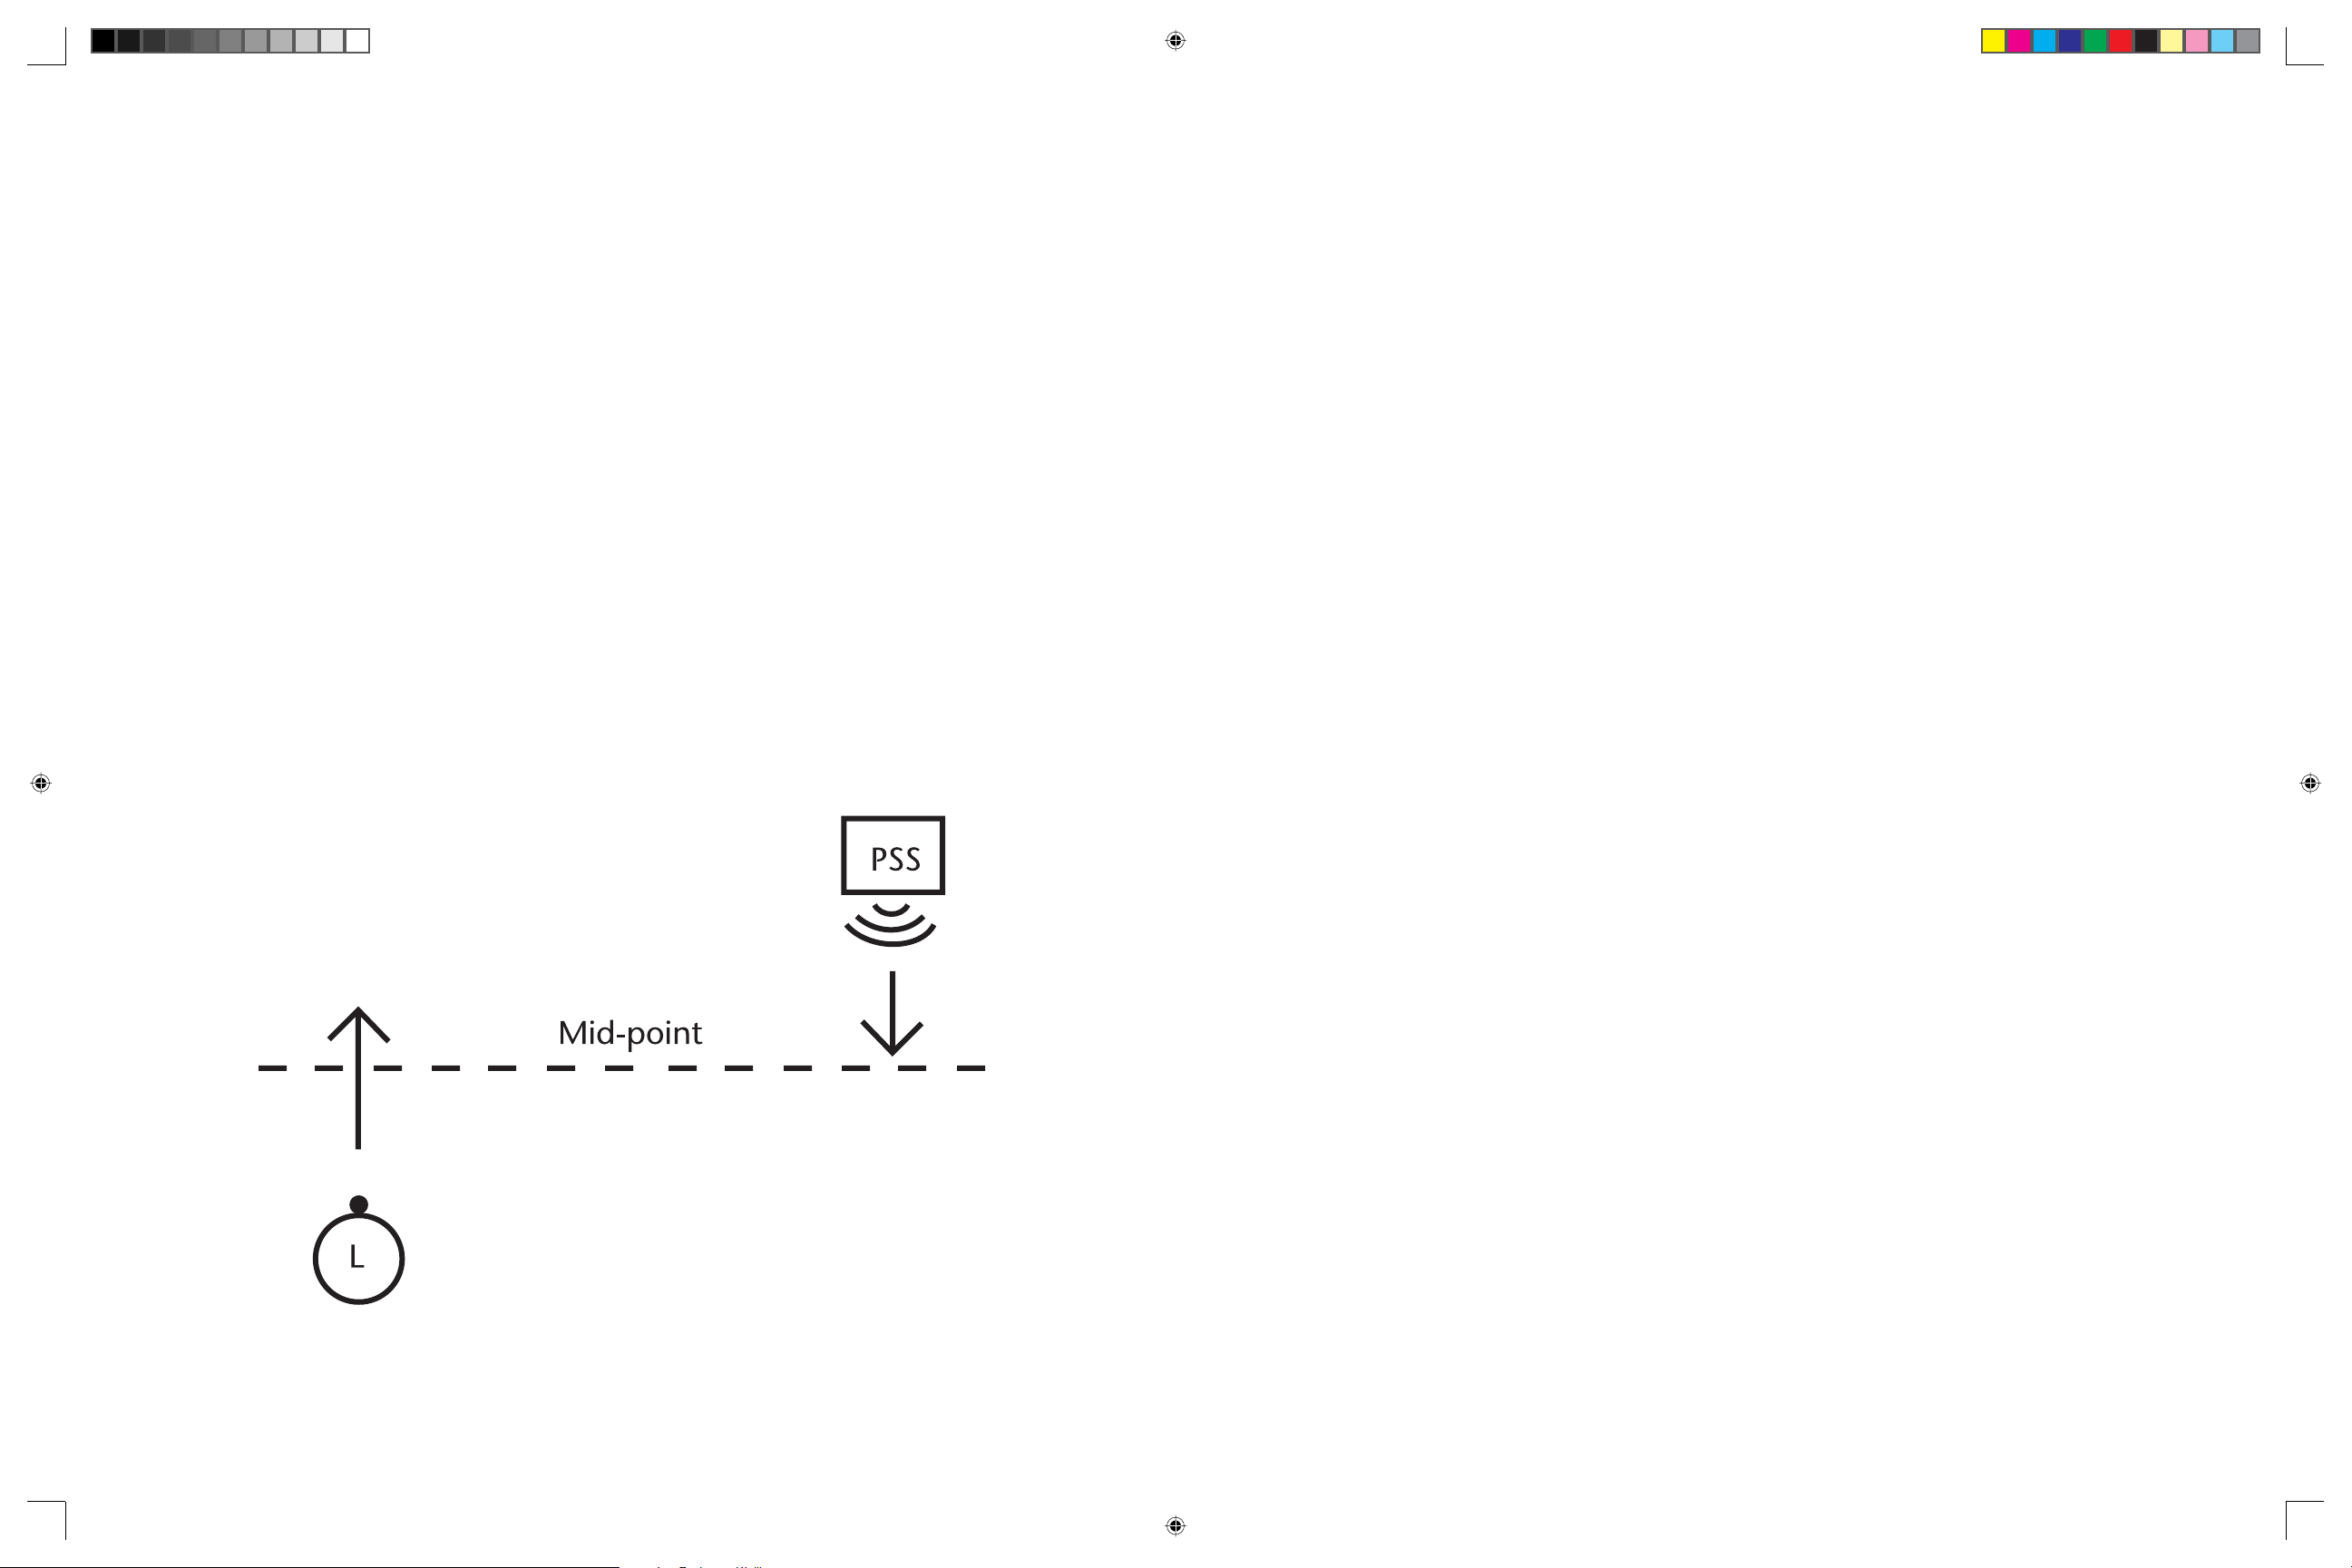
Activity Six: Localizing sound when moving in
opposition to the sound source
2. Repeat condition one by reducing the distance the
instructor walks and increasing the distance the
learner walks. Alternate sides.
1. Assume initial position: Instructor stands in front
and to the learner’s right at a specifi c distance away.
When sound source is turned on, instructor and
learner start walking toward each other in a parallel
line of direction. Instructor stops before he reaches
learner. Learner continues walking in a parallel line
and stops beside the sound source. The diffi culty
in performing this condition is in maintaining the
parallel position; tendency of learner will be to veer
toward or away from the sound.
Instructor: “Walk straight ahead until you hear the sound
directly on your right side; then stop.” (See Figure 8.)
3. Repeat condition one by having the learner stop and
start several times as he approaches the sound. When
the sound is turned off, the learner will stop; when
sound is turned on, the learner will start.
The activities outlined in chapters 2-5 are used to expose
and train children to basic ways of interacting with direct
sounds. These experiences and the skills developed through
these exercises can be extrapolated to more sophisticated
uses of sound in daily orientation and mobility tasks. A brief
discussion of other ways sound can be used for orientation
and mobility tasks and some examples of every day tasks
using the skills developed through these exercises is covered
in Appendix A.
Figure 8
54 | Chapter 5 | The Sound Localization Guidebook Prototype The Sound Localization Guidebook Prototype | Chapter 5 | 55
17820 Sound Local.ind 54-55 6/24/05, 11:35:25 AM
Page 36
Chapter
Six
Practicing Skills
Through Group
Activities
56 | Chapter 5 | The Sound Localization Guidebook Prototype
17820 Sound Local.ind 56-57 6/24/05, 11:35:27 AM
Page 37

Practicing Skills Through Group Activities
Learner Stationary and Sound Source Moving
The activities in chapter 6 focus on levels of learner
functioning and the development of basic localization skills.
It is recognized that the games and activities may be played
without the introduction of a sound source; however, the
additional emphasis on sound localization skills provides
many additional opportunities to develop this highly
desirable skill. This chapter lends itself to many adaptations
within a learner’s physical education curriculum. Attaching
the sound source to another person who is of interest in a
game and who is moving would fi t into this category.
Activities requiring a tracking response
Auditory tracking occurs when the learner follows a sound
through head or body movement while maintaining a
spatially stationary position. The area needed may be
relatively small for circle games, or in some instances, the
movements may require a large open area. The purposes
of the suggested activities are to track a moving sound and
to make game decisions based on information obtained
auditorily and requiring sound localization. For example,
procedures might be:
1. Incorporate the use of the sound source in primary
level circle games.
The Sound Localization Guidebook Prototype | Chapter 6 | 59
17820 Sound Local.ind 58-59 6/24/05, 11:35:52 AM
Page 38

METHOD: In games such as Ring around the Rosy or Farmer
2. Give the sound source a name and place at any point
in the Dell, learners in the circle may carry the sound source,
and the learner who has visual impairment can track the
sound, turning in place. When choosing is involved, the
learner should also be informed as to who is carrying the
device and who the classmates are to her right and left.
2. Use a sound source in tag or “it” games. Learners
should be made aware of the location of person or
persons who are “it.”
METHOD: In games such as Ocean Is Stormy or Pussy Wants
a Corner, the learner who has a visual impairment can
track those who are “it” within the play area and make
independent decisions about when to move.
within the room. The question then becomes “Where
Am I?” It may be by the locker, drinking fountain,
sink, pencil sharpener, or any other landmark within
the room.
Activities requiring classroom applications
The activities should be conducted in conjunction with
science instruction. The purpose is to demonstrate the
concept of planetary movements. For example, procedures
might be:
1. Demonstrate the movement of the moon (sound
source) around the earth (learner).
Activities requiring a verbal response
The activities should be conducted in the classroom. The
purpose of the activities is to localize a sound and associate it
with a specifi c point in the known environment.
For example, procedures might be:
1. Play an adapted version of Heads-Up Seven-Up in
which all learners have their heads on their desks. “It”
places the sound source on a classmate’s desk and
then from the front of the room asks, “Who has the
Sound Source?” Learners localize the sound before
raising their hands to reply.
2. Demonstrate the movement of the earth (sound
source) around the sun (learner).
Learner Moving and Sound Source Stationary
These activities emphasize skills that require accurate
localizations over greater distances. In general, a more open
and unrestrictive space is required.
Since expectations regarding learner movement have
been made, close attention must be paid to an underlying
principle in all physical activities for learners with visual
impairments. The work space must be so structured as to
insure that the learner moves safely and still experiences
freedom of movement. Quite often the student must be
60 | Chapter 6 | The Sound Localization Guidebook Prototype The Sound Localization Guidebook Prototype | Chapter 6 | 61
17820 Sound Local.ind 60-61 6/24/05, 11:35:53 AM
Page 39

taught protective techniques and be given suffi cient time
c. Use circle games. When the visually impaired
to explore the area. It is also important that supervision be
maintained over the space and/or the activity.
Activities requiring localization of a stationary sound
The purpose of the activities is to use a sound cue as a
goal or directional aid that assists movement. For example,
procedures might be:
1. Use game approach.
a. Incorporate the sound into primary
level games.
learner is in the outer circle, the sound source
should be centered. The procedure should
encourage the student to maintain an equal
distance from the sound source.
2. Use self-testing stunts. In activities classifi ed as selftesting stunts, the level of learner performance can
be infl uenced by his ability to localize sounds and the
availability of useful sound cues.
METHOD: In relays, direction of movement is especially
important where time is a factor and veering tendencies
must be overcome. In tug of war, a sound source may be
used in at least two ways to structure the environment:
METHOD: In games such as Lame Fox and Chickens, Squirrels
and Trees, Animal Chase, Midnight, or Minnows in the Net,
the sound source represents a base, rest, safety area, or
“it.” The learner runs toward the sound. Rapid movement
is necessary, and the learner is encouraged to avoid being
caught. The sound source may be placed at ground level,
but in order to avoid the possibility of tripping over it, it may
be held or suspended from the wall.
b. Use games that focus on listening acuity as well
as localization skills.
METHOD: In games such as Sardines and Easter Egg Hunt,
the learners search quietly and independently for a hidden
either place the sound source at the dividing line to indicate
the successfulness of the team effort, or place the device
directly behind the team with the instruction that they pull
toward the sound. Placement at the end of a trampoline,
facing the performer, may assist in maintaining a proper and
safe position on the bed of the trampoline. A sound source
is defi nitely an aid to developing freedom of movement and
locomotor skills in an open space. It may also be used to
provide additional cues to the various couple locations in
square dancing.
3. Use track and fi eld activities. In running dashes,
jumping, or throwing, the sound source is the best
method of maintaining a direction and orientation to
sound source. The diffi culty of the task can be increased
the task.
substantially by controlling the volume of the device.
62 | Chapter 6 | The Sound Localization Guidebook Prototype The Sound Localization Guidebook Prototype | Chapter 6 | 63
17820 Sound Local.ind 62-63 6/24/05, 11:35:54 AM
Page 40

Activities requiring classroom learning applications
Activities requiring a tracking response
The activities may be conducted in conjunction with social
studies, geography, or subjects related to cardinal directions.
The purpose is to structure the environment in order
to recognize the spatial relationship of the four cardinal
directions. Suggested situations:
1. Place the sound source at a point designated as
North. Relative positions of students or objects
within the area may be described using cardinal
directions in relation to a stationary northern position.
Discuss the many spatial relationships possible within
this framework.
2. Incorporate the use of a sound source in any
appropriate work experience. The sound source may
1. Games such as Chain Tag, Animal Chase, or Ocean
Is Stormy, may be structured so the sound source
is carried by “it” or the instructor who is close by.
The student with a visual impairment who is able to
localize is in a better position to avoid being caught.
Similarly, he may avoid being hit in Prison Ball, or
other throwing games. As an alternative to Dodge
Ball try games such as Prison Ball or Bounce and Catch.
The ball should be thrown from the sound source
location. In this manner the visually handicapped
learner has an opportunity to move to a point farthest
away from the sound source and thrower.
2. A different type of tracking is required in games
be used as a directional guide when mowing grass or
other work oriented situations in which the student
must cope with large open areas.
Learner Moving and Sound Source Moving
The task of localization is highly complex when both the
listener and the sound source are moving. However, in many
of the activities already discussed the situation does arise,
but may not have been emphasized. The reader should
carefully consider activities already suggested as possible
vehicles for developing these higher level skills.
such as Follow the Leader and Blue Bird through
the Window which require the student to follow
the sound. Types of self-testing activity that require
following a sound are riding a bicycle, following an
outdoor trail, or completing an obstacle course.
Activities requiring classroom learning application
The activities should be conducted in conjunction with
science instruction. The purpose is to develop the concept
of planetary movement. The activity has already been
discussed, but, with both elements allowed to move, a
higher conceptual level may be obtained.
64 | Chapter 6 | The Sound Localization Guidebook Prototype The Sound Localization Guidebook Prototype | Chapter 6 | 65
17820 Sound Local.ind 64-65 6/24/05, 11:35:56 AM
Page 41
Individualized localization tasks
1. The learner should develop the ability to maintain a
constant distance from the sound source. The skill
becomes one of moving in a congruent pattern with
the sound source.
2. The learner should also be able to intersect the
sound source at a point directly in front of him
by estimating distance and the speed at which he
approaches the intersection.
Appendices
A,
Using Sound
In Performing
O&M Tasks
B,
Playing Games
With a Sound
Source
C,
Sound Source
Adaptations
For Recreational
/Sport Activities
66 | Chapter 6 | The Sound Localization Guidebook Prototype
17820 Sound Local.ind 66-67 6/24/05, 11:35:57 AM
Page 42

Appendix A: Using sound in performing
O&M tasks
A person moving without vision relies on hearing to
structure interaction with the environment. Depending on
the situation, sound can be used in very different ways to
obtain information about the environment. This manual
deals with the fi rst level of practical use of sound for
navigation: interactions with single, discrete sound sources.
Interaction with single, discrete sound sources is basic to
many auditory skills and practicing these interactions can
aid development of other, more complex or subtle acoustic
skills. Other practical uses of sound in navigation include
paying attention to more than one source at a time, using
the sudden absence of sound to recognize a doorway or
opening, and paying attention to reverberation delay to
estimate the size of a room or the presence of a large object.
Recall that there are fi ve levels of learning that characterize
the effective use of discrete sounds in the environment.
1. Awareness
2. Discrimination
3. Interpretation
4. Localization
5. Conversion
A child must fi rst be aware of a sound. The child then learns
to discriminate one sound from another or one sound within
a background of other noise. A child must also be able to
The Sound Localization Guidebook Prototype | Appendix A | 69
17820 Sound Local.ind 68-69 6/24/05, 11:36:19 AM
Page 43

associate a sound with an object, or interpret the meaning
or by differences in the loudness and frequency of sounds
of a sound. For O&M purposes, it is often a prerequisite that
the child be able to localize or determine the location of a
sound. When these fi rst four basic conditions are met, a child
can use conversion to make practical use of a sound as an aid
to the learner’s interaction with the environment. Awareness,
discrimination, and interpretation are basic listening skills
that children should be taught and should practice but that
are often well developed before a child enters school. While
localization and conversion are also often well developed,
since they form the underpinnings of more sophisticated
uses of sound, they need to be particularly practiced. The
importance of developing a conscious and practiced sense
of using sound when moving through the environment can
be illustrated by discussing some common daily activities. In
this appendix we will discuss some of the factors infl uencing
localization of sounds and illustrate how they play a role in
common O&M tasks.
(Schenkman, 1983).
Just like visually locating a stationary object, being able to
localize a stationary sound source is made easier through
the use of binaurality. Being able to move our heads while
listening maximizes the benefi t of having two ears. Because
our head separates our ears from each other, sounds coming
to our two ears are slightly different. Our brains are designed
to make use of that difference between the sounds at the
two ears to fi gure out from where the sound came.
When we are listening to sounds around us, we usually
are not listening to only that sound. We either have other
sounds we are trying to ignore or the walls and objects
around us change the sound. This can be good or bad,
depending on what it is we want to do. If your objective is
to fi gure out from where a sound is coming, it is most easily
done if nothing is between you and the sound. If there are
The human perceptual system can determine the horizontal
position of a sound to within about 1 degree and can
determine the position of sounds in the vertical plane to
about 3 degrees (Perrott & Saberi, 1990), depending on
what kind of sound it is and the listening conditions. Our
auditory perceptual system is also not designed well for
lots of things around you or if you are in an enclosed room,
you might have trouble localizing a sound because of the
way the sound bounces off the objects and walls. However,
if your intent is to fi nd a particular object or to fi gure out the
dimensions of a space, then having sound bouncing around
is more helpful.
determining distances to sounds (Zahorik, 2001; 2002a).
We are best at localizing sounds directly in front of us and
get better if we can listen to a sound for a longer time and
if we can move our heads as we listen. Our perception of
the distance to or location of sounds is easily confused by
distracting sounds (Langendijk, Kistler, & Wightman, 2001)
70 | Appendix A | The Sound Localization Guidebook Prototype The Sound Localization Guidebook Prototype | Appendix A | 71
Chapter 4 dealt with the situation in which a sound in the
environment is stationary. In daily tasks, a person needs
to be able to localize stationary sounds to know where
important sound producing objects are. Being able to
localize sound producing objects such as vending machines,
17820 Sound Local.ind 70-71 6/24/05, 11:36:20 AM
Page 44

dogs, church bells, a person talking, or subway turnstiles
Chapter 5 dealt with situations in which both the learner
(to name a few) is essential to effi cient travel. Underlying
use of this localization ability is a list of spatial concepts
(i.e., right, left, up, down, forward, etc.) that a person
must have internalized and be able to use to connect his
or her own position to the sound. Being able to connect
your own position to another object in spatial terms is
the fi rst step to purposeful movement. One of the early
milestones of purposeful movement for an infant is reaching
toward a sound producing toy. Recognizing that the toy
is in a particular place and that the infant can move to
reach that toy begins the process of movement through
the environment and a lifetime of interaction with sounds
in the environment. As an infant toddles, a parent’s voice
becomes a common stationary sound the infant moves
and the sound could be in motion. A number of important
daily O&M tasks correspond to this category. As a toddler
begins walking or crawling through the home environment,
sounds such as the family dog or siblings move around
the environment. These are the fi rst consistent exposures
to sounds that move around the infant at a time when
the infant is also able to make large body movements in
reaction. Play with a parent or sibling that involves running
to or away helps calibrate the auditory system. A parent
rolling a toy car or truck toward a child who then reaches
for it, a child running away from a family member playfully
chasing them, or a child following a dog to pet it are all early
examples of localizing and moving in reaction to moving
sound sources. The activities in this manual take this kind of
toward. It is partially because we spend so much of our early
development moving toward meaningful sounds that we are
better able to localize sounds directly in front of us.
Moving from activities in which discrete sounds are
stationary and a child begins to move in relation to them
assists in the development of self-to-object concepts.
Learning how a sound’s position changes in relation
to a child’s body as he or she moves about is one way
to approach the instruction of this concept. As more
sounds become important to the child, object-to-object
relationships begin to be developed. However, these
spatial relations are better developed if a child has ongoing,
active exploration of the sound producing objects and their
exposure and systemize it so that a child is made aware of
the kind of information they have been reacting to and how
to become more adept at doing so. This practice can be
applied to future O&M tasks.
The following are examples of daily tasks applicable for some
of the activities outlined in chapter 5:
Activity One: Tracking a sound source by moving only
the head
1. Tracking a person as they walk. A common example
of this task indoors is paying attention to a teacher
relative positions.
72 | Appendix A | The Sound Localization Guidebook Prototype The Sound Localization Guidebook Prototype | Appendix A | 73
17820 Sound Local.ind 72-73 6/24/05, 11:36:21 AM
walking in a classroom. If a teacher (or anybody) is
talking to the child while simultaneously walking, it
Page 45

is important that the child be able to track that
person to indicate a continued interest in what the
person is saying.
Activities Three to Five: Following a moving
sound source, walking parallel to a moving
2. Following a ball in a sporting event. When developing
basic skills for later playing goalball, a child must be
able to auditorily track a ball rolling on the fl oor and
predict where that path will take the ball in relation to
the child’s position.
3. Tracking vehicles. When standing on a street corner,
waiting to cross, a person often does not want to
move their body unnecessarily in order to keep their
alignment relative to the crossing. However, they
might want to be aware of and track cars passing by
them to determine whether they are turning or not.
Depending on the particulars of the intersection, the
person might need to make a decision to cross based
on the path of these cars.
sound, and walking parallel to a sound while walking
a 90° angle
1. Matching paths with a passing person or object in
order to follow it. When walking with a group of
people or following one particular person, it is often
useful to simply follow the sound of their voice or
footsteps. Being able to discriminate that person
from any background noise and notice if they turn
and change your own path accordingly can be a
sophisticated use of sound.
Activity Six: Localizing sound when moving in
Activity Two: Tracking a sound source moving the
entire body
1. Aligning one’s self to passing traffi c. When waiting at
a street corner, perhaps after locating and pushing a
pedestrian pushbutton, a person often has to align
themselves to passing traffi c. Whether this is done in
relation to perpendicular or parallel traffi c, the task
requires that a person auditorily follow the path of a
moving vehicle and then move their entire body in
reaction to the path of that vehicle.
opposition to the sound source
1. Walking up to a curb based on the sounds of idling
traffi c. In some situations a person approaches an
intersection and must use the approaching traffi c to
gauge where the intersection is. When walking up to
an intersection with the parallel street on the right, if
no traffi c is currently traveling in the same direction
as the pedestrian, the sound of perpendicular
or oncoming traffi c must be used to gauge the
pedestrian’s position relative to the street. When
the pedestrian is crossing the street, perpendicular
traffi c is stopped and only the sound of oncoming
74 | Appendix A | The Sound Localization Guidebook Prototype The Sound Localization Guidebook Prototype | Appendix A | 75
17820 Sound Local.ind 74-75 6/24/05, 11:36:22 AM
Page 46

traffi c on the parallel street remains as an indication of
very large and there is a lot of space between several large
relative position.
These are just some examples of situations in which
the exercises in this manual can be applied to everyday
tasks. However, the skills developed in this manual can
be elaborated upon to develop more sophisticated uses
of sound for O&M tasks. There are many subtle acoustic
phenomena that people learn through trial and error
(Worchel & Mauney, 1950) and use unconsciously (Juurmaa,
1970a). Being able to localize discrete sounds in the
environment and paying more attention to sounds around
a person can lead that person to be aware of different kinds
of sounds around them. For example, when a discrete
sound source is blocked by an object, that sound lowers
objects (like on a grassy area among several buildings on a
college campus).
Refl ective environments (those with walls or borders of
some sort) or the presence of large objects create a fi eld
of refl ected sound that the human auditory system can
use, beyond the localization of direct sounds. The acoustic
fi eld, comprised of direct sounds and all of the refl ections
off walls, ceilings, and objects, is somewhat analogous to
the visual fi eld (Schwartz, 1984). Movement through this
acoustic fi eld allows a person to gain information about the
surroundings. The ratio of direct sound to refl ected sound
in this acoustic fi eld can be used to determine distances
to sounds (Zahorik, 2002b), and the pattern of refl ected
in intensity. The resulting “sound shadow” can be used to
detect objects. With practice, very slender objects such as
poles and small trees can be detected in this way. Moving
past such a sound shadow makes it more apparent than just
standing in front of it.
As a person practices being able to localize different kinds
of sounds in different environments, perhaps beginning
with more obvious phenomena such as sound shadows,
it will become apparent that there are other ways to use
sound. The physics behind sound phenomena do not have
to be understood for a person to be able to make practical
use of the effects. While the human perceptual system is
not sensitive enough to use echoes the same way bats or
sound can provide information about the size and structure
of a room (Clifton, Freyman, & Meo, 2002). How quickly
the reverberations fade away or whether they are refl ected
more strongly from one area than another (because of
room geometry or building materials, for example) make
different rooms or objects sound different from each other.
Rooms of different sizes will sound different whether the
person is actively making noise (footsteps, cane taps) or just
standing still but moving through the sound fi eld helps the
perception. The size and shape of the room and, to some
degree, the material the walls are made of and how many
windows there are, affects how sound bounces around in
the room. There is always sound around you, even if you are
trying to be very quiet. So just standing in the middle of a
dolphins can, in limited situations we can use echoes to
determine distances. This is generally when the distances are
76 | Appendix A | The Sound Localization Guidebook Prototype The Sound Localization Guidebook Prototype | Appendix A | 77
17820 Sound Local.ind 76-77 6/24/05, 11:36:24 AM
large room will sound different from standing in the middle
of a small room. With practice and consistent exposure to a
Page 47

particular room, a person might be able to tell whether large
pieces of furniture have been moved in the room, based on
Appendix B: Playing games with a
how the room sounds.
In addition to paying attention to how self-motion relative
to the fi eld of ambient sound indicates features of the
environment, the acoustic characteristics of directionality,
pitch, timbre, intensity, and envelope both for direct and
refl ected sound are used to distinguish between acoustic
environments (Kish, n.d.). These characteristics of sound
are also affected by the material off of which sound is
refl ected. With practice, a person can perceive increasingly
subtle variations in position, size, texture, shape, distance,
and even composition (Kish, n.d.). With practice, people
have been able to sense the presence of small objects from
2 to 3 meters away (Jones & Myers, 1954; Myers & Jones,
1958; Rice, Feinstein, & Schusterman, 1965), ascertain the
sound source
Animal Chase
This game is best played on an asphalt court or in a gym
approximately 50 feet wide. All players line up along one
side, and “it” takes his place in the middle of the playing
area. He calls the name of some animal, such as dog, cow,
or cat, whereupon all the players must run across the playing
area, imitating the animal designated. Anyone caught before
reaching the opposite side must join hands with “it” and
help her catch other players. The original “it” remains the
caller throughout the game. The last one caught is “it” for
the next game.
lateral location of a single object to within a few degrees
(Rice, 1969), determine the shape of objects (Hausfeld,
Power, Gorta, & Harris, 1982; Rice, 1967a, 1967b, 1967c),
and identify textures of surfaces (Hausfeld, Power, Gorta, &
Harris, 1982; Juurmaa, 1970b; Kellogg, 1962).
By developing awareness of and sensitivity to these
often subtle acoustic cues, a person who is blind can
make use of sound to learn a great deal of information
about her environment.
Variations: 1) The game can be played by assigning a
specifi c animal to two or three players. When that animal is
called, only those who represent it run across the court. 2)
As each player is caught and join “it,” he gets to call out the
next animal. 3) Place a portable sound source on each side
of the gym. 4) “It” wears a sound source.
Blue Bird (circle game)
Players stand in a circle, holding hands, arms up, which
signifi es that the windows are open. One or two blue birds
are in center. As you sing the song, the birds weave in
and out the open “windows.” The bluebird with blindness
78 | Appendix A | The Sound Localization Guidebook Prototype The Sound Localization Guidebook Prototype | Appendix B | 79
17820 Sound Local.ind 78-79 6/24/05, 11:36:24 AM
Page 48

follows a sighted bluebird who carries a sound source. Sing
or pass to a teammate and catch the incoming ball. At no
as follows, “Blue bird, blue bird through my window, blue
bird, blue bird through my window, blue bird, blue bird
through my window (players bring down arms to close
window)....oh blue bird aren’t you tired?” Birds want to stay
inside circle as windows are being closed. You can change
the name of the birds to fi t with your theme, (e.g. blue jay,
cardinal, sparrow, etc.). Then the blue bird gets to choose
someone else to be a blue bird, and the game continues.
Bounce and Catch
Create two even numbered teams, one for each side of
the gym. Use two different colored balls approximately 8
time is NOT trying to catch the ball an option. Players must
catch an incoming ball. As players go out, they sit on the
side, in order of how they got out, on their half of the gym.
If someone on the opposing team goes out, the fi rst player
in line rejoins the game one for one. Electronic sound balls
can be used, or place a sound source next to the player
throwing the ball.
Chain Tag
When a player who is blind participates in chain tag, the
playing area should have defi nite boundaries, such as
fences, walls, sides of buildings, edges of lawns, or concrete
inches in size. Each team gets a ball. When throwing the ball
to an opponent, the ball must bounce at least once, and
the person on the receiving end MUST make an attempt
to catch the ball. The object is to throw the ball “TO” an
opponent, not “AT” an opponent and force them to make
an attempt to catch the ball. If the ball makes contact
with an opponent before it bounces, the thrower is out! If
a player makes no attempt to catch the ball or dodges it,
then he is out. An unsuccessful attempt to catch the ball
means the player is out. A player can “SAVE” a teammate
who is out by catching a dropped ball, before it touches
the ground. If the save attempt fails, the “SAVER” is not out
but teammate still is. One ball can not be used to block the
other one. If a player has a ball when the other comes his
surfaces. The players scatter over the playing area. At the
signal, one player who is “it” chases the others. When he
tags a runner, the later joins hands with him, and the two
together chase the other players. A catch or tag made while
the line is broken is invalid. The game continues until all
but one have joined the chain. She is the winner and “it”
for the next game. So that a sightless player may have a fair
opportunity to win, he may be paired up with a classmate
who has normal vision, and the two of them attempt to
avoid being caught. More mobile sightless players should be
encouraged to run alone. In this case the chain should be
required to hold him for 10 counts before he is considered
caught. The sound source is used to defi ne a boundary of
the playing area.
way, there are three options: hold the ball and catch the
incoming one, throw the ball and catch the incoming one,
80 | Appendix B | The Sound Localization Guidebook Prototype The Sound Localization Guidebook Prototype | Appendix B | 81
17820 Sound Local.ind 80-81 6/24/05, 11:36:25 AM
Page 49

Easter Egg Hunt (Miniature Pumpkin Hunt,
The farmer takes a wife
Candy Cane Hunt)
This game can be changed to coincide with holidays. Hide
(real or plastic) eggs along with portable sound devices.
Players independently and quietly hunt for eggs, collecting
them in their bags or baskets. Older players can turn off
each device as they locate each egg.
The Farmer in the Dell (circle game)
Choose one player as the farmer. Have the players join
hands and dance around while the song is sung. At the end
of the fi rst verse, the farmer chooses his wife, who joins him
Hi-ho, the derry-o
The farmer takes a wife
The wife takes a child
The wife takes a child
Hi-ho, the derry-o
The wife takes a child
The child takes a nurse
The child takes a nurse
Hi-ho, the derry-o
The child takes a nurse
in the circle. At the end of the second, the wife chooses a
learner and so on until everyone is in the circle except the
cheese (who becomes the farmer the next round). If you
have less than 10 players, skip one of the verses... if you have
more than 10 players, pick one of the learners who are left
at the end to be the farmer. The player with blindness can
locate and select the player carrying the sound source as the
next one to move into the circle, or the sound source can be
placed inside the circle as an orientation device.
The farmer in the dell
The farmer in the dell
Hi-ho, the derry-o
The farmer in the dell
The nurse takes a cow
The nurse takes a cow
Hi-ho, the derry-o
The nurse takes a cow
The cow takes a dog
The cow takes a dog
Hi-ho, the derry-o
The cow takes a dog
The dog takes a cat
The dog takes a cat
Hi-ho, the derry-o
The farmer takes a wife
82 | Appendix B | The Sound Localization Guidebook Prototype The Sound Localization Guidebook Prototype | Appendix B | 83
17820 Sound Local.ind 82-83 6/24/05, 11:36:26 AM
The dog takes a cat
Page 50

The cat takes a rat
The cat takes a rat
Heads-Up Seven-Up
Hi-ho, the derry-o
The cat takes a rat
The rat takes the cheese
The rat takes the cheese
Hi-ho, the derry-o
The rat takes the cheese
The cheese stands alone
The cheese stands alone
Hi-ho, the derry-o
The cheese stands alone
The game is best if played with 20 or more players, and is
ideal for rainy days, when large groups need to be occupied.
Select seven players and tell them to move to the front of
the class. Someone, usually the teacher, says, “Heads down,
thumbs up,” and the rest of the group does just that.
The seven who were selected move quietly through the
room and each select one person by touching his or her
thumb. Once touched, the thumb goes down to avoid being
touched twice. When all seven players have touched the
thumbs of seven others, the teacher says, “Heads up, seven
up.” The heads go up, and the seven who were chosen
stand. Those standing get one chance to guess who picked
them. If they guess right, the two players switch places. If
Follow the Leader
The players form a column, and one player is appointed
leader. The leader performs various stunts, such as climbing
over obstacles, jumping certain distances, or walking 10 feet
with a book on her head. Players who fail to do any stunt
set by the leader go to the back of the line. The instructor
should change leaders after every four or fi ve stunts. The
player directly in front of the player with a visual impairment
can carry or wear the sound source and describe the next
action to perfom.
they don’t, the “toucher” gets to stay up for another round.
Another adaptation is described in chapter 6.
To adapt for sound, all players wear blindfolds except the
seven (can be fewer than seven). The seven each carry a
different sound source. The chosen seven must identify their
“touchers” by sound.
84 | Appendix B | The Sound Localization Guidebook Prototype The Sound Localization Guidebook Prototype | Appendix B | 85
17820 Sound Local.ind 84-85 6/24/05, 11:36:27 AM
Page 51

Lame Fox and Chickens
• Inchworm – Lie on belly and bring hips forward (up
in the air) without moving hands forward. When
Equipment needed:
• Panel mats (all) laid out to create pathways (mats on
both sides of the pathways)
• Pinnies (6)
Select six players to be foxes (they wear pinnies). All other
players are chickens trying to get away. Utilizing one of
the locomotor movements listed below, players must stay
in the pathways made by the mats. If a player touches
a mat (either a fox, or a chicken), player must sit on the
nearest mat until he says the alphabet without the vowels
(or anything else you think of that is not an exercise). Place
sound sources along the mats to mark the pathway.
hips are up in air, slide upper body forward without
moving feet.
• Lame bear – Walk like a bear, except with only one
back leg.
• Lame dog – Walk on hands and one foot.
• Rabbit – Start in squatting position. Reach forward
with hands only. When hands are back on the mat,
bring feet forward without moving hands.
• Snake – Slither on belly down and back.
• Seal – Hold self up in a pushup position. Keep arms
straight, and drag feet behind you.
Animal locomotor walks:
• Alligator – Slither like a snake while adding arms
(point elbows up in the air).
• Bear – Walk on all fours so the right hand and right
foot move forward at the same time, same with left
hand and left foot.
• Crab – Walk on all fours with bottom toward the mat
(feet/head fi rst).
• Dog – Walk on all fours on the mat.
• Frog – Squat down and jump off all fours at the same
time and land on all fours together.
Midnight
An enclosed area such as a gymnasium or tennis court is
a good place to play Midnight. All the players stand in a
semicircle with the fox in the center. The players ask, “What
time is it Mr. Fox?” If he replies that it is any hour except
midnight, they remain standing. When the fox shouts
“Midnight!” the players run to the far fence or wall, where
a sound source is placed. The fox follows the sound of the
footsteps and tags a player. This player becomes the next
fox, and the game is repeated.
86 | Appendix B | The Sound Localization Guidebook Prototype The Sound Localization Guidebook Prototype | Appendix B | 87
17820 Sound Local.ind 86-87 6/24/05, 11:36:28 AM
Page 52

Minnows in the Net
To start, all but two players are minnows (a little fi sh found
in shallow water). Minnows are going to try to swim
through the “net.” The “net zone” will be an area between
two tactile lines in the middle of the gym.
round. When everyone becomes part of the net, the teacher
can restart the game changing the locomotor movement.
Mother May I (A.K.A. Captain May I )
One person (it could be the teacher or another player)
Pick two players to be the “net” inside the net zone. The
“net” wears the sound source or places it on the fl oor at
their feet. The minnows will line up against one wall of the
gym and try to reach the other side of the gym performing
a designated locomotor movement (see animal walks listed
previously). A different sound source should be placed at
the gym wall. The players that are the net will try to tag
the minnows when they are within the net zone of the gym.
If a minnow gets tagged by the net, she becomes part of the
net too.
To make sure the main focus of the game remains dodging,
any player who is part of the net cannot move, pretending
that both feet are stuck in the mud. The players who are part
is chosen to be Mother or Captain. She stands facing
away from a line of players. She then chooses a player
(at random, or in order), and announces a direction. The
directions follow a pattern, such as, “Jamie, you may take ‘x’
giant/regular/baby steps forward/backward.” The student
responds with “Mother/Captain may I?” Mother then states
“Yes” or “No,” depending on her whim, and the player
complies. If the player forgets to ask, “Mother may I?” he
goes back to the starting line. First player to touch Mother
wins. If additional sound (other than Mother’s voice) is
needed, Mother can have a portable sound source at her
feet for orientation. All players can wear blindfolds.
Additional steps for Mother May I:
of the “net” can only tag the minnows by stretching out
• Scissors step – jump while crossing feet, then jump
their arms. The minnows who are unsuccessful at dodging
while uncrossing them
the net will get caught. Players playing the role of the “net”
can wear a portable sound source around their waists or be
required to sing a song.
Stress safety rules; minnows can only be tagged from the
shoulders to the waist. If a player gets tagged anywhere else,
then she automatically makes it through the net safely that
88 | Appendix B | The Sound Localization Guidebook Prototype The Sound Localization Guidebook Prototype | Appendix B | 89
• Banana step – lay down with feet at current spot,
mark where the top of player’s head is on the fl oor,
new spot for feet is where head was
• Bunny step – a hop
17820 Sound Local.ind 88-89 6/24/05, 11:36:28 AM
Page 53

Musical Chairs
Prison Ball
Players form a circle. If using chairs or other place markers,
start off with one less than the number of participants.
Start the music (or any sound device). As the music plays,
the players walk around the outside of the circle. When
the music stops, the players must sit. The one left standing
moves to the inside of the circle, and one more chair is
removed for the next round. If in gym class, students can
sit on the fl oor, and the last player to sit down moves to the
inside of the circle.
Ocean is Stormy
This game is played best in a gymnasium or on a tennis
Prison Ball is a milder version of dodge ball that does not
eliminate students from the game, instead when they
are hit by an opponent, they go to a prison area behind
the opposite team. Balls can only be thrown below the
shoulders. Players have the opportunity to get out of prison
and back on their respective team if they catch a ball that
was thrown in the air by one of their own teammates. If
someone makes a basket from half court, then everyone in
that prison gets to leave to go back to their side. Play with a
soft electronic sound ball. A sound source can be attached
to the basketball goal and/or in the prison area. This game
allows players to run, dodge, catch, throw, strategize
together, and cooperate with teammates.
court. One of the end walls or fences is designated as home
base and a sound source is placed there. All players form
teams of two, clasp hands, select a name of a fi sh, and
scatter about. One pair, known as sharks, carries a second
sound source and walks around the area calling the names
of fi sh. When the name of a fi sh that has been adopted
by a team is called, that pair falls in behind the sharks and
marches after them. When the sharks have called all the
fi sh they can think of, they say, “The ocean is stormy.” All
the players run for home base. Hands must remain clasped
throughout the game. The last team to reach home base
becomes the sharks for the next game.
Pussy wants a Corner
Stand in a circle with one player in the middle. Players in the
ring change places constantly, and the one in the middle
tries to get the place of one of them. When he succeeds,
the person displaced becomes the pussy and must stand
within the ring until he can displace someone else. A
stationary sound source can be placed in the center of the
ring as a reference point. For a moving sound source, have
a chosen one or two in the circle carry the source while
changing places.
90 | Appendix B | The Sound Localization Guidebook Prototype The Sound Localization Guidebook Prototype | Appendix B | 91
17820 Sound Local.ind 90-91 6/24/05, 11:36:29 AM
Page 54

Ring Around the Rosy
Players hold hands forming a circle; one wears or carries the
sound source. One player (wearing a blindfold is needed)
stands in the center of the circle. Skipping clockwise,
everyone sings “Ring around the rosy, pocket full of posies,
ashes, ashes we all fall down.” Everyone falls to the ground.
After everyone falls down, the center player locates the
player carrying/wearing the sound source; the two players
switch places.
continued until a champion is determined. The winner is the
leader next time.
Squirrels and Trees
Two players face each other and hold each other’s hands
(like for “London Bridge”), making a “tree.” A third player
(a squirrel) goes into the “tree.” The teacher (or another
designated person) can start music, clapping, or a sound
source. When the music or sound stops, the “squirrels”
change “trees.” You can adapt the game to different levels
Sardines
All players wear blindfolds. One player hides, taking a
sound source with him, while the rest count to 100. When
the counting is fi nished, they set out to hunt. Any player
discovering the hider crowds into the hiding place. Soon the
players are packed in like sardines. If there is not room to
hide in the same place, the fi nder sits down near the hiding
place. When the last hunter discovers the spot, the game
starts over with the fi rst fi nder becoming the hider.
Simon Says
The players stand facing the leader (teacher or another
by using letter sounds or different tones and rates of sound
instead of music. It can also be used as a cooperative game
or a competitive one like Musical Chairs. A sound source can
also be placed by a “tree” for the player to locate.
Squirrels and Nuts
Squirrels collect nuts and save them to help get through the
winter. This game gives players an idea of how diffi cult it can
be to fi nd nuts.
Use acorns or other items. Have the class close their eyes
while you hide a nut in the classroom. When hidden the
teacher says “Nut, nut who can fi nd the nut?” The player
student). The leader says, “Simon says, ‘Squat!’” whereupon
he squats. All players must do likewise. From time to time
the leader makes a movement, omitting the words “Simon
says,” saying, for example, “Reach for the sky.” In this case
any player imitating the leader is eliminated. The contest is
92 | Appendix B | The Sound Localization Guidebook Prototype The Sound Localization Guidebook Prototype | Appendix B | 93
17820 Sound Local.ind 92-93 6/24/05, 11:36:30 AM
who fi nds the nut can take it back to the tree where
everyone can locate it (circle area). The fi rst player to fi nd
the nut is the next to hide the nut. To make the game
harder, use a low volume, low rate, and low tone on the
sound source.
Page 55

Where Am I
Appendix C: Sound Source Adaptations for
All players wear blindfolds. Give the sound source a name
and place at any point within the room. It may be by the
locker, drinking fountain, sink, pencil sharpener, or any other
landmark within the room. The fi rst fi nder gets to hide the
sound source next time.
Zone Ball (a version of Prison Ball)
Players are divided into two teams. Each team throws
multiple balls at the other team trying to hit them below the
shoulders. Head hits are not allowed. If players are hit, they
run down the side wall to the captured zone behind
the other team. To get back in the game, they simply have
Recreational/Sport Activities
There are many outdoor and indoor athletic activities
that persons with visual impairments or blindness can
participate in with the assistance of a sound device. Not
only are recreational sports good for one’s physical health
and socialization, participation in sports using sound
devices continues to keep sound localization skills at peak
performance levels.
Archery
Equipment
to get a ball that is thrown to them. They don’t even have
to catch it, as long as they get it without leaving the
captured zone. They then run down the side wall to the
back of their own zone (touching a cone), and they are back
in the game. If they get the bonus ball (a designated color),
they may bring a teammate back in the game with them.
If players catch a ball thrown at them, they have saved
themselves from being hit, nothing more. No one goes out
or comes in, but they are saved. Use gator skin balls, bell
balls, and electronic sound balls. Sound sources can defi ne
playing boundaries.
• Bow
• Arrows
• Target
• One-inch steel pole or PVC pipe approximately 6-8
feet long
• Adjustable vertical T-pipe mounted into the ground
• Portable Sound Source
• Balloons (on target)
Line up the pipe perpendicular to the target. If possible, it
is best to permanently adhere the pole to the ground with
cement. Adjust the T-pipe as needed for each shooter. The
shooter can line up tactually to the target using the pipes.
94 | Appendix B | The Sound Localization Guidebook Prototype The Sound Localization Guidebook Prototype | Appendix C | 95
17820 Sound Local.ind 94-95 6/24/05, 11:36:31 AM
Page 56

Attach balloons to the target. Place the Portable Sound
batter should run. By using the remote control, activate
Source under the target, or on top or side if using a bale
of hay.
Basketball
Equipment
• Electronic sound emitting ball
• Two Portable Sound Sources with remote control (one
if playing half court)
Attach one sound source to each basketball goal, using
different rates and tones for each. Activate by using the
remote controls. Play regulation basketball or any adapted
form suited best for the players.
one base. If the runner reaches the correct base before an
outfi elder fi nds the ball and yells “ball,” a run is scored. If
the outfi elder fi nds the ball fi rst, the runner is out. In beep
baseball the pitcher and batter are on the same team. For
more information on beep baseball, see the National Beep
Baseball Association’s web site at http://www.nbba.org/.
Beep Kickball
Equipment
• Electronic sound ball
• Two Portable Sound Sources with remote controls
• Two bases
Beep Baseball
Equipment
• Beep Baseball
• Two Portable Sound Sources with remote control
• Two bases
• Baseball bats
Place one sound source at fi rst base using one rate and tone,
and another sound source at third base using a different rate
and tone. There is no second base in beep baseball. When
the batter hits the ball, randomly choose to which base the
Follow the same rules and instructions as for beep baseball.
Bocce (also known as Les Boules and Pétanque)
Equipment
• Set of bocce balls (available in sport stores and
on the Internet)
• Portable Sound Source
Have the judge/referee hold the sound source next to the
pallina (target ball) while the shooter rolls her bocce ball
to hit the pallina. For more information see one of the
following web sites.
96 | Appendix C | The Sound Localization Guidebook Prototype The Sound Localization Guidebook Prototype | Appendix C | 97
17820 Sound Local.ind 96-97 6/24/05, 11:36:32 AM
Page 57

http://www.usapetanque.org/
http://petanque.org/
Golf
http://www.bocce.org/history.html
Goalball
Equipment
• One regulation goalball or an electronic sound ball
• Blindfolds
• Knee pads, elbow pads, hip pads
• Face protection
Goalball is played in a gymnasium in a playing area the
size of a volleyball court. There are three members of each
team on each end of the court protecting the goal line.
Equipment
• Golf clubs
• Golf glove(s)
• Golf balls
• Portable Sound Source
Place a portable sound source at the hole, or someone
can manually tap the hole with the fl ag stick. For more
information on blind golf see http://www.blindgolf.com.
Hiking
Equipment
A team consists of one center and two wings. The game
is 20-minutes long, comprised of two 10-minute halves.
A regulation goalball is a rubber ball with bells inside
for auditory tracking. Each player must wear a blindfold
regardless of the degree of visual impairment. The object is
to get the ball past the other team’s goal line by underhand
rolling the ball. The defending players use their entire bodies
to block the ball from going over the goal line. For more
information visit:
http://www.usaba.org
http://www.ibsa.es/eng/deportes/goalball/presentacion.htm
• Portable Sound Source
• Appropriate clothing and shoes
The hiking leader can strap the sound source to his waist so
that the group can follow the sound.
98 | Appendix C | The Sound Localization Guidebook Prototype The Sound Localization Guidebook Prototype | Appendix C | 99
17820 Sound Local.ind 98-99 6/24/05, 11:36:34 AM
Page 58

Horseshoes
Additional Activities
Equipment
• Horseshoe set
• Two Portable Sound Sources with remote controls
Place a Portable Sound Source at each pitcher box as close
to the stake as possible without interfering with the game. If
you do not have a Portable Sound Source, someone can tap
the stake with a metal pole to create an orientation sound.
For more information on horseshoes, see:
http://www.horseshoepitching.com/rules/nhparul.shtml
Rock Wall Climbing
The Portable Sound Source can be used with the following
games, which are listed in Games for People with Sensory
Impairments, by Lauren J. Lieberman, Ph.D. and Jim F.
Cowart, Ph.D. (See the reference section.)
Ball in the Box
Box Ball or Bucket Ball
Bright Objects
Throw and Search
10 Shot
Basketball Shoot
Can Game
Archery Balloon Pop
Equipment
• Multiple Portable Sound Sources with remote controls
Attach sound sources to the wall at the various handholds.
Operate with remote controls.
Frisbee Golf
100 | Appendix C | The Sound Localization Guidebook Prototype The Sound Localization Guidebook Prototype | Appendix C | 101
17820 Sound Local.ind 100-101 6/24/05, 11:36:35 AM
Page 59

Reference
Section
Bibliography,
Additional Reading
for Games, Sports,
and Orientation
102 | Appendix C | The Sound Localization Guidebook Prototype
17820 Sound Local.ind 102-103 6/24/05, 11:36:36 AM
Page 60

Bibliography
Ashmead, D. H., Wall, R. S., Ebinger, K. A., Hill, M. M., Yang,
X., & Eaton, S. (1998). Spatial hearing in children with
visual disabilities. Perception, 27, 105-122.
Clifton, R. K., Freyman, R. L., & Meo, J. (2002). What
the precedence effect tells us about room acoustics.
Perception & Psychophysics, 64(2), 180-188.
Hausfeld, S., Power, R. P., Gorta, A., & Harris, P. (1982).
Echo perception of shape and texture by sighted
subjects. Perceptual Motor Skills, 55(2), 623-632.
Jones, C. G. E. F., & Myers S. O. (1954). Obstacle
experiments. The Teacher of the Blind, 42(6), 153-158.
Juurmaa, J. (1970a). On the accuracy of obstacle detection
by the blind, part 1. New Outlook for the Blind, 64(3),
65-72.
Juurmaa, J. (1970b). On the accuracy of obstacle detection
by the blind, part 2. New Outlook for the Blind, 64(4),
104-118.
Kellogg, W. (1962). Sonar system of the blind. Science, 137,
399-404.
Kish, D. (n.d.). Echolocation: How humans can “see”
without sight. Retrieved March 27, 2005, from http://ww
w.worldaccessfortheblind.org/echolocationreview.rtf
The Sound Localization Guidebook Prototype | Reference Section | 105
17820 Sound Local.ind 104-105 6/24/05, 11:37:00 AM
Page 61

Langendijk, E. H., Kistler, D. J., & Wightman, F. L. (2001).
Rice, C. E. (1967c). Quantitative measures of unaided echo
Sound localization in the presence of one or two
distracters. The Journal of the Acoustical Science of America,
109(5). Pt. 1, 2123-2134.
Lessard, N., Paré, F., & Lassonde, M. (1998). Early-blind
human subjects localize sound sources better than
sighted subjects. Nature, 395, 278-280.
Lewald, J. (2002). Opposing effects of head position on
sound localization in blind and sighted human subjects.
European Journal of Neuroscience, 15, 1219-1224.
Myers, S. O., & Jones, C. G. E. F. (1958). Obstacle
experiments: Second report. The Teacher of the Blind,
detection in the blind: Auditory echo localization. In R.
Dufton (Ed.), Proceedings of the International Conference
on Sensory Devices for the Blind. St. Dunstan’s: London,
England, (pp.89-102).
Rice, C. E. (1969). Perceptual enhancement in the early
blind. Psychological Record, 19, 1-14.
Rice, C. E., Feinstein, S. H., & Schusterman, R. J. (1965).
Echo detection ability of the blind: Size and distance
factors. Journal of Experimental Psychology, 70(3),
246-251.
Röder, B., Teder-Sälejärvi, W., Sterr, A., Rösler, F., Hillyard,
46(2), 47-62.
Perrott, D. R. & Saberi, K. (1990). Minimum audible angle
thresholds for sources varying in both elevation and
azimuth. The Journal of the Acoustical Society of America,
87(4), 1728-1731.
Rice, C. E. (1967a). The human sonar system. In R. G. Busnel
(Ed.), Animal sonar systems. Biology and bionics: Jouy-
en-Josas, laboratoire de physiologie acoustique: Vol. 2, (pp.
719-755).
Rice, C. E. (1967b). Human echo perception. Science, 156,
656-664.
S., & Neville, H. (1999). Improved auditory spatial tuning
in blind humans. Nature, 400, 162-166.
Schenkman, B. N. (1983). Human echolocation as a function
of kind of sound source and object position. Uppsala
Psychological Reports, 363.
Schwartz, M. (1984). The role of sound for space and object
perception in the congenitally blind infant. Advances in
Infant Research, 3, 23-59.
Sonksen, P., Levitt, S., & Kitsinger, M. (1984). Identifi cation
of constraints acting on motor development in young
visually disabled children and principles of remediation.
Care and development, 10, 273-286.
106 | Reference Section | The Sound Localization Guidebook Prototype The Sound Localization Guidebook Prototype | Reference Section | 107
17820 Sound Local.ind 106-107 6/24/05, 11:37:00 AM
Page 62

Worchel, P., & Mauney, J. (1950). The effect of practice
on the perception of obstacles by the blind. Journal of
Additional Reading for Games, Sports,
Experimental Psychology, 41, 170-176.
Zahorik, P. (2001). Estimating sound source distance with
and without vision. Optometry and Vision Science, 78(5),
270-275.
Zahorik, P. (2002a). Assessing auditory distance perception
using virtual acoustics. The Journal of the Acoustical Society
of America, 111(4), 1832-1846.
Zahorik, P. (2002b). Direct-to-reverberant energy ratio
sensitivity. The Journal of the Acoustical Society of America,
112(5), 2110-2117.
and Orientation
American Red Cross. (1991). Adapted aquatics and methods
manual for swimming for the handicapped.
Adams, G. (1984). Games, sports, and exercise for the
physically disabled (4th ed.) Philadelphia: Lea & Febiger.
Baum, G. (1991). Aquarobics. London: Arrow Books Limited.
Bilbert, A. G. (1991). Teaching guide to cerebral palsy sports.
Champaign, IL: Human Kinetics Publishing, Inc.
Block, M. E. (1994). A teacher’s guide to including students
with disabilities in regular physical education. Baltimore:
Paul H. Brookes Pub., Inc.
Block, S. D., (1997). Me and I’m great: Physical education
for children three through eight. Minneapolis: Burgess
Publishing.
Block, M. E. (1993). Special olympics motor activities training
program training manual. Washington, D.C.: Special
Olympics International.
Buell, C. E. (1966). Physical education for blind children.
Springfi eld, Il: Thomas. (out of print, limited availability)
108 | Reference Section | The Sound Localization Guidebook Prototype The Sound Localization Guidebook Prototype | Reference Section | 109
17820 Sound Local.ind 108-109 6/24/05, 11:37:01 AM
Page 63

-------. (1982). Physical education and recreation for the
Kalalian, L., & Eichstaedt, C. (1982). Developmental/adapted
visually handicapped. Reston, VA: American Alliance For
Physical Education, Recreation and Dance. (out of print,
limited availability)
Bossenmeyer, M. (1990). Perceptual-motor development
guide. Discovery Bay, CA: Front Row Experience.
Capon, J. (1981). Successful movement challenges. Discovery
Bay, CA: Front Row Experience.
Cowart, J. (1993). Adapted instructional and equipment
ideas for use with students who are multiply
handicapped blind within a leisure time context. In
P. Jansma, (Ed.), The psychomoter domain training and
physical education: Making ability count. Minneapolis,
MN: Burgess.
Kasser, S. L. (1995). Inclusive games: Movement fun for
everyone. Champaign, IL: Human Kinetics Publishing, Inc.
Lieberman, L. J., & Cowart, J. F. (1996). Games for people
with sensory impairments: Strategies for including
individuals of all ages. Champaign, IL: Human Kinetics
Publishing, Inc.
Lieberman, L. J., & Houston-Wilson, C. (2002). Strategies for
inclusion: A handbook for physical educators. Champaign,
IL: Human Kinetics Publishing, Inc.
serious disabilities (4th ed.). New York: University Press
of America.
Cratty, B. J. (1971). Movement and spatial awareness in blind
children and youth. Springfi eld, IL: Thomas.
Eason, R. L., Smith, T. L., & Caron, F. (1983). Adapted
physical activity, from theory to application. Champaign,
IL: Human Kinetics Pub., Inc.
Geddes, D. (1978). Physical activities for individuals with
handicapping conditions. St. Louis: C. V. Mosby Co.
Hill, E. W., & Ponder, P. (1976). Orientation and mobility
techniques: A guide for the practitioner. New York:
Lockette, K. F., & Keyes, A. M. (1994). Conditioning with
physical disabilities. Champaign, IL: Human Kinetics
Publishing, Inc.
Miller, P. D. (1995). Fitness programming and physical
disability. Champaign, IL: Human Kinetics Publishing, Inc.
Pica, R. (1991). Special themes for moving and learning.
Champaign, IL: Human Kinetics Publishing, Inc.
Rappaport M. L., & Schultz, L. (1989). Creative play
activities for children with disabilities: A resource book for
teachers and parents. Champaign, IL: Human Kinetics
Publishing, Inc.
American Foundation for the Blind.
110 | Reference Section | The Sound Localization Guidebook Prototype The Sound Localization Guidebook Prototype | Reference Section | 111
17820 Sound Local.ind 110-111 6/24/05, 11:37:03 AM
Page 64

Rimmer, J. (1994). Fitness and rehabilitation programs
Notice : The changes or modifications not expressly approved by the party responsible
• for compliance could void the user’s authority to operate the equipment.
for special populations. Madison, WI: Brown &
Benchmark Publishing.
Shepard, R. J. (1990). Fitness in special populations.
Champaign, IL: Human Kinetics Publishing, Inc.
Sherrill, C. (1986). Adapted physical education and recreation:
A multidisciplinary approach. Dubuque, IA: Wm. C. Brown.
Sherrill, C. (1987). Leadership training in adapted
physical education. Champaign, IL: Human Kinetics
Publishing, Inc.
White, E. (1995). Making archery a sport for the visually
impaired. Strategies, 8, 12-14.
Winnick, J. (1995). Adapted physical education and sport (2nd
ed.). Champaign, IL: Human Kinetics Publishing, Inc.
112 | Reference Section | The Sound Localization Guidebook Prototype The Sound Localization Guidebook Prototype | Reference Section | 113
17820 Sound Local.ind 112-113 6/24/05, 11:37:04 AM
Page 65

114 | Reference Section | The Sound Localization Guidebook Prototype The Sound Localization Guidebook Prototype | Reference Section | 115
17820 Sound Local.ind 114-115 6/24/05, 11:37:05 AM
Page 66

Thank You
for reading and using this manual. We welcome and
encourage suggestions for revisions or for additions to the
activities included in this edition.
The
Sound Localization
Guidebook
Louisville, KY
PROTOTYPE
Large Print Catalog Number 8-16080-00
17820 Sound Local.ind 116 6/24/05, 11:37:05 AM
 Loading...