

Page 1
www.outsign-elements.com
U s e r a n d M a i n t e n a n c e M a n u a l
O U T S I G N G A S M O D E L S 1 1 0 - 1 1 1 - 1 2 0 - 1 2 1
O u t d o o r C o o k i n g S y s t e m
1 3 1 2 C M 5 6 1 8
Page 2

2
OUTSIGN GAS
110
111
120
121
PRESSURE
TYPE OF BOTTLE
CATEGORIES
COUNTRIES
BURNER
PERFORMANCE
27-38 mbar
I3+
I3B/P
4.7 kw 4.7 kw 4.7 kw 4.7 kw
27-38 mbar 50 mbar 50 mbar
< to 33 cm dia.
Height: 33 cm
Approx 6 kg of gas
And 13 kg in total
For 20 hours of use
FR - France
LU - Luxembourg
BE - Belgium
CH - Switzerland
GB - Great Britain
CY - Cyprus
ES - Spain
GR - Greece
EI - Ireland
IT - Italy
LT - Lithuania
PT - Portugal
CZ - Czech Republic
SI - Slovenia
AT - Austria
CH - Switzerland
DE - Germany
FI - Finland
SE - Sweden
< to 33 cm dia.
Height: 33 cm
Approx 6 kg of gas
And 13 kg in total
For 20 hours of use
< to 33 cm dia.
Height: 62 cm
Approx13 kg of gas
And 27 kg in total
For 42 hours of use
< to 33 cm dia.
Height: 62 cm
Approx13 kg of gas
And 27 kg in total
For 42 hours of use
Characteristics / Models 110 - 111 - 120 - 121
Page 3
3
COOKOUT SAS - ZA LE VERNAY - 74290 ALEX - FRANCE
OS12
SN
N°
110
Universal grill Model : OUTSIGN.GAS
G30(Butane):
G31(Propane):
G30(Butane):
G31(Propane):
Qn 4.7 KW PCS
Qn 4.3 KW PCI
37 mbar
Country Categories
I3+
I3B/P
FR, LU, BE, CH, GB, CY, ES, GR, IE, IT, LT, PT, CZ, SI
Cet Appareil doit être utilisé à l’extérieur seulement. Consulter les notices avant d’installer et d’utiliser l’appareil.
This appliance must only be used outside. Please read the instructions before installing or using it.
Dieses Gerät darf nur im Freien benutzt werden. Bitte lesen Sie vor seiner Aufstellung und Benutzung die Anleitungen.
Este aparato solo debe ser utilizado en exteriores. Consulte las instrucciones antes de instalar o utilizar este aparato.
Dit apparaat mag enkel buiten worden gebruikt. Raadpleeg de handleiding voor u dit apparaat installeert en gebruikt.
AT, CH, DE, FI, SE
Type A
28-30 mbar
30 mbar
50 mbar
50 mbar
342 g/h
336 g/h
111 120 121
1312CM5618
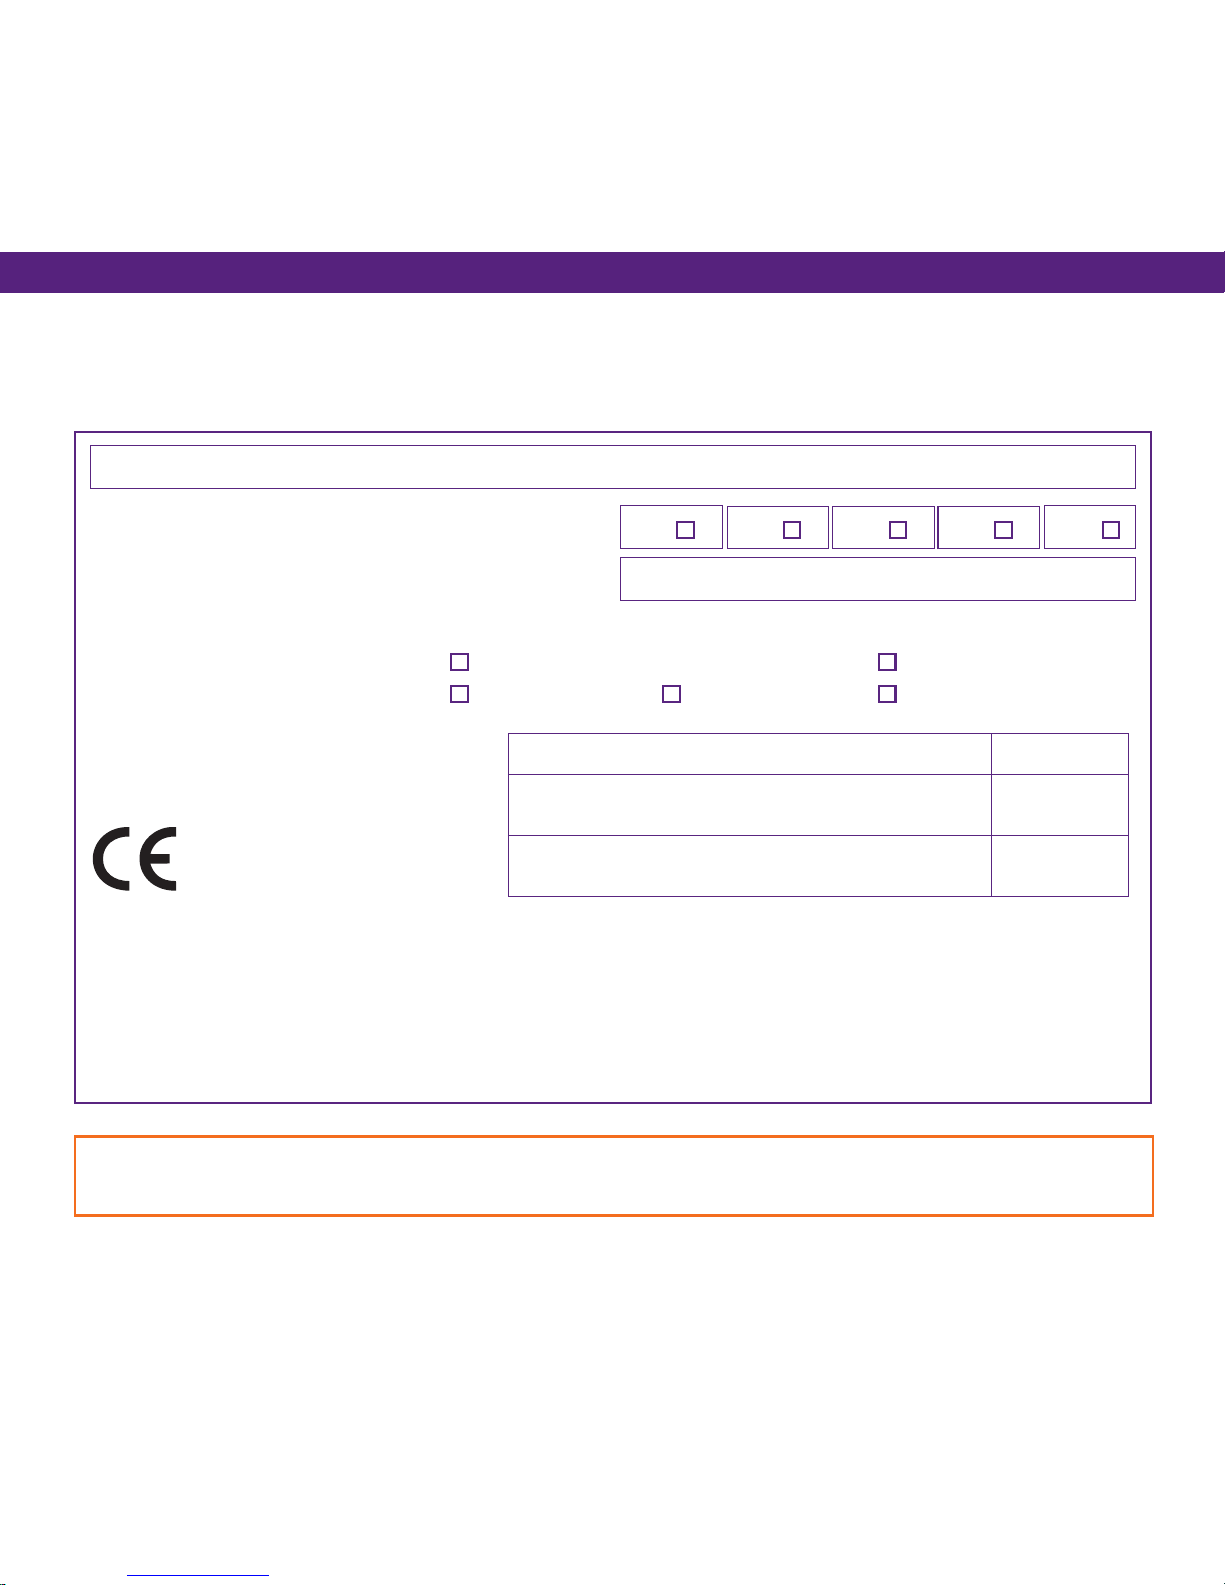
Which model do you have ?
Refer to the data plate on your appliance (see diagram below to identify the OUTSIGN model you have bought. The data plate is located on the right-hand
door hinge of the appliance. It indicates the equipment, the options and the settings of your OUTSIGN.
IMPORTANT :
You must be sure to use the correct pressure reducer for the pressure regulation on your appliance, indicated in mbar.
Page 4
4
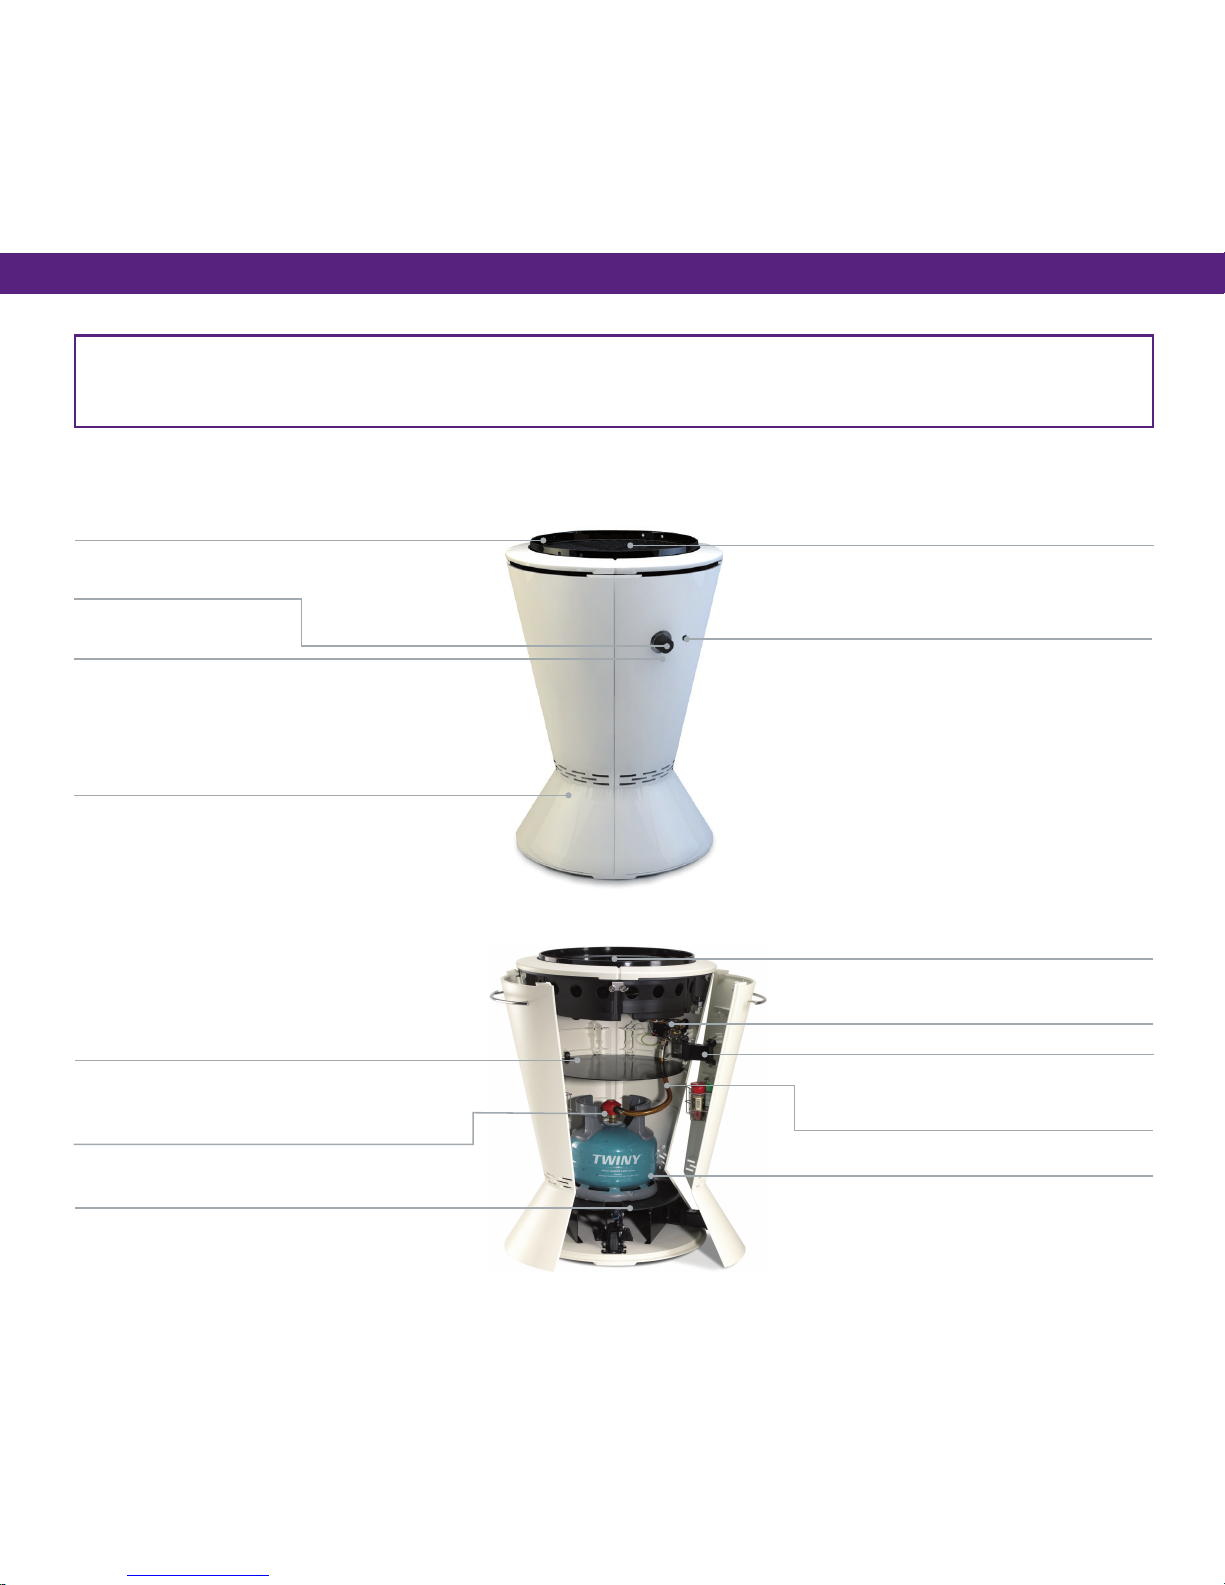
Thermostatic valve control
Thermostatic sensor
Battery lighter (under grill or plancha)
Enamelled, cast-iron, interchangeable plancha or grid.
Thickness: < 8mm dia. < 520 mm
Lighter button
Aluminium casing
with heat-proof outer surface
Description / Model 110 - 120
MODEL 110 (27/38 MBAR) - MODEL 120 (50 MBAR): SMALL GAS BOTTLE (5-6 KG OF GAS)
Weight: 45 to 70 kg - Height: 93 cm – Overall external diameter: 68 cm – Burner performance: 4.7 kw
Thermocouple (under grill or plancha)
Thermostatic assembly
Pivoting door hinge
Internal shelf also deects heat.
It is essential that this shelf is in place during use.
Sheathed braided stainless steel exible gas
supply hose. Recommended length: 50 cm.
(Supplied or not depending on country)
Pressure reducer (not supplied). Selected
In accordance with the pressure indicated on the
data plate located on the right-hand door hinge.
Gas bottle (not supplied)
Integrated bracket for the gas bottle with locking wedge.
Page 5
5
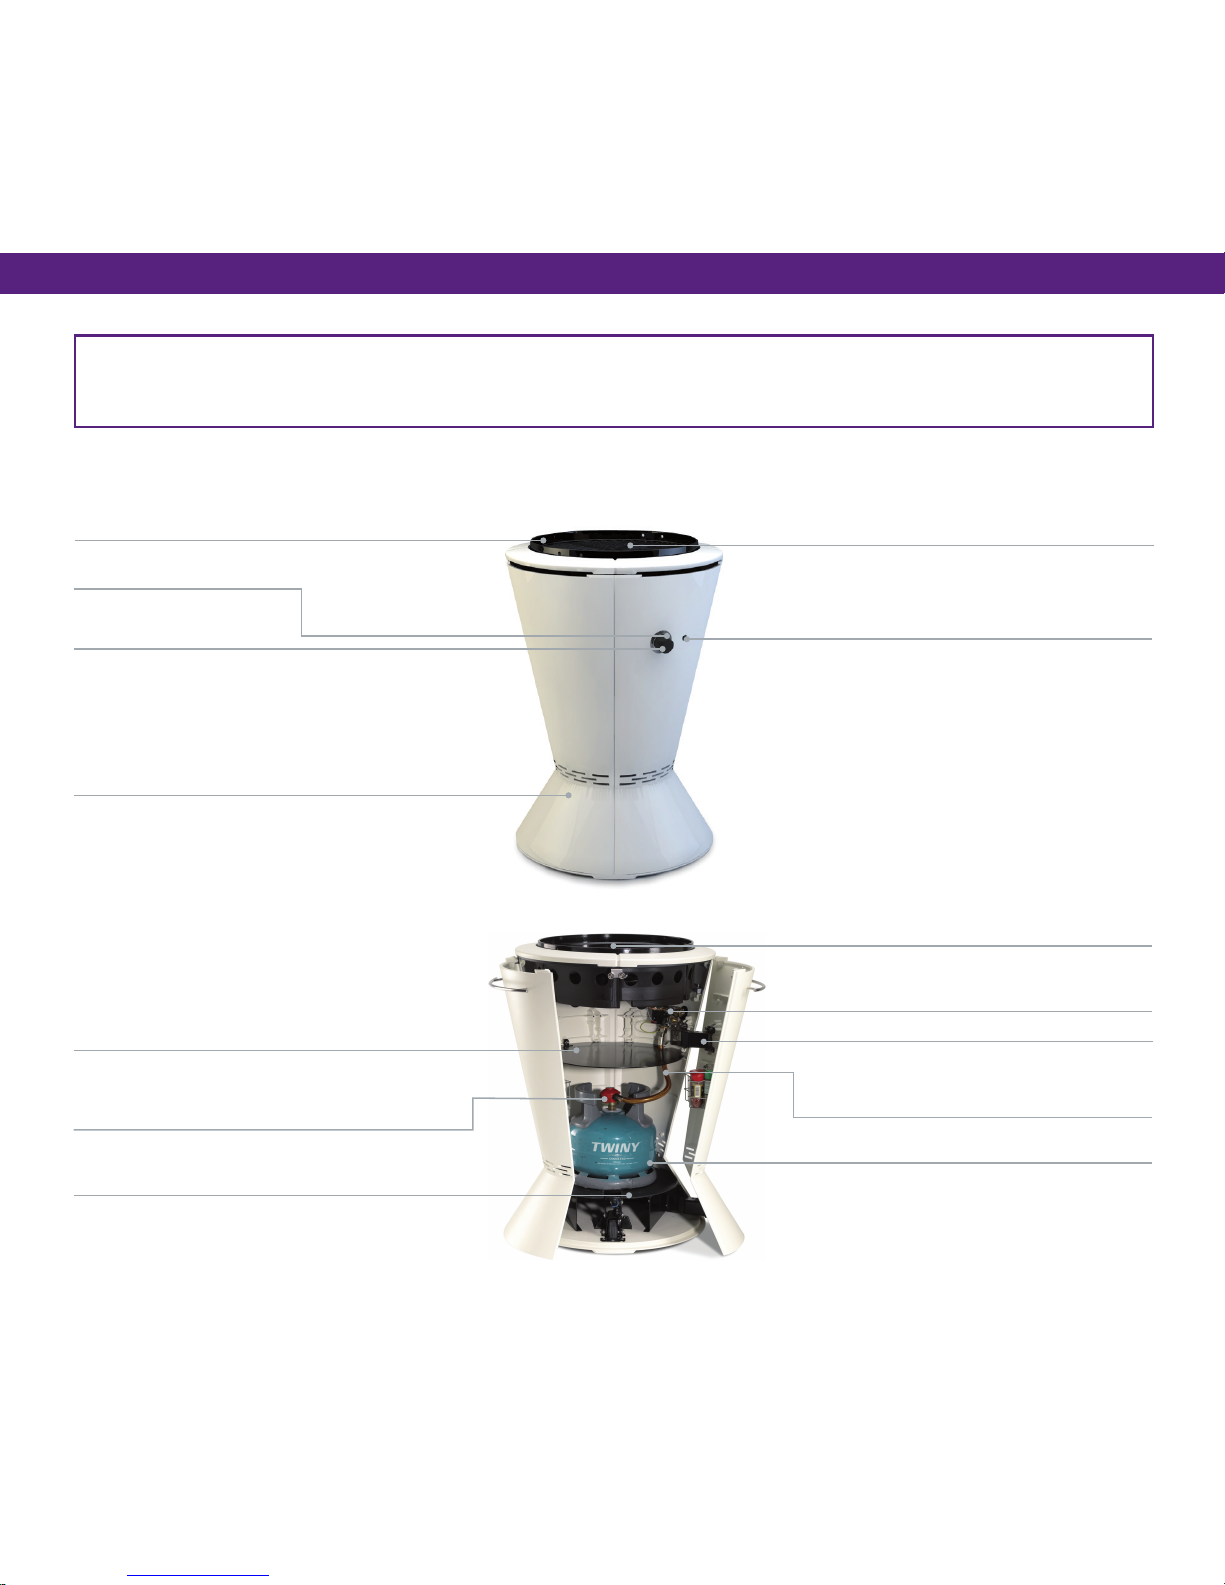
Thermostatic valve control
Thermostatic sensor
Battery lighter (under grill or plancha)
Enamelled, cast-iron, interchangeable plancha or grid.
Thickness: < 8mm dia. < 520 mm
Lighter button
Aluminium casing
with heat-proof outer surface
Description / Model 111 - 121
Thermocouple (under grill or plancha)
Thermostatic assembly
Pivoting door hinge
Internal shelf also deects heat.
It is essential that this shelf is in place during use.
Sheathed braided stainless- steel exible gas
supply hose. Recommended length: 50 cm.
(Supplied or not depending on country)
Gas bottle (not supplied)
Integrated bracket for the gas bottle with
locking wedge.
MODEL 111 (27/38 MBAR) - MODEL 121 (50 MBAR): GAS BOTTLE (17 KG OF GAS)
Weight : 45 to 70 kg - Height : 93 cm – Overall external diameter : 68 cm – Burner performance : 4.7 kw
Pressure reducer (not supplied). Select
in accordance with the pressure indicated on the
data plate located on the right-hand door hinge.
Page 6
6
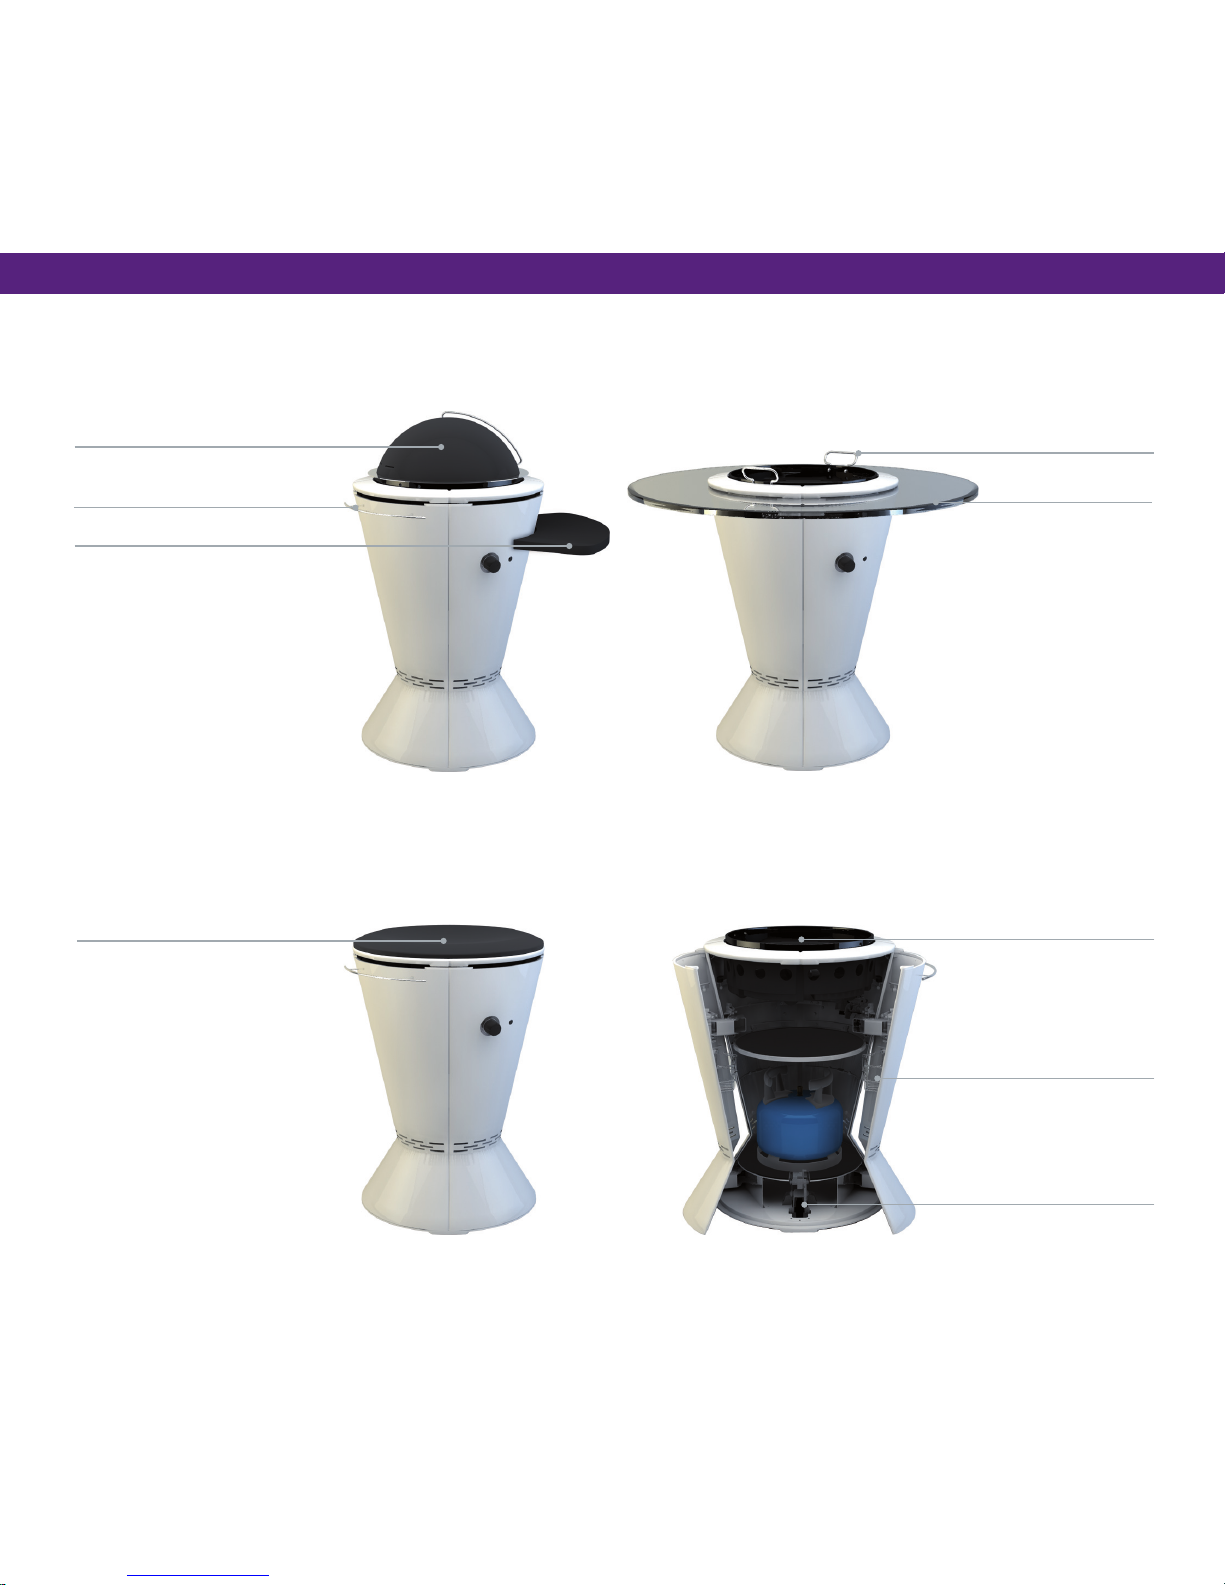
Cooking dome
Side table
Protective cover
Underside uppermost : provides
protection from residual heat after use
and also weather-protection Top side:
trivet for the grid or a serving dish
Retractable wheels kit
Steel storage baskets
Plancha
Handles for plancha or grill
Surround table
Handle / Hook for accessories
Description / Options
Page 7

7
Index
PART 1 / SAFETY INSTRUCTIONS
• Warnings 8 - 9
• Instructions relating to the use of gas 9 - 10
• Maintenance, Troubleshooting and After-sales Service 11
• Guarantee 11 - 12 - 13 - 14
PART 2 / INSTRUCTIONS FOR USE
• Unpacking the appliance 15
• Operating the doors 16
• Handling the equipment 17 - 18
• Installing the cooking accessories 18 - 19
• Connecting the liquid propane or butane bottle 20 - 21 - 22 - 23
• Replacing a gas cylinder 24 - 25
• Before each use 25
• Lighting instructions 26 - 27
• To extinguish 27
• Temperature and cooking 28
• Recommendations and safety instructions 29 - 30
• Storage 30
• Troubleshooting guide 31 - 32
PART 3 / ANNEXES
• Compliance 33
• Disposal 34
• Technical data 34
• Adapting to different gas supplies 34
• Injectors and pressure to burners 35
• Heat output 35
Page 8

8
1. SAFETY INSTRUCTIONS
2. INSTRUCTIONS FOR USE 3. ANNEXES
The user is responsible for ensuring correct installation and the proper use of this cooking system. A failure to adhere to the instructions contained in this manual
may cause an explosion or dangerous re. A failure to adhere to the instructions contained in this manual may cause serious injury or damage to property. This
instruction manual contains important information essential for the safe use of this appliance.
Read and follow all warnings and instructions before and during use of the appliance. Keep this manual for later reference. We also ask you to keep up to date
with the latest information relating to the use of our products by visiting our web site: www.outsign-elements.com
Warnings
• Read the instructions before using the appliance
• Do not leave this appliance in operation unattended
• Do not carry the appliance by the handles on the doors or by the side table
• The external parts can be very hot. Keep small children at a safe distance during use
• Only use this appliance outside in a well-ventilated area at least 3 metres from any habitation or building;
• Do not use this appliance under an overhang or under the branches of a tree;
• Do not use this appliance in a garage, shed, corridors or in any other enclosed space;
• Do not use this appliance on a boat or in any other recreational vehicle;
• Outsign barbecues and planchas are not designed for use as radiators and must not be used as such;
• Use protective gloves when handling hot parts;
• It is strictly prohibited to move your Outsign appliance while it is in use;
• Ensure the appliance is cool before moving or storing it.
• During cooking, the appliance must be positioned on a at, solid surface; ensure the appliance is levelled.
• Ensure that the surface is capable of withstanding the weight of the appliance and the gas bottle;
• Never lean on the appliance during cooking and do not place hands or ngers on the grill or the plancha or the upper rim;
• It is dangerous to attempt to modify the appliance and this is not authorised;
• The user is not authorised to modify any parts of the appliance;
• Use only certied OUTSIGN accessories;
• Do not store or use petrol or other inammable liquids or gases less than 8m (25 feet) from the appliance;
• Keep electric cables away from the heating elements during use;
• Clean your OUTSIGN gas cooking system thoroughly and regularly. When cleaning the knob and the burners, take care not to enlarge the orices;
• This appliance must be kept at a distance from inammable materials during use
• The user must not interfere with the parts guaranteed by the manufacturer.
Page 9

9
Warnings (continued)
• Check regularly for any obstruction of the burners by insects or spiders;
Do not use charcoal or briquettes or lava stone in your OUTSIGN appliance;
• Do not obstruct the air supply essential for burning and ventilation. The ventilation holes in the casing must be kept clear;
• Do not use your barbecue or your plancha when under the inuence of alcohol or drugs;
• In case of re, move away from the appliance and call the emergency services immediately.
Do not attempt to extinguish a grease or hydrocarbon re with water;
• If the heat ares up violently, remove the food from the ames until they have lost some of their intensity;
• In the event of a grease re, shut off the supply to the burners;
• Before using your appliance for the rst time, remove all protective labels using water and soap and heat the appliance for 30 minutes.
• Do not store oil or any other inammable liquid inside your OUTSIGN system.
• Never use the appliance without the internal shelf which also serves to deect heat.
Instructions relating to the use of gas
• Use the correct pressure reducer for your gas bottle and conguration as indicated on the data plate applied to the right-hand hinge of your OUTSIGN
(28-30 mbar, 37 mbar or 50 mbar) - not supplied with the OUTSIGN appliance;
• Install or replace the exible hose in accordance with the national regulations in force; be sure to use an appropriate exible hose which will not be
damaged when the doors are opened and closed;
• Before using your Outsign gas appliance for the rst time after an extended period in storage or out of use, inspect it carefully for any sign of a gas
leak and/or clogged burners;
• When your OUTSIGN cooking system is not in use, disconnect the gas bottle and store it outside in a well-ventilated area;
• Do not use your Outsign gas appliance if there is any inadequate seal in the gas connections.
Check the seal referring to the instructions in this manual;
NATURAL RISKS – SPIDERS AND INSECTS : there is always the possibility that very small insects make a web or a nest in the burner venturi. This
partially or totally blocks the gas supply. Indications of this are a yellow or smoky ame or a burner may be difcult or impossible to light. Ultimately,
the gas may even burn outside the venturi which can seriously damage your appliance. If this happens, shut off the gas cylinder immediately. As
soon as the appliance is cool, clean the burners. Clean the venturi with a brush or pipe cleaner. N.B.: damage caused by totally- or partially-blocked
venturi is not covered under the guarantee and is considered the result of inadequate maintenance.
1. SAFETY INSTRUCTIONS
2. INSTRUCTIONS FOR USE 3. ANNEXES
Page 10
10
Instructions relating to the use of gas (continued)
• Do not use a naked ame to look for gas leaks;
• Store the gas cylinder outside in a well-ventilated area;
• Never store the gas cylinder in close proximity to another gas-red appliance or in a very hot place such as in a car or on a boat;
• Do not store the spare gas bottle less than 3m (10 feet) from the appliance currently in use;
• Do not put any inammable product or cooking oil on the appliance or inside the casing;
• Open the casing doors each time you light the appliance;
• A safety thermocouple automatically cuts off the gas supply if the burner goes out. However, if the burner goes out during cooking, it is advisable to
shut off all the gas taps. Then open the casing and wait ve minutes before attempting to relight the barbecue in accordance with the lighting instructions;
• The OUTSIGN cooking system is designed for use with propane or butane gas only. Butane and propane are not natural gases. Any attempt to covert to
or to use natural gas with an appliance red by butane or propane is dangerous and will invalidate the guarantee;
• The use of a damaged or rusted gas bottle can be dangerous. If the bottle is damaged or rust is detected on the bottle, ask your gas supplier to
inspect the bottle;
• Do not use a gas bottle with a damaged tap;
• Even if your gas bottle appears to be empty, it may still contain some gas. Transport and handle the bottle with care;
• Do not under any circumstances attempt to disconnect the pressure reducer or any gas connector while the appliance is in use;
• Make sure you are outside and away from any source of ignition when replacing or connecting the gas bottle;
• Always close the taps on the gas cylinder when the barbecue is not in use;
• Never expose the gas cylinder to direct sunlight;
• Keep the gas cylinder out of the reach of children;
• Transport and store the gas cylinder upright and do not incline it;
• Do not smoke in the vicinity of the gas cylinder and never during transportation in a vehicle.
IF YOU SMELL GAS :
1
Shut off the gas supply to the appliance
2
Extinguish any ame.
3
Open the casing.
4
SIf the smell persists, move away from the appliance and immediately contact your gas supplier or the emergency services.
1. SAFETY INSTRUCTIONS
2. INSTRUCTIONS FOR USE 3. ANNEXES
Page 11
11
Maintenance, Troubleshooting and After-sales service
Refer repairs to Outsign customer services and use only original replacement parts.
To contact customer services:
COOKOUT SAS
393 chemin de Crêt Nant - Z.A Le Vernay
74290 Alex - France
Tél : +33 (0)4 50 64 00 15
www.outsign-elements.com
Guarantee
Cookout SAS (Outsign) hereby guarantees the ORIGINAL PURCHASER of the OUTSIGN gas barbecue that the product is free from any material or manufacturing
defects for the period specied hereinafter with effect from the date of purchase:
1. SAFETY INSTRUCTIONS
2. INSTRUCTIONS FOR USE 3. ANNEXES
Aluminium casing
Coating on the casing
Burner body
Enamelled cast-iron cooking grid and plancha
Nickel-chrome treated steel burner racks
Other parts excluding consumables
15 years against perforation
2 years excluding discoloration or scratches resulting from insufcient maintenance
5 years against perforation but not against rust
5 years against perforation but not against rust
3 years against perforation but not against rust
2 years
PLEASE NOTE :
In any event, this guarantee is dependent upon registration on our website and/or return of the guarantee coupon (customer record) below no later
than one month following the date of purchase. Failing this, the guarantee shall be ineffective.
Page 12
12
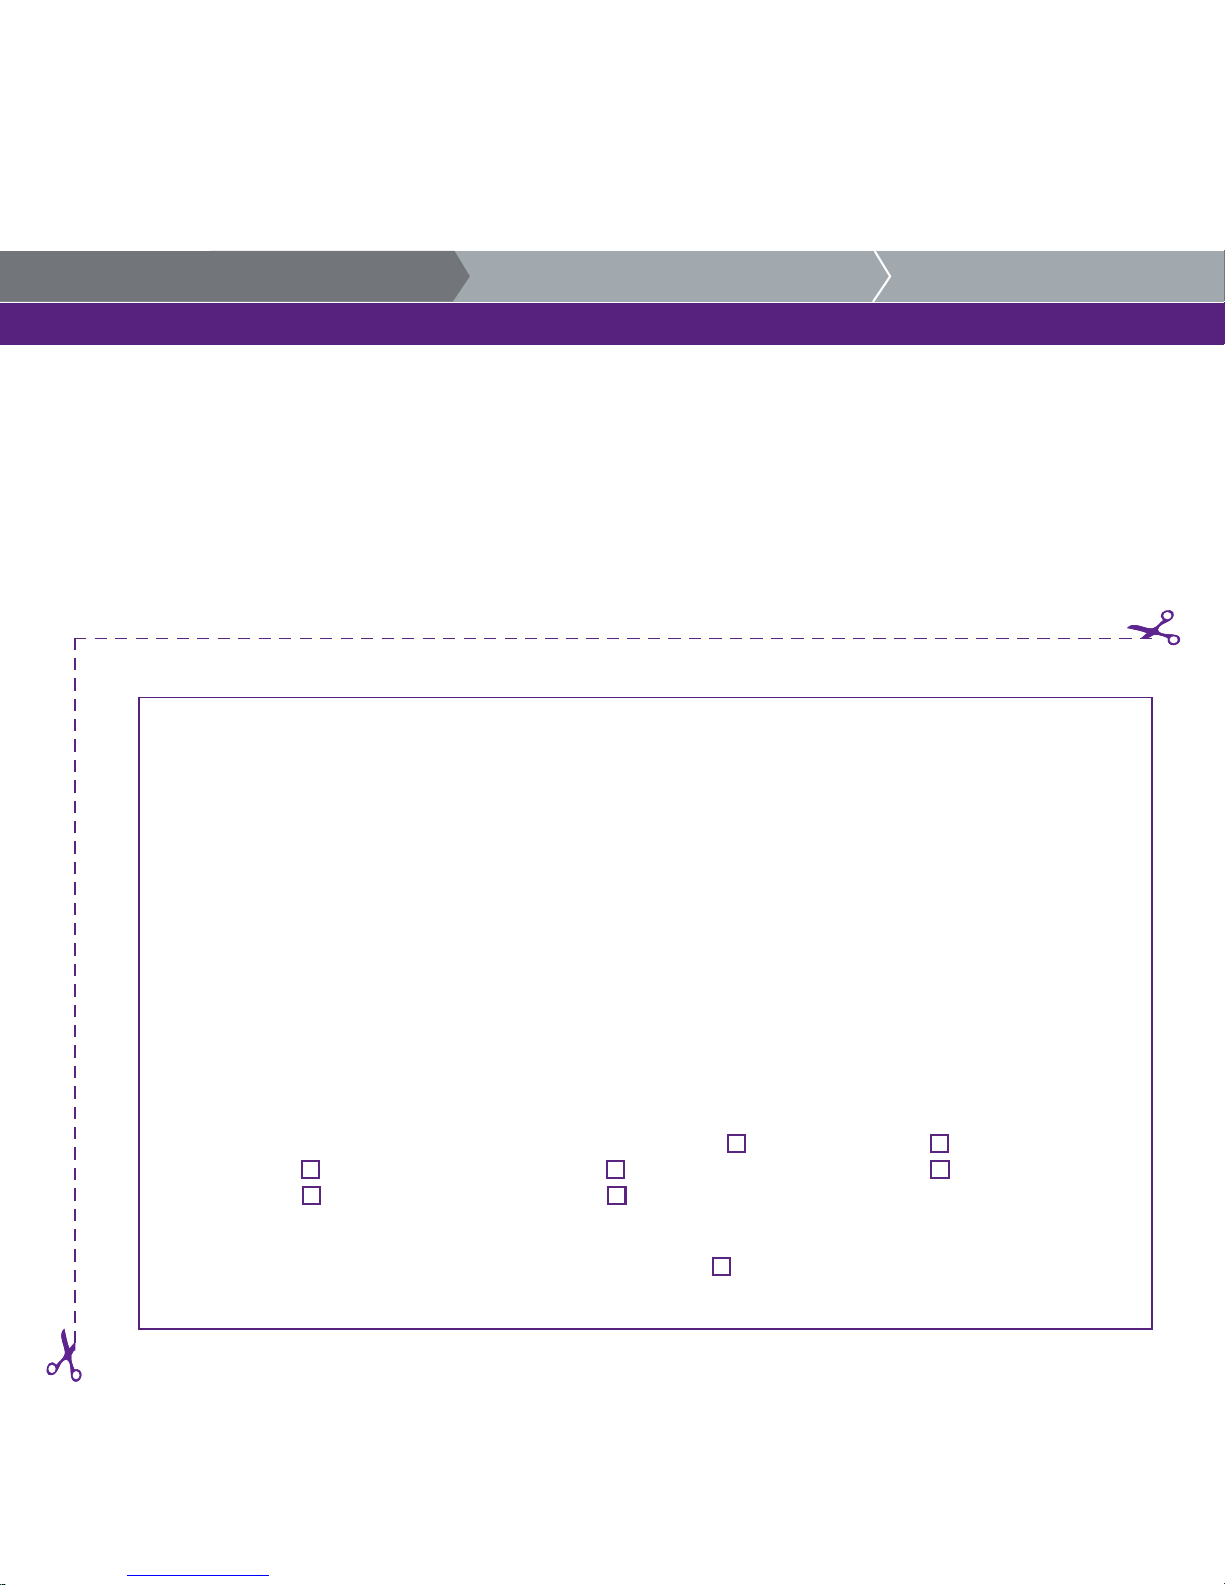
Guarantee (coupon to be returned)
NAME : ........................................................................................................................................................................
FIRST NAME : ...............................................................................................................................................................
ADDRESS : ..................................................................................................................................................................
....................................................................................................................................................................................
...................................................................................................................................................................................
....................................................................................................................................................................................
TEL : ....................................................................... EMAIL : .................................................................................
DATE OF PURCHASE : ..................................................................................................................................................
RESELLER : ..................................................................................................................................................................
...................................................................................................................................................................................
APPLIANCE SERIAL NUMBER : ......................................................................................................................................
( indicated on the data plate located on the right-hand door hinge, inside the appliance )
COULOUR :.............................................................. PLANCHA : GRID :
SIDE TABLE : SURROUND TABLE : MOBILITY KIT :
DOME : PROTECTIVE COVER :
I HAVE READ AND ACCEPT THE GENERAL CONDITIONS OF SALE: :
[ CUSTOMER RECORD ]
Please return this coupon to us at the address below in order to validate the guarantee.
COOKOUT SAS
393 chemin de Crêt Nant - Z.A Le Vernay
74290 Alex - France
You can also register on our web site : www.outsign-elements.com
1. SAFETY INSTRUCTIONS
2. INSTRUCTIONS FOR USE 3. ANNEXES
Page 13

13
Guarantee (continued)
The company, COOKOUT, may request reasonable proofs of your date of purchase; retain your till receipt or invoice. This guarantee is limited to repair or replacement of
the defective parts, subject to normal use and correct maintenance of the appliance, following conrmation by the company COOKOUT that the said parts are indeed
defective. Before returning a part, please contact customer services (Section: “Maintenance, Troubleshooting, Customer Services” in these instructions). If COOKOUT
conrms the fault on the part and accepts the claim, the part shall be replaced free of charge, transport costs are borne by the customer.
This limited guarantee does not cover faults or malfunctions caused by an accident, abusive or incorrect use, modication, incorrect application, vandalism, incorrect
installation, incorrect maintenance, failure to follow the normal maintenance instructions including, but without limitation, damage caused by the presence of insects in
the burner pipes. With respect to the plancha: violent thermal shock resulting in irreparable deformation of the plancha is not covered under the guarantee. This limited
guarantee shall not cover deterioration or damage caused by extreme climatic conditions such as hail, hurricane, earthquake or tornado, discoloration due to direct or
indirect exposure to chemical substances (present in the atmosphere).
The only express guarantee applicable is this guarantee specied in these presents. Any implicit guarantee applicable in relation to the marketable quality and the tness
for a specic use is limited to the period of cover under this written express limited guarantee. Certain countries do not allow limitations in time of implicit guarantees. It
may be that this limitation does not apply in your case.
The company, COOKOUT, declines all liability relating to specic consequential nancial loss. Certain countries do not allow the exclusion or limitation of accessory or
consequential loss. It may be that this limitation does not apply in your case.
COOKOUT does not authorise anyone or any company to assume on its behalf any other obligation or liability relating to the sale, installation, use, removal, return or
replacement of its appliances and no declaration to this effect shall in any way imply an obligation on the part of the COOKOUT. This guarantee shall apply solely to the
products sold retail by authorised resellers, the list of whom may be consulted on our web site, or products sold directly by our company.
PLEASE NOTE :
In any event, these guarantees are subject to your registering your purchase on our website and/or by returning the guarantee coupon above.
1. SAFETY INSTRUCTIONS
2. INSTRUCTIONS FOR USE 3. ANNEXES
Page 14
14
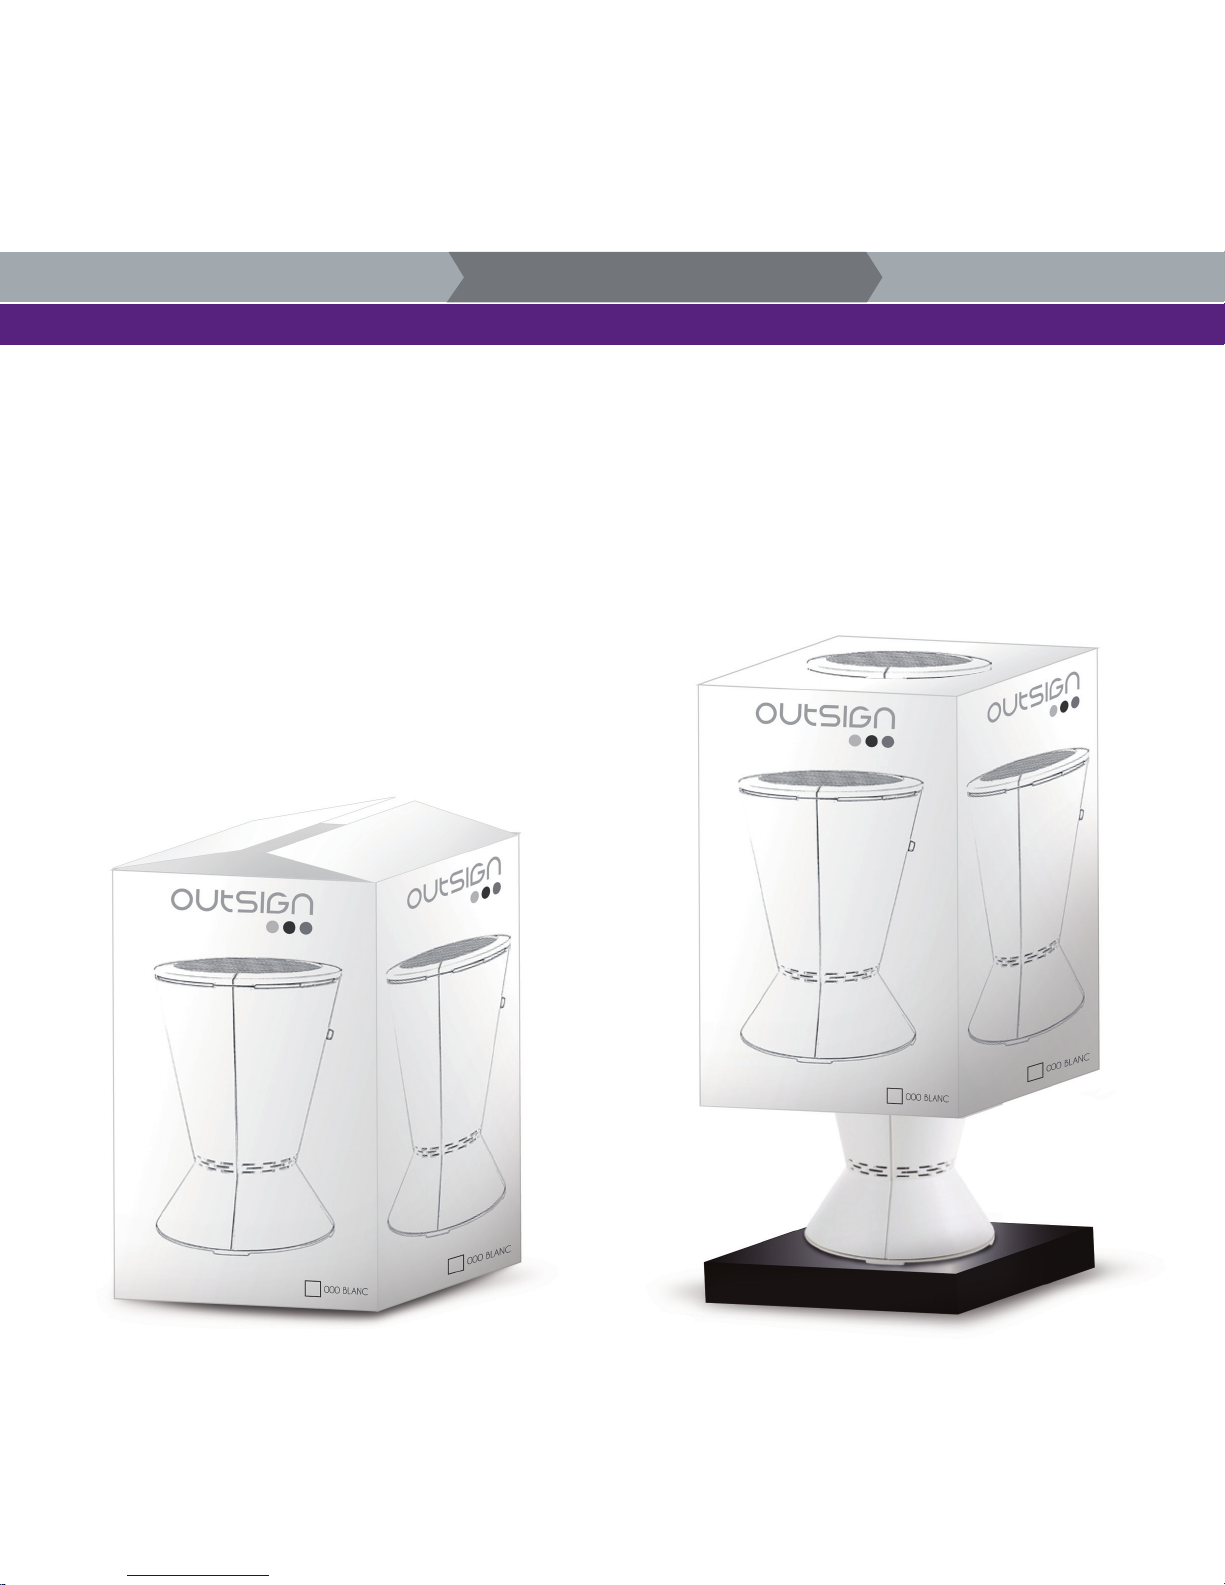
Unpacking the appliance
The appliance is delivered in appropriate packaging.
When the appliance is delivered, please check that the appliance is not damaged;
Do not use a cutter or any metal tool to remove packaging in case you scratch the external surfaces.
The appliance is unpacked in two stages:
• Open the top of the box to remove the accessories (grid, plancha etc.)
• Lift off the upper section to uncover the appliance (as shown in the illustration below).
1. SAFETY INSTRUCTIONS
2. INSTRUCTIONS FOR USE 3. ANNEXES
Page 15
15
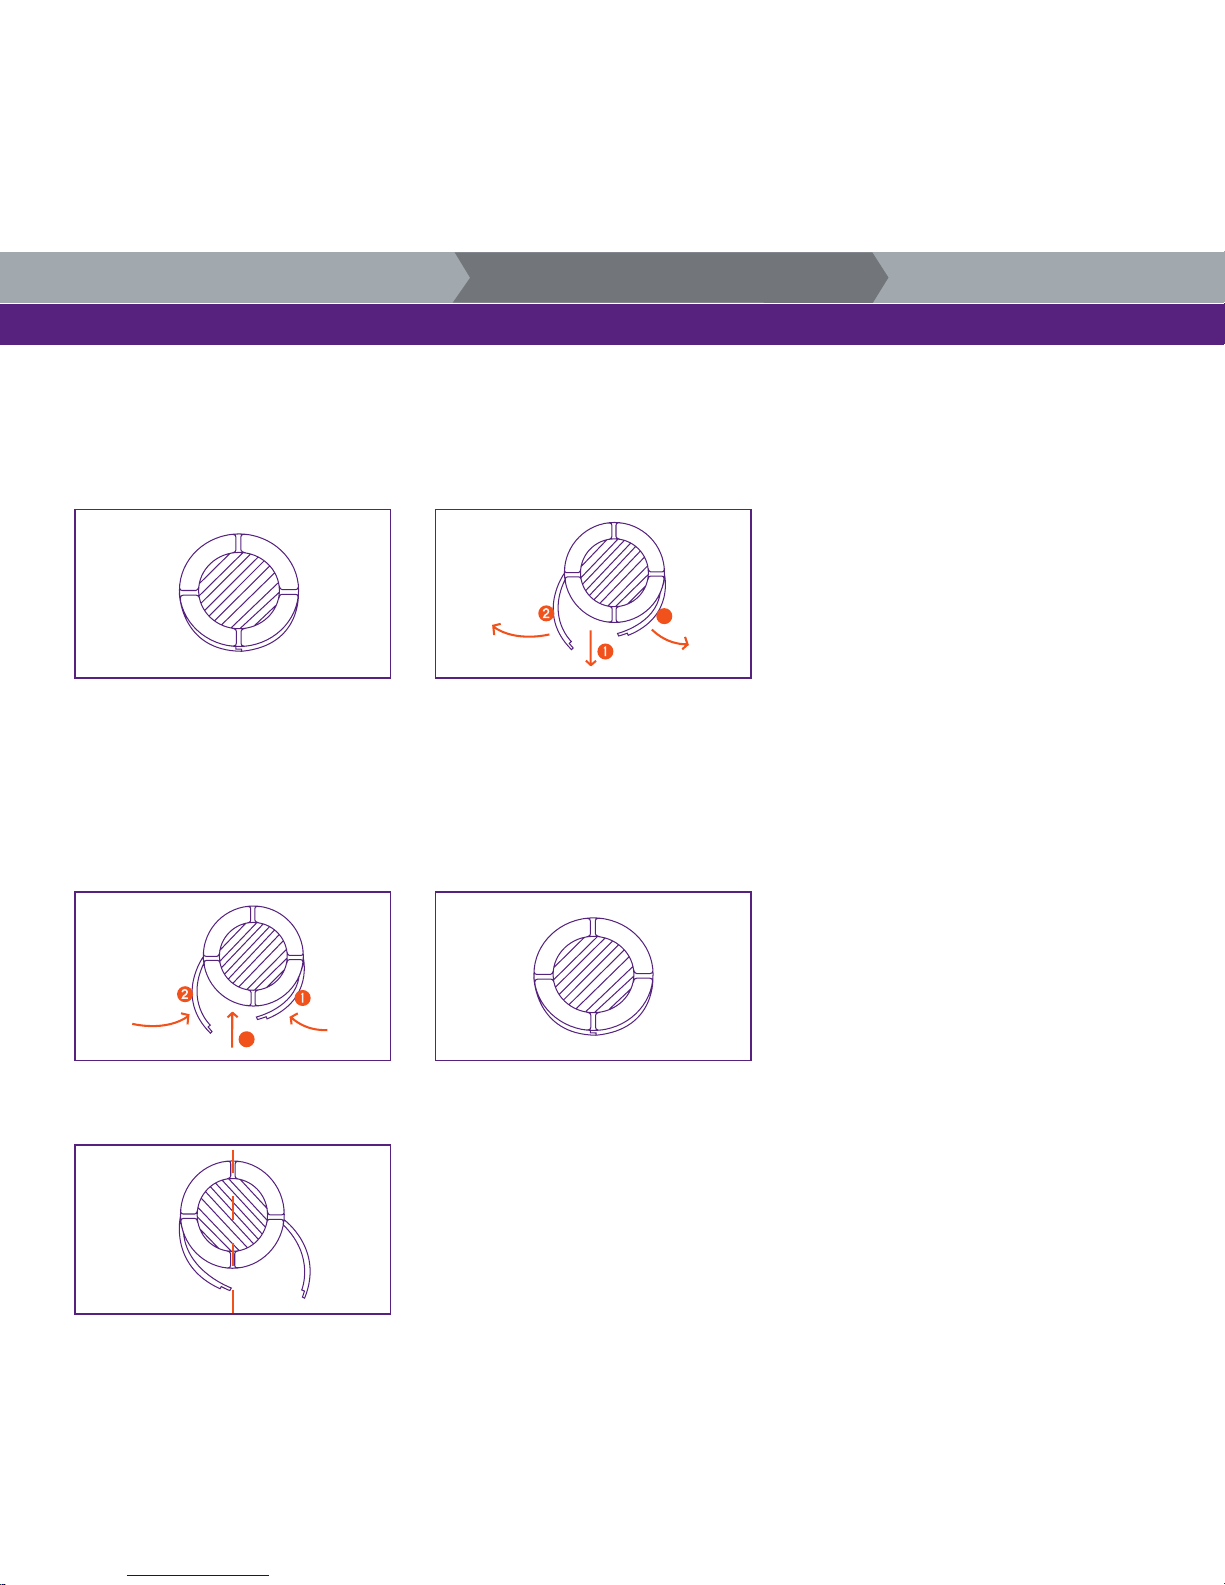
Operating the doors
[ OPENING THE DOORS ]
• Pull the left-hand door towards you about10 mm in order to release the catch in the rebates on the doors
• Open the door with a rotating movement to the left as far as the silicon stop
• Open the right-hand door with a rotating movement to the right as far as the door stop
[ CLOSING THE DOORS ]
• Close the right-hand door with a rotating movement to the left
• Close the left-hand door with a rotating movement to the right
• Push the left-hand door, away from you, approx 10 mm to lock the unit.
NB : There is a point at which the door sticks slightly as you open and close and this is quite normal. This occurs as the load is re-engaged and the door is
aligned vertically. When the doors are closed, the unit is rigid.
NB : The doors open asymmetrically (see diagram) and the opening is quite sufcient to allow the insertion and removal of gas bottles < 33 cm dia.
3
3
1. SAFETY INSTRUCTIONS
2. INSTRUCTIONS FOR USE 3. ANNEXES
Page 16
16
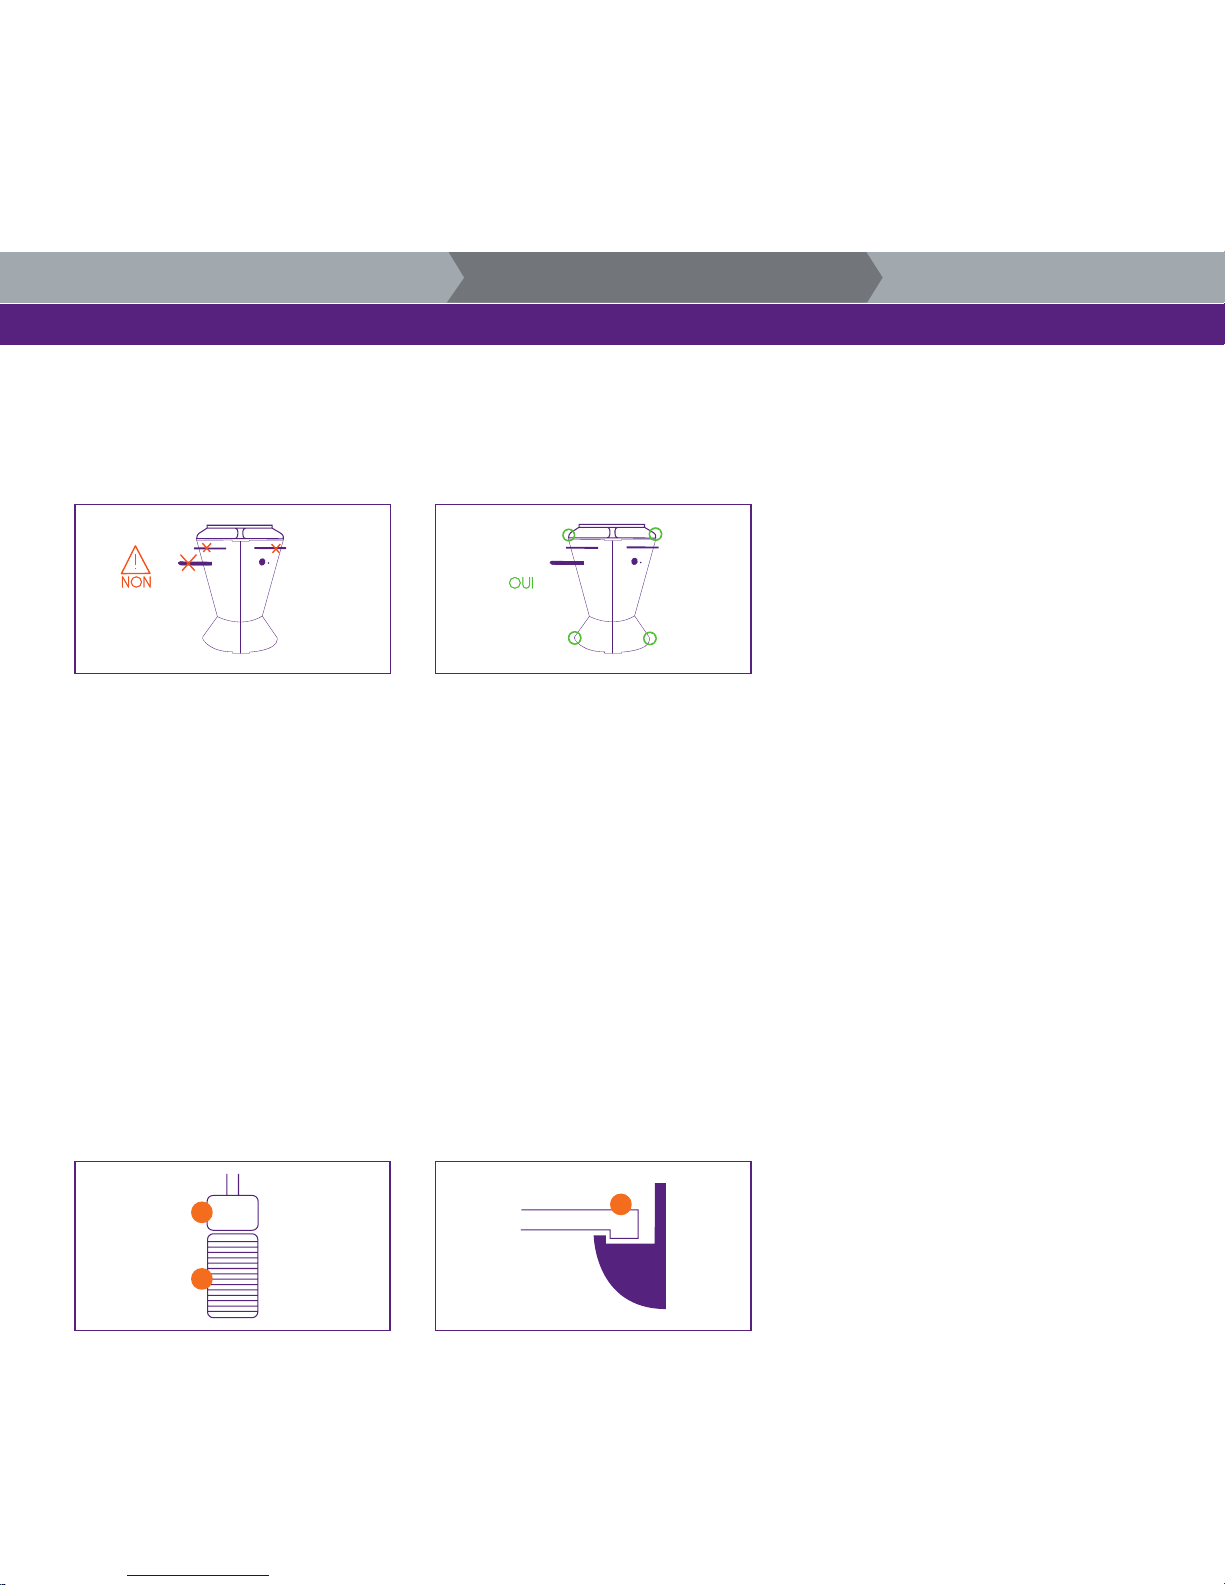
Handling the appliance
[ TO LIFT THE APPLIANCE ]
Never use the handles attached to the doors or the side table to lift the appliance.
If the system is not tted with the mobility kit, it should be carried by two people holding it from underneath and supporting it by the top.
First, remove the cooking accessory and the gas bottle.
[ MOVING THE APPLIANCE USING THE RETRACTABLE WHEELS ]
This mobility kit is provided for use with the stand-alone appliance. If you have added a table, it is essential that this is removed, only once the appliance is
cool and not in use, before the appliance is moved. Make sure the appliance is on at, solid ground appropriate for the use of the appliance.
[ LOCKING THE WHEELS IN POSITION ]
• Open the doors
• Depress the main pedal (1) and unlocking pedal (2).
• Hold the appliance with both hands under the rim to support the appliance and avoid it tipping over.
• Press the main pedal only (1) (do not press on the small, secondary pedal for unlocking the catch at the same time) to lift the appliance and then to
lock it when it is repositioned.
• Press on the lever of the catch in order to ensure it is properly locked in place.
• Inspect the catch to ensure it is properly fastened.
• Release the main pedal.
• Fold the pedals away.
• Close the doors.
1. SAFETY INSTRUCTIONS
2. INSTRUCTIONS FOR USE 3. ANNEXES
1
2
3
Page 17

17
Handling the appliance (continued)
[ DIRECTING THE MOVEMENT OF THE APPLIANCE ]
• Hold the rim as you would the steering wheel of a car to drive and guide it.
• You can also hold the side table as a handle bar if this is tted.
Remember : Under no circumstances use the side table or the handles to carry the appliance.
[ TO RETRACT THE WHEELS ]
• Open the doors
• Depress the main pedal and the unlocking pedal
• Steady the appliance with both hands under the rim to support it and avoid it tipping over.
• Press on both the main pedal and secondary unlocking pedal to raise the appliance and to unlock it.
• You can also pull on the lever of the catch in order to facilitate complete unlocking.
• Balance the unit (careful of the weight) by applying pressure equally to both pedals so that the appliance does not drop suddenly.
• Fold the pedals away inside.
• Close the doors
Remember : Wear shoes with closed toes – keep other people at a distance – ensure no-one has hands or feet between the base of the unit and the oor.
Remember the unit may weigh in excess of 50 kg. Do not move the appliance while it is in use, wait until it is cool.
Mise en place des éléments de cuisson
[ POSITIONING THE GRID ]
The grid must be positioned over the burner so that the cross is covering the burner and thus prevents :
• Direct contact between the ame and foodstuffs
• Burned fat which is detrimental to health
• Soiling of any parts other than the compartments provided for this.
• Excess smoke etc.
1. SAFETY INSTRUCTIONS
2. INSTRUCTIONS FOR USE 3. ANNEXES
Page 18
18
Handling the appliance (continued)
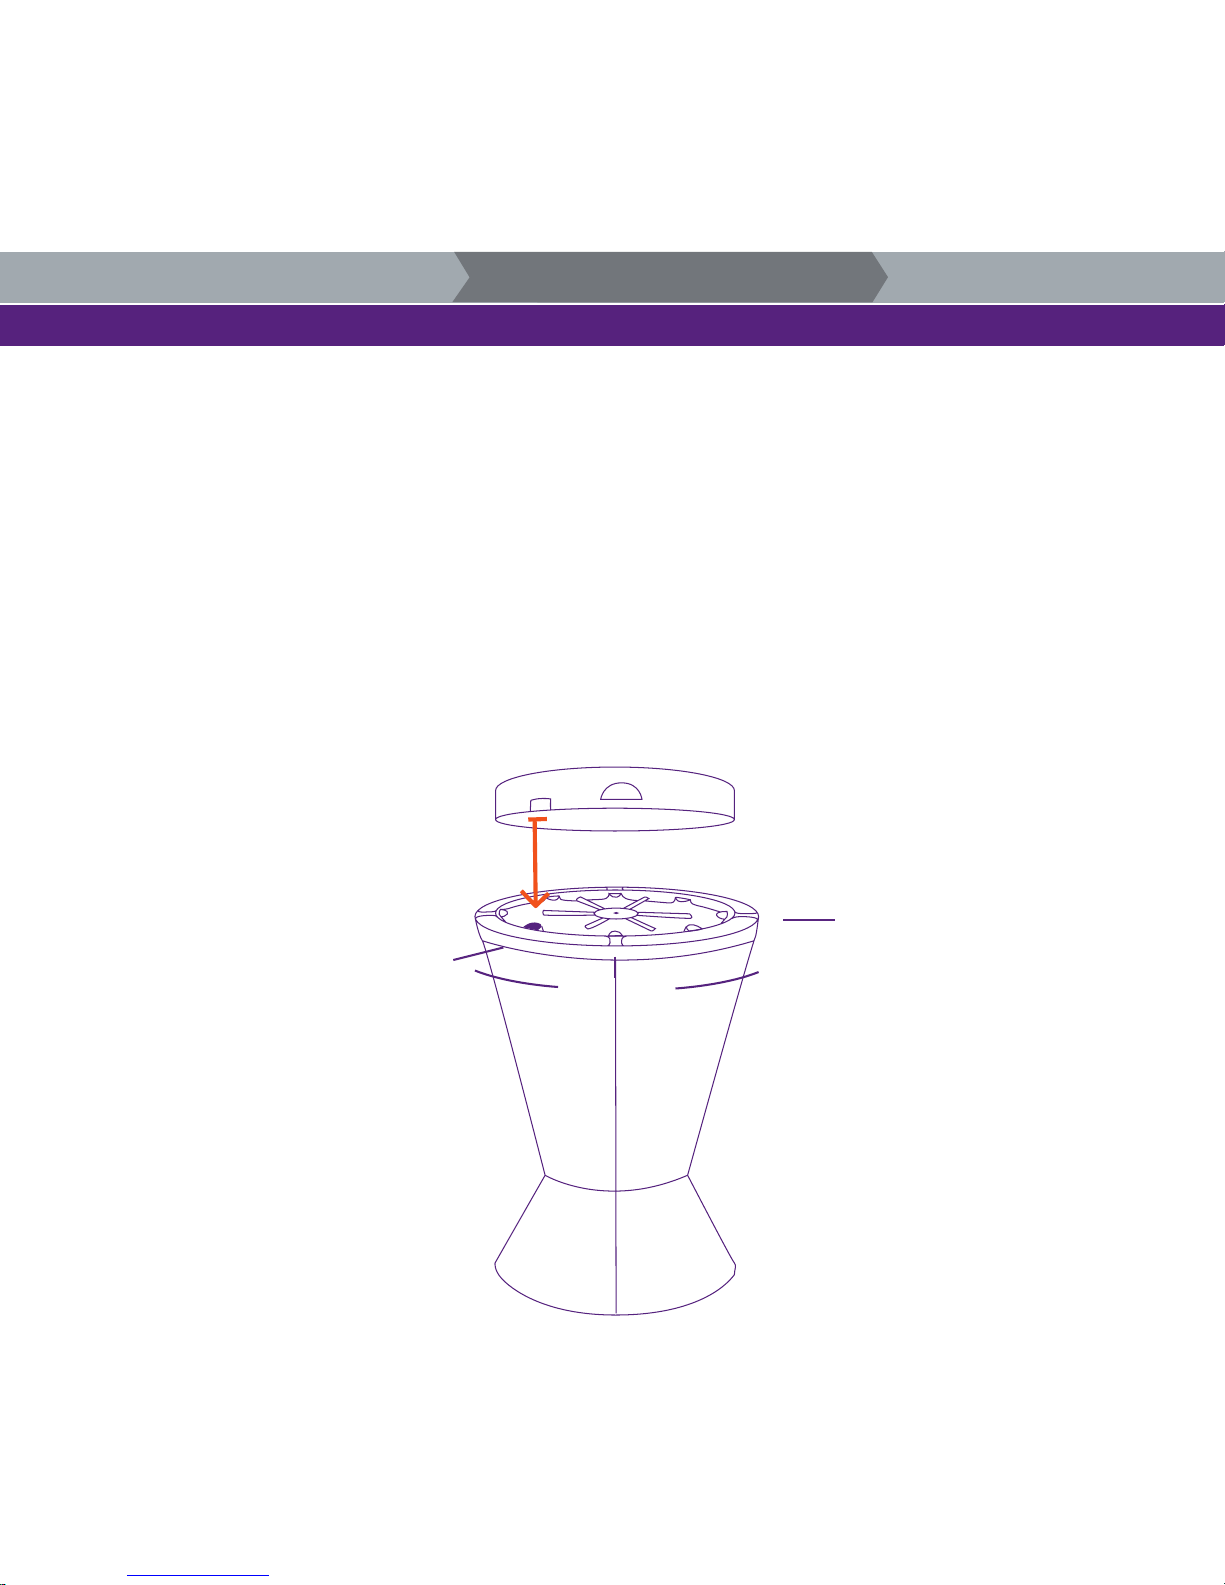
[ POSITIONING THE JUICES COLLECTION TUBE AND ITS SUPPORT ]
Having positioned the juices collection tube, place a container under the tube on the shelf. Do not use a plastic container; use a container able to withstand
temperatures of 280° (glass, Pyrex, aluminium, stainless steel etc.).
[ POSITIONING THE PLANCHA ]
The plancha must be positioned over the burner so that the juices run into the bowl provided.
To ensure this, the at section (in the form of a cross) under the cooking accessory (grid or plancha) must be aligned with the bracket of the burner situated
at 8 o’clock (mnemonic: meal time) as shown in the illustration below.
Warning : In plancha mode, according to the outside temperature, the outer rim may become very hot. Adequate protection is recommended.
[ INSTALLING THE COOKING ACCESSORIES ]
1. SAFETY INSTRUCTIONS
2. INSTRUCTIONS FOR USE 3. ANNEXES
8.30
6 o’clock
3 o’clock
Page 19
19
Connecting the liquid propane or butane bottle
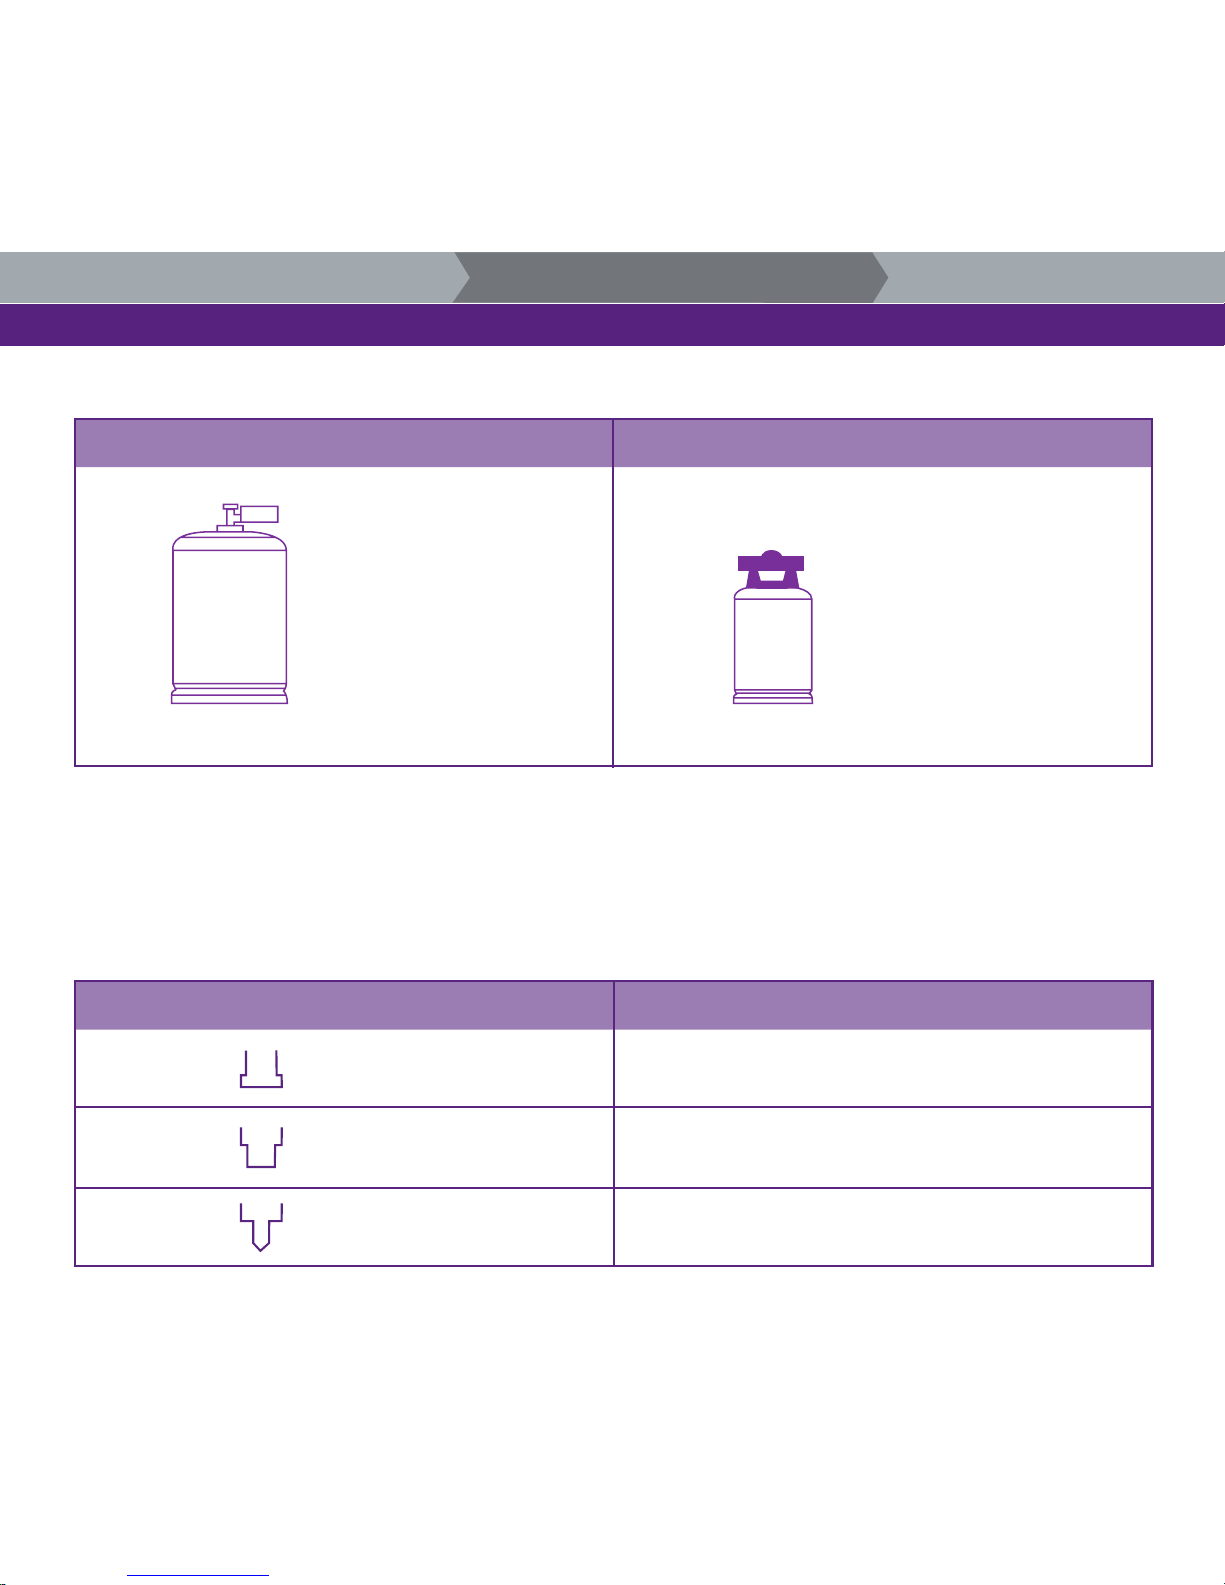
[ BOTTLE TYPES ]
Details of the model type are indicated on the data plate on your appliance located on the upper hinge of the right-hand door.
[ TYPE OF CONNECTIONS ]
Large bottle Small bottle
Diameter or width: 33 cm
Maximum height: 62 cm
13 kg of gas
27 kg in total
Approx 42 hours of use
Diameter or width: 33 cm
Maximum height: 62 cm
6 kg of gas
13 kg in total
Approx 20 hours of use
Braided, stainless steel
1/2 inch, female
1/4 inch, male
Hose nipple
France
Switzerland
Belgium
FOR MODELS 111 AND 121
GAS CONNECTION
FOR MODELS 110 AND 120
COUNTRY
1. SAFETY INSTRUCTIONS
2. INSTRUCTIONS FOR USE 3. ANNEXES
Page 20

20
Connecting the liquid propane or butane bottle
OUTSIGN recommends using 6 kg gas bottles..
The hose, the pressure reducer and the bottle are usually supplied by your gas supplier. The hose/pressure-reducer assembly must comply with local and
national regulations and be appropriate for the gas cylinder used and for the type of gas and the nominal pressure for this OUTSIGN cooking appliance, 28-30
/ 37 (28-30 mbar butane pressure reducer or 37 mbar propane pressure reducer).
Neither the pressure reducer connector nor the bottle is provided by OUTSIGN.
The pressure reducer connector is sold with the bottle by the gas supplier.
The hose must be as short as possible. The recommended length for the hose is 0.50 m. Use an appropriate exible hose that cannot be damaged by the
movement of the doors.
• Never connect this cooking system to a supply without pressure-reducer.
• Do not try to modify the hose or the pressure reducer in any way whatsoever.
• If a part or the whole of the hose is destroyed or damaged, the hose must be replaced.
• Inspect the hose along its entire length before each use to ensure there is no damage (cuts, tears, burnt sections) and that it is not excessively worn.
• Avoid any tight twists or bends in the exible hose.
• Do not twist the hose when you connect it or when you disconnect the gas cylinder.
• Do not fold the hose with a radius of curvature of less than 70mm
• Before each use of the appliance, ensure the hose is not caught in the doors.
• Prevent fat (or any other hot substance) falling on the hose and prevent contact of the hose with heated parts of the appliance.
• The pressure reducer connector must be protected when it is not connected to the gas cylinder.
• Change the joints each time the hose is disassembled. Use only joints which comply with the standard, NF D 36-125 (orange JT M20x150 joints at the
pressure reducer end; black JL G1/2 joints at the appliance end);
• The gas cylinder must always be installed so that it is stable and vertical;
• Never connect an uncertied gas cylinder to the OUTSIGN system;
• Check that the pressure indicated on your pressure reducer is correct for your OUTSIGN system.
WARNING :
Before installing the bottle, please check that the tap or pressure reducer on the gas bottle is closed
1. SAFETY INSTRUCTIONS
2. INSTRUCTIONS FOR USE 3. ANNEXES
Page 21
21
Connecting the liquid propane or butane bottle (continued)
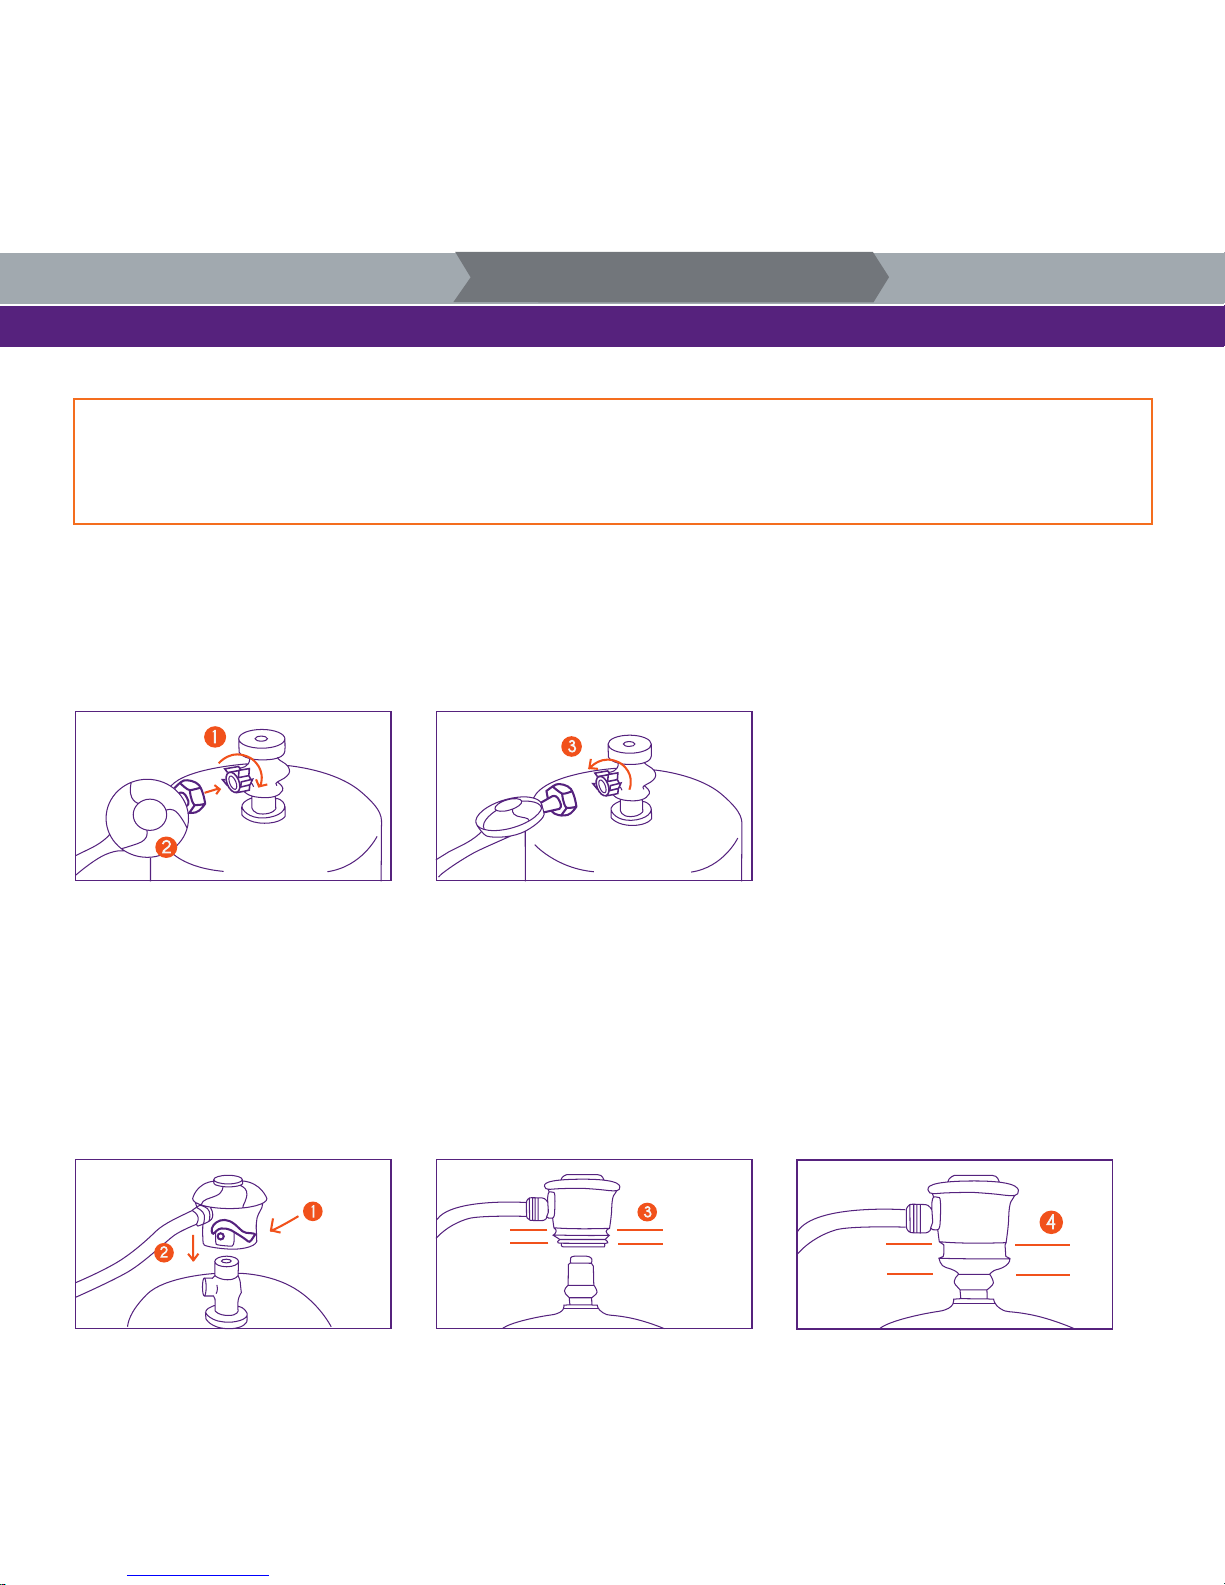
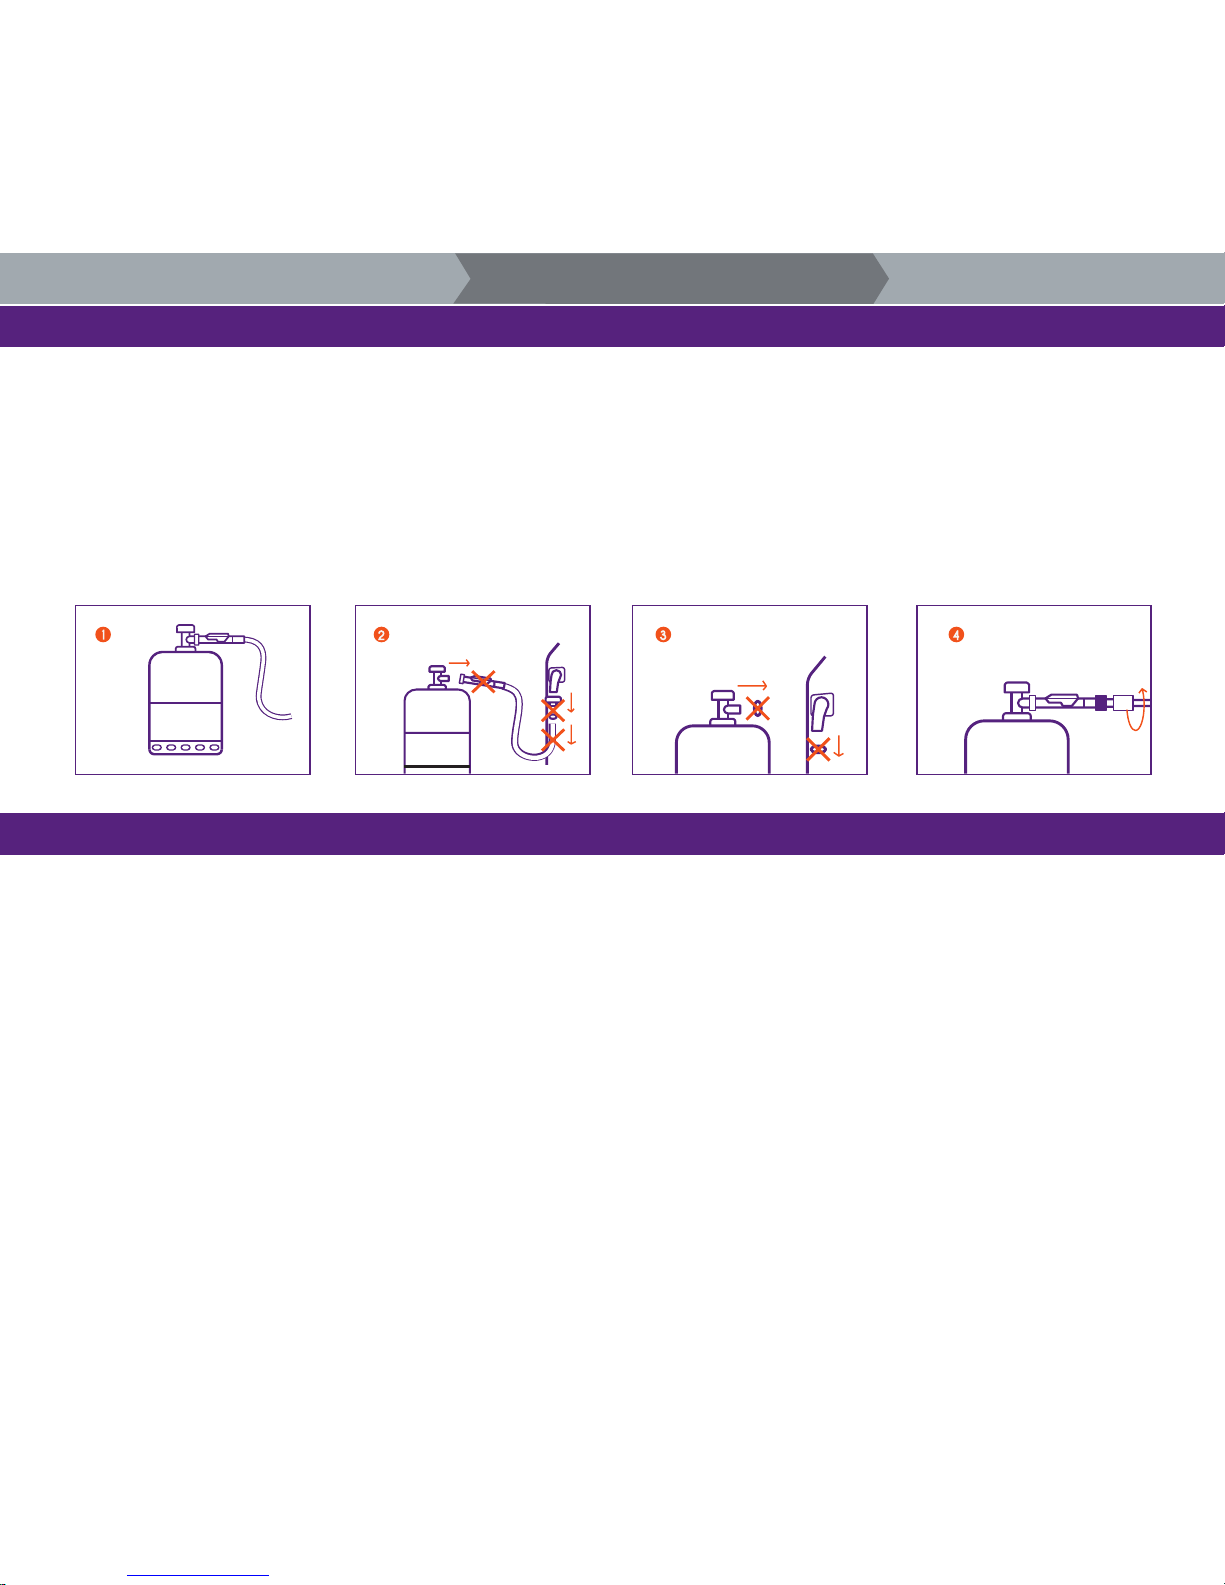
[ BOTTLES WITH A SCREW CONNECTION ]
• Unscrew the pressure reducer connector on the gas bottle by turning it in a clockwise direction (1)
• Position the pressure reducer so that the ventilation holes (2) are pointing downwards.
• Screw the pressure reducer connector on to the gas bottle by turning it anti-clockwise (3).
[ BOTTLES WITH A SNAP-ON CONNECTION ]
• Check that the lever on the pressure reducer (1) is pushed downwards (locked position).
• Press the pressure reducer down on to the gas bottle tap until it is fully engaged (2).
• Check that the lever on the pressure reducer is in the locked position. Slide the collar upwards (3). Press the pressure reducer down on the gas bottle
and hold down. Slide the collar into the locked position (4). If the pressure reducer fails to lock, repeat the procedure from the beginning.
IMPORTANT : It is strongly recommended to check the condition of the exible hose before each use and always to replace it immediately if it is
damaged. Contact Customer Services (Section: “Maintenance, Troubleshooting and After-sales service”) to order any new original part. When
installing your new exible hose, check that the hose is positioned such that it will not be damaged by the movement of the doors. Parts must be
installed in accordance with current regulations as well as best practices.
1. SAFETY INSTRUCTIONS
2. INSTRUCTIONS FOR USE 3. ANNEXES
Page 22
22
Connecting the liquid propane or butane bottle (continued)
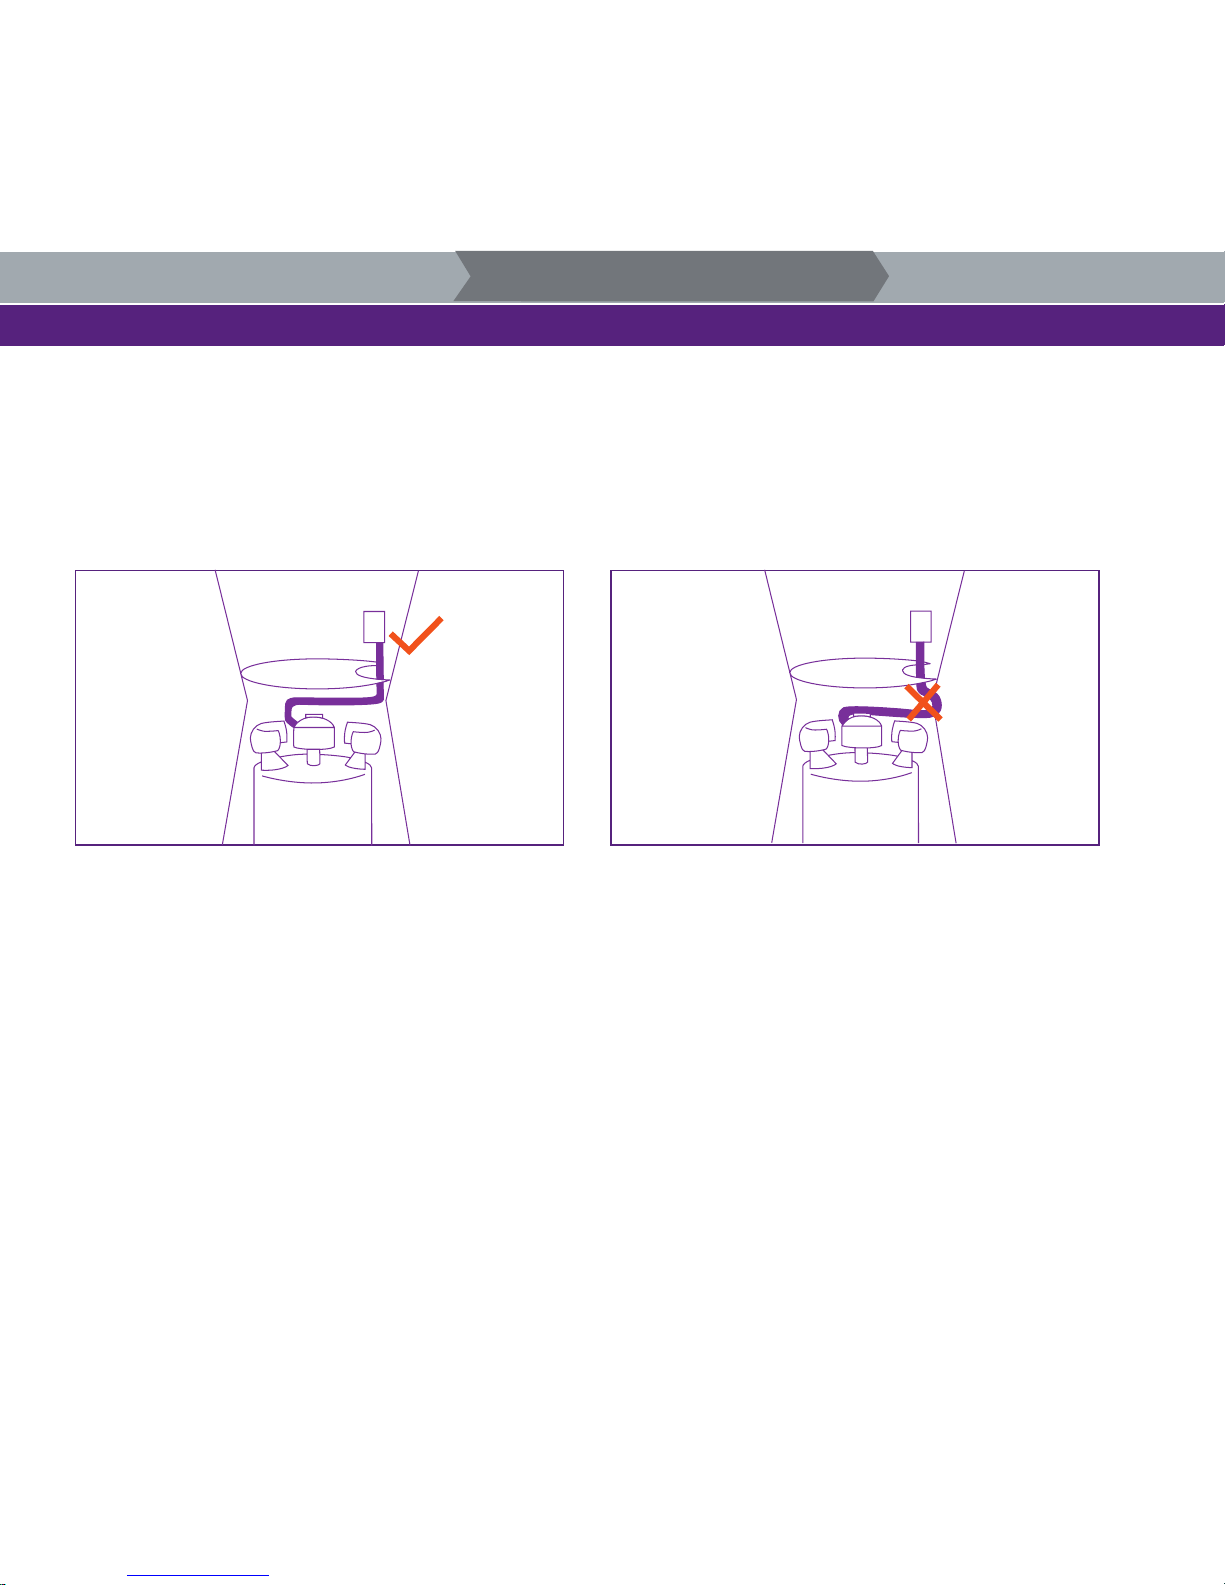
[ RUN OF THE FLEXIBLE HOSE ]
• The exible hose must pass through the opening in the internal shelf provided for it and then guided towards the underside of the cooking system such that no
loop is created where the doors close (see diagram below).
• The recommended hose is made of braided steel and is 50 cm in length.
1. SAFETY INSTRUCTIONS
2. INSTRUCTIONS FOR USE 3. ANNEXES
Page 23
23
Replacing a gas bottle
[ GAS BOTTLE TIGHTNESS TEST ]
You should carry out a tightness test:
• Before lighting the barbecue for the rst time;
• Each time the gas cylinder is replaced or a part of the gas system is modied;
• At least once per year, preferably at the beginning of the season.
The tightness test should be carried out outside in a well-ventilated area away from any naked ame, heat source or source of ignition.
It is prohibited to smoke. Simply use a 50:50 solution of liquid soap and water to detect leaks. Do not use a match or a naked ame.
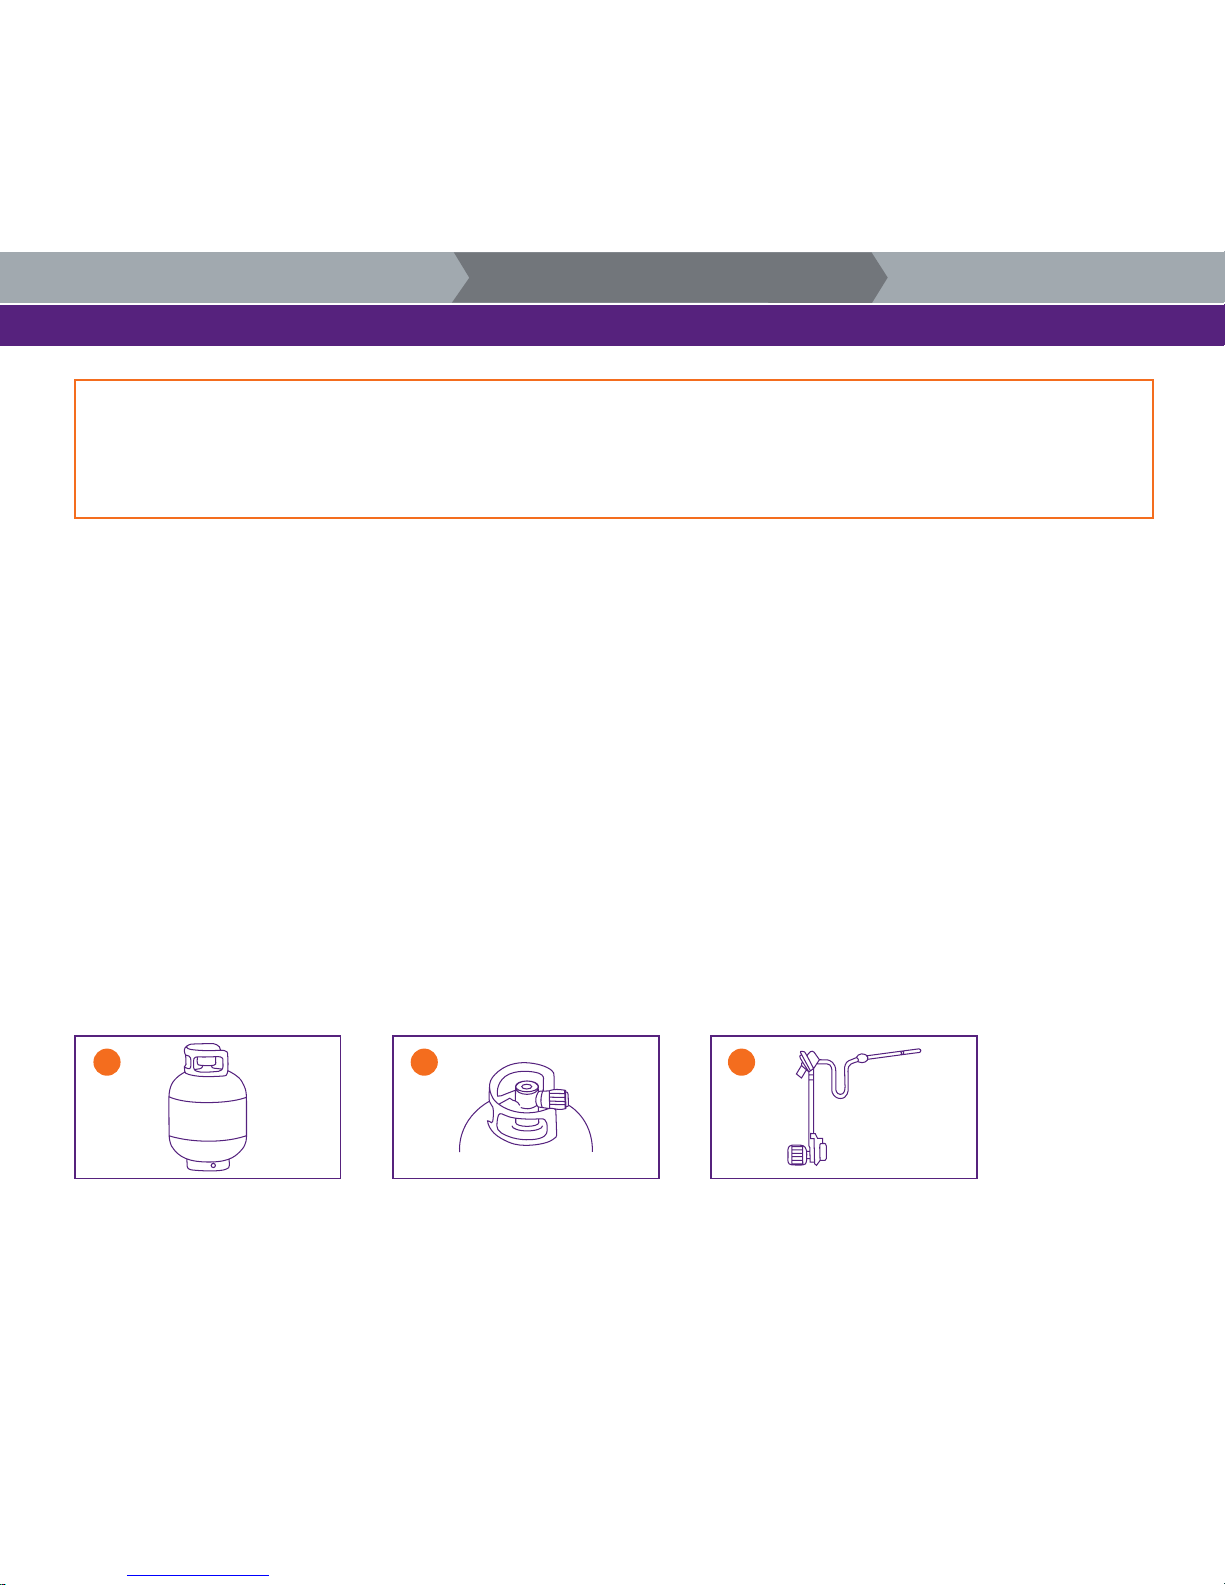
• Once the full cylinder has been connected to the barbecue and all the settings are at OFF, open the gas cylinder slowly one turn
• Apply the soap solution on to all the following connectors and components :
• The gas bottle weld seams (g A) ;
• All the connectors on the valve (g B);
• The connectors on the pressure reducer and the gas cylinder (g B);
• All the hose connectors (g C);
• Soap bubbles will appear if there is a leak.
• In the case of a leak, tighten up the connectors using an adjustable wrench. It is also recommended to change the bottle and to install a new one.
Retest tightness using a soap and water solution. If the leak persists, shut off the gas. DO NOT USE THE OUTSIGN COOKING SYSTEM. Contact customer
services (Section “Maintenance, Troubleshooting and After-Sales service”).
WARNING :
Ensure the gas cylinder is closed when you replace it. Gas cylinders must not be changed near any source of ignition. It is recommended to have
the liquid propane or butane bottle relled before it is completely empty. To do this, take the propane bottle to a gas supplier. Be careful not to drop
the propane bottles; handle with care.
A B C
1. SAFETY INSTRUCTIONS
2. INSTRUCTIONS FOR USE 3. ANNEXES
Page 24
24
Replacing a gas bottle (continued)
[ INSTRUCTIONS FOR DISCONNECTION ]
• Shut off the control valve.
• Unscrew the exible hose.
• Replace the old joints before positioning the hose.
• Screw in the hose nut by hand, on the pressure-reducer end, in accordance with the ow direction marked (nut on the recipient side), having checked
that the joint is in its seating and in good condition. Screw the nut down completely with a spanner.
Before each use
[ CHECK THE FOLLOWING POINTS ]
• The appliance is correctly installed in a position which presents no hazard.
• The doors on the casing are open prior to lighting the appliance;
• There is no leak in the gas supply (see section “Tightness test”);
• The burners are correctly installed and not blocked (see paragraph “Natural risks – spiders and insects” in the section “Warnings”)
• No gas supply hose must come into contact with a heated surface;
• The hose is not caught in the doors.
• On inspection, there is no sign of cracking on the hose.
Your appliance may be equipped with silicone bowls for cooking juices, adapted specically and exclusively to the OUTSIGN grill model. In this case, each
time the cooking system is used, check that there is no accumulation of juices in the bowls.
Wash the bowls using a soapy solution then rinse in clean water.
The bowls are also dishwasher-proof.
1. SAFETY INSTRUCTIONS
2. INSTRUCTIONS FOR USE 3. ANNEXES
2 3 4
Page 25
25
Lighting instructions
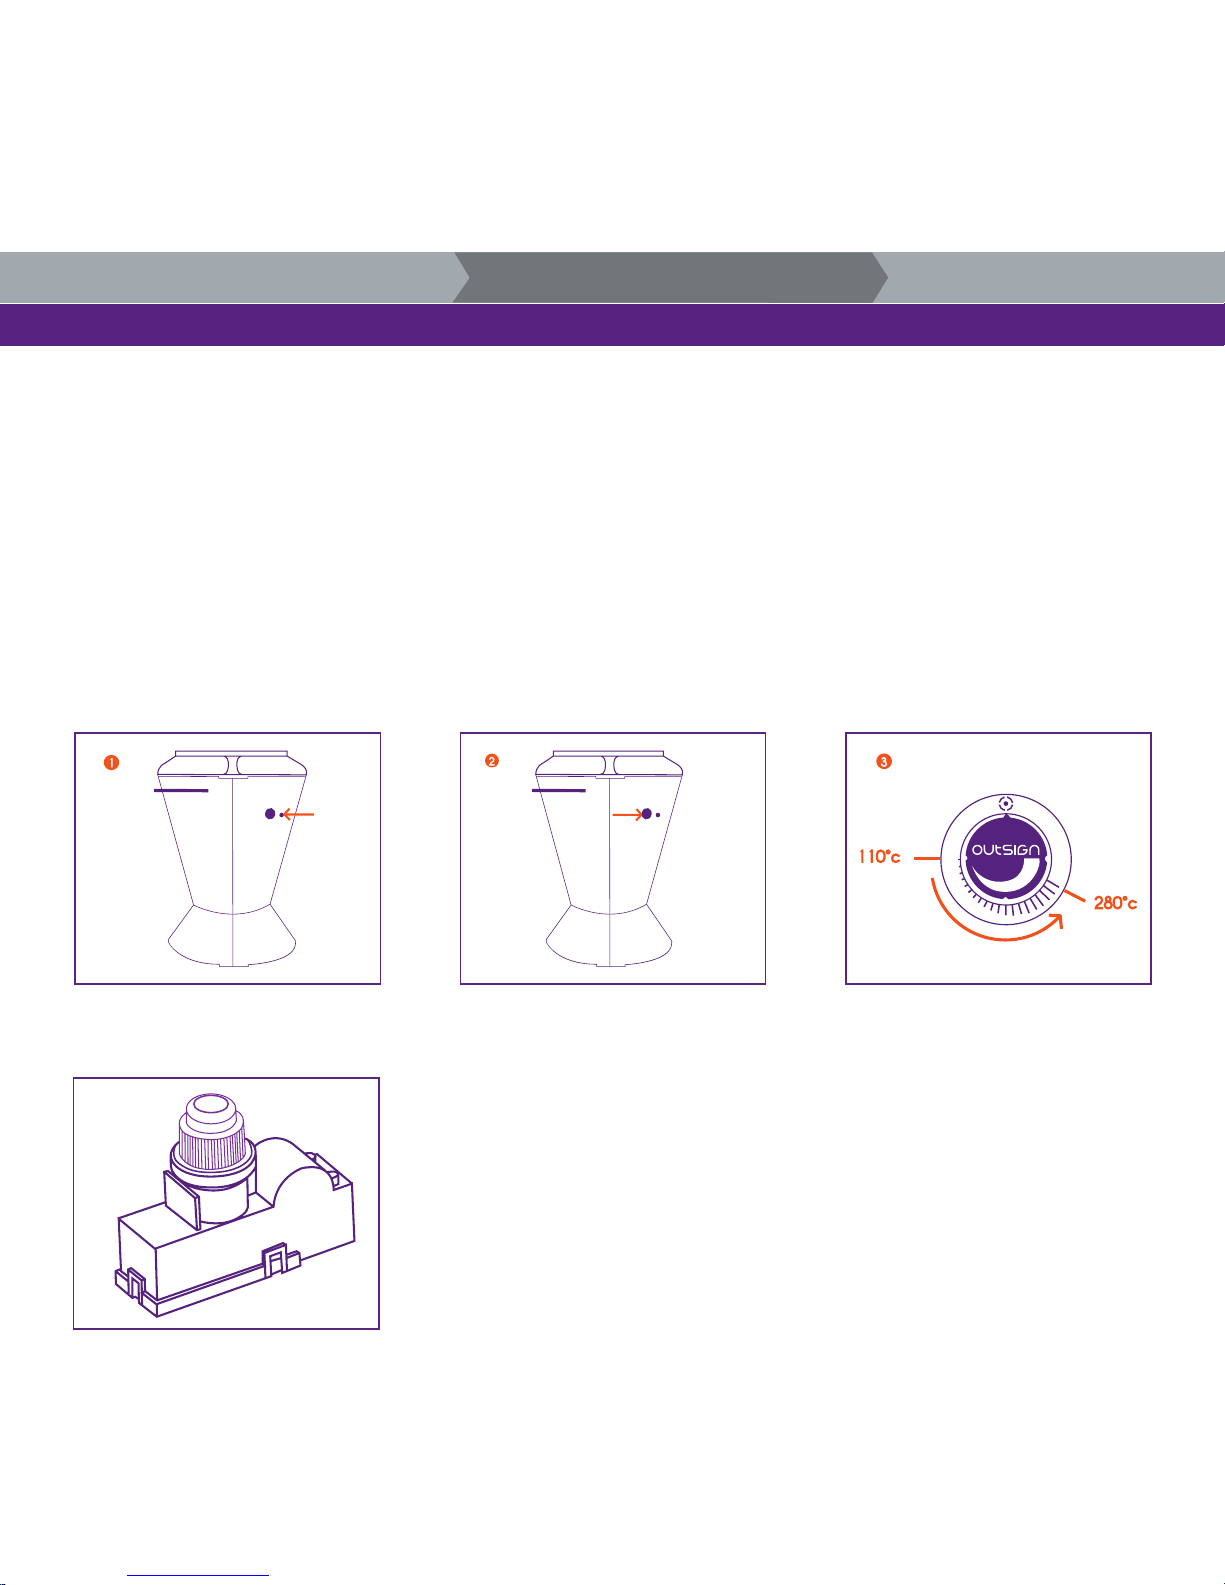
[ TO LIGHT THE BURNERS USING THE LIGHTER ]
• Open the tap on the gas cylinder
• Press the lighter (Fig. 1) until you hear a spark has been produced;
• Hold the lighter pressed in and press in the burner regulator (Fig. 2) and turn anti-clockwise to one of the positions within the adjustment settings
(Fig. 3);
• If the burner does not light after 5 attempts of ve seconds, shut off the gas and wait 5 minutes before trying again. In this way, the gas that has
accumulated can disperse. Try again repeating the previous steps.
• If the burner still does not light, read the section “Troubleshooting guide” to determine the cause of the problem and its solution or use a match as
described below.
• A safety thermocouple automatically shuts off the gas supply if the burner goes out.
• Always check that the burner regulator moves freely ensuring in particular that it does not remain in the pressed-in position
Zoom on the burner :
2
3
1. SAFETY INSTRUCTIONS
2. INSTRUCTIONS FOR USE 3. ANNEXES
Page 26
26
Lighting instructions (continued)
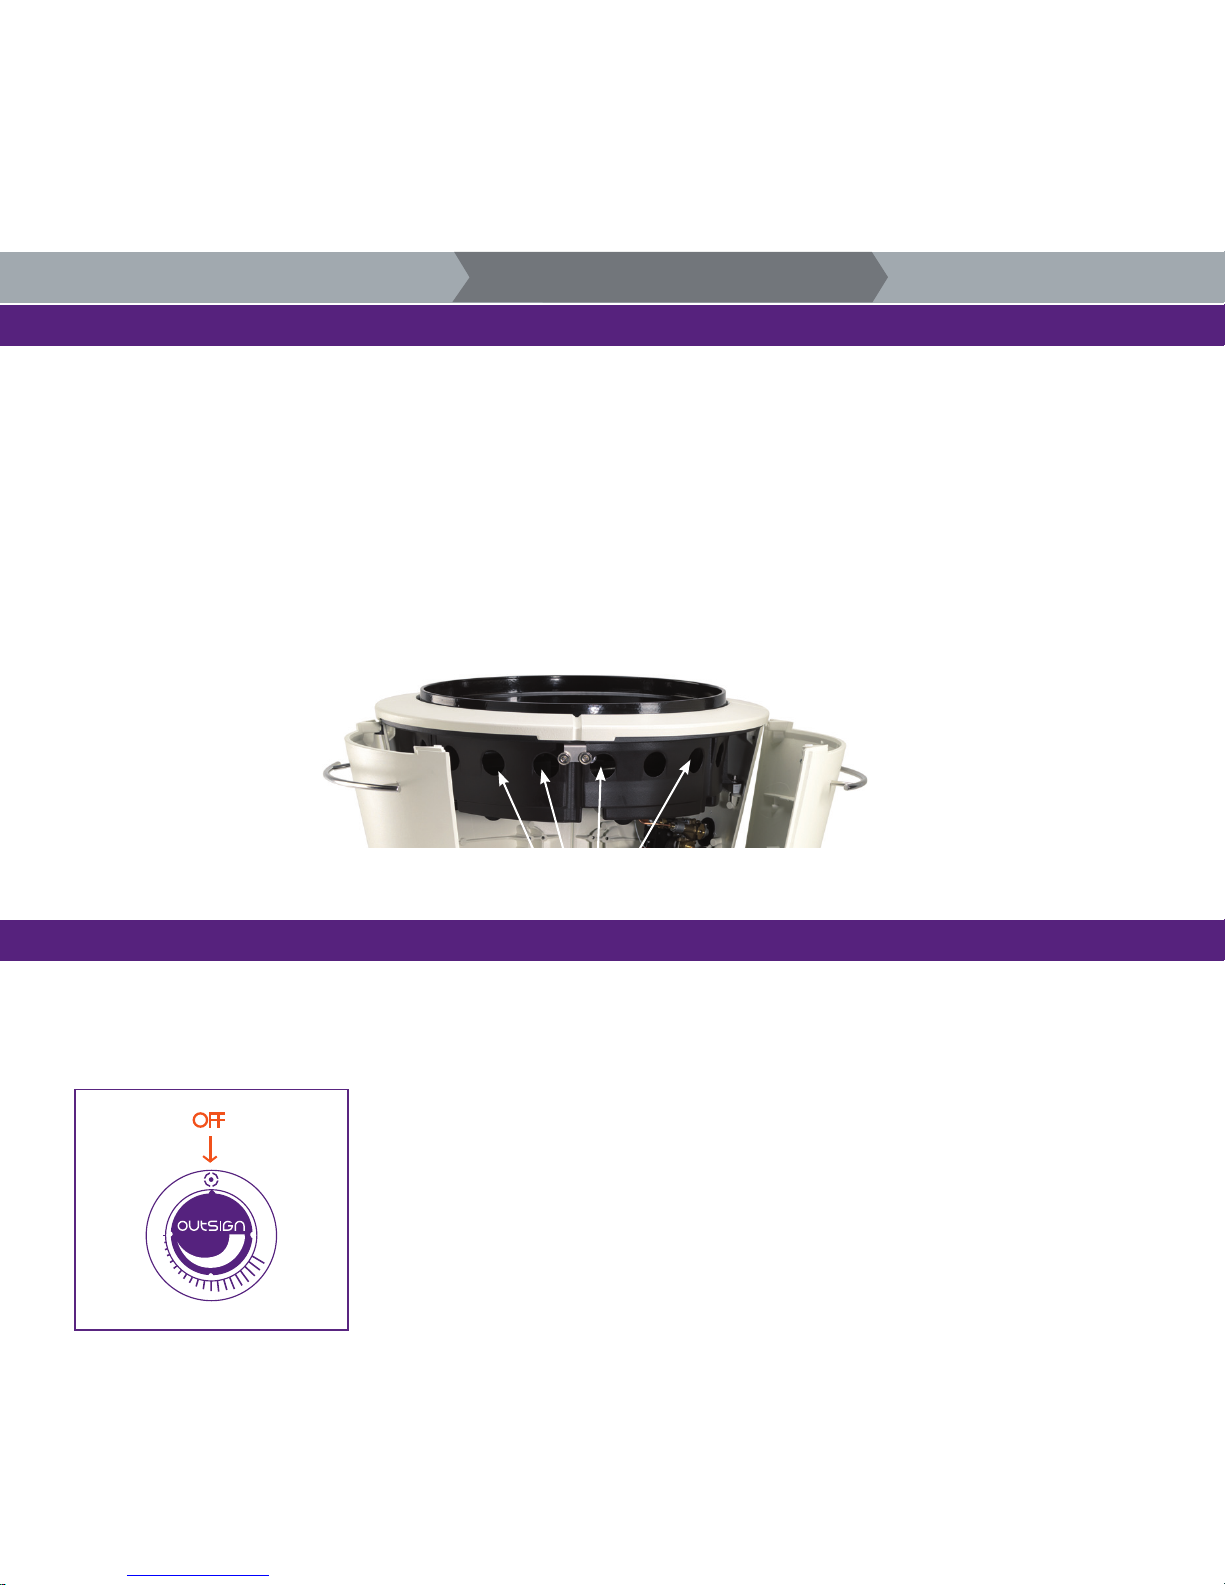
[ TO LIGHT THE BURNERS WITH A MATCH ]
Inside the casing, under the upper rim, there are small openings which allow direct access to one rack of burners using a long match.
• Insert a lighted match into the opening about 40 mm from the burner;
• Open the tap on the gas cylinder;
• Press in the required control button and set it to HIGH; the burner should light within 5 seconds. If it doesn’t, turn off the control button and wait 5 minutes
to allow the gas to disperse;
• Repeat steps 1 to 5. If the burner does not light after ve attempts, refer to the section “Troubleshooting guide”.
To extinguish
• Shut off the tap on the gas cylinder;
• Turn the control button to OFF
1. SAFETY INSTRUCTIONS
2. INSTRUCTIONS FOR USE 3. ANNEXES
Openings for manual lighting
Page 27
27
Temperature and Cooking
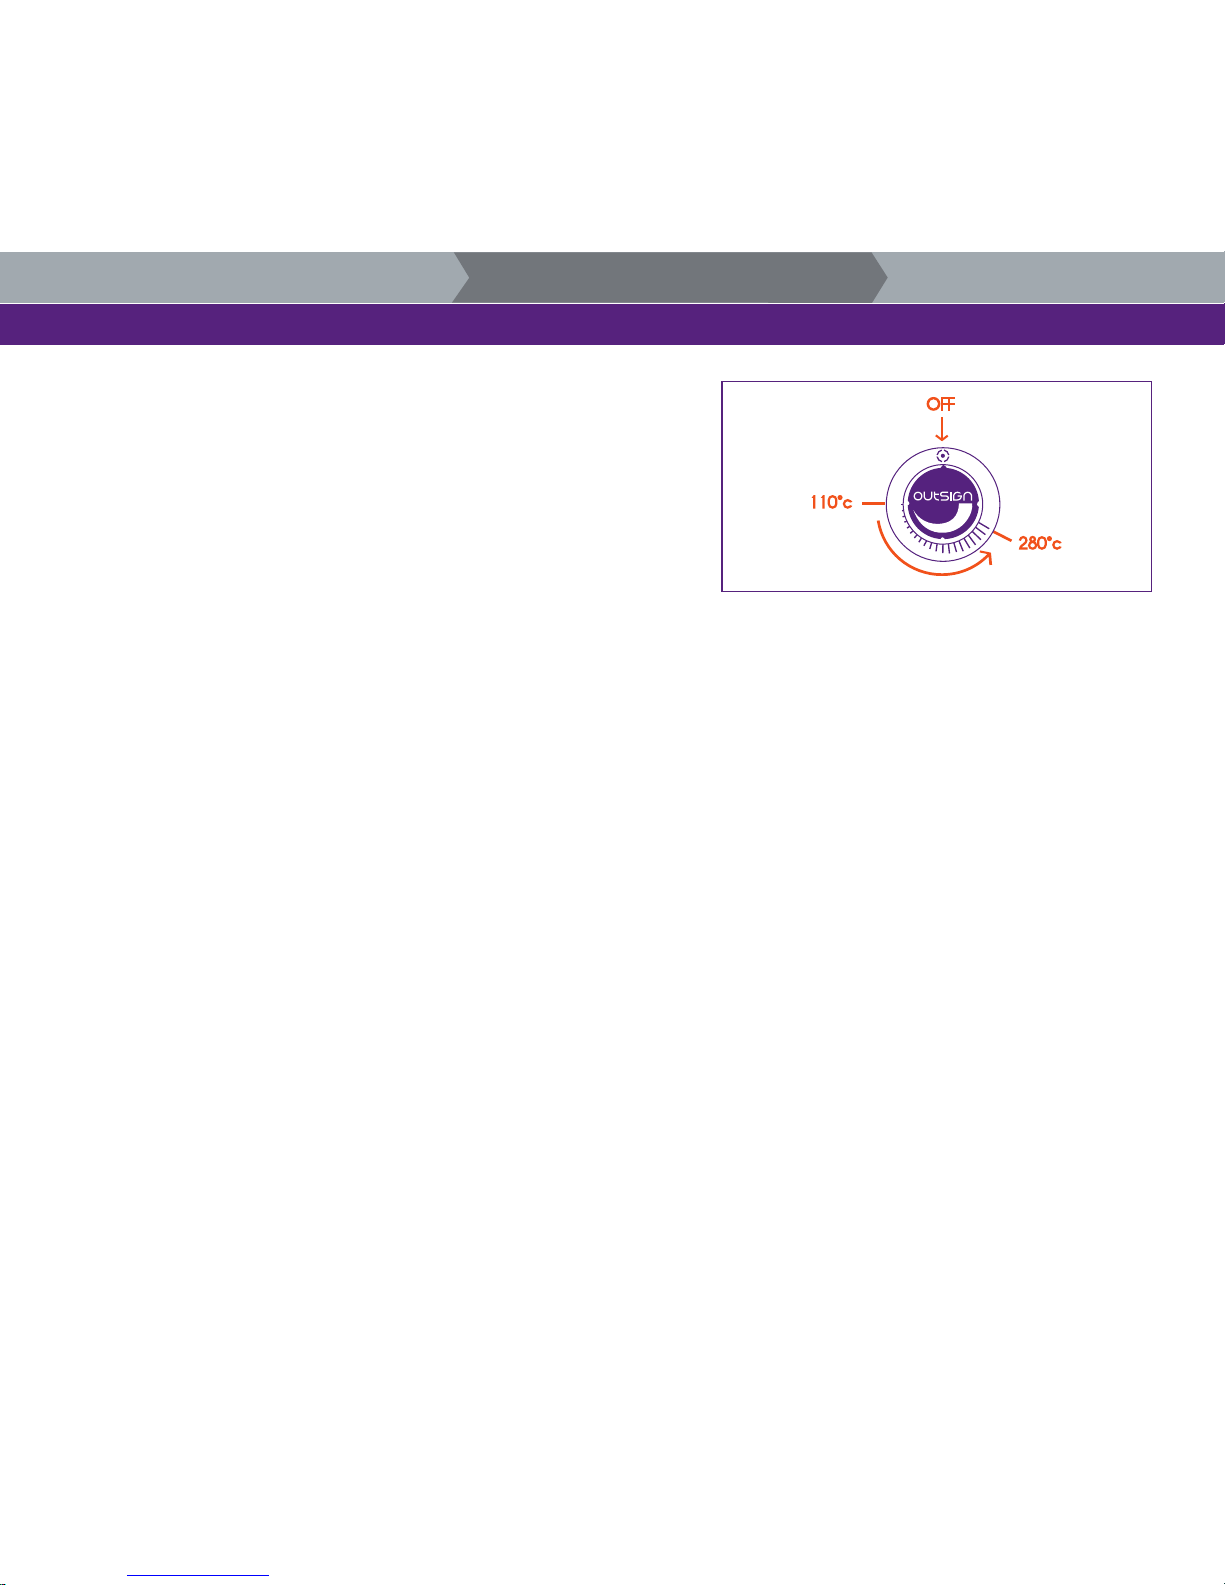
[ OPTIMAL TEMPERATURE REGULATION ]
Within a few minutes, OUTSIGN gas barbecues and planchas reach a temperature
between 110°C and 280 °C.
Use the control knob to adjust the cooking temperature, according to the wind,
weather conditions and also your recipes and ingredients.
[ RECOMMENDATIONS IN GRID MODE ]
• Preheat the barbecue for 5 to 10 minutes (depending on ambient conditions such as air temperature and wind)
• Determine the required temperature using the adjustment knob;
Applying a small amount of oil will enable grilled food to be browned evenly and prevent it sticking to the grid;
[ LIMITING FLAMES AND SMOKE ]
• Remove excess fat from meat prior to cooking;
• Cook fatty meat (chicken and pork) at low temperatures;
• Ensure the drain hole for fat is not blocked and that the bowls for cooking juices are not full. You can also put a small amount of water in the bowls to
reduce the smoke produced.
[ RECOMMENDATIONS IN PLANCHA MODE ]
• Before using for the rst time, preheat the plancha for approx 30 minutes in order to get rid of any residual smoke arising from the oils used in production
of the metal parts. This may give rise briey to a slight odour;
• Light the Outsign appliance and leave the plancha to heat for a few minutes at maximum heat (the plancha should be very hot), then reduce the heat
before placing the foodstuffs. Using the control knob, you cook the food exactly the way you wish: grilled, crispy or succulent;
• Use the control knob to determine the temperature required;
• Applying a small amount of oil will enable grilled food to be browned evenly and prevent it sticking to the grid;
• Ensure the drain hole for fat is not blocked, that the cup is not full and that the silicon bowls for cooking juices intended exclusively for use in grilling mode
have been removed;
• Never place ice cubes on a hot plancha (to thaw). This causes violent thermal shock and could deform the plancha.
1. SAFETY INSTRUCTIONS
2. INSTRUCTIONS FOR USE 3. ANNEXES
Page 28
28
Recommendations and safety instructions
[ PAINTED CASING AND RIM ]
Wash these parts with warm soapy water and rinse in clean water ;
[ GRID ]
After each use, allow the barbecue to cool down and clean the grids with a brush.
Do not use any acid-based cleaning product
[ PLANCHA ]
• While the plancha is still hot, scrape off the majority of the fat and juices towards the drain hole using a spatula;
• Allow the plancha to cool then wash with warm soapy water. The plancha is also dishwasher-proof;
• Use white vinegar to neutralise cooking odours and restore the shine on your plancha;
• Wipe the plancha before each use;
• Apply a tea-spoon of cooking oil to your plancha before storing; this will help to retain its as-new appearance.
[ BURNERS AND VENTURI ]
To limit oxidation, take care not to allow salt to fall on the burners.
The burners and the venturi must be cleaned at least twice per year. Clear the openings of any obstruction with a thin piece of wire. Brush the arms of the
burner with a synthetic-bre brush. Do not use metal brushes or wire-wool sponges because these can damage the nickel-chrome treatment on the burner.
Check that the base of the casing is clean and that none of the holes are blocked. If cracks, unusual holes or other damage is visible on a burner, it must be
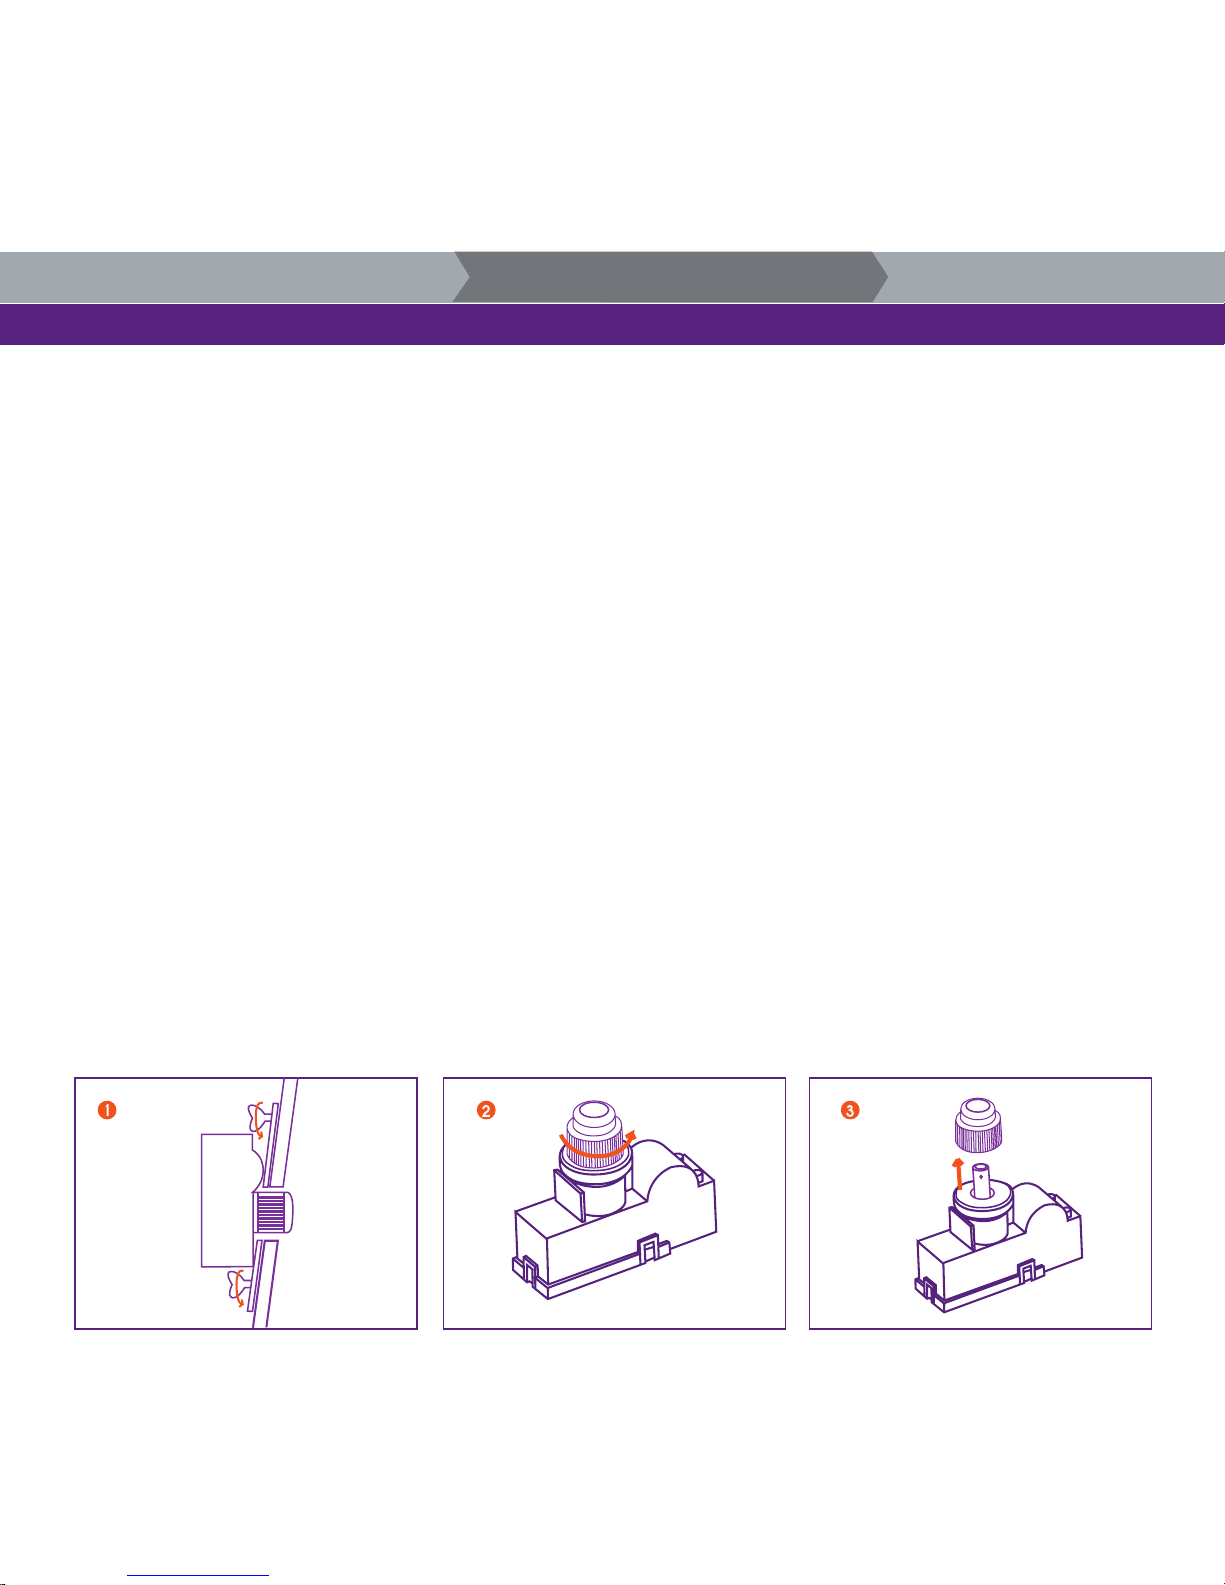
replaced. Change the1.5 VCC battery as soon as there is no longer a spark at the electrode. You can access the battery by unscrewing the supporting plate
behind the push-button, in turn accessible from the inside of the OUTSIGN system (as shown in the illustration below).
1. SAFETY INSTRUCTIONS
2. INSTRUCTIONS FOR USE 3. ANNEXES
2 3
Page 29
29
Recommendations and safety instructions (continued)
[ THERMOCOUPLE, IGNITION ELECTRODE AND INJECTOR ]
Clean the thermocouple, the ignition electrode and the injector regularly (every 6 months if the appliance is used regularly).
Check the control valve turns properly. If this is not the case, replace the faulty component by contacting Customer Services (Section: “Maintenance,
Troubleshooting and Customer Services”). The valves are lubricated for life.
[ SILICON FAT-DRIP BOWL ]
Remember to empty these bowls regularly in order to avoid overows into the interior of the appliance. To clean the bowls, wash them in warm soapy water
then rinse in clean water. The bowls are also dishwasher-proof. Remove the silicone bowls when you are not using the appliance to avoid water collecting in
them. This also allows natural ventilation. Do not try to remove the bowls during use; risk of burns or even a serious re.
[ SILICON COOKING DOME ]
Ensure that, under no circumstances, the maximum temperature of 280 °C is exceeded.
The silicon cooking dome is easily washed using soapy water.
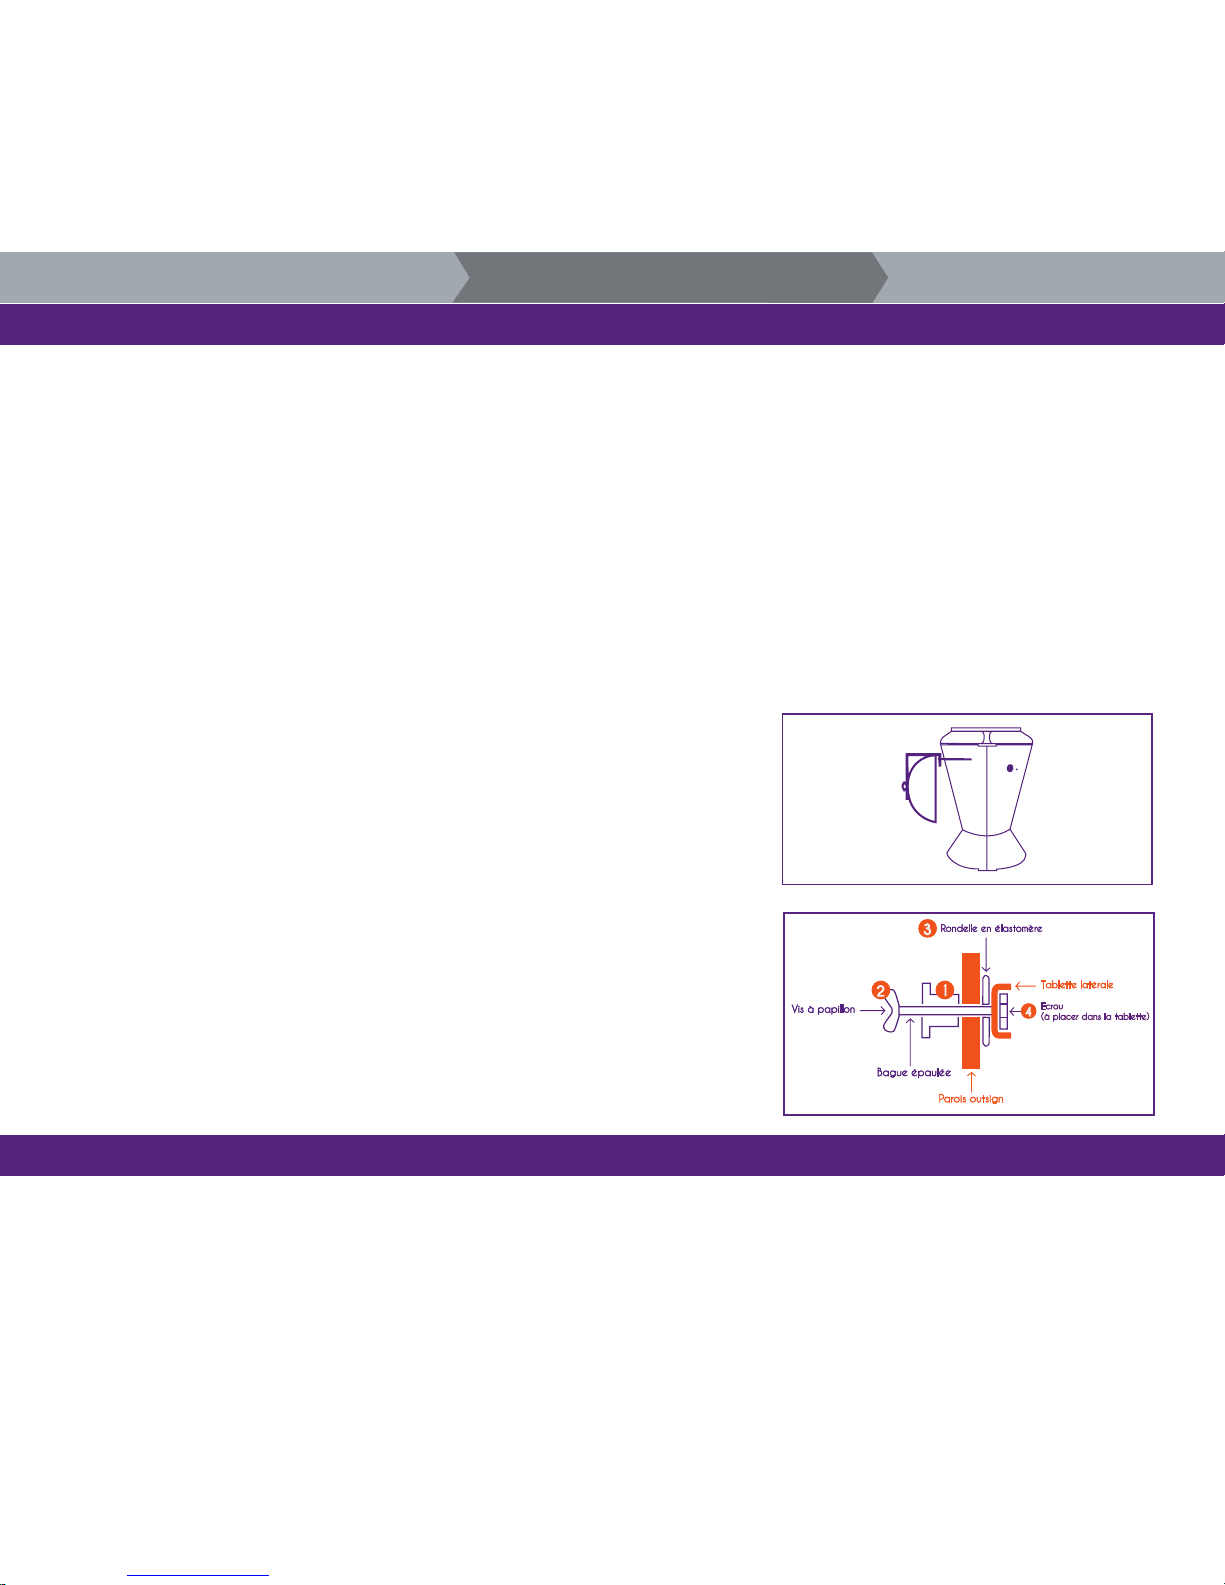
Can be hooked in place (see diagram opposite).
[ MOUNTING THE SIDE TABLE ]
Place the centring bush (1) at the opening in the casing prov ided.
Insert the wing nut (2) from the inside of the casing to the outside.
On the outside, position the silicon washer (3).
Place the screws (4) in the spaces provided in the side table.
Line them up and screw in from the inside.
Storage
Shut off the gas tap when the appliance is not in use.
You can store the appliance inside as long as the gas bot tle has been disconnected and stored in a well- ventilated area.
Whenever the appliance is out of use for extended periods, protect it with a cover
3
2
4
1. SAFETY INSTRUCTIONS
2. INSTRUCTIONS FOR USE 3. ANNEXES
Page 30

30
Troubleshooting guide
PROBLEMS POSSIBLE CAUSES SOLUTIONS
• Impossible to light the burner
• No spark when lighter is pressed.
• No sound.
• There is a spark but it does not light.
Try again.
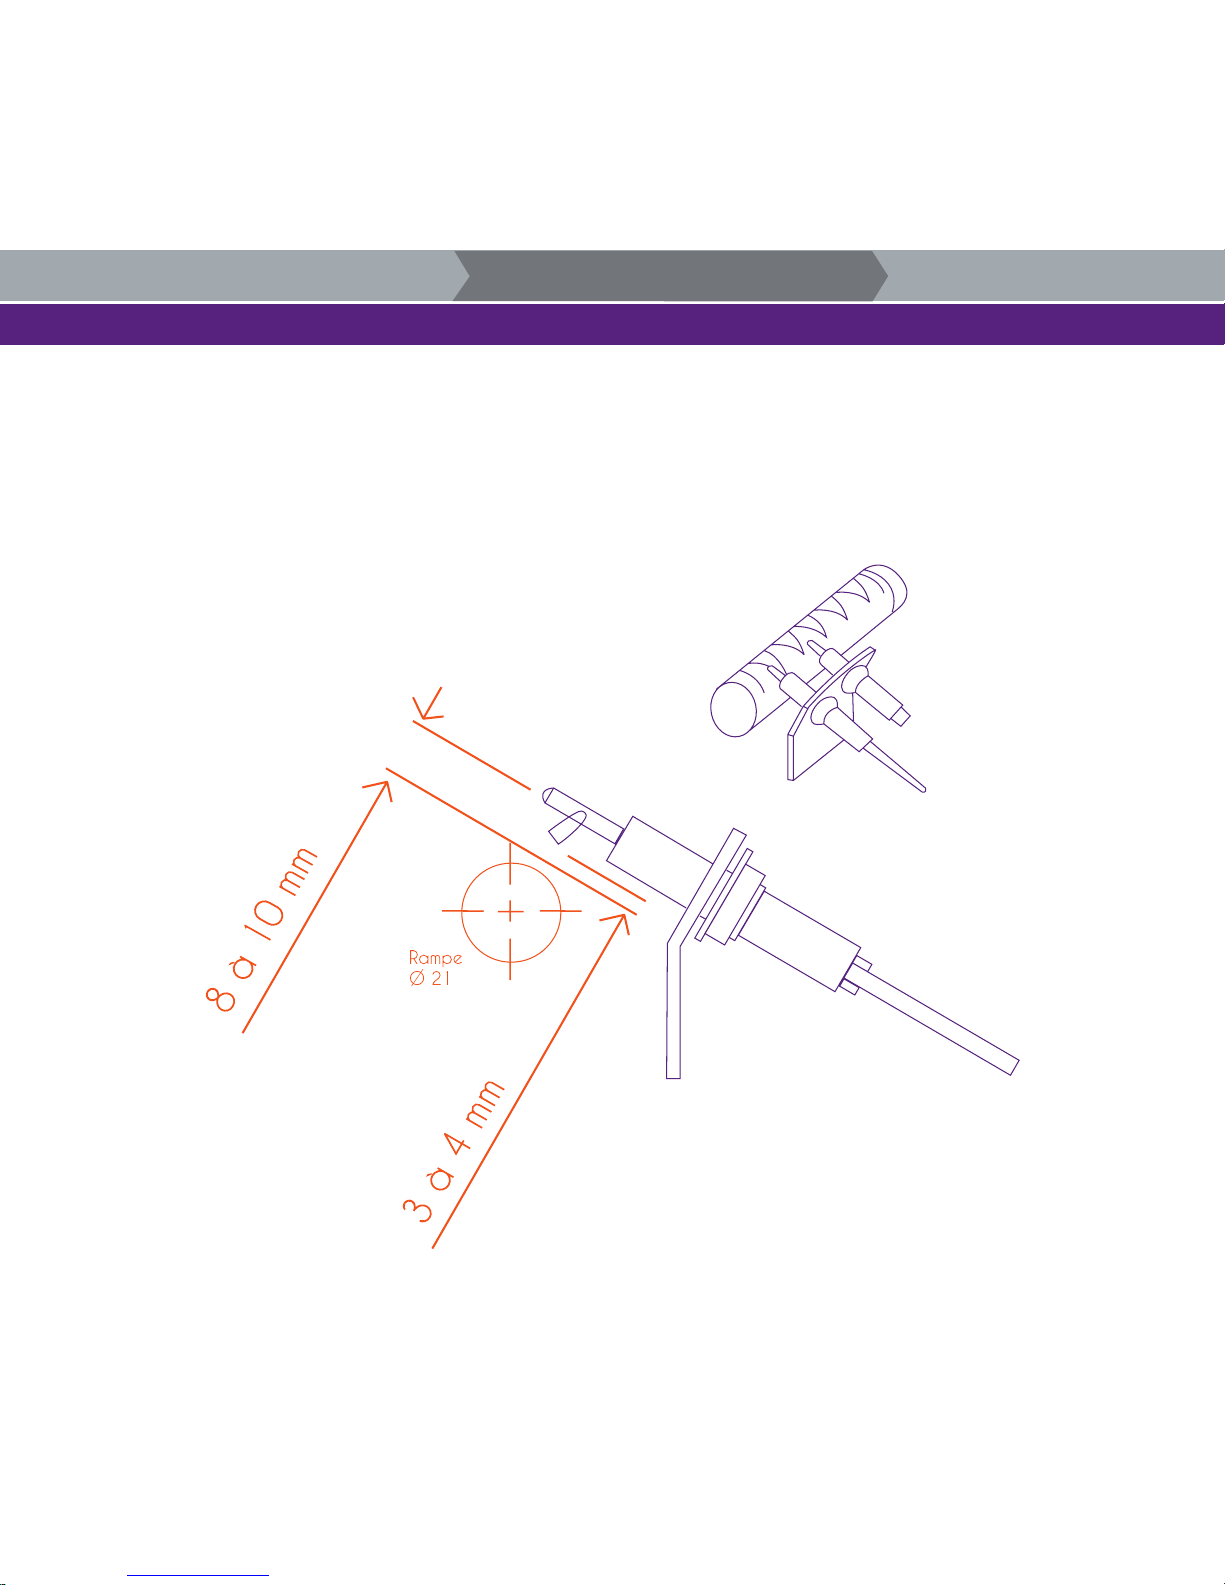
Otherwise, check positioning of the electrode
referring to the positioning instructions
repeated opposite.
• Insufcient heat
• Yellow ames
• Excessive heat and ames
• Flames behind the control panel
• Humming noise from the pressure
reducer
• Incomplete ame
• Blocked venturi
• The battery has been inserted incorrectly
• The battery is at
• The ignition button has been installed
incorrectly
• The sparker is defective
• The system has been soaked.
• The tap on the gas cylinder is not open
• The lighter is not correctly positioned in
relation to the thermocouple
• The burner holes are blocked
• The gas cylinder is empty or nearly empty
• The pressure reducer is not correctly
connected to the gas cylinder
• Venturi partially-blocked
• Salt on the burner
• Foodstuffs containing too much fat
• Drain hole for grease blocked
• Venturi blocked
• Temporary situation caused by high external
temperature or due to a full cylinder
• Burner blocked, perforated or rusted
• Clean the venturi
• Reinsert the battery correctly (pay attention
to correct orientation of the + and -)
• Replace with a new AA battery
• Unscrew button and reinstall
• Replace the sparker.
• Blow away excess water or wait until it dries
• Open the tap on gas cylinder
• Adjust the position of the electrode in
relation to the
• thermocouple (see diagram opposite)
• Clean the burner holes or replace the
burner
• Connect a new cylinder
• Tighten the pressure-reducer connectors
• Untangle the hose
• Clean the venturi
• Clean the burner
• Remove excess fat or reduce heat
• Clean the casing and the burner
• Shut off the gas immediately, allow the
barbecue to cool and clean the venturi
• Normal occurrence that does not imply any
problem or danger
• Clean or replace the burner
1. SAFETY INSTRUCTIONS
2. INSTRUCTIONS FOR USE 3. ANNEXES
Page 31
31
Troubleshooting guide
[ POSITIONING OF THERMOCOUPLE AND ELECTRODE ]
If the suggested solutions do not enable you to solve the problem, contact Customer Services (details provided in the Section “Maintenance, Troubleshooting
and Customer Services” - [email protected]).
1. SAFETY INSTRUCTIONS
2. INSTRUCTIONS FOR USE 3. ANNEXES
Page 32

32
CE 1312CM5618 compliance
Outsign is a registered trademark of the company, Cookout SAS.
This appliance is manufactured using materials appropriate for its use.
These materials are resistant to the mechanical, chemical and thermal conditions to which they are intended to be subjected.
The properties for the materials essential to safety are guaranteed by the company, CookOut SAS.
There is no solder on the gas line.
Materials liable to come into contact with foodstuffs and edible uids shall not degrade the quality of these foodstuffs and liquids
1. SAFETY INSTRUCTIONS
2. INSTRUCTIONS FOR USE 3. ANNEXES
WARNING :
This product has been subjected to safety tests. It is authorised only for use in France and EEC member States under the following respective
categories and pressures
COUNTRIES CATEGORY INDEX PRESSURE
GB (England)
BE (Belgium)
CY (Cyprus)
ES (Spain)
FR (France)
GR (Greece)
IE (Ireland)
IT (Italy)
LT (Lithuania)
LU (Luxembourg)
PT (Portugal)
CZ (Czech Republic)
SI (Slovenia)
CH (Switzerland)
AT (Austria)
CH (Switzerland)
DE (Germany)
FI (Finland)
SE (Sweden)
I3+
I3B/P
28-30/37 Mbar
50 Mbar
Page 33
33
Disposal
This symbol indicates that the product may not be disposed of in the household waste.
If you decide to throw away your barbecue, please contact Customer Services (details provided in the section “Maintenance, Troubleshooting and Customer
Services). Customer Services will ask you to return your appliance so that it can be disposed of. For your information: this system is entirely recyclable.
Technical data
Conversion to different types of gas
TYPE OF GAS
REFERENCE GAS AT NOMINAL
PRESSURE
SUPPLY PRESSURE
DIA. MAIN INJECTOR
(mm)
NOMINAL POWER
PRIMARY AIR REGULATOR
ON BURNER
NOMINAL OUTPUT
BY-PASS SCREW (mm)
G30 (Butane)
G31 (Propane)
G30 (Butane)
G31 (Propane)
G30 : Pn = 28-30 mbar
G31 : Pn = 37 mbar
G30 : Pn = 50 mbar
G31 : Pn = 50 mbar
20-30 mbar
37 mbar
50 mbar
50 mbar
1,05
1,05
0,95
0,95
4,7 kW
4,7 kW
4,7 kW
4,7 kW
3 holes open
3 holes open
3 holes open
3 holes open
342 g/h
336 g/h
342 g/h
336 g/h
locked
locked
locked
locked
1. SAFETY INSTRUCTIONS
2. INSTRUCTIONS FOR USE 3. ANNEXES
Page 34
34
Injectors and pressures to burners
Heat outputs
G30 = butane gas ; G31 = propane gas
I3+
B/P
I3B/P
1. SAFETY INSTRUCTIONS
2. INSTRUCTIONS FOR USE 3. ANNEXES
CATEGORY
INDEX
GAS
SUPPLY PRESSURE
(mbar)
BURNER INJECTOR
REDUCED FLOW
SCREW MARKED 50
NUMBER OF BURNERS
G30 / G31
G30 / G31
G30 / G31
28-30 / 37 mbar
30 mbar
50 mbar
105 / 100
e
105 / 100
e
95 / 100
e
Full on
Full on
Full on
1
1
1
GAS AND PRESSURE NOMINAL PRESSURE NOMINAL OUTPUT
G30/G31 : Pn = 28/37 mbar
G30/G31 : Pn = 50 mbar
4,7 kW
4,7 kW
G30 = 342 g/h
G31 = 336 g/h
Page 35

www.outsign-concept.com
C O O K O U T
A s i m p l i f i e d s t o c k c o r p o r a t i o n ( S A S ) w i t h c a p i t a l o f € 7 0 0 , 0 0 0
3 9 3 c h e m i n d e C r ê t N a n t – Z A L e Ve r n a y - 7 4 2 9 0 AL E X - F r a n c e
VAT IC FR 8 6 5 2 2 2 1 7 7 9 3 - S I R E T N ° : 5 2 2 2 1 7 7 9 3 0 0 0 1 0 – A P E : 4 6 4 9 Z
TO CONTA C T C U S TOMER SERVICES
C o o k o u t S A S – 3 9 3 c h e m i n d e C r ê t N a n t
Z.A Le Ve r n a y – 7 4 2 9 0 A l e x - Fra n c e
T é l : + 3 3 ( 0 ) 4 5 0 6 4 0 0 1 5
w w w.outsign - e l e m e n t s . c o m
 Loading...