

Page 1

1. DIAGRAM FOR SET UP..................................................................1
2. INTRODUCTION ..............................................................................1
3. POWER ON SEQUENCE .................................................................1
4. EDIT MODE OPERATION ..............................................................2
5. PRINT MODE OPERATION.........................................................10
6. ERASE FORMAT ............................................................................11
7. ERASE ALL FORMAT ...................................................................11
8. SPECIAL FEATURES OPERATION ............................................12
Appendix A. Pin Assignment ................................................................12
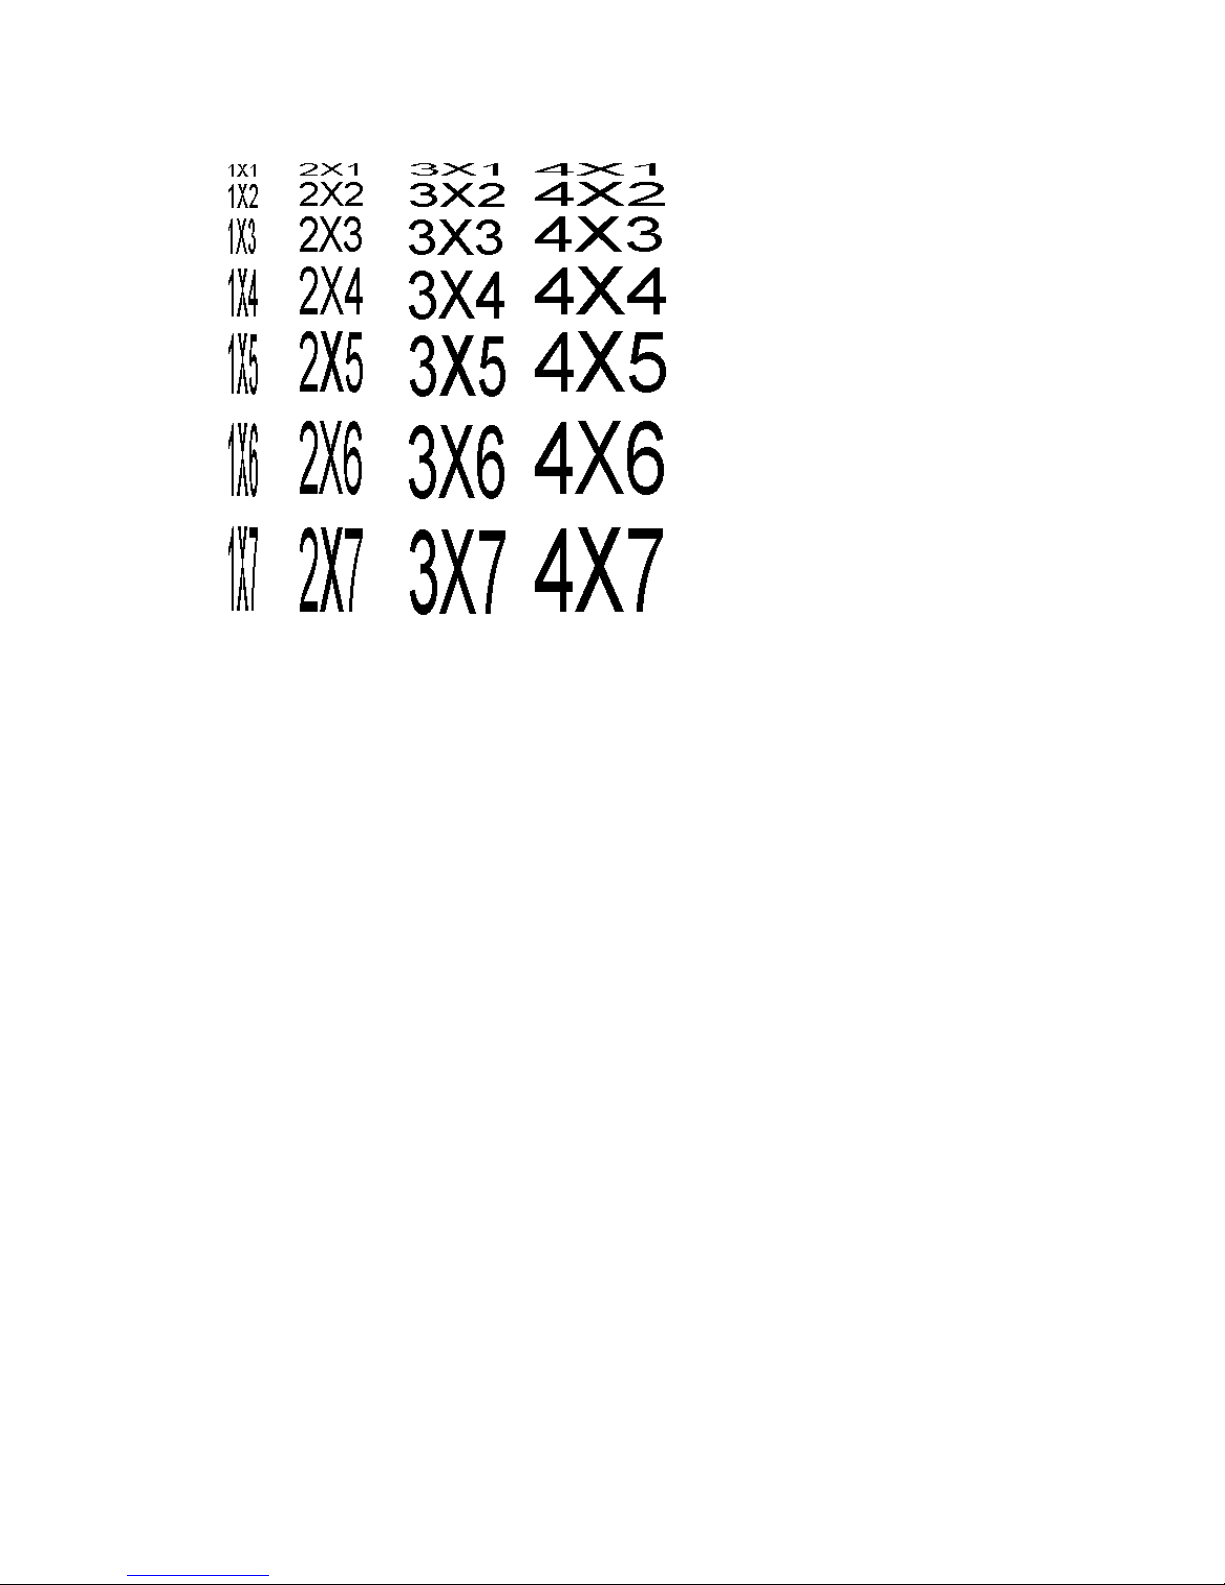
Appendix B. Font Expansions ..............................................................14
Page 2
1
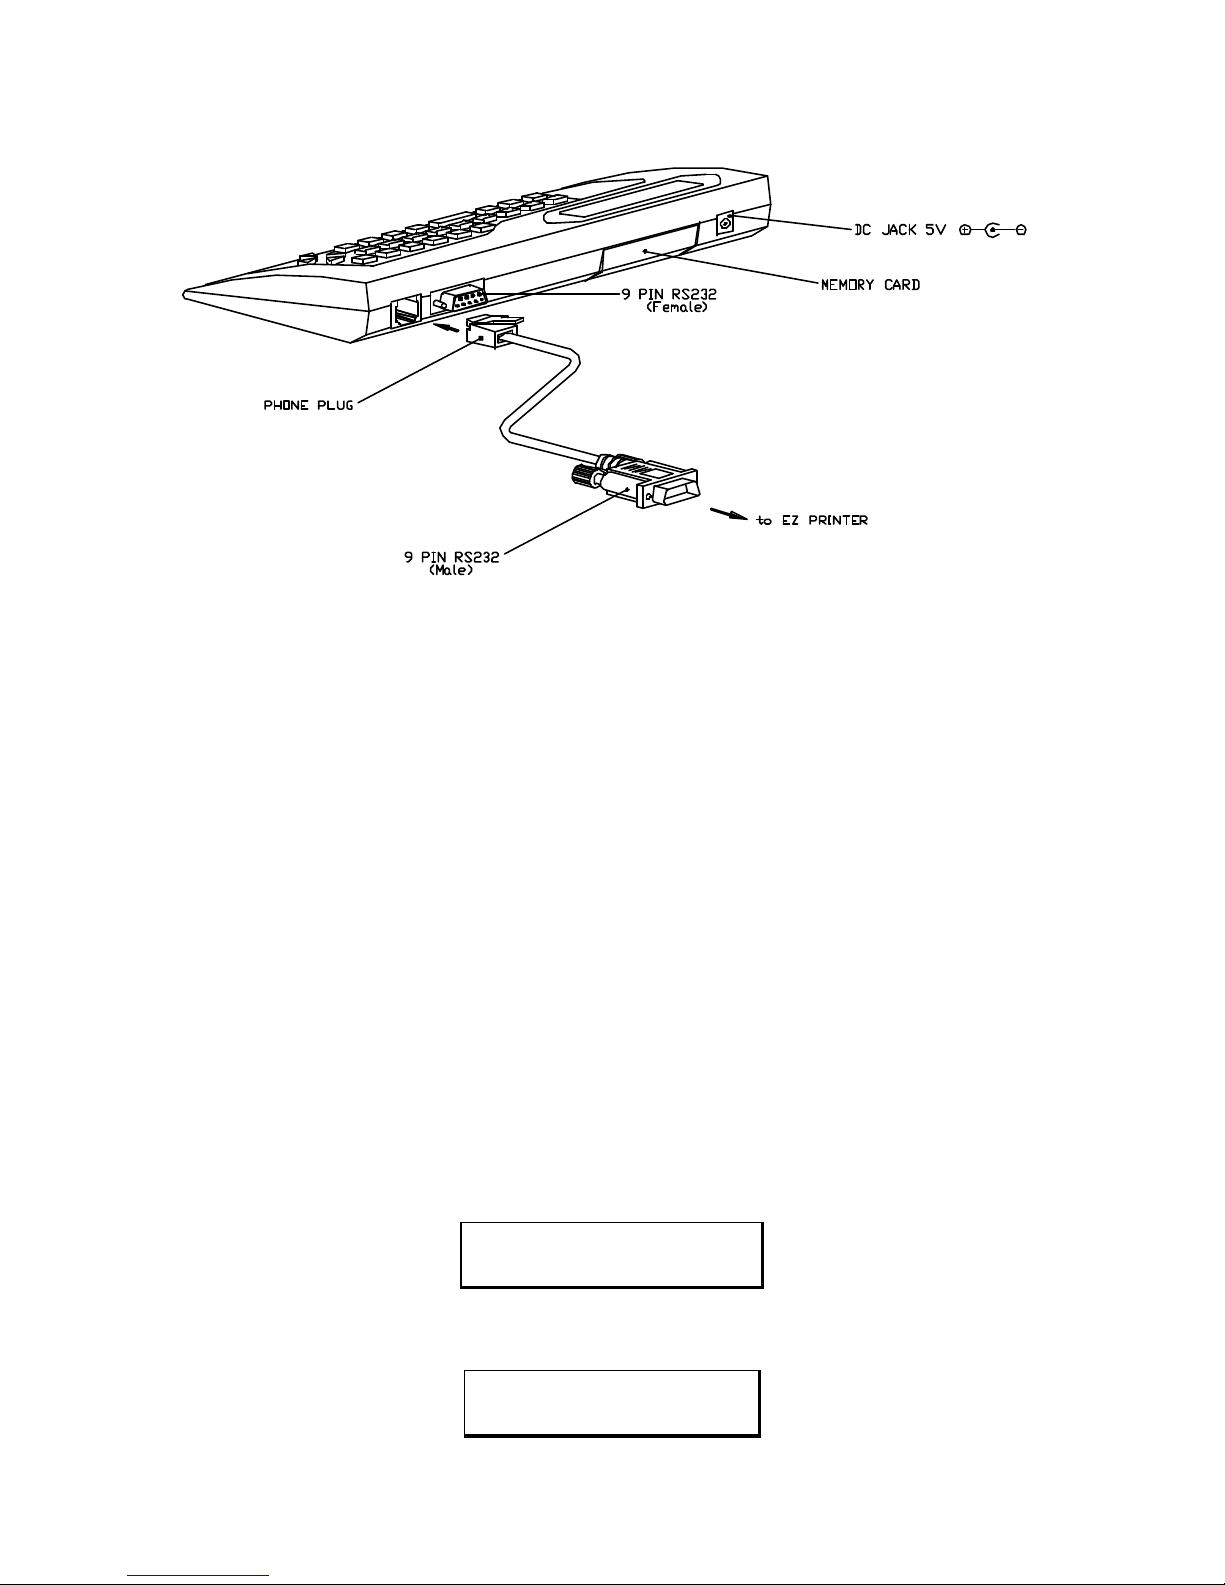
1. DIAGRAM FOR SET UP
2. INTRODUCTION
The KP-200 Stand-alone keyboard control Terminal supports four types of operation.
a. EDIT MODE OPERATION.
The operator can design or edit label formats by themselves. The label formats can be
stored in an interchangeable memory module. A maximum of eight formats may be
stored in each nterchangeable memory module.
b. PRINT MODE OPERATION.
Print the restored label format on the EZ -2 or EZ-4 Thermal Printer.
c. ERASE MODE OPERATION.
Delete an individual label format.
d. ERASE ALL MODE OPERATION.
Erase entire contents of interchangeable memory module.
3. POWER ON SEQUENCE
Connect the KP-200 keyboard to the EZ -2 or EZ-4 9 pin RS232 port with the interface
cable provided.
Power on the printer display show Product name and Version number. The LCD
display will show:
GODEX
KP-200 VER 1.0
After approximately 2 seconds the LCD will change to display the four types of
operation. The LCD display will show:
[1] EDIT MODE
[2] PRINT MODE ?
Page 3
2
There are four operation modes (as described in the introduction) that may be selected.
The keyboard operator can select the desired mode of operation by highlighting it with
the cursor keys and then pressing
ENTER” or
Press 1 to select EDIT MODE.
Press 2 to select PRINT MODE.
Press 3 to select ERASE FORM.
Press 4 to select ERASE ALL.
4. EDIT MODE OPERATION
Edit mode operation allows the keyboard operator to design new label format or edit
current ones.
Pressing 1 or ENTER when Edit mode is highlighted will begin the Edit mode
sequence.
(A) RESTORE FORMAT FROM MEMORY MODULE.
If a label format has previously been saved in the memory module, the LCD display
will show:
RESTORE FORM(Y/N)
Enter N and the keyboard will automatically step to (B).
Enter Y and the LCD display will show:
ENTER FORM NAME:
LAB1
Let us assume that LAB1 is the name of the first label format. You may use the cursor
keys to highlight previously formats of you may type in the format name if known.
Press ENTER and the keyboard will load the requested format from the memory
module. The LCD display will show:
WAIT FOR LOADING
>>.................................<<
(B) SELECT PRINTER TYPE.
The LCD display will show:
SELECT PRINTER TYPE.
Page 4
3
2” PRINTER 4” PRINTER
You may use the cursor keys to highlight the desired printer type or you may key in 2 to
select the EZ -2 or 4 to select the EZ-4. Press ENTER to accept your selection.
(C) SELECT PAPER TYPE.
The LCD display will show:
SELECT PAPER TYPE:
Label , Blkmrk , Fax
Label - Self adhesive label with gap mounted on backing sheet.
Blkmrk - Registration mark on underside of media.
Fax - Continuous media with no registration mark.
You may use the cursor keys to highlight the desired media type of by typing in the first
letter of the required media (L. B. or F.). Press ENTER to accept your selection.
(D) ENTER LABEL HEIGHT.
LCD display will show:
ENTER LABEL WIDTH
Enter label width in mm. Press ENTER to accept your selection. If you selected Fax in
the previous menu, the keyboard will automatically step to (H), otherwise proceed to
next menu (E).
(E) ENTER LABEL HEIGHT.
LCD display will show:
ENTER LABEL HEIGHT
Enter label height in mm. Press ENTER to accept your selection. If you selected label
at step (C), the keyboard will automatically step to (I), otherwise proceed with next
menu.
Note: Label height includes label length + gap.
Example: Label length is 25mm, Gap width is 3mm, then the LABEL HEIGHT will be
28mm
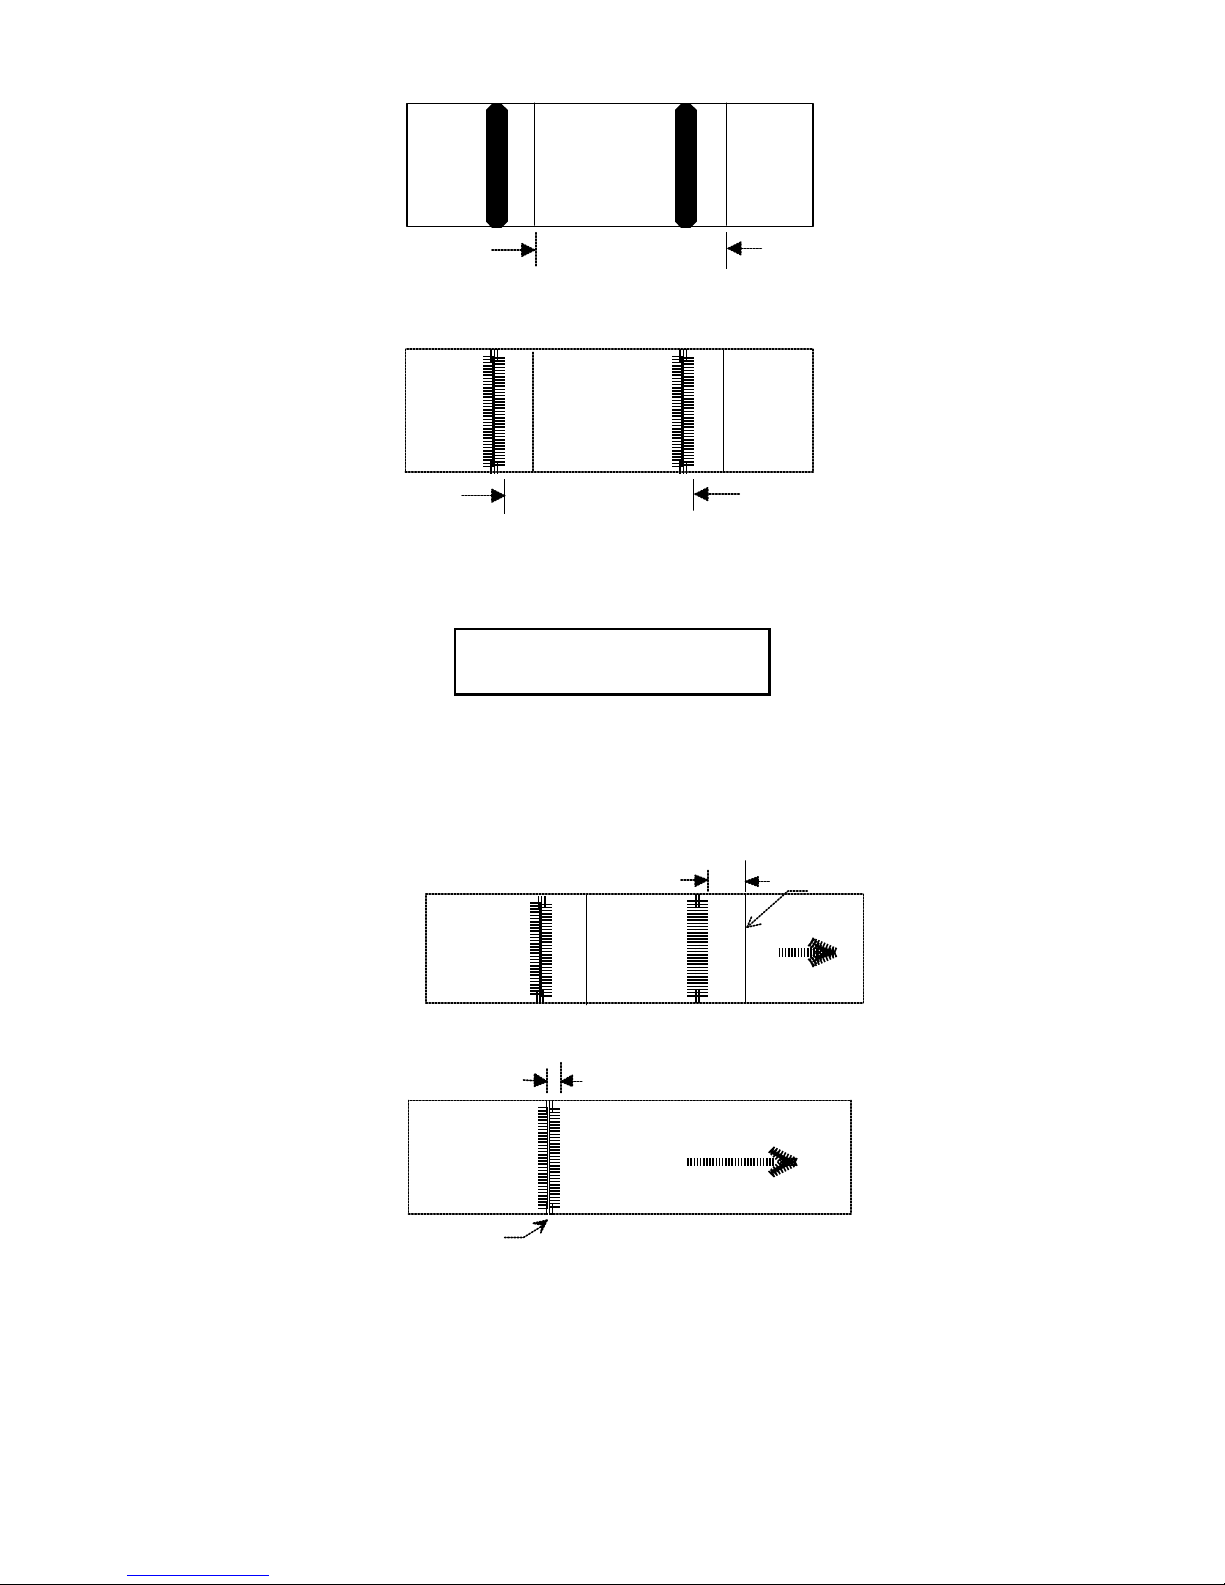
Label height in black mark label is defined as follows:
(a) The distance between tear line to next tear line.
Page 5
4
lebel heigh
t
(b) The distance Between Black mark (including itself).
lebel height
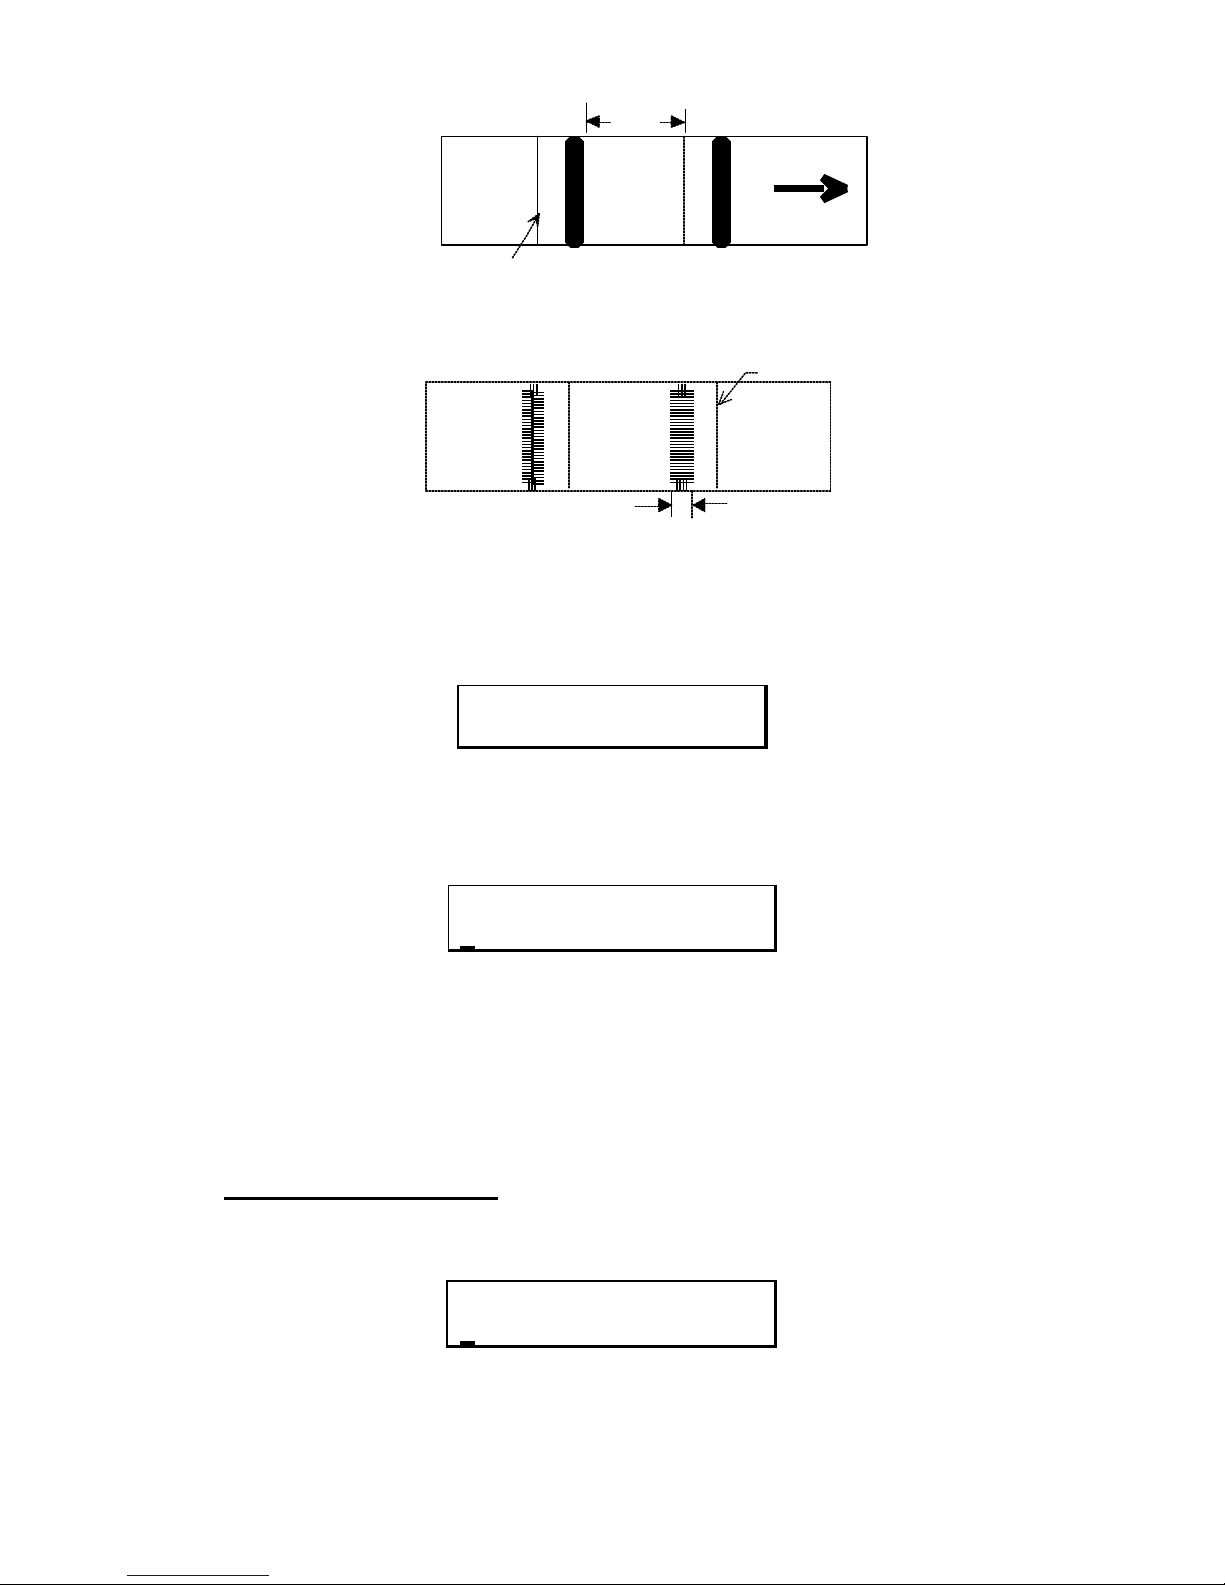
(F) ENTER TOP LENGTH
LCD display will show:
ENTER TOP LENGTH
The TOP LENGTH is defined as follows: X will be the distance from the edge of the
black registration mark to the next tear line along the paper feed axis.
(1) If X is less than 46mm, and the tear line is outside the black registration mark then
top length is X.
X
paper feed
tear line
(2) If Tear line is inside Black registration mark then TOP LENGTH = -X.
paper feed
tear line
x
(3) If X is greater than 46mm, and the Tear line is outside the Black registration mark
then TOP LENGTH= Label height - X.
Page 6
5
X
paper feed
tear line
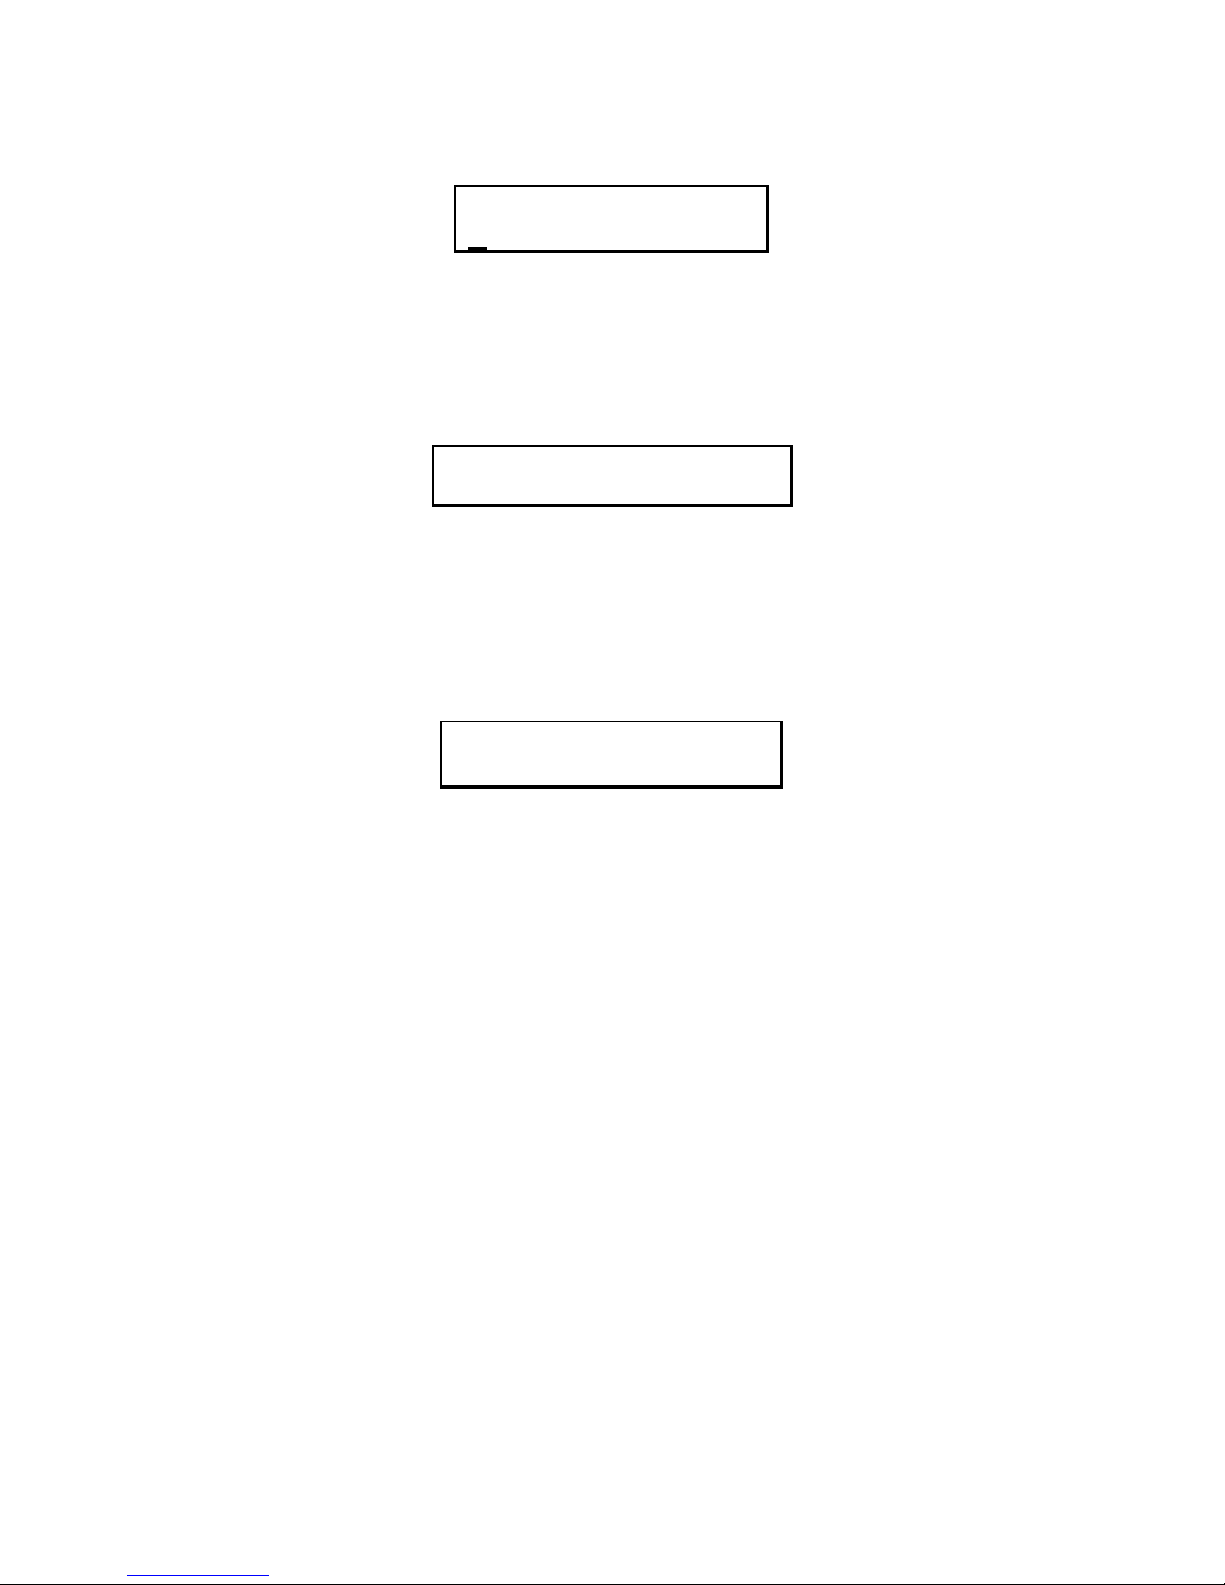
(G) ENTER BLACK LENGTH
The diagram of BLACK LENGTH is defined as follow:
te ar line
black len gth
The BLACK LENGTH in millimeters, then press “ENTER” key, KP-200 will go to
step(I).
(H) ENTER FEED LENGTH FOR FAX PAPER.
LCD display will show:
FEED LENGTH(1~25mm)
Enter Feed Length in mm and press ENTER to accept your selection.
(I) ENTER PRINT SPEED
LCD display will show:
SPEED 1 TO 2
2
Enter desired Print speed.
1 is equal to 1“ per second.
2 is equal to 2“ per second.
Press ENTER to accept your selection.
NOTE: 2“ per second is the default value.
(J) ENTER THERMAL HEAD
TEMPERATURE (DARKNESS)
LCD display will show:
DARKNESS 0 TO 7
5
Enter 0 to 7 (light to Dark), and press ENTER to accept your selection.
NOTE: Default value is 5.
Page 7
6
(K) SELECT SELF STRIP FUNCTION.
LCD display will show:
SELF – STRIP (Y/N)?
N
If your printer has the stripper option, you can enter Y to enable the stripper sensor.
Press ENTER to accept your selection.
NOTE: Default value is N.
(L) FIELD PROGRAMMING.
LCD display will show:
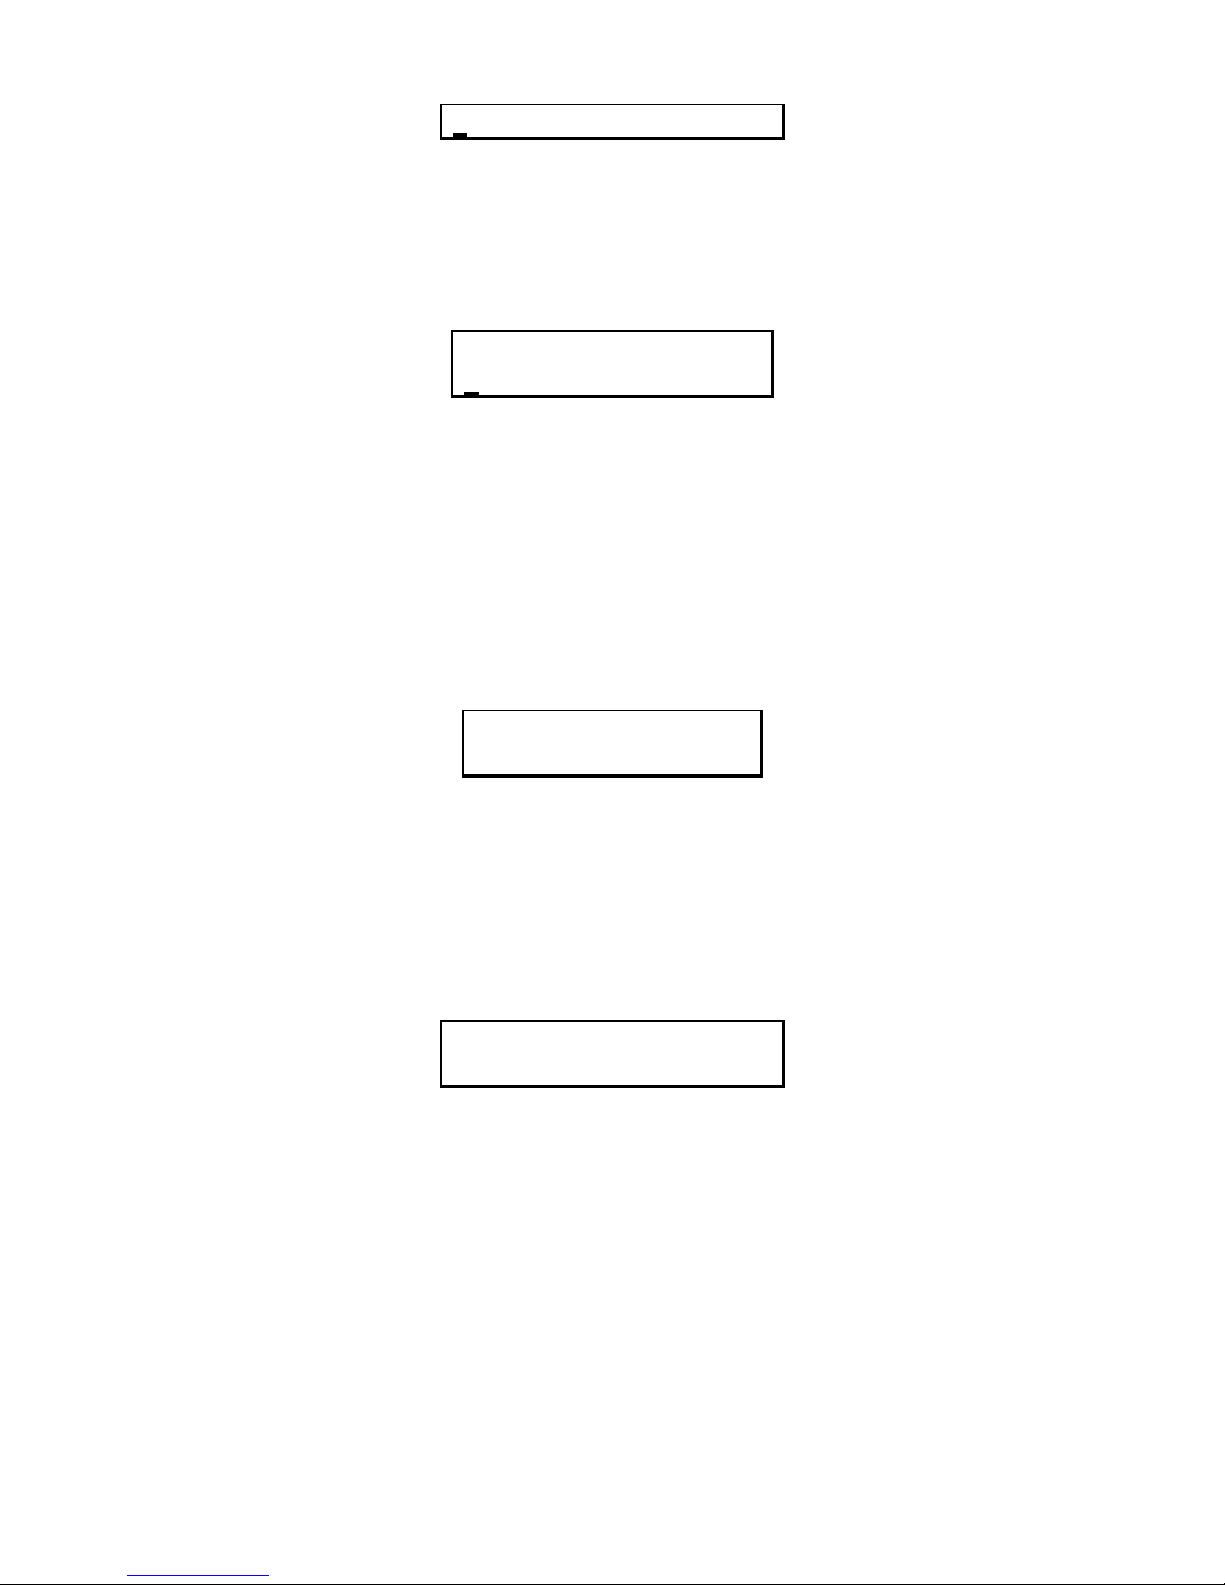
FIELD 1:
The maximum number of fields available on one label format is eighteen. If the label
format has been restored form the memory module, you may use the cursor keys to
select the field you wish to edit and then press ENTER. If this is to be a new label
format just press ENTER.
(M) ENTER DATA TYPE.
LCD display will show:
SELECT TEXT/BARCODE
[Shift]+[NUMERICAL]
Hold down the Shift key and press the 0 key to select the TEXT field.
Hold down the Shift key and press the 1 key to select the CODE 39 barcode field.
Hold down the Shift key and press the 2 key to select the CODE 93 barcode field.
Hold down the Shift key and press the 3 key to select the CODE 128 barcode field.
Hold down the Shift key and press the 4 key to select the CODABAR barcode field.
Hold down the Shift key and press the 5 key to select the INTERLEAVED 2 OF 5
barcode field.
Hold down the Shift key and press the 6 key to select the POSTNET barcode field.
Hold down the Shift key and press the 7 key to select the AN8 barcode field.
Hold down the Shift key and press the 8 key to select the EAN13 barcode field.
Hold down the Shift key and press the 9 key to select the UPC barcode field.
Page 8
7
(N) ENTER BLANK LINE.
The LCD display will show:
LINE SPACE? (0~99 mm)
Line space is defined as the distance from this field to the next in mm. Enter desired
dimension (0~99mm) and press ENTER to accept your selection.
NOTE: Default value is 0.
(O) VARIABLE FIELD?
The LCD display will show:
VARIABLE (Y/N)?
Y
For variable data press Y. For fixed data press N.
NOTE: Default value is Y.
(P) FONT SIZE.
1. Horizontal multiplier. The LCD display will show:
ENTER X SIZE(1~4)
1
Enter horizontal multiplier (1~4). Press ENTER to accept your selection.
2. Vertical multiplier. The LCD display will show:
ENTER Y SIZE(1~7)
1
Enter vertical multiplier (1~7). Press ENTER to accept your selection.
NOTE: The default value in both case is 1.
3. Enter Text Data. The LCD display will show:
ENTER DATA :
_
Enter the Text data and press ENTER.
(Q) BARCODE DATA FIELD.
1. Narrow bar ratio. The LCD display will show:
NARROW (2 TO 4)
2
Enter narrow bar to width in dots.(2 to 4).
Press ENTER to accept your selection.
NOTE: The default value is 2.
Page 9
8
2. Wide bar ratio. The LCD display will show:
WIDE(4 TO 12)
5
Enter wide bar width in dots(4 to 12) Press ENTER to accept your selection.
NOTE: The default value is 5.
3. Barcode height. The LCD display will show:
HEIGHT (1 TO 7)
3
Enter Barcode Height(1 to 7). Press ENTER to accept your selection.
NOTE: The default value is 3.
4. Human Readable. The LCD display will show:
READABLE(Y/N)
Y
Enter Y and human readable is enabled. Enter N and human readable is disabled.
Press ENTER to accept your selection.
NOTE: The default value is Y.
5. Enter Barcode. The LCD display will show:
ENTER DATA:
Enter the Barcode data and press ENTER to accept your selection. The keyboard
will automatically revert to menu K.
(R) SAVE FORMAT TO MEMORY CARD.
The LCD display will show:
SAVE FORM(Y/N)
Enter N - Keyboard will automatically step to next field.
Enter Y - LCD display will show:
Enter form name:
You can enter a maximum of sixteen characters to define a label name. Press
ENTER to save your format to the memory module.
Page 10
9
(S) HOW TO SET UP DATA FIELD AS A VARIABLE.
1. If the data field is to be a variable, then the LCD display will show:
DATA LENGTH?(1~34)
A variable field allows the operator to input variable field data while the keyboard is in
the PRINT MODE enter DATA LENGTH(1~34, Dependent upon Font size & Label
width).
Press ENTER to accept your selection.
2. The LCD display will show:
ENTER X SIZE(1-4)
Same procedure as (P). Press ENTER to
accept your selection.
3. The LCD display will show:
ENTER Y SIZE(1-7)
Same procedure as (P). Press ENTER to accept your selection.
4. The LCD display will show:
POSITION OR PRESS D ?
Press “Shift”+“TAB1” A dd one space in front of data.
Press “Shift”+“TAB2” Add eight spaces in front of data.
Press “&” This field and next field will be the same line.
Press “Shift”+“INS/L” To insert a field.
Press “Shift”+“DEL/L” To delete this field.
Press D to step to next screen.
5. The LCD display will show:
POSITION OR PRESS D ?
•••••••
The boxes displayed represent character fields to indicate to the operator the length (in
characters) of the variable data.
Example: If the data length is 5, LCD will show 5 blocks. If the data length is 3, LCD will
show 3 blocks. Press ENTER to proceed to next menu.
Page 11
10
6. LCD display will show:
SERIAL NUMBER(Y/N)
N
Press N to setup field with normal data, press ENTER to accept your selection. The
Keyboard will automatically revert to menu K. Press Y to setup field with a
incrementing counter, press ENTER to accept your selection.
Note : N is the default value.
7. LCD display will show:
ENTER STEP:
Enter the increment step for this serial field.
Press ENTER to accept your selection.
5. PRINT MODE OPERATION.
(a) LCD display will show:
RESTORE FORM(Y/N)
Press N to load format from memory module.
Press ENTER to step to next menu.
Press Y and go directly to menu(d).
(b) LCD display will show:
ENTER FORM NAME:
LAB1
Use the cursor keys to highlight the label format required or type in the format name
directly. Press ENTER to accept your selection.
(c) LCD display will show:
WAIT FOR LOADING
.....>> <<.....
If there are any variable fields in the restored label format, the operator will prompted with
the following:
ENTER TEXT:
Page 12
11
Type in variable text data and press ENTER to accept your selection.
ENTER BARCODE:
Type in variable barcode data and press ENTER to accept your selection.(d) LCD
display will show:
HOW MANY TO PRINT ?
Enter label quantity and press ENTER to print selected label.
6. ERASE FORMAT
This operation allows the operator to erase one of the formats saved in the memory
module.
The LCD display will show:
ENTER FORM NAME:
LAB1
You may use the cursor keys to highlight the appropriate label or you may type in the
label format name. Press ENTER key to accept your selection.
The LCD display will show:
LAB1
ERASE(Y/N)
Press Y to erase this format.
Press N to escape.
Keyboard will exit to menu screen.
7. ERASE ALL FORMAT
This operation allows the delete all previously stored label formats. The LCD display will
show:
ERASE ALL(Y/N)
Press Y to erase all formats.
Press N to escape.
Keyboard will exit to menu screen.
Page 13
12
8. SPECIAL FEATURES OPERATION
(a) TAB KEY
TAB1 = 1 SPACE.
TAB2 = 8 SPACES.
(b) PROCEDURE FOR DELETING A DATA FIELD
If the operator wishes to delete a data field in a label format, use the cursor keys to
highlight the unwanted field. The LCD display may show:
ENTER DATA
12345
Press both the SHIFT key and the DEL/L key. The LCD display will show:
DELETE DATA (Y/N)
Press Y to delete this field.
Press N to escape.
(c) PROCEDURE FOR INSERTING A DATA FIELD
Use the same procedure as above, but at ENTER DATA menu the LCD display may
show:
ENTER DATA (Y/N)
12345
Press both the SHIFT key and the INS/L key. The LCD display will show:
INSERT DATA (Y/N)
Press Y to step to next menu (see EDIT MODE OPERATION - Section L). Press N to
escape.
(d) TWO DATA FIELDS ON THE SAME LINE.
At ENTER DATA menu, the LCD display may show:
ENTER DATA (Y/N)
12345
If you type a & sign as the last character in this data field, the keyboard will print the
next data field and this data field on the same line.
Appendix A. Pin Assignment
Page 14

13
KP-200 (9 PIN FEMALE)
PIN SIGNAL
2 (TXD)
3 (RXD)
5 (GND)
9 (VCC)
Baud Rate : 4800 BPS
Data Length : 8
Stop Bit : 1
Parity : N
Page 15
14
Appendix B. Font Expansions
 Loading...