

Page 1

PROGRAMMER’S MANUAL 1
1. COMMUNICATION PORTS SPECIFICATION...........................1
1-1. PARALLEL INTERFACE.............................................................1
1-2 SERIAL INTERFACE..................................................................1
2. FIRMWARE COMMANDS...................................................3
2-1. EZPL....................................................................................3
2-2. LANGUAGE DESCRIPTION........................................................5
2-3. BAR CODES.........................................................................14
2-4. CODE PAGE.........................................................................15
3. EXAMPLE.....................................................................17
APPENDIX........................................................................27
A. EZ-4TT/2P/4P ABOVE 2.10...................................................27
B. EZ-4TT/2P/4P ABOVE 2.20...................................................31
Page 2
1
Programmer’s Manual
1. Communication Ports Specification
1-1. Parallel Interface
Handshake : DSTB to printer and BUSY to host.
Interface cable : DB25 Male (IBM-PC) 36 position parallel printer cable.
Pin out : Tabulated below.
PIN NO. FUNCTION TRANSMITTER
1 Strobe host
2-9 Data 0-7 host
10 Acknowledge printer
11 Busy printer
12 Paper empty printer
13 Select printer
14-16 N/C
17 Chassis Ground
18 N/C
19-30 Signal Ground
31 N/C host
32 Fault printer
33 Signal ground
34-36 N/C
1-2 Serial Interface
Serial port is set at the factory with 9600 baud-rate, no parity, 8 data bits, and 1 stop bit and
uses XON/XOFF protocol as well as RTS/CTS.
The connector is RS -232 DB9 female. The pin assignments are listed below.
PIN NO. 1 2 3 4 5 6 7 8 9
NAME +5 V TXD RXD N/C GND DTR/CTS N/C DTR/CTS N/C
PC to printer’s serial port (pin to pin) description
PC
Printer
1 1 +5V
RXD 2 2 TXD
TXD 3 3 RXD
4 4 N/C
GND 5 5 GND
DSR 6 6 DTR/CTS
7 7 N/C
RTS 8 8 DTR/CTS
Page 3

2
9 9 N/C
Page 4
3
2. Firmware Commands
2-1. EZPL
The EZPL (EZ Programming Language) is a high - level label definition and printer control
language.
The features are:
1) The data fields are stored and processed until the printing instruction is received.
2) All the data can be rotated.
3) Image can be downloaded and stored.
There are three basic types of commands:
1) Setup commands: contain the printer control instructions, configuration instructions and
image download instructions. See Table 1.1
2) Control commands: cause the printer to take action immediat ely, such as cleaning memory,
feeding label. See Table 1.2
3) Label formatting commands: defined field data, such as Line, Rectangle, Barcode, Text and
Images. See Table 1.3
Table 1.1 Setup Commands
Setup Command Syntax Page
Stop position setting ^Ex 5
Printing darkness set ^Hx 5
Number of printing pages ^Px 5
Label length setting ^Qx,y(,z ?) 5
Speed setting ^Sx 6
Number of copy per label ^Cx 6
Row column adjustment ^Rx 6
Label format begin sign ^L 6
Stripper sensor ^Ox 6
Download label format ^Fname 6
Recall label format ^Kname 7
Label Width (EZ2P/4P only) ^Wxx 7
Number of label per cut ^Dx 7
Page 5
4
Table 1.2 Control Commands
Control Command Syntax Page
Clean image buffer ~Ax 7
Graphics download to external Flash card ~Ex,name,length 8
Graphic driver format ~G 8
Graphic down load to internal memory ~Ix,name,length 8
Print last label ~Px 8
Print version message ~V 8
Date / Time setting ~Dm,d,y,h,i,s 8
Reset printer ~Z 8
Acknowledge from RS -232 ~K 9
Printer header testing ~T 9
Clear flash memory ~MDEL 9
Rotate printing ~Rx 9
Print the available space and data name in the memory card ~Xn 9
Table 1.3 Label Formatting Commands
Label Formatting Command Syntax Pag
e
Define date layout Daa|bb|cc 9
Serial number setting Cx,s,? value,prompt 10
Terminate label formatting mode
and print label
E 10
Single line image data Gwxxx 10
Line command La,x,y,x1,y1 10
Rectangle command Rx,y,x1,y1,lrw,ubw 10
Define time layout formatting Th|m|s 11
Graphics Yx,y,name 11
Text command At,x,y,x_mul,y_mul,gap,rotation,data 11
Barcode command Bt,x,y,narrow,wide,height,rotation,readable,data 12
PDF 417 command Px,y,w,h,r,c,ec,len 12
Maxicode command Mx,y,sno,nos,mode,ccode,zip,class,rotation,message 13
Define variable field Vxx,length,prompt 13
Pattern command Qx,y,width,height 13
** 1mm = 8dots (203dpi) = 12dots (300dpi) **
Page 6

5
2-2. Language Description
Rules and syntax
EZPL commands have parameter strings associated with them. The commands begin with a
letter as ID for each function. The comma (,) is the delimiter to separate each parameter. The
CR [Carriage Return: decimal (13), hex (oD)] is the end of every command. Control and Setup
commands use the tilde (~) and caret (^) prefix. Label Formatting command have no prefix.
Example: “ ~Ex,name,length ?“ is an image download command, (E) with three parameters
(x,name,length) and end with a “CR”.
* Setup Commands
1. Stop position setting
Syntax : ^Ex
Parameters : x = 0 ~ 40 (unit : mm)
Description : Feed paper to desire stop position.
The suggestion value of x is 10 for stripper operation, 12 for label gap
paper, 32 for EZ-4TC, 10 for EZ-2PC and 19 for EZ-4PC.
2. Printing darkness set
Syntax : ^Hx
Parameters : x = 00 ~ 19
Description : Set printing darkness.
3. Number of printing pages
Syntax : ^Px
Parameters : x = 1 ~ 32767
Description : This command tells the printer how many labels to print; and it will
initiate the program.(refer page18)
4. Label length setting
Syntax : ^Qx,y(,z ?)
Parameters :
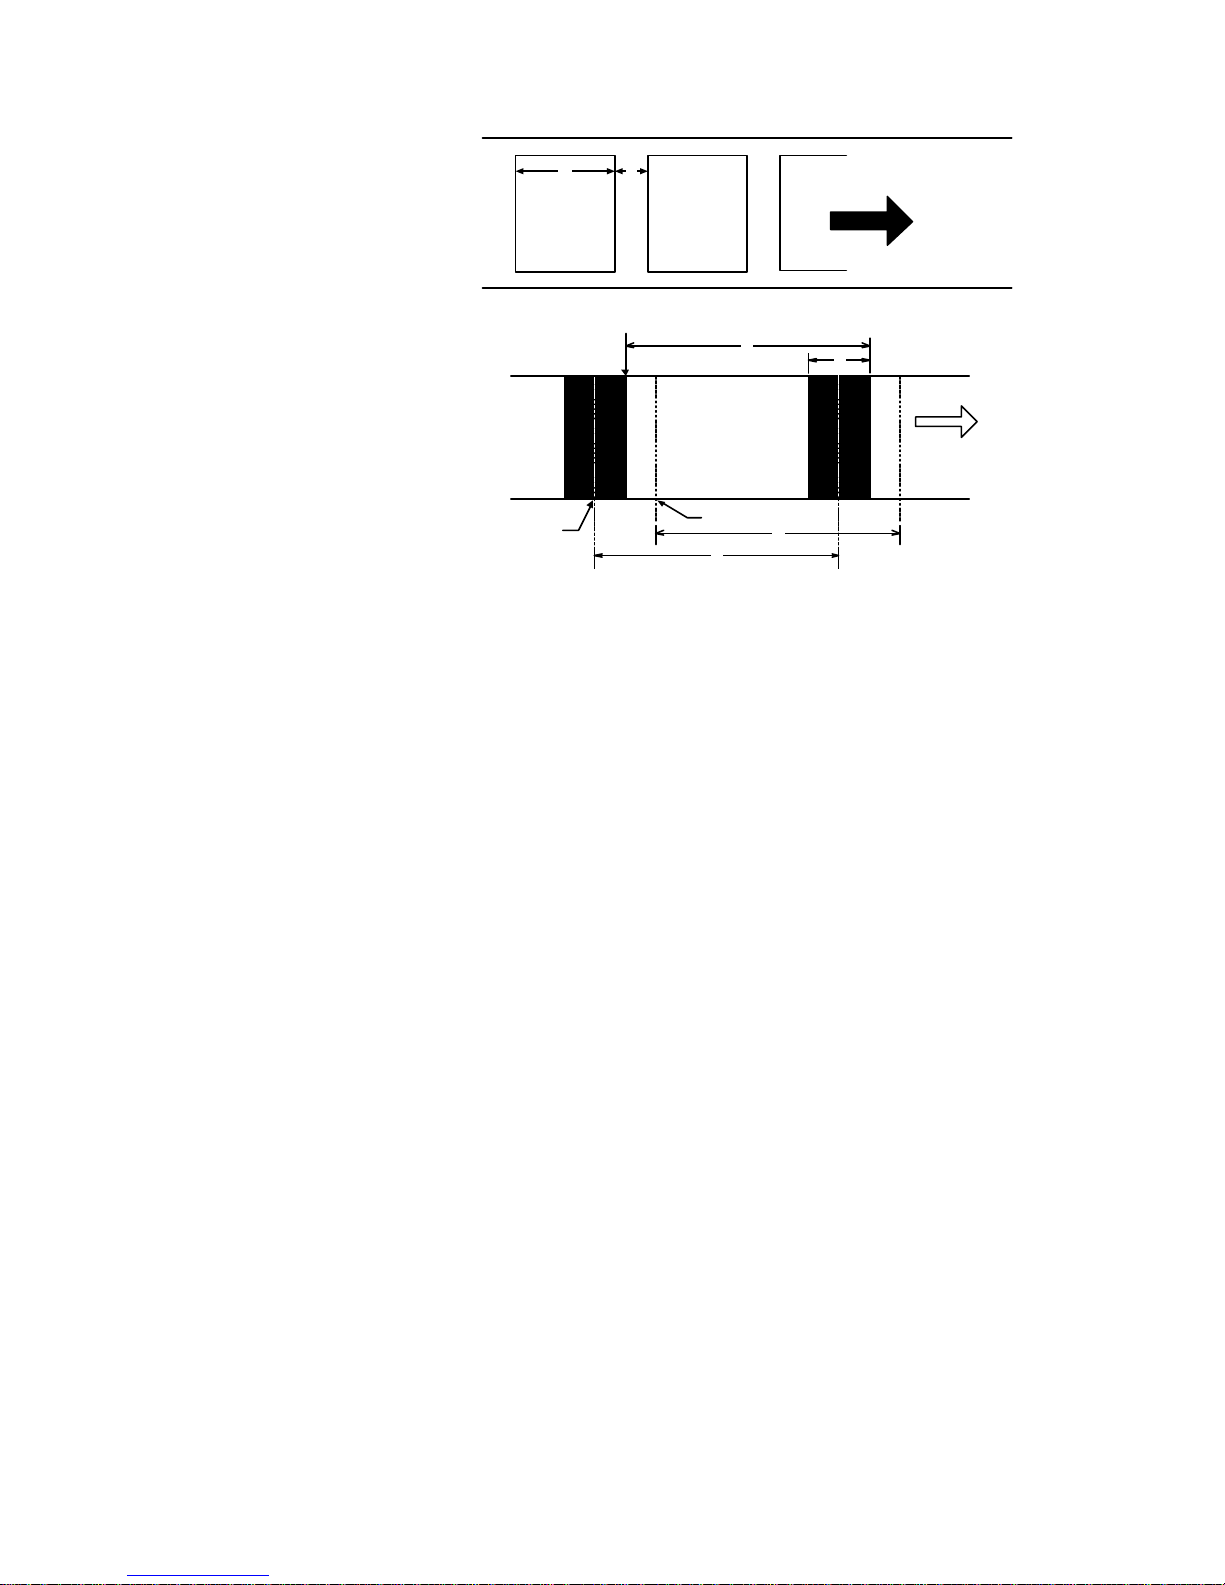
Die cut label: ^Qx,y (see fig. 1)
x = Label length (unit : mm)
y = Gap length (1~13mm)
Plain paper: ^Qx,0,z
x = Label length (unit : mm)
y = 0 (constant)
z = Feed paper length (unit : mm)
Black line label: ^Qx,y,z? (see fig. 2)
x = label length (unit : mm)
y = black mark width (1~13mm)
z = black line to top of form position
z+ -- when the position is outside black mark. (see fig. 2)
z- -- when the position is inside black mark. (see fig. 2)
Page 7
6
Description : Set a label size (length, gap length, [plain paper feed length])
(fig. 1)Die Cut Label
Command = ^Qx,y
Example: ^Q25,3?
(x= 25, y= 3 )mm
paper feed
direction
x
y
(fig. 2)Black line label
Command = ^Qx,y,z?
Example:
a. ^Q25,4,3+
(x= 25, y= 4, z= 3+)mm
b. ^Q25,4,3(x= 25, y= 4, z= 3-)mm
y
paper feed
direction
x
^Qx,y,z+
^Q,x,y,0+
^Q,x,y,z-
x
x
5. Speed setting
Syntax : ^Sx
Parameters : x=1 ~ 4 (inch/sec); ^S4 is 4 inch per second printer only
Description : Set printing speed.
6. Number of copy per label
Syntax : ^Cx
Parameters : x = 1 ~ 32767
Description : Number of copy for the same label (refer page18)
7. Row column adjustment
Syntax : ^Rx
Parameters : x = 0 ~ 399 dots
Response : None
Description : Set left margin.
8. Label format begin sign
Syntax : ^L
Parameters : None
Description : Set label format begins sign.
9. Stripper sensor
Syntax : ^Ox
Parameters : x = 0 , stripper disable
x = 1 , stripper enable
Description : Set the stripper sensor to be enabled or disabled. When you use this
command, it should be matched with ^Ex.(refer page22)
10. Download label format
Syntax : ^Fname
Page 8
7
data
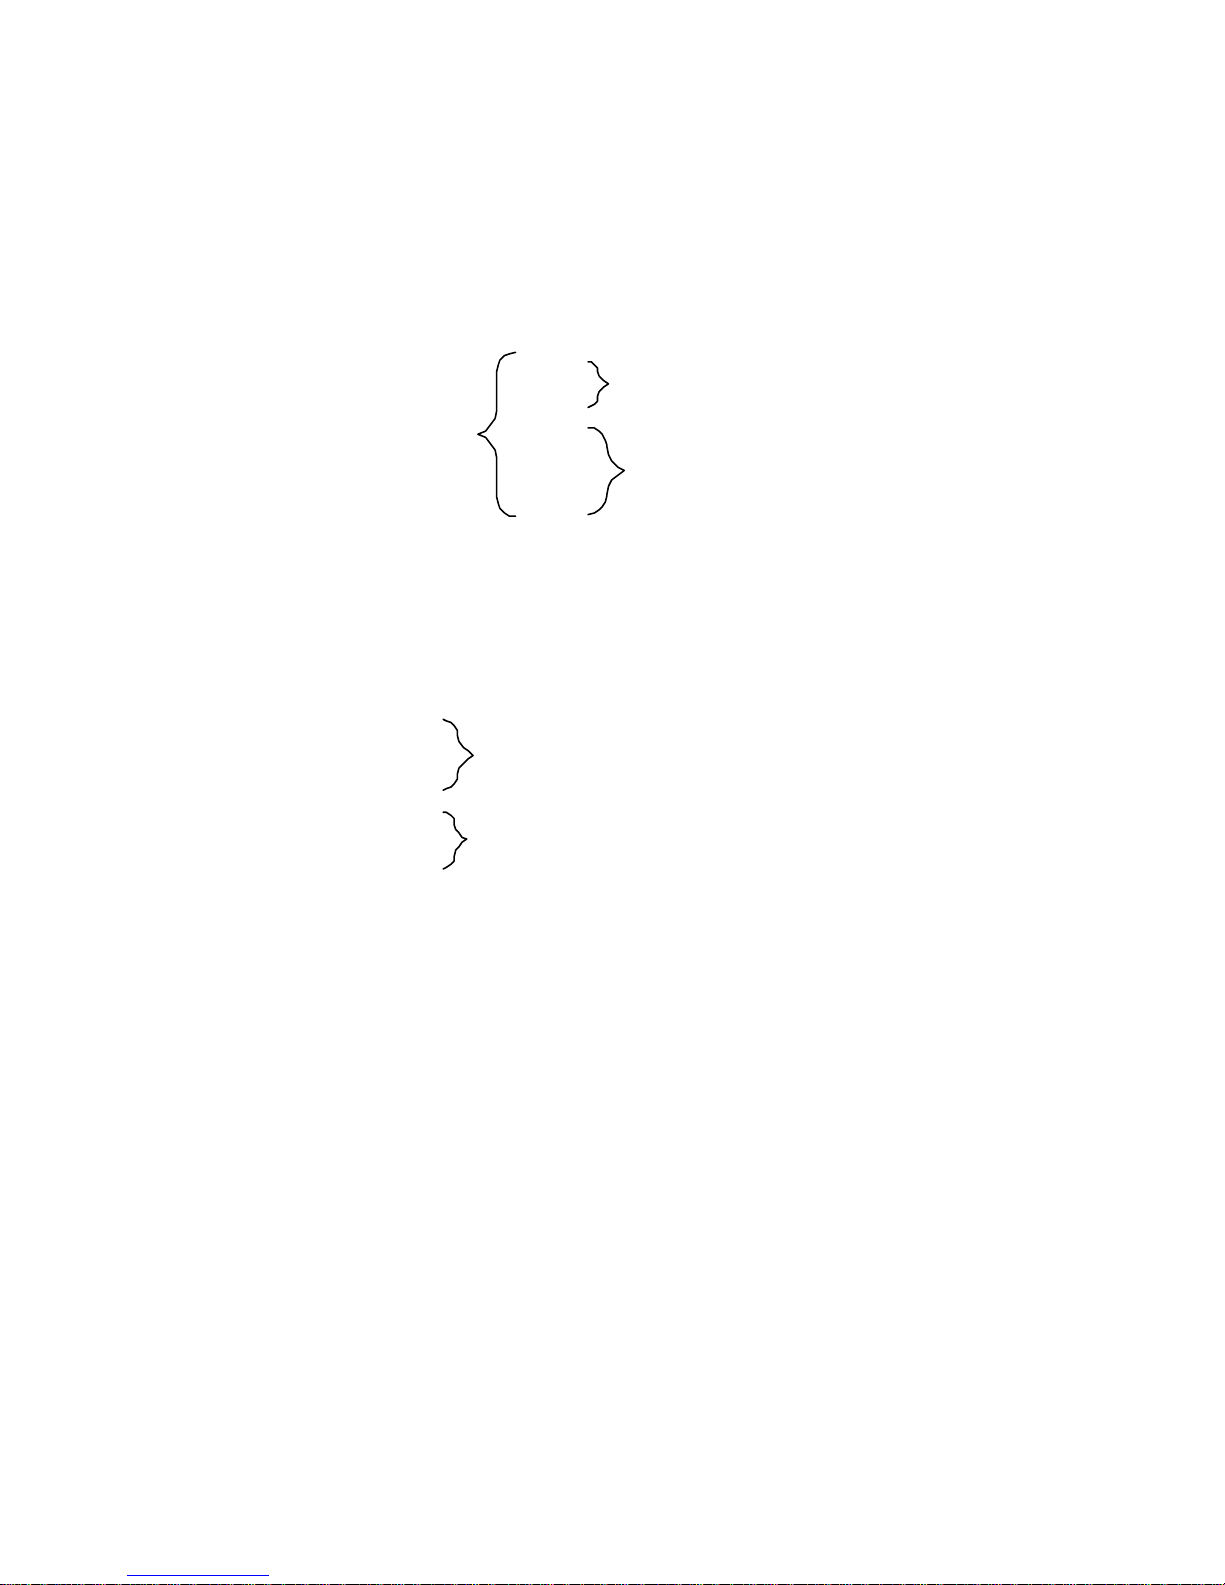
Parameters : name = name of the label format (up to 20 characters); maximum 329
formats (depend on format size)
data = the data contain the label formatting command for this stored
format.
Description : Download label format into external memory card (M1 or M2). After
finished the download, the printer will beep 2 times (refer page25
). If do not
install Flash Card (M1 or M2), the printer will beep 1 time.
^Fname
:
:
^L
:
:
E
Control/Setup command
Label format command
data
11. Recall label format
Syntax : ^Kname
Parameters : name = name of recall label format (up to 20 characters).
Description : Recall label format from external memory card (M1 or M2). (refer page25)
^Kname
:
:
E
:
:
~Px
data
Control/Setup command [option]
12. Label Width (EZ2P/4P only)
Syntax : ^Wxx
Parameters : x= label width
Description : Set the label width
13. Number of label per cut
Syntax : ^Dx
Parameters : X = 0 , disable cutting
X = 1 ~ 32767 , number of label per cut
Description : Number of label per cut. When you use this command, it should be
matched with ^Ex.(refer page22)
* Control Commands
1. Clean image buffer
Syntax : ~Ax
Parameters : x = I ; internal image buffer.
Description : Clear the internal 64K RAM.
Page 9

8
2. Graphics download to external Flash card
Syntax : ~Ex,name,length
Parameters : x = P, p ;PCX file
x = B, b ;BMP file
name : Name for image (up to 20 characters)
length : length of image (bytes), maximum 512K bytes
Description : Download monochrome image into external flash card. After finished the
download, the printer will beep 2 times (refer page23). If do not install Flash
Card (M1 or M2), the printer will beep 1 time.
3. Graphic driver format
Syntax : ~G
Parameters : None
Description : Printer is in the image-receiving mode. Image data are directly send from
host to the printing buffer. (refer page23)
4. Graphi c down load to internal memory
Syntax : ~Ix,name,length
Parameters : x = P, p ;PCX file
x = B, b ;BMP file
name = name for image (maximum character length 20 character)
length = length of image (bytes), maximum 64K bytes
Description : Download monochrome images into internal memory. After finished the
download, the printer will beep 2 times (refer page22).
5. Print last label
Syntax : ~Px
Parameters : x = 1 ~ 32767
Description : This command will repeatedly print the indicated copi
es of last label format.
(refer page18)
6. Print version message
Syntax : ~V
Parameters : None
Description : print firmware version (refer page24)
7. Date / Time setting
Syntax : ~Dm,d,y,h,i,s
Parameters : m = Month (01~12)
d = Day (01~31)
y = Year (Last two digits of year)
h = Hour (00~23)
i = Minutes (00~59)
s = Seconds (00~59)
Description : setting Real time clock(refer page19)
8. Reset printer
Syntax : ~Z
Parameters : None
Description : Reset the printer. The LED will flash once.
Page 10

9
9. Acknowledge from RS-232
Syntax
:
~Kn
Parameters :N = 0, disable
N = 1, enable (enable the printer to send a characher to PC through
RS-232)
Return Value :Y?
Description :Acknowledge a Y(0D0A) from RS -232 back to host each printing label
10. Printer header testing
Syntax : ~T
Parameters : None
Description : This command will print a pattern for the user to determine if the print head
is damaged (refer page24)
11. Clear flash memory
Syntax : ~MDEL
Parameters : None
Description : Clear all of the information in the external flash memory. When you use
external memory the first time, send this command to clear the external
memory.
12. Rotate printing
Syntax : ~Rx
Parameters : x = label width ; from 1 to 104 (unit : mm)
Description : Rotate the label formats a 180-degree when printing. (refer page24)
Return the original print direction, setting x > 104.
13. Print the available space and data name in the memory card
Syntax : ~Xn
Parameters : n = 1, print label format name and available space in memory card.
n = 2, print graphics name and available space in memory card.
n = 3, print fonts name and available space in memory card.
n = 4, print the name of the label format, graphics and fonts, and available
space in memory card.
Description : Print the available space in the memory card (unit: bytes)
Label Formatting Commands
1. Define date layout
Syntax : Daa|bb|cc
Parameters : aa, bb and cc define the year, month and day, the available formats are as
following.
y2 : year with two digits (97)
y4 : year with four digits (1997)
me : Month in letters (JAN, FEB, .... )
mn : Month in numeric (01, 02, .... )
dd : Day in numeric
Page 11

10
| : separator, it can be any ASCII character bet ween decimal 32 to 63.
Description : define the date layout for print out(refer page19)
2. Serial number setting
Syntax : Cx,s,? value,prompt
Parameters : x: 0~9
s: start value of serial variable (up to 13-digit)
? value: inc. / dec. value of serial variable (up to 12-digit)
prompt: prompt of serial variable (up to 20 characters)
Description : Set the serial number(refer page18)
3. Terminate label formatting mode and print label
Syntax : E
Parameters : None
Description : Ending formatting command; printer will print label after receiving this
command.
4. Single line image data (sub-command of ~G)
Syntax : Gwxxx
Parameters : wxxx...
w : byte number of image data (xxx...)
Description : This command is sub-command of ~G. It is sent by binary data. W is the
digits number byte of image data. (refer page23)
Example. If the image size is 50 bytes, the command is G2xxx ... (2 :
ASCII is 50 decimal [32H, 50 sec])
5. Line command
Syntax : La,x,y,x1,y1
Parameters : a = o, overwrite line
a = e, exclusive OR line
x : left -up
per horizontal (Hori.) pos. (dots; 1mm = 8 dots)
y : left -upper vertical (Vert.) pos. (dots)
x1: right -bottom Hori. pos. (dots)
y1: right -bottom Vert. pos. (dots)
Description : Define a line to render in the label. (refer page21)
** the diagonal line draw is not available **
6. Rectangle command
Syntax : Rx,y,x1,y1,lrw,ubw
Parameters : x : left -upper Hori. pos. (dots)
y : left -upper Vert. pos. (dots)
x1 : right -bottom Hori. pos. (dots)
y1 : right -bottom Vert. pos. (dots)
lrw : thickness of left, right border (dots)
ubw : thickness if upper, bottom border (dots)
(x,y)
lrm
ubw
(x1,y1)
Description : Draw a rectangle in the label (refer page21)
Page 12
11
7. Define time layout formatting
Syntax : Th|m|s
Parameters : h = hour format (2 digits from 0 ~ 23)
m = minutes (2 digits from 00 ~ 59)
s = seconds (2 digits for 00 ~ 59)
| = separator (It can be any separator between dec. 32 to dec. 63)
Description : Define the time layout for internal real-time clock. (refer page19)
8. Graphics
Syntax : Yx,y,name
Parameters : x : Hori. pos. of left -upper of graphics (dots)
y : Vert. pos. of left -upper of graphics (dots)
name : Name of graphics download
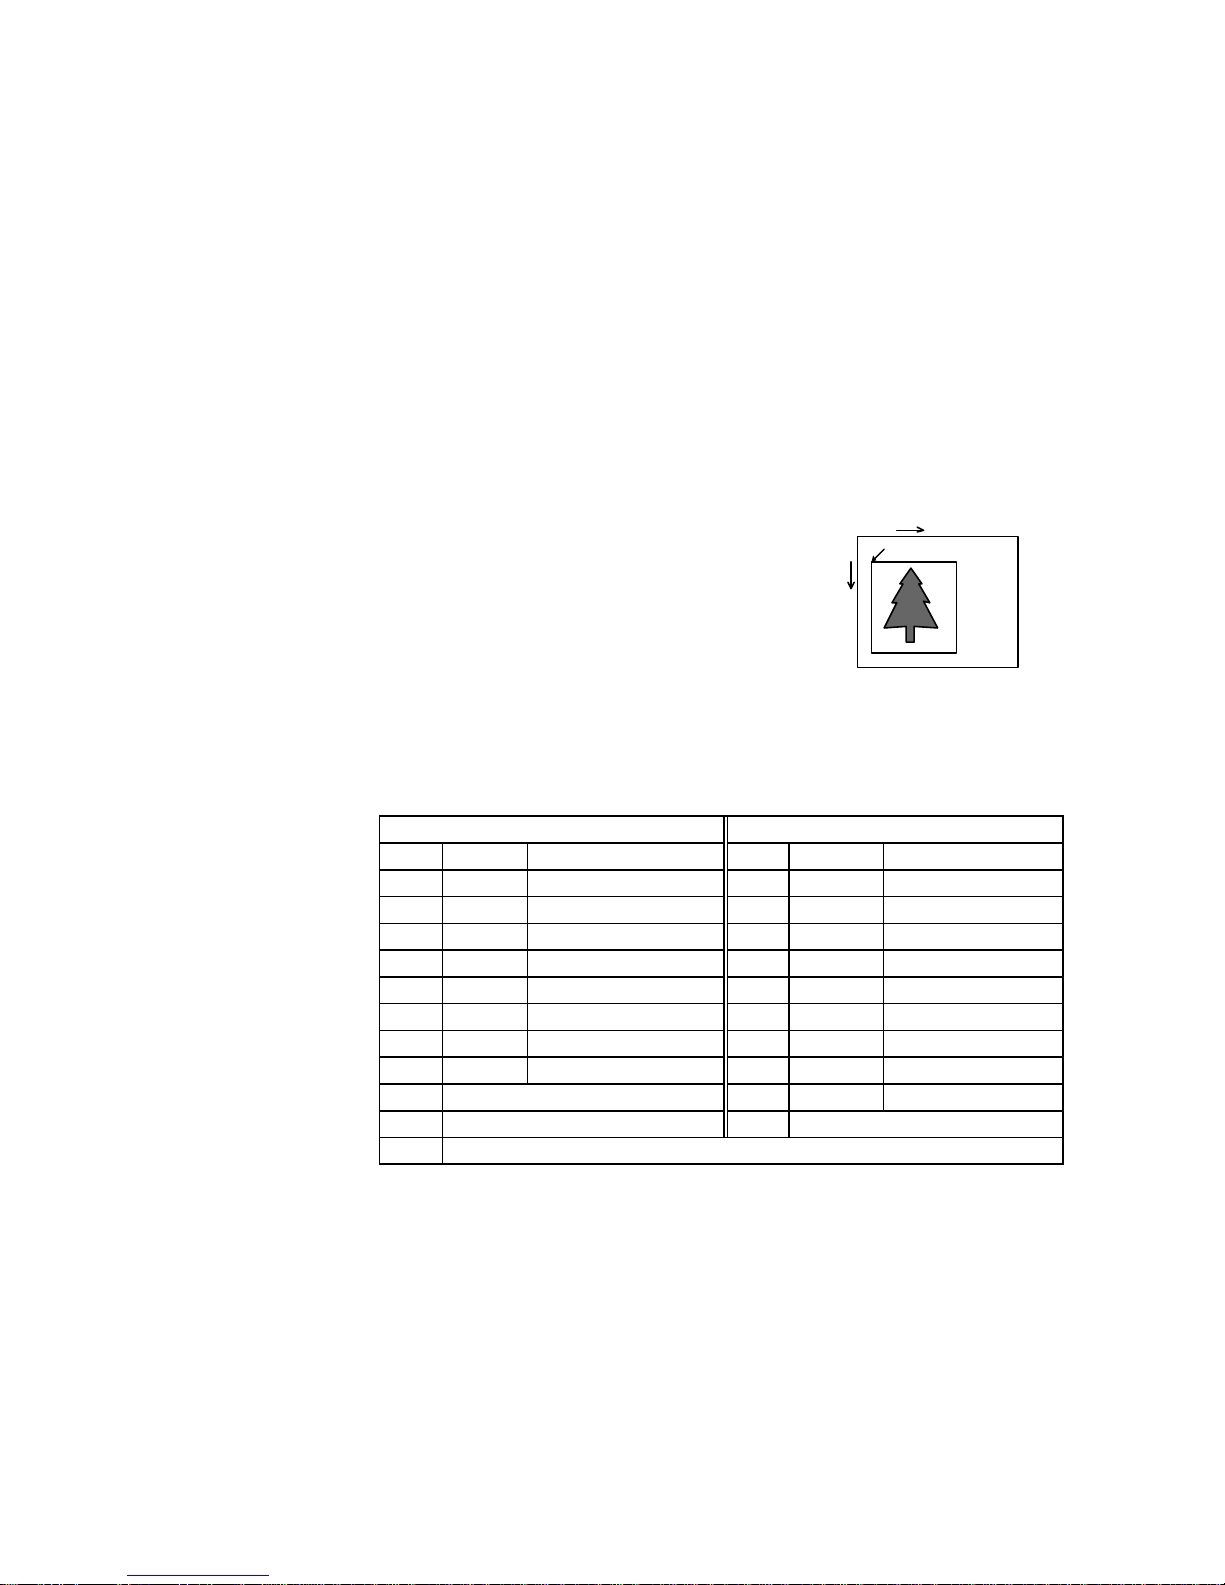
Description : Put the download graphic into label at the chosen position. (refer page22)
Example : A graphic in printer name
“ Graphic1 ”
command Y20,40,Graphic1 ? will put this
graphic into label at position (20,40)
(20,40)
x
y
9. Text command
Syntax : At,x,y,x_mul,y_mul,gap,rotation,data
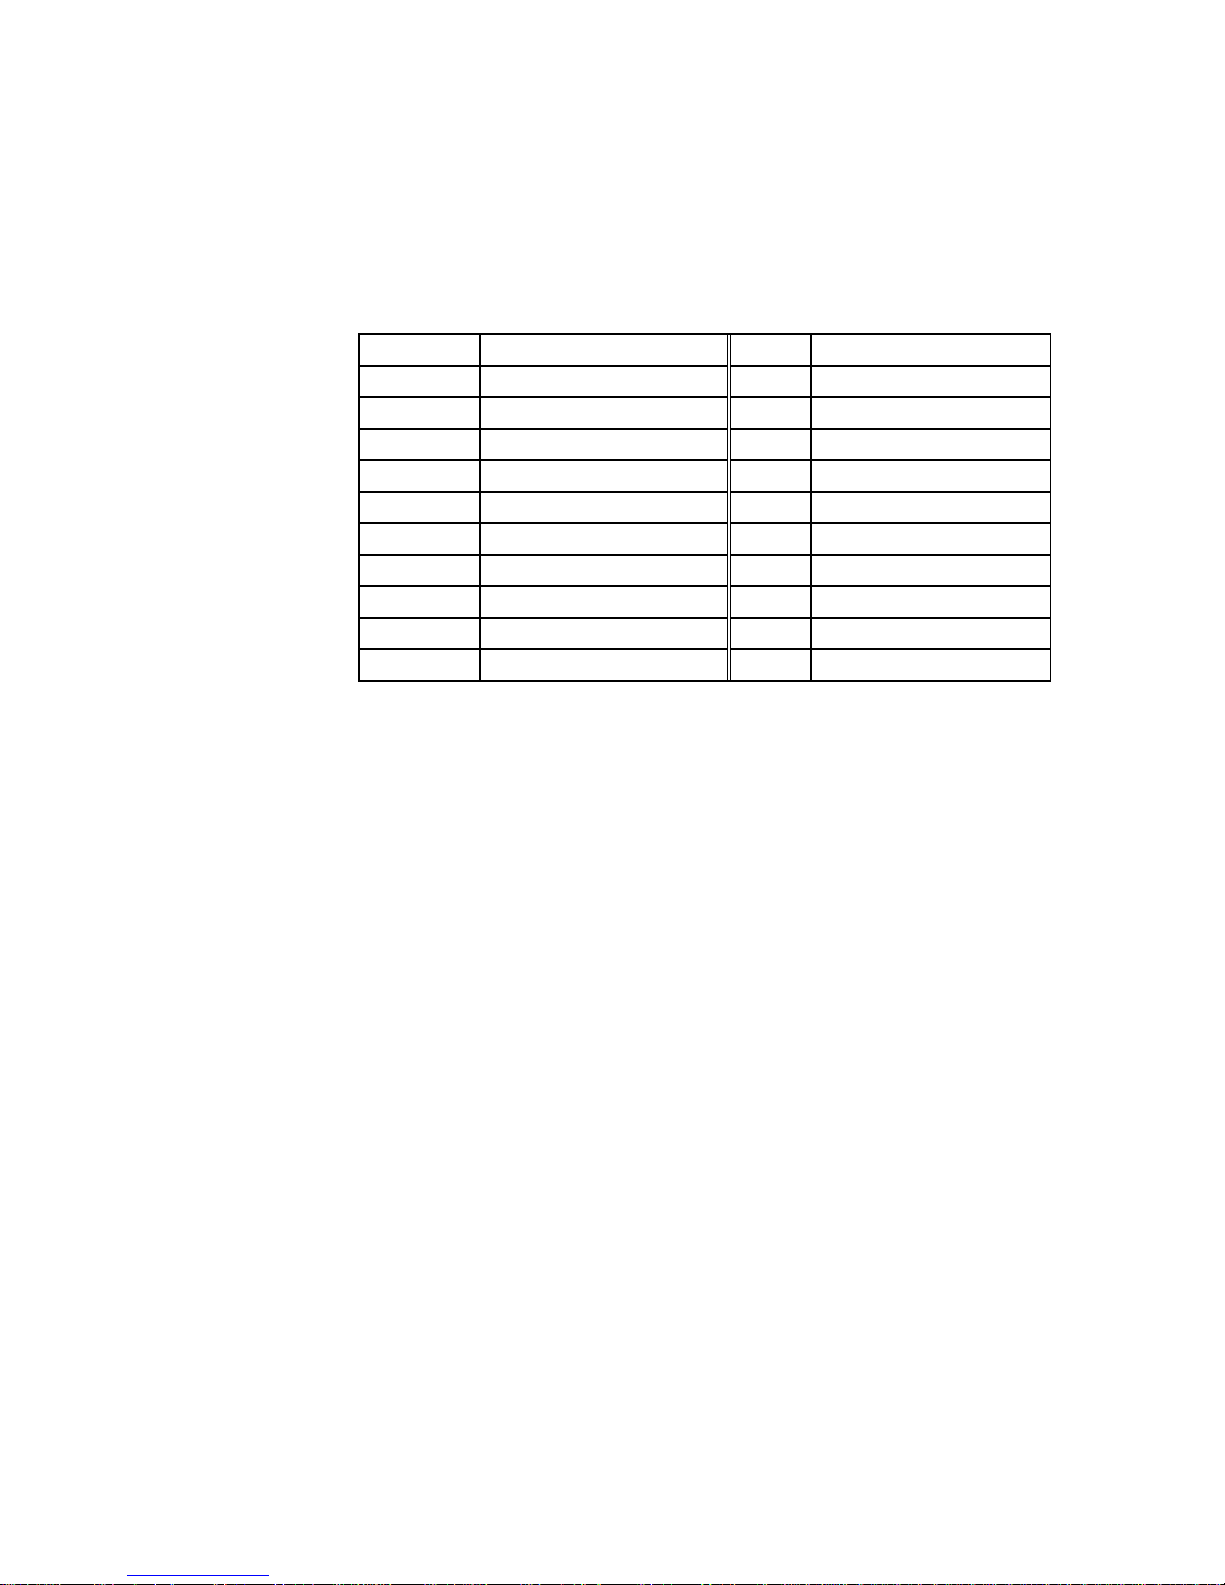
Parameters : t : Font type (203dpi) - A~H for code page 850, I for ASCII
t: Font type (300dpi) – A ~ I for code page 850, J for ASCII
203dpi 300dpi
Font Points Font style Font Points Font style
A 6 CG Triumvirate A 4 CG Triumvirate
B 8 CG Triumvirate B 5.3 CG Triumvirate
C 10 CG Triumvirate C 6.7 CG Triumvirate
D 12 CG Triumvirate D 8 CG Triumvirate
E 14 CG Triumvirate E 9.3 CG Triumvirate
F 18 CG Triumvirate F 12 CG Triumvirate
G 24 CG Triumvirate G 16 CG Triumvirate
H 30 CG Triumvirate H 20 CG Triumvirate
I 16x26 dots for US ASCII 8 bit I I CG Triumvirate
J 10.7*17.3 dots for ASCII
Z Chinese (Simplified, Traditional), Korean etc (only font card use).
x : Hori of left -bottom position of text (unit : dot, 1 mm = 8 dots)
y : Vert. of left -bottom position of text (unit : dot, 1 mm = 8 dots)
x_mul : Hori. expansion (1-10)
y_mul : Vert. expansion (1-10)
gap : Distance of the character (unit : dot, 1 mm = 8 dots)
rotation : Rotation of text (0-3)
0) 0? 1) 90? 2) 180? 3) 270?
data : Data string (up to 239 characters)
1. constant
Page 13
12
2. date information. (^D)
3. time information. (^T)
4. serial variable data. (^Cx)
5. variable data . (^Vxx)
10. Barcode command
Syntax : Bt,x,y,narrow,wide,height,rotation,readable,data
Parameters : t : bar-code type
A CODE 39 L UPC E - Add ON 2
B EAN 8 M UPC E - Add ON 5
C EAN 8 - Add ON 2 N I 2 of 5
D EAN 8 - Add ON 5 O CODABAR
E EAN 13 P Code 93
F EAN 13 - Add ON 2 Q Code 128 (subset a,b,c)
G EAN 13 - Add ON 5 R UCC 128
H UPC A S Post NET
I UPC A - Add ON 2 T DUN 14 ONLY 90
J UPC A - Add ON 5 U EAN 128
K UPC E V RPS 128
x : Hori. of left -bottom pos. of bar-code (unit : dot, 1 mm = 8 dots)
y : Vert. of left -bottom pos. of bar-code (unit : dot ,1 mm = 8 dots)
narrow (x dimension): narrow bar from 1~10 dots (0.125 ~ 1.25 mm)
** DUN 14 narrow setting from 5~8 dots **
** UPC & EAN narrow setting from 2 ~ 4 dots **
wide : wide bar from 2~30 dots (0.25 ~ 0.5 mm)
** CODE 39, 93, CODABAR & I 2 of 5 only **
height : height of bar-code from 24 ~ 1200 dots.
rotation : rotation of bar-code (0 -3)
0) 0? 1) 90? 2) 180? 3) 270?
readable : 0 - label off , 1 - label on
data : bar-code data
1. constant
2. date information. (^D)
3. time information. (^T)
4. serial variable data. (^Cx)
5. variable data . (^Vxx)
11. PDF 417 command
Syntax : Px,y,w,h,r,c,ec,len
Data
Parameters : x : Hori. of left -bottom pos. of bar-code (unit : dots).
y : Vert. of left -bottom pos. of bar-code (unit : dots).
w : width (x dimension) of the narrowest element (bar or space) in the bar
code.
h : height (y dimension) of each bar code row in the symbol.
r : number of bar code rows, from 3 to 90.
Page 14
13
c : number of bar code columns, from 1 to 30.
ec : error correction level; 0 ~ 8.
len : number of encoded data bytes, including carriage returns and line
feeds.
data : data to be encoded (the length of the data is equal to len; up to 1024
characters).
12. Maxicode command
Syntax : Mx,y,sno,nos,mode,ccode,zip,class,rotation,message
Parameters : x : Hori. of left –bottom pos. of bar code (unit: dots).
y : Vert. of left –bottom pos. of bar code (unit: dots).
sno : symbol number, in set of symbols 1 ~ 8.
nos : number of symbols in set of symbols 1 ~ 8.
mode : mode of maxicode 2, 3, 4 or 6.
zip : postal code
9 digits for US style postal code. If there is five digits zip code, four
zeros must be padded.
6 digits alphanumeric zip code for non-US style postal code.
ccode : three digit country code.
class : service class, 3 digit numeric.
rotation : rotation of bar-code (0 : 0?)
message : 1 ~ 84 characters.
13. Define variable field
Syntax : Vxx,length,prompt
Parameters : xx = from 00 ~ 29
length = number of characters (up to 98 characters)
prompt = prompt of variable (max. 20 characters)
Description : User define variable field setting(refer page25)
14. Pattern command
Syntax : Qx,y,width,height
data...
Parameters : x = Hori. of left -bottom pos. (unit : dots).
y = Vert. of left -bottom pos. (unit : dots).
width = width of graphic (unit : byte)
height = height of graphic (unit : dots)
(data length = width x height)
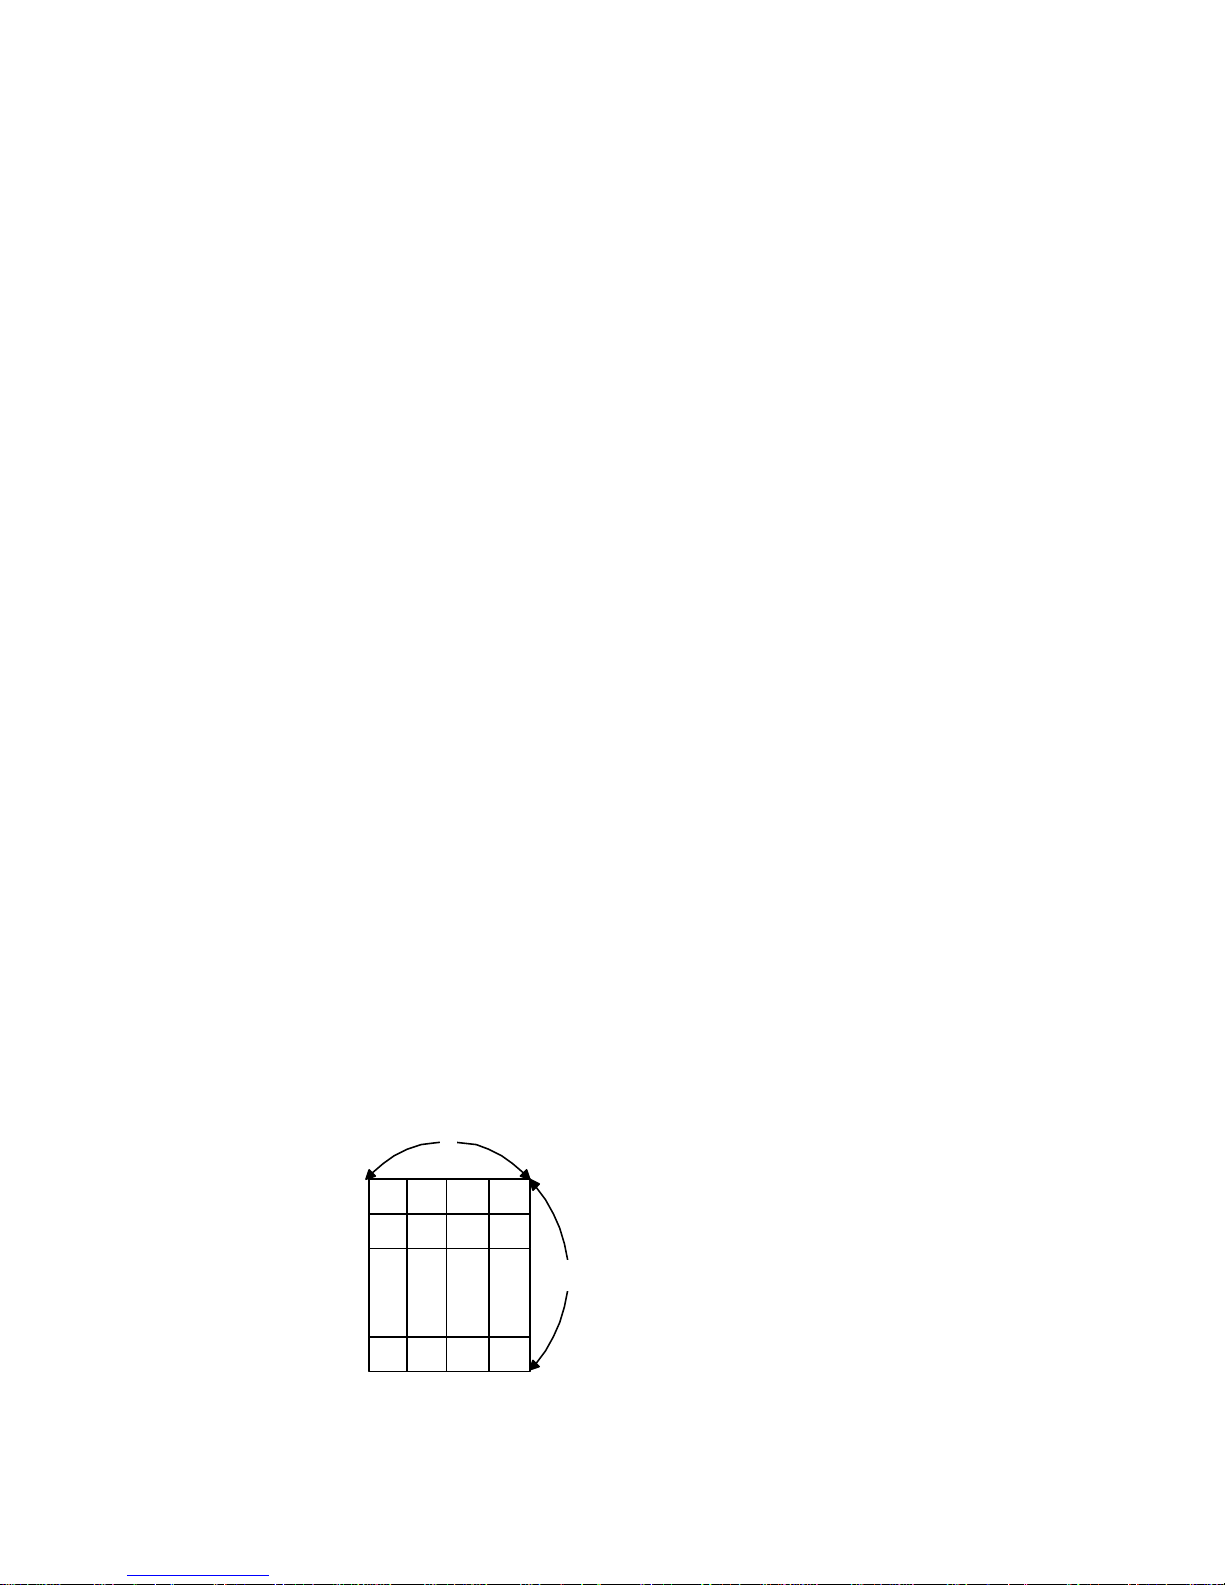
Description :
4
20
1 2 3 4
5 6 7 8
77 78 79 80
(refer page24)
1 bit = 1 dot
1 byte = 8 bits = 8 dots = 1 mm
data send out:
1 2 3 4 ......77 78 79 80
width = 4 ; height = 20
(data length : 4x20 = 80)
Page 15
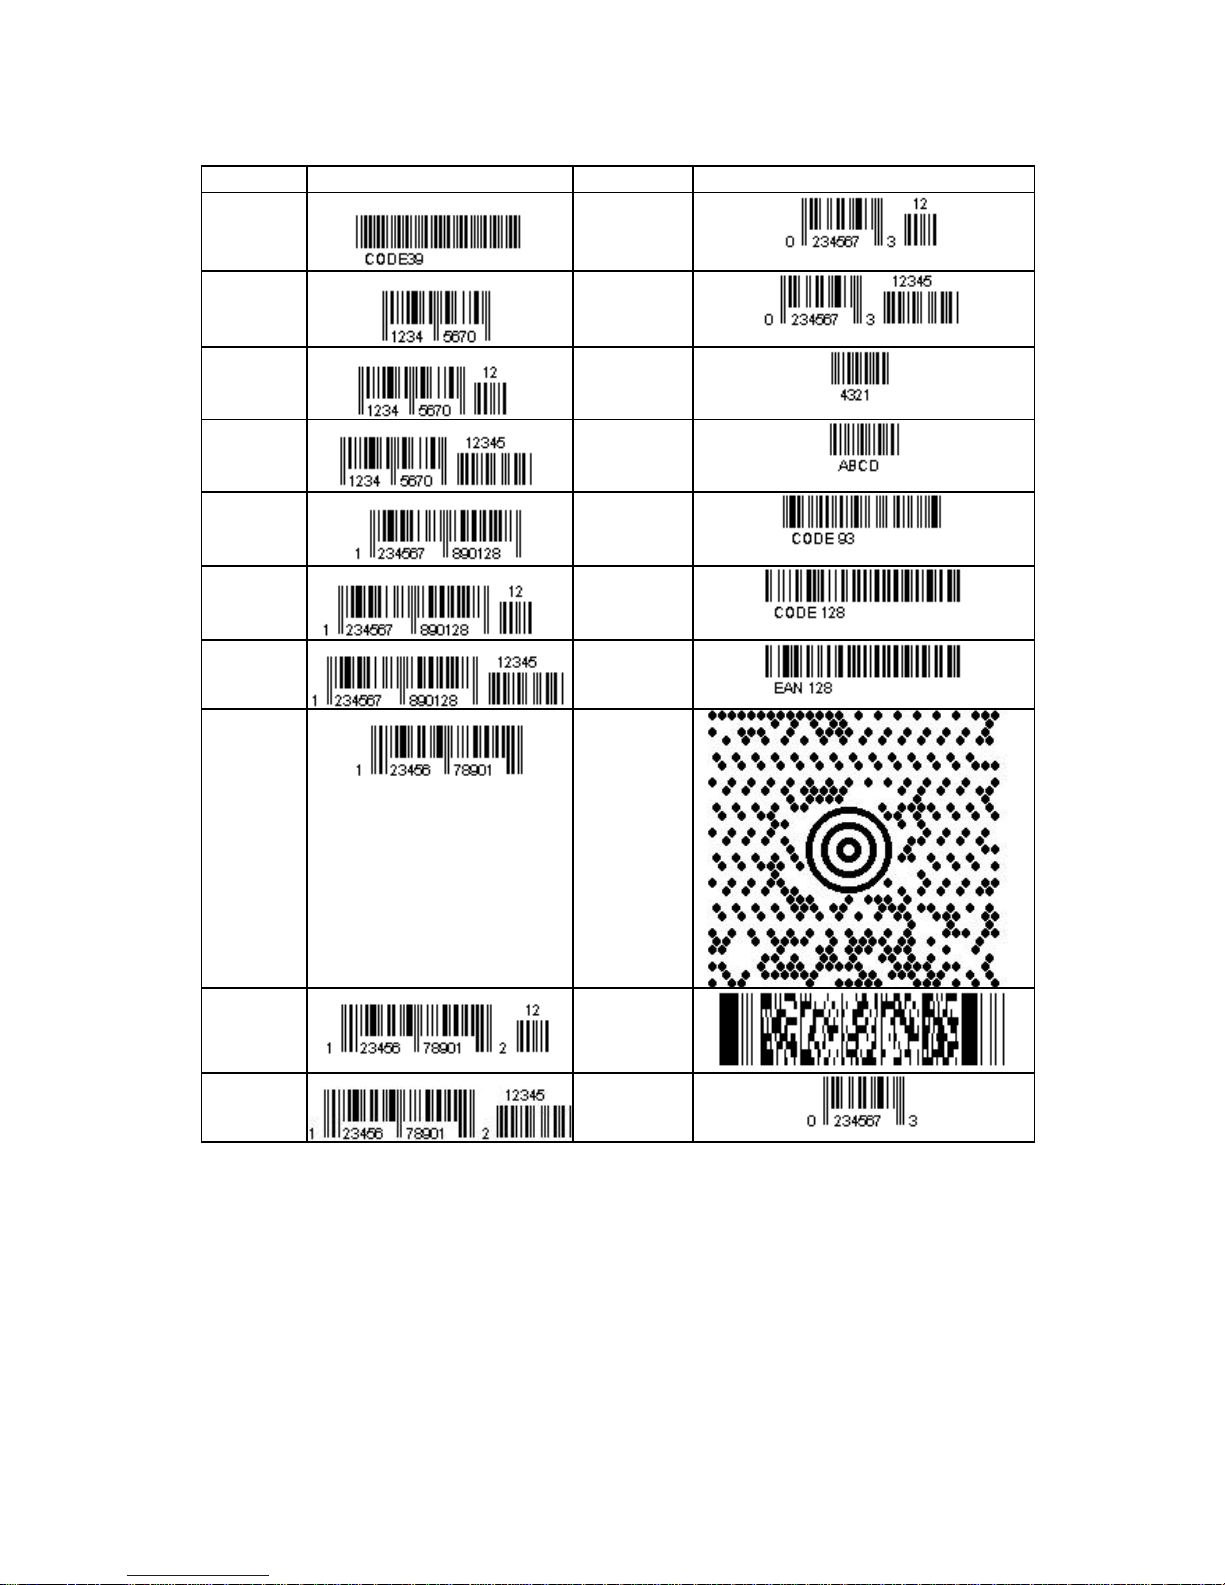
14
2-3. Bar Codes
CODE SAMPLE CODE SAMPLE
Code 39
UPC E
Add on 2
EAN 8
UPC E
Add on 5
EAN 8
Add on 2
I 2 of 5
EAN 8
Add on 5
CODABAR
EAN 13
Code 93
EAN 13
Add on 2
Code 128
EAN 13
Add on 5
EAN 128
UPC A
MAXICODE
UPC A
Add on 2
PDF 417
UPC A
Add on 5
UPC E
Page 16
15
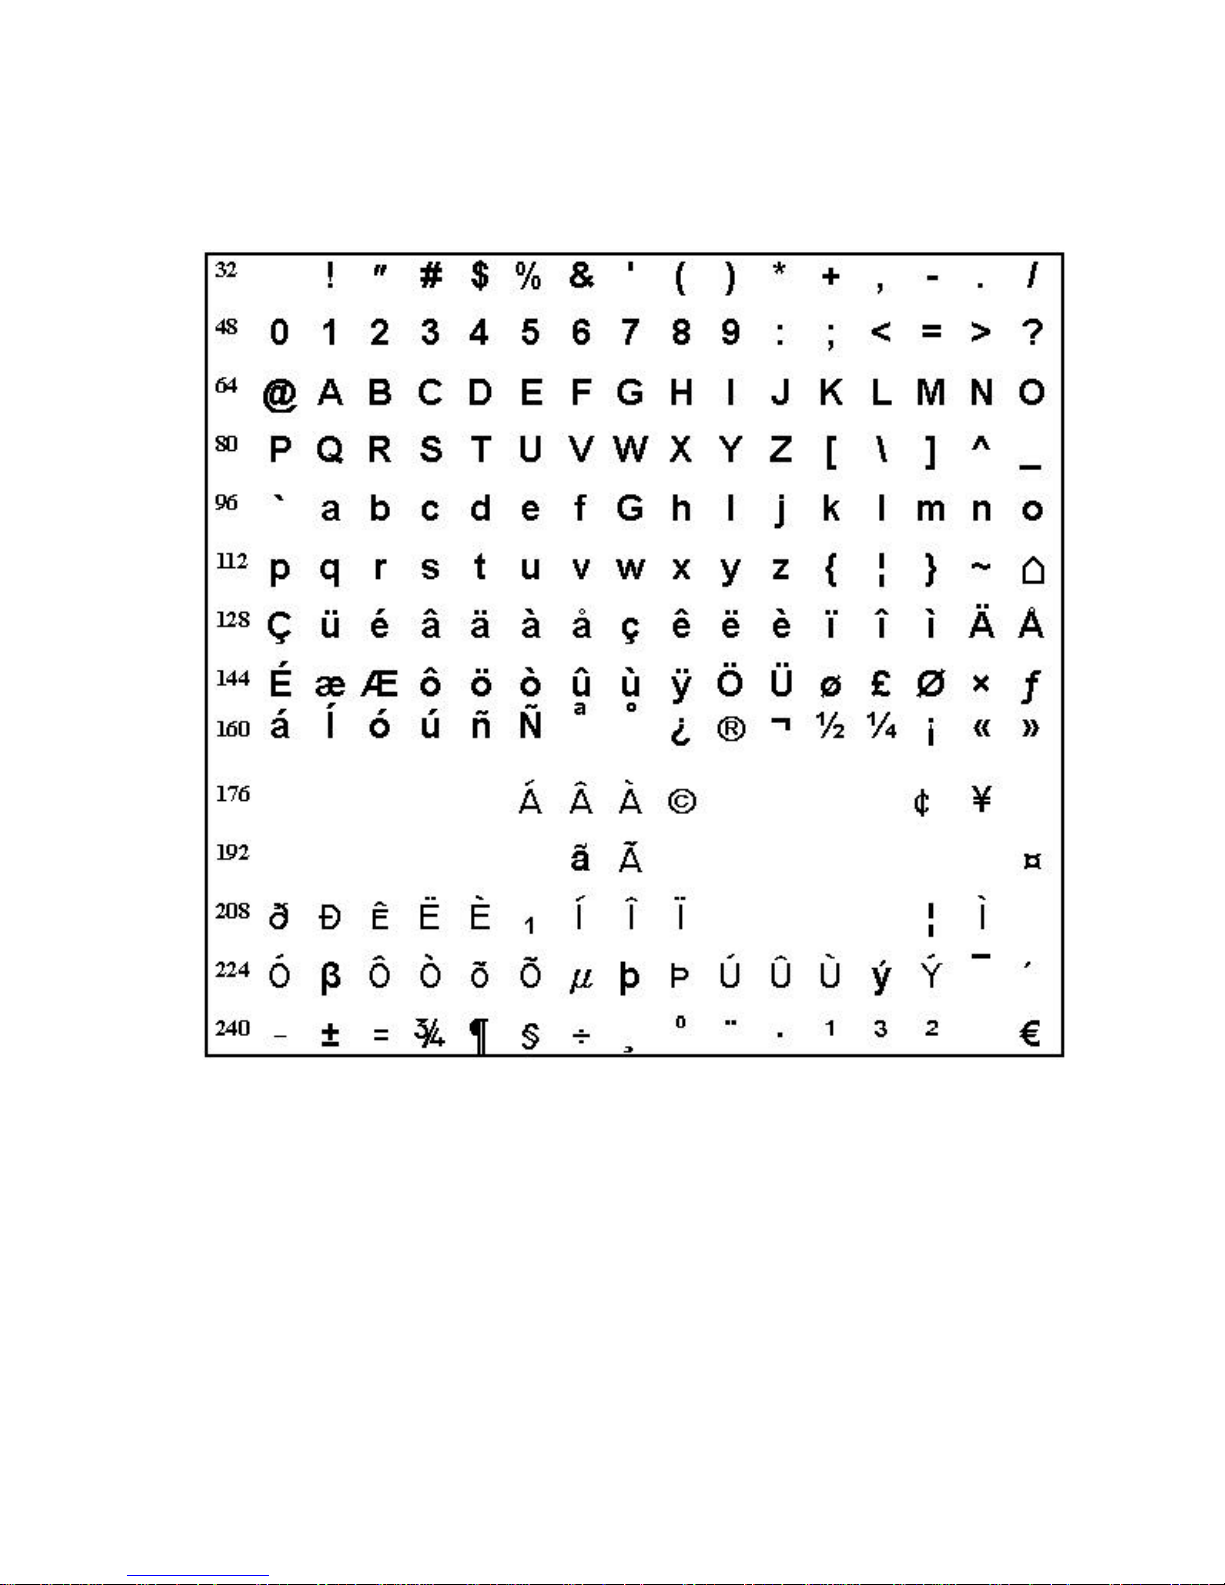
2-4. Code Page
Code page 850 compatible
(IBM compatible without graphics)
Page 17
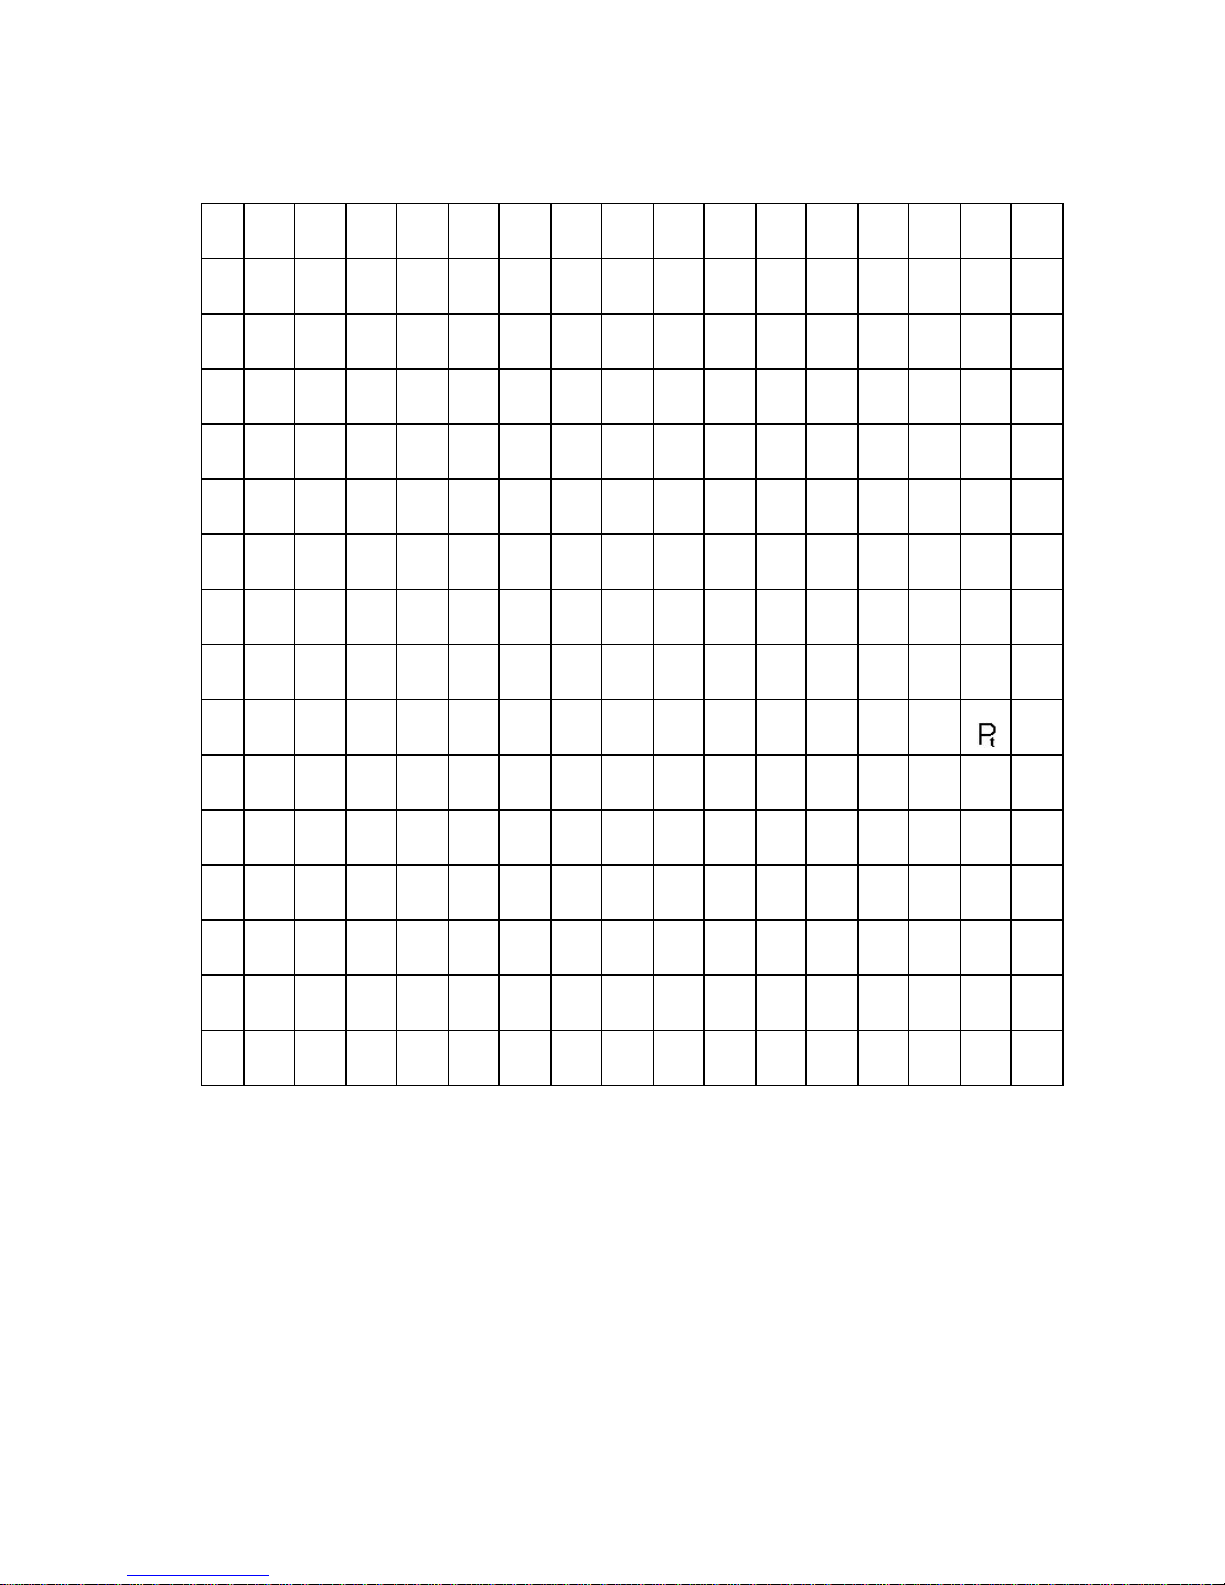
16
Font I (203DPI) / Font J (300DPI)
U.S. ASCII 8 bit (IBM compati ble)
0
?
? ? ? ?
?
? ? ? ? ?
? ? ? ? ¤
16
? ? ? ? ¶ § ¦
? ? ? ? ? + ? ? ?
32
! ? # $ % & ' ( ) * + , -
. /
48
0 1 2 3 4 5 6 7 8 9 : ; < = > ?
64
@ A B C D E F G H I J K L M N O
80
P Q R S T U V W X Y Z [
\ ] ^ _
96
` a b c d e f G h i
j k l m n o
11
2
p q r s t u v w x y z { ¦ } ~ ¦
12
8
Ç ü é â ä à å Ç ê ë è ï
î ì Ä Å
14
4
É æ Æ ô ö ò û Ù ÿ Ö Ü
? £ ¥
ƒ
16
0
á Í ó ú ñ Ñ
?
?
¿ ¬ ¬ ½ ¼ ¡ « »
17
6
¦ ¦ ¦
¦ ¦ ¦ ¦ + + ¦ ¦ + + + + +
19
2
+ - - + - + ¦ ¦
+ + - - ¦ - + -
20
8
- - - + + + + + + + + ¦
_ ¦ ¦ ¯
22
4
? ? ? ? ? ? ? ? ? ? ? ? ? ?
e n
24
0
= ± ? = ( )
÷ ˜ ? ? • v n ² ?
?
Page 18
17
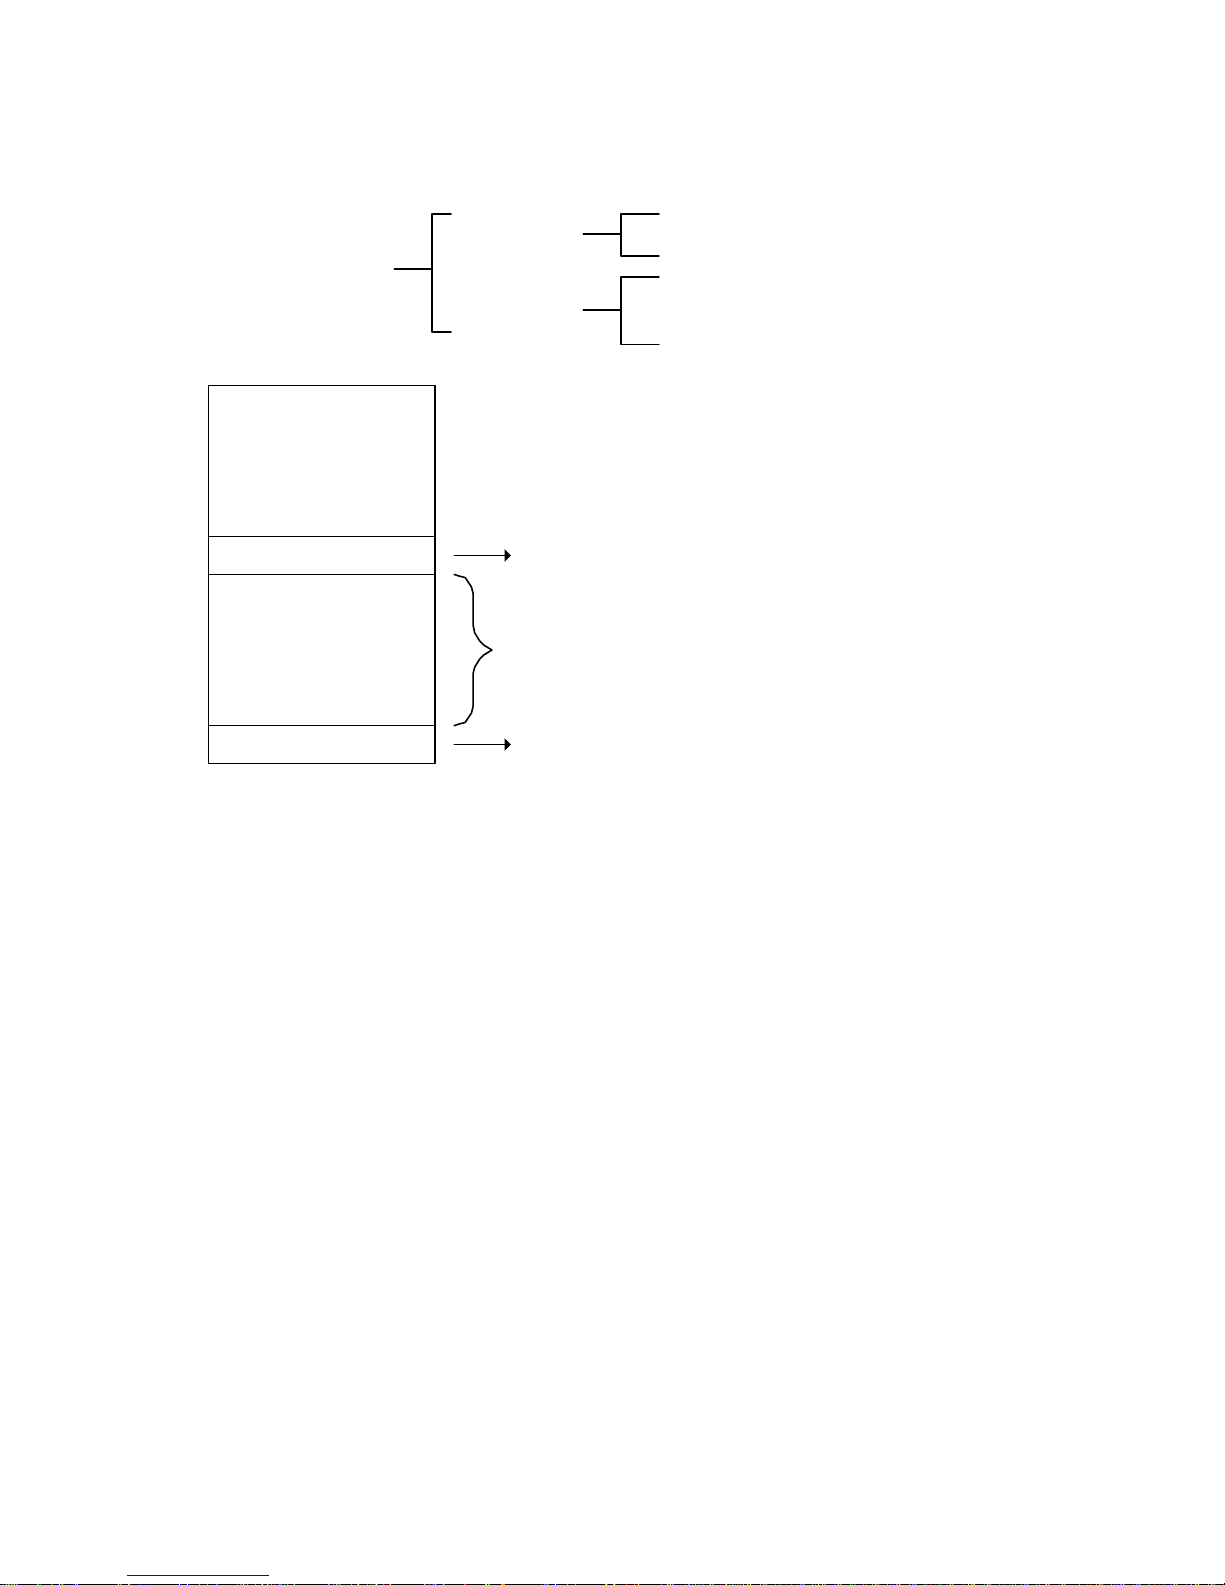
3. Example
How to construct a label using EZ -4TT command
Printer control
Label create
EZ-4TT command
control command
setup command
label format command
To create a label, it must be an order command combination.
Control command
or
Set up command
Label format
command
label format command must be
included between the ^L and E
command
^L is precedent for the begining
of label format
E is ending of label format
finished and printer will begin to
print
** Control or setup commands to be used in the label command area will be ineffective.
Example:
Saving the following contents (command file named: EX1).
^Q45,0,0
^W50
^S2
^H5
^E12
^L
AC,10,10,1,1,1,0,LABEL SAMPLE
AC,30,10,1,1,1,0,SPEED: 2
AC,50,10,1,1,1,0,DARKNESS: 5
AC,70,10,1,1,1,0,STOP POSITION: 12mm
E
The label can be created by the following MS-DOS command.
C:\>COPY EX1 PRN?
Page 19
18
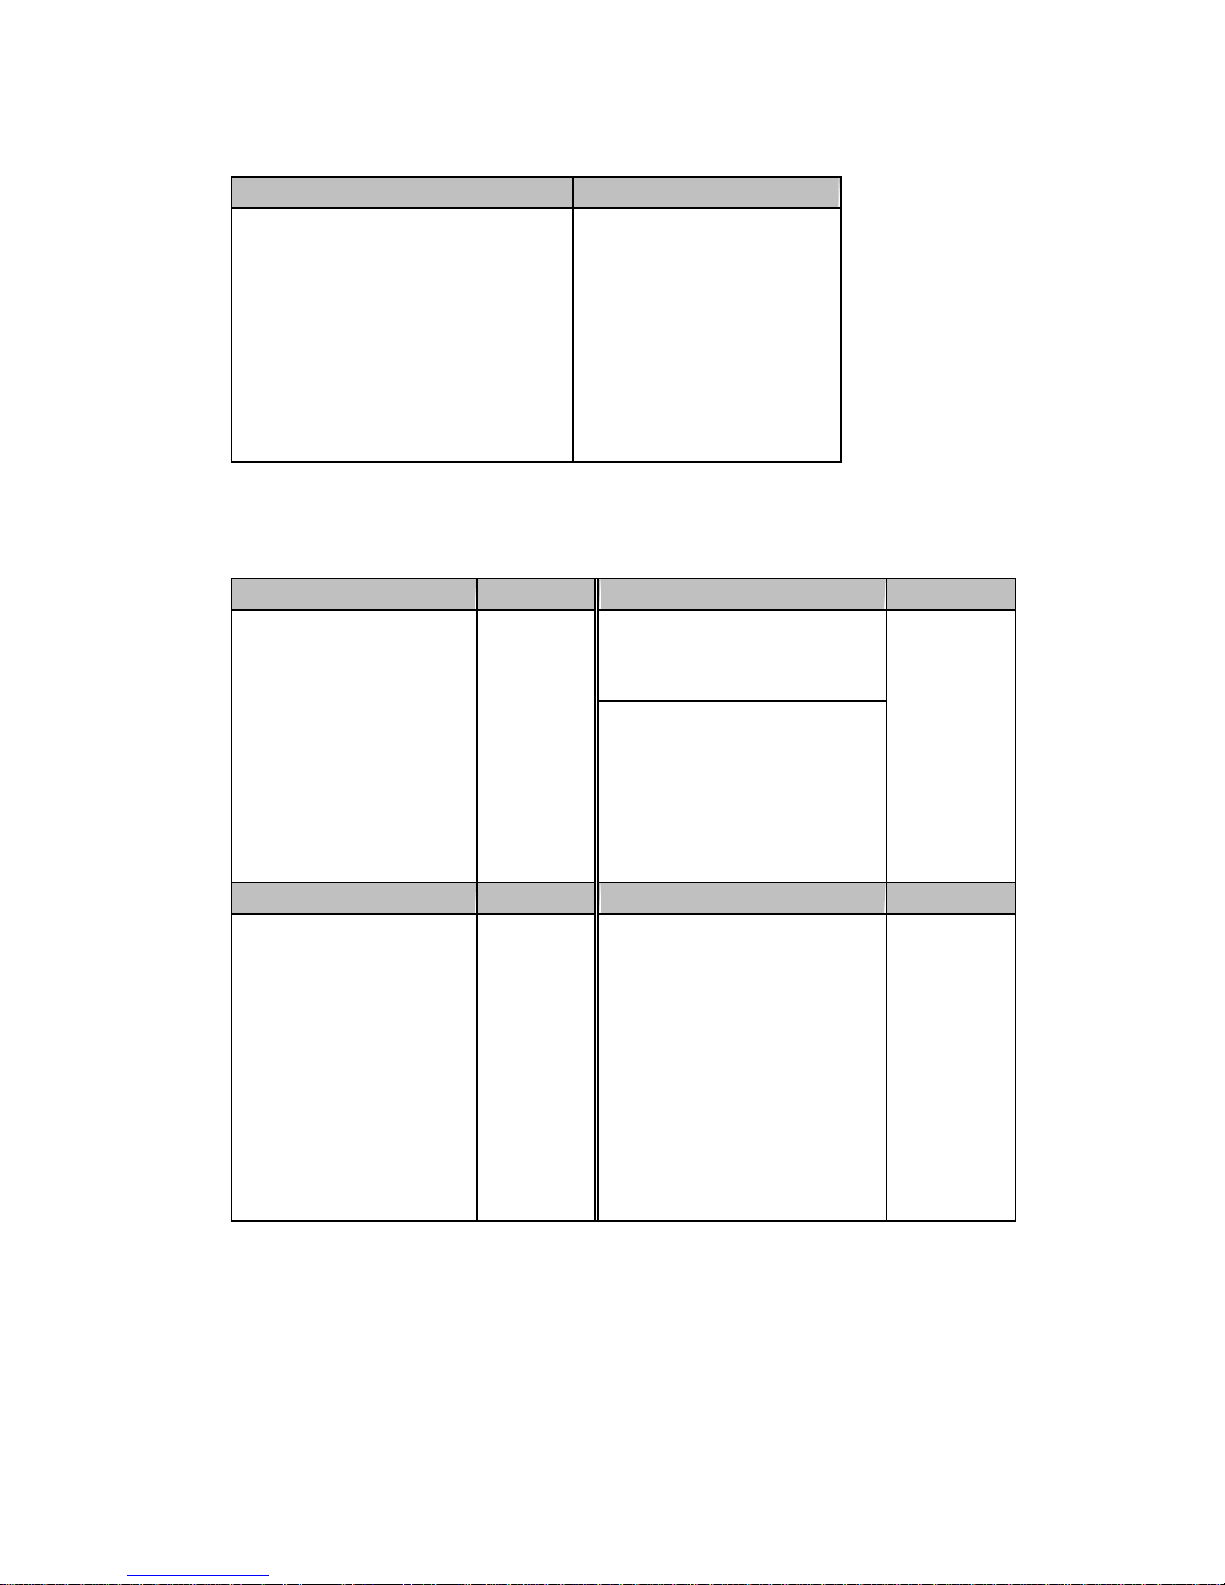
1. Text printing
(1) Text/ Date/ Time printing
Example Result
^Q50,0,2
^W50
^S2
^H5
^R10
^L
AC,10,10,1,1,1,0,EZ-4TT PRINTER
AC,10,50,1,1,1,0,^D
AC,10,100,1,1,1,0,^T
E
EZ-4TT PRINTER
MAY/09/97
08:39:36
?? The date output is default setting and user can change it with D command (see page 9)
?? The time output format is default setting and user can change it with T command (see
page 11)
(2) Serial number string printing
Example 1 Result Example 2 Result
^Q10,0,0 0000 ~P6 0016
^W50 0002 0018
^S2 0004 0020
^H5 0006 0022
^P8 0008 0024
^L 0010 0026
C0,0000,+2,A1 0012
; If you want to continue
printing the serial number from
0016 by 6 labels, send ~P6 .
AB,10,10,1,1,2,0,^C0 0014
E
Example 3 Result Example 4 Result
^Q10,0,0 0000 ^Q10,0,0 abc0000def
^W50 0000 ^W50 abc0002def
^S2 0002 ^S2 abc0004def
^H5 0002 ^H5 abc0006def
^P4 0004 ^P8 abc0008def
^C2 0004 ^L abc0010def
^L 0006 C0,0000,+2,A1 abc0012def
C0,0000,+2,A1 0006 AB,10,10,1,1,2,0,abc^C0def abc0014def
AB,10,10,1,1,2,0,^C0 E
E
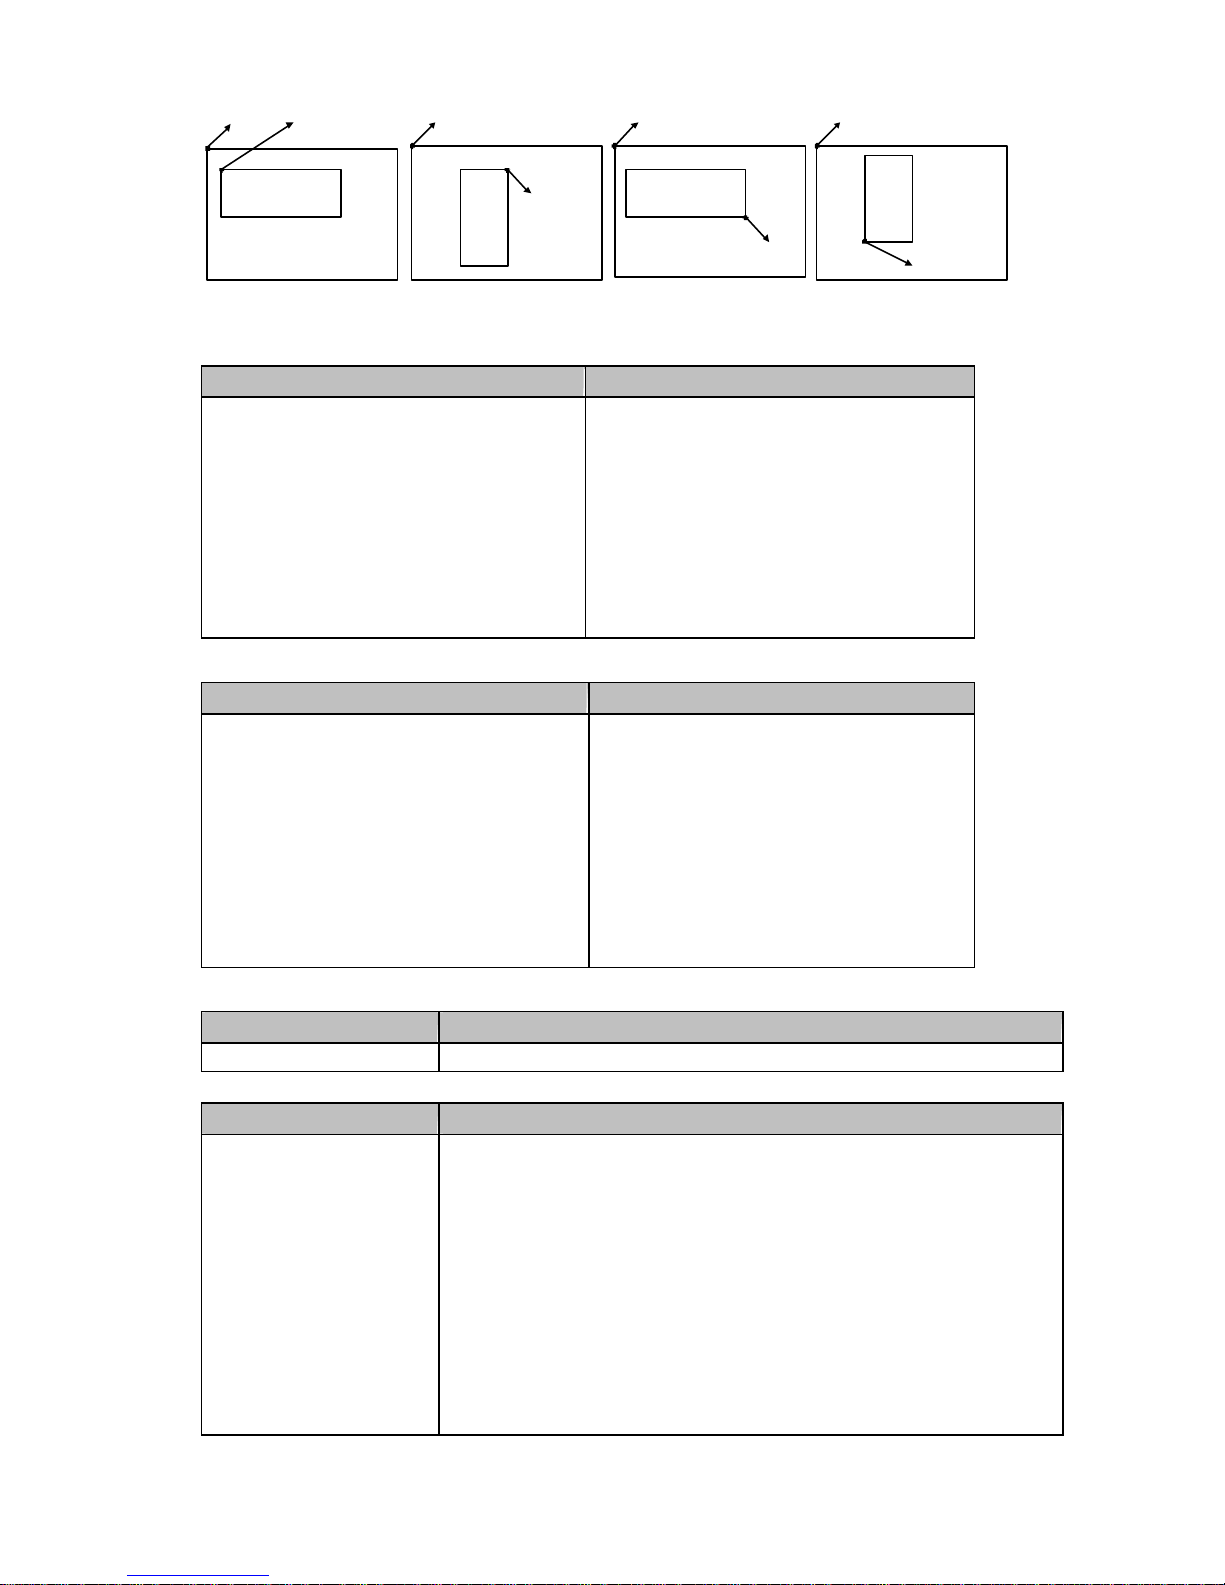
Setting the x and y value:
Page 20
19
abcd
(x,y)
(0,0)
abcd
(x,y)
(0,0) (0,0) (0,0)
abcd
(x,y)
abcd
(x,y)
0°
90° 180° 270°
2. Adjusting the character spacing
Example Result
^Q30,0,0
^W50
^S2
^H5
^L
AC,10,10,1,1,10,0,EZ-4TT PRINTER EZ-4TT PRINTER
AC,10,100,1,1,1,0,EZ-4TT PRINTER EZ-4TT PRINTER
E
3. Rotate printing
Example Result:
^Q50,0,0
^W50
^S2
^H5
^L
AC,100,30,1,1,1,0,ROTATION 0
AC,40,20,1,1,1,1,ROTATION 90
AC,260,150,1,1,1,2,ROTATION 180
AC,290,200,1,1,1,3,ROTATION 270
E
ROTATION 0
ROTATION 90
ROTATION 180
ROTATION 270
4. RTC Setting
Example Result
~D6,16,97,9,47,00 ; Date & Time setting. Send this command to printer
Example Result
^Q20,2 1997-JUN-16
^W50
^S2 09:47:00
^H5
^P1
^L
DY4-ME-DD ; date output format setting
Th:m:s ; time output format setting
AC,10,30,1,1,0,0,^D
AC,10,70,1,1,0,0,^T
Page 21
20
E ; terminate label formatting mode and start to print label
You can change date formatting as following formats.
Example Result
Dy4-me-dd 1997-MAY-09
Dy4/mn/dd 1997/05/09
Dmn|dd|y4 05|09|1997
Dy4 1997
Dme MAY
Ddd 09
Dy4,me 1997-MAY
Dme-dd MAY-09
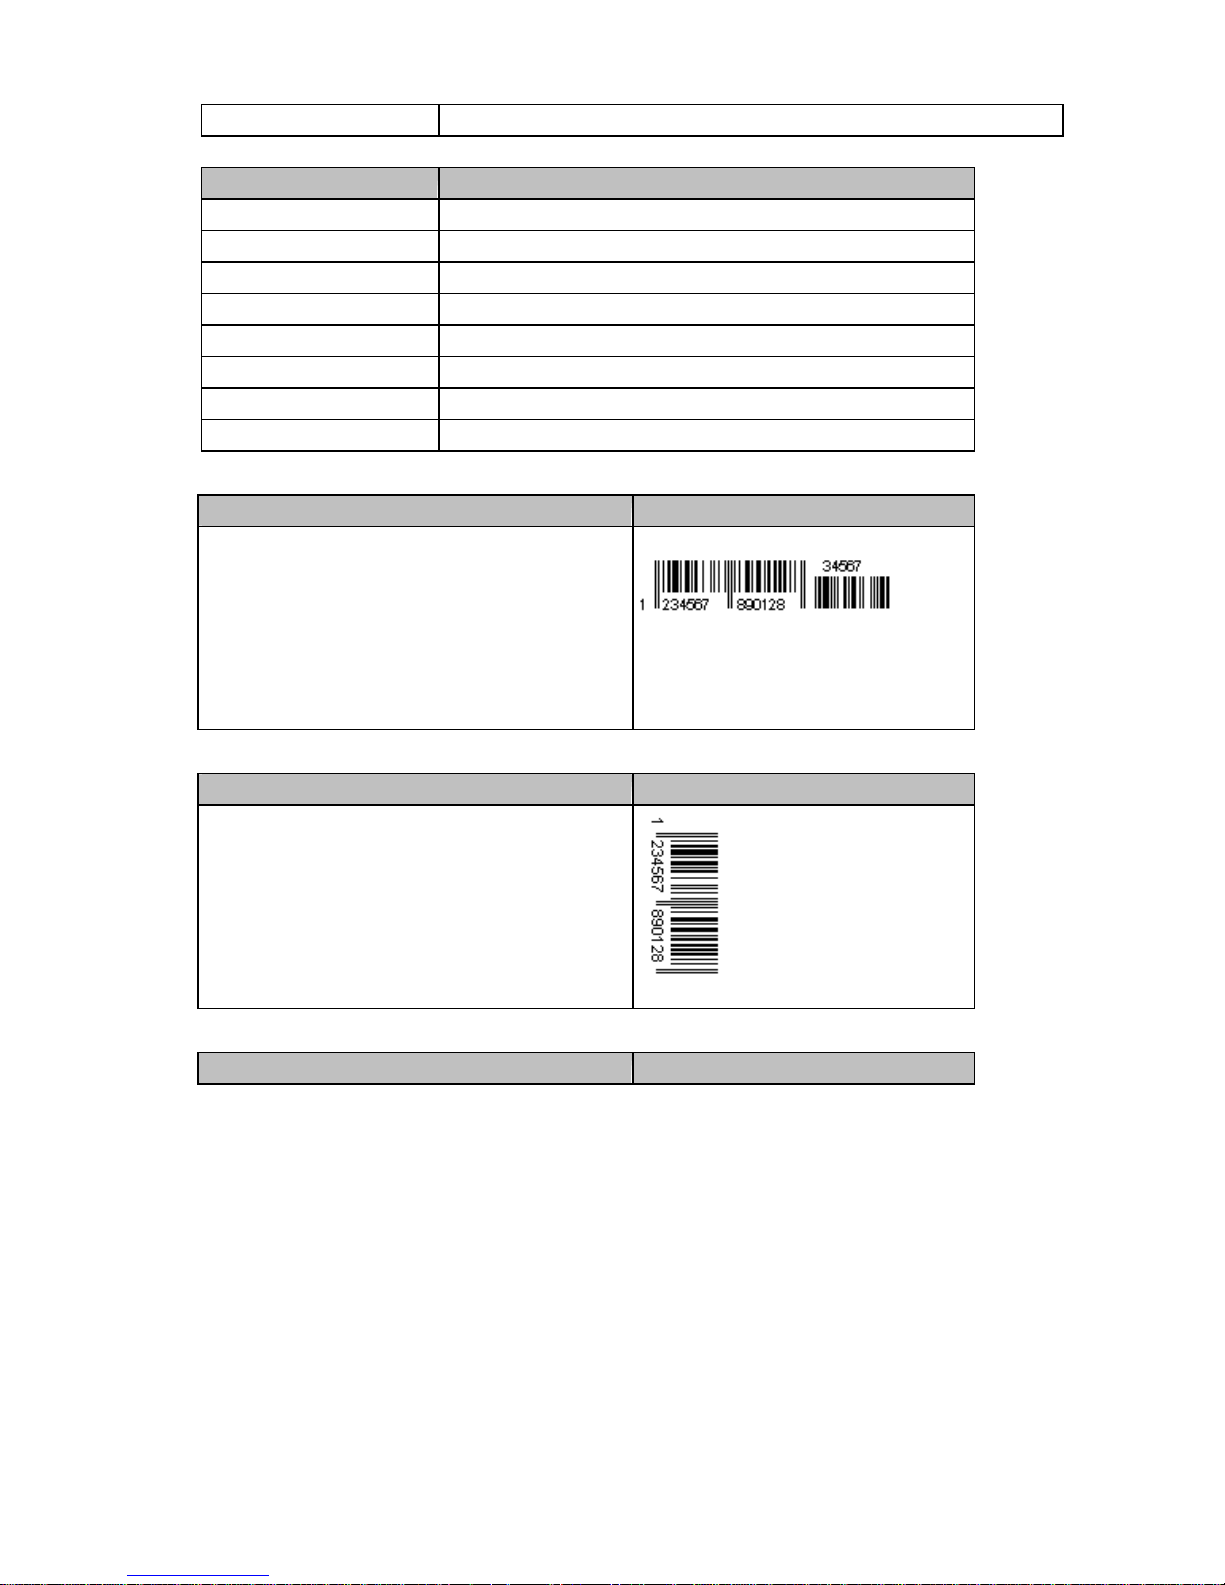
5. Barcode printing
Example Result
^Q30,0,0
^W50
^H5
^S2
^Q30,0,2
^L
BG,20,100,3,3,100,0,1,12345678901234567
E
6. Rotation bar-code
Example Result
^Q40,0,0
^W50
^H5
^S2
^Q30,0,2
^L
BE,100,20,2,4,80,1,1,123456789012
E
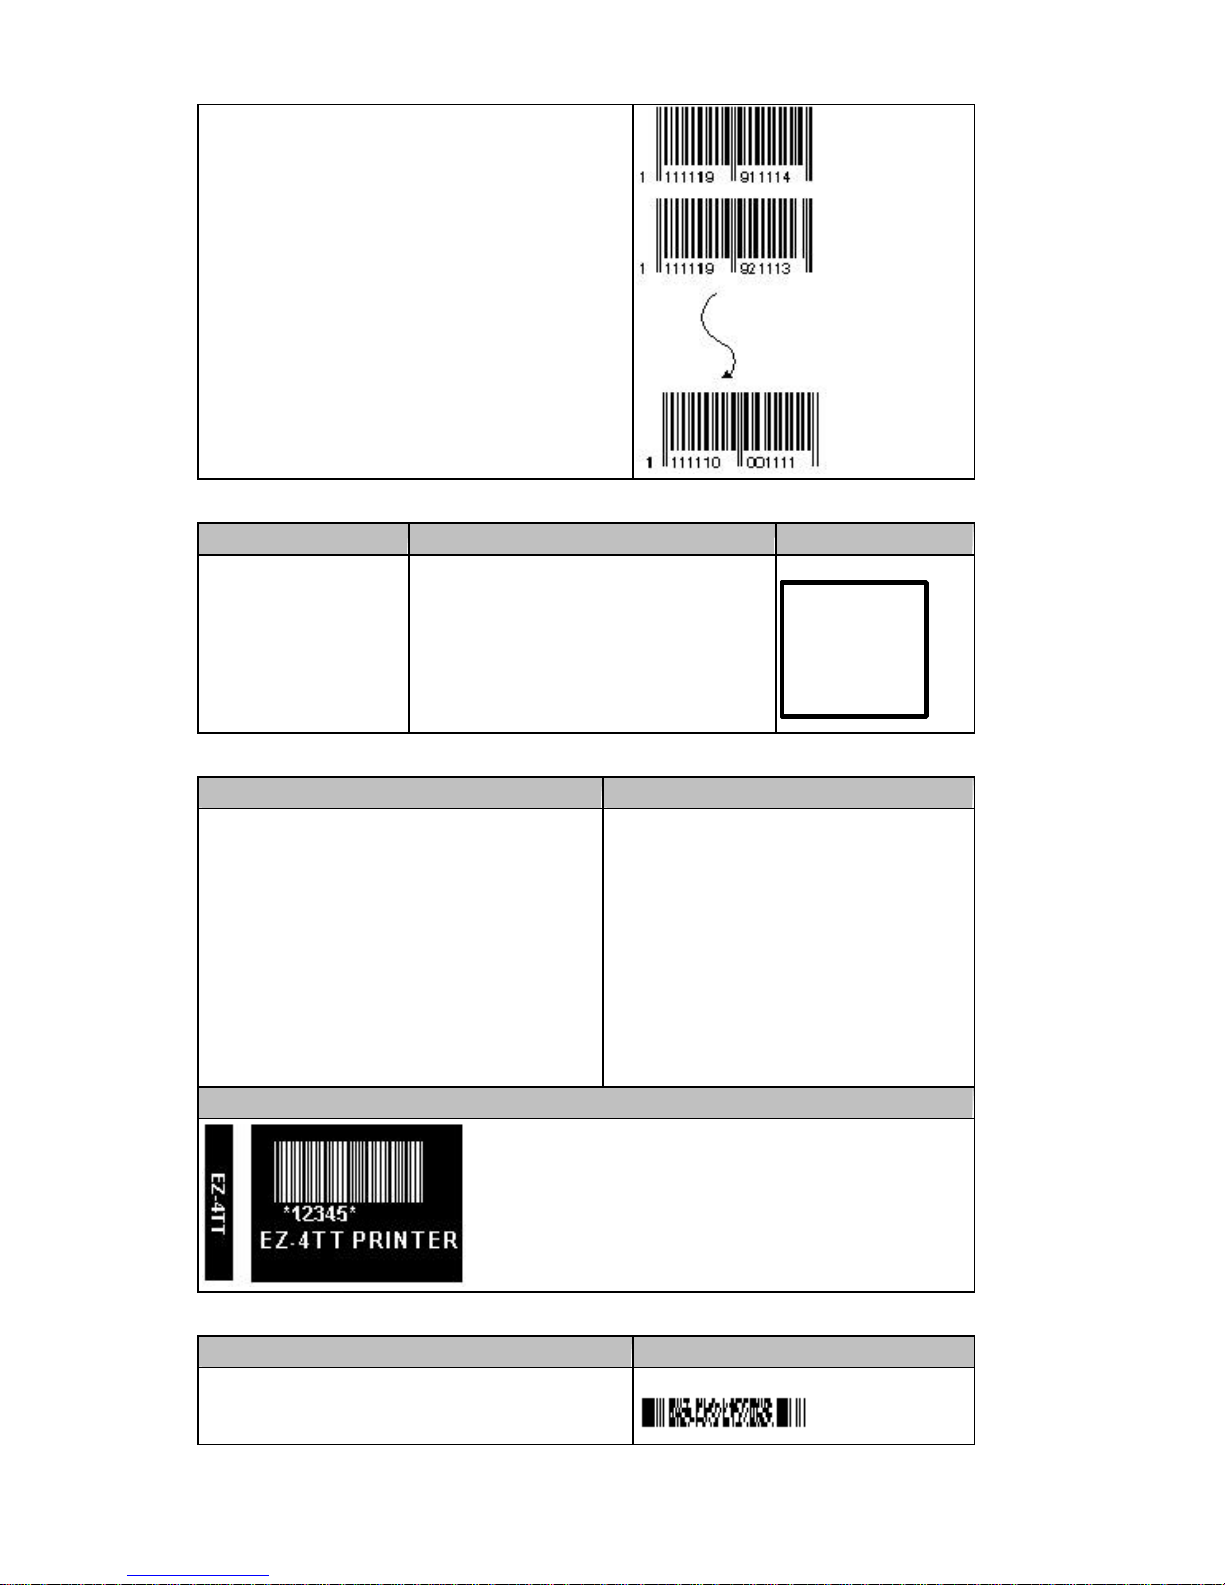
7. Setting bar-code serial number
Example Result
Page 22
21
^Q30,0,0
^W50
^H5
^S2
^Q20,0,2
^P10
^L
C0,000,-1,A3
BE,20,100,3,3,100,0,1,111111^C0111
E
8. Rectangle printing
Example Description Result
^H5
^S2
^Q50,2
^W45
^L
R20,20,120,120,8,8
E
; darkness = 5
; speed = 2 ips
; label length = 50mm, gap = 2 mm
; label width = 45mm
; (x,y) = (20,20), (x1,y1) = (120,120)
lrw = 8 dots, ubw = 8 dots
9. Line printing
Example Description
^Q50,2
^W52
^H6
^S2
^L
AB,50,60,1,1,1,1,EZ-4TT
LE,10,10,60,200
BA,150,40,25,50,0,1,12345
AC,110,130,1,1,1,0,EZ-4TT PRINTER
LE,100,10,400,200
E
; label length = 50mm, gap = 2 mm
; label width = 52mm
; darkness = 6
; speed = 2 ips
; (x,y) = (10,10), (x1,y1) = (60,200)
; (x,y) = (100,10), (x1,y1) = (400,200)
Result
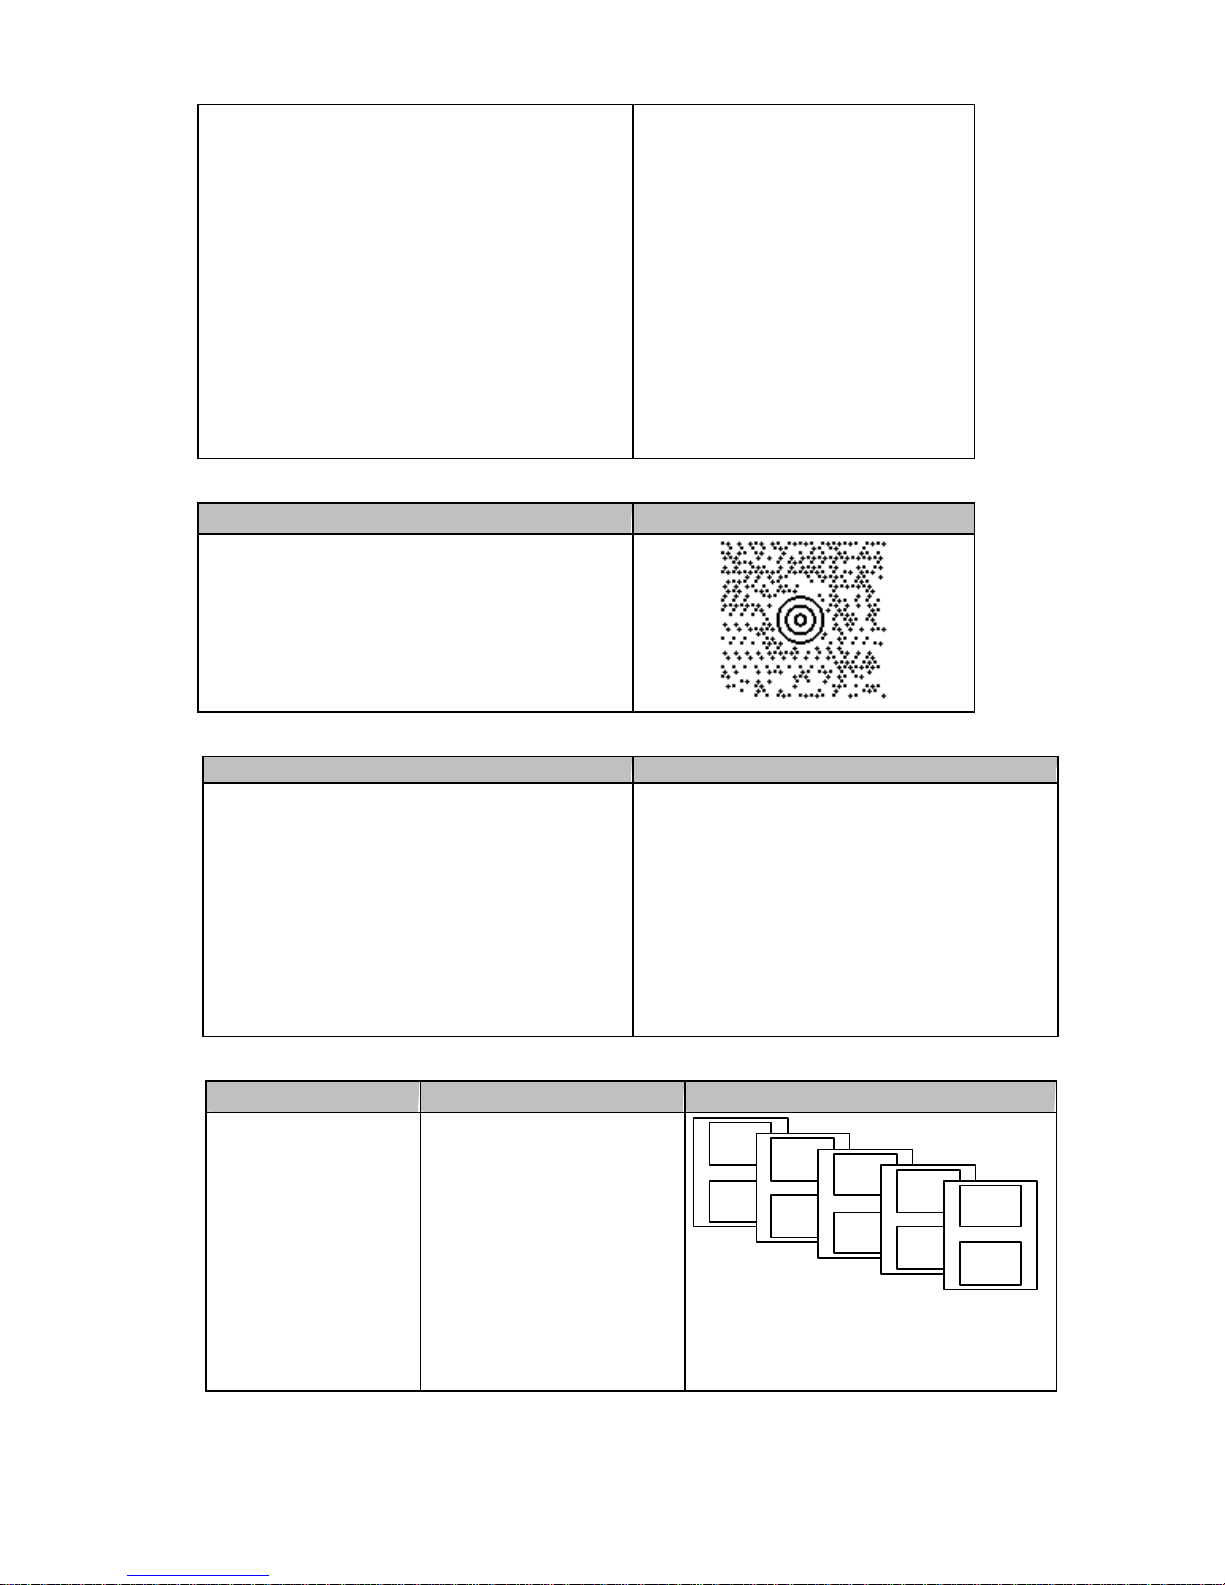
10. PDF417 printing
Example Result
^Q40,0,3
^W50
^S2
Page 23
22
^H5
^L
P30,20,3,3,3,3,1,100
12345678
12345678
12345678
12345678
12345678
12345678
12345678
12345678
12345678
12345678
E
11. Maxicode printing
Example Result
^Q50,0,0
^W40
^S2
^H5
^L
M30,20,1,1,2,840,068107317,8,0,123456
E
12. Stripper setting
Example Result
^Q50,2 ; label height=50mm, gap=2mm
^W80 ; label width = 80mm
^S2 ; speed=2 inch/sec
^O1 ; stripper enable
^E10 ; set stop positional is 10 mm
^P1 ; printing one label
^H5 ; darkness=5
^L ; label format begin sign
AD,20,20,1,1,3,0,Stripper Function
E
13. Cutter setting
Example Description Result
^Q20,0,0
^H5
^S2
^P10
^D2
^C1
^L
R10,10,120,90,2,2
C0,001,+1,A1
AC,20,30,1,1,1,0,a^C0
E
;plain paper length:20mm
feed label length :0mm
;print 10 labels
;2 labels per cut
a001
a002
a003
a004
a005
a006
a007
a008
a009
a010
Page 24
23
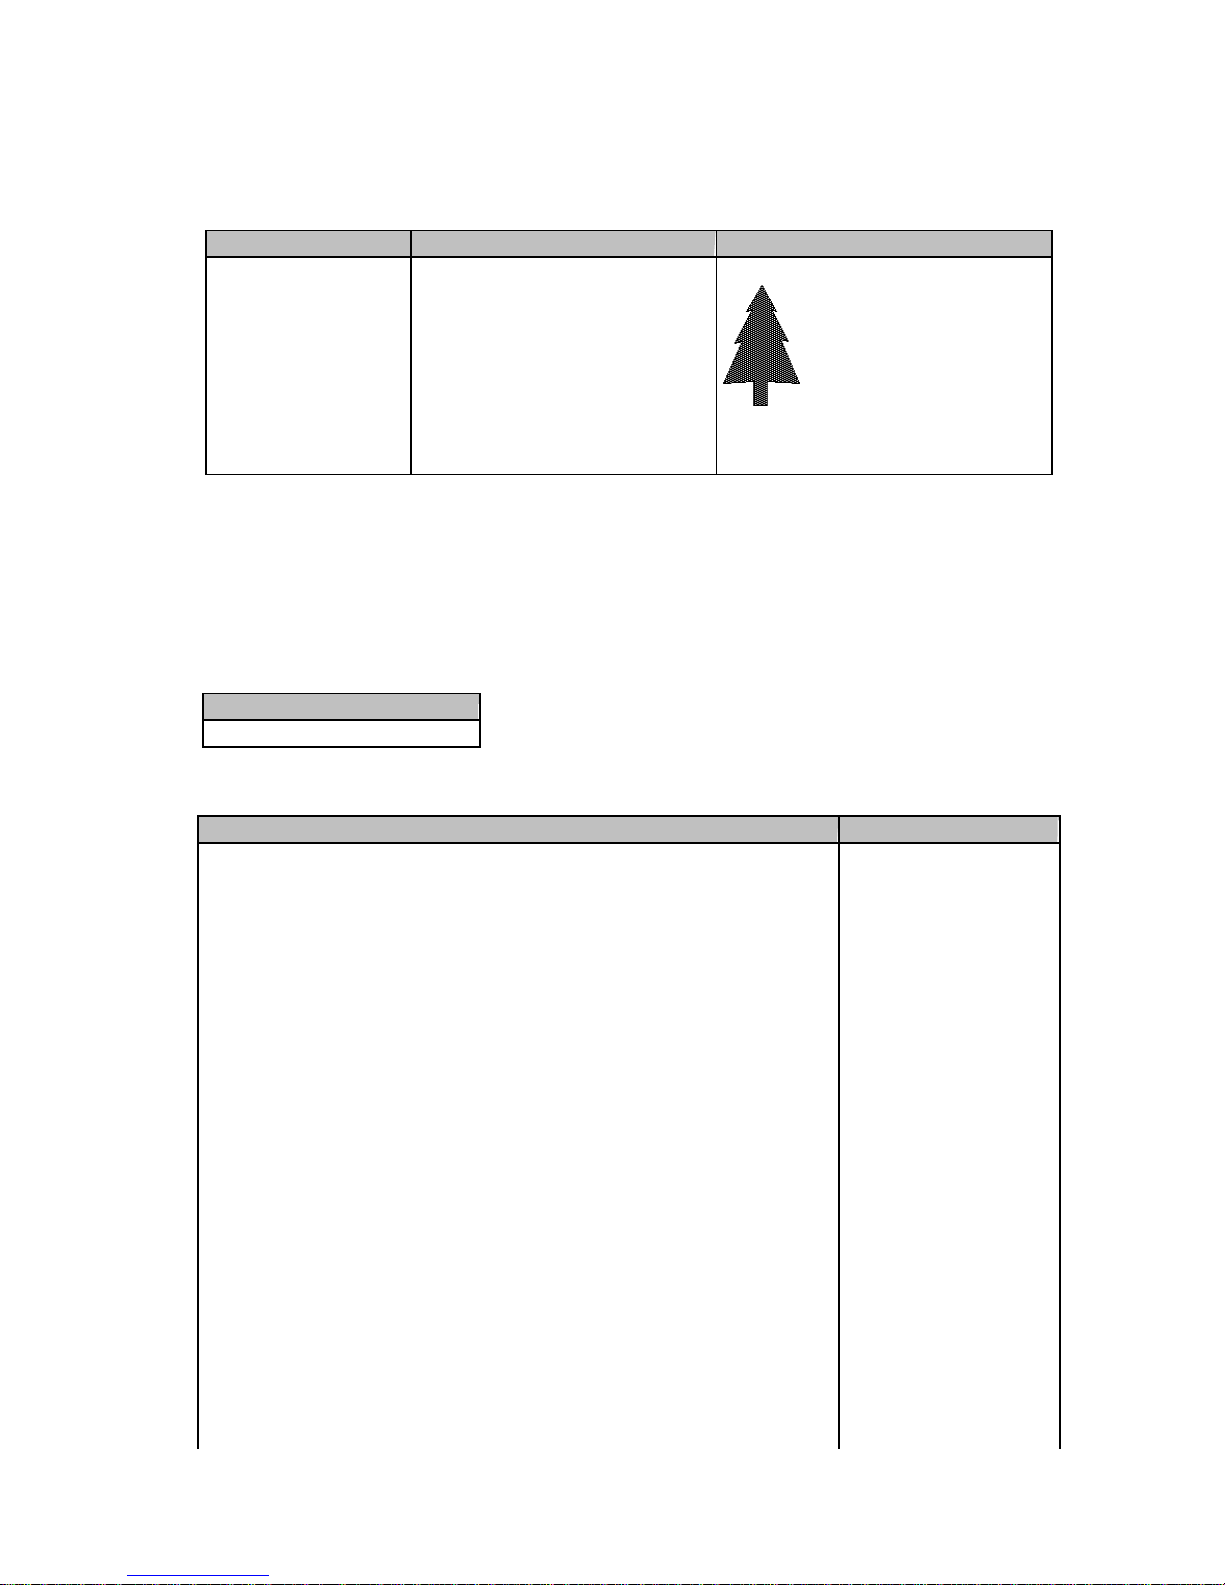
14. Download graphic to printer’s internal memory
Following the below steps to download graphic to printer.
1. Be prepared a graphic file (file name: TREE.PCX, file size: 922 bytes).
2. Be prepared two text files (TEST1.TXTand TEST2.TXT, see the following contents).
TEST1.TXT TEST2.TXT Print Result
~IP,TREE,922 ^Q30,0,0
^W50
^S2
^H5
^L
AB,50,10,1,1,1,0,INTERNAL
Y30,50,TREE
E
INTERNAL
3. In DOS mode, running the following commands.
COPY TEST1.TXT PRN?
COPY TREE.PCX PRN/B?
COPY TEST2.TXT PRN?
15. Download graphic to external flash card
Refer “14. Download graphic to printer’s internal memory”. You just need to change the
TEST1.TXT as the following contents.
TEST1.TXT
~EP,TREE,922
If your grpahic file is bitmap, the command will be “~EB,TREE,922”.
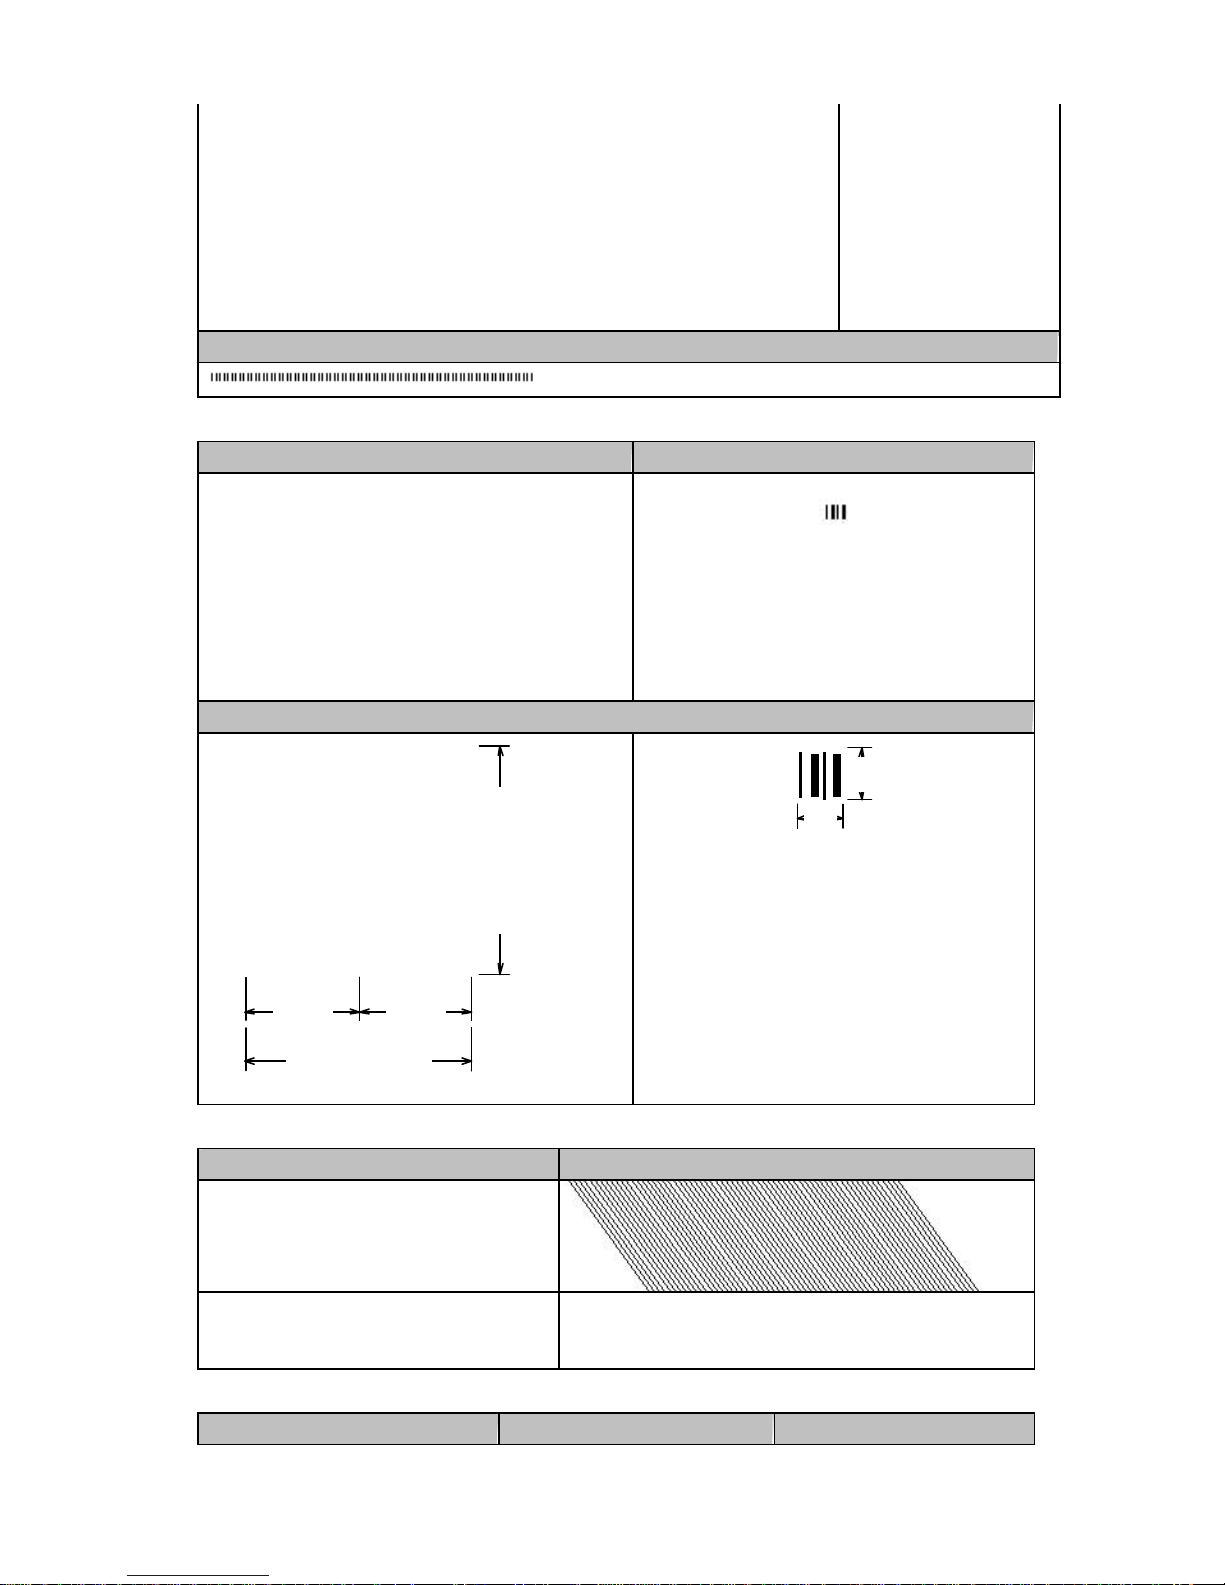
16. Graphic driver format
Example Description
^Q20,2
^W100
^R20 ; left margin = 20 dots
~G
G(AAAAAAAAAAAAAAAAAAAAAAAAAAAAAAAAAAAAAAA
A
G(AAAAAAAAAAAAAAAAAAAAAAAAAAAAAAAAAAAAAAA
A
G(AAAAAAAAAAAAAAAAAAAAAAAAAAAAAAAAAAAAAAA
A
G(AAAAAAAAAAAAAAAAAAAAAAAAAAAAAAAAAAAAAAA
A
G(AAAAAAAAAAAAAAAAAAAAAAAAAAAAAAAAAAAAAAA
A
G(AAAAAAAAAAAAAAAAAAAAAAAAAAAAAAAAAAAAAAA
A
G(AAAAAAAAAAAAAAAAAAAAAAAAAAAAAAAAAAAAAAA
A
G(AAAAAAAAAAAAAAAAAAAAAAAAAAAAAAAAAAAAAAA
A
G(AAAAAAAAAAAAAAAAAAAAAAAAAAAAAAAAAAAAAAA
A
G(AAAAAAAAAAAAAAAAAAAAAAAAAAAAAAAAAAAAAAA
A
; ( : ASCII is 40
decimal [ ( = 40 bytes]
; total 14 lines, so the
graphics height is
1.75mm (14 dots).
Page 25
24
G(AAAAAAAAAAAAAAAAAAAAAAAAAAAAAAAAAAAAAAA
A
G(AAAAAAAAAAAAAAAAAAAAAAAAAAAAAAAAAAAAAAA
A
G(AAAAAAAAAAAAAAAAAAAAAAAAAAAAAAAAAAAAAAA
A
G(AAAAAAAAAAAAAAAAAAAAAAAAAAAAAAAAAAAAAAA
A
E
Result
17. Pattern command setting
Example Result
^Q20,0,0
^W40
^S2
^E23
^H5
^L
Q20,10,2,8
GGGGGGGGGGGGGGGG
E
; length :2X8=16
; total 16
Description
HEIGHT = 8 DOTS
0100011101000111
0100011101000111
0100011101000111
0100011101000111
0100011101000111
0100011101000111
0100011101000111
0100011101000111
1 BYTE
WIDTH = 2 BYTES
1 BYTE
G : 01000111 (binary)
8dots
2mm
18. Print head test & Version list
Example Result
~T
~V # # # EZ-4 TT # # #
# # # VER. X.XX # # #
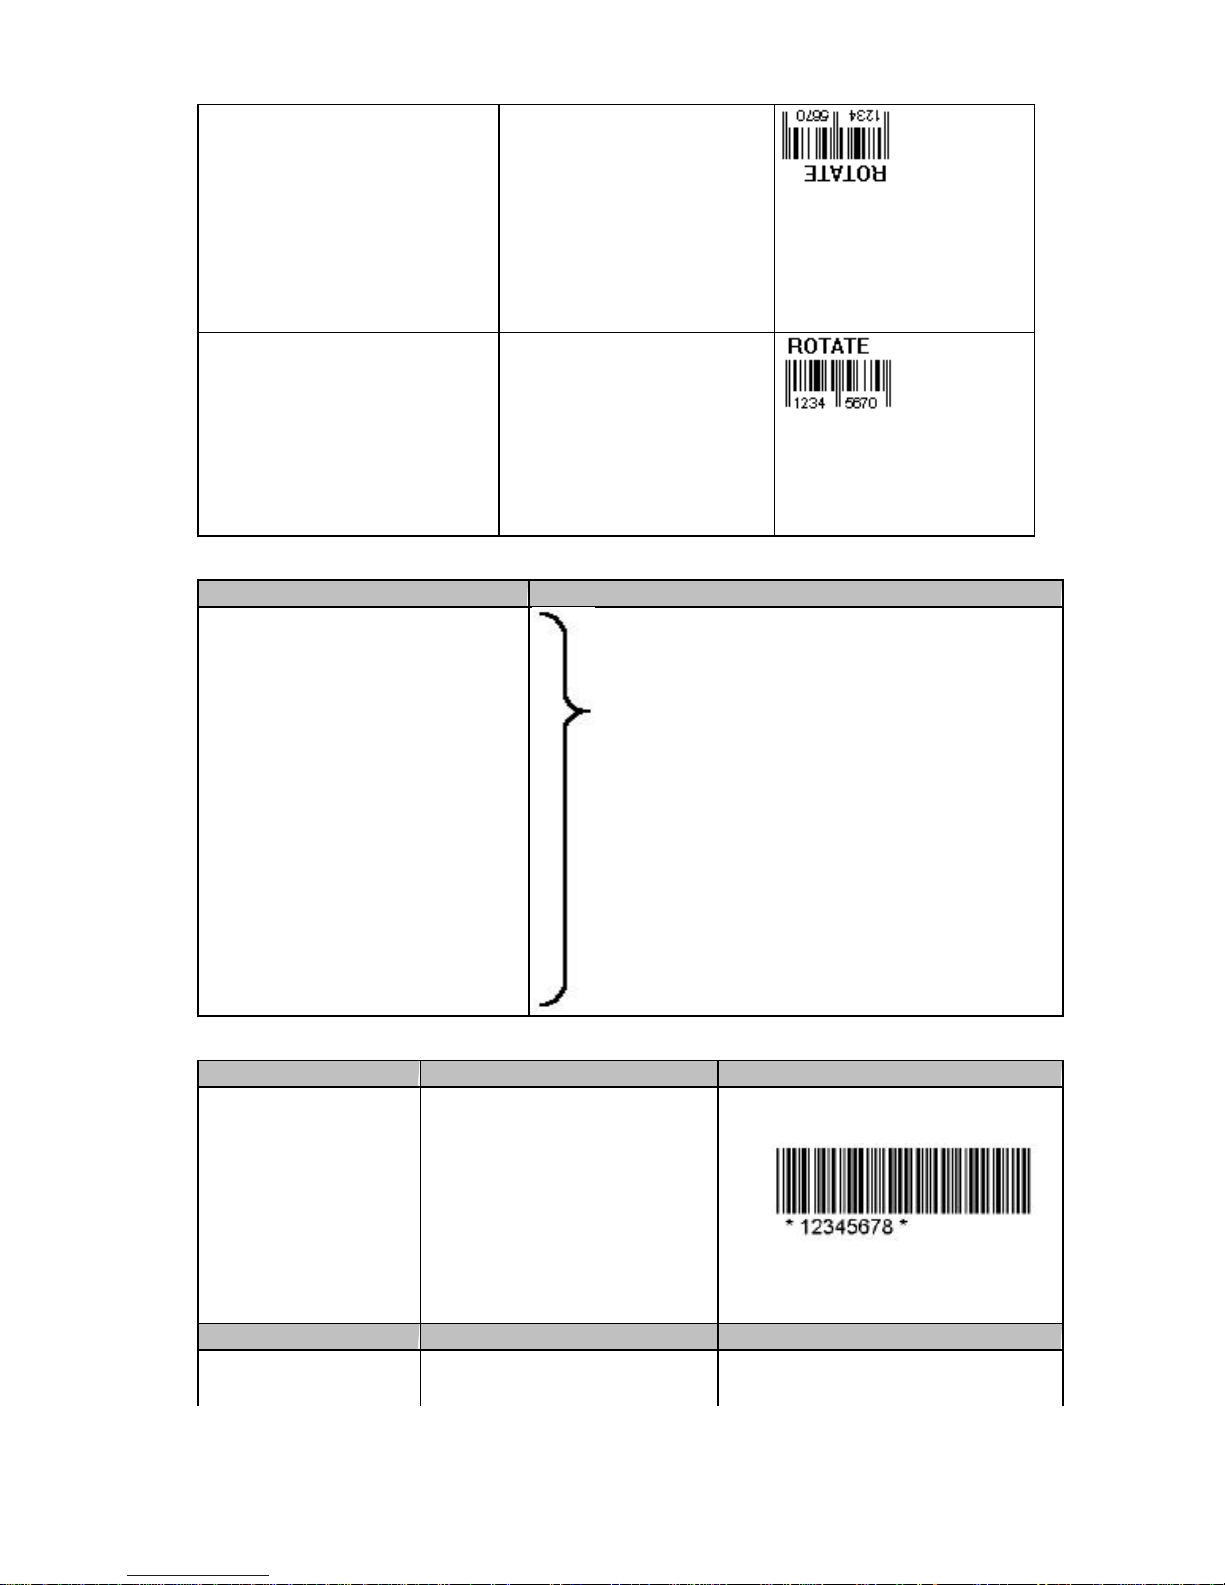
19. Rotate label format at printing
Example Description Result
Page 26
25
^Q30,0,0
^S2
^H5
~R50
^W40
^L
AC,20,10,1,1,1,0,ROTATE
BB,20,45,2,5,50,0,1,1234567
E
; label size is
40mm(h)x50mm(w); 2mm
gap
; rotate the label format 180
degree at print
^Q30,0,0
^S2
^H5
~R105
^L
AC,20,10,1,1,1,0,ROTATE
BB,20,45,2,5,50,0,1,1234567
E
; disable the rotate function
20. Download label format to external flash card & Variable field setting
Example Description
^Ftest
^Q50,0,15
^W70
^H5
^S2
^E12
^L
Define the download label format name is “test”.
Saving this file to TEST.CMD, at the DOS prompt
mode, run the following command.
TYPE TEST.CMD >> LPT1
or
COPY TEST.CMD PRN
C0,0000,+1,serial no. ? 1 sequential number: C0
V00,10,name
V01,8,barcode
V02,6,price
? 3 variable field: V00, V01, V02
AE,108,306,1,1,1,0,$^V02
AC,39,27,1,1,1,0,S/N.^C0
AD,126,78,1,1,1,0,^V00
BA,108,135,2,5,100,0,1,^V01
E
21. Recall label format
Example 1 Description Result
(Recall label format without
changing the label format)
^Ktest
0000 ; C0 = 0000
Book ; V00 = Book
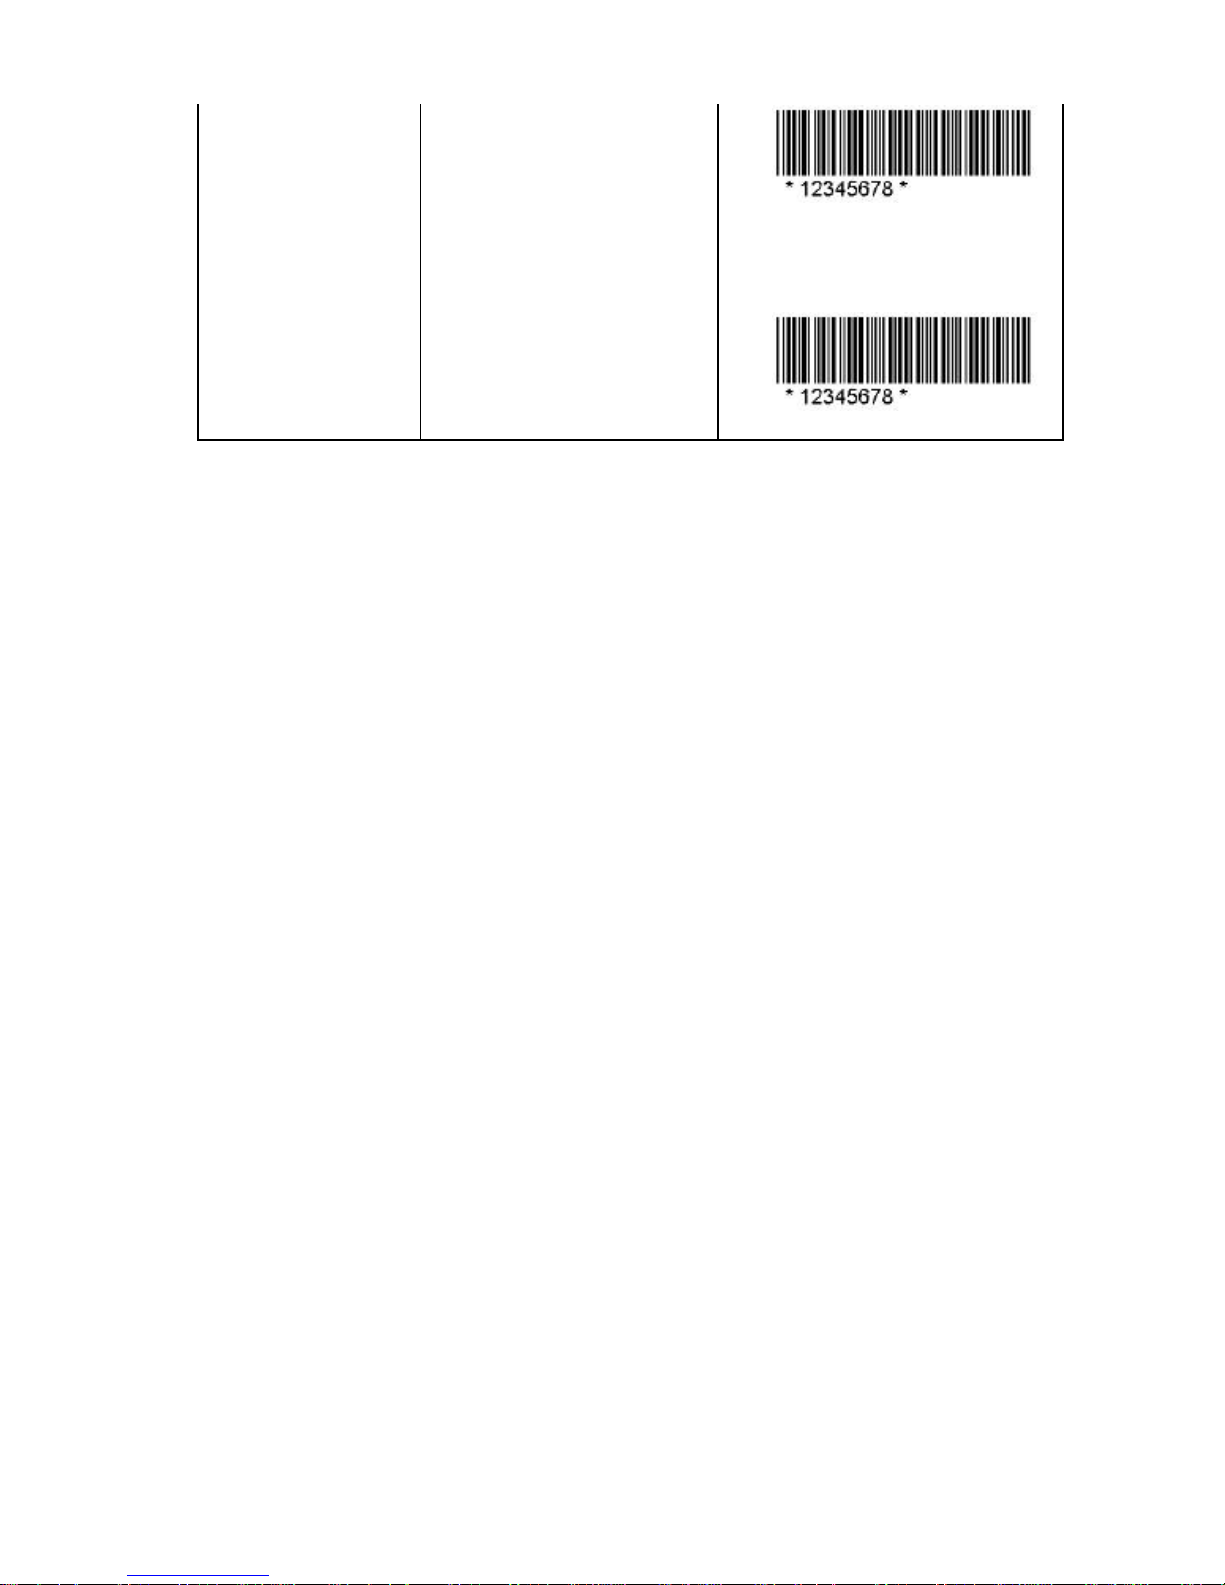
12345678 ; V01 = 12345678
200.00 ; V02 = 200.00
E
~P1
S/N.0000
Book
$200.00
Example 2 Description Result
(Recall label format and change
label format)
S/N.1111
Pencil
Page 27
26
^Ktest
1111
Pencil
12345678
100.00
E
; C0 = 1111
; V00 = Pencil
; V01 = 12345678
; V02 = 100.00
^Q35,0,0 ; Change label format setting
^S3 ; speed = 3“/sec
^H8 ; darkness = 8
~P2 ; printing last label for twice
$100.00
S/N.1112
Pencil
$100.00
Each time you change variable data or label format, repeat to send command from ^Kname to
~Px.
Page 28

27
Appendix
A. EZ -4TT/2P/4P above 2.10
1. Additional command
Fonts download to external memory
Syntax : ~J?
Parameters : ? = Font type; from a ~ z or A ~ Z; up to 26 fonts
Description : Download external fonts to external flash card. If download name already
exists in the flashcard, the printer will printout message “FONT NAME
ALREADY EXIST” and download is not allowed. Fonts are restricted to HP
Laser Jet II Plus (PCL-4) or compatible ones.
Download HVR0OE1A.SFP font to external flash card. Example :
~JA ; define A = HVR0OE1A.SFP
COPY HVR0OE1A.SFP PRN/B ; send command from DOS mode
External Text command
Syntax : Vt,x,y,x_mul,y_mul,gap,rotation,data
Parameters : t : Font type; from a ~ z (or A ~ Z)
x : Hori of left -bottom position of text (unit : dot, 1 mm = 8 dots)
y : Vert. of left -bottom position of text (unit : dot, 1 mm = 8 dots)
x_mul : Hori. expansion (1-10)
y_mul : Vert. expansion (1-10)
gap : Distance of the character (unit : dot, 1 mm = 8 dots)
rotation : Rotation of text (0-3)
0) 0? 1) 90? 2) 180? 3) 270?
data : Data string (up to 239 characters)
1. constant
2. date information. (^D)
3. time information. (^T)
4. serial variable data. (^Cx)
5. variable data . (^Vxx)
Example : VA,5,10,1,1,1,0,data ; use font A in the label
2. Revised command
Clean image buffer
Additional function: : After the printer buffer is cleared, you would hear the beep once from
the printer.
Serial number setting
Syntax : Cx,s,? value,prompt
Parameters : x: 0~9
s: start value of serial variable (up to 13-digit)
Page 29

28
? value: inc. / dec. value of serial variable (up to 12-digit)
prompt: prompt of serial variable (up to 20 characters)
Description : Set the serial number. An object allows at most 3 serial numbers.
Ex. AC,5,5,1,1,1,0,^C0^C1^C2
Graphics download to external flash card/ internal memory
Additional function: : If download name already exists, the printer will printout message
“ GRAPHICS NAME ALREADY EXIST” and download is not allowed.
Format download to external flash card
Additional function: If download name already exists, the printer will printout message “ FORM
NAME ALREADY EXIST” and download is not allowed.
RTC setting
The year sets from 1990 to 2089.
3. Revised function
Self Test
The self-test function helps you check if the printer works well. To get in the self-test function;
please follow the steps.
1. Hold down the feed button when powering on.
2. Release the feed button after the printer beeps 4 times.
3. Wait about 3 seconds, the printer will printout contain of the self-test.
Check mode
To get in the check mode; please take the following steps.
1. Hold down the feed button when powering on.
2. Continue to hold down the feed button. The printer will beep 4 times and print out a blank
label of 19cm long. When the printer stops, release the feed button.
3. The printer will print the following contents.
CHECK MODE BEGIN
Note: Disable the Check mode or Self-test, please power off the printer at least 2
seconds, than power on again.
Stripper operation
The first time to use strip function, the printer will send a blank label and printout very slowly.
After pick up the label, the printer printout will normally.
Install the Strip Bracket Bar
The strip bracket bar was use for strip function. If you don’t need to use strip function, you may
take out the strip bracket bar and keep to safe place. Please follow these steps to install the
strip bracket bar.
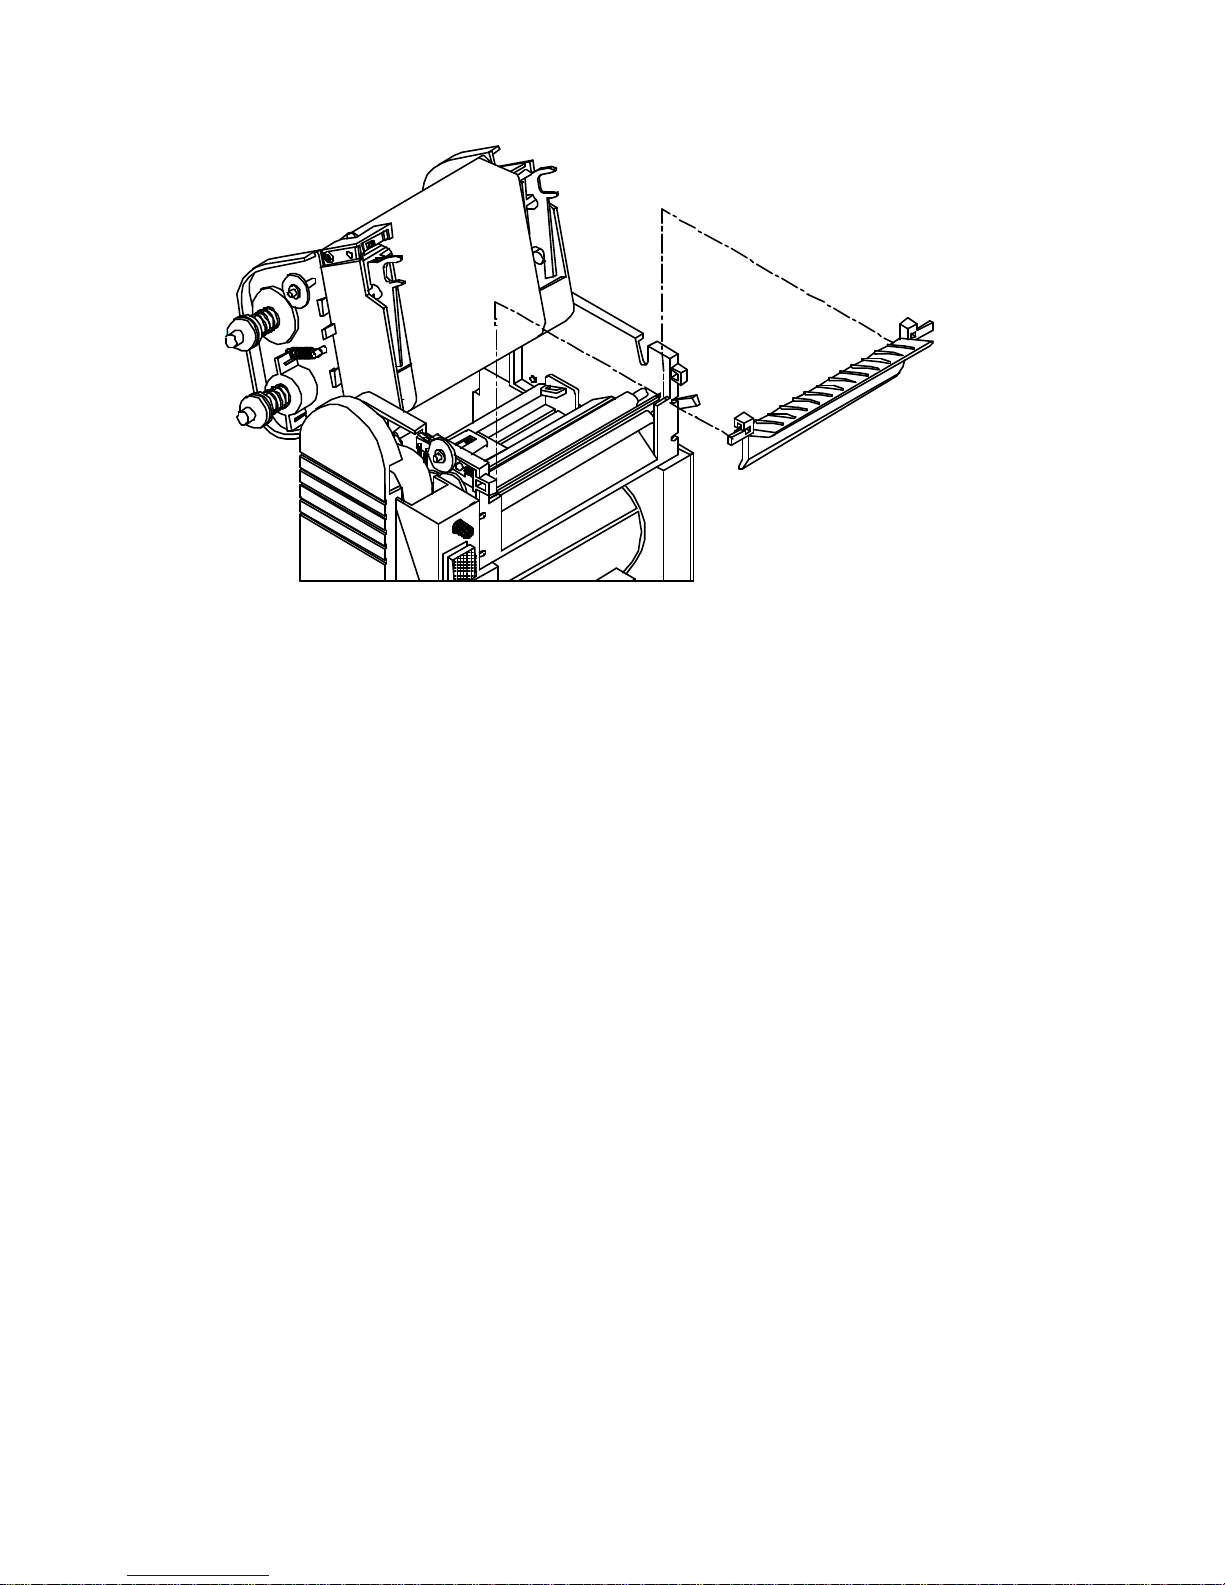
1. Refer the figure 1 to setup the strip bracket bar to the right position.
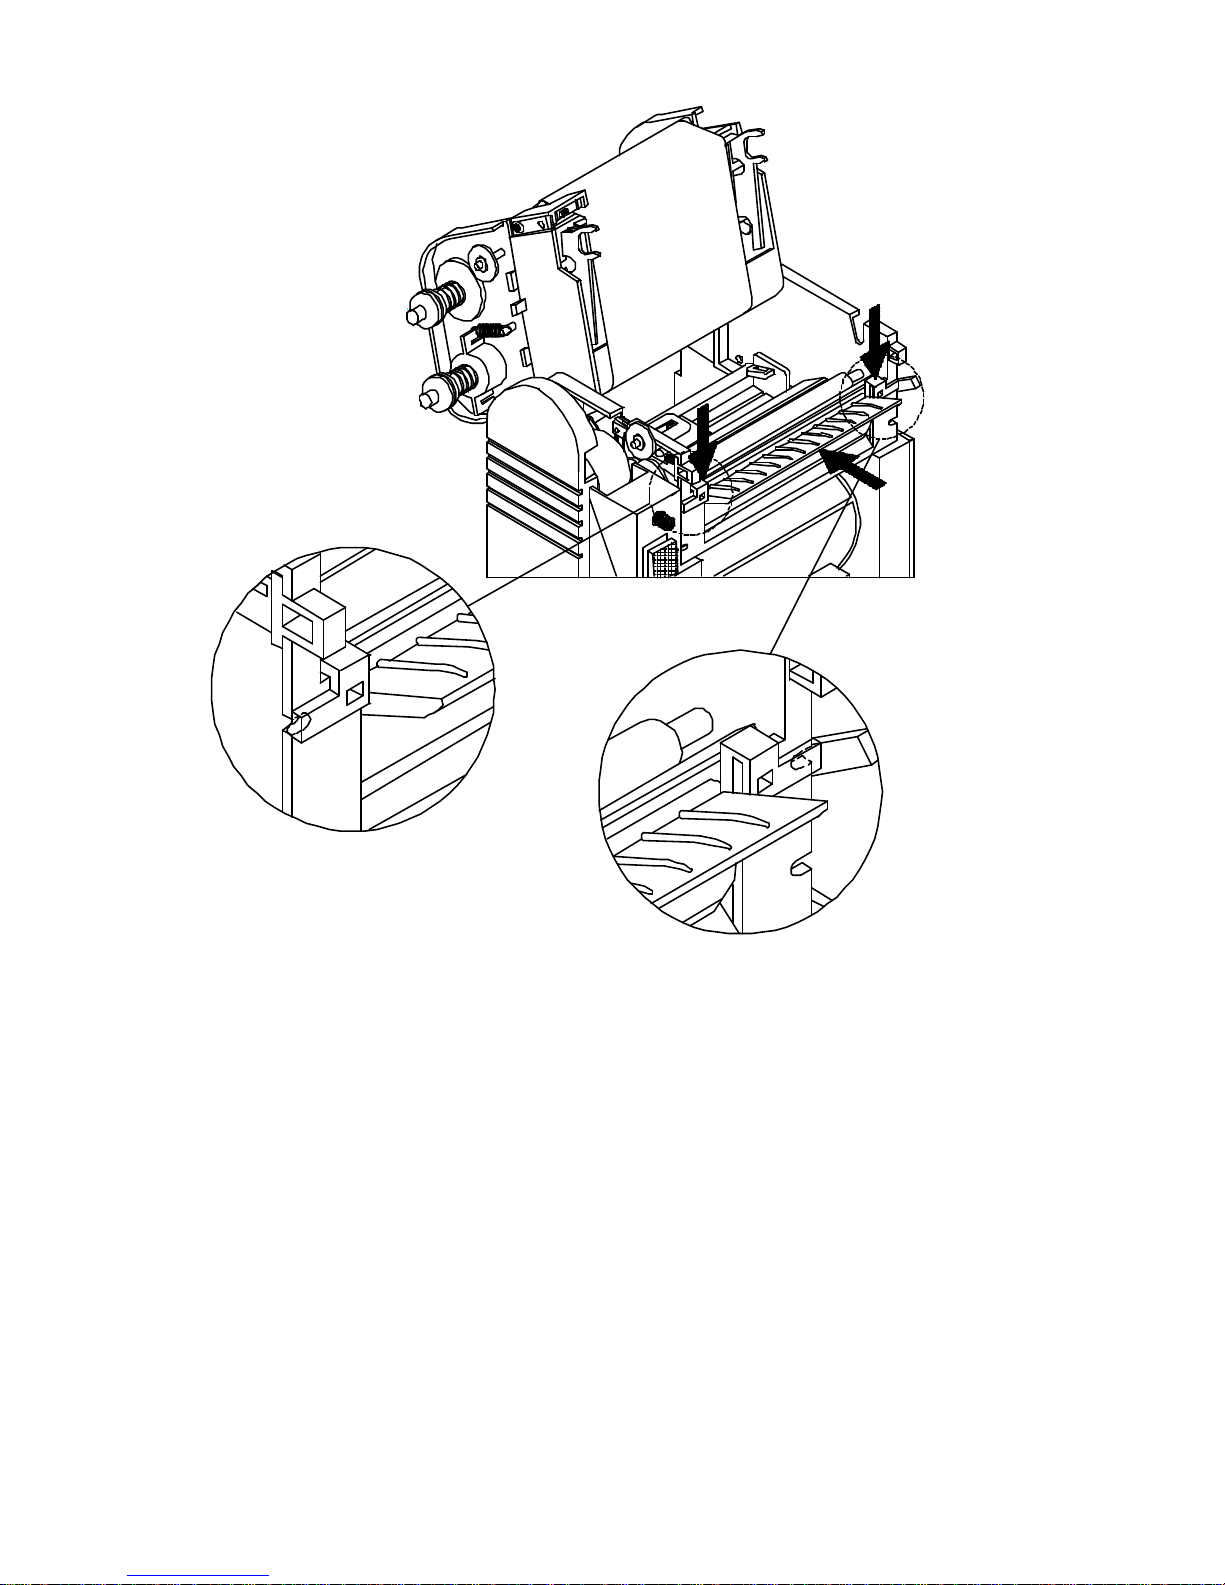
2. Refer the figure 2, follow the 3-arrow position and direction to gently insert the strip bracket
bar until hear the click sound.
3. Refer the figure 2, a part of zoom out to show the strip bracket bar correct position. Please
check whether the strip bracket bar was setup correct.
Page 30
29
4. About the strip function setting, please refer the technical user’s manual.
Fig. 1
Page 31
30
Fig. 2
Page 32
31
B. EZ -4TT/2P/4P above 2.20
Serial number setting
Syntax : Cx,ys,? value,prompt
Parameters : x: 0~9
s: start value of serial variable (up to 13-digit)
y:
y = none, Decimal (0~9)
y = A, Hexadecimal (0~9,A~F)
y = C, 0~9, A~Z
? value: inc. / dec. value of serial variable (up to 12-digit)
prompt: prompt of serial variable (up to 20 characters)
Description : Set the serial number. An object allows at most 3 serial numbers.
Ex. AC,5,5,1,1,1,0,^C0^C1^C2
Example : Program (print out 5 labels):
^Q50,0,0
^W100
^S2
^H5
^E12
^P5
^L
C0,000,+1,AA
C1,AEE,+1,BB
C2,CZYY,+1,CC
AC,5,5,1,1,1,0,^C0^C1^C2
E
Result:
000EEZYY
001EFZYZ
002F0ZZ0
003F1ZZ1
004F2ZZ2
Cutter setting
EZ-4TC
SW7 ON Rotary Cutter
OFF Guillotine Cutter
EZ-4PC
SW7 ON Guillotine Cutter
OFF Rotary Cutter
The maximum paper width accepts is 110 mm; and the acceptable minimum label
height is 30 mm.
Page 33
32
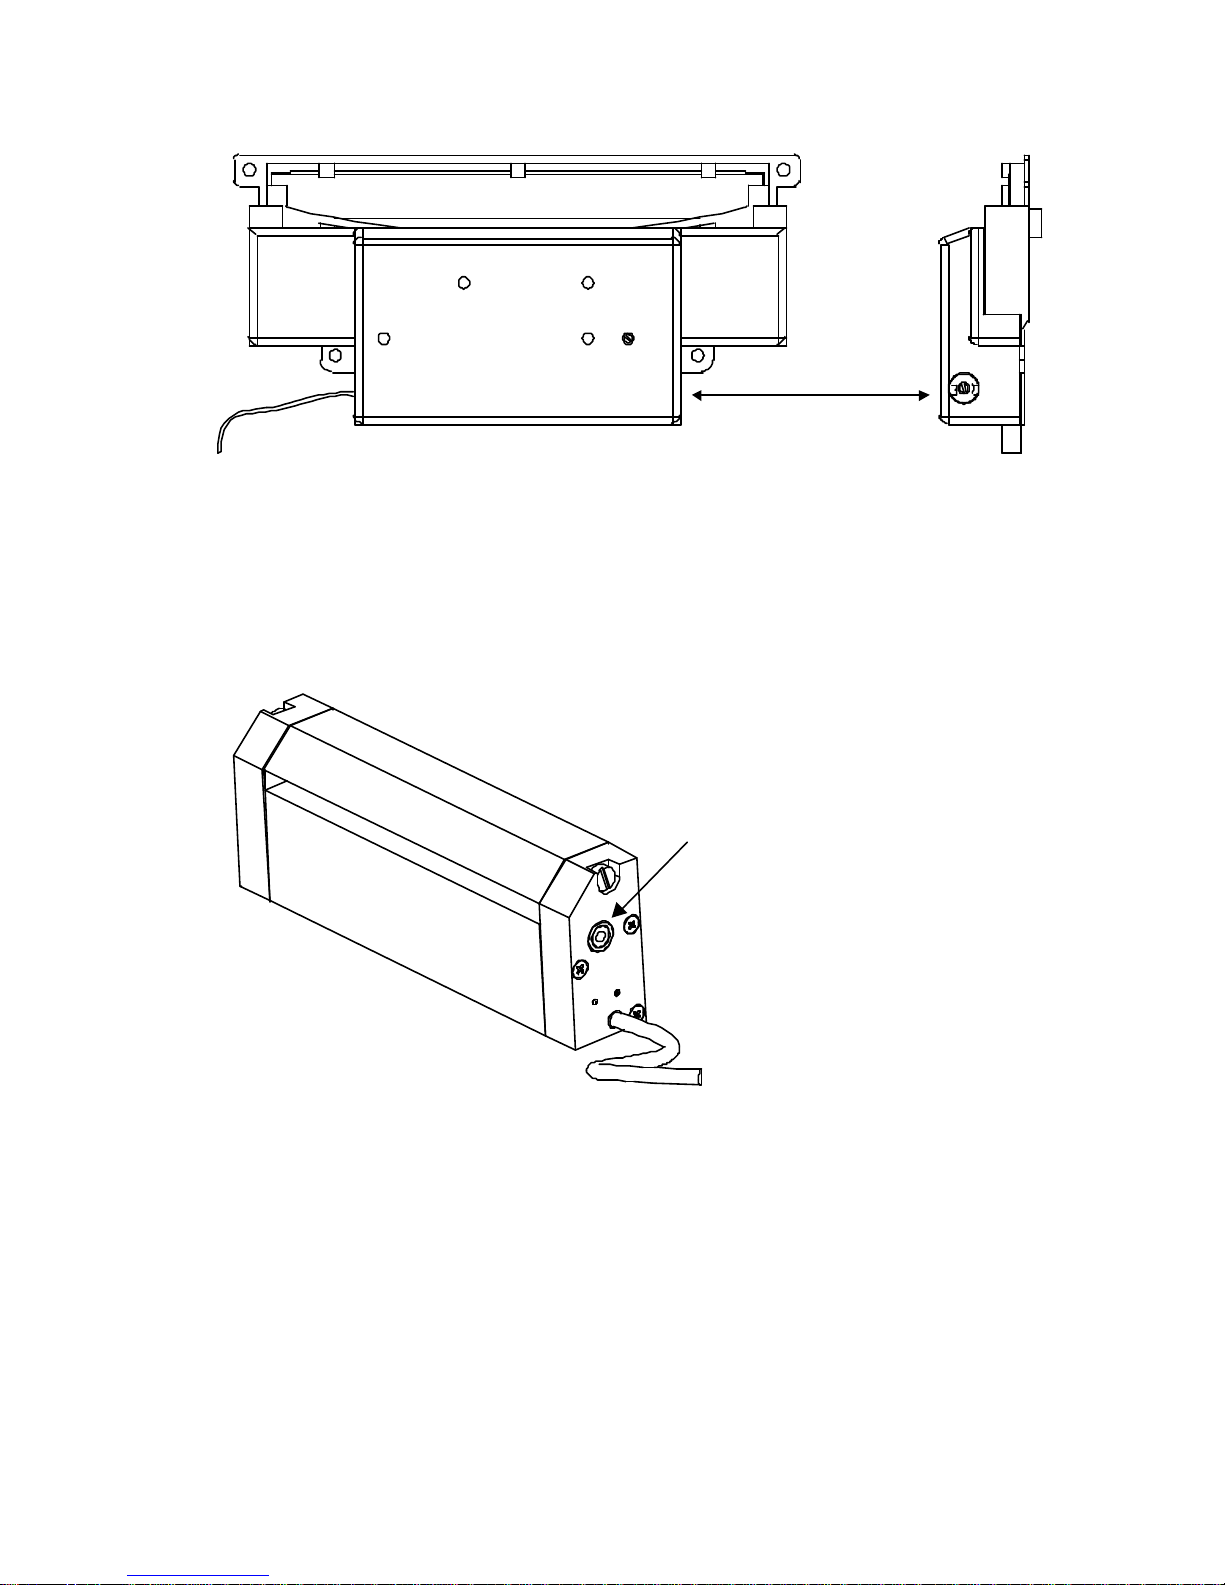
Guillotine Cutter Adjustment
A
1. There is an adjustable showed as arrow “A” on the left side of cutter.
2. The paper jam may cause the cutter work improperly, please power off the printer.
3. Use T type screw driver insert into the opening “A” and turn clockwise. The blade of cutter
should be opened, remove the paper inside the cuter.
4. After the paper jam problem is eliminated, power on the printer, at this moment, the cutter
will regress automatically to cutting position.
Rotary Cutter Adjustment
A
1. There are two adjustable opening showed as arrow “A” on the cutter.
2. The paper jam may cause the cutter work improperly, power off the printer.
3. Use #M3 Hex Key insert into the opening “A” and turn clockwise. The blade of cutter should
be opened, then remove the paper inside the cutter.
4. After the paper jam problem is eliminated, power on the printer, at this moment, the cutter
will regress automatically to cutting position.
 Loading...