

Page 1

User’s Manual
1240 Laser Scanner
Document Number : 1240-0116
Release Date : Jul 28, 1998
1998, SYNTECH INFORMATION Co., Ltd..
All rights reserved. CipherLab is a registered
trademark of SYNTECH INFORMATION Co., Ltd.
Page 2

WARNING
This equipment has been tested and found to comply
with the limits for a Class A digital device, pursuant
to Part 15 of FCC Rules. These limits are designed to
provide reasonable protection against harmful
interference in a residential installation. This
equipment generates, uses and can radiate radio
frequency energy and, if not installed and used in
accordance with the instructions, may cause harmful
interference to radio communications. However, there
is no guarantee that interference will not occur in a
particular installation. If this equipment does cause
harmful interference to radio or television reception,
which can be determined by turning the equipment off
and on, the user is encouraged to try correct the
interference by one or more of the following
measures:
• Reorient or relocate the receiving antenna.
• Increase the separation between the equipment and
receiver.
• Connect the equipment into an outlet on a circuit
different from that to which the receiver is
connected.
• Consult the dealer or an experienced radio/TV
technician for help.
Page 3

Table of Contents
1. Introduction..........................................................1
2. General Features ................................................... 2
2.1 Buzzer .......................................................... 2
2.2 Indicator .........................................................2
2.3 Scan Modes.....................................................2
2.4 Inhibit Time .................................................... 4
2.5 Scanner Time-out Duration.............................4
2.6 Reading Redundancy.......................................4
2.7 Supported Symbologies...................................4
2.8 Negative Barcodes...........................................5
3. Output Interface.................................................... 6
3.1 Keyboard Wedge Interface ..............................6
3.1.1 Keyboard Type......................................... 6
3.1.2 Keyboard Style - Alphabets ......................6
3.1.3 Keyboard Style – Digits ............................ 7
3.1.4 Capital Lock Status ..................................7
3.1.5 Alphabets Transmission...........................8
3.1.6 Digits Transmission .................................8
3.1.7 Inter-Character Delay ............................... 8
3.2 RS232 Interface ..............................................9
3.2.1 Transmission Mode..................................9
3.2.2 Baud Rate / Parity / Data Bits...................9
3.2.3 Flow Control............................................ 9
3.2.4 Inter-Character Delay ............................. 10
3.3 Wand Emulation........................................... 10
3.3.1 Normal Status ........................................10
3.3.2 Bar Status...............................................10
3.4 PC Term Mode..............................................10
4. Symbology Parameters ........................................ 12
4.1 Code39 ........................................................12
4.2 Italy / French Pharmacode............................. 12
4.3 Industrial / Interleave / Matrix 25..................12
4.4 Codabar ........................................................ 13
4.5 UPCE ........................................................ 14
4.6 EAN8 ........................................................ 14
4.7 UPCA ........................................................ 15
4.8 EAN13 ........................................................15
4.9 MSI ........................................................ 15
4.10 Plessey 16
5. Data Output Format............................................17
Page 4

5.1 Character Substitution................................... 17
5.2 Prefix / Postfix Code .....................................17
5.3 Code ID 17 ........................................................
5.4 Length Code ................................................. 18
6. Data Editing.......................................................19
6.1 Select Editing Format....................................19
6.2 Restore Default Format .................................19
6.3 Applicable Conditions ................................... 20
6.4 Total Number of Fields ................................. 20
6.5 Dividing Data into Fields.............................. 21
6.6 Additional Fields...........................................21
6.7 Field Transmission Sequence........................21
6.8 End of Format Programming......................... 22
6.9 Activate Data Editing Formats......................22
6.10 Exclusive Data Editing................................ 22
6.11 Programming Examples.............................. 22
7. Configuring 1240 ............................................... 24
7.1 Enter Configuration Mode.............................24
7.2 Default ........................................................ 24
7.3 List Setting ................................................... 24
7.4 Setting Parameter Values..............................25
7.4.1 Numeric Parameters............................... 25
7.4.2 Character String Parameters................... 26
7.4.3 Key Type/Status Setting .........................26
7.5 Exit Configuration Mode...............................28
Page 5

1
1. Introduction
This User’s Manual contains all the information
needed to operate and configure the 1240 Laser
Scanner. It is divided into two parts. The first part of
this manual describes the operation and
programmable features of the scanner. And the second
part of this manual is used for configuration, it
contains the setup barcodes used to configure the
scanner.
The 1240 is one of the most versatile and flexible
Laser scanner in the world. All the features and
functions required for up to date barcode reading are
included. This scanner provides for easy installation
and high product durability. The scanner can not only
fulfill the requirements needed today, but also can
suffice for long term usage. The main functions and
features provided on 1240 are listed below.
• Barcode Readability : Most popular barcode
symbologies are supported.
• Support negative barcodes.
• Support eight scan modes.
• Programmable Buzzer Volume and Beeping Tone
• Dual Color Indicator
• Multi-Interface Support : KBD Wedge, RS232
(Single/Dual Port), and Wand Emulation
• Programmable Code ID : Code ID can be
individually configured for each symbology.
• Programmable Length Code
• Programmable Prefix Code
• Programmable Postfix Code
• Character Substitution
• Data Editing : Data can be reorganized according to
user programmable formats. Up to three data
editing formats are supported.
• Extremely Low Power Consumption
Page 6

2
2. General Features
2.1 Buzzer
The buzzer of the scanner beeps differently to indicate
various operating conditions.
• Power On Beep : The Laser scanner will issue a
long beep to indicate a successful power on.
• Good Read Beep : There are five volume levels and
four beeping tones (frequencies) that user can select
from when there is a good read. The available
options are listed below.
Volume : Maximum/Loud/Medium/Minimum/Off
Frequency : 8 / 4 / 2 / 1 kHz
• Error Beep : The scanner will issue a long beep
with a low tone to indicate errors.
• Enter / Exit Configuration Beep : The scanner
will issue 6 beeps upon entering / exiting the
configuration mode.
• Setup Beep : In configuration mode, the scanner
will normally beep twice when a setup barcode is
read. If the particular setup parameter needs more
than one read, the scanner will only issue a short
beep to indicate that there are more setup barcodes
needed to complete the current parameter setting.
2.2 Indicator
There is a dual color indicator on top of the scanner.
Normally it is off, and it will turn red when there is a
good read. The indicator will be green when the
scanner is in configuration mode.
2.3 Scan Modes
There are eight scan modes supported by the Laser
scanner. User can choose the desired scan mode
depending on the application requirements. The
supported scan modes are described below.
• Auto Off Mode : The scanner will start
scanning once the switch is triggered. The
scanning continues until either a barcode is
Page 7

3
read or a preset scanning period (Scanner
Time-Out Duration) is expired.
• Continuous Mode : The scanner is always
scanning. To read the same barcode, the
barcode must be taken away from the scanning
line and back again.
• Auto Power Off Mode : The scanner will start
scanning once the switch is triggered. The
scanning continues until a preset scanning
period (Scanner Time-Out Duration) is
expired. Unlike the Auto Off mode, the
scanner will continue to scan and the scanning
period is re-counted each time there is a
successful read.
• Alternate Mode : The scanner will start
scanning once the switch is triggered. The
scanner will continue scanning until the switch
is triggered again.
• Momentary Mode : The scanner will be
scanning as long as the switch is depressed.
• Repeat Mode : The scanner is always
scanning just like Continuous Mode. But now
the switch acts like a “re-transmit button”. If
the switch is triggered within 1 second after a
good read, the same data will be transmit again
without actually reading the barcode. This “retransmit button” can be triggered as many
times as user desired, as long as the time
between each triggering does not exceed 1
second. This scan mode is most useful when
the same barcode is to be read many times.
• Laser Mode : The scanner will start scanning
once the switch is pressed. The scanning
continues until either a barcode is read, the
switch is released, or a preset scanning period
(Scanner Time-Out Duration) is expired. This
is the default scan mode for 1240.
• Test Mode : The scanner is always scanning.
The scanner will decode repeatedly even with
the same barcode.
Page 8

4
2.4 Inhibit Time
If the scanner mode is set to Continuous, Auto Power
Off, Alternate, or Momentary mode, the scanner will
prevent accidentally reading the same barcode twice
by using an Inhibit Time (Blocking Time). The
barcode must be taken away from the scanning line
longer than the Inhibit Time to allow second reading
of the same barcode. This Inhibit Time can be long or
short.
2.5 Scanner Time-out Duration
This parameter is used to limit the maximum
scanning period when the scan mode is either Auto
Off Mode or Auto Power Off Mode. This time-out
duration is specified in units of second. The default
time-out duration is three seconds.
2.6 Reading Redundancy
This parameter is used to specify the levels of reading
(decoding) security. If No Redundancy is selected,
only one successful decoding can make the reading
valid. If Three Times Redundancy is selected, it will
take 3 successful decodes to make the reading valid. It
is obvious that the more redundancy the user selects,
the higher the reading security and thus the slower the
reading speed. The user must compromise between
decoding security and decoding speed if the security
feature is needed.
2.7 Supported Symbologies
Most of the popular barcode symbologies are
supported. Each symbology can be individually
enabled or disabled. The scanner will automatically
discriminate and recognize all the symbologies that
are enabled. The supported barcode symbologies are
listed below.
• Code 39 (Standard / Full ASCII)
• Italy Pharmacode
• French Pharmacode
• Industrial 25
• Interleave 25
• Matrix 25
Page 9

5
• Codabar (NW-7)
• UPCA (with or without Addon)
• UPCE (with or without Addon)
• EAN8 (with or without Addon)
• EAN13 (with or without Addon)
• Code 93
• Code 128
• EAN 128
• MSI
• Plessey
2.8 Negative Barcodes
The Laser scanner can be configured to read negative
barcodes. Normally, barcodes are printed with the
color of the bars darker than that of the spaces. But
for negative barcodes, they are printed in the opposite
sense, just like negative films. The spaces of the
negative barcodes are printed with a color darker than
that of the bars.
Page 10

6
3. Output Interface
The 1240 is a multi-interface Laser scanner. It can be
configured as a keyboard wedge scanner, an RS-232
scanner, or a Wand emulation scanner. Replacing
appropriate interface cable and configuring the
desired interface type can easily change the output
interface.
3.1 Keyboard Wedge Interface
3.1.1 Keyboard Type
The keyboard wedge interface is enabled by
configuring/selecting keyboard type. The supported
keyboard types are listed below.
• PCAT - US, French German, Italian, Swedish,
Norwegian, UK, Belgium, Spanish, and
Portuguese KBD
• PCXT
• PS2-30
• PS-55
• IBM 5550
• IBM 3477 TYPE (Japanese KBD)
• IBM 34XX, 319X & Memorex Telex
(122Keys)
• Wyse Enhance KBD (US, French)
• DEC VT220,320,420
• Macintosh (ADB)
• Hitachi Elles
• NEC 5200
• NEC 9800
• NEC Astra
• Unisys TO-300
• Televideo 965
• ADDS 1010
3.1.2 Keyboard Style - Alphabets
Keyboard layout style can be selected. There are three
options to this setting : default layout (US or English
style), AZERTY layout, and QWERTZ layout. This
setting only works when the keyboard type selected is
for US keyboard. The scanner will make necessary
Page 11

7
adjustment when sending the ‘A’, ‘Q’, ‘W’, ‘Z’, ‘Y’,
and ‘M’ character according to this setting.
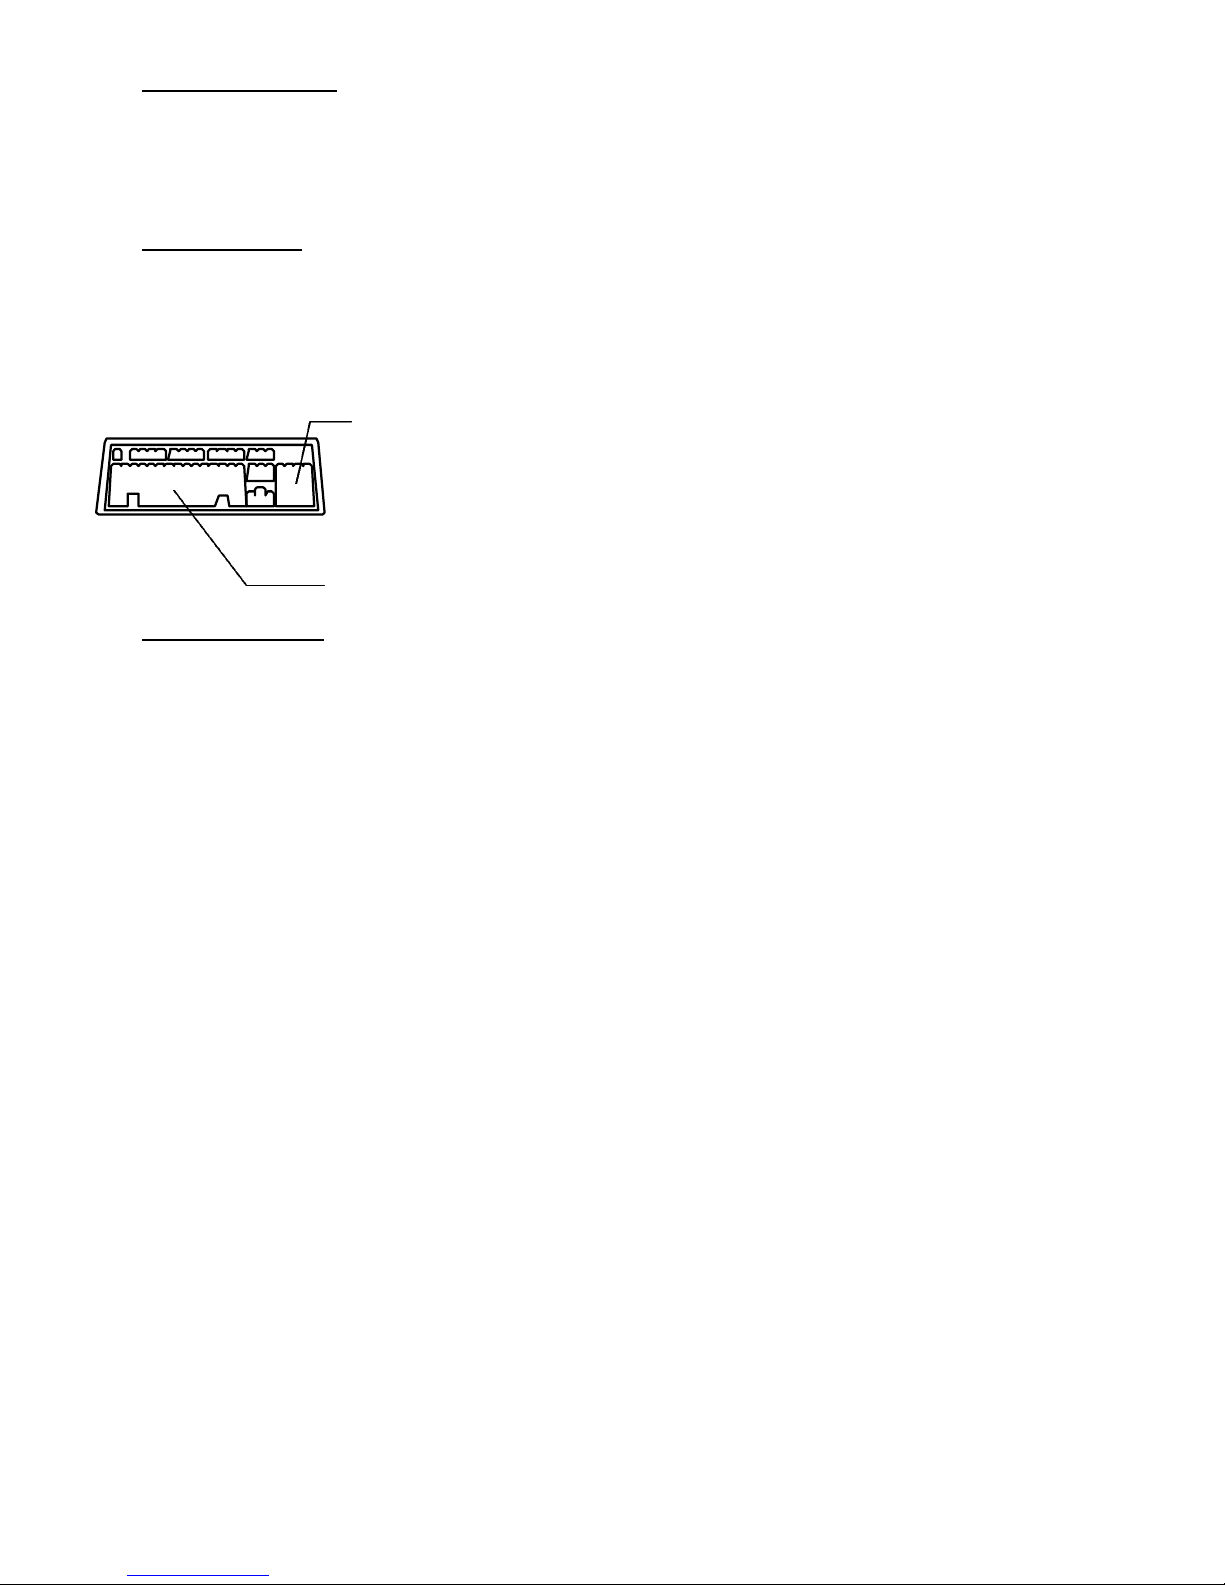
3.1.3 Keyboard Style – Digits
There are two digit layout styles as shown on the
following figures. One has its digit keys on top (upper
row), the other has them on bottom (lower row).
The digit layout style can be changed by configuring
this setting. There are three options to this setting :
Default, Lower Row, and Upper Row. The scanner
will make necessary adjustment when sending digits
according to the setting value of this parameter. This
setting is meant to be used with the above setting
(Keyboard Style – Alphabets) and perhaps Character
Substitution setting, when support to languages not
available on the scanner is needed.
3.1.4 Capital Lock Status
In order to send alphabets with correct case, the
scanner needs to know the capital lock status of the
keyboard. Incorrect settings may result in reversed
case of alphabets being transmitted. There are 3
options to this parameter : On, Off, or Auto Detection.
If this parameter is set to Auto Detection, the scanner
will automatically detect the capital lock status of the
keyboard before it transmits data. But the Auto
Detection option is supported only when the keyboard
type configured is either PCAT (all available
languages), PS2-30, PS55, IBM 34XX/319X or
Memorex Telex.
! @ # $
1 2 3 4
Digits on Lower Row
1 2 3 4
! @ # $
Digits on Upper Row
Page 12
8
3.1.5 Alphabets Transmission
User can choose how alphabets are sent by
configuring this parameter. The alphabets can be sent
according to their case (the Case Sensitive option), or
the case is ignored (the Ignore Case option) when
transmitting.
3.1.6 Digits Transmission
User can choose how the scanner transmits digits by
configuring this parameter. The scanner can transmit
digits by using the alphanumeric key or by using the
numeric key pad. The Num Lock status of the
keyboard should be ON if numeric key pad option is
selected.
3.1.7 Inter-Character Delay
An inter-character delay of 0 to 255 ms can be
configured to match the computer response time of the
keyboard interface. The delay time configured is
inserted between transmitting every character. The
longer the delay time configured, the slower the
transmission speed will be. The inter-character delay
is zero by default.
Numeric Key Pad
AlphaNumeric Key
Page 13

9
3.2 RS232 Interface
The RS-232 interface is enabled by reading the
“Activate RS-232 Interface” label in configuration
mode. User can select the desired transmission mode,
flow control, baud rate, parity, and data bits to be used
in this output interface.
3.2.1 Transmission Mode
There are four transmission modes supported on the
scanner when RS232 output interface is used. One of
them is for single port operation, and the others are
for dual port operation.
Single port operation is used where the scanner is
connected directly to the host computer, whereas the
dual port operation is used where the scanner is
connected between host and terminal. The interface
cable for dual port operation always has two
connectors, one of them is a male connector and the
other one is a female connector. Under dual port
operation, user can select whether data are transmitted
to either ends or are transmitted to both ends. The
supported transmission modes are listed below.
• Single Port
• Dual Port - Data are transmitted to male
connector end.
• Dual Port - Data are transmitted to female
connector end
• Dual Port - Data are transmitted to both ends.
3.2.2 Baud Rate / Parity / Data Bits
The supported baud rate, parity, and data bit are listed
below.
• Baud Rate : 38400 / 19200 / 9600 / 4800 /
2400 / 1200 / 600 / 300
• Parity : None / Even / Odd
• Data bit : 8 / 7
3.2.3 Flow Control
If the single port transmission mode is selected, user
can further configure the flow (handshake) control
method to be used. The available options are listed
below.
Page 14

10
• No Flow Control
• Scanner Ready : The scanner will activate the
RTS signal after power on. After each good
read the scanner will then wait for the CTS
signal becomes active. The data will not be
sent until CTS signal becomes active.
• Data Ready : The RTS signal will be activated
after each good read. The scanner will then
wait for the CTS signal becomes active. The
data will not be sent until CTS signal becomes
active.
• Inverted Data Ready : It is like the Data Ready
flow control, but the RTS signal level is
inverted.
3.2.4 Inter-Character Delay
An inter-character delay of 0 to 255 ms can be
configured to match the computer response time. The
delay time configured is inserted between transmitting
every character. The longer the delay time configured,
the slower the transmission speed will be. The intercharacter delay is zero by default.
3.3 Wand Emulation
The Wand Emulation output interface is enabled by
reading the “Activate Wand Emulation” label in
configuration mode. User can select the signal levels
of the normal status and bar status to be used in this
output interface.
3.3.1 Normal Status
This setting specifies the signal level of the normal
state when not transmitting a barcode image.
3.3.2 Bar Status
This setting specifies the signal level used to represent
a bar when transmitting a barcode image.
3.4 PC Term Mode
The PC Term mode is enabled by reading the
“Activate PC Term” label in configuration mode. The
Page 15

11
user can select US style keyboard or French style
keyboard depends on which activation label is read.
User can then select the desired baud rate, parity, and
data bits to be used in this output interface. The InterCharacter Delay and Capital Lock Status settings can
also be configured.
Page 16

12
4. Symbology Parameters
This section describes user configurable parameters
which are pertaining to barcode symbologies.
4.1 Code39
• Standard / Full ASCII Code 39 : User can
choose to read either Standard Code 39 or Full
ASCII Code 39 by configuring this parameter.
• Start/Stop Transmission : This parameter
specifies whether the start/stop characters of
Code 39 are included in the data being
transmitted.
• Checksum Verification : This parameter
specifies whether the scanner will perform
checksum verification when decoding Code 39.
If the checksum is incorrect, the barcode will
not be read.
• Checksum Transmission : This parameter
specifies whether the checksum character are
included in the data being transmitted.
4.2 Italy / French Pharmacode
For Italy /French Pharmacode, there is always a
checksum character included in the barcode. So the
checksum verification is always performed when
decoding these symbologies. User though can choose
whether the checksum character is to be transmitted
or not. The start / stop transmission of this code
shares the same setting of Code 39.
• Checksum Transmission : This parameter
specifies whether the checksum character are
included in the data being transmitted.
4.3 Industrial / Interleave / Matrix 25
• Start / Stop Selection : This parameter
provides the readability of all 2 of 5 symbology
variants. For example, flight tickets actually
use an Industrial 25 barcode but with
Interleave 25 start / stop. In order to read this
barcode, the start / stop selection parameter of
Industrial 25 should set to Interleave 25.
Page 17

13
• Checksum Verification : This parameter
specifies whether the scanner will perform
checksum verification when decoding these
barcodes. If the checksum is incorrect, the
barcode will not be read.
• Checksum Transmission : This parameter
specifies whether the checksum character are
included in the data being transmitted.
• Code Length Qualification : Because of the
weak structure of the 2 of 5 codes, a partial
scan has a high probability of decoding as a
valid but shorter 2 of 5 codes (known as short
scan). To prevent this kind of undesired
reading, the Code Length settings can help to
insure that the correct code is read by
qualifying the allowable code length. Code
length parameters can be configured in two
ways : Fixed Code Length or Max / Min code
length. If the fixed code length is selected, up
to 2 fixed lengths can be specified. And if max
/ min code length is selected, the max length
and the min length must be specified, and the
scanner will only accept those codes with
lengths fall between max / min length
specified.
• Read Odd Number of Digits : This parameter
is available only to the Interleave 25. This
parameter must be enabled to read Interleave
25 labels which contain odd number of digits.
4.4 Codabar
• Start/Stop Transmission : This parameter
specifies whether the start/stop characters of
Codabar are included in the data being
transmitted.
• Start / Stop Selection : Four different start /
stop pairs can be selected as start / stop
characters as listed below.
abcd / abcd
abcd / tn*e
ABCD / ABCD
ABCD / TN*E
Page 18

14
• CLSI Conversion : If this parameter is
enabled, the scanner will perform the CLSI
conversion when a 14 digits Codabar barcode
is read.
4.5 UPCE
• System Number Selection : The UPCE comes
with 2 flavors : System Number 0 and System
Number 1. These two differ in the way data
are encoded. The system number 1 is the new
UPCE extension to the ordinary UPCE (system
number 0). User can have the choice of
enabling both system numbers or just system
number 0.
Warning : Because of the way system number 1
is encoded, if both system numbers are
enabled, user might suffer from short scanning
UPCA or EAN13 into UPCE system number 1
barcodes.
• Convert to UPCA : If this parameter is
enabled, the UPCE read will be expanded into
UPCA, and the following processing will
follow the parameters configured for UPCA.
• System Number Transmission : If this
parameter is enabled, the system number will
be included in the data being transmitted.
• Checksum Transmission : If this parameter is
enabled, the checksum character will be
included in the data being transmitted.
4.6 EAN8
• Convert to EAN13 : If this parameter is
enabled, the EAN8 will be expanded into
EAN13, and the following processing will
follow the parameters configured for EAN13.
• Checksum Transmission : If this parameter is
enabled, the checksum character will be
included in the data being transmitted.
Page 19

15
4.7 UPCA
• Convert to EAN13 : If this parameter is
enabled, the UPCA will be expanded into
EAN13, and the following processing will
follow the parameters configured for EAN13.
• System Number Transmission : If this
parameter is enabled, the system number will
be included in the data being transmitted.
• Checksum Transmission : If this parameter is
enabled, the checksum character will be
included in the data being transmitted.
4.8 EAN13
• ISBN / ISSN Conversion : If these parameters
are enabled, the scanner will convert the code
into ISBN or ISSN code if the formats are
correct (EAN13 codes start with 978 or 979 for
ISBN, and 977 for ISSN).
• Checksum Transmission : If this parameter is
enabled, the checksum character will be
included in the data being transmitted.
4.9 MSI
• Checksum Verification : Three kinds of
checksum calculations can be implemented
into MSI code : Single Modulo 10, Double
Modulo 10, or Modulo 11 & 10 checksum. If
the checksum character is incorrect, the
barcode will not be read.
• Checksum Transmission : User can control
how the checksum is transmitted by
configuring this parameters.
1) Transmitted
2) Last digit not transmitted
3) Last 2 digits not transmitted
• Code Length Qualification : Because of the
weak structure of the MSI code, a partial scan
has a high probability of decoding as a valid
but shorter MSI codes (known as short scan).
To prevent these kind of undesired readings,
the Code Length settings can help to ensure
Page 20

16
that the correct code is read by qualifying the
allowable code length. Code length limitations
can be set in 2 ways : Fixed Code Length and
Max / Min code length. If the fixed code
length is selected, up to 2 fixed lengths can be
specified. And if max / min code length is
selected, the max length and the min length
must be specified, and the scanner will only
accept those codes with lengths fall between
max / min length specified.
4.10 Plessey
• Convert to UK Plessey : If this parameter is
enabled, the scanner will change each
occurrence of the character ’ into character ’
in the code.
• Checksum Transmission : If this parameter is
enabled, the checksum characters (two
characters) will be transmitted together with
data.
Page 21

17
5. Data Output Format
Data read by the scanner will be processed in the
following sequence (RS-232 and Keyboard Wedge
interfaces only).
1) The character substitution is performed on the
barcode data.
2) The Code ID and the Length Code are inserted at
the beginning of the data as shown below.
[Code ID] [Length Code] [Data]
3) The resulting data of step 1 will be processed by the
editing formats. For details, please refer to the
section “Data Editing”.
4) And finally the Prefix Code and the Postfix Code
will be added before transmission.
[Prefix Code] [Resulting Data of Step 2] [Postfix Code]
5.1 Character Substitution
There are three character substitution settings on the
scanner. These settings are configured on a character
base. That is, a specific character is to be substituted
by an another character. The character substitution is
performed on every occurrence of the characters
specified in these settings. Be aware, the substitution
is performed only on the barcode itself (exclude Prefix
Code, Postfix Code, Code ID, Length Code or any
Additional Field) and is performed before editing
mode processing.
If only the character to be replaced is specified, every
occurrence of that character in the barcode will be
taken away.
5.2 Prefix / Postfix Code
Up to four characters of prefix / postfix code can be
configured for the scanner. By default, the prefix code
is not configured and the postfix code is a Carriage
Return.
5.3 Code ID
Up to two characters of Code ID can be configured for
each symbology. To minimize the Code ID
configuration efforts, the scanner provides five
Page 22

18
predefined Code ID Sets that user can select from.
User can first select one of the Code ID Sets and then
make desired modifications. The pre-defined Code ID
Sets are shown below.
Symbology Set 1 Set 2 Set 3 Set 4 Set 5
Code 39 A C Y M A
Italy Pharmacode A C Y M A
French Pharmacode A C Y M A
Industrial 25 C H H H S
Interleave 25 D I Z I S
Matrix 25 E G G G S
Codabar F N X N F
Code 93 I L L L G
Code 128 H K K K C
UPCE S E C E E
EAN8 P B B FF E
EAN13 M A A F E
MSI V V D P M
Plessey W W E Q P
UPCA M A A F E
5.4 Length Code
Two digits Length Code representing the length of
data (character count) can be inserted in front of data
being transmitted. This Length Code parameter can
be individually enabled or disabled for each barcode
symbology.
Page 23

19
6. Data Editing
The 1240 Laser scanner provides advanced data
editing functions. Data editing is performed according
to user configured editing formats. Up to three editing
formats can be configured.
Data is divided into fields by user specified rules.
These fields together with user configurable
additional fields constitute the data actually sent to the
host computer. The detailed descriptions and the
configuration procedures of the editing format are
described in this section.
6.1 Select Editing Format
To start configuring an editing format, the editing
format to be configured must first be selected. Once it
is selected, the parameters pertaining to editing
format (applicable condition, total number of field,
field dividing rules, additional fields, and field
transmission sequence parameters) can be configured.
After all the desired parameters are configured, the
“End of Format Programming” label must be read to
complete the configuration of that editing format.
Note : Before completing the configuration of the
editing format, if parameters other than those
pertaining to editing format are read, the editing
format under configuration will be aborted. User must
restart the configuration again by selecting editing
format to be configured.
6.2 Restore Default Format
After the editing format to be configured is selected,
user can read the “Restore Default Format” label to
put the editing format back to default setting. The
default settings of the editing format are listed below.
• Applicable Code Type : All
• Applicable Length : Both max and min length
are zero.
• Matching string : Empty
• Matching String Location : 0
• Total number of field : 1
• Field Setting : Not Configured
Page 24

20
• Additional Fields : Empty
• Field Transmission Sequence : F1
6.3 Applicable Conditions
Three applicable conditions can be configured to
qualify whether the data read by the scanner can be
processed by the particular editing format. Data
editing will not be performed unless all three
applicable conditions are met The configurable
applicable conditions are described below.
• Code Type : This parameter specifies the code
type of the data eligible for data editing.
Multiple code types can be specified for this
parameter.
• Data Length : This parameter specifies the
length (character count) of the data eligible for
data editing. It is specified in the range format.
The length of the data must fall between max
and min length limits. If the max length and
the min length configured is both zero, the
scanner will not perform this length
qualification.
• Matching String and its Location : User can
specify a particular character string (up to four
characters) that must appear in the data which
is eligible for data editing. User can also
specify where (character position, starts from
one) this string should appear in the data by
configuring the matching string location. If the
location specified is zero, the scanner only
checks for the existence of the matching string
in the data. To disable the matching string
qualification, just leave the matching string
empty.
6.4 Total Number of Fields
Data can be divided into at most 6 fields. The total
number of fields configured must be correctly
specified. The fields are numbered from F1 to F6
accordingly, but only F1 to F5 can be configured.
Please note that, the number of fields can be
configured is always one less than total number of
Page 25

21
fields specified. The extra data characters beyond the
last field configured will be automatically assigned to
the next field. That is, if three fields are configured
for the editing format, the data characters after F3 will
be assigned to F4 automatically. This feature is quite
useful especially when data of variable lengths is
processed by editing formats.
6.5 Dividing Data into Fields
Data eligible for editing format is divided into fields
according to user specified rules. The rule for each
field can be configured in two ways.
• Field Terminating String : The field dividing
rule can be configured by specifying the field
terminating string. The field terminating string
configured can be up to two characters. The
scanner will search for the occurrence of this
particular string in the data for the field. The
field terminating string is always included in
the field. User though, has the option of
discarding this terminating string.
• Field Length : The field dividing rule can be
configured by simply specifying the field
length. The scanner will assign the next
specified number of characters into the field.
6.6 Additional Fields
User can create up to five additional fields for each
editing format. Each additional field can have at most
four characters. The additional fields are numbered
AF1 to AF5 accordingly.
6.7 Field Transmission Sequence
After the data fields and the additional fields are
configured, user can now program the transmission
sequence of these fields that comprise the final data.
The “Start” label must be read before assigning the
field transmission sequence. And then the desired
field transmission sequence can be specified. The
scanner will transmit the fields in the order
(sequence) user programmed when sending data. The
field transmission sequence can be assigned in any
Page 26

22
desired order and fields can also be assigned multiple
times. The maximum number of fields can be
assigned is twelve. After the sequence has been
assigned, the “End” label must be read to complete
the setting.
6.8 End of Format Programming
After all the desired parameters are configured, the
“End of Format Programming” label must be read to
conclude the programming of the editing format. This
label is located at the bottom of every even page in the
“Editing Format Parameters” section of the
configuration manual.
6.9 Activate Data Editing Formats
Before data can be processed by a particular editing
format, that format must be enabled. The editing
formats can be enabled or disabled individually.
6.10 Exclusive Data Editing
If this parameter is enabled, all data read by the
scanner must be processed by the editing format. If
the data is not eligible for all enabled editing formats,
the scanner will not accept the reading and the data
will not be transmitted.
6.11 Programming Examples
Example 1 : Extracts data from the 10th character to
the 19th character.
Total Number of Fields : 3
Field 1 : Divide field by field length, set field
length to 9
Field 2 : Divide field by field length, set field
length to 10
Field Transmission Sequence : F2
Example 2 : Extract the date code, item number, and
quantity information from barcodes. Data is encoded
in the barcode like this : From the first character to
the 6th character is the date code. From the 7th
character is the item number, its length is not fixed
Page 27

23
but is delimited by a ‘-’ character. After the ‘-’
character is the quantity information.
Data should be transmitted like this : Item number
goes first, then a TAB character, and then the date
code, and then another TAB character and finally the
quantity.
Total Number of Fields : 3
Field 1 : Divide field by field length, set the field
length to 6.
Field 2 : Divide field by field terminating string.
Set terminating string to ‘-’, and discard
the terminating string.
Additional Field 1 : Set to one TAB character.
Field Transmission Sequence :
F2 AF1 F1 AF1 F3
Page 28

24
7. Configuring 1240
Configuring the 1240 Laser Scanner is done by
reading the setup labels contained in the
Configuration Manual (the second part of this
manual). This section describes the procedure of
configuring the scanner. Some configuration
examples are also given in this section for illustration.
7.1 Enter Configuration Mode
To start the configuration, the ”Enter Setup” label
must be read. This will put the scanner in the
configuration mode. The scanner will respond with 6
beeps and the indicator will turn green after the label
is read. This “Enter Setup” label is located at the
bottom of almost every even page of the Configuration
Manual.
7.2 Default
All the parameters of the scanner will return to their
default values by reading the “Default” label. The
scanner will beep twice when the “Default” label is
read.
7.3 List Setting
The current setting of all scanner parameters can be
sent to the host computer for user inspection. The
listing is separated into ten pages. User can select the
page of interest by reading the “Page x” label. The
scanner can not list setting, if Wand Emulation
interface is configured.
Page 1 : Interface, Buzzer, and Scanner
Parameters
Page 2 : Prefix, Postfix, and Length Code Setting
Page 3 : Code ID
Page 4 : Readable Symbologies and Character
Substitution
Page 5 : Symbology Parameters (1/3)
Page 6 : Symbology Parameters (2/3)
Page 7 : Symbology Parameters (3/3)
Page 8 : Editing Format 1
Page 9 : Editing Format 2
Page 10 : Editing Format 3
Page 29
25
7.4 Setting Parameter Values
For most of the parameters, only one reading is
required to set them to new values. The scanner will
respond with two beeps when these parameters are
configured. But for some special parameters, multiple
readings are required to complete the setting. The
scanner will respond with a short beep if the
configuration of the parameter is still not complete.
These parameters usually refer to a numeric value or a
string of characters, such as keyboard type, intercharacter delay, prefix / postfix code, character
substitution, etc..
For these kinds of parameters, the label of the
parameter to be configured must be read first. And
then, the labels comprising the numeric value or
character string are read. And finally, the “Validate”
label must be read to complete the setting. The
scanner will respond with two beeps when the
“Validate” label is read.
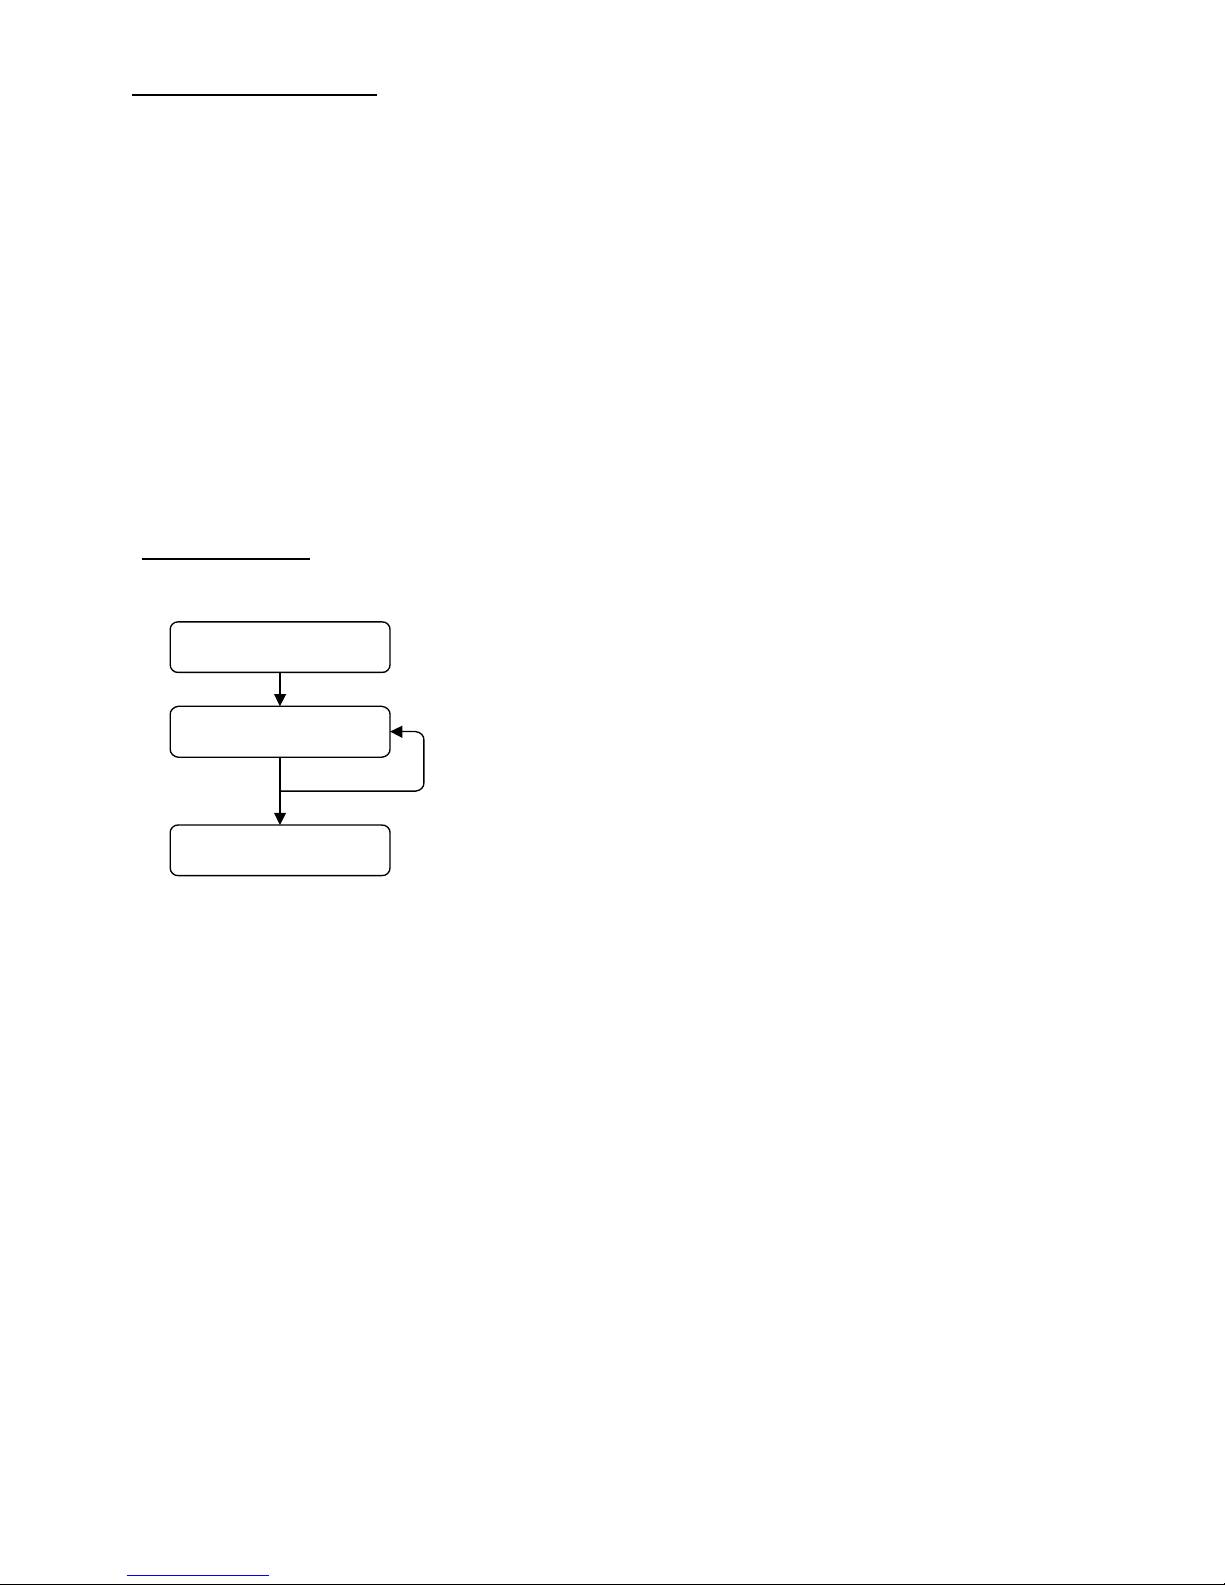
7.4.1 Numeric Parameters
The configuration procedures for numeric parameters
are shown below.
Parameter Label
Decimal Label
"Validate" Label
For example, to configure the Inter-Character Delay
to be 15 ms, the “Inter-Character Delay” label is first
read, and then the decimal digit labels “1” and “5”,
and finally, the”Validate” label to complete the
setting.
Page 30
26
7.4.2 Character String Parameters
Basically, two hexadecimal digits represent each
character programmed for the character string
parameters. The two hexadecimal digits usually
comprise a value which is the ASCII code equivalence
of the character being programmed.
Beside the two hexadecimal digits, there is an
optional key type/status can also be specified for each
character of the string parameters. This optional key
type/status can only be specified for some particular
parameters when keyboard interface is used. These
parameters are : Prefix Code, Postfix Code, Code ID,
and Additional Fields of Editing Formats.
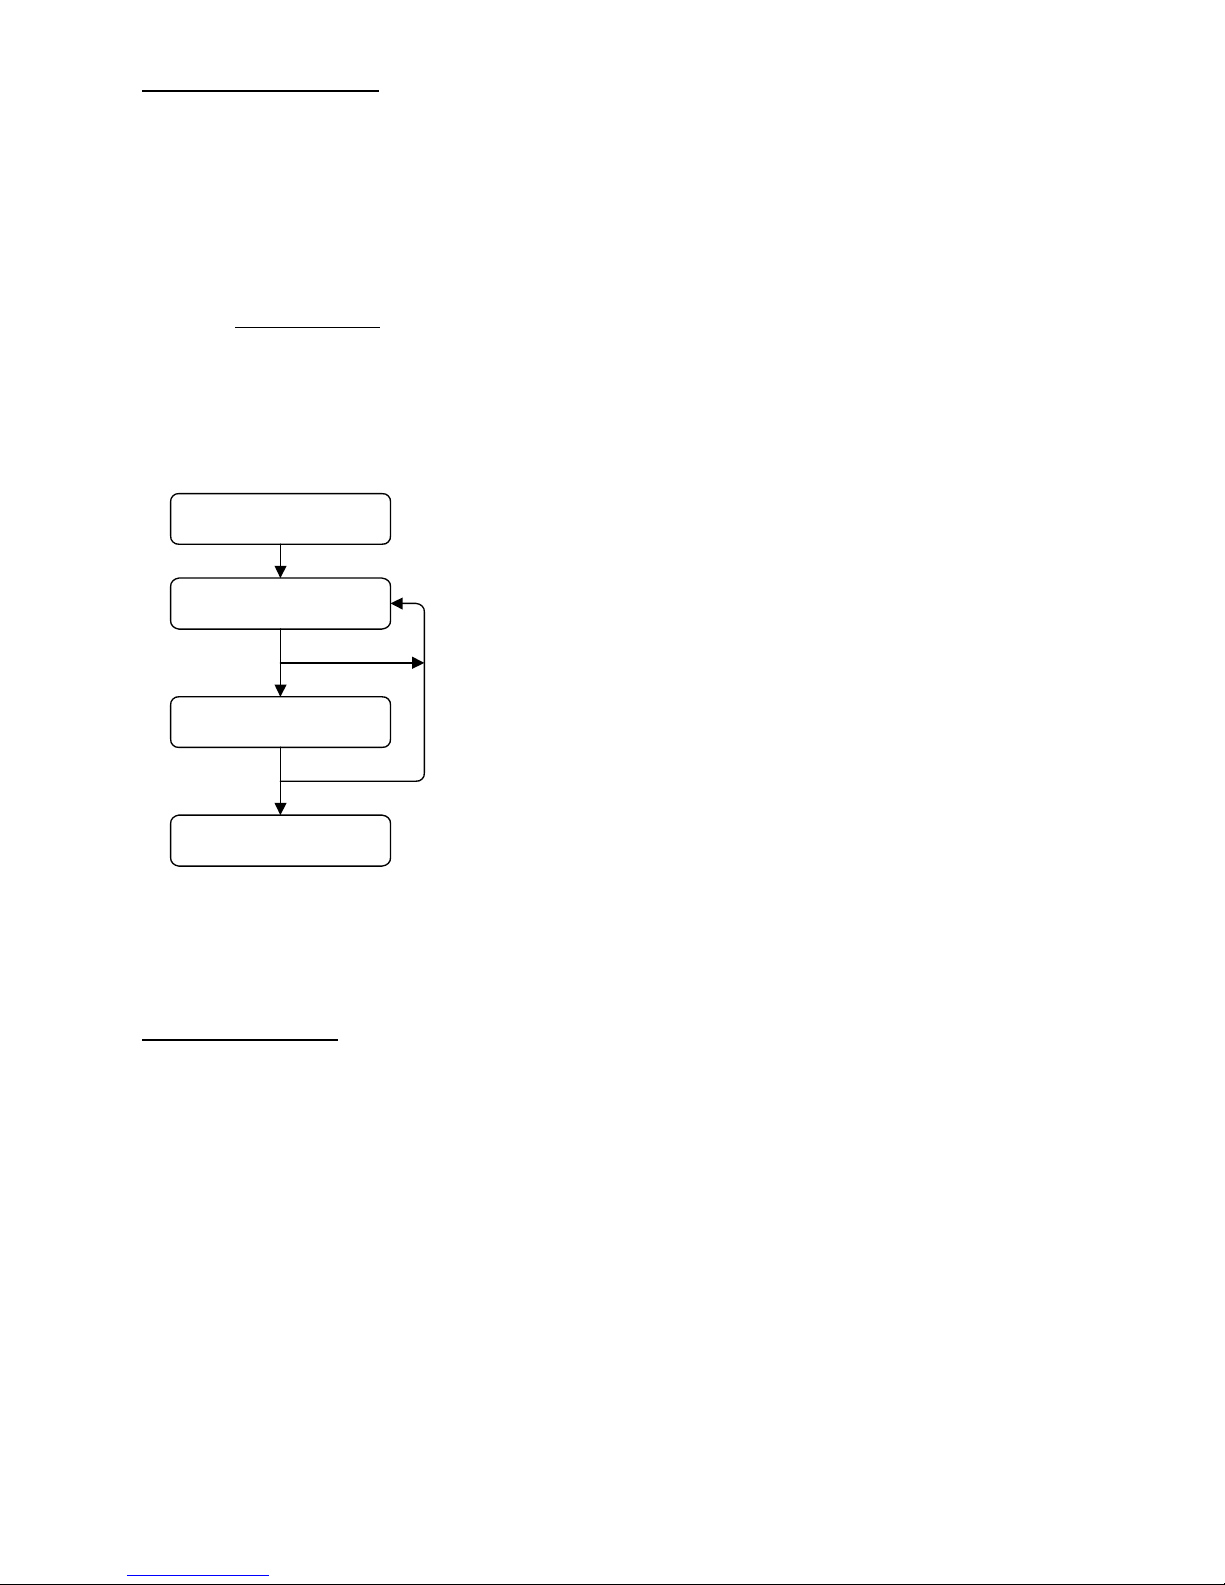
The available key type/status settings can be selected
will be described briefly. The configuration
procedures for character string parameters are shown
below.
Parameter Label
Key Type / Status Label
Two Hexadecimal Labels
"Validate" Label
For example, to configure the Prefix Code to be “AB”,
the “Prefix Code” label is first read, and then the
hexadecimal digit labels “4”, “1”, “4”, and “2” are
read, and finally, the “Validate” label to complete the
setting.
7.4.3 Key Type/Status Setting
Page 31

27
The key type/status is specified in character basis.
Each character programmed is by default of Normal
key type. A character of normal key type can have
associate status settings (add Shift/Control/Alternate).
Whereas a character of Scan Code type may not have
any associate key status settings.
• Normal Key Type: When this label is read,
the scanner will assume the following
hexadecimal digits are the ASCII code of the
character being programmed. And it will also
clear all the associate key status settings made
to the current character.
• Scan Code : When this label is read, the
scanner will assume the following hexadecimal
digits are the scan code value of the character
being programmed.
• Add Shift : The Shift key will be sent together
with the character programmed.
• Add Control (L) : The left Control key will be
sent together with the character programmed.
• Add Alternate (L) : The left Alternate key
will be sent together with the character
programmed.
• Add Control (R) : The right Control key will
be sent together with the character
programmed.
• Add Alternate (R) : The right Alternate key
will be sent together with the character
programmed.
For example, to program the Prefix Code to be “CtrlShift-B”, “C”, the programming sequence should be :
1) “Prefix Code” label
2) “Add Control (L)” label
3) “Add Shift” label
4) “4” of the hexadecimal digit
5) “2” of the hexadecimal digit
6) “4” of the hexadecimal digit
7) “3” of the hexadecimal digit
8) “Validate”
Page 32

28
Note : In internal representation of the characters
which are specified with either scan code or associate
key status, occupy two normal character space each.
So the maximum number of characters can be
configured for a string parameter will decrease, if
these character specifications are used.
7.5 Exit Configuration Mode
Both the “Update”, and the “Exit Setup without
Changes” labels will exit the scanner from
configuration mode when they are read. These two
labels differ in whether to keep the new settings on
the scanner or not, as their names suggest. The
scanner will respond with 6 beeps and restart itself, if
either label is read.
 Loading...