

Page 1
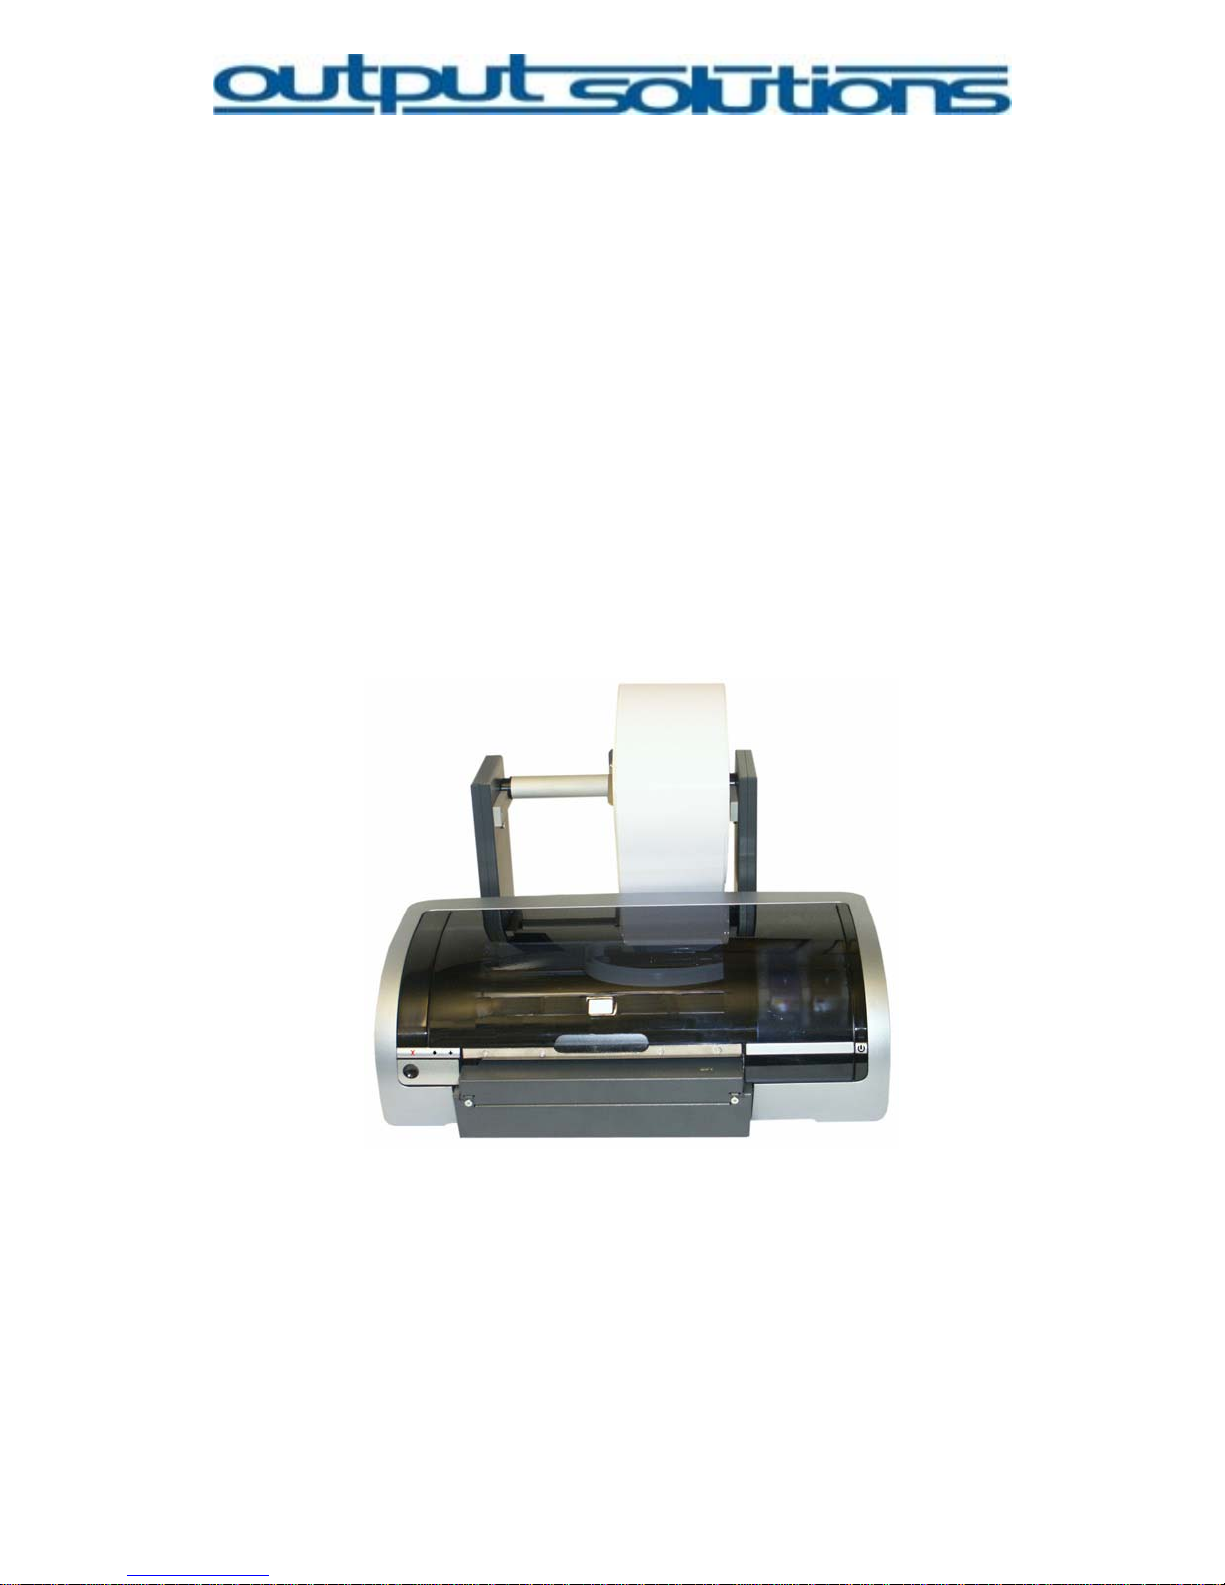
C-680 LabelJet
User Manual
Copyright © 2007
Godex Europe GmbH
All rights reserved
Godex Europe GmbH
Arnzhäuschen 36
D-42929 Wermelskirchen
Phone: +49 (0)2193–53396 0
Fax: +49 (0) 2193–53396 69
Email:
Web: www.godex.eu
Page 2

Output Solutions C-680 LabelJet Printer
1. Edition, January 2006
2. Edition, August 2007
Copyright 2006 Godex Europe GmbH
Notice
The information in this user manual is subject to change without prior
notice!
Godex Europe does not offer any warranty:
• in terms of this information material/regarding these information
materials
• to imply warranty concerning the marketability or the acceptability for
this special purpose
• for failures or consequential damages in accordan ce to the provision or
usage of these documents.
• for failures or consequential damages in accordance to the operation of
the printer.
No part of this book may be photocopied, reproduced or translated in any
other language without the written permission of Godex Europe GmbH.
Trademarks
Microsoft
®
, MS-DOS and Windows are registered trademarks of Microsoft
Corporation.
Adobe and Acrobat are registered trademarks of Adobe Systems
Incorporated.
is a registered trademark of Godex Europe
GmbH.
2
Page 3

Table of content
Page
I. Scope of delivery of Output Solutions C-680 LabelJet Printer
5
Printer........................................................................................................5
Accessories...............................................................................................5
II. Terms and conventions......................................................................6
Terms........................................................................................................6
Conventions ..............................................................................................6
Symbols.....................................................................................................6
III. Connectivity.........................................................................................7
Parallel port...............................................................................................7
USB-port....................................................................................................7
External Ethernet print server (optional)...................................................7
IV. Printer overview...................................................................................8
Power switch [1]........................................................................................9
Paper tear off sensor [2]............................................................................9
Tear-off edge [3]........................................................................................9
Button (no function) [4]..............................................................................9
Resume button and –LED [5]....................................................................9
Print cartridge status symbol and –LED [6]...............................................9
Print cancel button [7] .............................................................................10
The indicator of the Gap / Black Mark sensor position [9] ......................10
V. Installation..........................................................................................11
Install driver.............................................................................................11
Connect printer without label roll unit......................................................11
Calibrate print heads...............................................................................14
Calibrate printer to label size...................................................................17
Install roll unit ..........................................................................................18
VI. Labelprinter Administration Tool.....................................................20
LABELPRINTER SETTINGS..................................................................20
Pull-down Menu [1] .................................................................................20
Which Label material do you use? [2].....................................................21
Do TOF after each Label [3]....................................................................21
Cut/Tear Mode [4] ...................................................................................21
Tear/Cut Position Adjustment [5] ............................................................22
Save Settings and Load Profile [6]..........................................................22
3
Page 4

Send Settings to printer [7]......................................................................22
Printer Control [8]....................................................................................22
Default Data [9] .......................................................................................22
LABELPRINTER CONTROL...................................................................23
Calibration [1]..........................................................................................23
Cleaning [2].............................................................................................23
Statistic/Diag [3] ......................................................................................24
Printer[4]..................................................................................................24
Printer Control [5]....................................................................................24
Ink level Popup [6]...................................................................................25
VII. Quick Operating Guide .....................................................................26
Load labels..............................................................................................26
Print labels...............................................................................................26
Unload labels...........................................................................................26
Change label roll .....................................................................................26
VIII. Troubleshooting ................................................................................27
Printer does not print...............................................................................27
Check printer-LEDs.................................................................................27
Despite pressing the power switch the printer remains switched off......28
Check printer cable connections.............................................................28
Printer still does not print.........................................................................28
Poor print quality .....................................................................................29
Document is misprinted...........................................................................29
Photos are not printed correctly..............................................................30
Printer is slow..........................................................................................30
Printer doesn’t feed any paper................................................................31
Printer passes labels through/ can not CALIBRATE GAP SENSOR......31
Resume light is flashing..........................................................................31
After several print processes the printer start passing labels through
without printing........................................................................................31
Printer tries to CALIBRATE GAP SENSOR permanently.......................31
CALIBRATE GAP SENSOR does not detects gaps between labels......31
If you continue having problems .............................................................31
IX. Disposal..............................................................................................32
X. Label specification ............................................................................33
XI. Technical specification.....................................................................34
4
Page 5
I. Scope of delivery of
Output Solutions C-680 LabelJet Printer
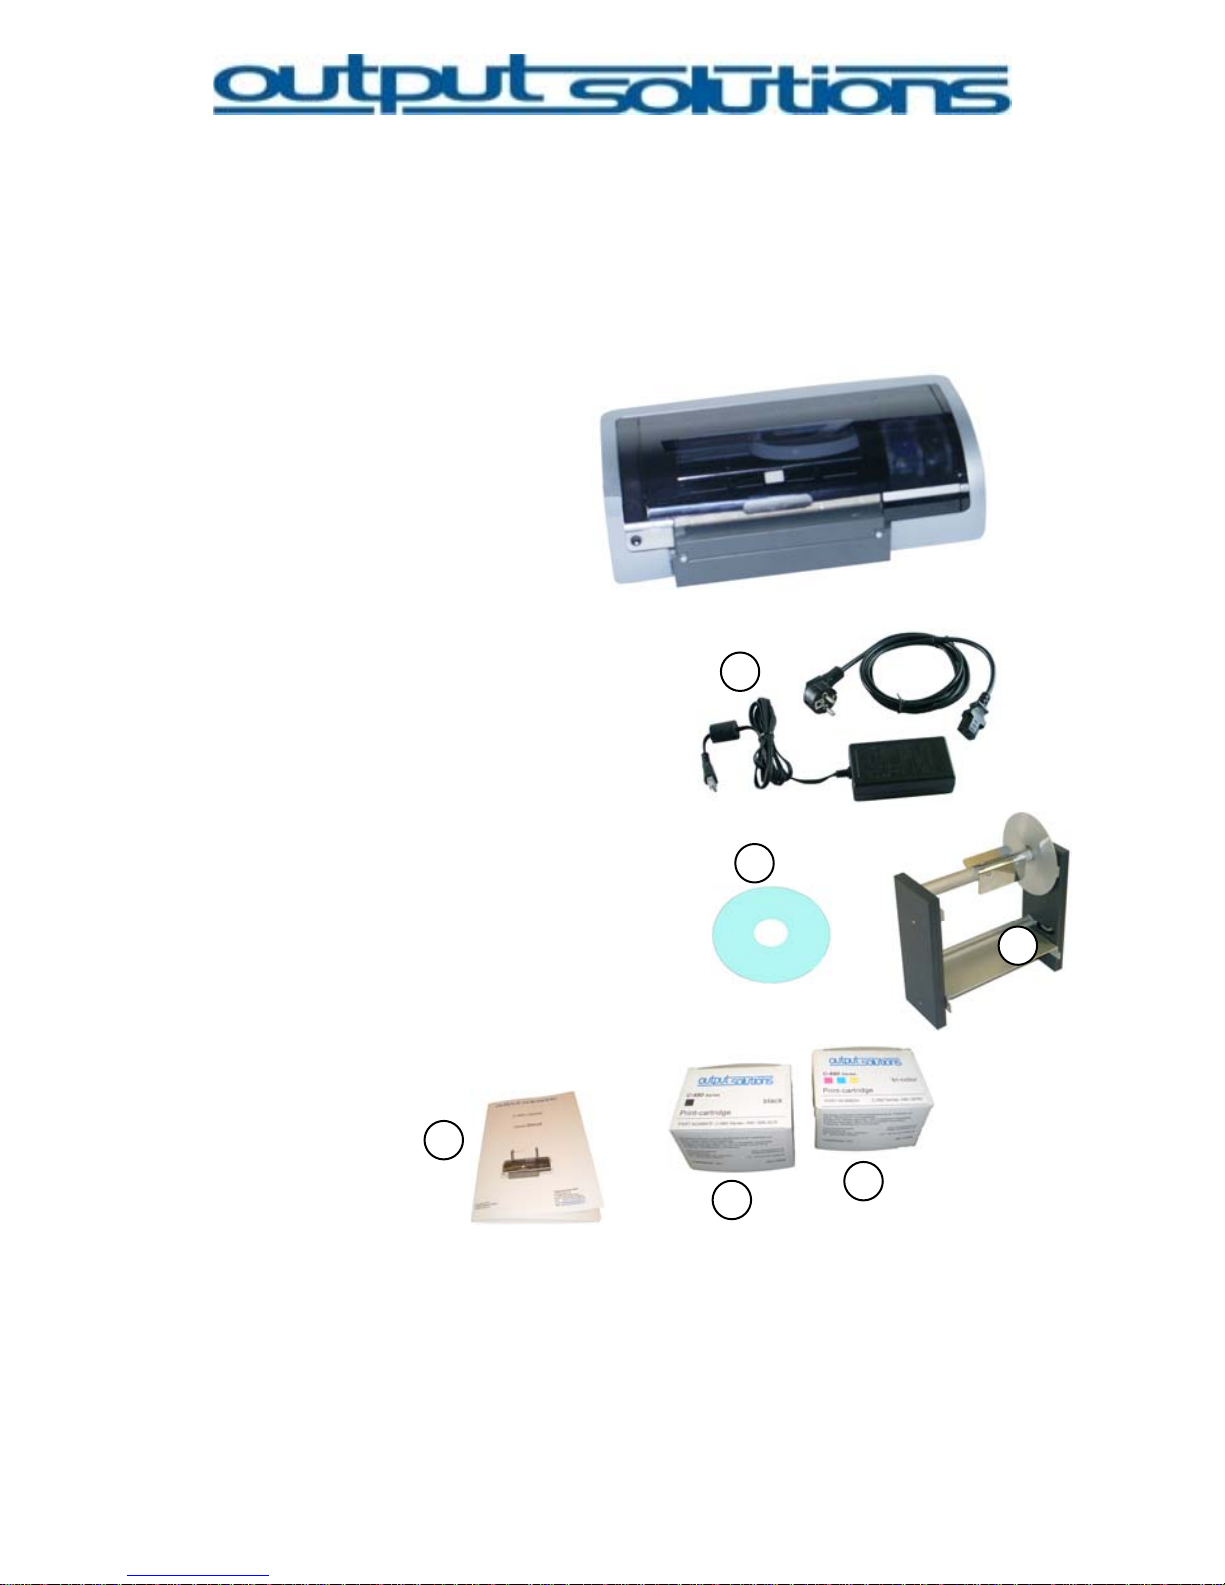
Your printer will be delivered in a carton with the following contents:
Printer
(Packed in a plastic bag and
foam cushions)
1
Accessories
1. Power supply unit
(the appearance may differ from the
picture shown, possibly a seperate line
cord is included)
3
2. Printer software CD
2
3. Roll unit and roll pick-up wi th steelplate
4. Tri-color print cartridge*
5. Black print cartridge *
6. User’s manual
*not included in shipment for every country
!
4
5
6
In case the content of the package is not complete please contact your
local dealer or Godex Europe GmbH.
5
Page 6
II. Terms and conventions
The following terms and conventions are used in this user’s manual.
Terms
The Output Solutions C-680 LabelJet Printer is also specified as
C-680 printer or simply as printer.
Conventions
• marks a listing
marks instructions as shown on pictures
⇒ marks a result of an action
Capital letters mark commands, instructions, functions and key symbols.
Symbols
A Note icon indicates that additional information is provided
Note:
The printer can also be used with only one printer cartridge.
The Caution icon indicates possible damages of the Output Solutions
C-680 LJ –Printer or of an other device.
Caution!:
Do not touch nozzles or copper contacts of the printer cartridge.
The Warning icon indicates possible harms to you or others:
Warning:
Keep new and used print cartridges out of the reach of children.
6
Page 7
III. Connectivity
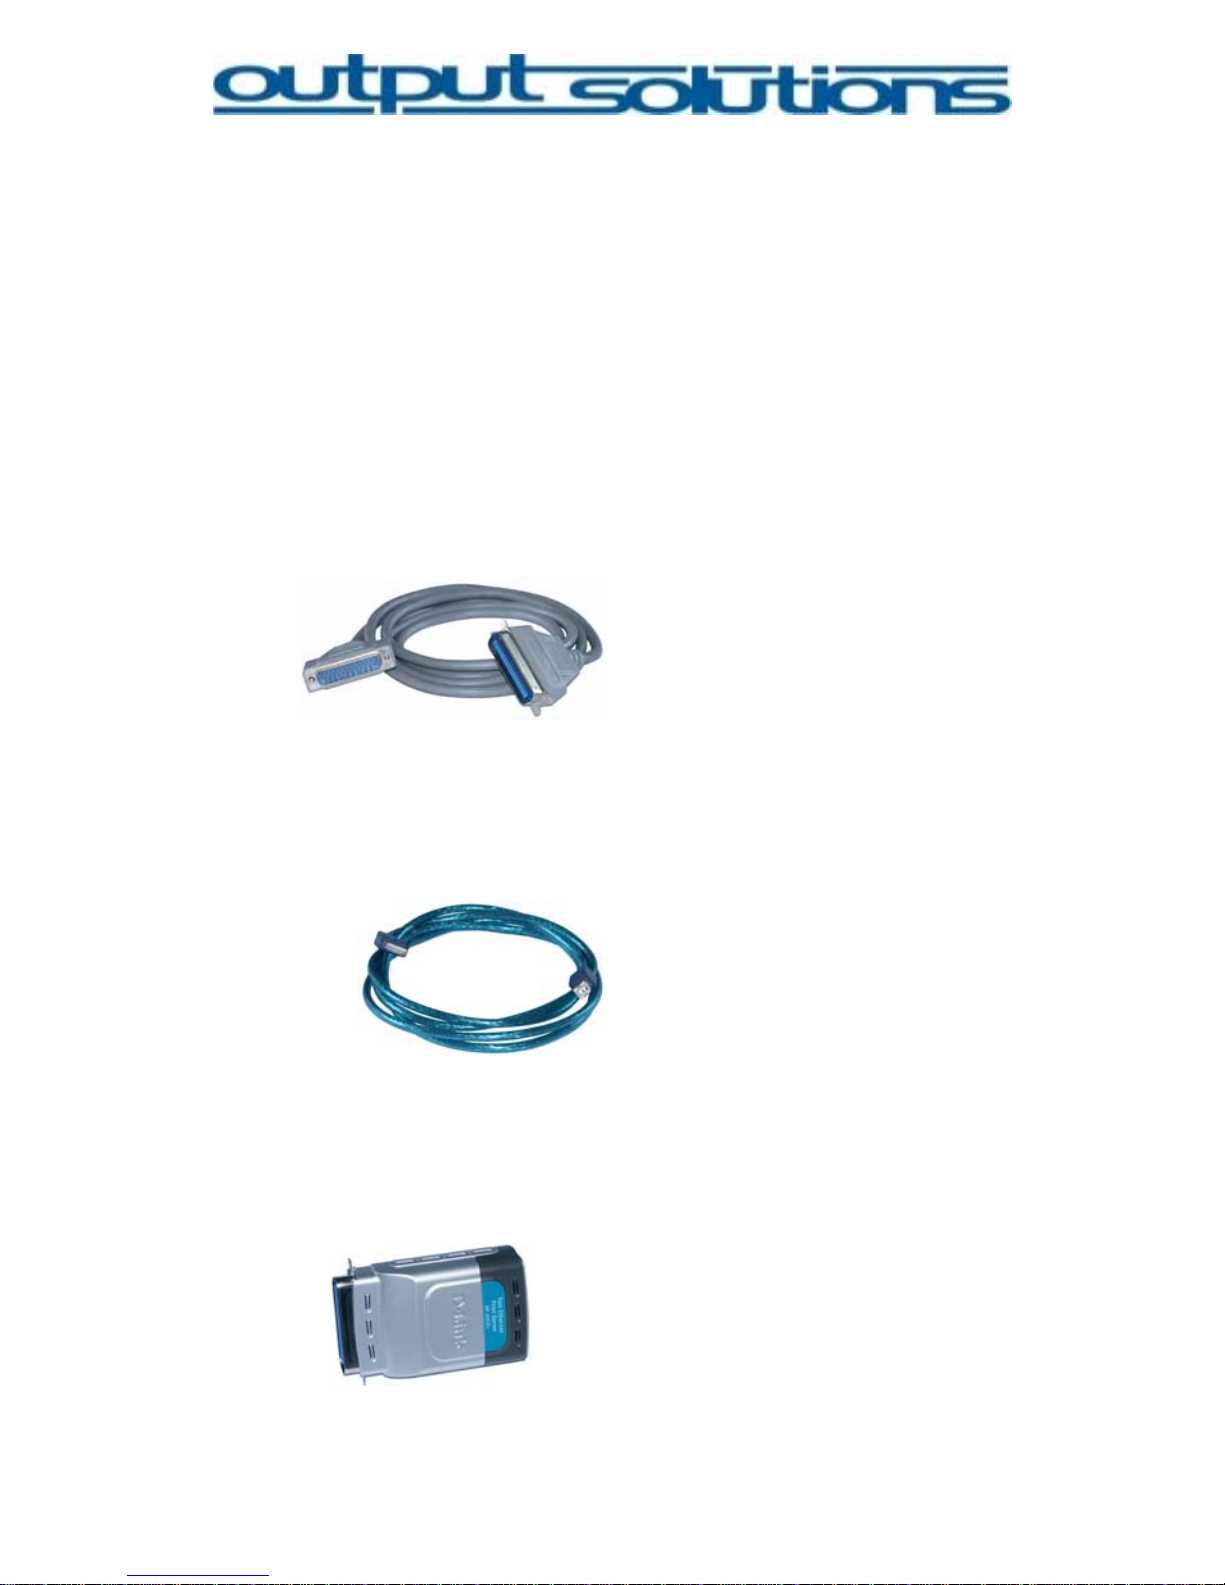
There are several connection options:
• Parallel port
• USB-port
• External network port (optional)
Parallel port
It is recommended to use the IEEE-1284 parallel cable.
(for Windows 2000- or Windows XP-operating systems)
USB-port
It is recommended to use the USB 2.0 cable
(for Windows 2000- or Windows XP-operating systems).
The cable should not be longer than 3 meter.
External Ethernet print server (optional)
The printer can also be connected with a Ethernet print server to a network.
Fast Ethernet print server should be connected to the parallel port of the
printer and to the LAN.
similar figure
7
Page 8
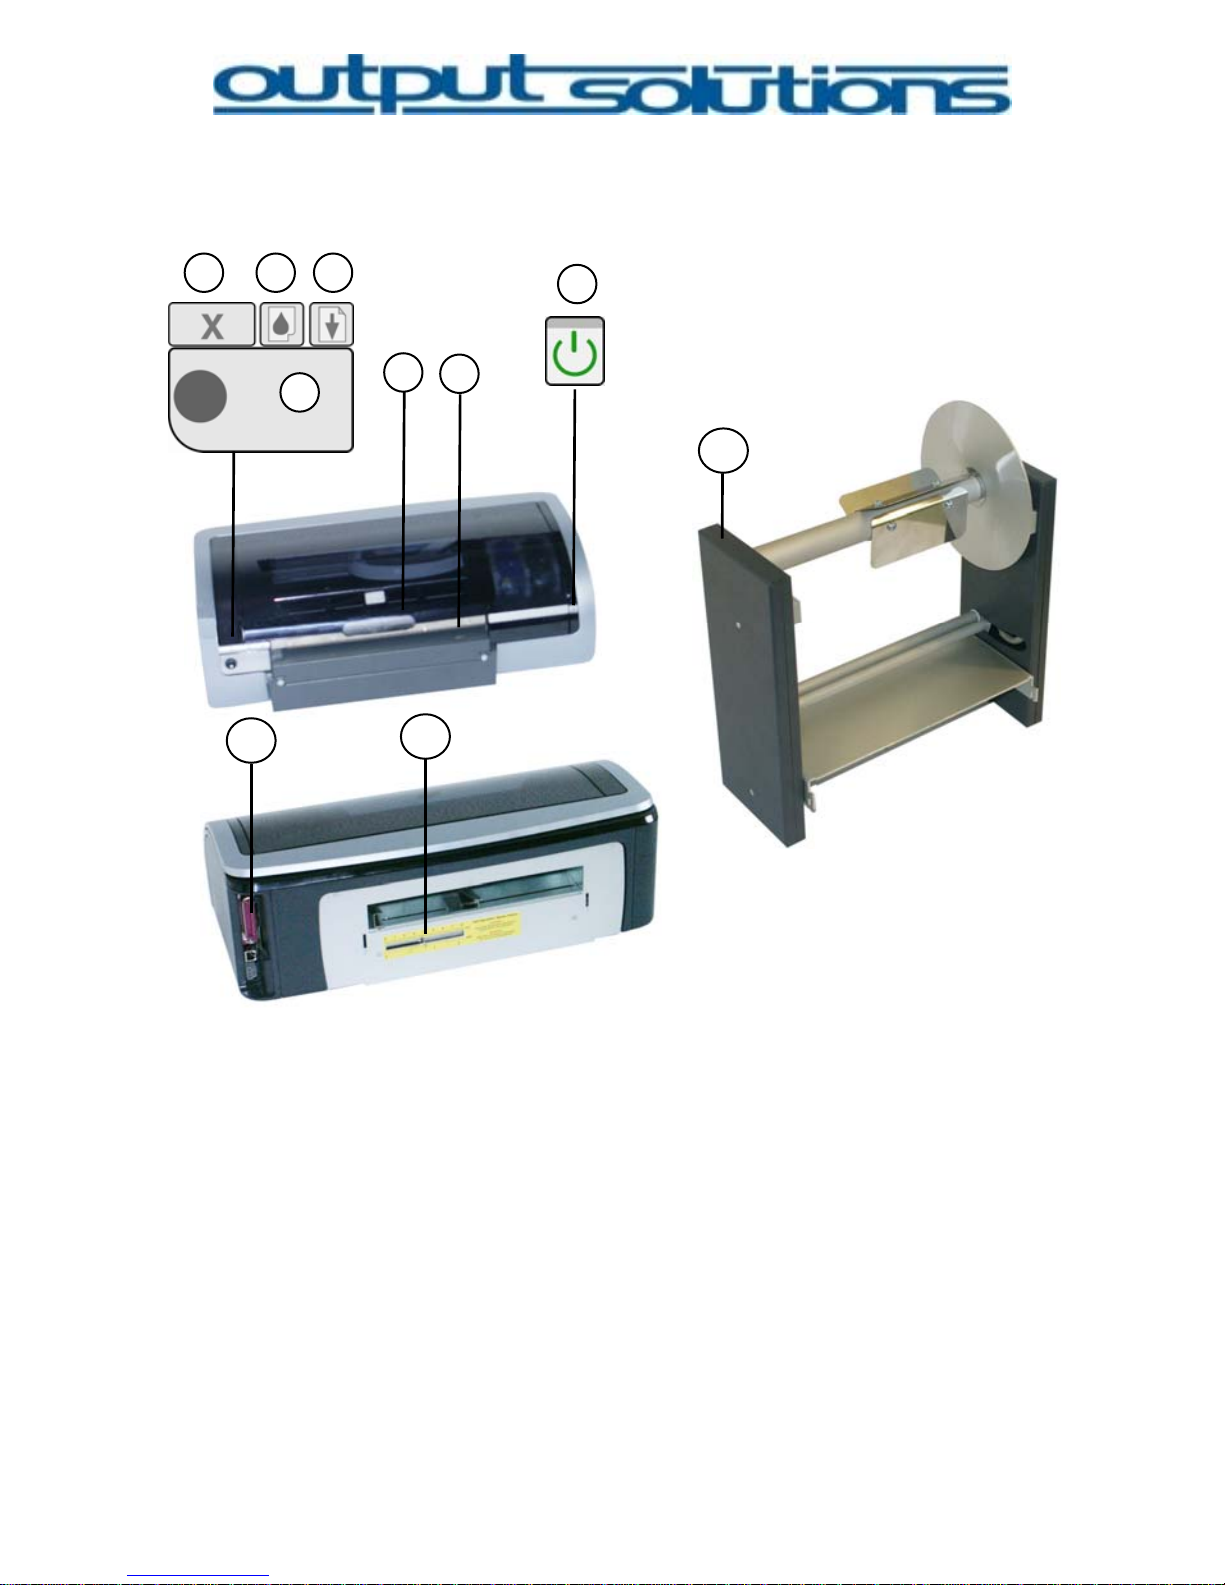
IV. Printer overview
9
8
1
10
5 6 7
4
3
2
1 Power switch 6 Print cartridge status symbol and -LED
2 Paper tear off sensor
(only available with
C-680 Standard)
7 Print cancel button
3 Paper tear off edge 8 The parallel and the USB connector
4 Button (no function) 9
Gap / Black Mark Sensor position
5 Resume button and -LED 10 Label roll holder and label roll rod
8
Page 9
Power switch [1]
The printer can be switched on and off with the power switch. After pushing
the button it will take a couple seconds until the printer is ready. The powerLED starts flashing when the computer processes dat a.
Caution!:
Always turn on/off the printer using the power switch. Using the switch of
the connection plug board, surge protector or ta power outlet can cause
damages to the printer and/or the ink cartridge will run dry.
Paper tear off sensor [2]
After the sensor detects that a label is printed, the printer will wait to print
the next label until the label is removed. This function is only active if
selected in the printer driver.
Tear-off edge [3]
Tear off the label by pulling it up against the tear-off edge.
Warning:
The tear-off edge could cause injuries.
Button (no function) [4]
On this printer this button has no function.
Resume button and –LED [5]
The Resume-LED flashes, if e.g. the paper tray is empty or a paper jam
has to be cleared. When the problem is solved press the resume button to
continue printing.
Print cartridge status symbol and –LED [6]
The print cartridge status-LED is on or flashes if the cartridge must be
tested or replaced. In the driver tab TOOLBOX you can display the actual
ink level of the cartridges.
9
Page 10

Print cancel button [7]
Pressing the print cancel button cancels the current print job.
The indicator of the Gap / Black Mark sensor position [9]
Sensor lever for adjustment of the Gap/Black Mark-Position.
10
Page 11
V. Installation
Note:
Follow the instructions one by one:
• Install driver, connect printer
• Connect printer before fixing the label roll unit
• Calibrate print heads
• Adjust printer to label size
• Install label roll unit
Install driver
Put the printer driver software CD in CD-ROM and follow the
instructions.
Install driver software.
Connect printer before fixing the label roll holder (see following page).
The operating system identifies new hardware.
Note:
If you do not have administrator rights, the administrator has to install the
driver software!
Connect printer without label roll unit
Position the printer at its allocated space.
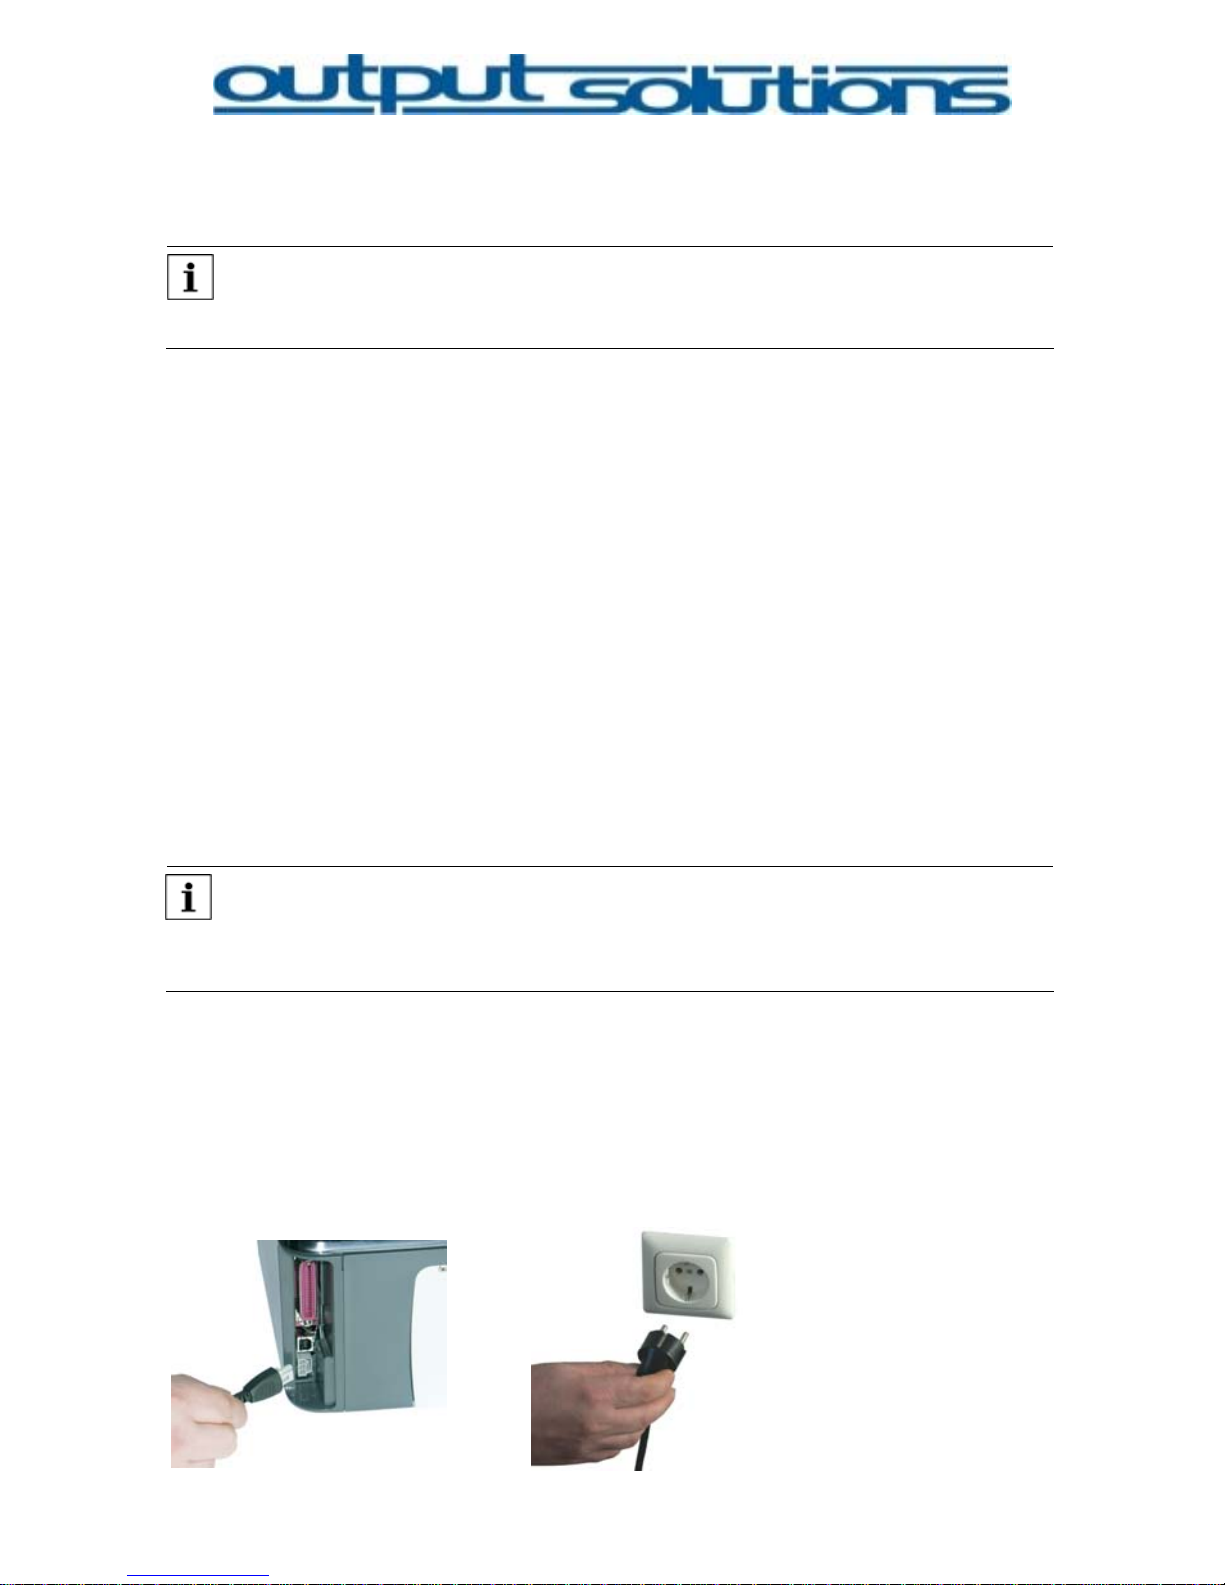
Connect the printer to the mains supply by connecting the low voltage
plug with the printer.
11
Page 12
Connect the power supply with a 230V power socket.
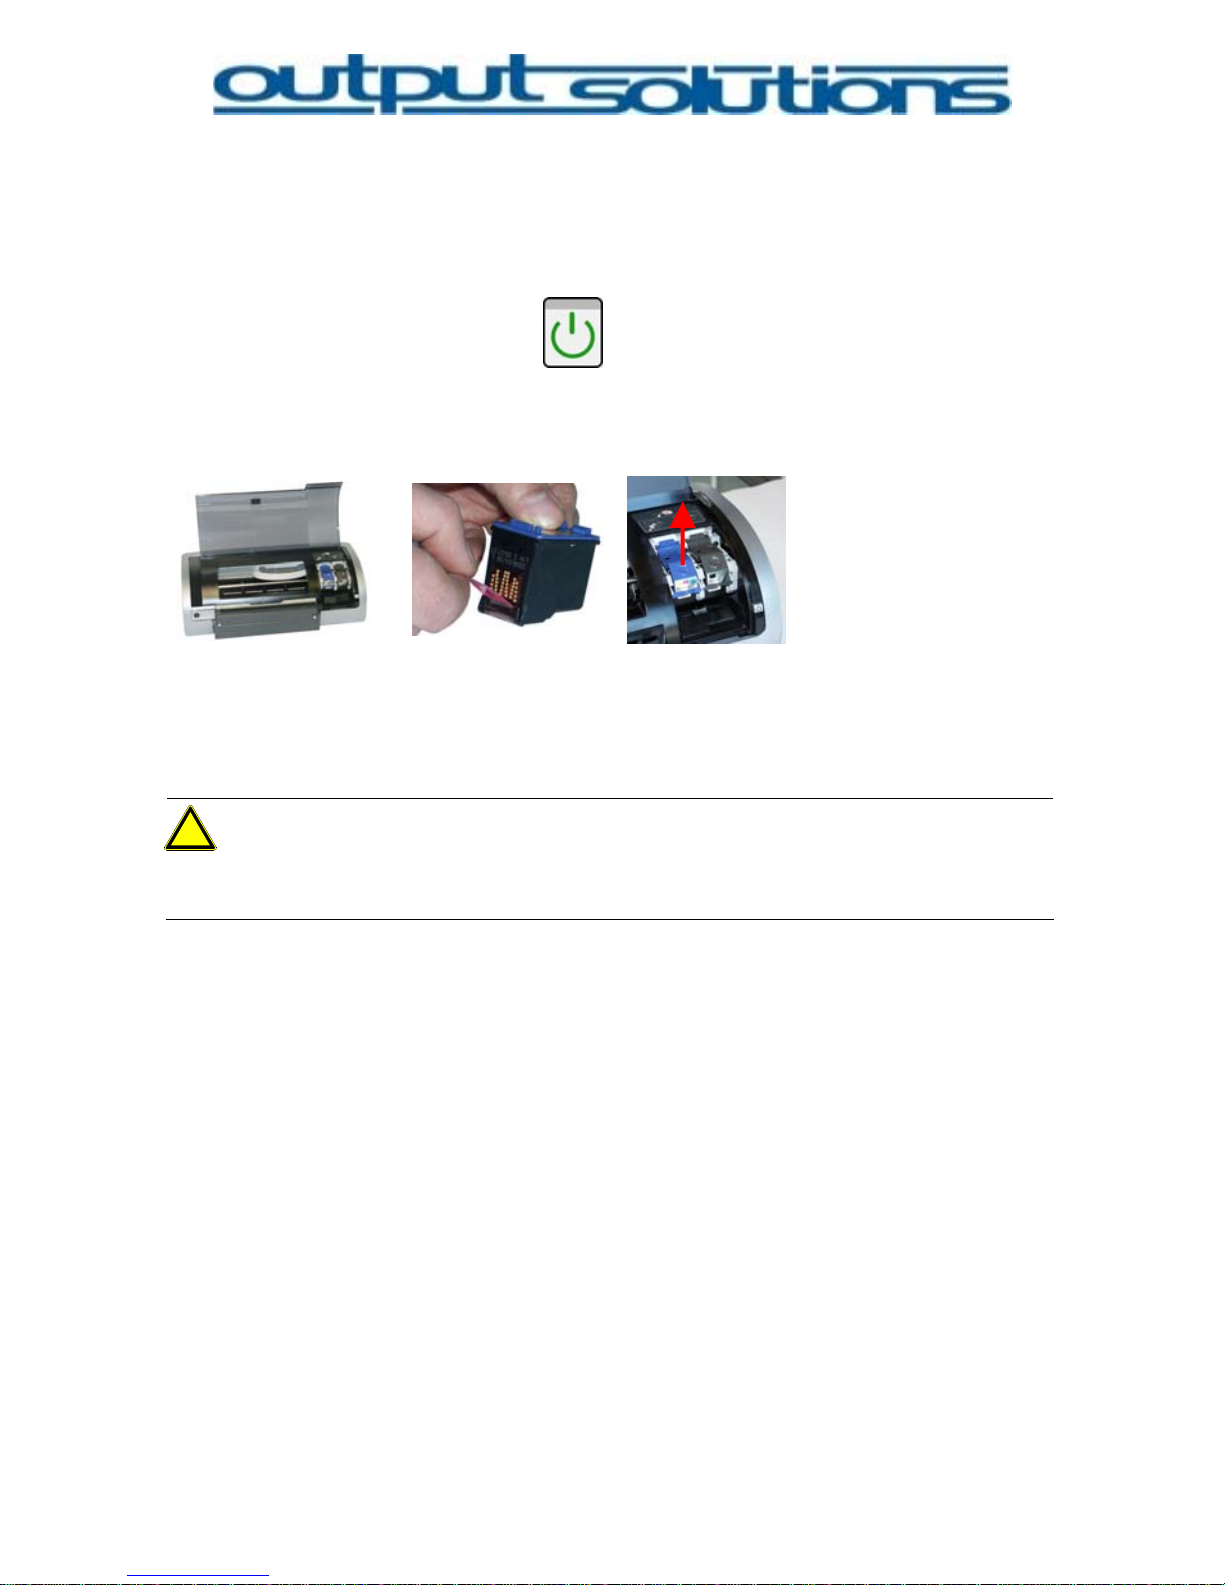
Press power switch.
Check if printer is turned on.
Open top cover.
Unpack Tri-Color print cartridge and take off the protection tape.
Lift the print cartridge latch.
Caution!:
Do not touch nozzles or electric contacts!
12
Page 13
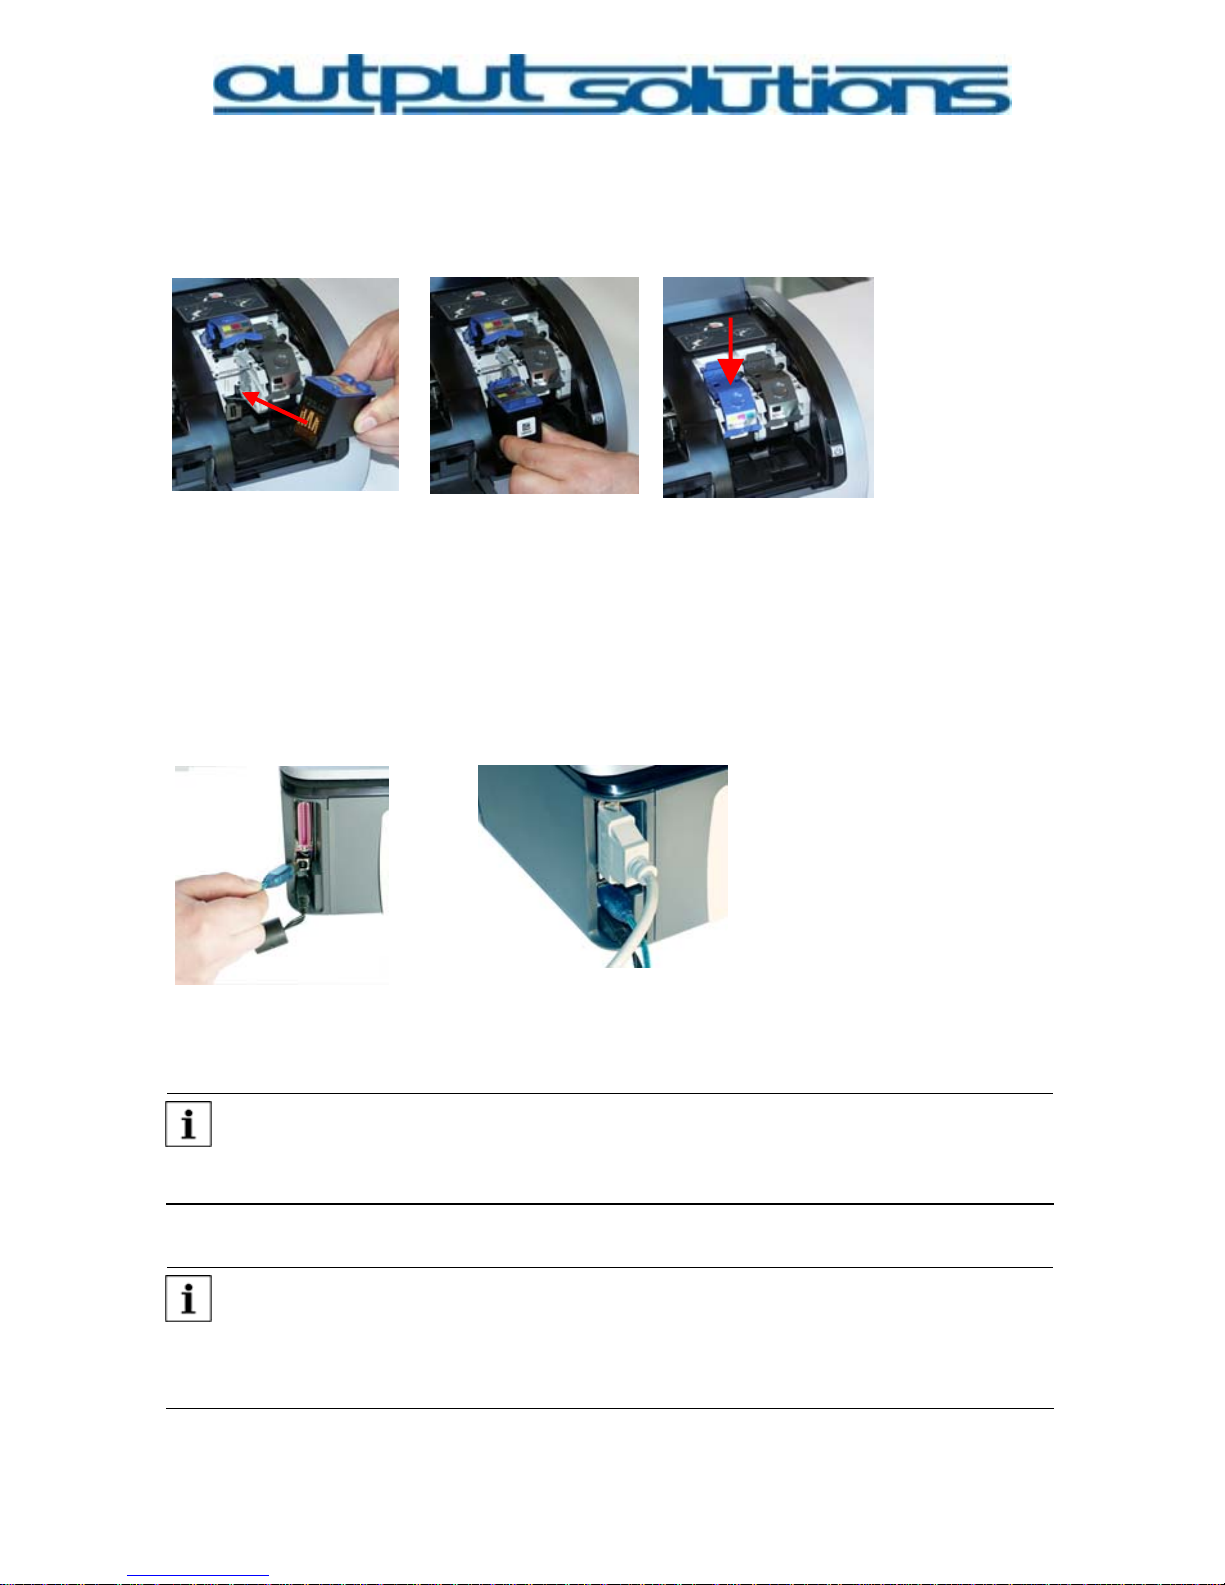
Insert new cartridge with contacts backwards and slide it into the print
cartridge cradle.
Push down the print cartridge latch until it locks in place.
Insert the black print cartridge following the same procedure and close
top cover.
Connect the USB-cable to the USB-port of the printer and connect the
printer to the computer, or
Connect the parallel cable to the parallel port of the printer and connect
the printer to the computer.
Note:
USB or Parallel cables are not part of the delivery!
Note:
Calibrate the print head after each cartridge exchan ge. The calibration
page will be printed on a plain DIN A4/letter sized sheet of paper!
13
Page 14
Calibrate print heads
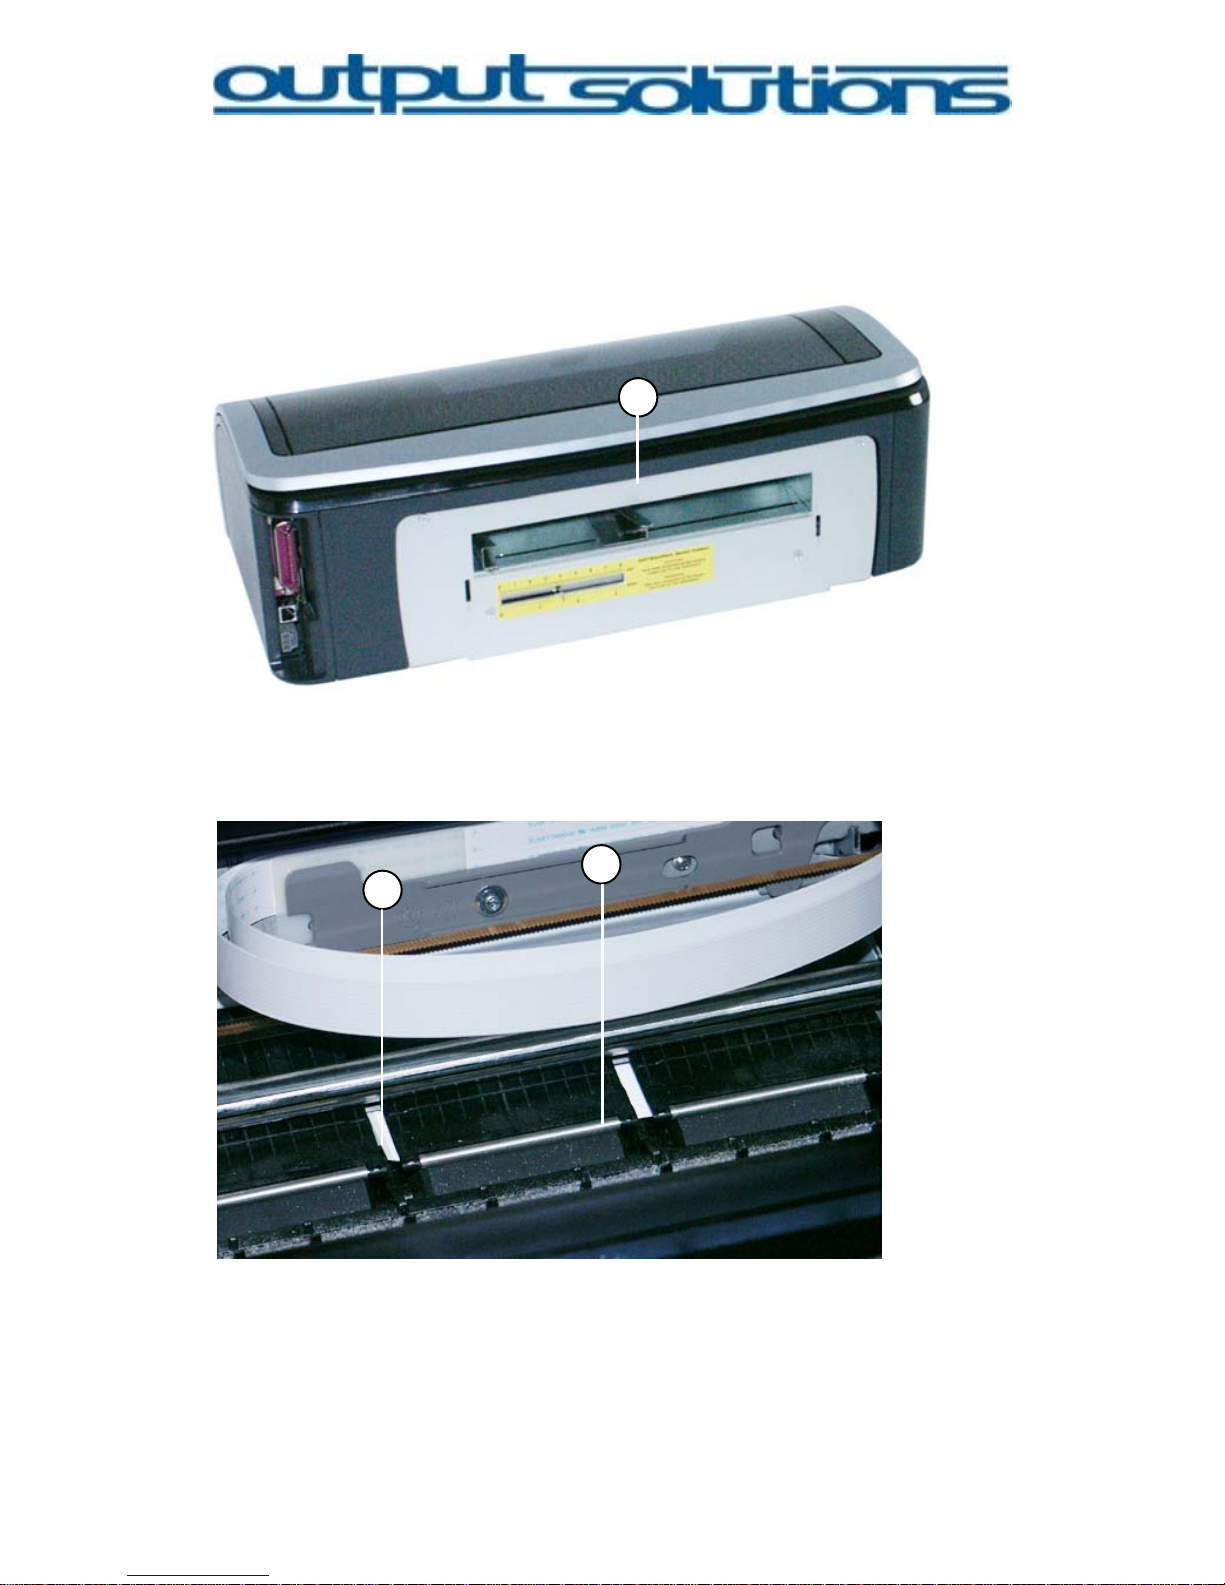
Slide paper guides [1] firmly against the paper and slide the DIN
A4/letter sized paper sheet forward until got stuck [2].
Uplift the top cover and check if the paper is slided in properly [2].
2
1
1
14
Page 15
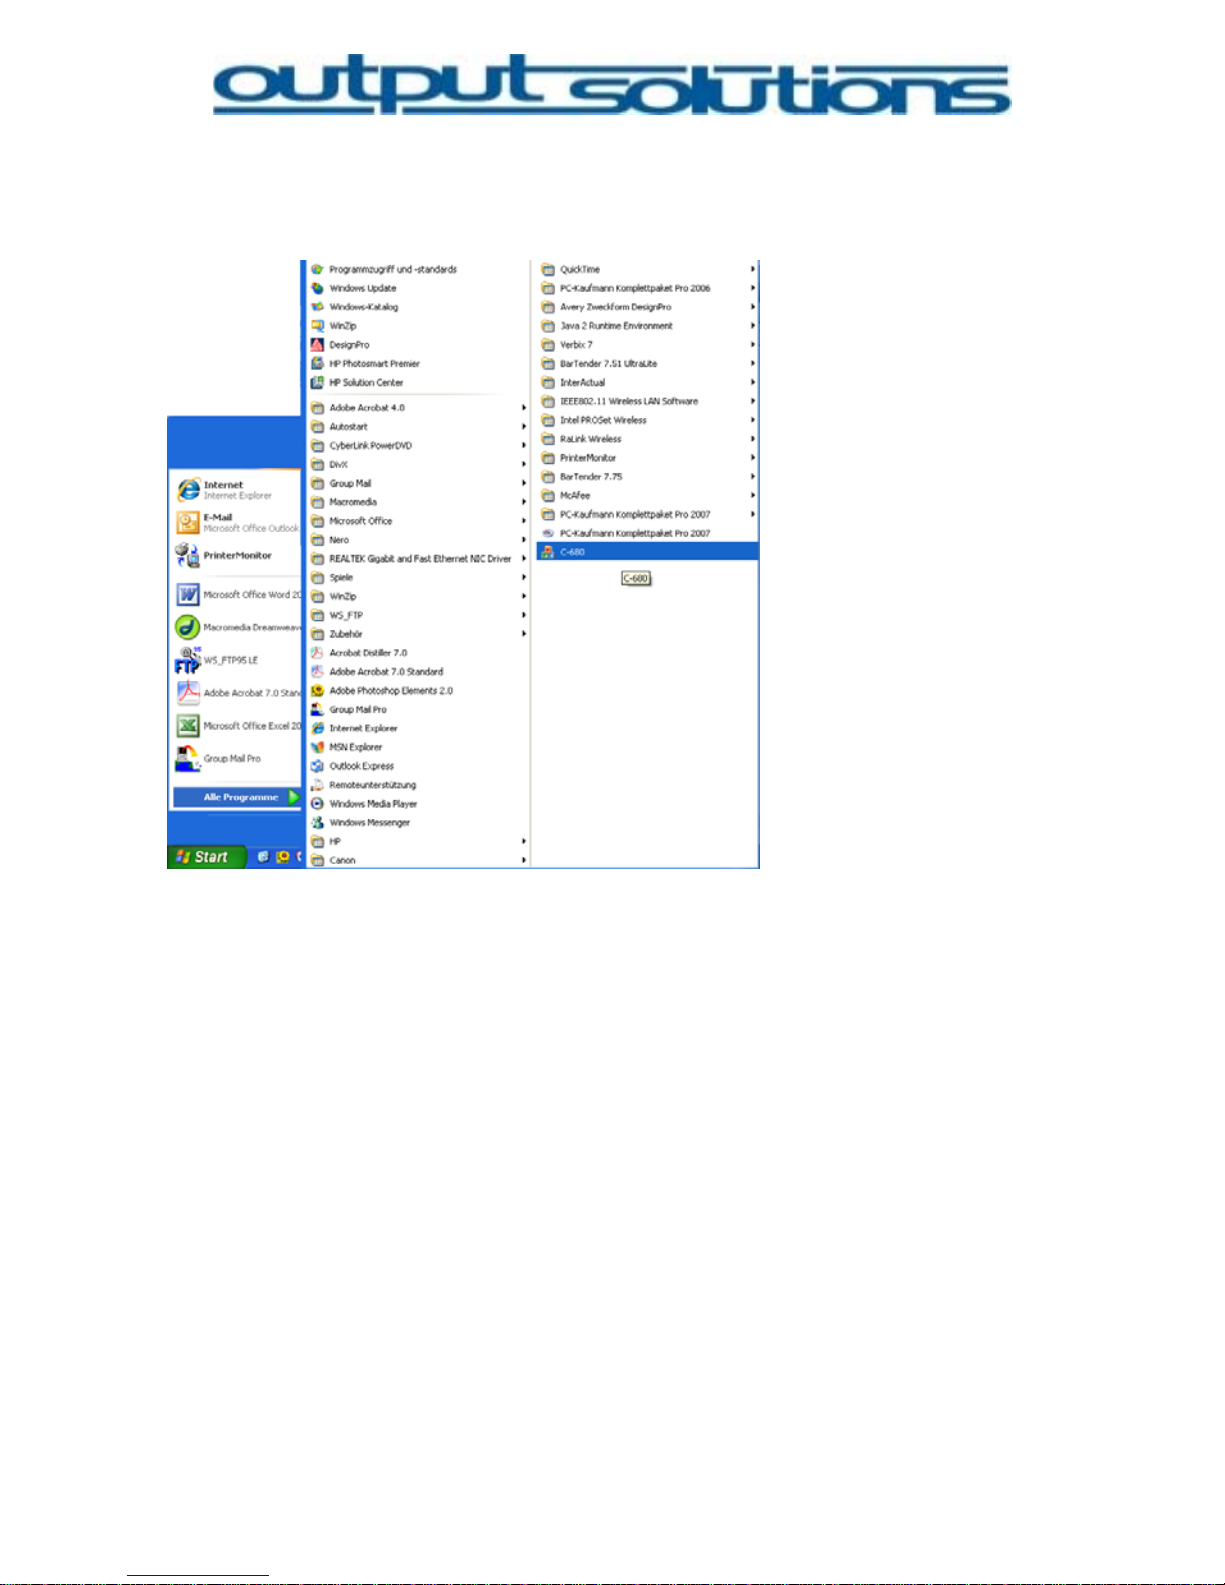
Open START/PROGRAMS and open the program C-680 (XP screen).
15
Page 16
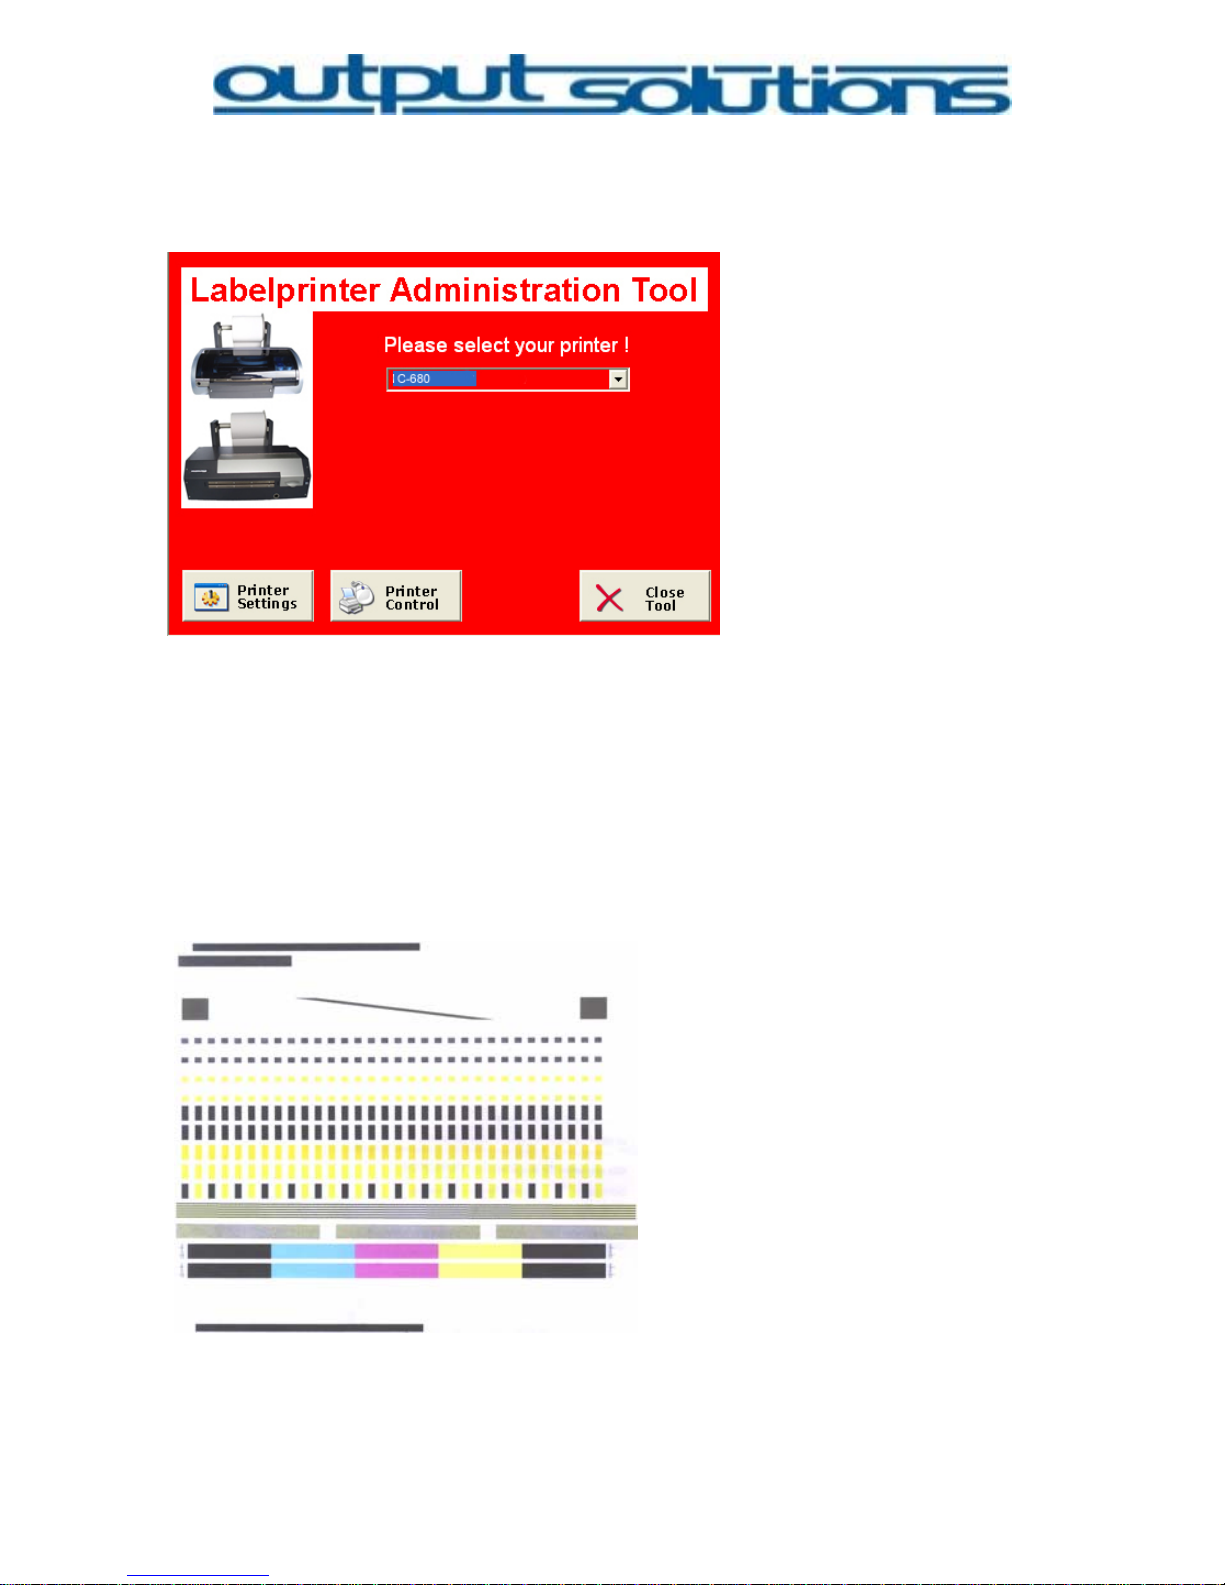
The LABELPRINTER ADMINISTRATION TOOLBOX will be displayed.
Select the printer driver C-680 LabelJet.
Click on button PRINTER CONTROL.
⇒ The PRINTER CONTROL BOX opens.
Click on button CALIBRATE PRINTHEADS
⇒ A calibration test page will be printed.
16
Page 17
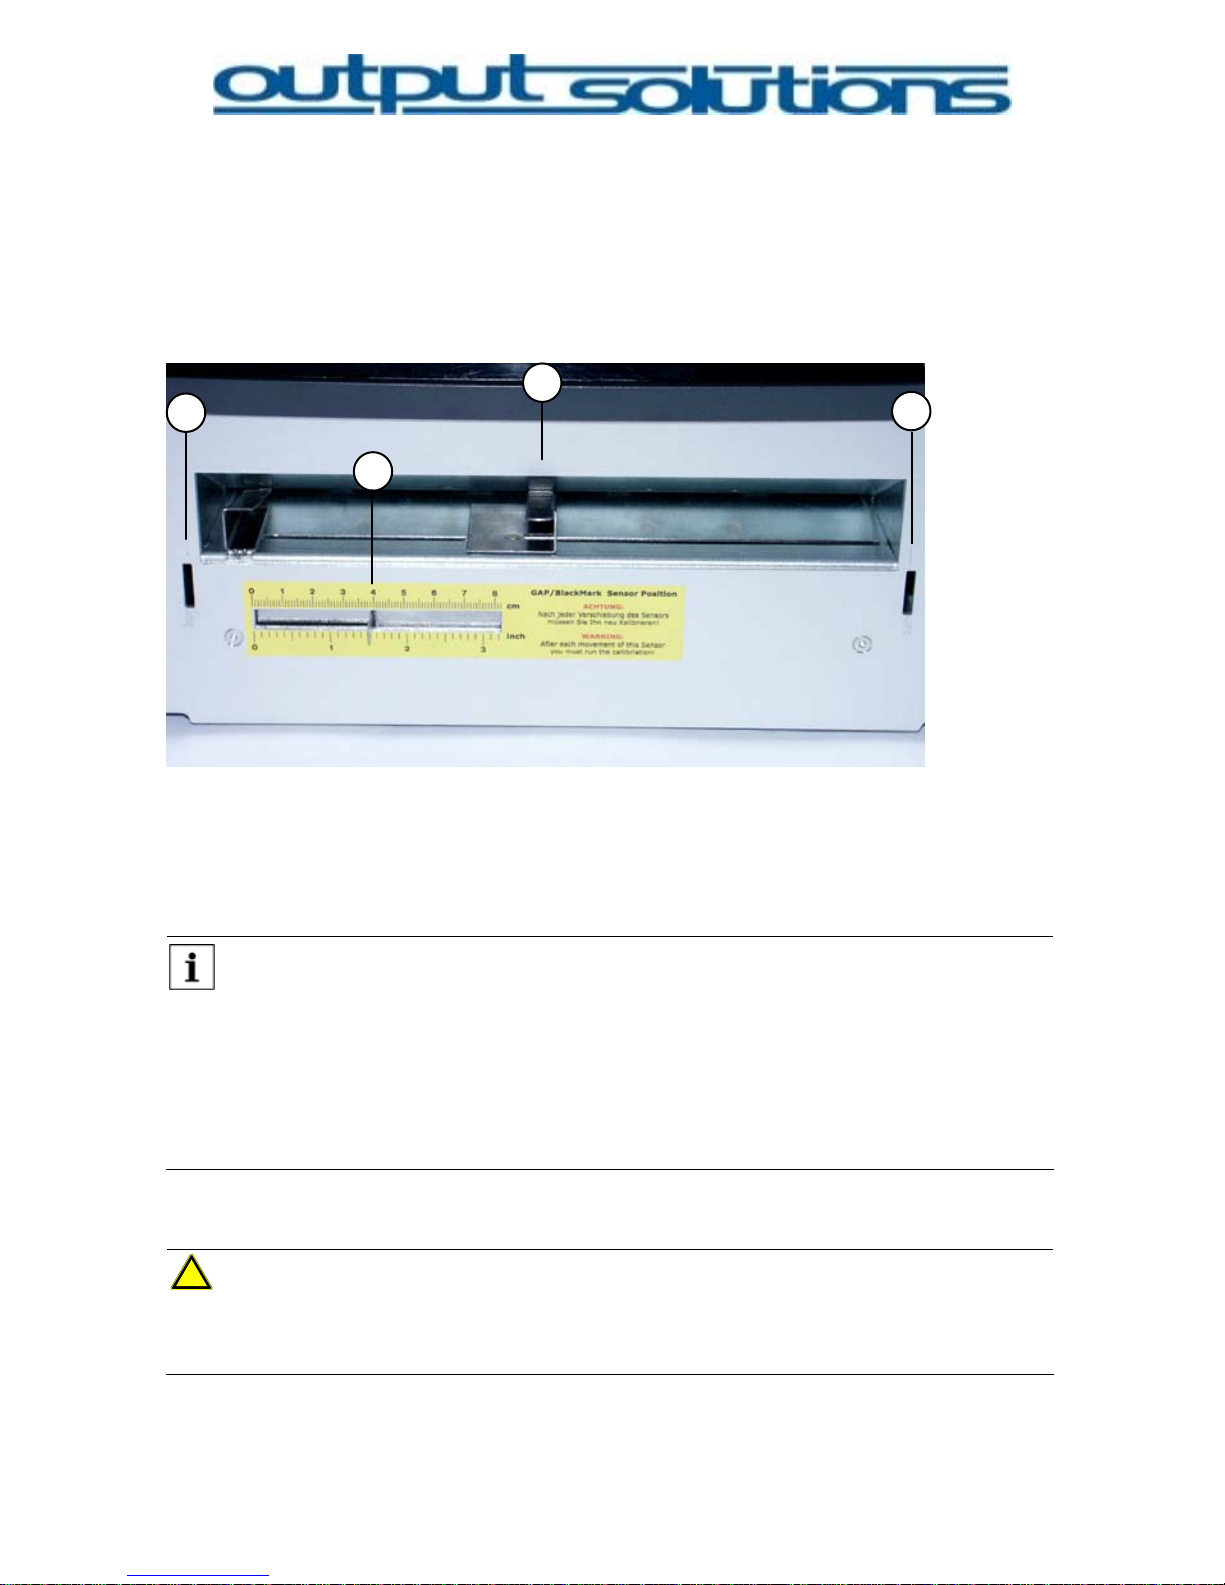
Calibrate printer to label size
In the PRINTER CONTROL BOX click on button CALIBRATE SENSOR.
The driver calibrates the sensor to the label and the label carrier. After that
the GAP-/BLACKMARK sensor is able to detect the gap between labels.
1
2
1
3
Measure the width of the label roll.
Set the sensor flag GAP-/BLACK MARK [2] at a position, which will
detect the gap between labels.
Note:
If labels are round or oval you must place the sensor lever into a position
where the gap between the labels is the most minimum.
Depending on the label type you must activate Gap or BlackMark button
in the LABELPRINTER SETTINGS BOX of the ADMINISTRATION
TOOL!
On the right side set the paper guide[3] to the label width.
Caution:
To avoid e.g. paper jam slide the paper guides firmly against the edges of
the paper.
17
Page 18
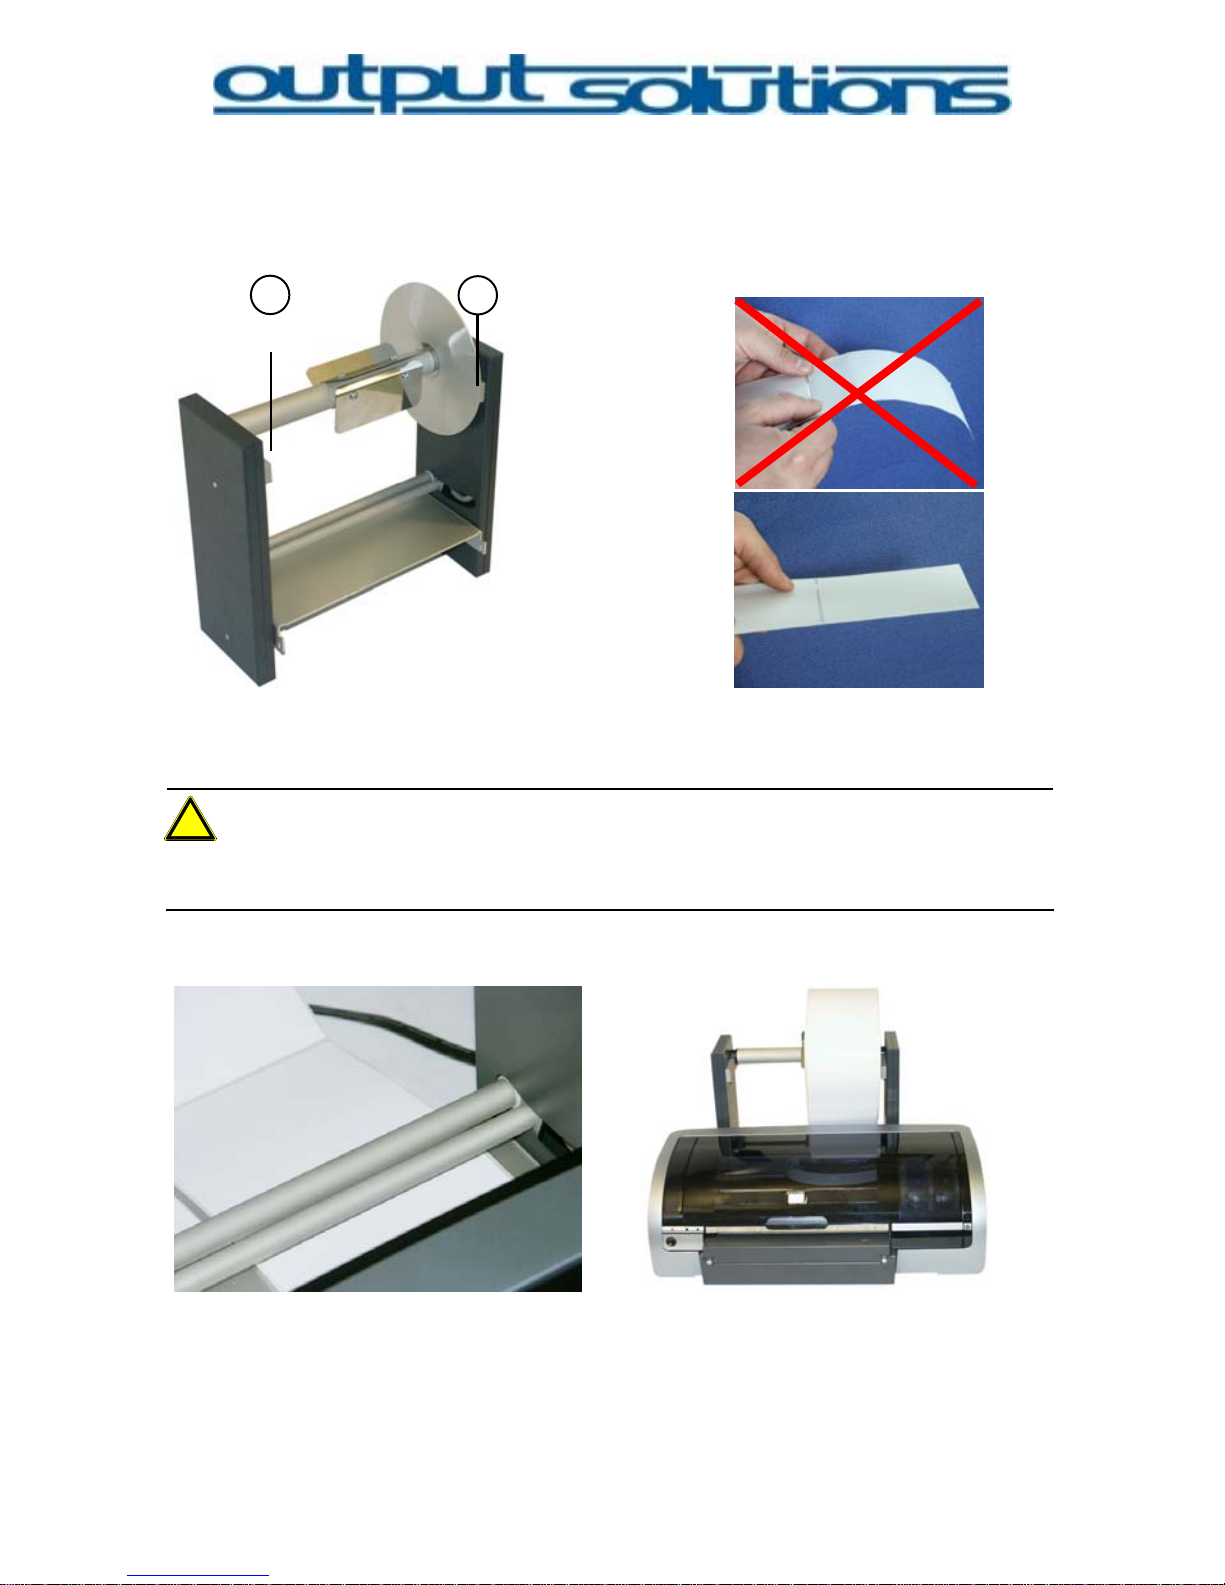
Install roll unit
Insert roll rod [1] into the core of the label roll until it is at its place [2].
Attach roll unit to the back of printer by sliding it into the slots
positioned at both sides of the paper entry.
Insert labels into the paper feed until it got stuck.
Caution!:
2
1
Be cautious that the label is not bended downwards to avoid paper jam.
Put the roll rod with the label roll in the bearings of the label holder and
tighten the label web by spinning the label roll gently backwards.
18
Page 19
Press the power and resume button at the same time or click on the
button LOAD/UNLOAD in the PRINTER CONTROL BOX
⇒The label material will be loaded.
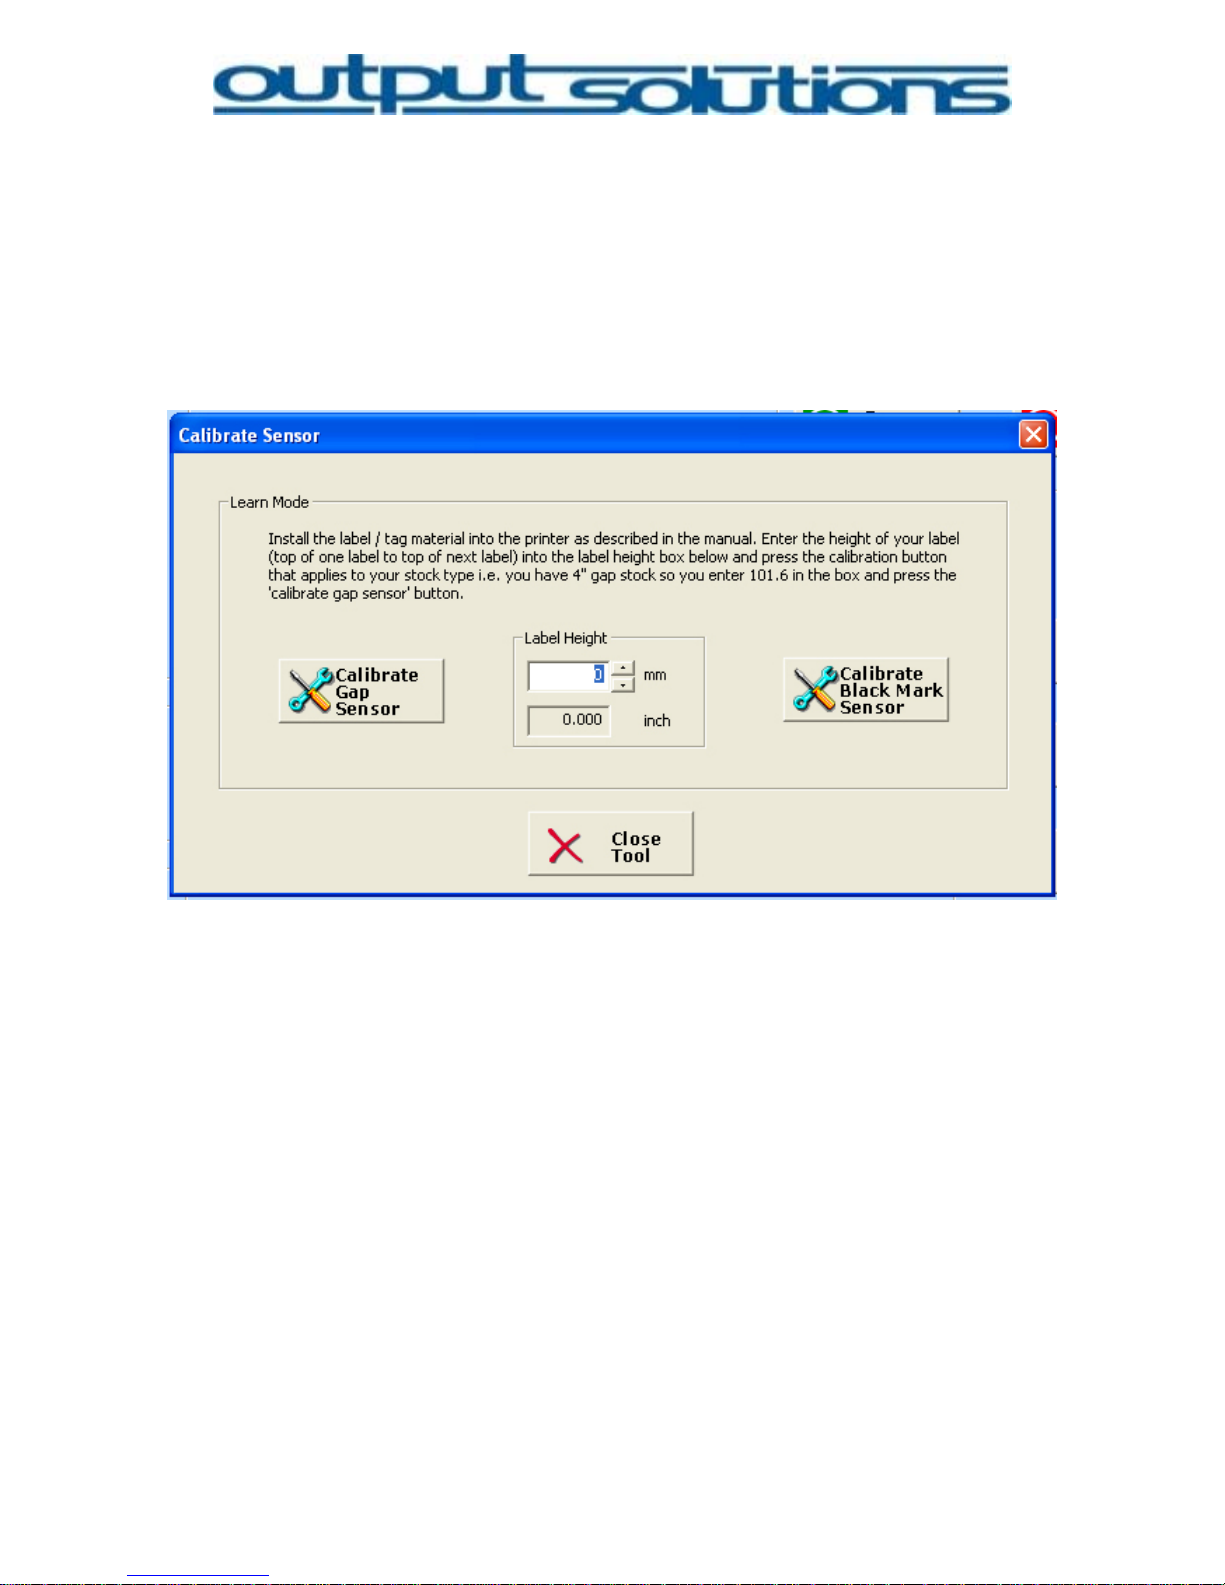
Click on the CALIBRATE SENSOR button.
⇒ The CALIBRATE SENSOR window opens.
Enter the height of your label in the box (reg. label terms see chapter
X. Label specification) and click on CALIBRATE GAP SENSOR or
CALIBRATE BLACKMARK SENSOR.
⇒ The printer will be calibrated.
The printer is ready for use.
19
Page 20
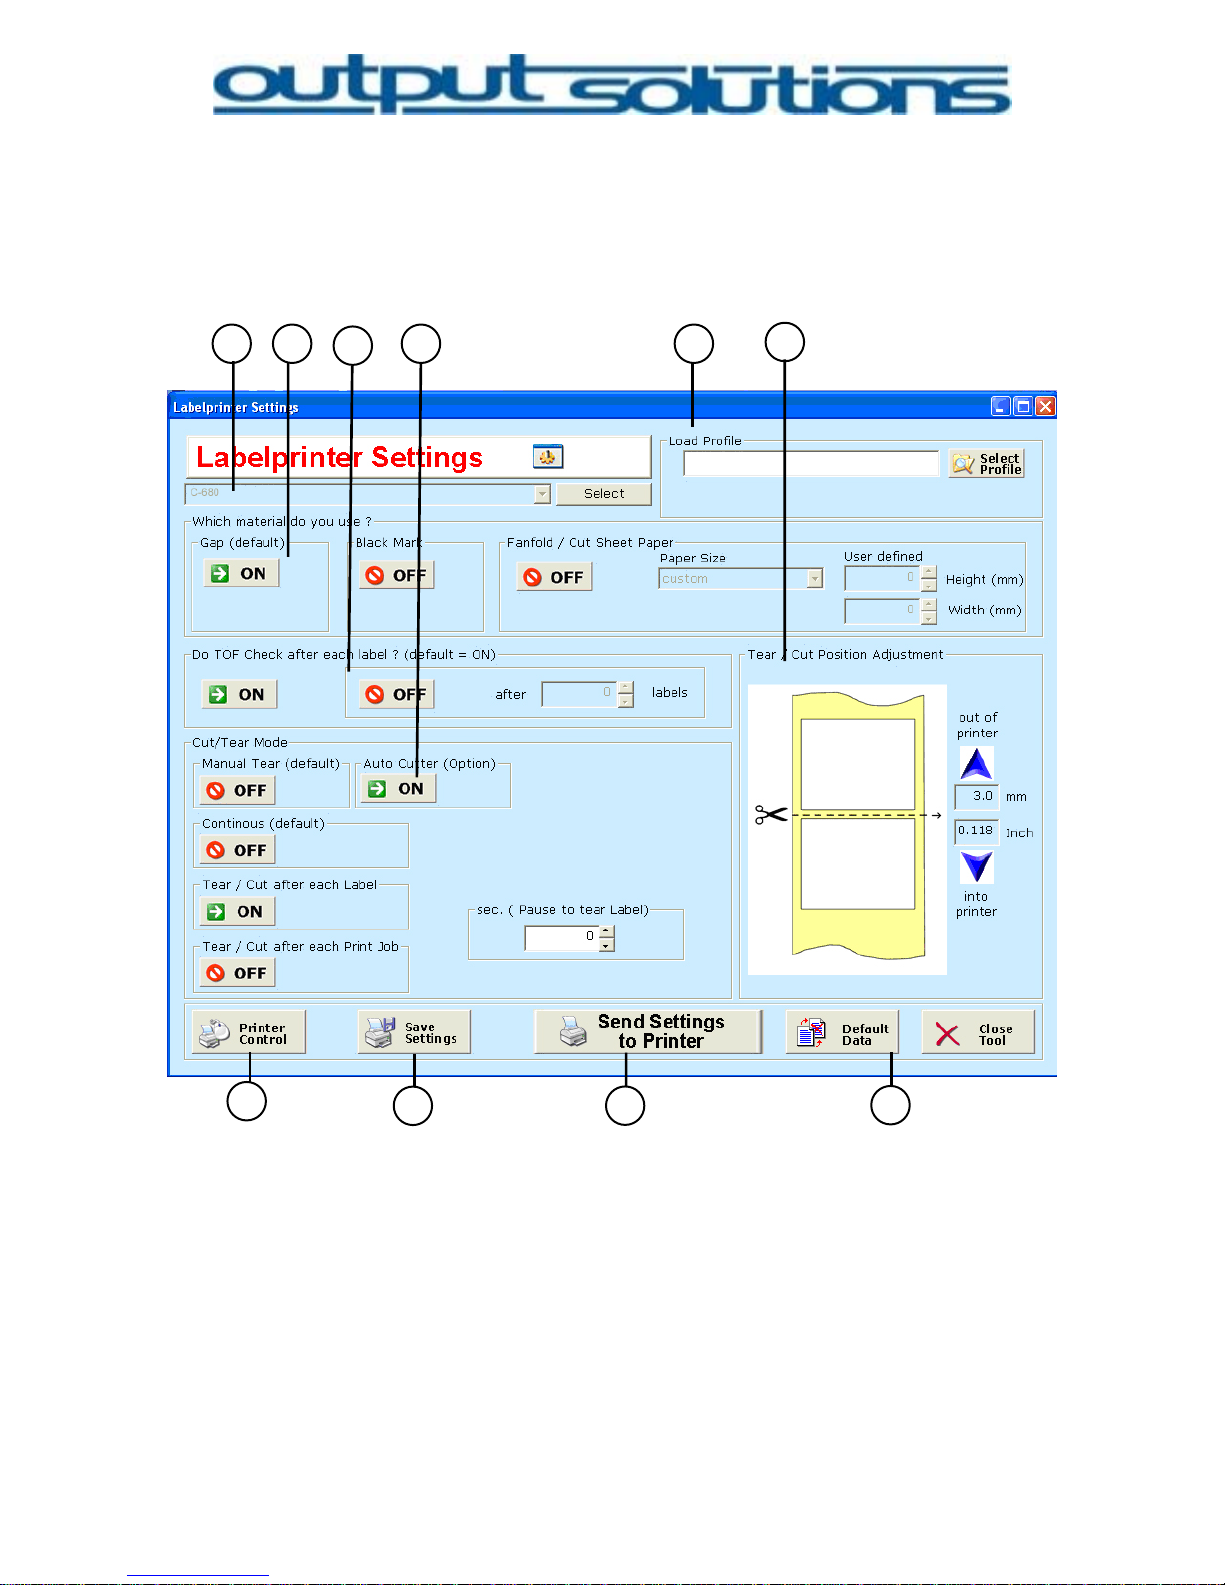
VI. Labelprinter Administration Tool
LABELPRINTER SETTINGS
1 2
3
4
5
6
9
8
7
6
Pull-down Menu [1]
Select the C-680 LabelJet printer driver. With the Labelprinter
Administration Tool you can manage several C-680 printers.
Confirm your selection by clicking on “SELECT” button.
20
Page 21
Which Label material do you use? [2]
• Gap
Activate this button if you use die-cutted labels on a roll.
• Black Mark
Activate this button when the sensor should detect preprinted black
bars on the label web.
• Fanfold/Cut Sheet Paper
Activate this button when you want to print on single paper sheets.
You can either use the predefined paper sizes or define the app ropriate
size manually.
Do TOF after each Label [3]
The TOF checks the GAP after each printed label. If you deactivate this
function the chance of misprints increases. You may choose TOF
check after a certain amount of printed labels, e.g. 3.
Note:
It is recommended not to deactivate the TOF check despite it is a bit
slower! The printer checks the previous gap after e ach printed label.
We do not recommend to deactivate the TOF check function!
Cut/Tear Mode [4]
• Manual Tear: default setting
Tear-off label by hand
• Automatic Cutter (optional): this option is only available with the C-680
with metal cabinet
The cutter cuts the labels after the printjob.
• Button: Continous (default)
The printer stops after the last printed label of the printjob.
• Button: Tear/Cut after each label
The printer will stop after each printed label and waits till the printed
label is torn off. Then the printer starts printing the next label.
•
21
Page 22
• Tear/Cut after each print job
The printer will stop after each print job and is going to wait till the
printed labels are torn off.
• Select the time after Tear off
This options defines the time the printer is going to wait before printing
the next label
Tear/Cut Position Adjustment [5]
In case the tear edges are not centric between the labels you can
adjust the position in both directions (forward/backward).
By clicking the arrow keys the label material will be moved in or out of
the printer in 0.5 mm steps.
Save Settings and Load Profile [6]
This functions allows you to save different print profiles and/or to load
previously saved profiles.
Send Settings to printer [7]
To activate all your settings you have to submit these to the printer.
Printer Control [8]
This button opens the Labelprinter Control Box.
Default Data [9]
Activate this button for the default values!
Note:
After activation/deactivation of any option press “Send Settings to printer”
to submit the settings to the printer!
22
Page 23
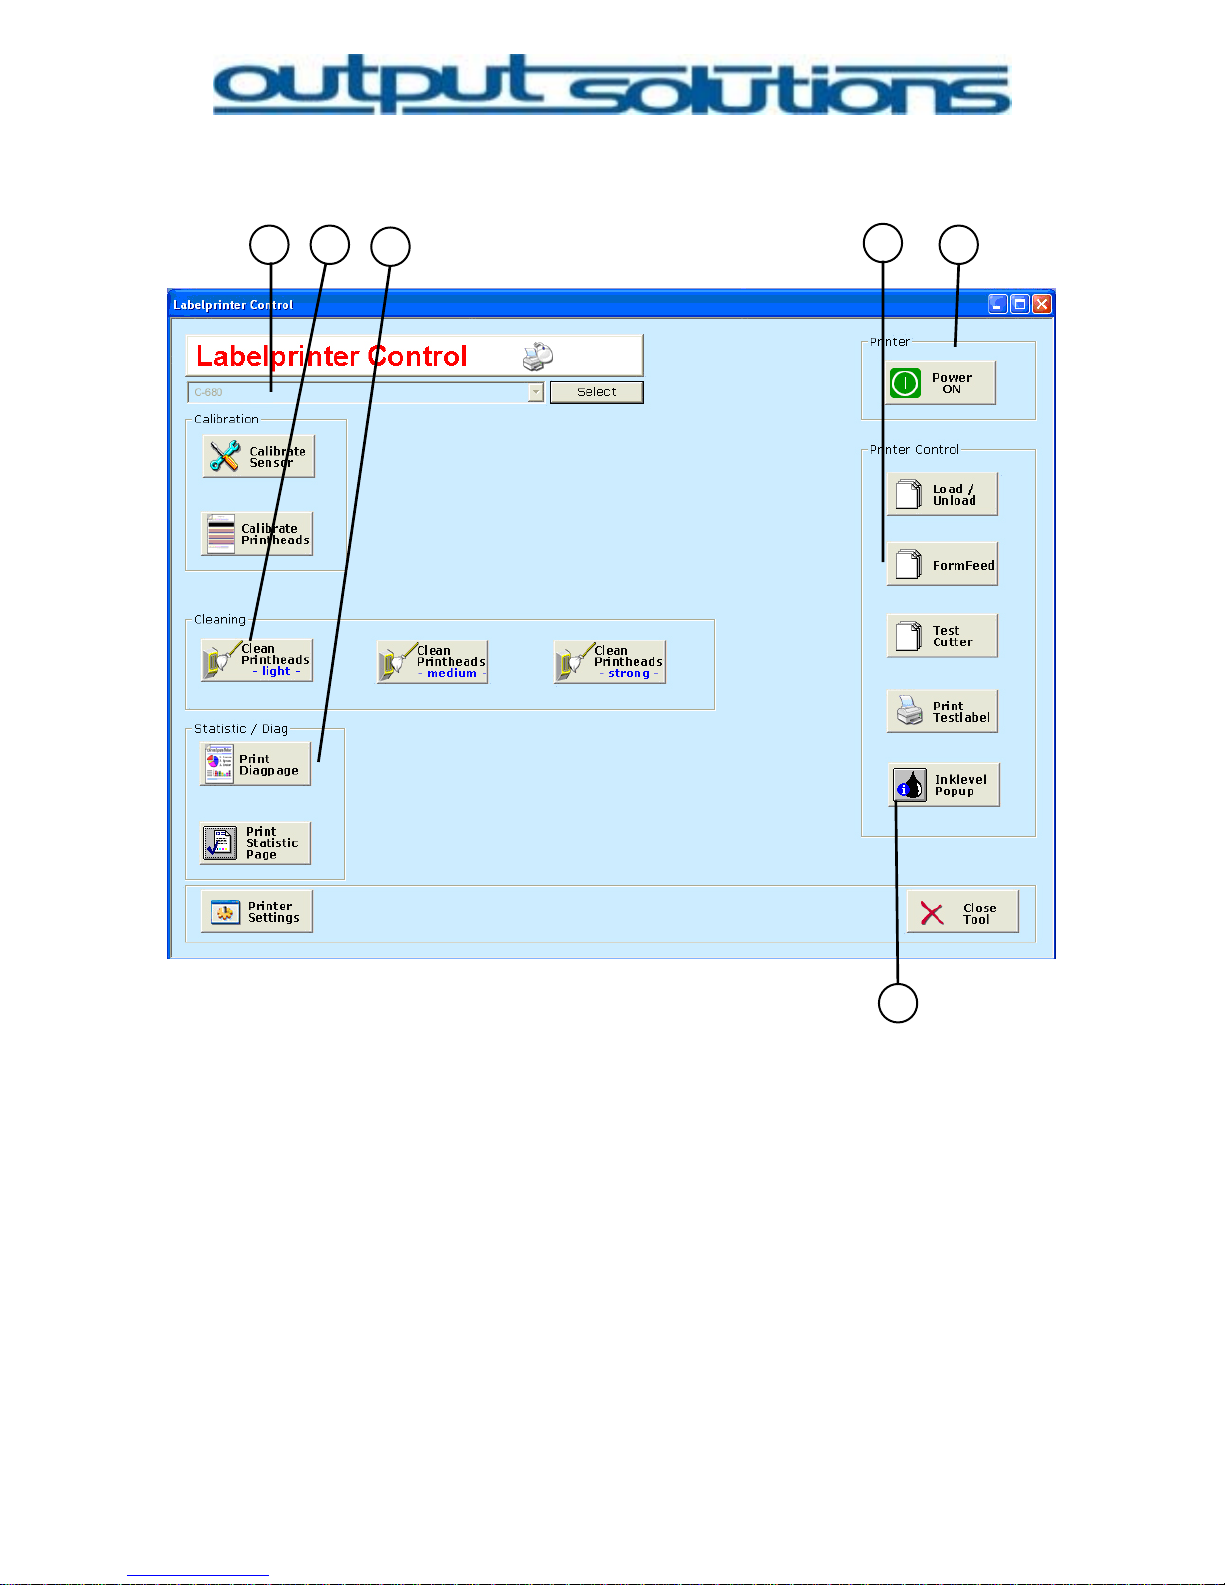
LABELPRINTER CONTROL
1 2
3
4
5
6
Calibration [1]
• Button: Calibrate Sensor
After changing from GAP to BlackMark and vice versa you have to
calibrate the printer. (see chapter V.Installation)
• Button: Calibrate Printheads
After changing the print cartidges it is recommended that you calibrate
the print heads. This ensures that you always have excellent print
quality. (see chapter V.Installation)
Cleaning [2]
• Button: Cleaning Printheads
23
Page 24
Choose the intensity you want to clean the print heads with.
Note:
Use “Cleaning Printheads -strong-“ only if it is inevitable! Excessive use
can cause damage to the print heads and wastes a lot of ink.
Statistic/Diag [3]
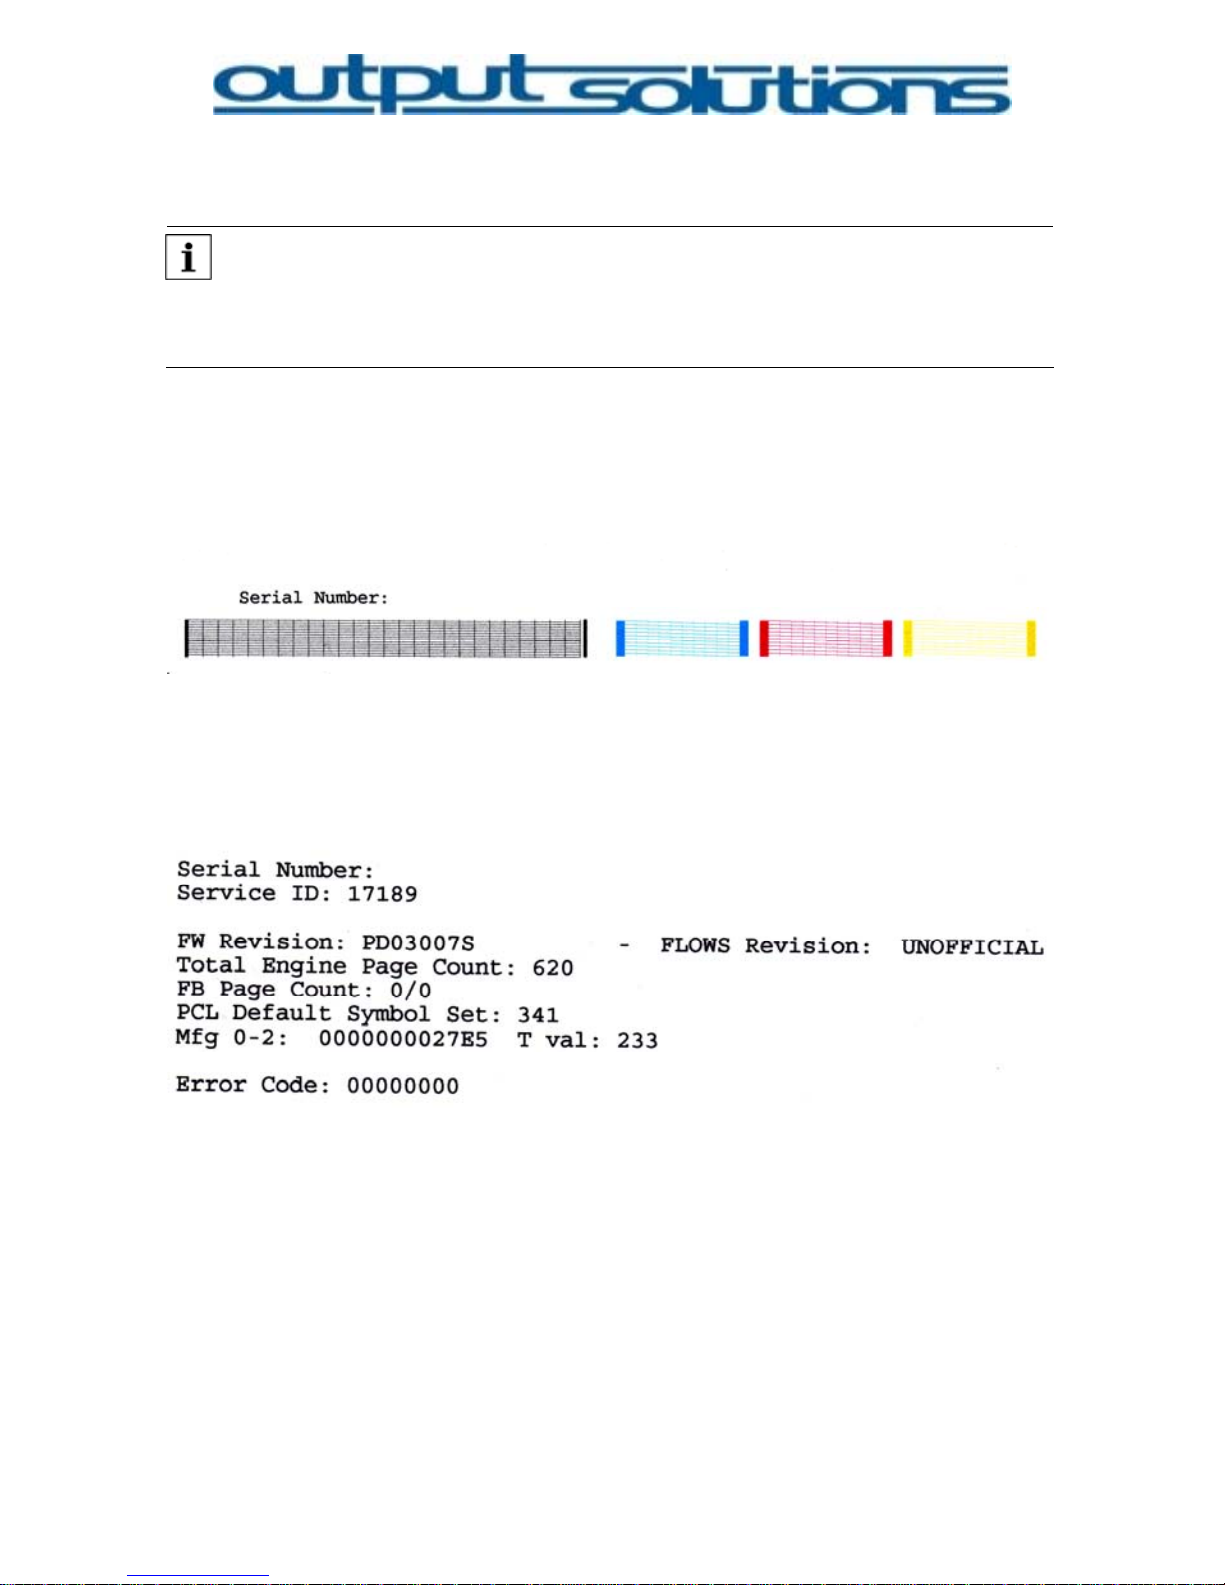
• Button: Print Diagpage
Print a diagnosis pattern to check if all nozzles work properly
• Button: Print Statistic Page
Print a statistic page and get valuable information about your printer
like serial number, total page count, firmware etc.
Printer[4]
Turn your printer ON with the toolbox
Printer Control [5]
• Button: Load/Unload
Load your labels with the toolbox or unload the labels when inserted
• Button: FormFeed
24
Page 25

Feed one label.
• Button: Test Cutter
Test if the cutter is working. The cutter will cut one time. (works only
with C-680 with metal housing and an installed cutter)
• Button: Print Test Label
Print a predefined label to check if the printer and the print head is
working properly.
Ink level Popup [6]
Activate or deactivate the ink level popup which appears with every
print job.
25
Page 26

VII. Quick Operating Guide
Load labels
Press the power and resume button at the same time or use the
LOAD/UNLOAD function in the PRINTER CONTROL BOX.
⇒ The labels will be transported to the first print line.
Print labels
Find out the exact label size.
Set label size in the respective program.
Write your text or create your label.
Select printer driver C-680 LabelJet Printer.
Open properties.
Set print quality, ink mixture for paper type and label size. It is
recommended to set “set size in application” because you predefined
the label size in your label software.
Set the respective label parameter in the Labelprinter Settings
(Administration Toolbox).
Start the printing.
Unload labels
Press the power and resume button at the same time or use the
LOAD/UNLOAD function in the PRINTER CONTROL BOX.
⇒ The labels will be ejected.
Change label roll
Unload labels.
Take roll pick-up out of the roll unit.
Pull the roll pick-up out of the core of label roll and put it aside.
If the core diameter of the new roll is the same as the old one insert roll
pick-up until stop otherwise you have to adjust the roll pick-up to the
core diameter of the new label roll. (An applicable roll pick-up optional
available)
Adjust printer to new label width.
Insert paper into paper feed.
Put roll pick-up with the new label roll in the retainer on the roll unit.
Load labels.
26
Page 27
VIII. Troubleshooting
Printer does not print
Check the following:
• The printer is connected to the power supply.
• All cables are connected properly.
• Printer is switched on.
• Print cartridges are installed correctly.
• Paper or other print media is inserted correctly in the tray.
• Top cover is closed.
Check printer-LEDs
The printer LEDs indicate status of the printer and possible problems.
• Power-LED flashes.
The printer initializes the print process.
LED stops flashing when printer has received all data.
• Resume-LED flashes
Paper tray may be empty.
Refill paper tray.
• Press the resume button on the front of the printer
Note:
There may be a paper jam.
• Print cartridge status-LED is on or flashing
Check ink level.
The function DISPLAY THE INK LEVELS on register tab TOOLBOX
checks which print cartridge low on ink i s. Please change cartridge that
are low on ink. If no print cartridge is low on ink press the resume
button.
If the print cartidge status-LED is still flashing switch printer off and on
again.
If print cartridge status-LED is on and flashing
Make sure you inserted the correct print cartridges.
27
Page 28

Open the printer’s top cover, take the black cartridge o ut and close top
cover again.
If LED is off: a problem with this cartridge exists.
If LED continues flashing: open the top cover, reinsert black cartridge and
take the color cartridge out.
Clean print cartridges (LABELPRINTER CONTROL BOX
CLEAN PRINT
CARTRIDGES).
If print cartridge status-LED still continues flashing replace print cartridge.
• All LEDs are flashing
The printer may need a restart.
Press power button to switch printer off and then to switch it on again.
If LED is still flashing switch printer off.
Disconnect the printer’s power cord out of the power outlet.
Plug power cord back in the power outlet.
Press power button to switch printer on.
Despite pressing the power switch the printer remains switched off
• The printer may have drawn too much power.
Disconnect the printer’s power cord from the power outlet.
Wait approx. 10 seconds.
Reconect power cord.
Switch printer on.
If you still can not switch the printer on try another power outlet or
connect directly to the power outlet rather than into a surge protector.
Check printer cable connections
• Printer connection via USB
If the printer cable is connected to a USB hub printing conflicts may
occur.
Attach USB cable directly to the computer. When printing do not use
other USB devices that are connected to the hub.
Printer still does not print
• Paper jam
Clear paper jam.
Press resume button.
Note:
28
Page 29

If you print on labels make sure that no label has separated from the label
carrier.
Poor print quality
• Streaks and missing lines:
If lines or dots on printed pages are missing or streaks appear the print
cartridges may be low on ink or need to be cleaned.
• Print is faded:
Make sure that black print cartridge is installed.
If the black text and images on the print-outs are faded you may be
print with the tri-color cartridge. In addition to the tri-color cartridge
insert a black print cartridge to achieve an optimal print quality.
Make sure that no print cartridge is low on ink. If any print cartridge is
low on ink you should replace it.
Make sure that the protection film has been peeled off the print
cartridges.
Consider selecting a higher print quality.
• Blank pages print:
May be the pink protection film is still attached to the cartridge. Make
sure that the protection film has been peeled off.
May be the print cartridges are low on ink. Replace empty cartridges.
• Too much or little ink appears on the page:
Adjust the ink volume: open the PRINTER SETTINGS.
Select the tab BASICS.
Click on button ADVANCED FEATURES.
Move the ink volume slider toward LIGHT or HEAVY.
Click OK.
Document is misprinted
• Text and images are misaligned:
If text and imaged are misaligned on your print-out the calibrate the
printer.
• Parts of the document are missing or not centered:
Open dialog box PRINTER PROPERTIES and confirm the following
options: tab EFFECTS
RESIZING OPTIONS: appropriate paper size
SCALE TO FIT: activate this option that text and graphics will be
adjusted to the paper format.
tab BASICS: ORIENTATION verify the appropriate orientation.
29
Page 30

• Print-out does not reflect new print settings:
You can adjust certain print settings, e.g. print sequence/order. The
default print settings may differ from the software application’s print
settings
Select appropriate print settings in the application.
Photos are not printed correctly
• Check printer properties:
Open Tab PAPER/QUALITY and check the following
Size is: appropriate paper size
Ink mixture for paper type: appropriate ink mixture
Quality: best or maximum resolution
• Colors are tinted or incorrect:
Calibrate the ink cartridges.
Reprint the photo.
If colors are still tinted or incorrect clean print cartride or change
cartridges.
• If colors are still tinted or incorrect, then open the dialog box PRINTER
PROPERTIES, select the tab COLOR, then COLOR ATTRIBUTES and
then do the following:
If colors are too yellow move the slider towards cooler.
If colors are too blue move the slider towards warmer.
Reprint photo.
• If colors are still tinted or incorrect, calibrate the print cartridges.
Printer is slow
The printer’s performance can be slowed down by a number of variables.
• Multiple software applications are opened
The printer does not have sufficient ressources for the printer to print at
its optimum speed.
Close all unnecessary applications to increase printer speed.
• Complex documents, graphics or photos are printing
Documents containing graphics or photos take longer to print than text
documents.
• Best or maximum dpi mode is selected
If the best or maximum dpi mode is selected the printer prints slower.
Select a different print quality mode if you want to increase the printer
speed.
30
Page 31

• computer does not meet system requirements
If your computer does not have enough RAM or free space on the hard
drive, the printer processing time will be longer.
Check if the computer’s RAM, hard disk space and proces sor speed
meet system requirements.
Free up space on the hard drive.
• Printer is in ink-backup mode
In ink-backup mode the printer may print more slowly
Use two print cartridges to increase print speed.
Printer doesn’t feed any paper
• No label stock inserted.
• Labels are not slided in until stop.
Printer passes labels through/ can not CALIBRATE GAP SENSOR
• Wrong sensor settings on in LABELPRINTER SETTINGS BOX of the
ADMINISTRATION TOOL.
Resume light is flashing
• Paper tray may be empty or there may be a paper jam.
After several print processes the printer start passing labels through
without printing
• The manual sensor setting GAP/BLACKMARK has been changed.
calibrate to the label size again.
Printer tries to CALIBRATE GAP SENSOR permanently.
• Deactivate CALIBRATE GAP/BLACK MARK SENSOR.
CALIBRATE GAP SENSOR does not detects gaps between labels
• Move the GAP/BLACKMARK sensor slightly.
If you continue having problems
If you continue to have problems after investigating the troubleshooting
topics, shut down, then restart your computer.
31
Page 32

If you still have problems after restarting your computer please contact the
hotline at [email protected] or contact the Godex Europe customer su pport
+49 (0)2193-53396 0
IX. Disposal
Please return your C-680 LJ to Godex Europe GmbH
32
Page 33
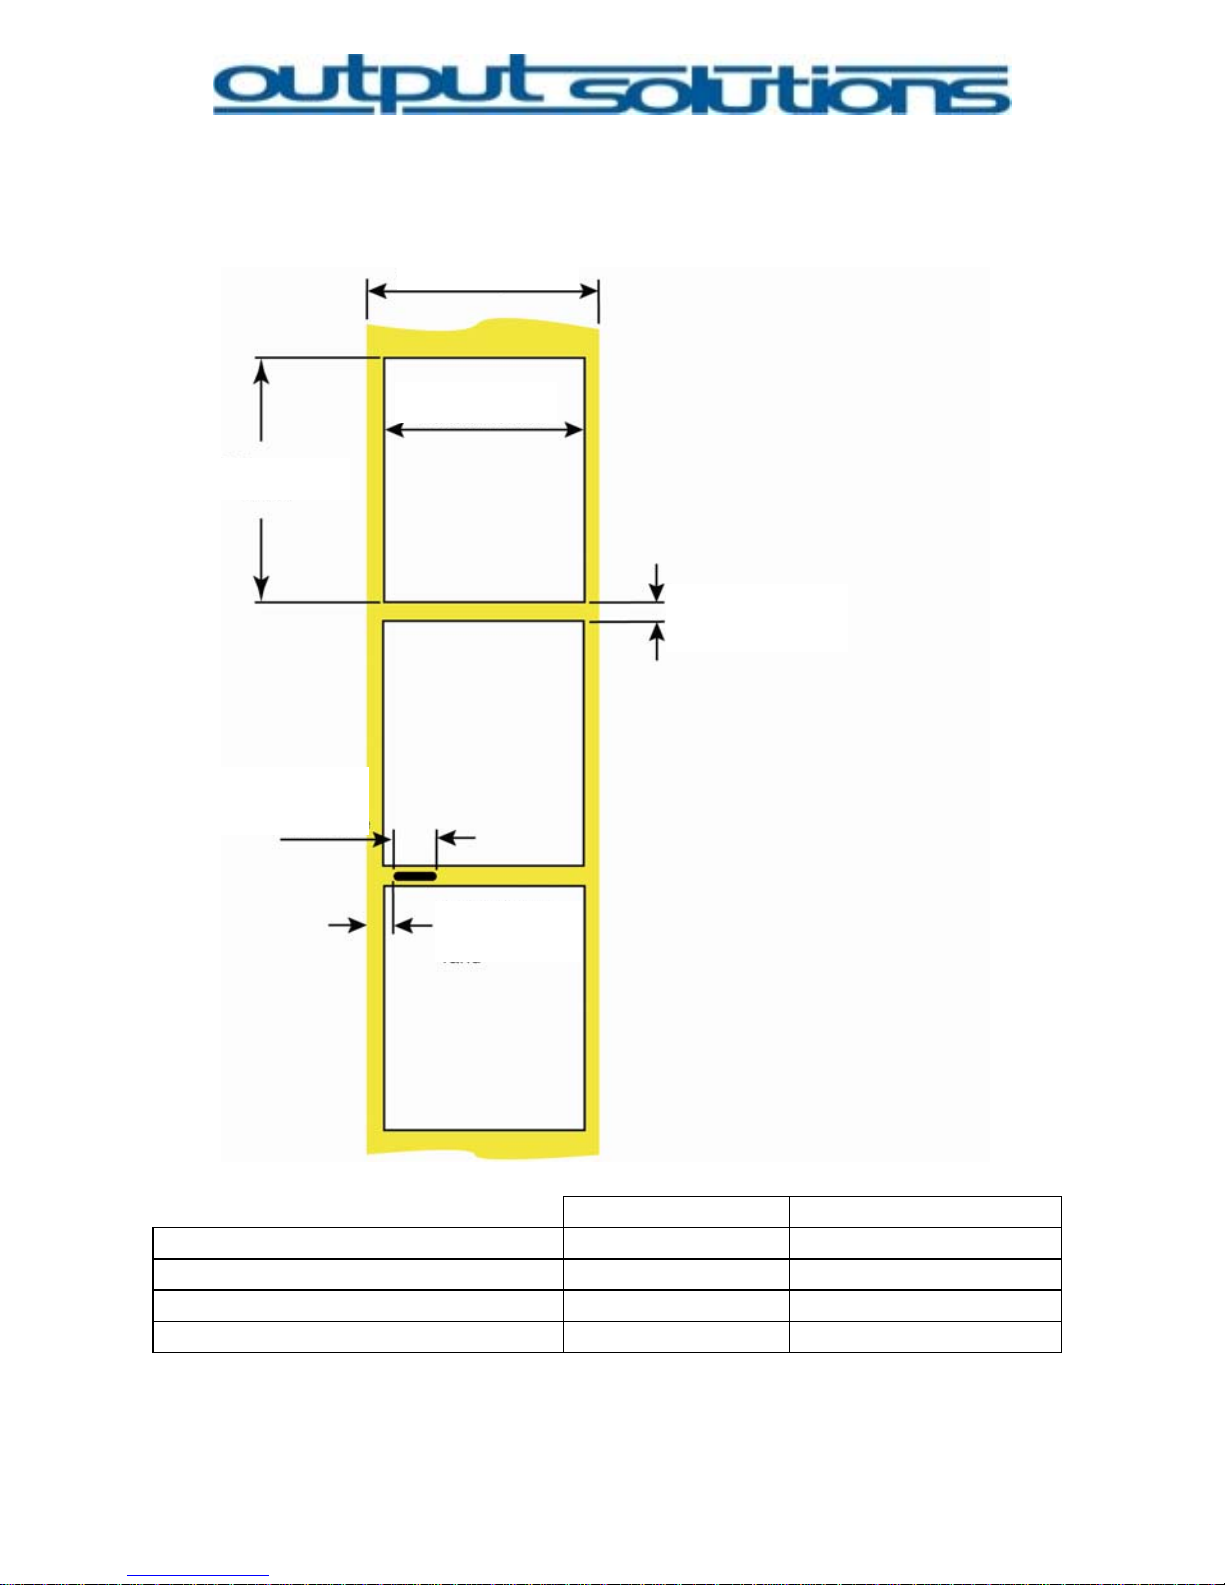
X. Label specification
Media widt h
Label height
Label width
Gap between
labels
Width of
through-hole
Distance from
edge of media
to trough-hole
Media widt h
Label height
Label width
Gap between
labels
Width of
through-hole
Distance from
edge of media
to trough-hole
Max Min
Label width 8“ (203 mm) 1.5“ (38 mm)
Media width 8.25“ (210 mm) 1.5“ (38 mm)
Label height 24“ (610 mm) 0.75“ (19 mm)
Gap between labels 10“ (253 mm) 0.10“ (2,5 mm)
33
Page 34
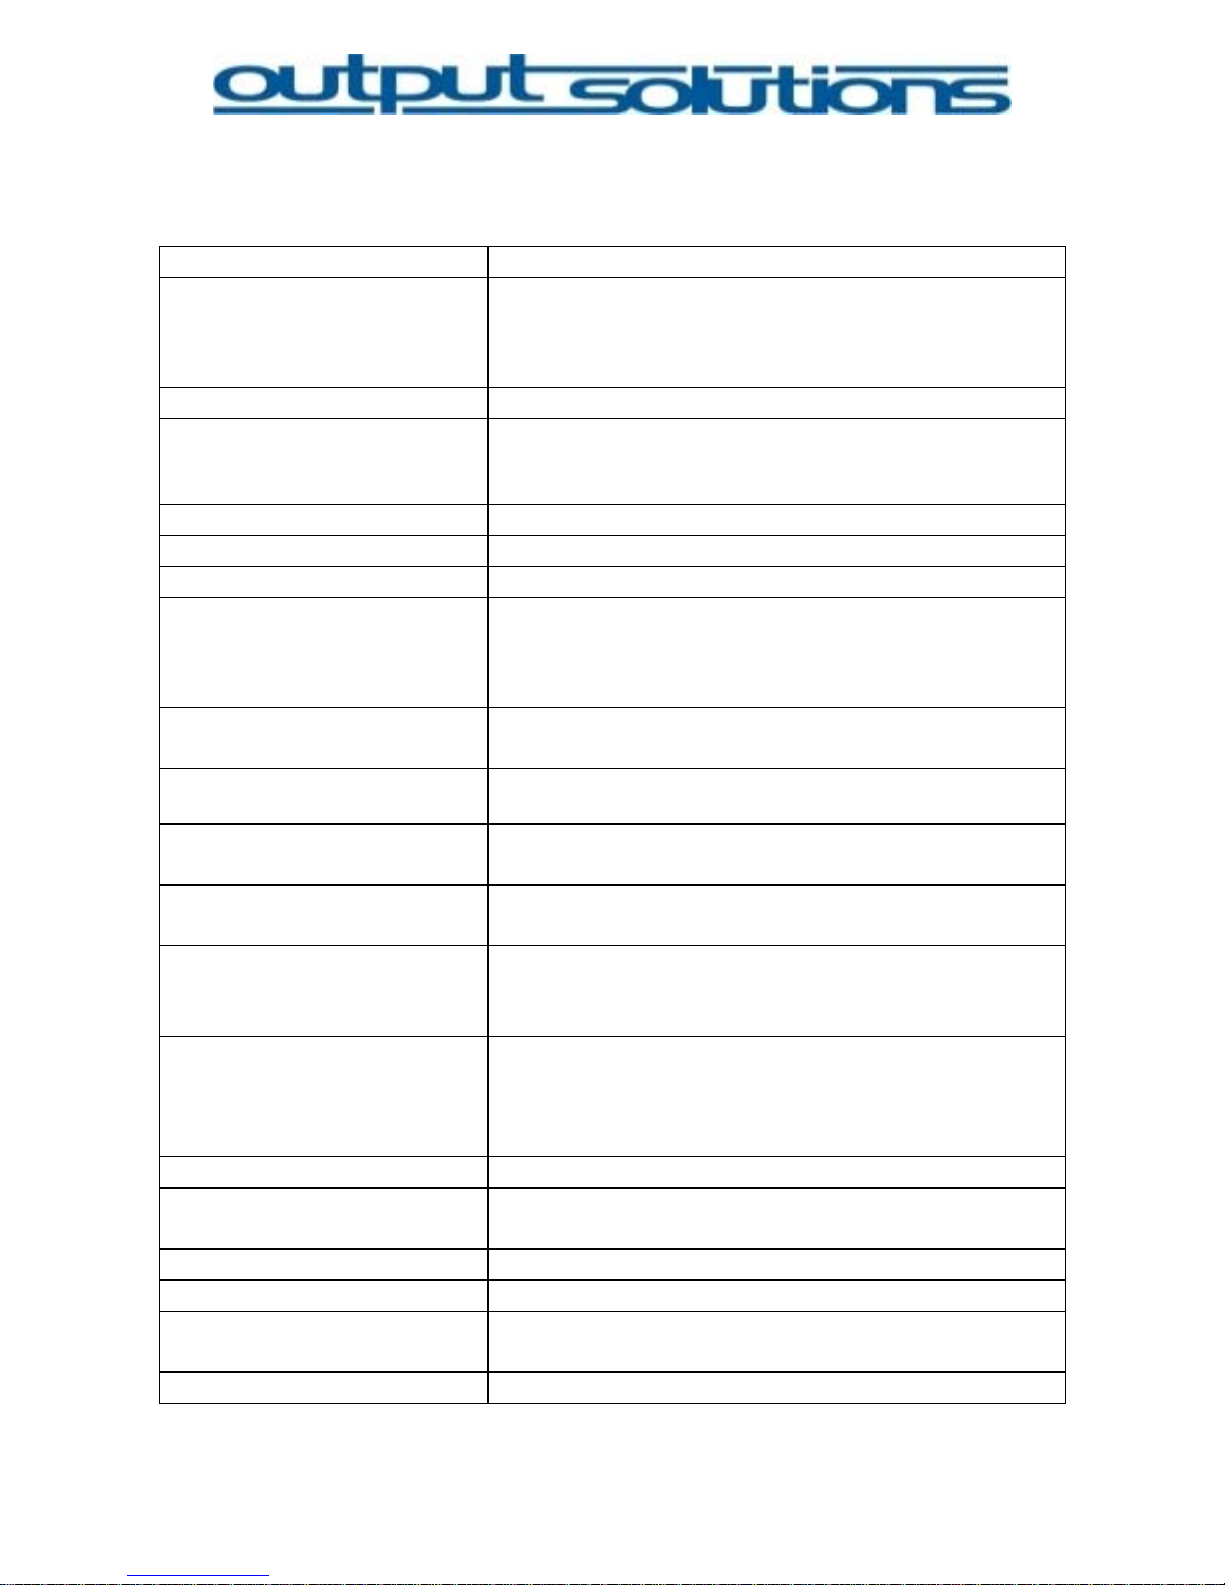
XI. Technical specification
Print method Drop-on-demand thermal inkjet printing
Print cartridges
416 ink nozzles on black print cartridge, ink jet impact
frequency max. 18 kHz;
300 ink nozzles on tri-color print cartridge, ink jet impact
frequency max. 21 kHz
Print speed Up to 12 ppm
Print resolution Black: up to 1200dpi
Color: up to 4800 x 1200dpi (optimized) in color and
1200 Input-dpi
Comptabile operating systems Microsoft Windows 2000 Professional, XP
Memory 8 MB built-in RAM
Printer languages (Emulationen) HP PCL Level 3 Enhanced, ASCI
Font information 8 built-in fonts (4 each in portrait & landscape): CG Times,
CG Times Italic;
Univers, Univers Italic; Courier, Courier Italic; Letter Gothik,
Letter Gothic Italic
Paper feed Sensor controlled label/paper feed
DIN A4 - manual
Media handling Continous rolls, label rolls, single sheets endless rolls,
label rolls, single sheets
Media size Width: min. 55 mm - max. 230 mm
Length: min. 70 mm - max. 600 mm
Electrical specifications Input voltage: 100 to 240 V (±10%)
Input frequency: 50 to 60Hz (±3 Hz). external
Power consumption (maximum) 32 watts average when printing
4 watts when idle
2 watts when off
Connectvity
-IEEE 1284 Centronics/bi-directional
- USB 2.0
- Plug & Play (Windows-Environment)
- Ethernet 10/100/1000, TCP/IP (optional)
Dimensions Printer: 447 (W) x250 (H) x 235 (D) mm – approx. 10 kg
Paper sensor
GAP-/BlackMark-Sensor 0 - 8,13 mm (0 - 3,2 Inch)
adjustable Noise level < 40 db(A)
Print cartridge capacity black: 19ml, tri-color: 17 ml, photo: 17ml
Operating conditions Temperature: ca. 5°C bis 40°C (41 to 104 degrees)
Humidity: 15% to 80% relative humidity non-condensing
Roll diameter max. label roll 22,86 cm (9 Inch)
34
Page 35
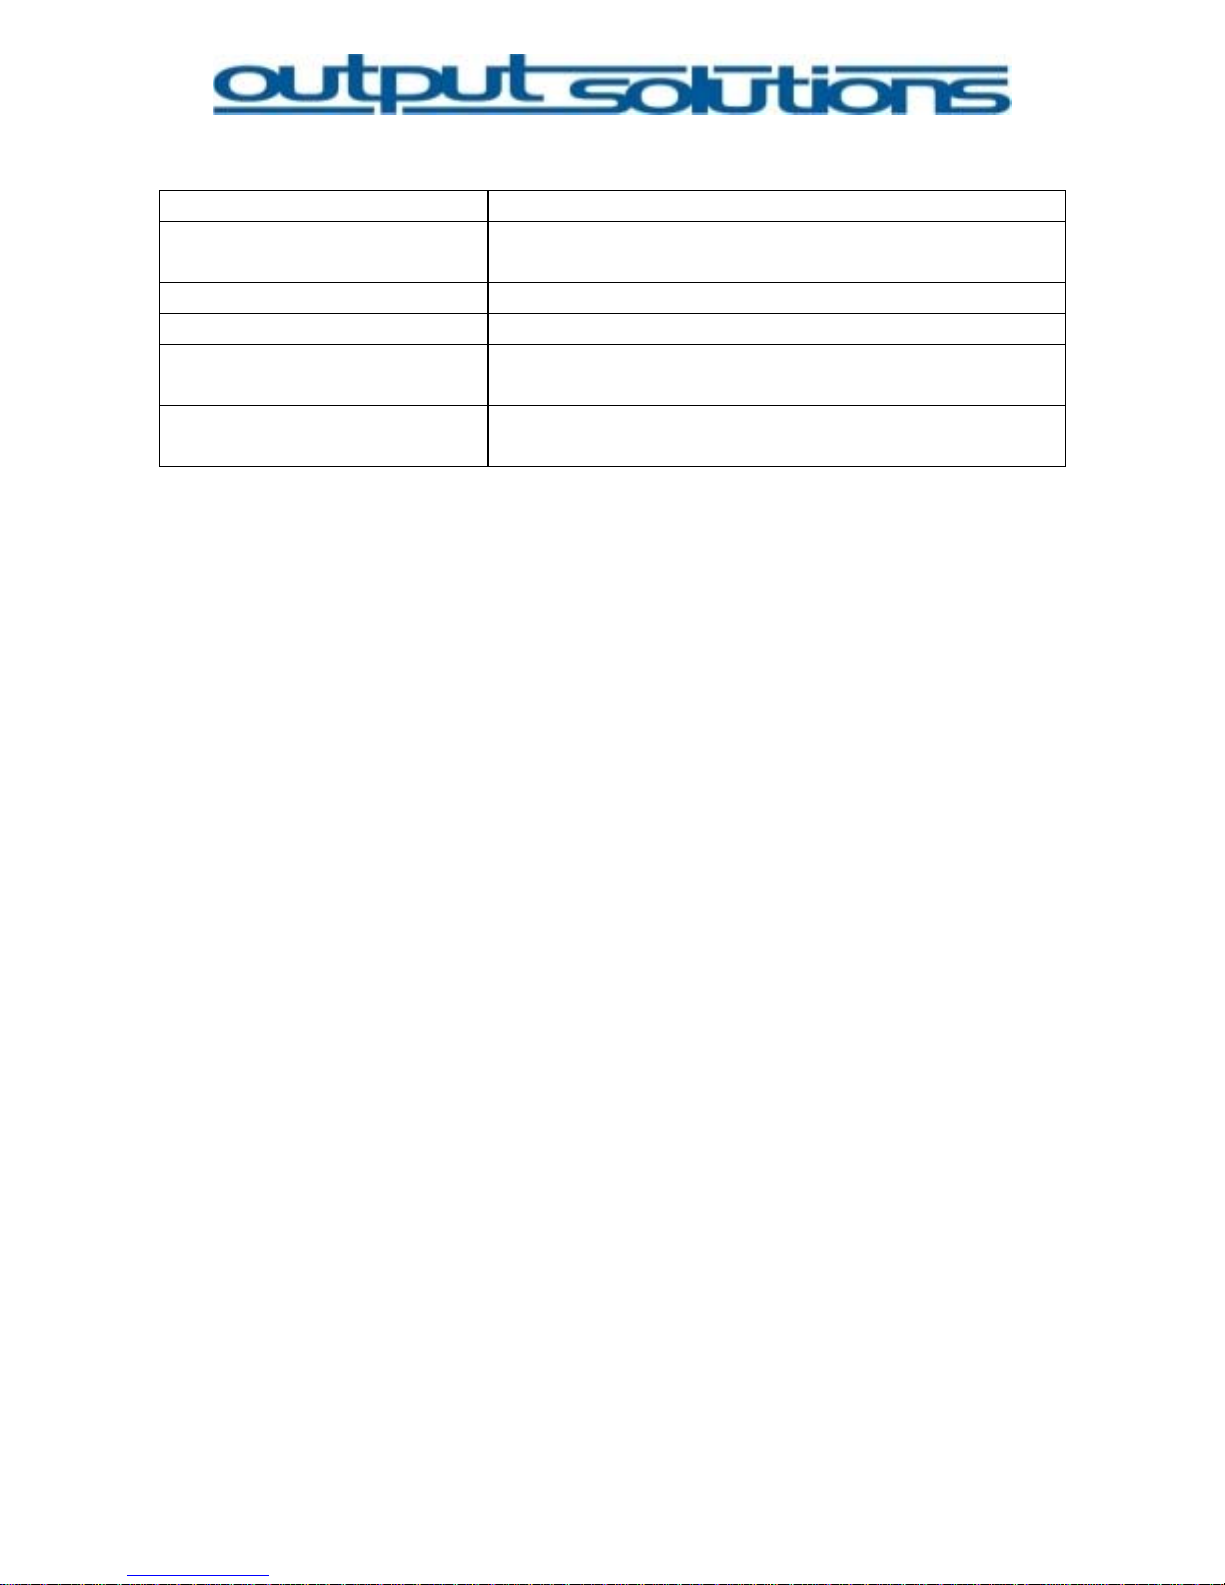
Roll width max. 21,59 cm (8,5 Inch)
Diameter of roll core
standard: 7,62 cm (3 Inch)
optional: 2,54 bis 12,7 cm (1 bis 5 Inch)
Paperthickness max. 1mm (optional bis 1,5 mm)
Roll media width 3,81 bis 21,59 cm (1,5 bis 8,5 Inch)
Label detection
Label sensor
continous, GAP, BlackMark
Media size min. 5,59 x 6,85 cm (2,2“ x 2,7“)
max. 21,95 x 30,48 cm (8,5“ x 12“)
35
Page 36

 Loading...